

Philips HI 292, HI 272, HI 274, HI 282, HI 284 User Manual
...
Mistral Elan
HI 272/74/82/84/92/94

2
English Page 4
• Keep pages 3 and 50 open when reading these operating instructions.
Deutsch Seite 12
• Schlagen Sie beim Lesen der Gebrauchsanweisung Seiten 3 und 50 auf.
Dansk Side 20
• Hold side 3 og side 50 opslået mens De læser brugsanvisningen.
Norsk Side 28
• Slå opp på side 3 og 50 før De leser videre.
Svenska Sid 35
• Ha sidan 3 och 50 utvikt när ni läser bruksanvisningen.
Suomi Sivu 43
• Pidä sivut 3 ja 50 auki samalla kun luet käyttöohjetta.
3
J
1
MAX
M
L
A
N
A
S
E
T
S
E
L
F
C
L
E
A
N
A C
B
E
F
H
I
K
D
N
L
G
HI 292
HI 294

4
Important
• Please read these instructions in conjunction with the
illustrations before using the appliance.
• Before using for the first time, check if the voltage rating on
the typeplate corresponds to the mains voltage in your home.
• Never use the appliance if it is damaged in any way.
• Take care that children cannot touch the iron when hot and
that they cannot pull the mains cord.
• The ejected steam is hot and therefore hazardous. Never direct
the steam towards people.
• Remove the plug from the socket before filling the iron with
water or pouring out the remaining water after use.
• Never immerse the iron in water.
• When you have finished ironing, and also when leaving the
iron even for a short while:
- set the steam control to position O;
- put the iron in upright position;
- remove the mains plug from the wall socket.
Note: The soleplate may become seriously corroded if the iron
is stored with the soleplate facing downwards.
• Some parts of the iron have been slightly greased and as a
result the iron may slightly smoke when switched on for the
first time. After a short while, however, this will cease.
• Before using the first time remove any sticker or protective foil
from the soleplate. Clean the soleplate with a soft cloth.
• Do not put vinegar or other descaling agents into the water
reservoir.
• Do not use chemically descaled water.
• The cordset should not be allowed to touch the soleplate when
it is hot.
• If the mains cord of this appliance is damaged, it must be
replaced by the original type only.
Please apply to your Philips dealer or to the Philips
organisation in your country for replacement.
English

5
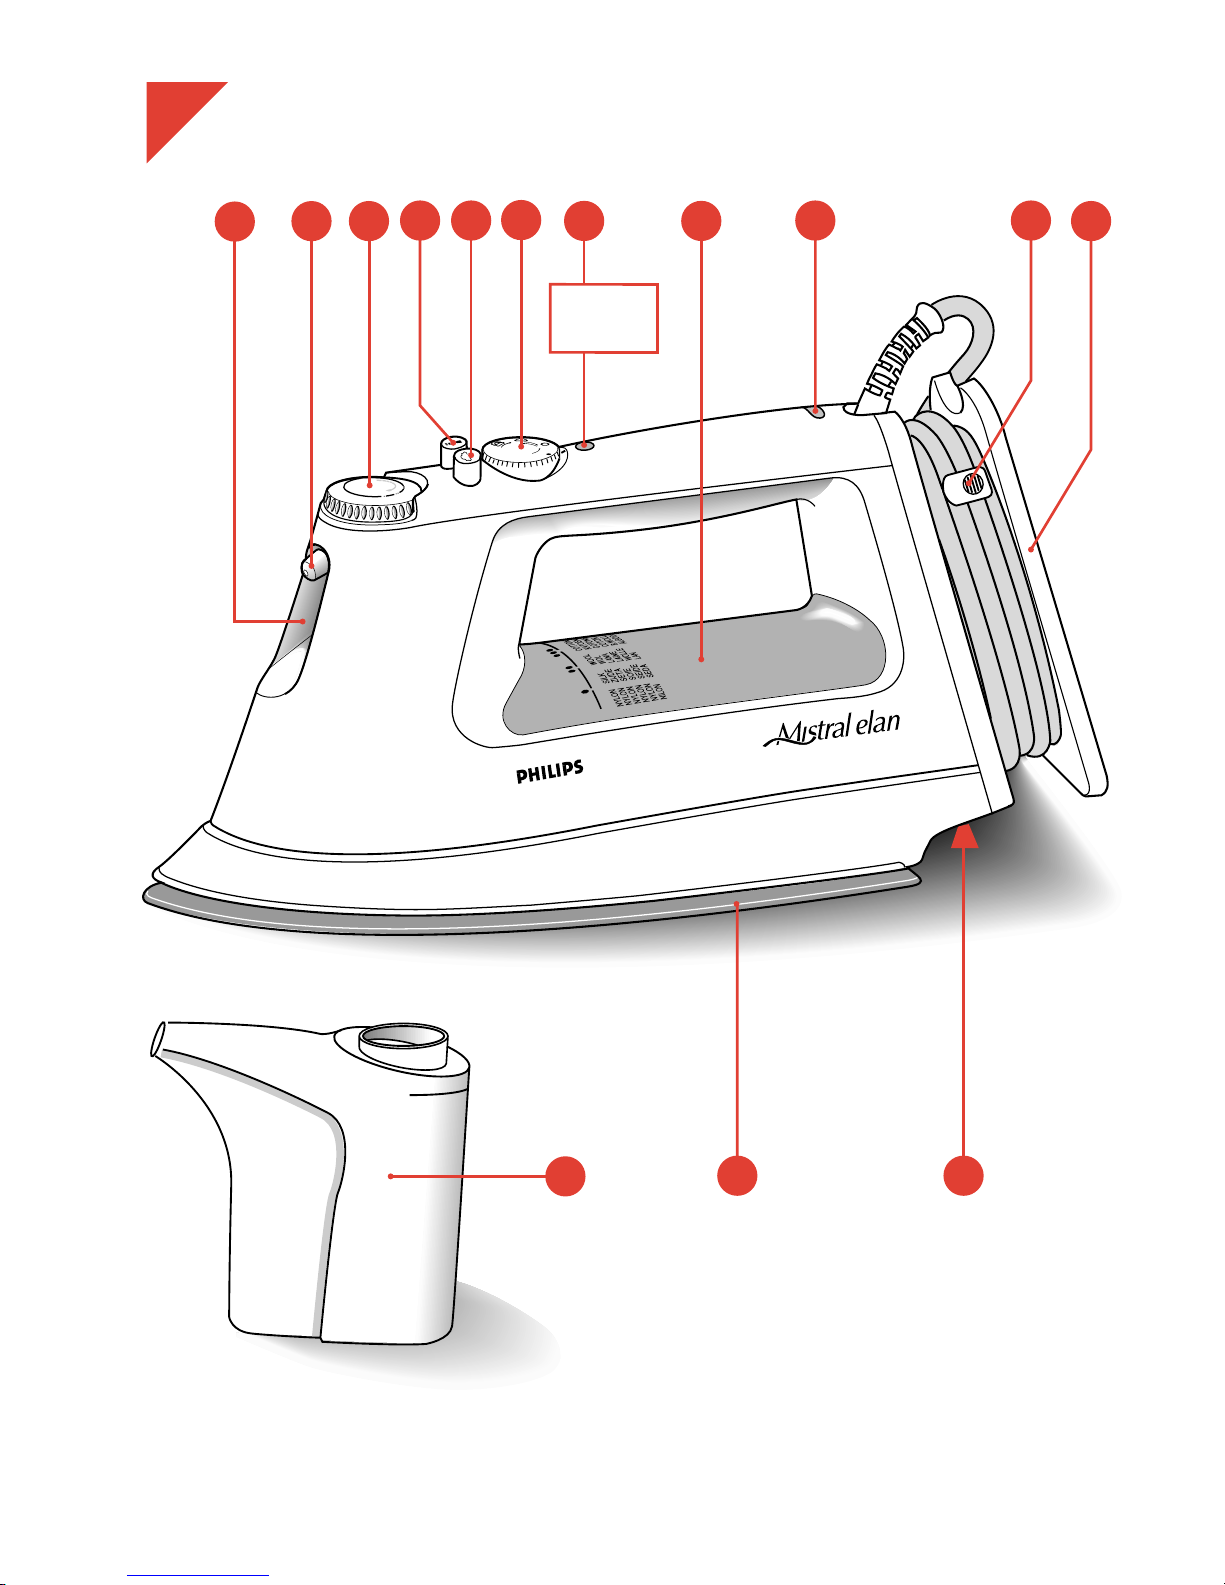
General description (fig. 1)
A Temperature control (rotate)
B Steam control (rotate)
O = no steam
N = normal steam
H = extra steam
1 SELF CLEAN = self-cleaning / descaling, removing steam control
needle
C Spray button T (press)
D Shot of Steam button s (press)
E Spray
F Filling aperture
G Soleplate
H Water reservoir with level indication
I Temperature pilot light (amber)
J Type plate
K Cord winder
L Cord clip
M Measuring beaker
N "Auto Stop" pilot light (red)
(with types HI 292 and HI 294 only)
Filling with water (for steam-ironing and spraying)
• Please fill this iron with normal tap water before using for the first time.
• For refilling, you can also use tapwater. However, if the water is very
hard (hardness higher than 17 °DH / 211⁄4°Clarke), it is advisable to
use distilled water.
- Remove the mains plug from the wall socket before filling the iron.
Set the steam control to position O (= no steam).
- Stand the iron on its end and pour water into the filling aperture (fig. 2).
Use the measuring beaker with spout for this purpose.
Do not fill higher than marking "MAX" on the water reservoir.
(Maximum filling = approx. 200 ml.)
6
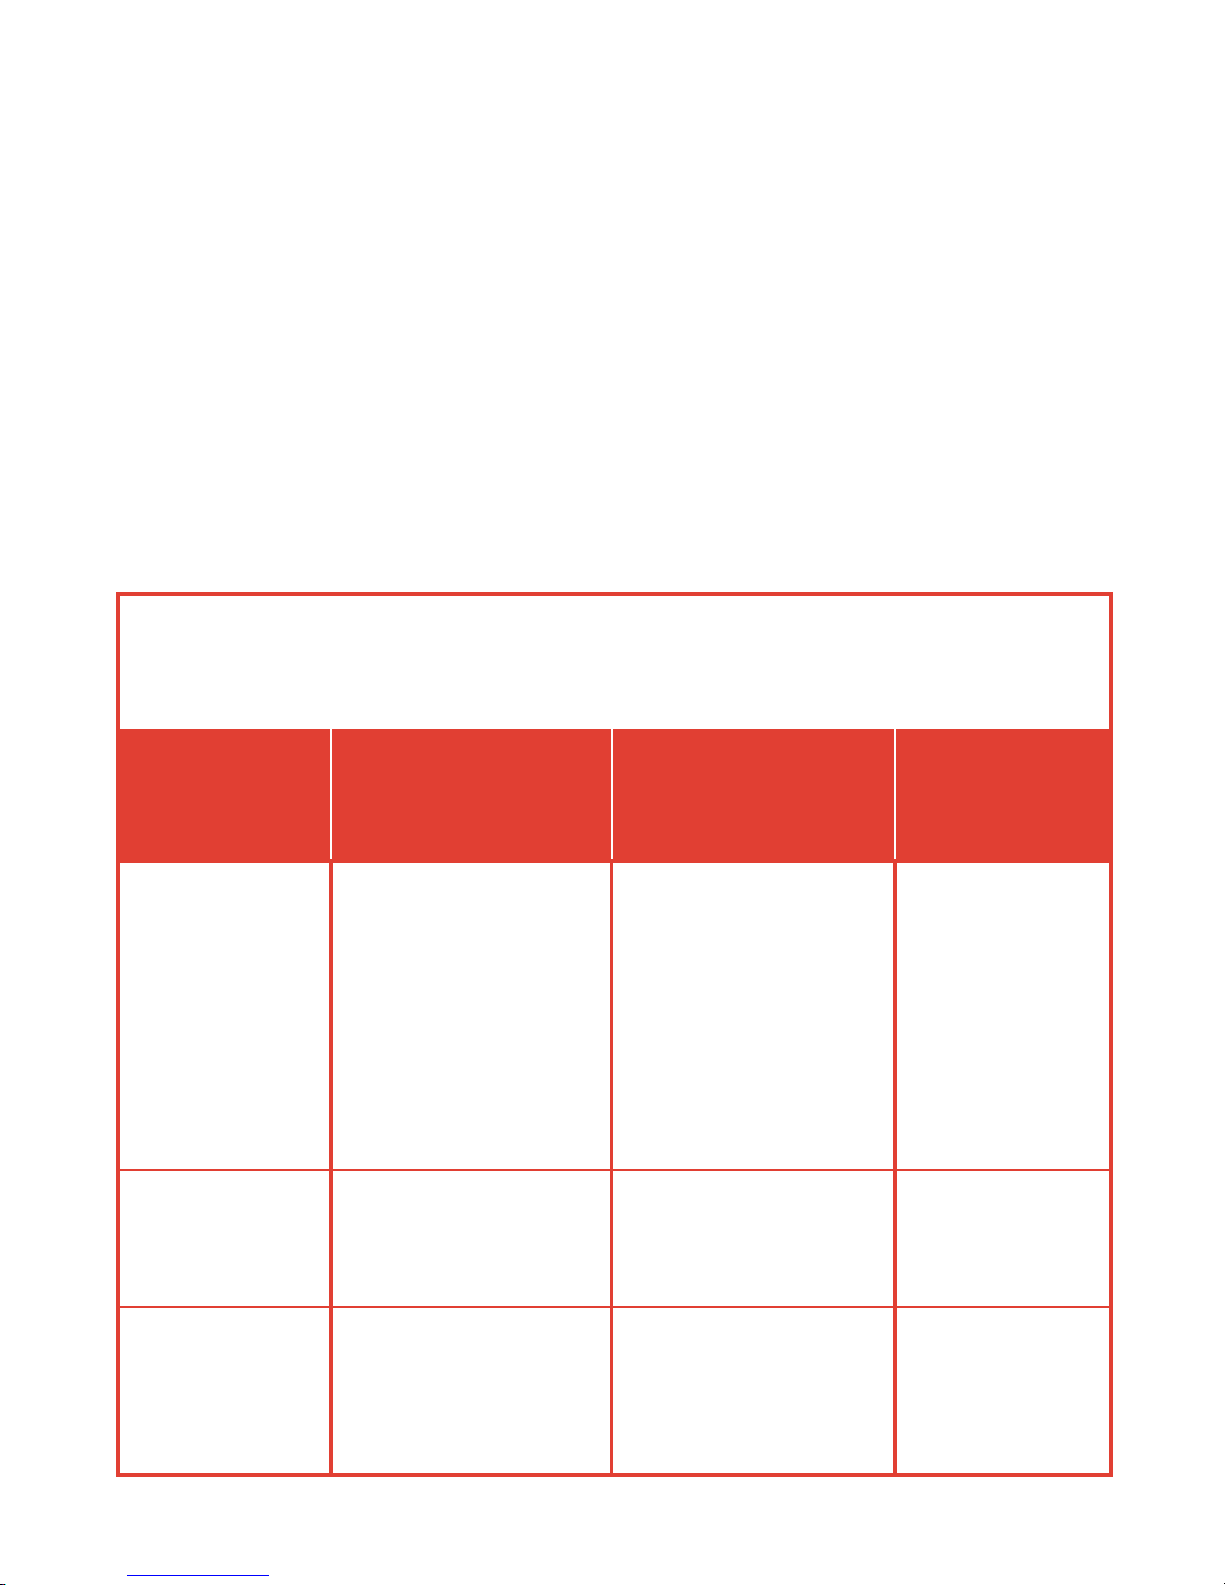
Ironing temperature
• Always check first to see whether a label with ironing instructions is
attached to the article to be ironed. (See table.)
Follow these ironing instructions in all cases.
• If ironing instructions are missing but you do know the kind of fabric,
then see the table.
• The table is valid for the materials only and is not applicable to any
applied finish, gloss etc.
Textile to which some kind of finish has been applied (gloss, wrinkle,
relief etc.) can best be ironed at lower temperatures.
• Sort the laundry out according to ironing temperature first: wool with
wool, cotton with cotton, etc.
Table
Note.: Z on the label means:
"This article cannot be ironed!"
Instructions
on label
B
C
D
Steam
control
O
No steam
N
Normal steam
H
Extra steam
Textile
Synthetic fibres
(e.g. acetate, acryl,
viscose, polyamide
(nylon),
polyester.
Silk
Wool
Cotton
Linen
Temperature
control
MIN
l
l
1
l
l
l
l
l
2
l
l
3
l
MAX

7
• The iron heats up quicker than it cools down. Therefore, start ironing
the articles requiring the lowest temperature such as those made of
synthetic fibres.
• If the fabric consists of various kinds of fibres, you must always select
the lowest ironing temperature of the composition of those fibres.
(E.g. an article consisting of "60% polyester and 40% cotton" should be
ironed at the temperature indicated for polyester (1) and without
steam.)
If you do not know what kind(s) of fabric(s) the article has been made
of, find a spot which will be invisible when wearing or using the article.
Try out the ironing temperature which is most suitable there. (Start at a
relatively low temperature.)
• Pure woollen fabrics (100% wool) may be pressed with the iron set to a
steam position. Preferably set the steam control to maximum position
and use a dry pressing cloth.
When steam-ironing woollen fabrics, shining of the fabric may occur.
This can be prevented by turning the article inside out and ironing the
reverse side.
• Velvet and other textures which rapidly acquire shiny spots should be
ironed in one direction only (with the nap) applying light pressure.
Always keep the iron moving.
• Iron the reverse side of synthetic materials and silk to prevent shining
spots. Do not use the spray to prevent stains.
Setting the temperature
- Stand the iron on its end.
- Set the temperature control to the correct ironing temperature as
indicated in the ironing instructions or in the table. (See fig. 3.)
- Insert the mains plug into the wall socket.
- After the amber temperature pilot light has gone out and come on again
you may start ironing. The pilot light will go out from time to time during
ironing.
If you set the temperature control to a lower setting after ironing at a
high temperature, do not begin again before the pilot light comes on.

8
Spraying
At any temperature by pushing on the spray button T (C) a couple of
times the laundry can be damped down (fig. 4).
Ensure that there is enough water in the water reservoir.
Shot of Steam
By pressing button s (D) an intense "shot" of steam is emitted from the
soleplate (fig. 5).
This can be very useful e.g. when removing stubborn creases.
The "shot" of steam facility can be used only while ironing with high
ironing temperature (positions ranging from 2 to 3).
You can apply max. five sequential shots of steam (with steam of good
quality).
Vertical position
“Shot of steam” can also be applied when holding the iron in a vertical
position. This is useful for removing creases from hanging clothes,
curtains, etc.
- Ensure that the water reservoir is filled-up completely.
- Set the temperature control to position 3 MAX.
- Wait a little while for the amber temperature pilot light to go out and to
come on again.
- Direct the soleplate towards the hanging clothes, curtains, etc. and
press button s (D).
• As soon as the steam output decreases, hold your iron horizontally and
wait a few seconds before using “Shot of steam” again.
Steam-ironing
• As indicated on the temperature control (A) and the table, steamironing is only possible at higher ironing temperatures:
2 or 3 for moderate steam
3 for maximum steam.
• With conventional steam irons, water may leak from the soleplate if a
too low temperature has been selected. This will then cause stains.
Your new steam iron (types HI 282, HI 284, HI 292 and HI 294 only)
has the "Drip Stop" feature. If a too low temperature has been

9
selected, your iron will automatically stop steaming to prevent water
leaking from the sole plate.
When this happens, you can hear "Click". Set the temperature control
to the advised position. Steaming will recommence as soon as the
appropriate temperature has been reached.
• Ensure that there is enough water in the water reservoir.
- Stand the iron on its rear side.
- Set the temperature control at the required position within the "steam
area" (2 or 3) (fig. 6).
- Insert the mains plug into the wall socket.
- Wait a little while for the amber temperature pilot light to go out and to
come on again.
- Set the steam control to the required position (fig. 3).
Ironing without steam
For ironing without steam proceed as described for steam-ironing.
However, the steam control should remain in position O (= no steam).
“Auto stop” (automatic safety shut-off)
(types HI 292 and HI 294 only)
If the iron is left in a motionless horizontal position for more than
30 seconds, or in a vertical position for more than 8 minutes, the red
“Auto Stop” pilot light (N) will start blinking and the heating element will
switch off automatically.
When picking up the iron again, the red light will go out and the amber
temperature pilot light (I) will come on. This indicates that the iron has
begun heating up again.
When the amber indicator light has gone out you can recommence
ironing.

10
Maintenance
• It is important to apply "self-cleaning" at least every two weeks to
remove scale etc.
The harder the water, the more the iron should be self- cleaned.
- Fill the water reservoir half-full with water.
- Stand the iron in upright position.
- Set the temperature control to MAX.
- Insert the mains plug into the wall socket.
- Allow the iron to heat up until the amber temperature pilot light first
goes out and then comes on again.
- Remove the plug from the wall socket.
- Hold the iron horizontally over the sink.
- Set the steam control to position 1 SELF CLEAN. Turn the steam
control far enough, so that the dot 1 on the steam control meets the
mark ▲ on the iron. The steam control will then spring up slightly.
- Pull the steam control up until it stops (fig. 7).
- Boiling water and steam will now come out of the holes in the soleplate.
Impurities and scale (if any) are washed away with it (fig. 8).
- Move the iron forwards and backwards while this happens.
- You can pull the steam control further upwards to remove the steam
control needle (fig. 9). It is then possible to remove any scale from the
needle. For this purpose you may use vinegar.
However, avoid bending or damaging the steam control needle!
- Replace the steam control needle. Insert the point of the needle exactly
in the centre of the aperture and fit the small notch at the side into the
spacing (fig. 10).
- Depress the steam control (fig. 11).
- Set the steam control to position O.
- Stand the iron upright on its end.
- Set the temperature control to MAX.
- Insert the mains plug into the wall socket and let the iron heat up again.
- Move the iron over a (preferably) old piece of cloth.
The remainder of the water inside the steam chamber will now vaporize
and leave the iron through the soleplate.
Do not put vinegar or other descaling agents into the water
reservoir.

11
Cleaning
- Before cleaning remove the mains plug from the wall socket and allow
the iron to cool down sufficiently.
- Scale and other setting can be wiped off the soleplate with a damp
cloth and some non-scratching (fluid) abrasive.
Keep the soleplate smooth: avoid hard contact with metal objects.
- The upper part of the appliance can be cleaned with a damp cloth.
- From time to time clean the inside of the water reservoir by filling with
water and shaking. Then pour the water back out.
Storage
- Remove the mains plug from the wall socket.
- Pour any remaining water out of the water reservoir (fig. 12).
- Set the steam control to position O.
- Stand the iron upright and let it cool down sufficiently.
- The mains cord can be wound around the cord storage.
Allow a generous loop of cord before starting the windings around the
cord storage.
- Always store the iron standing upright (fig. 13).
Regularly check if the mains cord is still in a good and safe condition.
For U.K. only:
Fitting a different plug
This appliance is fitted with a BS 1363 13 Amp. plug.
Should you need to replace the plug, connect the wires as follows:
Green/yellow wire to the Earth terminal (E) of the new plug.
Brown wire to the Live (L) terminal of the new plug.
Blue wire to the Neutral (N) terminal of the new plug.
Always fit the same value of fuse as that originally supplied with your
appliance.
Only use BS 1362 approved fuses.
As a guide only: Appliances under 700 W can have a 3 Amp. fuse (red)
and all others should have a 13 Amp. fuse (brown).
When disposing of an old plug (particularly the moulded type which has
been cut from the mains cord) always remove the fuse as the plug could
be dangerous if ever inserted in a live socket.

12
Wichtig
• Lesen Sie diese Gebrauchsanweisung sorgfältig durch, und
sehen Sie sich dabei die Abbildungen an, bevor Sie das Gerät
zum ersten Mal benutzen.
• Prüfen Sie vor Inbetriebnahme, ob die Spannungsangabe auf
dem Typenschild mit der örtlichen Netzspannung übereinstimmt.
• Benutzen Sie das Gerät niemals, wenn es in irgend einer
Hinsicht beschädigt ist.
• Der austretende Dampf ist sehr heiß und darum gefährlich.
Richten Sie den Dampfstrahl niemals direkt auf eine Person!
• Schließen Sie das Gerät nur an eine Schutzkontakt-Steckdose an.
• Ziehen Sie den Stecker aus der Steckdose, bevor Sie das Bügeleisen mit Wasser füllen oder das restliche Wasser ausgießen.
• Tauchen Sie das Bügeleisen niemals in Wasser.
• Wenn Sie das Bügeln beenden oder, sei es nur für kurze Zeit,
unterbrechen ...
- stellen Sie den Dampfregler auf Position O,
- stellen Sie das Bügeleisen aufrecht auf siene Rückseite,
- ziehen Sie den Stecker aus der Steckdose.
Wichtig: Stellen Sie das Bügeleisen immer auf seine Rückseite,
um Beschädigungen der Bügelsohle zu vermeiden.
• Einige Teile des Bügeleisens sind leicht eingefettet und
können beim ersten Gebrauch etwas Rauch entwickeln. Das
geht nach kurzer Zeit vorbei.
• Entfernen Sie vor dem ersten Gebrauch alle Aufkleber und die
Schutzfolie von der Bügelsohle. Reinigen Sie die Bügelsohle
mit einem weichen Tuch.
• Füllen Sie niemals Essig oder ein anderes Entkalkungsmittel
in den Wasserbehälter.
• Verwenden Sie kein chemisch enthärtetes Wasser.
• Achten Sei darauf, daß das Netzkabel nicht mit der heißen
Bügelsohle in Berührung kommt.
• Wenn das Netzanschlußkabel defekt oder beschädigt ist, muß
dieses durch ein Original-Netzkabel ersetzt werden. Wenden
Sie sich an Ihren Philips Händler oder an die Philips Service
Organisation.
Deutsch

13
Allgemeine Beschreibung (Abb. 1)
A Temperaturregler, Drehschalter
B Dampfregler, Drehschalter
O = kein Dampf
N = Dampf
H = Viel Dampf
1 SELF CLEAN = Selbstreinigung / entkalken, Dampfkontrollnadel
herausnehmen
C Sprühknopf T, Druckschalter
D Dampfstoß s, Druckschalter
E Sprühdüse
F Einfüllöffnung
G Bügelsohle
H Wasserbehälter mit Wasserstandsanzeige
I Kontrollampe für die Temperatur, bernsteingelb
J Typenschild
K Kabelaufwicklung
L Kabelklammer
M Meßbecher
N “Auto Stop” Kontrollampe, rot (Nur typen HI 292 und HI 294)
Füllen des Wasserbehälters zum Dampfbügeln und Sprühen
• Füllen Sie das Bügeleisen vor dem ersten Gebrauch bitte mit
normalem Leitungswasser.
• Zum Nachfüllen können Sie ebenfalls Leitungswasser verwenden;
sollte das Wasser aber sehr hart sein (mehr als 17 °dH), so empfiehlt
sich die Verwendung von destilliertem Wasser.
- Ziehen Sie vor dem Einfüllen des Wassers den Stecker aus der
Steckdose und stellen Sie den Dampfregler auf O (= kein Dampf).
- Stellen Sie das Bügeleisen auf seine Rückseite, und gießen Sie
Wasser durch die Einfüllöffnung (E) (Abb. 2). Verwenden Sie hierfür
den Meßbecher mit Ausguß. Füllen Sie nicht höher als bis zur Marke
MAX = ca. 200 ml.
14
Bügeltemperatur
• Prüfen Sie zuerst immer, ob das zu bügelnde Wäschestück ein Etikett
mit Bügelvorschriften enthält (siehe Tabelle).
Befolgen Sie diese Bügelvorschriften in jedem Falle.
• Wenn die Bügelvorschrift fehlt und Sie die Textilart kennen, so schauen
Sie in der Tabelle nach.
• Die Tabelle gilt nur für die oben aufgeführten Materialien, nicht aber für
appretiertes, chemisch behandeltes Material (knitterfrei, mit Glanz,
Relief o.ä), das bei niedrigerer Temperatur gebügelt werden sollte.
• Sortieren Sie das Bügelgut zuvor nach der erforderlichen Temperatur:
Wolle zu Wolle, Baumwolle zu Baumwolle usw.
• Das Bügeleisen ist schneller aufgeheizt als abgekühlt. Beginnen Sie
Tabelle
Wichtig! Z auf einem Etikett bedeutet:
"Dieses Teil darf nicht gebügelt werden."
Bügelvorschrift
B
C
D
Dampfregler
O
kein Dampf
N
Dampf
H
maximal
Dampf
Textilart
Synthetics
z.B. Acetat,
Acryl, Viskose,
Polyamid (Nylon),
Polyester
Seide
Wolle
Baumwolle
Leinen
Temperatureinstellung
MIN
l
l
1
l
l
l
l
l
2
l
l
3
l
MAX

15
deshalb mit den Textilien, die nur eine niedrige Temperatur vertragen,
z.B. mit den Synthetics.
• Bei Mischgeweben müssen Sie stets die Temperatur für die Faser
einstellen, welche die niedrigste Temperatur verlangt. Ein Wäscheteil
aus 60% Polyester und 40% Baumwolle muß ohne Dampf bei der
Einstellung (•) für Polyester gebügelt werden.
Wenn Sie nicht wissen, woraus das zu bügelnde Teil besteht, so
suchen Sie eine Stelle, die bei normalem Gebrauch nicht sichtbar ist,
und probieren Sie dort, welche Bügeltemperatur angemessen ist.
Beginnen Sie immer mit der niedrigsten Temperaturstufe.
• Rein wollene Textilien (100% Wolle) sollten mit einer Dampfeinstellung
gebügelt werden. Am besten bügeln Sie mit Dampstoß und verwenden
ein trockenes Bügeltuch.
Nach dem Dampfbügeln von Wollsachen kann es vorkommen, daß die
Oberfläche glänzt. Das können Sie vermeiden, indem Sie das Teil von
links, von der Rückseite, bügeln.
• Samt und andere Gewebe, die beim Bügeln rasch glänzende Stellen
annehmen, sollten Sie nur in eine Richtung (“mit dem Strich”) und mit
nur leichtem Druck bügeln.
Halten Sie das Bügeleisen dabei ständig in Bewegung.
• Bügeln Sie Synthetics und Seide stets von links, um glänzende Stellen
zu vermeiden. Verwenden Sie keine Sprays; das könnte Flecken
verursachen.
Temperaturregelung
- Stellen Sie das Bügeleisen auf seine Rückseite.
- Stellen Sie den Temperaturregler (A) auf die gemäß Bügelvorschrift
oder Tabelle erforderliche Bügeltemperatur (Abb. 3).
- Stecken Sie den Stecker in die Steckdose.
- Wenn die gelbe Kontrollampe (I) einmal aus- und wieder angegangen
ist, können Sie mit dem Bügeln beginnen. Während des Bügelns geht
die Kontrollampe von Zeit zu Zeit wieder aus.
Wenn Sie beim Bügeln auf eine niedrigere Temperatur herabschalten,
so bügeln Sie erst dann weiter, wenn die Kontrollampe erneut
aufleuchtet.

16
Einsprühen der Wäsche
Sie konnen die Wäsche bei jeder Temperatur einsprühen, indem Sie den
Sprühknopf T (C) mehrmals drücken (Abb. 4).
Achten Sie darauf, daß genügend Wasser im Wasserbehälter ist.
Dampfstoß
Wenn Sie den Druckschalter s (D) drücken, gibt die Bügelsohle ein
starker Dampfstrahl ab (Abb. 5). Das kann z. B. nützlich sein, um
Knitterfalten zu beseitigen. Der Dampfstoß kann nur bei hoher
Temperatur abgegeben werden, wenn der Schalter also auf 2 bis 3
steht. Sie können nacheinander höchstens fünf Dampfstöße mit guter
Dampfqualität abgeben.
In senkrechter Haltung aufdämpfen
Der Dampfstoß kann auch mit senkrecht gehaltenem Bügeleisen
angewendet werden. Das ist besonders vorteilhaft, um z.B. Falten aus
Vorhängen und Kleidungsstücken zu entfernen.
- Vergewissern Sie sich, daß der Wasserbehälter ganz gefüllt ist.
- Stellen Sie den Temperaturregler auf 3 MAX.
- Warten Sie bis die gelbe Kontrollampe aus- und wieder angegangen ist.
- Richten Sie die Bügelsohle auf das aufzuduampfende Teil, und drücken
Sie den Sprühknopf s (D).
• Sollte der Dampfausstoß nachlassen, so halten Sie das Bügeleisen
waagerecht, und warten Sie einige Sekunden, bevor Sie mit dem
Aufdämpfen fortfahren.
Dampfbügeln
• Wie der Dampfregler (A) anzeigt, ist Dampfbügeln nur bei höheren
Bügeltemperaturen möglich:
•• oder ••• für mäßigen Dampf
••• für maximalen Dampf.
• Wenn die Temperatur zu niedrig ist, tritt bei den üblichen Bügeleisen
Wasser aus der Bügelsohle aus. Das schadet der Bügelsohle.
(Nur Typen HI 282, HI 284, HI 292 und HI 294:) Ihr neues Bügeleisen
ist mit “Tropf-Stop” ausgerüstet: Ist die Temperatur zu niedrig, wird
die Dampfzufuhr automatisch unterbrochen. Sie hören dann ein
 Loading...