

Page 1

HI 205/206/215/216/218/225/226/228
Page 2

2
English Page 4
• Keep page 3 and page 46 open when reading these operating
instructions.
Deutsch Seite 11
• Schlagen Sie beim Lesen der Gebrauchsanweisung
Seiten 3 und 46 auf.
Dansk Side 18
• Hold side 3 og side 46 opslået mens De læser
brugsanvisningen.
Norsk Side 25
• Slå opp på side 3 og side 46 før De leser videre.
Svenska Sid 32
• Ha sidan 3 och sidan 46 utvikt när ni läser
bruksanvisningen.
Suomi Sivu 39
• Pidä sivut 3 ja 46 auki samalla kun luet käyttöohjetta.
Page 3
3
1
H
A EJ I
BFD
C
G
2
3
Page 4
4
Important
• Read the instructions for use and look at the illustrations
before you start using the steam iron.
• Remove any sticker or protective foil from the soleplate before
you use the appliance for the first time. Clean the soleplate
with a soft cloth.
• To prevent damage: check if the voltage indicated on the
appliance corresponds to the local mains voltage before you
connect the appliance.
• Use an earthed wall socket.
• Never use the appliance if it is damaged in any way.
• Unplug the appliance from the mains:
- before filling the iron with water or pouring out the remaining
water after use;
- before cleaning the iron.
• When you have finished ironing and also when you leave the
iron for a short while, always:
- set the steam control to position O;
- put the iron on its heel;
- remove the mains plug from the wall socket.
• Do not put vinegar, starch, chemically descaled water or
descaling agents in the water reservoir.
• Make sure the cord does not touch the soleplate when it is hot.
• The ejected steam is hot and therefore dangerous. Never direct
the steam at people.
• Always store the iron by placing it on its heel in a safe and dry
place.
• Never immerse the iron in water.
• Some parts of the iron have been slightly greased and, as a
result, the iron may give off some smoke when it is switched
on for the first time. This phenomenon is harmless and will
soon cease.
• This appliance is not intended for use by young or infirm
persons without supervision.
English
Page 5

5
• Young children should be supervised to ensure that they do
not play with the appliance.
• If the mains cord of this appliance is damaged, it may only be
replaced by a special cord assembly available from the
manufacturer or its service agent.
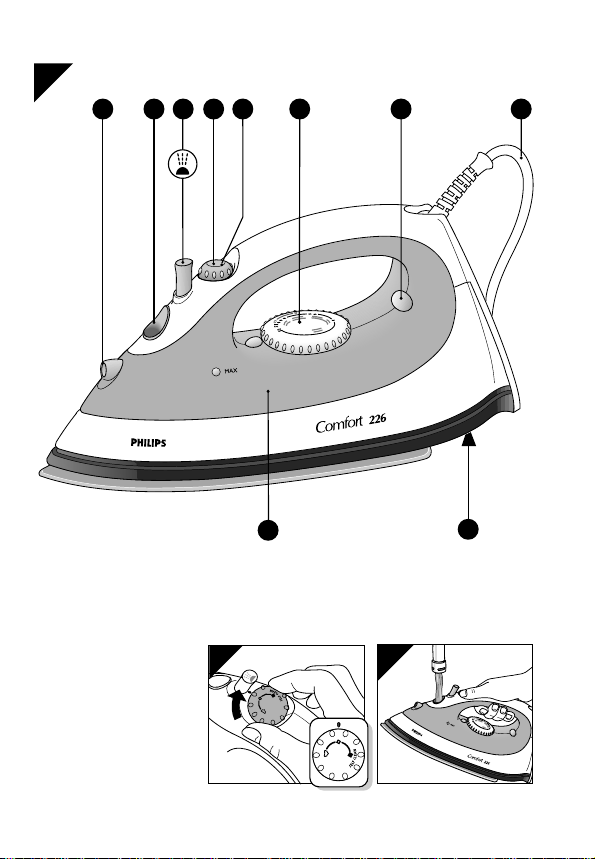
General description (fig. 1)
A Temperature control dial
B Steam control dial
O = no steam
q = steam
w = maximum steam
1 = self-clean
C Spray button T (type HI 215/216/225/226/228)
D Spray nozzle (type HI 215/216/225/226/228)
E Temperature pilot light (amber)
F Water filling opening
G Water reservoir
H Type plate
I Cord
J Extra steam 0 (press) (type HI 225/226/228)
Ironing temperature guide
• Follow the ironing instructions on the garment label. If these instructions
are missing but you do know the kind of fabric, consult the table.
• This table is only valid for plain fabrics and not for materials to which
finishes, glosses etc. have been applied. Textile to which some kind of
finish has been applied (gloss, crinkle, relief etc.) is best ironed at lower
temperatures.
• First sort the laundry according to ironing temperature: put wool with
wool, cotton with cotton, etc.
• The iron heats up more quickly than it cools down. Therefore, start
ironing articles that need to be ironed at the lowest temperature, such as
those made of synthetic fibres.
• If the fabric consists of various kinds of fibres, always select the
temperature required by the most delicate fibre, i.e. the lowest
Page 6

6
temperature. If, for example, an article consists of 60% polyester and
40% cotton, it should be ironed at the temperature indicated for polyester
(1) and without steam.
• If you do not know what kind(s) of fabric(s) the article is made of, find out
the appropriate temperature by ironing a piece of material that will not be
visible when you wear or use the article and start ironing at a relatively
low temperature.
• Pure woollen fabrics (100% wool) may be pressed with the iron set to a
steam position. It is advisable to set the steam control (B) to maximum
position and to use a dry pressing cloth.
• When steam-ironing woollen fabrics, shiny patches may occur. You can
prevent this by turning the article inside out and ironing the reverse side.
Fabric table
C
Wool
q
Instructions
on label
Fabric Temperature
control
Steam
control
Extra
Steam
Spray
B
Synthetic
fibres,
e.g. acryl,
viscose,
polyamide
(nylon),
polyester
Silk
O
0
X
D
Cotton
Linen
MIN
AA
AA
11
AA
AA
AA
AA
AA
AA
22
AA
AA
33
MAX
w 0
Extra
T
Z
Please note that Z on the label means:
“This article cannot be ironed!”
Extra
Page 7

7
• Velvet and other fabrics which tend to acquire shiny spots should be
ironed in one direction only (along with the nap) while applying very little
pressure.
Always keep the appliance moving while ironing.
• To prevent shiny spots, articles made of synthetic material or silk should
be ironed inside out. Do not use the spray function, as spraying could
cause stains.
Filling with water (for steam-ironing and spraying)
- Unplug the iron before you fill it (or before you pour out the remaining
water). Set the steam control (B) to position O (= no steam) (fig. 2).
• Fill the iron with normal tap water when using it for the first time.
• For refilling, you can also use tap water. However, if the water is very
hard, it is advisable to use distilled water.
Do not put vinegar, starch, chemically descaled water or
descaling agents in the water reservoir!
- Pour water into the filling aperture to the maximum (MAX) level (fig. 3).
Setting the temperature (see table)
- Put the iron on its heel.
- Set the temperature control (A) to the correct ironing temperature (fig. 4).
- Insert the mains plug into the wall socket.
- The iron is ready to be used after the amber temperature pilot light (E)
has first gone off and then come on again.
• The amber pilot light (E) will come on from time to time during ironing.
• If you set the temperature control (A) to a lower setting after ironing at a
high temperature, do not resume ironing until after the amber pilot light
(E) has come on and has gone off again. If you don’t wait for the light to
go out again, you run the risk of scorching the fabric.
Ironing without steam (see table)
- Set the Steam control (B) to position O (= no steam) (fig. 2).
• For more details on how to switch on the iron, see the section headed
“Setting the temperature”.
Page 8

8
Steam-ironing (see table)
• Make sure there is enough water in the water reservoir.
- Set the steam control (fig. 5):
No steam setting (O) for temperature settings MIN to 2.
Steam setting (q) for temperature settings 2 to 3.
Maximum steam setting (w) for temperature settings 3 to MAX.
• Water may leak from the soleplate if a too low temperature (2 or lower)
has been selected.
• For more details on how to switch on the iron, see the section headed
“Setting the temperature”.
Extra Steam 0 (types HI 225/226/228) (see table)
• This feature provides extra steam to remove stubborn creases.
• Apply Extra Steam only at 3 to MAX temperature setting.
- Set the steam control to the steam position w (fig. 6).
- Press and hold the Extra Steam button (J) 0 (max. 5 seconds) (fig. 7).
Then release the button.
Wait at least 1 minute before applying Extra Steam again to prevent
water from dripping out of the soleplate.
Spraying T (see table) (type HI 215/216/225/226/228)
- To remove stubborn creases from fabrics at any temperature, push the
spray button T (C) a couple of times to damp the laundry (fig. 8).
• Make sure there is enough water in the water reservoir.
Self-cleaning 1
• The iron has a self-clean function to remove scale and impurities.
• Use the self-clean function once every two weeks. If the water used is
very hard, you should use the self-clean function more often.
- Set the Steam control (B) to position O (fig. 2).
- Set the temperature control dial (A) to MAX.
- Fill the water reservoir (G) to maximum (MAX) level.
- Plug in the iron to the mains, allow the iron to heat up.
Page 9

9
- When the amber pilot light (E) goes off, unplug the iron.
- Hold the appliance horizontally over a sink (fig. 9).
- Set the steam control to position 1 (self clean) (fig. 10).
The steam control will then spring up slightly.
- Pull the steam control up slightly (fig. 10).
- Boiling water and steam will now come out of the holes in the soleplate.
Impurities and scale (if any) are washed away with it.
Move the iron forwards and backwards while this happens (fig. 11).
- Repeat self-clean if a lot of impurities are flushed out.
- You can pull the steam control further upwards to remove the steam
control needle (fig. 12). It is then possible to remove any scale from the
needle. For this purpose you may use vinegar.
Avoid bending or damaging the steam control needle!
- Replace the steam control needle. Insert the point of the needle exactly
in the centre of the aperture and fit the small notch at the side into the
spacing (fig. 13).
- Press the steam control (fig. 14).
- Set the steam control to position O (fig. 2).
Do not put vinegar, starch, chemically descaled water or
descaling agents in the water reservoir.
After self-cleaning
- Plug the iron into the mains to dry up the soleplate.
- When the amber pilot light (E) goes off, unplug the iron.
- Move the iron gently over a piece of used cloth to remove water stains.
Cool down the iron for storage.
Cleaning
- Before cleaning remove the mains plug from the wall socket and allow
the iron to cool down sufficiently.
- Scale and other stains can be wiped off the soleplate with a damp cloth
and a non-abrasive (liquid) cleaner.
Keep the soleplate smooth: avoid hard contact with metal objects.
- The upper part of the appliance can be cleaned with a damp cloth.
- From time to time clean the inside of the water reservoir by filling with
water and shaking (fig. 15). Then pour the water back out (fig. 16).
Page 10

10
Storage
- Remove the mains plug from the wall socket.
- Pour any remaining water out of the water reservoir (fig. 16).
- Set the Steam control (B) to position O (fig. 2).
- Stand the iron upright and let it cool down sufficiently.
- Wind the mains cord around the cord storage (fig. 17).
- Always store the iron standing on its heel (fig. 18).
- Always keep the iron in a safe dry place.
Regularly check if the mains cord is still in a good and safe condition.
Page 11

11
Wichtig
• Lesen Sie diese Gebrauchsanweisung sorgfältig durch, und
sehen Sie sich dabei die Abbildungen an, bevor Sie das Gerät
zum ersten Mal verwenden.
• Entfernen Sie vor dem ersten Gebrauch alle Aufkleber und die
Schutzfolie von der Bügelsohle. Reinigen Sie die Bügelsohle mit
einem sauberen, weichen Tuch.
• Prüfen Sie, bevor Sie das Gerät in Gebrauch nehmen, ob die
Spannungsangabe auf dem Typenschild mit der örtlichen
Netzspannung übereinstimmt.
• Schließen Sie das Gerät nur an eine Schuko-Steckdose an.
• Verwenden Sie das Gerät nie, wenn es in irgendeiner Hinsicht
defekt oder beschädigt ist.
• Ziehen Sie den Stecker aus der Steckdose, bevor Sie …
- Wasser einfüllen bzw. im Gerät verbliebenes Wasser
ausgießen oder
- das Gerät reinigen.
• Wenn Sie das Bügeln beenden oder den Raum - wenn auch nur
für kurze Zeit - verlassen, so …
- stellen Sie den Dampfregler auf Position O,
- stellen Sie das Bügeleisen auf seine Rückseite und
- ziehen Sie den Stecker aus der Steckdose.
• Füllen Sie niemals Essig, Entkalker, Wäschestärke oder andere
Chemikalien in den Wasserbehälter. Verwenden Sie auch kein
chemisch enthärtetes Wasser.
• Achten Sie darauf, daß das Netzkabel nicht die heiße Bügelsohle
berührt.
• Der austretende Dampf ist sehr heiß. Richten Sie ihn niemals auf
Personen!
• Bewahren Sie das Gerät, auf seiner Rückseite stehend, an einem
sicheren, trockenen Platz auf.
• Tauchen Sie das Gerät niemals in Wasser.
• Einige Teile des Bügeleisens sind leicht eingefettet und können
beim ersten Gebrauch etwas Rauch entwickeln. Das ist
ungefährlich und geht nach kurzer Zeit vorüber.
Deutsch
Page 12

12
• Dieses Gerät darf von gebrechlichen Personen nicht ohne
Aufsicht benutzt werden.
• Ein Dampfbügeleisen ist kein Spielzeug. Lassen Sie Kinder nicht
mit dem Gerät hantieren.
• Wenn das Netzkabel defekt oder beschädigt ist, muß es durch ein
original Philips Netzkabel ersetzt werden. Wenden Sie sich an
Ihren Philips Händler oder das Philips Service Center in
Ihrem Lande.
Allgemeine Beschreibung (Abb. 1)
A Temperaturregler, Drehschalter
B Dampfregler, Drehschalter
O = kein Dampf
q = minimale Dampfabgabe
w = maximale Dampfabgabe
1 = Selbstreinigungstaste
C Sprühtaste T (nur Typen HI 215/216/225/226/228)
D Sprühdüse (nur Typen HI 215/216/225/226/228)
E Temperatur-Kontrollampe, gelb)
F Einfüllöffnung
G Wasserbehälter
H Typenschild
I Netzkabel
J Turbodampf-Taste 0 Druckschalter (nur Typen HI 225/226/228)
Bügeltemperatur
• Prüfen Sie stets, ob eine Bügelvorschrift in das zu bügelnde Teil
eingenäht ist (vgl. die Tabelle). Befolgen Sie diese Bügelvorschrift in
allen Fällen. Wenn Bügelvorschriften fehlen, Sie aber die Textilart
kennen, so schauen Sie in der Tabelle nach.
• Die Tabelle gilt nur für die dort aufgeführten Materialien.
Chemisch behandeltes Material (z.B. Glanz, Relief, knitterfrei)
ist stets bei einer niedrigeren Temperatur zu bügeln.
• Sortieren Sie das Bügelgut zuvor immer nach der erforderlichen
Bügeltemperatur.
Das Bügeleisen ist schneller aufgeheizt als abgekühlt. Beginnen Sie
darum mit Textilien, die nur eine niedrige Temperatur vertragen, also ggf.
mit Synthetics.
Page 13

13
• Wählen Sie bei Mischgeweben immer die Temperaturstufe für die Faser,
welche die niedrigste Temperatur erfordert. Ein Wäschestück aus 60%
Polyester und 40% Baumwolle muß also bei Einstellung (1) auf dem
Temperaturregler für Polyester und ohne Dampf gebügelt werden.
• Wenn Sie nicht wissen, woraus das zu bügelnde Teil besteht, so suchen
Sie eine Stelle, die bei normaler Verwendung nicht sichtbar ist, und
prüfen Sie dort, mit der niedrigsten Temperatur beginnend, welche
Temperaturstufe angemessen ist.
• Textilien aus reiner Wolle (100% Wolle) können bei einer
Dampfeinstellung unter einem Bügeltuch gebügelt werden.
Der Dampfregler steht dabei am besten auf maximaler Position.
Tabelle
C
Wolle
q
Bügel-
vorschrift
Textilart Temperatur-
einstellung
Dampf-
regler
Turbo-
Dampf
Dampf-
sprühen
B
Synthetics,
z.B.
Acetat,
Acryl,
Viskose,
Polyamid
(Nylon),
Polyester
Seide
O
0
X
D
Baumwolle
Leinen
MIN
AA
AA
11
AA
AA
AA
AA
AA
AA
22
AA
AA
33
MAX
w 0
Extra
T
Z
So gekennzeichnete Z:
“Artikel dürfen nicht gebügelt werden!”
Extra
Page 14

14
• Damit wollene Teile durch das Bügeln keinen Glanz annehmen, sollten
sie gewendet und auf der Rückseite (“von links”) gebügelt werden.
• Samt und andere Gewebe, die durch das Bügeln rasch glänzende
Stellen annehmen, sollten nur in eine Richtung (“mit dem Strich”) und
unter nur leichtem Druck gebügelt werden.
Halten Sie das Bügeleisen dabei stets in Bewegung.
• Bügeln Sie Synthetics und Seide stets von links, um glänzende Stellen
zu vermeiden. Verwenden Sie kein Bügelspray; es könnte Flecken
verursachen.
Wasser zum Bügeln und Sprühen einfüllen
- Ziehen Sie vor dem Füllen, aber auch vor dem Leeren des Geräts
den Stecker aus der Steckdose. Stellen Sie den Dampfregler (B) auf
Position O = kein Dampf (Abb. 2).
• Füllen Sie das Gerät vor der ersten Verwendung mit normalem
Leitungswasser.
• Auch zum Nachfüllen können Sie Leitungswasser verwenden. Ist das
örtliche Wasser sehr hart (Härtebereich 3 oder 4), so empfiehlt sich
allerdings die Verwendung von destilliertem Wasser. Ihre Wasserwerke
geben Ihnen Auskunft über die Härte Ihres Leitungswassers.
Füllen Sie niemals Essig, chemisch enthärtetes Wasser oder andere
Chemikalien in den Wasserbehälter!
- Gießen Sie Wasser bis zur Marke MAX in den Wasserbehälter (Abb. 3).
Einstellen der Temperatur (vgl. die Tabelle)
- Stellen Sie das Bügeleisen auf seine Rückseite.
- Stellen Sie den Temperaturregler (A) auf die erforderliche Temperatur
(Abb. 4).
- Stecken Sie den Stecker in die Steckdose.
- Wenn die gelbe Kontrollampe (E) einmal aus- und dann wieder
angegangen ist, können Sie mit dem Bügeln beginnen.
• Die gelbe Kontrollampe leuchtet während des Bügelns von Zeit zu Zeit
auf und zeigt an, daß die Bügelsohle nachgeheizt wird.
• Wollen Sie mit einer niedrigeren Temperatur weiterbügeln, so stellen Sie
die neue Temperatur ein und warten Sie, bis die gelbe Kontrollampe anund wieder ausgegangen ist, damit das Bügelgut nicht angesengt wird.
Page 15

15
Trockenbügeln (vgl. die Tabelle)
- Stellen Sie den Dampfregler auf O = kein Dampf (Abb. 2) und
stecken Sie den Stecker in die Steckdose.
• Verfahren Sie weiter wie oben im Abschnitt “Einstellen der Temperatur”
beschrieben.
Dampfbügeln (vgl. die Tabelle)
• Prüfen Sie zuerst, ob sich genügend Wasser im Wasserbehälter befindet.
- Stellen Sie den Dampfregler (B) (Abb. 5) und Temperaturregler
(A) auf die folgenden Positionen:
Dampfregler Temperaturregler
O = kein Dampf MIN bis 2,
q = minimal 2 bis 3,
w = maximal 3 bis MAX.
• Ist eine zu niedrige Temperatur (MIN bis 2) eingestellt, kann Wasser
aus der Bügelsohle tropfen.
• Stecken Sie den Stecker in die Steckdose und verfahren Sie weiter wie
oben im Abschnitt “Einstellen der Temperatur” beschrieben.
Turbodampf 0 (nur Type HI 225/226/228) (vgl. die Tabelle)
• Mit dieser Einstellung können Sie leicht hartnäckige Falten entfernen.
• Turbodampf kann nur bei Temperatureinstellungen zwischen 3 und
MAX abgegeben werden.
- Stellen Sie den Dampfregler auf die Position w (Abb. 6).
- Drücken Sie die Turbodampf-Taste 0. Halten Sie sie für maximal
5 Sekunden gedrücktgedrückt (Abb. 7). Lassen Sie die Taste dann
wieder los.
Nach frühestens 1 Minute können Sie wieder einen Dampfstoß
abgeben. So vermeiden Sie, daß Wasser aus der Bügelsohle tropft.
Bügelgut einsprühen T (nur Typen HI 215/216/225/226/228) (vgl. die
Tabelle)
- Hartnäckige Falten können Sie bei jeder Einstellung anfeuchten.
Drücken Sie einige Male die Sprühtaste T (C) (Abb. 8).
Page 16

16
• Stellen Sie sicher, daß sich genügend Wasser im Wasserbehälter befindet.
Selbstreinigung 1
• Das Gerät verfügt über eine Selbstreinigungsfunktion, die
Kalkablagerungen und Verunreinigungen beseitigt.
• Führen Sie die Selbstreinigung alle 14 Tage durch.
Ist das verwendete Wasser besonders hart, so reinigen Sie häufiger.
- Stellen Sie den Dampfregler (B) auf Position O (Abb. 2).
- Stellen Sie den Temperaturregler (A) auf MAX.
- Füllen Sie den Wasserbehälter (G) bis zur Marke MAX.
- Stecken Sie den Stecker in die Steckdose, und lassen Sie Bügelsohle
aufheizen.
- Ziehen Sie den Stecker aus der Steckdose, wenn die gelbe Kontrollampe
erloschen ist.
- Halten Sie dann das Bügeleisen waagerecht über ein Spülbecken (Abb. 9).
- Stellen Sie den Dampfregler auf Position 1 .
- Der Dampfregler springt ein wenig heraus.
- Ziehen Sie den Dampfregler noch etwas höher (Abb. 10).
- Dampf und kochendes Wasser treten jetzt aus der Bügelsohle aus. Damit
werden Kalkreste und Verunreinigungen, sofern vorhanden, herausgespült.
- Bewegen Sie dabei das Bügeleisen vorsichtig waagerecht hin und
her (Abb. 11).
- Wiederholen Sie den Vorgang, falls das austretende Wasser stark
verunreinigt sein sollte.
- Sie können den Dampfregler weiter hochziehen (Abb. 12) und die
dort integrierte Dampfkontrollnadel entnehmen. So lassen sich
Kalkablagerungen an der Nadel, falls erforderlich auch mit Essig, entfernen.
Gehen Sie vorsichtig vor, damit Sie die Nadel nicht verbiegen.
- Setzen Sie die Dampfkontrollnadel genau in der Mitte der Öffnung
wieder ein. Der kleine Vorsprung an der Nadel muß in die Aussparung
eingreifen (Abb. 13).
- Drücken Sie den Dampfregler herunter (Abb. 14).
- Stellen Sie den Dampfregler auf Position O (Abb. 2).
Füllen Sie niemals Essig, chemisch enthärtetes Wasser,
Wäschesteife oder andere Chemikalien in den Wasserbehälter!
Nach der Selbstreinigung
- Stellen Sie das Bügeleisen auf seine Rückseite.
- Stecken Sie den Stecker in die Steckdose, und lassen Sie die
Bügelsohle trocknen.
- Ziehen Sie den Stecker aus der Steckdose, wenn die gelbe
Page 17

17
Kontrollampe (E) erloschen ist.
- Führen Sie die Bügelsohle über ein altes, aber sauberes Tuch,
damit es die im Bügeleisen verbliebene Feuchtigkeit aufnimmt.
- Lassen Sie das Bügeleisen abkühlen, bevor Sie es fortstellen.
Reinigung
- Ziehen Sie vor jeder Reinigung den Netzstecker aus der Steckdose,
und lassen Sie das Gerät ausreichend abkühlen.
- Kalkablagerungen und andere Verunreinigungen können mit einem
feuchten Tuch abgewischt werden, auf das Sie bei Bedarf ein wenig
Spülmittel aufgetragen haben.
Halten Sie die Bügelsohle unversehrt. Vermeiden Sie, daß sie mit
harten Gegenständen in Berührung kommt.
- Der obere Teil des Bügeleisens läßt sich mit einem feuchten Tuch
abwischen, auf das Sie bei Bedarf ein wenig Spülmittel auftragen
können.
- Füllen Sie von Zeit zu Zeit den Wasserbehälter mit klarem Wasser, und
schütteln Sie das Bügeleisen (Abb. 15). Gießen Sie dann das Wasser
aus (Abb. 16).
Aufbewahrung
- Ziehen Sie den Netzstecker aus der Steckdose.
- Gießen Sie ggf. das im Wasserbehälter verbliebene Wasser
aus (Abb. 16).
- Stellen Sie den Dampfregler (B) auf Position O (Abb. 2).
- Stellen Sie das Bügeleisen auf seine Rückseite, und lassen Sie es
ausreichend abkühlen.
- Wickeln Sie das Netzkabel um die Kabelaufwicklung (Abb. 17).
- Bewahren Sie das Bügeleisen stets auf seiner Rückseite stehend
auf (Abb. 18).
- Stellen Sie das Gerät an einen sicheren, trockenen Platz.
Prüfen Sie regelmäßig den Zustand des Netzkabels.
Page 18

18
Vigtigt
• Læs brugsanvisningen og kig på illustrationerne, før
strygejernet tages i brug.
• Inden strygejernet tages i brug første gang, fjernes eventuelle
klæbemærker eller beskyttelsesfolie fra strygesålen.
Tør derefter strygesålen af med en blød klud.
• Undgå beskadigelse: Inden strygejernet tages i brug første
gang, kontrolleres det, at spændingsangivelsen på
typeskiltet svarer til den lokale netspænding.
• Brug aldrig strygejernet, hvis det på nogen måde er
beskadiget.
• Tag altid stikket ud af stikkontakten:
- før der fyldes vand i vandtanken, og når overskydende vand
hældes ud efter brug;
- før strygejernet rengøres.
• Når De er færdig med at stryge eller forlader strygejernet - selv
for en kort stund - skal De altid huske at:
- sætte dampvælgeren i stilling O;
- stille strygejernet på højkant;
- tage stikket ud af stikkontakten.
• Kom aldrig eddike/eddikesyre, stivelse, kemisk afkalket vand
eller nogen form for afkalkningsmiddel ned i vandtanken.
• Pas på, at netledningen ikke kommer i nærheden af den varme
strygesål.
• Den damp, der kommer ud, er meget varm og derfor farlig.
Ret aldrig dampstrålen mod personer.
• Opbevar altid strygejernet stående på højkant et sikkert
og tørt sted.
• Nedsænk aldrig strygejernet i vand.
• Visse dele af strygejernet er smurt med lidt fedtstof, hvilket
kan forårsage en smule røgudvikling, første gang strygejernet
tages i brug. Dette er helt normalt og varer kun et kort øjeblik.
• Dette apparatet er ikke beregnet til at blive brugt af børn eller
svagelige personer uden opsyn.
Dansk
Page 19

19
• Hold altid børn under opsyn, så de ikke kan komme til at lege
med strygejernet.
• Hvis netledningen beskadiges, må den kun udskiftes med en
ny original ledning af samme type. Henvend Dem venligst til
Deres forhandler eller til Philips, hvis ledningen skal udskiftes.
Generel beskrivelse (fig. 1)
A Temperaturvælger (drejelig)
B Dampmængdeknap (drejelig)
O = Ingen damp
q = Normal damp
w = Maksimum damp
1 = Selvrensning
C Spray-knap T (type HI 215/216/225/226)
D Sprayåbning ((type HI 215/216/225/226)
E Temperatur-kontrollampe (gul)
F Åbning til påfyldning af vand
G Vandtank
H Typeskilt
I Netledning
J Ekstra kraftig damp 0 ((tryk) (type HI 225/226)
Strygetemperatur-vejledning
• Følg altid strygeanvisningen i det tøj, der skal stryges. Hvis der ingen
mærkning er i tøjet, men De kender tekstilarten, kan De følge den viste
tabel.
• Tabellen er kun gældende for de nævnte tekstiler og tager ikke højde
for eventuelle efterbehandlinger af tøjet som f.eks. glans eller lign. - Det
anbefales altid at stryge specialbehandlede stoffer (glans, rynker, tryk ell.
lign.) ved lav temperatur.
• Sortér tøjet efter strygetemperatur, inden strygningen påbegyndes.
Uld sammen med uld, bomuld med bomuld o.s.v.
• Strygejernet varmes hurtigere op, end det afkøles, så start med det tøj,
der kræver den laveste temperatur, f.eks. syntetiske tekstiler.
Page 20

20
• Hvis tøjet består af blandingstekstiler, vælges temperaturen for det
tekstil, der har den laveste strygetemperatur. F.eks. skal et tekstil, der
består af 60% polyester og 40% bomuld, stryges ved den temperatur,
der er angivet for polyester (1) og uden damp.
• Hvis De ikke ved, hvilket materiale tøjet er lavet af, vælges et sted på
tøjet, der ikke ses, når det bæres eller bruges. Prøv at finde frem til den
bedst egnede strygetemperatur. Begynd med en relativ lav temperatur.
• Ren uld (100%) kan stryges med strygejernet sat i dampstilling.
Det anbefales at sætte dampvælgeren (B) til maksimum damp og
bruge et tørt strygeklæde.
• Ved dampstrygning af ren uld kan tøjet komme til at skinne.
Dette undgås bedst ved at stryge det på vrangen.
Tekstiltabel
C
Uld
q
Strygeanvis
ning i tøjet
Materiale Temperatur-
indstilling
Damp-
indstilling
Kraftig
damp
Spray
B
Syntetiske
stoffer,
f.eks. akryl,
viscose,
polyamid
(nylon),
polyester
Silke
O
0
X
D
Bomuld
Linned
MIN
AA
AA
11
AA
AA
AA
AA
AA
AA
22
AA
AA
33
MAX
w 0
Extra
T
Z
Venligst bemærk: Er tøjet mærket med Z betyder det
“tåler ikke strygning!”
Extra
Page 21

21
• Fløjl og andre tekstiler, der let bliver blanke, stryges hele tiden i samme
retning (med luven) og med ganske let tryk. Hold hele tiden strygejernet i
bevægelse.
• Syntetiske stoffer og silke stryges på vrangen for at undgå blanke pletter.
Undlad at bruge spray- knappen, da det kan give skjolder på tøjet.
Vandpåfyldning (til dampstrygning og spraying)
- Tag altid stikket ud af stikkontakten før strygejernet fyldes med
eller tømmes for vand. Sæt dampvælgeren (B) i stilling O
(= ingen damp) (fig. 2).
• Første gang, strygejernet tages i brug, fyldes det med almindeligt
postevand.
• Ved efterfølgende påfyldninger kan De også anvende almindeligt
postevand. Hvis Deres vand er meget hårdt, anbefales det dog at bruge
destilleret vand.
Kom aldrig eddike/eddikesyre, stivelse, kemisk afkalket vand eller
nogen form for afkalkningsmiddel ned i vandtanken!
- Fyld vandtanken med vand (fig. 3) til MAX-markeringen.
Temperaturindstilling (se tabellen)
- Stil strygejernet på højkant.
- Indstil temperaturvælgeren (A) til den ønskede strygetemperatur (fig. 4).
- Sæt netstikket i en stikkontakt som tændes.
- Når den gule kontrollampe (E) er slukket og tændt igen, kan strygningen
påbegyndes.
• Under strygningen vil den gule kontrollampe (E) tænde og slukke med
jævne mellemrum.
• Hvis De efter at have strøget med en høj temperatur sætter
temperaturvælgeren (A) til et lavere niveau, skal De vente med at stryge
igen, til den gule kontrollampe (E) har været tændt og er slukket igen.
Hvis De ikke venter, til lampen slukker igen, risikerer De at svide tøjet.
Tørstrygning, d.v.s. uden damp (se tabellen)
- Sæt dampvælgeren (B) i stilling O (= ingen damp) (fig. 2).
• Tænd for strygejernet, se afsnittet “Temperaturindstilling”.
Page 22

22
Dampstrygning (se tabellen)
• Sørg altid for, at der er tilstrækkeligt med vand i vandtanken.
- Indstil dampvælgeren (fig. 5):
Stilling “ingen damp” (O) for temperaturindstillinger mellem MIN og 2.
Stilling “normal damp” (q) for temperaturindstillinger mellem 2 og 3.
Stilling “maksimum damp” (w) for temperaturindstillinger mellem 3
og MAX.
• Hvis der er valgt for lav temperatur (2 eller lavere) kan der dryppe
vand ud fra strygesålen.
• Tænd for strygejernet, se afsnittet “Temperaturindstilling”.
Ekstra kraftig damp 0 (type HI 225/226/228) (se tabellen)
• Denne finesse giver kraftig damp til at glatte ekstra besværlige
folder ud.
• Brug kun ekstra kraftig damp ved temperaturindstillinger mellem 3
og MAX.
- Sæt dampvælgeren i dampstilling w (fig. 6).
- Tryk på knappen for kraftig damp (J) 0 og hold knappen nede
(i max. 5 sekunder) (fig. 7). Slip derefter knappen.
Vent i mindst 1 minut før De igen trykker på knappen for kraftig
damp. Dette forhindrer, at der drypper vand ud fra strygesålen.
Spraying T (type HI 215/216/225/226/228) (se tabellen)
- Ved at trykke nogle gange på spray-knappen T (C) kan man fugte tøjet
uanset temperaturindstillingen for at få glattet ekstra besværlige folder
ud (fig. 8).
• Sørg for, at der er tilstrækkeligt med vand i vandtanken.
Selvrensning 1
• Strygejernet er forsynet med en selvrensnings-funktion, som fjerner
kalk og andre urenheder.
• Strygejernet skal selvrenses hver anden uge. Jo hårdere vand der
bruges, desto oftere skal apparatet selvrenses.
Page 23

23
- Sæt dampvælgeren (B) i stilling O (fig. 2).
- Sæt temperaturvælgeren (A) til MAX.
- Fyld vandtanken (G) op til MAX-markeringen.
- Sæt netstikket i en stikkontakt som tændes. Lad strygejernet varme op.
- Når den gule kontrollampe (E) slukker, tages stikket ud af
stikkontakten.
- Hold strygejernet vandret over køkkenvasken (fig. 9).
- Sæt dampvælgeren i stilling 1 (selvrens) (fig. 10).
Dampvælgerknappen springer et lille stykke op.
- Træk dampvælgerknappen lidt længere op (fig. 10).
- Der vil nu komme kogende vand og damp ud af hullerne i strygesålen.
Eventuelle urenheder og kalk vil samtidig blive skyllet med ud.
- Bevæg samtidig strygejernet frem og tilbage (fig. 11).
- Gentag selvrensnings-proceduren, hvis der kommer mange urenheder
med ud.
- Dampvælgeren kan trækkes yderligere op, så ventilnålen for
dampregulering kan tages ud (fig. 12) og renses for eventuel kalk.
Til rensning af nålen kan man anvende eddike/eddikesyre.
Pas på ikke at bøje eller beskadige ventilnålen!
- Sæt ventilnålen på plads igen. Spidsen af nålen sættes ned
nøjagtig midt i åbningen, og så det lille hak på siden passer
i mellemrummet (fig. 13).
- Tryk dampvælgeren ned (fig. 14).
- Sæt dampvælgeren i stilling O (fig. 2).
Kom aldrig eddike/eddikesyre, stivelse, kemisk afkalket vand eller
nogen form for afkalkningsmiddel ned i vandtanken!
Efter selvrensning
- Sæt strøm på strygejernet så strygesålen tørres.
- Når den gule kontrollampe (E) slukker, tages stikket ud af
stikkontakten.
- Bevæg strygejernet henover et gammelt stykke stof, så strygesålen
bliver helt tør. Lad strygejernet køle af, før det stilles væk.
Page 24

24
Rengøring
- Før De begynder at rengøre strygejernet, skal stikket være taget ud af
stikkontakten og strygejernet være tilstrækkeligt afkølet.
- Kalk og andre belægninger på strygesålen kan tørres af med en fugtig
klud og lidt ikke-ridsende, flydende rengøringsmiddel.
Hold strygesålen ren og glat: Undgå kontakt med metalgenstande.
- Den øverste del af strygejernet kan rengøres med en fugtig klud.
- Fra tid til anden kan vandtanken rengøres indvendigt ved at fylde den
med vand og ryste strygejernet (fig. 15), hvorefter vandet hældes ud
igen (fig. 16).
Opbevaring
- Tag stikket ud af stikkontakten.
- Hæld eventuel resterende vand ud af strygejernet (fig. 16).
- Sæt dampvælgeren (B) i stilling O (fig. 2).
- Stil strygejernet på højkant og lad det afkøle helt.
- Netledningen rulles op omkring ledningsholderen (fig. 17).
- Opbevar altid strygejernet stående på højkant (fig. 18).
- Stil strygejernet et sikkert og tørt sted.
Kontrollér med jævne mellemrum, at netledningen ikke på nogen måde er
beskadiget.
Dette apparat overholder de gældende EU-direktiver vedrørende
sikkerhed og radiostøj.
Page 25

25
Viktig
• Les bruksanvisningen og studer tegningene før
dampstrykejernet tas i bruk.
• Fjern alle klistremerker og beskyttelsesfilm fra sålen før
strykejernet brukes første gang. Rengjør sålen med en myk
klut.
• Unngå farlige situasjoner: Undersøk om strykejernets angitte
spenning tilsvarer spenningen til det lokale strømnettet før det
tilkobles.
• Bruk en jordet stikkontakt.
• Jernet må aldri brukes dersom det på noen måte er skadet.
• Trekk ut støpselet:
- Før jernet fylles med vann, eller når restvann tømmes
ut etter bruk.
- Før jernet rengjøres.
• Når strykingen er avsluttet, og når du lar jernet stå en kort
stund, må du alltid gjøre følgende:
- Still dampregulatoren på O;
- Plasser jernet i vertikal stilling;
- Trekk ut støpselet.
• Ha aldri eddik, stivelse, kjemisk avleiret vann eller
avleiringsmidler i vanntanken.
• Pass på at ledningen ikke kommer i kontakt med sålen når den
er varm.
• Dampen som strømmer ut, er varm og derfor farlig. Rett aldri
dampen mot personer.
• Når jernet settes bort, må du alltid la det stå oppreist på et
trygt og tørt sted.
• Dypp aldri jernet ned i vann.
• Noen deler av jernet er innsatt med litt fett. Jernet kan derfor
komme til å avgi litt røyk når det settes på første gang. Dette er
ufarlig og opphører etter kort tid.
• Dette utstyret bør ikke brukes av unge eller svakelige personer
uten tilsyn.
Norsk
Page 26

26
• Pass på at små barn ikke får tak i og leker med strykejernet.
• Hvis strømledningen er skadet, kan den bare erstattes med en
spesiallaget ledning fra produsenten eller en av produsentens
serviceagenter.
Generell beskrivelse (fig. 1)
A Temperaturvelger
B Dampregulator
O = ingen damp
q = damp
w = maksimal damp
1 = selvrens
C Sprayknapp T (type HI 215/216/225/226/228)
D Spraydyse (type HI 215/216/225/226/228)
E Kontrollampe for termostat (gul)
F Vannpåfyllingsåpning
G Vanntank
H Såle
I Ledning
J Ekstra damp 0 (trykk) (type HI 225/226/228)
Veiledning for stryketemperaturer
• Følg strykeanvisningene som angis på en merkelapp i klesplagget.
Dersom disse anvisningene mangler, men du vet hva plagget er laget av,
se i tabellen.
• Denne tabellen gjelder bare for enkle stoffer og ikke tøy som er
bearbeidet, utsmykket osv. Tekstiler som har blitt bearbeidet, utsmykket
osv. (påført glans, laget folder eller mønster på osv.) bør strykes ved lav
temperatur.
• Sorter klærne etter stryketemperatur: Legg ull sammen med ull, bomull
sammen med bomull osv.
• Jernet varmes raskere enn det avkjøles. Begynn derfor med å stryke
klær som må strykes ved lav temperatur, for eksempel syntetiske plagg.
• Dersom stoffet består av flere forskjellige fibre, velger du alltid en
temperatur som passer det mest ømtålige fiberet, f.eks. den laveste
Page 27

27
temperaturinnstillingen. Dersom et plagg for eksempel består av 60 %
polyester og 40 % bomull, bør det strykes ved den temperaturen som er
angitt for polyester (1) og uten damp.
• Dersom du ikke vet hva slags stoff(er) plagget er laget av, finner du den
temperaturen som passer, ved å stryke et stykke av stoffet som ikke er
synlig når plagget brukes, og begynner å stryke ved en relativt lav
temperatur.
• Ren ull (100 % ull) kan presses med damp. Det er tilrådelig å sette
dampregulatoren (B) på maksimum og bruke et tørt strykeklede.
• Det kan oppstå blanke partier når ull dampstrykes. Dette kan unngås
dersom plagget vrenges og strykes på innsiden.
Stofftabell
C
Ull
q
Veiledning på
merkelappene
Stoff Temperatur-
velge
Damp-
regulator
Ekstra
damp
Spray
B
Syntetiske
fibre,
f.eks. akryl,
viskose,
polyamid
(nylon),
polyester
Silke
O
0
X
D
Bomull
Lin
MIN
AA
AA
11
AA
AA
AA
AA
AA
AA
22
AA
AA
33
MAX
w 0
Extra
T
Z
Merk at Z på merkelappen betyr:
“Dette plagget må ikke strykes!”
Extra
Page 28

28
• Fløyel og andre stoffer som lett får blanke partier, bør strykes bare i én
retning (med fibrene) og med lite press. Jernet må holdes i bevegelse så
lenge strykingen pågår.
• For å forhindre blanke partier bør plagg av syntetisk stoff og silke strykes
på vrangen. Ikke bruk sprayinnstillingen på slike stoffer, da dette kan
lage flekker.
Ifylling av vann (for dampstryking og bruk av spray)
- Trekk ut støpselet før jernet fylles (eller før restvannet tømmes ut).
Still dampregulatoren (B) på O (= ingen damp) (fig.2).
• Fyll jernet med vann fra springen første gang det brukes.
• For etterfylling kan det også brukes vann fra springen, men hvis vannet
er svært hardt, anbefales det å bruke destillert vann.
Ikke ha eddik, stivelse, kjemisk avleiret vann eller avleiringsmidler
i vanntanken!
- Gjennom tappeåpningen helles det vann til maksimum-nivå
(MAX) (fig. 3).
Innstilling av temperaturen (se tabellen)
- Sett jernet i vertikal stilling.
- Sett temperaturvelgeren (A) på korrekt temperatur (fig. 4).
- Sett støpselet i stikkontakten.
- Jernet er klart til bruk når den gule kontrollampen (E) har sluttet å lyse og
deretter kommet på igjen.
• Den gule kontrollampen (E) vil gå på og av mens du stryker.
• Dersom temperaturvelgeren (A) stilles på en lav temperaturetter at jernet
har vært brukt ved høyere temperatur, må du ikke begynne å stryke før
det gule lyset (E) har gått på og av igjen. Dersom du ikke venter til lyset
har gått av igjen, kan du risikere at det oppstår svimerker på tøyet.
Stryking uten damp (se tabellen)
- Sett dampregulatoren (B) på O (= ingen damp) (fig. 2).
• Mer informasjon om hvordan jernet settes på, finnes i avsnittet
“Innstilling av temperaturen”.
Page 29

29
Stryking med damp (se tabellen)
• Sørg for at det er nok vann i vanntanken.
- Settl dampregulatoren på ønsket innstilling (fig. 5);
Ingen damp (O) for temperaturinnstillingene MIN til 2.
Dampinnstilling (q) for temperaturinnstillingene 2 til 3.
Dampinnstilling på maksimum (w) for temperaturinnstillingene 3 til
MAX.
• Vann kan lekke fra sålen hvis det er valgt for lav temperatur (2 eller
lavere).
• Mer informasjon om hvordan jernet settes på, finnes i avsnittet
“Innstilling av temperaturen”.
Ekstra damp 0 (type HI 225/226/228) (se tabellen)
• Denne funksjonen sørger for ekstra damp for fjerning av vanskelige
skrukker.
• Bruk Ekstra damp bare ved temperaturinnstillingen 3 til MAX.
- Sett dampregulatoren på damp w (fig. 6).
- Trykk på Ekstra damp-knappen (J) 0 og hold den inne
(maks. 5 sekunder) (fig. 7). Deretter slippes knappen.
Vent minst 1 minutt før neste gang du bruker Ekstra damp for å
hindre at det drypper vann fra sålen.
Spray T (type HI 215/216/225/226/228) (se tabellen)
- For å få bort vanskelige skrukker i tøyet kan sprayknappen T (C) brukes
et par ganger - uansett temperaturinnstilling - for å fukte tøyet (fig. 8).
• Pass på at det er nok vann i vanntanken.
Selvrens 1
• Bruk selvrensfunksjonen én gang annenhver uke. Hvis vannet er svært
hardt, bør selvrensfunksjonen brukes oftere.
• Sett dampregulatoren (B) på O (fig. 2).
- Sett termostaten (A) på MAX.
- Fyll vanntanken (G) helt opp til (MAX).
Page 30

30
- Sett støpselet i stikkontakten og la jernet varmes opp.
- Når det gule lyset (E) slukkes, kan du trekke ut støpselet.
- Hold jernet horisontalt over vasken (fig. 9).
- Sett dampregulatoren på 1 (selvrens) (fig. 10).
Dampregulatoren vil nå gå litt opp.
- Trekk dampregulatoren litt opp (fig. 10).
- Kokende vann og damp kommer nå ut av hullene i sålen.
Eventuelle urenheter og avleiringer vaskes nå ut.
- Beveg jernet frem og tilbake mens dette pågår (fig. 11).
- Gjenta selvrensen hvis mye urenheter vaskes ut.
- Dampregulatoren kan trekkes mer ut, slik at reguleringsnålen (fig. 12)
kan tas utog eventuelle avleiringer på nålen fjernes. Til dette kan det
brukes eddik.
Forsiktig: Dampreguleringsnålen må ikke bøyes eller skades!
- Sett reguleringsnålen på plass igjen. Stikk nålen nøyaktig inn i midten
av åpningen og tilpass det lille innsnittet på siden inn i mellomrommet
(fig. 13).
- Trykk på dampregulatoren (fig. 14).
- Still dampregulatoren på O (fig. 2).
Ha ikke eddik, stivelse, kjemisk avleiret vann eller avleiringsmidler
i vanntanken.
Etter selvrensprosessen
- Sett støpselet i stikkontakten for å tørke sålen.
- Når den gule kontrollampen (E) slukkes, kan du trekke ut støpselet.
- Fjern vannmerker ved å stryke jernet forsiktig over et brukt tøystykke.
Avkjøl jernet før det settes bort.
Rengjøring
- Før rengjøring trekkes støpselet ut og jernet avkjøles.
- Avleiringer og andre flekker kan tørkes av sålen med en fuktig klut og
et lett (flytende) rengjøringsmiddel uten slipeeffekt.
Hold sålen glatt og jevn: unngå kontakt med metall.
- Oversiden av strykejernet kan rengjøres med en fuktig klut.
- Rengjør vanntanken av og til innvendig ved å fylle den med vann og
deretter riste den (fig. 15). Tøm så ut vannet (fig. 16).
Page 31

31
Oppbevaring
- Trekk ut støpselet.
- Tøm vanntanken for restvann (fig. 16).
- Still dampregulatoren (B) på O (fig. 2).
- Sett jernet i vertikal stilling og la det avkjøles skikkelig.
- Vikle ledningen rundt ledningsfestet (fig. 17).
- Oppbevar alltid jernet i vertikal stilling (fig. 18).
- Oppbevar alltid jernet på et trygt, tørt sted.
Kontroller regelmessig at ledningen er i god og sikker forfatning.
Page 32

32
Viktigt
• Läs först hela bruksanvisningen och studera samtidigt
illustrationerna! Spara bruksanvisningen! Spara köpbevis och
kvitto!
• Se till att eventuella etiketter och skyddsfolie på stryksulan
avlägsnas innan strykjärnet ansluts till elnätet för första
gången. Torka av sulan med en mjuk trasa.
• Före användning, kontrollera att uppgiften om spänning, Volt,
som finns angiven på typskylten, överensstämmer med den
aktuella nätspänningen. Om så inte är fallet vänd dig till
inköpsstället.
• Anslut strykjärnet till ett jordat vägguttag.
• Använd inte strykjärnet om det på något sätt är skadat eller
inte fungerar korrekt.
• Drag ut stickproppen ur vägguttaget:
- Innan du fyller på eller tömmer ut återstående vatten efter
användning.
- Före rengöring av strykjärnet.
• KOM IHÅG! När du strukit färdigt eller om du lämnar
ångstrykjärnet utan uppsikt, även om det bara är för en kort
stund:
- Ställ ångratten i läge O.
- Ställ strykjärnet upprätt på parkeringshälen.
- Dra ut stickproppen ur vägguttaget.
• Fyll aldrig ättika, stärkelse, kemiskt avkalkat vatten eller
avkalkningsmedel i vattentanken.
• Sladden får inte komma i beröring med den heta stryksulan.
• Den utströmmande ångan är het och därför farlig. Rikta aldrig
ångan mot människor eller djur.
• Förvara strykjärnet stående på parkeringshälen i ett säkert och
torrt utrymme.
• Doppa aldrig ångstrykjärnet i vatten.
• Vissa av ångstrykjärnets delar är lätt inoljade vid leverans
vilket gör att en aning rök uppstår när järnet värms första
gången. Detta är helt ofarligt och upphör efter en liten stund.
Svenska
Page 33

33
• När du stryker böjs och nöts sladden hela tiden. Kontrollera
därför regelbundet sladdens infästning i strykjärnet och
stickkontakten, låt en fackman byta sladden om du misstänker
fel. Sladden får bara ersättas med en av orginaltyp vilken
tillhandahålls av Philips serviceombud.
• Strykjärnet är inte avsett att användas av små barn eller
handikappade personer utan övervakning.
• Barn ska övervakas så att de inte kan leka eller komma åt
strykjärnet speciellt när det är varmt. Var försiktig så att de inte
kan dra i nätsladden.
Beskrivning, fig. 1
A Termostatratt för inställning av stryktemperatur
B Ångreglage för inställning av ånga
O = ingen ånga
q = ånga
w = maximal ånga
1 = rengöring
C Sprayknapp T (tryck) (endast typerna HI 215/216/225/226/228)
D Spraymunstycke (endast typerna HI 215/216/225/226/228)
E Signallampa för temperatur (gulfärgad)
F Påfyllningsöppning
G Vattentank
H Typskylt
I Nätsladd
J Extra ånga 0 (tryck på ratten) (endast typerna HI 225/226/228)
Stryktemperatur
• Se efter om det finns tvätt/strykråd i de plagg du skall stryka och följ alltid
dessa råd.
• Finns det inga instruktioner i plagget men du vet vilket material som ingår
kan du ställa in rätt temperatur med hjälp av tabellen här intill.
• Tabellen gäller för vanliga tyger utan speciell ytstruktur. Textil med
plissering, appretur och liknande bör i allmänhet strykas med lägre
temperatur.
• Sortera plaggen efter stryktemperatur innan du börjar stryka, ylle med
ylle, bomull med bomull etc.
Page 34

34
• Eftersom strykjärnet värms upp fortare än det svalnar bör du börja med
att stryka de plagg som kräver lägsta temperaturen och sedan övergå till
högre och högre temperatur.
• Är plagget gjort av ett tyg som består av flera olika sorters fibrer, t ex
60% polyester och 40% bomull, så kallade blandtyger, måste alltid
temperaturen ställas in för det material som kräver lägst temperatur.
I nämnda exempel väljer man temperaturen för polyester (1) och ingen
ånga.
• Om du inte vet av vilket material tyget består, måste du pröva dig fram.
Sök reda på ett dolt ställe i plagget och prova först med låg temperatur
och sedan med högre och högre tills du hittar den bästa.
Tabell
C
Ylle
q
Strykråd/
inställning
Textiltyp Termostat-
rattens läge
Ångrattens
läge
Extra
ånga
Spray
B
Syntet,
t ex:
akryl,
viskos,
polyamid,
polyester
Silke
O
0
X
D
Bomull
Linne
MIN
AA
AA
11
AA
AA
AA
AA
AA
AA
22
AA
AA
33
MAX
w 0
Extra
T
Z
Observera att Z på ett etiketten betyder.
“Detta plagg får ej strykas!”
Extra
Page 35

35
• Ylletyger (100% ull) kan ångstrykas. Ställ ångratten (B) i maxläge och
använd en torr pressduk.
• Blanka ställen kan undvikas på ylletyger om plagget vänds ut och in och
stryks på avigsidan.
• Sammetstyger och andra tyger som lätt blir blanka skall strykas i en
riktning, med luggen och med lätt tryck. Strykjärnet måste hela tiden
hållas i rörelse.
• Siden och syntetiska material bör strykas på avigsidan för att undvika
blanka ställen. Vatten kan ge fläckar, använd därför inte spray på siden
eller andra känsliga tyger.
Påfyllning av vatten (för ångstrykning och spray)
- Dra ut stickproppen ur vägguttaget innan du fyller vatten i strykjärnet.
Ställ ångreglaget (B) i läge O = ångan avstängd, fig 2.
• Häll vanligt kranvattnet genom påfyllningsöppningen när du använder
strykjärnet för första gången.
• Du kan också i fortsättningen använda kranvatten om dess hårdhet inte
överstiger 17°DH. Vid högre hårdhet bör du använda avhärdat eller
destillerat vatten. Använd endast destillerat eller avhärdat vatten, som
finns att köpa i slutna förpackningar.
Använd inte vatten, som du själv avhärdat med kemiska medel.
Fyll aldrig ättika, stärkelse, kemiskt avkalkat vatten eller
avkalkningsmedel i vattentanken!
- Fyll aldrig upp mer vatten än till max-markeringen, fig 3.
Inställning av temperaturen (se tabell)
- Ställ strykjärnet upprätt på parkeringshälen.
- Vrid termostatratten (A) i rätt läge enligt tvätt/strykråden i plaggen eller
enligt tabellen, fig 4.
- Sätt stickproppen i vägguttaget.
- Vänta tills den gulfärgade signallampan (E) för temperatur slocknat och
åter tänts. Därefter kan du börja stryka.
• Medan du stryker kommer den gulfärgade signallampan att tändas och
släckas upprepade gånger, vilket är normalt.
• Om du ställer termostatratten (A) till en lägre temperatur, när en högre
varit inställd, måste du vänta tills den gulfärgade signallampan först tänts
och sedan slocknat igen, annars riskerar du att skada tyget.
Page 36

36
Torrstrykning utan ånga (se tabell)
- Torrstrykning går till på samma sätt som ångstrykning men ångreglaget
(B) skall stå i läge O = ångan avstängd, fig 2.
• Sätt stickproppen i vägguttaget och välj rätt temperatur, se “Inställning
av temperaturen”.
Ångstrykning (se tabell)
• Kontrollera att det finns tillräckligt med vatten i vattentanken.
- Ställ ångreglaget (B) i rätt läge, fig 5:
Ingen ånga (O) för temperturinställningar mellan MIN och 2.
Ånga (q) för temperaturinställningar mellan 2 och 3.
Maximal ånga (w) för temperaturinställning mellan 3 och MAX.
• Tänk på att ångstrykjärn kan läcka ut vatten från stryksulan om värmen
inte är tillräcklig (2 eller lägre). Detta kan förorsaka fläckar.
• Sätt stickproppen i vägguttaget och välj rätt temperatur, se “Inställning av
temperaturen”.
Extra ånga 0 (endast på typerna HI225/226/228) (se tabell)
• Med den här finessen kan du få extra ånga när tyget är
besvärligt och skrynkligt.
• Extra ånga ska endast användas när du ställt termostatratten mellan
3 och MAX.
- Ställ ångreglaget i ångläge w, fig 6.
- Tryck och håll ratten (J) 0 intryckt (max fem sekunder), fig 7.
Släpp sedan ratten.
Vänta i minst en minut innan du använder extra ånga igen, annars
kan vatten droppa från stryksulan.
Spray T (endast typerna HI 215/216/225/226/228) (se tabell)
- Genom att trycka några gånger på sprayknappen T (C) kan tyget fuktas
vid vilken inställd temperatur som helst, fig 8.
• För att kunna spraya måste det finnas tillräckligt med vatten i
vattentanken.
Page 37

37
Självrensning 1
• Det är viktigt att regelbundet utföra självrensningen så att kalk och
smutspartiklar avlägsnas.
• Den bör utföras var fjortonde dag vid normal användning. Ju hårdare
vatten du använder ju oftare måste du avkalka.
- Ställ ångreglaget (B) till läge O (= ångan avstängd), fig 2.
- Ställ termostatratten (A) i läge MAX.
- Fyll vattentanken (G) med vatten upp till MAX-indikeringen.
- Sätt stickproppen i vägguttaget och låt strykjärnet värmas upp.
- Drag ut stickproppen ur vägguttaget när den gulfärgade signallampan
(E) slocknat.
- Håll strykjärnet i vågrätt läge över en diskho, fig 9.
- Ställ ångreglaget i självrensningsläge 1, fig 10.
Ångreglaget hoppar upp en liten bit.
- Drag upp ångreglaget en bit till, fig 10.
- Nu strömmar kokande vatten och ånga ut genom ånghålen i stryksulan.
Kalk och andra avlagringar (om det är några) spolas ut med vattnet.
Rör strykjärnet fram och tillbaka, fig 11.
- Upprepa proceduren om vattentanken fortfarande skulle innehålla
föroreningar.
- Du kan dra upp ångreglaget helt och hållet. I änden på reglaget finns
nålen som kontrollerar ångflödet, fig 12. Nu kan du ta bort eventuella
kalkavlagringar från nålen. För rengöring av nålen kan du använda
ättika.
Var försiktig så inte nålen blir böjd eller förstörd!
- Sätt tillbaka ångreglaget. Se till att nålen är exakt mitt i öppningen och
att den lilla klacken på ångreglagets sida passar in i urtaget, fig 13.
- Tryck ned ångreglaget, fig 14.
- Vrid ångreglaget till läge O, fig 2.
Fyll aldrig ättika, stärkelse, kemiskt avkalkat vatten eller
avkalkningsmedel i vattentanken!
Efter självrensning
- Sätt stickproppen i vägguttaget och låt strykjärnet värmas upp så att
stryksulan torkar.
- Drag ut stickproppen ur vägguttaget när den gulfärgade signallampan
(E) slocknar.
- Stryk med ångstrykjärnet över något gammalt tygstycke så att
stryksulan är torr innan du låter strykjärnet svalna så du kan ställa
undan det.
Page 38

38
Rengöring
- Innan rengöring, dra först ut stickproppen ur vägguttaget och låt
strykjärnet kallna.
- Beläggningar på stryksulan kan i allmänhet avlägsnas med en trasa
fuktad med vatten och diskmedel, som skall vara av icke repande slag.
Håll stryksulan slät. Skrapa aldrig med hårda metallföremål t ex
verktyg eller kniv.
- Strykjärnets överdel kan torkas av med en fuktig väl urvriden trasa.
- Då och då bör vattentanken sköljas ur. Fyll den till hälften med vatten
och skaka strykjärnet, fig 15. Häll ut vattnet, fig 16.
Förvaring
- Dra ut stickproppen ur vägguttaget.
- Töm ut allt resterande vatten ur vattentanken, fig 16.
- Ställ ångreglaget (B) i läge O, fig 2.
- Ställ ångstrykjärnet i upprätt läge och låt det kallna ordentligt.
- Sladden kan lindas upp på sladdvindan, fig 17. Låt sladden gå i en
slinga närmast sladdfästet.
- Ställ alltid ångstrykjärnet i upprätt läge på parkeringshälen, fig 18.
- Förvara ångstrykjärnet i ett säkert och torrt utrymme.
Kontrollera regelbundet att sladden är i god och säker kondition.
Titta extra noga vid infästningen i strykjärnet.
Page 39

39
Tärkeää
• Lue käyttöohje ja katsele kuvat, ennen kuin alat käyttää laitetta.
• Poista höyryraudan pohjassa mahdollisesti oleva tarra tai
suojakelmu ennen käyttöönottoa. Pyyhi pohja puhtaaksi
pehmeällä liinalla.
• Tarkasta ennen käyttöönottoa, että laitteen arvokilven
jännitemerkintä vastaa paikallista verkkojännitettä.
• Älä käytä laitetta, jos se on jollain tavoin vaurioitunut tai ei toimi
kunnolla.
• Irrota pistotulppa pistorasiasta:
- ennen kuin täytät tai tyhjennät vesisäiliön;
- ennen höyryraudan puhdistamista.
• Kun lopetat silittämisen tai poistut hetkeksikin höyryraudan
vierestä:
- aseta höyrynvalitsin asentoon O;
- aseta höyryrauta pystyyn seisontatuen varaan;
- irrota pistotulppa pistorasiasta.
• Älä kaada vesisäiliöön etikkaa, tärkkiä, kemiallisesti
puhdistettua vettä tai kalkinpoistoaineita.
• Pidä huoli, ettei liitosjohto kosketa höyryraudan kuumaa pohjaa.
• Höyryraudasta tuleva höyry on kuumaa ja siten vaarallista.
Älä koskaan suuntaa höyryä ketään ihmistä kohti.
• Säilytä höyryrauta aina varmassa kuivassa paikassa
pystyasennossa.
• Älä upota höyryrautaa veteen.
• Jotkut höyryraudan osat on öljytty ja siksi höyryraudasta
saattaa lähteä hieman käryä ensimmäisellä käyttökerralla.
Tämä loppuu kuitenkin nopeasti.
• Laitetta ei ole tarkoitettu lasten tai heikkokuntoisten henkilöiden
käyttöön ilman valvontaa.
• Pieniä lapsia on pidettävä silmällä, etteivät ne pääse leikkimään
laitteella.
• Tarkasta liitosjohdon kunto säännöllisesti. Jos tämän laitteen
verkkoliitosjohto vaurioituu, se on korvattava erikoisjohdolla.
Ota yhteys lähimpään Philips-myyjään tai Philips
Kodinkoneiden valtuuttamaan huoltoliikkeeseen.
Suomi
Page 40

40
• Älä irrota pistotulppaa pistorasiasta johdosta vetämällä.
• Älä jätä laitetta lasten ulottuville.
• Jos laite on pudonnut veteen, irrota ensin pistotulppa
pistorasiasta, ennen kuin nostat laitteen vedestä.
• Tarkastuta veteen pudonnut laite huollossa ennen
käyttöönottoa.
• Älä käytä laitetta epävarmalla työtasolla.
• Älä taivuta liitosjohtoa tiukalle mutkalle.
• Pidä huoli, etteivät terävät kulmat, kuumuus tai kemikaalit pääse
vahingoittamaan liitosjohtoa.
• Anna höyryraudan jäähtyä ennen kuin laitat sen säilytykseen.
Laitteen osat (kuva 1)
A Lämpötilanvalitsin
B Höyrynvalitsin
O = ei höyryä
q = höyryä
w = eniten höyryä
1 = itsepuhdistus
C Suihkutuspainike T (mallit HI 215/216/225/226/228)
D Suihkutussuutin (mallit HI 215/216/225/226/228)
E Lämpötilan merkkivalo (keltainen)
F Täyttöaukko
G Vesisäiliö
H Arvokilpi
I Liitosjohto
J Lisähöyry 0 (mallit HI 225/226/228)
Silityslämpötila
• Noudata aina vaatekappaleessa olevaa silitysohjetta. Jos silitysohjetta ei
ole, mutta tunnet tekstiilin laadun, katso silloin taulukosta.
• Taulukko koskee varsinaista valmistusmateriaalia eikä mahdollisesti
käytettyä pintakäsittelyä, kiiltoa yms. Materiaalit, joihin on käytetty jotain
pintakäsittelyä (kiiltoa, rypistystä, kohokuviointia yms.), on paras silittää
käyttäen hieman alempaa lämpötilaa.
• Lajittele vaatteet ensin silityslämpötilan mukaan: villaiset yhteen,
puuvillaiset yhteen jne.
Page 41

41
• Höyryrauta kuumenee nopeammin kuin se jäähtyy. Silittäminen
kannattaa sen tähden aloittaa alinta lämpötilaa vaativista vaatteista,
esim. tekokuituisista.
• Jos vaatteissa on käytetty erilaisia materiaaleja, on lämpötila valittava
alinta lämpötilaa vaativan materiaalin mukaan. Esimerkiksi vaate, joka
sisältää “60 % polyesteriä ja 40 % puuvillaa”, on silitettävä polyesterin
lämpötilan mukaan (1) ja ilman höyryä.
• Ellet tunne vaatekappaleen materiaalia, kokeile silitystä varovasti jostain
sellaisesta kohdasta, joka ei näy. Aloita matalasta lämpötilasta.
• Villavaatteet (100 % villaa) voidaan silittää höyryasennolla.
Valitse mieluiten suurin lämpötila ja käytä kuivaa silitysliinaa.
Taulukko
C
Villa
q
Silitys-
ohje
Tekstiili Lämpötilan-
valitsin
Höyryn-
valitsin
Lisähöyry Suihkutus
B
Tekokuidut
esim.:
akryyli,
polyamidi
(nailon),
polyesteri,
viskoosi.
Silkki
O
0
X
D
Puuvilla
Pellava
MIN
AA
AA
11
AA
AA
AA
AA
AA
AA
22
AA
AA
33
MAX
w 0
Extra
T
Z
Huom. Merkki Z tarkoittaa:
“Tätä vaatetta ei voi silittää!”
Extra
Page 42

42
• Villakangas alkaa silitettäessä helposti kiiltää. Vaate kannattaa kääntää
nurinpäin ja silittää nurjalta puolelta.
• Sametti ja muut helposti kiiltävät materiaalit kannattaa silittää vain yhteen
suuntaan ja vain kevyesti painaen. Pidä höyryrauta koko ajan liikkeessä.
• Silitä tekokuidut ja silkki nurjalta puolelta, etteivät ne ala kiiltää. Älä käytä
suihkutusta, ettei tule läikkiä.
Vesisäiliön täyttö (höyrysilitystä ja suihkutusta varten)
- Irrota pistotulppa pistorasiasta ennen vesisäiliön täyttämistä
(tai tyhjentämistä). Aseta höyrynvalitsin (B) asentoon O
(= ei höyryä) (kuva 2).
• Täytä vesisäiliö ensimmäisellä kerralla vesijohtovedellä.
• Voit käyttää vesijohtovettä myös ensimmäisen kerran jälkeen.
Vain jos vesi on erittäin kovaa, on parempi käyttää tislattua vettä.
Älä kaada vesisäiliöön etikkaa, tärkkiä, kemiallisesti puhdistettua
vettä tai kalkinpoistoaineita.
- Täytä vesisäiliö enintään MAX-merkkiin asti (kuva 3).
Lämpötilan valinta (ks. taulukko)
- Aseta höyryrauta pystyyn seisontatuen varaan.
- Aseta lämpötilanvalitsin (A) oikeaan asentoon (kuva 4).
- Työnnä pistotulppa pistorasiaan.
- Voit aloittaa silittämisen, kun keltainen merkkivalo (E) on ensin
sammunut ja syttynyt uudelleen.
• Keltainen merkkivalo (E) syttyy ja sammuu aina välillä silittämisen
aikana.
• Jos asetat lämpötilanvalitsimen (A) alemmalle lämpötilalle silitettyäsi
ensin korkeammalla lämpötilalla, älä ala silittää ennen kuin keltainen
merkkivalo (E) on syttynyt ja sammunut uudelleen. Ellet odota
merkkivalon sammumista, silitettävä vaate saattaa kärventyä.
Silittäminen ilman höyryä (ks. taulukko)
- Aseta höyrynvalitsin (B) asentoon O (= ei höyryä) (kuva 2).
• Ala käyttää höyryrautaa kohdassa Lämpötilan valinta neuvotulla
tavalla.
Page 43

43
Höyrysilitys (ks. taulukko)
• Varmista, että vesisäiliössä on riittävästi vettä.
- Aseta höyrynvalitsin (kuva 5):
Ei höyryä -asento (O) lämpötiloille MIN - 2.
Höyryasento (q) lämpötiloille 2 - 3.
Suurin höyryasento (w) lämpötiloille 3 - MAX.
• Vettä voi valua pohjasta, jos on valittu liian matala lämpötila
(2 tai alempi).
• Ala käyttää höyryrautaa kohdassa Lämpötilan valinta neuvotulla tavalla.
Lisähöyry 0 (mallit HI 225/226/228) (ks. taulukko)
• Tämän lisähöyryn avulla voidaan poistaa itsepäisiä laskoksia.
• Käytä lisähöyryä vain lämpötiloissa 3 - MAX.
- Aseta höyrynvalitsin höyryasentoon w (kuva 6).
- Pidä lisähöyrypainiketta (J) 0 painettuna (enintään 5 sekuntia) (kuva 7).
Vapauta sitten painike.
Odota vähintään 1 minuutti, ennen kuin painat painiketta
uudelleen, ettei vettä tipu pohjasta.
Suihkutus T (mallit HI 215/216/225/226/228) (ks. taulukko)
- Itsepäiset laskokset voidaan poistaa kaikissa lämpötiloissa painamalla
suihkutuspainiketta T (C) pari kertaa, niin että vaatteet kostuvat (kuva 8).
• Varmista että vesisäiliössä on riittävästi vettä.
Itsepuhdistus 1
• Höyryraudassa on itsepuhdistustoiminto kalkin ja muiden
epäpuhtauksien poistamiseen.
• Käytä itsepuhdistusta kahden viikon välein. Mitä kovempaa käytetty
vesi on, sitä useammin höyryrauta tulisi puhdistaa.
- Aseta höyrynvalitsin (B) asentoon O (kuva 2).
- Aseta lämpötilanvalitsin (A) asentoon MAX.
- Kaada vesisäiliöön (G) vettä MAX-merkkiin asti.
- Työnnä pistotulppa pistorasiaan. Anna höyryraudan kuumentua.
Page 44

44
- Kun keltainen merkkivalo (E) sammuu, irrota pistotulppa pistorasiasta.
- Pidä höyryrautaa vaakasuorassa pesualtaan päällä (kuva 9).
- Aseta höyrynvalitsin asentoon 1 (itsepuhdistus) (kuva 10).
Höyrynvalitsin nousee hieman ylöspäin.
- Vedä höyrynvalitsinta vielä hieman ylemmäs (kuva 10).
- Pohjan höyryaukoista alkaa tulla kuumaa vettä ja höyryä.
Samalla epäpuhtaudet ja kalkki (jos niitä on) huuhtoutuvat pois.
- Toista itsepuhdistustoimenpide, jos epäpuhtauksia huuhtoutuu ulos
paljon.
- Heiluta höyryrautaa samalla edestakaisin (kuva 11).
- Voit vetää höyrynvalitsinta vielä ylemmäs, niin että voit poistaa
neulaventtiilin (kuva 12). Nyt neulaventtiili voidaan puhdistaa
mahdollisesta kalkista. Tähän voi käyttää etikkaliuosta.
Varo taivuttavasta tai vahingoittamasta neulaventtiiliä!
- Aseta neulaventtiili takaisin höyrynvalitsimeen. Työnnä kärki aivan
aukon keskelle ja sovita pieni uloke sivussa olevaan koloon (kuva 13).
- Paina höyrynvalitsinta (kuva 14).
- Aseta höyrynvalitsin asentoon O (kuva 2).
Älä laita vesisäiliöön etikkaa, tärkkiä, kemiallisesti puhdistettua
vettä tai kalkinpoistoaineita!
Itsepuhdistuksen jälkeen
- Liitä höyryrauta pistorasiaan, niin että sen pohja kuivuu.
- Kun keltainen merkkivalo (E) sammuu, irrota pistotulppa pistorasiasta.
- Liikuta höyryrautaa hitaasti käytetyn kankaanpalan päällä, niin että
vesitahrat häviävät. Anna höyryraudan jäähtyä ennen säilytystä.
Puhdistus
- Irrota pistotulppa pistorasiasta ja anna höyryraudan jäähtyä ennen
puhdistusta.
- Pohjaan tarttunut kalkki tai lika voidaan poistaa kostealla liinalla ja
naarmuttamattomalla (nestemäisellä) puhdistusaineella.
Varo pohjan naarmuuntumista: pohja ei saisi koskettaa metallia.
- Höyryraudan vaippa voidaan pyyhkiä kostealla liinalla.
- Puhdista vesisäiliö silloin tällöin täyttämällä vesisäiliö vedellä ja
ravistelemalla höyryrautaa (kuva 15). Kaada sitten vesi pois (kuva 16).
Page 45

45
Säilytys
- Irrota pistotulppa pistorasiasta.
- Kaada vesisäiliöön jäänyt vesi pois (kuva 16).
- Aseta höyrynvalitsin (B) asentoon O (kuva 2).
- Aseta höyryrauta pystyyn seisontatuen varaan ja anna jäähtyä
riittävästi.
- Liitosjohto voidaan kiertää johtokelan ympärille (kuva 17).
- Säilytä höyryrauta pystyasennossa seisontatuen varassa (kuva 18).
- Pidä höyryrauta varmassa kuivassa paikassa.
Oikeus muutoksiin varataan.
Page 46

46
4
5
6
7
8
10
9
11
12
13
14
15
18
17
16
Page 47

47
Page 48

4239 000 44532u
 Loading...