

Page 1
HI 216
English
IMPORTANT - READ BEFORE USE
Before first use:
1 Read these instructions for use and look at the illustrations
before you start using the appliance.
2 Remove any sticker or protective foil from the soleplate.
Clean the soleplate with a soft cloth.
3 Check if the voltage rating on the type plate corresponds to
the mains voltage in your home before you connect the
appliance.
• Use an earthed wall socket.
• Some parts of the iron have been slightly greased. This may
cause the iron to give off some smoke when you switch it
on for the first time. After a short while, however, this will
cease.
For optimal safety:
• Never leave the iron unattended when it is connected to
the mains.
• When you have finished ironing and also when you leave
the iron even for a short while: set the steam control to
position O, put the iron on its heel and remove the mains
plug from the wall socket.
• Young and infirm persons should not be allowed to use the
appliance without supervision.
• Keep an eye on children to make sure that they do not play
with the appliance.
• The soleplate of the iron can become extremely hot and
may cause burns if touched.
• Do not allow the cord to come into contact with the
soleplate when it is hot.
• Do not unplug the iron by pulling on the supply cord.
• Always unplug the appliance before filling/emptying the
water tank and before cleaning the iron.
• Regularly check if the mains cord is still undamaged and
safe.
• Never use the appliance if it is damaged in any way.
• If the mains cord of this appliance is damaged, it may only
be replaced by Philips or their service representative, as
special tools and/or parts are required.
To protect your iron:
• Always put the iron on a flat, stable area to prevent the
iron from toppling over (avoid putting it on the edges of
the ironing board or table).
• Make sure that the power cord does not obstruct any
passage.
• Never immerse the iron in water.
• To avoid scratching your soleplate, always rest the iron on
its heel.
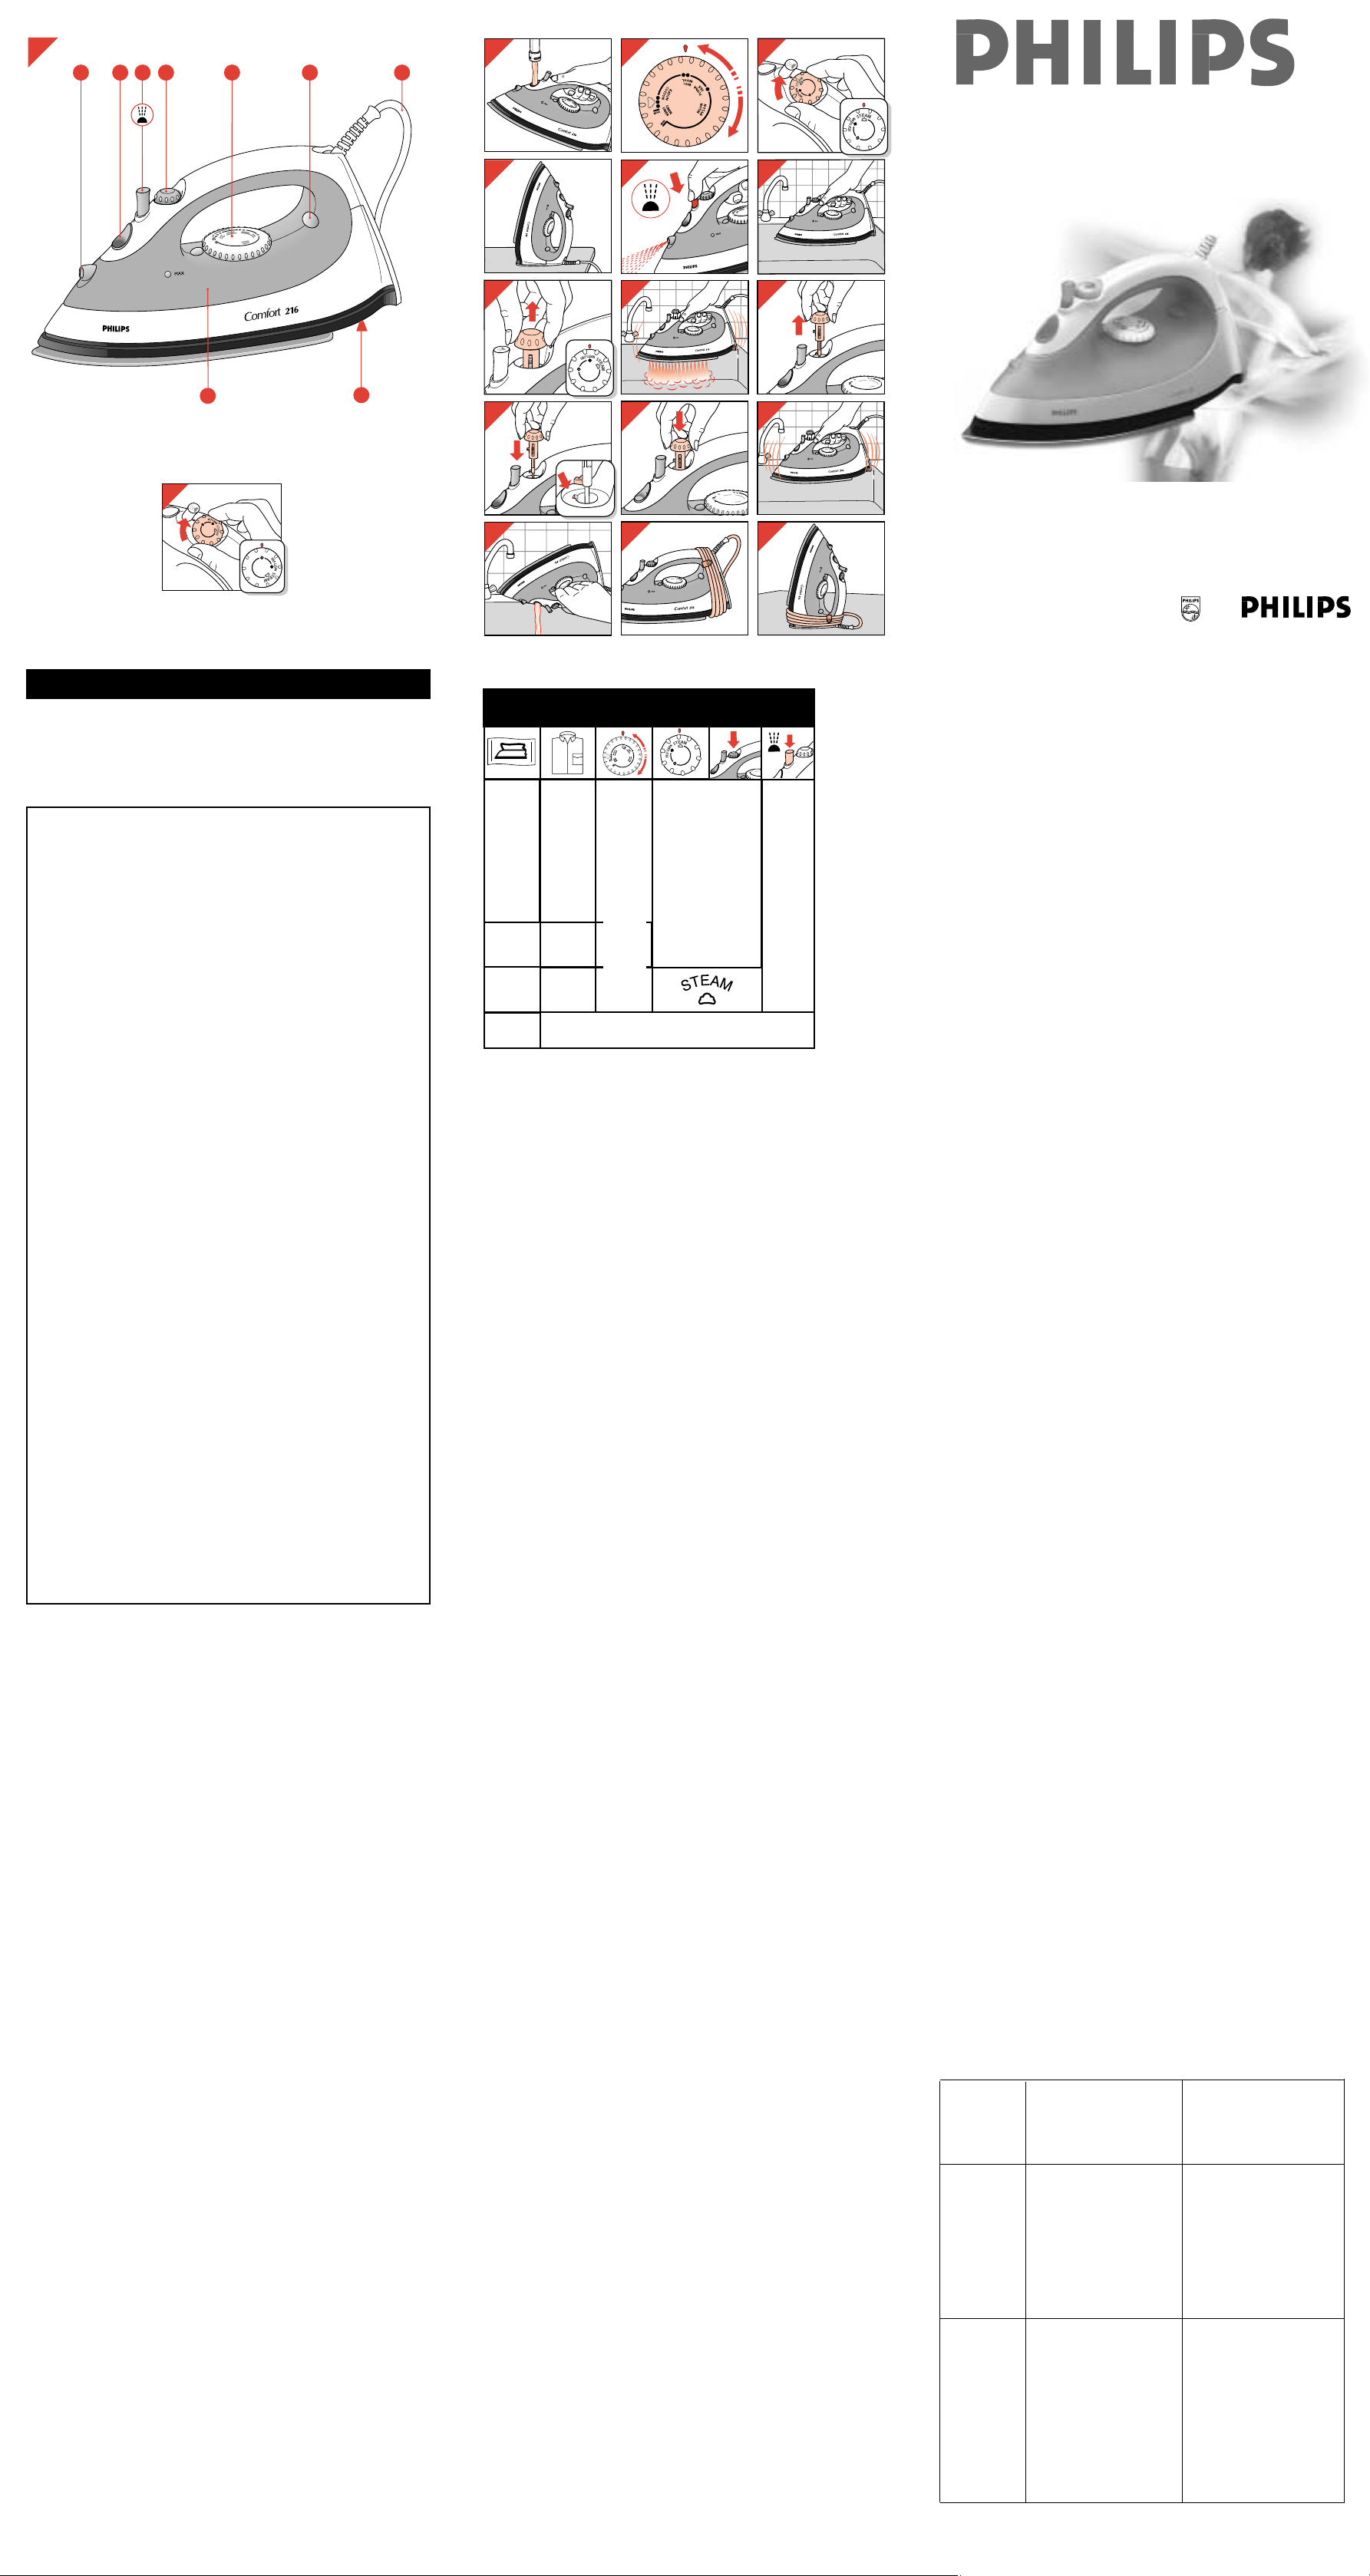
General description (fig. 1)
A Temperature control dial
B Steam control dial
R = steam
O = no steam
1 = self-clean
C Spray button T
D Spray nozzle
E Temperature pilot light (amber)
F Water filling opening
G Water reservoir
H Type plate
I Cord
Ironing temperature guide
• Follow the ironing instructions on the garment label. If these
instructions are missing but you do know the kind of fabric, consult
the table.
• This table is only valid for plain fabrics and not for materials to which
finishes, glosses etc. have been applied. Textile to which some kind
of finish has been applied (gloss, crinkle, relief etc.) is best ironed at
lower temperatures.
• First sort the laundry according to ironing temperature: put wool
with wool, cotton with cotton, etc.
• The iron heats up more quickly than it cools down. Therefore, start
ironing articles that need to be ironed at the lowest temperature,
such as those made of synthetic fibres.
• If the fabric consists of various kinds of fibres, always select the
temperature required by the most delicate fibre, i.e. the lowest
temperature. If, for example, an article consists of 60% polyester and
40% cotton, it should be ironed at the temperatur indicated for
polyester (1 on temperature dial (A)) and without steam.
• If you do not know what kind(s) of fabric(s) the article is made of,
find out the appropriate temperature by ironing a piece of material
that will not be visible when you wear or use the article and start
ironing at a relatively low temperature.
• Pure woollen fabrics (100% wool) may be pressed with the iron set
to a steam position. It is advisable to set the steam control (B) to
maximum position and to use a dry pressing cloth.
• When steam-ironing woollen fabrics, shiny patches may occur. You
can prevent this by turning the article inside out and ironing the
reverse side.
• Velvet and other fabrics which tend to acquire shiny spots should be
ironed in one direction only (along with the nap) while applying very
little pressure.
Always keep the appliance moving while ironing.
• To prevent shiny spots, articles made of synthetic material or silk
should be ironed inside out. Do not use the spray function, as
spraying could cause stains.
Cleaning
- Before cleaning remove the mains plug from the wall socket and
allow the iron to cool down sufficiently.
- Scale and other stains can be wiped off the soleplate with a damp
cloth and a non-abrasive (liquid) cleaner.
Keep the soleplate smooth: avoid hard contact with metal
objects.
- The upper part of the appliance can be cleaned with a damp cloth.
- From time to time clean the inside of the water reservoir by filling
with water and shaking (fig. 14). Then pour the water back out
(fig. 15).
Storage
1 Remove the mains plug from the wall socket.
2 Pour any remaining water out of the water reservoir (fig. 15).
3 Set the Steam control (B) to position O (fig. 2).
4 Stand the iron upright and let it cool down sufficiently.
5 Wind the mains cord around the cord storage (fig. 16).
6 Always store the iron standing on its heel (fig. 17).
7 Always keep the iron in a safe dry place.
Important: Regularly check if the mains cord is still in a
good and safe condition.
1
H
A
E I
B
F
D C
G
2
7
9
8
10
11
12
13 14
17
6
1615
5
4
3
Filling with water (for steam-ironing and spraying)
1 Unplug the iron before you fill it (or before you pour out the
remaining water). Set the steam control (B) to position
O (= no steam) (fig. 2).
2 Fill the iron with normal tap water when using it for the first time.
3 For refilling, you can also use tap water. However, if the water is
very hard, it is advisable to use distilled water.
Do not put vinegar, starch, chemically descaled water or
descaling agents in the water reservoir!
4 Pour water into the filling aperture to the maximum (max) level
(fig. 3).
Setting the temperature (see fabric table)
1 Put the iron on its heel.
2 Set the temperature control (A) to the correct ironing temperature
(fig. 4).
3 Insert the mains plug into the wall socket.
4 The iron is ready to be used after the amber temperature pilot light
(E) has first gone off and then come on again.
• The amber pilot light (E) will come on from time to time during
ironing.
• If you set the temperature control (A) to a lower setting after
ironing at a high temperature, do not resume ironing until after the
amber pilot light (E) has come on and has gone off again. If you don’t
wait for the light to go out again, you run the risk of scorching the
fabric.
Ironing without steam (see fabric table)
- Set the Steam control (B) to position O (= no steam) (fig. 2).
• For more details on how to switch on the iron, see the section
headed “Setting the temperature”.
Steam-ironing R (see fabric table)
• Make sure there is enough water in the water reservoir.
1 Set the temperature control at 3 to MAX (see the chapter
‘Setting the temperature’).
2 After the amber pilot light (E) has gone out, set the steam control
(B) to steam R (fig. 5).
3 Rest the iron on its heel in between ironing (fig. 6).
• Water may leak from the soleplate if a too low temperature (lower
than 3) has been selected.
• If the temperature dial (A) is set to 3 but you notice water
leaking from the soleplate, rest the iron on its heel and wait until the
pilot light (E) goes off, before ironing again.
• For more details on how to switch on the iron, see the section
headed “Setting the temperature”.
Spraying T (see fabric table)
- To remove stubborn creases from fabrics at any temperature, push
the spray button T (C) a couple of times to damp the laundry (fig. 7).
• Make sure there is enough water in the water reservoir.
Self-cleaning 1 (fig. 9)
• The iron has a self-clean function to remove scale and impurities.
• Use the self-clean function once every two weeks. If the water used
is very hard, you should use the self-clean function more often.
1 Set the Steam control (B) to position O (fig. 2).
2 Set the temperature control dial (A) to MAX.
3 Fill the water reservoir (G) to maximum (MAX) level.
4 Plug in the iron to the mains, allow the iron to heat up.
5 When the amber pilot light (E) goes off, unplug the iron.
6 Hold the appliance horizontally over a sink (fig. 8).
7 Set the steam control to position 1 (self clean) (fig. 9).
The steam control will then spring up slightly.
8 Pull the steam control up slightly (fig. 9).
Boiling water and steam will now come out of the holes in the
soleplate.
Impurities and scale (if any) are washed away with it.
9 Move the iron forwards and backwards while this happens (fig. 10).
Repeat self-clean if a lot of impurities are flushed out.
- You can pull the steam control further upwards to remove the
steam control needle (fig. 11). It is then possible to remove any scale
from the needle. For this purpose you may use vinegar.
Avoid bending or damaging the steam control needle!
10 Replace the steam control needle. Insert the point of the needle
exactly in the centre of the aperture and fit the small notch at the
side into the spacing (fig. 12).
11 Press the steam control (fig. 13).
12 Set the steam control to position O (fig. 2).
Do not put vinegar, starch, chemically descaled water or
descaling agents in the water reservoir.
After self-cleaning
1 Plug the iron into the mains to dry up the soleplate.
2 When the amber pilot light (E) goes off, unplug the iron.
3 Move the iron gently over a piece of used cloth to remove water
stains. Cool down the iron for storage.
THANK YOU for purchasing a Philips high quality steam iron.
For an optimal, long lasting and enjoyable use of this iron, please take the
time to read carefully through this instruction for use. Additionally, we added
several notes to help you to optimise your ironing time and take care of your
fabrics.
Trouble shooting guide
When encountering problems with your iron, before contacting our
service centre, please check with the below table first. The table
summarise the most common problems that you could encounter with
your iron. Please also refer to the different chapters for further
details.
If the problem cannot be solved, please contact the nearest Philips
Service Centre or their representatives. For telephone numbers: see
the worldwide guarantee leaflet.
Problem
The iron is
plugged in but the
soleplate is cold.
No steam.
Water drips from
the soleplate
- during ironing:
- after storage:
Possible cause(s)
- Connection problem.
- The temperature dial is in MINposition.
- Not enough water in the water
tank.
- Steam dial set at position O.
- Temperature too low.
- Scale has built up and blocks the
steam vents.
- The iron is not hot enough
- Iron has been store flat with
water remaining in the water
tank
Solution
- Check the plug and mains.
- Set the temperature dial to the
correct temperature for your
fabric (1, 2 or 3).
- Fill the water tank.
- Read the “Steam ironing”-chapter.
- Set to the steam area (3 to
MAX), rest the iron on its heel
and wait until the pilot light goes
off before ironing again.
- Follow the steps in the chapter
“Self-cleaning”.
- Rest the iron on its heel and wait
until the pilot light goes off before
ironing again.
- Before storage, pour out the
remaining water in the water tank
to avoid leakage from the
soleplate holes. Set the steam dial
to O and store the iron upright
on its heel.
B
C
D
Z
Synthetic
fibres, e.g.
acryl,
viscose,
polyamide
(nylon),
polyester
Silk
Wool
Cotton
Linen
T
Please note that Z on the label means:
“This article cannot be ironed!”
Fabric table
Instructions
on label
Fabric Temperature
control
Steam
control
Spray
MIN
A
A
1
A
A
A
A
A
A
2
A
A
3
MAX
O
u
4239 000 45852
Page 2
Bahasa Indonesia
PENTING – BACALAH SEBELUM MENGGUNAKAN
Sebelum penggunaan yang pertama kali:
1 Bacalah petunjuk dengan baik dan perhatikan ilustrasi
gambar sebelum anda mulai menggunakan alat ini.
2 Cabut stiker atau lapisan pelindung dari soleplate (bagian
bawah dari setrika). Bersihkan soleplate dengan kain halus.
3 Sebelum menghubungkan alat ke listrik, periksalah voltase
yang tercantum pada typeplate apakah sudah sesuai dengan
voltase utama di rumah anda.
• Gunakan stop kontak yang mempunyai arde (penangkal
petir).
• Beberapa bagian dari setrika sudah diberi minyak pelumas,
oleh karena itu setrika akan mengeluarkan asap ketika
pertama kali dihubungkan ke listrik. Asap tersebut akan
menghilang setelah beberapa saat.
Untuk keamanan yang optimal
• Jangan meninggalkan setrika tanpa pengawasan ketika
masih dihubungkan ke listrik.
• Bila anda sudah selesai menyetrika dan setrika tersebut
akan ditinggalkan walau hanya sebentar, setel pengatur uap
pada posisi O, letakkan dengan posisi tegak lurus dan
lepaskan steker dari stop kontak.
• Anak di bawah umur atau orang yang berfisik lemah tidak
boleh menggunakan alat ini tanpa pengawasan.
• Hindari alat dari jangkauan anak-anak.
• Soleplate akan menjadi panas sekali. Jangan pegang! karena
dapat mengakibatkan luka bakar.
• Kabel jangan bersentuhkan dengan soleplate yang panas.
• Jangan mencabut steker dari stop kontak dengan cara
menarik kabel.
• Selalu mencabut steker sebelum mengisi/mengosongkan
wadah air dan sebelum membersihkan setrika.
• Periksalah secara teratur bahwa kabel tidak rusak dan
aman untuk digunakan.
• Jangan menggunakan alat bila salah satu
bagian/komponennya ada yang rusak.
• Kabel yang rusak hanya dapat diganti oleh Philips atau
perwakilan service Philips karena diperlukan
peralatan/spare part yang khusus.
Untuk melindungi setrika anda
• Selalu meletakkan setrika pada tempat yang rata dan stabil
agar tidak jatuh (jangan meletakkannya pada tepi papan
setrika/meja).
• Pastikan kabel tidak menghalangi jalannya setrika.
• Jangan merendam setrika dalam air.
• Untuk menghindari goresan pada soleplate, selalu letakkan
setrika dengan posisi tegak lurus.
Gambaran umum (gb. 1)
A Tombol pengatur suhu
B Tombol pengatur uap
R = uap
O = tidak beruap
1 = pembersih otomatis
C Tombol penyemprot air T
D Pipa penyemprot air
E Lampu temperatur (cahaya kuning)
F Lubang pengisian air
G Wadah penyimpan air
H Type plate
I Kabel
Petunjuk pengaturan suhu
• Ikuti petunjuk cara menyetrika yang terdapat pada label pakaian anda.
• Jika petunjuk tersebut hilang/tidak ada tetapi anda mengetahui jenis
kainnya, lihatlah tabel.
• Tabel ini hanya berlaku untuk jenis kain biasa dan bukan untuk bahan
yang diproses lebih lanjut seperti kerut/prisket, embos, dsb. Jenis kain
tersebut (kerut/prisket, embos, dsb) paling baik disetrika dengan
suhu rendah.
• Pertama-tama sortir pakaian menurut suhu setrika: wol dengan wol,
katun dengan katun, dsb.
• Setrika lebih cepat panas daripada dingin. Oleh karena itu mulailah
menyetrika kain yang harus disetrika dengan suhu terendah lebih
dahulu seperti kain yang terbuat dari serat.
• Jika kain terdiri dari beberapa jenis serat, pilihlah selalu suhu yang
dibutuhkan oleh serat lembut yaitu suhu terendah. Misalnya, kain
mengandung 60% polyester dan 40% katun, maka harus disetrika
sesuai temperatur untuk polyester (1 pada tombol suhu (A)) dan
tanpa uap.
• Jika anda tidak mengetahui jenis kainnya, carilah suhu yang tepat
dengan menyetrika sedikit bagian dari pakaian dimana bagian tersebut
tidak akan terlihat bila anda memakainya dan setrikalah dengan suhu
yang relatif rendah.
• Untuk menyetrika kain yang berbahan wol 100%, setrika disetel pada
posisi uap. Disarankan untuk menyetel pengatur uap (B) pada posisi
maksimum dan menyetrika tanpa uap.
• Bila menyetrika bahan wol, ada bagian-bagian yang menjadi mengkilap.
Untuk mencegahnya, balikkanlah bagian dalam pakaian keluar dan
setrikalah.
• Beludru dan bahan lainnya yang cenderung meninggalkan bagian yang
mengkilap bila disetrika, harus disetrika satu arah (sesuai dengan
serat) dengan sedikit tekanan.
• Setrika harus selalu digerakkan bila sedang menyetrika.
• Untuk mencegah timbulnya bagian yang mengkilap pada kain yang
terbuat dari bahan sintetis atau sutera, maka balikkan keluar bagian
dalam pakaian dan setrikalah. Jangan menggunakan penyemprot
karena dapat meninggalkan noda.
Setelah membersihkan
1 Pasang steker di stop kontak untuk mengeringkan soleplate.
2 Ketika lampu (E) mati, cabut steker.
3 Gerakkan setrika di atas kain untuk menghilangkan air. Dinginkan
setrika untuk disimpan.
Membersihkan
- Sebelum membersihkan cabut steker terlebih dulu dari stop kontak
dan biarkan setrika sampai cukup dingin.
- Kotoran dan noda lainnya pada soleplate dapat dibersihkan dengan
kain lembab dan pembersih cair
Jagalah agar soleplate tetap licin: hindari kontak dengan
benda terbuat dari baja/logam.
- Bagian atas dari setrika dapat dibersihkan dengan kain lembab.
- Bersihkan secara teratur bagian dalam dari wadah air dengan cara
mengisinya dengan air lalu mengocoknya (gb. 14). Lalu buanglah air
dengan membalikkan setrika (gb. 15).
Penyimpanan
1 Cabut steker dari stop kontak.
2 Buanglah air yang tersisa dari wadah air.
3 Setel pengatur uap (B) di posisi O (gb. 2).
4 Letakkan setrika tegak lurus dan biarkan setrika menjadi dingin.
5 Lilitkan kabel di sekeliling tempat kabel (gb. 16).
6 Selalu meletakkan setrika tegak lurus (gb. 17)
7 Simpanlah setrika di tempat kering dan aman.
Penting: Periksalah secara teratur bahwa kabel selalu dalam
keadaan baik dan aman untuk digunakan.
1
H
A
E I
B
F
D C
G
2
7
9
8
10
11
12
13 14
17
6
1615
5
4
3
Mengisi air (untuk uap dan semprot)
1 Cabut steker dari stop kontak sebelum anda mengisinya dengan air
(atau sebelum membuang sisa air). Setel pengatur uap (B) di posisi O
(= tanpa uap) (gb. 2).
2 Isilah setrika dengan air keran pada saat akan digunakan pertama kali.
3 Untuk pengisian ulang, anda juga dapat menggunakan air keran. Bila
air banyak mengandung zat kapur, disarankan untuk menggunakan air
suling.
Jangan memasukkan cuka, kanji, air yang dimurnikan secara
kimia atau zat kimia pemurni air lainnya!
4 Tuangkan air ke dalam wadah melalui lubang pengisian air sampai
batas maksimum (MAX) (gb. 3).
Mengatur suhu (lihat tabel jenis kain)
1 Letakkan setrika tegak lurus.
2 Setel pengatur suhu (A) ke posisi yang dibutuhkan (gb. 4).
3 Pasang steker pada stop kontak.
4 Setrika siap digunakan setelah lampu (E) mati dan kemudian menyala
kembali.
• Lampu (E) akan mati dan menyala secara otomatis selama
menyetrika.
• Bila anda menyetel pengatur suhu (A) ke tingkat yang lebih rendah
sesudah menyetrika dengan suhu tinggi, tunggulah sampai lampu
menyala dan mati lagi kemudian barulah menyetrika kembali. Jika
anda langsung menyetrika tanpa menunggu lampu mati, dapat
mengakibatkan kain rusak.
Menyetrika tanpa uap (lihat tabel jenis kain)
- Setel pengatur uap (B) di posisi O (= tanpa uap) (gb. 2).
• Untuk lebih jelasnya mengenai bagaimana menyalakan setrika, lihatlah
bagian “Mengatur Temperatur”.
Menyetrika dengan uap R (lihat tabel jenis kain)
• Pastikan air dalam wadah cukup.
1 Setel pengatur suhu pada 3 sampai MAX (lihat bagian ‘Mengatur
temperatur’).
2 Setelah lampu (E) mati, setel pengatur uap (B) di tanda R (gb. 5).
3 Letakkan setrika tegak lurus (gb. 6).
• Air bocor dari soleplate jika memilih suhu yang terlalu rendah (lebih
rendah dari 3).
• Jika pengatur suhu (A) sudah disetel pada 3 tapi air menetes dari
soleplate, letakkan setrika tegak lurus dan tunggu sampai lampu (E)
mati sebelum menyetrika kembali.
• Untuk lebih jelasnya mengenai bagaimana menyalakan setrika, lihat
bagian “Mengatur Temperatur”.
Menyemprot T (lihat tabel jenis kain)
- Untuk lipatan/kusut yang sulit dihilangkan, tekan tombol semprot T
(C) beberapa kali untuk melembabkan kain (gb. 7).
• Pastikan air dalam wadah cukup.
Pembersih otomatis 1 (gb. 9)
• Setrika ini mempunyai fungsi pembersih otomatis untuk
menghilangkan kerak dan kotoran.
• Gunakan fungsi pembersih otomatis setiap 2 minggu sekali. Jika air
yang digunakan adalah air sadah (air yang banyak mengandung zat
kapur), maka fungsi pembersih otomatis tersebut harus lebih sering
digunakan.
1 Setel pengatur uap (B) di posisi O (gb. 2).
2 Setel pengatur suhu (A) di MAX.
3 Isilah wadah air (G) sampai batas maksimum (MAX).
4 Pasang steker di stop kontak, biarkan setrika panas.
5 Bila lampu (E) mati, cabut steker.
6 Pegang setrika dengan posisi horizontal/mendatar di atas bak cuci
(gb. 8).
7 Setel pengatur uap di posisi 1 (pembersih otomatis) (fig. 9).
Tombol pengatur uap akan naik sedikit.
8 Tarik tombol pengatur uap keatas (gb. 9).
Air panas dan uap akan keluar melalui lubang-lubang yang terdapat
pada soleplate.
Kotoran-kotoran dan kerak (bila ada) akan terbawa keluar.
9 Gerakkanlah setrika ke depan dan ke belakang (gb. 10).
Ulangi fungsi pembersih jika masih banyak kotoran yang keluar.
- Anda dapat menarik tombol pengatur uap dan mencabut jarumnya
(gb. 11) sehingga kotoran yang terdapat pada jarum dapat
dibersihkan. Anda dapat memggunakan cuka untuk
membersihkannya.
Jangan membengkokkan/merusak jarum pengatur uap.
10 Taruh kembali jarum tombol pengatur uap. Masukkan jarum tepat
di lubang (gb. 12).
11 Tekan tombol pengatur uap (gb. 13).
12 Setel pengatur uap di posisi O (gb. 2).
Jangan memasukkan cuka, kanji, air yang dimurnikan
secara kimia atau zat kimia pemurni air lainnya ke dalam
wadah air.
Terima kasih atas kepercayaan anda untuk membeli steam iron Philips.
Untuk pemakaian yang optimal, tahan lama dan nyaman, bacalah petunjuk
pemakaian dengan seksama. Disamping itu kami tambahkan pula
beberapa tips untuk membantu mengoptimalkan waktu menyetrika anda
dan merawat pakaian-pakaian anda.
Petunjuk mengatasi masalah
Bila ada masalah dengan setrika anda, sebelum menghubungi pusat
service kami, telitilah tabel di bawah ini.
Tabel ini terdiri dari beberapa masalah umum yang anda jumpai.
Jika masalah tidak dapat diatasi, hubungi Pusat Service Philips atau
perwakilannya. Nomor telepon bisa dilihat pada kartu garansi.
Masalah
Setrika sudah
dihubungkan ke
listrik tetapi
soleplate tetap
dingin
Tidak ada uap.
Air menetes dari
soleplate
- selama
menyetrika:
- setelah disimpan:
Kemungkinan penyebab
timbulnya masalah
- Masalah sambungan
- Pengatur suhu berada di posisi
MIN
- Air yang terdapat di wadah tidak
cukup.
- Pengatur uap berada di posisi O.
- Suhu terlalu rendah.
- Kotoran menyumbat lubang uap
pada soleplate.
- Setrika kurang panas
- Setrika ditaruh mendatar dengan
air masih tersisa dalam wadah.
Solusi
- Periksalah steker dan kabel.
- Setel pengatur suhu dan sesuaikan
dengan jenis kain (1, 2 or 3).
- Isilah wadah air.
- Bacalah bagian “Menyetrika
dengan uap”.
- Setel pengatur suhu ke daerah uap
(3 sampai MAX), letakkan
setrika tegak lurus dan tunggu
sampai lampu mati, setelah itu
baru menyetrika kembali.
- Ikuti langkah-langkah pada bagian
“Pembersih otomatis”.
- Letakkan setrika tegak lurus dan
tunggu sampai lampu mati
sebelum menyetrika kembali.
- Sebelum disimpan, buanglah air
yang tersisa dalam wadah untuk
mencegah kebocoran dari lubang
soleplate. Setel pengatur uap di
posisi O dan simpanlah setrika
tegak lurus.
B
C
D
Z
Sintetis
Serat
seperti:
Acryl,
Rayon,
Polyamide
(nylon),
polyester
Silk (Sutera)
Wool
(Wol)
Cotton
(Katun)
Linen
T
Perhatikan bahwa tanda Z pada label berarti:
“Bahan ini tidak boleh disetrika!”
Tabel jenis kain
Petunjuk
pada label
Jenis kain Kontrol suhu Kontrol uap
Semprot
MIN
A
A
1
A
A
A
A
A
A
2
A
A
3
MAX
O
 Loading...