

Page 1
HI 204/205/206/215/216/225/226
Page 2

2
English Page 4
• Keep page 3 and page 18 open when reading these operating
instructions.
Español Página 11
• Desplegar las páginas 3 y 18 al leer las instrucciones de manejo.
Page 3
3
1
H
A EJ I
BFD
C
G
2
3
Page 4

4
Important
• Read the instructions for use and look at the illustrations
before you start using the steam iron.
• Remove any sticker or protective foil from the soleplate before
you use the appliance for the first time. Clean the soleplate
with a soft cloth.
• To prevent damage: check if the voltage indicated on the
appliance corresponds to the local mains voltage before you
connect the appliance.
• Use an earthed wall socket.
• Never use the appliance if it is damaged in any way.
• Unplug the appliance from the mains:
- before filling the iron with water or pouring out the remaining
water after use.
- before cleaning the iron.
• When you have finished ironing and also when you leave the
iron for a short while, always:
- set the steam control to position O;
- put the iron on its heel;
- remove the mains plug from the wall socket.
• Do not put vinegar, starch, chemically descaled water or
descaling agents in the water reservoir.
• Make sure the cord does not touch the soleplate when it is hot.
• The ejected steam is hot and therefore dangerous. Never direct
the steam at people.
• Always store the iron by placing it on its heel in a safe and dry
place.
• Never immerse the iron in water.
• Some parts of the iron have been slightly greased and, as a
result, the iron may give off some smoke when it is switched
on for the first time. This phenomenon is harmless and will
soon cease.
• This appliance is not intended for use by young or infirm
persons without supervision.
• Young children should be supervised to ensure that they do
not play with the appliance.
English
Page 5

5
• If the mains cord of this appliance is damaged, it may only be
replaced by a special cord assembly available from the
manufacturer or its service agent.
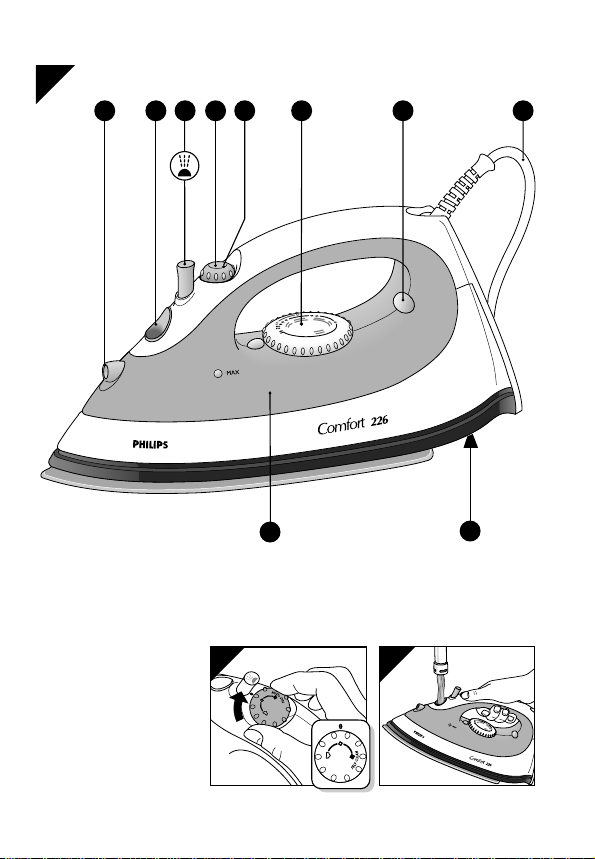
General description (fig. 1)
A Temperature control dial
B Steam control dial
O = no steam
q = steam
w = maximum steam
1 = self-clean
C Spray button T (type HI 215/216/225/226)
D Spray nozzle (type HI 215/216/225/226)
E Temperature pilot light (amber)
F Water filling opening
G Water reservoir
H Type plate
I Cord
J Extra steam 0 (press) (type HI 225/226)
Ironing temperature guide
• Follow the ironing instructions on the garment label. If these instructions
are missing but you do know the kind of fabric, consult the table.
• This table is only valid for plain fabrics and not for materials to which
finishes, glosses etc. have been applied. Textile to which some kind of
finish has been applied (gloss, crinkle, relief etc.) is best ironed at lower
temperatures.
• First sort the laundry according to ironing temperature: put wool with
wool, cotton with cotton, etc.
• The iron heats up more quickly than it cools down. Therefore, start
ironing articles that need to be ironed at the lowest temperature, such as
those made of synthetic fibres.
• If the fabric consists of various kinds of fibres, always select the
temperature required by the most delicate fibre, i.e. the lowest
temperature. If, for example, an article consists of 60% polyester and
40% cotton, it should be ironed at the temperature indicated for polyester
(1) and without steam.
Page 6
B
C
D
Z
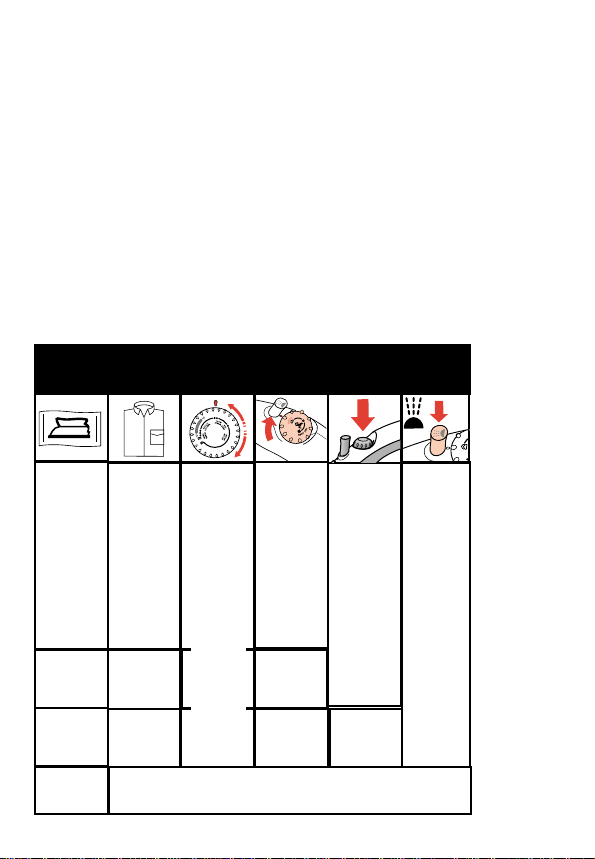
Synthetic
fibres, e.g.
acryl,
viscose,
polyamide
(nylon),
polyester
Silk
Wool
Cotton
Linen
O
w
q
0
0
T
Please note that Z on the label means:
“This article cannot be ironed!”
6
• If you do not know what kind(s) of fabric(s) the article is made of, find out
the appropriate temperature by ironing a piece of material that will not be
visible when you wear or use the article and start ironing at a relatively
low temperature.
• Pure woollen fabrics (100% wool) may be pressed with the iron set to a
steam position. It is advisable to set the steam control (B) to maximum
position and to use a dry pressing cloth.
• When steam-ironing woollen fabrics, shiny patches may occur. You can
prevent this by turning the article inside out and ironing the reverse side.
• Velvet and other fabrics which tend to acquire shiny spots should be
ironed in one direction only (along with the nap) while applying very little
pressure.
Always keep the appliance moving while ironing.
Fabric table
Instructions
on label
Fabric Temperature
control
Steam
control
Extra
Steam
Spray
MIN
AA
AA
11
AA
AA
AA
AA
AA
AA
22
AA
AA
33
MAX
X
Extra
Extra
Page 7

7
• To prevent shiny spots, articles made of synthetic material or silk should
be ironed inside out. Do not use the spray function, as spraying could
cause stains.
Filling with water (for steam-ironing and spraying)
- Unplug the iron before you fill it (or before you pour out the remaining
water). Set the steam control (B) to position O (= no steam) (fig. 2).
• Fill the iron with normal tap water when using it for the first time.
• For refilling, you can also use tap water. However, if the water is very
hard, it is advisable to use distilled water.
Do not put vinegar, starch, chemically descaled water or
descaling agents in the water reservoir!
- Pour water into the filling aperture to the maximum (max) level (fig. 3).
Setting the temperature (see table)
- Put the iron on its heel.
- Set the temperature control (A) to the correct ironing temperature (fig. 4).
- Insert the mains plug into the wall socket.
- The iron is ready to be used after the amber temperature pilot light (E)
has first gone off and then come on again.
• The amber pilot light (E) will come on from time to time during ironing.
• If you set the temperature control (A) to a lower setting after ironing at a
high temperature, do not resume ironing until after the amber pilot light
(E) has come on and has gone off again. If you don’t wait for the light to
go out again, you run the risk of scorching the fabric.
Ironing without steam (see table)
- Set the Steam control (B) to position O (= no steam) (fig. 2).
• For more details on how to switch on the iron, see the section headed
“Setting the temperature”.
Page 8

8
Steam-ironing (see table)
• Make sure there is enough water in the water reservoir.
- Set the steam control (fig. 5):
No steam setting (O) for temperature settings MIN to 2.
Steam setting (q) for temperature settings 2 to 3.
Maximum steam setting (w) for temperature settings 3 to MAX.
• Water may leak from the soleplate if a too low temperature (2 or lower)
has been selected.
• For more details on how to switch on the iron, see the section headed
“Setting the temperature”.
Extra Steam 0 (types HI 225/226) (see table)
• This feature provides extra steam to remove stubborn creases.
• Apply Extra Steam only at 3 to MAX temperature setting.
- Set the steam control to the steam position w (fig. 6).
- Press and hold the Extra Steam button (J) 0 (max. 5 seconds) (fig. 7).
Then release the button.
Wait at least 1 minute before applying Extra Steam again to prevent
water from dripping out of the soleplate.
Spraying T (types HI 215/216/225/226) (see table)
- To remove stubborn creases from fabrics at any temperature, push the
spray button T (C) a couple of times to damp the laundry (fig. 8).
• Make sure there is enough water in the water reservoir.
Self-cleaning 1
• The iron has a self-clean function to remove scale and impurities.
• Use the self-clean function once every two weeks. If the water used is
very hard, you should use the self-clean function more often.
- Set the Steam control (B) to position O (fig. 2).
- Set the temperature control dial (A) to MAX.
- Fill the water reservoir (G) to maximum (MAX) level.
- Plug in the iron to the mains, allow the iron to heat up.
Page 9

9
- When the amber pilot light (E) goes off, unplug the iron.
- Hold the appliance horizontally over a sink (fig. 9).
- Set the steam control to position 1 (self clean) (fig. 10).
The steam control will then spring up slightly.
- Pull the steam control up slightly (fig. 10).
- Boiling water and steam will now come out of the holes in the soleplate.
Impurities and scale (if any) are washed away with it.
Move the iron forwards and backwards while this happens (fig. 11).
- Repeat self-clean if a lot of impurities are flushed out.
- You can pull the steam control further upwards to remove the steam
control needle (fig. 12). It is then possible to remove any scale from the
needle. For this purpose you may use vinegar.
Avoid bending or damaging the steam control needle!
- Replace the steam control needle. Insert the point of the needle exactly
in the centre of the aperture and fit the small notch at the side into the
spacing (fig. 13).
- Press the steam control (fig. 14).
- Set the steam control to position O (fig. 2).
Do not put vinegar, starch, chemically descaled water or
descaling agents in the water reservoir.
After self-cleaning
- Plug the iron into the mains to dry up the soleplate.
- When the amber pilot light (E) goes off, unplug the iron.
- Move the iron gently over a piece of used cloth to remove water stains.
Cool down the iron for storage.
Cleaning
- Before cleaning remove the mains plug from the wall socket and allow
the iron to cool down sufficiently.
- Scale and other stains can be wiped off the soleplate with a damp cloth
and a non-abrasive (liquid) cleaner.
Keep the soleplate smooth: avoid hard contact with metal objects.
- The upper part of the appliance can be cleaned with a damp cloth.
- From time to time clean the inside of the water reservoir by filling with
water and shaking (fig. 15). Then pour the water back out (fig. 16).
Page 10

10
Storage
- Remove the mains plug from the wall socket.
- Pour any remaining water out of the water reservoir (fig. 16).
- Set the Steam control (B) to position O (fig. 2).
- Stand the iron upright and let it cool down sufficiently.
- Wind the mains cord around the cord storage (fig. 17).
- Always store the iron standing on its heel (fig. 18).
- Always keep the iron in a safe dry place.
Regularly check if the mains cord is still in a good and safe condition.
Page 11

11
Importante
• Antes de empezar a usar la Plancha de Vapor, lean estas
instrucciones y observen las ilustraciones.
• Antes de usar el aparato por vez primera, quiten cualquier
etiqueta o lámina protectora de la suela. Limpien la suela con
un paño suave.
• Para prevenir deterioros, antes de enchufar el aparato
comprueben si el voltaje indicado en él se corresponde con el
de su hogar.
• Usen un enchufe con toma de masa.
• No usen nunca el aparato si tiene cualquier tipo de deterioro.
• Desenchufen el aparato de la red :
- Antes de llenar la Plancha con agua o cuando vacíen el agua
sobrante después del uso.
- Antes de limpiar la Plancha
• Cuando hayan terminado de planchar, y también cuando dejen
sola la Plancha aunque sea por corto tiempo, siempre :
- Coloquen el control de vapor en la posición O.
- Pongan la Plancha sobre su talonera.
- Desenchufen el aparato de la red.
• No pongan vinagre, almidón, agua químicamente
descalcificada u otros agentes desincrustantes en el depósito
del agua.
• Asegúrense de que el cable de red no toque la suela de la
Plancha cuando ésta esté caliente.
• El vapor que sale está caliente y, por ello, es peligroso. No
dirijan nunca el chorro de vapor hacia las personas.
• Guarden siempre la Plancha, colocada sobre su talonera, en
un lugar seco y seguro.
• No sumerjan nunca la Plancha en agua.
• Algunas piezas de la Plancha han sido ligeramente
engrasadas y, debido a ello, la Plancha puede humear un poco
al ponerla en funcionamiento por vez primera.
Este fenómeno es inocuo y cesará al poco rato.
• Este aparato no está destinado a ser usado por personas
jóvenes o enfermas sin supervisión.
Español
Page 12

12
• Deben vigilar para asegurarse de que los niños pequeños no
jueguen con el aparato.
• Si el cable de red de este aparato se deteriora, solo puede ser
sustituido por un cable de red especial que está disponible en
el fabricante o en sus Servicios de Asistencia Técnica.
Descripción general ( fig. 1 )
A Mando de control de la temperatura
B Mando de control del vapor
O = sin vapor
q = vapor
w = vapor máximo
1 = auto limpieza
C Botón del rociador T (Tipos HI 215/216/225/226)
D Boquilla rociadora (Tipos HI 215/216/225/226)
E Lámpara piloto roja indicadora de la temperatura (Ambar)
F Abertura de llenado del agua
G Depósito del agua
H Placa de características
I Cable de red
J Vapor extra 0 (Presionar) (Tipos HI 225/226)
Guía para la temperatura de planchado
• Sigan siempre las instrucciones de planchado de la etiqueta sobre
planchado. Si no hay instrucciones de planchado pero conocen el tipo
de tejido, consulten la tabla.
• Esta tabla es solo válida para los materiales pero no para los
acabados, brillo, etc., aplicados. Los tejidos a los que se les haya
aplicado algún tipo de acabado (Satinado, arrugas, realces, etc.) es
mejor plancharlos a las más bajas temperaturas.
• Primero seleccionen la ropa a planchar de acuerdo con la temperatura
de planchado : lana con lana, algodón con algodón, etc.
• La Plancha se calienta con más rapidez que se enfría. Por
consiguiente, empiecen planchando los artículos que necesiten la
temperatura más baja, como son los fabricados con fibras sintéticas.
• Si el tejido está compuesto de varios tipos de fibras, siempre deben
Page 13

13
seleccionar la temperatura de planchado que requiera la fibra más
delicada, por ejemplo, la más baja temperatura. Por ejemplo, una
prenda que tenga el 60 % de poliester y el 40 % de algodón, deben
plancharla con la temperatura indicada para el poliester 1 y sin vapor.
• Si no saben de qué fibra (s) está compuesto el artículo, busquen un
lugar que no se vea cuando se lleve o use la prenda y prueben en él la
temperatura más apropiada, empezando con una temperatura
relativamente baja.
• Los tejidos de pura lana (100 % lana) pueden plancharse con la
Plancha ajustada a una posición de vapor. Es aconsejable colocar el
mando (B) de control del vapor en la posición máxima y usar un paño
Tabla de tejidos
B
C
D
Z
Fibras
sintéticas
como
acetato
acrílico,
viscosa,
poliamida
(nilón),
poliester
Seda
Lana
Algodón
Lino
O
w
q
0
0
T
Nota : Z en la etiqueta significa :
“Este artículo no puede ser planchado”
Istrucciones
en la
etiqueta
Tejido Control de
la
temperatura
Control del
vapor
Chorro de
vapor
Rociador
MIN
AA
AA
11
AA
AA
AA
AA
AA
AA
22
AA
AA
33
MAX
X
Extra
Extra
Page 14

14
seco interpuesto.
• Al planchar con vapor los tejidos de lana pueden aparecer brillos en
ellos. Se puede evitar girando el artículo hacia adentro y planchando
por el revés.
• El terciopelo y otros tejidos que adquieran puntos brillantes con
rapidez, deben plancharlos solo en una dirección (la del pelo),
aplicando una presión ligera y sin dejar de mover la Plancha.
• Planchen los materiales sintéticos y la seda por el revés, a fin de evitar
puntos brillantes. No usen el dispositivo rociador ya que el rociado
puede producir manchas.
Llenado con agua (Para planchar con vapor y rociar)
- Desenchufen la Plancha antes de llenarla (O de vaciar el resto de
agua). Pongan el mando (B) de control del vapor en la posición O
(= Sin vapor)(fig. 2).
• Llenen esta Plancha con agua normal del grifo cuando la usen por vez
primera.
• Para rellenarla, pueden usar también agua del grifo. Sin embargo, si el
agua es muy dura , es aconsejable usar agua destilada.
¡ No pongan vinagre, almidón, agua químicamente descalcificada
u otros agentes desincrustantes en el depósito del agua !
- Viertan el agua en la abertura de llenado hasta el nivel máximo (máx)
(fig. 3).
Ajuste de la temperatura (Ver la tabla)
- Coloquen la Plancha sobre su talonera.
- Coloquen el mando (A) del control de la temperatura en la correcta
temperatura de planchado (fig. 4).
- Enchufen el aparato a la red.
- La Plancha estará preparada para ser usada después que la lámpara
piloto (E) ámbar, indicadora de la temperatura, se haya apagado y
encendido de nuevo.
• La lámpara piloto (E) ámbar, indicadora de la temperatura, se apagará
de vez en cuando durante el planchado.
• Si, tras haber planchado con una alta temperatura, colocan el mando
(A) del control de la temperatura en una temperatura más baja, no
Page 15

empiecen a planchar de nuevo hasta que la lámpara piloto (E) ámbar
se haya encendido y apagado de nuevo. Si no esperan a que la
lámpara piloto se apague de nuevo, corren el riesgo de chamuscar el
tejido.
Planchado sin vapor (Ver la tabla)
- Pongan el mando (B) de control del vapor en la posición O
(= Sin vapor) (fig. 2).
• Para más detalles sobre como poner en marcha la Plancha, vean la
sección titulada “Ajuste de la temperatura”.
Planchado con vapor (Ver la tabla)
• Asegúrense de que haya suficiente agua en el depósito del agua.
- Ajusten el mando de control del vapor (fig. 5) :
Posición sin vapor (O) para posiciones de la temperatura entre MIN y
2.
Posición con vapor (q) para posiciones de la temperatura entre 2 y
3.
Posición de máximo vapor (w) para posiciones de la temperatura entre
3 y MAX.
• Si seleccionan una temperatura demasiado baja (2 o más baja), el
agua puede gotear por la suela.
• Para más detalles sobre como poner en marcha la Plancha, vean la
sección titulada “Ajuste de la temperatura”.
Vapor Extra 0 (Tipos HI 225/226) (Ver la tabla)
• Esta posibilidad proporciona vapor extra para eliminar las arrugas
rebeldes
• Apliquen el Vapor Extra solo con las posiciones de temperatura entre
3 y MAX.
- Ajusten el mando de control del vapor a la posición de vapor w (
(fig. 6).
- Presionen y mantengan apretado el botón Vapor Extra (J) 0
(Máx. 5 segundos) (fig. 7) y después suéltenlo.
Para evitar que gotee agua de la suela, esperen al menos durante
15
Page 16

16
1 minuto antes de volver a aplicar Vapor Extra.
Rociado T (Tipos HI 215/216/225/226) (Ver la tabla)
- Para humedecer la ropa para eliminar arrugas rebeldes de los tejidos a
cualquier temperatura, presionen un par de veces el botón del rociador
T (fig. 8).
• Asegúrense de que haya suficiente agua en el depósito del agua.
Autolimpieza 1
• La Plancha tiene una función de autolimpieza para eliminar
incrustaciones e impurezas.
• Usen la función de autolimpieza al menos una vez cada dos semanas.
Si el agua usada es muy dura, deberá usar más a menudo la función
de autolimpieza.
- Ajusten el mando (B) de control del vapor a la posición O (fig. 2).
- Coloquen el mando (A) de control de la temperatura en la posición
MAX.
- Llenen el depósito del agua (G) hasta nivel máximo (MAX).
- Enchufen la Plancha a la red y dejen que se caliente.
- Cuando la lámpara piloto (E) ámbar, indicadora de la temperatura, se
apague desenchufen la Plancha.
- Sostengan el aparato horizontalmente sobre un fregadero (fig. 9).
- Coloquen el mando de control del vapor en la posición 1
(Autolimpieza) (fig. 10).
El mando de control del vapor subirá ligeramente.
- Estiren ligeramente del mando de control del vapor (fig. 10 ).
- Después de ello, y a través de los agujeros de la suela, saldrá agua
hirviendo y vapor.
Con ello, las impurezas e incrustaciones (Si las hay) quedarán
eliminadas.
- Muevan la Plancha hacia adelante y hacia atrás mientras eso sucede
(fig. 11).
- Si salen muchas impurezas, repitan la autolimpieza.
- Pueden estirar del mando de control del vapor un poco más hacia
arriba para desmontar la aguja del mando de control del vapor (fig. 12),
con lo cual pueden eliminar de ella cualquier incrustación, usando
vinagre para ello.
Page 17

¡ Eviten el doblar o deteriorar la aguja del mando de control del
vapor !
- Vuelvan a montar la aguja del mando de control del vapor, insertando
la punta de la aguja exactamente en el centro de la apertura y fijando
la pequeña muesca lateral en el espacio (fig. 13).
- Presionen el mando de control del vapor hacia abajo (fig. 14).
- Coloquen el mando de control del vapor en la posición O. (fig. 2).
¡ No pongan vinagre, almidón, agua químicamente descalcificada
u otros agentes desincrustantes en el depósito del agua !
Después de la autolimpieza
- Enchufen la Plancha a la red para secar la suela.
- Cuando la lámpara piloto ámbar (E) se apague, desenchufen la Plancha.
- Pasen la Plancha suavemente por un trozo de tela vieja para eliminar
las manchas de agua. Para guardar la Plancha, déjenla enfriar.
Limpieza
- Antes de limpiar la Plancha, desenchúfenla de la red y déjenla que se
enfríe suficientemente.
- Las incrustaciones y otras suciedades pueden quitarse de la suela con
un paño húmedo y con un limpiador no abrasivo (Líquido).
Conserven lisa la suela y eviten choques fuertes con objetos
metálicos.
- La parte superior del aparato puede limpiarse con un paño húmedo.
- De vez en cuando, limpien el interior del depósito del agua llenándolo
con agua y agitándolo (fig. 15). Tiren después el agua (fig. 16).
Almacenamiento
- Desenchufen el aparato de la red.
- Saquen cualquier resto de agua que haya quedado en el depósito (fig.
16).
- Coloquen el mando (B) de control del vapor en la posición O (fig. 2).
- Pongan la Plancha en posición vertical y déjenla enfriar
suficientemente.
- Enrollen el cable de red alrededor del almacenamiento del cable (fig. 17).
- Guarden siempre la plancha en posición vertical sobre su talonera
(fig. 18).
17
Page 18

18
4
5
6
7
8
10
9
11
12
13
14
15
18
17
16
Page 19

19
Page 20

www.philips.com
u
4239 000 51991
 Loading...