

Page 1
HF8430
Page 2

2
Page 3
3
J
K
L
M
N
1
Page 4

4
Page 5

ENGLISH 6
DEUTSCH
ESPAÑOL 32
NEDERLANDS 45
PORTUGUÊS
18
59
HF8430
Page 6

6
ENGLISH
Introduction
Congratulations on your purchase and welcome to Philips! To fully benet
from the support that Philips offers, register your product at www.philips.
com/welcome.
Philips is dedicated to producing high-quality products that add value to
your life. We bring you candlelights and an intimate massager to seduce
each other.
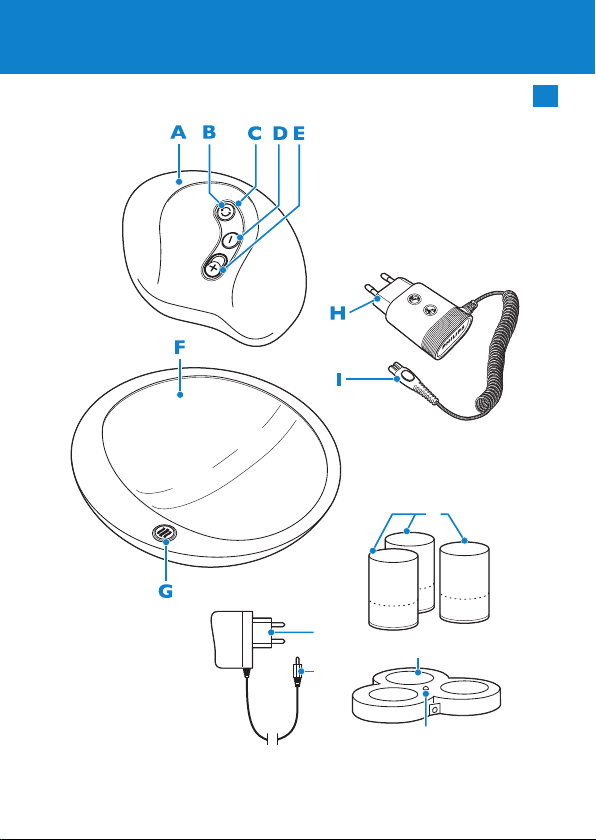
General description (Fig. 1)
A Massager
B Mode selection button
C Light ring
D Decrease button
E Increase button
F Charger of massager
G Pre-warming button with light ring
H Adapter of massager
I Small plug
J Candles
K Charger of candlelight set
L Charging light/button
M Adapter of candlelight set
N Small plug
Important
Read this user manual carefully before you use the appliances and save it
for future reference.
Danger
Keep the adapters and the charger of the candlelight set dry.
-
Any time body uids are exchanged, there is a risk of spreading
-
sexually transmitted diseases and infections. To reduce the risk of
infection, put a condom around the intimate massager when it is
contact with intimate areas. Change the condom when you move the
massager to another body part.
Page 7

ENGLISH 7
The massager is intended for external use only. Do not use it for
penetration.
Warning
Never immerse the candles and the charger of the massager in water
or any other liquid, nor rinse them under the tap.
Check if the voltage indicated on the adapters corresponds to the
local mains voltage before you connect the chargers.
Regularly check the massager, the chargers, the adapters and the
candles for possible damage. If any of these items is damaged in any
way, stop using it and consult our website www.philips.com/
intimatemassager.
The adapters contain a transformer. Do not cut off the adapters to
replace them with other plugs, as this causes a hazardous situation.
These appliances are not intended for use by persons with reduced
-
physical, sensory or mental capabilities, or lack of experience and
knowledge, unless they have been given supervision or instruction
concerning use of the appliances by a person responsible for their
safety.
Children should be supervised to ensure that they do not play with
the appliances.
Switch off the massager immediately and do not use it again if it
produces an abnormal sound. Consult our website www.philips.com/
intimatemassager.
Caution
Consult your doctor before you use the massager in the following
cases:
1 During pregnancy or shortly after delivery
2 If you have irritated skin or a skin disease
3 If you have other health problems
If use of the massager causes an allergic reaction, stop using it and
consult your doctor.
Do not use the massager on the eyes or arteries.
This massager is not intended as a medical appliance.
If you want to use the massager in combination with a lubricant or
massage oil, only use a water-based or silicon-based type. Do not use
Page 8

ENGLISH8
scented and/or alcohol-based lubricants or massage oils, as they may
cause damage.
Always clean the massager after use to reduce the risk of infections
(see chapter ‘Cleaning’).
Do not expose the massager and its charger to direct sunlight or UV
-
light (for example from a tanning appliance) for a long time.
Be careful not to drop the massager.
Only use each charger in combination with the appropriate adapter
supplied. Do not connect any other adapters to the chargers.
Always place the massager and the candles on the appropriate
charger. Do not place anything else on the chargers.
Do not expose the candlelight set to extreme heat.
Handle the candles with care, because the outside is made of glass.
Do not attempt to repair the appliances yourself. In case of any repair
or attempted repair by a service centre not authorised by Philips, the
guarantee becomes invalid. Consult our website www.philips.com/
intimatemassager for further instructions.
Compliance
These Philips appliances comply with all standards regarding
electromagnetic elds (EMF). If handled properly and according to the
instructions in this user manual, the appliances are safe to use based on
scientic evidence available today.
Charging
Massager
The massager and its charger become warm during charging.
Never cover the charger with anything (e.g. a towel or clothing) during
use.
Note: The massager is not charged when you unpack it. Charge the massager
before rst use.
For a single session, charge the massager for at least 10 hours.
For a full charge, charge the massager for 24 hours. When fully charged,
the massager has an operating time of up to 1 hour.
Page 9

ENGLISH 9
The actual operating time may vary over time, depending on the selected
vibration mode and speed.
Charge the massager when the light ring starts ashing slowly to indicate
that the battery is almost empty.
1 Insert the small plug into the charger and put the adapter in the
wall socket.
2 Placethemassageronthecharger.Itonlytsproperlyonthe
charger with the buttons facing up. (Fig. 2)
The massager switches off automatically when you place it on the charger.
Note: Make sure the pre-warming function is switched off when you charge
the appliance (see chapter ‘Preparing for use’).
Note: The charger does not work when the massager is placed incorrectly.
Duringchargingthelightringashes.
,
Note: When you charge the massager for the rst time or after a long period
of disuse, it may take a few minutes before the light ring starts ashing. This
is normal
Note: The appliance may produce a smell the rst few times you charge it.
This is normal.
When the battery is fully charged, the light ring goes out.
,
Candlelight set
Charge the candlelight set for 12 hours.
When the candles are fully charged, they have an operating time of
approx. 24 hours.
1 Insert the small plug into the charger and put the adapter in the
wall socket.
The charging light on the charger goes on (Fig. 3).
,
2 Put one or more candles on the charger (Fig. 4).
When the candles are fully charged, the charging light on the
,
charger goes out and the charging process stops.
Page 10

ENGLISH10
Note: The candles may go on when you put them on the charger. If they do,
remove the candles from the charger and tilt them to switch them off. Then
put the candles back onto the charger.
Note: For safety reasons, a built-in timer stops the charging process after 12
hours, when the batteries are fully charged. If you have one or more
uncharged candles left and want to charge them right away, press the button
on the charger to start another charging cycle. When you do this, the
charging light goes on again.
Preparing for use
Massager
Cleaning
Thoroughlycleanthemassagerbeforerstuse,aftereveryuseand
when you use it on another body area, to reduce the risk of
infection (see chapter ‘Cleaning’).
Pre-warming the massager
The charger has a pre-warming button that you can use to pre-warm the
bottom of the massager to a comfortable temperature (approx. 40°C).
Never warm the massager in an oven or microwave.
1 Placethemassagerinohecharger.Itonlytsproperlyonthe
charger with the buttons facing up.
2 Press the pre-warming button (Fig. 5).
Thepre-warminglightringstartsashingtoindicatethatthe
,
massager is warming up.
Afterapprox.5minutes,thepre-warminglightringstopsashing
,
and lights up continuously to indicate that the massager has
reached a comfortable temperature.
After 30 minutes, the pre-warming function automatically switches
,
off, but you can also switch it off by pressing the pre-warming
button again.
Page 11

ENGLISH 11
Using the appliance
Massager
1 Press any button to switch on the massager (Fig. 6).
The light ring goes on.
,
The massager starts operating in the default mode (mode 1) and at
,
moderate vibration speed.
Tip: We advise you to start in the default mode. You can gradually increase
the vibration speed once you are familiar with the options.
Note: If you feel uncomfortable during use, you can adjust the vibration
speed. See step 3.
2 Press the mode selection button to adjust the vibration to your
own preference (Fig. 7).
The appliance has 5 vibration modes (A to E) that activate up to 3
vibration spots placed in the tip (1), the top (2) and the bottom (3)
of the massager (Fig. 8).
A Tip motor runs, vibration is focused on one point
B Tip and bottom motors run in turn
C Top and bottom motors run in turn
D Tip and top motors run in turn
E All motors run in turn
3 Press the increase or decrease button one or more times to adjust
the vibration speed of the massager to your own
preference. (Fig. 9)
The appliance has 5 speed levels.
4 Youcanholdthemassagerindifferentways.Experimenttondthe
most comfortable way to use the massager.
Tip: For suggestions, consult the welcome booklet.
Tip: You can also use the massager in combination with a water-based or
silicon-based lubricant or massage oil. Do not use scented and/or alcoholbased lubricants or massage oils, as they may cause damage.
Page 12

ENGLISH12
5 To switch off the massager, press and hold the mode selection
button or the decrease button.
Travel lock
It is possible to lock the massager, for example if you are going to travel.
The travel lock prevents the massager from being switched on by
accident.
1 Switch off the massager.
2 Simultaneously press the increase button and the mode selection
button to activate the travel lock. (Fig. 10)
Thelightringashesoncetoindicatethatthemassagerislocked.
,
3 To deactivate the travel lock, press the increase button and the
mode selection button simultaneously again.
Thelightringashesoncetoindicatethatthemassageris
,
unlocked.
Note: When you place the massager on the plugged-in charger, the travel lock
is automatically deactivated.
Candlelight set
1 Tilt the candles to switch them on (Fig. 11).
You can switch off the candles in the same way.
Cleaning
Massager
Thoroughlycleanthemassagerbeforerstuse,aftereveryuseand
when you use it on another body area, to reduce the risk of infection.
Do not use aggressive or abrasive cleaning agents, chemical substances
or alcohol-based disinfectants to prevent damage to the massager.
Do not clean the massager with materials or tools that could cause
damage, e.g. metal or sharp kitchen utensils or scouring pads.
The massager and charger are not dishwasher-proof.
1 Switch off the massager and unplug the charger.
Page 13

ENGLISH 13
2 Clean the massager with a moist cloth soaked in lukewarm water
with mild anti-bacterial soap and rinse it under the tap. Dry the
massager properly after cleaning it.
Tip: Use a non-alcohol-based disinfectant to reduce the risk of infections.
Do not immerse the massager in water for more than one hour.
3 Clean the charger with a moist cloth and dry it properly.
Never immerse the charger in water or any other liquid, nor rinse it
under the tap.
Candlelight set
1 Switch off the candles and unplug the charger.
2 Clean the adapter and the charger with a dry cloth.
Keep the adapter and the charger dry.
3 Clean the outside of the candles with a moist cloth.
Do not use any cleaning agents to clean the candles. Do not clean the
candles in the dishwasher.
Handle the candles with care because the outside of the is made
of glass.
Storage
Massager
Always clean the massager after use.
1 Switch off the massager and unplug the charger.
2 Put the massager on the charger and store it in a safe, dry place
away from sunlight.
Candlelight set
1 Unplug the charger.
2 Place the candles on the charger.
Page 14

ENGLISH14
3 Store the charger with the candles on it in a safe, dry place away
from sunlight.
Replacement
If you need to replace an item of the massager or of the candlelight set,
consult our website www.philips.com/intimatemassager.
Note: The rechargeable batteries of the massager and the candles cannot be
replaced.
Environment
Do not throw away the appliances with the normal household waste
-
at the end of their life, but hand them in at an ofcial collection point
for recycling. By doing this, you help to preserve the
environment (Fig. 12).
The built-in rechargeable batteries of the massager and the candles
contain substances that may pollute the environment. Always remove
the batteries before you discard and hand in the appliances at an
ofcial collection point. Dispose of the batteries at an ofcial
collection point for batteries. If you have trouble removing the
batteries, you can also take the massager and the candles to a Philips
service centre. The staff of this centre will remove the batteries for
you and will dispose of them in an environmentally safe way. Consult
our website www.philips.com/intimatemassager for further
instructions (Fig. 13).
Removing the rechargeable batteries (optional)
If you choose to remove the rechargeable batteries of the massager and
the candles yourself before you hand them in at an ofcial collection
point, follow the instructions below.
Massager
Do not use sharp tools, such as knives or screwdrivers, to open the
massager.
1 Let the massager operate until it stops.
Page 15

ENGLISH 15
2 Put the massager in the battery-removal bag supplied.
3 Put the battery-removal bag with the massager in it in the freezer
for at least 24 hours.
4 Take the bag from the freezer. Immediately put the bag on the
ground and stamp on it with your foot to break the massager.
Caution: Only do this while wearing solid shoes. Attempting this with
bare feet could cause injuries.
Note: If the above treatment has not broken the massager, repeat steps 3
and 4.
5 Open the bag and take out the massager parts.
6 Unscrew the printed circuit board from the rechargeable battery
withaat-headscrewdriver.
Candles
1 Use a screwdriver to pry loose the battery housing inside the
candle.
2 Remove the battery housing from the candle.
3 Insert a screwdriver into the connection groove between the base
and the cover of the battery housing. Press down the screwdriver
to detach the cover from the base (Fig. 14).
4 Lift the battery out of the base.
Guarantee & service
If you need service or information or if you have a problem, consult our
website
www.philips.com/intimatemassager, or contact the Philips
Consumer Care Centre in your country (you nd its phone number in
the worldwide guarantee leaet).
Page 16

ENGLISH16
Troubleshooting
This chapter summarises the most common problems you could
encounter with the appliances. If you are unable to solve the problem
with the information below, consult our website wwww.philips.com/
intimatemassager.
Problem Possible cause Solution
The massager
does not work.
The massager
suddenly
switches off.
The rechargeable
battery is empty.
The charger is still
charging.
The travel lock is
activated.
The rechargeable
battery is empty.
You have pressed
the mode
selection button
or the decrease
button for some
time and thus
switched off the
massager.
Charge the rechargeable
battery (see chapter
‘Charging’).
It takes 24 hours to charge the
massager fully. When fully
charged, the massager has an
operating time of up to 1 hour.
For a single session, charge the
massager for at least 10 hours
(see chapter ‘Charging’).
Deactivate the travel lock (see
chapter ‘Using the appliance’).
Charge the massager (see
chapter ‘Charging’).
Press any button to switch on
the massager again.
Page 17

Problem Possible cause Solution
The charger of
the
massager does
not work.
The massager
and its
charger become
warm during
charging.
The charger of
the candlelight
set does not
work.
The candles of
the candlelight
set do not work.
The candles of
the candlelight
set go on when I
put them on the
charger.
The charger is
not plugged in.
The pre-warming
function is
activated.
You have not
placed the
massager on the
charger properly.
This is normal. No further action required.
The charger is
not plugged in.
The batteries of
the candles are
empty.
You did not
switch off the
candles when
their batteries
were empty.
Insert the small plug into the
charger and put the adapter in
the wall socket.
Press the pre-warming button
to switch off the pre-warming
function.
Place the massager properly
on the charger (see chapter
‘Charging’).
Insert the small plug into the
charger and put the adapter in
the wall socket.
Place the candles on the
plugged-in charger and charge
them for 12 hours.
Remove the candles from the
charger and tilt them to switch
them off. Then put the candles
back onto the charger.
ENGLISH 17
Page 18

18
DEUTSCH
Einführung
Herzlichen Glückwunsch zu Ihrem Kauf und willkommen bei Philips! Um
den Support von Philips optimal nutzen zu können, registrieren Sie Ihr
Produkt bitte unter www.philips.com/welcome.
Philips hat es sich zur Aufgabe gemacht, hochwertige Produkte zu
entwickeln, die Ihr Leben bereichern. Wir bieten Ihnen Kerzenlicht und ein
Massagegerät zur gegenseitigen Verführung.
Allgemeine Beschreibung (Abb. 1)
A Massagegerät
B Moduswahltaste
C Leuchtring
D Niedriger-Taste
E Höher-Taste
F Ladegerät des Massagegeräts
G Vorwärmtaste mit Leuchtring
H Adapter des Massagegeräts
I Gerätestecker
J Kerzen
K Ladegerät des Kerzen-Sets
L Ladeanzeige/-taste
M Adapter des Kerzen-Sets
N Gerätestecker
Wichtig
Lesen Sie diese Bedienungsanleitung vor dem Gebrauch der Geräte
aufmerksam durch und bewahren Sie sie für eine spätere Verwendung auf.
Gefahr
Achten Sie darauf, dass Adapter und Ladegerät des Kerzen-Sets nicht
nass werden.
Bei jedem Austausch von Körperüssigkeiten besteht das Risiko einer
-
Übertragung von Geschlechtskrankheiten und Infektionen. Um das
Infektionsrisiko zu verringern, streifen Sie ein Kondom über das Intim-
Massagegerät, bevor Sie es im Intimbereich einsetzen. Wechseln Sie
Page 19

DEUTSCH 19
das Kondom, wenn Sie das Massagegerät an einem anderen
Körperteil verwenden.
Das Massagegerät ist nur zur äußerlichen Anwendung bestimmt.
-
Führen Sie es nicht in Körperöffnungen ein.
Warnhinweis
Tauchen Sie die Kerzen und das Ladegerät des Massageräts keinesfalls
-
in Wasser oder andere Flüssigkeiten. Spülen Sie sie auch nicht unter
ießendem Wasser ab.
-
Überprüfen Sie vor dem ersten Gebrauch der Ladegeräte, ob die
Spannungsangaben auf den Adaptern mit der örtlichen Netzspannung
übereinstimmen.
-
Überprüfen Sie das Massagegerät, die Ladegeräte, Adapter und
Kerzen auf eventuelle Schäden. Falls eines dieser Geräte in
irgendeiner Weise beschädigt ist, verwenden Sie es nicht, und
besuchen Sie unsere Website unter www.philips.com/
intimatemassager.
Die Adapter enthalten jeweils einen Transformator. Ersetzen Sie die
-
Adapter keinesfalls durch andere Stecker, da dies den Benutzer
gefährden würde.
Diese Geräte sind für Benutzer mit eingeschränkten physischen,
-
sensorischen oder psychischen Fähigkeiten bzw. ohne jegliche
Erfahrung oder Vorwissen nur dann geeignet, wenn eine angemessene
Aufsicht oder ausführliche Anleitung zur Benutzung der Geräte durch
eine verantwortliche Person sichergestellt ist.
-
Achten Sie darauf, dass Kinder nicht mit den Geräten spielen.
-
Schalten Sie das Massagegerät bei Auftreten eines ungewöhnlichen
Geräusches sofort aus, und verwenden Sie es nicht mehr. Besuchen
Sie unsere Website www.philips.com/intimatemassager.
Achtung
Konsultieren Sie Ihren Arzt, bevor Sie das Massagegerät in den
folgenden Fällen verwenden:
1 Während einer Schwangerschaft oder kurz nach der Entbindung
2 Bei Hautirritationen oder Hauterkrankungen
3 Bei anderen gesundheitlichen Problemen
Page 20

DEUTSCH20
Wenn bei der Verwendung des Massagegeräts eine allergische
-
Reaktion auftritt, benutzen Sie das Gerät nicht mehr, und konsultieren
Sie Ihren Arzt.
Verwenden Sie das Massagegerät nicht in der Nähe der Augen oder
auf Blutgefäßen.
Dieses Massagegerät ist kein medizinisches Gerät.
-
Wenn Sie das Massagegerät in Verbindung mit Gleitgel oder
-
Massageöl benutzen möchten, verwenden Sie nur Mittel auf Wasseroder Silikonbasis. Verwenden Sie keine parfümierten und
alkoholhaltigen Gleitgele oder Massageöle, da diese das Gerät
beschädigen können.
Reinigen Sie das Massagegerät nach jedem Gebrauch, um das
-
Infektionsrisiko zu verringern (siehe Kapitel “Reinigung”).
Legen Sie Massagegerät und Ladegerät nicht über einen längeren
-
Zeitraum direktem Sonnen- oder UV-Licht (z. B. von einem
Bräunungsgerät) aus.
Lassen Sie das Massagegerät nicht fallen.
-
Verwenden Sie jedes Ladegerät nur mit dem entsprechenden
-
mitgelieferten Adapter. Schließen Sie keine anderen Adapter an die
Ladegeräte an.
Stellen Sie das Massagegerät und die Kerzen stets auf den
entsprechenden Adapter. Legen Sie nichts anderes auf die Adapter.
Setzen Sie das Kerzen-Set keiner extremen Hitze aus.
Gehen Sie vorsichtig mit den Kerzen um, da die Außenseite aus Glas
besteht.
Versuchen Sie nicht, das Gerät selbst zu reparieren. Bei Reparaturen
oder Reparaturversuchen durch nicht von Philips autorisierte
Werkstätten erlischt die Garantie. Weitere Informationen nden Sie
auf unserer Website unter www.philips.com/intimatemassager.
Normerfüllung
Diese Philips Geräte erfüllen sämtliche Normen bezüglich
elektromagnetischer Felder (EMF). Nach aktuellen wissenschaftlichen
Erkenntnissen sind die Geräte sicher im Gebrauch, sofern sie
ordnungsgemäß und entsprechend den Anweisungen in dieser
Bedienungsanleitung gehandhabt werden.
Page 21

DEUTSCH 21
Laden
Massagegerät
Während des Ladevorgangs werden das Massagegerät und das
Ladegerät warm.
Bedecken Sie das eingeschaltete Ladegerät niemals mit Handtüchern,
Kleidungsstücken oder anderen Gegenständen.
Hinweis: Das Massagegerät ist bei Lieferung nicht geladen. Laden Sie das
Massagegerät vor dem ersten Gebrauch auf.
Laden Sie das Massagegerät für eine einzelne Anwendung mindestens
10 Stunden lang auf.
Das vollständige Auaden des Massagegeräts dauert 24 Stunden. Voll
aufgeladen hat das Massagegerät eine Betriebsdauer von bis zu 1 Stunde.
Die tatsächliche Betriebszeit hängt vom jeweils ausgewählten
Vibrationsmodus und der eingestellten Vibrationsgeschwindigkeit ab.
Laden Sie das Massagegerät auf, sobald der Leuchtring langsam blinkt und
damit anzeigt, dass der Akku fast leer ist.
1 Stecken Sie den Gerätestecker in das Ladegerät und den Adapter in
eine Steckdose.
2 Legen Sie das Massagegerät auf das Ladegerät. Es lässt sich nur dann
richtig einsetzen, wenn die Tasten nach oben zeigen. (Abb. 2)
Das Massagegerät schaltet sich automatisch aus, wenn Sie es auf das
Ladegerät legen.
Hinweis: Stellen Sie sicher, dass die Vorwärmfunktion ausgeschaltet ist, wenn
Sie das Gerät auaden (siehe Kapitel “Für den Gebrauch vorbereiten”).
Hinweis: Das Ladegerät funktioniert nicht, wenn das Massagegerät nicht
richtig eingesetzt ist.
Während des Ladevorgangs blinkt der Leuchtring.
,
Hinweis: Beim ersten Auaden oder wenn Sie das Massagegerät längere Zeit
nicht benutzt haben, kann es einige Minuten dauern, bis der Leuchtring zu
blinken beginnt. Dies ist normal.
Page 22

DEUTSCH22
Hinweis: Möglicherweise entsteht bei den ersten Ladevorgängen des Geräts
ein Geruch. Dies ist normal.
Wenn der Akku vollständig aufgeladen ist, erlischt der Leuchtring.
,
Kerzen-Set
Laden Sie das Kerzen-Set 12 Stunden auf.
Vollständig aufgeladen haben die Kerzen eine Betriebsdauer von ca. 24
Stunden.
1 Stecken Sie den Gerätestecker in das Ladegerät und den Adapter in
eine Steckdose.
Die Ladeanzeige am Ladegerät leuchtet auf (Abb. 3).
,
2 Stellen Sie eine oder mehrere Kerzen auf das Ladegerät (Abb. 4).
Wenn die Kerzen vollständig aufgeladen sind, erlischt die
,
Ladeanzeige am Ladegerät, und der Ladevorgang wird beendet.
Hinweis: Die Kerzen schalten sich möglicherweise ein, wenn Sie sie auf das
Ladegerät stellen. Nehmen Sie in diesem Fall die Kerzen vom Ladegerät, und
neigen Sie sie, um sie auszuschalten. Stellen Sie die Kerzen anschließend
wieder auf das Ladegerät.
Hinweis: Aus Sicherheitsgründen unterbricht ein integrierter Timer den
Ladevorgang nach 12 Stunden, wenn die Akkus vollständig geladen sind.
Wenn noch eine oder mehrere ungeladene Kerzen übrig sind und Sie diese
sofort auaden möchten, drücken Sie die Taste am Ladegerät, um einen
weiteren Ladezyklus zu starten. Die Ladeanzeige leuchtet dann wieder auf.
Für den Gebrauch vorbereiten
Massagegerät
Reinigung
Reinigen Sie das Massagegerät vor und nach jedem Gebrauch sowie bei
Anwendung in einem anderen Körperbereich gründlich, um das
Infektionsrisiko zu verringern (siehe Kapitel “Reinigung”).
Page 23

DEUTSCH 23
Vorwärmen des Massagegeräts
Das Ladegerät verfügt über eine Vorwärmtaste, mit der Sie die Unterseite
des Massagegeräts auf eine angenehme Temperatur (ca. 40 °C)
vorwärmen können.
Wärmen Sie das Massagegerät niemals auf einem Herd oder in einer
Mikrowelle auf.
1 Legen Sie das Massagegerät auf das Ladegerät. Es lässt sich nur dann
richtig einsetzen, wenn die Tasten nach oben zeigen.
2 Drücken Sie die Vorwärmtaste (Abb. 5).
Der Vorwärmleuchtring beginnt zu blinken und zeigt damit an, dass
,
sich das Massagegerät aufwärmt.
Nach ungefähr 5 Minuten hört der Vorwärmleuchtring auf zu
,
blinken. Er leuchtet dann dauerhaft und zeigt damit an, dass das
Massagegerät eine angenehme Temperatur erreicht hat.
Nach 30 Minuten schaltet sich die Vorwärmfunktion automatisch
,
aus. Sie können sie auch selbst ausschalten, indem Sie die
Vorwärmtaste noch einmal drücken.
Das Gerät benutzen
Massagegerät
1 Drücken Sie eine beliebige Taste, um das Massagegerät
einzuschalten (Abb. 6).
Der Leuchtring leuchtet auf.
,
Das Massagegerät beginnt im Standardmodus (Modus 1) bei
,
mittlerer Vibrationsgeschwindigkeit.
Tipp: Wir empfehlen Ihnen, im Standardmodus zu beginnen. Sie können die
Vibrationsgeschwindigkeit schrittweise erhöhen, wenn Sie mit den
Einstellungen vertraut sind.
Hinweis: Wenn Sie sich während des Gebrauchs unwohl fühlen, können Sie
die Vibrationsgeschwindigkeit senken. Siehe Schritt 3.
2 Drücken Sie die Moduswahltaste, um die Vibration Ihren Wünschen
anzupassen (Abb. 7).
Page 24

DEUTSCH24
Das Gerät verfügt über fünf Vibrationsar ten (A bis E), welche die drei
-
Vibrationspunkte an der Spitze (1), der Oberseite (2) und der
Unterseite (3) des Massagegeräts aktivieren (Abb. 8).
A Motor an der Spitze ist aktiv, Vibration ist auf einen Punkt konzentriert
B Motoren an Spitze und Unterseite sind abwechselnd aktiv
C Motoren oben und unten laufen abwechselnd
D Motoren an Spitze und Oberseite sind abwechselnd aktiv
E Alle Motoren sind abwechselnd aktiv
3 Drücken Sie die Höher- oder Niedriger-Taste ein- oder mehrmals,
um die Vibrationsgeschwindigkeit des Massagegeräts Ihren
Wünschen anzupassen. (Abb. 9)
Das Gerät verfügt über fünf Geschwindigkeitsstufen.
4 Sie können das Massagegerät auf unterschiedliche Weise halten.
Experimentieren Sie ein wenig, um die angenehmste
VerwendungsartfürdasMassagegerätherauszunden.
Tipp: Vorschläge nden Sie in der Startbroschüre.
Tipp: Sie können das Massagegerät auch in Verbindung mit Gleitgel oder
Massageöl auf Wasser- oder Silikonbasis benutzen. Verwenden Sie keine
parfümierten oder alkoholhaltigen Gleitgele oder Massageöle, um
Beschädigungen zu vermeiden.
5 Halten Sie die Moduswahltaste oder die Niedriger-Taste gedrückt,
um das Massagegerät auszuschalten.
Reisesicherung
Das Massagegerät kann zu Transportzwecken, z. B. auf Reisen, gesicher t
werden. Die Reisesicherung verhindert, dass das Massagegerät
versehentlich eingeschaltet wird.
1 Schalten Sie das Massagegerät aus.
2 Drücken Sie gleichzeitig die Höher-Taste und die Moduswahltaste,
um die Reisesicherung zu aktivieren. (Abb. 10)
Der Leuchtring blinkt einmal und zeigt damit an, dass das
,
Massagegerät gesichert ist.
Page 25

DEUTSCH 25
3 Um die Reisesicherung zu deaktivieren, drücken Sie erneut
gleichzeitig die Höher-Taste und die Moduswahltaste.
Der Leuchtring blinkt einmal und zeigt damit an, dass das
,
Massagegerät entsichert ist.
Hinweis: Wenn Sie das Massagegerät in das angeschlossene Ladegerät legen,
wird die Reisesicherung automatisch deaktiviert.
Kerzen-Set
1 Neigen Sie die Kerzen, um sie einzuschalten (Abb. 11).
Auf dieselbe Art können Sie die Kerzen auch ausschalten.
Reinigung
Massagegerät
Reinigen Sie das Massagegerät vor und nach jedem Gebrauch sowie bei
Anwendung in einem anderen Körperbereich gründlich, um das
Infektionsrisiko zu verringern.
Verwenden Sie niemals aggressive Reinigungs- oder Scheuermittel,
chemische Substanzen oder Desinfektionsmittel auf Alkoholbasis, um
Beschädigungen am Massagegerät zu vermeiden.
Reinigen Sie das Massagegerät nicht mit Materialien oder Werkzeugen,
die Beschädigungen verursachen könnten, z. B. Gegenstände aus Metall,
spitze Küchenutensilien oder Scheuerschwämme.
Das Massagegerät und das Ladegerät sind nicht spülmaschinenfest.
1 Schalten Sie das Massagegerät aus, und ziehen Sie den Netzstecker
des Ladegeräts aus der Steckdose.
2 Reinigen Sie das Massagegerät mit einem feuchten, in lauwarmem
Wasser getränkten Tuch mit milder, antibakterieller Seife, und
spülenSieesunterießendemWasserab.TrocknenSiedas
Massagegerät nach der Reinigung gründlich.
Tipp: Verwenden Sie ein Desinfektionsmittel ohne Alkohol, um das
Infektionsrisiko zu verringern.
Page 26

DEUTSCH26
Tauchen Sie das Massagegerät nicht länger als eine Stunde in Wasser.
3 Reinigen Sie das Ladegerät mit einem feuchten Tuch, und trocknen
Sie es gründlich.
Tauchen Sie das Ladegerät niemals in Wasser oder andere Flüssigkeiten;
spülenSieesauchnichtunterießendemWasserab.
Kerzen-Set
1 Schalten Sie die Kerzen aus, und ziehen Sie den Netzstecker des
Ladegeräts aus der Steckdose.
2 Reinigen Sie Adapter und Ladegerät mit einem trockenen Tuch.
Halten Sie Adapter und Ladegerät trocken.
3 ReinigenSiedieAußenseitederKerzenmiteinemfeuchtenTuch.
Verwenden Sie für die Reinigung der Kerzen keine Reinigungsmittel.
Reinigen Sie die Kerzen nicht in der Spülmaschine.
Gehen Sie vorsichtig mit den Kerzen um, da diese aus Glas bestehen.
Aufbewahrung
Massagegerät
Reinigen Sie das Massagegerät nach jedem Gebrauch.
1 Schalten Sie das Massagegerät aus, und ziehen Sie den Netzstecker
des Ladegeräts aus der Steckdose.
2 Legen Sie das Massagegerät auf die Ladestation, und bewahren Sie
es an einem sicheren, trockenen Ort ohne direkte
Sonneneinstrahlung auf.
Kerzen-Set
1 Ziehen Sie den Netzstecker des Ladegeräts.
2 Stellen Sie die Kerzen in das Ladegerät.
Page 27

DEUTSCH 27
3 Bewahren Sie das Ladegerät mit den eingesetzten Kerzen an einem
sicheren, trockenen Ort ohne direkte Sonneneinstrahlung auf.
Ersatz
Wenn ein Teil des Massagegeräts oder des Kerzen-Sets ausgetauscht
werden muss, besuchen Sie unsere Website unter www.philips.com/
intimatemassager.
Hinweis: Die Akkus von Massagegerät und Kerzen können nicht ausgetauscht
werden.
Umweltschutz
Werfen Sie die Geräte am Ende der Lebensdauer nicht in den
-
normalen Hausmüll. Bringen Sie sie zum Recycling zu einer ofziellen
Sammelstelle. Auf diese Weise helfen Sie, die Umwelt zu
schonen (Abb. 12).
Die integrierten Akkus des Massagegeräts und der Kerzen enthalten
-
Substanzen, welche die Umwelt gefährden können. Entfernen Sie stets
die Akkus, bevor Sie die Geräte an einer ofziellen Recyclingstelle
abgeben. Geben Sie verbrauchte Akkus bei einer Batteriesammelstelle
ab. Falls Sie beim Entfernen der Akkus Probleme haben, können Sie
das Massagegerät und die Kerzen auch an ein Philips Service-Center
geben. Dort werden die Akkus herausgenommen und umweltgerecht
entsorgt. Weitere Informationen nden Sie auf unserer Website unter
www.philips.com/intimatemassager (Fig. 13).
Die Akkus entfernen (optional)
Wenn Sie die Akkus des Massagegeräts und der Kerzen selbst entfernen
möchten, bevor Sie sie an einer ofziellen Sammelstelle abgeben, befolgen
Sie die nachstehenden Anweisungen.
Massagegerät
Verwenden Sie keine spitzen Werkzeuge wie Messer oder
Schraubendreher, um das Massagegerät zu öffnen.
1 Lassen Sie das Massagegerät so lange laufen, bis es stillsteht.
Page 28

DEUTSCH28
2 Legen Sie das Massagegerät in den mitgelieferten Akku-
Entfernungsbeutel.
3 Legen Sie den Akku-Entfernungsbeutel mit dem Massagegerät
mindestens 24 Stunden lang ins Gefrierfach.
4 Nehmen Sie den Beutel aus dem Gefrierfach. Legen Sie den Beutel
sofortaufdenBoden,undtretenSiefestmitdemFußdarauf,um
das Massagegerät aufzubrechen.
Achtung:TragenSiedabeifesteSchuhe.WennSiediesbarfuß
versuchen, könnten Sie sich verletzen.
Hinweis: Sollte das Massagegerät nach dieser Vorgehensweise nicht
zerbrochen sein, wiederholen Sie die Schritte 3 und 4.
5 Öffnen Sie den Beutel, und entnehmen Sie die Teile des
Massagegeräts.
6 Schrauben Sie die Platine vom Akku mit einem
Schlitzschraubendreher ab.
Kerzen
1 Lösen Sie das Akkugehäuse in der Kerze mit einem
Schraubendreher.
2 Entfernen Sie das Akkugehäuse aus der Kerze.
3 Führen Sie einen Schraubendreher in die Verbindungsfuge zwischen
Sockel und Abdeckung des Akkufachs ein. Drücken Sie den
Schraubendreher nach unten, um die Abdeckung vom Sockel zu
lösen (Abb. 14).
4 Nehmen Sie den Akku aus dem Sockel.
Garantie und Kundendienst
Benötigen Sie weitere Informationen oder treten Probleme auf, besuchen
Sie unsere Website www.philips.com/intimatemassager, oder setzen Sie
sich mit einem Philips Service-Center in Ihrem Land in Verbindung
(Telefonnummer siehe Garantieschrift).
Page 29

DEUTSCH 29
Fehlerbehebung
In diesem Abschnitt sind die häugsten Probleme zusammengestellt, die
mit Ihren Geräten auftreten können. Sollten Sie ein Problem mithilfe der
nachstehenden Informationen nicht beheben können, besuchen Sie
unsere Website unter www.philips.com/intimatemassager.
Problem Mögliche Ursache Lösung
Das
Massagegerät
funktioniert
nicht.
Das
Massagegerät
schaltet sich
plötzlich aus.
Der Akku ist leer. Laden Sie den Akku auf (siehe
Kapitel “Laden”).
Das Ladegerät lädt
immer noch.
Die Reisesicherung
ist aktiviert.
Der Akku ist leer. Laden Sie das Massagegerät auf
Es dauert 24 Stunden, bis das
Massagegerät vollständig
aufgeladen ist. Voll aufgeladen
hat das Massagegerät eine
Betriebszeit von bis zu einer
Stunde. Laden Sie das
Massagegerät für eine einzelne
Anwendung mindestens 10
Stunden lang auf (siehe Kapitel
“Laden”).
Deaktivieren Sie die
Reisesicherung (siehe Kapitel
“Das Gerät benutzen”).
(siehe Kapitel “Laden”).
Page 30

DEUTSCH30
Problem Mögliche Ursache Lösung
Das Ladegerät
des
Massagegeräts
funktioniert
nicht.
Während des
Ladevorgangs
werden das
Massagegerät
und das
Ladegerät
warm.
Das Ladegerät
des KerzenSets
funktioniert
nicht.
Sie haben die
Moduswahltaste
und die NiedrigerTaste länger
gedrückt und damit
das Massagegerät
ausgeschaltet.
Das Ladegerät ist
nicht an das
Stromnetz
angeschlossen.
Die
Vorwärmfunktion
ist aktiviert.
Sie haben das
Massagegerät nicht
richtig in das
Ladegerät
eingesetzt.
Das ist normal. Es sind keine weiteren
Das Ladegerät ist
nicht an das
Stromnetz
angeschlossen.
Drücken Sie eine beliebige
Taste, um das Massagegerät
wieder einzuschalten.
Stecken Sie den Gerätestecker
in das Ladegerät und den
Adapter in eine Steckdose.
Drücken Sie die Vorwärmtaste,
um die Vorwärmfunktion
auszuschalten.
Legen Sie das Massagegerät
ordnungsgemäß in das
Ladegerät ein (siehe Kapitel
“Laden”).
Arbeitsschritte notwendig.
Stecken Sie den Gerätestecker
in das Ladegerät und den
Adapter in eine Steckdose.
Page 31

Problem Mögliche Ursache Lösung
Die Kerzen
funktionieren
nicht.
Die Kerzen des
Kerzen-Sets
schalten sich
ein, wenn ich
sie auf das
Ladegerät
stelle.
Die Akkus der
Kerzen sind leer.
Sie haben die
Kerzen nicht
ausgeschaltet, als
deren Akkus leer
waren.
Stellen Sie die Kerzen auf das
angeschlossene Ladegerät, und
laden Sie sie 12 Stunden lang
auf.
Nehmen Sie die Kerzen aus
dem Ladegerät, und neigen Sie
sie, um sie auszuschalten. Stellen
Sie dann die Kerzen wieder auf
das Ladegerät.
DEUTSCH 31
Page 32

32
ESPAÑOL
Introducción
Enhorabuena por la compra de este producto y bienvenido a Philips. Para
sacar el mayor partido de la asistencia que Philips le ofrece, registre su
producto en www.philips.com/welcome.
Philips se dedica a la fabricación de productos de alta calidad que aportan
algo nuevo a su vida. Le ofrecemos unas velas y un masajeador íntimo
para que seduzca a su pareja.
Descripción general (g. 1)
A Masajeador
B Botón de selección de modo
C Anillo luminoso
D Botón de disminución de intensidad
E Botón de aumento de intensidad
F Cargador del masajeador
G Botón de precalentamiento con anillo luminoso
H Adaptador del masajeador
I Clavija pequeña
J Velas
K Cargador del juego de velas
L Botón/piloto de carga
M Adaptador del juego de velas
N Clavija pequeña
Importante
Antes de usar los aparatos, lea atentamente este manual del usuario y
consérvelo por si necesitara consultarlo en el futuro.
Peligro
Mantenga los adaptadores y el cargador del juego de velas siempre
secos.
Siempre que se intercambian uidos corporales, existe el riesgo de
-
contagio de enfermedades e infecciones de transmisión sexual. Para
reducir el riesgo de infección, coloque un preservativo alrededor del
masajeador íntimo cuando entre en contacto con zonas íntimas.
Page 33

ESPAÑOL 33
Cambie el preservativo cuando desplace el masajeador a otra zona
del cuerpo.
El masajeador está diseñado sólo para uso externo. No lo utilice para
la penetración.
Advertencia
No sumerja nunca las velas y el cargador del masajeador en agua u
otros líquidos, ni los enjuague bajo el grifo.
Antes de enchufar los cargadores, compruebe si el voltaje indicado
en los adaptadores se corresponde con el voltaje de red local.
Compruebe regularmente el masajeador, los cargadores, los
adaptadores y las velas por si estuvieran dañados. Si alguno de los
componentes tiene algún daño, deje de utilizarlo y consulte nuestro
sitio Web www.philips.com/intimatemassager.
Los adaptadores contienen un transformador. No cor te los
-
adaptadores para sustituirlos por otras clavijas, ya que se producirán
situaciones de peligro.
Estos aparatos no deben ser usados por personas con su capacidad
física, psíquica o sensorial reducida, ni por quienes no tengan los
conocimientos y la experiencia necesarios, a menos que sean
supervisados o instruidos acerca del uso de los aparatos por una
persona responsable de su seguridad.
-
Asegúrese de que los niños no jueguen con estos aparatos.
-
Desconecte el masajeador inmediatamente y no vuelva a utilizarlo si
produce algún ruido anormal. Consulte nuestro sitio Web www.
philips.com/intimatemassager.
Precaución
Consulte a su médico antes de utilizar el masajeador en los siguientes
casos:
1 Durante el embarazo o poco después del parto
2 Si tiene la piel irritada o alguna enfermedad cutánea
3 Si tiene algún otro problema de salud
-
Si el uso del masajeador provoca una reacción alérgica, deje de
utilizarlo y consulte a su médico.
No utilice el masajeador en los ojos ni en las venas.
-
-
Este masajeador no está diseñado para nes médicos.
Page 34

ESPAÑOL34
Si desea utilizar el masajeador junto con algún lubricante o aceite de
masaje, utilice sólo productos a base de agua o silicona. No utilice
lubricantes o aceites de masaje perfumados o a base de alcohol ya
que pueden provocar daños.
Limpie siempre el masajeador después de utilizarlo para reducir los
-
riesgos de infección (consulte el capítulo “Limpieza”).
No exponga el masajeador o el cargador a la luz solar directa ni a la
-
luz UV (por ejemplo, de un solárium) durante largo tiempo.
No deje caer el masajeador.
-
Utilice cada cargador sólo con el adaptador adecuado que se
suministra.
Coloque siempre el masajeador y las velas en el cargador adecuado.
-
No coloque nada más en los cargadores.
No exponga el juego de velas a altas temperaturas.
-
Manipule las velas con cuidado, ya que el exterior es de cristal.
-
No intente reparar los aparatos usted mismo. En caso de que se
realice alguna reparación o intento de reparación en un centro de
servicio no autorizado por Philips, la garantía quedará anulada.
Consulte nuestro sitio Web www.philips.com/intimatemassager para
obtener más información.
Cumplimiento
Estos aparatos Philips cumplen todos los estándares sobre campos
electromagnéticos (CEM). Si se utilizan correctamente y de acuerdo con
las instrucciones de este manual, los aparatos se pueden usar de forma
segura según los conocimientos cientícos disponibles hoy en día.
Carga
Masajeador
El masajeador y su cargador se calientan durante la carga.
Nunca cubra el cargador con ningún objeto (por ejemplo, una toalla o
prenda de ropa) durante su uso.
Nota: Al sacarlo del embalaje, el masajeador no está cargado. Cárguelo antes
de utilizarlo por primera vez.
Page 35

ESPAÑOL 35
Para realizar una sola sesión, cargue el masajeador durante al menos
10 horas.
Para que esté completamente cargado, cargue el masajeador durante
24 horas. Cuando está completamente cargado, el masajeador tiene un
tiempo de funcionamiento de hasta 1 hora.
El tiempo de funcionamiento real puede variar según el modo de
vibración y la velocidad seleccionados.
Cargue el masajeador cuando el anillo luminoso comience a parpadear
lentamente, lo que indica que la batería está casi descargada.
1 Inserte la clavija pequeña en el cargador y enchufe el adaptador a la
toma de corriente.
2 Coloque el masajeador en el cargador. El masajeador encaja
correctamente en el cargador sólo con los botones orientados
haciaarriba.(g.2)
El masajeador se desconecta automáticamente al colocarlo en el
cargador.
Nota: Asegúrese de que la función de precalentamiento esté desactivada al
cargar el aparato (consulte el capítulo “Preparación para su uso”).
Nota: El cargador no funciona si el masajeador se coloca de forma incorrecta.
Durante la carga, el anillo luminoso parpadea.
,
Nota: Cuando cargue el masajeador por primera vez, o después de mucho
tiempo sin usarlo, el anillo luminoso puede tardar unos minutos en
parpadear. Esto es normal.
Nota: El aparato puede producir olor las primeras veces que lo cargue. Esto
es normal.
Cuando la batería está completamente cargada, el anillo luminoso
,
se apaga.
Juego de velas
Cargue el juego de velas durante 12 horas.
Cuando las velas están completamente cargadas, proporcionan un tiempo
de funcionamiento aproximado de 24 horas.
Page 36

ESPAÑOL36
1 Inserte la clavija pequeña en el cargador y enchufe el adaptador a la
toma de corriente.
Elpilotodecargadelcargadorseenciende(g.3).
,
2 Coloqueunaovariasvelasenelcargador(g.4).
Cuando las velas están completamente cargadas, el piloto de carga
,
del cargador se apaga y el proceso de carga se detiene.
Nota: Puede que las velas se enciendan al colocarlas en el cargador. Si es así,
quite las velas del cargador e inclínelas para apagarlas. A continuación, vuelva
a colocarlas en el cargador.
Nota: Por motivos de seguridad, el temporizador integrado detiene el proceso
de carga después de 12 horas, cuando las baterías están completamente
cargadas. Si necesita cargar algunas velas más y desea hacerlo de forma
inmediata, pulse el botón del cargador para iniciar otro ciclo de carga. Al
hacerlo, el piloto de carga vuelve a encenderse.
Preparación para su uso
Masajeador
Limpieza
Limpie a fondo el masajeador antes de usarlo por primera vez, después
de cada uso y al utilizarlo en otra zona del cuerpo, para reducir el
riesgo de infección (consulte el capítulo “Limpieza”).
Precalentamiento del masajeador
El cargador tiene un botón de precalentamiento que puede utilizar para
precalentar la parte inferior del masajeador hasta una temperatura
agradable (40 °C aproximadamente).
Nunca caliente el masajeador en el horno o el microondas.
1 Coloque el masajeador en el cargador. Sólo encaja perfectamente
en el cargador si los botones están orientados hacia arriba.
2 Pulseelbotóndeprecalentamiento(g.5).
El anillo luminoso de precalentamiento comienza a parpadear para
,
indicar que el masajeador se está calentando.
Page 37

ESPAÑOL 37
Tras unos 5 minutos, el anillo luminoso de precalentamiento deja
,
de parpadear y se ilumina de forma continua para indicar que el
masajeador ha alcanzado una temperatura agradable.
Tras 30 minutos, la función de precalentamiento se desconecta
,
automáticamente, aunque también puede desconectarla si pulsa de
nuevo el botón de precalentamiento.
Uso del aparato
Masajeador
1 Pulsecualquierbotónparaencenderelmasajeador(g.6).
El anillo luminoso se ilumina.
,
El masajeador comienza a funcionar en el modo predeterminado
,
(modo 1) y a una velocidad de vibración moderada.
Consejo: Le recomendamos que comience con el modo predeterminado y que
aumente gradualmente la velocidad de vibración una vez que se familiarice
con las opciones.
Nota: Si no se siente cómodo durante el uso del masajeador, puede ajustar la
velocidad de vibración. Consulte el paso 3.
2 Pulse el botón de selección de modo para ajustar la vibración a su
gusto(g.7).
El aparato dispone de 5 modos de vibración (de A a E) que activan
hasta 3 zonas de vibración en la punta (1), la parte superior (2) y la
parte inferior (3) del masajeador (g. 8).
A Se activa el motor de la punta, la vibración se concentra en esa zona
B Los motores de la punta y la parte inferior se activan sucesivamente
C Los motores de la parte superior e inferior se activan sucesivamente
D Los motores de la punta y la parte superior se activan sucesivamente
E Todos los motores se activan sucesivamente
3 Pulse el botón de aumento o disminución de la intensidad una o
varias veces para ajustar la velocidad de vibración del masajeador a
sugusto.(g.9)
El aparato tiene 5 niveles de velocidad.
Page 38

ESPAÑOL38
4 Puede sostener el masajeador de distintas formas. Experimente
hasta encontrar la forma más cómoda de usar el masajeador.
Consejo: Para obtener sugerencias, consulte el folleto de introducción.
Consejo: También puede usar el masajeador con lubricantes o aceites de
masaje a base de agua o silicona. No utilice lubricantes o aceites de masaje
perfumados o a base de alcohol ya que podrían provocar daños.
5 Para apagar el masajeador, mantenga pulsado el botón de selección
de modo o el botón de disminución de intensidad.
Bloqueo para viajes
Puede bloquear el masajeador, por ejemplo, si va a realizar un viaje. El
bloqueo para viajes evita que el masajeador se encienda accidentalmente.
1 Apague el masajeador.
2 Pulse al mismo tiempo el botón de aumento de intensidad y el
botón de selección de modo para activar el bloqueo para
viajes.(g.10)
El anillo luminoso parpadea una vez para indicar que el masajeador
,
está bloqueado.
3 Para desactivar el bloqueo para viajes, vuelva a pulsar al mismo
tiempo el botón de aumento de intensidad y el botón de selección
de modo.
El anillo luminoso parpadea una vez para indicar que el masajeador
,
está desbloqueado.
Nota: El bloqueo para viajes se desactiva automáticamente al colocar el
masajeador en el cargador enchufado.
Juego de velas
1 Inclinelasvelasparaencenderlas(g.11).
Puede apagarlas del mismo modo.
Page 39

ESPAÑOL 39
Limpieza
Masajeador
Limpie a fondo el masajeador antes de usarlo por primera vez, después
de cada uso y al utilizarlo en otra zona del cuerpo, para reducir el
riesgo de infección.
No utilice agentes de limpieza abrasivos o agresivos, sustancias químicas
ni desinfectantes a base de alcohol para evitar que se deteriore el
masajeador.
No limpie el masajeador con materiales o herramientas que puedan
dañarlo,porejemplo,utensiliosdecocinametálicosoalados,o
estropajos.
Ni el masajeador y ni el cargador pueden lavarse en el lavavajillas.
1 Apague el masajeador y desenchufe el cargador.
2 Limpie el masajeador con un paño humedecido en agua templada y
jabón antibacterias suave, y enjuáguelo bajo el grifo. Seque bien el
masajeador después de lavarlo.
Consejo: Use un desinfectante que no sea a base de alcohol para reducir el
riesgo de infecciones.
No sumerja el masajeador en agua durante más de una hora.
3 Limpie el cargador con un paño húmedo y séquelo bien.
No sumerja nunca el cargador en agua ni en otros líquidos, ni lo
enjuague bajo el grifo.
Juego de velas
1 Apague las velas y desenchufe el cargador.
2 Limpie el adaptador y el cargador con un paño seco.
Mantenga el adaptador y el cargador siempre secos.
3 Limpie la parte exterior de las velas con un paño húmedo.
Page 40

ESPAÑOL40
No utilice agentes de limpieza para limpiar las velas. No lave las velas en
el lavavajillas.
Manipule las velas con cuidado, ya que el exterior es de cristal.
Almacenamiento
Masajeador
Limpie siempre el masajeador después de usarlo.
1 Apague el masajeador y desenchufe el cargador.
2 Ponga el masajeador en el cargador y guárdelo en un lugar seguro,
seco y alejado de la luz del sol.
Juego de velas
1 Desenchufe el cargador.
2 Coloque las velas en el cargador.
3 Guarde el cargador con las velas en un lugar seguro, seco y alejado
de la luz del sol.
Sustitución
Si necesita sustituir un elemento del masajeador o del juego de velas,
consulte nuestro sitio Web www.philips.com/intimatemassager.
Nota: Las baterías recargables del masajeador y de las velas no pueden
sustituirse.
Medio ambiente
Al nal de su vida útil, no tire los aparatos junto con la basura normal
-
del hogar. Llévelos a un punto de recogida ocial para su reciclado.
De esta manera ayudará a conservar el medio ambiente (g. 12).
Las baterías recargables incorporadas del masajeador y de las velas
contienen sustancias que pueden contaminar el medio ambiente.
Quite siempre las baterías antes de deshacerse de los aparatos y
llévelas a un punto de recogida ocial. Deposite las baterías en un
Page 41

ESPAÑOL 41
lugar ocial de recogida de baterías. Si no puede quitar las baterías,
puede llevar el masajeador y las velas a un centro de servicio Philips.
El personal del mismo extraerá las baterías y se deshará de ellas de
forma no perjudicial para el medio ambiente. Consulte nuestro sitio
Web www.philips.com/intimatemassager para obtener más
información (Fig. 13).
Cómo extraer las baterías recargables (opcional)
Si decide quitar las baterías recargables del masajeador y las velas usted
mismo antes de llevarlos a un punto de recogida ocial, siga las
instrucciones que aparecen a continuación.
Masajeador
Noutiliceherramientasaladas,comocuchillosodestornilladores,
para abrir el masajeador.
1 Deje funcionar el masajeador hasta que se pare.
2 Ponga el masajeador en la bolsa suministrada para extracción de la
batería.
3 Ponga la bolsa para extracción de la batería con el masajeador en el
congelador durante al menos 24 horas.
4 Saque la bolsa del congelador. Ponga inmediatamente la bolsa en el
suelo y písela con fuerza para romper el masajeador.
Precaución: Realice este procedimiento sólo con zapatos resistentes. Si
lo intenta con los pies descalzos podría producirse lesiones.
Nota: Si no consigue romper el masajeador mediante el procedimiento
anterior, repita los pasos 3 y 4.
5 Abra la bolsa y saque las piezas del masajeador.
6 Desatornille el circuito impreso de la batería recargable con un
destornillador plano.
Page 42

ESPAÑOL42
Velas
1 Utiliceundestornilladorparaaojarelcompartimentodela
batería del interior de la vela.
2 Saque el compartimento de la batería de la vela.
3 Inserte un destornillador en la ranura de conexión que hay entre la
base y la tapa del compartimento de la batería. Presione hacia abajo
coneldestornilladorparasepararlatapadelabase(g.14).
4 Extraiga la batería de la base.
Garantía y servicio
Si necesita información o si tiene algún problema, consulte nuestro sitio
Web
www.philips.com/intimatemassager o póngase en contacto con el
Servicio de Atención al Cliente de Philips en su país (hallará el número de
teléfono en el folleto de la garantía mundial).
Guía de resolución de problemas
En este capítulo se resumen los problemas más frecuentes que pueden
surgir. Si no puede resolver el problema con la información indicada a
continuación, consulte nuestro sitio Web wwww.philips.com/
intimatemassager.
Problema Posible causa Solución
El masajeador no
funciona.
La batería
recargable está
descargada.
Cargue la batería recargable
(consulte el capítulo “Carga”).
Page 43

Problema Posible causa Solución
El masajeador se
apaga
repentinamente.
El cargador del
masajeador no
funciona.
El cargador
continúa cargando.
El bloqueo para
viajes está activado.
La batería
recargable está
descargada.
Ha pulsado el
botón de selección
de modo o el
botón de
disminución de
intensidad durante
un tiempo y el
masajeador se ha
apagado.
El cargador no está
enchufado.
La función de
precalentamiento
está activada.
El masajeador tarda 24 horas
en cargarse completamente.
Cuando está completamente
cargado, el masajeador tiene
un tiempo de funcionamiento
de hasta 1 hora. Para realizar
una sola sesión, cargue el
masajeador durante al menos
10 horas (consulte el capítulo
“Carga”).
Desactive el bloqueo para
viajes (consulte el capítulo
“Uso del aparato”).
Cargue el masajeador
(consulte el capítulo “Carga”).
Pulse cualquier botón para
encender el masajeador de
nuevo.
Inserte la clavija pequeña en
el cargador y enchufe el
adaptador a la toma de
corriente.
Pulse el botón de
precalentamiento para
desactivar esta función.
ESPAÑOL 43
Page 44

ESPAÑOL44
Problema Posible causa Solución
El masajeador y
su cargador se
calientan durante
la carga.
El cargador del
juego de velas no
funciona.
Las velas del
juego de velas no
funcionan.
Las velas del
juego de velas se
encienden al
colocarlas en el
cargador.
No ha colocado el
masajeador en el
cargador
correctamente.
Esto es normal. No tiene que hacer nada.
El cargador no está
enchufado.
Las baterías de las
velas están
descargadas.
No apagó las velas
cuando se agotaron
las baterías.
Coloque el masajeador
correctamente en el
cargador (consulte el capítulo
“Carga”).
Inserte la clavija pequeña en
el cargador y enchufe el
adaptador a la toma de
corriente.
Coloque las velas en el
cargador enchufado y
cárguelas durante 12 horas.
Quite las velas del cargador,
inclínelas para apagarlas y
vuelva a colocarlas en el
cargador.
Page 45

NEDERLANDS
Inleiding
Gefeliciteerd met uw aankoop en welkom bij Philips! Als u volledig wilt
proteren van de ondersteuning die Philips biedt, registreer uw product
dan op www.philips.com/welcome.
Philips spant zich in om hoogwaardige producten te maken die een
meerwaarde geven aan uw leven. Dit pakket bestaat uit kaarslampjes en
een intieme stimulator om elkaar te verleiden.
Algemene beschrijving (g. 1)
A Stimulator
B Modusselectieknop
C Lichtring
D Knop voor lagere snelheid
E Knop voor hogere snelheid
F Oplader van stimulator
G Voorverwarmknop met lichtring
H Adapter van stimulator
I Kleine stekker
J Kaarslampjes
K Oplader van kaarslampjesset
L Oplaadlampje/-knop
M Adapter van kaarslampjesset
N Kleine stekker
Belangrijk
Lees deze gebruiksaanwijzing zorgvuldig door voordat u de apparaten
gaat gebruiken. Bewaar de gebruiksaanwijzing om deze indien nodig te
kunnen raadplegen.
Gevaar
Houd de adapters en de oplader van de kaarslampjesset droog.
-
Wanneer er sprake is van uitwisseling van lichaamsvloeistoffen,
-
bestaat het gevaar van verspreiding van seksueel overdraagbare
ziekten en infecties. Om het risico op infecties te verminderen, raden
we u aan een condoom om de intieme stimulator te doen wanneer
45
Page 46

NEDERLANDS46
deze in contact komt met intieme lichaamsdelen. Vervang het
condoom wanneer u de stimulator op een ander lichaamsdeel gaat
gebruiken.
De stimulator is alleen bedoeld voor uitwendig gebruik. Gebruik het
apparaat niet voor penetratie.
Waarschuwing
Dompel de kaarslampjes en de oplader van de stimulator nooit in
-
water of een andere vloeistof en spoel ze ook niet af onder de kraan.
-
Controleer of het voltage aangegeven op de adapters overeenkomt
met de plaatselijke netspanning voordat u de opladers aansluit.
Controleer regelmatig of de stimulator, de opladers, de adapters en
-
de kaarslampjes niet beschadigd zijn. Als een van deze onderdelen op
enige wijze beschadigd is, gebruik ze dan niet meer en raadpleeg onze
website www.philips.com/intimatemassager.
-
De adapters bevatten een transformator. Knip de adapters niet af om
deze te vervangen door andere stekkers, omdat dit een gevaarlijke
situatie oplevert.
-
Deze apparaten zijn niet bedoeld voor gebruik door personen met
verminderde lichamelijke, zintuiglijke of geestelijke vermogens, of die
gebrek aan ervaring of kennis hebben, tenzij iemand die
verantwoordelijk is voor hun veiligheid toezicht op hen houdt of hen
heeft uitgelegd hoe de apparaten dienen te worden gebruikt.
-
Houd toezicht op kinderen om te voorkomen dat ze met de
apparaten gaan spelen.
-
Schakel de stimulator onmiddellijk uit en gebruik hem niet meer als
deze een abnormaal geluid produceert. Raadpleeg onze website
www.philips.com/intimatemassager.
Let op
-
In de volgende gevallen dient u eerst uw arts te raadplegen voordat
u de stimulator gaat gebruiken:
1 Tijdens een zwangerschap of kort na de bevalling
2 Als u een geïrriteerde huid of een huidziekte hebt
3 Als u andere gezondheidsproblemen hebt
Als het gebruik van de stimulator leidt tot een allergische reactie,
-
gebruik de stimulator dan niet meer en raadpleeg uw arts.
Page 47

NEDERLANDS 47
Gebruik de stimulator niet op ogen of slagaders.
De stimulator is niet bedoeld als medisch apparaat.
-
Als u de stimulator wilt gebruiken in combinatie met een glijmiddel of
-
massageolie, gebruik dan alleen varianten op water- of siliconenbasis.
Gebruik geen glijmiddelen of massageoliën die een geurstof en/of
alcohol bevatten, omdat dit schade kan veroorzaken.
Maak de stimulator na gebruik altijd schoon om het risico op infecties
-
te verminderen (zie hoofdstuk ‘Schoonmaken’).
Stel de stimulator en de bijbehorende oplader niet gedurende lange
-
tijd bloot aan direct zonlicht of UV-licht (bijvoorbeeld van een
bruiningsapparaat).
Pas op dat u de stimulator niet laat vallen.
-
Gebruik elke oplader alleen in combinatie met de bijbehorende
bijgeleverde adapter. Sluit geen andere adapters aan op de opladers.
Plaats de stimulator en de kaarslampjes altijd op de juiste oplader.
Plaats niets anders op de opladers.
Stel de kaarslampjesset niet bloot aan extreme hitte.
-
Wees voorzichtig met de kaarslampjes, want de buitenkant is gemaakt
van glas.
Probeer niet zelf de apparaten te repareren. In het geval van een
(poging tot) reparatie door een servicecentrum dat niet door Philips
is geautoriseerd, vervalt de garantie. Raadpleeg onze website www.
philips.com/intimatemassager voor verdere instructies.
Naleving van richtlijnen
Deze Philips-apparaten voldoen aan alle richtlijnen met betrekking tot
elektromagnetische velden (EMV). Mits de apparaten op de juiste wijze
en volgens de instructies in deze gebruiksaanwijzing worden gebruikt, zijn
deze veilig te gebruiken volgens het nu beschikbare wetenschappelijke
bewijs.
Page 48

NEDERLANDS48
Opladen
Stimulator
De stimulator en de bijbehorende oplader worden warm tijdens het
opladen.
Bedek de oplader nooit (bijvoorbeeld met een handdoek of
kledingstuk) tijdens gebruik.
Opmerking: De stimulator is niet vooraf opgeladen. Laad de stimulator op
voordat u deze voor de eerste keer gebruikt.
Voor één sessie moet u de stimulator minimaal 10 uur opladen.
Voor een volledige oplaadbeurt moet u de stimulator 24 uur opladen. Als
de stimulator volledig is opgeladen, kunt u deze maximaal 1 uur
gebruiken.
De werkelijke gebruikstijd kan in de loop van de tijd variëren, afhankelijk
van de gekozen vibratiemodus en snelheid.
Laad de stimulator op wanneer de lichtring langzaam begint te knipperen.
Dit geeft aan dat de accu bijna leeg is.
1 Steek de kleine stekker in de oplader en steek de adapter in het
stopcontact.
2 Plaats de stimulator op de oplader. Deze past alleen goed op de
oplader wanneer u de stimulator met de knoppen naar boven
plaatst.(g.2)
De stimulator schakelt automatisch uit wanneer u deze op de oplader
plaatst.
Opmerking: Zorg ervoor dat de voorverwarmfunctie is uitgeschakeld wanneer
u het apparaat oplaadt (zie hoofdstuk ‘Klaarmaken voor gebruik’).
Opmerking: De oplader werkt niet als de stimulator onjuist is geplaatst.
Tijdens het opladen knippert de lichtring.
,
Opmerking: Wanneer u de stimulator voor de eerste keer oplaadt of wanneer
u deze lange tijd niet hebt gebruikt, kan het enkele minuten duren voordat de
lichtring begint te knipperen. Dit is normaal.
Page 49

NEDERLANDS 49
Opmerking: Het apparaat kan de eerste paar keren wanneer u het oplaadt
een bepaalde geur voortbrengen. Dit is normaal.
Wanneer de accu volledig is opgeladen, gaat de lichtring uit.
,
Kaarslampjesset
Laad de kaarslampjesset 12 uur op.
Wanneer de kaarslampjes volledig zijn opgeladen, hebben ze een
gebruikstijd van ongeveer 24 uur.
1 Steek de kleine stekker in de oplader en steek de adapter in het
stopcontact.
Hetoplaadlampjeopdeopladergaatbranden(g.3).
,
2 Plaatseenofmeerderekaarslampjesopdeoplader(g.4).
Wanneer de kaarslampjes volledig zijn opgeladen, gaat het
,
oplaadlampje op de oplader uit en stopt het oplaadproces.
Opmerking: Mogelijk gaan de kaarslampjes branden wanneer u ze op de
oplader plaatst. Als dat het geval is, verwijder dan de kaarslampjes van de
oplader en houd ze schuin om ze uit te schakelen. Plaats de kaarslampjes
vervolgens terug op de oplader.
Opmerking: Uit veiligheidsoverwegingen is er een ingebouwde timer aanwezig
die het oplaadproces na 12 uur stopt, wanneer de accu’s volledig zijn
opgeladen. Als u een of meerdere kaarslampjes hebt waarvan de accu leeg is
en u deze meteen wilt opladen, drukt u op de knop op de oplader om een
nieuwe oplaadcyclus te starten. Als u dit doet, gaat het oplaadlampje opnieuw
branden.
Klaarmaken voor gebruik
Stimulator
Schoonmaken
Maak de stimulator grondig schoon voordat u deze voor het eerst
gebruikt, na elk gebruik en wanneer u deze op een ander deel van het
lichaam gebruikt, om het risico op infecties te verminderen (zie
hoofdstuk ‘Schoonmaken’).
Page 50

NEDERLANDS50
De stimulator voorverwarmen
De oplader heeft een voorverwarmknop waarmee u de onderkant van
de stimulator kunt voorverwarmen tot een aangename temperatuur
(ca. 40°C).
Verwarm de stimulator nooit in een oven of magnetron.
1 Plaats de stimulator op de oplader. Deze past alleen goed op de
oplader wanneer u de stimulator met de knoppen naar boven
plaatst.
2 Drukopdevoorverwarmknop(g.5).
De lichtring voor voorverwarming begint te knipperen om aan te
,
geven dat de stimulator wordt verwarmd.
Na ongeveer 5 minuten knippert de lichtring niet meer, maar
,
brandt deze continu om aan te geven dat de stimulator een
aangename temperatuur heeft bereikt.
Na 30 minuten schakelt de voorverwarmfunctie automatisch uit,
,
maar u kunt deze functie ook uitschakelen door nogmaals op de
voorverwarmknop te drukken.
Het apparaat gebruiken
Stimulator
1 Druk op een willekeurige knop om de stimulator in te
schakelen(g.6).
De lichtring gaat branden.
,
De stimulator start in de standaardmodus (modus 1) en op een
,
gemiddelde vibratiesnelheid.
Tip We raden u aan om in de standaardmodus te beginnen. U kunt
langzaam de vibratiesnelheid opvoeren wanneer u bekend bent met de
mogelijkheden.
Opmerking: Als het gebruik van de stimulator niet lekker aanvoelt, kunt u de
vibratiesnelheid aanpassen. Zie stap 3.
2 Druk op de modusselectieknop om de vibratie naar wens aan te
passen(g.7).
Page 51

NEDERLANDS 51
Het apparaat heeft 5 vibratiemodi (A t/m E) die maximaal 3
-
vibratiepunten in het uiteinde (1), de bovenkant (2) en de onderkant
(3) van de stimulator activeren (g. 8).
A Motor in het uiteinde is ingeschakeld, vibratie concentreert zich op
één punt.
B Motors in het uiteinde en aan de onderkant worden om en om
ingeschakeld.
C Motors aan de bovenkant en aan de onderkant worden om en om
ingeschakeld.
D Motors in het uiteinde en aan de bovenkant worden om en om
ingeschakeld.
E Alle motors worden om en om ingeschakeld.
3 Druk een of meerdere keren op de knop voor een hogere of lagere
snelheid om de vibratiesnelheid van de stimulator aan te passen aan
uweigenvoorkeur.(g.9)
Het apparaat heeft 5 snelheidsniveaus.
4 U kunt de stimulator op verschillende manieren vasthouden.
Experimenteer om te ontdekken hoe u de stimulator op de meest
aangename wijze gebruikt.
Tip Raadpleeg het welkomstboekje voor suggesties.
Tip U kunt de stimulator ook gebruiken in combinatie met een glijmiddel of
massageolie op water- of siliconenbasis. Gebruik geen glijmiddelen of
massageoliën die geurstof en/of alcohol bevatten, omdat dit schade kan
veroorzaken.
5 U schakelt de stimulator uit door de modusselectieknop of de
knop voor een lagere snelheid ingedrukt te houden.
Reisvergrendeling
U kunt de stimulator vergrendelen, bijvoorbeeld wanneer u op reis gaat.
De reisvergrendeling voorkomt dat de stimulator per ongeluk wordt
ingeschakeld.
1 Schakel de stimulator uit.
Page 52

NEDERLANDS52
2 Druk tegelijkertijd op de knop voor een hogere snelheid en de
modusselectieknopomdereisvergrendelingteactiveren.(g.10)
,
De lichtring knippert één keer om aan te geven dat de stimulator is
vergrendeld.
3 Om de reisvergrendeling te deactiveren, drukt u nogmaals
tegelijkertijd op de knop voor een hogere snelheid en de
modusselectieknop.
,
De lichtring knippert één keer om aan te geven dat de stimulator is
ontgrendeld.
Opmerking: Als u de stimulator op de op netspanning aangesloten oplader
plaatst, dan wordt de reisvergrendeling automatisch gedeactiveerd.
Kaarslampjesset
1 Houddekaarslampjesschuinomzeinteschakelen(g.11).
U kunt de kaarslampjes op dezelfde wijze uitschakelen.
Schoonmaken
Stimulator
Maak het stimulator grondig schoon voordat u deze voor het eerst
gebruikt, na elk gebruik en wanneer u deze op een ander deel van het
lichaam gebruikt, om het risico op infecties te verminderen.
Gebruik geen agressieve of schurende schoonmaakmiddelen, chemische
substanties of ontsmettingsmiddelen op alcoholbasis. Als u dit wel doet,
kan de stimulator beschadigd raken.
Maak de stimulator niet schoon met materialen of gereedschappen die
schade zouden kunnen veroorzaken. Denk hierbij aan metalen of
scherp keukengerei, of schuursponsjes.
De stimulator en de oplader zijn niet vaatwasmachinebestendig.
1 Schakel de stimulator uit en haal de stekker van de oplader uit het
stopcontact.
2 Maak de stimulator schoon met een vochtige doek gedrenkt in
lauw water met milde antibacteriële zeep en spoel de stimulator af
Page 53

NEDERLANDS 53
onder de kraan. Droog de stimulator goed af nadat u deze hebt
schoongemaakt.
Tip Gebruik een ontsmettingsmiddel (niet op alcoholbasis) om het risico op
infecties te verminderen.
Dompel de stimulator niet langer dan één uur in water.
3 Maak de oplader schoon met een vochtige doek en maak de
oplader vervolgens goed droog.
Dompel de oplader nooit in water of een andere vloeistof en spoel de
oplader ook niet af onder de kraan.
Kaarslampjesset
1 Schakel de kaarslampjes uit en haal de stekker van de oplader uit
het stopcontact.
2 Maak de adapter en de oplader schoon met een vochtige doek.
Houd de adapter en de oplader droog.
3 Maak de buitenkant van de kaarslampjes schoon met een vochtige
doek.
Gebruik geen schoonmaakmiddelen om de kaarslampjes schoon te
maken. Maak de kaarslampjes niet schoon in de vaatwasmachine.
Wees voorzichtig met de kaarslampjes, want de buitenkant is gemaakt
van glas.
Opbergen
Stimulator
Maak de stimulator na gebruik altijd schoon.
1 Schakel de stimulator uit en haal de stekker van de oplader uit het
stopcontact.
2 Plaats de stimulator op de oplader en berg de stimulator op een
veilige, droge plek op, buiten bereik van direct zonlicht.
Page 54

NEDERLANDS54
Kaarslampjesset
1 Haal de stekker van de oplader uit het stopcontact.
2 Plaats de kaarslampjes op de oplader.
3 Berg de oplader met de kaarslampjes op een veilige, droge plaats
op, buiten bereik van direct zonlicht.
Vervangen
Als u een onderdeel van de stimulator of van de kaarslampjesset wilt
vervangen, raadpleeg dan onze website www.philips.com/
intimatemassager.
Opmerking: De accu’s van de stimulator en de kaarslampjes kunnen niet
worden vervangen.
Milieu
Gooi de apparaten aan het einde van hun levensduur niet weg met
het normale huisvuil, maar lever deze in op een door de overheid
aangewezen inzamelpunt om ze te laten recyclen. Op die manier
levert u een bijdrage aan een schonere leefomgeving (g. 12).
De ingebouwde accu’s van de stimulator en de kaarslampjes bevatten
-
stoffen die schadelijk kunnen zijn voor het milieu. Verwijder de accu’s
altijd voordat u de apparaten afdankt en inlevert op een ofcieel
inzamelpunt. Lever de accu’s in op een ofcieel inzamelpunt voor
batterijen. Als u problemen ondervindt bij het verwijderen van de
accu’s, kunt u met de stimulator en de kaarslampjes ook naar een
Philips-servicecentrum gaan. Medewerkers van dit centrum
verwijderen dan de accu’s voor u en zorgen ervoor dat deze op
milieuvriendelijke wijze worden verwerkt. Raadpleeg onze website
www.philips.com/intimatemassager voor verdere instructies (Fig. 13).
De accu’s verwijderen (optioneel)
Als u ervoor kiest de accu’s van de stimulator en de kaarslampjes zelf te
verwijderen voordat u de stimulator en de kaarslampjes inlevert bij een
ofcieel inzamelpunt, volg dan de onderstaande instructies.
Page 55

NEDERLANDS 55
Stimulator
Gebruik geen scherpe gereedschappen zoals messen of
schroevendraaiers om de stimulator te openen.
1 Laat de stimulator ingeschakeld totdat deze stopt.
2 Plaats de stimulator in de bijgeleverde accuverwijderingszak.
3 Leg de accuverwijderingszak met de stimulator erin ten minste 24
uur in de vriezer.
4 Haal de zak uit de vriezer. Leg de zak meteen op de grond en
stamp erop met uw voet zodat de stimulator kapot gaat.
Let op: Doe dit alleen wanneer u stevige schoenen draagt. Als u dit
doet met blote voeten, kan dit verwondingen veroorzaken.
Opmerking: Als de stimulator door bovenstaande behandeling niet is
opengebroken, herhaal dan de stappen 3 en 4.
5 Open de zak en haal de onderdelen van de stimulator eruit.
6 Schroef de printplaat met een gewone schroevendraaier los van de
accu.
Kaarslampjes
1 Gebruik een schroevendraaier om de accubehuizing in het
kaarslampje los te wrikken.
2 Verwijder de accubehuizing uit het kaarslampje.
3 Steek een schroevendraaier in de verbindingsgleuf tussen het
onderste deel en het deksel van de accubehuizing. Duw de
schroevendraaier naar beneden om het deksel van het onderste
deelteverwijderen(g.14).
4 Haal de accu uit het onderste deel.
Garantie & service
Als u informatie nodig hebt of als u een probleem hebt, raadpleeg dan
onze website (www.philips.com/intimatemassager) of neem contact op
Page 56

NEDERLANDS56
met het Philips Consumer Care Centre in uw land (u vindt het
telefoonnummer in het ‘worldwide guarantee’-vouwblad).
Problemen oplossen
Dit hoofdstuk behandelt in het kort de problemen die u kunt
tegenkomen tijdens het gebruik van de apparaten. Als u er niet in slaagt
het probleem op te lossen met behulp van de onderstaande informatie,
raadpleeg dan onze website www.philips.com/intimatemassager.
Probleem Mogelijke oorzaak Oplossing
De stimulator
werkt niet.
De stimulator
schakelt plotseling
uit.
De accu is leeg. Laad de accu op (zie
hoofdstuk ‘Opladen’).
De oplader is nog
bezig met opladen.
De reisvergrendeling
is geactiveerd.
De accu is leeg. Laad de stimulator op (zie
Het duurt 24 uur om de
stimulator volledig op te
laden. Wanneer het
apparaat volledig is
opgeladen, kunt u de
stimulator maximaal 1 uur
gebruiken. Voor één sessie
moet u de stimulator
minimaal 10 uur opladen
(zie hoofdstuk ‘Opladen’).
Deactiveer de
reisvergrendeling (zie
hoofdstuk ‘Het apparaat
gebruiken’).
hoofdstuk ‘Opladen’).
Page 57

NEDERLANDS 57
Probleem Mogelijke oorzaak Oplossing
De oplader van
de stimulator
werkt niet.
De stimulator en
de bijbehorende
oplader worden
warm tijdens het
opladen.
De oplader van
de
kaarslampjesset
werkt niet.
U hebt de
modusselectieknop
of de knop voor een
lagere snelheid enige
tijd ingedrukt
gehouden, waardoor
de stimulator is
uitgeschakeld.
De stekker van de
oplader zit niet in het
stopcontact.
De
voorverwarmfunctie
is geactiveerd.
U hebt de stimulator
niet goed op de
oplader geplaatst.
Dit is normaal. U hoeft niets te doen.
De stekker van de
oplader zit niet in het
stopcontact.
Druk op een willekeurige
knop om de stimulator
weer in te schakelen.
Steek de kleine stekker in
de oplader en steek de
adapter in het stopcontact.
Druk op de
voorverwarmknop om de
voorverwarmfunctie uit te
schakelen.
Plaats de stimulator goed
op de oplader (zie
hoofdstuk ‘Opladen’).
Steek de kleine stekker in
de oplader en steek de
adapter in het stopcontact.
Page 58

NEDERLANDS58
Probleem Mogelijke oorzaak Oplossing
De kaarslampjes
van de
kaarslampjesset
werken niet.
De kaarslampjes
van de
kaarslampjesset
gaan branden
wanneer ik ze op
de oplader zet.
De accu’s van de
kaarslampjes zijn leeg.
U hebt de
kaarslampjes niet
uitgeschakeld toen
de accu’s leeg waren.
Plaats de kaarslampjes op
de oplader. Steek de
stekker van de oplader in
het stopcontact en laad de
kaarslampjes 12 uur op.
Haal de kaarslampjes van
de oplader en houd ze
even schuin om ze uit te
schakelen. Zet de
kaarslampjes vervolgens
terug op de oplader.
Page 59

PORTUGUÊS
Introdução
Parabéns pela sua compra e bem-vindo à Philips! Para tirar todo o
partido da assistência fornecida pela Philips, registe o seu produto em
www.philips.com/welcome.
A Philips dedica-se a criar produtos de elevada qualidade que melhoram
a sua vida. Oferecemos-lhe velas e um massajador para a sedução mútua.
Descrição geral (g. 1)
A Massajador
B Botão de selecção de modo
C Anel luminoso
D Botão para diminuir
E Botão para aumentar
F Carregador do massajador
G Botão de pré-aquecimento com anel luminoso
H Adaptador do massajador
I Ficha pequena
J Velas
K Carregador das velas
L Botão/luz de carregamento
M Adaptador das velas
N Ficha pequena
Importante
Leia cuidadosamente este manual do utilizador antes de utilizar os
aparelhos e guarde-o para uma eventual consulta futura.
Perigo
Mantenha os adaptadores e o carregador das velas secos.
-
Em caso de intercâmbio de uidos corporais, existe o risco de
-
contágio de doenças e infecções sexualmente transmissíveis. Para
reduzir o risco de infecção, coloque um preservativo em torno do
massajador, se este estiver em contacto com zonas íntimas. Mude de
preservativo quando alterar a posição do massajador.
59
Page 60

PORTUGUÊS60
O massajador destina-se apenas a uso externo. Não deverá ser
utilizado para penetração.
Aviso
Nunca mergulhe as velas e o carregador do massajador em água ou
-
em qualquer outro líquido, nem os enxagúe debaixo da torneira.
Verique se a voltagem indicada nos adaptadores corresponde à
voltagem eléctrica local antes de ligar os carregadores.
Verique regularmente a existência de danos no massajador,
adaptadores e velas. Se detectar danos, interrompa a utilização e
consulte o nosso Web site em www.philips.com/intimatemassager.
Os adaptadores integram um transformador. Não corte os
-
adaptadores para os substituir por outras chas, pois provocará uma
situação de perigo.
Estes aparelhos não devem ser utilizados por pessoas (incluindo
crianças) com capacidades físicas, sensoriais ou mentais reduzidas, ou
com falta de experiência e conhecimento, a não ser que lhes tenha
sido dada supervisão ou instruções relativas à utilização dos aparelhos
por uma pessoa responsável pela sua segurança.
As crianças devem ser vigiadas para assegurar que não brincam com
os aparelhos.
Desligue o massajador imediatamente e não volte a utilizá-lo se emitir
um ruído anormal. Consulte o nosso Web site em www.philips.com/
intimatemassager.
Cuidado
Consulte o seu médico antes de utilizar o massajador sob as
-
seguintes circunstâncias:
1 Durante a gravidez e pouco depois do parto
2 Se sofrer de irritação da pele ou doença epidérmica
3 Se tiver outros problemas de saúde
Se a utilização do massajador causar uma reacção alérgica, interrompa
o uso e consulte o seu médico.
Não utilize o massajador nos olhos ou artérias.
-
Este massajador não foi concebido para ns médicos.
-
Se desejar utilizar o massajador em conjunto com um lubricante ou
-
óleo de massagem, utilize apenas produtos com base em água ou
Page 61

PORTUGUÊS 61
silicone. Não utilize lubricantes ou óleos de massagem aromáticos e/
ou com base em álcool, pois poderão ser nocivos.
Limpe sempre o massajador após cada utilização de modo a reduzir
-
o risco de infecções (consulte o capítulo “Limpeza”).
Não exponha o massajador e o carregador à luz solar ou UV directa
-
(por exemplo, de um aparelho bronzeador) durante um longo
período de tempo.
Não deixe cair o massajador.
-
Utilize cada carregador apenas com o adaptador adequado fornecido.
Não ligue outros adaptadores aos carregadores.
Coloque sempre o massajador e as velas no carregador adequado.
Não coloque outro objecto nos carregadores.
Não exponha as velas a calor acentuado.
-
Manuseie as velas com cuidado, pois o exterior é fabricado em vidro.
-
Não tente reparar os aparelhos. As reparações ou tentativas de
reparação efectuadas por um centro de assistência não autorizado
pela Philips invalidam a garantia. Consulte o nosso Web site em www.
philips.com/intimatemassager para obter instruções adicionais.
Conformidade
Estes aparelhos Philips estão conformes a todas as normas relacionadas
com campos electromagnéticos (EMF). Se forem manuseados
correctamente e de acordo com as instruções deste manual do utilizador,
os aparelhos proporcionam uma utilização segura, como demonstrado
pelas provas cientícas actualmente disponíveis.
Carregar
Massajador
O massajador e o carregador aquecem durante o carregamento.
Nunca cubra o carregador (por exemplo, com uma toalha ou roupa)
durante a utilização.
Nota: O massajador não é fornecido com carga. Carregue-o antes da
primeira utilização.
Para a primeira sessão, o carregamento deverá ser, no mínimo, de 10
horas.
Page 62

PORTUGUÊS62
Para a carga completa, carregue durante 24 horas. O massajador
apresentará um período de funcionamento até 1 hora.
O período de funcionamento poderá variar com o tempo, dependendo
do modo e da velocidade de vibração seleccionados.
Carregue o massajador quando o anel luminoso apresentar uma
intermitência lenta (a bateria está quase sem carga).
1 Introduzaachapequenanocarregadorecoloqueoadaptadorna
tomada eléctrica.
2 Coloque o massajador no carregador. Encaixa correctamente
apenascomosbotõesvoltadosparacima.(g.2)
O aparelho desliga-se automaticamente quando o coloca no carregador.
Nota: Certique-se de que a função de pré-aquecimento está desligada
durante o carregamento (consulte o capítulo “Preparar para a utilização”).
Nota: O carregador não funciona quando o massajador é colocado
incorrectamente.
Durante o carregamento, o anel luminoso apresenta-se
,
intermitente.
Nota: Durante o primeiro carregamento ou após um longo período sem
utilizar o aparelho, poderão decorrer alguns minutos antes da luz de carga
se apresentar intermitente. É uma situação normal.
Nota: O massajador poderá gerar algum odor durante os primeiros
carregamentos. Tal é normal.
Quando a bateria tem a carga completa, o anel luminoso desliga-se.
,
Velas
Carregue as velas durante 12 horas.
Quando as velas estiverem totalmente carregadas, podem ser utilizadas
durante aproximadamente 24 horas.
1 Introduzaachapequenanocarregadorecoloqueoadaptadorna
tomada eléctrica.
Aluzdecarganocarregadorilumina-se(g.3).
,
2 Coloqueumaoumaisvelasnocarregador(g.4).
Page 63

PORTUGUÊS 63
Quando as velas estiverem totalmente carregadas, a luz de
,
carregamento desliga-se e o processo termina.
Nota: As velas poderão acender-se quando as coloca no carregador. Se tal
suceder, retire as velas do carregador e incline-as para as desligar. Volte a
colocá-las no carregador.
Nota: Por razões de segurança, um temporizador incorporado pára o
processo de carregamento após 12 horas, quando a carga estiver totalmente
reposta. Se uma ou mais das velas não tiver carga e quiser carregá-la
imediatamente, prima o botão no carregador para iniciar outro ciclo de
carregamento. A luz de carregamento volta a iluminar-se.
Preparar para a utilização
Massajador
Limpeza
Limpe cuidadosamente o massajador antes da primeira utilização, após
cada utilização e quando o utiliza noutra área do corpo, de modo a
reduzir o risco de infecção (consulte o capítulo “Limpeza”).
Pré-aquecer o massajador
O carregador dispõe de um botão de pré-aquecimento que poderá
utilizar para pré-aquecer a base do massajador para uma temperatura
agradável (aprox. 40°C).
Nunca aqueça o massajador num forno ou microondas.
1 Coloque o massajador num carregador. Encaixa correctamente
apenas com os botões voltados para cima.
2 Primaobotãodepré-aquecimento(g.5).
A luz de pré-aquecimento apresenta-se intermitente indicando que
,
o massajador está a aquecer.
Após cerca de 5 minutos, a luz de pré-aquecimento deixa de piscar
,
para indicar que o massajador atingiu uma temperatura agradável.
Page 64

PORTUGUÊS64
Após 30 minutos, a função de pré-aquecimento desliga-se
,
automaticamente; em alternativa, poderá desligá-la voltando a
premir o botão de pré-aquecimento.
Utilizar o aparelho
Massajador
1 Primaqualquerbotãoparaligaromassajador(g.6).
O anel luminoso acende-se.
,
Omassajadorcomeçaafuncionarnomodopredenido(modo1)
,
e a uma velocidade de vibração moderada.
Sugestão: Recomenda-se iniciar a utilização no modo predenido. Poderá
depois aumentar gradualmente a velocidade de vibração, à medida que se
familiarize com as opções.
Nota: Em caso de desconforto durante a utilização, ajuste a velocidade de
vibração. Consulte o passo 3.
2 Primaobotãodeselecçãodemodopararegularavibração(g.7).
O aparelho inclui 5 modos de vibração (A a E) que activam 3 pontos
de vibração situados na ponta (1), topo (2) e base (3) do
massajador (g. 8).
A Vibração centrada num só ponto (ponta)
B Ponta e base vibram alternadamente
C Topo e base vibram alternadamente
D Ponta e topo vibram alternadamente
E Todos os pontos vibram alternadamente
3 Prima o botão para aumentar ou diminuir uma ou mais vezes para
ajustaravelocidadedevibração.(g.9)
O massajador apresenta 5 níveis de velocidade.
4 Poderá segurar o massajador de várias formas. Experimente até
encontrar a mais confortável.
Sugestão: Para obter sugestões, consulte o folheto de boas-vindas.
Sugestão: Poderá utilizar o massajador em combinação com um lubricante
ou óleo de massagem com base em água ou silicone. Não utilize óleos de
Page 65

PORTUGUÊS 65
massagem ou lubricantes aromáticos e/ou com base em álcool, pois estes
poderão ser nocivos.
5 Para desligar o massajador, mantenha o botão de selecção de
modo ou o botão para diminuir sob pressão.
Bloqueio de viagem
É possível bloquear o massajador, por exemplo, para viajar. O bloqueio
evita a activação acidental do aparelho.
1 Desligue o massajador.
2 Prima simultaneamente o botão para aumentar e o botão de
selecçãodemodoparaactivarobloqueio.(g.10)
O anel luminoso pisca uma vez indicando que o aparelho se
,
encontra bloqueado.
3 Para desactivar o bloqueio, volte a premir simultaneamente o botão
para aumentar e o botão de selecção de modo.
O anel luminoso pisca uma vez indicando que o aparelho se
,
encontra desbloqueado.
Nota: Quando coloca a massajador no carregador ligado à corrente, o
bloqueio de viagem é automaticamente desactivado.
Velas
1 Inclineasvelasparaasacender(g.11).
Poderá desligá-las da mesma forma.
Limpeza
Massajador
Limpe cuidadosamente o massajador antes da primeira utilização, após
cada utilização e quando o utiliza noutra área do corpo, de modo a
reduzir o risco de infecção.
Não utilize agentes de limpeza agressivos ou abrasivos, substâncias
químicasnemdesinfectantescombaseemálcooloupoderádanicaro
massajador.
Page 66

PORTUGUÊS66
Não limpe o massajador com materiais ou ferramentas que possam
causardanos,porexemplo,utensíliosdecozinhametálicosouaados
ou esfregões.
O massajador e o carregador não podem ser lavados na máquina.
1 Desligue o massajador e desligue o carregador da tomada.
2 Limpe o massajador com um pano húmido mergulhado em água
tépida com sabão antibacteriano e enxagúe sob a torneira. Seque
cuidadosamente.
Sugestão: Não limpe com desinfectante com base em álcool para reduzir o
risco de infecções.
Não mergulhe o massajador em água durante mais de uma hora.
3 Limpe o carregador com um pano húmido e limpe-o
cuidadosamente.
Nunca mergulhe o carregador em água ou noutro líquido, nem o
enxagúe à torneira.
Velas
1 Desligue as velas e desligue o carregador da tomada.
2 Limpe o adaptador e o carregador com um pano húmido.
Mantenha o adaptador e o carregador secos.
3 Limpe o exterior das velas com um pano húmido.
Não utilize agentes de limpeza para limpar as velas. Não lave as velas na
máquina.
Manuseie as velas com cuidado, pois o exterior é fabricado em vidro.
Armazenamento
Massajador
Limpe sempre o massajador após cada utilização.
Page 67

PORTUGUÊS 67
1 Desligue o massajador e desligue o carregador da tomada.
2 Coloque o massajador no carregador e guarde-o num local seguro
e seco, afastado da luz solar.
Velas
1 Desligue o carregador.
2 Coloque as velas no carregador.
3 Guarde o carregador com as velas num local seguro e seco
afastado da luz solar.
Substituição
Se necessitar e substituir um item do massajador ou das velas, consulte o
nosso Web site www.philips.com/intimatemassager.
Nota: Não é possível substituir as baterias regarregáveis do massajador e das
velas.
Meio ambiente
Não deite fora os aparelhos junto com o lixo doméstico normal no
-
nal da sua vida útil; entregue-os num ponto de recolha ocial para
reciclagem. Ao fazê-lo ajuda a preservar o ambiente (g. 12).
As baterias recarregáveis incorporadas no massajador e nas velas
-
contêm substâncias que podem poluir o ambiente. Retire sempre as
baterias antes de se desfazer do aparelho e entregue o aparelho num
ponto de recolha ocial. Entregue as baterias num ponto de recolha
ocial. Se tiver problemas na remoção das baterias, poderá levar o
aparelho a um centro de assistência Philips, onde as baterias serão
removidas e eliminadas de forma segura para o ambiente (Fig. 13).
Retirar as baterias recarregáveis (opcional)
Se desejar retirar as bateria recarregáveis do massajador e das velas antes
da entrega num ponto de recolha ocial, siga as instruções em baixo.
Page 68

PORTUGUÊS68
Massajador
Nãoutilizeobjectosaados,comofacasechavesdefendas,paraabrir
o massajador.
1 Permita que o massajador trabalhe até parar.
2 Coloque o massajador no saco para remoção da bateria fornecido.
3 Coloque o saco (com o massajador) no congelador durante um
mínimo de 24 horas.
4 Retire o saco do congelador. Coloque-o imediatamente no chão e
pise-o para partir o massajador.
Atenção:Piseosacoutilizandosapatosfortes.Seozercomospés
descalços, poderá sofrer ferimentos.
Nota: Se não conseguir partir o massajador, repita os passos 3 e 4.
5 Abra o saco e retire as peças.
6 Desaparafuse as placas de circuito impresso da bateria com uma
chave de fendas.
Velas
1 Com uma chave de fendas, liberte o compartimento da bateria no
interior da vela.
2 Retire o compartimento da vela.
3 Introduza uma chave de fendas na fenda entre a base e a tampa do
compartimento da bateria. Faça pressão sobre a chave para soltar a
tampadabase(g.14).
4 Levante a bateria da base.
Garantia e assistência
Se precisar de assistência ou informação, consulte o nosso Web site em
www.philips.com/intimatemassager ou contacte o Serviço de Apoio ao
Consumidor Philips no seu país (poderá encontrar o número de telefone
no folheto de garantia mundial).
Page 69

PORTUGUÊS 69
Resolução de problemas
Este capítulo contém os problemas mais comuns tidos com os aparelhos.
Se não conseguir resolver o seu problema com a informação em baixo,
consulte o nosso Web site em www.philips.com/intimatemassager.
Problema Causa provável Solução
O massajador não
funciona.
O massajador
desliga-se
repentinamente.
A bateria
recarregável está
vazia.
O carregador
continua a
carregar.
O bloqueio de
viagem
encontra-se
activado.
A bateria
recarregável está
vazia.
Carregue a bateria (consulte o
capítulo “Carregar”).
O carregamento completo do
massajador demora 24 horas.
Com a carga completa,
apresenta um período de
funcionamento máximo de 1
hora. Para uma sessão
completa, carregue o
massajador durante, pelo
menos, 10 horas (consulte o
capítulo “Carregar”).
Desactive o bloqueio de
viagem (consulte o capítulo
“Utilizar o aparelho”).
Carregue o aparelho (consulte
o capítulo “Carregar”).
Page 70

PORTUGUÊS70
Problema Causa provável Solução
O carregador do
massajador não
funciona.
O massajador e o
carregador
aquecem durante
o carregamento.
O carregador das
velas não funciona.
Premiu o botão
de selecção de
modo ou o
botão para
diminuir durante
algum tempo e
desligou o
aparelho.
O carregador
não está ligado à
corrente
eléctrica.
A função de
préaquecimento
encontra-se
activada.
Não colocou o
massajador
correctamente
no carregador.
É normal. Não é necessário efectuar
O carregador
não está ligado à
corrente
eléctrica.
Prima qualquer botão para
voltar a ligar o massajador.
Introduza a cha pequena no
carregador e ligue o adaptador
à tomada eléctrica.
Prima o botão de préaquecimento para desligar a
respectiva função.
Coloque o massajador
correctamente no carregador
(consulte o capítulo
“Carregar”).
qualquer outra acção.
Introduza a cha pequena no
carregador e ligue o adaptador
à tomada eléctrica.
Page 71

Problema Causa provável Solução
As velas não
funcionam.
As velas acendemse quando as
coloca no
carregador.
As velas estão
sem carga.
Não desligou as
velas quando
caram sem
carga.
Coloque as velas no
carregador e carregue durante
12 horas.
Retire as velas do carregador e
incline-as para as desligar. Volte
a colocá-las no carregador.
PORTUGUÊS 71
Page 72

72
Page 73

73
Page 74

2 3 4 5
74
6
10 11 12
14
7 8 9
13
Page 75

75
Page 76

u
4203.000.4089.2www.philips.com
 Loading...