

Page 1
HF3485
Page 2

Page 3
1
Page 4
2 3 4 5
6 7 8 9
10 11 12 13
14
18
15 16 17
19
20
21
Page 5

Table of contents
ENGLISH 6
DANSK 18
DEUTSCH 30
43
ESPAÑOL 57
SUOMI 70
FRANÇAIS 81
ITALIANO 94
NEDERLANDS 106
NORSK 119
PORTUGUÊS 131
SVENSKA 144
TÜRKÇE 156
HF3485
Page 6

6
ENGLISH
Introduction
Congratulations on your purchase and welcome to Philips! To fully benet from the support that
Philips offers, register your product at www.philips.com/welcome.
The Philips Wake-up Light helps you wake up more pleasantly. The light intensity of the lamp
gradually increases to the set level in the set sunrise simulation time (the default time is 30 minutes).
The light gently prepares your body for waking up at the set time. To make waking up an even more
pleasant experience, you can use natural wake-up sounds, the FM radio or even downloaded sounds
or your own music from a USB stick.
The effects of the Wake-up Light
The Philips Wake-up Light gently prepares your body for waking up during the last 20 to 40 minutes
of sleep, depending on the sunrise simulation time you set. In the early morning hours our eyes are
more sensitive to light than when we are awake. During that period the relatively low light levels of
a simulated natural sunrise prepare our body for waking up and getting alert. People who use the
Wake-up Light wake up more easily, have a better overall mood in the morning and feel more
energetic. Because the sensitivity to light differs per person, you can set the light intensity of your
Wake-up Light to a level that matches your light sensitivity for an optimal start of the day.
For more information about the Wake-up Light, see www.philips.com.
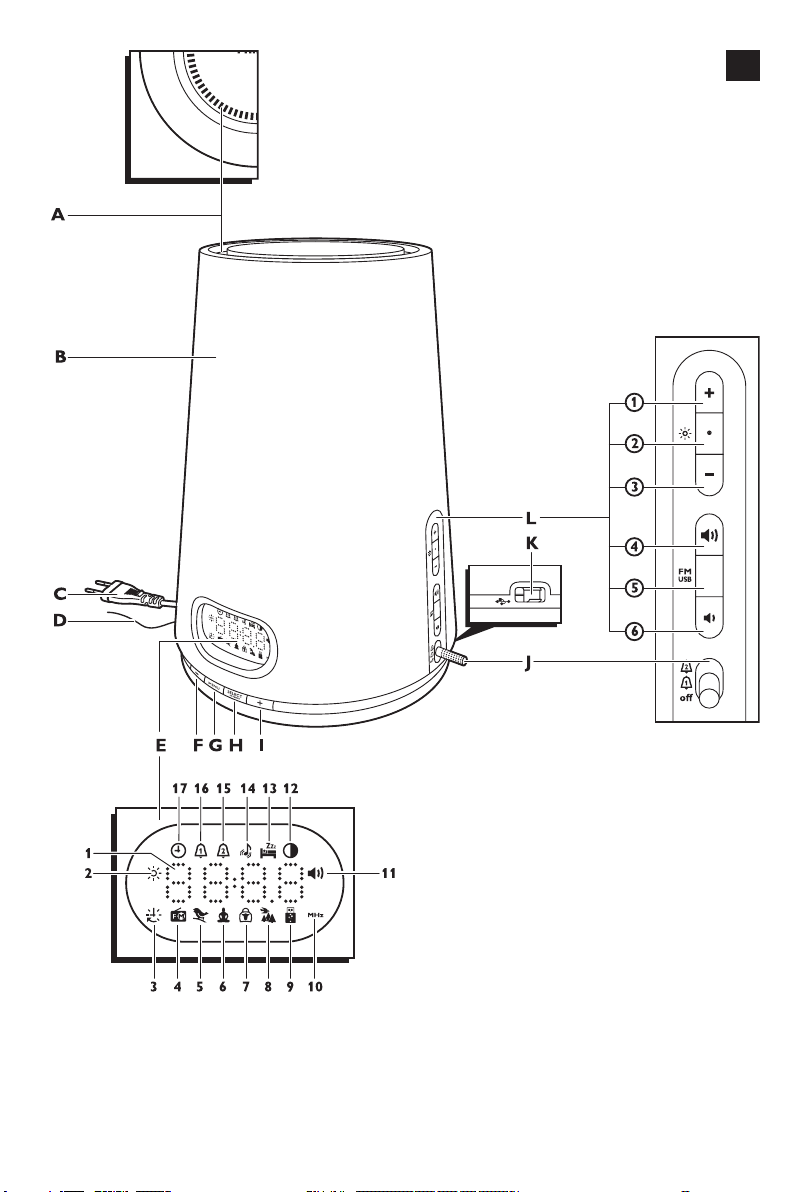
General description (Fig. 1)
A Top cover with vents
B Lamp housing
C Mains cord
D Antenna
E Display
1 Clock time/alarm time
2 Light intensity symbol
3 Sunrise simulation time symbol
4 Radio symbol
5 ‘Bird’ sound symbol
6 ’Yoga’ sound symbol
7 ’Cowbell’ sound symbol
8 ’Forest’ sound symbol
9 ‘USB stick’ symbol
10 Radio frequency symbol
11 Volume level symbol
12 Display brightness symbol
13 Sunset simulation symbol
14 Alarm sound symbol
15 Alarm 2 symbol
16 Alarm 1 symbol
17 Clock time symbol
F Menu ‘-’ button
G MENU button
H SELECT button (also FM presets selection)
I Menu ‘+’ button
J Control lever with ‘alarm off ’, ‘alarm 1’ and ‘alarm 2’ positions
K USB socket
L Buttons on the side of the appliance
1 Light intensity increase button
2 Lamp on/off button
3 Light intensity decrease button
Page 7

ENGLISH 7
4 Volume increase button
5 Radio on/off button
6 Volume decrease button
Important
- Read this user manual carefully before you use the appliance and save it for future reference.
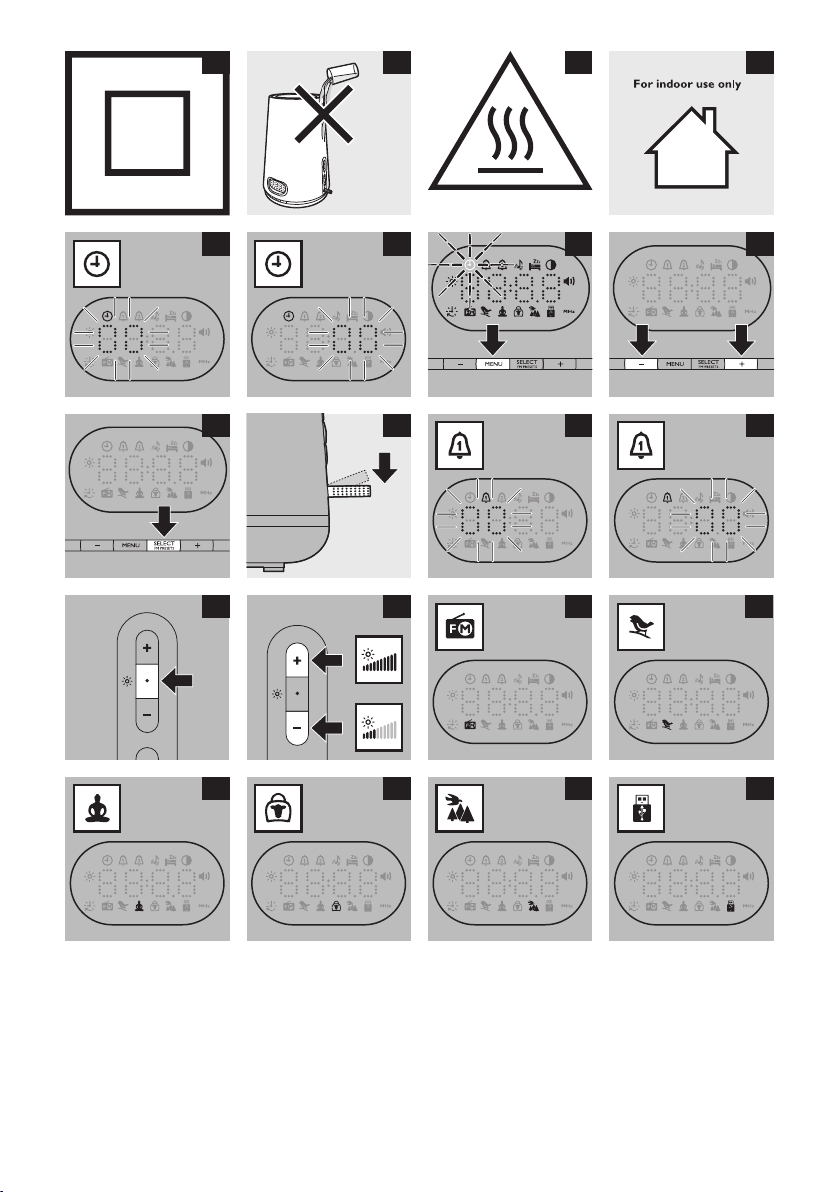
- This appliance is double insulated according to Class II (Fig. 2).
Danger
- Water and electricity are a dangerous combination. Do not use this appliance in wet
surroundings (e.g. in the bathroom or near a shower or swimming pool).
- Do not let water run into the appliance or spill water onto the appliance (Fig. 3).
Warning
- Check if the voltage indicated on the appliance corresponds to the local mains voltage before
you connect the appliance.
- Do not place anything on top of or close to the appliance that could cause water or any other
liquid to drip or splash onto the appliance.
- As you can only disconnect the appliance from the mains by removing the mains plug from the
wall socket, always make sure the mains plug is within easy reach when the appliance is
connected to the mains.
- The appliance is suitable for a mains voltage of 230V and a frequency of 50Hz.
- If the mains cord is damaged, you must have it replaced by Philips, a service centre authorised by
Philips or similarly qualied persons in order to avoid a hazard.
- Always let the appliance cool down for approx. 15 minutes before you open the top cover to
remove the lamp. The lamp and the metal part of the top cover become hot during use and you
may burn your ngers when you touch them. (Fig. 4)
- This appliance is not intended for use by persons (including children) with reduced physical,
sensory or mental capabilities, or lack of experience and knowledge, unless they have been given
supervision or instruction concerning use of the appliance by a person responsible for
their safety.
- Children should be supervised to ensure that they do not play with the appliance.
- This appliance is for indoor use only (Fig. 5).
Caution
- Do not drop the appliance on the oor, hit it hard or expose it to other heavy shocks.
- Place the appliance on a stable, level and non-slippery surface.
- Do not use the appliance at room temperatures lower than 10°C or higher than 35°C.
- Make sure the vents in the top and in the bottom of the appliance remain open during use.
- Never use the appliance if the lamp housing or top cover is damaged, broken or missing.
- Consult your doctor before you start using the appliance if you have suffered from or are
suffering from serious depression.
- Do not use this appliance as a means to reduce your hours of sleep. The purpose of this
appliance is to help you wake up more easily. It does not diminish your need for sleep.
- The appliance has no on/off switch. To disconnect the appliance from the mains, remove the
plug from the wall socket.
- This appliance is only intended for household use, including similar use for instance in hotels.
General
- This appliance allows you to choose the light intensity level you want to wake up to (see section
‘Setting the light intensity’ in chapter ‘Using the appliance’).
- If you often wake up too early or with a headache, reduce the light intensity level and/or the
sunrise simulation time.
Page 8

ENGLISH8
- If you share a bedroom with someone else, this person may unintentionally wake up from the
light of the appliance, even though this person is further removed from the appliance. This
phenomenon is the result of differences in light sensitivity between people.
- The power consumption of the appliance is lowest if the radio, the USB playback function and
the lamp are switched off.
This Philips appliance complies with all standards regarding electromagnetic elds (EMF). If handled
properly and according to the instructions in this user manual, the appliance is safe to use based on
scientic evidence available today.
Preparing for use
Setting the clock
1 Put the plug in the wall socket.
, The hour indication on the display starts ashing to indicate that you have to set the clock
time (Fig. 6).
2 Press the menu - or + button to select the hour.
3 Press the SELECT button to conrm.
, The minute indication starts ashing (Fig. 7).
4 Press the menu - or + button to set the minutes.
5 Press the SELECT button to conrm.
, The appliance leaves the menu and the display shows the set clock time.
The appliance is now ready for use.
Note: The method described above only applies when you plug in the appliance for the rst time, when
there has been a power failure or when the mains plug has been removed from the wall socket for more
than 15 minutes. In these cases, the hour indication ashes to indicate that you have to set the clock
time. In all other cases, you have to use the menu to set the clock time (see section ‘Menu functions’ in
chapter ‘Using the appliance’).
Using the appliance
Menu functions
Below you nd a description of all functions that can be set in the menu. These functions appear in
the menu in the following order:
- Clock time
- Alarm time 1
- Alarm time 2
- Alarm sound
- Sunset simulation
- Display brightness
You can set the menu functions in the following way:
1 Press the MENU button to enter the menu (Fig. 8).
Note: If you do not press any button within 30 seconds, the appliance exits the menu and the display
shows the clock time again.
2 Press the menu - or + button to select a function. (Fig. 9)
3 Press the SELECT button to enter this function (Fig. 10).
4 Press the menu - or + button to change a setting. (Fig. 9)
Page 9

ENGLISH 9
5 Press the SELECT button to conrm (Fig. 10).
Setting the alarm
Setting the alarm time
When you set the alarm, you set an alarm time and light intensity and you choose the type of sound
you want to wake up to. The alarm is set when the alarm symbol is visible on the display. The light
intensity slowly increases to the selected level during the set sunrise simulation time before the set
alarm time. The default sunrise simulation time is 30 minutes. This is the recommended time, but as
the sensitivity to light differs from person to person, it is possible to adjust the sunrise simulation
time to your own preference (see section ‘Setting the sunrise simulation time’ in this chapter). At the
set alarm time (after the sunset simulation time), the alarm sound slowly increases in 90 seconds to
the selected level.
Note: You can set two different alarm times, for example if you want to wake up at a different time in the
weekend than on weekdays.
Note: The volume you set for the alarm is also used as the volume for the radio and music on your
USB stick. To set the alarm volume, press the volume increase or decrease button. If you do not want to
wake up to the lamp or to a sound, select a light intensity or volume level of 0. See sections ‘Using the
appliance as a bedside lamp’ and ‘Setting the volume’ in this chapter.
1 Push the control lever to the middle position if you want to set alarm 1. Push the control
lever to the top position if you want to set alarm 2 (Fig. 11).
, The hour indication of the alarm time starts ashing (Fig. 12).
, To adjust the time, follow steps 2 to 5.
2 Press the menu - or + buttons to set the hour (Fig. 9).
Note: You can only do this when the hour indication ashes. If this is not the case, push the control lever
down and up again to enter the alarm time function. You can also set the alarm time in the menu (see
section ‘Menu functions’ in this chapter).
3 Press the SELECT button to conrm (Fig. 10).
, The minute indication of the alarm time starts ashing (Fig. 13).
4 Press the menu - or + buttons to set the minutes. (Fig. 9)
5 Press the SELECT button to conrm or wait for a few seconds (Fig. 10).
, The appliance leaves the menu and the display shows the clock time.
The alarm time is now set.
Setting the light intensity
You can set the light intensity you prefer for the simulated sunrise that takes place before the alarm
goes off.
Note: The light intensity you set is used for the alarm function as well as for the lamp function (see
section ‘Using the appliance as a bedside lamp’ below).
1 Press the lamp on/off button. (Fig. 14)
Note: It takes approx. 1 second for the lamp to go on. This is normal, the lamp needs to heat up.
Note: You can also set the light intensity when the lamp is out, but switching on the lamp makes it easier
to determine the preferred light intensity.
2 Press the light intensity increase and decrease buttons to select a light intensity (Fig. 15).
You can choose a light intensity between 1 and 20.
If you do not want the lamp to go on gradually as a simulated sunrise before the alarm goes off, set
the light intensity to 0.
Page 10

ENGLISH10
Tip: When you use the appliance for the rst time, set the light intensity to 20. The moment you wake up,
check which light intensity level the appliance has reached by briey pressing the light intensity increase
or decrease button. When you do this, the current alarm light intensity level appears on the display. Set
the alarm light intensity to this level for the next day.
3 To switch off the lamp, press the lamp on/off button again.
Setting the alarm sound
Note: You can adjust the volume level of the alarm sound to your preference (see section ‘Setting the
volume’ in this chapter). If you do not want to wake up to an alarm sound, set the volume level to 0.
1 Follow the instructions in section ‘Menu functions’ above and select the alarm sound function.
2 Press the SELECT button to conrm.
3 Press the menu - or + buttons to select the desired alarm sound (see below).
, The display shows the symbol of the selected alarm sound.
4 Press the SELECT button to conrm.
You can choose one of the following sounds:
- Radio (see also section ‘Using the radio as alarm sound’ below’) (Fig. 16)
- ’Bird’ sound (Fig. 17)
- ’Yoga’ sound (Fig. 18)
- ’Cowbell’ sound (Fig. 19)
- ’Forest’ sound (Fig. 20)
- Downloaded wake-up sounds or your own music from a USB stick (see also section
‘Using music on a USB stick as alarm sound’ below). (Fig. 21)
Tip: You can download more wake-up sounds at www.philips.com.
Using the radio as alarm sound
1 Follow instructions 1-4 in section ‘Setting the alarm sound’ to select the radio as
alarm sound.
, The display shows P1, which is preset radio station 1 (Fig. 22).
If you want to select another preset radio station, press the menu - or + button (see section ‘Using
the radio/playing music from a USB stick’). If you want to change the frequency of the preset radio
stations, see section ‘Using the radio/playing music from a USB stick’ in this chapter)
2 Press the SELECT button to conrm.
, The selected preset radio station is now set as the alarm sound.
Using music on a USB stick as alarm sound
Note: You can only use music on a USB stick if it is in MP3 or WMA format. You can check this on your
computer. The extension of the les should be .mp3 or .wma.
Refer to chapter ‘USB specications’ for more USB information.
1 Insert the USB stick in the USB socket of the appliance.
2 Follow instructions 1-4 in section ‘Menu functions’ above to select music from a USB stick as
alarm sound.
, The display shows 0001 to indicate the rst song on the USB stick. (Fig. 23)
To select another song, press the menu - and + buttons.
3 Press the SELECT button to conrm.
, The selected song is now set as the alarm sound.
Page 11

ENGLISH 11
Setting the sunrise simulation time
The sunrise simulation time is the time in which the light intensity of the lamp gradually increases to
the set level before the alarm sound is played. The default sunrise simulation time is 30 minutes,
because this is the optimum time for your body to prepare for waking up. As the sensitivity to light
differs from person to person, it is possible to adjust the sunrise simulation to your own preference.
You can reduce the sunrise simulation time to 20 or 25 minutes or increase it to 40 minutes.
1 Simultanuously press and hold the light intensity increase and decrease buttons for
3 seconds (Fig. 24).
, The sunrise simulation symbol and the default sunrise simulation time of 30 minutes appears
on the display. (Fig. 25)
2 Press the menu - or + button to increase or decrease the sunrise simulation time. (Fig. 9)
3 Press the SELECT button to conrm (Fig. 10).
Snoozing
1 Tap on the surface of the Wake-Up light with the inside of your hand to snooze the appliance
(some force needs to be applied to prevent accidental snoozing) (Fig. 26).
, The lamp continues to be on at the selected intensity level, but the alarm sound stops. After
9 minutes, the alarm sound is automatically played again.
Note: The 9-minute snooze time is xed. This time cannot be adjusted.
Switching the alarm function off and on
1 To switch off the alarm function when the alarm goes off, push down the control lever to the
bottom position (Fig. 27).
Note: The lamp stays on to light your room. You can switch off the lamp by pressing the lamp on/
off button.
Note: If you forget to switch off the alarm, the alarm (sound and/or light) automatically switches off after
90 minutes.
2 If you want the alarm to go off at one of the set alarm times the next day, set the control
lever to alarm 1 or alarm 2 again.
Alarm demonstration
If you want to get a quick demonstration (60 seconds) of the gradually increasing light intensity and
sound level, activate the test function of the appliance.
1 Simultanuously press and hold the menu - or + buttons until the word TEST appears on the
display (Fig. 28).
2 Simultanuously press the menu - or + buttons again to stop the demonstration.
Note: The appliance continues to run the alarm demonstration until you press the menu + and - button
again. The test automatically stops after 9 hours.
Using the radio/playing music from a USB stick
Switching on the radio
1 To switch on the radio, press the radio on/off button (Fig. 29).
, The radio starts to play.
Note: The radio function has 3 preset stations. To select one of the preset stations, press the SELECT
button below the display.
2 To select the desired radio frequency, press the menu - or + button. (Fig. 30)
Page 12

ENGLISH12
Tip: To scan radio frequencies automatically, press and hold the menu - or + button for approx. 2 seconds.
Tip: To make sure you get a good radio signal, fully unwind the antenna and move it around until you
have found a position at which reception is best.
3 To switch off the radio, press the radio on/off button again.
Changing the preset radio stations
The radio of the Wake-Up light has 3 preset radio stations.If you want to set different radio stations
as the preset stations, follow the steps below.
1 Press the radio on/off button to switch on the radio. (Fig. 31)
, The display shows P1, which is preset station 1 (Fig. 22).
Note: Press the SELECT button one or more times if you want to select another preset station.
2 To scan radio frequencies in order to change the preset station, press the menu - or +
button (Fig. 30).
, The appliance automatically stores the selected radio frequency.
Playing music from a USB stick
Note: You can only use music on a USB stick if it is in MP3 or WMA format. The appliance does not play
any other format.You can check this on your computer. The extension of the les should be .mp3 or
.wma. For more information, see chapter ‘USB specications’.
1 To play music from a USB stick, press the radio on/off button twice. (Fig. 31)
, If there is a USB stick in the USB socket, the appliance automatically starts scanning the
number of MP3 or WMA les on the USB stick. This may take a few minutes. Then the
number of songs is shown on the display and the appliance starts playing the rst song on the
USB stick.
, If the appliance detects that the les on the USB stick are not in MP3 or WMA format, the
display shows ‘ERR’.
2 To select the desired song le, press the menu - or + button. (Fig. 30)
If you hold down the menu - or + button, the song selection function skips through the songs faster.
3 To stop playing music from the USB stick, press the radio on/off button again.
Note: Put your music les in the root folder of the USB stick to ensure faster scanning.
Note: The songs are ordered based on the date that the music was put on the USB stick. If you want the
songs to be played in a specic order, put them in this order on your computer rst and then copy them
to your USB stick.
Setting the volume
1 To set the volume for the radio or music from a USB stick, press the volume increase or
decrease button. (Fig. 32)
You can choose a volume level between 1 and 20.
Note: The volume level you have selected is automatically set as the volume level for the alarm as well.
Sunset simulation
You can use the sunset simulation when you want the light and/or the sound of the Wake-up Light
to stay on and dim gradually during a set period of time (15 minutes to 1.5 hours) before you go to
sleep. The lamp and/or sound switch off automatically after the set time.
Note: The light intensity you set for the start of the sunset simulation is also used as the light intensity for
the sunrise simulation
Page 13

ENGLISH 13
1 Switch on the lamp and/or the radio or music from a USB stick. See sections ‘Using the
appliance as a bedside lamp’ and/or ‘Using the radio/playing music from a USB stick’ in
this chapter.
2 Follow the steps in section ‘Menu functions’ in this chapter to select the sunset simulation
function and to set the sunset simulation time.
, You can choose a time from 15 to 90 minutes (15, 30, 60 or 90).
Note: After the set time, no matter whether only the light and/or the radio are on, the sunset simulation
switches off both light and sound.
Tip: You can also press the light on/off button for 3 seconds to activate the sunset simulation
function (Fig. 33).
Using the appliance as a bedside lamp
You can use the appliance as a bedside lamp.
1 To switch on the lamp, press the lamp on/off button. (Fig. 14)
Note: It takes approx. 1 second for the lamp to go on. This is normal, the lamp needs to heat up.
2 Press the light intensity increase and decrease buttons to select a light intensity (Fig. 15).
You can choose a light intensity between 1 and 20.
Note: The light intensity you have selected is automatically set as the light intensity level for the alarm
as well.
3 To switch off the lamp, press the lamp on/off button again.
Setting the display brightness
1 Follow the steps in section ‘Menu functions’ in this chapter to select the display brightness
function and to set the desired display brightness. (Fig. 34)
, You can select a display brightness between 1 and 4.
Tip: If you set the display brightness to level 1, the appliance consumes the least power.
Note: The display brightness automatically increases to maximum level when setting the appliance to
allow the user optimal visibility. When the user has nished setting the appliance and leaves the menu,
the display brightness automatically returns to the set level.
Cleaning and maintenance
Never use scouring pads, abrasive cleaning agents or aggressive liquids such as petrol or acetone
to clean the appliance.
Regularly remove dust from the outside of the appliance with a dry cloth.
1 Unplug the appliance before you clean it.
2 Clean the outside of the appliance with a dry cloth.
Do not let water run into the appliance or spill water onto the appliance (Fig. 3).
Replacement
Except for the lamp, the appliance does not contain any serviceable parts.
The lamp has to be replaced when it stops burning or when the light output decreases (also see
chapter ‘Important’). You must replace the lamp with a Philips Halogen lamp, 100W, 12V, GY6.35.
Only this lamp provides the correct light intensity.
Note: This appliance has been designed to be used with self-shielded lamps only (Fig. 35).
Page 14

ENGLISH14
For more information, visit our website www.philips.com.
Replacing the lamp
1 Unplug the appliance before you replace the lamp.
2 If the lamp is still hot, let it cool down for approx. 15 minutes.
3 To unlock the top cover, press it and turn it anticlockwise until the O symbol on the top
cover is aligned with the 1 symbol on the lamp housing. (Fig. 36)
4 Remove the top cover. (Fig. 37)
5 Remove the old lamp from the lamp holder (Fig. 38).
6 Insert the pins of the new lamp into the lamp holder. (Fig. 39)
Do not touch the lamp with your ngers. Use a cloth or paper towel when you place
the lamp (Fig. 40).
7 Place the top cover back onto the appliance.
8 Lock the top cover by turning it clockwise until the 1 symbol on the top cover and the 1
symbol on the lamp housing are aligned. (Fig. 41)
Environment
- Do not throw away the appliance with the normal household waste at the end of its life, but
hand it in at an ofcial collection point for recycling. By doing this, you help to preserve the
environment (Fig. 42).
Guarantee and service
If you need service or information or if you have a problem, please visit the Philips website at
www.philips.com or contact the Philips Consumer Care Centre in your country (you nd its phone
number in the worldwide guarantee leaet). If there is no Consumer Care Centre in your country,
go to your local Philips dealer.
Troubleshooting
This chapter summarises the most common problems you could encounter with the appliance. If
you are unable to solve the problem with the information below, contact the Consumer Care
Centre in your country.
Problem Solution
The appliance does not
work at all.
The appliance functions
properly, but the lamp
does not work
anymore.
The appliance becomes
hot during use.
Perhaps the plug is not inserted properly in the wall socket. Put the plug
properly in the wall socket.
Perhaps there is a power failure. Check if the power supply works by
connecting another appliance.
Perhaps the lamp has reached the end of its life. The life depends on
how you use the appliance. In case of heavy use, the lamp may not last
as long as you expect. If the lamp breaks down, you can order a new
one or buy it at your local retailer. Contact the Philips Consumer Care
Centre in your country.
This is normal, as the appliance is heated up by the light of the lamp and
the electronics. Always let the appliance cool down before you replace
the lamp.
Page 15

Problem Solution
The appliance does not
respond when I try to
set different functions.
The lamp does not go
on when the alarm
goes off.
The lamp does not go
on right away when I
switch it on.
I do not hear the alarm
sound when the alarm
goes off.
The radio does not
work.
The radio produces a
crackling sound.
The alarm went off
yesterday, but it did not
go off today.
Remove the plug from the wall socket and wait 20 minutes before you
reinsert it. When you reinsert the plug, the appliance goes back to the
factory settings and you have to set all functions again.
Perhaps you set a light intensity level that is too low. Increase the light
intensity level.
Perhaps you switched off the alarm function by setting the control lever
to the bottom position. To switch on the alarm function, set the control
lever to the middle position (alarm 1) or top position (alarm 2),
depending on the time at which you want to wake up.
Perhaps the appliance is defective. Contact the Philips Consumer Care
Centre in your country.
It takes approx. 1 second for the lamp to go on. This is normal, the lamp
needs to heat up.
Perhaps you set a sound level that is too low. To set a higher sound level,
see chapter ‘Using the appliance’, section ‘Setting the volume’.
Perhaps you switched off the alarm function by setting the control lever
to the bottom position.
If you selected the radio as the alarm sound, the radio may be defective.
Switch on the radio after you switch off the alarm to check if the radio
works. If it does not work, contact the Philips Consumer Care Centre in
your country.
If you selected a downloaded wake-up sound or music on a USB stick
as the alarm sound, it is possible that the sounds or songs do not have
the correct format. This appliance only supports .mp3 and .wma les. If
the sound or music on the USB stick cannot be played, the appliance
automatically sets the bird sound as alarm sound to ensure
that you wake up at the set alarm time anyway.
The radio may be defective. Contact the Philips Consumer Care Centre
in your country.
Perhaps you set the volume too low. Increase the volume level.
Perhaps the broadcast signal is weak. Adjust the frequency (see chapter
‘Using the appliance’ section ‘Using the radio/playing music from a USB
stick’) and/or change the position of the antenna by moving it around.
Make sure you have unwound the antenna completely.
Perhaps you switched off the alarm function by setting the control
lever to the bottom position.
Perhaps you set a volume level and/or light intensity level that is too
low. Set a higher volume level and/or light intensity level.
ENGLISH 15
Page 16

ENGLISH16
Problem Solution
Perhaps there was a power failure that lasted more than approximately
15 minutes. In this case, the appliance goes back to factory settings. You
need to set all functions again.
I wanted to snooze, but
the alarm did not go
off again after
9 minutes.
The light wakes me too
early.
The light wakes me too
late
The lamp ashes. Perhaps the appliance is not suitable for the voltage to which it is
The appliance does not
recognise the USB stick.
An error message
appears on the display
when I insert the USB
stick into the USB
socket.
I have programmed the
appliance to wake me
up with music on a
USB stick, but instead I
hear a bird sound.
You probably pushed down the control lever to bottom position. This
switches off the alarm function altogether. If you want to snooze, you
have to tap on the appliance.
Perhaps you set the volume level to 0.
Perhaps the light intensity level you have set is not appropriate for you.
Try a lower light intensity level if you wake up too early. If light intensity
1 is not low enough, move the appliance further away from the bed.
Perhaps the appliance is positioned at a lower level than your head.
Make sure the appliance is located at a height at which the light is not
blocked by your bed, duvet or pillow. Also make sure the appliance is
not placed too far away.
connected. Make sure that the voltage indicated on the appliance
corresponds to the local mains voltage.
Perhaps the USB stick is not inserted into the USB socket properly.
Make sure you push the USB stick far enough into the USB socket.
Perhaps the music on the USB stick does not have the right format.
Make sure that the song is an MP3 or WMA le. You can check this on
your computer. The extension of the les should be .mp3 or .wma. See
chapter ‘USB specications’ for more information.
Perhaps you have removed the USB stick from the appliance or it is not
inserted into the USB socket properly. If the appliance does not detect
a USB stick, it automatically sets the bird sound as alarm sound to
ensure that you wake up at the set alarm time anyway. To use music on
a USB stick as alarm sound, the USB has to be in the USB socket
permanently.
Compatible USB devices
- USB ash memory (USB2.0 or USB1.1)
- USB ash players (USB2.0 or USB1.1)
- Memory cards (requires an additional card reader to work with this audio system)
Note: If your USB device a boot function, please wait until it has nished booting and is ready for use
before you connect it to the USB port of the appliance.
Supported formats
- USB or memory le format (FAT12, FAT16, FAT32 (sector size: 512 bytes)
- MP3 bit rate (data rate): 32-320 Kbps and variable bit rate
- WMA v7, v8 or v9
- Directory nesting up to a maximum of 8 levels
Page 17

ENGLISH 17
- Number of albums/folders: maximum 99
- Number of tracks/titles: maximum 999
- File name in Unicode UTF8 (maximum length: 128 bytes)
Unsupported formats:
- Empty albums: an empty album is an album that does not contain MP3/WMA les and is
not shown on the display.
- Unsupported le formats are skipped. For example Word documents (.doc) or MP3 les with
extension .dlf are ignored and not played.
- AAC, WAV and PCM audio les
- DRM protected les are not supported.
- WMA les in Lossless format
- Hidden les
Page 18

18
DANSK
Introduktion
Tillykke med dit køb og velkommen til Philips! For at få fuldt udbytte af den support, Philips tilbyder,
skal du registrere dit produkt på www.philips.com/welcome.
Med Philips Wake-up Light får du en mere behagelig opvågning. Lampens lysintensitet stiger gradvist
til det indstillede niveau for simulation af solopgang i løbet af det forudindstillede tidsrum
(standardtiden er 30 minutter). Lyset forbereder nænsomt din krop på at vågne på det indstillede
tidspunkt. Du kan gøre opvågningen endnu mere behagelig ved at bruge naturlige vækkelyde, FMradio eller for den sags skyld downloadede lyde eller din egen musik fra en USB-nøgle.
Virkningerne ved Wake-up Light
Philips Wake-up Light forbereder nænsomt din krop på at vågne i løbet af de sidste 20 til
40 minutters søvn, afhængigt af den tid til simulation af solopgang du indstiller. I de tidlige
morgentimer er øjnene mere følsomme over for skarpt lys, end når vi er vågne. I den periode
forbereder det forholdsvist lave lysniveau fra simuleret solopgang kroppen på at vågne og komme i
gang. Personer, der bruger Wake-up Light, vågner nemmere op, er generelt i bedre humør om
morgenen og har mere energi. Da lysfølsomheden er forskellig fra person til person, kan du indstille
lysintensiteten på Wake-up Light til et niveau, der passer til din egen lysfølsomhed, så du får en
optimal start på dagen.
Du nder ere oplysninger om Wake-up Light på www.philips.com.
A Topdæksel med ventilationshuller
B Lampekabinet
C Netledning
D Antenne
E Display
1 Klokkeslæt/vækketidspunkt
2 Symbol for lysintensitet
3 Tidssymbol for simulation af solopgang
4 Radiosymbol
5 Symbol for “fugle”-lyd
6 Symbol for “yoga”-lyd
7 Symbol for “koklokke”-lyd
8 Symbol for “skov”-lyd
9 Symbol for “USB-nøgle”
10 Symbol for radiofrekvens
11 Symbol for lydstyrkeniveau
12 Symbol for displaylysstyrke
13 Symbol for simulation af solnedgang
14 Symbol for vækkelyd
15 Symbol for alarm 2
16 Symbol for alarm 1
17 Klokkeslætsymbol
F Menuknappen “-”
G MENU-knap
H VÆLG-knap (også faste FM-stationer)
I Menuknappen “+”
J Aktiveringsknap med positionerne “alarm fra”, “alarm 1” og “alarm 2”
K USB-stik
L Knapper på siden af apparatet
1 Knap til at øge lysintensiteten
2 Tænd/sluk-knap til lampe
Page 19

DANSK 19
3 Knap til at mindske lysintensiteten
4 Knap til at øge lydstyrke
5 Tænd/sluk-knap til radio
6 Knap til at sænke lydstyrke
Vigtigt
- Læs denne brugsvejledning omhyggeligt igennem, inden apparatet tages i brug, og gem den til
eventuelt senere brug.
- Dette apparat er dobbeltisoleret i henhold til Klasse II (g. 2).
Fare
- Vand og elektricitet er en farlig kombination. Anvend aldrig apparatet i våde omgivelser (f.eks. i
badeværelset eller i nærheden af en bruser eller swimmingpool).
- Sørg for, at der ikke trænger vand ind i apparatet, og at der ikke spildes vand på det (g. 3).
Advarsel
- Kontrollér, om den angivne netspænding på apparatet svarer til den lokale netspænding, før du
slutter strøm til apparatet.
- Placer ikke noget ovenpå eller i nærheden af apparatet, der kan få vand eller anden væske til at
dryppe eller stænke på det.
- Da du kun kan afbryde strømtilførslen til apparatet ved at trække stikket ud af stikkontakten, skal
du altid sørge for at at stikket er inden for rækkevidde, når apparatet tilsluttes til stikkontakten.
- Apparatet kan tilsluttes en netspænding på 230 V og en frekvens på 50 Hz.
- Hvis netledningen beskadiges, må den kun udskiftes af Philips, et autoriseret Philips-
serviceværksted eller en tilsvarende kvaliceret fagmand for at undgå enhver risiko.
- Lad altid apparatet køle ned i ca. 15 min, inden du åbner det øverste låg for at fjerne pæren.
Pæren og metaldelen af det øverste låg bliver varme under brug, og du risikerer at brænde
ngrene, når du rører ved dem. (g. 4)
- Dette apparat er ikke beregnet til at blive brugt af personer (herunder børn) med nedsatte
fysiske og mentale evner, nedsat følesans eller manglende erfaring og viden, medmindre de er
blevet vejledt eller instrueret i apparatets anvendelse af en person, der er ansvarlig for
deres sikkerhed.
- Apparatet bør holdes uden for børns rækkevidde for at sikre, at de ikke kan komme til at
lege med det.
- Apparatet må kun benyttes indendørs (g. 5).
Forsigtig
- Undlad at tabe apparatet på gulvet, og udsæt det ikke for kraftige slag eller andre voldsomme
stød.
- Anbring apparatet på et stabilt, vandret og skridsikkert underlag.
- Undlad at anvende apparatet, hvis rumtemperaturen er under 10°C eller højere end 35°C.
- Sørg for, at ventilationshullerne for oven og for neden på apparatet forbliver åbne under brug.
- Brug ikke apparatet, hvis lampens kabinet eller øvre dæksel er beskadiget, knækket eller mangler.
- Kontakt din læge, før du begynder at bruge apparatet, hvis du har lidt af eller lider af
alvorlig depression.
- Brug ikke apparatet som et middel til at reducere dit søvnbehov. Formålet med apparatet er at
lette opvågningen. Det reducerer ikke søvnbehovet.
- Apparatet har ingen on/off (tænd/sluk)-kontakt. Træk stikket ud af stikkontakten for at afbryde
forbindelsen til lysnettet.
- Dette apparat er kun beregnet til husholdningsbrug, herunder lignende brug f.eks. på hoteller.
Generelt
- Apparatet giver dig mulighed for at vælge, hvilket lysintensitetsniveau du ønsker at vågne op til
(se afsnittet “Indstilling af lysintensiteten” i kapitlet “Sådan bruges apparatet”).
Page 20

DANSK20
- Hvis du ofte vågner for tidligt eller med hovedpine, skal du reducere lysintensitetsniveauet og/
eller tiden til simulation af solopgang.
- Hvis du deler soveværelse med andre, kan vedkommende blive vækket utilsigtet, selvom han/hun
ligger længere væk fra apparatet. Dette skyldes, at mennesker ikke nødvendigvis har
samme lysfølsomhed.
- Apparatets strømforbrug er lavest, hvis du har slukket for radioen, USB-afspilningsfunktionen
og lampen.
Elektromagnetiske felter (EMF)
Dette Philips-apparat overholder alle standarder for elektromagnetiske felter (EMF). Ved korrekt
anvendelse i overensstemmelse med instruktionerne i denne brugervejledning er apparatet sikkert
at anvende ifølge den videnskabelige viden, der er tilgængelig i dag.
Klargøring
Indstilling af uret
1 Sæt stikket i stikkontakten.
, Timeangivelsen på displayet begynder at blinke for at indikere, at du skal indstille
klokkeslættet (g. 6).
2 Tryk på menuknappen - eller + for at vælge timetal.
3 Tryk på VÆLG-knappen for at fortsætte.
, Minutangivelsen begynder at blinke (g. 7).
4 Tryk på menuknappen + eller - for at indstille minuttallet.
5 Tryk på VÆLG-knappen for at fortsætte.
, Apparatet forlader nu menuen, og displayet viser klokkeslættet.
Apparatet er nu klar til brug.
Bemærk: Den ovenfor beskrevne metode gælder kun, når du tilslutter apparatet for første gang, når der
har været strømsvigt, eller når netstikket har været taget ud af stikkontakten i mere end 15 minutter. I
disse tilfælde blinker timeangivelsen for at indikere, at du skal indstille klokkeslættet. I alle andre tilfælde
skal du bruge menuen til at indstille klokkeslættet (se afsnittet “Menufunktioner” i kapitlet “Sådan
bruges apparatet”).
Sådan bruges apparatet
Menufunktioner
Nedenfor nder du en beskrivelse af alle funktioner, der kan angives i menuen. Disse funktioner vises
i menuen i følgende rækkefølge:
- Klokkeslæt
- Vækketidspunkt 1
- Vækketidspunkt 2
- Vækkelyd
- Simulation af solnedgang
- Skærmlysstyrke
Du kan indstille menufunktionerne på følgende måde:
1 Tryk på MENU-knappen for at åbne menuen (g. 8).
Bemærk: Hvis du ikke trykker på nogen knap inden for 30 sekunder, forlader apparatet menuen, og
displayet viser igen klokkeslættet.
2 Tryk på menuknappen - eller + for at vælge en funktion. (g. 9)
Page 21

DANSK 21
3 Tryk på VÆLG-knappen for at åbne denne funktion (g. 10).
4 Tryk på menuknappen - eller + for at ændre en indstilling. (g. 9)
5 Tryk på VÆLG-knappen for at fortsætte (g. 10).
Indstilling af alarmen
Indstilling af vækketidspunkt
Når du indstiller alarmen, indstiller du vækketidspunkt og lysintensitet, og du vælger den lydtype, du
vil vågne op til. Alarmen er indstillet, når alarmsymbolet er synligt på displayet. Lysintensiteten øges
langsomt til det valgte niveau i løbet af den forudindstillede tid til simulation af solopgang før det
indstillede vækketidspunkt. Standardtiden til simulation af solopgang er 30 minutter. Dette er
den anbefalede tid, men da lysfølsomheden er forskellig fra person til person, er det muligt at
indstille tiden til simulation af solopgang til dit foretrukne valg (se afsnittet “Indstilling af tid til
simulation af solopgang” i dette kapitel). På det indstillede vækketidspunkt (efter tiden til simulation
af solopgang), øges vækkelyden langsomt i 90 sekunder til det valgte niveau.
Bemærk: Du kan indstille to forskellige vækketidspunkter, for eksempel hvis du gerne vil vækkes på et
andet tidspunkt i weekenden end på hverdage.
Bemærk: Den lydstyrke, du har valgt for alarmen, bruges også som lydstyrke for radioen og for musik på
din USB-nøgle. For at indstille alarmens lydstyrke skal du trykke på knappen til at øge eller mindske
lydstyrken. Hvis du ikke vil vækkes til lampen eller en lyd, skal du vælge en lille lysintensitet eller et
lydstyrkeniveau på 0. Se afsnittene “Sådan bruges apparatet som sengelampe” og “Indstilling af
lydstyrken” i dette kapitel.
1 Skub aktiveringsknappen til den midterste position, hvis du vil indstille alarm 1.
Skub aktiveringsknappen til den øverste position, hvis du vil indstille alarm 2 (g. 11).
, Timeangivelsen for vækketidspunktet begynder at blinke (g. 12).
, Følg trin 2 til 5 for at justere tiden.
2 Tryk på menuknappen - eller + for at indstille timetallet (g. 9).
Bemærk: Du kan kun foretage denne indstilling, når timeangivelsen blinker. Hvis dette ikke er tilfældet,
skal du skubbe aktiveringsknappen ned og op igen for at åbne funktionen for vækketidspunkt. Du kan
også indstille vækketidspunkt i menuen (se afsnittet “Menufunktioner” i dette kapitel).
3 Tryk på VÆLG-knappen for at fortsætte (g. 10).
, Minutangivelsen for vækketidspunktet begynder at blinke (g. 13).
4 Tryk på menuknappen - eller + for at indstille minuttallet. (g. 9)
5 Tryk på VÆLG-knappen for at bekræfte, eller vent et par sekunder (g. 10).
, Apparatet forlader nu menuen, og displayet viser klokkeslættet.
Vækketidspunktet er nu indstillet.
Indstilling af lysintensiteten
Du kan indstille din foretrukne lysintensitet for den simulerede solopgang, der nder sted, før
alarmen går i gang.
Bemærk: Den indstillede lysintensitet bruges til både alarm- og lampefunktionen (se afsnittet
“Sådan bruges apparatet som sengelampe” nedenfor).
1 Tryk på lampens tænd/sluk-knap. (g. 14)
Bemærk: Det tager ca. 1 sekund, før lampen tændes. Dette er normalt, da pæren skal varme op.
Bemærk: Du kan også indstille lysintensiteten, når lampen er slukket, men det er lettere at nde den
foretrukne lysintensitet, når lampen er tændt.
2 Tryk på knapperne til at øge og mindske lysintensiteten for at vælge lysintensitet (g. 15).
Page 22

DANSK22
Du kan vælge en lysintensitet på mellem 1-20.
Hvis du ikke ønsker, at lampen tændes gradvist som en simuleret solopgang, før alarmen går i gang,
skal du indstille lysintensiteten til 0.
Tip: Når du bruger apparatet for første gang, skal du indstille lysintensiteten til 20. Det øjeblik, du vågner
op, skal du kontrollere det lysintensitetsniveau, som apparatet har nået, ved kort at trykke på knappen til
at øge eller mindske lysintensiteten. Når du gør dette, vises det aktuelle lysintensitetsniveau for alarmen
på displayet. Indstil alarmens lysintensitet til dette niveau for næste dag.
3 Sluk for lampen ved at trykke på lampens tænd/sluk-knap.
Indstilling af vækkelyden
Bemærk: Du kan indstille lydstyrkeniveauet for vækkelyden til dit foretrukne valg (se afsnittet “Indstilling
af lydstyrken” i dette kapitel). Hvis du ikke vil vågne op til en vækkelyd, skal du indstille lydstyrken til 0.
1 Følg instruktionerne i afsnittet “Menufunktioner” ovenfor, og vælg vækkelydfunktionen.
2 Tryk på VÆLG-knappen for at fortsætte.
3 Tryk på menuknappen - eller + for at vælge den ønskede vækkelyd (se nedenfor).
, Displayet viser symbolet for den valgte vækkelyd.
4 Tryk på VÆLG-knappen for at fortsætte.
Du kan vælge én af følgende lyde:
- Radio (se også afsnittet “Sådan bruges radioen som vækkelyd” nedenfor) (g. 16)
- ”Fugle”-lyd (g. 17)
- ”Yoga”-lyd (g. 18)
- ”Koklokke”-lyd (g. 19)
- ”Skov”-lyd (g. 20)
- Downloadede vækkelyde eller din egen musik fra en USB-nøgle (se også afsnittet “Sådan bruges
musik på en USB-nøgle som vækkelyd” nedenfor). (g. 21)
Tip: Du kan downloade ere vækkelyde på www.philips.com.
Sådan bruges radioen som vækkelyd
1 Følg instruktionerne 1-4 i afsnittet “Indstilling af vækkelyden” for at vælge radioen som
vækkelyd.
, Displayet viser P1, som er den faste radiostation 1 (g. 22).
Hvis du vil vælge en anden fast radiostation, skal du trykke på menuknappen - eller + (se afsnittet
“Brug af radioen/afspilning af musik fra en USB-nøgle”). Hvis du vil ændre frekvensen for de faste
radiostationer, skal du se afsnittet “Brug af radioen/afspilning af musik fra en USB-nøgle” i
dette kapitel)
2 Tryk på VÆLG-knappen for at fortsætte.
, Den valgte, faste radiostation er nu indstillet som vækkelyd.
Sådan bruges musik på en USB-nøgle som vækkelyd
Bemærk: Du kan også bruge musik på en USB-nøgle, hvis den er i MP3- eller WMA-format. Du kan
kontrollere dette på din computer. Filtypenavnet skal være .mp3 eller .wma.
Se kapitlet “USB-specikationer” for at få ere USB-oplysninger.
1 Sæt USB-nøglen i apparatets USB-stik.
2 Følg instruktionerne 1-4 i afsnittet “Menufunktioner” ovenfor for at vælge musik fra en USB-
nøgle som vækkelyd.
, Displayet viser 0001 for at angive den første sang på USB-nøglen. (g. 23)
For at vælge en anden sang skal du trykke på menuknappen - og +.
Page 23

DANSK 23
3 Tryk på VÆLG-knappen for at fortsætte.
, Den valgte sang er nu indstillet som vækkelyd.
Indstilling af tiden til simulation af solopgang
Tiden til simulation af solopgang er den tidsperiode, hvor lysintensiteten for lampen gradvist øges til
det indstillede niveau, før vækkelyden afspilles. Standardtiden til simulation af solopgang er
30 minutter, da dette er den tid, det tager for din krop at forberede sig optimalt på at vågne.
Eftersom lysfølsomheden er forskellig fra person til person, er det muligt at indstille simulationen af
solopgang til dit foretrukne valg. Du kan reducere tiden til simulation af solopgang til 20 eller
25 minutter eller øge den til 40 minutter.
1 Tryk på knapperne til at øge og mindske lysintensiteten samtidigt, og hold dem nede i
3 sekunder (g. 24).
, Symbolet for simulation af solopgang og standardtiden for simulation af solopgang på
30 minutter vises på displayet. (g. 25)
2 Tryk på menuknappen - eller + for at øge eller mindske tiden til simulation af
solopgang. (g. 9)
3 Tryk på VÆLG-knappen for at fortsætte (g. 10).
Snooze-funktion
1 Tryk på overaden af Wake-up Light med håndaden for at aktivere snooze-funktionen (der
kræves et rimeligt tryk for at undgå, at funktionen aktiveres ved en fejl) (g. 26).
, Lampen fortsætter med at lyse ved det valgte intensitetsniveau, men vækkelyden stopper.
Efter 9 minutter afspilles vækkelyden automatisk igen.
Bemærk: Snooze-tiden på 9 minutter er fast og kan ikke justeres.
Sådan slås alarmfunktionen til og fra
1 For at slå alarmfunktionen fra, når alarmen går i gang, skal du trykke aktiveringsknappen ned
til den nederste position (g. 27).
Bemærk: Lampen forbliver tændt for at lyse dit rum op. Du kan slukke lampen ved at trykke på lampens
tænd/sluk-knap.
Bemærk: Hvis du har glemt at slå alarmen fra, slås alarmen (lyd og/eller lys) automatisk fra efter
90 minutter.
2 Hvis du ønsker, at alarmen skal gå i gang på et af de indstillede vækketidspunkter næste dag,
skal du indstille aktiveringsknappen til alarm 1 eller alarm 2 igen.
Demonstration af alarmen
Hvis du vil have en hurtig demonstration (60 sekunder) af den gradvist stigende lysintensitet og lyd,
skal du aktivere apparatets testfunktion.
1 Tryk på menuknappen - eller +, og hold den nede, indtil ordet TEST vises på displayet (g. 28).
2 Tryk på menuknappen - eller + igen for at stoppe demonstrationen.
Bemærk: Apparatet fortsætter med at køre demonstrationen af alarmen, indtil du trykker på
menuknappen + og - igen. Testen stopper automatisk efter 9 timer.
Brug af radioen/afspilning af musik fra en USB-nøgle
Sådan tændes der for radioen
1 Tænd for radioen ved at trykke på radioens tænd/sluk-knap (g. 29).
, Radioen begynder at spille.
Page 24

DANSK24
Bemærk: Radiofunktionen har 3 faste stationer. For at vælge en af de faste stationer skal du trykke på
VÆLG-knappen under displayet.
2 For at vælge den ønskede radiofrekvens skal du trykke på menuknappen - eller +. (g. 30)
Tip: Hvis du vil søge efter radiofrekvenser automatisk, skal du trykke på menuknappen - eller + og
holde den nede i ca. 2 sekunder.
Tip: Hvis du vil være sikker på at få et godt radiosignal, skal du rulle antennen helt ud og ytte den rundt,
indtil du nder den position, hvor modtagelsen er bedst.
3 Sluk for radioen ved at trykke på radioens tænd/sluk-knap igen.
Ændring af de faste radiostationer
Radioen til Wake-Up Light har 3 faste radiostationer. Hvis du vil indstille andre radiostationer som de
faste stationer, skal du følge trinene nedenfor.
1 Tryk på radioens tænd/sluk-knap for at tænde for radioen. (g. 31)
, Displayet viser P1, som er den faste station 1 (g. 22).
Bemærk: Tryk på VÆLG-knappen en eller ere gange, hvis du vil vælge en anden fast station.
2 Hvis du vil søge efter radiofrekvenser med henblik på at ændre den faste station, skal du
trykke på menuknappen - eller + (g. 30).
, Apparatet gemmer automatisk den valgte radiofrekvens.
Afspilning af musik fra en USB-nøgle
Bemærk: Du kan kun bruge musik på en USB-nøgle, hvis den er i MP3- eller WMA-format. Apparatet kan
ikke afspille andre formater. Du kan kontrollere dette på din computer. Filtypenavnet skal være .mp3
eller .wma. Du kan få ere oplysninger i kapitlet “USB-specikationer”.
1 Hvis du vil afspille musik fra en USB-nøgle, skal du trykke på radioens tænd/sluk-knap to
gange. (g. 31)
, Hvis en USB-nøgle er tilsluttet, søger apparatet automatisk efter antallet af MP3- eller WMA-
ler på USB-nøglen. Dette kan tage et par minutter. Derefter vises antallet af sange på
displayet, og apparatet begynder at afspille den første sang på USB-nøglen.
, Hvis apparatet registrerer, at lerne på USB-nøglen ikke er i MP3- eller WMA-format, viser
displayet ‘ERR’.
2 For at vælge den ønskede musikl skal du trykke på menuknappen - eller +. (g. 30)
Hvis du holder menuknappen - eller + nede, kører sangvælgerfunktionen hurtigere gennem sangene.
3 Hvis du vil stoppe afspilningen af musik fra USB-nøglen, skal du trykke på radioens tænd/sluk-
knap igen.
Bemærk: Læg dine musikler i rodmappen på USB-stikket for at sikre en hurtigere scanning.
Bemærk: Sangene er sorteret efter den dato, hvor musikken blev lagt på USB-nøglen. Hvis du ønsker, at
sangene afspilles i en bestemt rækkefølge, skal du først lægge dem i denne rækkefølge på din computer
og derefter kopiere dem til din USB-nøgle.
Indstilling af lydstyrken
1 Hvis du vil indstille lydstyrken for radioen eller musik fra en USB-nøgle, skal du trykke på
knappen til at øge eller mindske lydstyrken. (g. 32)
Du kan vælge et lydstyrkeniveau på mellem 1 og 20.
Bemærk: Den valgte lydstyrke indstilles også automatisk som alarmens lydstyrke.
Page 25

DANSK 25
Simulation af solnedgang
Du kan bruge simulationen af solnedgang, når du vil have lyset og/eller lyden på Wake-up Light til at
forblive tændt og langsomt blive reduceret i løbet af et indstillet tidsrum (15 minutter til 1,5 timer),
før du falder i søvn. Lampen og/eller lyden slukkes automatisk efter det indstillede tidspunkt.
Bemærk: Den lysintensitet, du indstiller til starten af simulationen af solnedgang, bruges også som
lysintensitet til simulationen af solopgang
1 Tænd for lampen og/eller radioen eller musik fra en USB-nøgle. Se afsnittene “Sådan bruges
apparatet som sengelampe” og/eller “Brug af radioen/afspilning af musik fra en USB-nøgle” i
dette kapitel.
2 Følg trinene i afsnittet “Menufunktioner” i dette kapitel for at vælge funktionen til simulation
af solnedgang og indstille tiden til simulation af solnedgang.
, Du kan vælge et tidsrum mellem 15 og 90 minutter (15, 30, 60 eller 90 minutter).
Bemærk: Efter det indstillede tidspunkt slukker simulationen af solnedgang både lys og lyd, uanset om
kun lys eller radio er tændt.
Tip: Du kan også trykke på tænd/sluk-knappen for lys og holde den nede i 3 sekunder for at aktivere
funktionen til simulation af solnedgang (g. 33).
Sådan bruges apparatet som sengelampe
Du kan benytte apparatet som sengelampe.
1 Tænd for lampen ved at trykke på lampens tænd/sluk-knap. (g. 14)
Bemærk: Det tager ca. 1 sekund, før lampen tændes. Dette er normalt, da pæren skal varme op.
2 Tryk på knapperne til at øge og mindske lysintensiteten for at vælge lysintensitet (g. 15).
Du kan vælge en lysintensitet på mellem 1-20.
Bemærk: Den valgte lysintensitet indstilles også automatisk som lysintensitetsniveau for alarmen.
3 Sluk for lampen ved at trykke på lampens tænd/sluk-knap.
Indstilling af displaylysstyrken
1 Følg trinene i afsnittet “Menufunktioner” i dette kapitel for at vælge displaylysstyrke-
funktionen og indstille den ønskede lysstyrke for displayet. (g. 34)
, Du kan vælge en displaylysstyrke mellem 1 og 4.
Tip: Hvis du indstiller displaylysstyrken til niveau 1, bruger apparatet mindst strøm.
Bemærk: Displaylysstyrken øges automatisk til maksimalniveau, når apparatet indstilles til at give
brugeren optimal synlighed. Når brugeren har indstillet apparatet og forlader menuen, sænkes
displaylysstyrken automatisk til det valgte niveau.
Rengøring og vedligeholdelse
Brug aldrig skuresvampe eller skrappe rengøringsmidler så som benzin, acetone eller lignende til
rengøring af apparatet.
Fjern jævnligt støv fra apparatets ydersider med en tør klud.
1 Tag stikket ud af stikkontakten, inden apparatet rengøres.
2 Rengør apparatets yderside med en tør klud.
Sørg for, at der ikke trænger vand ind i apparatet, og at der ikke spildes vand på det (g. 3).
Page 26

DANSK26
Udskiftning
Udover pæren er der ingen andre dele i apparatet, der skal udskiftes.
Pæren skal skiftes, når den holder op med at lyse, eller når lysproduktionen nedsættes (se også
kapitlet “Vigtigt’’). Du skal erstatte pæren med en halogenpære, 100 W, 12 V, GY6.35. Kun denne
pære er i stand til at give den rette lysintensitet.
Bemærk: Dette apparat er udviklet til brug udelukkende med selvbeskyttede pærer (g. 35).
Besøg vores websted på www.philips.com for at få ere oplysninger.
Udskiftning af pæren
1 Tag altid stikket ud af stikkontakten, før du udskifter pæren.
2 Hvis lampen stadig er varm, skal du lade den nedkøle i ca. 15 minutter.
3 Lås apparatets topdæksel op ved at trykke ned på det og dreje det mod uret, indtil O-
symbolet på topdækslet er lige ud for symbolet 1 på lampekabinettet. (g. 36)
4 Fjern topdækslet. (g. 37)
5 Skru den gamle pære ud af fatningen (g. 38).
6 Sæt den nye pære i soklen. (g. 39)
Rør ikke ved pæren med ngrene. Brug en klud eller køkkenrulle til at placere pæren (g. 40).
7 Sæt topdækslet tilbage på apparatet.
8 Lås topdækslet ved at dreje det med uret, indtil symbolet 1 på topdækslet er lige ud for
symbolet 1 på lampekabinettet. (g. 41)
Miljøhensyn
- Apparatet må ikke smides ud sammen med det almindelige husholdningsaffald, når det til sin tid
kasseres. Aevér det i stedet på en kommunal genbrugsstation. På den måde er du med til at
beskytte miljøet (g. 42).
Reklamationsret og service
Hvis du har behov for service eller oplysninger, eller hvis du har et problem, kan du besøge Philips’
websted på adressen www.philips.com eller kontakte det lokale Philips Kundecenter (telefonnumre
ndes i folderen “World-Wide Guarantee”). Hvis der ikke ndes et kundecenter i dit land, bedes du
kontakte din lokale Philips-forhandler.
Dette kapitel opsummerer de mest almindelige problemer, du kan støde på ved brug af apparatet.
Hvis du ikke kan løse problemet ved hjælp af nedenstående oplysninger, bedes du kontakte din
nærmeste Philips-forhandler.
Page 27

DANSK 27
Problem Løsning
Apparatet virker slet
ikke.
Apparatet fungerer
korrekt, men pæren
tænder ikke længere.
Apparatet bliver varmt
under brug.
Apparatet reagerer
ikke, når jeg forsøger
at indstille de
forskellige funktioner.
Lampen tændes ikke,
når alarmen går i gang.
Lampen lyser ikke op
med det samme, når
jeg tænder for den.
Jeg kan ikke høre
vækkelyden, når
alarmen går i gang.
Radioen virker ikke. Radioen kan være defekt. Kontakt din nærmeste Philips-forhandler.
Måske er stikket ikke sat korrekt i stikkontakten. Sæt det ordentligt i.
Der kan være strømafbrydelse. Kontrollér strømforsyningen ved at
tilslutte et andet apparat.
Måske er pærens levetid opbrugt. Levetiden afhænger af, hvordan du
bruger apparatet. I tilfælde af intens brug kan pærens levetid muligvis
være mindre, end du forventer. Hvis pæren bliver defekt, kan du bestille
en ny eller købe en hos din lokale forhandler. Kontakt dit lokale Philips
Kundecenter.
Dette er normalt, da apparatet varmes op af lyset fra lampen og af
elektronikken. Lad altid apparatet køle ned, inden du udskifter pæren.
Tag stikket ud af stikkontakten, og vent i 20 minutter, inden du sætter det
i igen. Når du sætter stikket tilbage i stikkontakten, sættes
apparatet tilbage til fabriksindstillingerne, og du skal indstille alle
funktioner igen.
Måske har du indstillet lysintensitetsniveauet for lavt. Øg
lysintensitetsniveauet.
Måske har du slået alarmfunktionen fra ved at skubbe aktiveringsknappen
til den nederste position. Slå alarmfunktionen til igen ved at skubbe
aktiveringsknappen til den midterste position (alarm 1) eller den øverste
position (alarm 2), afhængigt af det tidspunkt du ønsker at blive vækket
på.
Måske er apparatet defekt. Kontakt din nærmeste Philips-forhandler.
Det tager ca. 1 sekund, før lampen tændes. Dette er normalt, eftersom
pæren skal varme op.
Måske har du indstillet lydniveauet for lavt. Øg lydniveauet (se afsnittet
“Indstilling af lydstyrken” i kapitlet “Sådan bruges apparatet”).
Måske har du slået alarmen fra ved at skubbe aktiveringsknappen til den
nederste position.
Hvis du har valgt radioen som vækkelyd, er radioen muligvis defekt. Tænd
for radioen, når du har slukket for alarmen, for at kontrollere om radioen
virker. Hvis den ikke virker, bedes du kontakte din lokale Philipsforhandler.
Hvis du har valgt en downloadet vækkelyd eller musik fra en USB-nøgle
som alarmlyd, er det muligt, at lydene eller sangene ikke har det korrekte
format. Apparatet understøtter kun .mp3- og .wma-ler. Hvis lyden eller
musikken på USB-nøglen ikke kan afspilles, indstiller apparatet automatisk
fuglelyden som vækkelyd for at sikre, at du alligevel vækkes på det
indstillede vækketidspunkt.
Du har muligvis indstillet lydstyrken for lavt. Øg lydstyrkeniveauet.
Page 28

DANSK28
Problem Løsning
Der kommer en
knasende lyd fra
radioen.
Alarmen gik i gang i
går, men ikke i dag.
Jeg ville bruge snoozefunktionen, men
alarmen gik ikke i gang
igen efter 9 minutter.
Lyset vækker mig for
tidligt
Lyset vækker mig for
sent
Lampen blinker. Måske er apparatet ikke beregnet til den tilsluttede netspænding. Sørg for,
Apparatet genkender
ikke USB-nøglen.
Der vises en
fejlmeddelelse på
displayet, når jeg
sætter USB-nøglen ind
i USB-stikket.
Jeg har programmeret
apparatet til at vække
mig med musik på en
USB-nøgle, men i
stedet hører jeg
en fuglelyd.
Måske er sendesignalet svagt. Juster frekvensen (se afsnittet “Brug af
radioen/afspilning af musik fra en USB-nøgle” i kapitlet “Sådan bruges
apparatet”), og/eller skift antennens position ved at ytte rundt på den.
Kontroller, at du har rullet antennen helt ud.
Måske har du slået alarmfunktionen fra ved at skubbe
aktiveringsknappen til den nederste position.
Måske har du indstillet et for lavt lydstyrkeniveau og/eller
lysintensitetsniveau. Indstil et højere lydstyrke- og/eller
lysintensitetsniveau.
Måske har der været et strømsvigt, der varede længere end ca.
15 minutter. I dette tilfælde sættes apparatet tilbage til
fabriksindstillingerne. Du skal derefter indstille alle funktioner igen.
Du har formentlig skubbet aktiveringsknappen til den nederste position.
Dette slår alarmfunktionen helt fra. Hvis du vil bruge snooze-funktionen,
skal du trykke forsigtigt på apparatet.
Lydstyrkeniveauet er muligvis indstillet til 0.
Måske er lysintensitetsniveauet ikke indstillet optimalt for dig. Prøv at
indstille lysintensitetsniveauet til en lavere indstilling, hvis du vågner for
tidligt. Hvis lysintensitetsniveauet 1 ikke er lavt nok, skal du ytte
apparatet længere væk fra sengen.
Måske er apparatet placeret under hovedhøjde. Kontroller, at apparatet
er placeret i en højde, hvor din seng, dyne eller pude ikke spærrer for
lyset. Kontroller også, at apparatet ikke er placeret for langt væk.
at den indikerede netspænding på apparatet svarer til den lokale
netspænding.
Måske er USB-nøglen ikke sat korrekt i USB-stikket. Sørg for, at
du skubber USB-nøglen langt nok ind i USB-stikket.
Måske har musikken på USB-nøglen ikke det rigtige format. Kontroller, at
sangen er en MP3- eller WMA-l. Du kan kontrollere dette på din
computer. Filtypenavnet skal være .mp3 eller .wma. Se kapitlet “USB-
specikationer” for at få ere oplysninger.
Måske har du taget USB-nøglen ud af apparatet, eller den er ikke sat
korrekt i USB-stikket. Hvis apparatet ikke registrerer en USBnøgle, indstiller det automatisk fuglelyden som vækkelyd for at sikre, at du
alligevel vækkes på det indstillede vækketidspunkt. Hvis du vil
bruge musik fra en USB-nøgle som vækkelyd, skal USB-nøglen blive i
USB-stikket permanent.
Page 29

DANSK 29
Kompatible USB-enheder
- USB-ash-hukommelse (USB2.0 eller USB1.1)
- USB-ash-afspillere (USB2.0 eller USB1.1)
- Hukommelseskort (kræver en ekstra kortlæser for at kunne fungere sammen med dette
lydsystem)
Bemærk: Hvis din USB-enhed har en opstartsfunktion, skal du vente, indtil den er startet op og klar til
brug, før du slutter den til USB-porten i apparatet.
Understøttede formater
- USB- eller hukommelseslformat (FAT12, FAT16, FAT32 (sektorstørrelse: 512 bit)
- MP3-bithastighed (datahastighed): 32-320 kbps og variabel bithastighed
- WMA v7, v8 eller v9
- Biblioteksindlejring op til maks. 8 niveauer
- Antal album/mapper: maks. 99
- Antal numre/titler: maks. 999
- Filnavn i Unicode UTF8 (maks. længde: 128 byte)
Ikke-understøttede formater:
- Tomme album: et tomt album er et album, der ikke indeholder MP3/WMA-ler og ikke vises på
displayet.
- Ikke-understøttede lformater springes over. Word-dokumenter (.doc) eller MP3.ler med
ltypenavnet .dlf ignoreres og afspilles for eksempel ikke.
- AAC-, WAV- og PCM-lydler
- DRM-beskyttede ler understøttes ikke.
- WMA-ler i databevarende format
- Skjulte ler
Page 30

30
DEUTSCH
Einführung
Herzlichen Glückwunsch zu Ihrem Kauf und willkommen bei Philips! Um die Unterstützung von
Philips optimal nutzen zu können, registrieren Sie Ihr Produkt bitte unter www.philips.com/welcome.
Das Philips Wake-up Light macht das Aufwachen angenehmer. Innerhalb der eingestellten Zeit (die
Standardzeit beträgt 30 Minuten) steigert sich die Lichtintensität der Lampe - wie bei einem
natürlichen Sonnenaufgang - schrittweise auf die festgelegte Helligkeit. Das Licht bereitet Ihren
Körper sanft auf das Aufwachen zur eingestellten Weckzeit vor. Um das Aufwachen noch
angenehmer zu machen, können Sie außerdem natürliche Weckgeräusche, das UKW-Radio oder
sogar aus dem Internet heruntergeladene Titel bzw. Ihre eigene Musik von einem USB-Stick
verwenden.
Die Wirkung des Wake-up Lights
Das Philips Wake-up Light bereitet Ihren Körper während der letzten 20 bis 40 Minuten des Schlafes
(je nach gewählter Einstellung für die Sonnenaufgangssimulation) langsam auf das Aufwachen vor. In
den frühen Morgenstunden sind unsere Augen lichtempndlicher als während der Wachphasen am
Tag. In dieser Phase bereitet sich der Körper dank der relativ geringen Lichtintensität eines
simulierten Sonnenaufgangs auf das Aufwachen und Munterwerden vor. Durch die Anwendung des
Wake-up Lights werden Sie leichter wach und fühlen sich wohler und energiegeladener. Da die
Lichtempndlichkeit bei jedem Menschen unterschiedlich ist, können Sie die Lichtintensität Ihres
Wake-up Lights so einstellen, dass sie Ihrer Lichtempndlichkeit für einen optimalen Start in den Tag
am besten entspricht.
Weitere Informationen zum Wake-up Light nden Sie unter www.philips.com.
Allgemeine Beschreibung (Abb. 1)
A Obere Abdeckung mit Belüftungsschlitzen
B Lampengehäuse
C Netzkabel
D Antenne
E Display
1 Uhrzeit/Weckzeit
2 Lichtintensitätssymbol
3 Zeitsymbol für die Sonnenaufgangssimulation
4 Radiosymbol
5 Geräuschsymbol “Vogel”
6 Geräuschsymbol “Yoga”
7 Geräuschsymbol “Kuhglocken”
8 Geräuschsymbol “Wald”
9 Symbol für USB-Stick
10 Radiofrequenzsymbol
11 Lautstärkensymbol
12 Symbol für Displayhelligkeit
13 Symbol für Sonnenuntergangssimulation
14 Wecktonsymbol
15 Symbol für Weckzeit 2
16 Symbol für Weckzeit 1
17 Uhrzeitsymbol
F Menütaste “-”
G MENU-Taste
H Taste SELECT (auch für die Auswahl von UKW-Sendern)
I Menütaste “+”
J Schiebeschalter mit Positionen für deaktivierte Weckzeit, Weckzeit 1 und Weckzeit 2
K USB-Anschluss
Page 31

DEUTSCH 31
L Tasten am Seitenteil des Geräts
1 Taste zum Erhöhen der Lichtintensität
2 Ein-/Ausschalter für die Lampe
3 Taste zum Verringern der Lichtintensität
4 Taste zum Erhöhen der Lautstärke
5 Ein-/Ausschalter für das Radio
6 Taste zum Verringern der Lautstärke
Wichtig
- Lesen Sie diese Bedienungsanleitung vor dem Gebrauch des Geräts aufmerksam durch, und
bewahren Sie sie für eine spätere Verwendung auf.
- Dieses Gerät ist nach Klasse II zweifach isoliert (Abb. 2).
Gefahr
- Wasser und Strom sind eine gefährliche Kombination! Benutzen Sie das Gerät nicht in feuchter
Umgebung (z. B. im Badezimmer, in der Nähe einer Dusche oder eines Schwimmbeckens).
- Achten Sie darauf, dass kein Wasser in das Gerät gelangt oder darüber verschüttet wird (Abb. 3).
Warnhinweis
- Prüfen Sie, bevor Sie das Gerät in Betrieb nehmen, ob die Spannungsangabe auf dem Gerät mit
der örtlichen Netzspannung übereinstimmt.
- Stellen Sie nichts auf das Gerät oder in die Nähe des Geräts, das dazu führen könnte, dass
Wasser oder andere Flüssigkeiten auf das Gerät gelangen.
- Da Sie das Gerät nur von der Stromversorgung trennen können, indem Sie den Netzstecker aus
der Steckdose ziehen, vergewissern Sie sich immer, dass der Netzstecker leicht erreichbar ist,
wenn das Gerät an das Stromnetz angeschlossen ist.
- Das Gerät ist ausgelegt auf eine Stromspannung von 230 V und eine Frequenz von 50 Hz.
- Um Gefährdungen zu vermeiden, darf ein defektes Netzkabel nur von einem Philips ServiceCenter oder einer von Philips autorisierten Werkstatt durch ein Original-Ersatzkabel
ausgetauscht werden.
- Lassen Sie das Gerät ca. 15 Minuten lang abkühlen, bevor Sie zum Austauschen der Lampe die
obere Abdeckung abnehmen. Die Lampe und die Metallteile der oberen Abdeckung werden
während des Betriebs sehr heiß und können bei Berührung zu Verbrennungen führen. (Abb. 4)
- Dieses Gerät ist für Benutzer (einschl. Kinder) mit eingeschränkten physischen, sensorischen
oder psychischen Fähigkeiten bzw. ohne jegliche Erfahrung oder Vorwissen nur dann geeignet,
wenn eine angemessene Aufsicht oder ausführliche Anleitung zur Benutzung des Geräts durch
eine verantwortliche Person sichergestellt ist.
- Achten Sie darauf, dass Kinder nicht mit dem Gerät spielen.
- Dieses Gerät ist nur für den Gebrauch in Innenräumen vorgesehen (Abb. 5).
Achtung
- Lassen Sie das Gerät nicht fallen, und setzen Sie es keinerlei schweren Stößen aus.
- Stellen Sie das Gerät auf eine stabile, ebene und rutschfeste Oberäche.
- Verwenden Sie das Gerät nicht bei Zimmertemperaturen unter 10° C oder über 35° C.
- Achten Sie darauf, dass die Lüftungsschlitze auf der Ober- und Unterseite des Geräts während
des Gebrauchs nicht blockiert sind.
- Benutzen Sie das Gerät nicht, wenn das Lampengehäuse oder die Abdeckung beschädigt,
zerbrochen oder nicht vorhanden ist.
- Wenn Sie schon einmal eine schwere Depression hatten oder im Moment daran leiden,
konsultieren Sie Ihren Arzt, bevor Sie das Gerät benutzen.
- Benutzen Sie dieses Gerät nicht, um Ihre Schlafzeit zu verkürzen. Der Zweck dieses Geräts ist es,
Ihnen das Aufwachen zu erleichtern. Es verringert jedoch nicht Ihren Schlafbedarf.
- Das Gerät hat keinen Ein-/Ausschalter. Um das Gerät vom Stromnetz zu trennen, ziehen Sie den
Stecker aus der Steckdose.
Page 32

DEUTSCH32
- Dieses Gerät ist nur für den häuslichen Gebrauch oder in ähnlichem Umfeld, wie z. B. im Hotel,
geeignet.
Allgemeines
- Sie können die Lichtintensität, mit der Sie geweckt werden möchten, am Gerät einstellen (siehe
Abschnitt “Die Lichtintensität einstellen” im Kapitel “Das Gerät benutzen”).
- Wenn Sie oft zu früh oder mit Kopfschmerzen aufwachen, verringern Sie die Lichtintensität und/
oder die Dauer der Sonnenaufgangssimulation.
- Wenn eine weitere Person im Zimmer schläft, kann diese Person unbeabsichtigt durch das
Wake-up Light geweckt werden, obwohl sie weiter vom Gerät entfernt ist. Das liegt daran, dass
Menschen unterschiedlich auf eine bestimmte Lichtintensität reagieren.
- Der Stromverbrauch des Geräts ist am geringsten, wenn das Radio, die USBWiedergabefunktion und die Lampe ausgeschaltet sind.
Elektromagnetische Felder
Dieses Philips Gerät erfüllt sämtliche Normen bezüglich elektromagnetischer Felder (EMF).
Nach aktuellen wissenschaftlichen Erkenntnissen ist das Gerät sicher im Gebrauch, sofern es
ordnungsgemäß und entsprechend den Anweisungen in dieser Bedienungsanleitung
gehandhabt wird.
Für den Gebrauch vorbereiten
Die Uhrzeit einstellen
1 Stecken Sie den Stecker in die Steckdose.
, Die Stundenanzeige auf dem Display beginnt zu blinken und zeigt damit an, dass Sie die
Uhrzeit einstellen müssen (Abb. 6).
2 Drücken Sie die Menütaste “-” oder “+”, um die Stunde einzustellen.
3 Drücken Sie zur Bestätigung die SELECT-Taste.
, Die Minutenanzeige beginnt zu blinken (Abb. 7).
4 Drücken Sie die Menütaste “-” oder “+”, um die Minuten einzustellen.
5 Drücken Sie zur Bestätigung die SELECT-Taste.
, Das Gerät verlässt das Menü, und auf dem Display wird die eingestellte Uhrzeit angezeigt.
Das Gerät ist nun einsatzbereit.
Hinweis: Der hier beschriebene Ablauf gilt nur beim ersten Anschließen des Geräts, bei einem
Stromausfall, oder wenn der Netzstecker länger als 15 Minuten aus der Steckdose gezogen war. In
diesen Fällen leuchtet die Stundenanzeige auf, um anzuzeigen, dass Sie die Uhrzeit einstellen müssen. In
allen anderen Fällen müssen Sie die Uhrzeit über das Menü einstellen (siehe Abschnitt “Menüfunktionen”
im Kapitel “Das Gerät benutzen”).
Das Gerät benutzen
Menüfunktionen
Nachfolgend nden Sie eine Beschreibung aller Funktionen, die im Menü eingestellt werden können.
Diese werden im Menü in der folgenden Reihenfolge angezeigt:
- Uhrzeit
- Weckzeit 1
- Weckzeit 2
- Weckton
- Sonnenuntergangssimulation
- Anzeigehelligkeit
Die Menüfunktionen können folgendermaßen eingestellt werden:
Page 33

DEUTSCH 33
1 Drücken Sie zum Öffnen des Menüs die MENU-Taste (Abb. 8).
Hinweis: Wenn Sie 30 Sekunden lang keine Taste drücken, verlässt das Gerät das Menü, und das Display
zeigt wieder die Uhrzeit an.
2 Drücken Sie die Menütaste “-” oder “+”, um eine Funktion auszuwählen. (Abb. 9)
3 Drücken Sie zum Aufrufen der Funktion die SELECT-Taste (Abb. 10).
4 Drücken Sie die Menütaste “-” oder “+”, um eine Einstellung zu ändern. (Abb. 9)
5 Drücken Sie zur Bestätigung die SELECT-Taste (Abb. 10).
Den Wecker einstellen
Die Weckzeit einstellen
Wenn Sie den Wecker stellen, legen Sie eine Weckzeit und Lichtintensität fest, und wählen Sie den
Weckton aus, mit dem Sie geweckt werden möchten. Der Wecker ist gestellt, wenn das
Wecksymbol auf dem Display angezeigt wird. Während der für die Sonnenaufgangssimulation
festgelegten Dauer wird die Lichtintensität langsam bis zur ausgewählten Intensität erhöht, bis die
Weckzeit erreicht ist. Die Standarddauer für die Sonnenaufgangssimulation beträgt 30 Minuten.
Hierbei handelt es sich um die empfohlene Dauer. Da aber die Lichtempndlichkeit je nach Person
unterschiedlich ist, können Sie die Dauer der Sonnenaufgangssimulation individuell einstellen (siehe
Abschnitt “Die Dauer der Sonnenaufgangssimulation einstellen” in diesem Kapitel). Ist die festgelegte
Weckzeit erreicht (nach der Sonnenaufgangssimulation), wird der Weckton immer lauter, bis er nach
90 Sekunden die eingestellte Lautstärke erreicht.
Hinweis: Sie können zwei verschiedene Weckzeiten einstellen, zum Beispiel eine für Wochenenden und
eine für Arbeitstage.
Hinweis: Die für den Wecker festgelegte Lautstärke wird auch für das Radio und die Musik von Ihrem
USB-Stick verwendet. Zum Einstellen der Lautstärke drücken Sie die Taste zum Erhöhen bzw. Verringern
der Lautstärke. Wenn Sie nicht durch Licht, Musik oder Naturgeräusche geweckt werden möchten, stellen
Sie die Lichtintensität bzw. Lautstärke auf 0 (siehe Abschnitte “Das Gerät als Nachttischlampe
verwenden” und “Lautstärke einstellen” in diesem Kapitel.
1 Stellen Sie den Schiebeschalter auf die mittlere Position, wenn Sie die Weckzeit 1 einstellen
möchten. Stellen Sie den Schiebeschalter auf die oberste Position, wenn Sie die Weckzeit 2
einstellen möchten (Abb. 11).
, Die Stundenanzeige der Weckzeit beginnt zu blinken (Abb. 12).
, Um die Zeit einzustellen, befolgen Sie die Schritte 2 bis 5.
2 Drücken Sie die Menütaste “-” oder “+”, um die Stunde einzustellen (Abb. 9).
Hinweis: Dies ist nur dann möglich, wenn die Stundenanzeige blinkt. Ist dies nicht der Fall, schieben Sie
den Schiebeschalter nach unten und wieder nach oben, um die Weckzeitfunktion aufzurufen. Sie können
die Weckzeit auch im Menü einstellen (siehe Abschnitt “Menüfunktionen” in diesem Kapitel).
3 Drücken Sie zur Bestätigung die SELECT-Taste (Abb. 10).
, Die Minutenanzeige der Weckzeit beginnt zu blinken (Abb. 13).
4 Drücken Sie die Menütaste “-” oder “+”, um die Minuten einzustellen. (Abb. 9)
5 Drücken Sie zum Bestätigen die SELECT-Taste, oder warten Sie einige Sekunden
lang (Abb. 10).
, Das Gerät verlässt das Menü, und auf dem Display wird die eingestellte Uhrzeit angezeigt.
Die Weckzeit ist jetzt eingestellt.
Die Lichtintensität einstellen
Sie können die Lichtintensität einstellen, die Sie für den simulierten Sonnenaufgang vor der
eigentlichen Weckzeit bevorzugen.
Page 34

DEUTSCH34
Hinweis: Die Lichtintensität, die Sie festlegen, wird sowohl für die Weckfunktion verwendet, als auch für
die Lampenfunktion (siehe Abschnitt “Das Gerät als Nachttischlampe verwenden” unten).
1 Drücken Sie den Ein-/Ausschalter für die Lampe. (Abb. 14)
Hinweis: Es dauert etwa 1 Sekunde, bis die Lampe aueuchtet. Das ist normal, die Lampe muss sich
zunächst aufheizen.
Hinweis: Sie können die Lichtintensität auch einstellen, wenn die Lampe ausgeschaltet ist. Wenn die
Lampe eingeschaltet ist, ist es jedoch einfacher, die bevorzugte Lichtintensität zu bestimmen.
2 Betätigen Sie zum Einstellen der Lichtintensität die Tasten zum Verringern bzw. Erhöhen der
Lichtintensität (Abb. 15).
Sie können eine Lichtintensität zwischen 1 und 20 auswählen.
Wenn Sie nicht möchten, dass vor der eigentlichen Weckzeit der Sonnenaufgang simuliert wird,
setzen Sie die Lichtintensität auf 0.
Tipp: Stellen Sie die Lichtintensität auf 20 ein, wenn Sie das Gerät zum ersten Mal verwenden. Prüfen Sie
beim Aufwachen, welche Lichtintensität erreicht wurde, indem Sie kurz eine der Tasten zum Einstellen der
Lichtintensität drücken. Auf diese Weise wird die aktuelle Lichtintensität im Display angezeigt. Stellen Sie
für den nächsten Tag die Lichtintensität auf diesen Wert ein.
3 Betätigen Sie zum Ausschalten der Lampe erneut den Ein-/Ausschalter für die Lampe.
Den Weckton einstellen
Hinweis: Sie können die Lautstärke des Wecktons individuell einstellen (siehe Abschnitt “Lautstärke
einstellen” in diesem Kapitel). Wenn Sie nicht mit einem Weckton geweckt werden möchten, setzen Sie
die Lautstärke auf 0.
1 Folgen Sie den Anweisungen im obigen Abschnitt “Menüfunktionen”, und wählen Sie die
Wecktonfunktion aus.
2 Drücken Sie zur Bestätigung die SELECT-Taste.
3 Drücken Sie die Menütaste “-” oder “+”, um den gewünschten Weckton auszuwählen (siehe
unten).
, Das Display zeigt das Symbol für den ausgewählten Weckton an.
4 Drücken Sie zur Bestätigung die SELECT-Taste.
Sie können einen der folgenden Wecktöne auswählen:
- Radio (siehe auch Abschnitt “Das Radio als Wecker verwenden”) (Abb. 16)
- Weckton “Vogel” (Abb. 17)
- Weckton “Yoga” (Abb. 18)
- Weckton “Kuhglocken” (Abb. 19)
- Weckton “Wald” (Abb. 20)
- Heruntergeladene Wecktöne oder Ihre eigene Musik von einem USB-Stick (siehe auch
Abschnitt “Musik von einem USB-Stick als Weckton verwenden” unten). (Abb. 21)
Tipp: Sie können weitere Wecktöne unter www.philips.com herunterladen.
Das Radio als Wecker verwenden
1 Befolgen Sie die Anweisungen 1 bis 4 in Abschnitt “Den Weckton einstellen”, um das Radio als
Weckton auszuwählen.
, Das Display zeigt “P1” an, was für den ersten voreingestellten Radiosender steht (Abb. 22).
Wenn Sie einen anderen voreingestellten Radiosender auswählen möchten, drücken Sie die
Menütaste “-” oder “+” (siehe Abschnitt “Das Radio verwenden/Musik von einem USB-Stick
wiedergeben”). Wie Sie die Frequenz der voreingestellten Radiosender ändern können, erfahren Sie
ebenfalls in diesem Abschnitt.
Page 35

DEUTSCH 35
2 Drücken Sie zur Bestätigung die SELECT-Taste.
, Der ausgewählte voreingestellte Radiosender ist jetzt als Weckton festgelegt.
Musik von einem USB-Stick als Weckton verwenden
Hinweis: Sie können nur Musik von einem USB-Stick benutzen, wenn diese das Format MP3 oder WMA
aufweist. Sie können dies auf Ihrem Computer prüfen. Die Erweiterung der Dateien sollte .mp3 oder
.wma lauten.
Weitere Informationen zu USB nden Sie im Kapitel “USB-Spezikationen”.
1 Stecken Sie den USB-Stick in den USB-Anschluss des Geräts.
2 Befolgen Sie die Anweisungen 1 bis 4 im Abschnitt “Den Weckton einstellen”, um die Musik
von einem USB-Stick als Weckton auszuwählen.
, Das Display zeigt “0001” an, was für den ersten Titel auf dem USB-Stick steht. (Abb. 23)
Um einen anderen Titel auszuwählen, drücken Sie die Menütasten “-” oder “+”.
3 Drücken Sie zur Bestätigung die SELECT-Taste.
, Der ausgewählte Titel ist jetzt als Weckton festgelegt.
Die Dauer der Sonnenaufgangssimulation einstellen
Die Dauer der Sonnenaufgangssimulation ist die Zeit, in der die Lichtintensität der Lampe
schrittweise bis zur festgelegten Intensität erhöht wird, bevor der Weckton wiedergegeben wird. Die
Standarddauer liegt bei 30 Minuten, weil dies die optimale Zeit ist, um Ihren Körper auf das
Aufwachen vorzubereiten. Da aber die Lichtempndlichkeit jeder Person unterschiedlich ist, können
Sie die Dauer der Sonnenaufgangssimulation individuell einstellen. Sie können die Dauer auf 20 oder
25 Minuten reduzieren oder auf 40 Minuten erhöhen.
1 Halten Sie die Taste zum Erhöhen und Verringern der Lichtintensität gleichzeitig 3 Sekunden
lang gedrückt (Abb. 24).
, Auf dem Display werden das Symbol für Sonnenaufgangssimulation und die Standarddauer
von 30 Minuten angezeigt. (Abb. 25)
2 Drücken Sie die Menütaste “-” oder “+”, um die Dauer der Sonnenaufgangssimulation zu
erhöhen oder zu verringern. (Abb. 9)
3 Drücken Sie zur Bestätigung die SELECT-Taste (Abb. 10).
Schlummerfunktion
1 Tippen Sie mit der Innenseite Ihrer Hand auf die Oberäche des Wake-up Lights, um die
Schlummerfunktion des Geräts zu aktivieren (damit diese Funktion nicht aus Versehen
aktiviert werden kann, müssen Sie etwas Kraft aufwenden) (Abb. 26).
, Die Lampe bleibt mit der ausgewählten Lichtintensität eingeschaltet, aber der Weckton
schaltet sich aus. Nach 9 Minuten wird der Weckton automatisch wieder eingeschaltet.
Hinweis: Die Schlummerfunktion ist auf 9 Minuten voreingestellt und kann nicht geändert werden.
Die Weckfunktion aus- und einschalten
1 Um die Weckfunktion auszuschalten, wenn sich der Wecker einschaltet, schieben Sie den
Schiebeschalter in die untere Position (Abb. 27).
Hinweis: Die Lampe bleibt als Beleuchtungsquelle eingeschaltet. Sie können sie mit dem entsprechenden
Ein-/Ausschalter ausschalten.
Hinweis: Wenn Sie vergessen, den Wecker auszuschalten, wird das Wecksignal (Ton bzw. Licht) nach
90 Minuten automatisch ausgeschaltet.
2 Wenn Sie den Wecker für den nächsten Tag auf eine der beiden Weckzeiten stellen möchten,
schieben Sie den Schiebeschalter erneut auf die entsprechende Position.
Page 36

DEUTSCH36
Weckdemonstration
Wenn Sie eine kurze Demonstration (60 Sekunden) der sich langsam steigernden Lichtintensität
und Lautstärke wünschen, aktivieren Sie die Testfunktion des Geräts.
1 Halten Sie gleichzeitig die Menütasten “-” und “+” gedrückt, bis auf dem Display “TEST”
angezeigt wird (Abb. 28).
2 Drücken Sie erneut gleichzeitig die Menütasten “-” und “+”, um die Demonstration
zu beenden.
Hinweis: Die Weckdemonstration wird so lange fortgeführt, bis Sie die Menütasten “-” und “+” erneut
drücken. Der Testmodus wird nach 9 Stunden automatisch beendet.
Das Radio verwenden/Musik von einem USB-Stick wiedergeben
Das Radio einschalten
1 Betätigen Sie zum Einschalten des Radios den Ein-/Ausschalter für das Radio (Abb. 29).
, Die Radiowiedergabe beginnt.
Hinweis: Die Radiofunktion verfügt über 3 voreingestellte Radiosender. Um einen der voreingestellten
Sender auszuwählen, drücken Sie die Taste SELECT unterhalb des Displays.
2 Betätigen Sie zum Einstellen der Radiofrequenz die Menütaste “+” oder “-”. (Abb. 30)
Tipp: Halten Sie Menütaste “+” oder “-” etwa 2 Sekunden lang gedrückt, um die Radiofrequenzen
automatisch zu durchsuchen.
Tipp: Um sicherzustellen, dass Sie ein ausreichendes Radiosignal empfangen, wickeln Sie die Antenne
vollständig ab, und suchen Sie nach der Position, in der der Empfang optimal ist.
3 Betätigen Sie zum Ausschalten des Radios erneut den Ein-/Ausschalter für das Radio.
Voreingestellte Radiosender ändern
Das Radio des Wake-up Lights verfügt über 3 voreingestellte Radiosender. Wenn Sie andere
Radiosender als die voreingestellten Sender einstellen möchten, führen Sie die nachstehenden
Schritte aus.
1 Drücken Sie den Ein-/Ausschalter für das Radio, um das Radio einzuschalten. (Abb. 31)
, Das Display zeigt “P1” an, was für den ersten voreingestellten Sender steht (Abb. 22).
Hinweis: Drücken Sie ein- oder mehrmals die Taste SELECT, wenn Sie einen anderen voreingestellten
Sender auswählen möchten.
2 Um Radiofrequenzen zu durchsuchen und so den voreingestellten Sender zu ändern, drücken
Sie die Menütaste “-” oder “+” (Abb. 30).
, Das Gerät speichert automatisch die ausgewählte Radiofrequenz.
Musik von einem USB-Stick wiedergeben
Hinweis: Sie können nur Musik von einem USB-Stick benutzen, wenn sie das MP3- oder WMA-Format
aufweist. Das Gerät kann keine anderen Formate wiedergeben. Sie können dies auf Ihrem Computer
überprüfen. Die Erweiterung der Dateien sollte .mp3 oder .wma lauten. Weitere Informationen nden Sie
im Kapitel “USB-Spezikationen”.
1 Um Musik von einem USB-Stick wiederzugeben, drücken Sie zweimal den Ein-/Ausschalter
für das Radio. (Abb. 31)
, Ist ein USB-Stick an den USB-Anschluss angeschlossen, beginnt das Gerät automatisch, die
Anzahl von MP3- oder WMA-Dateien auf dem Stick zu überprüfen. Dies kann einige Minuten
dauern. Danach wird die Anzahl der Titel auf dem Display angezeigt, und das Gerät gibt den
ersten Titel auf dem USB-Stick wieder.
Page 37

DEUTSCH 37
, Wenn das Gerät erkennt, dass die Dateien auf dem USB-Stick nicht das Format MP3 oder
WMA aufweisen, wird auf dem Display “ERR” angezeigt.
2 Betätigen Sie zum Auswählen der gewünschten Musikdatei die Menütaste “+” oder “-
”. (Abb. 30)
Wenn Sie die Menütaste “+” oder “-” gedrückt halten, laufen die Titel schneller durch.
3 Um die Musikwiedergabe vom USB-Stick zu beenden, drücken Sie erneut den Ein-/
Ausschalter für das Radio.
Hinweis: Legen Sie für schnelleres Scannen Ihre Musikdateien im Stammordner des USB-Sticks ab.
Hinweis: Die Titel werden entsprechend dem Datum geordnet, an dem sie auf dem USB-Stick gespeichert
wurden. Wenn Sie die Titel in einer bestimmten Reihenfolge wiedergeben möchten, speichern Sie sie in
dieser Reihenfolge zunächst auf Ihrem Computer, und kopieren Sie sie dann auf den USB-Stick.
Lautstärke einstellen
1 Um die Lautstärke für das Radio oder die Musikwiedergabe von einem USB-Stick
einzustellen, drücken Sie die Taste zum Erhöhen bzw. Verringern der Lautstärke. (Abb. 32)
Sie können eine Lautstärke zwischen 1 und 20 auswählen.
Hinweis: Die von Ihnen ausgewählte Lautstärke wird automatisch auch als Lautstärke für die
Weckfunktion gespeichert.
Sonnenuntergangssimulation
Verwenden Sie diese Funktion, wenn Licht und/oder Ton eingeschaltet bleiben und sich langsam
abschwächen sollen, bevor Sie einschlafen. Dafür können Sie eine Zeitspanne auswählen (15 bis
90 Minuten), nach der sich das Gerät von selbst ausschaltet.
Hinweis: Die Lichtintensität, die Sie zu Beginn der Sonnenuntergangssimulation festlegen, wird ebenfalls
für die Sonnenaufgangssimulation verwendet.
1 Schalten Sie die Leuchte bzw. das Radio oder die Musik von einem USB-Stick ein (siehe
Abschnitte “Das Gerät als Nachttischlampe verwenden” bzw. “Das Radio verwenden/Musik
von einem USB-Stick wiedergeben” in diesem Kapitel).
2 Befolgen Sie die Schritte im Abschnitt “Menüfunktionen” in diesem Kapitel, um die
Sonnenuntergangssimulation auszuwählen und die entsprechende Dauer festzulegen.
, Sie können eine Dauer zwischen 15 und 90 Minuten (15, 30, 60 oder 90 Minuten) auswählen.
Hinweis: Nach dieser Zeitspanne werden Licht und Ton ausgeschaltet, auch wenn nur eines der beiden
aktiviert ist.
Tipp: Sie können auch den Ein-/Ausschalter für die Lampe 3 Sekunden lang drücken, um die
Sonnenuntergangssimulation zu aktivieren (Abb. 33).
Das Gerät als Nachttischlampe verwenden
Sie können das Gerät als Nachttischlampe benutzen.
1 Betätigen Sie zum Einschalten der Lampe den Ein-/Ausschalter für die Lampe. (Abb. 14)
Hinweis: Es dauert etwa 1 Sekunde, bis die Lampe aueuchtet. Das ist normal, die Lampe muss sich
zunächst aufheizen.
2 Betätigen Sie zum Einstellen der Lichtintensität die Tasten zum Verringern bzw. Erhöhen der
Lichtintensität (Abb. 15).
Sie können eine Lichtintensität zwischen 1 und 20 auswählen.
Hinweis: Die von Ihnen ausgewählte Lichtintensität wird automatisch auch als Lichtintensität für die
Weckfunktion gespeichert.
Page 38

DEUTSCH38
3 Betätigen Sie zum Ausschalten der Lampe erneut den Ein-/Ausschalter für die Lampe.
Einstellen der Anzeigehelligkeit
1 Befolgen Sie die Schritte im Abschnitt “Menüfunktionen” in diesem Kapitel, um die
Anzeigehelligkeit auszuwählen und wunschgemäß einzustellen. (Abb. 34)
, Sie können eine Anzeigehelligkeit zwischen 1 und 4 auswählen.
Tipp: Wenn Sie die Anzeigehelligkeit auf 1 festlegen, verbraucht das Gerät am wenigsten Energie.
Hinweis: Wenn Sie das Gerät einstellen, steigt die Anzeigehelligkeit automatisch auf die Höchststufe,
damit Sie optimal sehen können. Wenn die Einstellungen abgeschlossen sind und Sie das Menü verlassen,
verringert sich die Anzeigehelligkeit automatisch wieder auf den eingestellten Wert.
Benutzen Sie zum Reinigen des Geräts keine Scheuerschwämme und -mittel oder aggressive
Flüssigkeiten wie Benzin oder Azeton.
Entfernen Sie den Staub auf der Außenseite des Geräts regelmäßig mit einem trockenen Tuch.
1 Ziehen Sie vor dem Reinigen des Geräts den Netzstecker aus der Steckdose.
2 Reinigen Sie die Außenseiten des Geräts mit einem trockenen Tuch.
Achten Sie darauf, dass kein Wasser in das Gerät gelangt oder darüber verschüttet wird (Abb. 3).
Ersatz
Außer der Lampe enthält das Gerät keine Teile, die vom Kunden repariert oder ausgetauscht
werden können.
Die Lampe muss ausgetauscht werden, wenn sie aufhört zu leuchten oder die Lichtintensität
nachlässt (siehe auch Kapitel “Wichtig”). Die Lampe darf nur durch eine Halogen-Lampe von Philips
(100 W, 12 V, GY6,35) ersetzt werden. Nur diese bietet die korrekte Lichtintensität.
Hinweis: In diesem Gerät dürfen nur Halogen-Lampen verwendet werden (Abb. 35).
Weitere Informationen nden Sie auf unserer Website www.philips.com.
Die Lampe austauschen
1 Ziehen Sie stets den Netzstecker aus der Steckdose, bevor Sie die Lampe auswechseln.
2 Wenn die Lampe noch heiß ist, lassen Sie sie ungefähr 15 Minuten abkühlen.
3 Um die obere Abdeckung zu entriegeln, drücken Sie sie nach unten, und drehen Sie sie gegen
den Uhrzeigersinn, bis das O-Symbol auf der oberen Abdeckung mit dem 1-Symbol auf dem
Lampengehäuse auf gleicher Höhe ist. (Abb. 36)
4 Nehmen Sie die obere Abdeckung ab. (Abb. 37)
5 Schrauben Sie die Lampe aus der Fassung (Abb. 38).
6 Stecken Sie die neue Lampe in die Fassung. (Abb. 39)
Berühren Sie die Lampe nicht mit bloßen Händen, sondern verwenden Sie beim Einsetzen der
Lampe ein Stoff- oder Papiertaschentuch (Abb. 40).
7 Bringen Sie die obere Abdeckung wieder am Gerät an.
8 Verriegeln Sie die obere Abdeckung wieder, indem Sie sie im Uhrzeigersinn drehen, bis sich
das 1-Symbol auf der Abdeckung auf Höhe des 1-Symbols auf dem Lampengehäuse
bendet. (Abb. 41)
Page 39

DEUTSCH 39
Umwelt
- Werfen Sie das Gerät am Ende der Lebensdauer nicht in den normalen Hausmüll. Bringen Sie es
zum Recycling zu einer ofziellen Sammelstelle. Auf diese Weise tragen Sie zum Umweltschutz
bei (Abb. 42).
Garantie und Kundendienst
Benötigen Sie weitere Informationen oder treten Probleme auf, besuchen Sie bitte die Philips
Website (www.philips.com), oder setzen Sie sich mit einem Philips Service-Center in Ihrem Land in
Verbindung (Telefonnummer siehe internationale Garantieschrift). Sollte es in Ihrem Land kein
Service-Center geben, wenden Sie sich bitte an Ihren Philips Händler.
Fehlerbehebung
In diesem Kapitel sind die häugsten Probleme aufgeführt, die beim Gebrauch Ihres Geräts auftreten
können. Sollten Sie ein Problem mithilfe der nachstehenden Informationen nicht beheben können,
wenden Sie sich bitte an das Philips Service-Center in Ihrem Land.
Problem Lösung
Das Gerät funktioniert
nicht.
Das Gerät ist in
Ordnung, aber die
Lampe funktioniert
nicht mehr.
Das Gerät wird
während des
Gebrauchs heiß.
Das Gerät reagiert
nicht, wenn ich
verschiedene
Funktionen einstellen
möchte.
Die Lampe leuchtet
nicht auf, wenn sich
der Wecker
einschaltet.
Möglicherweise ist der Netzstecker nicht richtig in die Steckdose
eingesteckt. Stecken Sie ihn richtig ein.
Möglicherweise liegt ein Stromausfall vor. Überprüfen Sie, ob die
Stromversorgung funktioniert, indem Sie ein anderes Gerät an die
Steckdose anschließen.
Vielleicht hat die Lampe das Ende ihrer Lebensdauer erreicht. Diese
hängt davon ab, wie Sie das Gerät benutzen. Wenn Sie das Gerät sehr
häug verwenden, ist die Lebensdauer der Lampe möglicherweise kürzer
als erwartet. Wenn die Lampe nicht mehr funktionier t, können Sie eine
neue bestellen oder bei Ihrem Händler vor Ort kaufen. Kontaktieren Sie
das Philips Service-Center in Ihrem Land.
Dies ist normal, da die Lampe und die Elektronik das Gerät aufheizen.
Lassen Sie das Gerät immer abkühlen, bevor Sie die Lampe ersetzen.
Ziehen Sie den Stecker aus der Steckdose, und warten Sie 20 Minuten,
bevor Sie ihn wieder einstecken. Wenn Sie den Stecker wieder
einstecken, wird das Gerät auf die Werkseinstellungen zurückgesetzt, und
Sie müssen alle Funktionen erneut einstellen.
Möglicherweise haben Sie die Lichtintensität zu niedrig eingestellt. Stellen
Sie einen höheren Wert ein.
Vielleicht haben Sie die Weckfunktion ausgeschaltet, indem Sie den
Schiebeschalter auf die untere Position gestellt haben. Um die
Weckfunktion einzuschalten, stellen Sie den Schiebeschalter auf die
mittlere (Weckzeit 1) oder obere Position (Weckzeit 2), je nachdem zu
welcher Zeit Sie geweckt werden möchten.
Möglicherweise ist das Gerät defekt. Setzen Sie sich mit dem Philips
Service-Center in Ihrem Land in Verbindung.
Page 40

DEUTSCH40
Problem Lösung
Die Lampe leuchtet
nicht sofort, wenn ich
sie einschalte.
Ich höre den Weckton
nicht, wenn der
Wecker sich
einschaltet.
Das Radio funktioniert
nicht.
Das Radio macht
Knackgeräusche.
Gestern hat sich der
Wecker eingeschaltet,
aber heute hat er
nicht funktioniert.
Es dauert etwa 1 Sekunde, bis die Lampe leuchtet. Das ist normal, die
Lampe muss sich zunächst aufheizen.
Möglicherweise haben Sie die Lautstärke zu niedrig eingestellt.
Informationen zum Einstellen einer höheren Lautstärke nden Sie im
Kapitel “Das Gerät benutzen” im Abschnitt “Lautstärke einstellen”.
Möglicherweise haben Sie die Weckfunktion ausgeschaltet, indem Sie den
Schiebeschalter ganz nach unten geschoben haben.
Wenn Sie das Radio als Weckgeräusch gewählt haben, ist dieses
möglicherweise defekt. Überprüfen Sie, ob das Radio funktioniert.
Drücken Sie dazu die Radiotaste, nachdem Sie den Wecker ausgeschaltet
haben. Wenn das Radio nicht funktionier t, wenden Sie sich an das Philips
Service-Center in Ihrem Land.
Wenn Sie einen heruntergeladenen Weckton oder Musik von einem
USB-Stick als Weckton ausgewählt haben, kann es sein, dass die
Musikdateien nicht das richtige Format aufweisen. Dieses Gerät
unterstützt nur MP3- und WMA-Dateien. Wenn der ausgewählte Ton
oder die Musik auf dem USB-Stick nicht wiedergegeben werden kann,
weckt Sie das Gerät automatisch mit Vogelgesang, sodass Sie auf jeden
Fall rechtzeitig geweckt werden.
Möglicherweise ist das Radio defekt. Setzen Sie sich mit einem Philips
Service-Center in Ihrem Land in Verbindung.
Möglicherweise ist die Lautstärke zu niedrig eingestellt. Erhöhen Sie die
Lautstärke.
Vielleicht ist das Sendersignal schwach. Passen Sie die Frequenz an (siehe
Kapitel “Das Gerät benutzen”, Abschnitt “Das Radio verwenden/Musik
von einem USB-Stick wiedergeben”) bzw. ändern Sie die Position der
Antenne. Vergewissern Sie sich, dass Sie die Antenne vollständig
abgewickelt haben.
Möglicherweise haben Sie die Weckfunktion ausgeschaltet, indem Sie den
Schiebeschalter ganz nach unten geschoben haben.
Möglicherweise haben Sie die Lautstärke und/oder die Lichtintensität zu
niedrig eingestellt. Stellen Sie eine höhere Lautstärke und/oder
Lichtintensität ein.
Eventuell ist der Strom in der Zwischenzeit für mehr als 15 Minuten
ausgefallen. In diesem Fall wurde das Gerät auf die Werkseinstellungen
zurückgesetzt, und Sie müssen alle Funktionen erneut einstellen.
Page 41

DEUTSCH 41
Problem Lösung
Ich wollte die
Schlummerfunktion
verwenden, aber der
Wecker schaltete sich
nach 9 Minuten nicht
wieder an.
Das Licht weckt mich
zu früh.
Das Licht weckt mich
zu spät.
Die Lampe blinkt. Möglicherweise ist das Gerät für die verfügbare Netzspannung nicht
Das Gerät erkennt
den USB-Stick nicht.
Eine Fehlermeldung
erscheint auf dem
Display, wenn ich den
USB-Stick anschließe.
Ich habe das Gerät so
programmiert, dass ich
mit Musik von einem
USB-Stick geweckt
werde, aber
stattdessen höre ich
Vogelgesang.
Sie haben wahrscheinlich den Schiebeschalter auf die unterste Position
heruntergedrückt. Dadurch wird die Weckfunktion ausgeschaltet. Wenn
Sie die Schlummerfunktion verwenden möchten, müssen Sie auf das
Gerät tippen.
Möglicherweise haben Sie die Lautstärke auf 0 gestellt.
Möglicherweise ist die gewählte Lichtintensität für Sie nicht geeignet.
Stellen Sie eine niedrigere Lichtintensität ein, wenn Sie zu früh
aufwachen. Wenn die Lichtintensität 1 nicht niedrig genug ist, stellen Sie
das Gerät weiter vom Bett entfernt auf.
Möglicherweise sind Sie zu spät aufgewacht, weil die Geräteposition
niedriger ist als Ihre Kopfhöhe. Achten Sie darauf, dass das Gerät so
positioniert ist, dass das Licht nicht von Bett, Bettdecke oder Kissen
blockiert wird. Außerdem darf das Gerät nicht zu weit vom Bett entfernt
stehen.
geeignet. Die örtliche Netzspannung muss der Spannungsangabe auf
dem Gerät entsprechen.
Vielleicht wurde der USB-Stick nicht korrekt an den USB-Anschluss
angeschlossen. Vergewissern Sie sich, dass Sie den USB-Stick korrekt
angeschlossen haben.
Vielleicht besitzt die Musik auf dem USB-Stick das falsche Format.
Vergewissern Sie sich, dass es sich bei dem Musiktitel um eine MP3- oder
eine WMA-Datei handelt. Dies können Sie auf Ihrem Computer prüfen.
Die Erweiterung der Dateien sollte .mp3 oder .wma lauten. Weitere
Informationen nden Sie im Kapitel “USB-Spezikationen”.
Vielleicht haben Sie den USB-Stick vom Gerät getrennt oder nicht richtig
an den USB-Anschluss angeschlossen. Wenn das Gerät keinen USB-Stick
erkennt, verwendet es automatisch Vogelgesang als Weckton, um
sicherzustellen, dass Sie zur festgelegten Weckzeit auf jeden Fall geweckt
werden. Um Musik von einem USB-Stick als Weckton zu verwenden,
muss der USB-Stick dauerhaft angeschlossen sein.
Kompatible USB-Geräte:
- USB-Flash-Speicher (USB 2.0 oder USB 1.1)
- USB-Flash-Player (USB 2.0 oder USB 1.1)
- Speicherkarten (zusätzliches Kartenlesegerät für Verwendung mit diesem Audiosystem
erforderlich)
Hinweis: Wenn Ihr USB-Gerät eine Funktion zum Hochfahren besitzt, warten Sie, bis es hochgefahren
und bereit ist, bevor Sie es an den USB-Anschluss des Geräts anschließen.
Page 42

DEUTSCH42
Unterstützte Formate
- USB- oder Speicher-Dateiformat FAT12, FAT16, FAT32 (Abschnittsgröße: 512 Byte)
- MP3-Bitrate (Übertragungsgeschwindigkeit): 32 – 320 Kbit/s und variable Bitrate
- WMA v7, v8 oder v9
- Die Verschachtelung von Verzeichnissen ist auf maximal 8 Ebenen beschränkt.
- Anzahl der Alben/Ordner: maximal 99
- Anzahl der Tracks/Titel: maximal 999
- Dateiname in Unicode UTF8 (maximale Länge: 128 Byte)
Nicht unterstützte Formate:
- Leere Alben: Ein leeres Album ist ein Album, das keine MP3-/WMA-Dateien enthält und im
Display nicht angezeigt wird.
- Dateien mit nicht unterstützten Formaten werden übersprungen. So werden z. B. WordDokumente (.doc) oder MP3-Dateien mit der Erweiterung .dlf ignoriert und nicht
wiedergegeben.
- AAC-, WAV- und PCM-Audiodateien
- DRM-geschützte Dateien werden nicht unterstützt.
- WMA-Dateien im Lossless-Format
- Ausgeblendete Dateien
Page 43

Συγχαρητήρια για την αγορά σας και καλώς ήρθατε στη Philips! Για να επωφεληθείτε πλήρως
από την υποστήριξη που παρέχει η Philips, καταχωρήστε το προϊόν σας στην ιστοσελίδα
www.philips.com/welcome.
Το ξυπνητήρι με φως της Philips σάς βοηθά να ξυπνάτε πιο ευχάριστα. Η ένταση φωτός της
λάμπας αυξάνεται σταδιακά έως ότου φτάσει στο επίπεδο που έχετε ρυθμίσει, το χρόνο
προσομοίωσης ανατολής που έχετε ρυθμίσει (ο προεπιλεγμένος χρόνος είναι 30 λεπτά). Ο
φωτισμός προετοιμάζει απαλά το σώμα σας για αφύπνιση στην προγραμματισμένη ώρα. Για
μια ακόμη πιο ευχάριστη αφύπνιση, μπορείτε να χρησιμοποιήσετε φυσικούς ήχους αφύπνισης
ή το ραδιόφωνο FM ή ακόμη ήχους που έχετε λάβει ή μουσική από USB.
Το ξυπνητήρι με φως της Philips προετοιμάζει απαλά το σώμα σας για αφύπνιση κατά τη
διάρκεια των τελευταίων 20 έως 40 λεπτών του ύπνου, ανάλογα με το χρόνο προσομοίωσης
ανατολής που έχετε ρυθμίσει. Κατά τις πρώτες πρωινές ώρες, τα μάτια μας είναι πιο ευαίσθητα
στο φως απ’ ό,τι όταν είμαστε ξύπνιοι. Σε αυτό το διάστημα, τα σχετικά χαμηλά επίπεδα
φωτισμού μιας εικονικής ανατολής του ήλιου προετοιμάζουν το σώμα μας έτσι ώστε να
ξυπνήσει και να είναι σε ετοιμότητα. Τα άτομα που χρησιμοποιούν το ξυπνητήρι με φως
ξυπνούν πιο εύκολα, έχουν γενικότερα καλύτερη διάθεση το πρωί και αισθάνονται πιο
ενεργητικά. Επειδή η ευαισθησία στο φως διαφέρει από άνθρωπο σε άνθρωπο, μπορείτε να
ρυθμίσετε την ένταση του φωτισμού του ξυπνητηριού σας σε ένα επίπεδο που να ταιριάζει με
την ευαισθησία σας στο φως προκειμένου να έχετε ένα όσο το δυνατόν πιο όμορφο ξεκίνημα
της ημέρας.
Για περισσότερες πληροφορίες σχετικά με το ξυπνητήρι με φως, ανατρέξτε στη διεύθυνση
www.philips.com.
A Επάνω κάλυμμα με οπές εξαερισμού
B Περίβλημα λάμπας
C Καλώδιο
D Κεραία
E Οθόνη
1 Ώρα ρολογιού/αφύπνισης
2 Σύμβολο έντασης φωτός
3 Σύμβολο χρόνου προσομοίωσης ανατολής
4 Σύμβολο ραδιοφώνου
5 Σύμβολο ήχου πουλιών
6 Σύμβολο ήχου γιόγκα
7 Σύμβολο ήχου κουδούνας
8 Σύμβολο ήχου δάσους
9 Σύμβολο USB
10 Σύμβολο συχνότητας ραδιοφώνου
11 Σύμβολο επιπέδου έντασης ήχου
12 Σύμβολο φωτεινότητας οθόνης
13 Σύμβολο προσομοίωσης ηλιοβασιλέματος
14 Σύμβολο ήχου αφύπνισης
15 Σύμβολο αφύπνισης 2
16 Σύμβολο αφύπνισης 1
17 Σύμβολο ώρας ρολογιού
F Κουμπί μενού ‘-’
G Κουμπί MENU (Μενού)
H Κουμπί SELECT (Επιλογή) (επίσης επιλογή προεπιλογών FM)
43
Page 44

44
I Κουμπί μενού ‘+’
J Μοχλός ελέγχου με θέσεις για απενεργοποίηση αφύπνισης, αφύπνιση 1 και αφύπνιση 2
K Υποδοχή USB
L Κουμπιά στο πλαϊνό μέρος της συσκευής
1 Κουμπί αύξησης έντασης φωτός
2 Κουμπί ενεργοποίησης/απενεργοποίησης λάμπας
3 Κουμπί μείωσης έντασης φωτός
4 Κουμπί αύξησης έντασης ήχου
5 Κουμπί ενεργοποίησης/απενεργοποίησης ραδιοφώνου
6 Κουμπί μείωσης έντασης ήχου
- Διαβάστε προσεκτικά το παρόν εγχειρίδιο χρήσης προτού χρησιμοποιήσετε τη συσκευή
και κρατήστε το για μελλοντική αναφορά.
- Η συσκευή αυτή διαθέτει διπλή μόνωση σύμφωνα με την Κλάση II (Εικ. 2).
- Το νερό και ο ηλεκτρισμός αποτελούν επικίνδυνο συνδυασμό. Μην χρησιμοποιείτε αυτή τη
συσκευή σε υγρό περιβάλλον (π.χ. στο μπάνιο ή κοντά σε ντους ή πισίνα).
- Αποφεύγετε την είσοδο νερού στο εσωτερικό της συσκευής ή τη ρίψη νερού στη
συσκευή (Εικ. 3).
- Ελέγξτε εάν η τάση που αναγράφεται στη συσκευή αντιστοιχεί στην τοπική τάση ρεύματος
προτού συνδέσετε τη συσκευή.
- Μην τοποθετείτε αντικείμενα πάνω ή κοντά στη συσκευή που μπορεί να προκαλέσουν το
στάξιμο νερού ή οποιουδήποτε άλλου υγρού στη συσκευή.
- Επειδή μπορείτε να αποσυνδέσετε τη συσκευή από το ρεύμα μόνο αφαιρώντας το καλώδιο
ρεύματος από την πρίζα, να βεβαιώνεστε πάντα ότι το καλώδιο είναι εύκολα προσβάσιμο
όταν η συσκευή είναι συνδεδεμένη στο ρεύμα.
- H συσκευή είναι κατάλληλη για τάση ρεύματος 230V και συχνότητα 50Hz.
- Εάν το καλώδιο υποστεί φθορά, θα πρέπει να αντικατασταθεί από ένα κέντρο σέρβις
εξουσιοδοτημένο από τη Philips ή από εξίσου εξειδικευμένα άτομα προς αποφυγή
κινδύνου.
- Αφήνετε πάντα τη συσκευή να κρυώσει για περίπου 15 λεπτά, πριν να ανοίξετε το επάνω
κάλυμμα για να αφαιρέσετε τη λάμπα. H λάμπα και το μεταλλικό τμήμα του επάνω
καλύμματος θερμαίνονται κατά τη χρήση και ενδέχεται να κάψετε τα δάκτυλά σας εάν τα
αγγίξετε. (Εικ. 4)
- Αυτή η συσκευή δεν προορίζεται για χρήση από άτομα (συμπεριλαμβανομένων των
παιδιών) με περιορισμένες σωματικές, αισθητήριες ή διανοητικές ικανότητες ή από άτομα
χωρίς εμπειρία και γνώση, εκτός και εάν τη χρησιμοποιούν υπό επιτήρηση ή έχουν λάβει
οδηγίες σχετικά με τη χρήση της συσκευής από άτομο υπεύθυνο για την ασφάλειά τους.
- Τα παιδιά θα πρέπει να επιβλέπονται προκειμένου να διασφαλιστεί ότι δεν θα παίζουν με
τη συσκευή.
- Η συσκευή αυτή προορίζεται μόνο για εσωτερική χρήση (Εικ. 5).
- Προσέχετε να μην σας πέσει η συσκευή στο δάπεδο, μην την χτυπάτε δυνατά και μην την
υποβάλλετε σε ισχυρούς κραδασμούς.
- Τοποθετείτε τη συσκευή σε σταθερή, επίπεδη και αντιολισθητική επιφάνεια.
- Μην χρησιμοποιείτε τη συσκευή σε θερμοκρασία δωματίου χαμηλότερη από 10°C ή
υψηλότερη από 35°C.
- Βεβαιωθείτε ότι οι οπές εξαερισμού στο επάνω και κάτω μέρος της συσκευής παραμένουν
ανοιχτές κατά τη διάρκεια της χρήσης.
Page 45

45
- Μην χρησιμοποιείτε ποτέ τη συσκευή εάν το περίβλημα της λάμπας ή το επάνω κάλυμμα
έχει φθαρεί, σπάσει ή δεν είναι στη θέση του.
- Συμβουλευτείτε το γιατρό σας πριν χρησιμοποιήσετε τη συσκευή εάν στο παρελθόν ή στο
παρόν πάσχετε από σοβαρή κατάθλιψη.
- Μην χρησιμοποιείτε τη συσκευή ως μέσο μείωσης των ωρών ύπνου σας. Ο σκοπός αυτής
της συσκευής είναι να σας βοηθά να ξυπνάτε πιο εύκολα. Δεν μειώνει την ανάγκη σας για
ύπνο.
- Η συσκευή δεν διαθέτει διακόπτη ενεργοποίησης/απενεργοποίησης. Για να αποσυνδέσετε
τη συσκευή από το ρεύμα, αποσυνδέστε το φις από την πρίζα.
- Η συσκευή αυτή προορίζεται μόνο για οικιακή χρήση, ή παρόμοια χρήση για παράδειγμα
σε ξενοδοχεία.
- Η συσκευή αυτή σάς επιτρέπει να επιλέγετε το επίπεδο έντασης φωτός που επιθυμείτε για
την αφύπνιση σας (δείτε την ενότητα ‘Ρύθμιση της έντασης φωτός’ στο κεφάλαιο ‘Χρήση
της συσκευής’).
- Εάν ξυπνάτε συχνά πολύ νωρίς ή με πονοκέφαλο, μειώστε το επίπεδο του φωτός και/ή το
χρόνο προσομοίωσης αφύπνισης.
- Εάν μοιράζεστε το υπνοδωμάτιο με κάποιον άλλο, αυτό το άτομο ενδέχεται να ξυπνάει
ακούσια από το φωτισμό της συσκευής, ακόμη και εάν βρίσκεται πιο μακριά από αυτή.
Αυτό το φαινόμενο είναι αποτέλεσμα των διαφορών από άνθρωπο σε άνθρωπο όσον
αφορά στην ευαισθησία στο φως.
- Η κατανάλωση ισχύος της συσκευής είναι χαμηλότερη αν το ραδιόφωνο, η λειτουργία
αναπαραγωγής USB και η λάμπα είναι απενεργοποιημένες.
Η συγκεκριμένη συσκευή της Philips συμμορφώνεται με όλα τα πρότυπα που αφορούν τα
ηλεκτρομαγνητικά πεδία (EMF). Εάν γίνει σωστός χειρισμός και σύμφωνα με τις οδηγίες του
παρόντος εγχειριδίου χρήσης, η συσκευή είναι ασφαλής στη χρήση, βάσει των επιστημονικών
αποδείξεων που είναι διαθέσιμες μέχρι σήμερα.
1 Συνδέστε το φις στην πρίζα.
, Η ένδειξη ώρας στην οθόνη αρχίζει να αναβοσβήνει υποδεικνύοντας ότι θα πρέπει να
ρυθμίσετε την ώρα ρολογιού (Εικ. 6).
2 Πιέστε το κουμπί - ή + του μενού για να επιλέξετε την ώρα.
3 Πιέστε το κουμπί SELECT (Επιλογή) για επιβεβαίωση.
, Η ένδειξη λεπτών αρχίζει να αναβοσβήνει (Εικ. 7).
4 Πιέστε το κουμπί - ή + του μενού για να ρυθμίσετε τα λεπτά.
5 Πιέστε το κουμπί SELECT (Επιλογή) για επιβεβαίωση.
, Η συσκευή εξέρχεται από το μενού και στην οθόνη εμφανίζεται η καθορισμένη ώρα
ρολογιού.
Η συσκευή είναι τώρα έτοιμη για χρήση.
Σημείωση: Η παραπάνω μέθοδος ισχύει μόνο όταν συνδέετε τη συσκευή για πρώτη φορά, σε
περίπτωση διακοπής ρεύματος ή όταν το φις αφαιρεθεί από την πρίζα για περισσότερο από
15 λεπτά. Στις περιπτώσεις αυτές, η ένδειξη ώρα αναβοσβήνει για να σας υποδείξει ότι έχει
ρυθμίσει την ώρα του ρολογιού. Σε όλες τις άλλες περιπτώσεις, πρέπει να χρησιμοποιήσετε το
μενού για να ρυθμίσετε την ώρα του ρολογιού(δείτε την ενότητα ‘Λειτουργίες μενού’ στο κεφάλαιο
‘Χρήση της συσκευής’).
Page 46

46
Παρακάτω θα βρείτε μια περιγραφή όλων των λειτουργιών που μπορούν να ρυθμιστούν στο
μενού. Αυτές οι λειτουργίες εμφανίζονται στο μενού με την ακόλουθη σειρά:
- Ώρα ρολογιού
- Ώρα αφύπνισης 1
- Ώρα αφύπνισης 2
- Ήχος αφύπνισης
- Προσομοίωση ηλιοβασιλέματος
- Φωτεινότητα οθόνης
Μπορείτε να ρυθμίσετε τις λειτουργίες μενού με τον εξής τρόπο:
1 Πιέστε το κουμπί MENU (Μενού) για να εισέλθετε στο μενού (Εικ. 8).
Σημείωση: Αν δεν πατήσετε κανένα κουμπί εντός 30 δευτερολέπτων, κλείνει το μενού της συσκευής
και στην οθόνη εμφανίζεται ξανά η ώρα του ρολογιού.
2 Πιέστε το κουμπί - ή + του μενού για να επιλέξετε μια λειτουργία. (Εικ. 9)
3 Πιέστε το κουμπί SELECT (Επιλογή) για να εισέλθετε σε αυτή τη λειτουργία (Εικ. 10).
4 Πιέστε το κουμπί - ή + του μενού για να αλλάξετε μια ρύθμιση. (Εικ. 9)
5 Πιέστε το κουμπί SELECT (Επιλογή) για επιβεβαίωση (Εικ. 10).
Όταν ρυθμίζετε την αφύπνιση, επιλέγετε μια ώρα αφύπνισης και τον τύπο του ήχου με τον
οποίο επιθυμείτε να ξυπνήσετε. Η αφύπνιση έχει ρυθμιστεί όταν το σύμβολο αφύπνισης είναι
ορατό στην οθόνη. Η ένταση φωτός αυξάνεται αργά έως ότου φτάσει στο επίπεδο που έχετε
επιλέξει, κατά τη διάρκεια του χρόνου προσομοίωσης ανατολής πριν από την αφύπνιση που
έχετε ρυθμίσει. Ο προεπιλεγμένος χρόνος προσομοίωσης ανατολής είναι 30 λεπτά. Αυτός
είναι ο συνιστώμενος χρόνος, όμως, επειδή η ευαισθησία στο φως διαφέρει από άτομο σε
άτομο, μπορείτε να ρυθμίσετε το χρόνο προσομοίωσης ανατολής ανάλογα με τις προτιμήσεις
σας (δείτε την ενότητα ‘Ρύθμιση του χρόνου προσομοίωσης αφύπνισης’ στο κεφάλαιο). Κατά
την ώρα αφύπνισης που έχετε ρυθμίσει (μετά το χρόνο προσομοίωσης ηλιοβασιλέματος), ο
ήχος αφύπνισης αυξάνει αργά σε 90 δευτερόλεπτα έως το επιλεγμένο επίπεδο.
Σημείωση: Μπορείτε να ρυθμίσετε δύο διαφορετικές ώρες αφύπνισης, π.χ. αν θέλετε να ξυπνάτε
διαφορετική ώρα το σαββατοκύριακο από τις καθημερινές.
Σημείωση: Η ένταση ήχου που ρυθμίζετε για την αφύπνιση χρησιμοποιείται επίσης ως ένταση ήχου
για το ραδιόφωνο και τη μουσική στο USB σας. Για να ρυθμίσετε την ένταση του ήχου, πατήστε το
κουμπί αύξησης ή μείωσης έντασης ήχου. Αν δεν θέλετε να ξυπνάτε με την λάμπα ή κάποιο ήχο,
επιλέξτε ένταση φωτός ή ήχου 0. Δείτε τις ενότητες ‘Χρήση της συσκευής ως φωτιστικό κομοδίνου’
και ‘Ρύθμιση έντασης’ στο κεφάλαιο αυτό.
1 Πιέστε το μοχλό ελέγχου προς τη μεσαία θέση αν θέλετε να ρυθμίσετε την αφύπνιση 1.
Πιέστε το μοχλό ελέγχου προς την επάνω θέση αν θέλετε να ρυθμίσετε την αφύπνιση
2 (Εικ. 11).
, Η ένδειξη ώρας για την ώρα αφύπνισης ξεκινά να αναβοσβήνει (Εικ. 12).
, Για να ρυθμίσετε την ώρα, ακολουθήστε τα βήματα 2 έως 5.
2 Πιέστε τα κουμπιά - ή + του μενού για να ρυθμίσετε την ώρα (Εικ. 9).
Σημείωση: Αυτό είναι δυνατό μόνο όταν η ένδειξη ώρας αναβοσβήνει. Διαφορετικά, πιέστε ξανά το
μοχλό ελέγχου προς τα επάνω και προς τα κάτω για να εισέλθετε στη λειτουργία ώρας αφύπνισης.
Page 47

47
Μπορείτε επίσης να ρυθμίσετε την ώρα αφύπνισης στο μενού (δείτε την ενότητα ‘Λειτουργίες μενού’
σε αυτό το κεφάλαιο).
3 Πιέστε το κουμπί SELECT (Επιλογή) για επιβεβαίωση (Εικ. 10).
, Η ένδειξη λεπτών για την ώρα αφύπνισης αρχίζει να αναβοσβήνει (Εικ. 13).
4 Πιέστε τα κουμπιά - ή + του μενού για να ρυθμίσετε τα λεπτά. (Εικ. 9)
5 Πιέστε το κουμπί SELECT (Επιλογή) για επιβεβαίωση ή περιμένετε μερικά
δευτερόλεπτα (Εικ. 10).
, Η συσκευή εξέρχεται από το μενού και στην οθόνη εμφανίζεται η ώρα του ρολογιού.
Η ώρα αφύπνισης έχει ρυθμιστεί.
Μπορείτε να ρυθμίσετε την ένταση φωτός που προτιμάτε για την προσομοίωση ανατολής πριν
από την αφύπνιση.
Σημείωση: Η ένταση φωτός που ρυθμίζετε, χρησιμοποιείται για τη λειτουργία αφύπνισης καθώς και
για τη λειτουργία της λάμπας (δείτε την ενότητα ‘Χρήση της συσκευής ως φωτιστικό
κομοδίνου’ παρακάτω).
1 Πιέστε το κουμπί ενεργοποίησης/απενεργοποίησης της λάμπας. (Εικ. 14)
Σημείωση: Χρειάζεται περίπου 1 δευτερόλεπτο για να ανάψει η λάμπα. Αυτό είναι φυσιολογικό,
καθώς η λάμπα πρέπει να θερμανθεί.
Σημείωση: Μπορείτε επίσης να ρυθμίσετε την ένταση φωτός όταν η λάμπα είναι σβηστή, όμως όταν
η λάμπα είναι αναμμένη είναι πιο εύκολο να καθορίσετε την ένταση φωτός που προτιμάτε.
2 Πιέστε τα κουμπιά αύξησης και μείωσης της έντασης φωτός για να επιλέξετε την ένταση
του φωτός (Εικ. 15).
Μπορείτε να επιλέξετε μια ένταση φωτός από το 1 έως το 20.
Αν δεν θέλετε να ανάβει σταδιακά η λάμπα ως προσομοίωση ανατολής πριν από την
απενεργοποίηση της αφύπνισης, ρυθμίστε την ένταση φωτός σε 0.
Συμβουλή: Όταν χρησιμοποιήσετε τη συσκευή για πρώτη φορά, ρυθμίστε την ένταση φωτός στο 20.
Μόλις ξυπνήσετε, ελέγξτε σε ποιο επίπεδο έντασης φωτός βρίσκεται η συσκευή πιέζοντας στιγμιαία
το κουμπί αύξησης ή μείωσης έντασης φωτός. Με αυτή την ενέργεια, το τρέχον επίπεδο έντασης
φωτός της αφύπνισης εμφανίζεται στην οθόνη. Ρυθμίστε την ένταση φωτός της αφύπνισης σε αυτό
το επίπεδο για την επόμενη μέρα.
3 Για να σβήσετε τη λάμπα, πιέστε ξανά το κουμπί ενεργοποίησης/απενεργοποίησης
λάμπας.
Σημείωση: Μπορείτε να ρυθμίσετε το επίπεδο έντασης ήχου του ήχου αφύπνισης ανάλογα με τις
προτιμήσεις σας (δείτε την ενότητα ‘Ρύθμιση έντασης’ σε αυτό το κεφάλαιο). Αν δεν θέλετε να
ξυπνάτε με τον ήχο αφύπνισης, ρυθμίστε το επίπεδο της έντασης στο 0.
1 Ακολουθήστε τις οδηγίες στην ενότητα ‘Λειτουργίες μενού’ παραπάνω και επιλέξτε τη
λειτουργία ήχου αφύπνισης.
2 Πιέστε το κουμπί SELECT (Επιλογή) για επιβεβαίωση.
3 Πιέστε τα κουμπιά - ή + του μενού για να επιλέξετε τον ήχο αφύπνισης που θέλετε (βλ.
παρακάτω).
, Στην οθόνη εμφανίζεται το σύμβολο του ήχου αφύπνισης που θέλετε.
4 Πιέστε το κουμπί SELECT (Επιλογή) για επιβεβαίωση.
Μπορείτε να επιλέξετε έναν από τους παρακάτω ήχους:
Page 48

48
- Ραδιόφωνο (δείτε επίσης την ενότητα ‘Χρήση του ραδιοφώνου ως ήχο αφύπνισης’
παρακάτω) (Εικ. 16)
- Ήχος πουλιών (Εικ. 17)
- Ήχος γιόγκα (Εικ. 18)
- Ήχος κουδούνας (Εικ. 19)
- Ήχος δάσους (Εικ. 20)
- Ήχοι αφύπνισης που έχετε λάβει ή μουσική από USB (δείτε επίσης την ενότητα ‘Χρήση
μουσικής από USB ως ήχο αφύπνισης’ παρακάτω). (Εικ. 21)
Συμβουλή: Μπορείτε να πραγματοποιήσετε λήψη περισσότερων ήχων αφύπνισης από τη διεύθυνση
www.philips.com.
1 Ακολουθήστε τις οδηγίες 1-4 στην ενότητα ‘Ρύθμιση του ήχου αφύπνισης’ για να
επιλέξετε το ραδιόφωνο ως ήχο αφύπνισης.
, Στην οθόνη εμφανίζεται η ένδειξη P1, που είναι ο προκαθορισμένος σταθμός
ραδιοφώνου 1 (Εικ. 22).
Αν θέλετε να επιλέξετε κάποιο άλλο προκαθορισμένο σταθμό ραδιοφώνου, πιέστε το κουμπί ή + του μενού (δείτε την ενότητα ‘Χρήση του ραδιοφώνου/αναπαραγωγή μουσικής από USB’).
Αν θέλετε να αλλάξετε τη συχνότητα των προκαθορισμένων σταθμών ραδιοφώνου, δείτε την
ενότητα ‘Χρήση του ραδιοφώνου/αναπαραγωγή μουσικής από USB’ στο κεφάλαιο αυτό)
2 Πιέστε το κουμπί SELECT (Επιλογή) για επιβεβαίωση.
, Ο επιλεγμένος προκαθορισμένος σταθμός ραδιοφώνου έχει τώρα ρυθμιστεί ως ήχος
αφύπνισης.
Σημείωση: Μπορείτε να χρησιμοποιήσετε μουσική από USB μόνο αν είναι σε μορφή MP3 ή WMA.
Μπορείτε να ελέγξετε τη μορφή στον υπολογιστή σας. Η επέκταση των αρχείων πρέπει να είναι .
mp3 ή .wma.
Ανατρέξτε στο κεφάλαιο ‘Προδιαγραφές USB’ για περισσότερες πληροφορίες για το USB.
1 Τοποθετήστε το USB στην υποδοχή USB της συσκευής.
2 Ακολουθήστε τις οδηγίες 1-4 στην ενότητα ‘Λειτουργίες μενού’ παραπάνω για να
επιλέξετε μουσική από USB ως ήχο αφύπνισης.
, Στην οθόνη εμφανίζεται η ένδειξη 0001 για το πρώτο τραγούδι από το USB. (Εικ. 23)
Για να επιλέξετε κάποιο άλλο τραγούδι, πιέστε τα κουμπιά - ή + του μενού.
3 Πιέστε το κουμπί SELECT (Επιλογή) για επιβεβαίωση.
, Το επιλεγμένο τραγούδι έχει τώρα ρυθμιστεί ως ήχος αφύπνισης.
Ο χρόνος προσομοίωσης ανατολής είναι ο χρόνος σταδιακής αύξησης της έντασης φωτός
της λάμπας έως το ρυθμισμένο επίπεδο πριν από την αναπαραγωγή του ήχου αφύπνισης. Ο
προεπιλεγμένος χρόνος προσομοίωσης ανατολής είναι 30 λεπτά, επειδή αυτός είναι ο
καλύτερος χρόνος αφύπνισης για το σώμα σας. Επειδή η ευαισθησία στο φως διαφέρει από
άτομο σε άτομο, μπορείτε να ρυθμίσετε το χρόνο προσομοίωσης ανατολής ανάλογα με τις
προτιμήσεις σας. Μπορείτε να μειώσετε το χρόνο προσομοίωσης ανατολής σε 20 ή 25 λεπτά ή
να τον αυξήσετε σε 40 λεπτά.
1 Ταυτόχρονα, πιέστε και κρατήστε πατημένα τα κουμπιά αύξησης και μείωσης της
έντασης φωτός για περίπου 3 δευτερόλεπτα (Εικ. 24).
, Το σύμβολο προσομοίωσης ανατολής και ο προεπιλεγμένος χρόνος προσομοίωσης
ανατολής 30 λεπτών εμφανίζεται στην οθόνη. (Εικ. 25)
Page 49

49
2 Πιέστε το κουμπί - ή + του μενού για να αυξήσετε ή να μειώσετε το χρόνο
προσομοίωσης ανατολής. (Εικ. 9)
3 Πιέστε το κουμπί SELECT (Επιλογή) για επιβεβαίωση (Εικ. 10).
1 Ακουμπήστε την επιφάνεια του ξυπνητηριού με την παλάμη σας για να ενεργοποιήσετε
την επανάληψη αφύπνισης (χρειάζεται να ασκήσετε λίγη πίεση, ώστε να αποφεύγεται η
τυχαία ενεργοποίηση της επανάληψης) (Εικ. 26).
, Η λάμπα παραμένει αναμμένη στο επιλεγμένο επίπεδο έντασης, αλλά ο ήχος της
αφύπνισης σταματά. Μετά από 9 λεπτά, ο ήχος αφύπνισης αναπαράγεται ξανά αυτόματα.
Σημείωση: Ο χρόνος επανάληψης αφύπνισης των 9 λεπτών είναι σταθερός και δεν μπορεί να
αλλάξει.
1 Για να απενεργοποιήσετε τη λειτουργία αφύπνισης όταν απενεργοποιείται η αφύπνιση,
πιέστε το μοχλό ελέγχου προς την κάτω θέση (Εικ. 27).
Σημείωση: Η λάμπα παραμένει αναμμένη για να φωτίζει το δωμάτιό σας. Μπορείτε να σβήσετε τη
λάμπα πιέζοντας το κουμπί ενεργοποίησης/απενεργοποίησης φωτός.
Σημείωση: Αν ξεχάσετε να απενεργοποιήσετε την αφύπνιση, η αφύπνιση (ήχος ή/και φωτισμός)
απενεργοποιείται αυτόματα μετά από 90 λεπτά.
2 Αν θέλετε να απενεργοποιηθεί η αφύπνιση σε μία από τις ρυθμισμένες ώρες αφύπνισης
την επόμενη ημέρα, ρυθμίστε ξανά το μοχλό ελέγχου στην αφύπνιση 1 ή στην
αφύπνιση 2.
Εάν επιθυμείτε μια γρήγορη επίδειξη (60 δευτερολέπτων) του σταδιακά αυξανόμενου
επιπέδου φωτός και ήχου, ενεργοποιήστε τη λειτουργία δοκιμής της συσκευής.
1 Πατήστε ταυτόχρονα και κρατήστε πατημένα τα κουμπιά -ή + του μενού έως ότου
εμφανιστεί η λέξη TEST (Δοκιμή) στην οθόνη (Εικ. 28).
2 Πιέστε ταυτόχρονα τα κουμπιά - ή + του μενού ξανά για να σταματήσετε την επίδειξη.
Σημείωση: Η συσκευή συνεχίζει την επίδειξη αφύπνισης μέχρι να πιέσετε ξανά το κουμπί + και - του
μενού. Η δοκιμή σταματά αυτόματα μετά από 9 ώρες.
1 Για να ενεργοποιήσετε το ραδιόφωνο, πιέστε το κουμπί ενεργοποίησης/
απενεργοποίησης ραδιοφώνου (Εικ. 29).
, Το ραδιόφωνο αρχίζει να λειτουργεί.
Σημείωση: Η λειτουργία ραδιοφώνου διαθέτει 3 προκαθορισμένους σταθμούς. Για να επιλέξετε
κάποιον από αυτούς, πιέστε το κουμπί SELECT (Επιλογή) κάτω από την οθόνη.
2 Για να επιλέξετε την επιθυμητή ραδιοφωνική συχνότητα, πιέστε το κουμπί μενού
- ή +. (Εικ. 30)
Συμβουλή: Για αυτόματη αναζήτηση ραδιοφωνικών συχνοτήτων, πιέστε και κρατήστε πατημένο το
κουμπί μενού - ή + για περίπου 2 δευτερόλεπτα.
Συμβουλή: Για να εξασφαλίσετε ένα καλό ραδιοφωνικό σήμα, ανοίξτε πλήρως την κεραία και
μετακινήστε τη μέχρι να βρείτε μια θέση με τη βέλτιστη λήψη.
Page 50

50
3 Για να απενεργοποιήσετε τo ραδιόφωνο, πιέστε ξανά το κουμπί ενεργοποίησης/
απενεργοποίησης ραδιοφώνου.
Το ραδιόφωνο του ξυπνητηριού με φως διαθέτει 3 προκαθορισμένους σταθμούς ραδιοφώνου.
Αν θέλετε να ρυθμίσετε άλλους σταθμούς, ακολουθήστε τα παρακάτω βήματα.
1 Πιέστε το κουμπί ενεργοποίησης/απενεργοποίησης για να ενεργοποιήσετε το
ραδιόφωνο. (Εικ. 31)
, Στην οθόνη εμφανίζεται η ένδειξη P1, που είναι ο προκαθορισμένος σταθμός 1 (Εικ. 22).
Σημείωση: Πιέστε το κουμπί SELECT (Επιλογή) μία ή περισσότερες φορές για να επιλέξετε κάποιον
άλλο προκαθορισμένο σταθμό.
2 Για αυτόματη αναζήτηση ραδιοφωνικών συχνοτήτων προκειμένου να αλλάξετε τον
προκαθορισμένο σταθμό, πιέστε το κουμπί μενού - ή + (Εικ. 30).
, Η συσκευή αποθηκεύει αυτόματα την επιλεγμένη ραδιοφωνική συχνότητα.
Σημείωση: Μπορείτε να χρησιμοποιήσετε μουσική από USB μόνο αν είναι σε μορφή MP3 ή WMA. Η
συσκευή δεν αναπαράγει άλλη μορφή. Μπορείτε να ελέγξετε τη μορφή στον υπολογιστή σας. Η
επέκταση των αρχείων πρέπει να είναι .mp3 ή .wma. Για περισσότερες πληροφορίες, δείτε το
κεφάλαιο ‘Προδιαγραφές USB’.
1 Για την αναπαραγωγή μουσικής από USB, πιέστε το κουμπί ενεργοποίησης/
απενεργοποίησης ραδιοφώνου δύο φορές. (Εικ. 31)
, Αν υπάρχει USB στην υποδοχή USB, η συσκευή ξεκινά αυτόματα τη σάρωση των
αρχείων MP3 ή WMA που βρίσκονται στο USB. Η σάρωση ενδέχεται να διαρκέσει μερικά
λεπτά. Στη συνέχεια, ο αριθμός των τραγουδιών εμφανίζεται στην οθόνη και η συσκευή
ξεκινά την αναπαραγωγή του πρώτου τραγουδιού από το USB.
, Αν η συσκευή εντοπίσει ότι τα αρχεία στο USB δεν είναι σε μορφή MP3 ή WMA, τότε
στην οθόνη εμφανίζεται η ένδειξη ‘ERR’.
2 Για να επιλέξετε το αρχείο τραγουδιού που θέλετε, πιέστε το κουμπί μενού - ή
+. (Εικ. 30)
Εάν κρατήσετε πατημένο το κουμπί μενού - ή +, η λειτουργία επιλογής τραγουδιού
παρακάμπτει τα τραγούδια πιο γρήγορα.
3 Για να σταματήσετε την αναπαραγωγή μουσικής από το USB, πιέστε ξανά το κουμπί
ενεργοποίησης/απενεργοποίησης του ραδιοφώνου.
Σημείωση: Τοποθετήστε τα αρχεία μουσικής στο ριζικό φάκελο του USB στικ, για να εξασφαλίσετε
ταχύτερη σάρωση.
Σημείωση: Τα τραγούδια ταξινομούνται με βάση την ημερομηνία αποθήκευσης της μουσικής στο
USB. Αν θέλετε να αναπαράγονται τα τραγούδια με συγκεκριμένη σειρά, ταξινομήστε τα σε αυτή τη
σειρά πρώτα στον υπολογιστή σας και, στη συνέχεια, αντιγράψτε τα στο USB.
1 Για να ρυθμίσετε την ένταση του ραδιοφώνου ή της μουσικής από το USB, πιέστε το
κουμπί αύξησης ή μείωσης έντασης ήχου. (Εικ. 32)
Μπορείτε να επιλέξετε ένα επίπεδο έντασης φωτός από το 1 έως το 20.
Σημείωση: Το επίπεδο έντασης ήχου που επιλέξατε ρυθμίζεται αυτόματα και ως επίπεδο έντασης
ήχου για την αφύπνιση.
Page 51

51
Μπορείτε να χρησιμοποιήσετε την προσομοίωση ηλιοβασιλέματος όταν επιθυμείτε ο
φωτισμός ή/και ο ήχος του ξυπνητηριού με φως να παραμένει ενεργός και να μειώνεται
σταδιακά κατά τη διάρκεια μιας καθορισμένης χρονικής περιόδου (15 λεπτά έως 1,5 ώρα)
πριν κοιμηθείτε. Η λάμπα ή/και ο ήχος απενεργοποιούνται αυτόματα μετά τον
καθορισμένο χρόνο.
Σημείωση: Η ένταση φωτός που ρυθμίζετε για την έναρξη της προσομοίωσης ηλιοβασιλέματος
χρησιμοποιείται επίσης ως ένταση φωτός για την προσομοίωση ανατολής
1 Ενεργοποιήστε τη λάμπα και/ή το ραδιόφωνο ή τη μουσική από ένα USB. Δείτε τις
ενότητες ‘Χρήση της συσκευής ως φωτιστικό κομοδίνου’ και/ή ‘Χρήση ραδιοφώνου/
αναπαραγωγής μουσικής από USB’ σε αυτό το κεφάλαιο.
2 Ακολουθήστε τα βήματα στην ενότητα ‘Λειτουργίες μενού’ σε αυτό το κεφάλαιο για να
επιλέξετε την προσομοίωση ηλιοβασιλέματος και να ρυθμίσετε το χρόνο προσομοίωσης
ηλιοβασιλέματος.
, Μπορείτε να επιλέξετε χρονικό διάστημα από 15 έως 90 λεπτά (15, 30, 60 ή 90 λεπτά).
Σημείωση: Μετά τον καθορισμένο χρόνο, ανεξάρτητα εάν είναι ενεργοποιημένος μόνο ο φωτισμός ή/
και το ραδιόφωνο, η προσομοίωση ηλιοβασιλέματος απενεργοποιεί και το φωτισμό και τον ήχο.
Συμβουλή: Μπορείτε επίσης να πιέσετε το κουμπί ενεργοποίησης/απενεργοποίησης φωτός για
3 δευτερόλεπτα για να ενεργοποιήσετε τη λειτουργία προσομοίωσης ηλιοβασιλέματος (Εικ. 33).
Μπορείτε να χρησιμοποιήσετε τη συσκευή ως φωτιστικό κομοδίνου.
1 Για να ανάψετε τη λάμπα, πιέστε το κουμπί ενεργοποίησης/απενεργοποίησης
λάμπας. (Εικ. 14)
Σημείωση: Χρειάζεται περίπου 1 δευτερόλεπτο για να ανάψει η λάμπα. Αυτό είναι φυσιολογικό,
καθώς η λάμπα πρέπει να θερμανθεί.
2 Πιέστε τα κουμπιά αύξησης και μείωσης της έντασης φωτός για να επιλέξετε την ένταση
του φωτός (Εικ. 15).
Μπορείτε να επιλέξετε μια ένταση φωτός από το 1 έως το 20.
Σημείωση: Η ένταση φωτός που επιλέξατε ρυθμίζεται αυτόματα και ως επίπεδο έντασης φωτός
για την αφύπνιση.
3 Για να σβήσετε τη λάμπα, πιέστε ξανά το κουμπί ενεργοποίησης/απενεργοποίησης
λάμπας.
1 Ακολουθήστε τα βήματα στην ενότητα ‘Λειτουργίες μενού’ σε αυτό το κεφάλαιο για να
επιλέξετε τη λειτουργία φωτεινότητας οθόνης και να ρυθμίσετε τη φωτεινότητα της
οθόνης που θέλετε. (Εικ. 34)
, Μπορείτε να επιλέξετε φωτεινότητα οθόνης από το 1 έως το 4.
Συμβουλή: Αν ρυθμίσετε τη φωτεινότητα οθόνης στο επίπεδο 1, η συσκευή καταναλώνει την
ελάχιστη δυνατή ισχύ.
Σημείωση: Η φωτεινότητα οθόνης αυξάνεται αυτόματα στο μέγιστο επίπεδο, κατά τη ρύθμιση της
συσκευής, παρέχοντας στο χρήστη βέλτιστη ορατότητα. Όταν ο χρήστης ολοκληρώσει τη ρύθμιση
της συσκευής και εξέρχεται από το μενού, η φωτεινότητα της οθόνης επανέρχεται αυτόματα στο
καθορισμένο επίπεδο.
Page 52

52
Μην χρησιμοποιείτε ποτέ συρμάτινα σφουγγαράκια, στιλβωτικά καθαριστικά ή υγρά όπως
πετρέλαιο ή ασετόν για τον καθαρισμό της συσκευής.
Αφαιρείτε τακτικά τη σκόνη από το εξωτερικό μέρος της συσκευής με ένα στεγνό πανί.
1 Αποσυνδέετε τη συσκευή από την πρίζα πριν την καθαρίσετε.
2 Καθαρίστε το εξωτερικό μέρος της συσκευής με ένα στεγνό πανί.
Αποφεύγετε την είσοδο νερού στο εσωτερικό της συσκευής ή τη ρίψη νερού στη
συσκευή (Εικ. 3).
Εκτός από τη λάμπα, η συσκευή δεν περιλαμβάνει επισκευάσιμα εξαρτήματα.
Η λάμπα πρέπει να αντικαθίσταται όταν παύει να ανάβει ή όταν μειώνεται η απόδοση
φωτισμού (δείτε επίσης το κεφάλαιο ‘Σημαντικό’). Θα πρέπει να αντικαθιστάτε τη λάμπα με μια
λάμπα αλογόνου της Philips, 100W, 12V, GY6.35. Μόνο η συγκεκριμένη λάμπα παρέχει τη σωστή
ένταση φωτός.
Σημείωση: Αυτή η συσκευή έχει σχεδιαστεί για να χρησιμοποιείται μόνο με αυτοπροστατευόμενη
λάμπα (Εικ. 35).
Για περισσότερες πληροφορίες, επισκεφθείτε την ιστοσελίδα μας στη διεύθυνση
www.philips.com.
1 Αποσυνδέστε τη συσκευή από την πρίζα πριν αντικαταστήσετε τη λάμπα.
2 Αν η λάμπα είναι ακόμα ζεστή, αφήστε την να κρυώσει για περίπου 15 λεπτά.
3 Για να ασφαλίσετε το επάνω κάλυμμα, πιέστε και γυρίστε το αριστερόστροφα έως ότου
το σύμβολο O στο επάνω κάλυμμα ευθυγραμμιστεί με το σύμβολο 1 στο περίβλημα της
λάμπας. (Εικ. 36)
4 Αφαιρέστε το επάνω κάλυμμα. (Εικ. 37)
5 Αφαιρέστε την παλιά λάμπα από την υποδοχή της (Εικ. 38).
6 Εισαγάγετε τις ακίδες της καινούριας λάμπας μέσα στην υποδοχή της λάμπας. (Εικ. 39)
Μην πιάνετε τη λάμπα με τα δάκτυλά σας. Χρησιμοποιήστε ένα πανί ή χαρτί κουζίνας όταν
την τοποθετείτε (Εικ. 40).
7 Επανατοποθετήστε το επάνω κάλυμμα στη συσκευή.
8 Ασφαλίστε το επάνω κάλυμμα γυρίζοντας το δεξιόστροφα, μέχρι το σύμβολο 1 του
επάνω καλύμματος να ευθυγραμμιστεί με το σύμβολο 1 του περιβλήματος της
λάμπας. (Εικ. 41)
- Στο τέλος της ζωής της συσκευής μην την πετάξετε μαζί με τα συνηθισμένα απορρίμματα
του σπιτιού σας, αλλά παραδώστε την σε ένα επίσημο σημείο συλλογής για ανακύκλωση.
Με αυτόν τον τρόπο, θα βοηθήσετε στην προστασία του περιβάλλοντος (Εικ. 42).
Page 53

53
Εάν χρειάζεστε σέρβις ή πληροφορίες ή εάν αντιμετωπίζετε κάποιο πρόβλημα, επισκεφτείτε
την ιστοσελίδα της Philips στη διεύθυνση www.philips.com ή επικοινωνήστε με το Κέντρο
Εξυπηρέτησης Καταναλωτών της Philips στη χώρα σας (θα βρείτε το τηλέφωνο στο φυλλάδιο
διεθνούς εγγύησης). Εάν δεν υπάρχει Κέντρο Εξυπηρέτησης Καταναλωτών στη χώρα σας,
απευθυνθείτε στον τοπικό σας αντιπρόσωπο της Philips.
Σε αυτό το κεφάλαιο συνοψίζονται τα πιο συνηθισμένα προβλήματα που μπορεί να
αντιμετωπίσετε με τη συσκευή. Εάν δεν μπορείτε να επιλύσετε το πρόβλημα βάσει των
παρακάτω πληροφοριών, επικοινωνήστε με το Κέντρο Εξυπηρέτησης Καταναλωτών στη χώρα
σας.
Πρόβλημα Λύση
Η συσκευή δεν
λειτουργεί καθόλου.
Η συσκευή
λειτουργεί σωστά,
αλλά η λάμπα δεν
λειτουργεί πλέον.
Η συσκευή
θερμαίνεται κατά τη
χρήση.
Η συσκευή δεν
ανταποκρίνεται όταν
προσπαθώ να
ρυθμίσω
διαφορετικές
λειτουργίες.
Η λάμπα δεν ανάβει
όταν η αφύπνιση
απενεργοποιείται.
Η λάμπα δεν ανάβει
αμέσως μόλις την
ανάψω.
Ενδέχεται το φις να μην έχει συνδεθεί σωστά στην πρίζα. Συνδέστε
το φις σωστά στην πρίζα.
Ενδέχεται να υπάρχει διακοπή ρεύματος. Ελέγξτε εάν υπάρχει
παροχή ρεύματος συνδέοντας κάποια άλλη συσκευή.
Ενδέχεται η λάμπα να έφτασε στο τέλος της διάρκειας ζωής της. Η
διάρκεια ζωής εξαρτάται από τη χρήση της συσκευής. Σε περίπτωση
πολύ συχνής χρήσης, η λάμπα ενδέχεται να μην διαρκέσει όσο
περιμένατε. Εάν η λάμπα χαλάσει, μπορείτε να παραγγείλετε ή να
αγοράσετε καινούργια από τον αντιπρόσωπο της περιοχής σας.
Επικοινωνήστε με το Κέντρο Εξυπηρέτησης Καταναλωτών της Philips
στη χώρα σας.
Αυτό είναι φυσιολογικό, καθώς η συσκευή θερμαίνεται από το φως
της λάμπας και τα ηλεκτρονικά κυκλώματα. Αφήνετε πάντα τη
συσκευή να κρυώσει πριν να αντικαταστήσετε τη λάμπα.
Αποσυνδέστε το φις από την πρίζα και περιμένετε 20 λεπτά πριν την
τοποθετήσετε ξανά. Όταν συνδέσετε ξανά το φις, η συσκευή
επανέρχεται στις προεπιλεγμένες ρυθμίσεις και πρέπει να ρυθμίσετε
ξανά όλες τις λειτουργίες.
Ενδέχεται να ρυθμίσατε ένα πολύ χαμηλό επίπεδο έντασης φωτός.
Αυξήστε το επίπεδο έντασης φωτός.
Ενδέχεται να απενεργοποιήσατε τη λειτουργία αφύπνισης
ρυθμίζοντας το μοχλό ελέγχου στην κάτω θέση. Για να
ενεργοποιήσετε τη λειτουργία αφύπνισης, ρυθμίστε το μοχλό
ελέγχου στη μεσαία θέση (αφύπνιση 1) ή στην επάνω θέση
(αφύπνιση 2), ανάλογα με την ώρα αφύπνισης που επιθυμείτε.
Ενδέχεται η συσκευή να είναι ελαττωματική. Επικοινωνήστε με το
Κέντρο Εξυπηρέτησης Καταναλωτών της Philips στη χώρα σας.
Χρειάζεται περίπου 1 δευτερόλεπτο για να ανάψει η λάμπα. Αυτό
είναι φυσιολογικό, καθώς η λάμπα πρέπει να θερμανθεί.
Page 54

54
Πρόβλημα Λύση
Δεν ακούγεται ο
ήχος αφύπνισης
όταν
απενεργοποιείται η
αφύπνιση.
Το ραδιόφωνο δεν
λειτουργεί.
Το ραδιόφωνο
παράγει έναν ήχο
κροταλίσματος.
Η αφύπνιση
ενεργοποιήθηκε
εχθές, αλλά όχι
σήμερα.
Ήθελα να αναβάλω
την αφύπνιση, όμως
δεν ενεργοποιήθηκε
έπειτα από 9 λεπτά.
Ενδέχεται να ρυθμίσατε ένα πολύ χαμηλό επίπεδο ήχου. Για να
ρυθμίσετε ένα υψηλότερο επίπεδο ήχου, ανατρέξτε στο κεφάλαιο
‘Χρήση της συσκευής’, ενότητα ‘Ρύθμιση έντασης’.
Ενδέχεται να απενεργοποιήσατε τη λειτουργία αφύπνισης
ρυθμίζοντας το μοχλό ελέγχου στην κάτω θέση.
Εάν επιλέξατε το ραδιόφωνο ως ήχο αφύπνισης, το ραδιόφωνο
ενδέχεται να είναι ελαττωματικό. Ενεργοποιήστε το ραδιόφωνο
αφού απενεργοποιήσετε την αφύπνιση για να ελέγξετε εάν
λειτουργεί το ραδιόφωνο. Εάν δεν λειτουργεί, επικοινωνήστε με το
Κέντρο Εξυπηρέτησης Καταναλωτών της Philips στη χώρα σας.
Αν επιλέξατε ως ήχο αφύπνισης έναν ήχο που έχετε λάβει ή
μουσική από USB, ενδέχεται οι ήχοι ή τα τραγούδια να μην έχουν το
σωστό φορμά. Η συσκευή αυτή υποστηρίζει μόνο αρχεία .mp3 και
.wma. Αν δεν είναι δυνατή η αναπαραγωγή ήχου ή μουσικής από το
USB, η συσκευή ρυθμίζει αυτόματα τον ήχο πουλιών ως ήχο
αφύπνισης για να διασφαλιστεί ότι θα ξυπνήσετε ούτως ή άλλως τη
ρυθμισμένη ώρα.
Ενδέχεται το ραδιόφωνο να είναι ελαττωματικό. Επικοινωνήστε με
το Κέντρο Εξυπηρέτησης Καταναλωτών της Philips στη χώρα σας.
Ενδέχεται να έχετε ρυθμίσει την ένταση του ήχου πολύ χαμηλά.
Αυξήστε την ένταση του ήχου.
Ενδέχεται το σήμα εκπομπής να είναι ασθενές. Ρυθμίστε τη
συχνότητα (δείτε την ενότητα ‘Χρήση της συσκευής’ ενότητα ‘Χρήση
ραδιοφώνου/αναπαραγωγής μουσικής από USB’) και/ή αλλάξτε τη
θέση της κεραίας μετακινώντας τη. Βεβαιωθείτε ότι έχετε ανοίξει
πλήρως την κεραία.
Ενδέχεται να απενεργοποιήσατε τη λειτουργία αφύπνισης
ρυθμίζοντας το μοχλό ελέγχου στην κάτω θέση.
Ενδέχεται να ρυθμίσατε ένα πολύ χαμηλό επίπεδο ήχου ή/και
έντασης φωτός. Ρυθμίστε ένα υψηλότερο επίπεδο ήχου ή/και
έντασης φωτός.
Ενδέχεται να υπήρξε διακοπή ρεύματος, η οποία διήρκεσε για
περισσότερο από περίπου 15 λεπτά. Σε αυτή τη περίπτωση, η
συσκευή επανέρχεται στις εργοστασιακές ρυθμίσεις. Θα πρέπει να
ρυθμίσετε εκ νέου όλες τις λειτουργίες.
Πιθανώς πιέσατε το μοχλό ελέγχου προς τα κάτω και
απενεργοποιήθηκε εντελώς η λειτουργία αφύπνισης. Αν θέλετε να
αναβάλετε την αφύπνιση, πατήστε τη συσκευή.
Ενδέχεται να ρυθμίσατε το επίπεδο έντασης ήχου στο 0.
Page 55

Πρόβλημα Λύση
Ο φωτισμός με
ξυπνά πολύ νωρίς.
Ο φωτισμός με
ξυπνά πολύ αργά.
Η λάμπα
αναβοσβήνει.
Η συσκευή δεν
αναγνωρίζει το USB.
Όταν τοποθετώ το
USB στην υποδοχή
USB, εμφανίζεται ένα
μήνυμα σφάλματος
στην οθόνη.
Έχω προγραμματίσει
τη συσκευή να με
ξυπνά με μουσική
από το USB, όμως
ακούω ήχο πουλιών.
Ενδέχεται το επίπεδο έντασης φωτός που ρυθμίσατε να μην είναι
κατάλληλο για εσάς. Δοκιμάστε ένα χαμηλότερο επίπεδο έντασης
φωτός, εάν ξυπνάτε πολύ νωρίς. Εάν η ένταση φωτός 1 δεν είναι
αρκετά χαμηλή, μετακινήστε τη συσκευή πιο μακριά από το κρεβάτι.
Ενδέχεται η συσκευή να έχει τοποθετηθεί σε χαμηλότερο επίπεδο
από το κεφάλι σας. Βεβαιωθείτε ότι η συσκευή τοποθετείτε σε ένα
ύψος, στο οποίο ο φωτισμός δεν εμποδίζεται από το κρεβάτι, το
πάπλωμα ή το μαξιλάρι σας. Επίσης, βεβαιωθείτε ότι η συσκευή δεν
τοποθετείτε πολύ μακριά.
Ενδέχεται η συσκευή να μην είναι κατάλληλη για την τάση με την
οποία έχει συνδεθεί. Βεβαιωθείτε ότι η τάση που αναγράφεται στη
συσκευή αντιστοιχεί στην τοπική τάση ρεύματος.
Ενδέχεται το USB να μην έχει τοποθετηθεί σωστά στην υποδοχή
USB. Βεβαιωθείτε ότι έχετε σπρώξει αρκετά το USB στην υποδοχή
USB.
Ίσως η μουσική στο USB να μην έχει το σωστό φορμά. Βεβαιωθείτε
ότι το τραγούδι είναι αρχείο MP3 ή WMA. Μπορείτε να το ελέγξετε
στον υπολογιστή. Η επέκταση των αρχείων πρέπει να είναι .mp3 ή .
wma. Δείτε το κεφάλαιο ‘Προδιαγραφές USB’ για περισσότερες
πληροφορίες.
Ίσως αφαιρέσατε το USB από τη συσκευή ή δεν το έχετε
τοποθετήσει σωστά στην υποδοχή USB. Αν η συσκευή δεν εντοπίσει
USB, ρυθμίζει αυτόματα τον ήχο πουλιών ως ήχο αφύπνισης για να
διασφαλιστεί ότι θα ξυπνήσετε ούτως ή άλλως τη ρυθμισμένη ώρα.
Για να χρησιμοποιήσετε μουσική από ένα USB ως ήχο αφύπνισης, το
USB πρέπει να βρίσκεται μόνιμα τοποθετημένο στην υποδοχή USB.
55
- Μνήμη ash USB (USB2.0 ή USB1.1)
- Συσκευές αναπαραγωγής ash USB (USB2.0 ή USB1.1)
- Κάρτες μνήμης (απαιτείται πρόσθετη συσκευή ανάγνωσης καρτών για τη λειτουργία με
αυτό το σύστημα ήχου)
Σημείωση: Εάν η συσκευή USB εκτελεί λειτουργία εκκίνησης, περιμένετε έως ότου ολοκληρωθεί η
εκκίνηση και το USB είναι και πάλι έτοιμο για χρήση, πριν να το συνδέσετε στη θύρα USB της
συσκευής.
- Φορμά USB ή αρχείων μνήμης (FAT12, FAT16, FAT32 (μέγεθος τομέα: 512 bytes)
- Ρυθμός bit MP3 (ρυθμός δεδομένων): 32-320 Kbps και μεταβλητός ρυθμός bit
- WMA v7, v8 ή v9
- Συγκέντρωση καταλόγου έως 8 επίπεδα
- Αριθμός άλμπουμ/φακέλων: μέγιστο 99
- Αριθμός κομματιών/τίτλων: μέγιστο 999
- Όνομα αρχείου σε Unicode UTF8 (μέγιστο μήκος: 128 bytes)
Page 56

56
- Κενά άλμπουμ: ένα κενό άλμπουμ είναι ένα άλμπουμ που δεν περιέχει αρχεία MP3/WMA
και δεν εμφανίζεται στην οθόνη.
- Τα μη υποστηριζόμενα φορμά αρχείων παραλείπονται. Π.χ. τα έγγραφα Word (.doc) ή τα
αρχεία MP3 με επέκταση .dlf παραβλέπονται και δεν αναπαράγονται.
- Αρχεία ήχου AAC, WAV και PCM
- Δεν υποστηρίζονται αρχεία με προστασία DRM.
- Αρχεία WMA σε φορμά Lossless
- Κρυφά αρχεία
Page 57

ESPAÑOL
Introducción
Enhorabuena por la compra de este producto y bienvenido a Philips. Para sacar el mayor partido de
la asistencia que Philips le ofrece, registre su producto en www.philips.com/welcome.
La Wake-up Light de Philips le ayuda a despertarse de forma más agradable. La intensidad de la luz
de la lámpara aumenta gradualmente hasta el nivel ajustado en el tiempo establecido de simulación
del amanecer (el tiempo por defecto es de 30 minutos). La luz prepara suavemente el cuerpo para
que se levante a la hora programada. Para que el despertar sea una experiencia aún más agradable,
puede utilizar sonidos naturales, la radio FM, sonidos descargados o incluso su propia música desde
un dispositivo USB.
Los efectos de Wake-up Light
La Wake-up Light de Philips prepara gradualmente el cuerpo para desper tarse durante los últimos
20 a 40 minutos del sueño. A lo largo de las primeras horas de la mañana, nuestros ojos se
muestran más sensibles a la luz que cuando ya estamos despiertos. En ese período, los niveles de luz
relativamente bajos de un amanecer natural simulado preparan nuestro cuerpo para desper tarse y
estar alerta. Las personas que utilizan la Wake-up Light se despiertan con mayor facilidad, de mejor
humor por la mañana y con más energía. Debido a que la sensibilidad a la luz varía en cada persona,
puede jar la intensidad de la luz de la Wake-up Light al nivel que se ajuste a su sensibilidad para
comenzar el día de una manera óptima.
Si desea más información sobre Wake-up Light, visite www.philips.com.
A Cubierta superior con rejillas
B Carcasa de la Lámpara
C Cable de alimentación
D Antena
E Pantalla
1 Hora del reloj/hora de la alarma
2 Símbolo de intensidad de la luz
3 Símbolo de tiempo de simulación del amanecer
4 Símbolo de radio
5 Símbolo de sonido de “pájaro”
6 Símbolo de sonido de “yoga”
7 Símbolo de sonido de “cencerro”
8 Símbolo de sonido de “bosque”
9 Símbolo “dispositivo USB”
10 Símbolo de frecuencia de radio
11 Símbolo de nivel de volumen
12 Símbolo de brillo de la pantalla
13 Símbolo de simulación del atardecer
14 Símbolo de sonido de la alarma
15 Símbolo de alarma 2
16 Símbolo de alarma 1
17 Símbolo de hora del reloj
F Botón de menú “-”
G Botón MENU
H Botón SELECT (también selección de presintonías FM)
I Botón de menú “+”
J Palanca de control con posiciones de “alarma desactivada”, “alarma 1” y “alarma 2”
K Toma USB
L Botones de la parte lateral del aparato
1 Botón de aumento de intensidad de la luz
57
Page 58

ESPAÑOL58
2 Botón de encendido/apagado de la lámpara
3 Botón de disminución de intensidad de la luz
4 Botón de aumento de volumen
5 Botón de encendido/apagado de la radio
6 Botón de disminución de volumen
Importante
- Antes de usar el aparato, lea atentamente este manual de usuario y consérvelo por si necesitara
consultarlo en el futuro.
- Este aparato tiene doble aislamiento según la Clase II (g. 2).
Peligro
- El agua y la electricidad son una combinación peligrosa. No utilice este aparato en ambientes
húmedos (por ejemplo, en el baño o cerca de una ducha o una piscina).
- No deje que entre agua en el aparato o que se derrame agua sobre el mismo (g. 3).
Advertencia
- Antes de enchufar el aparato, compruebe si el voltaje indicado en el mismo se corresponde con
el voltaje de red local.
- No coloque nada encima ni cerca del aparato que pudiera causar que agua o cualquier otro
líquido salpique o gotee en el aparato.
- Ya que usted sólo puede desconectar el aparato de la red de suministro quitando la clavija del
enchufe de pared, siempre asegúrese que la clavija está a mano cuando el aparato es conectado
a la red.
- El aparato es adecuado para voltajes de red de 230 V y frecuencia de 50 Hz.
- Si el cable de alimentación está dañado, debe ser sustituido por Philips o por un centro de
servicio autorizado por Philips, con el n de evitar situaciones de peligro.
- Deje siempre que el aparato se enfríe durante aproximadamente 15 minutos antes de abrir la
cubierta superior para retirar la bombilla. La bombilla y la pieza de metal de la cubierta superior
se calientan mucho durante el uso y puede quemarse los dedos cuando las toque. (g. 4)
- Este aparato no debe ser usado por personas (adultos o niños) con su capacidad física, psíquica
o sensorial reducida, ni por quienes no tengan los conocimientos y la experiencia necesarios, a
menos que sean supervisados o instruidos acerca del uso del aparato por una persona
responsable de su seguridad.
- Asegúrese de que los niños no jueguen con este aparato.
- Este aparato es sólo para uso en interiores (g. 5).
Precaución
- No deje caer el aparato al suelo y no lo golpee bruscamente o lo exponga a golpes fuertes.
- Coloque el aparato sobre una supercie estable, plana y no deslizante.
- No utilice el aparato a una temperatura ambiente por debajo de 10 °C o que supere los 35 °C.
- Asegúrese de que las rejillas de ventilación de la parte superior e inferior del aparato
permanezcan abiertas durante el uso.
- No utilice nunca el aparato sin la carcasa de la lámpara o la cubierta superior, o si éstas están
dañadas o rotas.
- Consulte a su médico antes de comenzar a utilizar el aparato si ha padecido o padece una
depresión grave.
- No utilice este aparato con el n de reducir sus horas de sueño. El propósito del mismo es
ayudarle a despertarse con mayor facilidad, pero no reduce la necesidad de sueño.
- El aparato no tiene interruptor de encendido/apagado. Para desconectarlo de la red, desenchufe
la clavija de la toma de corriente.
- Este aparato está diseñado únicamente para uso doméstico o similar como, por ejemplo, en
hoteles.
Page 59

ESPAÑOL 59
General
- Este aparato le permite seleccionar el nivel de intensidad de la luz con el que desea despertarse
(consulte la sección “Ajuste de la intensidad de la luz” del capítulo “Uso del aparato”).
- Si a menudo se despierta demasiado pronto o con dolor de cabeza, reduzca el nivel de
intensidad de la luz o el tiempo de simulación del amanecer.
- Si comparte la habitación, la otra persona podría despertarse involuntariamente debido a la luz
del aparato, incluso si se encuentra alejada del mismo. Este fenómeno se debe a las diferencias
en cuanto a sensibilidad a la luz de las personas.
- El consumo de energía del aparato es menor si la radio, la función de reproducción de USB y la
lámpara están apagadas.
Campos electromagnéticos (CEM)
Este aparato Philips cumple todos los estándares sobre campos electromagnéticos (CEM). Si se
utiliza correctamente y de acuerdo con las instrucciones de este manual, el aparato se puede usar
de forma segura según los conocimientos cientícos disponibles hoy en día.
Preparación para su uso
Ajuste del reloj
1 Enchufe el aparato a la toma de corriente.
, La indicación de hora comienza a parpadear en la pantalla para indicar que debe ajustar la
hora del reloj (g. 6).
2 Pule el botón de menú + o - para seleccionar la hora.
3 Pulse el botón SELECT para conrmar.
, La indicación de minutos comienza a parpadear (g. 7).
4 Pulse el botón de menú - o + para seleccionar los minutos.
5 Pulse el botón SELECT para conrmar.
, El aparato sale del menú y la pantalla muestra la hora del reloj que se ha ajustado.
El aparato está listo para usar.
Nota: El método descrito anteriormente sólo se aplica cuando conecte el aparato por primera vez,
cuando haya habido un corte en el suministro de energía o cuando se haya desenchufado el aparato
durante más de 15 minutos. En estos casos, la indicación de la hora parpadea para indicar que tiene
que ajustar la hora del reloj. En todos los otros casos, tiene que utilizar el menú para ajustar la hora del
reloj (consulte la sección “Funciones del menú” del capítulo “Uso del aparato”).
Uso del aparato
Funciones del menú
A continuación, encontrará una descripción de todas las funciones que pueden ajustarse en este
menú. Estas funciones aparecen en el menú en el siguiente orden:
- Hora del reloj
- Hora de la alarma 1
- Hora de la alarma 2
- Sonido de la alarma
- Simulación del atardecer
- Brillo de la pantalla
Puede congurar las funciones del menú de la siguiente forma:
1 Pulse el botón MENU para acceder al menú (g. 8).
Page 60

ESPAÑOL60
Nota: Si no pulsa ningún botón en 30 segundos, el aparato sale del menú y la hora del reloj vuelve a
aparecer en la pantalla.
2 Pulse el botón de menú - o + para seleccionar una función. (g. 9)
3 Pulse el botón SELECT para acceder a esta función (g. 10).
4 Pulse el botón de menú - o + para cambiar un ajuste. (g. 9)
5 Pulse el botón SELECT para conrmar (g. 10).
Ajuste de la hora de la alarma
Al ajustar la alarma, establece una hora de alarma y la intensidad de la luz, así como el tipo de
sonido con el que desea despertarse. La alarma está congurada cuando el símbolo de la alarma
aparece en la pantalla. La intensidad de la luz aumenta lentamente hasta el nivel seleccionado
durante el tiempo establecido de simulación del amanecer antes de la hora de la alarma ajustada. El
tiempo de simulación del amanecer por defecto es de 30 minutos. Éste es el tiempo recomendado,
pero como la sensibilidad a la luz varía según la persona, es posible ajustar el tiempo de simulación
del amanecer como preera (consulte la sección “Ajuste del tiempo de simulación del amanecer”
de este capítulo). A la hora de la alarma establecida (después del tiempo de simulación del
atardecer), el sonido aumentará lentamente hasta el nivel seleccionado durante 90 segundos.
Nota: Puede ajustar dos horas de alarma diferentes, por ejemplo, si desea despertarse los nes de
semana a una hora diferente de la de los días de diario.
Nota: El volumen que establezca para la alarma también se utilizará como el volumen para la radio y la
música del dispositivo USB. Para ajustar el volumen de la alarma, pulse el botón de aumento o de
disminución de volumen. Si no desea despertarse con la lámpara ni con un sonido, seleccione una
intensidad de luz o un nivel de volumen 0. Consulte las secciones “Uso del aparato como una lámpara
de noche” y “Ajuste del volumen” de este capítulo.
1 Coloque la palanca de control en la posición intermedia si desea ajustar la alarma 1. Coloque
la palanca de control en la posición superior si desea ajustar la alarma 2 (g. 11).
, La indicación de la hora de la alarma comienza a parpadear (g. 12).
, Para ajustar la hora, siga los pasos del 2 al 5.
2 Pulse los botones de menú - o + para ajustar los minutos (g. 9).
Nota: Podrá realizar esta acción únicamente cuando la indicación de la hora parpadee. Si no es así, suba
o baje la palanca de control de nuevo para acceder a la función de hora de la alarma. También puede
ajustar la hora de la alarma en el menú. (Consulte la sección “Funciones del menú” de este capítulo.)
3 Pulse el botón SELECT para conrmar (g. 10).
, La indicación de minutos de la hora de la alarma comienza a parpadear (g. 13).
4 Pulse los botones de menú - o + para ajustar los minutos. (g. 9)
5 Pulse el botón SELECT para conrmar o esperar durante unos segundos (g. 10).
, El aparato sale del menú y la pantalla muestra la hora del reloj.
La hora de la alarma ya está ajustada.
Ajuste de la intensidad de la luz
Puede ajustar la intensidad de la luz que preera para el amanecer simulado que sucede antes de
que se active la alarma.
Nota: La intensidad de la luz que haya establecido se utilizará para la función de alarma así como para
la función de lámpara (consulte la siguiente sección “Uso del aparato como una lámpara de noche”).
1 Pulse el botón de encendido/apagado de la lámpara. (g. 14)
Page 61

ESPAÑOL 61
Nota: La lámpara tarda aproximadamente 1 segundo en encenderse. Esto es normal, la lámpara
necesita calentarse.
Nota: También puede ajustar la intensidad de la luz cuando la lámpara esté desactivada, pero si la
enciende será más fácil determinar la intensidad de luz que preere.
2 Pulse los botones de aumento y disminución de intensidad de la luz para seleccionar la
intensidad de la luz (g. 15).
Puede seleccionar una intensidad de luz entre 1 y 20.
Si no desea que la lámpara se encienda gradualmente como un amanecer simulado antes de que la
alarma se active, ajuste la intensidad de la luz a 0.
Consejo: Cuando utilice el aparato por primera vez, ajuste la intensidad de la luz en 20. Cuando se
despierte, compruebe el nivel de intensidad de la luz que ha alcanzado el aparato pulsando brevemente
los botones de aumento o disminución de intensidad de la luz. Al hacerlo, el nivel de intensidad de la luz
de la alarma aparece en la pantalla. Ajuste la intensidad de la luz de la alarma en este nivel para el día
siguiente.
3 Para encender la lámpara, pulse de nuevo el botón de encendido/apagado de la lámpara.
Ajuste del sonido de la alarma
Nota: Puede ajustar el nivel de volumen del sonido de la alarma según su preferencia (consulte la sección
“Ajuste del volumen” de este capítulo). Si no desea despertarse con un sonido de la alarma, ajuste el
nivel de volumen en 0.
1 Siga las instrucciones en “Funciones del menú” de la sección anterior y seleccione la función
de sonido de la alarma.
2 Pulse el botón SELECT para conrmar.
3 Pulse los botones de menú - o + para seleccionar el sonido de la alarma deseado (consulte a
continuación).
, La pantalla muestra el símbolo del sonido de la alarma seleccionado.
4 Pulse el botón SELECT para conrmar.
Puede seleccionar uno de los siguientes sonidos:
- Radio (consulte también la siguiente sección “Uso de la radio como sonido de la
alarma”) (g. 16)
- Sonido de “pájaro” (g. 17)
- Sonido de “yoga” (g. 18)
- Sonido de “cencerro” (g. 19)
- Sonido de “bosque” (g. 20)
- Sonidos del despertador descargados o su propia música de un dispositivo USB (consulte
también la siguiente sección “Uso de la música de un dispositivo USB como sonido de la
alarma”). (g. 21)
Consejo: Puede descargar más sonidos para el despertador en www.philips.com.
Uso de la radio como sonido de la alarma
1 Siga las instrucciones 1-4 de la sección “Ajuste del sonido de la alarma” para seleccionar la
radio como sonido de la alarma.
, En la pantalla aparece P1, que es la emisora de radio presintonizada 1 (g. 22).
Si desea seleccionar otra emisora de radio presintonizada, pulse los botones del menú - o +
(consulte la sección “Uso de la radio/reproducción de música desde un dispositivo USB”). Si desea
cambiar la frecuencia de las emisoras de radio presintonizadas, consulte la sección “Uso de la radio/
reproducción de música desde un dispositivo USB” de este capítulo)
2 Pulse el botón SELECT para conrmar.
Page 62

ESPAÑOL62
, La emisora de radio presintonizada seleccionada se ha establecido ahora como sonido de la
alarma.
Uso de la música de un dispositivo USB como sonido de la alarma
Nota: Sólo puede utilizar música de un dispositivo USB si está en formato MP3 o WMA. Puede
comprobarlo en el ordenador. La extensión de los archivos debe ser .mp3 o .wma.
Consulte el capítulo “Especicaciones USB” para obtener más información sobre los
dispositivos USB.
1 Introduzca el dispositivo USB en la toma USB del aparato.
2 Siga las instrucciones 1-4 de la sección anterior “Funciones del menú” para seleccionar
la música de un dispositivo USB como sonido de la alarma.
, La pantalla muestra 0001 para indicar la primera canción del dispositivo USB. (g. 23)
Para seleccionar otra canción, pulse los botones de menú - y +.
3 Pulse el botón SELECT para conrmar.
, La canción seleccionada se ha establecido ahora como el sonido de la alarma.
Ajuste del tiempo de simulación del amanecer
El tiempo de la simulación del amanecer es el tiempo en el que la intensidad de la luz de la lámpara
aumenta gradualmente hasta el nivel establecido antes de que se reproduzca el sonido de la alarma.
El tiempo de simulación del amanecer por defecto es de 30 minutos, porque éste es el tiempo
óptimo para que el cuerpo se prepare para desper tar. Como la sensibilidad a la luz varía según la
persona, es posible ajustar el tiempo de simulación del amanecer como preera. Puede reducir el
tiempo de simulación del amanecer a 20 ó 25 minutos o aumentarlo a 40 minutos.
1 Mantenga pulsados simultáneamente los botones de aumento y de disminución de intensidad
de la luz durante 3 segundos (g. 24).
, El símbolo de simulación del amanecer y el tiempo por defecto de la simulación del
amanecer de 30 minutos aparecen en la pantalla. (g. 25)
2 Pulse el botón de menú - o + para aumentar o disminuir el tiempo de simulación del
amanecer. (g. 9)
3 Pulse el botón SELECT para conrmar (g. 10).
Alarma diferida
1 Dé unos golpecitos en la supercie de la Wake-up Light con la palma de la mano para
silenciar el aparato (debe usar un poco de fuerza para evitar silenciar el aparato de forma
accidental) (g. 26).
, La lámpara continúa encendida con el nivel de intensidad seleccionado, pero el sonido de la
alarma se detiene. Transcurridos 9 minutos, el sonido de la alarma se activa de nuevo
automáticamente.
Nota: El tiempo de 9 minutos de la alarma diferida es jo y no puede ajustarse.
Activación y desactivación de la función de alarma
1 Para desactivar la función de alarma cuando la alarma se activa, baje la palanca de control a la
posición inferior (g. 27).
Nota: La lámpara permanece encendida para iluminar la habitación. Puede apagar la lámpara pulsando
el botón de encendido/apagado de la misma.
Nota: Si se olvida de apagar la alarma, la alarma (sonido o luz) se apaga automáticamente transcurridos
90 minutos.
Page 63

ESPAÑOL 63
2 Si desea que la alarma se apague y no suene en una de las horas establecidas para el día
siguiente, vuelva a ajustar la palanca de control en alarma 1 o alarma 2.
Demostración de alarma
Si desea ver una demostración rápida (60 segundos) del nivel de luz y sonido aumentando
gradualmente, active la función de prueba del aparato.
1 Mantenga pulsados simultáneamente los botones del menú - o + hasta que la palabra TEST
(prueba) aparezca en la pantalla (g. 28).
2 Vuelva a pulsar simultáneamente los botones del menú - o + parar detener la demostración.
Nota: El aparato continúa ejecutando la demostración de alarma hasta que vuelva a pulsar el botón del
menú + y -. La prueba se detiene automáticamente transcurridas 9 horas.
Uso de la radio/reproducción de música desde un dispositivo USB
Cómo encender la radio
1 Para encender la radio, pulse el botón de encendido/apagado de la misma (g. 29).
, La radio comienza a reproducir.
Nota: La función de radio tiene 3 emisoras presintonizadas. Para seleccionar una, pulse el botón SELECT
debajo de la pantalla.
2 Para seleccionar la frecuencia de radio deseada, pulse el botón de menú - o +. (g. 30)
Consejo: Para buscar las frecuencias de radio automáticamente, mantenga pulsado el botón - o +
durante unos 2 segundos.
Consejo: Para asegurarse de que obtiene una buena señal de radio, desenrolle completamente la antena
y muévala hasta que encuentre la posición en la que la recepción sea óptima.
3 Para encender la radio, pulse de nuevo el botón de encendido/apagado de la misma.
Cambio de las emisoras de radio presintonizadas
La radio de la Wake-up Light tiene 3 emisoras de radio presintonizadas. Si desea ajustar emisoras de
radio diferentes como emisoras presintonizadas, siga los pasos que se detallan a continuación.
1 Pulse el botón de encendido/apagado de la radio para encenderla. (g. 31)
, En la pantalla aparece P1, que es la emisora presintonizada 1 (g. 22).
Nota: Pulse el botón SELECT una o varias veces si desea seleccionar otra emisora presintonizada.
2 Para buscar las frecuencias de radio para cambiar las emisoras presintonizadas, pulse el botón
del menú - o + (g. 30).
, El aparato almacena automáticamente la frecuencia de radio seleccionada.
Reproducción de música desde un dispositivo USB
Nota: Sólo puede utilizar música de un dispositivo USB si está en formato MP3 o WMA. El aparato no
reproduce ningún otro formato. Puede comprobarlo en el ordenador. La extensión de los archivos debe
ser. mp3 o .wma. Para obtener más información, consulte el capítulo “Especicaciones USB”.
1 Para reproducir música desde un dispositivo USB, pulse dos veces el botón de encendido/
apagado. (g. 31)
, Si hay un dispositivo USB en la toma USB, el aparato comienza automáticamente a buscar el
número de archivos MP3 o WMA del dispositivo USB. Es posible que tarde unos minutos. A
continuación, el número de canciones aparecerá en la pantalla y el aparato comenzará a
reproducir la primera canción del dispositivo USB.
, Si el aparato detecta que los archivos del dispositivo USB no están en formato MP3 ni en
WMA, la pantalla muestra “ERR”.
Page 64

ESPAÑOL64
2 Para seleccionar el archivo de música deseado, pulse el botón del menú - o +. (g. 30)
Si mantiene pulsado el botón - ó + del menú, la función de selección de canciones se desplaza por
las canciones más rápido.
3 Para dejar de reproducir desde el dispositivo USB, vuelva a pulsar el botón de encendido/
apagado de la radio.
Nota: Ponga sus archivos de música en la carpeta raíz del dispositivo USB para asegurar una búsqueda
más rápida.
Nota: Las canciones se ordenan según la fecha en la que la música se introdujo en el dispositivo USB. Si
desea que las canciones se reproduzcan en un orden especíco, primero colóquelas en este orden en el
ordenador y, a continuación, cópielas en el dispositivo USB.
Ajuste del volumen
1 Para ajustar el volumen para la radio o la música de un dispositivo USB, pulse el botón de
aumento o de disminución de volumen. (g. 32)
Puede seleccionar un nivel de volumen entre 1 y 20.
Nota: El nivel de volumen que haya seleccionado se ajustará automáticamente como el nivel de volumen
de la alarma.
Simulación del atardecer
Puede usar la simulación del atardecer cuando desee que la luz y/o el sonido de la Wake-up Light
permanezcan encendidos y se atenúen gradualmente durante un periodo de tiempo establecido
(de 15 minutos a 1 hora y media) antes de irse a dormir. La lámpara y/o el sonido se apagan
automáticamente una vez que transcurre el tiempo establecido.
Nota: La intensidad de la luz que haya establecido para el comienzo de la simulación del atardecer se
utilizará también para la simulación del amanecer
1 Encienda la lámpara, la radio o escuche música desde un dispositivo USB. Consulte las
secciones “Uso del aparato como una lámpara de noche” o “Uso de la radio/reproducción de
música desde un dispositivo USB” de este capítulo.
2 Siga los pasos de la sección “Funciones del menú” de este capítulo para seleccionar la función
de simulación del atardecer y ajustar el tiempo de la misma.
, Puede escoger un periodo de tiempo de 15 a 90 minutos (15, 30, 60 ó 90).
Nota: Una vez transcurrido el tiempo establecido, independientemente de si sólo la luz o la radio están
encendidas, la función de simulación del atardecer apaga tanto la luz como el sonido.
Consejo: También puede pulsar el botón de encendido/apagado de la lámpara durante 3 segundos para
activar la función de simulación del atardecer (g. 33).
Uso del aparato como una lámpara de noche
Puede utilizar el aparato como lámpara de noche.
1 Para encender la lámpara, pulse el botón de encendido/apagado de la misma. (g. 14)
Nota: La lámpara tarda aproximadamente 1 segundo en encenderse. Esto es normal, la lámpara
necesita calentarse.
2 Pulse los botones de aumento y disminución de intensidad de la luz para seleccionar la
intensidad de la luz (g. 15).
Puede seleccionar una intensidad de luz entre 1 y 20.
Nota: La intensidad de luz que haya seleccionado se ajustará automáticamente como el nivel de
intensidad de luz de la alarma.
Page 65

ESPAÑOL 65
3 Para encender la lámpara, pulse de nuevo el botón de encendido/apagado de la lámpara.
Ajuste del brillo de la pantalla
1 Siga los pasos de la sección “Funciones del menú” de este capítulo para seleccionar la función
de brillo de la pantalla y ajustarlo. (g. 34)
, Puede seleccionar un brillo de la pantalla entre 1 y 4.
Consejo: Si ajusta el brillo de la pantalla en el nivel 1, el aparato consumirá menos energía.
Nota: El brillo de la pantalla aumenta automáticamente al nivel máximo al ajustar el aparato para que
el usuario tenga una visibilidad óptima. Cuando el usuario ha terminado de ajustar el aparato y sale del
menú, el brillo de la pantalla vuelve automáticamente al nivel establecido.
Limpieza y mantenimiento
No utilice estropajos, agentes abrasivos ni líquidos agresivos, como gasolina o acetona, para
limpiar el aparato.
Limpie regularmente el polvo del exterior del aparato con un paño seco.
1 Desenchufe el aparato antes de limpiarlo.
2 Limpie el exterior del aparato con un paño seco.
No deje que entre agua en el aparato o que se derrame agua sobre el mismo (g. 3).
Sustitución
A excepción de la lámpara, el aparato no contiene ninguna pieza que necesite ser reemplazada.
La lámpara debe sustituirse cuando deje de iluminarse o cuando se observe una disminución de su
rendimiento (consulte también el capítulo “Importante”). Para sustituir la lámpara deberá utilizar una
lámpara halógena de Philips de 100 W 12 V, GY6.35. Sólo estas lámparas proporcionan la intensidad
de la luz correcta.
Nota: Este aparato ha sido diseñado para utilizarse únicamente con lámparas con autopantalla (g. 35).
Para obtener más información, visite nuestra página Web www.philips.com.
Sustitución de la bombilla
1 Desenchufe el aparato antes de sustituir la bombilla.
2 Si la bombilla está todavía caliente, deje que se enfríe durante unos 15 minutos.
3 Para desbloquear la cubierta superior, presiónela y gírela en el sentido contrario al de las
agujas del reloj hasta que el símbolo O de la cubierta superior esté alineado con el
símbolo 1 de la carcasa de la lámpara. (g. 36)
4 Retire la cubierta superior. (g. 37)
5 Retire la bombilla usada de la lámpara (g. 38).
6 Inserte las patillas de la nueva bombilla en el portalámparas. (g. 39)
No toque la bombilla con los dedos. Utilice un paño o un papel de cocina para colocarla (g. 40).
7 Vuelva a colocar la cubierta superior en el aparato.
8 Bloquee la cubierta superior del aparato girándola en el sentido de las agujas del reloj hasta
que el símbolo 1 de la cubierta superior y el símbolo 1 de la carcasa de la lámpara estén
alineados. (g. 41)
Page 66

ESPAÑOL66
Medio ambiente
- Al nal de su vida útil, no tire el aparato junto con la basura normal del hogar. Llévelo a un
punto de recogida ocial para su reciclado. De esta manera ayudará a conservar el medio
ambiente (g. 42).
Garantía y servicio
Si necesita información o si tiene algún problema, visite la página Web de Philips en www.philips.
com, o póngase en contacto con el Servicio de Atención al Cliente de Philips en su país (hallará el
número de teléfono en el folleto de la garantía mundial). Si no hay Servicio de Atención al Cliente
de Philips en su país, diríjase a su distribuidor local Philips.
Guía de resolución de problemas
En este capítulo se resumen los problemas más frecuentes que pueden surgir. Si no puede resolver
el problema con la siguiente información, póngase en contacto con el Servicio de Atención al
Cliente de su país.
Problema Solución
El aparato no funciona. Puede que la clavija no esté bien enchufada a la toma de corriente.
El aparato funciona
correctamente, pero la
lámpara ya no
funciona.
El aparato se calienta
durante su uso.
El aparato no
responde cuando
intento congurar
diferentes funciones.
La lámpara no se
enciende cuando se
activa la alarma.
La lámpara no se
enciende directamente
al conectarla.
Conéctela correctamente.
Puede que haya un fallo en el suministro de energía. Compruebe si la
toma de corriente funciona conectando otro aparato.
Quizás la lámpara ha alcanzado el n de su vida. La vida útil depende de
cómo utilice el aparato. En caso de uso intensivo, puede que la lámpara
no dure tanto como esperaba. Si la lámpara se rompe, puede solicitar
otra nueva o comprarla a su distribuidor local. Contacte con el Servicio
de Atención al Cliente de Philips de su país.
Esto es normal, el aparato se calienta debido a la luz de la lámpara y a
los sistemas electrónicos. Deje siempre que el aparato se enfríe antes de
sustituir la bombilla.
Desenchufe la clavija de la toma de corriente y espere 20 minutos antes
de volver a enchufarla. Cuando vuelva a enchufarla, el aparato volverá a
los ajustes de fábrica y tendrá que ajustar todas las funciones otra vez.
Puede que haya ajustado un nivel de intensidad de luz demasiado bajo.
Aumente el nivel de intensidad.
Es posible que desactivara la función de alarma al bajar la palanca de
control en la posición inferior. Para activar la función de alarma, coloque
la palanca de control en la posición intermedia (alarma 1) o en la
posición superior (alarma 2), dependiendo de la hora a la que quiera
despertarse.
Puede que el aparato esté defectuoso. Póngase en contacto con el
Servicio de Atención al Cliente de Philips en su país.
La lámpara tarda aproximadamente 1 segundo en encenderse. Esto es
normal, la lámpara necesita calentarse.
Page 67

ESPAÑOL 67
Problema Solución
No se oye el sonido
de la alarma cuando
ésta se activa.
La radio no funciona. Puede que la radio esté defectuosa. Póngase en contacto con el Servicio
La radio produce un
sonido crepitante.
La alarma se activó
ayer, pero no lo ha
hecho hoy.
Deseaba retrasar la
alarma, pero ésta no
se activó de nuevo
transcurridos
9 minutos.
La luz me despierta
demasiado pronto.
Puede que haya ajustado un nivel de sonido demasiado bajo. Para ajustar
un nivel de sonido más alto, consulte la sección “Ajuste del volumen” del
capítulo “Uso del aparato”.
Puede que haya desactivado la función de alarma al colocar la palanca de
control en la posición inferior.
Si ha seleccionado la radio como sonido de la alarma, la radio podría
estar defectuosa. Encienda la radio después de haber apagado la alarma
para comprobar si funciona. Si no funciona, póngase en contacto con el
Servicio de Atención al Cliente de Philips en su país.
Si ha seleccionado un sonido del despertador descargado o música de
un dispositivo USB como sonido de la alarma, es posible que los sonidos
o las canciones no tengan el formato correcto. Este aparato sólo admite
archivos .mp3 y .wma. Si el sonido o la música del dispositivo USB no
pueden reproducirse, el aparato ajusta automáticamente el sonido de
pájaro como sonido de la alarma para garantizar que de todas formas se
despierte a la hora de la alarma establecida.
de Atención al Cliente de Philips en su país.
Puede que haya ajustado el volumen demasiado bajo.
Es posible que la señal de emisión sea débil. Ajuste la frecuencia
(consulte la sección “Uso de la radio/reproducción de música desde un
dispositivo USB” del capítulo “Uso del aparato”) o cambie la posición de
la antena. Asegúrese de que ha desenrollado la antena completamente.
Puede que haya desactivado la función de alarma al colocar la palanca de
control en la posición inferior.
Puede que haya ajustado un nivel de volumen o un nivel de intensidad
de luz demasiado bajo. Ajuste unos niveles más altos.
Puede que se haya producido un fallo en el suministro de energía
durante más de 15 minutos. En ese caso, se restablecen los valores
predeterminados de fábrica del aparato. Tendrá que congurar de nuevo
todas las funciones.
Probablemente bajó la palanca de control hasta la posición inferior. Esto
desactiva completamente la función de alarma. Si desea retrasar la
alarma, tiene que dar unos golpecitos en el aparato.
Puede que haya ajustado el nivel de volumen en 0.
Puede que el nivel de intensidad de luz que ha ajustado no sea
adecuado para usted. Pruebe un nivel de intensidad de luz inferior si se
despierta demasiado pronto. Si el nivel de intensidad 1 no es lo
sucientemente bajo, aleje el aparato de la cama.
Page 68

ESPAÑOL68
Problema Solución
La luz me despierta
demasiado tarde.
La lámpara parpadea. Quizás el aparato no es adecuado para el voltaje al que está conectado.
El aparato no
reconoce el
dispositivo USB.
Cuando introduzco el
dispositivo USB en la
toma USB aparece un
mensaje de error en la
pantalla.
He programado el
aparato para
despertarme con
música de un
dispositivo USB, pero
en su lugar se oye un
sonido de pájaro.
Puede que el aparato esté situado a una altura inferior a la de su cabeza.
Asegúrese de que el aparato esté situado a una altura tal que la luz no
resulte interceptada por la cama, edredón o almohada. Asegúrese
también de que el aparato no está colocado demasiado lejos.
Asegúrese de que el voltaje indicado en el aparato se corresponde con
el de la red local.
Es posible que el dispositivo USB no se haya insertado en la toma USB
correctamente. Asegúrese de que introduce el dispositivo USB
correctamente en la toma USB.
Es posible que la música del dispositivo USB no tenga el formato
correcto. Asegúrese de que la canción es un archivo en MP3 o WMA.
Puede comprobarlo en el ordenador. La extensión de los archivos debe
ser .mp3 o .wma. Para obtener más información, consulte el capítulo
“Especicaciones USB”.
Es posible que haya extraído el dispositivo USB del aparato o que no
esté insertado en la toma USB correctamente. Si el aparato no detecta
un dispositivo USB, establece automáticamente el sonido de pájaro
como sonido de la alarma para garantizar de todos modos que se
despierte a la hora de la alarma establecida. Para utilizar música de un
dispositivo USB como sonido de la alarma, el USB tiene que estar
conectado en la toma USB correctamente.
Dispositivos USB compatibles
- Memoria ash USB (USB 2.0 o USB 1.1)
- Reproductores ash USB (USB 2.0 o USB 1.1)
- Tarjetas de memoria (requieren un lector de tarjetas adicional para funcionar en este sistema de
audio)
Nota: Si el dispositivo USB dispone de una función de inicio, espere hasta que haya terminado de
iniciarse y esté listo para su uso antes de conectarlo al puerto USB del aparato.
Formatos compatibles
- USB o formato de archivo de memoria FAT12, FAT16, FAT32 (tamaño de sector: 512 bytes)
- Velocidad de bits (velocidad de datos) de MP3: 32-320 Kbps y velocidad de bits variable
- WMA v7, v8 o v9
- Directorios anidados hasta un máximo de 8 niveles
- Número de álbumes/carpetas: 99 como máximo
- Número de pistas/títulos: 999 como máximo
- Nombre de archivo en Unicode UTF8 (longitud máxima: 128 bytes)
Page 69

ESPAÑOL 69
Formatos no compatibles:
- Álbumes vacíos: un álbum vacío es aquel que no contiene archivos MP3 o WMA y no se
mostrará en la pantalla.
- Los formatos de archivo que no son compatibles se omiten. Por ejemplo los documentos de
Word (.doc) o los archivos de MP3 con extensión .dlf se ignoran y no se reproducen.
- Archivos de audio AAC, WAV y PCM.
- Los archivos con protección DRM no son compatibles.
- Archivos WMA con formato sin pérdidas
- Archivos ocultos
Page 70

70
SUOMI
Johdanto
Onnittelut ostoksestasi ja tervetuloa Philips-tuotteiden käyttäjäksi! Hyödynnä Philipsin tuki ja
rekisteröi tuotteesi osoitteessa www.philips.com/welcome.
Philips Wake-up Light -herätysvalon avulla heräät miellyttävämmin. Lampun valoteho kasvaa asteittain
määritettyyn tasoon simuloidun auringonnousun aikana (oletusaika on 30 minuuttia). Valo valmistelee
hellävaraisesti elimistöäsi heräämään valittuun aikaan. Herääminen on entistäkin miellyttävämpää, kun
käytät herätysäänenä luonnon ääniä, FM-radiota tai itse lataamaasi musiikkia USB-muistitikusta.
Wake-up Light -herätysvalon vaikutukset
Philips Wake-up Light valmistelee elimistöä heräämiseen unen viimeisen 20–40 minuutin ajan
auringonnousun simuloinnin aika-asetuksen mukaan. Varhain aamulla silmämme ovat herkemmät
valolle kuin hereillä ollessamme. Aamun tunteina simuloidun auringonnousun suhteellisen hämärä
valo valmistaa elimistöä heräämään virkeänä. Herätysvaloa käyttävät heräävät helpommin, ovat
aamuisin paremmalla tuulella ja tuntevat olonsa energisemmäksi. Voit aloittaa päiväsi mahdollisimman
miellyttävästi säätämällä valotehon tasolle, joka sopii juuri sinun valoherkkyydellesi.
Lisätietoja Wake-up Light -herätysvalosta on sivustossa www.philips.com.
Yleiskuvaus (Kuva 1)
A Suojakansi, jossa on ilmanvaihtoaukko
B Lampun kotelo
C Virtajohto
D Antenni
E Näyttö
1 Kellonaika/herätysaika
2 Valotehon kuvake
3 Auringonnousun simulointiajan kuvake
4 Radiokuvake
5 Linnunlaulun kuvake
6 Joogaäänen kuvake
7 Lehmänkelloäänen kuvake
8 Metsän äänen kuvake
9 USB-muistitikun kuvake
10 Radiotaajuuskuvake
11 Äänenvoimakkuuden kuvake
12 Näytön kirkkauden kuvake
13 Auringonlaskun simuloinnin kuvake
14 Herätysäänen kuvake
15 Herätysajan 2 kuvake
16 Herätysajan 1 kuvake
17 Kellonajan kuvake
F Valikon ‘-’ -painike
G MENU-valikkopainike
H SELECT-painike (myös FM-pikavalinnat)
I Valikon ‘+’ -painike
J Ohjauskytkin, jossa on kolme asentoa: herätys ei käytössä, herätysaika 1 ja herätysaika 2
K USB-liitäntä
L Laitteen sivupaneelissa olevat painikkeet
1 Valotehon lisäyspainike
2 Lampun painike
3 Valotehon vähennyspainike
4 Äänenvoimakkuuden lisäyspainike
5 Radion painike
Page 71

SUOMI 71
6 Äänenvoimakkuuden säädin
Tärkeää
- Lue tämä käyttöopas huolellisesti ennen käyttöä ja säilytä se myöhempää tarvetta varten.
- Tämä laite on kaksoiseristetty suojausluokan II vaatimusten mukaisesti (Kuva 2).
Vaara
- Vesi ja sähkölaitteet eivät sovi yhteen! Tämän takia laitetta ei saa käyttää kosteissa tiloissa, kuten
suihku- tai kylpyhuoneessa tai uima-altaan lähellä.
- Älä valuta tai läikytä vettä laitteen päälle (Kuva 3).
Varoitus
- Tarkista, että laitteeseen merkitty käyttöjännite vastaa paikallista verkkojännitettä, ennen kuin liität
laitteen pistorasiaan.
- Älä aseta laitteen päälle tai lähelle mitään, mikä voi aiheuttaa laitteen kastumisen.
- Koska voit katkaista laitteen verkkovirran vain irrottamalla pistokkeen pistorasiasta, varmista aina,
että pistoke on esteettömästi käsiteltävissä, kun laite on liitetty verkkovirtaan.
- Laitteen käyttöjännite on 230 V ja taajuus 50 Hz.
- Jos virtajohto on vahingoittunut, se on oman turvallisuutesi vuoksi hyvä vaihdattaa Philipsin
valtuuttamassa huoltoliikkeessä tai muulla ammattitaitoisella korjaajalla.
- Anna laitteen jäähtyä noin 15 minuuttia ennen suojakannen ja lampun irrottamista. Lamppu ja
suojakansi kuumenevat käytön aikana, ja voit polttaa sormesi, jos kosket niihin. (Kuva 4)
- Laitetta ei ole tarkoitettu lasten tai sellaisten henkilöiden käyttöön, joiden fyysinen tai henkinen
toimintakyky on rajoittunut tai joilla ei ole kokemusta tai tietoa laitteen käytöstä, muuten kuin
heidän turvallisuudestaan vastaavan henkilön valvonnassa ja ohjauksessa.
- Pienten lasten ei saa antaa leikkiä laitteella.
- Laite on tarkoitettu vain sisäkäyttöön (Kuva 5).
Varoitus
- Älä pudota laitetta lattialle, kolauta sitä tai altista muille koville iskuille.
- Aseta laite tukevalle, tasaiselle ja liukumattomalle pinnalle.
- Älä käytä laitetta alle 10 °C:n tai yli 35 °C:n lämpötilassa.
- Varmista, että mikään ei käytön aikana peitä laitteen päällä ja pohjassa olevia ilmanvaihtoaukkoja.
- Älä käytä laitetta, jos lampun kotelo tai suojus on vioittunut, rikki tai puuttuu.
- Ota yhteys lääkäriin ennen laitteen käyttöä, mikäli kärsit tai olet kärsinyt vakavasta masennuksesta.
- Älä käytä laitetta yöunen lyhentämiseen. Laitteen tarkoitus on auttaa sinua heräämään
helpommin. Se ei vähennä unen tarvetta.
- Laitteessa ei ole virtakytkintä. Laite sammutetaan irrottamalla pistoke pistorasiasta.
- Laite on tarkoitettu vain kotitalouksien käyttöön tai samantapaiseen käyttöön
esimerkiksi hotelleissa.
Yleistä
- Herätyksen valoteho on valittavissa (katso luvun Käyttö kohta Valotehon asettaminen).
- Jos heräät usein liian aikaisin tai kärsit herätessäsi päänsärystä, vähennä valotehoa ja/tai
auringonnousun simuloinnin aikaa.
- Jos nukut samassa huoneessa toisen ihmisen kanssa, valo saattaa herättää hänet, vaikka hän olisi
kauempana laitteesta. Tämä ilmiö johtuu henkilökohtaisista eroista valoherkkyyden suhteen.
- Laite kuluttaa vähiten virtaa, kun radio, USB-toisto ja lamppu on kytketty pois käytöstä.
Sähkömagneettiset kentät (EMF)
Tämä Philips-laite vastaa kaikkia, sähkömagneettisia kenttiä (EMF) koskevia standardeja. Jos laitetta
käytetään oikein ja tämän käyttöohjeen ohjeiden mukaisesti, sen käyttäminen on turvallista
tämänhetkisen tutkimustiedon perusteella.
Page 72

SUOMI72
Käyttöönoton valmistelu
Kellonajan asettaminen
1 Työnnä pistoke pistorasiaan.
, Näytön tunnit-ilmaisin alkaa vilkkua merkkinä siitä, että voit asettaa kellonajan (Kuva 6).
2 Aseta tunti valikon miinus (–)- tai plus (+) -painikkeilla
3 Vahvista SELECT-painikkeella.
, Minuutit-ilmaisin alkaa vilkkua (Kuva 7).
4 Aseta minuutit valikon miinus (–)- tai plus (+) -painikkeilla
5 Vahvista SELECT-painikkeella.
, Laite siirtyy pois valikosta ja näyttöön tulee asetettu kellonaika.
Laite on nyt käyttövalmis.
Huomautus: Edellä kuvattu menetelmä koskee laitteen ensimmäistä käyttökertaa tai tilannetta
sähkökatkoksen jälkeen tai kun pistoke on ollut irti pistorasiasta yli 15 minuuttia. Tällöin tunnit-ilmaisin
vilkkuu ja kellonaika on asetettava. Muissa tapauksissa kellonaika on asetettava valikon kautta (katso
ohjeet luvun Käyttö kohdasta Valikkotoiminnot).
Käyttö
Valikkotoiminnot
Seuraavassa on kuvattu kaikki valikon avulla asetettavat toiminnot. Nämä toiminnot ovat seuraavassa
järjestyksessä:
- Kellonaika
- Herätysaika 1
- Herätysaika 2
- Herätysääni
- Auringonlaskusimulointi
- Näytön kirkkaus
Määritä valikkotoiminnot seuraavalla tavalla:
1 Avaa valikko painamalla MENU-painiketta (Kuva 8).
Huomautus: Jos et paina mitään painiketta 30 sekunnissa, valikko sulkeutuu ja kellonaika ilmestyy
näyttöön.
2 Valitse toiminto valikon miinus (–)- tai plus (+) -painikkeilla (Kuva 9)
3 Siirry toimintoon painamalla SELECT-painiketta (Kuva 10).
4 Muuta asetusta valikon miinus (–)- tai plus (+) -painikkeilla (Kuva 9)
5 Vahvista SELECT-painikkeella (Kuva 10).
Herätyksen asettaminen
Herätysajan asettaminen
Herätystä asetettaessa valitaan herätysaika, valotehon taso ja haluttu hälytysääni. Herätys on asetettu,
kun herätyskuvake näkyy näytössä. Valoteho lisääntyy ennen herätystä hitaasti valittuun tehotasoon
asti auringonnoususimuloinnin aika-asetuksen mukaan. Auringonnoususimuloinnin suositeltu ja
oletusarvoinen aika on 30 minuuttia. Valoherkkyys kuitenkin vaihtelee, joten
auringonnoususimuloinnin ajan voi valita itse (katso tämän luvun kohta Auringonnoususimuloinnin
ajan asettaminen). Valittuna herätysaikana (auringonlaskusimuloinnin jälkeen) herätysääni voimistuu
hitaasti 90 sekunnissa asetetulle tasolle.
Page 73

SUOMI 73
Huomautus: Laitteessa on kaksi herätysaikaa, joten arkipäivien ja viikonlopun herätysajat voi määrittää
erilaisiksi.
Huomautus: Valittu herätyksen äänenvoimakkuus määrittää myös radion ja USB-muistista soitetun
musiikin äänenvoimakkuuden. Herätyksen äänenvoimakkuuden voi asettaa painamalla
äänenvoimakkuuden lisäys- tai vähennyspainiketta. Jos et halua herätä lampun valoon tai herätysääneen,
aseta valotehoksi tai äänenvoimakkuudeksi 0. Katso tämän luvun kohdat Käyttö lukulamppuna ja
Äänenvoimakkuuden asettaminen.
1 Aseta ohjauskytkin keskiasentoon, jos haluat käyttää 1. herätysaikaa, ja yläasentoon, jos haluat
käyttää 2. herätysaikaa (Kuva 11).
, Herätysajan tunnin ilmaisin alkaa vilkkua (Kuva 12).
, Aseta aika vaiheiden 2-5 mukaan.
2 Aseta tunti valikon miinus (–)- tai plus (+) -painikkeilla (Kuva 9)
Huomautus: Voit tehdä näin vain tunnin ilmaisimen vilkkuessa. Jos ilmaisin ei vilku, voit siirtyä herätysajan
asetustilaan painamalla ohjauskytkimen alas ja työntämällä sen takaisin ylös. Voit määrittää herätysajan
myös valikon avulla. Katso tämän luvun kohta Valikkotoiminnot.
3 Vahvista SELECT-painikkeella (Kuva 10).
, Herätysajan minuutin ilmaisin alkaa vilkkua (Kuva 13).
4 Aseta minuutit valikon miinus (-)- tai plus (+) -painikkeilla. (Kuva 9)
5 Vahvista SELECT-painikkeella tai odota muutama sekunti (Kuva 10).
, Laite siirtyy pois valikosta ja näyttöön tulee kellonaika.
Herätys on nyt asetettu.
Valotehon asettaminen
Voit asettaa haluamasi valotehon ennen herätystä alkavalle auringonnoususimuloinnille.
Huomautus: Asettamaasi valotehoa käytetään herätystoiminnon lisäksi myös silloin, kun laitetta käytetään
lamppuna (katso jäljempää kohta Käyttö lukulamppuna).
1 Paina lampun virtapainiketta. (Kuva 14)
Huomautus: Lampun syttyminen kestää tavallisesti noin sekunnin, koska lampun on ensin lämmettävä.
Huomautus: Valotehon voi asettaa silloinkin, kun lamppu on sammutettu. Haluttu valoteho on kuitenkin
helpompi määrittää lampun palaessa.
2 Valitse valoteho painamalla valotehon lisäys- ja vähennyspainikkeita (Kuva 15).
Valotehon asteikko on 1–20.
Jos et halua lampun valon voimistuvan hitaasti ennen herätystä auringonnousua simuloiden, aseta
valotehoksi 0.
Vinkki: Kun käytät laitetta ensimmäistä kertaa, aseta valotehon tasoksi 20. Tarkista heti herättyäsi, minkä
tehotason lamppu on saavuttanut: kun painat kevyesti valotehon lisäys tai vähennyspainiketta, nykyinen
valon tehotaso tulee näkyviin laitteen näyttöön. Aseta tämä taso herätyksen valotehoksi seuraavaa päivää
varten.
3 Katkaise laitteesta virta painamalla valopainiketta uudelleen.
Herätysäänen asettaminen
Huomautus: Herätysäänen äänenvoimakkuuden voi asettaa halutulle tasolle (katso tämän luvun kohta
Äänenvoimakkuuden asettaminen). Herätysäänen voi myös poistaa käytöstä asettamalla
äänenvoimakkuudeksi 0.
1 Noudata edellä kohdassa Valikkotoiminnot mainittuja ohjeita ja valitse herätysääni.
Page 74

SUOMI74
2 Vahvista SELECT-painikkeella.
3 Valitse haluttu herätysääni valikon miinus (-)- ja plus (+) -painikkeilla.
, Valitun herätysäänen kuvake tulee näyttöön.
4 Vahvista SELECT-painikkeella.
Voit valita jonkin seuraavista äänistä:
- Radio (katso myös jäljempää kohta (Radio herätysäänenä) (Kuva 16)
- Linnunlaulu (Kuva 17)
- Joogaääni (Kuva 18)
- Lehmänkellon ääni (Kuva 19)
- Metsän ääni (Kuva 20)
- Ladatut herätysäänet tai oman musiikin käyttö USB-muistitikulta (katso myös jäljempää kohta
USB-muistitikulla oleva musiikki herätysäänenä). (Kuva 21)
Vinkki: Lisää herätysääniä voi ladata osoitteessa www.philips.com.
Radio herätysäänenä
1 Aseta radio herätysääneksi noudattamalla kohdan Herätysäänen asettaminen ohjeita 1–4.
, Näytössä näkyy P1, joka on pikavalinta-asema 1 (Kuva 22).
Toisen pikavalinta-aseman voi valita painamalla valikon miinus (-)- tai plus (+) -painikkeita (katso
kohta Radion käyttö / musiikin toistaminen USB-muistitikulta). Ohjeita pikavalinta-asemien taajuuksien
muuttamiseen on tämän luvun kohdassa Radion käyttö / musiikin toistaminen USB-muistitikulta).
2 Vahvista SELECT-painikkeella.
, Valittu pikavalinta-asema on nyt asetettu herätysääneksi.
USB-muistitikulla oleva musiikki herätysäänenä
Huomautus: USB-muistitikulta voi toistaa vain MP3- tai WMA-musiikkitiedostoja. Voit tarkistaa
tietokoneella, ovatko tiedostotunnisteet .mp3 tai .wma.
Lisätietoja USB-yhteydestä on luvussa USB-määritykset.
1 Aseta USB-muistitikku laitteen USB-liitäntään.
2 Aseta muistitikulla oleva musiikki herätysääneksi noudattamalla edellä olevan kohdan
Valikkotoiminnot ohjeita 1–4.
, Näyttöön ilmestyvä 0001 viittaa USB-muistitikun ensimmäiseen kappaleeseen. (Kuva 23)
Muita kappaleita voi valita valikon miinus (–) ja plus (+) -painikkeilla.
3 Vahvista SELECT-painikkeella.
, Valittu kappale on nyt asetettu herätysääneksi.
Auringonnoususimuloinnin ajan asettaminen
Auringonnoususimuloinnin aika määrittää ajanjakson, jona lampun valoteho vaiheittain lisääntyy
asetettuun tehotasoon ennen herätysäänen toistamista. Oletusaika on 30 minuuttia, ja se on
ihanteellinen aika valmistamaan elimistö heräämiseen. Ihmisten valoherkkyys vaihtelee, joten
auringonnoususimuloinnin aika-asetuksen voi määrittää itselleen sopivaksi. Aikaa voi lyhentää 20 tai
25 minuuttiin tai pidentää 40 minuuttiin.
1 Pidä valotehon lisäys- ja vähennyspainikkeita painettuna samanaikaisesti 3 sekuntia (Kuva 24).
, Auringonnoususimuloinnin kuvake ja 30 minuutin oletusaika ilmestyvät ruutuun. (Kuva 25)
2 Lyhennä tai pidennä auringonnoususimuloinnin aikaa valikon miinus (–)- tai plus (+) -
painikkeilla. (Kuva 9)
3 Vahvista SELECT-painikkeella (Kuva 10).
Page 75

SUOMI 75
Lisäaika
1 Saat lisää torkkuaikaa napauttamalla Wake-up Lightin pintaa kämmenelläsi (voimaa on
käytettävä jonkin verran, ettei torkkuaikaa lisätä vahingossa) (Kuva 26).
, Lamppu palaa edelleen valitulla valoteholla, mutta herätysääni sammuu. Herätysääni kuuluu
jälleen automaattisesti 9 minuutin kuluttua.
Huomautus: Lisäaika on aina 9 minuuttia. Tätä aikaa ei voi muuttaa.
Herätystoiminnon poistaminen käytöstä ja kytkeminen käyttöön
1 Kun herätys käynnistyy, herätystoiminnon voi poistaa käytöstä painamalla ohjauskytkin ala-
asentoon (Kuva 27).
Huomautus: Lamppu jatkaa huoneen valaisemista. Voit sammuttaa sen painamalla lampun
virtapainiketta.
Huomautus: Jos herätystä ei muista poistaa käytöstä, herätysääni ja/tai herätysvalo sammuu
automaattisesti 90 minuutin kuluttua.
2 Herätyksen voi asettaa käynnistymään seuraavana päivänä määritettynä ajankohtana
asettamalla ohjausvipu herätysasentoon 1 tai 2.
Herätystesti
Jos haluat pikaesittelyn (60 sekuntia) vähitellen lisääntyvästä valosta ja äänestä, ota laitteen
testitoiminto käyttöön.
1 Pidä samanaikaisesti painettuna valikon miinus (-)- ja plus (+) -painikkeita, kunnes näytössä
näkyy sana TEST (Kuva 28).
2 Pysäytä esittely painamalla samanaikaisesti valikon miinus (-) ja plus (+) -painikkeita.
Huomautus: Herätyksen esittely jatkuu, kunnes painat valikon plus (+)- ja miinus (-) -painikkeita
uudelleen. Esittely päättyy automaattisesti 9 tunnin kuluttua.
Radion käyttö / musiikin toistaminen USB-muistitikulta
Radion käynnistäminen
1 Käynnistä radio painamalla radion virtapainiketta (Kuva 29).
, Radion toisto käynnistyy.
Huomautus: Radiossa on 3 pikavalinta-asemaa. Aseman voi valita painamalla näytön alla olevaa
SELECT-painiketta.
2 Valitse radiotaajuus painamalla valikon miinus (-)- tai plus (+) -painiketta. (Kuva 30)
Vinkki: Voit selata radiotaajuuksia automaattisesti pitämällä valikon miinus (-)- tai plus (+) -painiketta
painettuna noin 2 sekuntia.
Vinkki: Voit varmistaa radiosignaalin laadun suoristamalla antennin kunnolla ja etsimällä sille paikka, jossa
vastaanotto on paras mahdollinen.
3 Voit sulkea radion painamalla radion virtapainiketta uudelleen.
Pikavalinta-asemien muuttaminen
Wake-up Light -herätysvalon radiossa on 3 pikavalinta-asemaa. Pikavalinta-asemat voi määrittää alla
neuvotulla tavalla.
1 Käynnistä radio painamalla radion virtapainiketta. (Kuva 31)
, Näytössä näkyy P1, joka on pikavalinta-asema 1 (Kuva 22).
Huomautus: Paina SELECT-painiketta vielä yhden tai useamman kerran, jos haluat valita toisen
pikavalinta-aseman.
Page 76

SUOMI76
2 Voit selata radiotaajuuksia pikavalinta-aseman muuttamista varten painamalla valikon miinus (-
)- tai plus (+) -painiketta (Kuva 30).
, Laite tallentaa automaattisesti valitun radiotaajuuden.
Musiikin toistaminen USB-muistitikulta
Huomautus: USB-muistitikulta voi toistaa vain MP3- tai WMA-musiikkitiedostoja. Laite ei tue muita
musiikkiformaatteja. Voit tarkistaa tiedostojen yhteensopivuuden tietokoneellasi. Musiikkitiedostojen
tunnisteiden on oltava .mp3 tai .wma. Lisätietoja on luvussa USB-määritykset.
1 USB-muistitikulla olevan musiikin toisto käynnistyy, kun radion virtapainiketta painetaan
kahdesti. (Kuva 31)
, Jos USB-liitännässä on muistitikku, laite etsii automaattisesti, kuinka monta MP3- tai WMA-
tiedostoa siinä on. Haku voi kestää muutaman minuutin. Kappaleiden lukumäärä näkyy tämän
jälkeen näytössä, ja laite alkaa toistaa USB-muistitikun ensimmäistä kappaletta.
, Jos laite havaitsee, että USB-muistitikun tiedostot eivät ole MP3- tai WMA-tiedostoja,
näytössä näkyy ERR.
2 Valitse haluttu kappale painamalla valikon miinus (-)- tai plus (+) -painiketta. (Kuva 30)
Voit selata kappaleita nopeammin pitämällä valikon miinus (-)- tai plus (+) -painiketta painettuna.
3 USB-muistitikulla olevan musiikin toiston voi pysäyttää painamalla uudestaan radion
virtapainiketta.
Huomautus: Sijoita musiikkitiedostot USB-muistitikun juurikansioon haun nopeuttamiseksi.
Huomautus: Kappaleet järjestetään USB-muistitikulle kopiointipäivän perusteella. Jos haluat muuttaa
kappaleiden järjestystä, siirrä ne ensin tietokoneelle halutussa järjestyksessä ja kopioi ne sitten USB-
muistitikulle.
Äänenvoimakkuuden asettaminen
1 Radion tai USB-muistitikulta toistetun musiikin äänenvoimakkuutta säädetään
äänenvoimakkuuden lisäys- tai vähennyspainikkeilla. (Kuva 32)
Äänenvoimakkuuden asteikko on 1–20.
Huomautus: Valitsemasi äänenvoimakkuus asetetaan automaattisesti myös herätyksen
äänenvoimakkuustasoksi.
Auringonlaskusimulointi
Auringonlaskusimuloinnilla voit määrittää valon himmenemään ja/tai äänen vaimenemaan vähitellen
tietyn ajan kuluessa (15 minuutista 1,5 tuntiin) ennen nukahtamista. Lamppu sammuu ja/tai ääni
kytkeytyy pois automaattisesti määritettynä aikana.
Huomautus: Auringonlaskusimuloinnin alkuvaiheen valotehoa käytetään myös
auringonnoususimuloinnissa.
1 Sytytä lamppu ja/tai käynnistä radion tai USB-muistitikulla olevan musiikin toisto. Katso tämän
luvun kohdat Käyttö lukulamppuna ja Radion käyttö / musiikin toisto USB-muistitikulta.
2 Valitse auringonlaskusimulointi tämän luvun kohdan Valikkotoiminnot ohjeiden mukaan ja
aseta auringonlaskusimuloinnin aika.
, Voit valita ajaksi 15-90 minuuttia (15, 30, 60 tai 90).
Huomautus: Määritetyn ajan jälkeen auringonlaskusimulointi poistaa käytöstä sekä valon että äänen,
vaikka vain valo ja/tai radio on käytössä.
Vinkki: Auringonlaskusimuloinnin voi käynnistää myös painamalla valopainiketta 3 sekuntia (Kuva 33).
Page 77

SUOMI 77
Käyttö lukulamppuna
Voit käyttää laitetta lukulamppuna.
1 Kytke lamppuun virta painamalla valopainiketta. (Kuva 14)
Huomautus: Lampun syttyminen kestää tavallisesti noin sekunnin, koska lampun on ensin lämmettävä.
2 Valitse valoteho painamalla valotehon lisäys- ja vähennyspainikkeita (Kuva 15).
Valotehon asteikko on 1–20.
Huomautus: Valitsemasi valoteho asetetaan automaattisesti myös herätyksen valotehon tasoksi.
3 Katkaise laitteesta virta painamalla valopainiketta uudelleen.
Näytön kirkkauden asettaminen
1 Valitse näytön kirkkaustoiminto tämän luvun kohdan Valikkotoiminnot ohjeiden mukaan ja
aseta näytön kirkkaus. (Kuva 34)
, Näytön kirkkauden voi säätää tasolle 1-4.
Vinkki: Laite kuluttaa vähiten virtaa kirkkausasetuksella 1.
Huomautus: Näytön kirkkaus lisääntyy automaattisesti enimmäistasoon asti asetusten valinnan aikana,
jotta valintojen tekeminen olisi mahdollisimman helppoa. Kun käyttäjä lopettaa asetusten tekemisen ja
poistuu valikosta, näytön kirkkaus palaa automaattisesti määritetylle tasolle.
Puhdistus ja hoito
Älä käytä naarmuttavia tai syövyttäviä puhdistusaineita tai -välineitä laitteen puhdistamiseen
(kuten bensiiniä tai asetonia).
Puhdista laitteen pinnat pölystä säännöllisesti kuivalla liinalla.
1 Irrota aina pistoke pistorasiasta ennen laitteen puhdistamista.
2 Puhdista laitteen ulkopuoli kuivalla liinalla.
Älä valuta tai läikytä vettä laitteen päälle (Kuva 3).
Varaosat
Lamppu on laitteen ainoa vaihdettava osa.
Lamppu on vaihdettava, kun se lakkaa palamasta tai kun valoteho heikkenee (katso myös kohta
Tärkeää). Käytä aina Philips 100W, 12V, GY6.35 -halogeenilamppua. Valoteho on oikea vain näitä
lamppuja käytettäessä.
Huomautus: Laitteessa käytetään ainoastaan lamppuja, joissa on sisäänrakennettu suojaus (Kuva 35).
Lisätietoja on osoitteessa www.philips.com.
Lampun vaihtaminen
1 Irrota pistoke pistorasiasta aina ennen lampun vaihtamista.
2 Jos lamppu on vielä kuuma, anna se jäähtyä noin 15 minuuttia.
3 Laitteen suojakannen voi avata painamalla kantta ja kiertämällä sitä vastapäivään, kunnes
suojakannen O-kuvake on lampun kotelon kuvakkeen 1 kohdalla. (Kuva 36)
4 Irrota suojakansi. (Kuva 37)
5 Irrota vanha lamppu pidikkeestä (Kuva 38).
6 Aseta uuden lampun nastat lampun pidikkeeseen. (Kuva 39)
Page 78

SUOMI78
Älä kosketa lamppua sormillasi. Käytä liinaa tai talouspaperia, kun asennat lampun (Kuva 40).
7 Aseta suojakansi paikalleen.
8 Lukitse suojakansi kiertämällä sitä myötäpäivään, kunnes suojakannen 1-kuvake on lampun
kotelon 1-kuvakkeen kohdalla. (Kuva 41)
Ympäristöasiaa
- Älä hävitä vanhoja laitteita tavallisen talousjätteen mukana, vaan toimita ne valtuutettuun
kierrätyspisteeseen. Näin autat vähentämään ympäristölle aiheutuvia haittavaikutuksia (Kuva 42).
Takuu ja huolto
Jos haluat lisätietoja tai laitteen kanssa tulee ongelmia, tutustu Philipsin verkkosivustoon osoitteessa
www.philips.com tai kysy neuvoa Philipsin asiakaspalvelusta (puhelinnumero on kansainvälisessä
takuulehtisessä). Jos maassasi ei ole asiakaspalvelua, ota yhteyttä Philipsin jälleenmyyjään.
Vianmääritys
Tässä luvussa kuvataan tavallisimmat laitteen käyttöön liittyvät ongelmat. Ellet onnistu ratkaisemaan
ongelmaa alla olevien ohjeiden avulla, ota yhteys Philipsin maakohtaiseen kuluttajapalvelukeskukseen.
Ongelma Ratkaisu
Laite ei toimi lainkaan. Laitteen pistoke ei ehkä ole kunnolla pistorasiassa. Työnnä pistoke
Laite toimii oikein,
mutta lamppu ei enää
toimi.
Laite kuumenee
käytettäessä.
Laite ei reagoi, kun sen
toimintoja yritetään
asettaa.
Lamppu ei sammu,
kun herätys kytketään
pois käytöstä.
Lamppu ei syty heti,
kun sen virta
kytketään.
kunnolla pistorasiaan.
Pistorasiaan ei ehkä tule virtaa. Tarkista pistorasian virrantulo yhdistämällä
siihen jokin toinen laite.
Lamppu on ehkä kulunut loppuun. Käyttöikä riippuu laitteen käytöstä. Jos
laitetta käytetään paljon, lamppu ei ehkä kestä käytössä odotettua
käyttöikää. Jos lamppu rikkoutuu, voit tilata uuden tai ostaa lampun
jälleenmyyjältä. Ota yhteys Philipsin maakohtaiseen
kuluttajapalvelukeskukseen.
Tämä on normaalia, sillä lampun valo ja elektroniikka lämmittävät laitetta.
Anna laitteen jäähtyä, ennen kuin vaihdat lampun.
Poista pistoke pistorasiasta ja odota 20 minuuttia, ennen kuin asetat sen
takaisin paikalleen. Kun virta jälleen kytketään, laite palaa tehdasasetuksiin
ja sinun on tehtävä kaikki asetukset uudelleen.
Asettamasi valotehotaso saattaa olla liian matala. Valitse korkeampi
valotehotaso.
Olet saattanut poistaa herätystoiminnon käytöstä painamalla
ohjauskytkimen ala-asentoon. Kytke herätys käyttöön asettamalla
ohjauskytkin keskiasentoon (1. herätys) tai yläasentoon (2. herätys)
halutusta herätysajasta riippuen.
Laite saattaa olla viallinen. Ota yhteys Philipsin maakohtaiseen
kuluttajapalvelukeskukseen.
Lampun syttyminen kestää tavallisesti noin sekunnin, koska lampun on
ensin lämmettävä.
Page 79

SUOMI 79
Ongelma Ratkaisu
Herätysääntä ei kuulu,
kun herätys käynnistyy.
Radio ei toimi. Radio saattaa olla viallinen. Ota yhteys Philipsin maakohtaiseen
Radion ääni rätisee. Lähetyssignaali saattaa olla heikko. Säädä taajuutta (katso luvun Käyttö
Herätys toimi eilen,
mutta ei tänään.
Herätys ei käynnistynyt
uudelleen 9 minuutin
kuluttua, vaikka
aktivoin
torkkuherätyksen.
Valo herättää minut
liian aikaisin.
Valo herättää minut
liian myöhään.
Lamppu vilkkuu. Laite ei ehkä sovi sille jännitteelle, johon se on yhdistetty. Varmista, että
Asettamasi äänenvoimakkuuden taso saattaa olla liian matala. Katso luvun
Käyttö kohta Äänenvoimakkuuden asettaminen ja aseta korkeampi
äänenvoimakkuuden taso.
Olet saattanut poistaa herätyksen käytöstä painamalla ohjauskytkimen
ala-asentoon.
Jos olet valinnut herätysääneksi radion, vika voi olla radiossa. Tarkista
radion toiminta avaamalla radio, kun olet kytkenyt herätyksen pois
käytöstä. Jos radio ei toimi, ota yhteys Philipsin maakohtaiseen
kuluttajapalvelukeskukseen.
Jos olet valinnut herätysääneksi ladatun äänen tai USB-muistitikulla olevan
musiikkitiedoston, ääni tai kappale voi olla virheellinen. Laite tukee vain
.mp3- ja .wma-tiedostoja. Jos USB-muistitikun ääntä tai musiikkia ei voi
toistaa, laite asettaa herätysääneksi automaattisesti linnunlaulun, jotta jokin
herätysääni kuuluu varmasti.
kuluttajapalvelukeskukseen.
Ehkä äänenvoimakkuus on liian alhainen. Lisää äänenvoimakkuutta.
kohta Radion käyttö / musiikin toisto USB-muistitikulta) ja/tai säädä
antennin asentoa liikuttelemalla antennia. Varmista, että olet suoristanut
antennijohdon kunnolla.
Olet saattanut poistaa herätyksen käytöstä painamalla ohjauskytkimen
ala-asentoon.
Olet saattanut asettaa äänenvoimakkuuden ja/tai valotehon liian alhaiselle
tasolle. Aseta äänenvoimakkuus ja/tai valoteho korkeammaksi.
Jos laitteen virta on katkennut yli 15 minuutiksi sähkökatkoksen vuoksi,
laite on palautunut tehdasasetuksiin. Kaikki toiminnot on silloin
määritettävä uudelleen.
Todennäköisesti painoit ohjauskytkimen ala-asentoon, mikä kytkee
herätyksen kokonaan pois käytöstä. Torkkuherätys valitaan napauttamalla
laitetta.
Äännevoimakkuuden tasona on ehkä 0.
Valitsemasi valoteho ei ehkä ole sinulle sopiva. Kokeile alhaisempaa
valotehoa, jos heräät liian aikaisin. Jos valoteho 1 ei ole riittävän alhainen,
siirrä laitetta kauemmas sängystä.
Laite saattaa olla päätäsi matalammalla tasolla. Varmista, että laite on
tarpeeksi korkealla, jotta sänky, peitto tai tyyny ei ole valon tiellä. Varmista
myös, että laite on riittävän lähellä sänkyä.
laitteen käyttöjännitemerkintä vastaa paikallista verkkojännitettä.
Page 80

SUOMI80
Ongelma Ratkaisu
Laite ei tunnista USBmuistitikkua.
Näytössä näkyy
virheviesti, kun liitän
muistitikun USBliitäntään.
Laitteen herätysääneksi
on asetettu USBmuistitikulla oleva
kappale, mutta
herätysäänenä kuuluu
linnunlaulu.
USB-määritykset
Yhteensopivat USB-laitteet
- USB-muistitikku (USB 2.0 tai USB 1.1)
- USB ash -soittimet (USB 2.0 tai USB 1.1)
- Muistikortit (tarvitaan tämän laitteen kanssa yhteensopiva kortinlukija)
Huomautus: Jos USB-laite on käynnistymässä, odota kunnes se on käynnistynyt ennen kytkemistä laitteen
USB-porttiin.
Tuetut formaatit
- USB- tai muistitietomuoto (FAT12, FAT16, FAT32 (sektorin koko: 512 tavua)
- MP3-bittinopeus (tiedonsiirtonopeus): 32–320 kbps ja vaihtuva bittinopeus
- WMA v7, v8 tai v9
- Enintään 8 sisäkkäistä hakemistoa
- Albumien tai kansioiden määrä: enintään 99
- Raitojen tai kappaleiden määrä: enintään 999
- Tiedostonimi Unicode UTF-8 -muodossa (enimmäispituus: 128 tavua)
Muodot, joita ei tueta:
- Tyhjät albumit: tyhjällä albumilla tarkoitetaan albumia, jossa ei ole MP3/WMA-tiedostoja ja joka ei
näy näytössä.
- Epäyhteensopivat tiedostot ohitetaan. Esimerkiksi Word-asiakirjoja (.doc) tai MP3-tiedostoja,
joiden tunniste on .dlf, ei toisteta.
- AAC-, WAV- ja PCM-äänitiedostot
- DRM-suojattuja tiedostoja ei tueta.
- WMA Lossless -tiedostot
- Piilotiedostot
Ehkä muistitikku ei ole kunnolla USB-liitännässä. Työnnä muistitikku
varmasti riittävään syvälle liitäntään.
USB-muistitikun musiikkitiedostot eivät ehkä ole yhteensopivia. Varmista,
että kappaleet ovat MP3- tai WMA-musiikkitiedostoja. Voit tarkistaa
tiedostojen yhteensopivuuden tietokoneellasi. Kappeleiden
tiedostotunnisteiden on oltava .mp3 tai .wma. Lisätietoja on luvussa USBmääritykset.
Olet saattanut irrottaa USB-muistitikun laitteesta, tai se ei ehkä ole
kunnolla kiinni USB-liitännässä. Jos laite ei tunnista USB-muistitikkua,
linnunlaulu asetetaan automaattisesti herätysääneksi, jotta jokin
herätysääni kuuluu varmuudella. Muistitikun on oltava USB-liitännässä
pysyvästi, jos siinä olevia musiikkitiedostoja halutaan käyttää
herätysäänenä.
Page 81

FRANÇAIS
Introduction
Félicitations pour votre achat et bienvenue dans l’univers Philips ! Pour proter pleinement de
l’assistance Philips, enregistrez votre produit sur le site à l’adresse suivante :
www.philips.com/welcome.
L’Éveil lumière Philips vous aide à vous réveiller plus agréablement. L’intensité lumineuse de la lampe
augmente peu à peu jusqu’au niveau sélectionné pendant la durée de simulation du lever du soleil
choisie (la durée par défaut est de 30 minutes). La lumière prépare doucement votre corps au réveil
à l’heure programmée. Pour faire du réveil une expérience plus agréable encore, vous pouvez utiliser
des sons naturels, la radio FM ou même les sons téléchargés ou votre propre musique à partir d’une
clé USB.
Effets de l’Éveil lumière
L’Éveil lumière de Philips permet de préparer tout en douceur votre corps au réveil pendant les
dernières 20 à 40 dernières minutes de sommeil, selon la durée de simulation du lever du soleil
choisie. Tôt le matin, nos yeux sont plus sensibles à la lumière que pendant la journée. Au cours de
cette période, une lumière relativement faible et simulant un lever de soleil permet de préparer
notre corps au réveil et à l’action. Les personnes qui utilisent l’Éveil lumière se lèvent plus facilement
et de meilleure humeur ; elles se sentent plus énergiques. Étant donné que la sensibilité à la lumière
varie d’une personne à une autre, vous pouvez régler l’intensité lumineuse de l’appareil selon vos
préférences pour commencer votre journée du bon pied.
Pour plus d’informations sur l’Éveil lumière, rendez-vous sur le site www.philips.com.
A Couvercle supérieur avec fentes
B Corps de la lampe
C Cordon d’alimentation
D Antenne
E Écran
1 Heure/heure de l’alarme
2 Symbole d’intensité lumineuse
3 Symbole de la durée de simulation du lever du soleil
4 Symbole radio
5 Symbole du son « oiseau »
6 Symbole du son « yoga »
7 Symbole du son « sonnaille »
8 Symbole du son « forêt »
9 Symbole « clé USB »
10 Symbole de la fréquence radio
11 Symbole du niveau de volume
12 Symbole de la luminosité de l’afchage
13 Symbole de simulation du coucher du soleil
14 Symbole de la sonnerie d’alarme
15 Symbole Alarme 2
16 Symbole Alarme 1
17 Symbole heure
F Bouton « - » du menu
G Bouton MENU
H Bouton SELECT (également pour la sélection des stations FM présélectionnées)
I Bouton « + » du menu
J Levier de commande avec positions « alarme désactivée », « alarme 1 » et « alarme 2 »
K Connecteur USB
L Boutons sur le côté de l’appareil
81
Page 82

FRANÇAIS82
1 Bouton d’augmentation de l’intensité lumineuse
2 Bouton d’activation/désactivation de la lampe
3 Bouton de diminution de l’intensité lumineuse
4 Bouton d’augmentation du volume
5 Bouton d’activation/désactivation de la radio
6 Bouton de diminution du volume
Important
- Lisez attentivement ce mode d’emploi avant d’utiliser l’appareil et conservez-le pour un
usage ultérieur.
- Cet appareil bénécie d’une double isolation conformément aux normes classe II (g. 2).
Danger
- L’eau et l’électricité ne font pas bon ménage. N’utilisez jamais l’appareil dans un environnement
humide (dans la salle de bain ou près d’une douche ou d’une piscine par exemple).
- Veillez à ne pas faire pénétrer d’eau dans l’appareil ni à en renverser sur celui-ci (g. 3).
Avertissement
- Avant de brancher l’appareil, vériez que la tension indiquée sur l’appareil correspond à la
tension supportée par le secteur local.
- Ne placez pas d’objet sur ou près de l’appareil an de le protéger contre les risques
d’éclaboussure ou de fuite.
- Comme l’appareil ne peut être déconnecté de l’alimentation qu’en débranchant le cordon
d’alimentation de la prise secteur, veillez toujours à ce que le cordon d’alimentation soit
facilement accessible lorsque l’appareil est branché sur le secteur.
- Cet appareil est conçu pour une tension secteur de 230 V et une fréquence de 50 Hz.
- Si le cordon d’alimentation est endommagé, il doit être remplacé par Philips, par un Centre
Service Agréé Philips ou par un technicien qualié an d’éviter tout accident.
- Laissez toujours l’appareil refroidir pendant environ 15 minutes avant d’ouvrir le couvercle
supérieur de la lampe. L’ampoule et la partie métallique du couvercle supérieur chauffent lors
de l’utilisation et vous risquez de vous brûler les doigts en les touchant. (g. 4)
- Cet appareil n’est pas destiné à être utilisé par des personnes (notamment des enfants) dont les
capacités physiques, sensorielles ou intellectuelles sont réduites, ou par des personnes manquant
d’expérience ou de connaissances, à moins que celles-ci ne soient sous surveillance ou qu’elles
n’aient reçu des instructions quant à l’utilisation de l’appareil par une personne responsable de
leur sécurité.
- Veillez à ce que les enfants ne puissent pas jouer avec l’appareil.
- Cet appareil est destiné à un usage en intérieur uniquement (g. 5).
Attention
- Ne faites pas tomber l’appareil et protégez-le des coups et chocs violents.
- Placez l’appareil sur une surface stable, plane et non glissante.
- N’utilisez pas l’appareil lorsque la température de la pièce est inférieure à 10 ºC ou supérieure à
35 ºC.
- Veillez à ne pas obturer les orices d’aération au-dessus et en dessous de l’appareil pendant son
fonctionnement.
- N’utilisez pas l’appareil si le corps de la lampe ou le capot supérieur est endommagé, cassé ou
absent.
- Consultez un médecin avant d’utiliser l’appareil si vous avez souffert ou souffrez de dépression
sévère.
- N’utilisez pas cet appareil pour réduire votre nombre d’heures de sommeil. Cet appareil a été
conçu uniquement pour faciliter votre éveil mais ne saurait en aucun cas réduire le nombre
d’heures de repos dont vous avez besoin.
Page 83

FRANÇAIS 83
- L’appareil n’est doté d’aucun bouton marche/arrêt. Pour le débrancher, retirez la che du cordon
d’alimentation de la prise secteur.
- Cet appareil est destiné à un usage domestique ou similaire uniquement, dans les hôtels
par exemple.
Général
- Cet appareil vous permet de choisir le niveau d’intensité lumineuse pour votre réveil (voir la
section « Réglage de l’intensité lumineuse », chapitre « Utilisation de l’appareil »).
- Si vous vous réveillez souvent trop tôt ou avec des maux de tête, réduisez l’intensité lumineuse
et la durée de simulation du lever du soleil.
- Si vous partagez votre chambre, l’autre personne risque d’être également réveillée par la
lumière de l’appareil, même si cette dernière est relativement éloignée. Ce phénomène est dû à
la différence de sensibilité à la lumière d’une personne à l’autre.
- La consommation électrique de l’appareil est plus faible si la radio, la fonction de lecture via USB
et la lampe sont désactivées.
Champs électromagnétiques (CEM)
Cet appareil Philips est conforme à toutes les normes relatives aux champs électromagnétiques
(CEM). Il répond aux règles de sécurité établies sur la base des connaissances scientiques actuelles
s’il est manipulé correctement et conformément aux instructions de ce mode d’emploi.
Avant l’utilisation
Réglage de l’heure
1 Branchez le cordon d’alimentation sur la prise secteur.
, L’indicateur d’heure de l’afcheur commence à clignoter pour vous signaler que vous devez
dénir l’heure de l’horloge (g. 6).
2 Appuyez sur le bouton - ou + du menu pour sélectionner l’heure.
3 Appuyez sur le bouton SELECT pour conrmer.
, L’indicateur de minutes commence à clignoter (g. 7).
4 Appuyez sur le bouton - ou + du menu pour régler les minutes.
5 Appuyez sur le bouton SELECT pour conrmer.
, L’appareil quitte le menu et l’afcheur indique l’heure dénie.
L’appareil est désormais prêt à l’emploi.
Remarque : La méthode décrite ci-dessus s’applique uniquement lorsque vous branchez l’appareil pour la
première fois, lorsqu’il y a eu une panne de courant ou lorsque le cordon d’alimentation a été débranché
de la prise secteur pendant plus de 15 minutes. Dans ces cas-là, l’heure clignote pour indiquer que vous
devez régler l’horloge. Dans tous les autres cas, vous devez utiliser le menu pour dénir l’heure (voir la
section « Fonctions du menu » dans le chapitre « Utilisation l’appareil »).
Utilisation de l’appareil
Fonctions du menu
Vous trouverez ci-dessous une description de l’ensemble des fonctions pouvant être dénies dans le
menu. Ces dernières apparaissent dans l’ordre suivant :
- Heure (horloge)
- Heure alarme 1
- Heure alarme 2
- Sonnerie d’alarme
- Simulation du coucher du soleil
- Luminosité de l’afchage
Page 84

FRANÇAIS84
Vous pouvez régler les fonctions du menu ainsi :
1 Appuyez sur le bouton MENU pour accéder au menu (g. 8).
Remarque : Si vous n’appuyez sur aucun bouton dans les 30 secondes, l’appareil quitte le menu et
l’afcheur repasse en mode horloge.
2 Appuyez sur le bouton - ou + du menu pour sélectionner une fonction. (g. 9)
3 Appuyez sur le bouton SELECT pour accéder à cette fonction (g. 10).
4 Appuyez sur le bouton - ou + du menu pour modier un réglage. (g. 9)
5 Appuyez sur le bouton SELECT pour conrmer (g. 10).
Réglage de l’alarme
Réglage de l’heure de l’alarme
Lorsque vous réglez l’alarme, vous dénissez une heure d’alarme et une intensité lumineuse et vous
choisissez le type de son avec lequel vous souhaitez vous réveiller. L’alarme est activée lorsque le
symbole alarme est visible sur l’afcheur. L’intensité lumineuse augmente lentement jusqu’au niveau
choisi pendant la durée de simulation du lever du soleil dénie avant l’heure choisie pour l’alarme.
La durée de simulation du lever du soleil par défaut est de 30 minutes. C’est la durée recommandée,
mais comme la sensibilité à la lumière varie d’une personne à l’autre, il est possible d’adapter la
durée de simulation du lever du soleil à votre convenance (voir la section « Réglage de la durée de
simulation du lever du soleil » dans ce chapitre). À l’heure dénie (après la durée de simulation du
coucher du soleil), la sonnerie d’alarme augmente lentement pendant 90 secondes jusqu’au
niveau choisi.
Remarque : Vous pouvez dénir deux réglages différents pour l’alarme, par exemple si vous souhaitez
vous réveiller plus tard le weekend que pendant la semaine.
Remarque : Le volume que vous dénissez pour l’alarme est également utilisé pour la radio et la musique
lue depuis votre clé USB. Pour dénir le volume de l’alarme, appuyez sur le bouton d’augmentation ou de
diminution du volume. Si vous ne voulez pas vous réveiller avec la lampe ou avec un son, choisissez une
intensité lumineuse ou un niveau de volume de 0. Reportez-vous aux sections « Utilisation de l’appareil
comme lampe de chevet » et « Réglage du volume » dans ce chapitre.
1 Poussez le levier de commande en la position intermédiaire si vous souhaitez activer
l’alarme 1. Poussez le levier de commande en position supérieure si vous souhaitez activer
l’alarme 2 (g. 11).
, Les heures de l’alarme se mettent à clignoter (g. 12).
, Pour régler l’heure, suivez des étapes 2 à 5.
2 Appuyez sur le bouton - ou + du menu pour sélectionner l’heure (g. 9).
Remarque : Vous ne pouvez effectuer cette opération que lorsque les heures clignotent. Si ce n’est pas le
cas, déplacez le levier vers le bas puis vers le haut pour accéder à la fonction de réglage de l’heure de
l’alarme. Vous pouvez également programmer l’heure de l’alarme dans le menu (voir la section
« Fonctions du menu » de ce chapitre).
3 Appuyez sur le bouton SELECT pour conrmer (g. 10).
, Les minutes de l’alarme se mettent à clignoter (g. 13).
4 Appuyez sur le bouton - ou + du menu pour régler les minutes. (g. 9)
5 Appuyez sur le bouton SELECT pour conrmer ou patientez quelques secondes (g. 10).
, L’appareil quitte le menu et l’afcheur indique l’heure de l’horloge.
L’heure de l’alarme est maintenant programmée.
Page 85

FRANÇAIS 85
Réglage de l’intensité lumineuse
Vous pouvez dénir l’intensité lumineuse que vous préférez pour la simulation de lever de soleil qui
intervient avant le déclenchement de l’alarme.
Remarque : L’intensité lumineuse que vous dénissez est utilisée pour la fonction d’alarme ainsi que pour
la fonction lampe (voir la section « Utilisation de l’appareil comme lampe de chevet » ci-dessous).
1 Appuyez sur le bouton d’activation/désactivation de la lampe. (g. 14)
Remarque : La lampe met environ 1 seconde à s’allumer. Cela est tout à fait normal car cette dernière
doit chauffer.
Remarque : Vous pouvez également dénir l’intensité lumineuse lorsque la lampe est éteinte, mais le fait
d’allumer la lampe facilite la détermination de votre intensité lumineuse préférée.
2 Appuyez sur les boutons d’augmentation et de diminution de l’intensité lumineuse pour
sélectionner une intensité lumineuse (g. 15).
Vous pouvez choisir un niveau d’intensité lumineuse compris entre 1 et 20.
Si vous ne voulez pas que la lampe s’allume progressivement comme un lever de soleil simulé avant
que l’alarme ne se déclenche, réglez l’intensité lumineuse sur 0.
Conseil : Lors de la première utilisation, réglez l’intensité lumineuse sur 20. À votre réveil, vériez le
niveau d’intensité lumineuse atteint en appuyant brièvement sur le bouton d’augmentation ou de
diminution de l’intensité lumineuse. Cette opération fait apparaître le niveau actuel d’intensité lumineuse
de l’alarme sur l’afcheur. Réglez l’intensité lumineuse sur ce niveau pour le jour suivant.
3 Pour éteindre la lampe, appuyez de nouveau sur le bouton d’activation/désactivation de la
lampe.
Réglage de la sonnerie d’alarme
Remarque : Vous pouvez régler le volume de la sonnerie de l’alarme à votre convenance (voir la section
« Réglage du volume » dans ce chapitre). Si vous ne voulez pas vous réveiller avec une sonnerie d’alarme,
réglez le niveau de volume sur 0.
1 Suivez les instructions de la section « Fonctions du menu » ci-dessus et choisissez la fonction
de sonnerie d’alarme.
2 Appuyez sur le bouton SELECT pour conrmer.
3 Appuyez sur le bouton - ou + du menu pour choisir la sonnerie d’alarme souhaitée (voir ci-
dessous).
, L’afcheur présente le symbole de la sonnerie d’alarme choisie.
4 Appuyez sur le bouton SELECT pour conrmer.
Vous pouvez choisir parmi les sons suivants :
- Radio (voir également la section « Utilisation de la radio comme sonnerie d’alarme » ci-
dessous) (g. 16)
- Son « oiseau » (g. 17)
- Son « yoga » (g. 18)
- Son « sonnaille » (g. 19)
- Son « forêt » (g. 20)
- Les sons de réveil téléchargés ou votre propre musique depuis votre clé USB (voir également la
section « Utilisation de la musique stockée sur une clé USB comme sonnerie d’alarme » ci-
dessous). (g. 21)
Conseil : Vous pouvez télécharger plus de sons de réveil à l’adresse www.philips.com.
Page 86

FRANÇAIS86
Utilisation de la radio comme sonnerie d’alarme
1 Suivez les instructions 1 à 4 de la section « Réglage de la sonnerie d’alarme » pour choisir la
radio comme sonnerie d’alarme.
, L’afcheur indique P1, ce qui correspond à la station de radio présélectionnée n° 1 (g. 22).
Si vous souhaitez choisir une autre station de radio présélectionnée, appuyez sur le bouton - ou +
du menu (voir la section « Utilisation de la radio/lecture de musique depuis une clé USB »). Si vous
souhaitez changer la fréquence des stations de radio présélectionnées, reportez-vous à la section
« Utilisation de la radio/lecture de musique depuis une clé USB » de ce chapitre.
2 Appuyez sur le bouton SELECT pour conrmer.
, La station de radio présélectionnée choisie est alors dénie comme sonnerie d’alarme.
Utilisation de la musique stockée sur une clé USB comme sonnerie d’alarme
Remarque : Vous ne pouvez utiliser la musique stockée sur une clé USB que si les chiers sont au format
MP3 ou WMA. Vous pouvez vérier ceci sur votre ordinateur. L’extension des chiers doit être .mp3 ou
.wma.
Reportez-vous au chapitre « Spécications USB » pour plus d’informations sur la technologie USB.
1 Insérez la clé USB dans le connecteur USB de l’appareil.
2 Suivez les instructions 1 à 4 de la section « Fonctions du menu » ci-dessus pour choisir la
musique stockée sur clé USB comme sonnerie d’alarme.
, L’afcheur indique 0001, ce qui correspond à la première chanson sur la clé USB. (g. 23)
Pour choisir une autre chanson, appuyez sur les boutons - et + du menu.
3 Appuyez sur le bouton SELECT pour conrmer.
, La chanson choisie est alors dénie comme sonnerie d’alarme.
Réglage de la durée de simulation de lever de soleil
La durée de simulation de lever de soleil est la durée pendant laquelle l’intensité lumineuse de la
lampe augmente progressivement jusqu’au niveau déni avant que la sonnerie d’alarme ne se
déclenche. La durée de simulation de lever de soleil par défaut est de 30 minutes, car il s’agit de la
durée idéale pour préparer votre corps au réveil. Comme la sensibilité à la lumière varie d’une
personne à l’autre, il est possible de régler la simulation de lever de soleil à votre convenance. Vous
pouvez réduire la durée de simulation de lever de soleil à 20 ou 25 minutes ou l’augmenter à
40 minutes.
1 Appuyez simultanément sur les boutons d’augmentation et de diminution de l’intensité
lumineuse et maintenez-les enfoncés pendant 3 secondes (g. 24).
, Le symbole de simulation de lever de soleil et la durée de simulation de lever de soleil par
défaut de 30 minutes apparaissent sur l’afcheur. (g. 25)
2 Appuyez sur le bouton - ou + du menu pour augmenter ou diminuer la durée de simulation
de lever de soleil. (g. 9)
3 Appuyez sur le bouton SELECT pour conrmer (g. 10).
Répétition
1 Tapotez la surface de l’Éveil lumière avec votre paume pour activer la fonction de répétition
de l’appareil (an de ne pas activer la fonction de répétition par inadvertance il est nécessaire
de tapoter fermement) (g. 26).
, La lampe reste allumée à l’intensité sélectionnée, mais le son de l’alarme s’arrête. Au bout de
9 minutes, le son d’alarme retentit de nouveau.
Remarque : L’intervalle de répétition de 9 minutes est xe. Vous ne pouvez pas le modier.
Page 87

FRANÇAIS 87
Activation/désactivation de la fonction d’alarme
1 Pour désactiver la fonction d’alarme lorsque l’alarme se déclenche, poussez le levier de
commande dans sa position la plus basse (g. 27).
Remarque : La lampe reste allumée et éclaire la pièce. Vous pouvez l’éteindre en appuyant sur le bouton
d’activation/désactivation de la lampe.
Remarque : Si vous oubliez d’éteindre l’alarme, cette dernière (son et/ou lumière) s’éteint
automatiquement après 90 minutes.
2 Si vous souhaitez que l’alarme se déclenche à l’une des heures dénies le jour suivant, placez
à nouveau le levier de commande en position Alarme 1 ou Alarme 2.
Test de l’alarme
Si vous souhaitez tester rapidement (60 secondes) l’augmentation progressive de l’intensité
lumineuse et du volume sonore, activez la fonction Test de l’appareil.
1 Appuyez simultanément sur les boutons - ou + du menu et maintenez-les enfoncés jusqu’à ce
que le mot TEST apparaisse sur l’afcheur (g. 28).
2 Appuyez à nouveau simultanément sur les boutons - ou + du menu pour arrêter la
démonstration.
Remarque : L’appareil continue à exécuter la démonstration d’alarme jusqu’à ce que vous appuyiez à
nouveau sur les boutons + et - du menu. Le test s’arrête automatiquement au bout de 9 heures.
Utilisation de la radio/lecture de musique depuis une clé USB
Allumer la radio
1 Pour allumer la radio, appuyez sur le bouton d’activation/désactivation de la radio (g. 29).
, La radio se lance.
Remarque : La fonction radio dispose de 3 stations présélectionnées. Pour choisir l’une des stations
présélectionnées, appuyez sur le bouton SELECT situé sous l’afcheur.
2 Pour sélectionner la fréquence radio de votre choix, appuyez sur le bouton - ou +
du menu. (g. 30)
Conseil : Pour effectuer une recherche automatique des fréquences radio, maintenez le bouton - ou + du
menu enfoncé pendant environ 2 secondes.
Conseil : Pour assurer un bon signal radio, déroulez entièrement l’antenne et déplacez-la jusqu’à ce que
vous trouviez une position apportant une réception optimale.
3 Pour arrêter la radio, appuyez de nouveau sur le bouton d’activation/désactivation de la radio.
La radio de l’Éveil lumière dispose de 3 stations de radio présélectionnées. Si vous voulez dénir
d’autres stations de radio présélectionnées, suivez les étapes ci-dessous.
1 Allumez la radio en appuyant sur le bouton d’activation/désactivation correspondant. (g. 31)
, L’afcheur indique P1, ce qui correspond à la station présélectionnée n° 1 (g. 22).
Remarque : Appuyez sur le bouton SELECT une ou plusieurs fois si vous voulez choisir une autre
station présélectionnée.
2 Pour rechercher des fréquences radio pour changer la station présélectionnée, appuyez sur
le bouton - ou + du menu (g. 30).
, L’appareil enregistre automatiquement la fréquence radio choisie.
Page 88

FRANÇAIS88
Lecture de musique depuis une clé USB
Remarque : Vous ne pouvez utiliser la musique stockée sur une clé USB que si les chiers sont au format
MP3 ou WMA. L’appareil ne lit pas les autres formats. Vous pouvez vérier ceci sur votre ordinateur.
L’extension des chiers doit être .mp3 ou .wma. Pour en savoir plus, reportez-vous au chapitre
« Spécications USB ».
1 Pour lire de la musique à partir d’une clé USB, appuyez deux fois sur le bouton d’activation/
désactivation de la radio. (g. 31)
, Si une clé USB se trouve dans le connecteur USB, l’appareil commence automatiquement à
rechercher le nombre de chiers MP3 ou WMA présents sur la clé USB. Ceci peut prendre
quelques minutes. Le nombre de chansons est ensuite indiqué sur l’afcheur et l’appareil
commence à jouer la première chanson sur la clé USB.
, Si l’appareil détecte que les chiers sur la clé USB ne sont pas au format MP3 ou WMA,
l’afcheur indique le message« ERR ».
2 Pour choisir le chier audio souhaité, appuyez sur le bouton - ou + du menu. (g. 30)
Si vous maintenez enfoncé le bouton - ou + du menu, la fonction de sélection de chanson permet
de parcourir les chansons plus rapidement.
3 Pour arrêter la lecture de musique à partir de la clé USB, appuyez à nouveau sur le bouton
d’activation/désactivation de la radio.
Remarque : Placez vos chiers musicaux dans le répertoire racine de la clé USB pour que la recherche
soit plus rapide.
Remarque : Les chansons sont triées en fonction de la date à laquelle le chier a été chargé sur la clé
USB. Si vous voulez que les chansons soient jouées dans un ordre spécique, commencez par les mettre
dans cet ordre sur votre ordinateur, puis copiez-les sur votre clé USB.
Réglage du volume
1 Pour régler le volume de la radio ou de la musique lue depuis une clé USB, appuyez sur le
bouton d’augmentation ou de diminution du volume. (g. 32)
Vous pouvez choisir un niveau sonore compris entre 1 et 20.
Remarque : Le niveau sonore que vous avez choisi s’applique aussi automatiquement à l’alarme.
Simulation du coucher du soleil
Vous pouvez utiliser la fonction de simulation de coucher de soleil lorsque vous souhaitez que la
lumière et/ou le son de l’Éveil lumière diminuent progressivement pendant une période dénie
(15 minutes à 1,5 heure) au moment du coucher. La lumière et/ou le son s’éteignent
automatiquement à l’heure programmée.
Remarque : L’intensité lumineuse que vous dénissez pour le début de la simulation de coucher de soleil
est également utilisée comme intensité lumineuse pour la simulation de lever de soleil
1 Allumez la lampe et/ou la radio ou la musique lue depuis une clé USB. Reportez-vous aux
sections « Utilisation de l’appareil comme lampe de chevet » et/ou « Utilisation de la radio/
lecture de musique depuis une clé USB » dans ce chapitre.
2 Suivez les étapes de la section « Fonctions du menu » dans ce chapitre pour choisir la
fonction de simulation de coucher de soleil et dénir la durée de simulation de coucher de
soleil.
, Vous pouvez choisir une durée allant de 15 à 90 minutes (15, 30, 60 ou 90).
Remarque : À l’heure programmée, même si seule la lumière ou la radio est activée, la fonction de
simulation de coucher de soleil éteint à la fois la lumière et le son.
Page 89

FRANÇAIS 89
Conseil : Vous pouvez également appuyer sur le bouton d’activation/désactivation de la lumière pendant
3 secondes pour activer la fonction de simulation de coucher de soleil (g. 33).
Utilisation de l’appareil comme lampe de chevet
Vous pouvez utiliser l’appareil comme lampe de chevet.
1 Pour allumer la lampe, appuyez sur le bouton d’activation/désactivation de la lampe. (g. 14)
Remarque : La lampe met environ 1 seconde à s’allumer. Cela est tout à fait normal car cette dernière
doit chauffer.
2 Appuyez sur les boutons d’augmentation et de diminution de l’intensité lumineuse pour
sélectionner une intensité lumineuse (g. 15).
Vous pouvez choisir un niveau d’intensité lumineuse compris entre 1 et 20.
Remarque : Le niveau d’intensité lumineuse que vous avez choisi s’applique aussi automatiquement à
l’alarme.
3 Pour éteindre la lampe, appuyez de nouveau sur le bouton d’activation/désactivation de la
lampe.
1 Suivez les étapes de la section « Fonctions du menu » dans ce chapitre pour choisir la
fonction de luminosité de l’afchage et dénir la luminosité souhaitée. (g. 34)
, Vous pouvez choisir un niveau de luminosité compris entre 1 et 4.
Conseil : Si vous dénissez le niveau de luminosité au niveau 1, la consommation électrique de l’appareil
est minimale.
Remarque : Le niveau de luminosité augmente automatiquement pour atteindre le niveau maximal lors
du réglage de l’appareil pour favoriser une visibilité optimale. Lorsque l’utilisateur a terminé de régler
l’appareil et qu’il quitte le menu, la luminosité de l’afchage revient automatiquement au niveau réglé.
Nettoyage et entretien
N’utilisez jamais d’éponges à récurer, de produits abrasifs ou de détergents agressifs tels que
l’essence ou l’acétone pour nettoyer l’appareil.
Ôtez régulièrement la poussière pouvant s’accumuler à l’extérieur de l’appareil à l’aide d’un
chiffon sec.
1 Débranchez l’appareil avant de le nettoyer.
2 Nettoyez l’extérieur de l’appareil à l’aide d’un chiffon sec.
Veillez à ne pas faire pénétrer d’eau dans l’appareil ni à en renverser sur celui-ci (g. 3).
Remplacement
À l’exception de l’ampoule, l’appareil ne contient aucune pièce réparable.
L’ampoule doit être remplacée lorsqu’elle ne s’allume plus ou n’atteint plus l’intensité habituelle (voir
également le chapitre « Important »). Remplacez-la par une ampoule halogène Philips 100 W, 12 V,
GY6.35. Cette ampoule est la seule qui puisse fournir l’intensité lumineuse demandée.
Remarque : Cet appareil a été conçu pour une utilisation avec des ampoules autoprotégées
uniquement (g. 35).
Vous trouverez de plus amples informations sur notre site Web à l’adresse www.philips.com.
Page 90

FRANÇAIS90
Remplacement de l’ampoule
1 Débranchez toujours l’appareil avant de changer d’ampoule.
2 Si la lampe est toujours chaude, laissez-la refroidir environ 15 minutes.
3 Pour déverrouiller le couvercle supérieur, appuyez dessus et faites-le tourner dans le sens
inverse des aiguilles d’une montre jusqu’à ce que le symbole O sur le couvercle supérieur
soit aligné avec le symbole 1 sur le corps de la lampe. (g. 36)
4 Ôtez le couvercle supérieur. (g. 37)
5 Enlevez l’ampoule de son support (g. 38).
6 Insérez les broches de la nouvelle ampoule dans son support. (g. 39)
Ne touchez pas l’ampoule avec les doigts. Utilisez un chiffon ou un essuie-tout pour installer
l’ampoule (g. 40).
7 Replacez le couvercle supérieur sur l’appareil.
8 Fixez le couvercle supérieur en le tournant dans le sens des aiguilles d’une montre jusqu’à ce
que le symbole 1 sur le couvercle soit aligné avec le symbole 1 sur le corps de la
lampe. (g. 41)
Environnement
- Lorsqu’il ne fonctionnera plus, ne jetez pas l’appareil avec les ordures ménagères, mais déposezle à un endroit assigné à cet effet, où il pourra être recyclé. Vous contribuerez ainsi à la
protection de l’environnement (g. 42).
Garantie et service
Si vous souhaitez obtenir des informations supplémentaires ou faire réparer l’appareil, ou si vous
rencontrez un problème, rendez-vous sur le site Web de Philips à l’adresse www.philips.com ou
contactez le Service Consommateurs Philips de votre pays (vous trouverez le numéro de téléphone
correspondant sur le dépliant de garantie internationale). S’il n’existe pas de
Service Consommateurs Philips dans votre pays, renseignez-vous auprès de votre revendeur Philips
local.
Dépannage
Cette rubrique présente les problèmes les plus courants que vous pouvez rencontrer avec votre
appareil. Si vous ne parvenez pas à résoudre le problème à l’aide des informations ci-dessous,
contactez le Service Consommateurs Philips de votre pays.
Page 91

Problème Solution
L’appareil ne
fonctionne pas.
L’appareil fonctionne
correctement, mais la
lampe ne s’allume plus.
L’appareil devient
chaud en cours
d’utilisation.
L’appareil ne répond
pas lorsque j’essaie de
régler différentes
fonctions.
La lampe ne s’allume
pas lorsque l’alarme se
déclenche.
La lampe ne s’allume
pas immédiatement
lorsque je l’allume.
Il n’y aucun son
lorsque l’alarme se
déclenche.
La che du cordon d’alimentation n’a peut-être pas été correctement
insérée dans la prise secteur. Branchez le cordon d’alimentation
correctement sur la prise secteur.
Il y a peut être une panne de courant. Vériez si l’alimentation électrique
fonctionne en branchant un autre appareil.
La lampe a peut-être atteint la n de sa vie. La durée de vie dépend de
l’utilisation qui est faite de l’appareil. En cas d’utilisation intensive, la lampe
peut avoir une durée de vie plus courte que prévu. Si la lampe tombe en
panne, vous pouvez en commander une nouvelle ou l’acheter auprès de
votre revendeur local. Contactez le Service Consommateurs Philips de
votre pays.
Ce phénomène est normal car l’appareil est chauffé par l’ampoule et les
composants électroniques. Laissez toujours l’appareil refroidir avant de
remplacer l’ampoule.
Débranchez le cordon de la prise secteur et attendez 20 minutes avant
de le rebrancher. Lorsque vous rebranchez le cordon, l’appareil revient
aux préréglages d’usine et vous devez régler à nouveau toutes les
fonctions.
Le niveau de luminosité est peut-être trop faible. Augmentez-le.
Vous avez peut-être désactivé la fonction d’alarme en plaçant le levier de
commande en position inférieure. Pour activer la fonction d’alarme,
placez le levier de commande en position intermédiaire (alarme 1) ou
en position supérieure (alarme 2), selon l’heure à laquelle vous voulez
vous réveiller.
L’appareil est peut-être défectueux. Contactez le Service
Consommateurs Philips de votre pays.
La lampe met environ 1 seconde à s’allumer. Cela est tout à fait normal
car cette dernière doit chauffer.
Le niveau sonore est peut-être trop bas. Pour l’augmenter, reportez-vous
à la section « Utilisation de l’appareil » du chapitre « Réglage du
volume ».
Vous avez peut-être désactivé la fonction d’alarme en mettant le levier
en position inférieure.
Si vous avez sélectionné la radio comme son d’alarme, il se peut que la
radio présente un dysfonctionnement. Désactivez l’alarme, puis allumez
la radio pour vérier si elle fonctionne correctement. Si ce n’est pas le
cas, contactez le Service Consommateurs Philips de votre pays.
FRANÇAIS 91
Page 92

FRANÇAIS92
Problème Solution
Si vous avez choisi un son de réveil ou une musique lu(e) depuis une clé
USB comme sonnerie d’alarme, il est possible que les sons ou les
chansons ne soient pas au format correct. Cet appareil prend
uniquement en charge les chiers .mp3 et .wma. Si le son ou la musique
sur la clé USB ne peut pas être joué, l’appareil dénit automatiquement
le son « oiseau » comme sonnerie d’alarme pour que vous ayez la
certitude de vous réveiller à l’heure de toute façon.
La radio ne fonctionne
pas.
La radio émet des
grésillements.
L’alarme s’est
déclenchée hier, mais
pas aujourd’hui.
J’ai voulu utiliser la
fonction de répétition,
mais l’alarme ne s’est
pas déclenchée à
nouveau au bout de
9 minutes.
La lumière me réveille
trop tôt.
La lumière me réveille
trop tard.
La lampe clignote. La tension nominale de l’appareil ne correspond peut-être pas à la
L’appareil ne reconnaît
pas la clé USB.
La radio est peut-être défectueuse. Contactez le Service
Consommateurs Philips de votre pays.
Le volume est peut-être réglé sur un niveau trop bas. Augmentez-le.
Le signal de diffusion est peut-être faible. Ajustez la fréquence (voir
chapitre « Utilisation de l’appareil », section « Utilisation de la radio/
lecture de musique depuis une clé USB ») et/ou modiez la position de
l’antenne en la déplaçant. Assurez-vous que vous avez déroulé l’antenne
complètement.
Vous avez peut-être désactivé la fonction d’alarme en mettant le levier
en position inférieure.
Vous avez peut-être déni un niveau sonore et/ou un niveau d’intensité
lumineuse trop faible. Sélectionnez un niveau plus élevé.
Il y a peut-être eu une panne de courant ayant duré plus de 15 minutes.
Dans ce cas, l’appareil rétablit les réglages d’usine. Vous devrez régler à
nouveau toutes les fonctions.
Vous avez probablement poussé le levier de commande en position
inférieure. Ceci désactive totalement la fonction d’alarme. Si vous voulez
utiliser la fonction de répétition, tapotez sur l’appareil.
Vous avez peut-être réglé le niveau sonore sur 0.
Vous avez peut-être choisi un niveau d’intensité qui ne vous convient pas.
Si vous vous réveillez trop tôt, réduisez l’intensité lumineuse. Si le niveau
d’intensité lumineuse 1 n’est pas sufsamment bas, éloignez l’appareil de
votre lit.
L’appareil est peut-être positionné plus bas que votre tête. Assurez-vous
que l’appareil est situé à un niveau tel que la lumière ne peut pas être
masquée par votre lit, votre couette ou votre oreiller, et qu’il n’est pas
trop éloigné de votre lit.
tension secteur. Assurez-vous que la tension indiquée sur l’appareil
correspond bien à la tension secteur locale.
La clé USB n’est peut-être pas correctement insérée dans le connecteur
USB. Veillez à pousser la clé USB sufsamment loin dans le connecteur
USB.
Page 93

FRANÇAIS 93
Problème Solution
Un message d’erreur
apparaît sur l’afcheur
lorsque j’insère la clé
USB dans le
connecteur USB.
J’ai programmé
l’appareil pour me
réveiller avec la
musique lue depuis
une clé USB, mais
j’entends le son
« oiseau ».
Périphériques USB compatibles
- Mémoires ash USB (USB 2.0 ou USB 1.1)
- Lecteurs ash USB (USB 2.0 ou USB 1.1)
- Cartes mémoire (lecteur de carte supplémentaire requis pour ce système audio)
Remarque : Si votre périphérique USB est doté d’une fonction de démarrage, veuillez patienter jusqu’à ce
que le démarrage soit terminé et que l’appareil soit prêt à être utilisé avant de le connecter au port USB
de l’appareil.
Formats pris en charge
- USB ou format de chier mémoire (FAT12, FAT16, FAT32 (taille du secteur : 512 Ko))
- Débit binaire MP3 (taux de données) : 32 - 320 Kbit/s et débit binaire variable
- WMA v7, v8 ou v9
- Imbrication de répertoires jusqu’à 8 niveaux
- Nombre d’albums/dossiers : 99 maximum
- Nombre de pistes/titres : 999 maximum
- Nom de chier dans Unicode UTF8 (longueur maximale : 128 octets)
Formats non pris en charge :
- Albums vides : un album vide est un album ne contenant pas de chiers MP3/WMA. Il n’apparaît
pas sur l’afcheur.
- Les formats de chier non pris en charge sont ignorés. Par exemple, les documents Word (.doc)
ou les chiers MP3 avec l’extension .dlf sont ignorés et ne sont pas lus.
- Fichiers audio AAC, WAV et PCM
- Fichiers protégés contre la copie non pris en charge.
- Fichiers WMA au format Lossless
- Fichiers masqués
La musique sur la clé USB n’est peut-être pas au bon format. Assurez-
vous que la chanson est un chier MP3 ou WMA. Vous pouvez vérier
ceci sur votre ordinateur. L’extension des chiers doit être .mp3 ou .
wma. Reportez-vous au chapitre « Spécications USB » pour plus
d’informations.
Vous avez peut-être enlevé la clé USB de l’appareil ou elle n’est peut-
être pas insérée correctement dans le connecteur USB. Si l’appareil ne
détecte pas de clé USB, il dénit automatiquement le son « oiseau »
comme sonnerie d’alarme pour avoir la certitude de vous réveiller à
l’heure de toute façon. Pour utiliser la musique lue depuis une clé USB
comme sonnerie d’alarme, la clé USB doit rester en permanence dans le
connecteur USB.
Page 94

94
ITALIANO
Introduzione
Congratulazioni per l’acquisto e benvenuti in Philips! Per trarre il massimo vantaggio dall’assistenza
Philips, registrate il vostro prodotto su www.philips.com/welcome.
La Wake-up Light di Philips consente di svegliarsi più piacevolmente. L’intensità luminosa della
lampada aumenta progressivamente no al livello impostato nell’arco del tempo di simulazione del
sorgere del sole (il tempo predenito è 30 minuti). La luce prepara delicatamente il corpo al
risveglio all’ora programmata. Per fare in modo che il risveglio sia un’esperienza ancora più piacevole,
potete utilizzare i suoni della natura, la radio FM, suoni scaricati o la vostra musica contenuta in una
chiavetta USB.
Gli effetti della Wake-up Light
La Wake-up Light di Philips prepara gradualmente il vostro corpo al risveglio nei 20-40 minuti che
precedono l’orario della sveglia a seconda del tempo di simulazione del sorgere del sole impostato.
Nelle prime ore del mattino gli occhi sono più sensibili alla luce rispetto a quando siete svegli. In
questo arco di tempo, l’intensità luminosa relativamente bassa di un’alba naturale simulata prepara il
vostro corpo al risveglio e all’attenzione. Le persone che usano la Wake-up Light si svegliano più
facilmente, hanno un umore migliore al mattino e si sentono più energiche. Poiché la sensibilità
all’esposizione luminosa varia a seconda della persona, è possibile impostare l’intensità della luce
della Wake-up Light ad un livello che corrisponde alla propria sensibilità per iniziare al meglio
la giornata.
Per ulteriori informazioni sulla Wake-up Light, visitare il sito Web www.philips.com.
A Coperchio superiore con fori di ventilazione
B Alloggiamento della lampada
C Cavo di alimentazione
D Antenna
E Display
1 Ora/orario della sveglia
2 Simbolo di intensità luminosa
3 Simbolo del tempo di simulazione del sorgere del sole
4 Simbolo della radio
5 Simbolo del suono “uccello”
6 Simbolo del suono “yoga”
7 Simbolo del suono “campanaccio”
8 Simbolo del suono “foresta”
9 Simbolo della “chiavetta USB”
10 Simbolo della frequenza radio
11 Simbolo del livello del volume
12 Simbolo della luminosità dello schermo
13 Simbolo della simulazione del tramonto
14 Simbolo del suono della sveglia
15 Simbolo della sveglia 2
16 Simbolo della sveglia 1
17 Simbolo dell’orologio
F Pulsante del menu “-”
G Pulsante MENU
H Pulsante SELECT (anche per la selezione delle stazioni FM preimpostate)
I Pulsante del menu “+”
J Leva di controllo con posizioni “sveglia spenta”, “sveglia 1” e “sveglia 2”
K Presa USB
L Pulsanti sul lato dell’apparecchio
Page 95

ITALIANO 95
1 Pulsante di aumento dell’intensità luminosa
2 Pulsante on/off della lampada
3 Pulsante di diminuzione dell’intensità luminosa
4 Pulsante per aumentare il volume
5 Pulsante on/off della radio
6 Pulsante per diminuire il volume
Importante
- Prima di utilizzare l’apparecchio, leggete attentamente il presente manuale e conservatelo per
eventuali riferimenti futuri.
- Questo apparecchio dispone di un doppio isolamento, in conformità con la Classe II (g. 2).
Pericolo
- Acqua ed elettricità costituiscono una combinazione pericolosa. Non usate l’apparecchio in
ambienti umidi (ad es. in bagno, in prossimità di docce o piscine).
- Evitate il contatto diretto dell’apparecchio con l’acqua (g. 3).
Avviso
- Prima di collegare l’apparecchio, vericate che la tensione riportata sulla spina corrisponda alla
tensione disponibile.
- Non posizionate niente sopra o in prossimità dell’apparecchio che possa riversare su di esso
acqua o altri tipi di liquidi.
- Poiché l’apparecchio può essere scollegato dall’alimentazione solo rimuovendo la spina di
alimentazione dalla presa di corrente a muro, assicurarsi sempre che la spina di alimentazione sia
vicina quando l’apparecchio è collegato all’alimentazione.
- L’apparecchio supporta una tensione pari a 230 V e una frequenza di 50 Hz.
- Nel caso in cui il cavo di alimentazione fosse danneggiato, dovrà essere sostituito presso i centri
autorizzati Philips, i rivenditori specializzati oppure da personale debitamente qualicato, per
evitare situazioni pericolose.
- Lasciate raffreddare sempre l’apparecchio per circa 15 minuti prima di aprire il coperchio
superiore per rimuovere la lampadina. Quest’ultima e il rivestimento superiore in metallo si
surriscaldano durante l’utilizzo e vi potreste bruciare le dita in caso di contatto. (g. 4)
- L’apparecchio non è destinato a persone (inclusi bambini) con capacità mentali, siche o
sensoriali ridotte, fatti salvi i casi in cui tali persone abbiano ricevuto assistenza o formazione per
l’uso dell’apparecchio da una persona responsabile della loro sicurezza.
- Adottate le dovute precauzioni per evitare che i bambini giochino con l’apparecchio.
- L’apparecchio deve essere utilizzato solo in interni (g. 5).
Attenzione
- Non fate cadere l’apparecchio sul pavimento, non colpitelo con violenza né esponetelo a ur ti
eccessivi.
- Appoggiate l’apparecchio su una supercie stabile, orizzontale e non scivolosa.
- Non usate l’apparecchio a una temperatura ambiente inferiore a 10°C o superiore a 35°C.
- Assicuratevi che i fori di areazione sulla parte superiore e inferiore dell’apparecchio rimangano
liberi durante l’uso.
- Non utilizzate mai l’apparecchio se il rivestimento della lampada o il coperchio superiore
risultano danneggiati, rotti o assenti.
- Se avete sofferto o soffrite di depressione grave, consultate un medico prima di utilizzare
l’apparecchio.
- Non utilizzate questo apparecchio come metodo per ridurre le ore di sonno. Lo scopo di
questo apparecchio è facilitare il risveglio e non riduce la necessità di sonno.
- L’apparecchio non dispone di interruttore on/off. Per scollegare l’alimentazione, estrarre la spina
dalla presa di corrente a muro.
Page 96

ITALIANO96
- Questo apparecchio è stato progettato solo per l’uso domestico e in luoghi analoghi, ad
esempio gli alberghi.
Indicazioni generali
- L’apparecchio vi consente di scegliere il livello di intensità luminosa desiderato per il risveglio
(vedere la sezione “Impostazione dell’intensità luminosa” nel capitolo “Modalità d’uso
dell’apparecchio”).
- Se vi svegliate troppo presto o accusando mal di testa, riducete il livello d’intensità luminosa e/o
il tempo di simulazione del sorgere del sole.
- Se dormite con un’altra persona, quest’ultima può essere svegliata dalla luce dell’apparecchio,
anche se si trova a una certa distanza. Questo fenomeno è causato dalle differenze di sensibilità
alla luce tra le varie persone.
- Il consumo energetico dell’apparecchio è minimo se la radio, la funzione di riproduzione USB e
la lampada sono spente.
Campi elettromagnetici (EMF)
Questo apparecchio Philips è conforme a tutti gli standard relativi ai campi elettromagnetici (EMF).
Se utilizzato in modo appropriato seguendo le istruzioni contenute nel presente manuale d’uso,
l’apparecchio consente un utilizzo sicuro come confermato dai risultati scientici attualmente
disponibili.
Predisposizione dell’apparecchio
Impostazione dell’orologio
1 Inserite la spina nella presa di corrente a muro.
, L’indicatore dell’ora sul display inizia a lampeggiare a indicare che è necessario impostare
l’ora (g. 6).
2 Premete il pulsante del menu - o + per selezionare l’ora.
3 Premete il pulsante SELECT per confermare.
, L’indicatore dei minuti inizia a lampeggiare (g. 7).
4 Premete il pulsante del menu - o + per impostare i minuti.
5 Premete il pulsante SELECT per confermare.
, L’apparecchio esce dal menu e sul display è visualizzata l’ora impostata.
L’apparecchio è pronto per l’uso.
Nota Il metodo descritto sopra si applica solo quando l’apparecchio viene alimentato la prima volta,
quando si è vericato un blackout o quando la spina di alimentazione è rimasta scollegata dalla presa di
corrente per più di 15 minuti. In questi casi, l’indicatore dell’ora lampeggia segnalando che è necessario
impostare l’ora. In tutti gli altri casi, è necessario usare il menu per impostare l’ora (vedere la sezione
“Funzioni del menu” nel capitolo “Modalità d’uso dell’apparecchio”).
Modalità d’uso dell’apparecchio
Funzioni del menu
Di seguito viene riportata una descrizione di tutte le funzioni che possono essere impostate nel
menu. Queste funzioni sono visualizzate nel menu principale nell’ordine che segue:
- Ora
- Orario della sveglia 1
- Orario della sveglia 2
- Suono della sveglia
- Simulazione del tramonto
- Luminosità display
Page 97

ITALIANO 97
È possibile impostare le funzioni del menu come descritto sotto:
1 Per accedere a un menu, premete il pulsante MENU (g. 8).
Nota Se non premete un pulsante qualsiasi entro 30 secondi, l’apparecchio esce dal menu e il display
mostra di nuovo l’ora.
2 Premete il pulsante del menu - o + per selezionare una funzione. (g. 9)
3 Premete il pulsante SELECT per accedere alla funzione scelta (g. 10).
4 Premete il pulsante del menu - o + per modicare un’impostazione. (g. 9)
5 Premete il pulsante SELECT per confermare (g. 10).
Impostazione della sveglia
Impostazione dell’orario della sveglia
Per impostare la sveglia, regolate l’orario e l’intensità luminosa, quindi scegliete il tipo di suono per il
risveglio. La sveglia è impostata quando il simbolo relativo è visibile sul display. L’intensità luminosa
aumenta lentamente no al livello selezionato durante il tempo preimpostato di simulazione del
sorgere del sole che precede l’orario della sveglia. Il tempo di simulazione del sorgere del sole
predenito è di 30 minuti. Questo è il tempo consigliato, ma poiché la sensibilità alla luce differisce
da persona a persona, potete impostare il tempo di simulazione del sorgere del sole in base alle
vostre preferenze (vedere la sezione “Impostazione del tempo di simulazione del sorgere del sole”
in questo capitolo). All’ora impostata (dopo il tempo di simulazione del tramonto), il segnale
acustico dell’allarme aumenta gradualmente per 90 secondi no a raggiungere il livello prescelto.
Nota Potete impostare due orari della sveglia diversi, ad esempio se desiderate svegliarvi a orari differenti
nel ne settimana e nei giorni feriali.
Nota Il volume impostato per la sveglia è anche usato come volume per la radio e la musica su chiavetta
USB. Per regolare il volume della sveglia, premete il pulsante di aumento o diminuzione del volume. Se
non volete svegliarvi con la luce della lampada o con un segnale acustico, scegliete un’intensità luminosa
o un livello del volume pari a 0. Vedere le sezioni “Utilizzo dell’apparecchio come lampada per il
comodino” e “Impostazione del volume” in questo capitolo.
1 Spostate la leva di controllo nella posizione centrale se desiderate impostare la sveglia 1.
Spostate la leva di controllo verso l’alto se desiderate impostare la sveglia 2 (g. 11).
, L’indicatore dell’ora della sveglia inizia a lampeggiare (g. 12).
, Per regolare l’orario, seguite i passaggi da 2 a 5.
2 Premete il pulsante del menu - o + per impostare l’ora (g. 9).
Nota Potete effettuare questa operazione solo quando l’indicatore dell’ora lampeggia. In caso contrario,
spostate la leva di controllo verso il basso e nuovamente verso l’alto per attivare la funzione di sveglia.
Inoltre, è possibile impostare l’orario della sveglia nel menu (vedere la sezione “Funzioni del menu” in
questo capitolo).
3 Premete il pulsante SELECT per confermare (g. 10).
, L’indicatore dei minuti della sveglia inizia a lampeggiare (g. 13).
4 Premete il pulsante del menu - o + per impostare i minuti. (g. 9)
5 Premete il pulsante SELECT per confermare oppure attendete per alcuni secondi (g. 10).
, L’apparecchio esce dal menu e sul display viene visualizzata l’ora.
La sveglia è stata impostata.
Impostazione dell’intensità luminosa
Potete impostare l’intensità luminosa che preferite per la simulazione del sorgere del sole che ha
inizio prima dell’orario di sveglia.
Page 98

ITALIANO98
Nota L’intensità luminosa impostata viene utilizzata per la funzione di sveglia come pure per la funzione
di lampada (vedere la sezione “Utilizzo dell’apparecchio come lampada per il comodino” di seguito).
1 Premete il pulsante on/off della lampada. (g. 14)
Nota La lampada impiega circa 1 secondo per accendersi. Si tratta di una procedura normale poiché
quest’ultima deve riscaldarsi.
Nota Potete anche impostare l’intensità luminosa quando la lampada è spenta, ma accendendola è più
semplice stabilire l’intensità luminosa preferita.
2 Premete i pulsanti per aumentare/diminuire l’intensità luminosa + e - per selezionare
l’illuminazione richiesta (g. 15).
È possibile scegliere un livello di intensità luminosa compreso tra 1 e 20.
Se non desiderate che la lampada continui progressivamente la simulazione del sorgere del sole
prima che scatti la sveglia, impostate l’intensità luminosa su 0.
Consiglio Quando l’apparecchio viene utilizzato per la prima volta, impostate l’intensità luminosa su 20.
Quando vi svegliate, controllate il livello di intensità luminosa raggiunto dall’apparecchio premendo
brevemente i pulsanti per aumentare o diminuire l’intensità luminosa. In questo modo il livello corrente
dell’intensità luminosa della sveglia viene visualizzato sul display. Impostate il livello di intensità luminosa
della sveglia su questo parametro per il giorno successivo.
3 Per spegnere la lampada, premete nuovamente il pulsante on/off.
Impostazione del suono della sveglia
Nota Potete regolare il livello del volume della sveglia in base alle vostre preferenze (vedere la sezione
“Impostazione del volume” in questo capitolo). Se non volete svegliarvi con il segnale acustico della
sveglia, impostate il livello del volume su 0.
1 Seguite le istruzioni della sezione “Funzioni del menu” riportata sopra e selezionate il suono
della sveglia.
2 Premete il pulsante SELECT per confermare.
3 Premete il pulsante del menu - o + per selezionare il suono della sveglia desiderato (vedere
di seguito).
, Il display mostra il simbolo del suono della sveglia selezionato.
4 Premete il pulsante SELECT per confermare.
Potete scegliere uno dei seguenti suoni:
- Radio (vedere anche la sezione “Utilizzo della radio come suono della sveglia” di
seguito) (g. 16)
- Suono “uccello” (g. 17)
- Suono “yoga” (g. 18)
- Suono “campanaccio” (g. 19)
- Suono “foresta” (g. 20)
- Suoni della sveglia scaricati o musica presente su una chiavetta USB (vedere anche la sezione
“Utilizzo di le musicali su una chiavetta USB come suono della sveglia” di seguito). (g. 21)
Consiglio Potete scaricare altri suoni della sveglia dal sito Web www.philips.com.
Utilizzo della radio come suono della sveglia
1 Seguite le istruzioni 1-4 nella sezione “Impostazione del suono della sveglia” per selezionare
la radio come suono della sveglia.
, Il display mostra P1, ossia la stazione radio preimpostata 1 (g. 22).
Se desiderate scegliere un’altra stazione radio preimpostata, premete il pulsante del menu - o +
(vedere la sezione “Utilizzo della radio/riproduzione di musica da una chiavetta USB”). Per cambiare
Page 99

ITALIANO 99
la frequenza delle stazioni radio preimpostate, vedere la sezione “Utilizzo della radio/riproduzione di
musica da una chiavetta USB” in questo capitolo).
2 Premete il pulsante SELECT per confermare.
, La stazione radio preimpostata che avete selezionato viene quindi impostata come suono
della sveglia.
Nota Potete usare le musicali su una chiavetta USB solo se sono in formato MP3 o WMA. Potete
controllare il formato sul vostro computer. L’estensione dei le deve essere .mp3 o .wma.
Fate riferimento al capitolo “Speciche USB” per ulteriori informazioni.
1 Inserite la chiavetta USB nella relativa presa dell’apparecchio.
2 Seguite le istruzioni 1-4 della sezione “Funzioni del menu” riportata sopra per selezionare da
una chiavetta USB i le musicali come suono della sveglia.
, Il display mostra 0001 per indicare la prima canzone sulla chiavetta USB. (g. 23)
Per scegliere un’altra canzone, premete i pulsanti del menu - e +.
3 Premete il pulsante SELECT per confermare.
, La canzone selezionata viene quindi impostata come suono della sveglia.
Impostazione del tempo di simulazione del sorgere del sole
Il tempo di simulazione del sorgere del sole è l’intervallo in cui l’intensità luminosa della lampada
aumenta progressivamente no al livello impostato prima della riproduzione del suono della sveglia.
Il tempo di simulazione del sorgere del sole predenito è di 30 minuti, vale a dire il tempo ottimale
afnché il corpo si prepari al risveglio. Poiché la sensibilità alla luce differisce da persona a persona,
potete impostare la funzione di simulazione del sorgere del sole in base alle vostre preferenze.
Potete ridurre il tempo di simulazione del sorgere del sole impostandolo su 20 o 25 minuti oppure
aumentarlo no a 40 minuti.
1 Tenete premuti contemporaneamente per 3 secondi entrambi i pulsanti per aumentare e
diminuire l’intensità luminosa (g. 24).
, Il simbolo di simulazione del sorgere del sole e il tempo di simulazione del sorgere del sole
predenito di 30 minuti vengono visualizzati sul display. (g. 25)
2 Premete il pulsante del menu - o + per aumentare o diminuire il tempo di simulazione del
sorgere del sole. (g. 9)
3 Premete il pulsante SELECT per confermare (g. 10).
Funzione snooze
1 Toccate la supercie della Wake-Up Light con il palmo della mano per mettere in pausa
l’apparecchio (per prevenire l’attivazione accidentale di questa funzione è necessaria un po’ di
forza) (g. 26).
, La lampada rimane accesa al livello di intensità selezionato, ma il suono della sveglia si
interrompe. Dopo 9 minuti, esso viene riprodotto nuovamente.
Nota La pausa di 9 minuti è ssa e non può essere regolata.
Attivazione/disattivazione della funzione di sveglia
1 Per disattivare la funzione di sveglia quando si attiva, spostate verso il basso la leva di
controllo (g. 27).
Nota La lampada rimane accesa per illuminare la vostra stanza. Potete spegnerla premendo il
pulsante on/off.
Page 100

ITALIANO100
Nota Se la sveglia non viene spenta, quest’ultima (suono e/o luce) viene disattivata automaticamente
dopo 90 minuti.
2 Se volete che la sveglia scatti il giorno successivo ad uno degli orari prestabiliti, impostate
nuovamente la leva di controllo sulla sveglia 1 o 2.
Dimostrazione della funzione di sveglia
Per una dimostrazione veloce (60 secondi) dell’intensità luminosa e dell’audio ad aumento graduale,
attivate la funzione test dell’apparecchio.
1 Tenete premuti contemporaneamente entrambi i pulsanti - e + nché la parola TEST viene
visualizzata sul display (g. 28).
2 Tenete premuti contemporaneamente entrambi i pulsanti - e + ancora una volta per
interrompere la dimostrazione.
Nota L’apparecchio continua a riprodurre la dimostrazione nché non premete nuovamente i pulsanti
del menu + e -. Il test si ferma automaticamente dopo 9 ore.
Utilizzo della radio/riproduzione di musica da una chiavetta USB
Accensione della radio
1 Per accendere la radio, premete il pulsante on/off (g. 29).
, La radio si accende.
Nota Sulla radio sono salvate 3 stazioni preimpostate. Per scegliere una delle stazioni preimpostate,
premete il pulsante SELECT sotto il display.
2 Per selezionare la frequenza radio prescelta, premete il pulsante del menu - o +. (g. 30)
Consiglio Per eseguire la scansione automatica delle frequenze radio, tenete premuto il pulsante del
menu - o + per circa 2 secondi.
Consiglio Per ottenere un segnale radio ottimale, estendete completamente l’antenna e spostatela no a
che non avete raggiunto una buona ricezione.
3 Per spegnere la radio, premete nuovamente il pulsante on/off.
Sulla radio della Wake-up Light sono salvate 3 stazioni preimpostate. Se desiderate salvare stazioni
preimpostate diverse, procedete come indicato di seguito.
1 Premete il pulsante on/off della radio per accenderla. (g. 31)
, Il display mostra P1, ossia la stazione preimpostata 1 (g. 22).
Nota Premete il pulsante SELECT una o più volte se desiderate scegliere un’altra stazione preimpostata.
2 Per eseguire la scansione delle frequenze radio al ne di cambiare una stazione preimpostata,
premete il pulsante del menu - o + (g. 30).
, L’apparecchio salva automaticamente la frequenza radio selezionata.
Riproduzione di musica da una chiavetta USB
Nota Potete usare le musicali su una chiavetta USB solo se sono in formato MP3 o WMA. L’apparecchio
non riproduce altri formati. Potete controllare il formato sul vostro computer. L’estensione dei le deve
essere .mp3 o .wma. Per ulteriori informazioni, vedere il capitolo “Speciche USB”.
1 Per riprodurre la musica da una chiavetta USB, premete due volte il pulsante on/off della
radio. (g. 31)
, Se nella presa USB è presente una chiavetta, l’apparecchio avvia automaticamente la scansione
del numero di le MP3 o WMA contenuti nel dispositivo. Questa operazione potrebbe
 Loading...