

Philips HF3462/30, HF3461, HF3451, HF3462/20, HF3462/10 Instruction Manual
Wake-up Light

2
3
1

4

HF3462/30, HF3462/20, HF3462/10, HF3461, HF3451
ENGLISH 6
DANSK 15
ESPAÑOL 24
SUOMI 34
NORSK 43
PORTUGUÊS 52
SVENSKA 62

6
Introduction
This appliance helps you wake up feeling tter and more energetic. It creates a summer dawn
experience that makes awakening and getting up easier. The light intensity slowly increases to the
chosen level during 30 minutes. Light reduces the level of the sleep hormone melatonin and
increases the production of the cortisol hormone that makes you feel more energetic when you
wake up. You can have the appliance wake you up by light only or by light and sound. The appliance
can also be used as a reading lamp.
Light and the biological clock
Exposure to light regulates the biological clock that controls the body’s circadian rhythms. The
melatonin level rises in the evening, preparing our body for sleep and lowering the body
temperature. The light in the morning stimulates the secretion of the hormone cortisol, which makes
us awake and alert. Optimally, the circadian rhythms are in sync with our sleep-wake rhythm.
Disturbed sleep and circadian rhythms can severely impact our health, performance and productivity.
In autumn and winter, when the days are shorter and darker, many people experience tiredness and
need more sleep. Lack of energy and trouble to get up in the morning are common symptoms of
the winter blues. Other symptoms may be unexpected mood changes, concentration problems and
a craving for food rich in fattening carbohydrates. Some people may even develop a serious
depression (seasonal affective disorder or SAD), which disappears when spring comes.
The effects of dawn simulation
Hypersomnia is associated with a phase delay of the circadian rhythm. The Philips Wake-up Light
regulates the circadian rhythm during the last half hour of sleep. In the early morning hours, our eyes
are more sensitive to light than when we are awake. During that period, the relatively low light levels
of a simulated natural sunrise are sufcient to phase-advance our biological clock, to suppress the
melatonin production and to elevate the cortisol level upon awakening. Clinical studies have shown
that regular use of a dawn simulator can alleviate even the severest symptoms of the winter blues.
People who use the Wake-up Light wake up more easily and feel more energetic. Their overall
mood, productivity and ability to concentrate are improved. With the Philips Wake-up Light, you can
set the light level that corresponds to your light sensitivity for optimum dawn simulation.
For more information about the health benets, see www.philips.com, search word “Wake-up Light”.
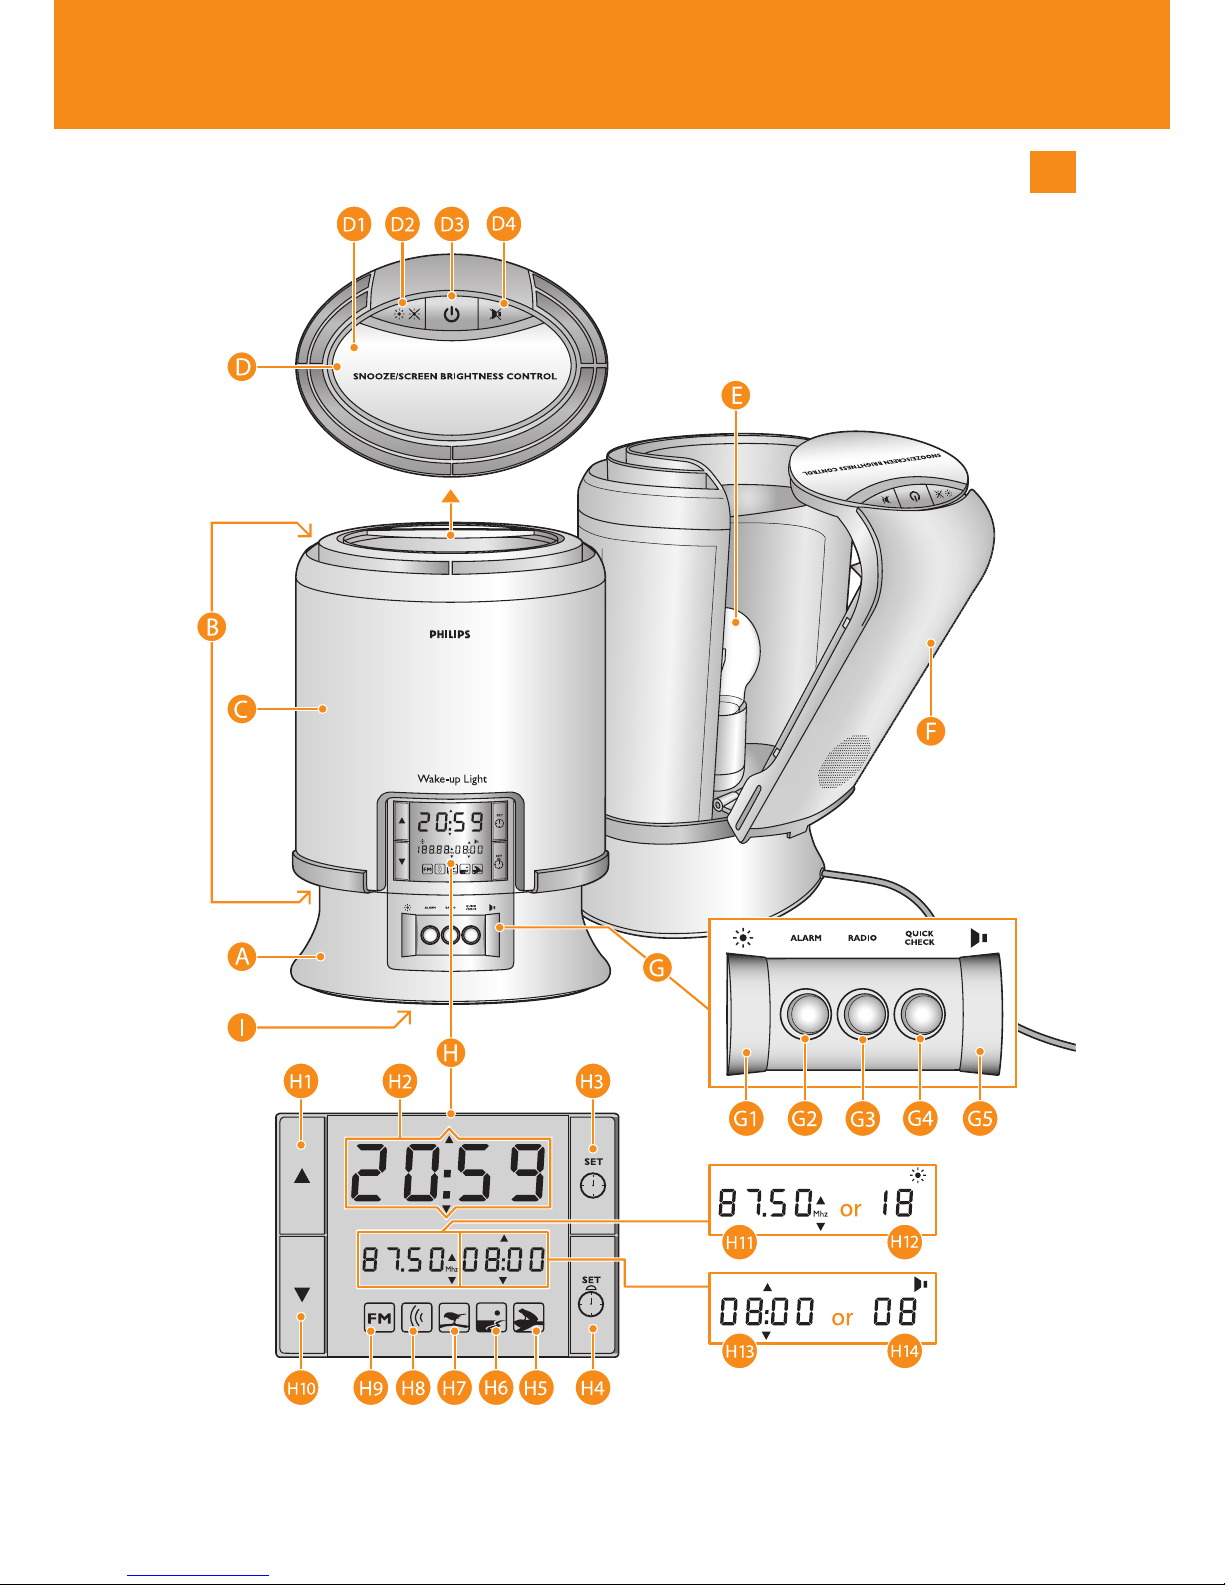
General description (Fig. 1)
A Base
B Vents
C Lamp housing
D Top control panel
1 SNOOZE/SCREEN BRIGHTNESS CONTROL button
2
@& button (light on/off)
3
3 button (light and sound on/off)
4
# button (sound off)
E 100W lamp (HF3462, HF3461) or 75W lamp (HF3451)
F Lamp replacement hatch
G Bottom control panel
1
@ wheel (turn to set the light intensity)
2 ALARM button
3 RADIO button (HF3462, HF3461 only)
4 QUICK CHECK button
5
$ wheel (turn to set volume)
H Display section
1
% button
2 Time indication
ENGLISH

3 ( button (to set clock time)
4
* button (to set alarm time)
5 Natural pond sound symbol (HF3462, HF3461 only)
6 Natural sea sound symbol (HF3462, HF3461 only)
7 Natural forest sound symbol
8 Gentle beep symbol
9 Radio symbol (HF3462, HF3461 only)
10
^ button
11 Radio frequency indication (HF3462, HF3461 only)
12 Light level indication (visible when light level is adjusted)
13 Alarm time indication
14 Sound level indication (visible when sound level is adjusted)
I Reset button
Note: The HF3462/30, HF3462/20, and the HF3462/10 are technical the same, they only differ in
colour. Because of this the three versions will simply be called HF3462 in the rest of this user manual.
Important
Read this user manual carefully before you use the appliance and save it for future
reference (Fig. 2).
This appliance is double-insulated according to Class II (Fig. 3).
This appliance meets the requirements of the European Medical Device Directive MDD
93/42/EEC.
Check if the voltage indicated on the appliance corresponds to the local mains voltage before
you connect the appliance.
The appliance is suitable for mains voltages of 230V.
If the mains cord is damaged, you must have it replaced by Philips, a service centre authorised
by Philips or similarly qualied persons in order to avoid a hazard.
Do not subject the appliance to heavy shocks.
Water and electricity are a dangerous combination. Do not use this appliance in wet
surroundings (e.g. in a bathroom or near a shower or swimming pool).
Do not let water run into the appliance or spill water onto the appliance.
This appliance is not intended for use by persons (including children) with reduced physical,
sensory or mental capabilities, or lack of experience and knowledge, unless they have been
given supervision or instruction concerning use of the appliance by a person responsible for
their safety.
Children should be supervised to ensure that they do not play with the appliance.
Place the appliance on a stable, level surface and make sure there is at least 15cm free space
around it and 40cm above it to prevent overheating (Fig. 4).
Do not use the appliance at room temperatures lower than 10ºC or higher than 35ºC.
Make sure the vents in the base and on top of the appliance remain open during use.
Regularly remove dust from the inside of the appliance with a dry cloth, as accumulated dust
close to a powerful lamp presents a potential re hazard. See chapter ‘Cleaning and
maintenance’ for more details.
The appliance has been tted with an automatic protection against overheating. If the
appliance is insufciently cooled (e.g. because the vents are covered), the appliance switches
off automatically. Remove the cause of overheating, unplug the appliance and let it cool down
for approx. 20 minutes. Then switch the appliance back on by plugging it in again.
Let the appliance cool down for approx. 15 minutes before you clean or store it.
Never use the appliance when the lamp housing is damaged, broken or missing.
We advise you to set the light intensity for waking up to a setting between 9 and 20 (for the
HF3451 with 75W lamp) or between 7 and 15 (for the HF3462, HF3461 with 100W lamp).
,
,
,
,
,
,
,
,
,
,
,
,
,
,
,
,
,
,
,
ENGLISH 7

These settings correspond to light intensity levels of 100 to 300 lux. The correct setting
depends on your light sensitivity and will have to be determined by yourself. It is possible to
select a higher or lower setting. See chapter ‘Using the appliance’ for more details. If light
level 20 of the HF3451 is not high enough, we advise you to move the appliance closer to the
bed.
If you wake up too early or with a headache, reduce the light level.
If you share a bedroom with someone else, this person may unintentionally wake up from the
light of the appliance, even though this person is further removed from the appliance. This
phenomenon is the result of differences in light sensitivity between people.
If you start having trouble waking up again, this is possibly due to a decrease in the lamp’s
light output that occurs after some time. In that case, you can increase the light level or
replace the lamp.
Consult your doctor before you start using the Philips Wake-up Light if you have suffered
from or are suffering from a serious depression.
Do not use this appliance as a means to reduce your hours of sleep. The purpose of this
appliance is to help you wake up more easily. It does not diminish your need for sleep.
Always replace the lamp with a Philips 75W E27 SOFTONE softwhite 230V T55 (HF3451) or
a Philips 100W E27 SOFTONE softwhite 230V T55 lamp (HF3462, HF3461).
The appliance has no on/off switch. To disconnect the appliance from the mains, remove the
plug from the wall socket.
If the appliance is used in an industrial area and/or near a power station, it may occur that,
under certain circumstances, the lamp goes off after it has come on. This does not have an
adverse or harmful effect on the safe functioning of the appliance the next time it is used.
Electromagnetic elds (EMF)
This Philips appliance complies with all standards regarding electromagnetic elds (EMF). If handled
properly and according to the instructions in this user manual, the appliance is safe to use based on
scientic evidence available today.
Preparing for use
Installation
1 Before rst use, open the hatch in the back of the appliance (see chapter ‘Replacement’) and
screw the lamp into the lamp holder.
2 Place the appliance at 40-50cm from your head, for example on a bedside table (Fig. 5).
3 Put the plug in the wall socket.
The time on the display starts to blink and arrows appear above and below the time to
indicate that the clock time has to be set (Fig. 6).
Note: If the display doesn’t light up after you have plugged in the appliance, press the reset button on the
bottom of the appliance.
Setting the clock time
1 Use the ^ and the % buttons to set the time.
2 Hold the button down longer to put the time forward or backward more quickly.
Note: After you have set the time for the rst time, you have to press the ‘set time’ button before you can
adjust the time again. The time on the display starts to blink and arrows appear above and below the
time to indicate that the clock time can be set.
3 When you have set the correct time, press the ‘set time’ button to conrm the time (Fig. 7).
The time on the display stops blinking and the arrows disappear.
,
,
,
,
,
,
,
,
,
,
ENGLISH8

Note: If you do not conrm the time, the blinking stops and the arrows disappear after 10 seconds. This
indicates that the time has been set.
The appliance is now ready for use.
Using the appliance
Setting the alarm
When you set the alarm, you choose the light intensity level, the type of sound and the sound level.
The alarm is set when the light ring round the ALARM button burns. The light intensity slowly
increases to the chosen level during the last 30 minutes before the set alarm time. The sound slowly
increases in 90 seconds to the chosen level after the set alarm time.
Setting the alarm time
1 Press the alarm time button ( *) to set the alarm. (Fig. 8)
The alarm time starts blinking and two arrows appear above and below the alarm
time (Fig. 9).
2 Use the % and the ^ buttons to set the alarm time, i.e. the time at which you wish to get
up. (Fig. 10)
3 Press the button longer to put the time forward or backward more quickly.
4 Press the alarm time button ( *) again to conrm the alarm time. (Fig. 8)
The arrows disappear and the alarm time stops blinking.
Note: If you do not conrm the alarm time, the blinking stops after 10 seconds. This means that the
alarm time has been set.
Setting the sound and the sound level
1 Press the ALARM button (Fig. 11).
The light ring round the ALARM button starts burning (Fig. 12).
The rst sound symbol (radio symbol for HF3462, HF3461 and gentle beep symbol for
HF3451) starts blinking for 3 seconds and the sound can be heard.
2 Press the ALARM button again if you want to select another wake-up sound. When you have
found the sound you want to use, do not press the ALARM button again (Fig. 11).
After 3 seconds, the symbol of the sound selected stops blinking to indicate that it has been
selected.
The alarm has been set and continues to work until you switch the alarm function off. When
you do this, the sound symbol disappears from the display and the light ring round the
ALARM button goes out. See also section ‘Switching the alarm on or off’.
3 Turn the volume control wheel $ to set the sound level. (Fig. 13)
The $ appears on the display. (Fig. 14)
4 If you want no sound at wake-up time, select level 0.
Setting the light intensity level
1 Use the light adjustment wheel @ to set the light intensity level. (Fig. 15)
The @ appears on the display.
Tip: We advise a light intensity between 9 and 20 (for the HF3451 with 75W lamp) or between 7 and
15 (for the HF3462, HF3461 with 100W lamp) for the alarm function. Set the light intensity to your
own preference by trying out the alarm function at different light intensity levels.
2 If you don’t want the light to go on at wake-up time, select light intensity level 0.
,
,
,
,
,
,
,
,
ENGLISH 9

Quick alarm check
1 Press the QUICK CHECK button to start an accelerated wake-up alarm test (Fig. 16).
The light ring round the QUICK CHECK button goes on (Fig. 17).
During the rst 50 seconds of the test, you see a rapid increase of the light intensity to the
selected level. During the last 40 seconds, you hear the selected sound gradually increase to
the selected level.
2 Press the QUICK CHECK button again to stop the test (Fig. 16).
The light ring round the QUICK CHECK button goes out.
Note: The appliance continues to run the accelerated wake-up alarm test until you press the QUICK
CHECK button.
Switching the alarm on or off
The light ring round the ALARM button burns when the alarm is on. At the set time, the wake-up
sound is played and the lamp has reached the selected light intensity level.
1 Press the 3 button to switch off the light and the wake-up sound. (Fig. 18)
The light ring round the ALARM button continues to burn. The alarm function is still active
and the wake-up alarm will go off at the set time and with the set sound and light intensity
the next day (Fig. 12).
2 Press the # button if you want to switch off the sound when the alarm goes off. (Fig. 19)
3 Press the @& button if you want to switch off the lamp when the alarm goes off. (Fig. 20)
4 If you want to switch off the alarm function altogether, press the ALARM button one or
more times until there is no sound symbol on the display and the light ring round the
ALARM button goes out.
Snoozing
1 Press the SNOOZE/SCREEN BRIGHTNESS CONTROL button to switch off the sound for 9
minutes when the alarm has gone off (Fig. 21).
The lamp continues to burn at the selected intensity level. After 9 minutes, the wake-up sound is
automatically played again.
2 Press the SNOOZE/SCREEN BRIGHTNESS CONTROL button longer to dim the light.
Note: You can only do this once. After you release the button, it functions as SCREEN BRIGHTNESS
CONTROL button again.
Note: You can only use the snooze function within 15 minutes after the alarm starts to go off. After those
15 minutes, the button no longer functions as SNOOZE button and only functions as
SCREEN BRIGHTNESS CONTROL button.
Adjusting the light intensity during the wake-up phase
1 Turn the light adjustment wheel @ to select a higher or lower light intensity. (Fig. 15)
The lamp burns at the selected intensity during the rest of the wake-up phase.
Adjusting the brightness of the display
1 Press the SNOOZE/SCREEN BRIGHTNESS CONTROL button to adjust the brightness of
the display (Fig. 21).
Press the button again to set the brightness to another level. There are three levels.
Note: This button cannot be used to adjust the display brightness when the alarm goes off and during
snoozing.
,
,
,
,
ENGLISH10

3 button
1 When the alarm goes off at the set wake-up time, press the 3 button to switch off the
wake-up alarm light and sound.
Note: The alarm function remains active and the light round the alarm button continues to burn.
2 When you have switched on the reading lamp and/or the radio, press the 3 button to switch
off the reading lamp and/or the radio.
When you press the
3 button again, only the light goes on.
Note: When the alarm function is active, pressing the 3 button does not affect the alarm settings.
Reading lamp
1 Press the @& button to switch the lamp on or off. (Fig. 20)
2 Turn the light adjustment wheel @ upwards or downwards to increase or decrease the light
intensity level. (Fig. 15)
The light level indication on the display @ shows the light intensity level (00 to 20). (Fig. 22)
Tip: We advise you to set the light intensity to 20 (maximum level) for reading. If this light level is not
strong enough, switch on an extra lamp.
Do not forget to set the light intensity level back to the wake-up level!
Radio (HF3462, HF3461 only)
1 Press the RADIO button to switch on the radio (Fig. 23).
The light ring round the button starts burning (Fig. 24).
2 Use the % and the ^ buttons to select the frequency of your favourite station. (Fig. 25)
You can choose FM stations.
3 You can use the external antenna for better reception. Insert the external antenna into the
antenna socket next to symbol ò on the back of the appliance.
4 Press the RADIO button to switch off the radio (Fig. 23).
Power failure
To make sure the alarm goes off at the set time after a short power failure, the appliance has been
provided with a backup system. This system has a self-charging battery that does not have to be
replaced. The system remembers the time for a few minutes.
After a long power failure, the display shows an incorrect clock time and the alarm time is
00.00. Set the correct clock time (see chapter ‘Preparing for use’) and the correct alarm time
(see chapter ‘Using the appliance’) (Fig. 6).
Reset
1 If the appliance does not respond well, remove the plug from the wall socket and then
reinsert it. If this does not help, press the reset button on the bottom of the appliance to
reset the display to the factory default settings (Fig. 26).
Cleaning and maintenance
Always unplug the appliance and let it cool down for approx. 15 minutes before you start
cleaning it.
Never use scouring pads, abrasive cleaning agents or aggressive liquids such as petrol or acetone
to clean the appliance.
,
,
,
ENGLISH 11

Regularly remove dust from the inside of the appliance with a dry cloth, as accumulated dust
close to a powerful lamp presents a potential re hazard.
1 Clean the outside of the appliance with a damp cloth.
2 Clean the inside of the appliance with a dry cloth.
Open the lamp replacement hatch by rst pushing the rib at the bottom inwards and then
upwards with some force (Fig. 27).
Tilt the lamp replacement hatch outwards as far as it goes (Fig. 28).
Do not let water run into the appliance or spill water onto the appliance (Fig. 29).
Replacement
Except for the lamp, the appliance does not contain any serviceable parts.
The lamp has to be replaced when it stops burning or when the light output decreases (also see
chapter ‘Important’). You must replace the lamp with a Philips 75W E27 SOFTONE softwhite 230V
T55 (HF3451) or a Philips 100W E27 SOFTONE softwhite 230V T55 lamp (HF3462, HF3461).Only
this lamp provides the correct light intensity.
Replacing the lamp
1 Unplug the appliance.
2 Let the appliance cool down for approx. 15 minutes.
3 Open the lamp replacement hatch by rst pushing the rib at the bottom inwards and then
upwards with some force (Fig. 27).
4 Tilt the lamp replacement hatch outwards as far as it goes (Fig. 28).
5 Remove the old lamp from the lamp holder (Fig. 30).
6 Screw a new lamp in the lamp holder.
Environment
Do not throw away the appliance with the normal household waste at the end of its life, but
hand it in at an ofcial collection point for recycling. By doing this, you help to preserve the
environment (Fig. 31).
Guarantee and service
If you need service or information or if you have a problem, please visit the Philips website at
www.philips.com or contact the Philips Customer Care Centre in your country (you nd its phone
number in the worldwide guarantee leaet). If there is no Customer Care Centre in your country,
go to your local Philips dealer or contact the Service Department of Philips Domestic Appliances
and Personal Care BV.
Guarantee restrictions
The international guarantee does not cover the lamp.
Specications
Model HF3451, HF3461 and HF3462
Rated voltage 230V
Rated frequency 50Hz
,
,
,
-
ENGLISH12

Model HF3451, HF3461 and HF3462
Rated input 75W (HF3451) or 100W
(HF3462, HF3461)
Class II
Classication Not classied
Ingress of water IPX0
Operating conditions Temperature from +10°C to +35°C
Relative humidity from 30% to 90%
Storage conditions Temperature from -20°C to +50°C
Relative humidity from 30% to 90% (no
condensation)
Circuit diagrams, parts lists and other technical descriptions will be provided on request.
Take measures to prevent the occurrence of electromagnetic interference or other types of
interference between this appliance and other appliances.
Frequently asked questions
Question Answer
Why does the appliance
not work?
Perhaps you have not inserted the plug properly into the wall socket.
Put the plug properly into the wall socket.
Perhaps there is a power failure. Check if the power supply works by
connecting another appliance.
Perhaps the mains cord is damaged. If the mains cord is damaged, you
must have it replaced by Philips, a service centre authorised by Philips
or similarly qualied persons in order to avoid a hazard.
Perhaps the appliance overheated and the overheating protection
switched off the appliance. Remove the cause of overheating (e.g. a
towel that blocks one or more vents) and unplug the appliance. Wait
approx. 20 minutes and then put the plug back into the wall socket.
Why does the appliance
become hot during use?
This is normal, as the appliance is heated up by the light of the lamp.
The appliance does not
respond when I try to
set different functions.
What should I do?
Press the Reset button in the bottom of the appliance or remove the
plug from the wall socket and reinsert it. The appliance is then reset to
the factory default settings.
Why does the light not
go on when the alarm
goes off?
Perhaps you set the light level too low.
Perhaps you switched off the alarm function by pressing the ALARM
button.
Perhaps the lamp is defective. Replace the lamp (see chapter
‘Replacement’).
ENGLISH 13

Question Answer
Why can I not switch on
the lamp again
immediately after I
switched it off?
You have to wait 3 seconds for the lamp to dim. During this time, the
3 button does not work.
Why do I hear no sound
when the alarm goes
off?
Perhaps you set the sound level too low. Turn the volume control to a
higher sound level.
Perhaps you switched off the alarm function by pressing the ALARM
button.
If you selected the radio as alarm sound (HF3462, HF3461 only), the
radio may be defective. Press the radio button after you switch off the
alarm to check if the radio works. If it does not work, contact the
Philips Customer Care Centre in your country.
Why does the radio
(HF3462, HF3461
only) not work?
The radio function is probably defective. Contact the Philips Customer
Care Centre in your country.
Connect the external antenna if you have not yet connected it. See
section ‘Radio’ in chapter ‘Using the appliance’.
Why does the radio
(HF3462, HF3461
only) produce a
crackling sound?
Perhaps the broadcast signal is weak. Search for the correct signal (see
chapter ‘Using the appliance’).
The alarm went off
yesterday. Why did it not
go off today?
Perhaps you switched off the alarm function by pressing the ALARM
button. Set the alarm for the next day and switch off the wake-up
alarm sound and light the next day by pressing the
3 button (see
chapter ‘Using the appliance’).
Perhaps you set the sound and/or light level to a too low setting. Set a
higher sound and/or light level.
Perhaps there has been a power failure that outlasted the capacity of
the backup system. After a long power failure, the display shows an
incorrect clock time and the alarm time is 00.00. Set the correct clock
time (see chapter ‘Preparing for use’) and the correct alarm time (see
chapter ‘Using the appliance’).
Why does the light
wake me too early/too
late?
Perhaps the light level you have set is not appropriate for you. Try a
lower light level if you wake up too early or a higher light level if you
wake up too late. For most people, the light is effective at settings 9-20
(HF3451) or 7-15 (HF3462, HF3461).
Perhaps you woke up too late because the appliance is at a lower level
than your head. Make sure the appliance is located at such a height
that the light is not blocked by your bed, duvet or pillow.
Why does the
SNOOZE button not
function?
The snooze function can only be used within 15 minutes after the
alarm starts to go off. After those 15 minutes, the button no longer
functions as SNOOZE button and only functions as SCREEN
BRIGHTNESS CONTROL button.
ENGLISH14

Introduktion
Dette apparat hjælper dig med at vågne op og føle dig veloplagt og fyldt med energi. Det skaber
en fornemmelse af sommerdaggry, der gør det nemmere at vågne og komme ud af sengen. Lysets
intensitet øges langsomt til det valgte niveau i løbet af 30 minutter. Lys reducerer produktionen af
søvnhormonet melatonin og øger produktionen af hormonet cortisol, der får dig til føle dig mere
energisk, når du vågner. Apparatet kan indstilles til at vække dig med lys eller med lys og lyd og kan
tillige bruges som læselampe.
Lys og det biologiske ur
Lys regulerer det biologiske ur, der kontrollerer kroppens døgnrytme. Melatonin-niveauet øges om
aftenen og forbereder kroppen på søvn og sænker kropstemperaturen. Lyset om morgenen
stimulerer udskillelsen af hormonet cortisol, der gør os vågne og friske. Det optimale er en
døgnrytme, som er synkron med vores søvn/vågen-rytme. Forstyrret søvn og døgnrytme kan have
alvorlige konsekvenser for vores helbred, energi og produktivitet. Om efteråret og vinteren, når
dagene er kortere og mørkere, er der mange mennesker, der lider af træthed og trænger til mere
søvn. Mangel på energi og problemer med at komme op om morgenen er almindelige symptomer
på vintertræthed. Andre symptomer kan være uventede humørsvingninger, koncentrationsbesvær og
en udpræget lyst til mad med højt kulhydratindhold. Nogle mennesker udvikler endda en alvorlig
depression (vinterdepression), der forsvinder igen, når foråret kommer.
Effekten ved simulation af daggry
Hypersomnia opstår på baggrund af en faseforsinkelse i døgnrytmen. Philips’ Wake-up Light
regulerer døgnrytmen i løbet af søvnens sidste halve time. I de tidlige morgentimer er øjnene mere
følsomme overfor skarpt lys, end når vi er vågne. I den periode er det forholdsvist lave lysniveau fra
simuleret daggry tilstrækkeligt til at få det biologiske ur i gang, undertrykke produktionen af
melatonin og øge cortisol-niveauet ved opvågningen. Kliniske undersøgelser har vist, at regelmæssig
brug af en daggry-simulator kan dulme selv de alvorligste symptomer på vintertræthed. Personer,
som bruger Wake-Up Light, har nemmere ved at vågne og føler sig mere energiske. De bliver i
bedre humør, er mere produktive og kan bedre koncentrere sig. Med Philips Wake-up Light er det
muligt at indstille lysniveauet, så det passer til den enkelte persons lysfølsomhed og giver en optimal
daggry-simulation.
Yderligere oplysninger om helbredsmæssige fordele ndes på adressen www.philips.com under
søgeordet “Wake-up Light”.
Generel beskrivelse (g. 1)
A Basisenhed
B Ventilationshuller
C Lampekabinet
D Øverste kontrolpanel
1 SNOOZE/SCREEN BRIGHTNESS CONTROL knap
2
@& knap (lys on/off)
3
3 knap (lys og lyd on/off)
4
# knap (lyd off)
E 100 W pære (HF3462, HF3461) eller 75 W pære (HF3451)
F Dæksel når pæren skal udskiftes
G Nederste kontrolpanel
1
@ hjul (drejes for indstilling af lysintensitet)
2 ALARM knap
3 RADIO-knap (kun HF3462, HF3461)
4 QUICK CHECK knap
5
$ hjul (drejes for indstilling af lydstyrke)
H Display-sektion
DANSK 15

1 % knap
2 Timer indikation
3
( knap (til indstilling af klokkeslæt)
4
* knap (til indstilling af vækketidspunkt)
5 Symbol for naturlig rislen af vand (kun HF3462, HF3461)
6 Symbol for naturligt bølgebrus (kun HF3462, HF3461)
7 Symbol for naturlige skovlyde
8 Symbol for behageligt bip-signal
9 Radioknap (kun HF3462, HF3461)
10
^ knap
11 Indikator for radiofrekvens (kun HF3462, HF3461)
12 Indikator for lysniveau (synlig når lysniveauet er justeret)
13 Indikator for vækketidspunkt
14 Indikator for lydniveau (synlig når lydniveauet er justeret)
I Reset-tast (nulstilling)
Bemærk: HF3462/30, HF3462/20 og HF3462/10 er teknisk set samme model, der er kun farven til
forskel. Derfor vil disse tre udgaver blot blive kaldt HF3462 i resten af denne brugsvejledning.
Vigtigt
Læs denne brugsvejledning omhyggeligt igennem, inden apparatet tages i brug, og gem den til
eventuelt senere brug (g. 2).
Dette apparat er dobbeltisoleret i henhold til klasse II (g. 3).
Dette apparat opfylder kravene i European Medical Device Directive MDD 93/42/EEC.
Kontrollér, om den angivne netspænding på apparatet svarer til den lokale netspænding, før
du slutter strøm til apparatet.
Apparatet kan tilsluttes en netspænding på 230 V.
Hvis netledningen beskadiges, må den kun udskiftes af Philips, et autoriseret Philipsserviceværksted eller en tilsvarende kvaliceret fagmand for at undgå enhver risiko.
Udsæt ikke apparatet for voldsomme rystelser eller stød.
Vand og elektricitet er en farlig kombination. Anvend aldrig apparatet i våde omgivelser (f.eks.
i badeværelset eller i nærheden af en bruser eller swimmingpool).
Sørg for, at der ikke trænger vand ind i apparatet, og at der ikke spildes vand på det.
Dette apparat er ikke beregnet til at blive brugt af personer (herunder børn) med nedsatte
fysiske og mentale evner, nedsat følesans eller manglende erfaring og viden, medmindre de er
blevet vejledt eller instrueret i apparatets anvendelse af en person, der er ansvarlig for deres
sikkerhed.
Apparatet bør holdes uden for børns rækkevidde for at sikre, at de ikke kan komme til at
lege med det.
Anbring apparatet på et stabilt, plant underlag og sørg for, at der er mindst 15 cm luft
omkring det og 40 cm over det for at undgå overophedning (g. 4).
Undlad at anvende apparatet, hvis rumtemperaturen er under 10ºC eller højere end 35ºC.
Sørg for, at ventilationshullerne i basisenheden og oven på apparatet ikke er tildækkede under
brug.
Fjern jævnligt støv fra apparatets inderside med en tør klud, da støvansamlinger tæt på en
kraftig pære kan udgøre en potentiel brandfare. Se afsnittet “Rengøring og vedligeholdelse”
for nærmere oplysninger.
Apparatet er forsynet med en automatisk beskyttelse mod overophedning. Hvis apparatet
ikke afkøles tilstrækkeligt (f.eks. hvis ventilationshullerne er tildækkede), vil apparatet slukke
automatisk. Fjern årsagen til overophedningen, træk stikket ud af stikkontakten, og lad
apparatet køle af i ca. 20 minutter. Tænd derefter apparatet igen ved at sætte stikket tilbage i
stikkontakten.
Lad apparatet køle af i ca. 15 minutter, før du rengør det eller stiller det væk.
,
,
,
,
,
,
,
,
,
,
,
,
,
,
,
,
,
DANSK16

Brug aldrig apparatet, hvis lampekabinettet er beskadiget, gået i stykker eller mangler.
Vi anbefaler at indstille lysintensiteten til opvågning mellem 9 og 20 (for HF3451 med 75 W
pære) eller mellem 7 og 15 (for HF3462, HF3461 med 100 W pære). Disse indstillinger svarer
til en lysintensitet på 100 til 300 lux. Den korrekte indstilling afhænger af din lysfølsomhed og
skal bestemmes af dig. Det er muligt at vælge en højere eller lavere indstilling. Se afsnittet
“Sådan bruges apparatet” for yderligere oplysninger. Hvis en lysintensitet på 20 for HF3451
ikke er høj nok, anbefaler vi, at du ytter apparatet tættere på sengen.
Hvis du vågner for tidligt eller med hovedpine, skal du reducere lysniveauet.
Hvis du deler soveværelse med andre, kan vedkommende blive vækket utilsigtet, selvom han/
hun ligger længere væk fra apparatet. Dette fænomen skyldes, at mennesker ikke nødvendigvis
har samme lysfølsomhed.
Hvis du begynder at have problemer med at vågne, kan det skyldes en reduktion i pærens
lysproduktion, hvilket forekommer efter et stykke tid. I dette tilfælde kan du enten øge
lysniveauet eller udskifte pæren.
Kontakt din læge, før du starter med at bruge Philips Wake-up Light, hvis du har lidt af eller
lider af en alvorlig depression.
Brug ikke apparatet som et middel til at reducere dit søvnbehov. Formålet med apparatet er
at lette opvågningen. Det reducerer ikke søvnbehovet.
Udskift altid pæren med en Philips 75 W E27 SOFTONE softwhite 230 V T55 (HF3451) eller
en Philips 100 W E27 SOFTONE softwhite 230 V T55-pære (HF3462, HF3461).
Apparatet har ingen on/off (tænd/sluk)-kontakt. Træk stikket ud af stikkontakten for at
afbryde forbindelsen til lysnettet.
Hvis apparatet bruges i et industriområde og/eller i nærheden af et el-værk, kan det under
særlige omstændigheder ske, at pæren slukker, efter den er blevet tændt. Dette har ingen
betydning for apparatets sikkerhedsfunktion, næste gang det anvendes.
Elektromagnetiske felter (EMF)
Dette Philips-apparat overholder alle standarder for elektromagnetiske felter (EMF). Ved korrekt
anvendelse i overensstemmelse med instruktionerne i denne brugsvejleding, er apparatet sikkert at
anvende, ifølge den videnskabelige viden, der er tilgængelig i dag.
Klargøring
Installation
1 Før produktet anvendes første gang, skal du åbne dækslet på apparatets bagside (se kapitlet
“Udskiftning”) og skrue pæren i fatningen.
2 Placér apparatet 40-50 cm fra dit ansigt, f.eks. på et natbord (g. 5).
3 Sæt stikket i en stikkontakt.
Klokkeslættet i displayet begynder at blinke, og pilene over og under klokkeslættet indikerer,
at det skal indstilles (g. 6).
Bemærk: Hvis displayet ikke lyser, når du har sat stikket i stikkontakten, skal du trykke på reset-knappen
i bunden af apparatet.
Indstilling af klokkeslæt
1 Brug knapperne ^ og % til indstilling af klokkeslæt.
2 Hold knappen nede for hurtigere frem- eller tilbageindstilling.
Bemærk: Når først klokkeslættet har været indstillet første gang, skal du trykke på knappen til indstilling
af tid, før klokkeslættet kan genindstilles. Klokkeslættet i displayet begynder at blinke, og de to pile over
og under klokkeslættet indikerer, at klokkeslættet kan indstilles.
,
,
,
,
,
,
,
,
,
,
,
DANSK 17

3 Når du har indstillet det rigtige klokkeslæt, skal du bekræfte det ved at trykke på knappen til
indstilling af tid (g. 7).
Klokkeslættet i displayet holder op med at blinke og pilene forsvinder.
Bemærk: Hvis du ikke bekræfter det indstillede klokkeslæt, holder det automatisk op med at blinke, og
pilene forsvinder efter 10 sekunder. Dette betyder at tiden er indstillet.
Apparatet er nu klar til brug.
Sådan bruges apparatet
Indstilling af alarmen
Når alarmen indstilles, skal du vælge lysintensitet, lydtype og lydniveau. Alarmen er indstillet, når den
lysende ring omkring ALARM knappen er tændt. Lysintensiteten øges langsomt til det valgte niveau i
løbet af de sidste 30 minutter før det indstillede vækketidspunkt. Lyden øges langsomt til det valgte
niveau i løbet af 90 sekunder efter det indstillede vækketidspunkt.
Indstilling af vækning
1 Tryk på knappen for alarmtidspunkt ( *) til indstilling af vækketidspunkt. (g. 8)
Alarmtidspunktet begynder at blinke, og to pile vises over og under alarmtidspunktet (g. 9).
2 Brug knapperne % og ^ til at indstille alarmtidspunktet, dvs. det tidspunkt du ønsker at blive
vækket. (g. 10)
3 Hold knappen nede for hurtigere frem- og tilbageindstilling.
4 Tryk på knappen for alarmtidspunkt ( *) igen for at bekræfte alarmtidspunktet (g. 8)
Pilene forsvinder, og alarmtidspunktet holder op med at blinke.
Bemærk: Hvis alarmtidspunktet ikke bekræftes, holder det op med at blinke efter 10 sekunder. Dette
betyder, at alarmtidspunktet er indstillet.
Indstilling af lyd- og lydniveau
1 Tryk på ALARM knappen (g. 11).
Den lysende ring omkring ALARM knappen begynder at lyse (g. 12).
Det første lydsymbol (radiosymbol for HF3462, HF3461 og bip-symbol for
HF3451) begynder at blinke i 3 sekunder, og lyden høres.
2 Tryk på ALARM knappen igen for valg af anden vækkelyd. Når den ønskede lyd er fundet, skal
der ikke trykkes på ALARM knappen igen (g. 11).
Efter 3 sekunder, holder lydsymbolet op med at blinke, hvilket indikerer, at det er valgt.
Alarmen er indstillet og fortsætter med at være aktiv, indtil du slukker alarmfunktionen. Når
du gør det, forsvinder lydsymbolet fra displayet og den lysende ring omkring ALARM knappen
slukker. Se også afsnittet “Sådan tændes og slukkes alarmen”.
3 Drej lydstyrke-hjulet $ for at indstille lydniveauet. (g. 13)
$ vises i displayet. (g. 14)
4 Ønsker du ingen vækkelyd, vælges niveau 0.
Indstilling af niveau for lysintensitet
1 Brug hjulet til lysjustering @ for at indstille niveauet for lysintensitet. (g. 15)
@ vises i displayet.
Tip: Vi anbefaler en lysintensitet mellem 9 og 20 (for HF3451 med 75W pære) eller mellem 7 og 15 (for
HF3462, HF3461 med 100 W pære) til alarmfunktionen. Indstil din foretrukne lysintensitet ved at
afprøve alarmfunktionen med forskellige niveauer for lysintensitet.
2 Hvis lyset ikke skal aktiveres ved vækning, vælges 0.
,
,
,
,
,
,
,
,
,
DANSK18

Hurtig alarm kontrol
1 Tryk på knappen QUICK CHECK for at starte en hurtig kontrol af vækkealarmen (g. 16).
Den lysende ring omkring knappen QUICK CHECK tændes (g. 17).
I de første 50 sekunder af testen, ses en hurtig forøgelse af lysintensiteten til det valgte
niveau. I de sidste 40 sekunder, høres den valgte lyd, der gradvist øges til det valgte niveau.
2 Tryk på QUICK CHECK igen for at stoppe testen (g. 16).
Den lysende ring omkring QUICK CHECK slukkes.
Bemærk: Apparatet fortsætter med at køre den accelererede test af vækkealarmen, indtil der trykkes på
knappen QUICK CHECK.
Tænd og sluk for alarmen
Den lysende ring omkring ALARM knappen lyser, når alarmen er tændt. På det indstillede tidspunkt
afspilles vækkelyden, og pæren er nået op på det valgte lysintensitetsniveau.
1 Tryk på knappen 3 for at slukke lys og vækkelyd. (g. 18)
Lyset omkring ALARM knappen fortsætter med at lyse. Alarmfunktionen er stadig aktiv, og
vækkealarmen vil gå i gang næste dag på det indstillede tidspunkt og med den indstillede lyd
og lysintensitet (g. 12).
2 Tryk på knappen # , hvis lyden skal slukkes, når alarmen går i gang. (g. 19)
3 Tryk på knappen @& , hvis lyset skal slukkes, når alarmen går i gang. (g. 20)
4 Hvis hele alarmfunktionen skal slukkes, skal du trykke på ALARM knappen en eller ere
gange, indtil lydsymbolet i displayet er forsvundet, og den lysende ring omkring ALARM
knappen er slukket.
Snooze-funktion
1 Tryk på SNOOZE/SCREEN BRIGHTNESS CONTROL knappen for at deaktivere lyden i 9
minutter, efter alarmen er gået i gang (g. 21).
Pæren fortsætter med at lyse på det valgte lysintensitetsniveau. Efter 9 minutter afspilles
vækkelyden automatisk igen.
2 Hold SNOOZE/SCREEN BRIGHTNESS CONTROL knappen nede i lidt længere tid for at
dæmpe lyset.
Bemærk: Dette kan kun gøres en gang. Når knappen slippes, vil den igen fungere som SCREEN
BRIGHTNESS CONTROL.
Bemærk: Snooze-funktionen kan kun bruges i 15 minutter, efter alarmen er aktiveret. Efter de 15
minutter fungerer knappen ikke længere som SNOOZE-knap, men kun som SCREEN BRIGHTNESS
CONTROL-knap.
Justering af lysintensiteten i opvågningsfasen
1 Drej på hjulet til lysjustering @ for at vælge en højere eller lavere lysintensitet. (g. 15)
Pæren lyser ved den valgte intensitet under resten af vækkefasen.
Sådan justeres displayets lysstyrke
1 Tryk på knappen SNOOZE/SCREEN BRIGHTNESS CONTROL for at justere lysstyrken i
displayet (g. 21).
Tryk på knappen igen for at indstille lysstyrken til et andet niveau. Der er tre niveauer.
Bemærk: Denne knap kan ikke bruges til at justere displayets lysstyrke, når alarmen er i gang, og når
snooze-funktionen bruges.
,
,
,
,
DANSK 19

3 knap
1 Når alarmen aktiveres på det indstillede vækketidspunkt, trykkes der på knappen 3 for at
slukke vækkealarmens lys og lyd.
Bemærk: Alarmfunktionen fortsætter med at være aktiv og lyset omkring ALARM knappen lyser fortsat.
2 Når du vil slukke for læselampen og/eller radioen, trykker du blot på knappen 3.
Når der trykkes på
3 knappen igen, er det kun lyset, der tændes.
Bemærk: Når alarmfunktionen er aktiv, påvirker det ikke indstillingerne, hvis der trykkes på 3 knappen.
Læselampe
1 Tryk på @& knappen, for at tænde eller slukke for lampen. (g. 20)
2 Drej hjulet til lysjustering @ op eller ned for at øge eller reducere lysintensiteten. (g. 15)
Indikatoren til lysniveauet i displayet @ viser lysintensitetsniveauet (00 til 20). (g. 22)
Tip: Vi anbefaler at indstille lysintensiteten til 20 (højeste niveau) til læsning. Giver dette ikke nok lys, må
du tænde en ekstra lampe.
Husk at stille lysintensiteten tilbage til opvågnings-niveau!
Radio (kun HF3462, HF3461)
1 Radioen tændes ved tryk på RADIO knappen (g. 23).
Den lysende ring omkring knappen begynder at lyse (g. 24).
2 Brug % og ^ knapperne for at vælge frekvens. (g. 25)
Der kan vælges FM-kanaler.
3 Brug eventuelt den eksterne antenne til at opnå bedre modtagelse. Sæt den eksterne antenne
i antennestikket ved siden af symbolet ò på apparatets bagside.
4 Radioen slukkes ved tryk på RADIO knappen (g. 23).
Strømsvigt
For at sikre at alarmen går i gang efter et kortere strømsvigt, er apparatet udstyret med et backupsystem med selvopladende batteri, der ikke skal udskiftes. Systemet husker klokkeslættet i nogle få
minutter.
Efter længerevarende strømsvigt viser displayet et forkert klokkeslæt og alarmtidspunktet er
00.00. Indstil det rigtige klokkeslæt (se afsnittet “Klargøring”) og det rigtige alarmtidspunkt
(se afsnittet “Sådan bruges apparatet”) (g. 6).
Nulstilling
1 Hvis apparatet ikke reagerer, skal du tage stikket ud af stikkontakten og sætte det i igen. Hvis
det ikke hjælper, skal du trykke på reset-knappen nederst på apparatet for at nulstille
displayet til fabriksindstillingerne (g. 26).
Rengøring og vedligeholdelse
Tag altid stikket ud af stikkontakten og lad apparatet køle af i ca. 15 minutter, før det rengøres.
Brug aldrig skuresvampe eller skrappe rengøringsmidler så som benzin, acetone eller lignende til
rengøring af apparatet.
Fjern jævnligt støv fra apparatets inderside med en tør klud, da støvansamlinger tæt på en kraftig
lampe kan udgøre en potentiel brandfare.
1 Apparatet rengøres udvendigt med en fugtig klud.
,
,
,
DANSK20

2 Apparatet rengøres indvendigt med en tør klud.
Åbn pærens udskiftningsdæksel ved først at trykke nederste del af dækslet ind og derefter
opad med lidt kraft (g. 27).
Vip udskiftningsdækslet så langt ud som muligt (g. 28).
Sørg for, at der ikke trænger vand ind i apparatet, og at der ikke spildes vand på det (g. 29).
Udskiftning
Udover pæren er der ingen andre dele i apparatet, der skal udskiftes.
Pæren skal udskiftes, når den holder op med at lyse, eller når lyset bliver svagere (se også afsnittet
“Vigtigt”). Pæren skal udskiftes med en Philips 75 W E27 SOFTONE softwhite 230 V T55 (HF3451)
eller en Philips 100 W E27 SOFTONE softwhite 230 V T55-pære (HF3462, HF3461). Kun disse
pærer giver den korrekte lysintensitet.
Udskiftning af pæren
1 Tag stikket ud af stikkontakten.
2 Lad apparatet afkøle i ca. 15 minutter.
3 Åbn pærens udskiftningsdæksel ved først at trykke nederste del af dækslet ind og derefter
opad med lidt kraft (g. 27).
4 Vip udskiftningsdækslet så langt ud som muligt (g. 28).
5 Skru den gamle pære ud af fatningen (g. 30).
6 Skru en ny pære i.
Miljøhensyn
Apparatet må ikke smides ud sammen med det almindelige husholdningsaffald, når det til sin tid
kasseres. Aevér det i stedet på en kommunal genbrugsstation. På den måde er du med til at
beskytte miljøet (g. 31).
Garanti og service
For alle yderligere oplysninger eller ved eventuelle problemer med apparatet henvises venligst til
Philips hjemmeside på adressen www.philips.com eller det lokale Philips Kundecenter (telefonnumre
ndes i vedlagte “World-Wide Guarantee” folder). Hvis der ikke ndes et kundecenter i dit land,
bedes du venligst kontakte din lokale Philips-forhandler eller serviceafdelingen i Philips Domestic
Appliances and Personal Care BV.
Gældende forbehold i reklamationsretten
Pæren er ikke omfattet af den internationale garanti.
Specikationer
Model HF3451, HF3461 og HF3462
Nominel spænding 230 V
Nominel frekvens 50 Hz
Nominel indgang 75 W (HF3451) eller 100 W
(HF3462, HF3461)
Klasse II
Klassikation Ikke klassiceret
,
,
,
-
DANSK 21

Model HF3451, HF3461 og HF3462
Vandindtrængen IPX0
Driftsforhold Temperatur fra +10 °C til +35 °C
Relativ fugtighed fra 30 % til 90 %
Opbevaringsbetingelser Temperatur fra -20 °C til +50 °C
Relativ fugtighed fra 30% til 90% (ingen
kondensation)
Kredsløbsdiagrammer, reservedelslister og andre tekniske beskrivelser fremsendes efter anmodning.
Tag forholdsregler for at undgå elektromagnetiske forstyrrelser eller andre typer interferens mellem
dette og andre apparater.
Ofte stillede spørgsmål
Spørgsmål Svar
Hvorfor fungerer
apparatet ikke?
Stikket sidder muligvis ikke ordentligt i stikkontakten. Sæt stikket
ordentligt i stikkontakten.
Der kan være strømafbrydelse. Kontrollér strømforsyningen ved at
tilslutte et andet apparat.
Netledningen kan være beskadiget. Er dette tilfældet, må den kun
udskiftes af Philips, et autoriseret Philips værksted eller af tilsvarende
kvalicerede fagfolk for at undgå enhver risiko.
Måske er apparatet overophedet, så overophedningssikringen har
slukket for det. Fjern årsagen til overophedningen (f.eks. et håndklæde,
der dækker et eller ere ventilationshuller) og træk stikket ud af
stikkontakten. Vent i ca. 20 minutter, inden du sætter stikket tilbage i
stikkontakten.
Hvorfor bliver apparatet
varmt under brug?
Dette er normalt, da apparatet opvarmes af pærens lys.
Apparatet reagerer
ikke, når jeg forsøger at
indstille forskellige
funktioner. Hvad gør
jeg?
Tryk på reset-knappen i bunden af apparatet eller tag stikket ud af
stikkontakten, og sæt det i igen. Apparatet nulstilles derved til
fabriksindstillingerne.
Hvorfor tænder lyset
ikke, når alarmen går i
gang?
Lysniveauet muligvis indstillet for lavt.
Du er måske kommet til at slukke alarmfunktionen ved at trykke på
ALARM knappen.
Pæren kan være defekt. Udskift pæren (se afsnittet “Udskiftning”).
Hvorfor kan pæren ikke
tændes straks efter, at
den er blevet slukket?
Der går 3 sekunder, mens pæren dæmpes. I dette tidsrum fungerer
3
knappen ikke.
DANSK22

Spørgsmål Svar
Hvorfor kommer der
ingen lyd, når alarmen
går i gang?
Lydniveauet er muligvis indstillet for lavt. Indstil lydstyrken til et højere
niveau.
Du er måske kommet til at slukke alarmfunktionen ved at trykke på
ALARM knappen.
Hvis du har valgt radioen som alarmlyd (kun HF3462, HF3461), er
radioen muligvis defekt. Tryk på radioknappen, når du har slukket for
alarmen, for at kontrollere om radioen virker. Hvis den ikke virker,
bedes du kontakte dit lokale Philips Kundecenter.
Hvorfor virker radioen
ikke (kun HF3462,
HF3461)?
Radiofunktionen er muligvis defekt. Kontakt det lokale Philips
Kundecenter.
Tilslut den eksterne antenne, hvis den ikke allerede er tilsluttet. Se
“Radio” i afsnittet “Sådan bruges apparatet”.
Hvorfor afgiver radioen
(kun HF3462,
HF3461) en skrattende
lyd?
Måske er sendesignalet svagt. Søg efter det rigtige signal (se afsnittet
“Sådan bruges apparatet”).
Alarmen gik i gang i går.
Hvorfor gør den ikke
det i dag?
Du er måske kommet til at slukke alarmfunktionen ved at trykke på
ALARM knappen. Indstil alarmen til næste dag, og sluk for lyd og lys
til vækkealarmen den næste dag, ved at trykke på
3 knappen (se
afsnittet “Sådan bruges apparatet”).
Lyd- og/eller lysniveauet er muligvis indstillet for lavt. Indstil et højere
lyd- og/eller lysniveau.
Der har muligvis været en strømafbrydelse, der har varet for længe i
forhold til backup-systemets kapacitet. Efter et længerevarende
strømsvigt viser displayet et forkert klokkeslæt og alarmtidspunktet er
00:00. Indstil det rigtige klokkeslæt (se afsnittet “Klargøring”) og det
rigtige alarmtidspunkt (se afsnittet “Sådan bruges apparatet”).
Hvorfor vækker lyset
mig for tidligt/sent?
Lysniveauet er muligvis ikke indstillet til et niveau, der passer til dig. Prøv
et lavere niveau, hvis du vækkes for tidligt eller et højere niveau, hvis du
vækkes for sent. For de este mennesker er indstillingerne effektive
mellem 9-20 (HF3451) eller 7-15 (HF3462, HF3461).
Apparatet er muligvis placeret lavere end hovedet. Sørg for at
apparatet er placeret således, at lyset ikke blokeres af sengen, dynen
eller puden.
Hvorfor virker
SNOOZE knappen
ikke?
Snooze-funktionen kan kun bruges i 15 minutter efter, at alarmen er
gået i gang. Efter de 15 minutter fungerer knappen ikke længere som
SNOOZE-knap, men kun som SCREEN BRIGHTNESS CONTROL
(lysstyrken i displayet).
DANSK 23
 Loading...