

Philips miniRITE T R, HearLink 9010 MNR T R, HL 9010 MNR T R, HER9012, HearLink 7010 MNR T R User Manual
...
HearLink
miniRITE T R
HearLink
Receiver
in-the-Ear
Hearing Aids
Receiver
in-the-Ear
Hearing Aids
miniRITE T R
User Guide


Model overview
This booklet is valid for the following hearing
aid families and models:
HearLink 9010 MNR T R – HL 9010 MNR T R
(HER9012)
GTIN: 05714464002818
HearLink 7010 MNR T R – HL 7010 MNR T R
(HER7012)
GTIN: 05714464002801
HearLink 5010 MNR T R – HL 5010 MNR T R
(HEB5012)
GTIN: 05714464002795
The following acoustic options are available
for the above families:
60-Speaker
85-Speaker
100-Speaker (power aid)
100-Speaker with Power Mold (power aid)
105-Speaker with Power Mold (power aid)
Your individual hearing aid
settings
Settings overview for your hearing aid
Left Right
Yes No
Yes No
On O
On O
On O
On O
Volume Control
Program Button
Volume Control indicators
Beeps at min/max
volume
Clicks when
changing volume
Beeps at preferred
volume
Battery indicators
Low battery warning
Yes No
Yes No
On O
On O
On O
On O
Warranty certicate
Name of owner:
Hearing care professional:
Hearing care professional address:
Hearing care professional phone:
Purchase date:
Warranty period:
Model right:
Model left:
Month:
Serial no.:
Serial no.:

International warranty
Your hearing aid is covered by an international
limited warranty issued by the manufacturer for
a period of 24 months from the date of delivery.
This limited warranty covers manufacturing and
material defects in the hearing aid itself, but
not in accessories such as batteries, tubing,
speakers, earpieces and lters, etc. Problems
arising from improper/incorrect handling
or care, excessive use, accidents, repairs
made by an unauthorized party, exposure to
corrosive conditions, physical changes in your
ear, damage due to foreign objects entering
the device or incorrect adjustments are NOT
covered by the limited warranty and may void
it. The above warranty does not aect any legal
rights that you might have under applicable
national legislation governing sale of consumer
goods. Your hearing care professional may have
issued a warranty that goes beyond the clauses
of this limited warranty. Please consult him/her
for further information.
If you need service
Take your hearing aid to your hearing care
professional, who may be able to sort out minor
problems and adjustments immediately.

Introduction to this booklet
This booklet shows you how to use and
maintain your new hearing aid. Please read
the booklet carefully including the warning
sections. This will help you to get the most out
of your new hearing aid.
Your hearing care professional has adjusted
the hearing aid to meet your needs. If you
have further questions, please contact your
hearing care professional.
More information is available on
www.hearingsolutions.philips.com.

Intended use
The hearing aid is intended to amplify and
transmit sound to the ear and thereby
compensate for impaired hearing within mild
to moderate to profound hearing loss. This
hearing aid is intended to be used by adults
and children older than 36 months.
Important notice
The hearing aid amplication is uniquely
adjusted and optimized to your hearing
capabilities during the hearing aid
tting performed by your hearing care
professional.

In short
Charging
Charge the hearing aid every night.
The LED on the hearing aid will turn red when
the hearing aid is charging and green when
fully charged.
It takes 3 hours to fully charge the hearing aid.
ON/O FF
· The hearing aid turns ON when you remove it
from the charger.
· The hearing aid turns OFF when you place it
in the charger.
Always leave the charger connected to a
power supply when the hearing aid is seated
in the charging port. Unplugging the charger
will make the hearing aid turn on and start
using the battery.

Table of contents
Identify your hearing aid, speaker,
and earpiece 13
Your hearing aid −What it is and does 16
Charger − What it is and does 17
Preparing the charger 18
Charging the hearing aids 19
Charging time 20
Battery performance 21
Turn hearing aid ON/OFF using charger 22
Turn hearing aid ON/OFF using Program
Button 23
Low battery indication 24
Identify left and right hearing aid 25
Put on the hearing aid 26
Cleaning 27
Replacing standard earpieces 29
ProWax miniFit lter 30
Replace ProWax miniFit lter 31

Clean customized earpieces 32
Replace ProWax lter 33
Store the hearing aid 34
Flight mode 35
Optional features and accessories 36
Change volume (optional) 37
Change program (optional) 38
Mute the hearing aid (optional) 40
Put hearing aid in pairing mode 41
Using hearing aid with iPhone, iPad,
or iPod touch 42
Pairing hearing aid with iPhone 43
Re-connect your hearing aids to your
iPhone, iPad, or iPod touch 46
Wireless accessories (optional) 47
Other options (optional) 48
Sound and LED indications 49
General warnings 52
Troubleshooting guide 62

Water & dust resistance 66
Conditions of use 67
Mobile phone 68
Technical information 70
Technical data 75
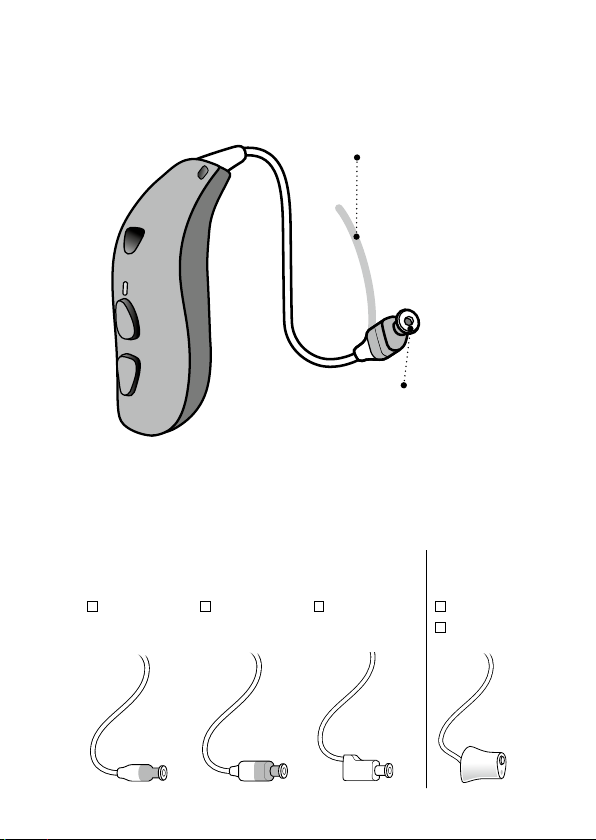
Identify your hearing aid,
speaker, and earpiece
Ear grip
(optional)
Speaker
(60-Speaker shown)
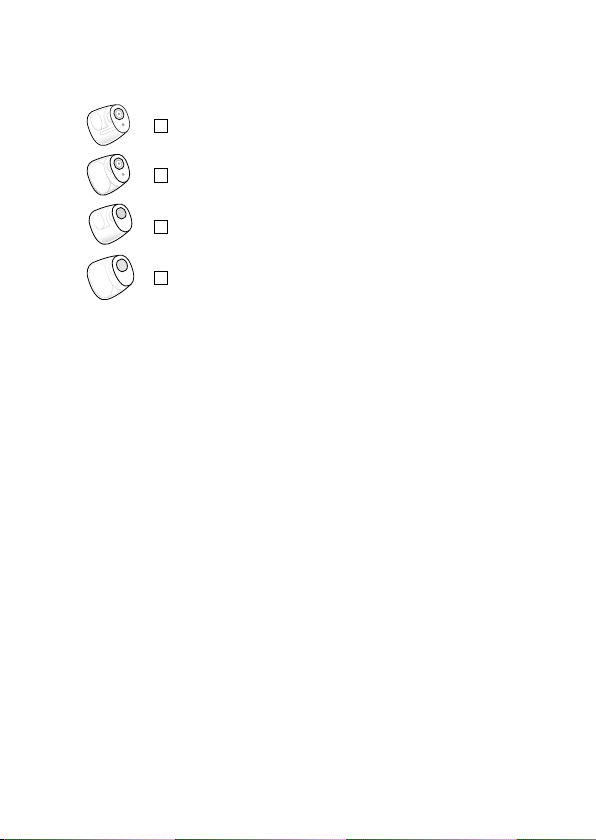
Speakers
miniRITE T R hearing aid comes with ve
dierent speakers:
Standard
speakers
60-Speaker 85-Speaker 100-Speaker 100-Speaker
Power Mold
speakers
105-Speaker
13
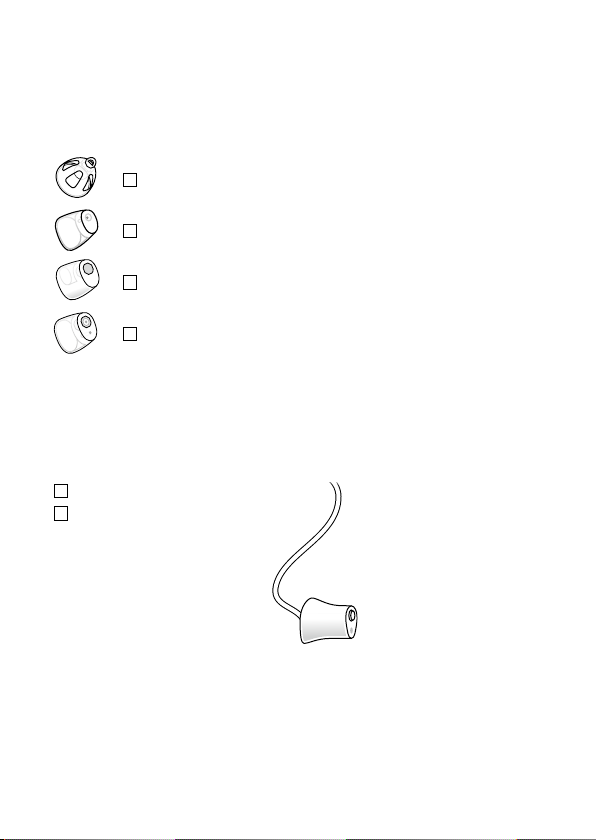
Earpieces
The speaker uses one of the following
earpieces:
Dome (Open Dome shown)*
Grip Tip*
VarioTherm® Micro Mold or Lite Tip
Micro Mold or Lite Tip
Power Mold speakers
100-Speaker
105-Speaker
* Please see details for replacing the dome or
Grip Tip in sec tion: “Replace dome or Grip Tip”.
Va r ioThe rm® is a registered trademark of Dreve.
14
Customized earpieces
Micro Mold
Lite Tip
VarioTherm® Micro Mold
VarioTherm® Lite Tip
Va r ioThe rm® is a registered trademark of Dreve.
15
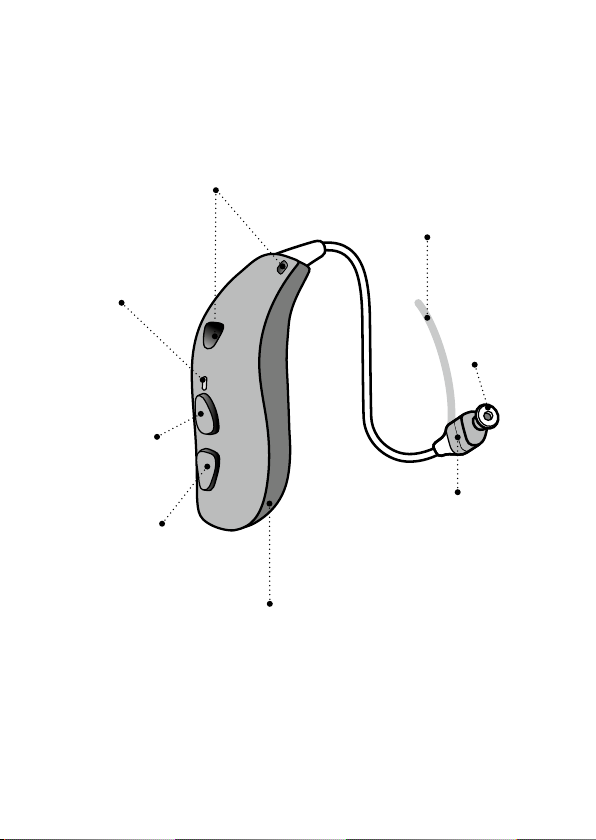
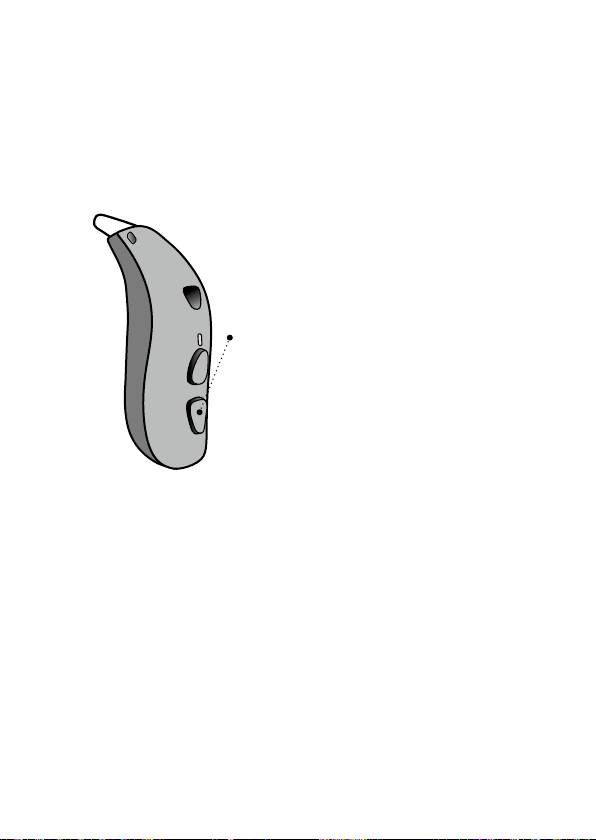
Your hearing aid −
What it is and does
Microphones
Sound in
LED light
Charging, ON,
OFF, ight
mode status
Program
Button
Upper part:
Volume up,
program
change.
Lower part:
ON, OFF, ight
mode, volume
down, program
change
Rechargeable battery
Only replaced by
the hearing care
professional
Ear grip
Holds the speaker
in place (optional)
Wax lter
Protect
the speaker
from wax
Speaker
Sound out
16
Start up
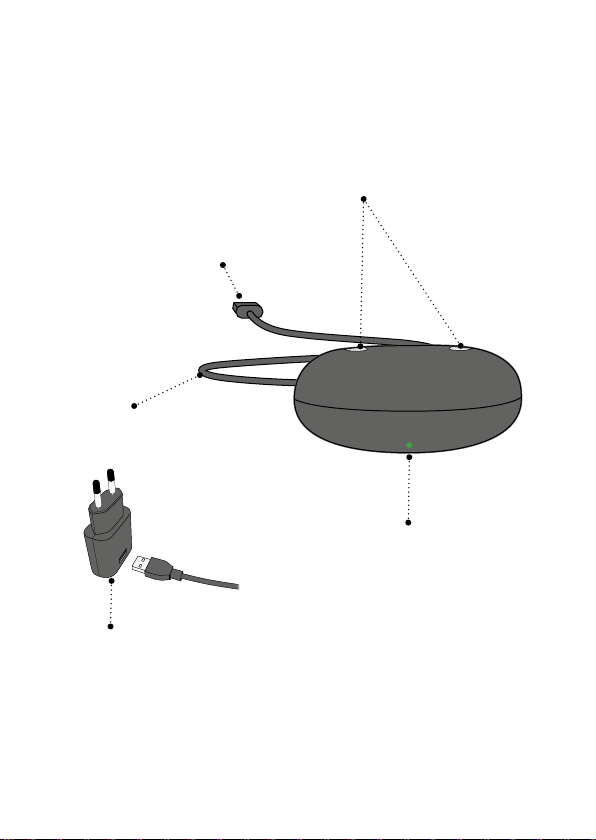
Charger − What it is and does
Charging ports
For hear ing aids when
charging
USB connector
Insert in power plug or
other power sources
Power cable
Supply power
LED light
Status indicator for
charger ON/OFF
Power plug*
For power socket
* Power plug will vary from countr y to country
17
Start up
Start up
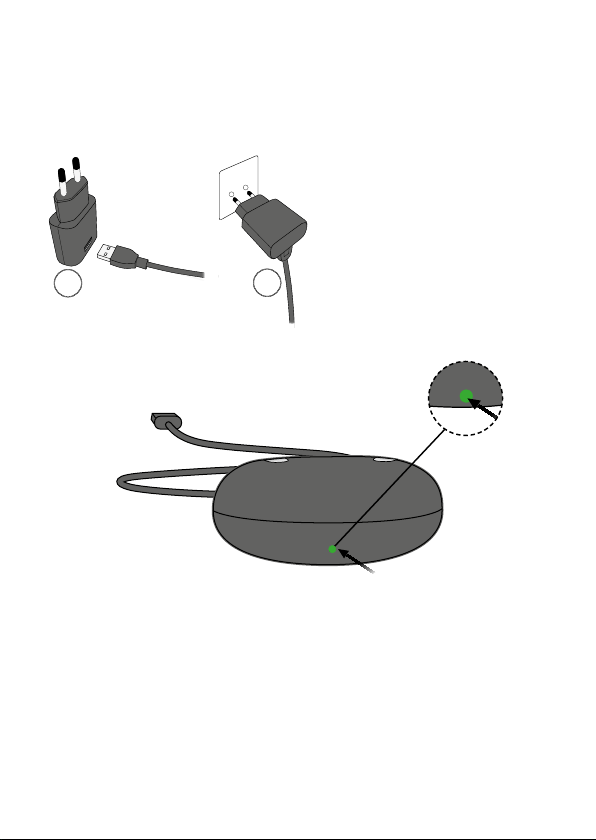
Preparing the charger
Connect to power source
1. Insert the USB
connector into
the power plug.
2. Insert the power
plug into a
1
Charger is on
2
power socket.
The charger
will turn on
automatically.
When the charger is connected to power,
the green LED turns on.
18
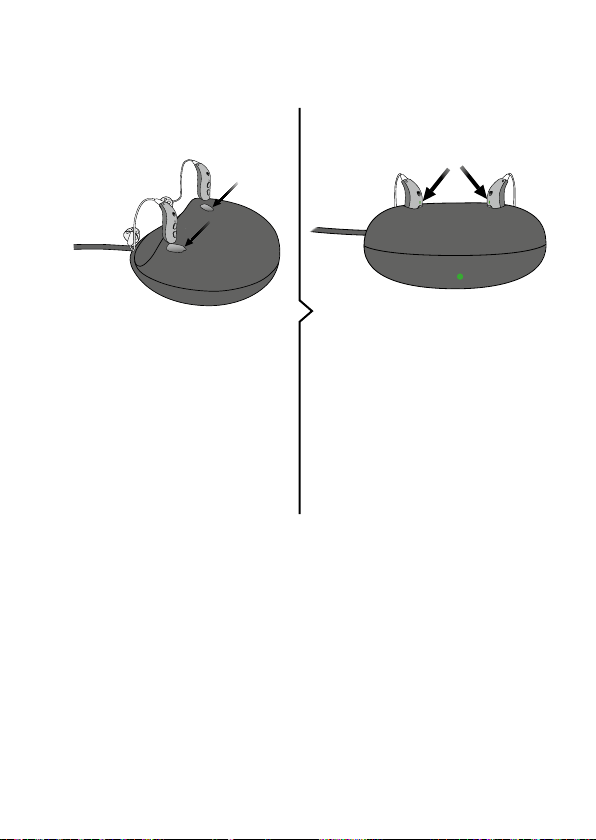
Charging the hearing aids
Place hearing aids
in charger
Place the hear ing aids
in the charging ports as
shown in the picture.
Charger
The LEDs on the hearing aids
will turn on when the hearing
aids are correctly placed in the
charger.
Hearing aid LED charging
status:
Red light = Charging
Green light = Fully charged
19

Charging time
Fully charge your hearing aid at least 3 hours
before rst time use.
Charge your hearing aid every night. That
ensures that you will start your day with a fully
charged hearing aid.
Charging time can vary depending on the
remaining capacity of the battery. If your
hearing aid is completely drained, the normal
charging time is:
3 hours = Fully charged
1 hour = 50 % charged
0.5 hours = 25 % charged
The charging process will automatically stop
when the battery is fully charged. Leave
the hearing aid in the charger when you do
not use it. Remember to keep the charger
connected to a power source.
Note that charging time may vary between the
left and the right hearing aid.
20

Battery performance
The daily battery performance varies
depending on your individual use and hearing
aid settings.
Streaming sound from a TV, mobile phone
or AudioClip can inuence daily battery
performance.
If your hearing aid runs out of battery, place it
in the charger for a recharge. Additional usage
time cannot be achieved by trying to restart
the hearing aid.
For the best charging conditions, the room
temperature should be between +5 °C to
+35 °C.
If you experience that your hearing aid does
not perform for a full day, it might be time
to have the battery replaced. Contact your
hearing care professional.
21

Turn hearing aid ON/OFF
using charger
Your hearing aid automatically turns ON when
removed from the charger.
The hearing aid LED turns green after
6 seconds, conrming that it is ready for use.
You may hear a start-up jingle.
Your hearing aid automatically turns OFF
when placed in the charger and starts
charging. The LED turns red.
Important notice
Always leave the charger connected to a
power source when the hearing aid is seated
in the charging port. Unplugging the charger
will make the hearing aid turn on and start
using the battery.
22
Turn hearing aid ON/OFF
using Program Button
The hearing aid can be turned ON and OFF
using the Program Button.
ON:
Press and hold the lower part of
the button for approx. 2 seconds.
Release the button and wait until
the hearing aid LED turns GREEN.
The hearing aid is now turned ON.
You may hear a short start-up
jingle.
OFF:
Press and hold the lower part of
the button for approx. 3 seconds
until the hearing aid LED turns
RED and the hearing aid plays 4
descending tones. Release the
Program Button and the hearing
aid is turned OFF.
See overview “Sound and LED indications”.
23

Low battery indication
When the battery is running low, you will
hear 3 short beeps. This will leave you
approximately 2 hours before the hearing aid
stops working. The beeps will be repeated
every 30 minutes. Just before the battery runs
out you will hear 4 descending tones.
If you are streaming audio to your hearing
aid (e.g., from TV or mobile phone), you have
approximately 1 hour before the hearing aid
stops working, when you hear the 3 short
beeps.
Stopping streaming will prolong the battery
performance.
Three beeps
The battery is
running low
Four beeps
The battery
has run out
Optional LED
The LED blinks red and continuously repeats
to indicate that the battery is low.
24
 Loading...