

Philips HearLink 9000, HL 9000, HEI9000, HEI9001, HEI9002 User Manual
...
HearLink
HearLink
In-the-Ear
Hearing Aids
In-the-Ear
Hearing Aids
User Guide


Model overview
This booklet is valid for the Philips HearLink family
in the following hearing aid models, battery sizes,
styles, lter types and options.
To be lled out by your hearing care professional.
Models/CTNs
Battery size
Styles
Filters
Options
HearLink 9000 – HL 9000
(HEI9000, HEI9001, HEI9002)
GTIN: 05714464002788
HearLink 7000 – HL 7000
(HEI7000, HEI7001, HEI7002)
GTIN: 05714464002771
HearLink 5000 – HL 5000
(HEI5000, HEI5001, HEI5002)
GTIN: 05714464002764
HearLink 3000 – HL 3000
(HEI3000, HEI3001, HEI3002)
GTIN: 05714464002757
HearLink 2000 – HL 2000
(HEI2000, HEI2001, HEI2002)
GTIN: 05714464002740
10
IIC, Invisible-In-the-Canal
CIC, Completely-In-the-Canal
ITC, In-the-Canal
ProWax miniFit lter
T-C a p lter
O-Cap lter
Program Button
Volume Control
Tel e co il
Auto Telephone
NFMI
312
Your individual hearing aid
settings
Settings overview for your hearing aid
Left Right
Yes No
Yes No
Yes No
On O
On O
On O
On O
Volume Control
Program Button
Mute
Volume Control indicators
Beeps at min/max
volume
Clicks when changing
volume
Beeps at preferred
volume
Battery indicators
Low battery warning
Yes No
Yes No
Yes No
On O
On O
On O
On O

Warranty certicate
Name of owner:
Hearing care professional:
Hearing care professional address:
Hearing care professional phone:
Purchase date:
Warranty period:
Model right:
Model left:
Battery size:
Month:
Serial no.:
Serial no.:

International warranty
Your hearing aid is covered by an international
limited warranty issued by the manufacturer for
a period of 24 months from the date of delivery.
This limited warranty covers manufacturing and
material defects in the hearing aid itself, but
not in accessories such as batteries, tubing,
speakers, earpieces and lters, etc. Problems
arising from improper/incorrect handling
or care, excessive use, accidents, repairs
made by an unauthorized party, exposure to
corrosive conditions, physical changes in your
ear, damage due to foreign objects entering
the device or incorrect adjustments are NOT
covered by the limited warranty and may void
it. The above warranty does not aect any legal
rights that you might have under applicable
national legislation governing sale of consumer
goods. Your hearing care professional may have
issued a warranty that goes beyond the clauses
of this limited warranty. Please consult him/her
for further information.
If you need service
Take your hearing aid to your hearing care
professional, who may be able to sort out minor
problems and adjustments immediately.

Introduction to this booklet
This booklet shows you how to use and
maintain your new Philips hearing aid. Please
read the booklet carefully including the
warning sections. This will help you to achieve
the full benet of your new hearing aid.
Your hearing care professional has adjusted
the hearing aid to meet your needs. If you
have further questions, please contact your
hearing care professional.
More information is available on
www.hearingsolutions.philips.com.

Intended use
The hearing aid is intended to amplify and
transmit sound to the ear and thereby
compensate for impaired hearing within mild
to severe hearing loss. This hearing aid is
intended for use by adults and children older
than 36 months.
Important notice
The hearing aid amplication is uniquely
adjusted and optimized to your hearing
capabilities during the hearing aid
tting performed by your hearing care
professional.

Identify your hearing aid
Philips is oering a wide variety of in-the-ear
hearing aids. Please see the model overview
for your style and battery size. This will make
it easier for you to navigate through this
booklet.

Table of contents
Size 10 battery (CIC style shown) 12
Size 312 battery (ITC style shown) 13
Identify left and right hearing aid 14
MultiTool for handling batteries
and cleaning 15
Turn the hearing aid on and o 16
When to replace a battery 17
Replace the battery 18
Insert the hearing aid 20
Remove your hearing aid 21
Caring for your hearing aid 22
Filter replacement 24
Replace ProWax miniFit lter 25
Replace T-Cap lter 26
Replace O-Cap lter 27
Optional features and accessories 28
Change programs 29
Change volume with Program Button 31

Change volume with Volume Control 32
Mute the hearing aid 33
Other options 34
General warnings for all hearing aids 35
Warning to hearing aid dispensers 40
Troubleshooting guide 44
Water & dust resistance 46
Conditions of use 47
Mobile phone 48
Technical information 50
Technical Data 55
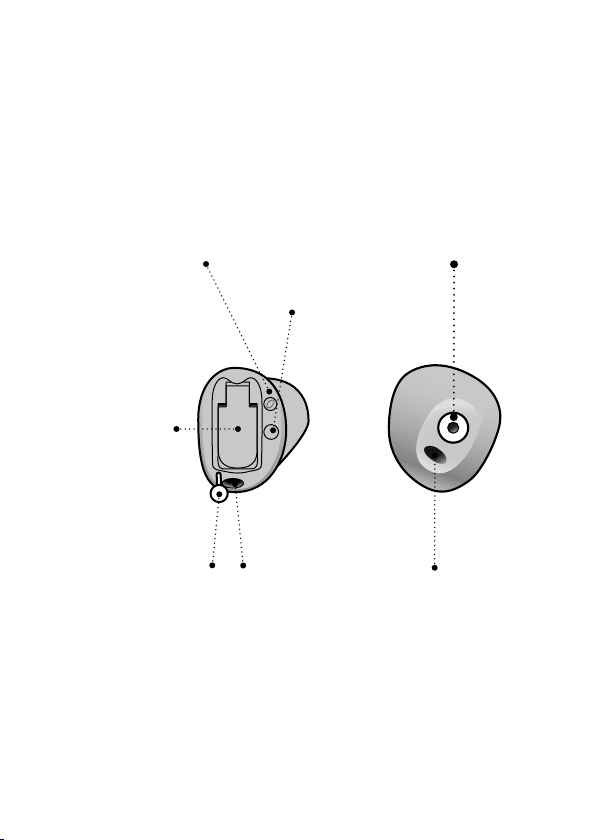
Size 10 battery
(CIC style shown)
What it is and does
Microphone inlet
Sound in
Battery drawer
Contains the
battery and
functions as
on/o switch
Pull-out string
Pull out the
hear ing aid
Program Button
(optional)
Mute, change
volume and
program
Vent
Sound outlet
Sound out
Vent
Components may be positioned dierently on
your hearing aid.
12
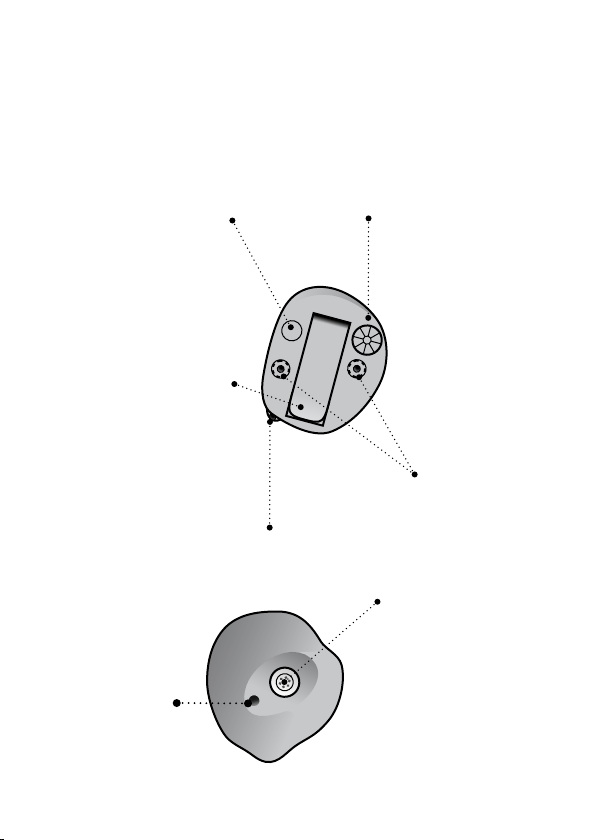
Size 312 battery
(ITC style shown)
What it is and does
Program Button
(optional)
Mute, change
volume and
program
Battery drawer
Contains the
battery and
functions as
on/o switch
Vent
Volume
Control
(optional)
Change
volume
Microphone inlet
Sound in
Vent
Sound outlet
Sound out
13
Identify left and right
hearing aid
It is important to distinguish between the left
and the right hearing aid as they might be
shaped and programmed dierently.
A BLUE shell,
dot or tex t ident ies
the LEF T hear ing aid*
A RED shell,
dot or tex t ident ies
the RIGHT hear ing aid*
* Shell and dot is only available for IIC
14
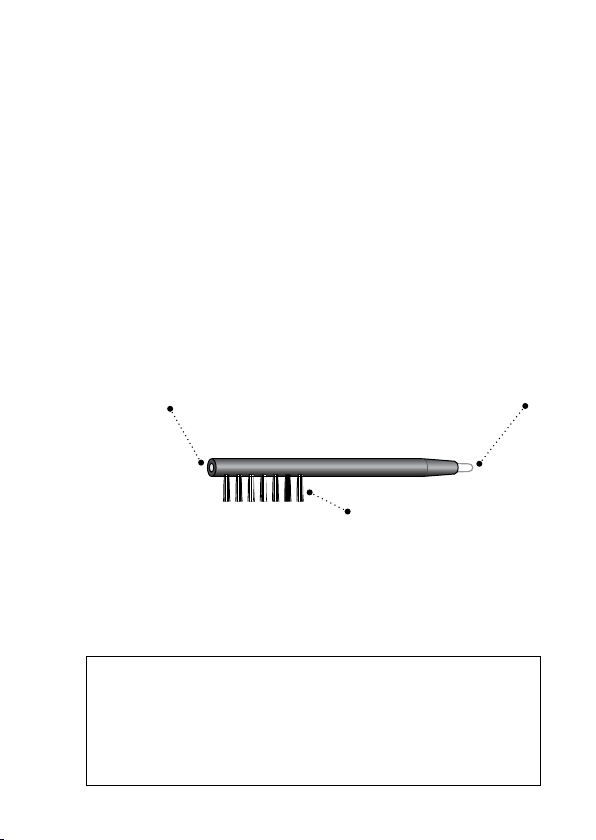
MultiTool for handling
batteries and cleaning
The MultiTool contains a magnet that makes
it easier to replace the battery in the hearing
aid. It also contains a brush and a wire loop
for cleaning and removing ear wax from your
earpiece. If you need a new MultiTool, please
contact your hearing care professional.
Magnet
Brush
Important notice
The MultiTool has a built-in magnet.
Keep the MultiTool at least 30 cm away
from credit cards and other magnetically
sensitive devices.
Wire loop
15
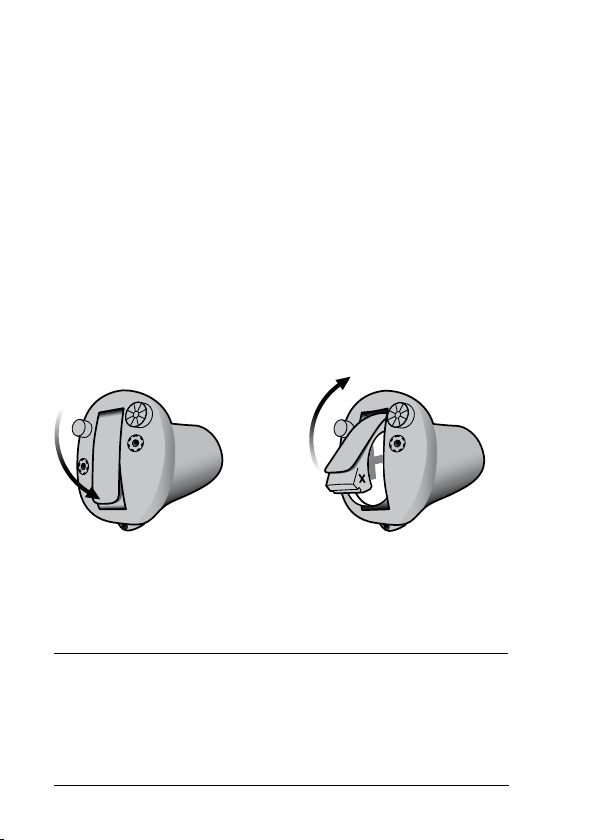
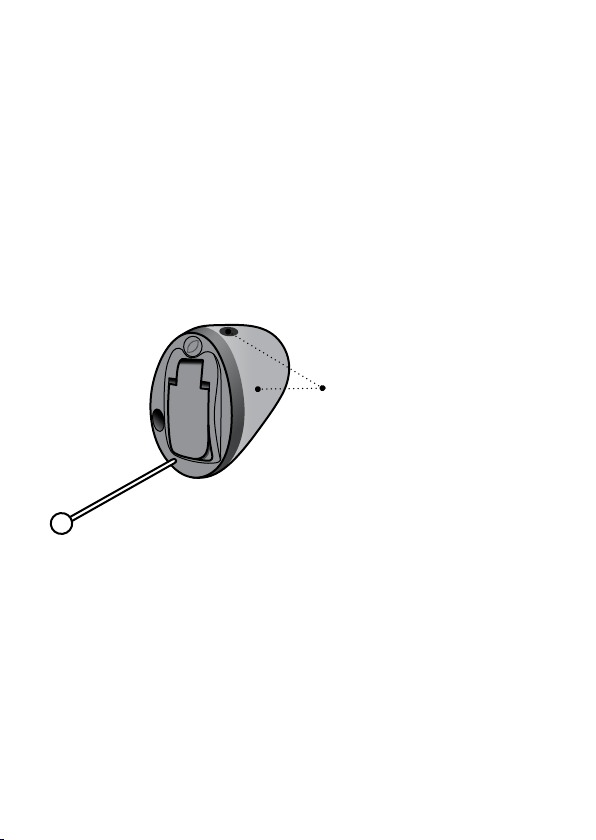
Turn the hearing aid on and o
The battery drawer is also used to switch the
hearing aid on and o. To preserve the battery,
make sure your hearing aid is switched o when
you are not wearing it. If you wish to return
to the standard settings of the hearing aid
programmed by your hearing care professional,
simply open and then close the battery drawer.
Tur n ON
Close the battery drawer
with the battery in place
Tur n OF F
Open the battery drawer
Whenever the hearing aid is not in use for
longer periods of time (e.g., at night), fully
open the battery drawer to allow air to
circulate and to make sure the hearing aid
does not drain the battery.
16

When to replace a battery
When it is time to replace the battery, you
will hear three beeps repeated at moderate
intervals until the battery runs out.
Three beeps
The bat tery is running low
Four beeps
The bat tery has run out
Battery tip
To make sure the hearing aid is always
working, bring spare batteries with you, or
replace the battery before you leave home.
17
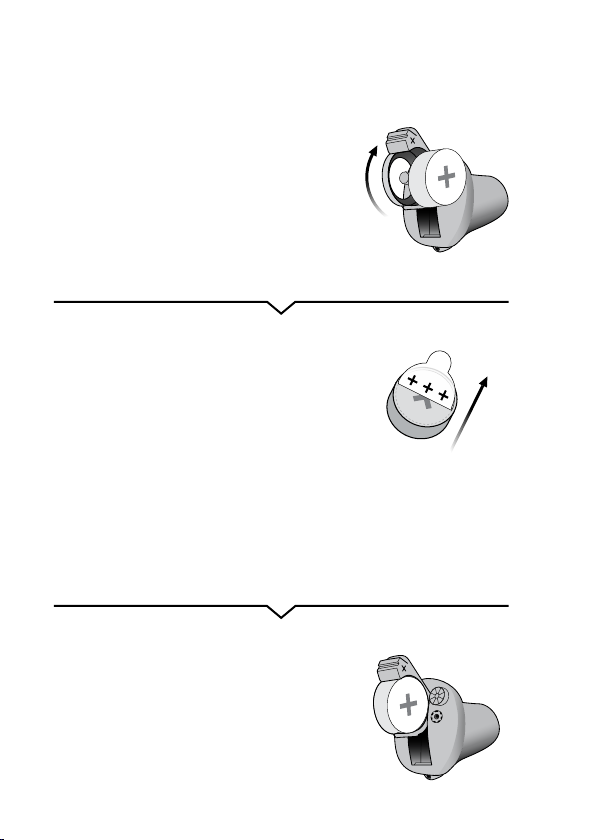
Replace the battery
1. Remove
Fully open the battery drawer.
Remove the battery.
2. Uncover
Remove the sticky label from
the + side of the new battery.
Tip:
Wait 2 minutes so that the
battery can draw air, to ensure
optimal functioning.
3. Insert
Insert the new battery into the
battery drawer.
Make sure the + side faces the
+ on the battery drawer.
18
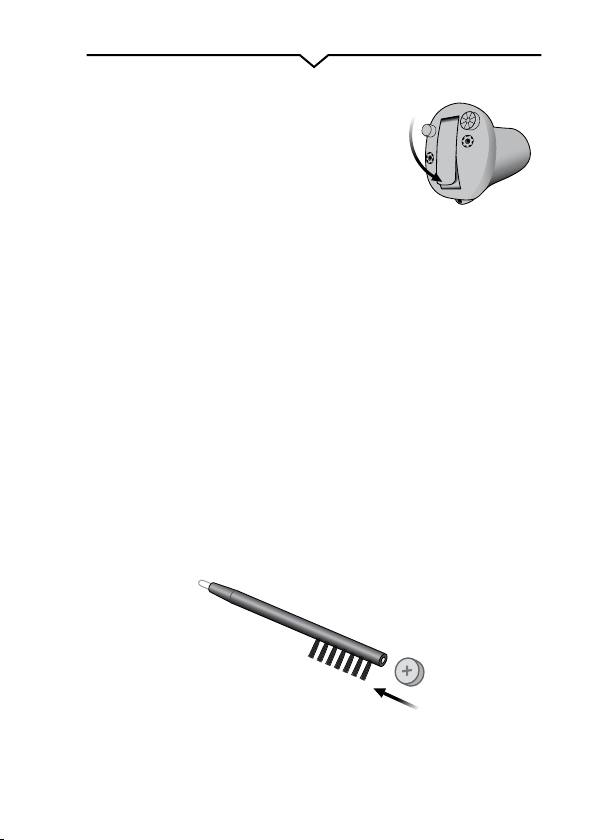
4. Close
Close the battery drawer.
The hearing aid will play a
jingle through the earpiece.
Hold the earpiece close to
your ear to hear the jingle.
Tip
The MultiTool can be used for battery change.
Use the magnetic end to remove and insert
batteries.
The MultiTool is provided by your hearing care
professional.
Mu ltiToo l
19
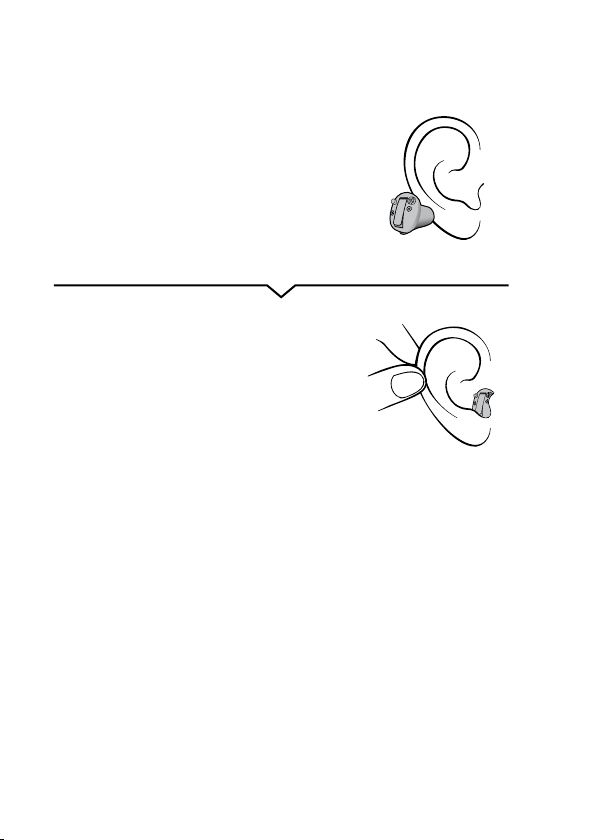
Insert the hearing aid
Step 1
Place the tip of the hearing
aid in your ear canal.
Step 2
Gently pull your ear outwards
and push the hearing aid
into the ear canal, twisting
slightly if necessary. Follow
the natural contour of the ear
canal. Push the hearing aid to
make sure it ts comfortably
in the ear.
20
 Loading...