

Philips HeartStart XL Plus 861290 Instructions For Use Manual

Philips
HeartStart XL
Plus Owners
Manual
Get an original copy of the Philips HeartStart XL Plus Owners
Manual for manufacturer information about service,
available accessories and how to use and maintain your
device.

English
HeartStart XL+
Model No. 861290
Instructions for Use

NOTICE
About This Edition
Publication number 453564090581
Edition 2; Printed in the USA
To determine the product level version to which these Instructions
for Use are applicable refer to the version level appearing on the back
cover of this book or on the label of the User Documentation
CD-ROM that accompanied this device. This information is subject
to change without notice.
The information in this document applies to the HeartStart XL+
versions indicated below.
Philips shall not be liable for errors contained herein or for
incidental or consequential damages in connection with the
furnishing, performance, or use of this material.
Edition History
Pub. Number Ed. S/W Version Print Date
453564090581 1 A July 2011
453564090581 2 A.01 Dec. 2011
Copyright
Copyright © 2011
Koninklijke Philips Electronics N.V.
All rights are reserved. Permission is granted to copy and distribute
this document for your organization’s internal educational use.
Reproduction and/or distribution outside your organization in
whole or in part is prohibited without the prior written consent of
the copyright holder.
SMART Biphasic
Other trademarks and trade names are those of their respective
owners.
®
is a registered trademark of Philips.
Medical Device Directive
The HeartStart XL+ complies with the requirements of the Medical
Device Directive 93/42/EEC and carries the
accordingly.
0123
mark
Manufacturer:
Philips Medical Systems
3000 Minuteman Road
Andover, MA USA 01810-1099
(978) 687-1501
Authorized EU-representative:
Philips Medizin Systeme Böblingen GmbH
Hewlett Packard Str. 2
71034 Böblingen
Germany
Canada EMC: ICES-001
For the Declaration of Conformity Statement, please see the Philips
Healthcare web site at
http://incenter.medical.philips.com/PMSPublic. Scroll over the
Quality and Regulatory tab located in the upper left corner of the
window. Click to see the regulatory by Modality. Then click to select
Defibrillators and select the entry for Declaration of Conformity
(DoC).
Chemical Content: REACH requires Philips Healthcare to provide
chemical content information for Substances of Very High Concern
(SVHC) if they are present above 0.1% of the product weight.
Components of/within electric and electronic equipment may
contain phthalates above the threshold (e.g. bis(2-ethyl (hexyl)
phthalate), CAS nr.: 117-81-7). the REACH SVHC list is updated
on a regular basis. Therefore please refer to the following Philips
REACH website for the most up-to-date information on products
containing SVHC above the threshold.
http://www.philips.com/about/sustainability/reach.page.
Warning
Radio frequency (RF) interference coming from devices other than
the HeartStart XL+ may degrade the performance of the device.
Electromagnetic compatibility with surrounding devices should be
assessed prior to using the defibrillator/monitor.
Use of supplies or accessories other than those recommended by
Philips may compromise product performance.
THIS PRODUCT IS NOT INTENDED FOR HOME USE. U.S.
FEDERAL LAW RESTRICTS THIS DEVICE TO SALE BY OR
ON THE ORDER OF A PHYSICIAN.
I

Notice
Conventions Used in This Manual
This book contains the following conventions:
WARNING: Warning statements alert you to a potential serious outcome, adverse event or safety hazard. Failure to
observe a warning may result in death or serious injury to the user or patient.
CAUTION: Caution statements alert you to where special care is necessary for the safe and effective use of the
product. Failure to observe a caution may result in minor or moderate personal injury or damage to the
product or other property, loss of data, and possibly in a remote risk of more serious injury and/or cause
environmental pollution.
NOTE: Notes contain additional information on usage.
The “bull’s eye” icon indicates a process or a procedure (a set of steps to achieve a certain goal).
Text represents text that appears on the device screen.
[Soft key text] represents text that appears as a soft key label on the device screen.
“Voice” represent voice prompt messages.
On-line viewing only
Hypertext represents hypertext links, which display as blue; click on the blue link to jump to that
destination.
II

Table of Content
Chapter 1 Introduction 1
Overview . . . . . . . . . . . . . . . . . . . . . . . . . 1
Intended Use . . . . . . . . . . . . . . . . . . . . . . . 2
Indications for Use . . . . . . . . . . . . . . . . . . . . . . 2
Safety Considerations . . . . . . . . . . . . . . . . . . . . . 3
Getting Started . . . . . . . . . . . . . . . . . . . . . . . 3
Documentation and Training . . . . . . . . . . . . . . . . . . . 4
Chapter 2 Device Basics 5
Introduction . . . . . . . . . . . . . . . . . . . . . . . . 5
Basic Orientation . . . . . . . . . . . . . . . . . . . . . . . 6
Front of the Device . . . . . . . . . . . . . . . . . . . . . . 6
Right (Therapy) Side . . . . . . . . . . . . . . . . . . . . . 7
Connecting the Therapy Cable . . . . . . . . . . . . . . . . . . . 7
Left (Monitor) Side . . . . . . . . . . . . . . . . . . . . . . 9
Top Pan el . . . . . . . . . . . . . . . . . . . . . . . . 11
Back Panel . . . . . . . . . . . . . . . . . . . . . . . . 13
Accessory Storage System . . . . . . . . . . . . . . . . . . . . 16
Installing Paper . . . . . . . . . . . . . . . . . . . . . . . 18
Test Plug & Test Load . . . . . . . . . . . . . . . . . . . . . 19
Chapter 3 Working with the HeartStart XL+ 21
Operating Modes . . . . . . . . . . . . . . . . . . . . . . . 21
Controls. . . . . . . . . . . . . . . . . . . . . . . . . . 22
Therapy Knob and Controls . . . . . . . . . . . . . . . . . . . . 22
General Function Buttons . . . . . . . . . . . . . . . . . . . . 23
Soft Keys . . . . . . . . . . . . . . . . . . . . . . . . 23
Ready For Use Indicator . . . . . . . . . . . . . . . . . . . . . 24
Power . . . . . . . . . . . . . . . . . . . . . . . . . . 24
Lithium Ion Battery . . . . . . . . . . . . . . . . . . . . . . 25
Power Indicators . . . . . . . . . . . . . . . . . . . . . . . 25
Turning the HeartStart XL+ On . . . . . . . . . . . . . . . . . . . 26
Turning the HeartStart XL+ Off . . . . . . . . . . . . . . . . . . . 26
Device Shutdown . . . . . . . . . . . . . . . . . . . . . . 26
The Display . . . . . . . . . . . . . . . . . . . . . . . . . 27
Status Area . . . . . . . . . . . . . . . . . . . . . . . . 27
Parameter Area . . . . . . . . . . . . . . . . . . . . . . . 28
Message Area . . . . . . . . . . . . . . . . . . . . . . . 29
III

Table of Contents
Waveform and Display Soft Keys Area . . . . . . . . . . . . . . . . . 29
Adjusting Volumes. . . . . . . . . . . . . . . . . . . . . . 32
Alarms. . . . . . . . . . . . . . . . . . . . . . . . . . 33
Clinical Mode Alarm Notification . . . . . . . . . . . . . . . . . . 34
Responding to Alarms . . . . . . . . . . . . . . . . . . . . . 37
Entering Patient Information . . . . . . . . . . . . . . . . . . . . 38
Continued Use . . . . . . . . . . . . . . . . . . . . . . . 39
Passwords . . . . . . . . . . . . . . . . . . . . . . . . . 39
Safety Considerations . . . . . . . . . . . . . . . . . . . . . . 40
Chapter 4 ECG Monitoring 43
Overview . . . . . . . . . . . . . . . . . . . . . . . . . 43
Preparing to Monitor ECG . . . . . . . . . . . . . . . . . . . . 44
Skin Preparation . . . . . . . . . . . . . . . . . . . . . . 44
Monitoring ECG with Pads . . . . . . . . . . . . . . . . . . . 44
Monitoring ECG with Electrodes . . . . . . . . . . . . . . . . . . 45
Monitor View . . . . . . . . . . . . . . . . . . . . . . . . 49
Selecting the Waveform . . . . . . . . . . . . . . . . . . . . 49
Displaying an Annotated ECG . . . . . . . . . . . . . . . . . . . 51
Arrhythmia Monitoring . . . . . . . . . . . . . . . . . . . . . 52
Aberrantly-Conducted Beats . . . . . . . . . . . . . . . . . . . 52
Intermittent Bundle Branch Block . . . . . . . . . . . . . . . . . . 52
Arrhythmia Learning/Relearning . . . . . . . . . . . . . . . . . . 52
Heart Rate and Arrhythmia Alarms . . . . . . . . . . . . . . . . . . 54
Setting Alarms. . . . . . . . . . . . . . . . . . . . . . . 56
Responding to Alarms . . . . . . . . . . . . . . . . . . . . . 57
HR/Arrhythmia Alarms in AED Mode . . . . . . . . . . . . . . . . . 57
Troubleshooting . . . . . . . . . . . . . . . . . . . . . . . 57
Chapter 5 AED Mode 59
Precautions for AED Therapy . . . . . . . . . . . . . . . . . . . 60
AED View. . . . . . . . . . . . . . . . . . . . . . . . . 61
AED Soft Keys . . . . . . . . . . . . . . . . . . . . . . 62
Using AED Mode to Defibrillate . . . . . . . . . . . . . . . . . . . 63
Preparation . . . . . . . . . . . . . . . . . . . . . . . 63
Operation . . . . . . . . . . . . . . . . . . . . . . . . 63
Using AED Mode to Monitor . . . . . . . . . . . . . . . . . . . 70
Configurable Resuscitation Protocols. . . . . . . . . . . . . . . . . . 71
AED Alarms . . . . . . . . . . . . . . . . . . . . . . . . 71
Other Alarms in AED Mode . . . . . . . . . . . . . . . . . . . 72
Troubleshooting . . . . . . . . . . . . . . . . . . . . . . . 72
Chapter 6 Manual Defibrillation 73
Overview . . . . . . . . . . . . . . . . . . . . . . . . . 73
IV

Table of Contents
Precautions for Manual Defibrillation . . . . . . . . . . . . . . . . . . 74
Code View . . . . . . . . . . . . . . . . . . . . . . . . . 75
Preparing for Defibrillation . . . . . . . . . . . . . . . . . . . . . 76
Using Multifunction Electrode Pads . . . . . . . . . . . . . . . . . . 76
Using External Paddles . . . . . . . . . . . . . . . . . . . . . 76
Using Infant Paddles. . . . . . . . . . . . . . . . . . . . . . 77
Using Internal Paddles . . . . . . . . . . . . . . . . . . . . . 77
Defibrillation . . . . . . . . . . . . . . . . . . . . . . . . 78
Step 1 - Select Energy . . . . . . . . . . . . . . . . . . . . . 78
Step 2 - Charge . . . . . . . . . . . . . . . . . . . . . . . 78
Step 3 - Shock . . . . . . . . . . . . . . . . . . . . . . . 79
Manual Defibrillation Alarms . . . . . . . . . . . . . . . . . . . . 80
Troubleshooting. . . . . . . . . . . . . . . . . . . . . . . . 80
Chapter 7 Cardioversion 81
Overview . . . . . . . . . . . . . . . . . . . . . . . . . 81
Precautions for Cardioversion . . . . . . . . . . . . . . . . . . . . 82
Preparing for Synchronized Cardioversion . . . . . . . . . . . . . . . . . 83
Code View and Cardioversion . . . . . . . . . . . . . . . . . . . . 84
Delivering a Synchronized Shock . . . . . . . . . . . . . . . . . . . 85
With External Paddles . . . . . . . . . . . . . . . . . . . . . 85
Delivering Additional Shocks . . . . . . . . . . . . . . . . . . . 86
Tu rn in g S yn c O f f . . . . . . . . . . . . . . . . . . . . . . 86
Cardioversion Alarms . . . . . . . . . . . . . . . . . . . . . . 87
Troubleshooting. . . . . . . . . . . . . . . . . . . . . . . . 87
Chapter 8 Pacing 89
Overview . . . . . . . . . . . . . . . . . . . . . . . . . 89
Pacing View . . . . . . . . . . . . . . . . . . . . . . . . . 90
Demand Mode Versus Fixed Mode . . . . . . . . . . . . . . . . . . . 91
Preparing for Pacing. . . . . . . . . . . . . . . . . . . . . . . 91
Demand Mode Pacing . . . . . . . . . . . . . . . . . . . . . . 93
Fixed Mode Pacing . . . . . . . . . . . . . . . . . . . . . . . 95
Defibrillating During Pacing . . . . . . . . . . . . . . . . . . . . 96
Pacing Alarms . . . . . . . . . . . . . . . . . . . . . . . . 97
Troubleshooting. . . . . . . . . . . . . . . . . . . . . . . . 98
Chapter 9 Pulse Oximetry 99
Overview . . . . . . . . . . . . . . . . . . . . . . . . . 99
Understanding Pulse Oximetry . . . . . . . . . . . . . . . . . . . 100
Selecting a Sensor . . . . . . . . . . . . . . . . . . . . . 101
Applying the Sensor . . . . . . . . . . . . . . . . . . . . . 101
Monitoring SpO
SpO2 Alarms . . . . . . . . . . . . . . . . . . . . . . . 103
. . . . . . . . . . . . . . . . . . . . . . 102
2
V

Table of Contents
SpO2 Desat Alarm. . . . . . . . . . . . . . . . . . . . . . 105
Changing SpO2 Alarm Limits . . . . . . . . . . . . . . . . . . . 105
Enabling/Disabling SpO2 Alarms . . . . . . . . . . . . . . . . . . 105
Pulse Rate Alarms . . . . . . . . . . . . . . . . . . . . . . . 106
Changing Pulse Rate Alarm Limits . . . . . . . . . . . . . . . . . . 106
Enabling/Disabling Pulse Rate Alarms . . . . . . . . . . . . . . . . . 106
Disabling SpO2 Monitoring . . . . . . . . . . . . . . . . . . . . 107
Caring for Sensors. . . . . . . . . . . . . . . . . . . . . . . 107
Troubleshooting . . . . . . . . . . . . . . . . . . . . . . . 107
Chapter 10 Blood Pressure Monitoring 109
Overview . . . . . . . . . . . . . . . . . . . . . . . . . 109
Measuring NBP . . . . . . . . . . . . . . . . . . . . . . . 110
NBP Alarms . . . . . . . . . . . . . . . . . . . . . . . . 113
Changing NBP Alarm and Source Limits . . . . . . . . . . . . . . . . 114
Enabling/Disabling NBP Alarms . . . . . . . . . . . . . . . . . . 114
Caring for Cuffs . . . . . . . . . . . . . . . . . . . . . . . 114
NBP Calibration . . . . . . . . . . . . . . . . . . . . . . . 114
Troubleshooting . . . . . . . . . . . . . . . . . . . . . . . 114
Chapter 11 Trending 115
Overview . . . . . . . . . . . . . . . . . . . . . . . . . 115
Viewing Trend Data . . . . . . . . . . . . . . . . . . . . . 115
Printing the Trends Report. . . . . . . . . . . . . . . . . . . . 117
Troubleshooting . . . . . . . . . . . . . . . . . . . . . . 117
Chapter 12 Data Management 119
Overview . . . . . . . . . . . . . . . . . . . . . . . . . 119
Event Summary . . . . . . . . . . . . . . . . . . . . . . . 120
Data Management Mode . . . . . . . . . . . . . . . . . . . . . 128
Internal Memory . . . . . . . . . . . . . . . . . . . . . . 128
Accessing Data on the USB Drive . . . . . . . . . . . . . . . . . . 130
Printing Data . . . . . . . . . . . . . . . . . . . . . . . . 132
Printing During a Patient Event . . . . . . . . . . . . . . . . . . 132
Printing While in Data Management Mode. . . . . . . . . . . . . . . . 133
Mark Events . . . . . . . . . . . . . . . . . . . . . . . . 134
Chapter 13 Configuration 135
Overview . . . . . . . . . . . . . . . . . . . . . . . . . 135
Entering Configuration Mode . . . . . . . . . . . . . . . . . . . 135
Accessing Configuration Mode. . . . . . . . . . . . . . . . . . . 135
Setting Date and Time. . . . . . . . . . . . . . . . . . . . . 136
Changing Settings . . . . . . . . . . . . . . . . . . . . . . 137
VI

Table of Contents
Exporting Settings . . . . . . . . . . . . . . . . . . . . . 137
Importing Settings . . . . . . . . . . . . . . . . . . . . . 137
Printing Settings. . . . . . . . . . . . . . . . . . . . . . 138
Restoring Default Settings . . . . . . . . . . . . . . . . . . . 138
Configurable Parameters . . . . . . . . . . . . . . . . . . . . 139
Chapter 14 Operational and Shift Checks 147
Shift Check . . . . . . . . . . . . . . . . . . . . . . . . 147
Weekly Shock Test . . . . . . . . . . . . . . . . . . . . . 148
Operational Check . . . . . . . . . . . . . . . . . . . . . . 151
Performing an Operational Check . . . . . . . . . . . . . . . . . 152
Printing Operational Check Results . . . . . . . . . . . . . . . . . 158
Operational Check Summaries . . . . . . . . . . . . . . . . . . 160
Auto Test Summaries . . . . . . . . . . . . . . . . . . . . 161
Chapter 15 Maintenance 163
Overview . . . . . . . . . . . . . . . . . . . . . . . . 163
Automated Tests . . . . . . . . . . . . . . . . . . . . . . 164
Auto Test Summaries . . . . . . . . . . . . . . . . . . . . 164
Battery Maintenance . . . . . . . . . . . . . . . . . . . . . 166
Battery Life . . . . . . . . . . . . . . . . . . . . . . . 166
Initializing Batteries . . . . . . . . . . . . . . . . . . . . . 166
Charging Batteries . . . . . . . . . . . . . . . . . . . . . 166
Calibrating Batteries . . . . . . . . . . . . . . . . . . . . . 167
Storing Batteries. . . . . . . . . . . . . . . . . . . . . . 167
Discarding Batteries . . . . . . . . . . . . . . . . . . . . . 167
General Battery Safety . . . . . . . . . . . . . . . . . . . . 168
Power-Related Alarms . . . . . . . . . . . . . . . . . . . . 169
Cleaning Instructions . . . . . . . . . . . . . . . . . . . . . 170
Defibrillator/Monitor, Paddles, Cables and Battery . . . . . . . . . . . . . 170
Printer Printhead . . . . . . . . . . . . . . . . . . . . . 171
Side Pouches . . . . . . . . . . . . . . . . . . . . . . 171
SpO2 Sensor and Cable . . . . . . . . . . . . . . . . . . . . 171
NBP Cuff . . . . . . . . . . . . . . . . . . . . . . . 171
HeartStart XL+ Disposal . . . . . . . . . . . . . . . . . . . . 171
Chapter 16 Troubleshooting 173
Overview . . . . . . . . . . . . . . . . . . . . . . . . 173
Resolving Issues . . . . . . . . . . . . . . . . . . . . . . . 173
Responding to Test Results . . . . . . . . . . . . . . . . . . . 173
Symptoms . . . . . . . . . . . . . . . . . . . . . . . . 175
Calling For Service . . . . . . . . . . . . . . . . . . . . . . 187
VII

Table of Contents
Chapter 17 Supplies & Accessories 189
Ordering Replacement Supplies and Accessories . . . . . . . . . . . . . . . 189
Chapter 18 Specifications 195
Specifications . . . . . . . . . . . . . . . . . . . . . . . . 195
General . . . . . . . . . . . . . . . . . . . . . . . . 195
Defibrillator . . . . . . . . . . . . . . . . . . . . . . . 195
Manual Defibrillation Mode . . . . . . . . . . . . . . . . . . . 197
AED Mode . . . . . . . . . . . . . . . . . . . . . . . 198
ECG and Arrhythmia Monitoring . . . . . . . . . . . . . . . . . . 198
Display . . . . . . . . . . . . . . . . . . . . . . . . 200
Battery . . . . . . . . . . . . . . . . . . . . . . . . 200
Thermal Array Printer . . . . . . . . . . . . . . . . . . . . . 201
Noninvasive Pacing . . . . . . . . . . . . . . . . . . . . . 201
SpO2 Pulse Oximetry . . . . . . . . . . . . . . . . . . . . . 202
NBP . . . . . . . . . . . . . . . . . . . . . . . . . 203
Patient Data Storage . . . . . . . . . . . . . . . . . . . . . 204
Environmental . . . . . . . . . . . . . . . . . . . . . . 204
USB Device . . . . . . . . . . . . . . . . . . . . . . . 205
Symbol Definition . . . . . . . . . . . . . . . . . . . . . . 206
Shipper Carton Symbol Definitions . . . . . . . . . . . . . . . . . . 207
Abbreviation Definitions . . . . . . . . . . . . . . . . . . . . . 208
Electromagnetic Compatibility . . . . . . . . . . . . . . . . . . . 209
Reducing Electromagnetic Interference . . . . . . . . . . . . . . . . . 209
VIII

Thank you for choosing the HeartStart XL+ defibrillator/monitor. Whether the HeartStart XL+ is your
first Philips product or another in a long list of Philips devices, we welcome you to the Philips family of
defibrillators.
The HeartStart XL+ has been developed and designed around you to meet the advanced requirements of
hospital code teams, nurses, physicians and biomedical engineers. The device is easy to use in all modes.
You can monitor ECG and optional pulse oximetry (SpO
you can administer therapy using 1-2-3 defibrillation in Manual Mode, 2-step AED Mode, synchronized
cardioversion and optional Pacing Mode.
Overview
The HeartStart XL+ is a lightweight, portable defibrillator/monitor. It provides four clinical modes of
operation: Monitor, Manual Defibrillation/Synchronized Cardioversion, AED and Pacing.
Introduction
) and non-invasive blood pressure (NBP). And
2
1
In Monitor Mode, depending on the ECG cable used, you can view 2 different ECG waveforms at one
time on the display. Using a 3-lead ECG cable, you can view either Lead I, II or III. With a 5-Lead ECG
cable, you can view two leads from Leads I, II, III, aVR, aVL, aVF or V. Optional monitoring of SpO
(numeric and pleth wave) and NBP are available. Measurements and waves are presented on the display
and alarms are available to alert you to a change in the patient’s condition. You can also display the Vital
Signs Trending Report to view all key monitoring parameters and their measurements at a glance.
Manual Defibrillation Mode provides simple 1-2-3 defibrillation. You analyze the patient’s ECG and, if
appropriate: 1) select an energy setting; 2) charge; and 3) deliver the shock. Defibrillation is performed
using paddles (internal or external) or multifunction electrode pads. You can also perform synchronized
cardioversion in Manual Defibrillation Mode.
In AED Mode, the HeartStart XL+ analyzes the patient’s ECG and determines whether a shock is
advised. Voice prompts guide you through the 2-step defibrillation process, while easy-to-follow
instruction and patient information (including Adult and Infant/Child patient categories) appear on the
display. Voice prompts are reinforced by messages on the display.
Optional Pacing Mode offers non-invasive transcutaneous pacing therapy. Pace pulses are delivered
through multifunction electrode pads in Demand or Fixed modes.
The HeartStart XL+ incorporates Philips’ low energy SMART Biphasic waveform for defibrillation.
2
1

1: Introduction Overview
The HeartStart XL+ automatically stores critical event data such as Event Summaries and Vital Signs
Trending. You can also transfer the data to a USB drive and download it to a compatible version of
Philips’ data management solution – HeartStart Event Review Pro.
The HeartStart XL+ is powered by a rechargeable Lithium Ion battery. Available battery power is
determined by viewing the battery power indicators located on the front of the device, the icons on the
display, or by checking the gauge on the battery itself. Additionally, AC Power may be applied as a
secondary power source and for continual battery charging.
The Ready For Use (RFU) indicator provides a constant status update, indicating the HeartStart XL+ is
ready for use, needs attention or is unable to deliver therapy. The device performs automated tests on a
regular basis and displays results on the RFU indicator. In addition, performing specified Operational
Checks ensures the HeartStart XL+ is functioning properly.
The HeartStart XL+ is highly configurable to better meet the needs of diverse users. Be sure to familiarize
yourself with your device’s configuration before using the HeartStart XL+. See “Configuration” on
page 135 for more details.
Intended Use
The HeartStart XL+ is intended for use in a hospital setting by qualified medical personnel trained in the
operation of the device and qualified by training in basic life support, advanced life support or
defibrillation.
When operating as a semi-automated external defibrillator in AED Mode, the HeartStart XL+ is suitable
for use by medical personnel trained in basic life support that includes the use of an AED.
When operating in Monitor, Manual Defibrillation or Pacing modes, the HeartStart XL+ is suitable for
use by healthcare professionals trained in advance life support.
Indications for Use
The HeartStart XL+ is a defibrillator/monitor. The device is for use by qualified medical personnel
trained in the operation of the device and certified by training in basic life support, advanced life support
or defibrillation. It must be used by or on the order of a physician.
AED Therapy
AED Mode is used in the presence of suspected cardiac arrest on patients that are unresponsive, not
breathing and pulseless.
Manual Defibrillation
Asynchronous defibrillation is the initial treatment for ventricular fibrillation and ventricular tachycardia
in patients that are pulseless and unresponsive.
Synchronous defibrillation (cardioversion) is indicated for termination of atrial fibrillation.
2

Overview 1: Introduction
Non-Invasive External Pacing
The pacing option is indicated for treating patients with symptomatic bradycardia.
Pulse Oximetry
The SpO2 option is indicated for use when it is beneficial to assess the patient’s oxygen saturation level.
Non-Invasive Blood Pressure Monitoring
The NBP option is indicated for non-invasive measurement of a patient’s arterial blood pressure.
ECG Monitoring
ECG monitoring is indicated to be used for monitoring, alarming and recording of the patients’ heart
rate and morphology.
Safety Considerations
General warnings and cautions that apply to the use of the HeartStart XL+ are provided in “Safety
Considerations” on page 40. Additional warnings and cautions specific to a particular feature are
provided in the appropriate sections of these instructions.
WARNINGS: The HeartStart XL+ is not intended to be deployed in settings or situations that promote use by
untrained personnel. Operation by untrained personnel can result in injury or death.
Electric shock hazards exist internally. Do not attempt to open the device. Refer servicing to qualified
personnel.
Use only supplies and accessories approved for use with your HeartStart XL+. Use of non-approved
supplies and accessories could affect performance and results.
Use the HeartStart XL+ on one patient at a time.
Use single-use supplies and accessories only once.
NOTE: The HeartStart XL+ has not been tested for use outside a hospital’s clinical environment. See
“Environmental” on page 204 for use environment specifications.
Getting Started
The HeartStart XL+ comes from the factory ready to use. However, before putting the device into
clinical use for the first time, it is recommended you:
•Read these Instructions for Use in their entirety.
• Fully charge the battery. See “Power” on page 24.
• Run an Operational Check. See “Operational Check” on page 151.
• Perform a Shift Check. See “Shift Check” on page 147.
3

1: Introduction Overview
Documentation and Training
Philips Healthcare provides several additional options for HeartStart XL+ documentation and training,
besides these Instructions for Use, including:
•Quick Reference Card
• Battery Application Note
• ECG Quality Application Note
• Algorithm Application Notes
• Shift Checklist
• User Training DVD
• Service Manual and Training program
• Web-based Training
NOTE: Other application notes can be found on the Philips website at www.philips.com/ProductDocs.
4

Introduction
Combining Philips’ experience in resuscitation with the current wants and needs of today’s medical
environment, the HeartStart XL+ has been designed with the clinician in mind.
Philips pioneered 1-2-3 defibrillation for you to defibrillate a patient and save a life quickly and easily.
HeartStart XL+ controls, indicators, menus and icons were carefully designed and organized to facilitate
ease of use. Display information is designed to present key information for the current task.
This chapter provides a basic orientation on the HeartStart XL+’s external features, including the various
color-coded cable ports, installing the battery and printer paper, and optional external paddles.
See “Working with the HeartStart XL+” on page 21 for instructions on how to operate the device.
2
Device Basics
NOTES: If your HeartStart XL+ does not have some of the optional functionality listed in this chapter, disregard
these controls and the related information described throughout this manual.
Pictures of the HeartStart XL+ display appearing throughout this manual are for illustration purposes
only. The content of these areas varies with the display view, the options on your device and the function
being performed.
5
2: Device Basics Basic Orientation
Basic Orientation
This section provides an overview of the HeartStart XL+, options and accessories.
Front of the Device
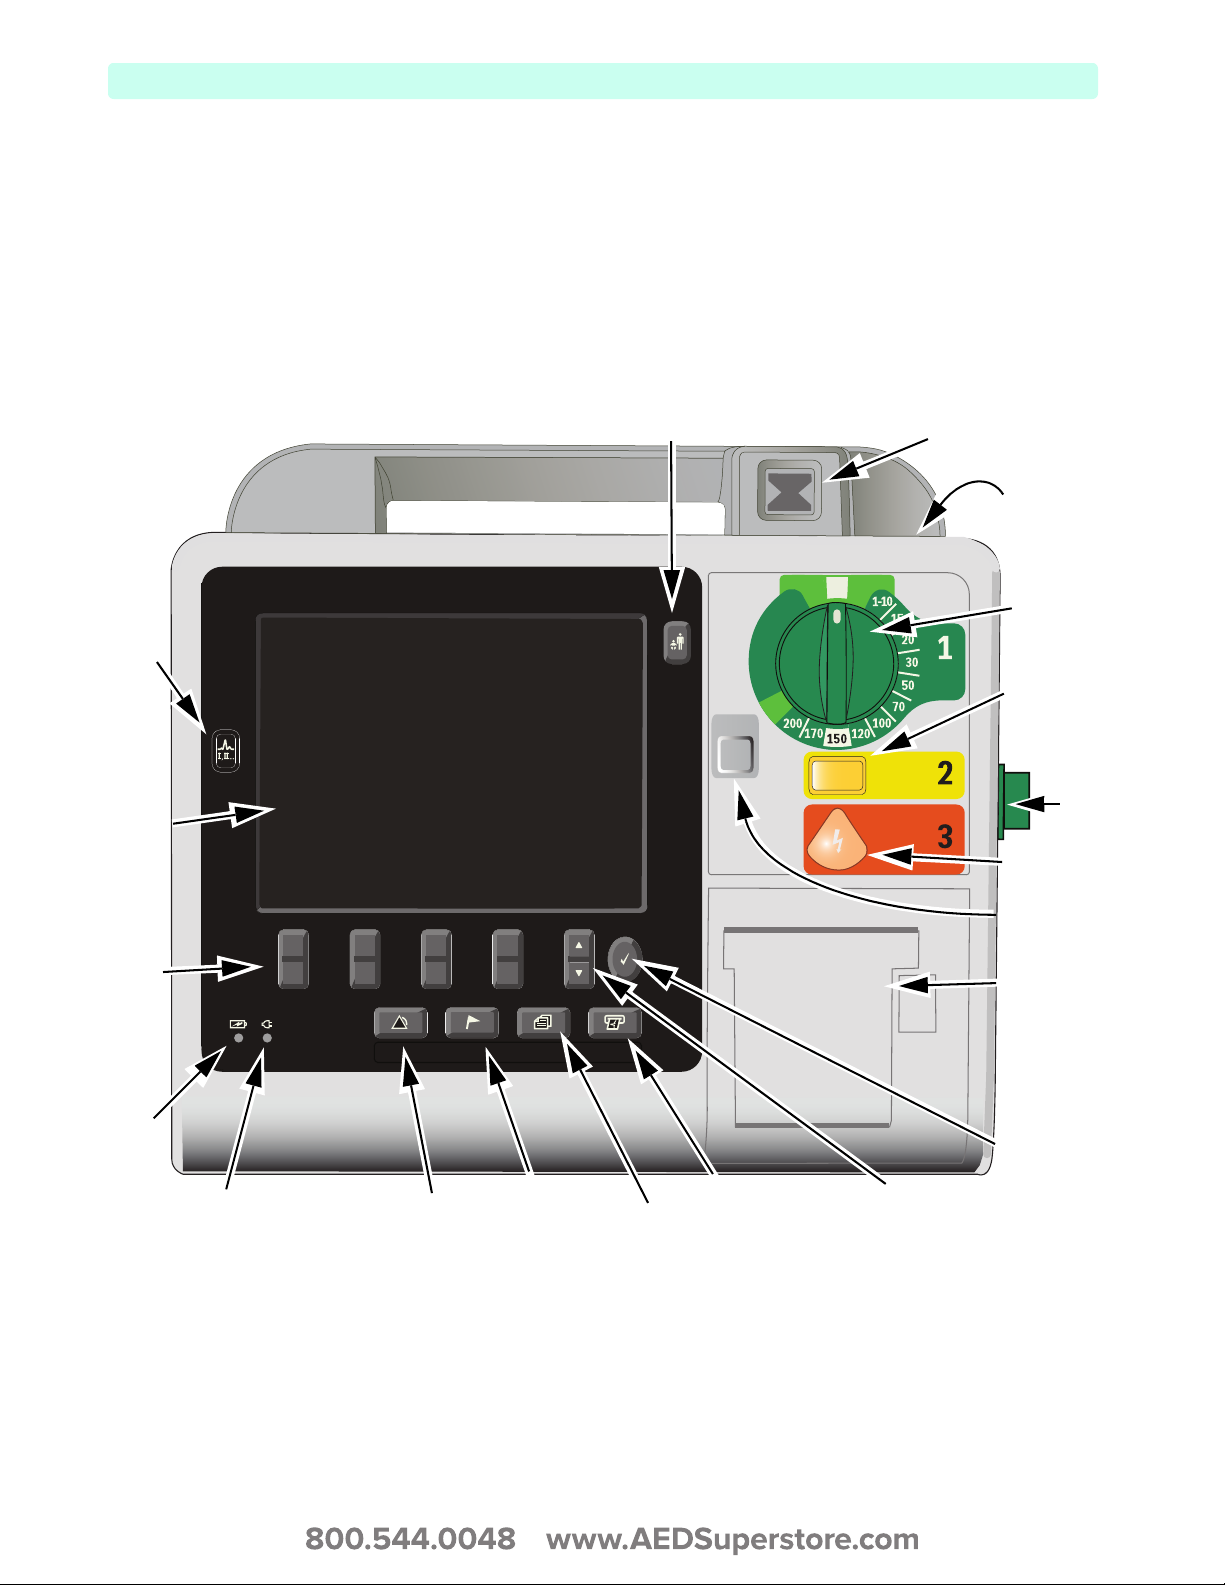
The front of the device contains operational controls and indicators as shown in Figure 1.
Figure 1 Front View
Lead
Select
button
Display
Soft
Keys (4)
Alarms
Mark Event PrintReports
Patient Category button
Sync
Pacer
AED M onitor
OFF
Off
Charge
Charge
Shock
Shock
Ready For Use
(RFU) Indicator
Flash Drive
USB Data
Port
Select
Energy
Charge
button
Shock
button
Sync button
Therapy
Knob
Therapy
Port
Printer
door
and
latch
Battery
indicator
External Power Indicator
6
Menu Select
button
Alarm Pause
button
Mark Event
button
Reports button
Print button
Navigation
buttons
Additional controls and indicators are located on the external paddles (see “External Paddle Features” on
page 11) and the Lithium Ion battery (see “Battery Fuel Gauge” on page 14).
Basic Orientation 2: Device Basics
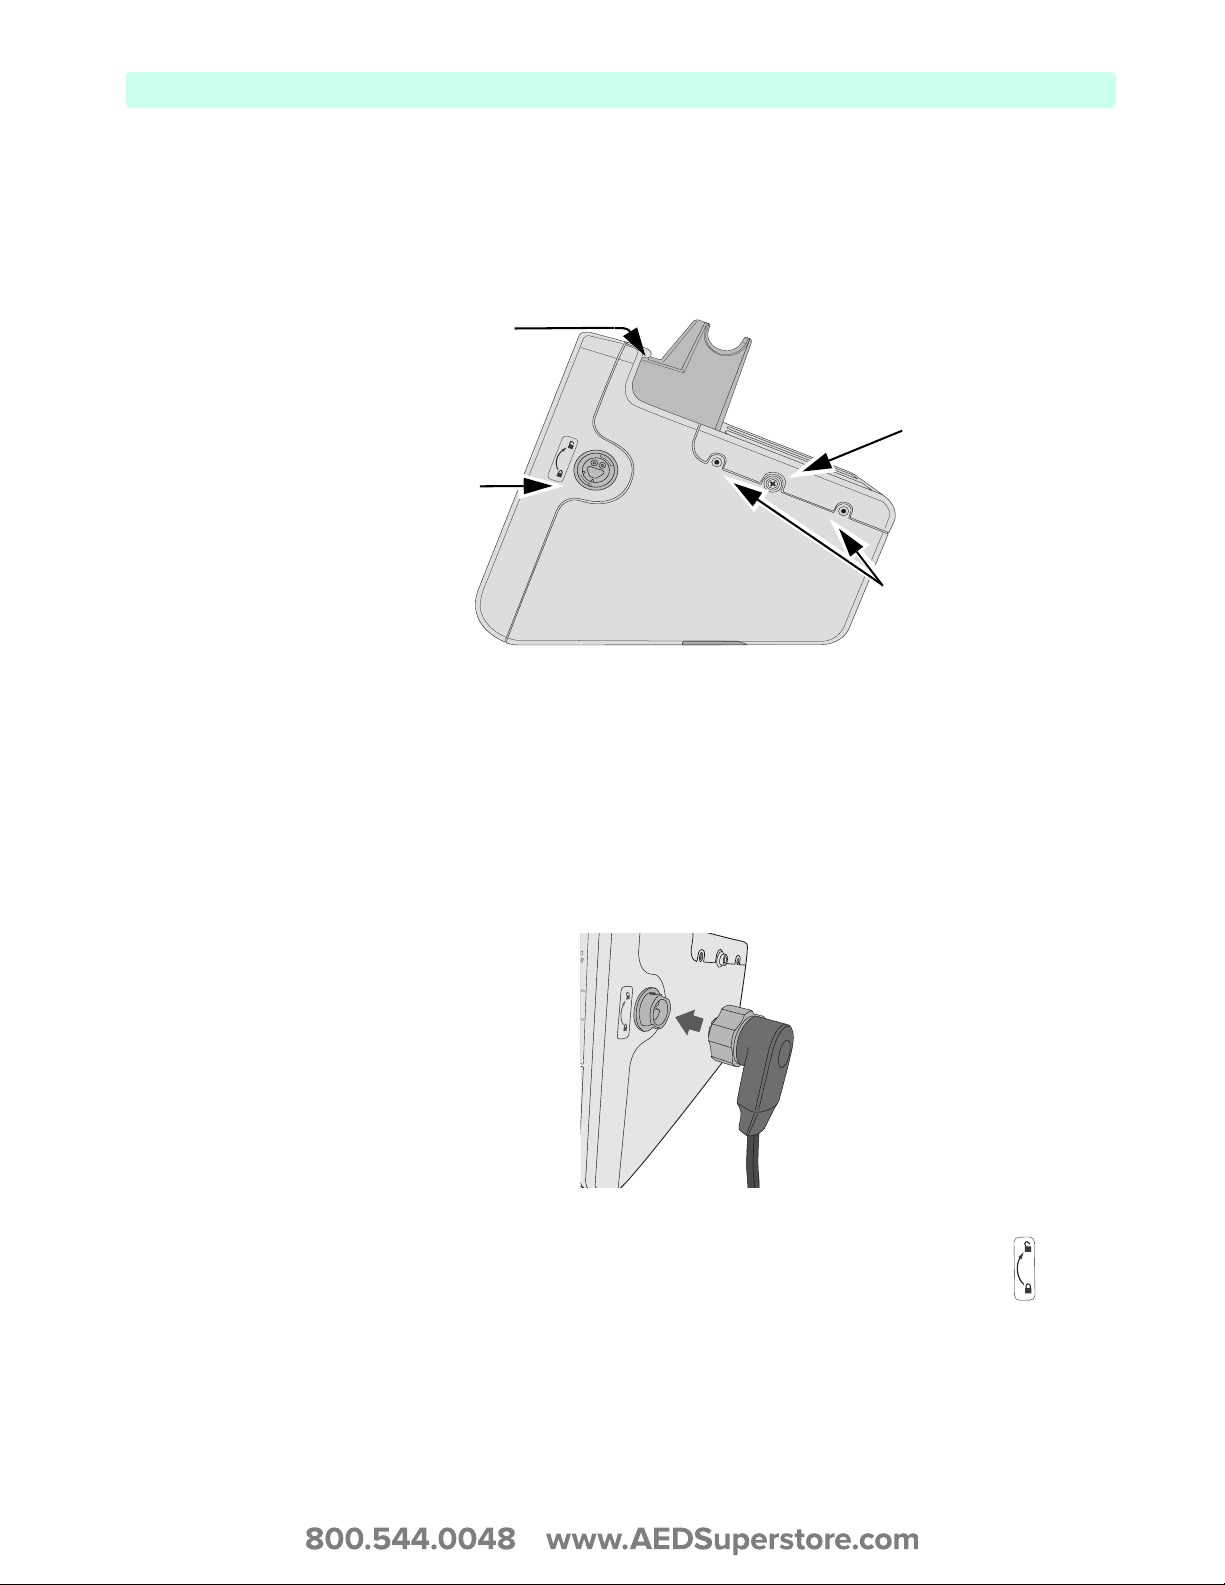
Right (Therapy) Side
The right side of the HeartStart XL+ is dedicated to administering therapy. It contains a therapy port for
paddles (external or internal) or a therapy cable with multifunction electrode pads.
Figure 2 Right (Therapy) Side View
USB Data Port
Cable Wrap Snap
Therapy Port
Storage Pouch
Connectors
Connecting the Therapy Cable
To connect the Therapy Cable:
1 Align the white pointer on the cable with the white arrow on the green Therapy port, see Figure 3.
2 Insert the cable into the green Therapy port and push until you hear it click into place. Confirm the
connection by gently tugging on the cable to make sure it does not come loose.
Figure 3 Connecting the Therapy Cable
To detach the Therapy Cable:
1 Rotate the green knob in a clockwise direction as indicated by the lock/unlock symbol next to
the Therapy port.
2 Pull the cable away from the device.
7
2: Device Basics Basic Orientation
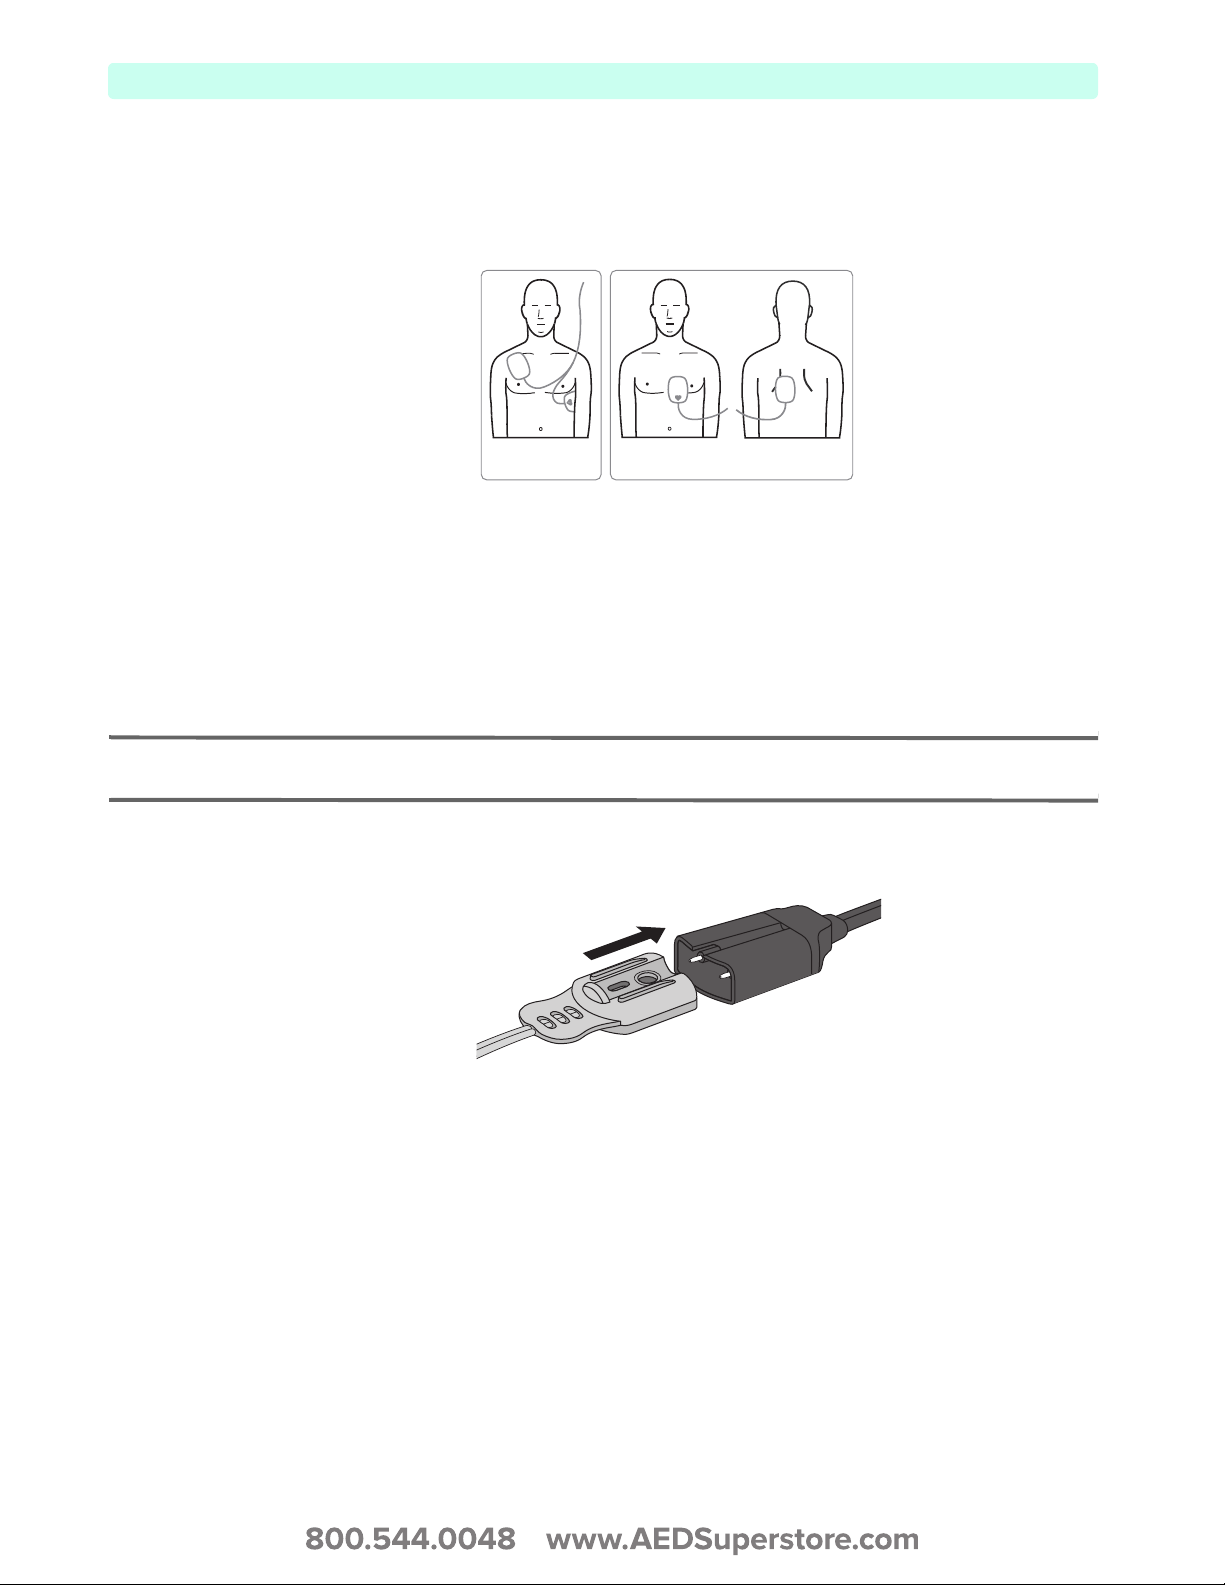
Multifunction Electrode Pads
You can use multifunction electrode pads to monitor and administer therapy to patients with the
HeartStart XL+.
Figure 4 Multifunctional Pads
Anterior-Apex
Placement
Anterior-Posterior
Placement
Connecting Multifunction Electrode Pads
To connect multifunction electrode pads:
1 Check the expiration date on the pads package and inspect the package for any damage. Discard
expired or damaged pads.
2 Connect the Therapy cable to the HeartStart XL+ (see “Connecting the Therapy Cable” on page 7).
3 Open the package and connect the pads connector to the end of the Therapy cable (see Figure 5).
NOTE: If you are using Philips’ HeartStart Preconnect Pads (989803166021), there is no need to open the pads
package to connect the pads connector to the Therapy cable.
Figure 5 Connecting Multifunctional Pads
4 Apply the pads to the patient as directed on the pads packaging or according to your organization’s
protocol.
8
Basic Orientation 2: Device Basics
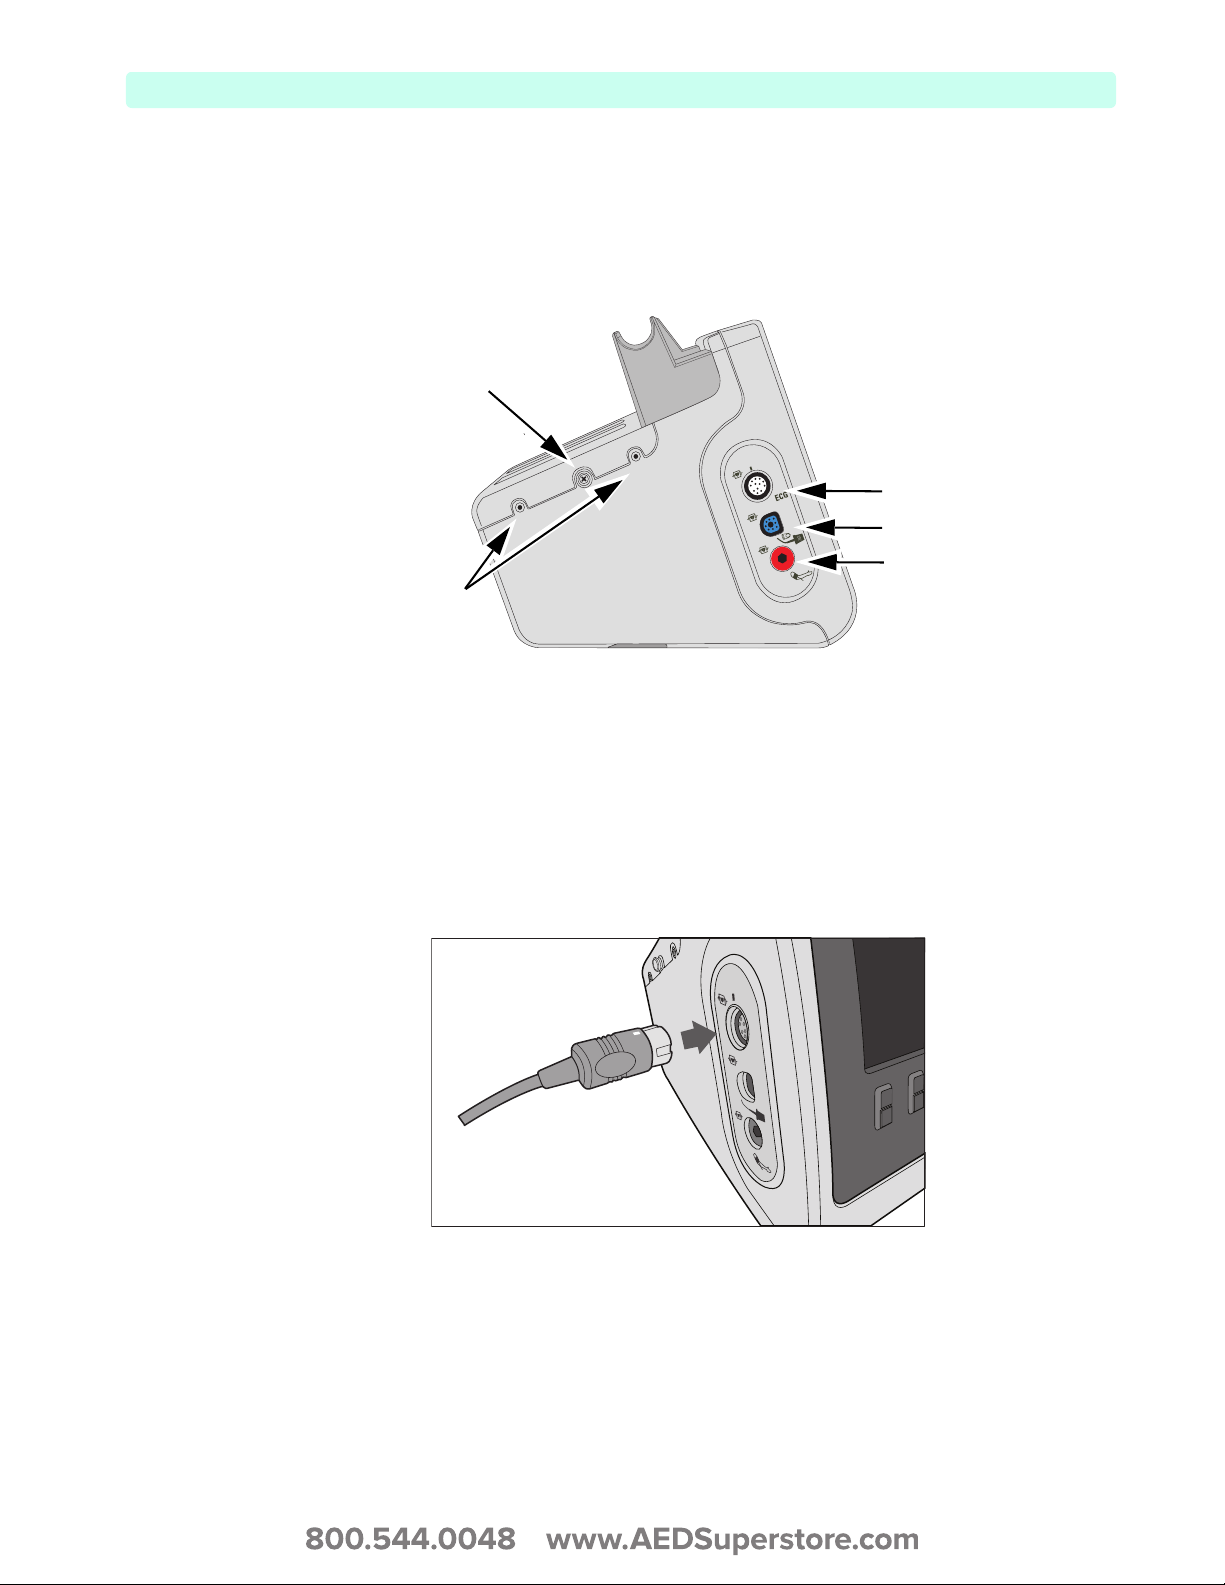
Left (Monitor) Side
The left side of the HeartStart XL+ is dedicated to monitoring key vital signs (see Figure 6). It has ports
for ECG, SpO
Figure 6 Left (Monitor) Side View
and NBP.
2
Cable Wrap Snap
White ECG port
Blue SpO2 port
Storage Pouch
Connectors
Red NBP port
Connecting the ECG cable
To connect a 3- or 5-Lead cable:
1 Align the ECG cable with the white ECG port (see Figure 7). The white key marker on the ECG
cable faces the top of the device.
2 Push the ECG cable firmly into the ECG port.
Figure 7 Connecting the ECG Cable
ECG
9
2: Device Basics Basic Orientation
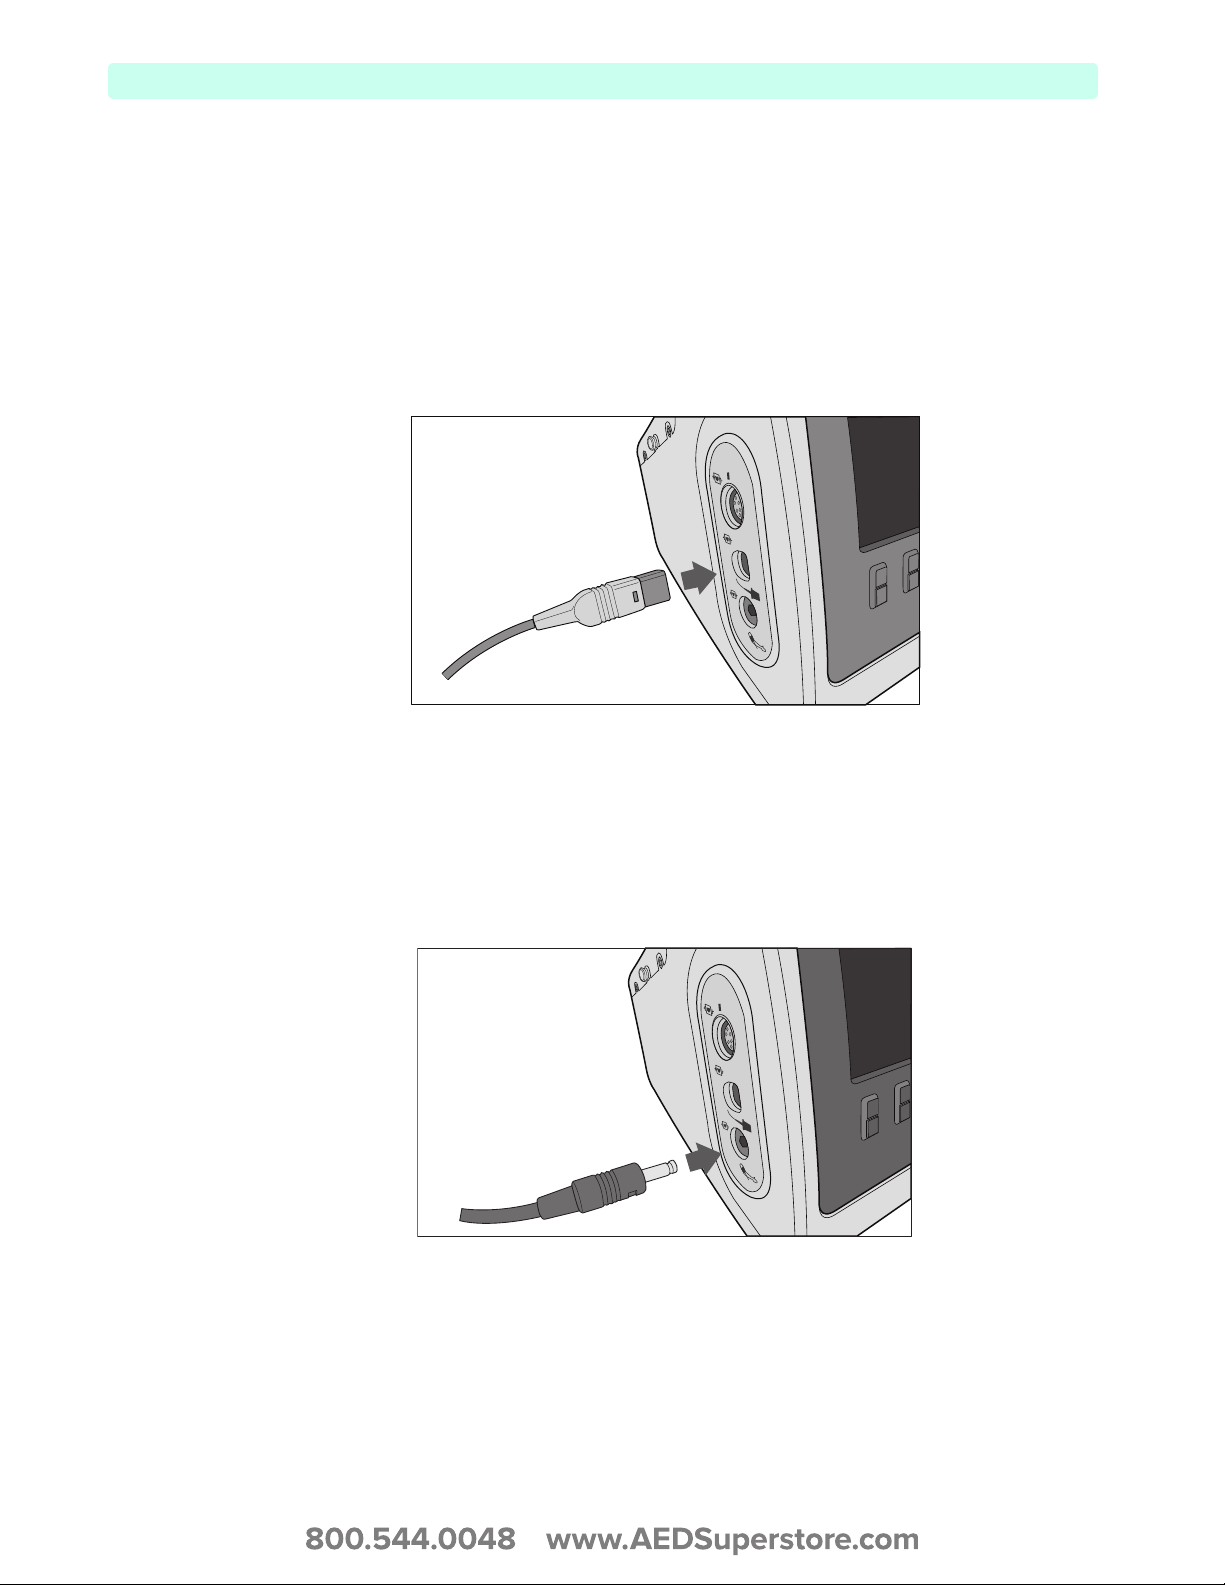
Connecting the SpO2 Cable
To connect the SpO
1 Hold the cable connector with the flat side and blue marking facing the front of the HeartStart XL+
(see Figure 8).
2 Insert the cable into the blue SpO
until it is no longer visible.
Figure 8 Connecting the SpO2 Cable
cable:
2
port and push the blue portion of the connector into the device
2
ECG
Connecting the NBP Cable
To connect the NBP cable:
1 Insert the NBP cable into the red NBP port (see Figure 9) and push completely in.
2 Attach the NBP cable to the NBP cuff.
Figure 9 Connecting the NBP Cable
ECG
10
Basic Orientation 2: Device Basics
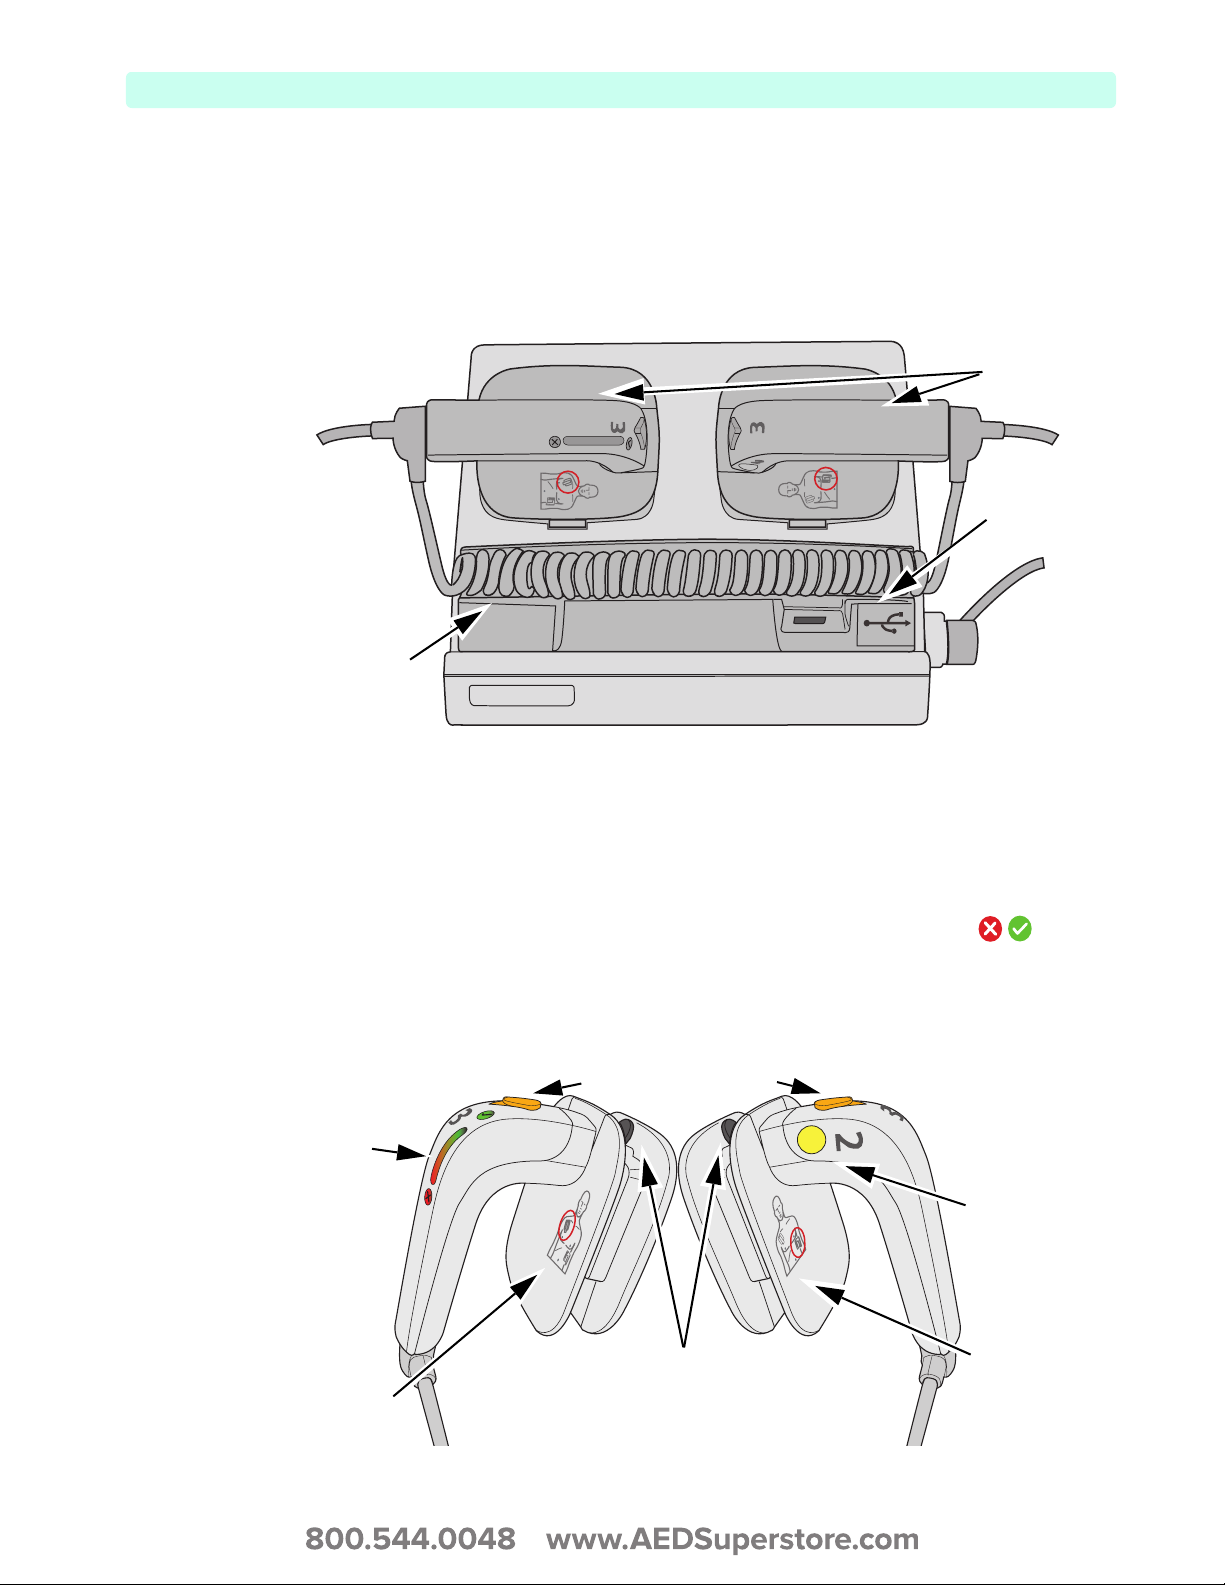
Top Panel
The top of the HeartStart XL+ has a handle for easy transport and also the USB data port. If optional
external paddles are present, they reside in the paddle tray on the top of the device as shown in Figure 10.
Figure 10 Top View (with optional paddles installed)
Back of device
External Paddles
USB Data
port
Handle
HeartStart XL+
Front of device
External Paddles
The M3543A External Paddles can be used on both adult/child (≥ 10kg) and infant (< 10kg) patients.
The apex paddle has a yellow button to remotely charge the defibrillator. Both paddles have orange shock
buttons that flash when the defibrillator is charged. Press both buttons simultaneously to administer a
shock. The sternum paddle contains a Patient Contact Indicator (PCI) with PCI icons . Orange
or red lights on the PCI indicate poor patient contact. Adjust paddle pressure and placement to optimize
patient contact. Green lights on the PCI indicate good contact is established.
Figure 11 External Paddle Features
Flashing Shock buttons
Patient Contact
Indicator
Remote Charge
button
Proper apex
paddle
placement icon
11
Proper sternum
paddle placement
icon
Release buttons for
Infant Paddles
2: Device Basics Basic Orientation
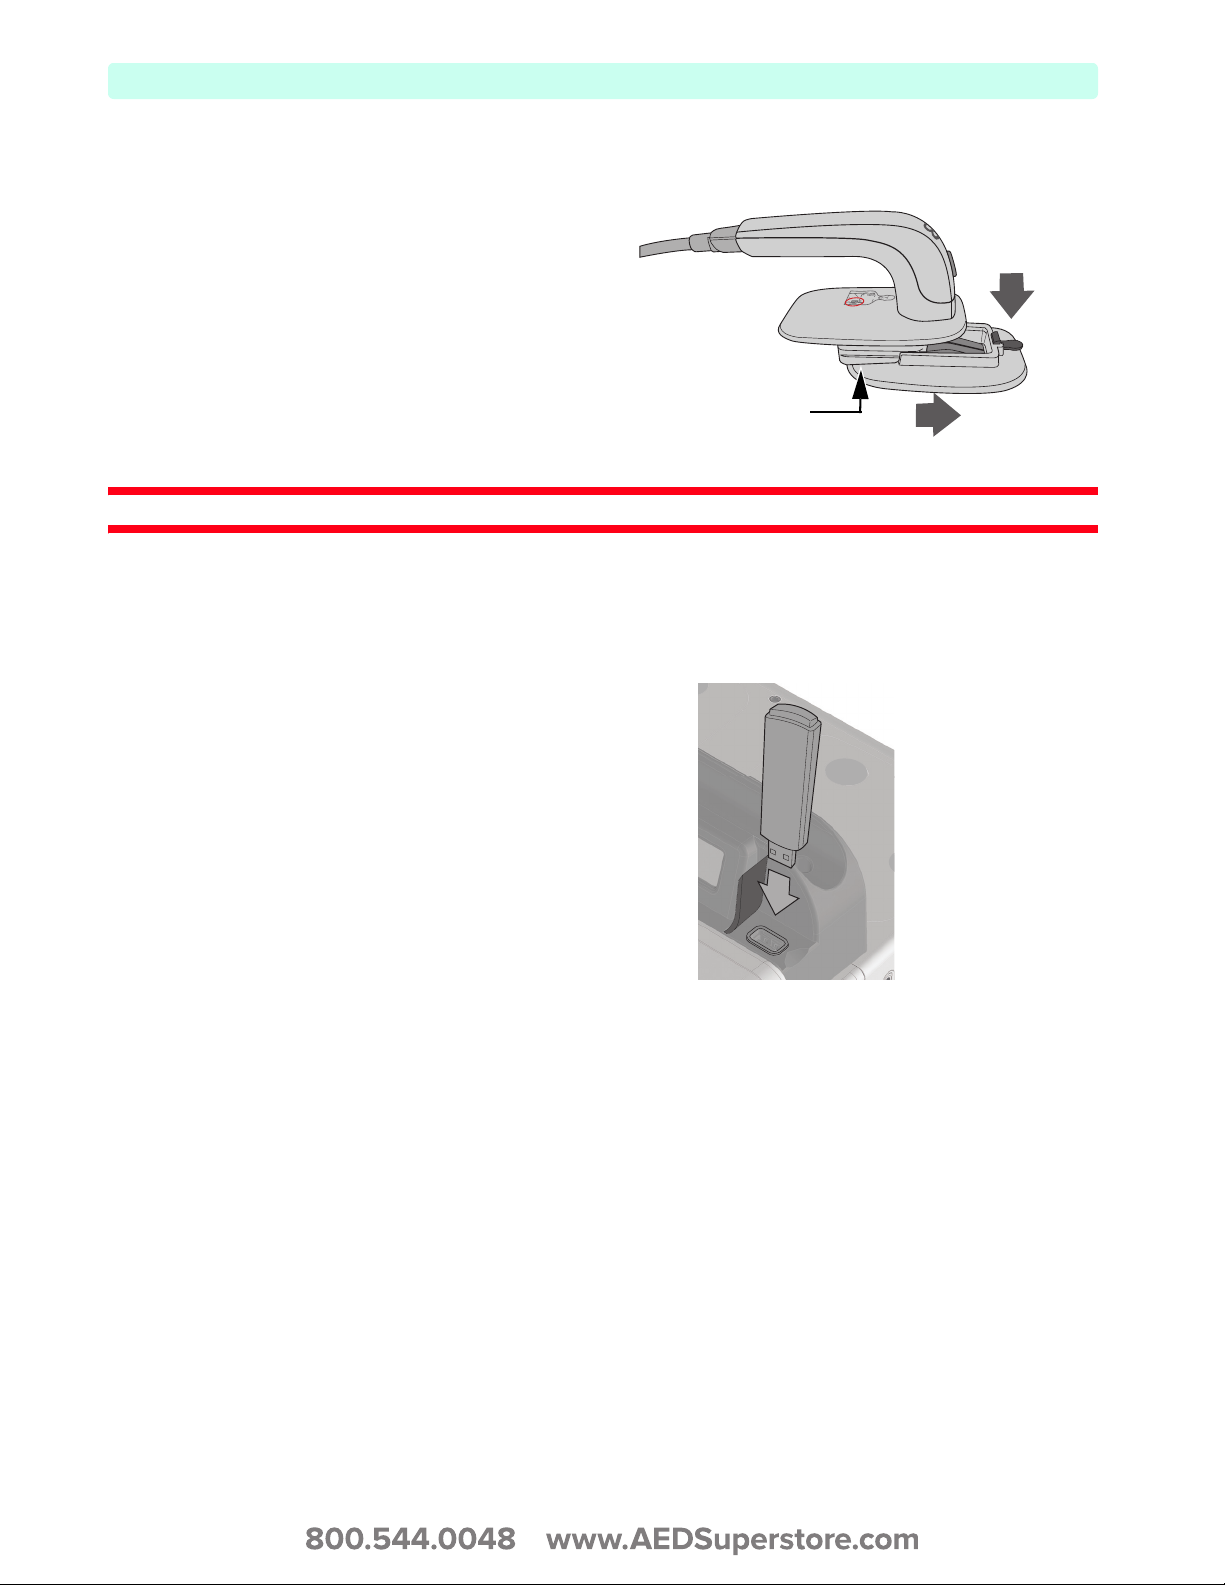
Accessing Infant Paddles
To access the M3543A infant
paddles:
1 Press down on the release
buttons located on the front of
the external paddles.
2 Slide the adult electrode clip off
and away from the paddle
exposing the infant-sized
surface underneath.
WARNING: Make sure the defibrillator is not charged before accessing the infant paddles.
Figure 12 Infant Paddles
Infant Paddles
USB Data Port
The HeartStart XL+ allows you to save data to and import configurations and new software revisions
from a USB drive which is inserted into a USB port on the top of the device.
To insert a USB drive:
1 Locate the USB data port on the
top right of the HeartStart XL+,
just to the right of the RFU
indicator.
Figure 13 Data Port
1
2
2 Lift the plastic door to expose USB
port.
3 Insert your USB drive (USB
symbol facing forward) into the
port.
12
Basic Orientation 2: Device Basics
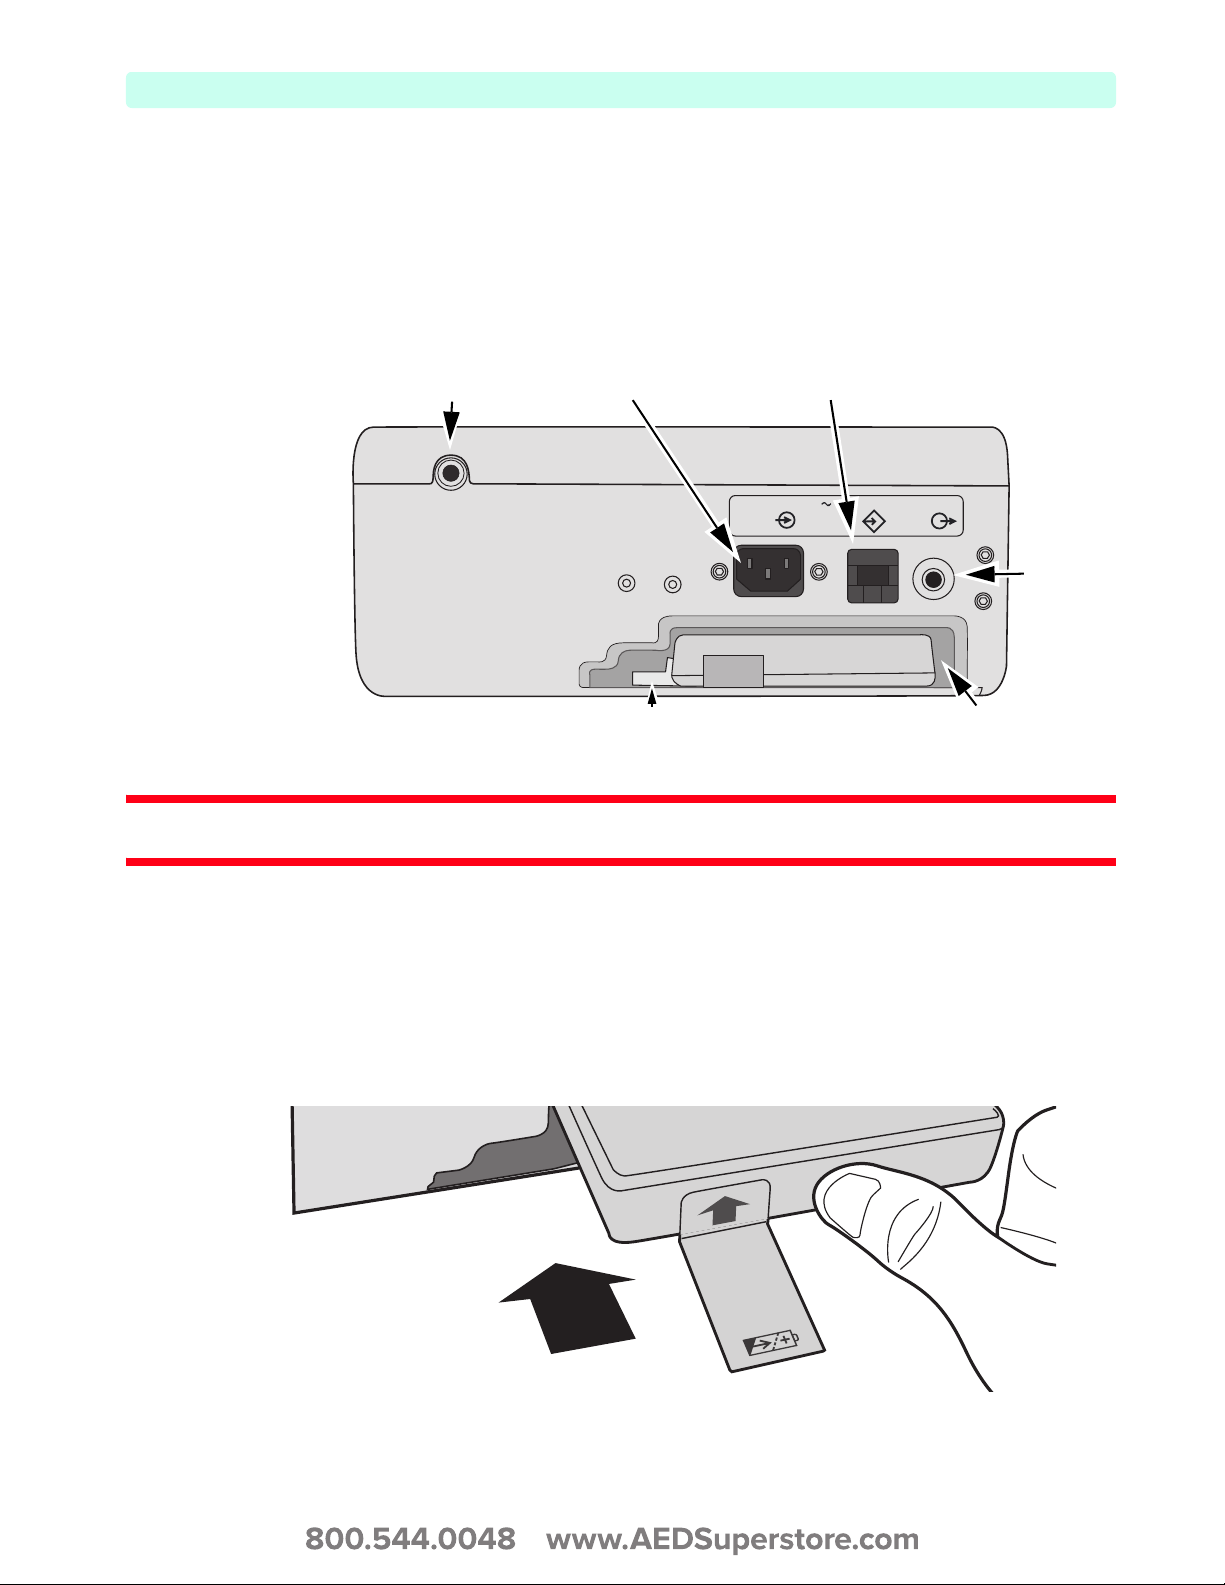
Back Panel
The back panel of the HeartStart XL+ has a compartment for the Lithium Ion battery. It also contains
the AC power connection, the ECG Out jack to connect to an external monitor, and the LAN port. See
Figure 14. For more information on ECG Out, see the ECG Out Cable Application Note which can be
found on the Philips website at
Figure 14 Back Side View
www.philips.com/ProductDocs.
Cable Wrap Snap
AC Connection LAN Port
100 - 240 V
50 - 60 Hz
1- 0.46 A
LAN
ECG
ECG Out
Battery CompartmentBattery Latch
WARNING: Do not connect a LAN cable to the HeartStart XL+ while in a clinical mode. Incorrect ECG diagnosis
may result due to excessive noise.
Installing the Battery
To install the HeartStart XL+ Lithium Ion battery:
1 Align the battery in the battery compartment. Confirm the arrow on the Battery Tab is pointed up.
2 Insert the battery into the battery compartment until you hear the Battery Latch lock into place.
Figure 15 Installing the Battery
13
2: Device Basics Basic Orientation
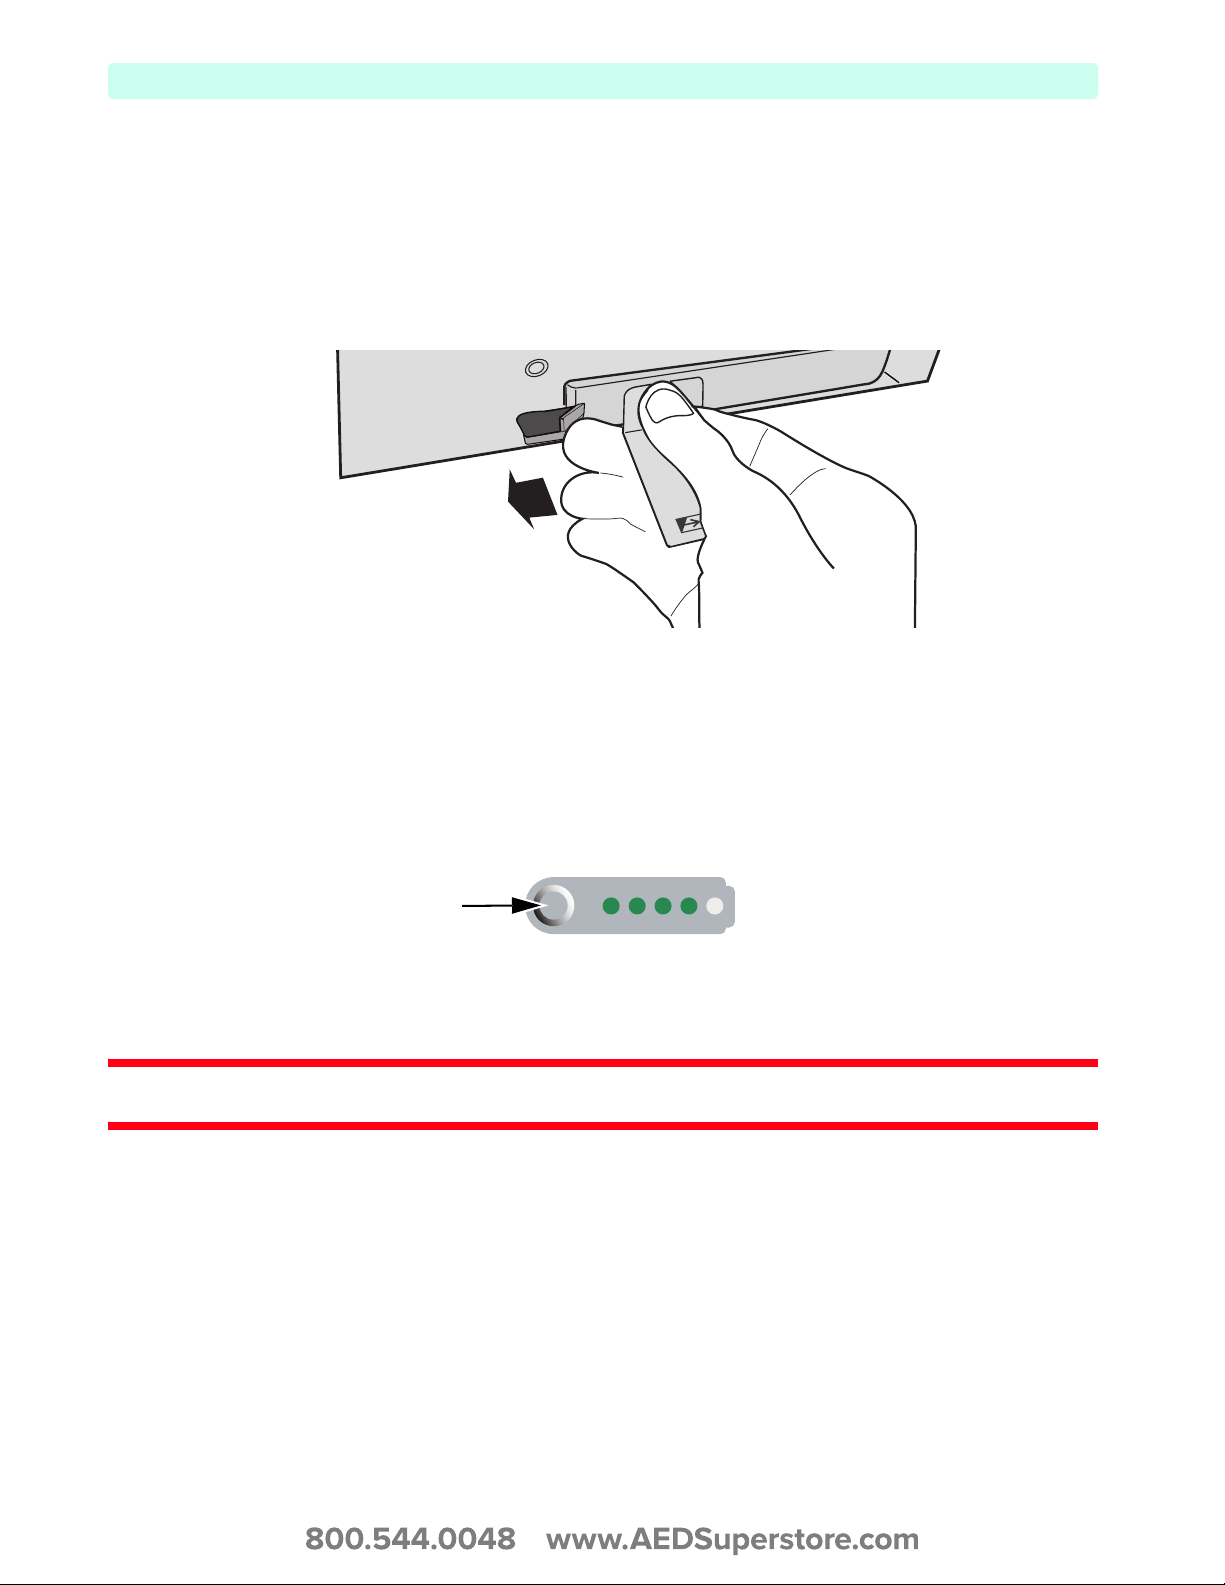
Removing the Battery
To remove the HeartStart XL+ Lithium Ion battery:
1 Push the Battery Latch to the left to eject the battery.
2 Pull on the Battery Tab and battery to completely remove the battery.
Figure 16 Removing the Battery
Battery Fuel Gauge
When you want to check the power remaining in your Lithium Ion battery when it is not installed in the
HeartStart XL+, press the Battery Power Gauge (see Figure 17) located on the end of the battery opposite
the battery tab. Each solid green light indicates approximately 20 percent charge. A flashing green light
closest to the button indicates the battery is too weak and must be recharged before use.
Figure 17 Battery Gauge
Press here
To check the battery power remaining when the battery is inserted in the device, look at the battery
gauge on the display (see Figure 29 “Battery Charge Level” on page 28).
WARNING: Use only approved batteries to power the HeartStart XL+. Use of non-approved batteries could affect
performance and results.
14
Basic Orientation 2: Device Basics
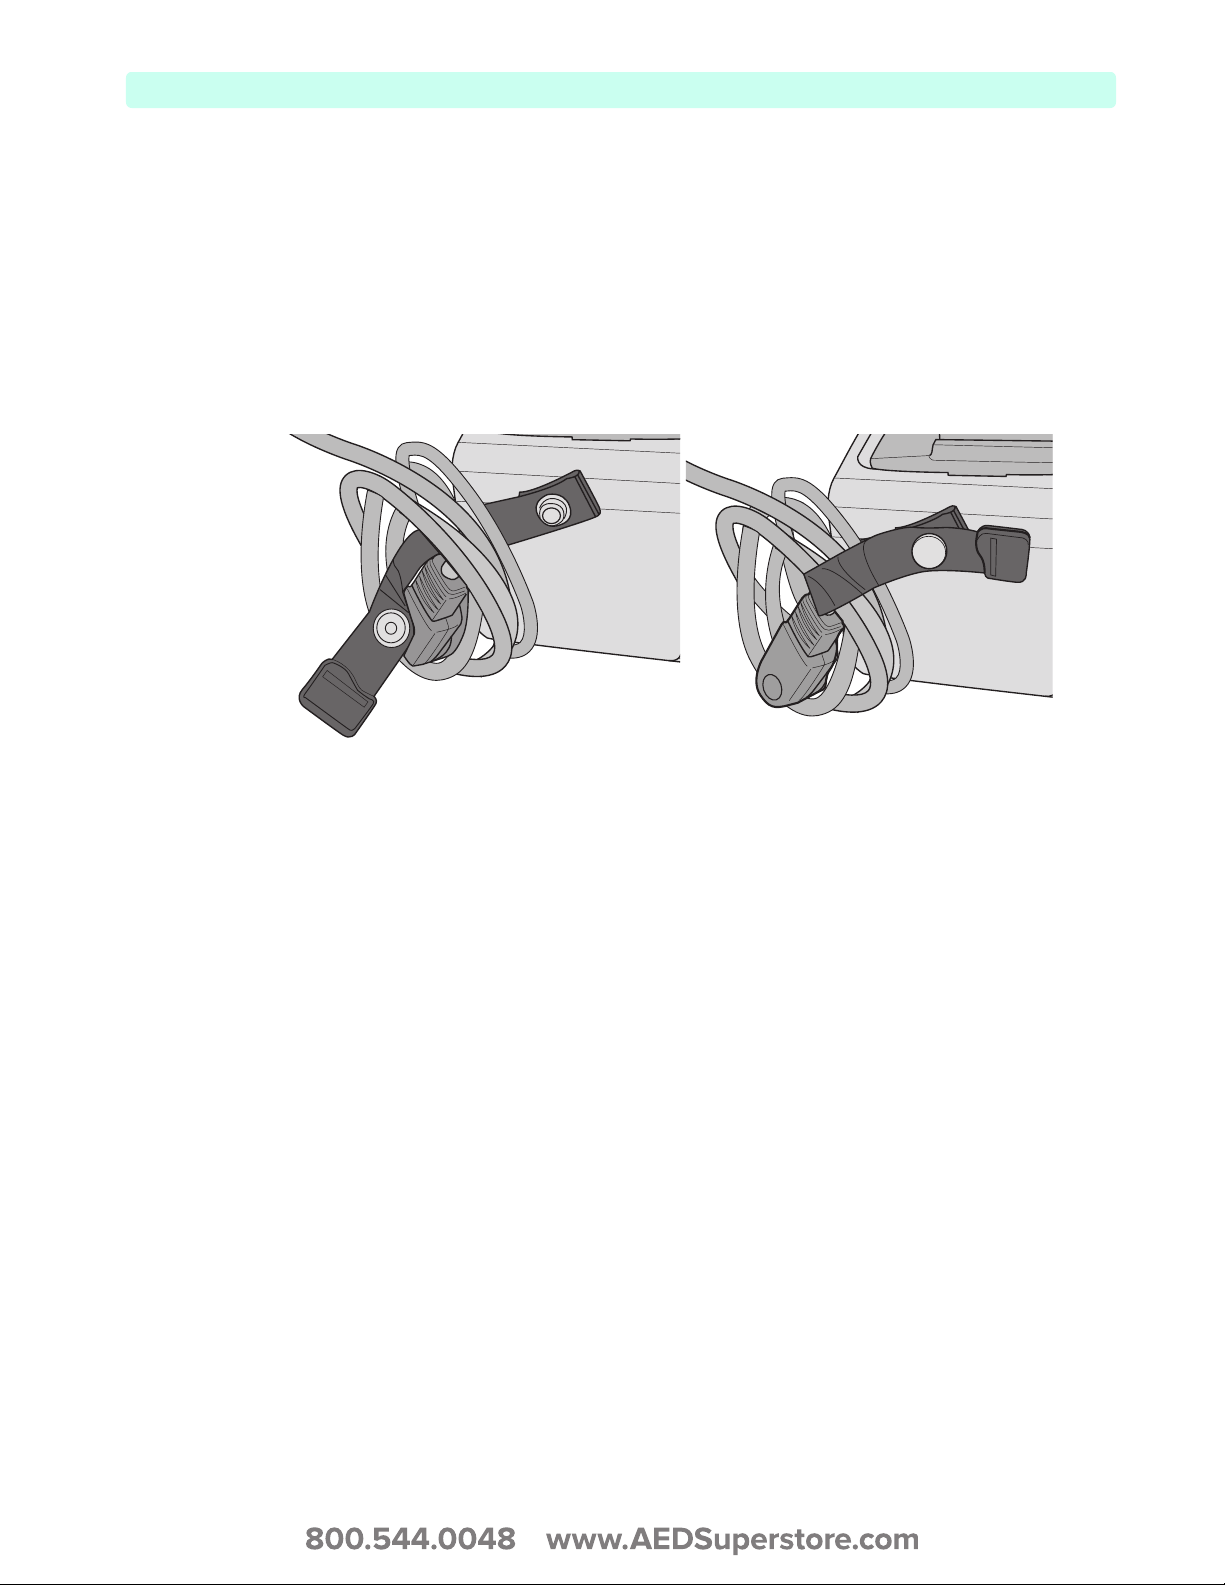
Installing the Cable Wraps
The HeartStart XL+ comes with cable wraps to assist in cable management.
To attach the cable wraps to the HeartStart XL+:
1 Snap the cable wrap into the Cable Management Connector snap on the back of the device.
2 Loop your cable around the cable wrap and snap into place.
3 To remove the cable, tug on the loose end of the cable wrap to unsnap.
Figure 18 Cable Wrap
15
2: Device Basics Basic Orientation
Accessory Storage System
The HeartStart XL+ can be ordered with an optional Accessory Storage System to assist in cable and
accessory management.
NOTE: You need a Phillips-head screwdriver to install the Accessory Storage System pouches.
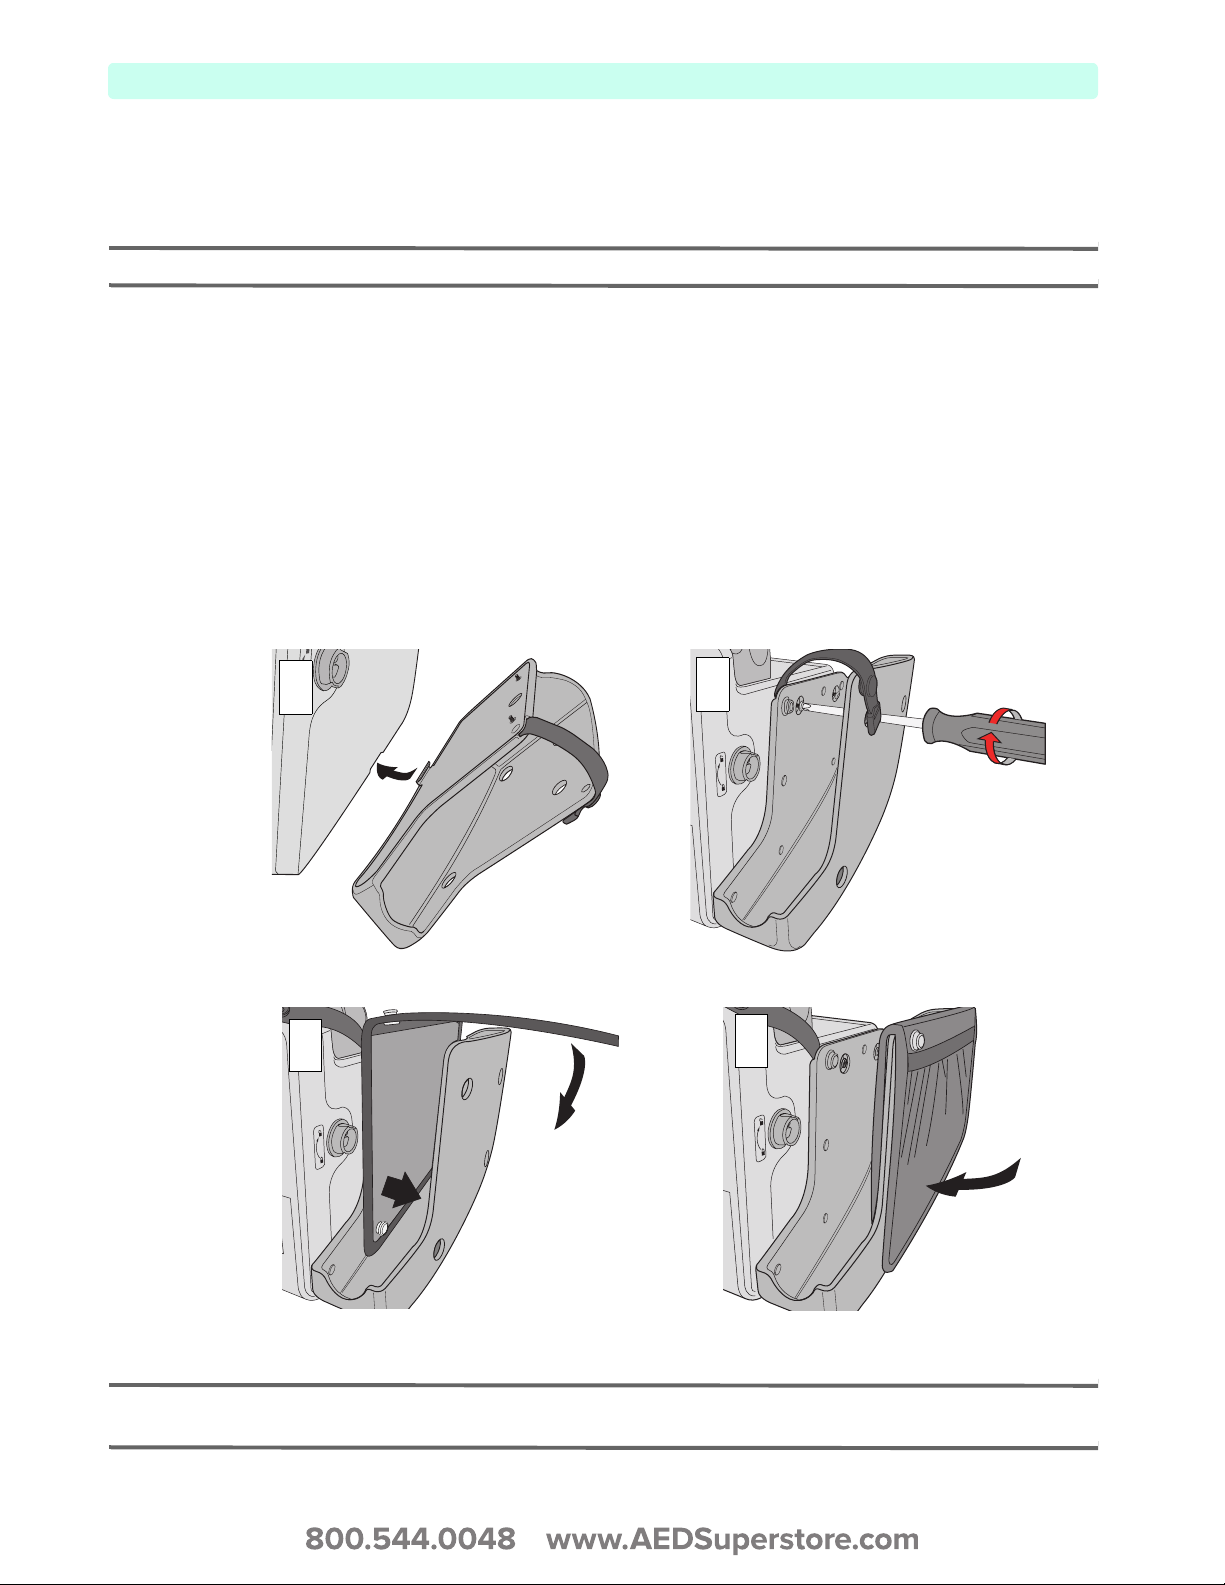
Attaching the Pouches
To attach your HeartStart XL+ Accessory Storage System to your defibrillator:
1 Insert the hook on the bottom of the storage system’s side pouch into the groove along the side of the
HeartStart XL+ (see Figure 19 - Step 1).
2 Lift the pouch up into place and secure in two locations with Phillips screws (see Figure 19 - Step 2).
3 Drape the double-sided black pocket over the outside end of the pouch, aligning the tapered edge of
the bag with the bottom of the pouch. (see Figure 19 - Step 3)
4 Secure the bottom edges of the bag by snapping them together through the holes along the bottom
edge of the pouch. (see Figure 19 - Step 4)
Figure 19 Attaching the Pouches
1
3
2
4
NOTE: Figure 19 illustrates attaching the Accessory Storage System pouch on the right (therapy) side of the
device. Use the same procedure to install the pouch on the left (monitoring) side.
16
Basic Orientation 2: Device Basics
e
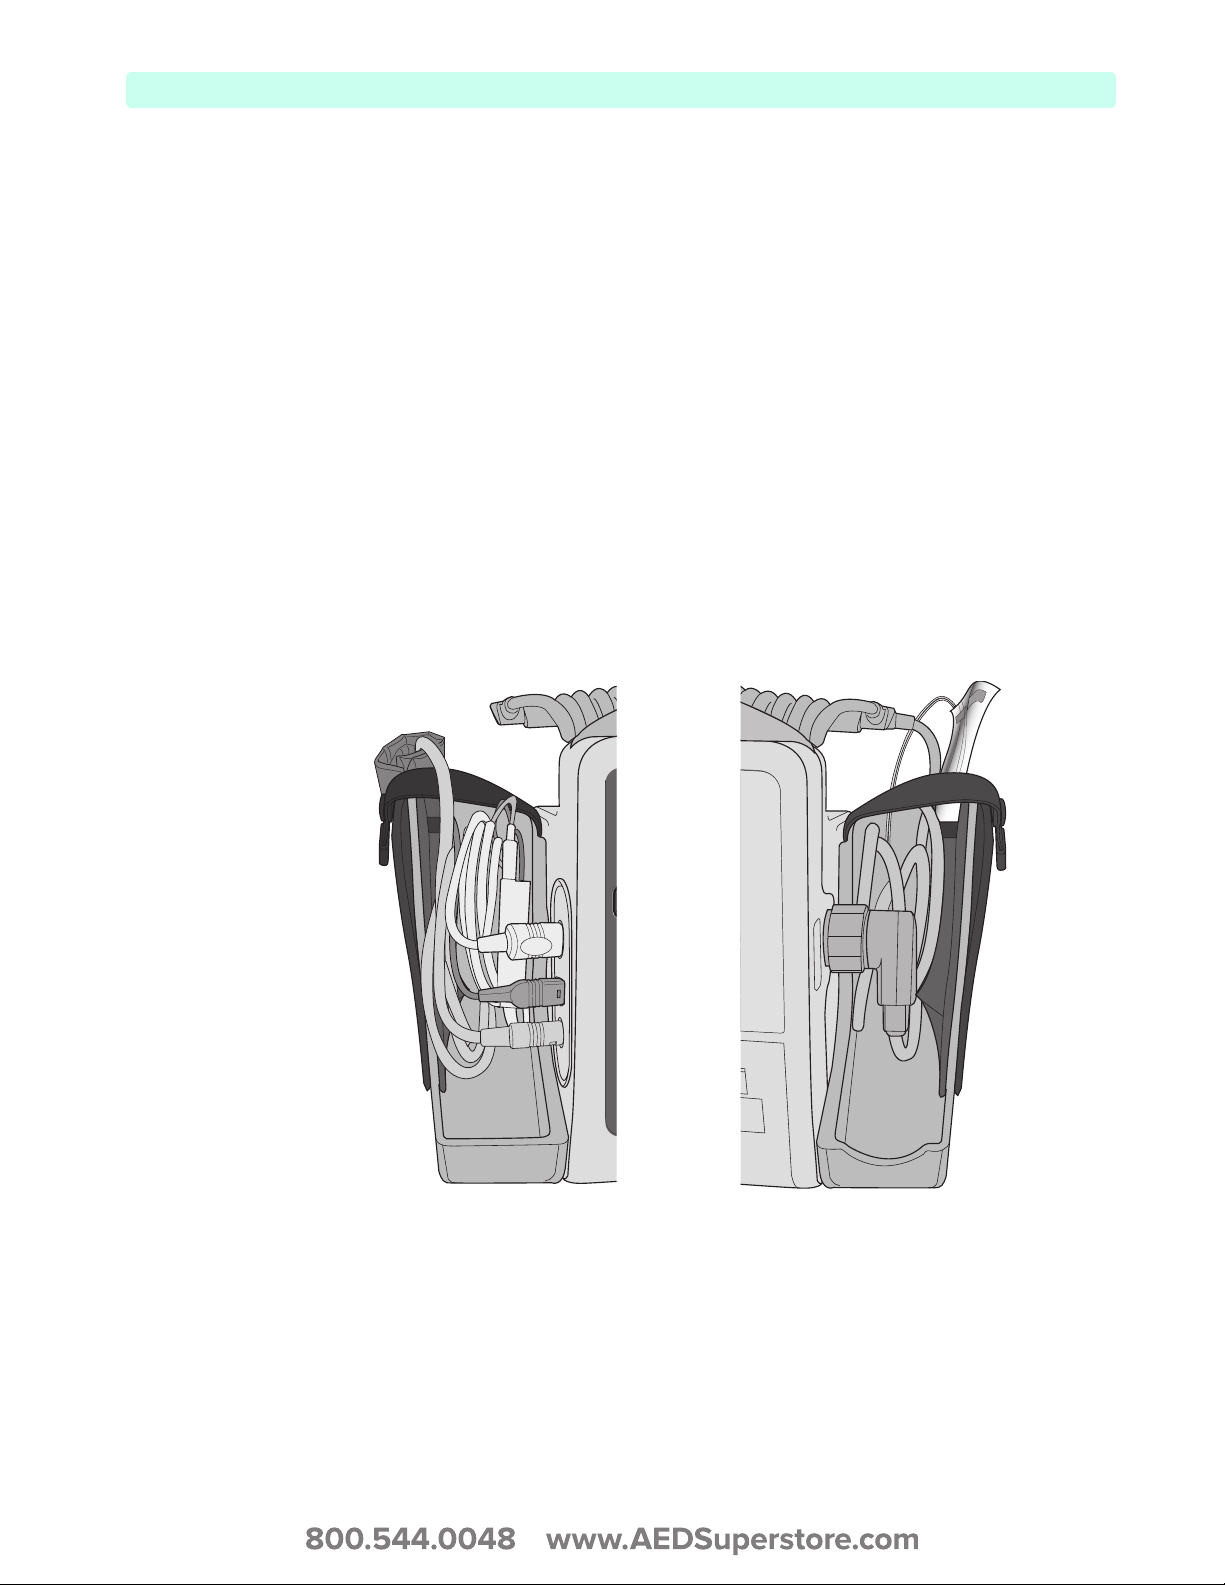
Filling the Accessory Pouches
The HeartStart XL+ Accessory Pouches are designed to hold your essential monitoring and defibrillation
accessories. Recommended accessory placement includes:
• Monitor side (see Figure 20):
• Connect the NBP tubing to the NBP port. Coil the remaining tubing with the NBP cuff. Place
them in the outside slot of the double-sided black bag.
• Connect the SpO
cable to the SpO2 port. Coil the remaining cable and finger sensor and place
2
them in the inside slot of the double-sided bag.
• Connect the ECG cable to the ECG port. Coil the remaining cable and leads and place it in the
large pouch.
• Therapy side (see Figure 21):
• Connect the Therapy cable to the Therapy port. Coil the remaining cable and place it in the
large pouch.
• If you are using pads, place pads in the inside slot of the double-sided bag. If you use paddles,
place gel pads or conductive material in the inside slot.
Figure 20 Monitor Side Accessories Figure 21 Therapy Side Accessories
Select
Select
Energy
Energy
17
2: Device Basics Basic Orientation
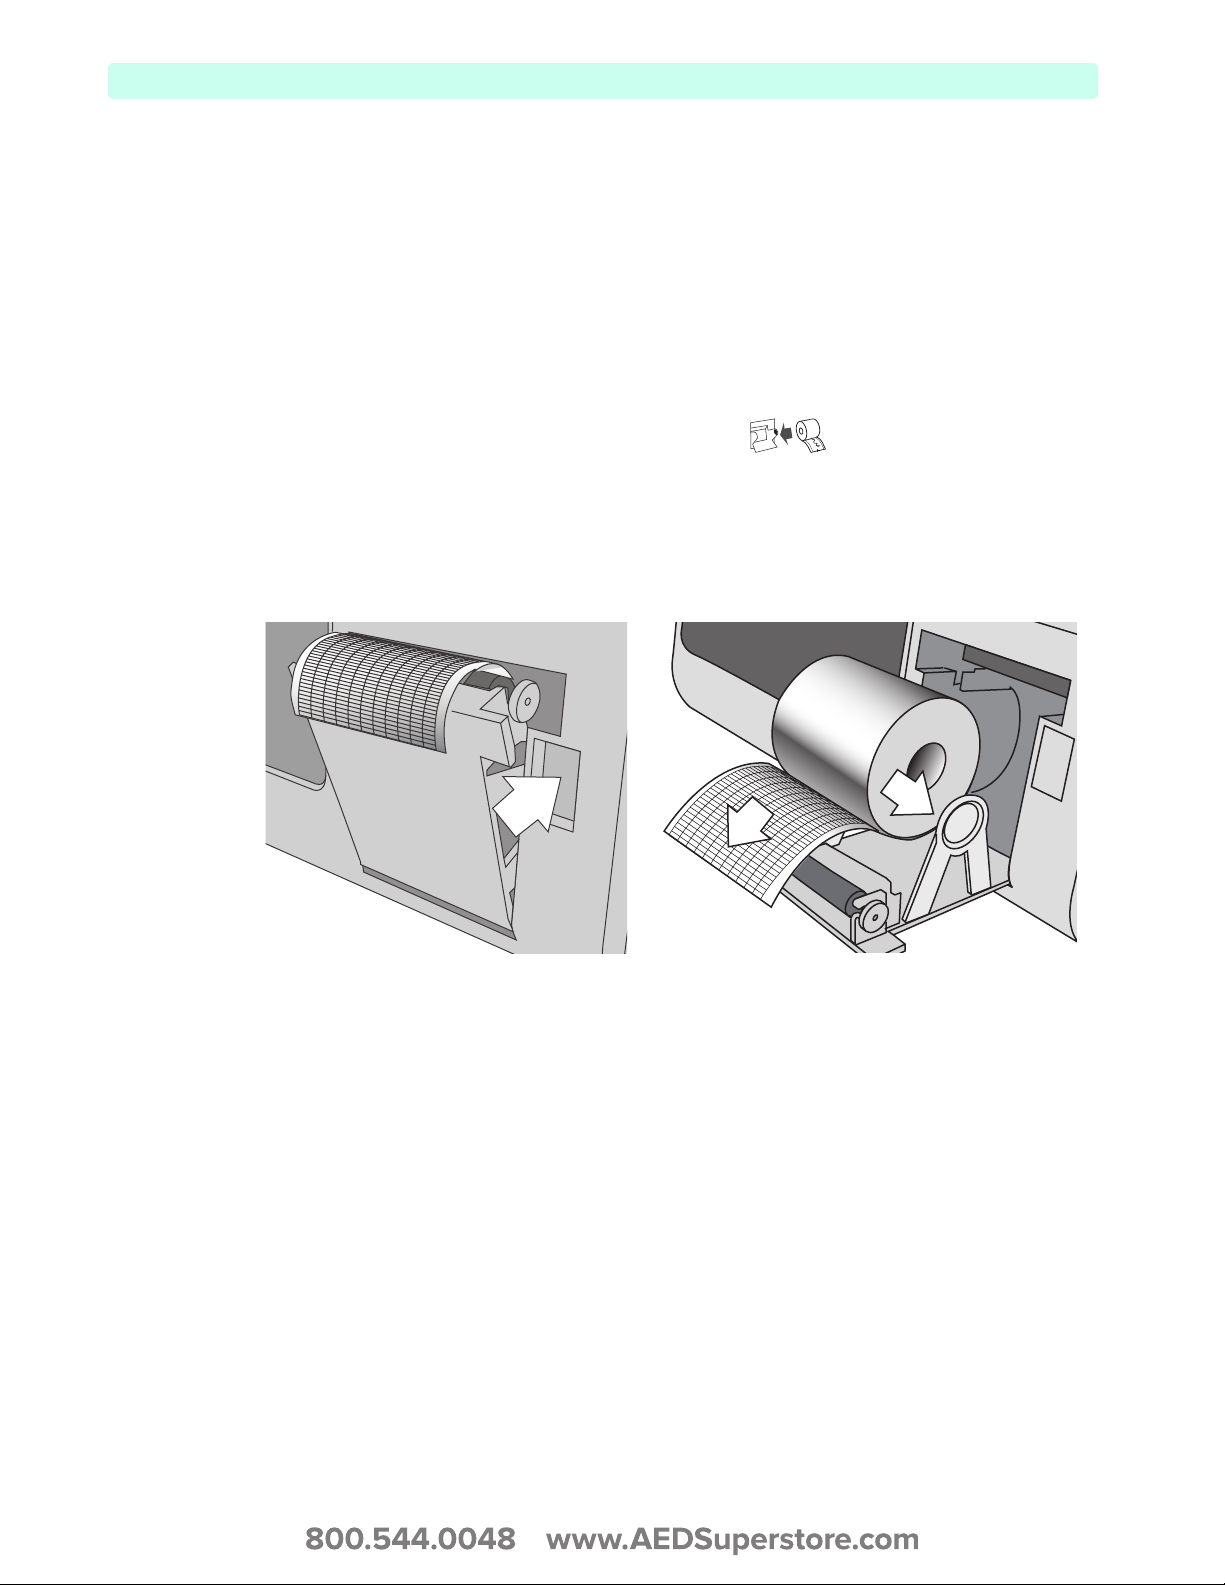
Installing Paper
The HeartStart XL+ uses 50 mm graphed paper for printing.
To install printer paper:
1 Open the printer door by pushing on the printer door latch (see Figure 22).
2 If there is an empty or almost empty paper roll in the printer, pull up on the roll to remove it.
3 Examine the new roll of printer paper and remove any remaining adhesive residue from the outer
layer of paper.
4 Place the new roll of paper in the paper well, positioning the roll so that the end of the roll is on the
bottom and the grid faces up as indicated by the symbol inside the printer.
5 Pull the end of the paper out past the roller.
6 Close the printer door.
7 Test the printer before putting the defibrillator back into service. See “Printing Data” on page 132.
Figure 22 Installing Printer Paper
18
Basic Orientation 2: Device Basics
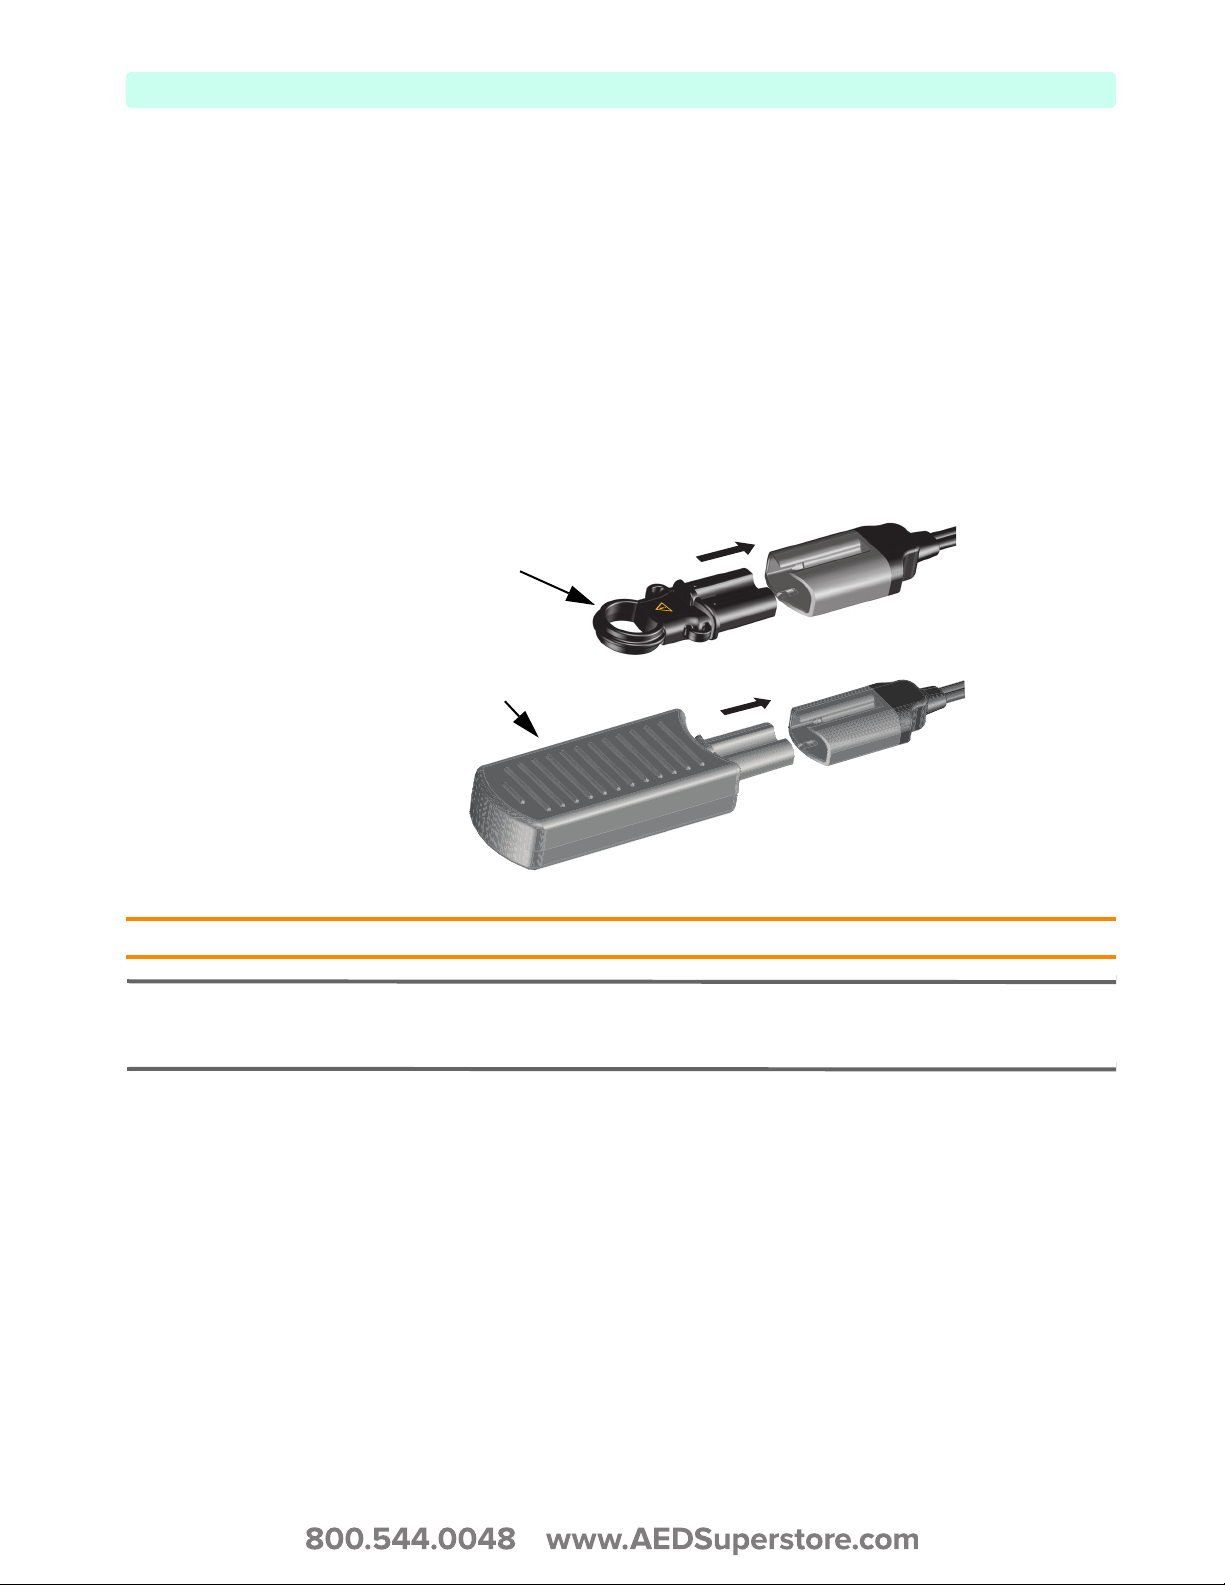
Test Plug & Test Load
Your HeartStart XL+ comes with a defibrillator Test Plug to assist in performing a Weekly Shock Test.
You can also use the M3725A Test Load, ordered seperately, to perform a Weekly Shock Test.
To use either the Test Plug or Test Load during a Weekly Shock Test, insert the plug or load into the
Therapy cable (see Figure 23).
The Test Plug and Test Load behave differently during the Weekly Shock Test. The Test Plug creates an
electrical “short” while the Test Load applies an impedence at the end of the Therapy cable. Therefore,
similar successful Weekly Shock Test results appear differently on the device.
For more on the Weekly Shock Test see “Weekly Shock Test” on page 148.
Figure 23 Connecting Defibrillator Test Plug/Load
Test Plug
Test Load
CAUTION: The defibrillator test plug is not compatible for use with the HeartStart MRx or HeartStart XL.
NOTE: Using the tie provided, tie the test plug about 18 inches (46 cm) from the end of the therapy cable tight
enough to prevent the plug from sliding along the cable. The plug should be oriented such that it can
easily be inserted into the cable while you have the the cable stowed.
19
 Loading...