

Page 1

Quick install guide
Welcome to the growing family of owners of PHILIPS equipment.
Thank you for buying a HDRW 720/69. The following pages contain
explanations of the main features that will help you better understand
how the HDRW 720/69 works.
You will find step-by-step descriptions of each function in the respective
chapter of the User manual.
Features
The HDRW 720 is a DVD recorder that can store TV-shows on a built-in hard disk (HDD).
Moreover, it is a DVD player that can play back DVDs, audio and (s-)video CDs, and MP3 CDs. You can play back and edit the stored TV shows
(or camcorder recordings), and save (archive) these on DVD+RW/+R media for later viewing.
But your HDRW 720 is more than just an ordinary DVD recorder with a built-in hard disk.
From now on, it's better to use your TV set just as a monitor and tune to the various TV channels from your DVD recorder, taking advantage of
features like FlexTime, Instant Replay, or the abitity to pause live TV.
FlexTime:
•
With FlexTime, you can watch or rewind a TV show while it is being recorded.
You don't have to wait until the end of the recording before starting playback.
Instant Replay:
•
You can repeat a scene of a live TV show at the touch of a button ( JUMP BACK ), as often as you like.
Pause Live TV
•
You can pause a live TV show by pressing PAUSE 9 to, say, answer a phone call, while the recording continues. By pressing PLAY G , you
can resume playback of the show at the scene it was interrupted.
ENGLISH
Time Shift Buffer
The above features are available because the HDRW 720 uses a so-called Time Shift Buffer.
As soon as you turn on your DVD recorder, it starts recording from the current TV channel into the
Time Shift Buffer. The DVD recorder stores all the TV shows you watched since you turned on the
recorder. If you watched a TV show for more than 60 seconds, the recorder will insert a marker. If
information is already available from the GUIDE Plus+
mark the beginning of the TV show.
Note:When you are recording from a cable box through the external input jacks, the title and start/end
information will not be available.
If the Time Shift Buffer is full (the default setting is 3 hours) the recorder will delete the oldest
recording to make room for new recordings. You can mark TV shows or parts of these to be recorded permanently on the HDD while the other
contents of the Time Shift Buffer will be deleted.
The Time Shift Buffer can be best compared to a conveyor belt running from right to left. A TV show resembles a package on this conveyor belt. If
you change the programme number or the GUIDE Plus+
belt. You can adjust the time a package will remain on the conveyor belt from 1 to 6 hours (the default setting is 3 hours).
As long as the packages are still on the conveyor belt, you can mark them red ( REC/OTR n ) or remove the marker ( RED function button).
You can only mark the package that's directly in front of you.
At the end of the conveyor belt (the preset time has expired), the recorder will decide whether a package will be stored (marked red) or
destroyed (unmarked). Only the packages that are marked red will be stored.
If you delete the Time Shift Buffer, the recorder will immediately remove all packages from the belt, storing only those you marked red.
®
system, the recorder will store the title and
®
system detects the start of a TV show, a new package will be placed on the conveyor
1
Page 2
Quick install guide
Simultaneous recording and playback
Thanks to the built-in HDD and the high data rates it can achieve, you can record and play back at the same time.
This enables you to:
watch, pause, or rewind a TV show while it is being recorded (FlexTime, Pause live TV)
•
watch a TV show stored on the HDD while another recording is being made
•
playback a DVD while the HDD records a TV show.
•
store (archive) a TV show from the HDD to a DVD+RW/+R while another show is being recorded on the HDD.
•
Media Browser
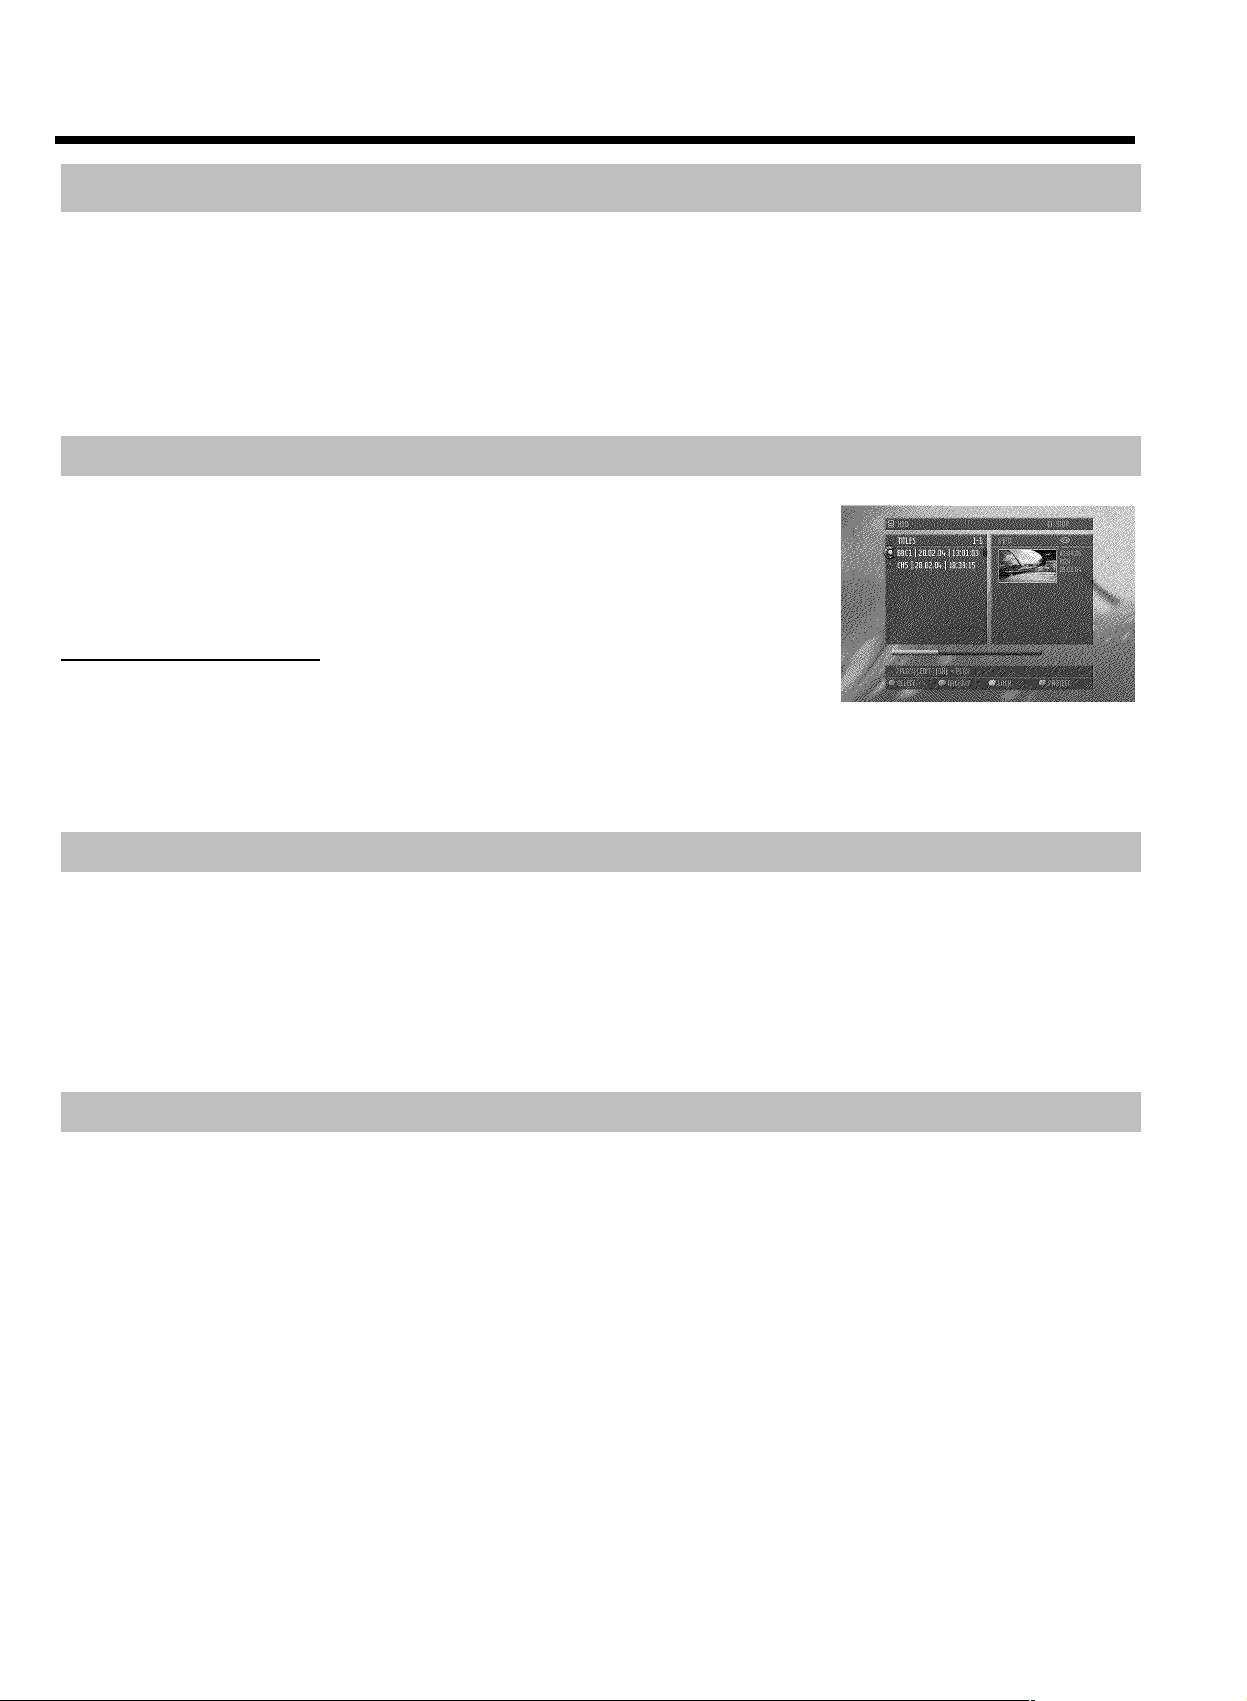
The Media Browser provides an overview of all the recordings on the HDD. You can display a list of all
recordings according to certain criteria ('Recording Date', 'Protected'...). You can select recordings
in the Media Browser for playback, editing, or storage on a DVD+RW/+R (archiving). Moreover, you
can lock recordings that you can only play back after entering a valid PIN code. If you haven't entered a
PIN code yourself, then the PIN code is '0000'.
Changing the PIN code
1 Press DISC MENU and then SYSTEM MENU ,
2 Select 'A' with D , then select the '(Disc features)' symbol with B , and confirm with C .
3 Confirm 'Access control' with C and enter the 4-digit code. Re-enter the code for confirmation and press SYSTEM MENU to end.
For more information, read chapter 'Access control (child lock)' in the user manual.
Archiving titles on a DVD+RW/+R
You can copy (archive) recordings from the HDD to a DVD+RW/+R.
To do so, select the desired recording in the Media Browser and press the 'ARCHIVE' colour function button. That's all!
Since the archiving process will take some time, you can switch to a different TV programme in the meantime by pressing CHANNEL q ,
CHANNEL r . Please note that you cannot use the FlexTime, Instant Replay, and Pause LiveTV features of the Time Shift Buffer or play back a
recording from the HDD during the archiving process, since the HDD is already playing back a recording (copying from the HDD to the
DVD+RW/+R). Nevertheless, it is possible to make recordings into the Time Shift Buffer (the Time Shift Buffer is filled). If you turn off the DVD
recorder using STANDBY m , the archiving process will continue until it is completed, and then the DVD-Recorder will switch off automatically.
Time Shift Buffer (continued)
The Time Shift Buffer is the heart of your HDRW 720. All recordings, except those via the front sockets, will be made into the Time Shift Buffer
first.
You can mark a recording to be stored permanently on the HDD.
Recordings are copied on the HDD when:
the preset Time Shift Buffer period expires (the default setting is 3 hours)
•
the Time Shift Buffer is deleted ('Flush Buffer'function( SYSTEM MENU button, 'Set up'menu ))
•
you turn off the DVD recorder with STANDBY m
•
you switch to camera mode using CAM (switch back with the same button).
•
date/time or channel settings have changed (menu is called up).
•
You can either set markers yourself or the DVD recorder can set such markers automatically, e.g. : timer recordings. The Time Shift Buffer keeps
record of which TV shows you watched during the last hours. This is shown using the so-called time bar with a series of recorded programmes on
the screen.
On the right-hand side, you can see a moving IIIIIIIIII symbol indicating that the Time Shift Buffer is being filled.
On the left-hand side, you can also see a moving IIIIIIIIII symbol indicating that the Time Shift Buffer is being emptied, i.e. recordings are being
discarded. The programmes in the Time Shift Buffer are separated by a vertical line. The name of the TV show is displayed above the line. The
time information on both sides of the time bar indicate the start and end time of the Time Shift Buffer. The current recording time is on the
right-hand end, and the oldest recording on the left-hand end.
2
Page 3

Quick install guide
Navigation in the Time Shift Buffer
You can move to any position within the Time Shift Buffer and watch the recording that was stored at that time.The indicator (yellow rectangle on
the time bar) shows the playback position in the Time Shift Buffer. You can move this indicator using the C , D buttons. If the playback position
is as far on the right-hand side as it can get, you are watching the current (live) picture of the TV channel you are tuned in. In the header of the
Time Shift Buffer, you will see an aerial symbol (contrary to the HDD symbol that appears when playing back from the HDD).
The following is a short overview of the basic buttons for navigation in the Time Shift Buffer:
N , JUMP BACK , D
When you reach the left end of the time bar, the recorder will switch to normal playback speed.
O , JUMP FWD , C
When you reach the right end of the time bar, you are watching the current TV programme. It is not possible to move further to the right. In
order to do so, the recorder would have to anticipate the future programme. You can use O to 'catch up' with the current TV programme.
PAUSE 9 If you stopped playback, the indicator will remain at that position until the preset time of the Time Shift Buffer has reached that
position (the indicator reaches the left end of the time bar). When it reaches the end, the DVD recorder will automatically switch to playback.
PLAY G Playback at normal speed. The limits of the Time Shift Buffer cannot be exceeded.
Recordings using the Time Shift Buffer
Recordings are always stored in the Time Shift Buffer first.
The following recording options are available:
Programmed recordings (TIMER) that will be carried out automatically at a predefined date/time
•
Direct recording of the current, live TV programme.
•
Marking of TV shows that have already been stored in the Time Shift Buffer.
•
You can mark recordings in the Time Shift Buffer to store them on the HDD instead of having them discarded when the Time shift Buffer period
expires. When a TV show is marked, a red marker appears on the time bar of the Time Shift Buffer. This marker indicates the recording. You
don't need to do anything else.
ENGLISH
The DVD recorder automatically transfers a show to the HDD when:
the preset Time Shift Buffer period expires (the default setting is 3 hours).
•
the Time Shift Buffer is deleted ('Flush Buffer'function( SYSTEM MENU button, 'Set up'menu )).
•
you turn off the DVD recorder with STANDBY m .
•
you switch to camera mode using CAM (switch back with the same button).
•
date/time or channel settings have changed (menu is called up).
•
In the case of programmed recordings, the marker is set automatically. After that, the recording is also automatically stored on the HDD. When a
red marker has been set, you do not need to do anything else. Even if you turn off the recorder with STANDBY m , the recording will be stored
first before the DVD recorder automatically switches off.
3
Page 4

Quick install guide
Programming a recording
You have the following options for programming a recording:
®
The GCode
By entering the G-Code programming number, you automatically set start/stop time, date, and programme number
Manual programming.
Manually started recordings
To record the current TV show, press REC/OTR n .
If you want to stop the recording, press the STOP h button. Select 'Yes' using D and confirm with OK .
If you want to mark a TV programme in the Time Shift Buffer, move the button on the time bar using C , D within the desired programme and
press REC/OTR n . To remove the marker, press the RED function button. The time bar must be visible. ( INFO button)
Recording mode
Recordings on the HDD will be carried out in an adjustable recording quality, the so-called recording mode. The higher the quality, the greater the
HDD space required. The recording quality is indicated as M1, M2, M2x, M3, M4, M6, and M8. The number indicates the number of hours that will
fit on a single-layer, 4.7GB DVD+RW or DVD+R. This means that you can store only 1 hour of 'M1' recordings on a DVD+RW/+R, while 8 hours
of 'M8' recordings will fit on the same disc.
This is particularly important when you want to copy recordings from the HDD onto a DVD+RW/+R. The quality of recordings on the HDD
cannot be changed at a later stage.
system:
For example:
A 3-hour movie that was stored on the HDD in recording quality 'M1' will not fit on a DVD+RW/+R (M1=1 hour on a DVD+RW/+R). Only 1
hour of this movie can be copied onto a DVD+RW/+R. If you recorded the same movie in recording mode M3, the entire movie would fit on a
DVD+RW/+R. (M3=3 hours on a DVD+RW/+R).
A few closing instructions
If you have any problems operating the device:
1) Read the items in the User Manual in the section 'Before you call an engineer'
2) Visit the Internet site http://www.philips.com/support to get some online help,
3) Call the customer support service. You will find the telephone numbers at the back of the User manual.
4
Page 5
Quick install guide
Connecting to the TV
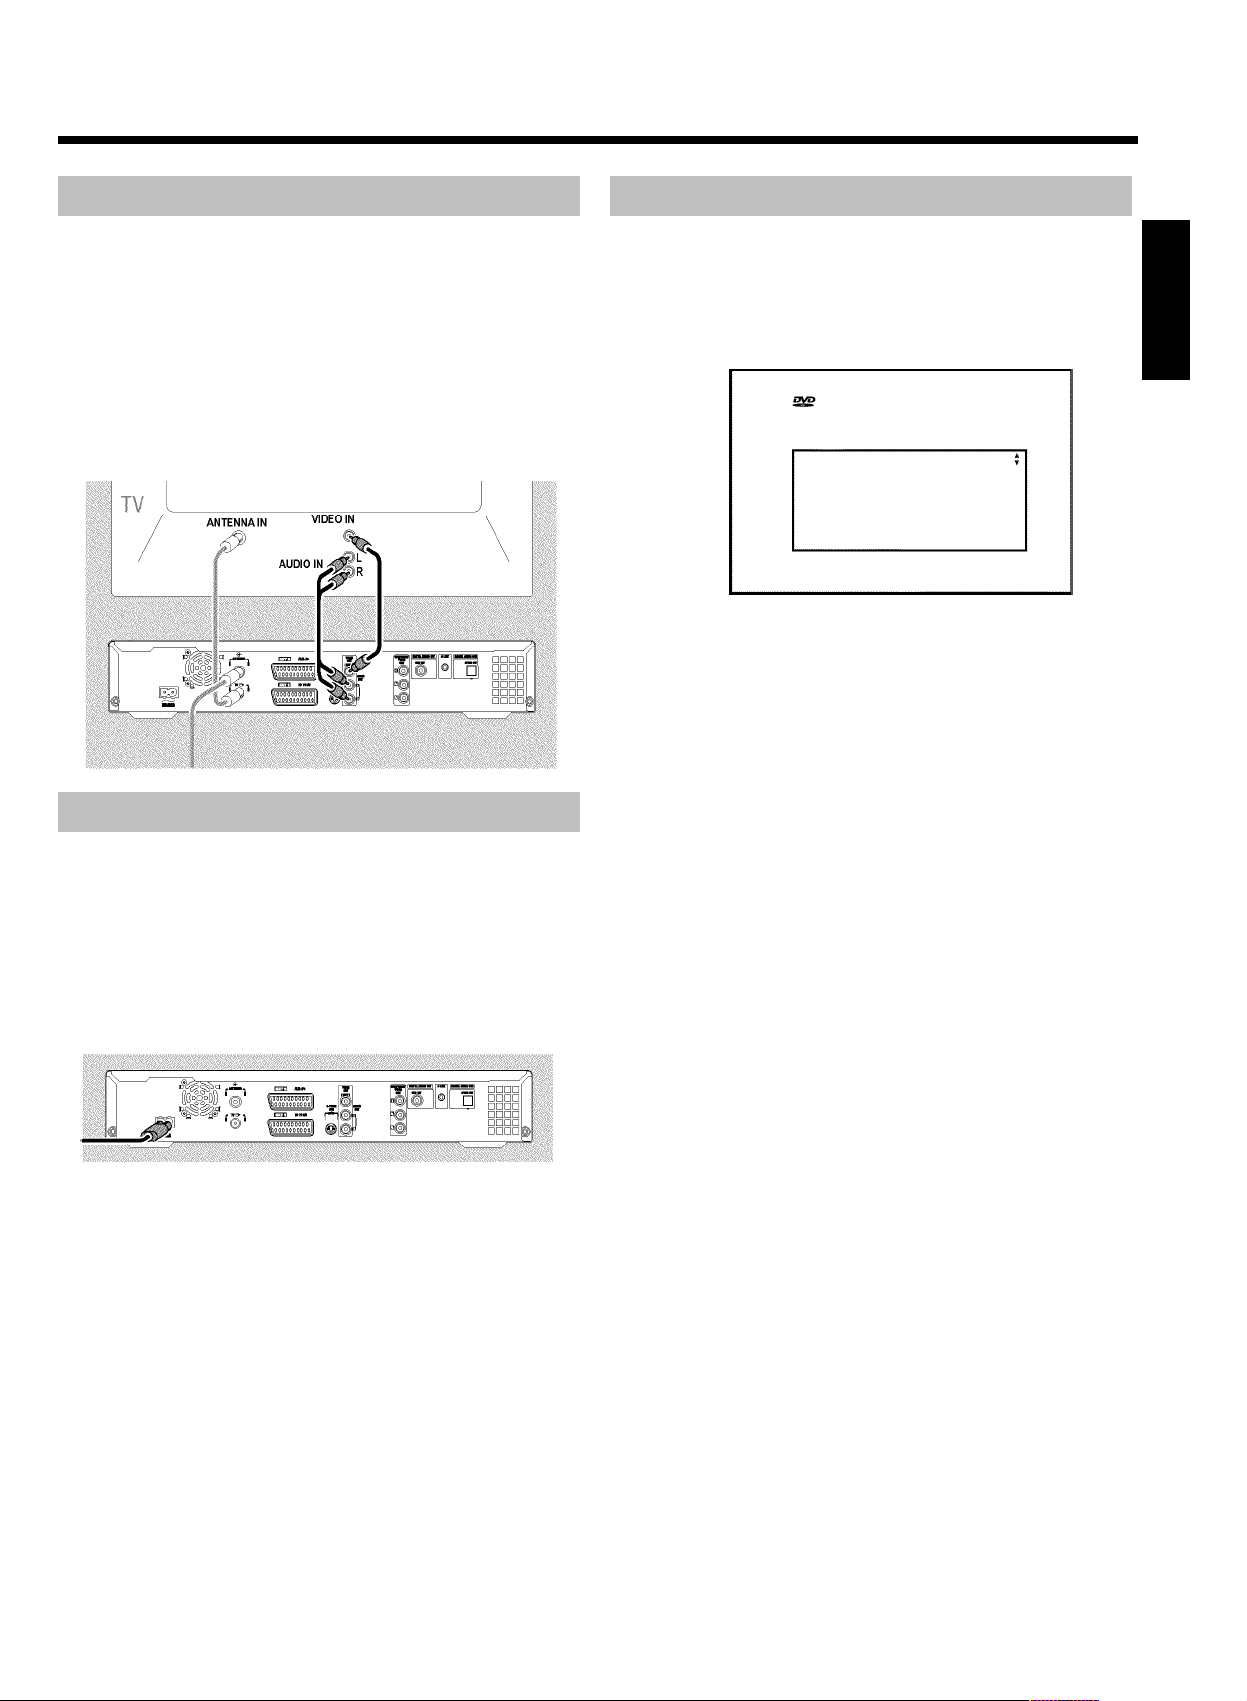
1 Switch off your TV set.
2 Remove the aerial cable plug from your TV set. Insert it into the
ANTENNA IN socket at the back of the DVD recorder.
3 Insert one end of the supplied aerial cable into the TV
OUT socket at the back of the DVD recorder and the other end
into the aerial input socket at the back of the TV set.
4 Connect sockets S-VIDEO OUT (Y/C) or VIDEO OUT
(CVBS) and AUDIO OUT L/R with the corresponding sockets
of your TV set.
Connecting to the mains
Always check if the local mains voltage matches the voltage range
printed on the type plate at the back or bottom of the DVD-recorder.
If not consult your dealer or the customer support from your country.
1 Switch on the TV set.
Initial installation
1 Press STANDBY-ON m on the front of the DVD-recorder
P 'PHILIPS' and then 'IS TV ON?' will appear on the display.
2 If necessary, select the programme number for the input socket at
the TV set.
P The initial installation menu appears on the screen.
Virgin mode
Menu Language
English
Español
Français
Italiano
Deutsch
Press OK to continue
3 Select your favourite setting using B or A .
Confirm with OK .
4 Proceed in the same way with the further menus: 'Audio
Language', 'Subtitle', 'TV shape', 'Country'.
P The Automatic channel search starts after the confirmation of
the message 'If you have connected the antenna - press
OK' using OK .
P After all channels have been found, the menu for Time/Date
setting appears.
Check the data displayed and change them if necessary
5 To end, press SYSTEM MENU .
ENGLISH
2 Insert one end of the supplied mains cable into the mains socket
4MAINS at the back of the DVD recorder and the other end
into the wall socket.
5
Page 6

Quick install guide
Programming recordings with the
GCode
1 Switch on the TV set. If required, select the programme number
for the DVD recorder.
2 Press TIMER s on the remote control.
P The 'Schedule' screen will appear
3 Press the red function button ('G-Code').
®
System
G-Code Manual Home
Please enterthe G-Code programming number and
press OK to confirm.
Grid Search Schedule Info
No programmes
=========
Once 0
a 'Please enter programme number' appears on the
screen
b This message appears when the TV channel has not been assigned
yet.
Enter the program number and confirm with OK .
G-Code Manual Home
Please enter the G-Code programming number and
press OK to confirm.
Grid Search Schedule Info
/Record Freq. Timing
21-Oct 20:00 21:30 BBC1 Once 0
12345====
P The decoded data appears after confirmation.
You can use the colour buttons to make the following settings.
First, the right tile must be highlighted ( C button). Check the
functions (descriptions) in the corresponding colour field
before pressing a button.
4 Enter the entire G-Code number. This number is up to 9 digits
long and can be found next to the start time of the TV programme
in your TV listings magazine.
e.g.: 5-312-4 or 5,312 4
Enter 53124 for the G-Code-number.
Use therefore the number buttons 0..9 on the remote control.
If you make a mistake you can press D or the green action button
to go back a position.
5 Confirm with OK .
Deactivate 'VPS/PDC'!
If 'VPS/PDC' appears instead of the time, press the yellow function
button until the 'V/P' sign disappears.
Setting up repeat recordings
You can choose from the following settings with the green action button:
'Frequency': 'Once': single recordings
'M-F': Repeated daily recordings (Monday to Friday).
'Mon': Repeated weekly recordings (every week on the
same day e.g. Monday).
6 If all information is correct, press the OK button. The data is
stored.
7 To end, press TIMER s .
If one or more recordings have been programmed 'TIMER' will light up
on the display.
6
Page 7

Quick install guide
Recording on the HDD
As soon as you turn on the DVD recorder, the currently selected TV
channel on the DVD-Recorder is recorded in a temporary storage
(Time shift Buffer).
Therefore, you can jump back to the currently selected TV programme
using JUMP BACK and watch a scene again.
Moreover, you can use all playback features such as still picture, slow
motion, search by time, search with N , O even with recordings
that are still in the time shift buffer.
In the meantime, the recording continues.
Recordings in the time shift buffer will be automatically deleted (factory
setting 3 hours).
Only recordings marked in the Time shift Buffer will be stored on the
the built-in HDD
Buttons in the 'Time Shift Buffer'
1 Press INFO to display the bar of the time shift buffer on the
screen.
2 The following buttons are available:
O N , O , PLAY G , PAUSE 9 , D , C , JUMP
FWD , JUMP BACK for navigation in the time bar.
O RETURN
You can jump back to the previous scene of the time shift
buffer or to playback from the HDD.
If you press this button again, you can switch to the picture of
the actual running TV show.
O TUNER
To switch to the actual TV show (live) of the selected TV
channel.
O T/C
Switching between title/chapter for selection using N ,
O . The top screen line displays either 'TITLE' for selecting
titles or 'CHAPTER' for selecting chapters
O REC/OTR n :
- To start a recording that will be stored on the HDD.
- To mark a title that will be stored on the HDD.
- Hold button down to start the recording from the actual
position.
ENGLISH
Symbols in the 'Time Shift Buffer'
Following symbols can appear in the info bar at the top of the screen in
the 'Time Shift Buffer'. With the INFO button on the remote control
you can also call up this infobar.
Left area
Information about the input signal were displayed here:
'C' Actual TV show (live picture) from the selected TV channel
'P01' Programme/Channel number of the selected TV channel
D' Playback from the HDD
'
Right area
Information about the current operating status were displayed here:
'B 16:03:02' Actual (live) picture of the selected TV-channel
( TUNER button)
'J PLAY' Playback from the HDD
'M PAUSE' Still picture
'H 1/2X' Slow motion forwards
O RED function button:
- To cancel the marked recording that was set with the
REC/OTR n button.
- Hold button down to stop the recording at the actual
position.
O YELLOW function button: ('OVERVIEW')
To display an overview of all content of the time shift buffer.
O BLUE function button:('MORE INFO'):
To display any additional information for the actual TV show
transmitted by the GUIDE Plus+
®
system.
'G -1/2X' Slow motion backwards
'L 4X' Fast motion forwards
'K -4X' Fast motion backwards
7
Page 8

Quick install guide
Manual recordings
When you switch on the DVD recorder, the currently selected TV
programme will be recorded will be recorded in the Time Shift Buffer.
In order to store a recording on the HDD, you must mark it red in the
Time Shift Buffer (time bar) before the Time Shift Buffer is deleted.
How can I delete the Time Shift Buffer?
- Switch off the recorder using STANDBY m
- Select the 'Flush Buffer' feature ( SYSTEM MENU button, 'Set
up' menu)
- The preset time of the Time Shift Buffer (1-6 hours) has expired
Starting a recording
1 In case the time bar of the Time Shift Buffer is not visible on the
screen, press INFO on the remote control.
2 Press REC/OTR n .
P The red light around the record button n on the front will
switch on.
P '1 Programm +30' will appear on the screen on the right end
of the time bar. This indicates that the recording will
automatically end after 30 minutes. Press
REC/OTR n several times to prolong the switch-off time.
Recording the previous TV show
If the DVD recorded has been on for some time, the Time Shift Buffer
already contains recordings. You can select those recordings (TV shows)
that you want to store on the HDD.
- Select the beginning of the oldest recording with D or C and hold
down REC/OTR n to mark the recording from the beginning.
- Select the end of the most recent recording using C or D and hold
down the RED function button to cut off the end.
You can remove the marker using the RED function button.
Ending a recording manually(immediately)
1 If necessary, switch the TV set to the programme number (input
socket) of the DVD recorder.
2 Press STOP h
P A message appears on the screen, asking whether you really
want to end the recording.
O If you want to end the recording, select 'Yes' with D and
confirm with OK .
O If you do not want to end the recording, confirm 'No' using
OK .
STOP h will always end only the current recording (current time).
If you want to end a recording earlier than scheduled (jump back in the
Time Shift Buffer using D ), proceed as follows:
- Press INFO to display the time bar.
- Hold down the red function button.
3 To permanently store the recording on the hard disk, you have to
erase the Time Shift Buffer. The following options are available:
O the preset Time Shift Buffer period expires (the default setting
is 3 hours)
O the Time Shift Buffer is manually erased ('Flush
Buffer'function( SYSTEM MENU button, 'Set up'menu ))
O you turn off the DVD recorder with STANDBY m
O you switch to camera mode using CAM (switch back with the
same function button).
Starting a recording from the current position (from here onward)
You can also start a recording immediately, regardless of the
recordings in the Time Shift Buffer.
1 Hold down REC/OTR n until the red light on the record button
n at the front switches on.
8
Page 9

Quick install guide
Recording from the front sockets
Using this function, you can store recordings via the front sockets
directly on the HDD.
You can edit these recordings on the HDD and transfer (archive) them
later with higher speed on a DVD+RW/+R disc.
1 Connect the camcorder to the front sockets.
2 Press CAM on the remote control.
P The DVD recorder will switch to camera mode.
3 Select the socket to which the camcorder is connected using
CHANNEL q or CHANNEL r .
O 'CAM1'
For recordings from the VIDEO (CAM1) , S-VIDEO
(CAM1) sockets.
Switching between the two sockets is done automatically.
O 'CAM2'
For recordings from the DV IN (CAM2) socket.
4 Press REC/OTR n to start the recording.
5 You can stop the recording using the following buttons:
O PAUSE 9
The recording will be paused. If you press the button again,
the recording will resume.
A new chapter is created.
O STOP h
The recording will be interrupted. You can start a new
recording by pressing REC/OTR n .
A new title is created.
6 Press CAM to terminate the camera operating mode.
P The recording will be stored on the HDD as a new title.
7 Press CAM to terminate the camera operating mode.
P The recording will be stored on the HDD as a new title.
Archiving (storing) titles on a DVD+RW/+R
You can choose the title of the HDD that you want to transfer on a
DVD+RW/+R.
Please observe:
For archiving you can only use the same recording quality that was
used for recording on the HDD. You cannot change the recording
quality for recordings on a DVD+RW/+R.
1 Insert a DVD+RW/+R on which you want to store the selected
titles.
2 Press BROWSER HDD .
P The media browser appears with an overview of all recordings
on the HDD.
3 Select the title you want to copy on the DVD+RW/+R using B ,
A .
O If you want to archive several titles at a time, mark the desired
titles with SELECT .
4 Start the archiving process by pressing the green function button.
If this button is not visible on the screen, check if this title is available in
the 'Time shift Buffer'. If necessary switch the DVD-Recorder off using
STANDBY m or use the 'Flush Buffer' function (button
SYSTEM MENU , menu 'Set up')
P A message indicating the process appears both on the screen
and in the display.
P During and after the archiving process, you see the TV show
of the currently selected TV channel. The buttons D , C ,
JUMP BACK , JUMP FWD , PLAY G , PAUSE 9 are
without function during archiving. Timer recordings will take
place.
Interrupt the process
Press the yellow function button. If necessary call up the informatoon on
the screen using the INFO button.
Finalising a DVD+R
If recordings were stored (archived) on a DVD+R you have to finalise it
to make play back in a DVD-Player possible.
- Press DISC MENU and then STOP h to mark the first title.
- Press A to go to the 'disc info screen'
- Press C and select then the line 'Finalise disc' using B .
- Confirn with OK .
ENGLISH
9
Page 10

Quick install guide
Playback from the HDD
Each recording stored on the HDD is displayed in the media browser
with a corresponding index picture.
1 Press BROWSER HDD on the remote control or HDD on the
DVD recorder.
P The Media Browser appears.
2 Select the title you want using B , A on the remote control or
DOWN , UP on the device.
You can switch a page forward or back using CHANNEL q ,
CHANNEL r .
3 You can choose one of the following options to start playback:
O OK
Playback always starts at the beginning of the selected title.
O PLAY G
Playback will start at the position where it was interrupted in
the selected title( STOP h ). This also works if other titles or
DVDs have been played in the meantime.
Symbols in the 'Media Browser'
If you call up the Media Browser with the BROWSER HDD button,
following symbols can appear in the infobar at the top of the screen:
'
P' This title was marked in the Time Shift Buffer for the storage on
the HDD. This title can only be deleted or locked (child lock). If
you want to make additional changes, you have to flush the time
shift buffer. Use therefore the 'Flush Buffer' function (button
SYSTEM MENU , menu 'Set up') or switch the DVD-Recorder
to standby.
'
E' This title has been played once (has been 'watched'). If there is no
storage capacity free on the HDD such 'watched' titles will be
deleted automatically if the function 'Auto delete' is switched on.
You can change these setting in the title edit menu ( EDIT button,
blue button, EDIT button )
Titles that were not played back, will have no symbol.
'
F' The title is protected against editing and 'Auto delete'. If the title
is not protected, no symbol will be shown.
'
' Child lock is activated. The index picture is switched off. Playback
starts only if the right PIN code was entered. If no PIN code has
been entered or the PIN code was deleted, the PIN code is '0000'.
Change the Code
- Press DISC MENU and then SYSTEM MENU .
- Select the symbol '
B and confirm using C .
- Confirm the line 'Access control' using C and enter the 4 digit
code. Enter the code again for confirmation and end using SYSTEM
MENU .
In the section 'Changing the PIN code' in chapter 'Access control (Child
Lock)' you will find further informations.
' using D then '(Disc features)' with
A
'
Q' The marked titles will be stored (archived) on a DVD+RW/+R.
10
Page 11

Buttons in the 'Media Browser'
O Delete title:
red function button
The tiltle (recordings) will be erased from the HDD.
O Archive title:
green function button
The title will be transferred to DVD+RW/+R. If it is not
possible to record on a DVD+RW/+R, an error message
appears (disc not inserted,...).
If you want to archive several titles, mark the desired titles
with SELECT . You can unmark the title using the same
button.
Available functions during archiving
- Switching between the TV channels using CHANNEL q ,
CHANNEL r .
- The selected TV show is recorded in the time shift buffer.
- Timer recordings takes place
O Lock/unlock title (child lock):
yellow function button
Playback starts only if the right PIN code was entered. If no
PIN code has been entered or the PIN code was deleted, the
PIN code is '0000'. How you change the PIN code you will
read in the section 'Symbols in the media browser'
Quick install guide
ENGLISH
O Protect/unprotect title against editing, automatic
deletion:
blue function button
An error message will appear if you try to edit this title.
Automatically deletion will take place, if your HDD will run full
with recordings. Stored recordings will be deleted in a certain
order. See details in the section 'Symbols in the media
browser'
Switch over to the actual TV channel during playback from a disc
You can play back a disc, while the current TV show is still being
recorded.
1 To interrupt playback from a disc, press TUNER
P You will see the TV-show from the selected TV channel on
the DVD-recorder
O To continue playback, from the disc press DISC MENU .
11
Page 12

Quick install guide
The remote control
REC/OTR n Record the current TV show on the HDD, mark recordings in the time
shift buffer to be stored on HDD.
Hold button down to start the recording from now. (Mark the
recording from the beginning of the actual position in the Time Shift
Buffer).
STANDBY m To switch set on or off, interrupt menu function.
A programmed recording (TIMER) or an archiving process will be
continued until the end, and the device will then be switched off.
CAM Switch to 'Camera mode' (recording directly on the HDD and not
through time shift buffer).
TV/HDD No function
RETURN Return to previous menu on a video CD (VCD). This also works with
some DVD discs.
Moreover, you can jump back to the previous scene of the time shift
buffer during playback from the HDD. You can switch to the picture of
the actual running TV show with the TUNER button.
EDIT Call up/Cancel the edit menu.
Call up/Cancel the menu for editing titles during playback.
TIMER s To make a TIMER programming with/without G-Code
alter/clear programmed recordings.
SELECT Select function/value.
You can mark several titles in the media browser.
Switch on repeat play during playback from a disc.
You can switch to upper case characters if you enter names
TUNER This button lets you switch to the picture of the internal tuner (TV
channel).
During play back from the Time Shift Buffer, you can jump to the actual
TV show (live) of the selected TV channel.
SYSTEM MENU Call up/Cancel the system menu.
Depending on the operating mode from which you press this button:
•) DVD system menu: Press DISC MENU first.
•) HDD system menu: Press TUNER first.
DISC MENU For displaying the DVD menu or the index screen overview.
INFO For displaying additional information on the screen or the time shift
buffer during playback/recording on the HDD.
BROWSER HDD Call up/cancel the overview of HDD recordings (media browser).
GUIDE/TV No function
®
system or to
12
AB Cursor buttons up, down in the menus.
Previous or next position in the time shift buffer during playback from
HDD.
Page 13

Quick install guide
DC Cursor buttons left, right in the menus.
Previous or next position during playback of a title from the HDD
(media browser or time shift buffer). If you hold down this button you
can faster browse through the recordings. The speed will increase
automatically.
OK Confirming of functions
Starting the playback from the beginning in the 'Media Browser'.
STOP h Stop playback /Recording
Hold down the button to open and close the disc tray.
PAUSE 9 If this button is pressed during playback, the DVD recorder switches to
pause. You will see a still picture. If this button is pressed during
recording in the 'Camera mode', the DVD recorder switches to pause
and inserts a chapter marker.
PLAY G Play back a recorded disc.
CHANNEL q Next programme number
CHANNEL r Previous programme number
JUMP BACK To jump back a certain time period (factory setting 30 seconds) The
setting can be changed in the settings of the HDD (button TUNER ,
SYSTEM MENU , line 'Set up', 'Jump back')
N Briefly press the button during playback: Previous chapter or previous
title
Hold down the button: Search backwards
Hold down the button during the still picture: slow motion backwards
In the title edit menu (button EDIT , line 'Video edit') you can jump
to the beginning during still picture (button PAUSE 9 ). This is
needful if you want to hide a scene at the beginning.
ENGLISH
O Briefly press the button during playback: Next chapter or next title
Hold down the button: Search forwards
Hold down the button during the still picture: slow motion forward
In the title edit menu (button EDIT , line 'Video edit') you can jump
to the end during still picture (button PAUSE 9 ). This is needful if
you want to hide a scene at the end.
JUMP FWD To jump forward a certain time period (factory setting 30 seconds) The
setting can be changed in the settings of the HDD (button TUNER ,
SYSTEM MENU , line 'Set up', 'Jump forward')
0..9 For entering numbers or characters at the corresponding entry fields.
T/C Switching between title and chapter for selection using N , O .
If 'INFO' appears in the display, the index menu from a recorded disc
will be shown or an introductory film will be played. In this case, this
function is not available.
DISC MANAGER Call up/Cancel the disc manager (DM).
13
Page 14

Quick install guide
Colour buttons
You can call up different functions in the menus using the following colour buttons. The functions
will be shown in a bar at the bottom of the screen. If this bar is not visible, you can display it using
the INFO button.
Most of the colour buttons work only if this bar is visible.
RED Red function button, in some screens the function of a 'clear' button
(e.g. Disc Manager, 'Sort TV channels' menu, edit the title name,...).
Stop recordings in the time shift buffer.
GREEN Green function button
YELLOW Yellow function button
BLUE Blue function button
Additional TV functions
With the enclosed multicode remote control you can control the main functions of your TV set.
To do this, you must first enter a code number that corresponds to the type/brand of your TV set.
You will find the code numbers on the last page of the user manual. How to enter this code
number you will read in the chapter 'Using your DVD-Recorder remote control with your TV set'in
the user manual.
TV VOLUME q Increase TV volume
TV VOLUME r Reduce TV volume
For the following functions you need to hold down the •TVbutton (on the left side) and then
select the function you need with the appropriate button.
STANDBY m Switch on/off TV set
0..9 Number buttons 0 - 9
CHANNEL q To select a higher programme number
CHANNEL r To select a lower programme number
Additional TV functions for Philips TV-sets if supported from the TV. You need to hold down the •
TV button (on the left side).
T/C switch Teletext (TXT) on/off
TIMER s Clock display on the screen on/off
RETURN To return to the previous selected TV program/ previous menu step
SYSTEM MENU Call up the System Menu from the TV
B , A In the menus cursor up/down
D , C In the menus cursor left/right
14
OK Confirm functions or settings
RED ,GREEN ,
YELLOW, BLUE
TUNER Switching the TV from the external sockets to the internal tuner.
Colour buttons for special functions
Page 15

ENGLISH
15
Page 16

ENGLISH
(WwnnNNNwwnnwWNnwNwnNwnNnWNwwnN) HDRW 720/69
16
3103 605 21461
4363/000
 Loading...