

Page 1

If you don’t have a set-top box follow the instructions for ‘Connection without Set-Top Box’. If you have a set-top box,
follow the instructions for ‘Connection without Set-Top Box’ then the instructions for ‘Connection with Set-Top Box’.
Connection without Set-Top Box
Before Connecting
Your TV should be plugged into the wall jack via the antenna
cable. Unplug the antenna cable from the TV.
Connecting
Connect the antenna cable (plugged out from the
1
TV) to ANTENNA IN socket at the rear of
the recorder.
Connect the provided antenna cable into the TV
2
OUTPUT socket at rear of the recorder and into
the Antenna In socket of the TV.
a
Connect the Video (CVBS) cable (yellow) to the
3
VIDEO (CBVS) socket of the TV and to the OUT 2
VIDEO (CBVS) socket at rear the recorder.
or
Connect the S-Video cable to the S-VIDEO socket
b
3
of the TV and to the OUT 2 S-VIDEO socket at rear
the recorder.
Connect the red Audio cable to the red socket of
4
the TV and recorder and the white Audio cable to
the white socket of the TV and recorder.
Connect the power cable from the recorder to an
5
AC power outlet.
DVD Recorder/Hard Disk
Television
Connection with Set-Top Box
With the TV Guide on ScreenTM System, your new Philips
Hard Disk & DVD Recorder can control your set-top box
(satellite receiver or cable TV box) via the IR-Blaster (GLINK cable). You can now only record TV shows that are
received through the cable box.
Connecting
Follow the instructions under ‘Connection without Set-Top
Box’ to connect the recorder then proceed to step 1 below.
Connect the G-LINK cable (supplied) to the G-LINK
1
socket at the rear of the recorder.
Place the IR-Blaster transmitter in front of your set-
2
top box in such a way that it can acquire the signal
broadcasted by the transmitter.
If not already connected, plug in the power cable of
3
your set-top box to an AC power outlet.
Television
DVD Recorder/Hard Disk
Cable Box
IR-Blaster
Positioning of G-LINK transmitter
Set-Top Box
IR-Blaster
Note
The IR-Blaster must be placed about one inch in front of
the set-top box.
Remote Control
Description
REC/OTR
1
Record the current TV
show and mark recordings in the TSB to be
stored on HDD.
TUNER
2
Switch to live TV.
COLOUR BUTTONS
3
Have different functions
(shown at bottom of
screen) in different menus.
BROWSER HDD
4
Call up the HDD menu.
STOP
5
Stop playback/recording.
Hold down to open and
close the disc tray.
PAUSE
6
Pause playback.
JUMP BACK
7
Jump back a certain time.
PREVIOUS
8
Previous chapter or title.
Hold down to search
backwards.
STANDBY
9
Switch on or off.
DISC MENU
10
Display the DVD menu.
INFO
11
Display additional
information.
GUIDE/TV
12
Call up the GUIDE
Plus+® system.
LEFT , RIGHT ,
13
UP , DOWN ,
OK
Used to navigate through
the menus.
PLAY
14
Play/resume from
disc/HDD.
JUMP FWD
15
To jump forward a
certain time.
NEXT
16
Next Chapter or Title.
Hold down to search
forwards.
Finding the Viewing Channel
Press the STANDBY-ON button on the recorder.
1
The recorder will display ‘IS THE TV ON?’
OPEN/CLOSE TV GUIDE OK
Front Panel of Recorder
STANDBY-ON
STANDBY-ON
Switch on the TV set.
2
Press the ‘0’ button on the TV remote control, scroll
3
down until you see the Menu Language menu. This is
your correct viewing channel for the recorder.
Tip
If unable to find the correct viewing channel, check your
connections again or check your TV’s user manual.
HARD DISK & DVD RECORDER
Installation
Follow the on-screen instructions:
Select your Menu Language.
1
Tip
Use the recorder’s remote control to make the selections.
Select your Audio Language.
2
Select your Subtitle Language.
3
Select your TV Shape.
4
Select your Country.
5
The recorder will now ask if you have connected
6
your antenna. Do so if you haven’t.
The recorder will now start automatic Channel Search.
7
Tip
If no channels were found, check your antenna connection
and check your user manual to search for channels.
Check Date and Time and press
8
OK to finish.
TV Guide on ScreenTM Installation
Press OK when you see ‘Welcome to Your TV
1
Guide on Screen System’.
Find your IR-Blaster if you haven’t connected it
2
and press
Press UP or DOWN to select your
3
country and press OK
Key in your zip code and press OK .
4
OK .
.
Step 2: Configuring for Cable
You have indicated that you have. Now the TV on Screen
System need some additional information.
Is a cable box connected to this DVD Recorder?
Yes
No
Using your your DVD Recorder remote, move up or down to highlight your answer. Press
OK to choose.
Installing Set-Top Box
If you do not have a set-top box, go to step C.
Select ‘Yes’ and press OK if you have cable service.
1
UP
RIGHT
LEFT
DOWN
OPEN
Tip
Selected ‘No’ if you don’t and proceed to Step C.
Select ‘Yes’ and press OK if you have a external
2
set-top box. Select ‘No’ for all other.
Tip
If you have selected ‘No’, proceed to Step C.
Press UP or DOWN to select the channel
3
on the recorder which the cable service is tuned to
and press OK .
You are now prompted to connect the IR-Blaster, do
4
so if you haven’t.
Tip
For more information on installing additional receivers, see
the user manual.
Finalize Installation
Press UP or DOWN to select the brand
1
of your set-top box and press OK .
Tip
If you do not see your brand, select ‘not listed’.
Read the information on screen carefully and press
2
OK to confirm.
Change the channel on your set-top box to 02 and
3
press OK .
The recorder will now attempt to change the channel
4
number to 09 on your set-top box. Press UP or
DOWN to select ‘Yes’ if it has.
Step 2: Configuring for Cable
Testing complete.
If your cable box automatically changed to and remained on
channel 09, the test was successful.
Is your cable box now tuned to channel 09?
Yes
No
Test this code again
philips
Using your your DVD Recorder remote, move up or down to highlight your answer. Press
If it has not, refer to the user manual for more details
5
on installing your set-top box.
Check the settings on screen, if they are incorrect select
6
‘No, repeat setup process’. If they are correct, select ‘Yes,
end setup process’ and press OK to confirm.
Press OK after you finish reading about TV Guide
7
on Screen
complete the setup.
Switch the set-top box to the channel that transmits
8
the TV Guide data, leave it on overnight to load the
program data. It will be available in the next 24 hours.
You must leave the recorder in Standby mode at night in
TM
System information and OK again to
order for it to load new program listings.
OK to choose.
Important Note
Page 2
Pause Live TV
When watching live TV, it is now possible to pause it, do
something else then return to continue watching from
where you stopped.
Press PAUSE when you are watching any live TV
1
program to suspend it.
Press PLAY to continue.
2
Tip
When you switch on the recorder, the TV program of the
current channel is temporarily recorded in the Time Shift
Buffer (TSB). It is from the TSB that you are watching from
in Pause Live TV. All content in the TSB will be erased when
the recorder is switched to Standby mode.
Press TUNER to go back to watching the live TV
3
program instead of the TSB.
Recording to HDD
Record Directly to HDD
Press REC/OTR to record. When the recorder
1
is switched to standby mode the title will be saved
to the Hard Disk Drive (HDD).
Press UP or DOWN to choose the title
2
you want to transfer from the TSB to the HDD.
Tip
A new title is created every time you change the channel.
Press REC/OTR to highlight the title to transfer.
3
Tip
The title will be marked in red and transferred to the HDD.
Playback from HDD
From Titles on the HDD
Press BROWSER HDD to see what titles are
1
stored on the HDD.
Press UP or DOWN to select title.
2
Press PLAY on the title you want.
3
Play Recording while Recording it
Press T/C to select title or chapter.
1
Press PREVIOUS to go back to the part of the
2
recording you want to watch and the recorder will
start playing from there.
Using TV Guide on Screen
TV GUIDE .
Press
1
SCHEDULE
LISTINGS
SORT
North Shore “Tessa” (Drama) Jason offers a
housekeeping position to a crafty ex-con (Amanda
Righetti) who won’t rest until she’s scored serious
points, Vincent... and a better job. Brooke Burn,
Krisoffer Polanda, TV14 (Stong Language,
Suggestive Dialogue)
Press RIGHT or LEFT to select
2
‘LISTING’.
Press UP or DOWN to select the TV
3
channel you want.
Tip
PressYELLOW to see an overview of all the channels
available and choose from there.
Press RIGHT or LEFT to choose the
4
show you want.
Tip
Press and hold RIGHT or LEFT to browse
through. Press BACK
the previous day and the next day program listings.
Once the program is highlighted, press RED to
5
instruct the recorder to record it.
Tip
You can store up to 6 TV shows for recording.
Press BLUE to stored a reminder on the
6
recorder to watch the program.
and FWD to switch between
RECORDFAVORITES INFO
TM
Press DOWN on the category you want and
4
you find a list of sub-categories.
LISTINGS
Zenon: Z3 (Action) Zenon competes in a galactic
contest and helps an activist friend who wants to
prevent the moon from being colonized. Stuart
Pankin, Lauren Maltby, Kristen Storms. NR.
8:00 10:00
Press UP or DOWN to select the sub
5
category you want then press OK .
Press UP , DOWN , LEFT , RIGHT
6
to browser through the shows in the subcategory.
Tip
If ‘No program found’ appears on the screen, it means that
there is no TV shows of that category on that day.
Once the program is highlighted, press GREEN
7
to instruct the recorder to record it.
Press BLUE to stored a reminder on the
8
recorder to watch the program.
When editing your channel list in the Editor area, please do
NOT turn your host channel “OFF”. If you do, you will not
receive the automatic daily listings updates.
IMPORTANT NOTE
PROMOTIONS
SORT
FAVORITES INFO
RECORD
HDRW 720
Quick Start Guide
-
Tip
The message ‘1 program +30’ will be shown, it means that
the recorder will switch to standby mode after 30 minutes
of recording. Every time you press REC/OTR
itional 30 minutes is added to the recording time.
Press STOP and select ‘yes’ to stop the
2
recording immediately.
Tip
Switch to another channel and a new title will be created
for the recording of the new TV program, except when the
channel is changed again in less than 1 minute.
Transfer recording from TSB to HDD
INFO to view what is in the TSB.
Press
1
an add-
Tip
Now you can pause and jump forward or backward of
what you have already recorded without interfering with
the recording.
Press
3
TUNER to go back to live TV.
Searching for TV Shows
Keep pressing UP until you highlight in
1
yellow any of the options of ‘LISTING’, ‘SORT’,
‘PROMOTIONS’, ‘SETUP’, ‘MESSAGES and
‘SCHEDULE’.
LISTINGS
Move down to select a subcaterogory for Movies.
Move right for Sports, left for ALPHABETICAL
SORT
PROMOTIONS
Need help?
TV Guide on ScreenTM System
Go to www.tvguideonscreen.com
User Manual
Check the user manual of the recorder.
Online
Go to www.philips.com/support
Hotline
Call 1-888-PHILIPS (1-888-744-5477) for our
operators.
Hours of Operation
Tip
For more information on the ‘SETUP’, ‘MESSAGE’ and
‘SCHEDULE’ menus please refer to the user manual.
Press RIGHT or LEFT to highlight the
2
‘SEARCH’ option.
Press DOWN to see the categories of ‘Movies’,
3
‘Sports’, ‘Children’s’, ‘Educational’, ‘News’, ‘Variety’,
philipsphilips
‘Series’, ‘HDTV’, ‘Keyword’ and ‘Alphabetical’.
Monday - Saturday 7:00 am EST - 11:00 pm EST
Sunday 8:00 am EST - 11:00 pm EST
365 days a year, excluding holidays
2005 © Koninklijie Philips Electronics N. V.
All rights reserved.
12 NC 3139 246 15141
www.philips.com
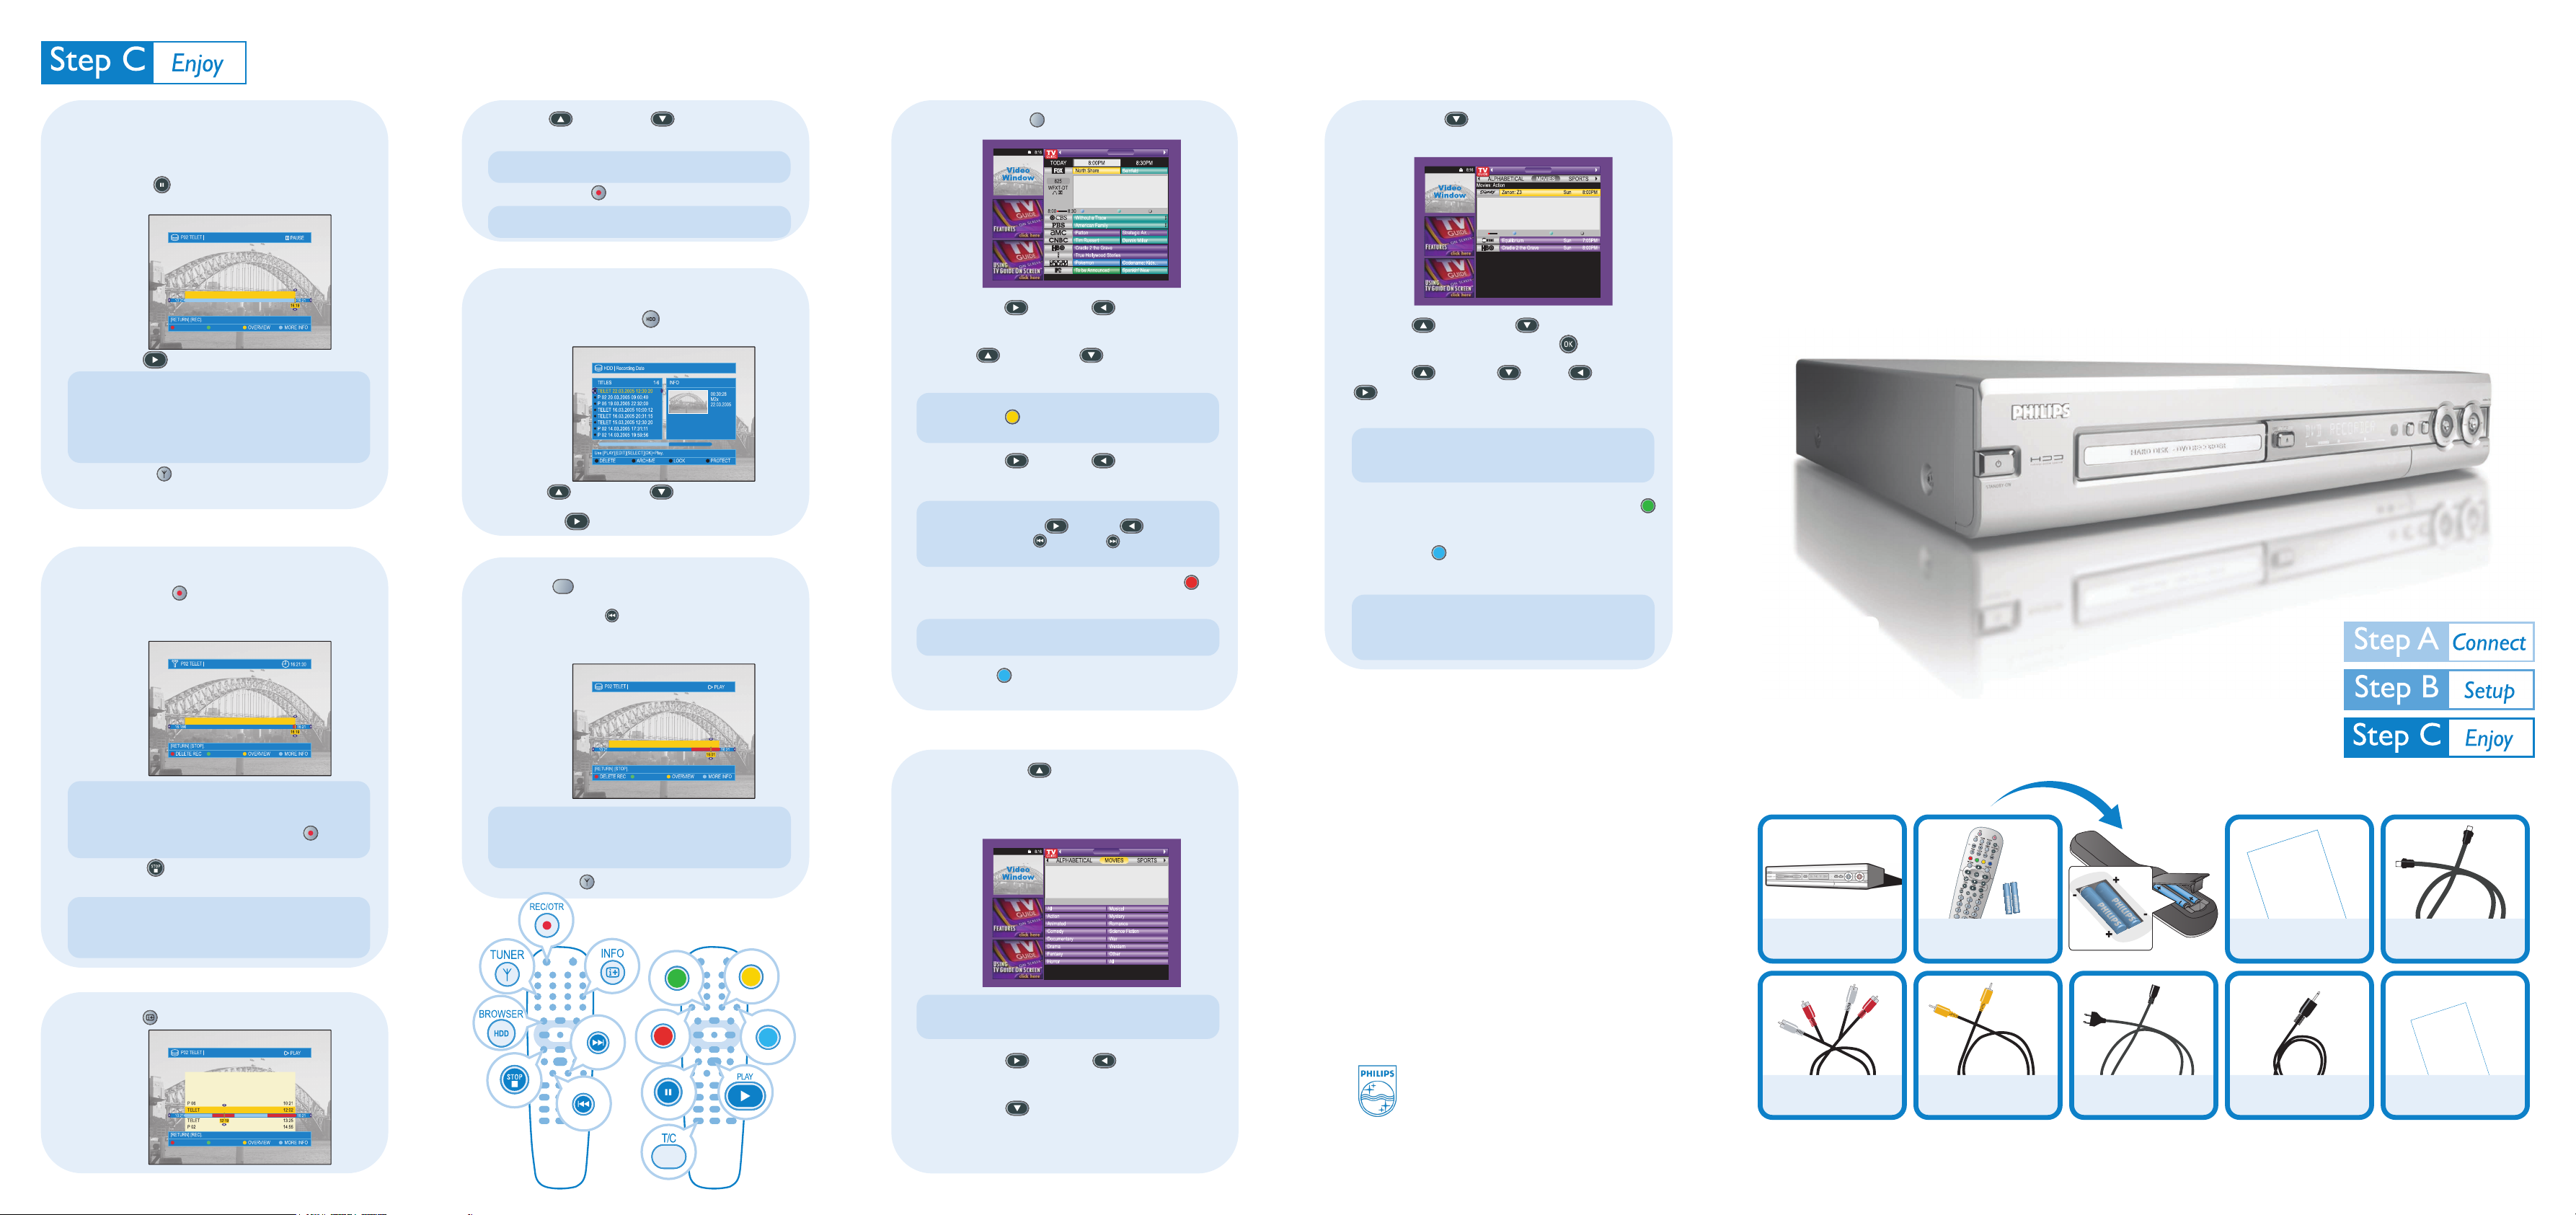
What’s in the Box?
You should find these items upon opening the box.
HDD
Philips Hard Disk
DVD Recorder
Audio L/R Cable
Remote Control
and Batteries
Video CVBS Cable
Mains Cable
Quick Start Guide
G-Link Cable
& Transmitter
philips
Antenna Cable
User Manual
 Loading...