

Philips HD9621, HD9622 User Manual
HD9621
HD9622
1
2
3
9
1
EN User manual 5
ES Manual del usuario 20
FR Guide d’utilisation 37
°F
4
11
5
12
13
6
14
7
8
10
MAX
15
Specifications are subject to change without notice
Les caractéristiques sont susceptibles d'être modifiées sans préavis
© 2016 Koninklijke Philips N.V.
All rights reserved.
Tous droits réservés. 4203 064 64371

2
°F
1
3
2
4
2
1
5
26
27
28
6
10
14
18
1
7
11
15
19
8
12
16
20
9
13
17
21
HD9622
29
2
22
23
2
1
24
1
2
25

IMPORTANT SAFEGUARDS
When using electrical appliances, basic safety precautions should always be
followed including the following:
1 Read all instructions.
2 Do not touch hot surfaces. Use handles or knobs.
3 To protect against electrical shock do not immerse cord, plugs or
appliance in water or other liquid.
4 Close supervision is necessary when any appliance is used by or near children
or invalids. Children should be supervised by a responsible person to ensure
they do not play with the appliance.
5 Unplug from outlet when not in use and before cleaning. Allow to cool before
putting on or taking o parts.
6 Do not operate any appliance with a damaged cord or plug or after the
appliance malfunctions or has been damaged in any manner. For assistance
call 1-866-309-8817.
7 The use of accessory attachments not recommended by the appliance
manufacturer may cause injuries.
8 Do not block any ventilation openings. Install in accordance with the
manufacturer’s instructions.
9 Do not use outdoors.
10 Do not let cord hang over edge of table or counter, or touch hot surfaces.
11 Do not place on or near a hot gas or electric burner, or in a heated oven.
12 Extreme caution must be used when moving an appliance containing hot oil or
other hot liquids.
13 Plug the cord into the wall outlet. To disconnect, turn any control to “o”, then
remove plug from wall outlet.
14 Do not use appliance for other than intended use.
15 Use extreme caution when removing the pan, basket or double-layer rack and
disposing hot grease.
16 Do not clean with metal scouring pads. Pieces can break o the pad and touch
electrical parts, creating a risk of electric shock.
17 Use only on properly grounded outlet.
18 A short power-supply (or detachable power-supply cord) should be used to
reduce the risk resulting from becoming entangled in or tripping over a longer
cord.
19 Extension cords may be used if care is exercised in their use. If an extension
cord is used:
- The marked electrical rating of the cord must be as great as the rating of
the appliance.
- The cord should be arranged so that it will not drape over the edge of the
counter or table top where it could be pulled by children or tripped over
unintentionally.
- If the appliance is of grounded type, the extension cord should be a
grounded-type 3-wire cord.
5ENGLISH

6 ENGLISH
20 This appliance has a polarized plug (one blade is wider than the other). To
reduce the risk of electric shock, this plug is intended to t into a polarized
outlet only one way. If the plug does not t fully in the outlet, reverse the plug. If
it still does not t, contact a qualied electrician. Do not attempt to modify the
plug in any way.
21 Oversize foods or metal utensils must not be inserted in the appliance as they
may create a re or risk of electric shock.
22 A re may occur if the appliance is covered or touching ammable material,
including curtains, draperies, walls, and the like, when in operation. Do not store
any item on top of the appliance when in operation.
23 Do not place any of the following materials in the appliance: paper, cardboard,
plastic, and the like.
24 If you are using baking or parchment paper to avoid food from sticking to the
mesh basket, never put in the paper without placing the food you are cooking
on top of the paper. Otherwise the lightweight baking paper could be lifted by
the air ventilation and touch the heater.
25 Immediately unplug the appliance if you see dark smoke coming out of it. Wait
for smoke emission to stop before pulling the pan out of appliance.
26 Use on a at stable, heat-resistant surface away from water or any heat source.
27 Do not leave appliance unattended while it is operating.
28 This appliance operates at high temperatures which may cause burns.
Do not touch hot surfaces, parts or the inside of the appliance while it is
operating. Let the appliance cool down completely before you handle or
clean it.
29 During hot airfrying, hot steam is released through the hot air outlet openings.
Keep your hands and face away from the steam and air outlet openings.
30 Avoid contact with moving parts.
31 This appliance works with hot air only; food is not fried in oil or fat! Never ll the
pan with fat or oil.
32 This product is for household use only.
33 Never use the airfryer without the pan and basket in place.
34 Be sure that handle is assembled and fastened properly.
35 Do not use the plug in or near a power outlet that contains an electric air
freshener to prevent damage to the plug.
SAVE THESE INSTRUCTIONS
Consuming raw or undercooked meats, poultry, seafood, shellsh or eggs may
increase your risk of foodborne illness.
Make sure ingredients prepared in this appliance come out golden-yellow instead
of dark brown.
Remove burnt remnants. For the best results, do not fry fresh potatoes at a
temperature above 180°C/350°F or beyond golden-yellow.

Table of Contents
IMPORTANT SAFEGUARDS 5
Introduction 8
General description 8
Before rst use 9
Preparing for use 9
Using the appliance 12
Using the double-layer rack (HD9622 only) 14
Using the splatter-proof lid 15
Cleaning 15
Storage 16
Disposal 16
Troubleshooting 17
Warranty 19
One year limited warranty 19
7ENGLISH

8 ENGLISH
Introduction
Congratulations on your purchase and welcome to Philips! To fully benet from the
support that Philips oers, register your product at www.philips.com/welcome.
Your new Airfryer allows you to prepare your favorite ingredients and snacks
in a healthier way. The Airfryer uses hot air in combination with high-speed
air circulation (TurboStar rapid air technology) and a top grill to prepare a
variety of tasty dishes in a healthy, fast and easy way. Your ingredients are
heated from all sides at once and there is no need to add oil to most of the
ingredients. For more inspiration, recipes and information about the Airfryer, visit
www.philips.com/kitchen or download the free Airfryer App for IOS® or Android™
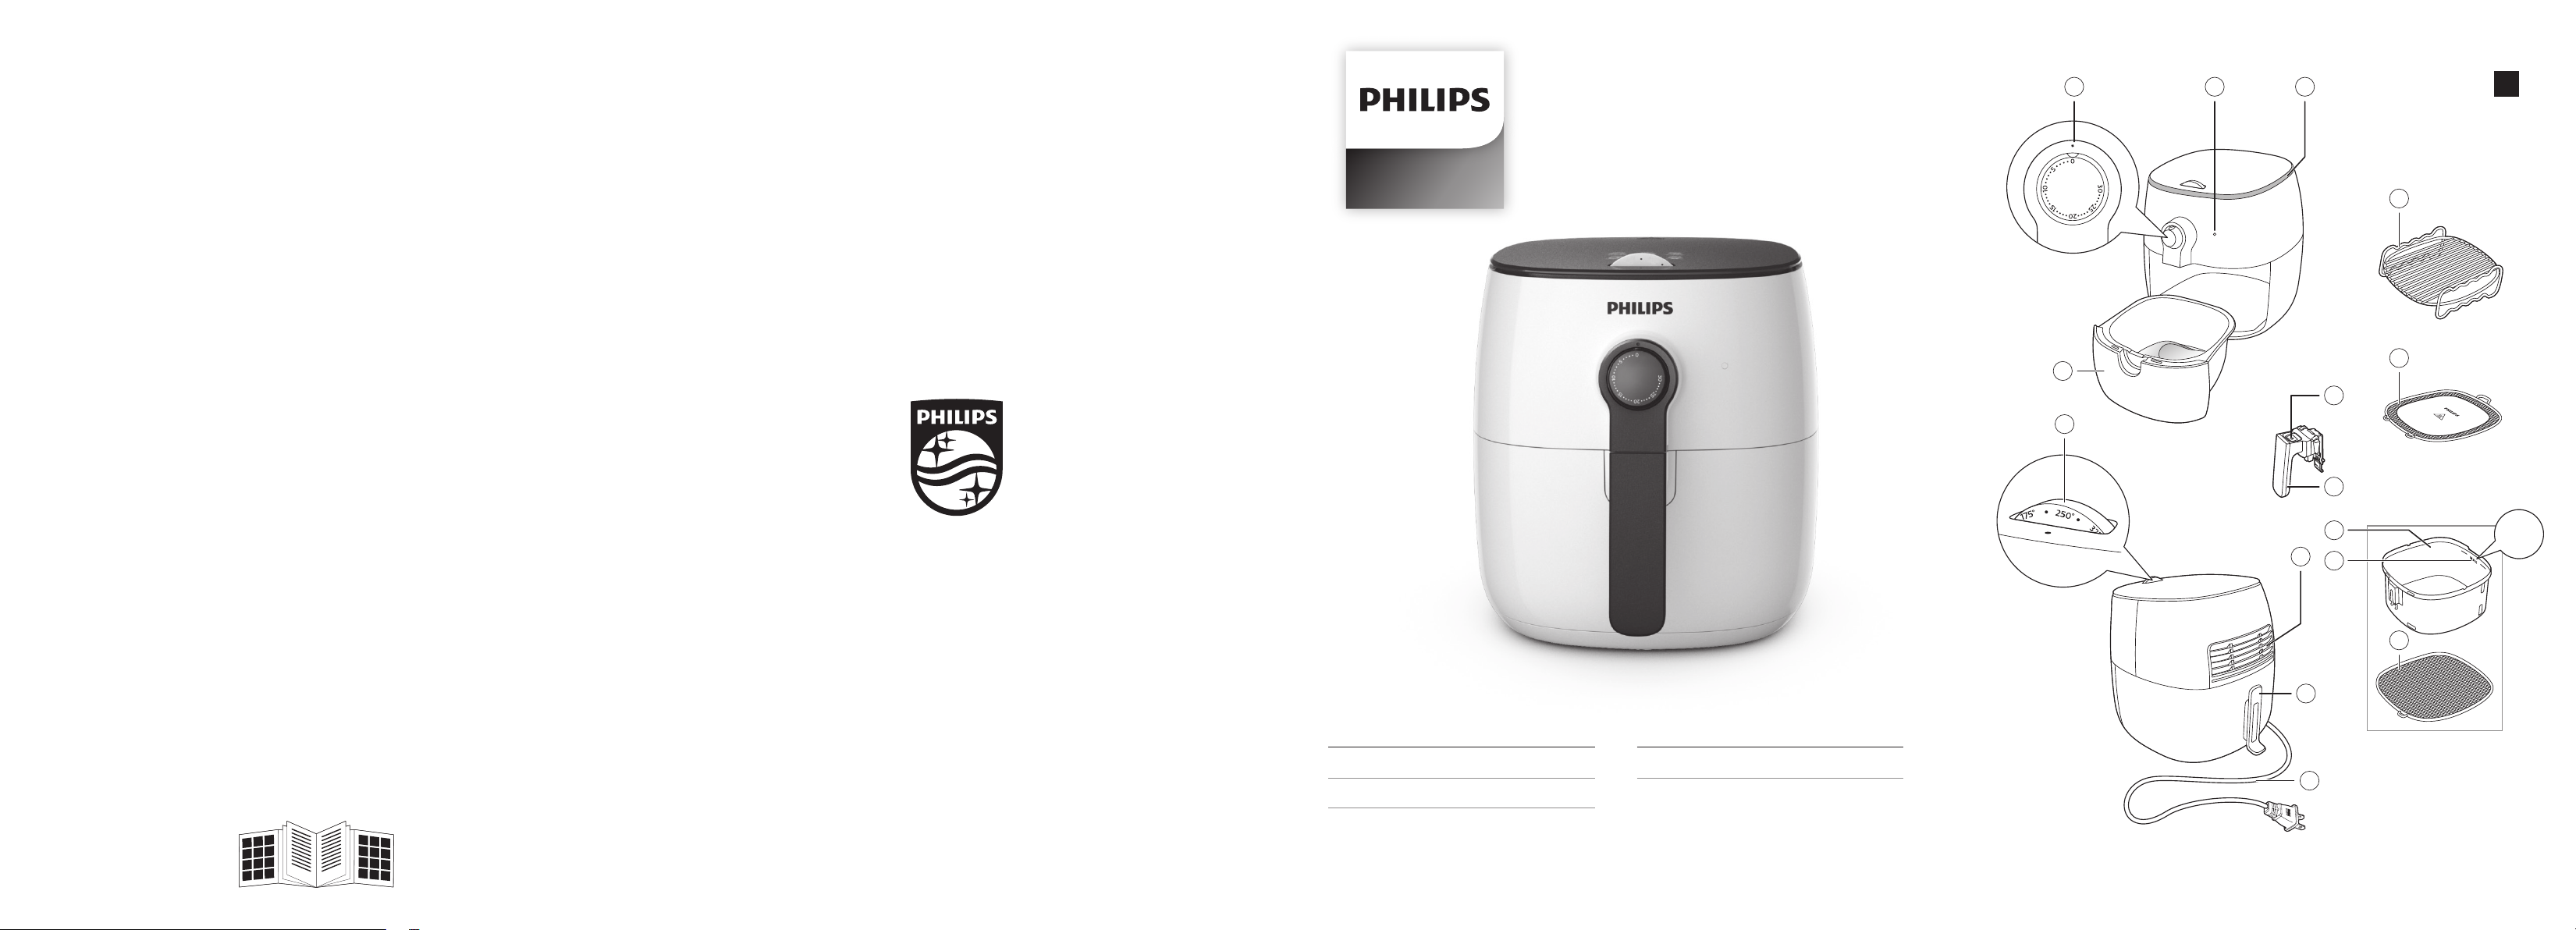
General description (Fig. 1)
a Timer/power-on knob
b Power-on indicator
c Air inlet
d Pan
e Temperature control knob
f Air outlets
g Cord storage wrap
h Power cord
i Double-layer rack (HD9622 only)
j Splatter-proof lid
k Basket release button
l EasyClick handle
m Basket with removable mesh bottom
n MAX indication
o Removable mesh bottom
Before rst use
1 Remove all packing material.
2 Remove any stickers or labels from the appliance.
3 Thoroughly clean the appliance before rst use, as indicated in the cleaning
table.
Preparing for use
Placing the removable mesh bottom
1 Remove the pan from the appliance (Fig. 2).
2 Put the pan with the basket on a suitable surface, press the basket release
button and remove the basket from the pan (Fig. 3).
3 Insert the hook of the mesh bottom into the slot on the right bottom side of the
basket. Push the mesh bottom down until it locks into position (‘click’ on both
sides). (Fig. 4).
4 Put the basket back into the pan (Fig. 5).
Note
• Never use the pan without the basket in it.
5 Slide the pan back into the appliance (Fig. 6).
9ENGLISH
Placing the EasyClick handle
Warning
• Always make sure the basket and the handle have cooled down before you
attach or detach the EasyClick handle.
1 To attach the handle: Hold the basket with one hand and hold the handle with
the other hand. Slide the handle into the opening on the basket from below
until it locks into place (‘click’) (Fig. 7).
2 To detach the handle: Hold the basket with one hand and hold the handle with
the other hand. Pull gently with the index nger of the hand which holds the
handle on the red release tab while pulling the handle straight down (Fig. 8).
10 ENGLISH
Food table
The table below helps you select the basic settings for the types of food you want
to prepare.
Note
• Keep in mind that these settings are suggestions. As ingredients dier in origin,
size, shape as well as brand, we cannot guarantee the best setting for your
ingredients.
Min.- max.
amount (g/
Ingredients
Frozen fries 200-800g
Home-made
fries (1/2cm /
1/4in thick)
Potato
wedges
Frozen
snacks (e.g.
spring rolls,
chicken
nuggets)
Pork chops 100-500g
Hamburger 100-500g
Sausages 100-500g
Drumsticks 100-500g
Chicken
breast
Quiche 300g
oz)
7-28 oz
200-800g
7-28 oz
200-800g
7-28 oz
100-400g
3.5-14 oz
3.5-17.5 oz
3.5-17.5 oz
3.5-17.5 oz
3.5-17.5 oz
100-500g
3.5-17.5 oz
10.5 oz
Time
(minutes)
11-25 180°C/350°F Shake
12-25 180°C/350°F Shake
15-27 180°C/350°F Shake
6-10 200°C/400°F Turn or
8-14 200°C/400°F
7-14 160°C/325°F
3-15 160°C/325°F
15-22 180°C/350°F
10-15 180°C/350°F
20-25 160°C/325°F Use a baking
Tem per a ture
(°C/°F)
Shake/
Tu rn
halfway
halfway
halfway
shake
halfway
Additional
information
Soak 30 min.
in water, dry
then add
1/2 tbsp of oil.
Soak 30 min.
in water, dry
then add
1/2 tbsp of oil.
For the
cooking times,
refer to the
instructions on
the packaging
of the
snack. Time
compared to
oven should
be halved.
tray or oven
dish.

11ENGLISH
Min.- max.
amount (g/
Ingredients
Muns 80-300g
Cake
Mixed
veggies
Pre-baked
toast/bread
rolls
Fresh bread
rolls/bread
Fish 150-400g
Shellsh 100-400g
Chicken
bread
crumbed
Apple chips 400g
Dried
mushrooms
Fried banana
chips
oz)
3-10.5 oz
200-400g
7-14 oz
100-500g
3.5-17.5 oz
100-200g
3.5-7 oz
100-500g
3.5-17.5 oz
5.3-14 oz
3.5-14 oz
100-300g
3.5-10.5 oz
14 oz
200g
7 oz
150g
5.3 oz
Time
(minutes)
8-13 180°C/350°F Use heat-
15-25 160°C/325°F Use a cake
8-12 180°C/350°F
3-6 200°C/400°F
15-25 180°C/350°F
10-18 200°C/400°F
7-15 180°C/350°F
8-15 180°C/350°F Add oil to the
75 90°C/200°F Cut into 2mm /
100 100°C/200°F Cut into 2mm /
20 160°C/325°F Use plantain
Tem per a ture
(°C/°F)
Shake/
Tu rn
Additional
information
proof silicone
mun cups.
pan.
breadcrumbs.
5/64 in slices
5/64 in slices
bananas;
cut into 5mm/
3/16 in slices;
add 1 teaspoon
of oil.
12 ENGLISH
Using the appliance
Airfrying
Caution
• This is an Airfryer that works on hot air. Do not ll the pan with oil or frying fat
(Fig. 9).
• Do not touch hot surfaces. Use handles or knobs. Only hold the pan by the
basket handle.
• This product is for household use only.
• The appliance may produce some smoke when you use it for the rst time.
This is normal.
• Preheating of the appliance is not necessary.
1 Place the appliance on a stable, horizontal, level and heat-resistant surface.
Note
• Do not put anything on top or on the sides of the appliance. This could disrupt
the airow and aect the frying result.
2 Unwind the power cord from the cord storage wrap (Fig. 10).
3 Put the plug in the wall outlet.
4 Remove the pan from the appliance (Fig. 11).
5 Put the ingredients in the basket (Fig. 12).
Note
• The Airfryer can prepare a large range of ingredients. Consult the ‘Food table’
for the right quantities and approximate cooking times.
• Do not exceed the amount indicated in the ‘Food table’ section or overll the
basket beyond the ‘MAX’ indication as this could aect the quality of the end
result.
• If you want to prepare dierent ingredients at the same time, make sure you
check the suggested cooking time required for the dierent ingredients before
you start to cook them simultaneously. Home-made fries and drumsticks,
for example, can be cooked simultaneously because they require the same
settings.
6 Place the basket back into the pan, slide pan back into the appliance. Turn the
temperature control knob to the required temperature (Fig. 13).
Note
• Never use the pan without the basket in place.
7 Turn the timer knob to the required cooking time to switch on the appliance
(Fig. 14).
Note
• The power-on indicator goes on. During use the power-on indicator goes on
from time to time. This indicates that the appliance is heating up to the right
temperature.
• The timer continues to count down the set cooking time.
• Some ingredients require shaking or turning halfway through the cooking time
(see ‘Food table’). To shake the ingredients, remove the pan from the appliance
and shake it over the sink. Then slide the pan back into the appliance. To
reduce the weight, you can also remove the basket from the pan. (Fig. 15)
• Be careful not to press the basket release button while shaking.
Tip
• If you set the timer to half the cooking time, when you hear the timer bell it is
time to shake or turn the ingredients. Be sure to reset the timer to the remaining
cooking time.
8 When you hear the timer bell, the set cooking time has elapsed. You can also
switch o the appliance manually. To do this, turn the power-on knob to 0
(counterclockwise); this requires some more force than turning clockwise
(Fig. 16).
Note
• Excess oil from the ingredients is collected on the bottom of the pan.
• If you prepare several batches of fatty ingredients (e.g. drumsticks, sausages
or hamburgers), carefully pour o any excess oil or rendered fat from pan after
each batch or before shaking or replacing the basket in the pan.
13ENGLISH
9 Remove the pan from the appliance and place it on a heat-resistant surface
(Fig. 17).
10 Check if the ingredients are ready.
Note
• If the ingredients are not ready yet, simply slide the pan back into the
appliance and set the timer for a few extra minutes.
• After hot airfrying, the pan, basket, accessories, housing and ingredients are
hot. Depending on the type of ingredients in the basket, steam may escape
from the pan.
11 Press the basket release button and lift the basket out of the pan (Fig. 18).
12 Empty the basket contents into a bowl or onto a plate. Always remove the
basket with ingredients from the pan to serve as hot oil or rendered fat may be
in bottom of the pan (Fig. 19).
Note
• To remove large or fragile ingredients, use a pair of tongs to lift out ingredients.

14 ENGLISH
Making home-made fries
To make great home-made fries in the Airfryer:
- Choose a potato variety suitable for making fries, e.g. fresh, russet potatoes.
- It is best to air fry the fries in portions of up to 500 grams / 17.5 oz for an even
result. Larger fries tend to be less crispy than smaller fries.
- Shake the basket 2-3 times during the airfrying process.
1 Peel the potatoes and cut into sticks.
2 Soak the potato sticks in a bowl of water for at least 30 minutes.
3 Empty the bowl and dry the potato sticks with a dish towel or paper towel.
4 Pour a half tablespoon of oil in the bowl, put the sticks in the bowl and mix until
the sticks are coated with oil.
5 Remove the sticks from the bowl with your ngers or a slotted kitchen utensil so
excess oil remains in the bowl.
Note
• Do not tilt the bowl to pour all the sticks in the basket at once to prevent excess
oil from going into the pan.
6 Put the sticks in the basket.
7 Fry the potato sticks and shake the basket halfway through the airfrying
process. Shake 2-3 times if you prepare more than 400g/14 oz of fries.
Note
• Consult the chapter “Food table” for the right quantities and cooking times.
Using the double-layer rack (HD9622 only)
Use the double-layer rack to maximize your cooking space.
Note
• If cooking dierent ingredients at the same time, make sure that the cooking
temperature and time is the same for each type of ingredient.
• Always position meats on lower level and vegetables above to avoid cross
contamination of food or unsafe transfer of meat juices or partially cooked
foods.
1 Follow steps 1 to 4 of section ‘Airfrying’.
2 Put one half of the ingredients in the basket (Fig. 20).
3 Place the double-layer rack in the basket (Fig. 21).
4 Put the second half of the ingredients onto the double-layer rack (Fig. 22).
5 Follow steps 6 to 12 of section ‘Airfrying’.
Warning
• The double-layer rack becomes very hot during use. Wear oven gloves when
you remove the double-layer rack from the basket.
Using the splatter-proof lid
Use the splatter-proof lid if you are cooking light-weight ingredients in order to
keep them in the basket, fatty ingredients or to reduce the speed of browning.
Note
• When using the splatter-proof lid, you may need more time to reach the same
level of browning and doneness.
1 Follow steps 1 to 5 of section ‘Airfrying’.
2 Hold the lid with the top side facing you. Insert the two hooks of the lid into the
two slots on the front side of the basket. Push the lid down until it locks into
position (‘click’ on both sides). (Fig. 23).
3 Proceed with step 6 to 9 of section ‘Airfrying’.
4 Carefully remove the splatter-proof lid (Fig. 24).
Warning
15ENGLISH
• The splatter-proof lid is very hot. Wear oven gloves when you remove it.
5 Proceed with step 10 to 12 of section ‘Airfrying’.
Cleaning
Warning
• Let the basket, pan, accessories and the inside of the appliance cool down
completely before you start cleaning (Fig. 25).
• Pan, basket and inside of appliance have a non-stick coating. Do not use
metal kitchen utensils or abrasive cleaning materials as this may damage the
non-stick coating.
Clean the appliance after every use. Remove oil and fat from the bottom of the pan
after every use to prevent smoke.
1 Turn the timer knob to 0, remove the plug from the wall outlet and let the
appliance cool down for 10 minutes.
Tip
• Remove the pan and the basket to let the Airfryer cool down more quickly.
2 Disassemble the appliance completely.

16 ENGLISH
3 Clean all parts as indicated in the cleaning table.
Tip
• If food residues are stuck to the pan, double-layer rack or basket, you can
soak them in hot water and dishwashing liquid for 10-15 minutes. Soaking
loosens the food residues and makes it easier to remove. The quality of your
dishwashing liquid determines how easy it is to remove food residues and
grease. Make sure you use a dishwashing liquid that can dissolve oil and
grease. If there are grease stains on the pan or basket and you have not been
able to remove them with hot water and dishwashing liquid, use a liquid
degreaser.
• If necessary, food residues stuck to the heating element can be removed with
a soft to medium bristle brush. Do not use a steel wire brush or a hard bristle
brush, as this might damage the coating on the heating element.
4 Clean the inside of the appliance with hot water and a non-abrasive sponge.
5 Clean the heating element with a cleaning brush to remove any food residues.
6 You can clean the pan, basket, and double-layer rack in a dishwasher. You can
also clean them with hot water, dishwashing liquid and a non-abrasive sponge
(Fig. 26).
7 Pull the pan out of the appliance (Fig. 17).
8 Wipe the outside of the appliance with a moist cloth (Fig. 27).
9 Clean the inside of the appliance with a moist cloth (Fig. 28).
This appliance has no other user-serviceable parts. For assistance in the U.S. or
Canada only, call 1-866-309-8817.
Storage
1 Unplug the appliance and let it cool down.
2 Make sure all parts are clean and dry before you store the appliance.
3 Wrap the power cord onto the cord storage wrap.
Note
• Always hold the Airfryer horizontally when you carry it. Make sure that you also
hold the drawer on the front part of the appliance as it can slide out of the
appliance if accidentally tilted downwards. This can lead to damaging of the
drawer.
Disposal
Your product is designed and manufactured with high quality materials and
components, which can be recycled and reused. For recycling information, please
contact your local waste management facilities or visit www.recycle.philips.com
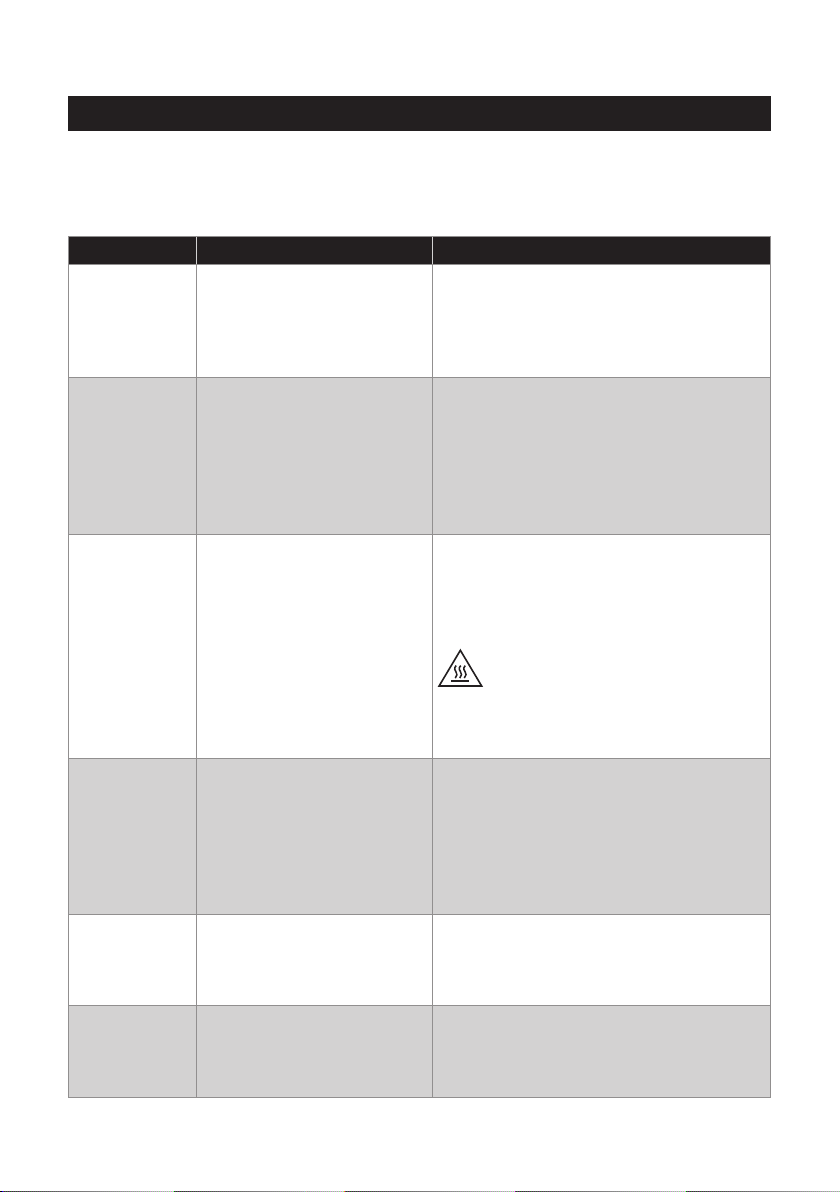
Troubleshooting
This chapter summarizes the most common problems you could encounter with
the appliance. If you are unable to solve the problem with the information below,
visit www.philips.com/support or (in the US or Canada only) call 1-866-309-8817
for assistance.
Problem Possible cause Solution
The outside
of the
appliance
becomes hot
during use.
The outside of the
appliance becomes hot
because the heat inside
radiates to the outside
walls.
This is normal. All handles, knobs and
buttons that you need to touch during
use stay cool enough to touch.
The pan, basket, double-layer rack,
and the inside of the appliance always
become hot when the appliance is
switched on to ensure the food is
properly cooked. The pan, basket, and
double-layer rack are always too hot
to touch.
If you leave the appliance switched on
for a longer time, some areas get too
hot to touch. These areas are marked
on the appliance with the following
icon:
17ENGLISH
My homemade fries do
not turn out
as I expected.
You did not use the right
potato type.
The amount of ingredients
in the basket is too big.
Certain types of
ingredients need to be
shaken halfway through
the cooking time.
As long as you are aware of the hot
areas and avoid touching them, the
appliance is completely safe to use.
To get the best results, use fresh,
russet potatoes.
If you need to store the potatoes, do
not store them in a cold environment
like in a fridge. Choose potatoes
whose package states that they are
suitable for frying.
Follow the instructions in this user
manual to prepare home-made fries
(see ‘Food table’ or download the free
Airfryer App).
Follow the instructions in this user
manual to prepare home-made fries
(see ‘Food table’ or download the free
Airfryer App).
 Loading...