

Page 1
User manual /
1
HD9220
Manual del usuario /
Guide d’utilisation
2 3 4 5
6
10 11 12
7 8 9
13
4222.005.0421.3
14 15
Page 2
ENGLISH
IMPORTANT SAFEGUARDS
When using electrical appliances, basic safety precautions should always
be followed including the following:
1 Read all instructions.
2 Do not touch hot surfaces. Use handles or knobs.
3 To protect against electrical shock do not immerse cord, plugs or
appliance in water or other liquid.
4 Close supervision is necessary when any appliance is used by or near
children.
5 Unplug from outlet when not in use and before cleaning. Allow to
cool before putting on or taking off parts.
6 Do not operate any appliance with a damaged cord or plug or after
the appliance malfunctions or has been damaged in any manner.
For assistance in the U.S. and Canada only, call 1-866-309-8817.
7 The use of accessory attachments not recommended by the appliance
manufacturer may cause injuries.
8 Do not block any ventilation openings. Install in accordance with the
manufacturer’s instructions.
9 Do not use outdoors.
10 Do not let cord hang over edge of table or counter, or touch hot
surfaces.
11 Do not place on or near a hot gas or electric burner, or in a heated
oven.
12 Extreme caution must be used when moving an appliance containing
hot oil or other hot liquids.
13 Plug the cord into the wall outlet. To disconnect, turn any control to
“off”, then remove plug from wall outlet.
14 Use extreme caution when removing the pan, basket and disposing
hot grease.
15 Do not clean with metal scouring pads. Pieces can break off the pad
and touch electrical parts, creating a risk of electric shock.
16 Use only on properly grounded outlet.
17 A short power-supply cord (or detachable power-supply cord) should
be used to reduce the risk resulting from becoming entangled in or
tripping over a longer cord.
18 Extension cords may be used if care is exercised in their use. If an
extension cord is used:
The marked electrical rating of the cord must be as great as the rating
of the appliance.
The cord should be arranged so that it will not drape over the edge
of the counter or table top where it could be pulled by children or
tripped over unintentionally.
19 This appliance has a polarized plug (one blade is wider than the
other). To reduce the risk of electric shock, this plug is intended to t
into a polarized outlet only one way.If the plug does not t fully into
the outlet, reverse the plug. If it still does not t, contact a qualied
electrician. Do not attempt to modify the plug in any way.
20 Oversize foods or metal utensils must not be inserted in the appliance
as they may create a re or risk of electric shock.
21 A re may occur if the appliance is covered or touching ammable
material, including curtains, draperies, walls, and the like, when in operation.
Do not store any item on top of the appliance when in operation.
22 Do not place any of the following materials in the appliance: paper,
cardboard, plastic, and the like.
SAVE THESE INSTRUCTIONS
Consuming raw or undercooked meats, poultry, seafood, shellsh or eggs
may increase your risk of foodborne illness.
Introduction
Congratulations on your purchase and welcome to Philips! To fully benet
from the support that Philips offers, register your product at
www.philips.com/welcome.
Your new airfryer allows you to prepare your favorite ingredients and snacks
in a healthier way.
The airfryer uses hot air in combination with high-speed air circulation
(Rapid Air) and a top grill to prepare a variety of tasty dishes in a healthy,
fast and easy way. Your ingredients are heated from all sides at once and
there is no need to add oil to most of the ingredients.
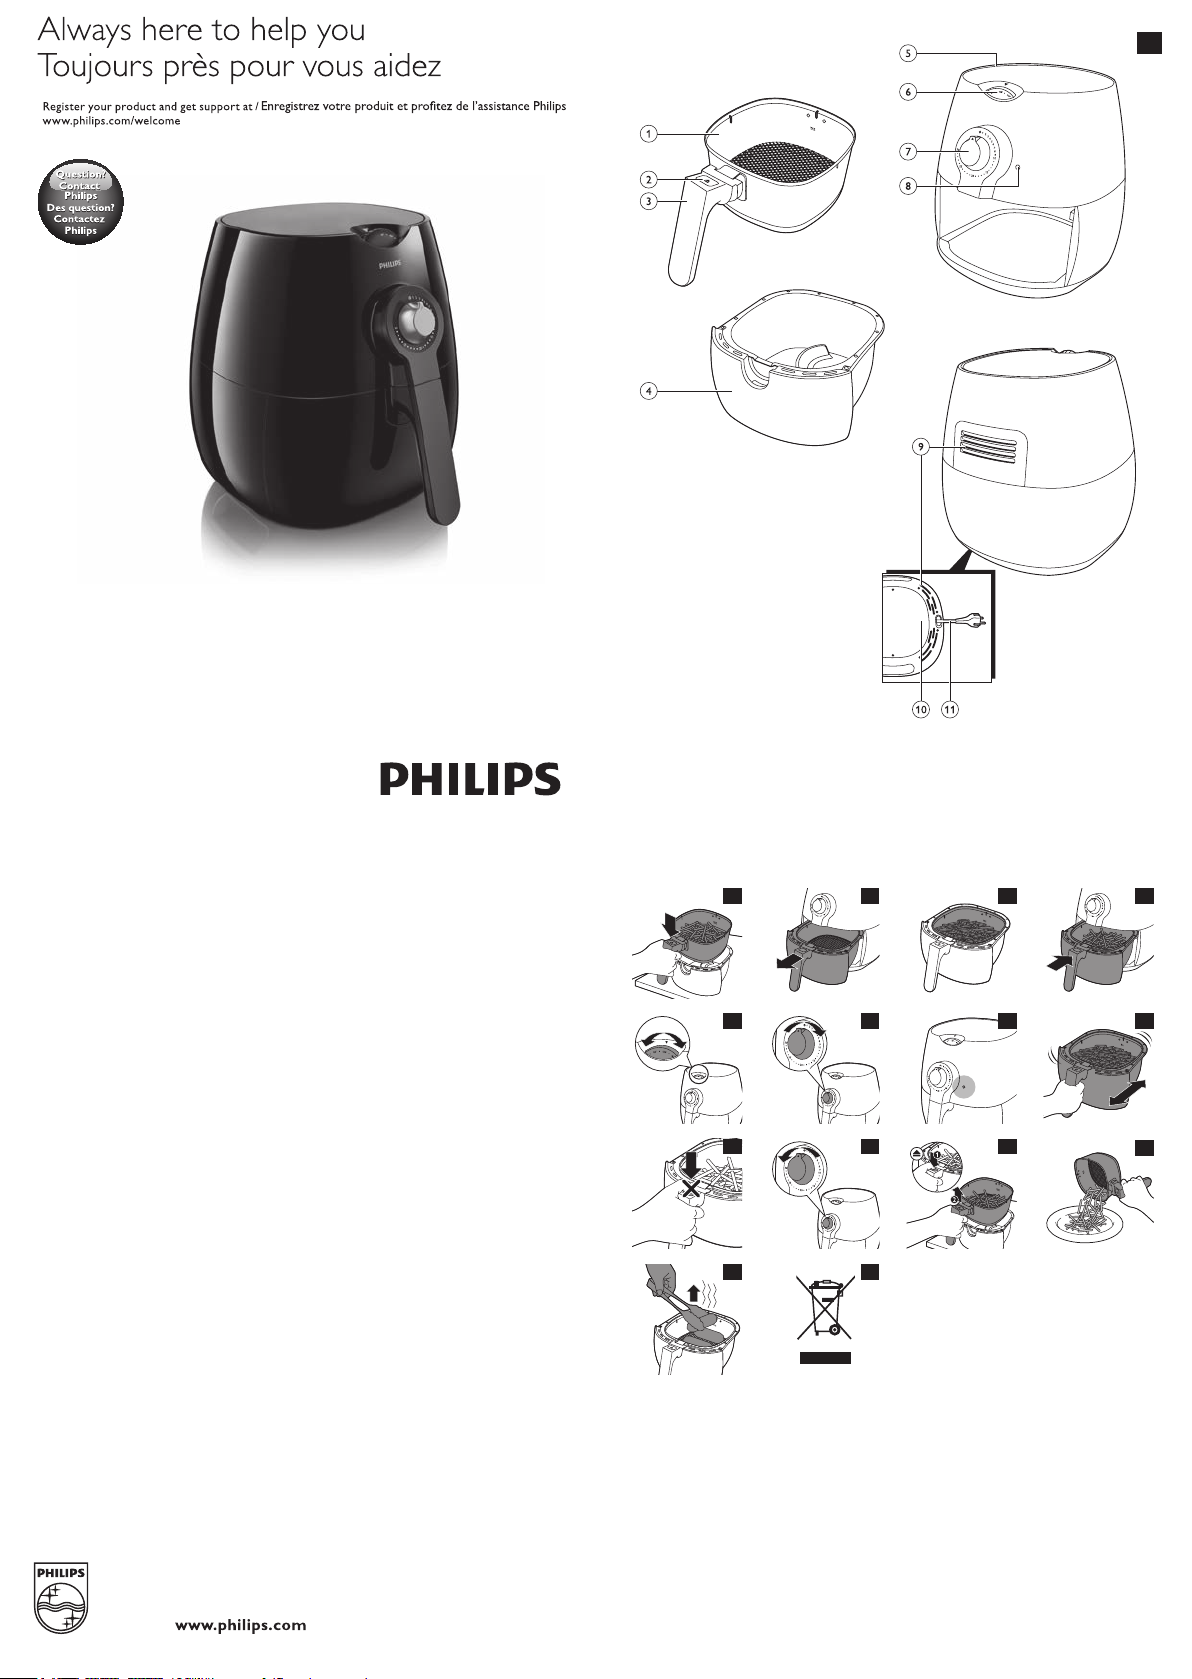
General description (Fig. 1)
1 Basket
2 Basket release button
3 Basket handle
4 Pan
5 Air inlet
6 Temperature control knob (180-390°F / 80°C-200°C)
7 Timer (0-30 min.)/power-on knob
8 Power-on indicator
9 Air outlet openings
10 Cord storage compartment
11 Power cord
Before first use
1 Remove all packaging material.
2 Remove any stickers or labels from the appliance.
3 Thoroughly clean the basket and the pan with hot water, some
dishwashing liquid and a non-abrasive sponge.
Note: You can also clean these parts in the dishwasher.
4 Wipe the inside and outside of the appliance with a moist cloth.
This is an airfryer that works on hot air. Do not ll the pan with oil or
frying fat.
Preparing for use
1 Place the appliance on a stable, horizontal and level surface.
Do not place the appliance on non-heat-resistant surfaces.
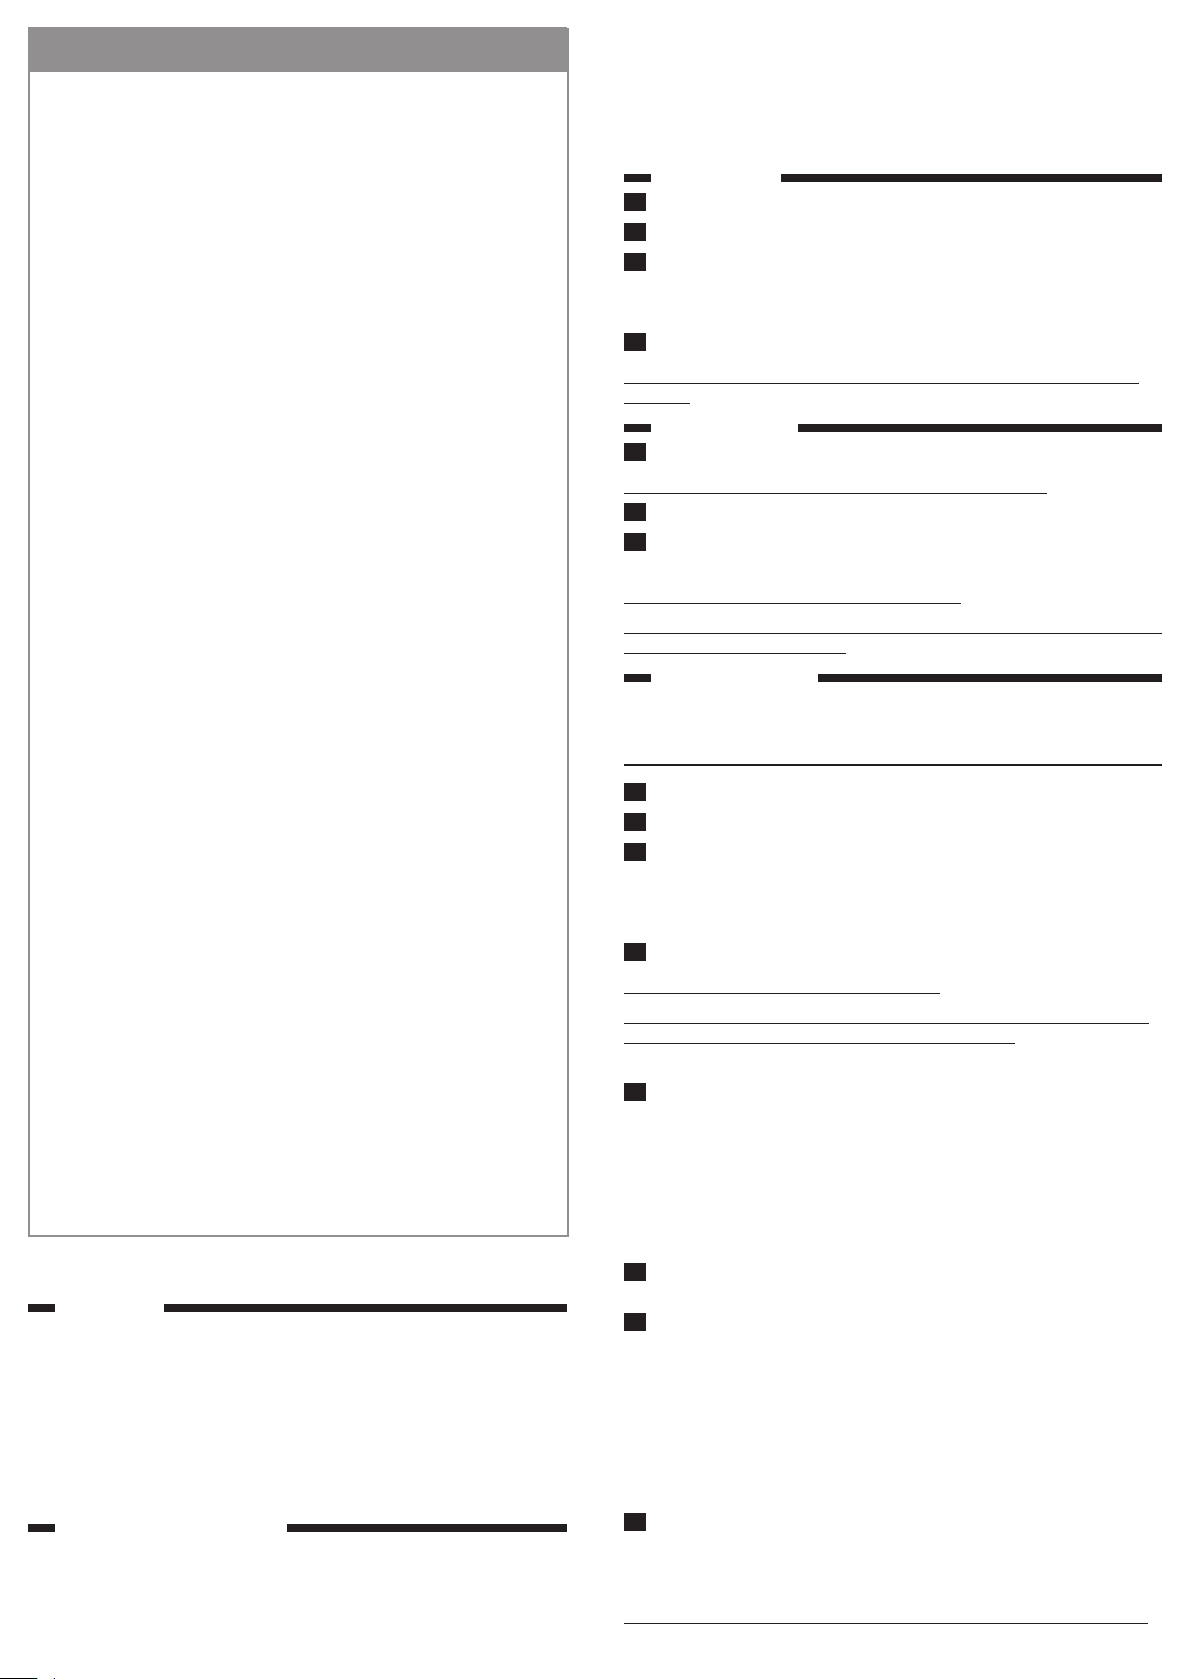
2 Place the basket in the pan properly (Fig. 2).
3 Pull the power cord out of the cord storage compartment in the
bottom of the appliance.
Do not ll the pan with oil or any other liquid.
Do not put anything on top of the appliance. This disrupts the airow and
affects the hot air frying result.
Using the appliance
The airfryer can prepare a large range of ingredients. The recipe booklet
included helps you get to know the appliance.
Hot air frying
1 Put the power plug in a grounded wall outlet.
2 Carefully pull the pan out of the airfryer (Fig. 3).
3 Put the ingredients in the basket (Fig. 4).
Note: Never ll the basket beyond the MAX indication or exceed the amount
indicated in the table (see section ‘Settings’ in this chapter), as this could affect
the quality of the end result.
4 Slide the pan back into the airfryer (Fig. 5).
Never use the pan without the basket in it.
Caution: Do not touch the pan during and for some time after use, as it
gets very hot. Only hold the pan by the basket handle.
5 Turn the temperature control knob clockwise to the required
temperature. See section ‘Settings’ in this chapter to determine
the right temperature (Fig. 6).
Note: If you want to prepare different ingredients at the same time, make sure
you check the preparation time and the temperature required for the different
ingredients before you start to prepare them simultaneously. Home-made fries
and drumsticks, for example, can be prepared simultaneously because they
require the same settings.
6 Determine the required preparation time for the ingredient
(see section ‘Settings’ in this chapter).
7 To turn on the appliance, turn the timer knob to the
required preparation time (Fig. 7).
Add 3 minutes to the preparation time when the appliance is cold.
Note: If you want, you can also let the appliance preheat without any
ingredients inside. In that case, turn the timer knob to more than 3 minutes.
Then ll the basket and turn the timer knob to the required preparation time.
, The power-on indicator goes on (Fig. 8).
, The timer starts counting down the set preparation time.
, Excess oil from the ingredients is collected on the bottom of the pan.
8 Some ingredients require shaking halfway through the preparation
time (see section ‘Settings’ in this chapter). To shake the ingredients,
pull the pan out of the appliance by the handle and shake it. Then slide
the pan back into the airfryer (Fig. 9).
Caution: Do not press the basket release button during shaking (Fig. 10).
Page 3

Tip: To reduce the weight, you can remove the basket from the pan and shake
the basket only. To do so, pull the pan out of the appliance, place it on a
heat-resistant surface and press the basket release button.
Tip: If you set the timer to half the preparation time, you hear the timer bell
when you have to shake the ingredients. However, this means that you have to
set the timer again to the remaining preparation time after shaking.
9 When you hear the timer bell, the set preparation time has elapsed.
Pull the pan out of the appliance and place it on a heat-resistant surface.
Note: You can also turn off the appliance manually. To do this, turn the timer
control knob to 0 (Fig. 11).
10 Check if the ingredients are ready.
If the ingredients are not ready yet, simply slide the pan back into the
appliance and set the timer to a few extra minutes.
11 To remove small ingredients (e.g. fries), press the basket release
button (1) and lift the basket out of the pan (2). (Fig. 12)
Do not turn the basket upside down with the pan still attached to it,
as any excess oil that has collected on the bottom of the pan will leak
onto the ingredients.
After hot air frying, the pan and the ingredients are hot. Depending on
the type of ingredients in the airfryer, steam may escape from the pan.
12 Empty the basket into a bowl or onto a plate. (Fig. 13)
Tip: To remove large or fragile ingredients, use a pair of tongs to lift the
ingredients out of the basket (Fig. 14).
13 When a batch of ingredients is ready, the airfryer is instantly ready
for preparing another batch.
Settings
The table below helps you to select the basic settings for the ingredients
you want to prepare.
Note: Keep in mind that these settings are indications. As ingredients differ in
origin, size, shape as well as brand, we cannot guarantee the best setting for
your ingredients.
Because the Rapid Air technology instantly reheats the air inside the
appliance, pulling the pan briey out of the appliance during hot air
frying barely disturbs the process.
Tips
- Smaller ingredients usually require a slightly shorter preparation time
than larger ingredients.
- A larger amount of ingredients only requires a slightly longer
preparation time, a smaller amount of ingredients only requires a slightly
shorter preparation time.
- Shaking smaller ingredients halfway through the preparation time
optimizes the end result and can help prevent unevenly fried ingredients.
- Add some oil to fresh potatoes for a crispy result. Fry your ingredients
in the airfryer within a few minutes after you added the oil.
- Do not prepare extremely greasy ingredients such as sausages in the airfryer.
- Snacks that can be prepared in an oven can also be prepared in the airfryer.
- The optimal amount for preparing crispy fries is 1lb/0,45kg.
- Use pre-made dough to prepare lled snacks quickly and easily. Pre-made
dough also requires a shorter preparation time than home-made dough.
- You can also use the airfryer to reheat ingredients. To reheat ingredients,
set the temperature to 300°F / 150°C for up to 10 minutes.
- Make sure the ingredients that come out of this appliance have a light to
medium brown color instead of a dark brown color. Remove burnt food
remnants. Do not fry fresh potatoes at a temperature above 356°F /
180°C to minimize the production of acrylamide.
Min-max
Amount
(oz/g)
Time
(min.)
Temperature
(°F /°C)
Shake Extra
information
Potatoes &
fries
Thin frozen
fries
Thick frozen
fries
Homemade fries
(1/4 inch /
10 a 25 /
300-700
10 a 25 /
300-700
10 a 25 /
300-800
12-16 390 / 200 Shake
12-20 390 / 200 Shake
18-25 355 / 180 Shake add 1/2
tbsp of oil
to the fries
8x8 mm)
Home-made
potato
wedges
Min-max
Amount
(oz/g)
10 a 25 /
300-800
Time
(min.)
Temperature
(°F /°C)
Shake Extra
information
18-22 355 / 180 Shake add 1/2
tbsp of
oil to the
wedges
Homemade potato
cubes
10 a 25 /
300-700
12-18 355 / 180 Shake add 1/2
tbsp of
oil to the
cubes
Meat &
Poultry
Steak 4 a 18 /
8-12 355 / 180
100-500
Pork chops 4 a 18 /
10-14 355 / 180
100-500
Hamburger 4 a 18 /
7-14 355 / 180
100-500
Chicken
wings
Drumsticks 4 a 18 /
4 a 18 /
100-500
13-15 355 / 180
18-22 355 / 180
100-500
Chicken
breast
4 a 18 /
100-500
10-15 355 / 180
Snacks
Onion rings 10 a 25 /
300-700
Frozen
chicken
4 a 18 /
100-500
12-16 390 / 200 Shake Use oven-
ready
6-10 390 / 200 Shake Use oven-
ready
nuggets
Frozen sh
sticks
Frozen
cheese sticks
Mixed
vegetables
4 a 16 /
100-400
4 a 16 /
100-400
4 a 16 /
100-400
6-10 390 / 200 Use oven-
ready
8-10 355 / 180 Use oven-
ready
10 320 / 160
Note: Add 3 minutes to the preparation time when you start frying while the
airfryer is still cold.
Making home-made fries
For the best results, we advise to use pre-baked (e.g. frozen) fries. If you
want to make home-made fries, follow the steps below.
1 Peel the potatoes and cut them into sticks.
2 Soak the potato sticks in a bowl for at least 30 minutes, take them
out and dry them with paper towel.
3 Pour ½ tablespoon of olive oil in a bowl, put the sticks on top and
mix until the sticks are coated with oil.
4 Remove the sticks from the bowl with your ngers or a kitchen
utensil so that excess oil stays behind in the bowl. Put the sticks in
the basket.
Note: Do not tilt the bowl to put all the sticks in the basket in one go, to prevent
excess oil from ending up on the bottom of the pan.
5 Fry the potato sticks according to the instructions in this chapter.
Cleaning
Clean the appliance after every use. Remove oil from the bottom of the
pan after every use to prevent smoke.
Let the basket, pan and the inside of the appliance cool completely before
you start cleaning. The pan, basket and the inside of the appliance have a
non-stick coating. Do not use metal kitchen utensils or abrasive cleaning
materials to clean them, as this may damage the non-stick coating.
1 Remove the power plug from the wall outlet, turn timer control knob
to 0 and let the appliance cool down.
Note: Remove the pan to let the airfryer cool down more quickly.
2 Wipe the outside of the appliance with a moist cloth.
Page 4

3 Clean the pan and basket with hot water, some dishwashing liquid and
a non-abrasive sponge.
You can use a degreasing liquid to remove any remaining dirt.
Note: The pan and basket are dishwasher-safe.
Tip: If dirt sticks to the basket, or the bottom of the pan, ll the pan with hot
water with some dishwashing liquid. Put the basket in the pan and let the pan
and the basket soak for approximately 10 minutes.
4 Clean the inside of the appliance with hot water and a non-abrasive
sponge.
5 If necessary clean the heater with a cleaning brush to remove any
food residues.
Storage
1 Unplug the appliance and let it cool down.
2 Be sure all parts are clean and dry.
3 Push the cord into the cord storage compartment. Secure the
cord by inserting it into the cord xing slot.
Environment
- Do not throw away the appliance with the normal household waste
at the end of its life, but hand it in at an ofcial collection point for
recycling. By doing this, you help to preserve the environment (Fig. 15).
Warranty and service
If you need service or information or if you have a problem, please visit
the Philips website at www.philips.com/support or call in the U.S. and
Canada only, 1-866-309-8817 for assistance.
Troubleshooting
This chapter summarizes the most common problems you could encounter
with the appliance. If you are unable to solve the problem with the
information below, visit www.philips.com/support or call in the U.S. and
Canada only, 1-866-309-8817 for assistance.
Problem Possible cause Solution
The airfryer
does not work.
The ingredients
fried with
the airfryer are
not done.
The ingredients
are fried
unevenly in the
airfryer.
Fried foods are
not crispy when
they come out
of the airfryer.
I cannot slide
the pan into
the appliance
properly.
The appliance is
not plugged in.
You have not set
the timer.
The amount of
ingredients in
the basket is too
big.
The set
temperature is
too low.
The preparation
time is too short.
Certain types of
ingredients need
to be shaken
halfway through
the cooking time.
You used a type
of food to be
prepared in a
traditional deep
fryer.
There are too
many ingredients
in the basket.
The basket is not
placed in the pan
correctly.
Put the power plug in an grounded
wall outlet.
Turn the timer knob to the
required preparation time to turn
on the appliance.
Put smaller batches of ingredients in
the basket. Smaller batches are fried
more evenly.
Turn the temperature control knob
to the required temperature setting
(see section ‘Settings’ in chapter
‘Using the appliance’).
Turn the timer knob to the
required preparation time
(see section ‘Settings’ in chapter
‘Using the appliance’).
Ingredients that lie on top of or
across each other (e.g. fries) need
to be shaken halfway through the
cooking time. See section ‘Settings’
in chapter ‘Using the appliance’.
Use food intended to be cooked
in an oven or lightly brush some oil
onto the food for a crispier result.
Do not ll the basket beyond the
MAX indication.
Push the basket down into the pan
until you hear a click.
Problem Possible cause Solution
White
smoke comes
out of the
appliance.
Home-made
fries are fried
unevenly in the
airfryer.
Home-made
fries are not
crispy when
they come out
of the airfryer.
One Year Limited Warranty
Philips warrants that this product shall be free from defects in material,
workmanship and assembly, under normal use, in accordance with the
specications and warnings, for a period of one year from the date of
purchase. This warranty extends only to the original purchaser of the
product, and is not transferable. To exercise your rights under this warranty,
you must provide proof of purchase in the form of an original sales receipt
that shows the product name and the date of purchase. For customer
support or to obtain warranty service, please visit our website
www.philips.com/support. THERE ARE NO OTHER EXPRESS OR
IMPLIED WARRANTIES. Philips’ liability is limited to repair or, at its sole
option, replacement of the product. Incidental, special and consequential
damages are disclaimed where permitted by law. This warranty gives you
specic legal rights. You may also have other rights that vary from state to
state or province to province.
Manufactured for: Philips Consumer Lifestyle
A Division of Philips Electronics North America Corporation
P.O. Box 10313, Stamford, CT 06904 USA
Manufactured for: Philips Electronics Ltd
281 Hillmount Road
Markham, ON L6C2S3 Canada
You are
preparing greasy
ingredients.
The pan still
contains grease
residues from
previous use.
You did not soak
the potato sticks
properly before
you fried them.
You did not use
the right potato
type.
The crispiness
of the fries
depends on the
amount of oil
and water in the
fries.
When you fry greasy ingredients in
the airfryer, a large amount of oil
or rendered fat will leak into the
pan. The oil or fat produces white
smoke and the pan may heat up
more than usual. This does not
affect the appliance or the end
result. Midway through the cooking
process you can carefully pour off
any excess oil or rendered fat from
the pan and then continue cooking.
White smoke is caused by
grease heating up in the pan. Be
sure you clean the pan properly
after each use.
Soak the potato sticks in a bowl for
at least 30 minutes, take them out
and dry them with paper towel.
Use fresh potatoes and be sure
they stay rm during frying.
Be sure you dry the potato sticks
properly before you add the oil.
Cut the potato sticks smaller for a
crispier result.
Add slightly more oil for a crispier
result.
ESPAÑOL
PRECAUCIONES
IMPORTANTES
Si utiliza un aparato eléctrico siempre debe tomar medidas de seguridad
básicas, tales como:
1 Lea todas las instrucciones.
2 No toque supercies calientes. Use las manijas o las perillas.
3 No sumerja el cable de alimentación, los conectores ni el aparato en
agua u otros líquidos para evitar descargas eléctricas.
4 Realice una estricta supervisión si el aparato es utilizado por niños o
personas con discapacidad o en su cercanía.
5 Desconecte el aparato del tomacorriente cuando no lo utilice y antes
de limpiarlo. Deje que se enfríe antes de añadir o retirar piezas.
6 Nunca use ningún aparato si el cable de alimentación o el conector
están dañados, si funciona mal o si sufrió algún tipo de daño.
7 Evite el uso de accesorios no recomendados por el fabricante del
aparato para prevenir lesiones.
Page 5

8 No obstruya ningún oricio de ventilación. Para instalar, siga las
instrucciones de fábrica.
9 No utilice el dispositivo al aire libre.
10 No deje que el cable cuelgue del borde de la supercie sobre la que
se encuentra apoyado ni permita que toque supercies calientes.
11 No lo coloque sobre quemadores eléctricos o que funcionen con gas
caliente ni cerca de ese tipo de aparatos. Tampoco lo coloque dentro
de hornos calientes.
12 Tome las medidas de precaución necesarias cuando mueva un
artefacto que contenga aceite caliente u otros líquidos calientes.
13 Enchufe el conector al tomacorriente de pared. Para desconectarlo,
lleve los controles a la posición de apagado y desconéctelo del
tomacorriente.
14 Extreme precauciones cuando quite el sartén, la canasta y cuando
deseche el aceite caliente.
15 No limpie con esponjas metálicas. Pueden saltar pedazos de la esponja
y tocar partes eléctricas, lo que genera un riesgo de electrocución.
16 Solo utilice este artefacto en un tomacorriente con una apropiada
conexión a tierra.
17 Se debe usar un cable de alimentación corto (o un cable de
alimentación desmontable) para reducir el riesgo de enredarse o
tropezarse con un cable largo.
18 Se pueden utilizar cables de extensión si se toman las precauciones
debidas. Si se utiliza un cable de extensión:
La clasicación eléctrica del cable debe ser igual a la clasicación
del artefacto.
El cable debe instalarse de tal manera que no cuelgue del borde de la
supercie de apoyo, para así evitar caídas y enredos.
19 Este aparato cuenta con un conector polarizado (una hoja es más ancha
que la otra). Para reducir el riesgo de descarga eléctrica, este conector
está diseñado para ajustarse a una salida polarizada de un solo modo. Si
el conector no se ajusta por completo a la salida, invierta el conector. Si
sigue sin encajar, póngase en contacto con un electricista calicado. No
intente modicar el conector de ningún modo.
20 No debe introducir en el artefacto alimentos de gran tamaño o
utensilios de metal ya que pueden provocar un incendio o riesgo de
electrocución.
21 Puede ocurrir un incendio si el ar tefacto está cubierto o en contacto
con material inamable, esto incluye cortinas, tapicería, paredes o
similares, durante su funcionamiento. No almacene objetos sobre el
aparato durante su funcionamiento.
22 No introduzca ninguno de los siguientes materiales en el aparato:
papel, cartón, plástico o similares.
CONSERVE ESTAS
INSTRUCCIONES
El consumo de carnes, aves, pescados y mariscos o huevos crudos o sin
cocinar puede incrementar el riesgo de contraer enfermedades transmitidas
por los alimentos.
Introducción
Felicitaciones por su compra y bienvenido a Philips. Para disfrutar de todos
los benecios que le ofrece la asistencia de Philips, registre su producto en
www.philips.com/welcome.
La nueva airfryer le permite preparar sus ingredientes y aperitivos favoritos
de una manera más sana.
La airfryer utiliza aire caliente combinado con circulación de aire a alta
velocidad (Rapid Air) y una parrilla superior para preparar una variedad
de platos sabrosos de una manera rápida, sana y fácil. Los ingredientes se
calientan por todos los lados de una sola vez y no hay necesidad de añadir
aceite a la mayoría de los ingredientes.
Información general (Fig. 1)
1 Cesta
2 Botón de liberación de la cesta
3 Asa de la cesta
4 Sartén
5 Entrada de aire
6 Perilla de control de temperatura (180-390 °F / 80-200 °C)
7 Temporizador (0-30 min.)/botón de encendido/apagado
8 Indicador de encendido
9 Aberturas de salida de aire
10 Compartimento para guardar el cable
11 Cable de alimentación
Antes del primer uso
1 Elimine todo el material de embalaje.
2 Elimine cualquier pegatina o etiqueta del aparato.
3 Limpie a fondo la cesta y la sartén con agua caliente, un poco de
detergente líquido y una esponja no abrasiva.
Nota: También puede lavar estas piezas en el lavavajillas.
4 Limpie el interior y exterior del aparato con un paño húmedo.
Este aparato es una airfryer que funciona con aire caliente. No llene la
sartén de aceite o grasa para freír.
Preparación inicial
1 Coloque el aparato sobre una supercie estable, horizontal y plana.
No coloque el aparato sobre supercies no resistentes al calor.
2 Coloque la cesta en la sartén correctamente (Fig. 2).
3 Saque el cable de alimentación del compartimento para guardar el
cable situado en la parte inferior del aparato.
No llene la sartén con aceite ni cualquier otro líquido.
No coloque nada encima del aparato. Esto interrumpe el ujo de aire y
afecta al resultado de los alimentos fritos con aire caliente.
Uso del aparato
La airfryer puede preparar una gran variedad de ingredientes. El libro de
recetas incluido le ayudará a conocer el funcionamiento del aparato.
Cómo freír con aire caliente
1 Conecte el artefacto a un enchufe de pared con conexión a tierra.
2 Saque con cuidado la sartén de la airfryer (Fig. 3).
3 Ponga los ingredientes en la cesta (Fig. 4).
Nota: Nunca llene la cesta por encima de la indicación MAX ni exceda la
cantidad indicada en la tabla (consulte la sección “Ajustes” en este capítulo), ya
que esto podría afectar a la calidad del resultado.
4 Vuelva a poner la sartén en la airfryer (Fig. 5).
Nunca utilice la sartén si no está la cesta en su interior.
Precaución: No toque la sartén durante ni hasta un rato después de su
uso, ya que se calienta demasiado. Sujete la sartén únicamente por el asa.
5 Gire la perilla de control de temperatura en sentido de las agujas del
reloj hasta la temperatura necesaria. Consulte la sección “Ajustes” en
este capítulo para determinar la temperatura correcta (Fig. 6).
Nota: Si desea preparar distintos ingredientes al mismo tiempo, asegúrese de
vericar el tiempo y temperatura de preparación de los ingredientes antes de
prepararlos al mismo tiempo. Por ejemplo, puede preparar al mismo tiempo
patatas fritas y muslos de pollo, ya que requieren los mismos ajustes.
6 Determine el tiempo de preparación necesario para el ingrediente
(consulte la sección “Ajustes” en este capítulo).
7 Para encender el artefacto, gire la perilla del temporizador al tiempo
de preparación requerido (Fig. 7).
Añada 3 minutos al tiempo de preparación cuando el aparato
esté frío.
Nota: Si lo desea, también puede dejar que el aparato se precaliente sin ningún
ingrediente dentro. En ese caso, gire el botón del temporizador hasta más de
3 minutos y luego llene la cesta y gire el botón del temporizador hasta el
tiempo de preparación necesario.
, El indicador de encendido se ilumina (Fig. 8).
, El temporizador comienza la cuenta atrás desde el tiempo de
preparación establecido.
, El exceso de aceite procedente de los ingredientes se recoge en el
fondo de la sartén.
8 Algunos ingredientes se tienen que sacudir a mitad del tiempo de
preparación (consulte la sección “Ajustes” en este capítulo). Para sacudir
los ingredientes, saque la sartén del aparato sujetándola por el asa y
agítela. A continuación vuelva a poner la sartén en la airfryer (Fig. 9).
Precaución: No pulse el botón de liberación de la cesta mientras sacude
la sartén (Fig. 10).
Sugerencia: Para reducir el peso, puede quitar la cesta de la sartén y sacudir
sólo la cesta. Para hacerlo, saque la sartén del aparato, colóquela sobre una
supercie resistente al calor y pulse el botón de liberación de la cesta.
Page 6

Sugerencia: Si pone el temporizador a la mitad el tiempo de preparación, oirá
el timbre del temporizador cuando tenga que sacudir los ingredientes. Sin
embargo, esto signica que después de sacudir los alimentos tiene que ajustar
otra vez el tiempo de preparación restante en el temporizador.
9 Cuando oiga el timbre del temporizador, signica que el tiempo de
preparación establecido ha pasado. Saque la sartén del aparato y
colóquela en una supercie resistente al calor.
Nota: También puede apagar el aparato manualmente. Para ello, gire el
temporizador hasta la posición 0 (Fig. 11).
10 Compruebe si los ingredientes están listos.
Si los ingredientes no están listos todavía, sólo tiene que volver a poner la
sartén en el aparato y ajustar unos minutos extra en el temporizador.
11 Para sacar pequeños ingredientes (por ejemplo, patatas fritas),
pulse el botón de liberación de la cesta (1) y saque la cesta de la
sartén (2). (Fig. 12)
No ponga la cesta al revés si la sartén todavía está sujeta a la misma, ya
que el posible exceso de aceite que se recoge en el fondo de la sartén
goteará en los ingredientes.
Después de freír con aire caliente, la sartén y los ingredientes están
calientes. Dependiendo del tipo de ingredientes que utilice en la airfryer,
puede salir vapor de la sartén.
12 Vacíe la cesta en un recipiente o en un plato. (Fig. 13)
Sugerencia: En el caso de ingredientes grandes o delicados, utilice unas pinzas
para sacar los ingredientes de la cesta (Fig. 14).
13 Cuando un lote de ingredientes está listo, la airfryer está
instantáneamente preparada para cocinar otro lote.
Ajustes
La siguiente tabla le ayudará a seleccionar los ajustes básicos para los
ingredientes que desee preparar.
Nota: Tenga presente que estos ajustes son indicaciones. Debido a que los
ingredientes varían según su origen, tamaño, forma o marca, no podemos
garantizar el mejor ajuste para sus ingredientes.
Como la tecnología Rapid Air recalienta instantáneamente el aire dentro del
aparato, el hecho de sacar brevemente la sartén del aparato mientras éste
fríe con aire caliente apenas afecta al proceso.
Sugerencias
- Normalmente los ingredientes más pequeños requieren un tiempo de
preparación ligeramente más corto que los ingredientes de mayor tamaño.
- Una cantidad más grande de ingredientes sólo requiere un tiempo
de preparación ligeramente más largo, una cantidad más pequeña de
ingredientes sólo requiere un tiempo de preparación ligeramente más corto.
- Sacudir los ingredientes más pequeños a mitad del tiempo de
preparación optimiza el resultado nal y puede ayudar a evitar que los
ingredientes se frían de forma desigual.
- Añada un poco aceite a las patatas crudas para obtener un resultado
crujiente. Fría los ingredientes en la airfryer pocos minutos después de
añadir el aceite.
- No prepare ingredientes muy grasientos, como salchichas, en la airfryer.
- Los alimentos que se pueden preparar en un horno también se pueden
preparar en la airfryer.
- La cantidad óptima para preparar crujientes papas fritas es 1 libra/0,45 kg.
- Utilice masa ya preparada para elaborar aperitivos rellenos rápida
y fácilmente. La masa ya preparada también requiere un tiempo de
preparación más corto que la masa hecha en casa.
- También puede utilizar la AirFryer para recalentar ingredientes. Para ello,
ajuste la temperatura a 300 °F/150 °C durante un tiempo de hasta
10 minutos.
- Asegúrese de que al sacar los ingredientes estos tengan un color
dorado claro a medio en lugar de un color café oscuro. Quite los restos
de comida quemada. No fría patatas frescas a una temperatura superior
a 356 °F/180 °C para disminuir la producción de acrilamida.
Cantidad
mínima y
máxima
(oz/g)
Tiempo
(min.)
Temperatura
(°F /°C)
Sacudir Información
extra
Patatas
y patatas
fritas
Patatas en
rebanadas
10 a 25 /
300-700
12 - 16 390 / 200 Sacudir
congeladas
Patatas fritas
congeladas
Cantidad
mínima y
máxima
(oz/g)
10 a 25 /
300-700
Tiempo
(min.)
Temperatura
(°F /°C)
Sacudir Información
12-20 390 / 200 Sacudir
extra
gruesas
Patatas fritas
caseras
(1/4 pulgadas /
8x8 mm)
10 a 25 /
300-800
18-25 355 / 180 Sacudir agregue
1/2
cucharada
sopera de
aceite a
las patatas
fritas
Rodajas de
patatas caseras
10 a 25 /
300-800
18-22 355 / 180 Sacudir agregue
1/2
cucharada
sopera de
aceite a las
rodajas
Cubos de
patata caseros
10 a 25 /
300-700
12-18 355 / 180 Sacudir agregue
1/2
cucharada
sopera de
aceite a los
cubos
Carne y
carne de ave
Filete 4 a 18 /
8 - 12 355 / 180
100-500
Chuletas de
cerdo
Hamburguesa 4 a 18 /
4 a 18 /
100-500
10 - 14 355 / 180
7-14 355 / 180
100-500
Alitas de pollo 4 a 18 /
13 - 15 355 / 180
100-500
Muslos 4 a 18 /
18-22 355 / 180
100-500
Pechuga de
pollo
4 a 18 /
100-500
10 - 15 355 / 180
Aperitivos
Aros de
cebolla
10 a 25 /
300-700
12 - 16 390 / 200 Sacudir Utilice
alimentos
listos para
horno
Taquitos
de pollo
congelados
4 a 18 /
100-500
6 - 10 390 / 200 Sacudir Utilice
alimentos
listos para
horno
Palitos de
pescado
congelados
4 a 16 /
100-400
6 - 10 390 / 200 Utilice
alimentos
listos para
horno
Palitos
de queso
congelados
4 a 16 /
100-400
8 - 10 355 / 180 Utilice
alimentos
listos para
horno
Mix de
verduras
4 a 16 /
100-400
10 320 / 160
Nota: Añada 3 minutos al tiempo de preparación cuando empiece a freír
mientras la airfryer todavía esté frío.
Preparación de patatas fritas caseras
Para obtener los mejores resultados, es aconsejable utilizar patatas
precocinadas (por ejemplo, congeladas). Si desea preparar patatas fritas
caseras, siga los pasos que se indican a continuación.
1 Pele las patatas y córtelas en tiras.
2 Deje las tiras de patata en remojo en un recipiente durante al menos
30 minutos y después séquelas con papel de cocina.
3 Vierta ½ cucharada de aceite de oliva en un recipiente, coloque las
tiras encima y mézclelas hasta que estén cubiertas de aceite.
Page 7

4 Saque las tiras del recipiente con las manos o con un utensilio de
cocina para que el aceite sobrante se quede en el recipiente. Coloque
las tiras en la cesta.
Nota: No incline el recipiente para colocar todas las tiras en la cesta de una
sola vez; de este modo evitará que el aceite sobrante acabe en el fondo de la
sartén.
5 Fría las tiras de patata según las instrucciones de este capítulo.
Limpieza
Limpie el aparato después de cada uso. Elimine el aceite del fondo del
sartén después de cada uso para evitar la producción de humo.
Permita que se enfríe por completo la canasta, la sartén y el interior del
aparato antes de que inicie la limpieza. La sartén, la canasta y el interior
del aparato tienen un recubrimiento antiadherente. No use utensilios de
cocina metálicos o materiales de limpieza abrasivos para limpiarlos, pues
puede dañar el recubrimiento antiadherente.
1 Quite el cable de alimentación de la toma de corriente de la pared,
coloque la perilla de control del temporizador en 0 y deje que se
enfríe el aparato.
Nota: Saque la sartén para permitir que la airfryer se enfríe más rápido.
2 Limpie la parte exterior del aparato con un paño húmedo.
3 Limpie la sartén y la cesta con agua caliente, un poco de detergente
líquido y una esponja no abrasiva.
Puede utilizar un líquido desengrasante para eliminar la suciedad restante.
Nota: La sartén y la cesta son aptas para el lavavajillas.
Sugerencia: Si se queda suciedad atascada en la cesta o en el fondo de la sartén,
llene la sartén con agua caliente y un poco de detergente líquido. Coloque la cesta
en la sartén y déjelas a remojo durante aproximadamente 10 minutos.
4 Limpie el interior del aparato con agua caliente y una esponja no
abrasiva.
5 De ser necesario, limpie el calentador con un cepillo de limpieza para
eliminar cualquier residuo de comidas.
Almacenamiento
1 Desenchufe el artefacto y déjelo enfriar.
2 Asegúrese de que todas las piezas están limpias y secas.
3 Introduzca el cable en el compartimento para guardar el cable. Fije el
cable insertándolo en la ranura de jación.
Medio ambiente
- Cuando nalice la vida útil del aparato, no lo deseche junto con los
residuos domésticos habituales. Llévelo a un centro de recolección
ocial para su reciclado. De esta forma, ayudará a proteger el medio
ambiente (Fig. 15).
Garantía y servicio
Si necesita información, asistencia o tiene un problema, visite el sitio web de
Philips en www.philips.com/support o llame al
- Colombia: 01-800-700-7445
- Costa Rica: 0800-507-7445
- Dominican Republic: 1-800-751-2673
- Ecuador: 1-800-10-1045
- El Salvador: 800-6024
- Guatemala: 1-800-299-0007
- Honduras: 8002-791-9273
- Mexico: 01800504 6200
- Nicaragua: 1-800-507-0018
- Panama: 800-8300
para obtener ayuda.
Solución de problemas
Este capítulo resume los problemas más comunes que puede afrontar
con este aparato. Si aún con la información descrita no puede resolver el
problema, visite www.philips.com/support
Problema Posible causa Solución
La airfryer no
funciona.
El aparato no
está enchufado.
No ha
puesto el
temporizador.
Conecte el artefacto a un enchufe
de pared con conexión a tierra.
Gire el botón del temporizador
hasta el tiempo de preparación
necesario para encender el aparato.
Problema Posible causa Solución
Los ingredientes
fritos con la
airfryer no están
hechos del todo.
La cantidad de
ingredientes
que hay en
la cesta es
Coloque lotes de ingredientes más
pequeños en la cesta. Los lotes más
pequeños se fríen de forma más
uniforme.
demasiado
grande.
La temperatura
seleccionada es
demasiado baja.
Gire el control de temperatura
hasta la posición de temperatura
necesaria (consulte la sección
“Ajustes” en el capítulo “Uso del
aparato”).
El tiempo de
preparación
es demasiado
corto.
Gire el botón del temporizador
hasta el tiempo de preparación
necesario (consulte la sección
“Ajustes” en el capítulo ‘Uso del
aparato’).
Los ingredientes
se fríen de forma
desigual en la
airfryer.
Ciertos tipos
de ingredientes
se deben
sacudir a mitad
del tiempo de
cocción.
Los ingredientes que están
mezclados o unos sobre otros (por
ejemplo, las patatas fritas) se tienen
que sacudir a mitad del tiempo de
preparación. Consulte la sección
“Ajustes” en el capítulo ‘Uso del
aparato’.
Los alimentos
fritos no están
crujientes
cuando salen de
la AirFryer.
No puedo
introducir
la sartén en
el aparato
Utilizó un tipo
de alimento
para preparar
en una freidora
tradicional.
Hay
demasiados
ingredientes en
la cesta.
Use alimentos que se cocinen en
un horno o aplíqueles un poco de
aceite con un pincel para obtener
un resultado más crujiente.
No llene la cesta por encima de la
indicación MAX.
correctamente.
La cesta no
está colocada
Presione la cesta en la sartén hasta
que oiga un clic.
en la sartén
correctamente.
Sale humo
blanco del
aparato.
Está
preparando
ingredientes
grasientos.
Cuando fríe ingredientes grasientos
en la AirFryer, se gotea al sartén
una gran cantidad de aceite o
grasa derretida. El aceite o grasa
producen humo blanco y es posible
que la sartén se caliente más de lo
normal. Esto no afecta al aparato
o el resultado nal. A la mitad del
proceso de cocinar, puede escurrir
cuidadosamente cualquier exceso
de aceite o grasa derretida del
sartén y, luego, seguir cocinando.
La sartén
todavía
contiene restos
de grasa del
El humo blanco lo provoca la
grasa que se calienta en la sartén.
Asegúrese de limpiar la sartén
correctamente después de cada uso.
uso anterior.
Las patatas fritas
hechas en casa
se fríen de forma
desigual en la
AirFryer.
No ha dejado
en remojo las
tiras de patata
correctamente
antes de
Deje las tiras de patata en remojo
en un recipiente durante al menos
30 minutos y después séquelas con
papel de cocina.
freírlas.
Las papas fritas
caseras no
están crujientes
cuando salen de
la AirFryer.
No ha utilizado
el tipo correcto
de patata.
La textura
crujiente de las
patatas fritas
depende de
la cantidad de
Utilice patatas frescas y asegúrese
de que no se rompen mientras se
fríen.
Asegúrese de secar las tiras de
patata correctamente antes que
añadir el aceite.
aceite y agua
de las patatas.
Page 8

Problema Posible causa Solución
Haga las tiras de patata más
pequeñas para obtener un resultado
más crujiente.
Añada un poco más aceite para
obtener un resultado más crujiente.
Garantía limitada a un año
Philips garantiza que este producto esté libre de defectos en el material,
fabricación y ensamblado, en condiciones normales de uso, de acuerdo con
las especicaciones y las advertencias, por un periodo de un año a partir
de la fecha de compra. Esta garantía solo se extiende para el comprador
original del producto y no es transferible. Para ejercer sus derechos en esta
garantía, debe proporcionar el comprobante que corresponda al recibo
original de la compra, el cual muestra el nombre del producto y la fecha
de la compra. Para servicio al cliente u obtener un servicio de garantía,
visite nuestro sitio web www.philips.com/support. NO HAY OTRAS
GARANTÍAS EXPRESAS O IMPLÍCITAS. La responsabilidad de Philips se
limita a reparar o, a su entero criterio, remplazar el producto. Se deslinda
de los daños accidentales, especiales o resultantes, donde la ley lo permita.
Esta garantía le otorga derechos legales especícos. También tiene otros
derechos que varían dependiendo del estado o provincia.
Fabricado por: Philips Consumer Lifestyle
Una división de Philips Electronics North America Corporation P.O. Casilla
10313, Stamford, CT 06904
Fabricado para: Philips Electronics Ltd
281 Hillmount Road
Markham, ON L6C2S3
Fabricado por:
- Colombia: 01-800-700-7445
- Costa Rica: 0800-507-7445
- Dominican Republic: 1-800-751-2673
- Ecuador: 1-800-10-1045
- El Salvador: 800-6024
- Guatemala: 1-800-299-0007
- Honduras: 8002-791-9273
- Mexico: 01800504 6200
- Nicaragua: 1-800-507-0018
- Panama: 800-8300
FRANÇAIS (CANADA)
MISES EN GARDE
IMPORTANTES
Quand vous utilisez un produit électrique, suivez toujours les mesures de
sécurité fondamentales, notamment ce qui suit :
1 Lisez toutes les instructions.
2 Ne touchez pas les surfaces chaudes, mais servez-vous des poignées
ou boutons.
3 Pour prévenir les risques de chocs électriques, ne plongez pas le
cordon, les prises, ni l’appareil dans l’eau, ni dans aucun autre liquide.
4 Exercez toujours une surveillance étroite lorsque l’appareil est utilisé
par des enfants ou en leur présence.
5 Assurez-vous de toujours débrancher l’appareil lorsque vous ne
l’utilisez pas et avant de le nettoyer. Laissez-le refroidir avant d’y mettre
des objets ou d’en retirer.
6 Cessez d’utiliser l’appareil si son cordon d’alimentation ou toute autre
partie venait à être endommagé ou si vous veniez à constater un
dysfonctionnement quel qu’il soit. Pour obtenir de l’aide, rendez-vous
sur le site www.philips.com/support ou aux États-Unis et au Canada
seulement, composez le 1-866-309-8817.
7 N’utilisez aucun accessoire non recommandé par le fabricant de
l’appareil sous peine de risquer des blessures.
8 N’obstruez aucune prise de ventilation. Installez l’appareil en
conformité avec les instructions du fabricant.
9 N’utilisez pas cet appareil à l’extérieur.
10 Ne laissez pas le cordon d’alimentation dépasser du bord de la table
ou du comptoir sur lequel l’appareil est posé, ni entrer en contact avec
des surfaces chaudes.
11 Ne placez pas l’appareil sur ou à proximité d’un brûleur à gaz ou
électrique, ni sur un four chaud.
12 Faites preuve d’extrême prudence lorsque vous déplacez un appareil
contenant de l’huile chaude ou d’autres liquides chauds.
13 Branchez le cordon d’alimentation sur une prise murale. Pour le
débrancher, réglez tous les boutons sur la position d’arrêt, puis retirez
la che de la prise.
14 Faites preuve d’extrême prudence lorsque vous retirez la cuve et le
panier pour éliminer l’huile chaude.
15 Ne vous servez pas de tampons à récurer métalliques pour le
nettoyage, car vous risqueriez de briser des pièces et de créer des
risques de choc électrique si vous endommagez les composants.
16 Branchez cet appareil uniquement sur une prise correctement mise
à la terre.
17 Le cordon d’alimentation à utiliser doit être court (ou amovible)
pour éviter qu’il ne s’emmêle ou qu’il ne puisse être accroché
involontairement.
18 Vous pouvez toutefois utilisez des rallonges en redoublant de vigilance.
Si vous souhaitez utiliser une rallonge vériez les points suivants :
Les caractéristiques électriques du cordon d’alimentation doivent être
aussi élevées que celles de l’appareil.
La rallonge doit être disposée de façon à ne pas reposer au bord
d’une table ou d’un comptoir car un enfant pourrait alors facilement
l’attraper ou quelqu’un pourrait se prendre les pieds dedans.
19 Cet appareil possède une che polarisée (une lame est plus grosse
que l’autre). An de réduire les risques d’électrocution, cette che ne
peut être insérée que d’une seule façon dans une prise polarisée. Si la
che ne s’adapte pas parfaitement à la prise, essayez dans l’autre sens.
S’il est impossible d’insérer la che correctement, communiquez avec
un électricien. Ne tentez en aucun cas de la modier par vous-même.
20 N’insérez ni aliment trop gros ni ustensile en métal dans l’appareil
car vous risqueriez de provoquer un incendie ou un risque de choc
électrique.
21 Un incendie pourrait se déclarer si l’appareil est en contact avec des
matériaux inammables tels que des rideaux, des tentures ou un mur
pendant qu’il fonctionne. Ne posez aucun objet sur l’appareil en cours
d’utilisation.
22 Ne mettez aucun objet en papier, en carton, en plastique ou matière
similaire dans l’appareil.
CONSERVEZ CES
CONSIGNES
La consommation de viande, de volaille, de poissons, de fruits de mer, de
crustacés ou d’œufs crus ou pas assez cuits peut augmenter le risque de
maladies d’origine alimentaire.
Introduction
Félicitations pour votre achat et bienvenue dans l’univers Philips! Pour
proter pleinement du soutien de Philips, enregistrez votre produit sur le
site : www.philips.com/welcome.
Votre nouvelle friteuse AirFryer vous permet de préparer vos plats et
en-cas préférés de façon plus saine.
La friteuse AirFryer utilise de l’air chaud qui circule rapidement grâce à la
technologie Rapid Air et est équipée d’une grille supérieure pour préparer
une foule de plats savoureux d’une manière saine, rapide et facile. Les
aliments sont cuits uniformément en une seule fois et il n’est pas nécessaire
d’ajouter de l’huile pour cuire la plupart d’entre eux.
Description générale (fig. 1)
1 Panier
2 Bouton de déverrouillage du panier
3 Poignée du panier
4 Cuve
5 Entrée d’air
6 Thermostat (180-390 °F / 80-200 °C)
7 Minuteur (0 à 30 min) et bouton de mise en marche
8 Voyant de mise en marche
9 Sorties d’air
10 Compartiment de rangement du cordon
11 Câble d’alimentation
Avant la première utilisation
1 Retirez l’appareil de l’emballage.
2 Retirez tous les autocollants et étiquettes de l’appareil.
3 Nettoyez soigneusement le panier et la cuve avec de l’eau chaude, du
liquide vaisselle et une éponge non abrasive.
Remarque : Vous pouvez également nettoyer ces pièces au lave-vaisselle.
4 Essuyez l’extérieur et l’intérieur de l’appareil à l’aide d’un chiffon
humide.
Page 9

Cette friteuse AirFryer fonctionne avec de l’air chaud. Ne remplissez pas
la cuve d’huile ni de graisse à friture.
Avant l’utilisation
1 Posez l’appareil sur une surface horizontale, plane et stable.
Ne posez pas l’appareil sur une surface qui ne résiste pas à la chaleur.
2 Placez le panier correctement dans la cuve (g. 2).
3 Retirez le cordon d’alimentation du compartiment de rangement à
l’arrière de l’appareil.
Ne remplissez pas la cuve d’huile ni d’aucun autre liquide.
Ne posez aucun objet sur le dessus de l’appareil, an d’éviter d’entraver la
circulation de l’air et de garantir un résultat de friture à l’air chaud optimal.
Utilisation de l’appareil
La friteuse AirFryer permet de préparer une grande variété d’aliments.
Le livret de recettes inclus vous aide à mieux connaître l’appareil.
Friture à l’air chaud
1 Branchez la che d’alimentation sur une prise murale mise à la terre.
2 Retirez soigneusement la cuve de la friteuse AirFryer (g. 3).
3 Mettez les aliments dans le panier (g. 4).
Remarque : Ne remplissez jamais le panier au-dessus de la mention MAX et ne
dépassez pas la quantité indiquée dans le tableau de la section «Réglages» de
ce chapitre, car cela peut nuire à la qualité de friture.
4 Remettez la cuve dans la friteuse AirFryer (g. 5).
N’utilisez jamais la cuve sans le panier à l’intérieur.
Attention : Ne touchez pas la cuve pendant que l’appareil fonctionne ou
refroidit, car elle est très chaude. Tenez-la uniquement par la poignée du panier.
5 Tournez le bouton du thermostat en sens horaire jusqu’à sélectionner
la température requise. Reportez-vous à la section «Réglages» de ce
chapitre pour déterminer la température appropriée (g. 6).
Remarque : Si vous souhaitez faire cuire plusieurs aliments en même temps,
pensez à bien vérier les temps et les températures de cuisson de chacun
d’entre eux au préalable. Par exemple, les frites maison et les pilons de poulet
peuvent être cuits en même temps car ils font appel aux mêmes réglages.
6 Déterminez le temps de cuisson nécessaire (voir la section
«Réglages» de ce chapitre).
7 Pour allumer l’appareil, réglez le minuteur sur le temps de cuisson
requis (g. 7).
Ajoutez 3 minutes au temps de cuisson si l’appareil est froid.
Remarque : Si vous le souhaitez, vous pouvez préchauffer l’appareil à vide.
Dans ce cas, réglez le minuteur sur plus de 3 minutes. Déposez ensuite des
aliments dans le panier et réglez à nouveau le minuteur sur le temps de
cuisson requis.
, Le voyant d’alimentation s’allume (g. 8).
, Le minuteur commence le compte à rebours à partir du temps que
vous avez programmé.
, L’excédent d’huile est recueilli au fond de la cuve.
8 Certains aliments doivent être mélangés à mi-cuisson (voir la section
«Réglages» de ce chapitre). Pour cela, sortez la cuve de la friteuse
AirFryer par la poignée et secouez-la. Remettez-la ensuite dans la
friteuse (g. 9).
Attention : N’appuyez pas sur le bouton de déverrouillage du panier
pendant que vous secouez la cuve (g. 10).
Suggestion : Si la cuve est trop lourde, vous pouvez enlever le panier de la cuve
et secouez le panier uniquement. Pour cela, sortez la cuve de l’appareil, puis
posez-la sur une surface résistant à la chaleur et appuyez sur le bouton de
déverrouillage du panier.
Suggestion : Vous pouvez régler le minuteur sur la moitié du temps de cuisson
an qu’un signal sonore vous indique à quel moment mélanger les aliments.
Cependant, vous devrez ensuite régler de nouveau le minuteur sur la moitié du
temps de cuisson.
9 Lorsque vous entendez le signal sonore, la cuisson est terminée. Sortez
la cuve de la friteuse et posez-la sur une surface résistant à la chaleur.
Remarque : Vous pouvez également éteindre l’appareil manuellement en réglant
le minuteur sur 0 (g. 11).
10 Vériez que les aliments sont cuits.
Si les aliments ne sont pas cuits, remettez la cuve dans la friteuse et réglez le
minuteur pour quelques minutes supplémentaires.
11 Pour sortir de petits aliments, comme les frites, appuyez sur le
bouton de déverrouillage du panier (1) et retirez le panier de la
cuve (2). (g. 12)
Ne retournez pas le panier lorsqu’il est encore xé à la cuve, car
l’excédent d’huile recueilli au fond de la cuve coulerait sur les aliments.
Une fois la cuisson terminée, la cuve et les aliments sont chauds. Selon
le type d’aliments cuits dans la friteuse AirFryer, de la vapeur peut
s’échapper de la cuve.
12 Videz le panier dans un bol ou un plat. (g. 13)
Suggestion : Pour sortir du panier les aliments épais ou fragiles, utilisez des
pinces (g. 14).
13 Lorsqu’un panier d’aliments est cuit, vous pouvez immédiatement en
faire cuire un autre dans la friteuse AirFryer.
Réglages
Le tableau ci-dessous vous aide à choisir les réglages de base pour certains
aliments.
Remarque : N’oubliez pas que ces réglages sont donnés à titre d’indication.
Étant donné que les aliments n’ont pas tous la même origine, la même taille
ou la même forme et qu’ils sont de marques différentes, nous ne pouvons pas
garantir le meilleur réglage pour leur cuisson.
Étant donné que la technologie Rapid Air réchauffe instantanément l’air
dans la friteuse, le fait de sortir brièvement la cuve de la friteuse pendant la
cuisson a des conséquences sur la friture à l’air chaud.
Suggestions
- Les petits aliments nécessitent généralement un temps de cuisson plus
court que celui des aliments plus gros.
- Une plus grande quantité d’aliments nécessite un temps de cuisson
légèrement plus long et une plus petite quantité d’aliments nécessite un
temps de cuisson légèrement plus court.
- Le fait de mélanger les petits aliments à mi-cuisson permet d’obtenir un
meilleur résultat nal et de s’assurer qu’ils sont frits de manière uniforme.
- Avant de faire cuire des pommes de terre crues dans la friteuse
AirFryer, ajoutez-y quelques gouttes d’huile pour qu’elles croustillent.
- Ne cuisez pas des aliments trop gras comme les saucisses dans la
friteuse AirFryer.
- Les en-cas qui peuvent être cuits au four peuvent également être cuits
dans la friteuse AirFryer.
- La quantité idéale pour obtenir des frites croustillantes est de
450 grammes (1 livre).
- Utilisez de la pâte toute prête pour préparer rapidement et facilement
des amuse-gueules fourrés. De plus, la pâte toute prête nécessite un
temps de cuisson moins long que la pâte maison.
- Vous pouvez également utiliser la friteuse AirFryer pour réchauffer des
aliments. Pour cela, réglez la température sur 150 °C (300 °F) et le
temps de cuisson sur 10 minutes au maximum.
- Vériez que les aliments cuits dans cet appareil ont une teinte
légèrement ou moyennement brune et non pas une couleur brune
très foncée. Retirez les résidus de nourriture brûlée. Ne faites pas frire
de pommes de terre crues à une température supérieure à 180 °C
(356 °F) de façon à limiter la synthèse d’acrylamide.
Quantité
min.-max.
(oz/g)
Temps
(min)
Température
(°F/°C)
Mélanger
Renseignements
supplémentaires
Pommes
de terre
et frites
Frites
surgelées
10 a 25 /
300-700
12 à 16 390/200 Mélan-
ger
minces
Frites
surgelées
10 a 25 /
300-700
12 à 20 390/200 Mélan-
ger
épaisses
Frites
maison
(1/4 po /
8x8 mm)
10 a 25 /
300-800
18 à 25 355/180 Mélan-
ger
ajouter ½ cuillère à soupe
d’huile pour
préparer les
frites
Page 10

Pommes
de
terre en
quartiers,
maison
Quantité
min.-max.
(oz/g)
10 a 25 /
300-800
Temps
(min)
Température
(°F/°C)
Mélanger
18 à 22 355/180 Mélan-
ger
Renseignements
supplémentaires
ajouter ½ cuillère à soupe
d’huile aux
quartiers de
pommes de
terre
Pommes
de terre
en cubes,
maison
10 a 25 /
300-700
12 à 18 355/180 Mélan-
ger
ajouter
½ cuillère à
soupe d’huile
aux cubes de
pommes de
terre
Viande
et
volaille
Steak 4 a 18 /
8 à 12 355/180
100-500
Côtelettes
de porc
Hamburger
Ailes de
poulet
Pilons de
poulet
Poitrine de
poulet
4 a 18 /
100-500
4 a 18 /
100-500
4 a 18 /
100-500
4 a 18 /
100-500
4 a 18 /
100-500
10 à 14 355/180
7 à 14 355/180
13 à 15 355/180
18 à 22 355/180
10 à 15 355/180
En-cas
Rondelles
d’oignon
10 a 25 /
300-700
12 à 16 390/200 Mélan-
ger
Utiliser des
aliments prêts à
cuire au four
Croquettes
de poulet
4 a 18 /
100-500
6 à 10 390/200 Mélan-
ger
Utiliser des
aliments prêts à
cuire au four
surgelées
Bâtonnets
de poisson
congelés
Bâtonnets au
fromage
4 a 16 /
100-400
4 a 16 /
100-400
6 à 10 390/200 Utiliser des
aliments prêts à
cuire au four
8 à 10 355/180 Utiliser des
aliments prêts à
cuire au four
congelés
Mélange
de
4 a 16 /
100-400
10 320/160
légumes
Remarque : Ajoutez 3 minutes au temps de cuisson si vous mettez des aliments
à frire alors que la friteuse AirFryer n’est pas chaude.
Cuisson des frites maison
Pour obtenir des résultats optimaux, nous vous conseillons d’utiliser des
frites précuites (surgelées, par exemple). Pour préparer des frites maison,
suivez les étapes ci-dessous.
1 Épluchez les pommes de terre et coupez-les en bâtonnets.
2 Faites tremper les bâtonnets de pommes de terre dans un bol rempli
d’eau pendant au moins 30 minutes, puis séchez-les avec de l’essuie-tout.
3 Versez ½ cuillère à soupe d’huile d’olive dans un bol, puis ajoutez-y
les pommes de terre coupées et mélangez jusqu’à ce qu’elles soient
enrobées d’huile.
4 Sortez les pommes de terre du bol avec les mains ou un ustensile,
de façon à ce que l’excès d’huile reste dans le bol. Mettez-les ensuite
dans le panier.
Remarque : Ne versez pas directement les pommes de terre dans le panier an
d’éviter qu’une trop grande quantité d’huile soit recueillie au fond de la cuve
pendant la cuisson.
5 Faites cuire les frites selon les instructions fournies dans ce chapitre.
Nettoyage
Nettoyez l’appareil après chaque utilisation. Retirez l’huile du fond de la cuve
après chaque utilisation pour éviter la formation de fumée.
Laissez le panier, la cuve et l’intérieur de l’appareil refroidir complètement
avant de les nettoyer. La cuve, le panier et l’intérieur de l’appareil ont
un revêtement antiadhésif. N’utilisez pas d’ustensiles métalliques ou
de produits abrasifs pour les nettoyer an d’éviter d’endommager ce
revêtement.
1 Débranchez l’appareil de la prise murale, réglez le minuteur sur 0 et
laissez l’appareil refroidir.
Remarque : Retirez la cuve pour que la friteuse AirFryer refroidisse plus rapidement.
2 Essuyez l’extérieur de l’appareil à l’aide d’un chiffon humide.
3 Nettoyez la cuve et le panier avec de l’eau chaude, du liquide vaisselle
et une éponge non abrasive.
Vous pouvez utiliser un produit dégraissant pour éliminer les résidus
restants.
Remarque : La cuve et le panier sont lavables au lave-vaisselle.
Suggestion : Si des détritus restent collés au panier ou au fond de la cuve,
remplissez cette dernière d’un mélange d’eau chaude et de liquide vaisselle,
puis insérez le panier à l’intérieur et laissez tremper une dizaine de minutes.
4 Nettoyez l’intérieur de l’appareil avec de l’eau chaude et une éponge
non abrasive.
5 Si nécessaire, frottez l’élément chauffant avec une brosse de nettoyage
pour éliminer les restes de nourriture.
Entreposage
1 Débranchez l’appareil et laissez-le refroidir.
2 Assurez-vous que toutes les parties sont propres et sèches.
3 Rangez le cordon d’alimentation dans son compartiment et insérez-le
dans la fente.
Environnement
- Ne jetez pas l’appareil avec les ordures ménagères à la n de sa vie
utile; déposez-le plutôt dans un point de collecte de recyclage. Vous
contribuerez ainsi à la protection de l’environnement (g. 15).
Garantie et service
Si vous souhaitez obtenir des informations supplémentaires ou faire réparer
l’appareil, ou si vous rencontrez un problème, visitez le site Web de Philips
à l’adresse www.philips.com/support ou aux États-Unis et au Canada
seulement composez le 1 866 309-8817 pour obtenir de l’aide.
Dépannage
Ce chapitre présente les problèmes les plus courants pouvant survenir avec
votre appareil. Si vous ne parvenez pas à résoudre le problème à l’aide des
renseignements ci-dessous, visitez notre site Web www.philips.com/support
ou aux États-Unis et au Canada seulement composez le 1 866 309-8817
pour obtenir de l’aide.
Problème Cause possible Solution
La friteuse
AirFryer ne
L’appareil n’est
pas branché.
Branchez la che d’alimentation sur
une prise murale mise à la terre.
fonctionne pas.
Vous n’avez pas
réglé le minuteur.
Réglez le minuteur sur le temps
de cuisson approprié pour mettre
l’appareil en marche.
Les aliments
frits avec
la friteuse
AirFryer ne
La quantité
d’aliments dans
le panier est trop
grande.
Mettez moins d’aliments dans le
panier an qu’ils cuisent de manière
plus uniforme.
sont pas assez
cuits.
La température
sélectionnée est
trop basse.
Réglez le thermostat sur la
température appropriée (voir la
section «Réglages» du chapitre
«Utilisation de l’appareil»).
Le temps de
cuisson n’est pas
assez long.
Réglez le minuteur sur le temps
de cuisson requis (voir la section
«Réglages» du chapitre «Utilisation
de l’appareil»).
Page 11

Problème Cause possible Solution
Les aliments ne
sont pas frits
de manière
uniforme.
Il peut être
nécessaire de
mélanger la
préparation à
mi-cuisson pour
certains types
Pour une cuisson optimale de
certains aliments comme les frites,
vous devez les mélanger à micuisson. Reportez-vous à la section
«Réglages» du chapitre «Utilisation
de l’appareil».
d’aliments.
Les aliments
frits ne sont
pas croustillants
après avoir
été cuits dans
la friteuse
Vous avez
utilisé un type
d’ingrédient
devant être cuit
dans une friteuse
traditionnelle.
Utilisez des aliments permettant une
cuisson au four ou badigeonnez-les
d’un peu d’huile pour un résultat
plus croustillant.
AirFryer.
Je n’arrive pas
à glisser la cuve
dans l’appareil
Vous avez mis
trop d’aliments
dans le panier.
Ne remplissez pas le panier au-delà
de l’indication MAX.
correctement.
Le panier
n’est pas placé
correctement
Enfoncez le panier dans la cuve
jusqu’à ce que vous entendiez un
clic.
dans la cuve.
De la fumée
blanche
s’échappe de
l’appareil.
Vous faites frire
des aliments gras.
Lorsque des aliments gras sont cuits
dans la friteuse AirFryer, une grande
quantité d’huile (graisse fondue)
coule dans la cuve. L’huile produit
de la fumée blanche et la cuve peut
être plus chaude que d’habitude.
Ceci n’a aucune conséquence sur le
fonctionnement de l’appareil ou sur
le résultat nal. Vous pouvez vider
avec précaution la cuve à mi-cuisson
an de retirer l’excès d’huile.
La cuve contient
des résidus
de graisse de
l’utilisation
La cuisson d’aliments gras produit
de la fumée blanche. Assurez-vous
de nettoyer correctement la cuve
après chaque utilisation.
précédente.
Les frites
maison ne
sont pas cuites
uniformément
dans la friteuse
AirFryer.
Vous n’avez pas
correctement
fait tremper les
pommes de
terre coupées
avant de les faire
Faites tremper les bâtonnets de
pommes de terre dans un bol
rempli d’eau pendant au moins
30 minutes, puis séchez-les avec de
l’essuie-tout.
frire.
Vous n’avez pas
utilisé la bonne
Utilisez des pommes de terre à
chair ferme.
variété de
pommes de terre.
Les frites
maison ne
sont pas
croustillantes
lorsqu’elles
sortent de
la friteuse
Le croustillant
des frites dépend
de la qualité
d’huile utilisée
et de l’humidité
des pommes de
terre.
Veillez à sécher correctement les
pommes de terre coupées avant
d’ajouter l’huile.
AirFryer.
Coupez les pommes de terre
en plus petits morceaux pour un
résultat plus croustillant.
Ajoutez légèrement plus d’huile
pour un résultat plus croustillant.
EXPRESSE OU IMPLICITE. La responsabilité de Philips se limite à la
réparation ou, à son entière discrétion, au remplacement du produit. Philips
décline toute responsabilité quant aux dommages accidentels, spéciaux ou
induits, lorsque la loi l’autorise. Cette garantie vous donne des droits précis
reconnus par la loi, auxquels peuvent s’ajouter des droits qui varient selon
les États ou les provinces.
Fabriqué pour:
Philips Consumer Lifestyle
Une division de Philips Electronics North America Corporation
P.O. Box 10313, Stamford, CT 06904
États-Unis
Fabriqué pour:
Philips Electronics Ltd / Ltée
281 Hillmount Road
Markham, ON L6C 2S3
Canada
Garantie limitée d’un an
Philips garantit que ce produit sera exempt de défauts de matériaux, de
main-d’œuvre et de fabrication, dans des conditions normales d’utilisation,
conformément aux spécications et aux avertissements, pendant un an à
compter de la date d’achat. La présente garantie s’applique uniquement à
l’acheteur d’origine du produit et n’est pas cessible. Pour exercer vos droits
en vertu de la présente garantie, vous devez fournir une preuve d’achat
sous la forme d’un reçu de caisse original sur lequel gurent le nom du
produit et la date d’achat. Pour communiquer avec le service à la clientèle
ou faire appel au service de garantie, visitez notre site
www.philips.com/support. IL N’EXISTE AUCUNE AUTRE GARANTIE
 Loading...