

Philips HD8944/06, HD8943/16, Xelsis HD8944, Xelsis HD8943 Quick Start Manual
QUICK START GUIDE - 요약 설명서
Before using the machine, please read the instruction manual completely.
Carefully read the safety regulations provided in the instruction manual.
본 커피 머신을 사용하기 전에, 사용 설명서를 꼼꼼히 읽으십시오.
사용 설명서에 기술된 안전 규정을 주의 깊게 읽으십시오.
The man ufacturer reser ves the r ight to make cha nges w ithou t prio r notic e.
필립스 Saeco는 사전 공지 없이 제품 사양을 변경할 권리가 있습니다.
Type HD8943 / HD8944 - Cod.15002470 - Rev.00 - del 15-03-10
Type HD8943 / HD8944
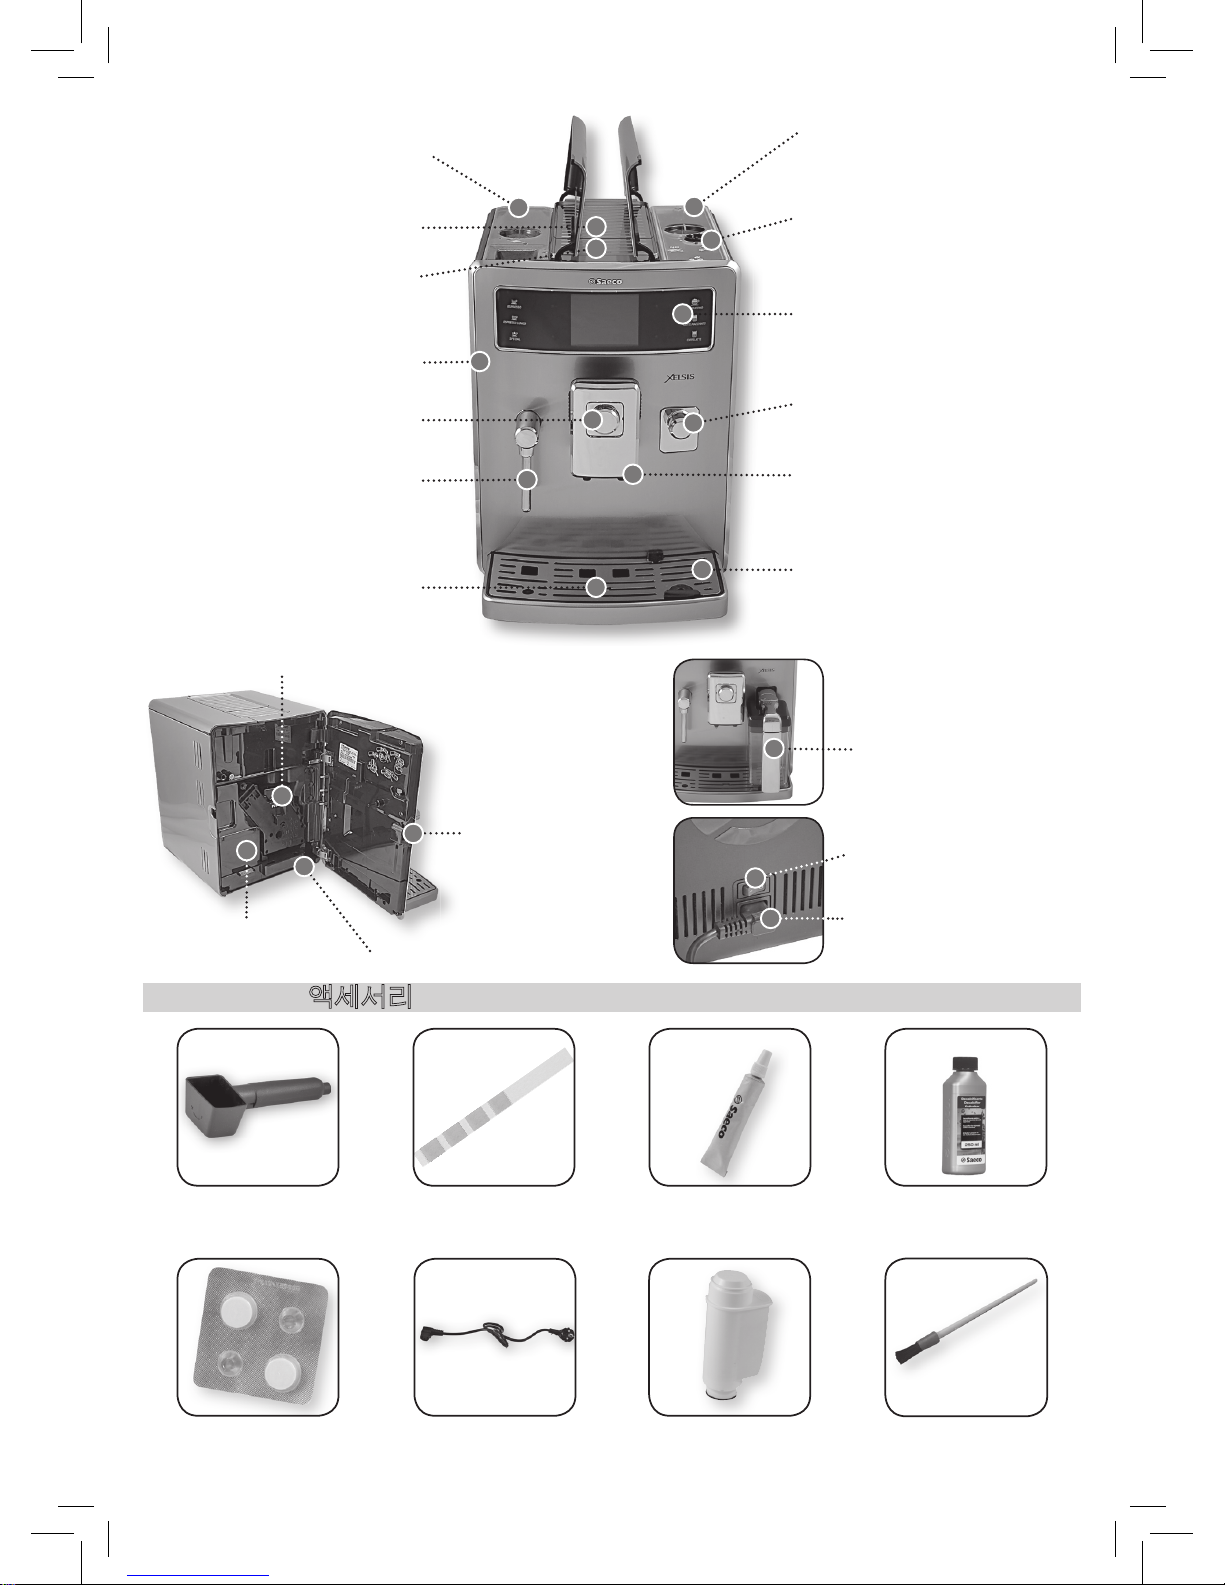
ACCESSORIES 액세서리
Intenza water lter
INTENZA 정수 필터
Cleaning brush
청소용 브러시
Descaling solution
스케일 제거 용액
Brew group lubricant
추출 그룹 윤활유
Power cord
전원 코드
Water hardness tester
물 경도 검사지
Brew group cleaning tablets
추출 그룹 세척제
Pre-ground co ee measuring scoop
분쇄커피용 스푼
Milk carafe
우유통
Door opening button
도어 열림 버튼
Power cord connector
전원 코드 커넥터
Power button
전원 스위치
Water tank
물 탱크
Co ee bean hopper with lid
원두 투입구 + 덮개
Grinder adjustment
분쇄 조절기
Control panel
제어판
Milk carafe connector
우유통 연결부
Dispensing spout
음료 추출구
Drip tray + grill
물받이 + 분리형 잔 받침대
Cup-warming surface
컵 예열판
Pre-ground bypass doser
분쇄 커피 투입구
Service door
서비스 도어
SBS dial
SBS 다이얼
Hot water/steam wand
뜨거운 물/스팀 봉
Full drip tray indicator
물받이 교체시기 표시기
Brew group
추출 그룹
Used grounds drawer
찌꺼기 통
Liquid recovery tray
내부 물받이
4
6
2 31
5
9
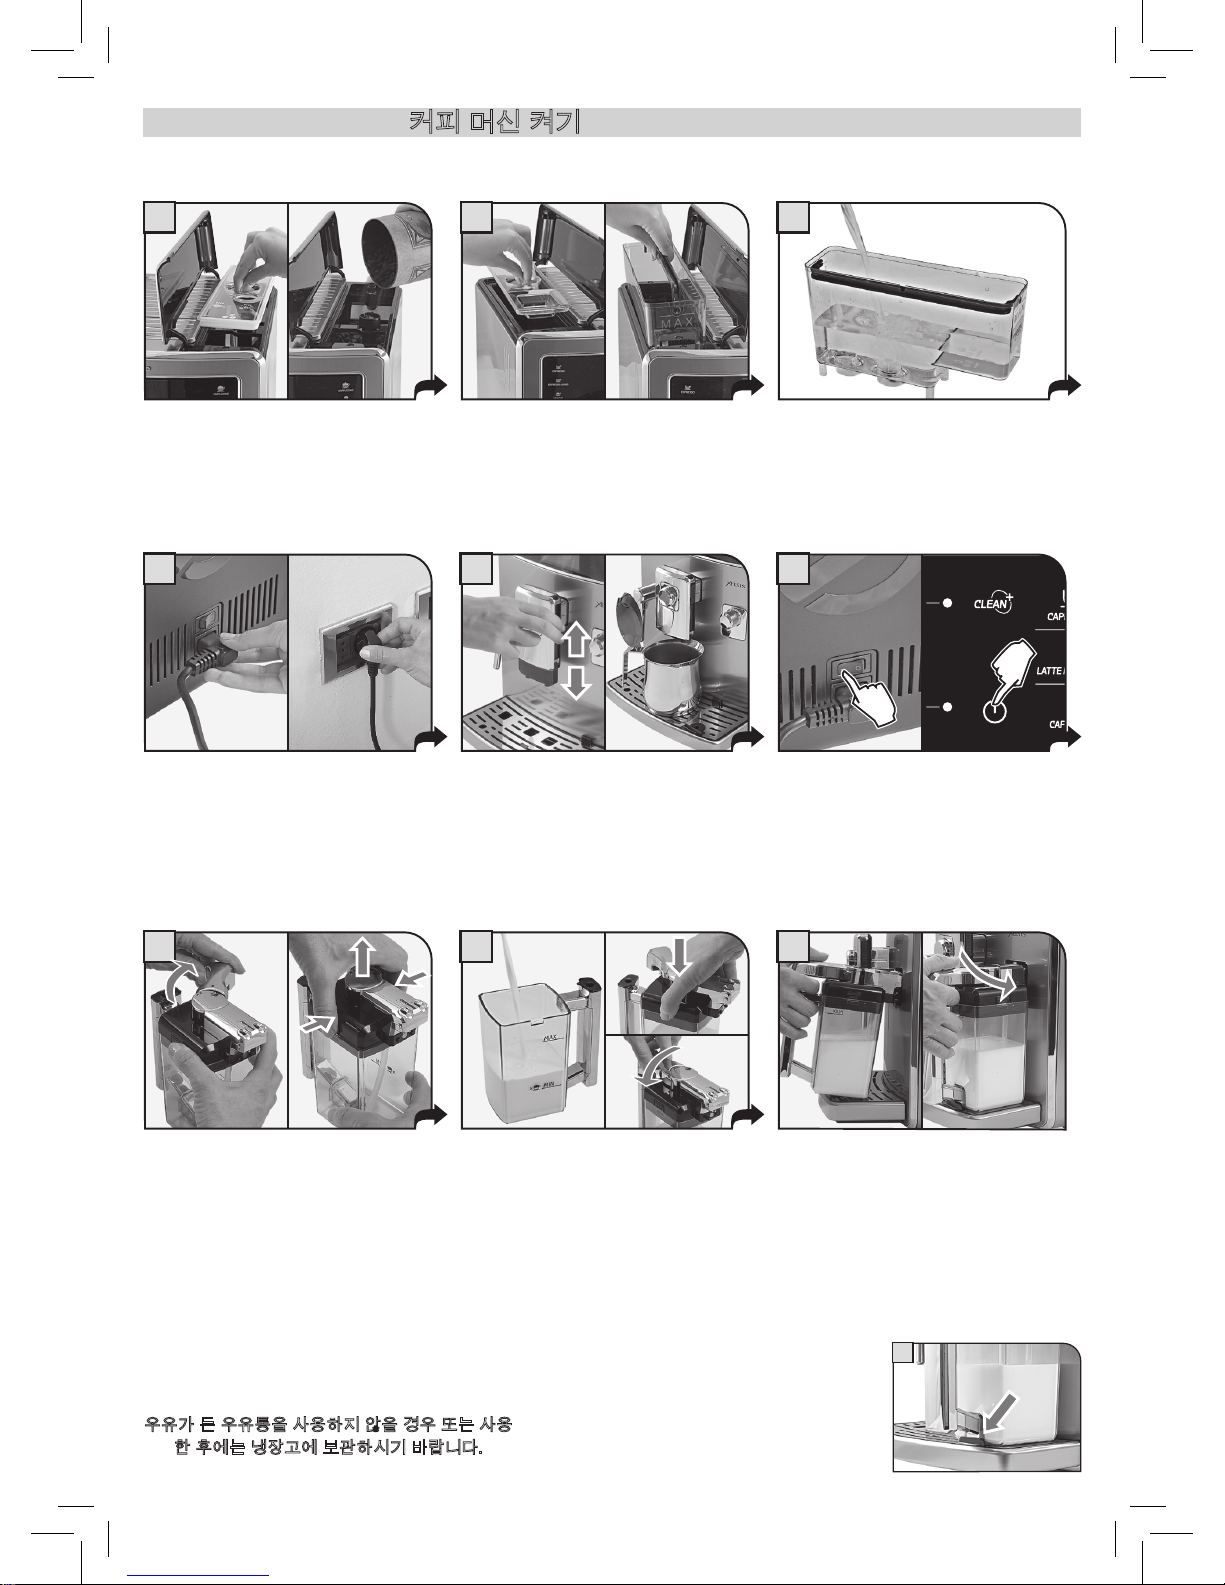
Insert the carafe inclined towards the front. The
carafe base should be positioned on the hole
(E) located on the drip tray. Insert the carafe
by turning it towards the base through a round
movement (as shown in the gure), until it is
hooked to the hole (E) located in the drip tray.
The carafe will be naturally back in place.
7 8
E
우유통을 앞쪽으로 기울여서 장착하십시오. 우유통의 밑부분은 잔 받침대의 잠
금 프레임(E) 위에 위치해야 합니다. 우유통을 원을
그리듯이 아래쪽으로 돌려서 (그림과 같이) 잔 받침
대의 잠금 프레임(E)에 연결되도록 장착하십시오.
우유통이 제자리에 장착됩니다.
Remove the covers. Fill the hopper with
co ee beans, then close the covers.
덮개를 여십시오. 원두 투입구를 커피 원두
로 채운 다음 덮개를 닫으십시오.
Insert the plug into the socket located on the
back of the machine and insert the other end
into a power outlet with suitable current.
커피 머신 뒤편에 있는 전원 코드 커넥터에
플러그를 꽂으시고 다른 한 쪽을 해당 전압
을 공급하는 전원 콘센트에 꽂으십시오.
Adjust the dispensing spout and place a cup
beneath it.
음료 추출구를 조절하고 그 아래에 컵을 놓
으십시오.
Set the power button to the “I” position. Press
the stand-by button to start the machine.
전원 스위치를 “I”로 설정하십시오. 커피 머
신을 켜기 위해 대기 버튼을 누르십시오.
(Only for beverages with milk) Rotate the
handle clockwise and press on the disengage buttons to allow the lid removal.
(우유가 함유된 음료일 경우에만) 핸들을
시계 방향으로 돌린 다음, 뚜껑 부분의 해
제 버튼을 눌러서 뚜껑을 분리하십시오.
Fill the carafe with cold milk. Fill milk to above
the “min” line, but do not exceed the “max”
level indicated on the carafe. Replace the lid.
우유통에 찬 우유를 넣으십시오. 우유통에
표시된 «MIN» 눈금 이상의 우유를 채우되
«MAX» 눈금은 초과하지 마십시오. 뚜껑을
제자리에 놓으십시오.
STARTING THE MACHINE 커피 머신 켜기
Before turning on the machine, make sure that the power button is set to “0”.
커피 머신을 켜기 전에 전원 스위치가 “0”에 설정되어 있는지 확인하십시오.
Remove the covers. Remove the water tank.
덮개를 여십시오. 물 탱크를 분리하십시오.
Fill the tank with fresh drinking water. Do not exceed the “max” level indicated on the water tank.
Place the water tank back into the machine.
물 탱크를 깨끗한 식수로 채우십시오. 물 탱
크에 최고 수위 표시(MAX) 이상의 물을 넣
지 마십시오. 물 탱크를 다시 커피 머신에 장
착시킵니다.
우유가 든 우유통을 사용하지 않을 경우 또는 사용
한 후에는 냉장고에 보관하시기 바랍니다.
When the carafe with milk is not going to be
used, or after using it, store it in the refrigerator.
 Loading...