

Page 1

EnglisH
Русский
Type HD8917, HD8916
Register your product and get support at
www.saeco.com/welcome
HD8917-HD8916_4219_460_2550_2_BOOKLET_A5_bl_FRONTCOVER.indd 1 27/01/16 16:54
Page 2

Page 3

English 5
Русский 38
Page 4

Page 5
ESPRESSO CAPPUCCINO
ESPRESSO LUNGO LATTE MACCHIATO
AROMA STRENGTH MENU
19
20
10
9
2
1
3
4
8
7
6
32
30
16
25
26
27
28
37
38
34
12
13
11
17
33
31
22
5
3635
18
15 14
21
29
23 24
1
Page 6

English
Contents
Introduction 6
Important 6
Warning 6
Caution 7
Electromagnetic fields (EMF) 7
Machine overview 8
The user interface 8
First installation 9
Manual rinsing cycle 12
Hot water circuit rinsing 12
Coffee brewing circuit rinsing 12
AquaClean filter 13
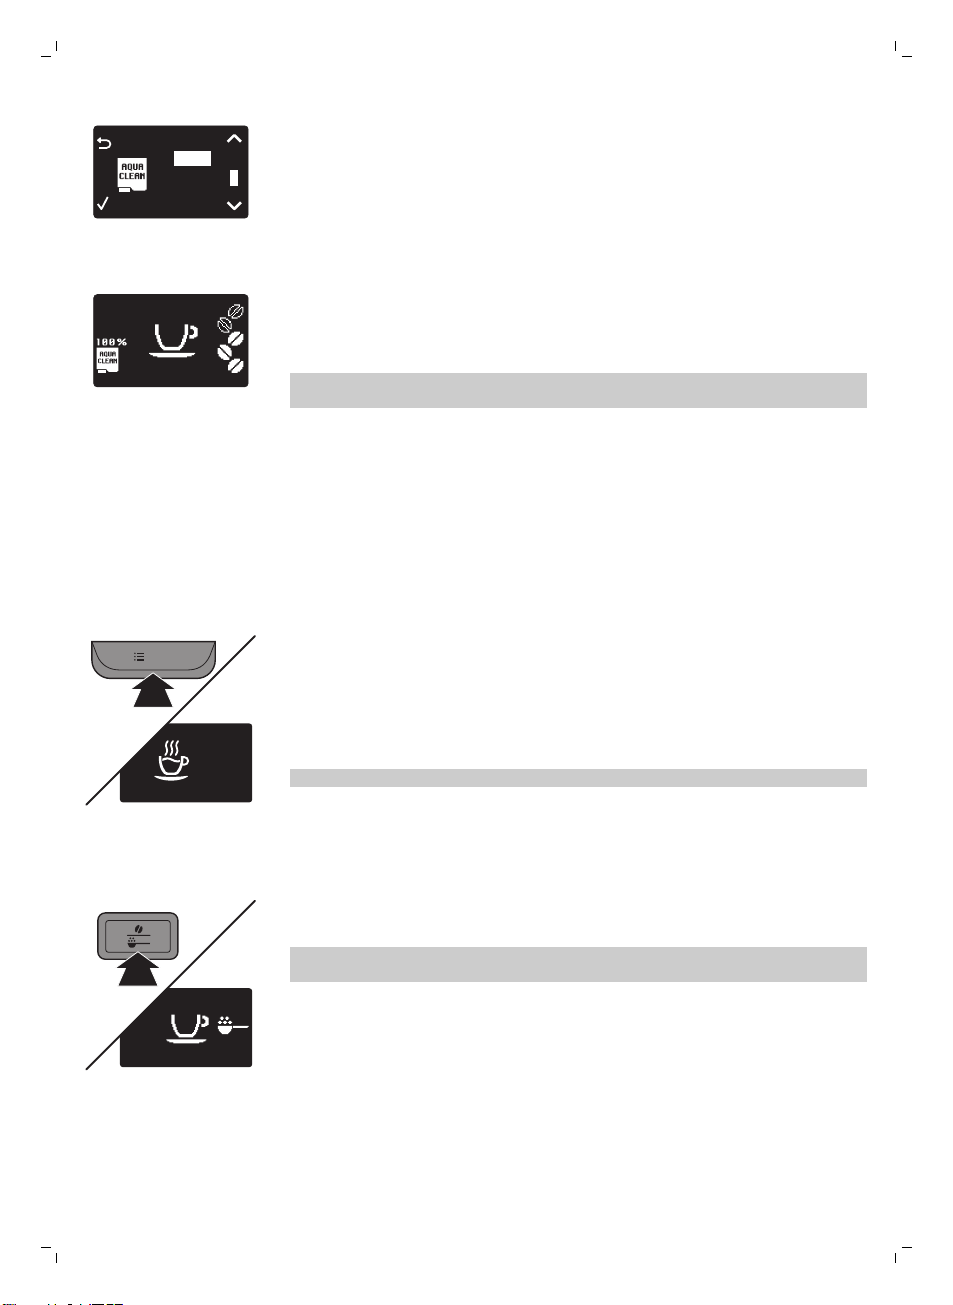
Preparing and installing the AquaClean filter 13
Activating the AquaClean filter 13
Replacing the AquaClean filter 14
Measuring the water hardness 15
Beverage types and lengths 16
Brewing coffee 16
Adjusting the coffee dispensing spout 16
Brewing coffee with beans 17
Brewing 1 cup of coffee 17
Brewing 2 cups of coffee 17
Brewing coffee with pre-ground coffee 17
Brewing milk-based beverages 17
How to use the milk carafe 17
Brewing milk-based coffee beverages and milk froth 18
Special drinks 19
How to select special drinks 19
Dispensing hot water 19
Inserting and removing the hot water dispensing spout 19
Dispensing hot water 19
Adjusting quantity and taste 20
Saeco Adapting System 20
Adjusting coffee and milk length 20
Adjusting coffee strength 20
Adjusting the grinder settings 21
Maintenance and care 21
Cleaning the drip tray and the coffee grounds container 21
Cleaning the brew group 22
Monthly lubrication of the brew group 25
Cleaning the milk carafe 25
Descaling procedure 28
5
English
Page 7

6
English
What to do if the descaling procedure is interrupted 30
Warning icons and error codes 30
Meaning of error codes 31
Troubleshooting 32
Demo mode function 36
Ordering accessories Saeco 36
Technical specifications 36
Recycling 37
Guarantee and support 37
Introduction
Dear customer, we thank you for buying the Saeco Incanto full-automatic
espresso machine!
Coffee is a natural product and its characteristics may vary according to
origin, blend and roasting. The machine is equipped with a self-adjustment
system that allows it to get the best taste out of your favorite coffee beans.
It regulates itself after brewing 10-20 coffees.
In this user manual you find all the information you need to install, use,
maintain and get the best out of your machine. To fully benefit from the
support that Saeco offers, please register your product at
www.philips.com/welcome.
Important
Warning
-
Connect the machine to a wall socket with a voltage matching the
technical specifications of the machine.
-
Connect the machine to an earthed wall socket.
-
Do not let the power cord hang over the edge of a table or counter, or
touch hot surfaces.
-
Never immerse the machine, mains plug or power cord in water (danger
of electrical shock).
-
Do not pour liquids on the power cord connector.
-
Never direct the hot water jet towards body parts: danger of burns.
-
Do not touch hot surfaces. Use handles and knobs.
-
Switch off the machine with the main switch located on the back and
remove the mains plug from the socket:
-
If a malfunction occurs.
-
If the machine will not be used for a long time.
-
Before cleaning the machine.
-
Pull on the plug, not on the power cord.
-
Do not touch the mains plug with wet hands.
-
Do not use the machine if the mains plug, the power cord or the machine
itself is damaged.
Page 8

Caution
English
-
Do not make any modifications to the machine or its power cord.
-
Only have repairs carried out by a service center authorized by Philips to
avoid a hazard.
-
The machine should not be used by children younger than 8 years old.
-
This machine can be used by children aged from 8 years and above and
by persons with reduced physical, sensory or mental capabilities or lack
of experience and knowledge if they have been given supervision or
instruction concerning use of the machine in a safe way and if they
understand the hazards involved.
-
Cleaning and user maintenance shall not be made by children unless
they are older than 8 and supervised.
-
Keep the machine and its cord out of the reach of children aged less than
8 years.
-
Children should be supervised to ensure that they do not play with the
machine.
-
Never insert fingers or other objects in the coffee grinder.
-
This machine is intended for normal household use only. It is not
intended for use in environments such as staff kitchens of shops, offices,
farms or other work environments.
-
Always put the machine on a flat and stable surface. Keep it in upright
position, also during transport.
-
Do not place the machine on a hotplate or directly next to a hot oven,
heater or similar source of heat.
-
Only put roasted coffee beans in the bean hopper. If ground coffee,
instant coffee, raw coffee beans or any other substance is put in the
coffee bean hopper, it may cause damage to the machine.
-
Let the machine cool down before inserting or removing any parts. The
heating surfaces may retain residual heat after use.
-
Never fill the water tank with warm, hot or sparkling water, as this may
cause damage to the water tank and the machine.
-
Never use souring pads, abrasive cleaning agents or aggressive liquids
such as petrol or acetone to clean the machine. Simply use a soft cloth
dampened with water.
-
Descale your machine regularly. The machine indicates when descaling is
needed. Not doing this will make your appliance stop working properly.
In this case repair is not covered under your guarantee.
-
Do not keep the machine at temperatures below 0°C.Water left in the
heating system may freeze and cause damage.
-
Do not leave water in the water tank when the machine is not used over
a long period of time. The water can be contaminated. Use fresh water
every time you use the machine.
7
Electromagnetic fields (EMF)
This Philips appliance complies with all applicable standards and
regulations regarding exposure to electromagnetic fields.
Page 9

ESPRESSO
8
English
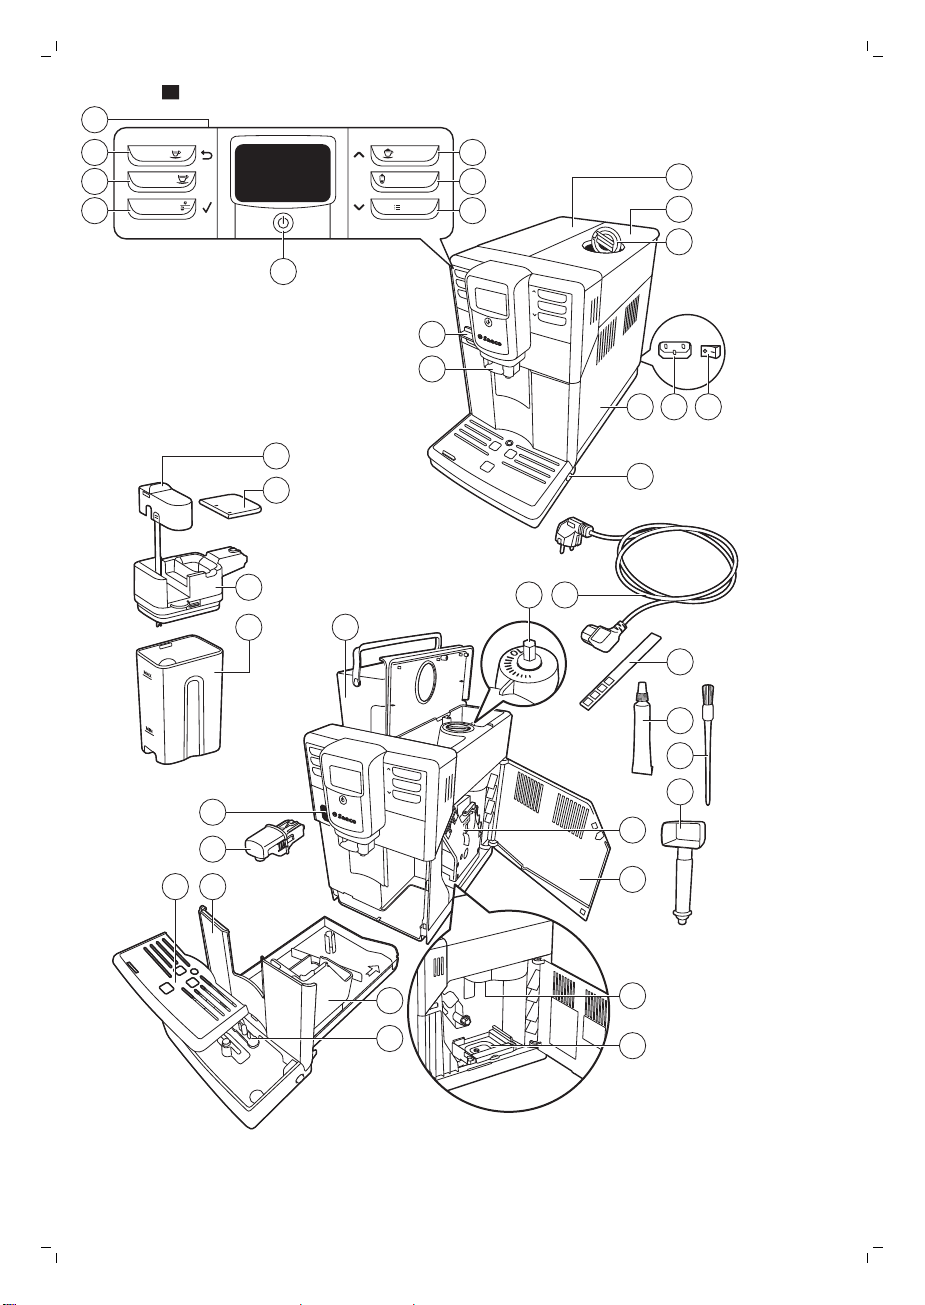
Machine overview
1 User interface
2 ESPRESSO button
3 ESPRESSO LUNGO button
4 AROMA STRENGTH button
5 Standby button
6 MENU button
7 LATTE MACCHIATO button
8 CAPPUCCINO button
9 Protection cover
10 Adjustable coffee dispensing spout
11 Lid of the water tank
12 Lid of the bean hopper
13 Lid of the pre-ground coffee compartment
14 Main switch
15 Socket for cord
16 Service door
17 Drip tray release button
18 Milk froth dispensing spout
19 Lid of the milk carafe
20 Top of the milk carafe
21 Milk carafe
22 Water tank
23 Grinder adjustment knob
24 Cord
25 Water hardness tester
26 Grease
27 Cleaning brush
28 Multifunctional tool (measuring scoop, grinder adjustment key and coffee
duct cleaning tool)
29 Brew group
30 Inside of maintenance door with cleaning instructions
31 Coffee exit duct
32 Coffee residues drawer
33 Drip tray full indicator
34 Coffee grounds container
35 Drip tray cover
36 Drip tray
37 Hot water dispensing spout
38 Opening for hot water dispensing spout
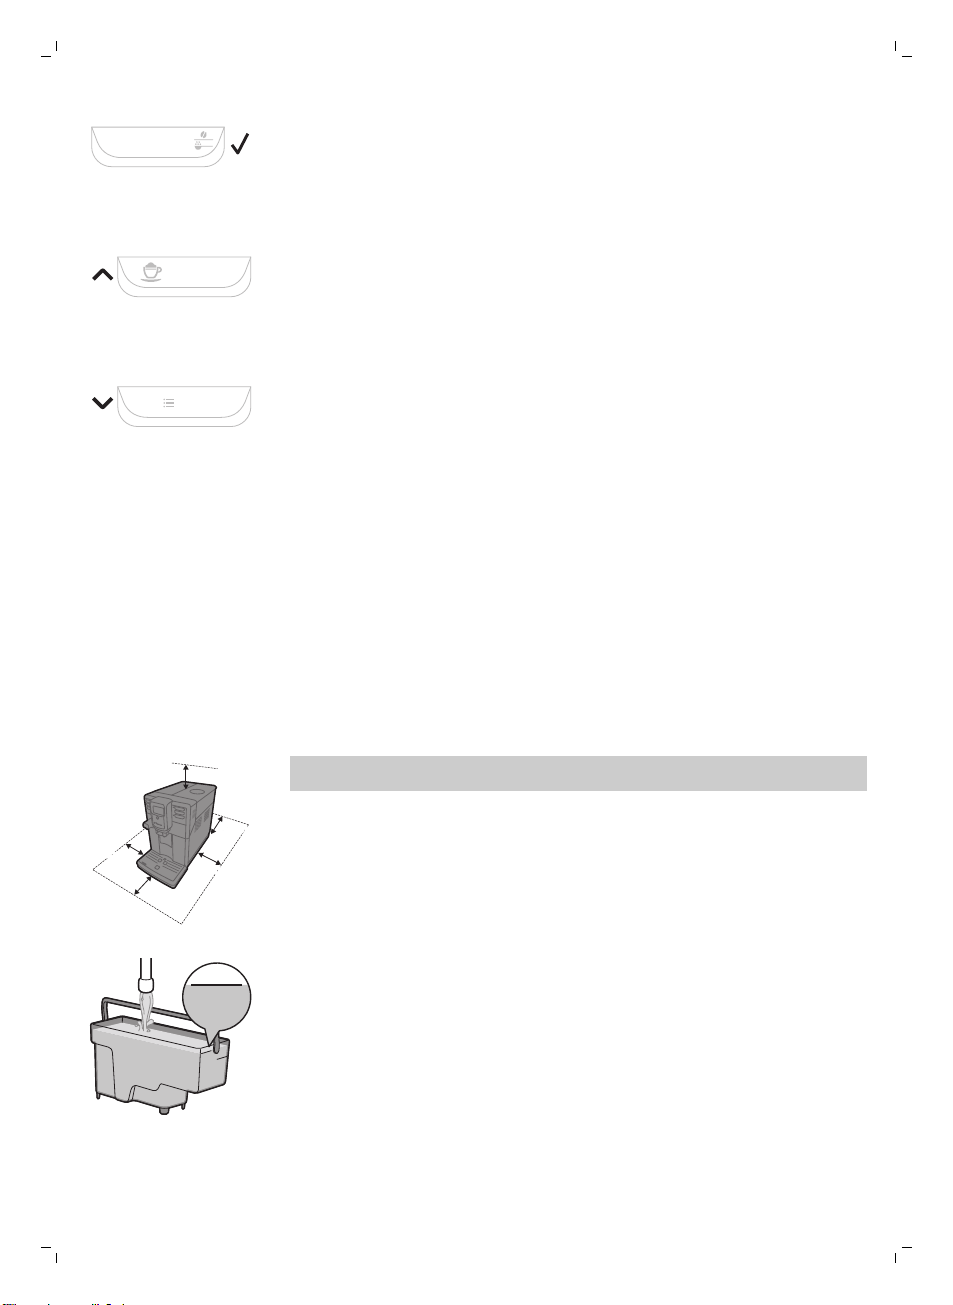
The user interface
Use these buttons to navigate through the menus:
ESPRESSO button=ESC button:press this button to return to the main menu.
Page 10
AROMA STRENGTH
AROMA STRENGTH button=OK button:press this button to select, confirm or
CAPPUCCINO
MENU
15 cm
15 cm
15 cm
15 cm
15 cm
15 cm
15 cm
15 cm
M
AX
CALC
CLEAN
MAX
stop a function.
CAPPUCCINO button=UP button:press this button to scroll up through the
display menu.
MENU button=DOWN button:press this button to scroll down through the
display menu.
First installation
This machine has been tested with coffee. Although it has been carefully
cleaned, there may be some coffee residues left. We guarantee, however,
that the machine is absolutely new. new.Like with most full-automatic
machines, you first need to brew some coffees to enable the machine to
complete its self-adjustment and get the best tasting coffee.
1 Remove all packaging material from the machine.
2 Place the machine on a table or worktop away from the tap, the sink and
heat sources.
Note: Leave at least 15 cm of free space above, behind and on both sides
of the machine.
English
9
3 Fill the water tank with fresh water to the MAX level indication.
Page 11
2
1
10
English
4 Open the lid of the bean hopper. Fill the bean hopper with coffee beans
and close the lid.
Note: Do not overfill the bean hopper to avoid damage to the grinder.
Caution: Only use espresso beans. Never use ground coffee, unroasted
coffee beans or caramelized coffee beans, as this may cause damage
to the machine.
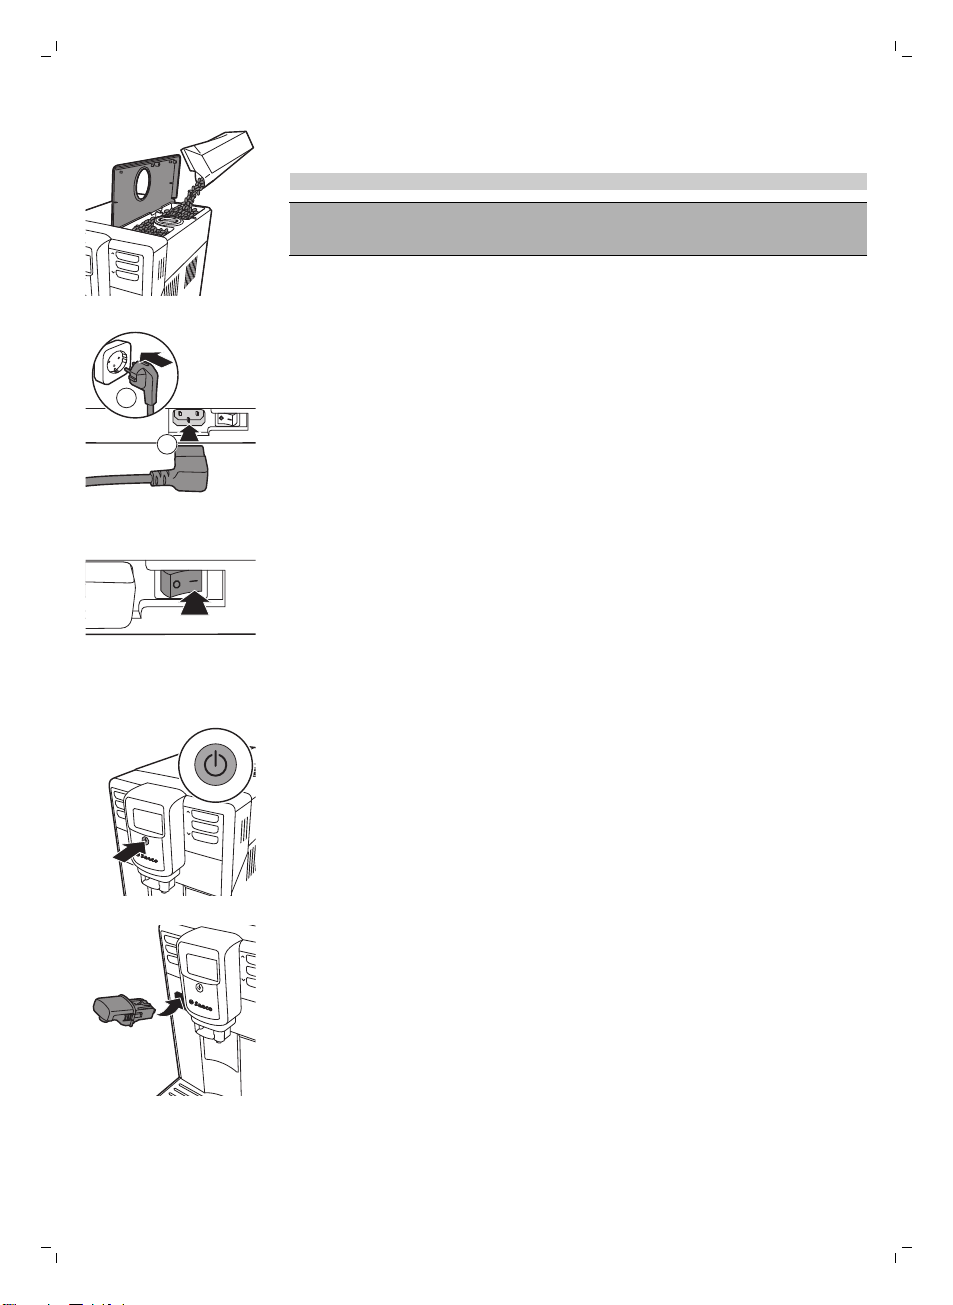
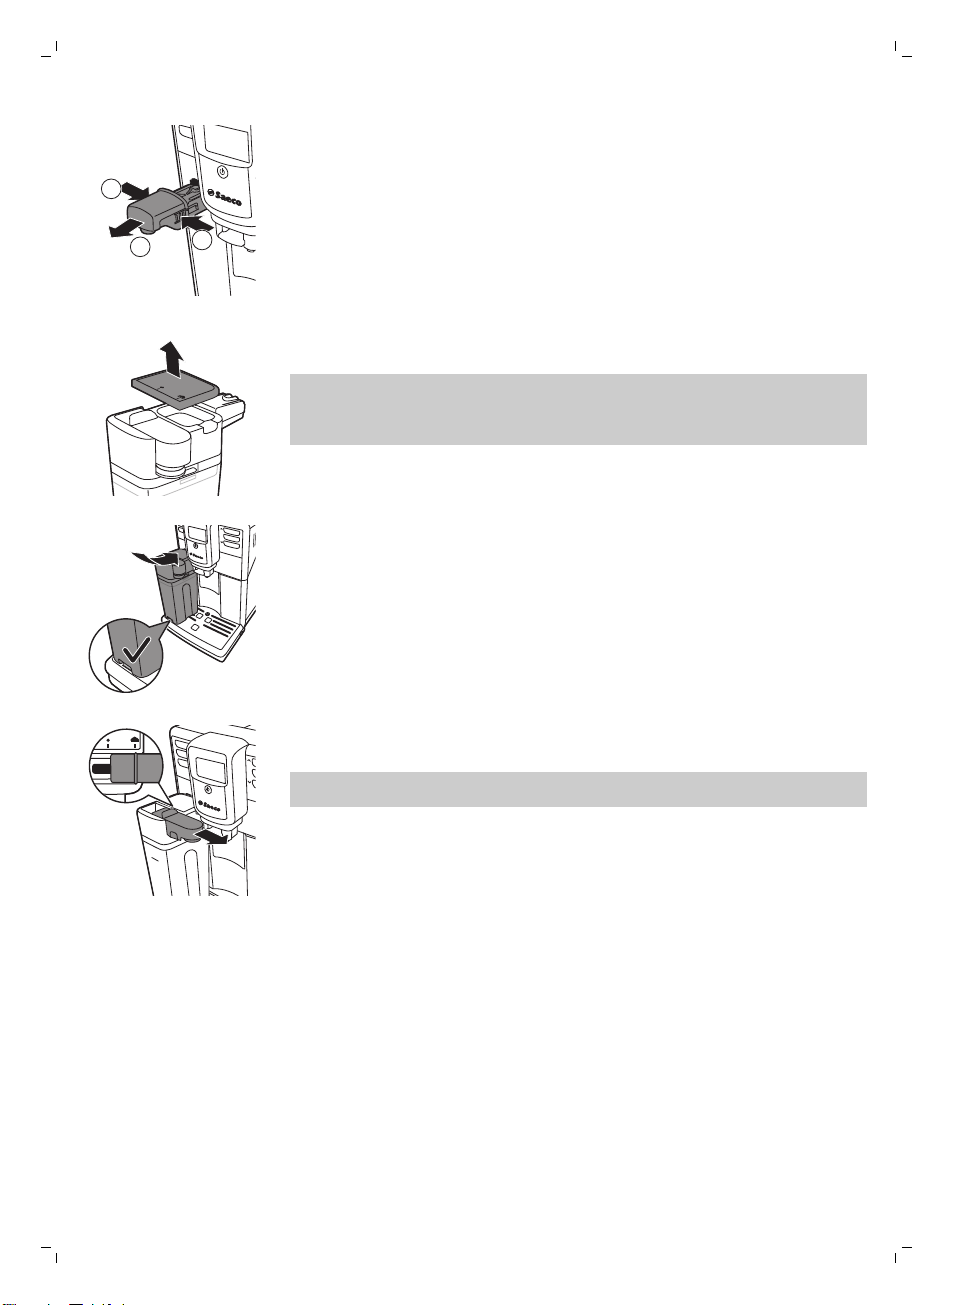
5 Insert mains plug into a wall socket (1) and insert the small plug into the
socket located on the back of the machine (2).
6 Set the main switch to the ON position to switch on the machine.
The standby button flashes.
7 Press the standby button to switch on the machine.
8 Insert the hot water dispensing spout.
Page 12
INSTALL
FILTER
English
-
The display shows the circuit priming icon to indicate that you have to
prime the circuit.
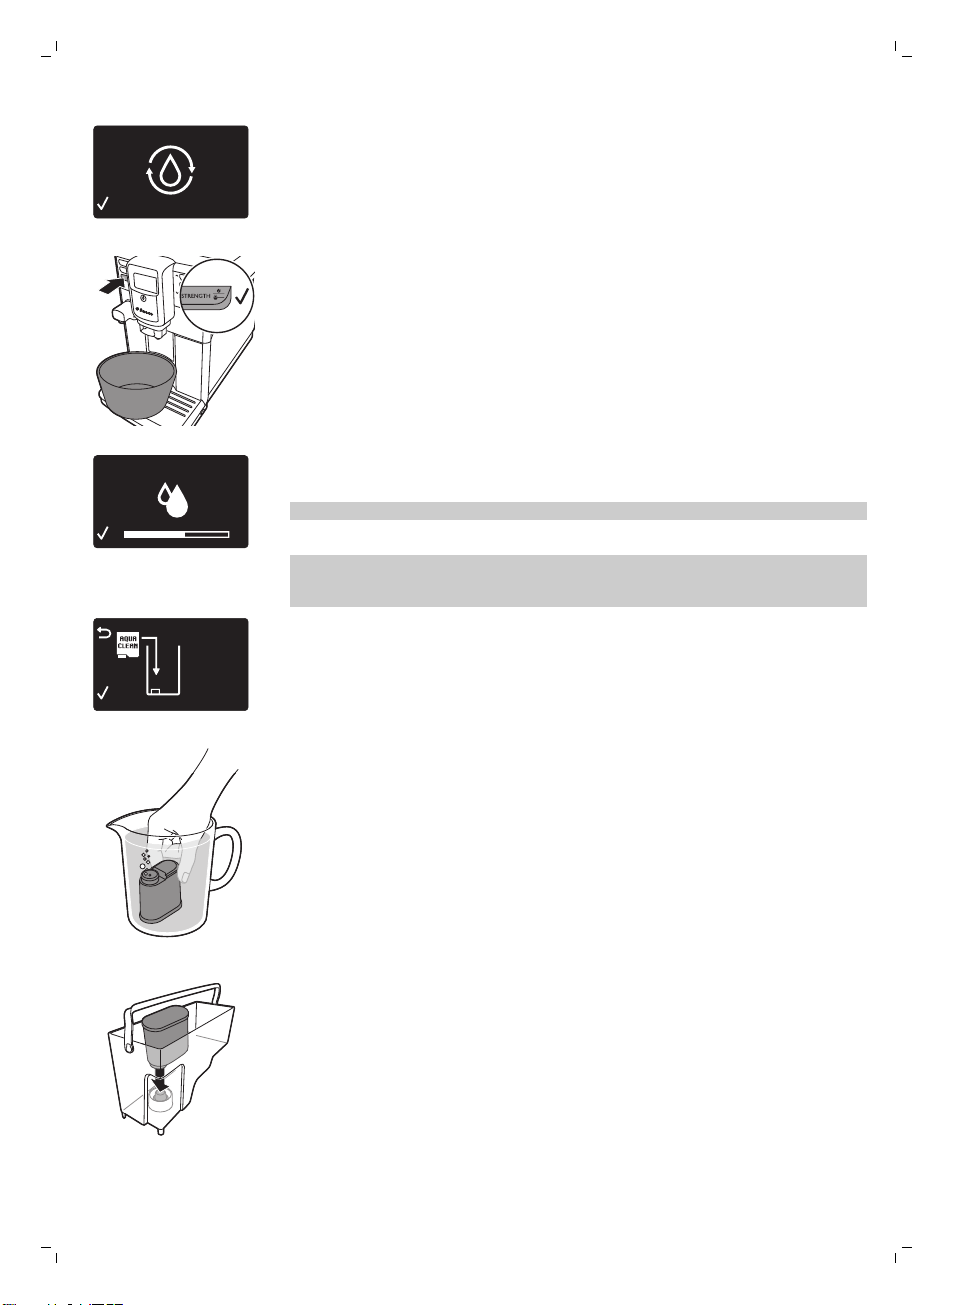
9 Place a container under the hot water dispensing spout. Press the OK
button to start the water circuit priming cycle. The machine reminds you
have to insert the water spout, press the OK button.
-
The machine starts dispensing hot water.
-
The display shows the priming icon. The progress bar shows the
progress of the priming cycle.
10 The machine heats up and the display shows the temperature icon.
11 Empty the container and place it under the coffee dispensing spout.
12 The machine starts rinsing water through the coffee dispensing spout.
The display shows the rinsing icon and a progress bar.
Note: Do not interrupt the rinsing cycle.
13 The display asks: AquaClean filter?
Note:If you want to install the AquaClean filter afterwards, press the ESC
button and continue with the manual rinsing cycle. For installation, see
chapter 'AquaClean filter'.
14 If you want to install the AquaClean filter, press the OK button. Activation
will take 2 minutes.
-
The display reminds you to install the filter.
15 Remove the AquaClean filter from its packaging. Shake the filter for about
5 seconds.
11
16 Immerse the AquaClean filter upside down in a jug with cold water and
wait until no more air bubbles come out.
17 Insert the AquaClean filter vertically onto the filter connection. Push the
AquaClean filter to the lowest possible point. Make sure that the filter fits
tightly and the seal is in the right position, to guarantee the best
performance.
18 Fill the water tank with fresh water to the MAX level indication.
Page 13
0 / 8
OFF
ON
MENU
HOT
WATER
GROUND COFFEE
12
English
19 Select ON on the display and confirm the activation by pressing the OK
button.
-
-
-
20 Dispense 2 cups (0.5 l) of hot water to complete the activation. Discard
this water. To complete the activation you have to perform both the hot
water circuit rinsing and coffee brewing circuit rinsing.
After installing the AquaClean filter, you do not have to perform the manual
rinsing cycle.
Manual rinsing cycle
During the manual rinsing cycle, fresh water flows through the water and
coffee brewing circuit. This takes a few minutes.
Hot water circuit rinsing
1 Insert the hot water dispensing spout (if it is not installed) and place a
container under the hot water dispensing spout.
2 Press the MENU button. Select the DRINKS function, confirm and scroll
the menu to select the HOT WATER function. Press the OK button to
confirm.
-
-
Note: To interrupt the rinsing cycle, press the OK button.
3 When the machine has dispensed 2 cups of hot water (0.5 l) press the OK
button to stop the hot water dispensing. Repeat steps 1 to 3 twice.
When activation is finished, the display shows a tick to confirm
activation.
The machine starts heating up automatically.
Then the machine ready screen appears with the AquaClean 100%
icon to indicate that the filter has been installed.
The display reminds you to install the hot water dispensing spout,
press the OK button to confirm.
The machine starts dispensing hot water.
Coffee brewing circuit rinsing
1 Place a container under the coffee dispensing spout.
2 Press the AROMA STRENGTH button and select the pre-ground coffee
brewing function.
Note: Do not add pre-ground coffee in the pre-ground coffee
compartment.
3 Press the ESPRESSO LUNGO button.
-
The machine starts dispensing water from the coffee dispensing
spout.
4 Wait until the machine stops dispensing water and empty the container.
5 Repeat steps 1 to 4 twice.
6 When the machine has returned to the main menu, empty the
container.The machine is ready for use
Page 14

AquaClean filter
The AquaClean filter is designed to reduce limescale deposits in your coffee
machine and provide filtered water to preserve the aroma and flavor of each
cup of coffee. If you use a series of 8 Aquaclean filters as indicated in this
user manual, you don't have to descale your machine for 5000 cups (with a
capacity of 100 ml).
Note: Your machine has to be completely limescale-free before you start to
use the AquaClean filter. If you did not activate the filter upon first use and
brewed more than 50 cups (with 100 ml capacity), you need to descale the
machine before you activate the filter.
Note: Replace the AquaClean filter when the filter icon starts flashing on the
display. Replace the AquaClean filter at least every 3 months, even if the
machine has not yet indicated that replacement is required.
Preparing and installing the AquaClean filter
1 Remove the AquaClean filter from its packaging. Shake the filter for about
5 seconds.
2 Immerse the AquaClean filter upside down in a jug with cold water and
wait until no more air bubbles come out.
English
13
3 Insert the AquaClean filter vertically onto the filter connection. Push the
AquaClean filter to the lowest possible point. Make sure that the filter fits
tightly and the seal is in the right position, to guarantee the best
performance.
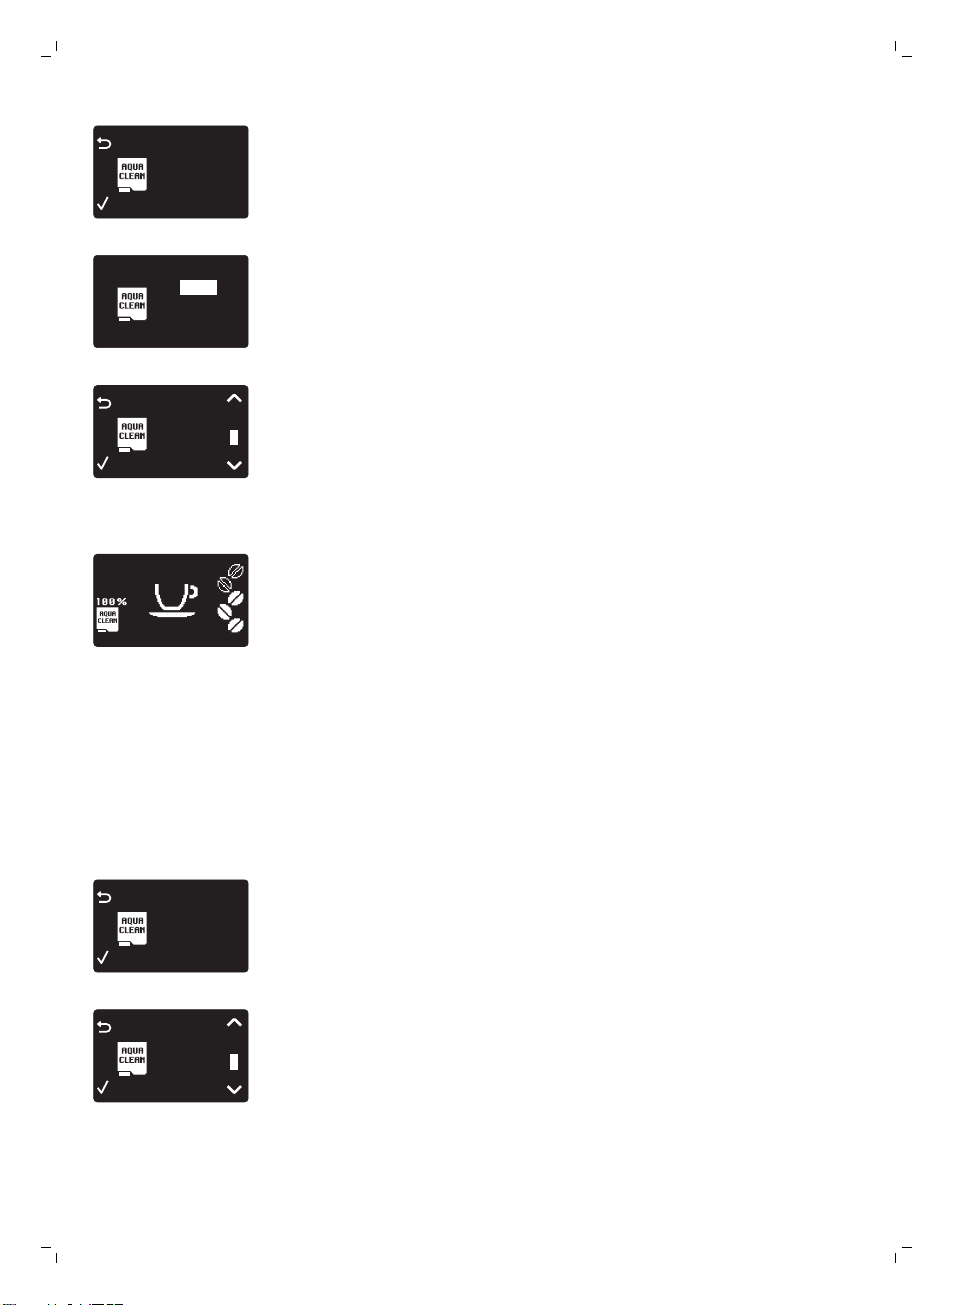
Activating the AquaClean filter
You can install the AquaClean filter at first installation as part of the
installation procedure. If you skipped installation of the AquaClean filter at
first use, you can install it by entering the menu as described below.
1 Press the MENU button, select MENU and press the OK button to
confirm. Scroll to 'AquaClean' filter. Press the OK button to confirm.
Page 15
0 / 8
80%
NEW?
0 / 8
ON
OFF
0 / 8
WATER
FILTER
1 / 8
80%
NEW?
1 / 8
WATER
FILTER
14
English
-
The display shows the number of AquaClean filters that have been
installed previously from 0 to 8 filters.
2 Select ON on the display, press the OK button to confirm.
3 The display automatically updates the number of filters used.
-
Then the machine ready screen appears with the AquaClean 100%
icon to indicate that the filter has been installed.
4 Dispense 2 cups of hot water (0.5 l) to complete the activation. Discard
this water.
Replacing the AquaClean filter
Replace the AquaClean filter when the filter icon starts flashing on the
display. Replace the AquaClean filter at least every 3 months, even if the
machine has not yet indicated that replacement is required.
1 Take out the AquaClean filter. Follow the steps in section 'Preparing and
installing the AquaClean filter'.
2 Press the MENU button, select MENU and press the OK button to
confirm. Scroll to 'AquaClean' filter. Press the OK button to confirm.
3 Select ON on the display and confirm the activation by pressing the OK
button.
4 Dispense 2 cups of hot water (0.5 l) to complete the activation. Discard
this water.
Replacing the filter after 8 filters were used
1 When the filter icon starts flashing on the display, press the MENU
button, select MENU and press OK to confirm. Scroll to 'AquaClean' filter.
Press OK to confirm.
Page 16

DESCALE BEFORE
ACTIVATING FILTER
-
1
2
3
4
The display tells you that you need to descale the machine before
activating the new filter.
2 Press the OK button to start the descaling procedure. See chapter
'Descaling procedure'.
-
Press the ESC button several times to leave the filter menu if you do
not want to descale right away.
3 At the end of the descaling procedure, the display asks you if you want
to install the AquaClean filter.
-
Follow the steps in 'Replacing the AquaClean filter'.
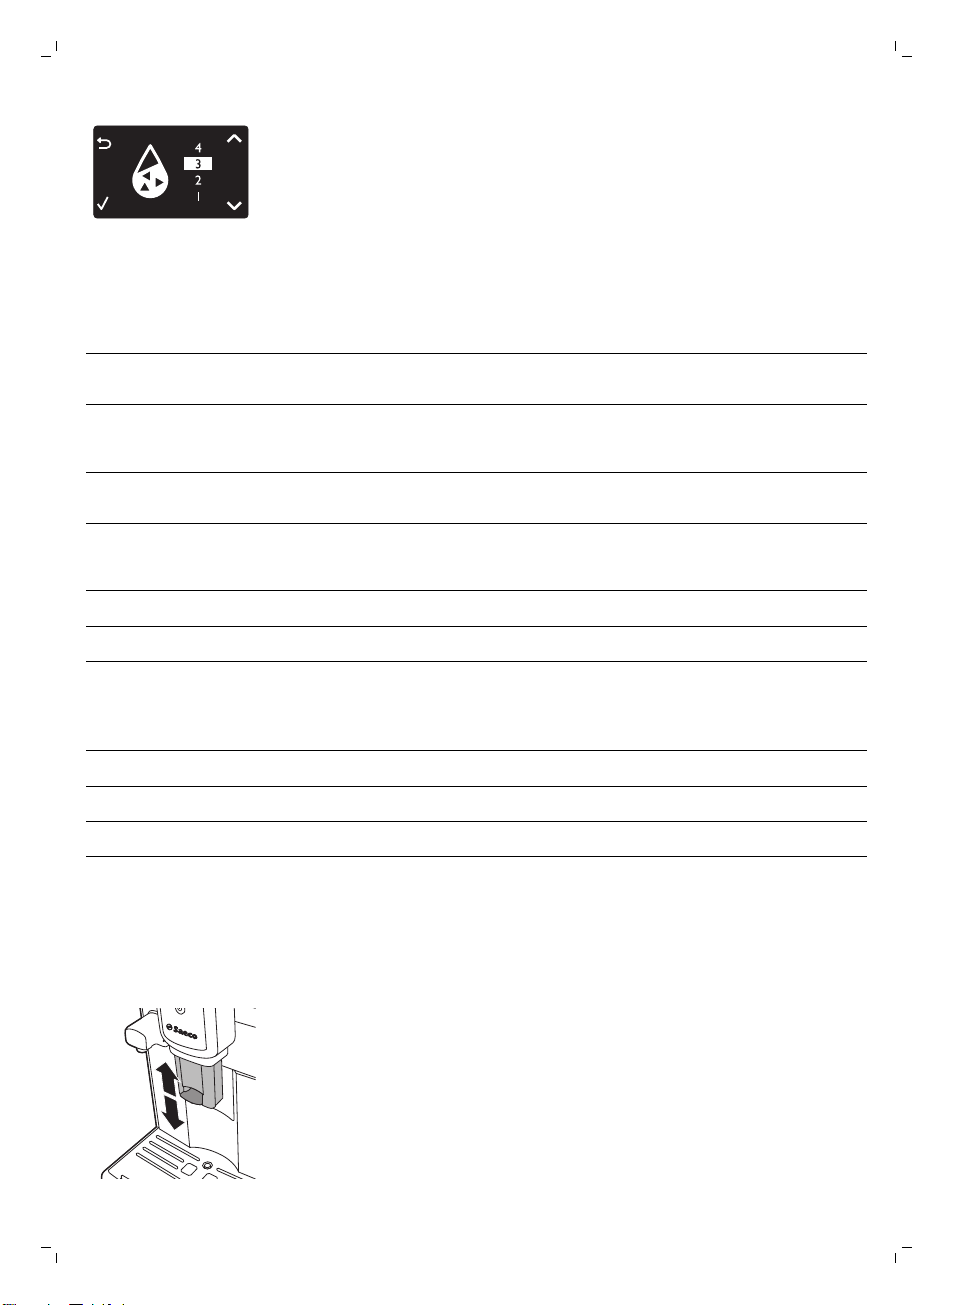
Measuring the water hardness
To be able to adjust the machine settings to the water in your region, please
measure the water hardness with the water hardness strip supplied.
1 Immerse the water hardness test strip (supplied with the machine) in tap
water for 1 second.
2 Remove the water hardness strip and and wait for 1 minute.
3 Check how many squares have changed into the red colour and check
the water hardness in below table.
English
15
numbers of red squares
1 1 very soft water
2 2 soft water
3 3 hard water
4 4 very hard water
value to be set water hardness
Setting the water hardness
1 To set the water hardness, press the MENU button, select menu and
scroll to select WATER HARDNESS.
Page 17
16
English
2 Press the OK button and select the water hardness in your area.
3 Press the OK button to confirm.
4 Press the ESC button to return to the main menu.
Beverage types and lengths
Beverage name
Espresso Coffee with thick crema served in
Description How to select
a small cup
Button on control panel
Espresso Lungo A longer espresso with thick
crema served in a medium-sized
cup
Cappuccino 1/3 espresso, 1/3 hot milk and 1/3
milk foam served in a large cup
Latte Macchiato Long shot of hot milk with foam
stained with a shot of espresso
and served in a tall glass
Frothed milk Hot milk with foam Special Drinks menu
Hot Water Special Drinks Menu
Button on control panel
Button on control panel
Button on control panel
Beverage name
Espresso 40 ml 20 - 230 ml
Espresso Lungo 80 ml 20 - 230 ml
Hot water 300 ml 50 - 450 ml
Standard length Length range
Brewing coffee
Adjusting the coffee dispensing spout
The machine can be used to dispense different coffee types in cups or
glasses of different sizes. To adjust the height of the coffee dispensing spout
to the size of the cup or glass, slide the spout up or down.
Page 18
Brewing coffee with beans
Brewing 1 cup of coffee
1 Place a cup under the coffee dispensing spout.
2 Press the ESPRESSO or ESPRESSO LUNGO button to brew the selected
coffee.
-
Coffee starts pouring from the coffee dispensing spout.
Note: If you want to stop the brewing process before the machine has
finished dispensing the preset coffee volume, press the OK button.
Brewing 2 cups of coffee
1 Place two cups under the coffee dispensing spout.
2 You can brew two cups of espresso or espresso lungo simultaneously.
Press the button of the desired beverage twice. The machine
automatically carries out two grinding cycles in sequence.
Brewing coffee with pre-ground coffee
When you brew coffee with pre-ground coffee, use the measuring scoop in
the multifunctional tool supplied to put the correct dose in the pre-ground
coffee compartment. If you add more pre-ground coffee, the excess coffee
will end up in the coffee grounds drawer.
1 Open the lid of the pre-ground coffee compartment.
2 Pour one measuring scoop of pre-ground coffee into the compartment.
Caution: Do not put any other substance than pre-ground coffee in the
pre-ground coffee compartment, as this may damage the machine.
3 Close the lid of the pre-ground coffee compartment.
4 Place a cup under the coffee dispensing spout.
5 Press the AROMA STRENGTH button and select pre-ground coffee
-
The machine automatically starts brewing the selected beverage.
Note: You can only brew one coffee beverage at a time with pre-ground
coffee.
English
17
Brewing milk-based beverages
The milk carafe is used to froth milk and brew milk-based coffee beverages.
How to use the milk carafe
Note: Before first use, rinse the milk carafe as described in chapter
'Maintenance and care', section 'Cleaning the milk carafe'.
Caution: Steam and hot milk may spray out of the milk froth dispensing
spout at the start of the brewing cycle.
Caution: Make sure that the milk carafe is installed and the milk froth
dispensing spout is open before you select a milk-based coffee beverage
or milk froth.
Page 19
1
1
2
18
English
1 If the hot water dispensing spout is installed, press the release buttons on
both sides of the hot water dispensing spout (1) and remove it (2).
2 Remove the milk carafe lid.
3 Fill the milk carafe with milk between the MIN and MAX level indications.
Note: Use cold milk (at a temperature of approximately 5°C/41°F) with a
protein content of at least 3% to ensure an optimal frothing result. You
can use whole milk or semi-skimmed milk. It is also possible to use
skimmed milk, soy milk and lactose-free milk.
4 Slightly tilt the milk carafe and insert it into the guides of the machine.
Then push the bottom of the carafe towards the machine until it locks
onto the drip tray.
5 Pull out the milk froth dispensing spout completely to the right to froth
dispensing position.
Note: If the milk froth dispensing spout is not pulled out fully, the milk
carafe does not froth milk properly.
Brewing milk-based coffee beverages and milk froth
1 Place a cup under the open milk froth dispensing spout.
2 Choose your milk-based beverage.
-
Press the CAPPUCCINO button to brew a cappuccino.
-
Press the LATTE MACCHIATO button to brew a latte macchiato.
-
Press the MENU button, choose 'Drinks' and scroll down through the
drinks to select milk froth.
-
The machine reminds you have to install the milk carafe and pull out
the milk froth dispensing spout.
3 The machine first dispenses a preset quantity of frothed milk into the cup
or glass and then dispenses a preset quantity of coffee.
Page 20

-
1
1
2
To stop dispensing milk or coffee, press the OK button.
4 After brewing milk-based coffee beverages, the display asks you if you
want to perform a quick clean of the milk carafe spout. You have 10
seconds to perform the quick clean.You can perform the quick clean
while leaving the milk inside the milk carafe. Remove the cup with the
beverage and place a container under the milk froth dispensing spout.
Press the OK button twice to confirm that you want to quick clean, or
press the ESC button to perform the quick clean later. It is recommended
to perform quick clean at least once a day, see chapter 'Cleaning the milk
carafe'.
Special drinks
How to select special drinks
1 Press the MENU button and select 'Drinks'.
2 Press the OK button to confirm.
3 Scroll the menu and select the desired beverage.
Dispensing hot water
Inserting and removing the hot water dispensing spout
To insert the hot water dispensing spout:
1 Tilt the hot water dispensing spout slightly and insert it into the machine.
2 Press and turn the hot water dispensing spout downwards to lock it in the
machine.
To remove the hot water spout:
English
19
1 Press the release buttons on the sides of the hot water dispensing spout
to unlock it.
2 Lift the hot water dispensing spout slightly and pull it out of the machine.
Dispensing hot water
Caution: Steam and hot water may spray out of the hot water dispensing
spout when brewing starts. Wait until the cycle has ended before
removing the hot water dispensing spout.
1 Press the MENU button. Select 'Drinks', confirm and scroll to select 'Hot
water'.
Page 21

ESPRESSO
20
English
Caution: Only select 'Hot water' in the menu when the hot water
dispensing spout is installed.
2 Press the OK button to confirm.The display reminds you to install the hot
water dispensing spout, press the OK button to confirm. The machine
starts dispensing hot water.
-
To stop dispensing hot water, press the OK button.
Adjusting quantity and taste
Saeco Adapting System
Coffee is a natural product and its characteristics may vary according to
origin, blend and roasting. The machine is equipped with a self-adjustment
system that allows it to get the best taste out of your favorite coffee beans.
It regulates itself after brewing some coffees.
Adjusting coffee and milk length
You can adjust the quantity of beverage brewed according to your taste and
to the size of the cups.
1 To adjust the length of espresso, press and hold the ESPRESSO button
until the display shows the MEMO icon.
-
The machine enters the programming phase and starts to brew the
selected beverage.
2 Press the OK button when the cup contains the desired amount of
espresso.
-
The tick on the display shows that the button is programmed: every
time it is pressed, the machine will brew espresso in the amount set.
To set the length of espresso lungo, cappuccino and latte macchiato,
follow the same procedure: press and hold the button of the beverage
and press the OK button when the desired amount is in the cup. To
adjust the length of milk-based coffee beverages, insert the milk
carafe and save the milk volume first and then save the coffee
volume.
Adjusting coffee strength
To change the coffee strength, press the AROMA STRENGTH button. Each
time you press the AROMA STRENGTH button, the aroma strength changes
by one degree. The display shows the chosen strength, which will only be
saved when brewing a coffee.
Page 22
1
2
3
4
5
1 Very mild
2
1
2 Mild
3 Regular
4 Strong
5 Very strong
Note: The machine will automatically dispense the correct quantity of coffee
for each coffee strength.
GROUND COFFEE is the last option in the coffee strength menu. Select this
option to brew coffee with ground coffee. Use the measuring scoop
integrated in the multifunctional tool supplied to dose the correct quantity
of ground coffee.
Note: The machine returns to the main screen and saves the chosen aroma
strength when you brew a coffee.
Adjusting the grinder settings
You can adjust the grinder settings with the grinder adjustment key
integrated into the handle of the multifunctional tool. At each setting
selected, the ceramic coffee grinder guarantees a perfectly even grind for
every cup of coffee you brew. It preserves the full coffee aroma and delivers
the perfect taste to every cup.
Note: You can only adjust the grinder settings when the machine is grinding
coffee beans.
1 Place a cup under the coffee dispensing spout.
2 Open the lid of the bean hopper.
3 Press the ESPRESSO button.
4 When the grinder starts grinding, place the grinder adjustment key on the
grinder adjustment knob (1). Push and turn to the left or to the right (2).
-
There are 5 different grinder settings you can choose from. The smaller
the dot the stronger the coffee.
Caution: Do not turn the grinder adjustment knob more than one notch at
a time to prevent damage to the grinder.
English
21
Maintenance and care
Maintenance of your machine is important to prolong the life of your
machine and to ensure optimum quality and taste of your coffee.
Cleaning the drip tray and the coffee grounds container
Perform the following actions while the machine is switched on:
-
When the display shows the 'empty coffee grounds container' icon,
empty the coffee grounds container.
Page 23
1
1
2
2
1
22
English
-
The drip tray is full when the drip tray full indicator pops up through the
drip tray. Empty and clean the drip tray every day.
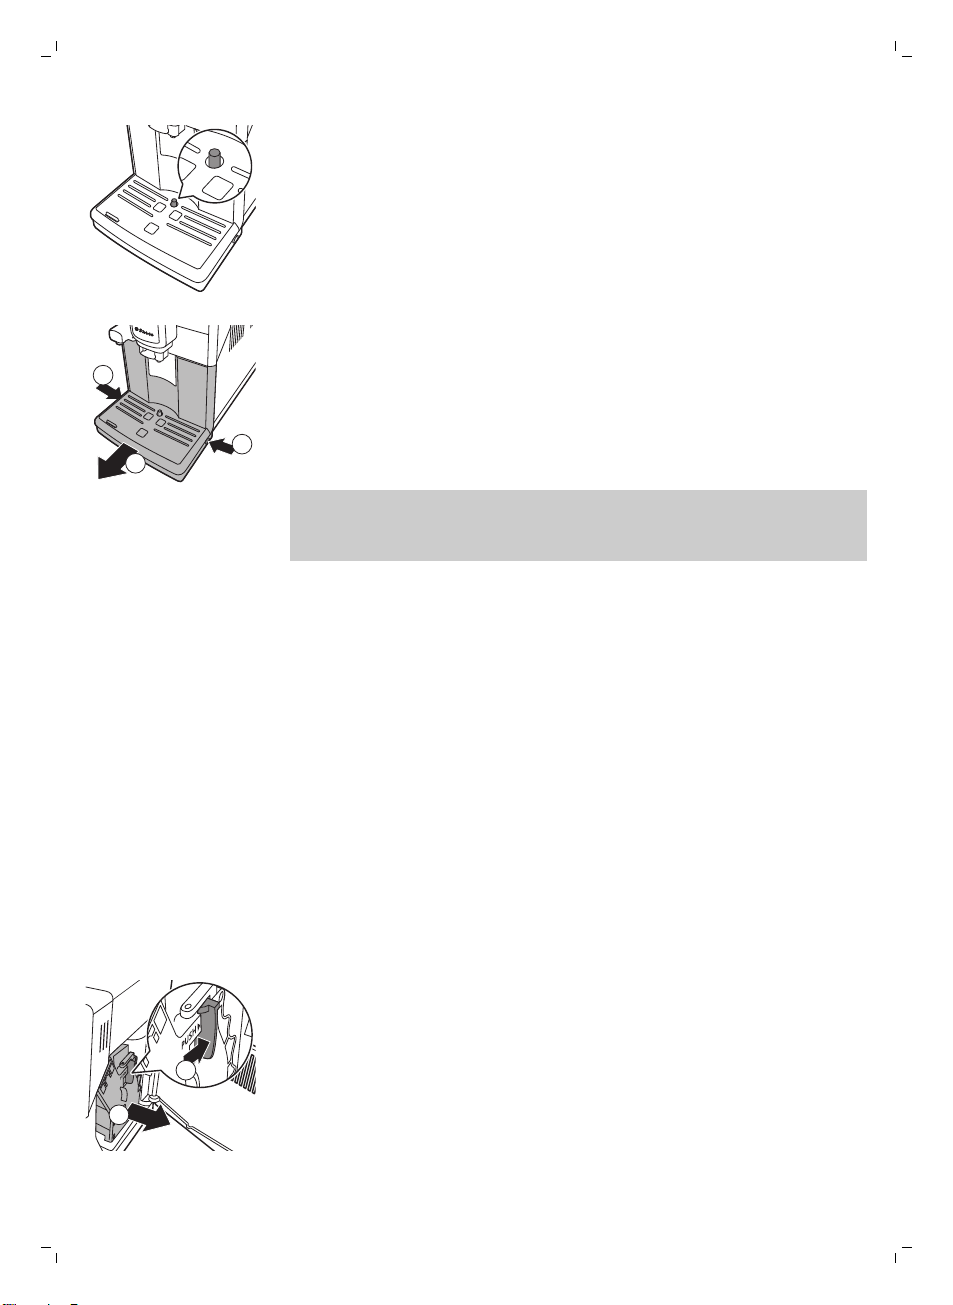
1 Press the release buttons on both sides of the drip tray (1) and pull the
drip tray out of the machine (2).
2 Remove and empty the coffee grounds container.
3 Empty and rinse the drip tray under the tap.
4 Place the coffee grounds container back in the drip tray.
5 Slide the drip tray back into the machine until it locks into position with a
click.
Note: Make sure that the machine is still switched on when you remove the
drip tray. If you switch off the machine before you remove the drip tray, the
'empty coffee grounds container' icon will be visible on the display when
you switch on the machine again, even though the drip tray is empty.
Cleaning the water tank
1 Remove the water tank from the machine and rinse it with fresh water
periodically.
2 Fill the water tank with fresh water up to the MAX level indication and
place it back in the machine.
Cleaning the coffee compartments
-
Clean the bean hopper with a dry cloth once a month.
-
If necessary, clean the pre-ground coffee compartment with a dry cloth.
Cleaning the brew group
Weekly cleaning of the brew group
1 Switch off the machine and unplug it.
2 Remove the drip tray with the coffee grounds container.
3 Empty the drip tray and rinse it under the tap.
4 Empty the coffee grounds container and rinse it under a lukewarm tap.
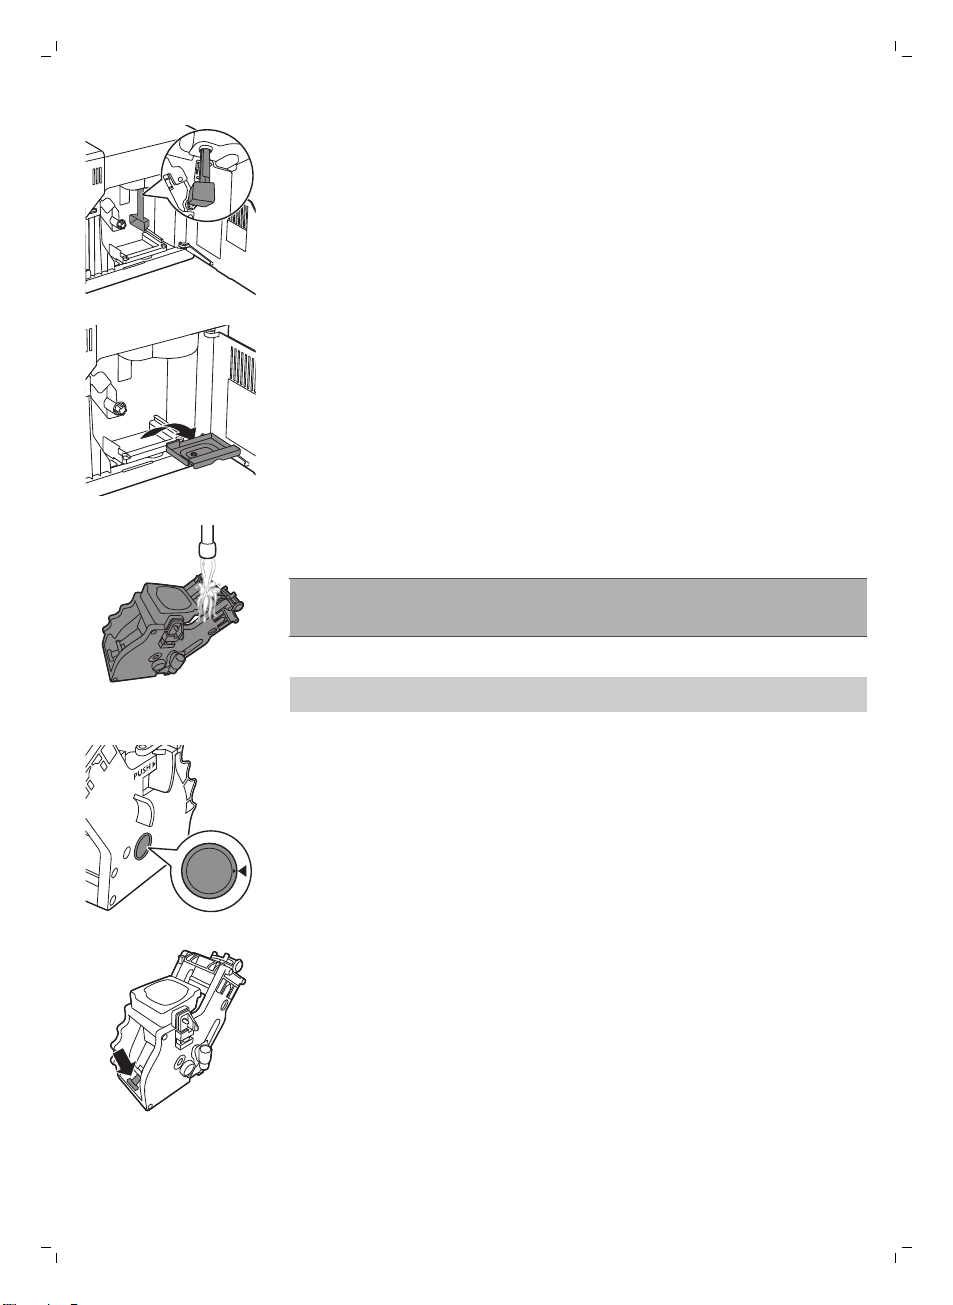
5 Open the service door.
6 Press the PUSH button (1) and pull at the grip of the brew group to
remove it from the machine (2).
Page 24
English
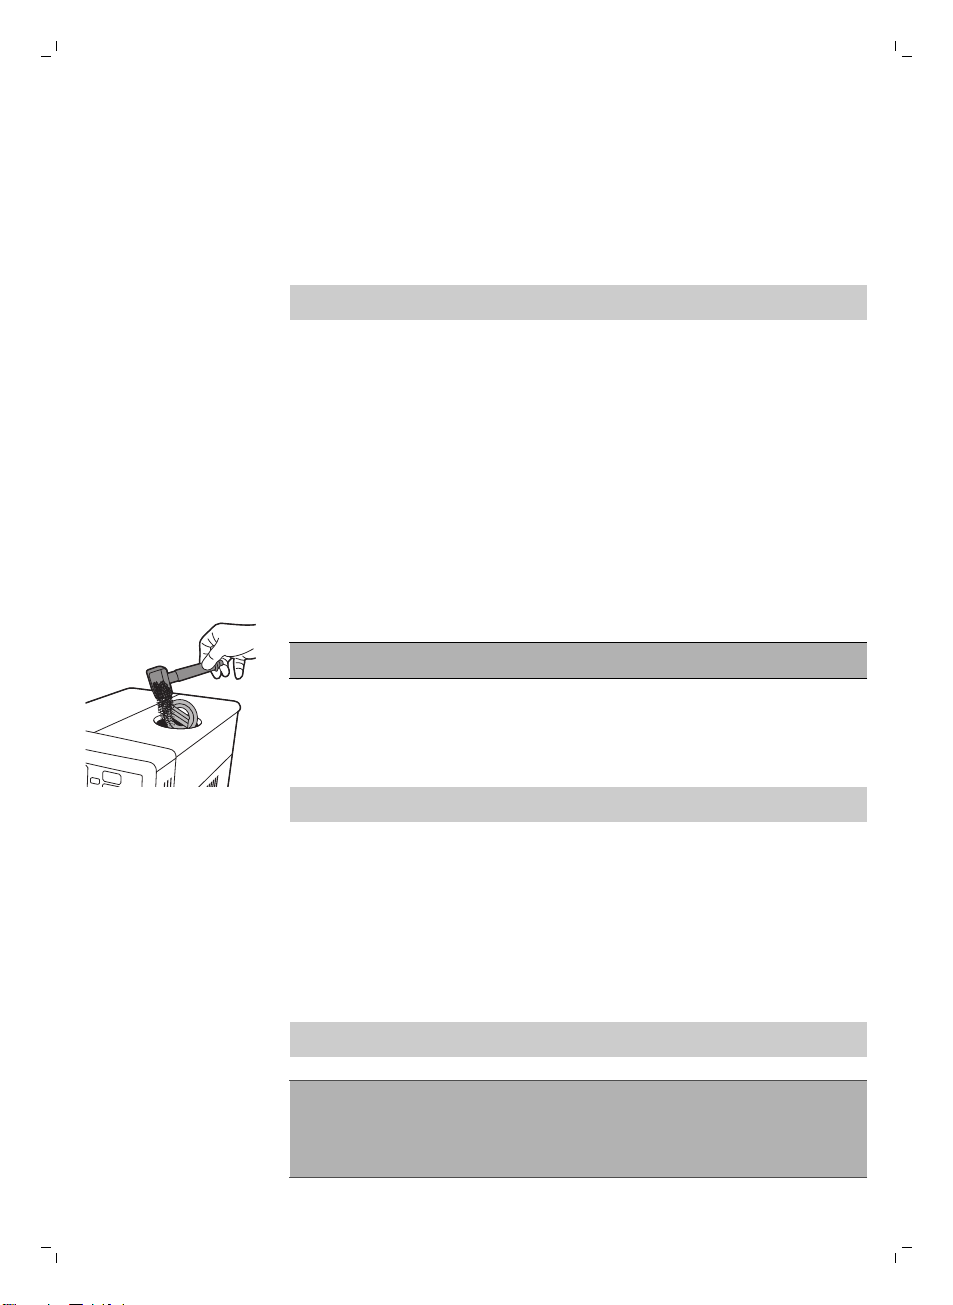
7 Clean the coffee exit duct thoroughly with a spoon handle or with the
multifunctional tool provided with the machine. Insert it as indicated in
the figure.
8 Remove the coffee residues container, empty it and rinse it under a
lukewarm tap. Let it dry and then reinsert it.
9 Rinse the brew group thoroughly with lukewarm water. Clean the upper
filter carefully.
Caution: Do not clean the brew group in the dishwasher and do not use
washing-up liquid or a cleaning agent to clean it. This may cause the brew
group to malfunction and may have a negative effect on the coffee taste.
10 Let the brew group air-dry thoroughly.
Note: Do not dry the brew group with a cloth to prevent fibers from
collecting inside the brew group.
11 Clean the inside of the machine with a soft damp cloth.
12 Before you slide the brew group back into the machine, make sure the
two reference signs on the side match. If they do not match, perform the
following step:
23
-
Make sure the lever is in contact with the base of the brew group.
13 Make sure that the locking hook of the brew group is in the correct
position.
Page 25

24
English
-
To position the hook correctly, push it upwards until it is in uppermost
position.
-
The hook is not correctly positioned if it is still in bottommost position.
14 Slide the brew group back into the machine along the guiding rails on the
sides until it locks into position with a click.
Caution: Do not press the PUSH button.
15 Close the service door.
Monthly cleaning of the brew group with the degreasing tablet
-
Perform this cleaning cycle after the machine has brewed 500 cups of
coffee or once a month.
-
Use a degreasing tablet for this cleaning cycle.
Caution: Only use degreasing tablets for cleaning. They do not have a
descaling function.
1 Place a container under the coffee dispensing spout.
2 Press the AROMA STRENGTH button and select pre-ground coffee.
3 Put a degreasing tablet in the pre-ground coffee compartment.
4 Press the ESPRESSO LUNGO button. The machine dispenses water from
the coffee dispensing spout.
5 When the progress bar has reached the middle, set the main switch on
the back of the machine to OFF.
6 Let the degreasing solution work for approximately 15 minutes.
7 Set the main switch to ON.
8 Press the standby button.
9 Wait until the machine performs an automatic rinsing cycle.
10 Perform the 'Weekly cleaning of the brew group' procedure.
11 Remove the drip tray with the coffee grounds container. Empty the drip
tray and the coffee grounds container and place them back in the
machine.
12 Press the AROMA STRENGTH button and select pre-ground coffee.
13 Press the ESPRESSO LUNGO button. The machine dispenses water from
the coffee dispensing spout.
14 Repeat steps 12 and 13 twice. Discard the dispensed water.
15 To clean the drip tray, put a degreasing tablet in the drip tray and fill the
drip tray up to two-thirds of its capacity with hot water. Let the
degreasing tablet take effect for about 30 minutes. Then empty the drip
tray and rinse it thoroughly.
Page 26

Monthly lubrication of the brew group
Lubricate the brew group after the machine has brewed 500 cups of coffee
or once a month.
1 Switch off the machine and unplug it.
2 Remove the brew group and rinse it under a lukewarm tap as described
in section 'Weekly cleaning of the brew group'.
3 Apply some grease around the shaft in the bottom of the brew group.
4 Apply some grease to the rails on both sides (see figure).
5 Insert the brew group as described in section 'Weekly cleaning of the
brew group'.
English
25
Cleaning the milk carafe
Carafe quick clean
Place a container under the milk froth dispensing spout and pull out the milk
froth dispensing spout.After preparing a milk-based beverage, the carafe
cleaning icon appears on the display.
1 When the carafe cleaning icon appears on the display, press the OK
button if you want to perform a cleaning cycle.
Tip: Remove the cup with the beverage and place a container under the milk
froth dispensing spout.
2 Place a container under the milk froth dispensing spout and pull out the
milk froth dispensing spout.
3 Press the OK button to start dispensing hot water.
To clean the milk carafe thoroughly, you have to do the
following regularly:
1 Disassemble the top of the milk carafe.
Page 27

1 2
5
3
4
1
2
1
26
English
2 Remove the lid of the milk carafe.
3 Lift the milk froth dispensing spout out of the top of the carafe.
4 Remove the suction tube from the milk froth dispensing spout.
5 Rinse the suction tube with lukewarm tap water thoroughly.
Weekly cleaning of the milk carafe
The milk froth dispensing spout consists of 5 components. Disassamble all
components once a week to clean them.
1 Suction tube
2 Rubber support
3 Milk frother
4 Milk frother connection
5 Dispensing spout lid
Disassembling the milk carafe
1 Press the release buttons on both sides of the top of the milk carafe (1)
and lift the top off the milk carafe (2).
2 Turn the dispensing spout lid upside down and hold it firmly in your
hand. Pull the suction tube off the rubber support.
Page 28

2
1
English
3 Press the release buttons on the milk froth dispensing spout and remove
the milk frother from the the rubber support.
4 Pull the milk frother connection out of the milk frother.
5 Rinse all components under a lukewarm tap.
Tip: All detachable parts, except the carafe, can be cleaned in the
dishwasher.
27
Reassembling the milk carafe
1 To reassemble the milk froth dispensing spout, follow steps 2 to 4 of
'Disassembling the milk froth dispensing spout' in reverse order.
2 Place the milk froth dispensing spout back in the top of the milk carafe.
3 Place the top of the milk carafe back on the milk carafe.
Note: Before you place the milk froth dispensing spout back in the top of
the milk carafe, move the pin inside the top to the correct position. If this
pin is not in the correct position, you cannot place the milk froth
dispensing spout back in the top of the milk carafe.
Monthly cleaning of the milk carafe
Only use SAECO milk circuit cleaner CA6705 for this cleaning cycle.
Page 29

START
CALC
CLEAN
28
English
1 Pour the contents of the milk circuit cleaner sachet in the milk carafe.
Then fill the milk carafe with water up to the MAX level indication.
2 Insert the milk carafe into the machine and place a container under the
milk froth dispensing spout.
3 Press the MENU button, select ' Drinks' and scroll to milk froth. Press the
OK button to start dispensing the cleaning solution.
4 Repeat step 3 until the milk carafe is empty.
5 When the carafe is empty, remove the container and the milk carafe from
the machine.
6 Rinse the milk carafe thoroughly and fill it with fresh water up to the MAX
level indication.
7 Insert the milk carafe into the machine.
8 Place the container under the milk froth dispensing spout.
9 Press the MENU button and select milk froth in the special drinks menu
to start the carafe rinsing cycle.
10 Repeat step 9 until the milk carafe is empty.
Note: Never drink the solution dispensed during this step
11 Repeat step 6-10.
12 When the machine stops dispensing water, the cycle is finished.
13 Disassemble all the components and rinse them under a lukewarm tap.
The machine is ready for use.
Descaling procedure
When the display shows 'start calc clean', you need to descale the machine.
If you do not descale the machine when this message appears on the
display, the machine stop working properly. In that case, repairs are not
covered by the guarantee.
Only use Saeco descaling solution to descale the machine. Saeco descaling
solution is designed to ensure optimal performance of the machine. The use
of other products may damage the machine and leave residues in the water.
You can buy Saeco descaling solution in the online shop at
www.shop.philips.com/service. The descaling procedure lasts 30 minutes
and consists of a descaling cycle and a rinsing cycle. You can pause the
descaling or rinsing cycle by pressing the ESC button. To continue the
descaling or rinsing cycle, press the OK button.
Note: Do not remove the brew group during the descaling
procedure.Warning: Do not drink the descaling solution or the
water dispensed during the descaling procedure.
1 Remove the drip tray and the coffee grounds container, empty and clean
them and put back into place.
2 Place a large container (1.5 l) under the coffee dispensing spout.
3 When the display shows 'START CALC CLEAN', press the OK button to
start the descaling procedure.Remove the hot water dispensing if
present.
Page 30

REMOVE
FILTER
MAX
CALC
CLEAN
CALC
CLEAN
1
2
English
-
The following display reminds you have to insert the carafe.
-
The following display reminds you have to open the milk dispensing
29
spout.
-
The following display reminds you have to remove the AquaClean
filter.
Note: You can press ESC to skip descaling. If you want to start the
descaling procedure later, press the MENU button, choose select ' Menu'
and scroll to select 'Descaling'. Press OK to confirm.
4 Pour the descaling solution in the water tank. Fill the water tank with
fresh water up to the CALC CLEAN level indication. Place the water tank
back in the machine. Press the OK button to confirm.
-
The first phase of the descaling cycle starts. The machine starts
dispensing the descaling solution at intervals.
-
The display shows the descaling icon, the phase indication and the
duration. This first phase takes 20 minutes.
5 Let the machine dispense the descaling solution until the water tank is
empty.
6 Remove the water tank and rinse it.
7 Fill the water tank with fresh water up to the CALC CLEAN level
indication. Place the water tank back in the machine and press OK.
8 Remove and rinse the milk carafe. Fill the milk carafe with water up to the
MIN level indication. Insert the milk carafe into the machine and open the
milk froth dispensing spout.
9 Remove and empty the container and place it back under the coffee
dispensing spout. Press OK to confirm.
10 The second phase of descaling starts, which is a rinsing cycle. This phase
takes 3 minutes. The display shows the rinsing icon and the duration of
the phase.
Note: If the water tank is not filled up to the CALC CLEAN level, the
machine may require another rinsing cycle.
Page 31

30
English
11 Wait until the machine stops dispensing water. The descaling procedure
is finished when the tick appears on the display.
12 Press the OK button to exit the descaling cycle. The machine starts
heating up and performs the automatic rinsing cycle.
13 Remove and empty the container.
14 Perform the 'Weekly cleaning of the milk carafe' procedure to clean the
milk carafe after descaling.
15 Clean the brew group by performing the 'Weekly brew group cleaning'
cycle.
16 Install a new AquaClean filter in the water tank.
Tip: Using the AquaClean filter reduces the need for descaling!
What to do if the descaling procedure is interrupted
Once the descaling procedure has started, you must complete it till the very
end without switching off the machine. If the machine gets stuck during the
cycle, you can exit the descaling procedure by pressing the standby button.
If this occurs, or in case of a power failure or accidental disconnection of the
cord, do the following:
1 Empty and rinse the water tank thoroughly.
2 Fill the water tank up to the CALC CLEAN level indication and switch the
machine back on. The machine will heat up and perform an automatic
rinsing cycle.
3 Before brewing any beverages, perform a manual rinsing cycle, see
section 'Manual rinsing cycle'.
Note: If the descaling procedure was not completed, the machine will
require another descaling procedure as soon as possible.
Warning icons and error codes
Warning signals are displayed in red. Below you find a list of the
warnings that may appear on the display and their meaning.
-
Fill the water tank with fresh water to the MAX level indication.
-
The bean hopper is empty. Put new coffee beans in the bean hopper.
Page 32

10
xx
English
-
The brew group is not in the machine. Insert the group.
-
Insert the drip tray.
-
Close the service door.
-
Remove the coffee grounds container and empty it.
-
If an error code is triggered, check the section 'Meaning of error codes' to
see what the code on the display means and what you can do. The
machine cannot be used when this icon is on the display.
31
Meaning of error codes
Error code Problem Cause Possible solution
1 Coffee grinder blocked Coffee exit duct
3 - 4 The brew group cannot
be removed.
clogged
The brew group is not
positioned correctly.
Clean the coffee exit
duct thoroughly with
the handle of the
multifunctional tool or a
spoon handle.
Close the maintenance
door. Switch the
machine off and back
on again. Wait for the
‘machine ready’ icon on
the display and then
remove the brew group.
Page 33

32
English
Error code Problem Cause Possible solution
1 Coffee grinder blocked Coffee exit duct
clogged
5 Water circuit problem There is air in the water
circuit.
Other error codes Switch the machine off
If the above solutions do not help to remove the error code icon from the
display and bring the machine back to normal working order, contact the
Philips Saeco hotline. Contact details can be found in the warranty booklet
or on www.saeco.com/support.
Clean the coffee exit
duct thoroughly with
the handle of the
multifunctional tool or a
spoon handle.
Remove and place back
the water tank a couple
of times. Make sure you
insert it into the
machine properly.
Check if the water tank
compartment is clean.
and switch it back on
again after 30 seconds.
Try this 2 or 3 times.
Troubleshooting
Problem
The machine does not
switch on
Make sure the main switch is set in
Cause Solution
The machine is disconnected or the
main switch is in the OFF position.
Check if the mains cord is inserted
correctly
ON position.
The machine is in DEMO
mode.
The drip tray is quickly
filled.
Place a cup under the dispensing
The coffee grounds
container full icon remains
displayed.
The standby button has been
pressed for more than 8 seconds.
This is normal. The machine uses
water to rinse the internal circuit and
brew group. Some water flows
through the internal system directly
into the drip tray.
The coffee grounds container was
emptied while the machine was
switched off.
Switch the machine off and then
on again using the main switch on
the back of the machine.
Empty the drip tray when the 'drip
tray full' full indicator pops up
through the drip tray cover.
spout to collect rinsing water.
Always empty the coffee grounds
container while the machine is ON.
If the coffee grounds container is
emptied while the machine is
switched off, the coffee cycle
counter is not reset. In that case,
the 'empty coffee grounds
container' message will stay on the
display even though the container
is not full.
Page 34

English
33
The coffee grounds container was
The brew group cannot be
removed.
The coffee grounds container is not
The brew group cannot be
inserted.
Reset the machine by switching it
The machine is still in the descaling
placed back too fast.
The brew group is not positioned
correctly.
removed.
The brew group is not in the correct
position.
procedure.
Do not place back the coffee
grounds container until the screen
message prompts you to put it
back
Close the maintenance door.
Switch the machine off and back
on again. Wait for the machine
ready screen to appear and then
remove the brew group
Remove the coffee grounds
container before removing the
brew group
The brew group was not put in rest
position before it was placed back.
Make sure that the lever is in
contact with the base of the brew
group and that the hook of the
brew group is in the correct
position.
on and off. Place the drip tray and
the coffee grounds container back.
Leave the brew group out. Close
the maintenance door and switch
the machine on and off. Then try
to reinsert the brew group.
You cannot remove the brew
group when the descaling process
is active. First complete the
descaling process and then
remove the brew group.
The coffee has too little
cream or is watery.
The coffee blend is not the correct
The machine is performing its self-
The brew group is dirty. Clean the brew group.
Coffee is leaking from the
coffee dispensing spout
The coffee is not hot
enough.
The temperature is set too low.
You added milk. Whether the milk you add is warm
The grinder is set to a coarse setting. Adjust the grinder to a finer setting.
one.
adjustment.
The coffee dispensing spout is
clogged.
The cups you use are cold. Preheat the cups by rinsing them
Check the menu settings.
Change the coffee blend.
Brew a few cups of coffee.
Clean the coffee dispensing spout
and its holes using a pipe cleaner.
with hot water.
Set the temperature to high in the
menu.
or cold, it will always decrease the
temperature of the coffee to some
extent.
Page 35

34
English
The machine grinds the
coffee beans, but coffee
does not come out.
The brew group is dirty. Clean the brew group.
The coffee dispensing spout is dirty. Clean the coffee dispensing spout
The coffee exit duct is blocked. Clean the coffee exit duct with the
The coffee comes out
slowly.
The brew group is dirty. Clean the brew group.
The coffee exit duct is blocked. Clean the coffee exit duct with the
The machine circuit is blocked by
The frothed milk is too
cold.
The milk does not froth. The milk carafe is dirty or not
The milk froth dispensing spout has
The grind is set too fine. Adjust the grinder to a coarser
The grind is ground too finely. Change the coffee blend or adjust
limescale.
The cups are cold. Warm the cups with hot water.
inserted correctly.
not been opened fully.
setting.
and its holes with a pipe cleaner.
handle of the multifunctional tool
or a spoon handle.
the grinder.
handle of the multifunctional tool
or a spoon handle.
Descale the machine.
Clean the carafe and make sure
that you position and insert it
correctly.
Check that the milk froth
dispensing spout has been set in
the correct position.
The milk carafe is incompletely
The type of milk used is not suitable
The AquaClean filter
cannot be activated as the
tick does not appear on
the display.
The filter cannot be
activated and the
machine asks for
descaling.
assembled.
for frothing.
A filter has just been activated. You have to dispense at least 10
You have already replaced 8
AquaClean filters. After 8 filter
replacements you need to descale
the machine.
Check that all the components
have been assembled correctly.
Different types of milk result in
different amounts of froth and
different froth qualities. We have
tested the following milk types
which proved to deliver a good
milk froth result: semi-skimmed or
full-fac cow's milk, soy milk and
lactose-free milk. Other types of
milk have not been tested and
may result in a small amount of
milk froth.
cups (100of 100ml each before
you can activate a new filter. Be
careful as you activate a new filter,
the filter counter will increase
automatically.
Descale your machine first and
install the filter.
Page 36

English
35
The filter has not been replaced in
The filter has not been installed
The AquaClean filter was not
The AquaClean filter is
installed, but the
descaling message
appears.
The descaling message
appears before 8 filters
were replaced.
You placed the AquaClean filter after
You did not activate the replacement
time after the AquaClean water filter
signal started flashing.
during first installation but after
having brewed approx.50 coffees
(based on 100ml cups). The machine
has to be completely limescale-free
before installing the AquaClean filter.
correctly activated during first
installation.
After 8 filter replacements, you need
to descale the machine
You did not activate the AquaClean
filter correctly during first installation.
having used the machine for a while.
filter in the machine menu.
Descale your machine first and
install the filter.
First descale the machine and
then install a new AquaClean filter.
After descaling, the filter counter is
reset to 0/8. Always confirm filter
activation in the machine menu,
also after filter replacement
Follow the instructions on the
display until you receive
confirmation that the filter has
been activated.
First descale the machine and
then install a new AquaClean filter.
This will reset the filter counter to
0/8. Always confirm filter
activation in the machine menu,
also after filter replacement.
First descale the machine and
then install a new AquaClean filter.
Always activate the filter in the
machine menu.
You did not replace the filter when
The filter does not fit. You need to remove air from the
There is still water in the water tank. Empty the water tank before you
You try to install another filter than
There is water under the
machine.
The machine is not placed on a
the filter symbol started flashing.
filter.
the AquaClean filter.
The drip tray is too full and
overflowed.
horizontal surface.
Note: If you are unable to solve the problem with the information in this
table, contact the Saeco Consumer Care Centre.
Let air bubbles come out of the
filter.
install the filter.
Only the AquaClean filter will fit.
Empty the drip tray when the drip
tray full indicator pops up through
the drip tray. Always empty the
drip tray before you start descaling
the machine.
Place the machine on a horizontal
surface so that the drop iray full
indicator works properly.
Page 37

36
English
Demo mode function
The machine is provided with a demo mode function.
1 Press and hold the STANDBY button for more than 8 seconds to enter
the demo mode function.
2 To exit the demo mode, switch the machine OFF and ON using the main
switch at the back of the machine.
Ordering accessories Saeco
To clean and descale the machine, only use the Saeco maintenance
products. These products can be purchased in the Philips online shop (if
available in your country) at www.shop.philips.com/service, from your local
reseller or from the authorized service centers.
Ordering maintenance products:
Typenumber
CA6700 Descaling solution
CA6903 AquaClean filter
HD5061 Brew group grease
CA6704 Degreasing tablets
CA6705 Milk circuit cleaner
Product
Technical specifications
The manufacturer reserves the right to improve the technical specifications
of the product. All the preset quantities are approximate.
Description
Housing material Thermoplastic
Size (w x h x d) 221 x 340 x 430 mm
Weight 7.5 kg
Power cord length 800 - 1200 mm
Control panel Front
Cup size up to 152 mm
Water tank 1.8 litres, removable
Coffee bean hopper capacity 250 g
Coffee grounds drawer capacity 15 pucks
Milk carafe capacity 500 ml
Value
Page 38

English
Pump pressure 15 bar
Boiler stainless steel boiler
Safety devices thermal fuse
Energy saving mode < 1 Wh
Nominal voltage - Power rating - Power supply See data on inside of maintenance door
Recycling
-
This symbol means that this product shall not be disposed of with normal
household waste (2012/19/EU).
-
Follow your country's rules for the separate collection of electrical and
electronic products. Correct disposal helps prevent negative
consequences for the environment and human health.
Guarantee and support
If you need information or support, please visit www.saeco.com/support or
read the separate guarantee leaflet.
If you need information or support, please contact the Philips Saeco hotline
in your country. Contacts are included in the warranty booklet supplied
separately or visit www.saeco.com/support.
37
Page 39

38
Русский
Содержание
Введение 39
Важная информация 39
Предупреждение 39
Внимание! 40
Электромагнитные поля (ЭМП) 41
Обзор кофемашины 41
Пользовательский интерфейс 42
Первая установка 42
Цикл промывки вручную 45
Промывка контура горячей воды 45
Промывка контура заварки кофе 46
Фильтр AquaClean 46
Подготовка и установка фильтра AquaClean 46
Активация фильтра AquaClean 47
Замена фильтра AquaClean 48
Измерение жесткости воды 48
Тип и объем напитка 49
Приготовление кофе 50
Регулировка носика выхода кофе 50
Приготовление кофе из зерен 50
Приготовление 1 чашки кофе 50
Приготовление 2 чашек кофе 50
Приготовление напитка из молотого кофе 51
Приготовление напитков на молочной основе 51
Как пользоваться сосудом для молока 51
Приготовление кофейных напитков на молочной основе и молочной пены 52
Особые напитки 53
Как выбрать особые напитки 53
Подача горячей воды 53
Установка и снятие носика для подачи горячей воды 53
Подача горячей воды 53
Регулировка количества и крепости 54
Адаптивная система Saeco 54
Настройка объема кофе и молока 54
Настройка крепости кофе 54
Регулировка параметров кофемолки 55
Техническое обслуживание и уход 55
Очистка поддона для капель и контейнера для кофейной гущи 55
Очистка варочной группы 56
Ежемесячная смазка варочной группы 59
Очистка сосуда для молока 60
Процесс очистки 62
Русский
Page 40

Русский
Действия в случае прерывания процедуры очистки от накипи 64
39
Значки предупреждений и коды ошибок 65
Описание кодов ошибок 66
Поиск и устранение неисправностей 66
Деморежим 71
Заказ аксессуаров Saeco 71
Технические характеристики 71
Утилизация 72
Гарантия и поддержка 72
Введение
Уважаемый покупатель! Благодарим вас за покупку автоматической
эспрессо-кофемашины Saeco Incanto.
Характеристики кофе зависят от страны его происхождения, состава и
способа обжарки. Кофемашина оснащена системой самостоятельной
регулировки, которая позволяет извлечь максимум вкуса и аромата из
кофейных зерен. После 10-20 циклов заварки система настроится
самостоятельно.
В настоящем руководстве вы найдете всю необходимую информацию по
установке, эксплуатации, обслуживанию и оптимальному использованию
своей машины. Чтобы воспользоваться всеми преимуществами поддержки
Saeco, зарегистрируйте продукт на веб-сайте www.philips.com/welcome.
Важная информация
Предупреждение
-
Подключите кофемашину к розетке электросети, напряжение которой
соответствует техническим характеристикам устройства.
-
Подключайте кофемашину к заземленной розетке.
-
Шнур питания не должен свисать с края стола или контактировать с
горячими поверхностями.
-
Не погружайте кофемашину, сетевой шнур или вилку сетевого шнура в
воду. Это может привести к поражению электрическим током.
-
Не допускайте попадания жидкости на штекер шнура питания.
-
Запрещается направлять горячую воду на любые участки тела. Это
может привести к ожогам.
-
Не прикасайтесь к горячим поверхностям. Используйте предусмотренные
на машине ручки.
-
Отключите кнопку питания, расположенную на задней панели устройства,
и извлеките из розетки вилку сетевого шнура в следующих случаях:
-
При возникновении сбоя.
-
Если кофемашина не будет использоваться в течение длительного
периода времени.
-
Перед очисткой кофемашины.
Page 41

40
Русский
Внимание!
-
При отключении держитесь за вилку, а не за сетевой шнур.
-
Не прикасайтесь к вилке питания мокрыми руками.
-
Запрещено пользоваться кофемашиной, если сетевая вилка, шнур
питания или сам прибор повреждены..
-
Запрещается вносить какие-либо изменения в конструкцию кофемашины
или шнура питания.
-
Во избежание рисков ремонт аппарата следует проводить только в
сертифицированном сервисном центре Philips .
-
К использованию машины не допускаются дети возрастом до 8 лет.
-
Дети старше 8 лет и лица с ограниченными интеллектуальными или
физическими возможностями, а также лица с недостаточным опытом и
знаниями могут пользоваться кофемашиной только под присмотром или
после получения инструкций по безопасному использованию
кофемашины и при условии понимания потенциальных опасностей.
-
Дети старше 8 лет могут осуществлять очистку и уход за прибором
только под присмотром взрослых.
-
Храните прибор и шнур в месте, недоступном для детей младше 8 лет.
-
Не оставляйте детей без присмотра и не позволяйте им играть с
кофемашиной.
-
Запрещается подносить к кофемолке пальцы или вставлять в нее
посторонние предметы.
-
Кофемашина предназначена только для домашнего использования в
стандартных условиях. Она не предназначена для использования в
качестве кухонного прибора в магазинах, офисах, сельскохозяйственных
помещениях или на других рабочих местах.
-
Устанавливайте кофемашину на ровную устойчивую поверхность.
Прибор должен всегда находиться в вертикальном положении (включая
период транспортировки)..
-
Не ставьте кофемашину на плиту, рядом с духовым шкафом, радиатором
или другими источниками тепла.
-
В контейнер можно засыпать только обжаренные кофейные зерна. Не
загружайте в бункер молотый и растворимый кофе, необжаренные зерна
или любые другие продукты, так как это может привести к повреждению
кофемашины.
-
Дайте кофемашине остыть перед установкой или извлечением каких-
либо деталей. Поверхность нагревательного элемента сохраняет
остаточное тепло после использования.
-
Не заполняйте резервуар для воды теплой, горячей или газированной
водой, так как это может привести к повреждению резервуара и
кофемашины.
-
Запрещается использовать для чистки кофемашины губки с абразивным
покрытием, абразивные чистящие средства или растворители типа
бензина или ацетона. Достаточно использовать мягкую ткань, смоченную
водой.
Page 42

-
Регулярно выполняйте очистку кофемашины от накипи. Машина
предупреждает о необходимости удаления накипи. Несоблюдение этого
требования приведет к сбоям в работе аппарата. В таком случае
гарантия на ремонт не распространяется.
-
Не храните кофемашину при температуре ниже 0 °C, так как оставшаяся
в системе нагрева вода может замерзнуть и повредить прибор.
-
Если кофемашина не будет использоваться в течение длительного
периода времени, то воду из резервуара необходимо слить. Вода может
испортиться. Всегда используйте только свежую воду.
Электромагнитные поля (ЭМП)
Этот прибор Philips соответствует всем применимым стандартам и нормам
по воздействию электромагнитных полей.
Обзор кофемашины
1 Пользовательский интерфейс
2 Кнопка ESPRESSO
3 Кнопка ESPRESSO LUNGO
4 Кнопка AROMA STRENGTH
5 Кнопка режима ожидания
6 Кнопка MENU
7 Кнопка LATTE MACCHIATO
8 Кнопка CAPPUCCINO
9 Защитный колпачок
10 Регулируемый носик выхода кофе
11 Крышка резервуара для воды
12 Крышка контейнера для кофейных зерен
13 Крышка отделения для молотого кофе
14 Переключатель питания
15 Гнездо для шнура питания
16 Эксплуатационная крышка
17 Кнопка открывания поддона для капель
18 Носик выхода молочной пены
19 Крышка сосуда для молока
20 Верхняя часть сосуда для молока
21 Сосуд для молока
22 Резервуар для воды
23 Регулятор помола
24 Сетевой шнур
25 Измеритель жесткости воды
26 Смазка
27 Щеточка для очистки
28 Многофункциональный инструмент (мерная ложка, кнопка регулировки
кофемолки и инструмент для очистки отверстия под кофе)
29 Варочная группа
30 Внутренняя часть сервисной дверцы с инструкциями по очистке
31 Выходное отверстие для кофе
32 Контейнер для частиц кофе
33 Индикатор заполнения поддона для капель
34 Контейнер для кофейной гущи
35 Крышка поддона для капель
36 Поддон для капель
Русский
41
Page 43

ESPRESSO
AROMA STRENGTH
CAPPUCCINO
MENU
42
Русский
37 Носик для подачи горячей воды
38 Отверстие для носика для подачи горячей воды
Пользовательский интерфейс
Для выбора различных пунктов меню используйте следующие кнопки:
Кнопка ESPRESSO=Кнопка ESC:нажмите эту кнопку, чтобы вернуться в
главное меню.
Кнопка AROMA STRENGTH=Кнопка ОК:нажмите эту кнопку для выбора,
подтверждения или отмены функции.
Кнопка CAPPUCCINO=Кнопка ВВЕРХ:нажмите для прокрутки меню вверх.
Кнопка MENU=Кнопка ВНИЗ:нажмите для прокрутки меню вниз.
Первая установка
При тестировании машины мы использовали настоящий кофе. Мы
тщательно очистили машину, однако в ней по-прежнему могут
присутствовать следы кофе. При этом мы гарантируем, что устройство
полностью новое.Как и при использовании большинства автоматических
кофемашин, для проведения автоматической настройки и достижения
оптимального вкуса кофе необходимо сначала выполнить несколько циклов
приготовления напитка.
1 Снимите с кофемашины весь упаковочный материал.
2 Установите кофемашину на столе или рабочей поверхности на
достаточном расстоянии от водопроводного крана, раковины и
источников тепла.
Page 44

15 cm
15 cm
15 cm
15 cm
15 cm
15 cm
15 cm
15 cm
M
AX
CALC
CLEAN
MAX
2
1
Русский
43
Примечание. Над кофемашиной, за ней и по обеим сторонам должно
оставаться не менее 15 см свободного пространства.
3 Наполните резервуар чистой водой до отметки MAX.
4 Откройте крышку контейнера для кофейных зерен. Засыпьте в контейнер
кофейные зерна и закройте крышку.
Примечание. Чтобы не допустить повреждения кофемолки, не засыпайте
в контейнер слишком много зерен.
Внимание! Используйте только зерна для эспрессо. Не используйте
молотый кофе и необжаренные или карамелизированные зерна, так как
это может привести к повреждению кофемашины.
5 Вставьте вилку сетевого шнура в розетку электросети (1), а затем
вставьте маленький штекер в разъем, расположенный на задней панели
кофемашины (2).
6 Установите переключатель питания, расположенный на задней части
устройства, в положение ON.
Будет мигать кнопка режима ожидания.
Page 45

INSTALL
FILTER
44
Русский
7 Нажмите кнопку режима ожидания, чтобы включить кофемашину.
8 Вставьте носик для подачи горячей воды.
-
На дисплее появится значок, указывающий на необходимость заливки
жидкости в контур.
9 Поставьте чашку под носик для подачи горячей воды. Нажмите
кнопку ОК, чтобы начать цикл заполнения водой. На дисплее
кофемашины появится сообщение, напоминающее о необходимости
вставки носика для подачи воды. Нажмите кнопку OK.
-
Кофемашина начнет подачу горячей воды.
-
На дисплее появится значок заливки контуров. Индикатор выполнения
отображает ход выполнения заливки.
10 Машина нагревается, и на дисплее появляется значок температуры.
11 Опустошите емкость и снова установите ее под носиком выхода кофе.
12 Машина будет пропускать воду через носик выхода кофе. На дисплее
отображается значок промывки и шкала выполнения.
Примечание. Не прерывайте цикл промывки.
13 На дисплее появляется следующий вопрос: «Фильтр AquaClean?»
Примечание. Если вы желаете установить фильтр AquaClean позже,
нажмите кнопку ESC и выполните цикл ручной промывки. Процедура
установки описана в разделе «Фильтр AquaClean».
14 Если вы желаете установить фильтр AquaClean, нажмите кнопку ОК.
Активация займет 2 минуты.
-
На дисплее отобразится сообщение, предлагающее установить.
15 Извлеките из упаковки фильтр AquaClean. Потрясите фильтр в течение
примерно 5 секунд.
Page 46

0 / 8
OFF
ON
Русский
16 Переверните фильтр AquaClean и поместите его в емкость с холодной
водой. Дождитесь, пока из фильтра перестанут выделяться пузырьки
воздуха.
17 Вставьте фильтр AquaClean в вертикальном положении в
соответствующий разъем. Нажмите на фильтр AquaClean, чтобы он
опустился вниз до упора. Для обеспечения оптимальной работы
убедитесь, что фильтр плотно зафиксирован, а уплотнительный слой
находится в правильном положении.
18 Наполните резервуар чистой водой до отметки MAX.
19 Выберите на дисплее пункт «ON» (вкл.) и подтвердите активацию, нажав
кнопку OK..
-
После завершения активации на дисплее будет показана галочка.
-
Кофемашина начнет нагреваться автоматически.
45
-
Затем отобразится экран, указывающий на готовность кофемашины к
работе. Также отобразится значок AquaClean 100%, подтверждающий
установку фильтра.
20 Приготовьте 2 чашки (0,5 л) горячей воды, чтобы завершить активацию.
Вылейте эту воду. Чтобы завершить активацию, необходимо выполнить
как промывку контура горячей воды, так и промывку контура подачи кофе.
После установки фильтра AquaClean цикл промывки вручную выполнять не
требуется.
Цикл промывки вручную
Во время выполнения цикла промывки вручную через контур подачи воды и
заварки кофе пропускается чистая вода. Промывка занимает несколько
минут.
Промывка контура горячей воды
1 Вставьте носик для подачи горячей воды (если он не установлен) и
разместите под ним посуду.
Page 47

MENU
HOT
WATER
GROUND COFFEE
46
Русский
2 Нажмите кнопку MENU (меню). Перейдите к функции DRINKS (напитки),
подтвердите выбор и прокрутите меню до пункта HOT WATER (горячая
вода). Для подтверждения нажмите кнопку ОК.
-
На дисплее кофемашины появится сообщение, напоминающее о
необходимости вставки носика для подачи воды. Нажмите кнопку OK,
чтобы подтвердить действие.
-
Кофемашина начнет подачу горячей воды.
Примечание. Для прерывания цикла промывки нажмите кнопку ОК.
3 После того, как кофемашина нальет 2 чашки горячей воды (0,5 л),
нажмите кнопку ОК, чтобы прекратить выдачу горячей воды. Дважды
повторите шаги 1—3.
Промывка контура заварки кофе
1 Поставьте посуду под носик выхода кофе.
2 Нажмите кнопку AROMA STRENGTH и выберите функцию варки PRE-
GROUND COFFEE (предварительно молотый кофе).
Примечание. Не добавляйте молотый кофе в отделение для молотого
кофе.
3 Нажмите кнопку ESPRESSO LUNGO.
-
Машина начнет пропускать воду через носик выхода кофе.
4 Дождитесь, пока машина перестанет подавать воду, а затем слейте
жидкость из посуды.
5 Дважды повторите шаги 1—4.
6 После того, как на дисплее снова появится главное меню, вылейте
жидкость из посуды. Кофемашина готова к использованию.
Фильтр AquaClean
Фильтр AquaClean обеспечивает защиту вашей кофемашины от
известкового налета и позволяет получать чистую воду, сохраняющую
аромат и вкус каждой чашки кофе. При использовании комплекта из 8
фильтров Aquaclean, как указано в данном руководстве, очистку
кофемашины от накипи нужно будет выполнять только после приготовления
5000 чашек кофе (емкостью 100 мл).
Примечание. Перед началом использования фильтра AquaClean машина
должна быть полностью очищена от накипи. Если вы не активировали
фильтр при первом использовании и приготовили больше 50 чашек кофе
(емкостью 100 мл), перед активацией фильтра машину необходимо
очистить от накипи.
Примечание. Если значок фильтра на дисплее начинает мигать, то
необходимо заменить фильтр AquaClean. Производите замену фильтра
AquaClean каждые 3 месяца, даже если на дисплее машины не мигает
соответствующий индикатор.
Подготовка и установка фильтра AquaClean
1 Извлеките из упаковки фильтр AquaClean. Потрясите фильтр в течение
примерно 5 секунд.
Page 48

2 Переверните фильтр AquaClean и поместите его в емкость с холодной
0 / 8
80%
NEW?
0 / 8
ON
OFF
0 / 8
WATER
FILTER
водой. Дождитесь, пока из фильтра перестанут выделяться пузырьки
воздуха.
3 Вставьте фильтр AquaClean в вертикальном положении в
соответствующий разъем. Нажмите на фильтр AquaClean, чтобы он
опустился вниз до упора. Для обеспечения оптимальной работы
убедитесь, что фильтр плотно зафиксирован, а уплотнительный слой
находится в правильном положении.
Активация фильтра AquaClean
При первом использовании машины можно установить фильтр AquaClean.
Если при первом использовании машины вы не устанавливали фильтр
AquaClean, то для его установки необходимо войти в соответствующее
меню, как описано ниже.
1 Нажмите кнопку MENU, выберите пункт MENU, а затем нажмите кнопку
OK для подтверждения. Прокрутите меню для выбора фильтра
«AquaClean». Для подтверждения нажмите кнопку ОК.
-
На дисплее отображается количество ранее установленных фильтров
AquaClean (от 0 до 8).
Русский
47
2 Выберите на дисплее пункт «ON» (вкл.) и нажмите кнопку OK
для подтверждения выбора.
3 На дисплее автоматически обновится число использованных фильтров.
Page 49

1 / 8
80%
NEW?
1 / 8
WATER
FILTER
DESCALE BEFORE
ACTIVATING FILTER
48
Русский
-
Затем отобразится экран, указывающий на готовность машины к
работе. Также отобразится значок «AquaClean 100%»,
подтверждающий установку фильтра.
4 Приготовьте 2 чашки (0,5 л) горячей воды, чтобы завершить активацию.
Вылейте эту воду.
Замена фильтра AquaClean
Если значок фильтра на дисплее начинает мигать, то необходимо заменить
фильтр AquaClean.Производите замену фильтра AquaClean каждые
3 месяца, даже если на дисплее машины не мигает соответствующий
индикатор.
1 Извлеките фильтр AquaClean. Выполните процедуры, указанные в
разделе «Подготовка и установка фильтра AquaClean».
2 Нажмите кнопку MENU, выберите пункт MENU, а затем нажмите кнопку
OK для подтверждения. Прокрутите меню для выбора фильтра
«AquaClean». Для подтверждения нажмите кнопку ОК.
3 Выберите на дисплее пункт «ON» (вкл.) и подтвердите активацию, нажав
кнопку OK..
4 Приготовьте 2 чашки (0,5 л) горячей воды, чтобы завершить активацию.
Вылейте эту воду.
Замена фильтра после 8 циклов
1 Когда на дисплее начнет мигать значок фильтра, нажмите кнопку MENU,
выберите пункт MENU и нажмите кнопку OK для подтверждения
действия. Прокрутите меню для выбора фильтра «AquaClean». Нажмите
кнопку OK для подтверждения.
-
Перед активацией нового фильтра на дисплее появится напоминание
о необходимости удаления накипи.
2 Нажмите кнопку OK, чтобы начать процедуру очистки от накипи. См.
раздел «Процедура очистки от накипи».
-
Если вы не хотите проводить очистку от накипи в данный момент,
несколько раз нажмите кнопку ESC для выхода из меню фильтра.
3 По завершении процедуры очистки от накипи на дисплее будет показан
запрос на установку фильтра AquaClean.
-
Выполните процедуры, указанные в разделе «Установка фильтра
AquaClean».
Измерение жесткости воды
Чтобы отрегулировать кофемашину в соответствии с параметрами воды,
актуальными для вашего региона, необходимо с помощью входящих в
комплект тестовых полосок проверить уровень жесткости воды.
Page 50

1
2
3
4
Русский
1 Поместите тестовую полоску (входит в комплект поставки машины) в
водопроводную воду на 1 секунду.
2 Уберите тестовую полоску от воды и подождите 1 минуту.
3 Посмотрите, сколько делений на тестовой полоске поменяли цвет на
красный, и сравните результат с данными в таблице ниже.
49
количество красных
устанавливаемое значение жесткость воды
сегментов
1 1 очень мягкая вода
2 2 мягкая вода
3 3 жесткая вода
4 4 очень жесткая вода
Установка степени жесткости воды
1 Чтобы настроить жесткость воды, нажмите кнопку MENU (меню),
выберите меню и прокрутите список до пункта WATER HARDNESS
(жесткость воды).
2 Нажмите кнопку ОК и выберите значение жесткости воды в вашем
регионе.
3 Для подтверждения нажмите кнопку ОК.
4 Нажмите кнопку ESC, чтобы вернуться в главное меню.
Тип и объем напитка
Название напитка Описание Как выбрать
Эспрессо Кофе с густой пеной, подаваемый
в небольшой чашке
Кнопка на панели управления
Эспрессо лунго Эспрессо увеличенного объема с
густой пеной, подаваемый в
чашке среднего размера
Кнопка на панели управления
Page 51

50
Русский
Капучино 1/3 эспрессо, 1/3 горячего молока
и 1/3 молочной пены, подается в
крупной чашке
Латте макиато Объемная порция горячего
молока с пеной, в которую
добавлена порция эспрессо.
Подается в высоком стакане
Молочная пена Горячее молоко с пеной Меню Special Drinks (особые
Горячая вода Меню Special Drinks (особые
Кнопка на панели управления
Кнопка на панели управления
напитки)
напитки)
Название напитка
Эспрессо 40 мл 20—230 мл
Эспрессо лунго 80 мл 20—230 мл
Горячая вода 300 мл 50—450 мл
Стандартный объем Диапазон объемов
Приготовление кофе
Регулировка носика выхода кофе
Эта кофемашина предназначена для разлива различных видов кофе в
чашки и стаканы разных размеров. Высоту носика выхода кофе в
зависимости от размера чашки или стакана можно настроить, сдвинув его
вверх или вниз.
Приготовление кофе из зерен
Приготовление 1 чашки кофе
1 Поставьте чашку под носик выхода кофе.
2 Нажмите кнопку ESPRESSO или ESPRESSO LUNGO, чтобы приготовить
требуемый вид кофе.
-
Напиток будет наливаться через носик выхода кофе.
Примечание. Чтобы остановить процесс приготовления до того, как
кофемашина выдаст заданный объем кофе, нажмите кнопку ОК.
Приготовление 2 чашек кофе
1 Поставьте две чашки под носик выхода кофе.
Page 52

2 Одновременно можно готовить две чашки эспрессо или эспрессо лунго.
1
1
2
Нажмите кнопку выбранного напитка дважды. Кофемашина
автоматически выполнит два последовательных цикла помола.
Приготовление напитка из молотого кофе
Для приготовления напитка с использованием молотого кофе используйте
входящую в комплект поставки мерную ложку. С ее помощью загрузите
нужную дозу порошка в отделение для молотого кофе. Если загрузить
слишком много кофе, то излишки попадут в ящик для молотого кофе.
1 Откройте крышку отделения для молотого кофе.
2 Засыпьте в соответствующее отделение одну мерную ложку молотого
кофе.
Внимание! Не загружайте в отделение для молотого кофе любые другие
продукты, так как это может привести к повреждению кофемашины.
3 Закройте крышку отсека предварительно молотого кофе.
4 Поставьте чашку под носик выхода кофе.
5 Нажмите кнопку AROMA STRENGTH, чтобы выбрать пункт PRE-
GROUND COFFEE (предварительно молотый кофе).
-
Машина автоматически начнет приготовление выбранного напитка.
Примечание. При использовании молотого кофе можно готовить только
один вид кофе за раз.
Русский
51
Приготовление напитков на молочной основе
Для приготовления молочной пены и кофейных напитков на молочной
основе используется сосуд для молока.
Как пользоваться сосудом для молока
Примечание. Перед первым использованием сполосните сосуд для молока,
как указано в главе «Обслуживание и уход», раздел «Очистка сосуда для
молока».
Внимание! В начале цикла приготовления из носика для молочной пены
может вылетать пар и брызги горячего молока.
Внимание! Перед выбором напитка на молочной основе или с молочной
пеной убедитесь в том, что установлен сосуд для молока и носик для
молочной пены.
1 Если установлен носик для подачи горячей воды, нажмите кнопки
отсоединения, расположенные по обе стороны от носика (1), и снимите
его (2).
Page 53

52
Русский
2 Снимите крышку сосуда для молока.
3 Залейте в сосуд молоко в диапазоне между отметками MIN и MAX.
Примечание. Для получения идеальной пены необходимо использовать
холодное молоко (прибл. 5 °C) с минимальным содержанием белка 3 %. В
зависимости от ваших предпочтений, вы можете использовать как
цельное, так и полуобезжиренное молоко. Кроме того, можно
использовать обезжиренное молоко, соевое молоко и молоко, не
содержащее лактозы.
4 Слегка наклоните сосуд для молока и вставьте его в направляющие для
машины. Затем прижмите нижнюю часть сосуда по направлению к
машине, чтобы зафиксировать его на поддоне.
5 Отведите носик для молочной пены вправо до упора. В этом положении
выполняется выдача молочной пены.
Примечание. Если не отвести носик полностью, то процесс
приготовления пены в сосуде для молока может происходить
неправильно.
Приготовление кофейных напитков на молочной основе и
молочной пены
1 Поставьте чашку под открытый носик для молочной пены.
2 Выберите напиток на молочной основе.
-
Для приготовления капучино нажмите кнопку CAPPUCCINO.
-
Нажмите кнопку LATTE MACCHIATO для приготовления латте
макиато.
-
Нажмите кнопку MENU, выберите пункт «Drinks» (напитки), а затем
прокрутите меню вниз для выбора молочной пены.
-
На дисплее кофемашины появится сообщение, напоминающее о том,
что необходимо установить сосуд для молока и отвести носик для
молочной пены.
3 Машина сначала выдает в чашку или в стакан заданное количество
молочной пены, а затем добавляет требуемое количество кофе.
-
Чтобы прекратить выдачу молока или кофе, нажмите кнопку ОК.
Page 54

4 После приготовления напитка на молочной основе на дисплее появится
1
1
2
сообщение, предлагающее выполнить быструю очистку носика
молочного сосуда. На выполнение быстрой очистки дается 10 секунд.
Быструю очистку можно выполнить, не выливая молоко из сосуда.
Заберите чашку с напитком и поместите другую посуду под носиком для
молочной пены. Нажмите кнопку ОК дважды, чтобы подтвердить очистку,
или ESC, чтобы выполнить быструю очистку позже. Быструю очистку
рекомендуется выполнять как минимум один раз в день, см. раздел
«Очистка сосуда для молока».
Особые напитки
Как выбрать особые напитки
1 Нажмите кнопку MENU и выберите пункт «Drinks» (напитки).
2 Для подтверждения нажмите кнопку ОК.
3 Прокрутите меню для выбора требуемого напитка.
Подача горячей воды
Установка и снятие носика для подачи горячей воды
Чтобы вставить носик для подачи горячей воды:
1 Слегка наклоните носик для подачи горячей воды и вставьте его в
машину.
2 Нажмите и проверните носик для подачи горячей воды, чтобы
зафиксировать его на устройстве.
Чтобы извлечь носик для подачи горячей воды:
Русский
53
1 Для разблокировки нажмите кнопки отсоединения по бокам носика для
подачи горячей воды.
2 Слегка поднимите носик для подачи горячей воды и вытяните его из
кофемашины.
Подача горячей воды
Внимание! В начале цикла приготовления из носика для подачи горячей
воды может вылетать пар и брызги горячей воды. Снимать носик для подачи
горячей воды можно только после окончания цикла.
1 Нажмите кнопку MENU (меню). Перейдите к пункту «Drinks» (напитки),
подтвердите выбор и прокрутите меню до пункта «Hot water» (горячая
вода).
Page 55

ESPRESSO
54
Русский
Внимание! Выбирать пункт «Hot water» в меню можно только после
установки носика для подачи горячей воды.
2 Для подтверждения нажмите кнопку ОК.На дисплее кофемашины
появится сообщение, напоминающее о необходимости вставки носика
для подачи воды. Нажмите кнопку OK, чтобы подтвердить действие.
Кофемашина начнет подачу горячей воды.
-
Чтобы прекратить выдачу горячей воды, нажмите кнопку ОК.
Регулировка количества и крепости
Адаптивная система Saeco
Характеристики кофе зависят от страны его происхождения, состава и
способа обжарки. Кофемашина оснащена системой самостоятельной
регулировки, которая позволяет извлечь максимум вкуса и аромата из
кофейных зерен. После нескольких циклов заварки система настроится
самостоятельно.
Настройка объема кофе и молока
Размер порции можно регулировать в зависимости от предпочтений и от
объема чашки.
1 Чтобы настроить объем эспрессо, нажмите и удерживайте кнопку
ESPRESSO, пока на дисплее не появится значок MEMO.
-
Кофемашина входит в режим программирования и начинает
приготовление выбранного напитка.
2 Как только чашка будет заполнена нужным количеством эспрессо,
нажмите кнопку ОК.
-
Галочка на дисплее указывает на то, что кнопка запрограммирована
успешно: после каждого нажатия кнопки кофемашина будет готовить
заданный объем эспрессо. Выполните аналогичную процедуру, чтобы
настроить объем эспрессо лунго, капучино и латте макиато: нажмите и
удерживайте кнопку требуемого напитка, а затем после того, как
чашка будет заполнена нужным количеством напитка, нажмите кнопку
ОК. Для настройки объема напитков на молочной основе вставьте
сосуд для молока и сначала сохраните объем молока, а затем —
объем кофе.
Настройка крепости кофе
Чтобы изменить уровень крепости кофе, нажмите кнопку AROMA
STRENGTH. При каждом нажатии кнопки AROMA STRENGTH уровень
крепости изменяется на одну ступень. На дисплее отображается выбранный
уровень крепости, который сохраняется только при приготовлении кофе.
Page 56

1
2
3
4
5
1 Очень слабый
2
1
2 Слабый
3 Стандартный
4 Крепкий
5 Очень крепкий
Примечание. Для каждого из уровней крепости машина автоматически
выбирает нужное количество кофе.
Последним в меню уровня крепости стоит пункт GROUND COFFEE.
Выберите этот пункт для приготовления напитка из молотого кофе. Для того,
чтобы засыпать нужное количество кофейного порошка, используйте
входящую в комплект поставки мерную ложку.
Примечание. При приготовлении кофе машина возвращается на главный
экран и сохраняет выбранный уровень крепости.
Регулировка параметров кофемолки
Для настройки кофемолки используйте соответствующую кнопку,
встроенную в ручку многофункционального инструмента. Независимо от
выбранных параметров кофемолка обеспечивает идеальный помол зерен
для приготовления отменного кофе чашка за чашкой. Кофемашина
сохраняет все богатство аромата и гарантирует исключительный вкус
напитка в каждой чашке.
Примечание. Настраивать кофемолку можно только тогда, когда
кофемашина размалывает кофейные зерна.
1 Поставьте чашку под носик выхода кофе.
2 Откройте крышку контейнера для кофейных зерен.
3 Нажмите кнопку ESPRESSO.
4 Когда кофемолка начнет размалывать зерна, найдите кнопку регулировки
помола на регулировочной ручке (1). Нажмите кнопку и поверните ручку
влево или вправо (2).
-
На выбор доступны 5 различных настроек кофемолки. Чем тоньше
помол, тем крепче получается кофе.
Внимание! Не поворачивайте ручку регулировки помола более чем на одну
ступень единовременно во избежание повреждения кофемолки.
Русский
55
Техническое обслуживание и уход
Обслуживание кофемашины продлевает срок ее службы и гарантирует
оптимальное качество и вкус кофе.
Очистка поддона для капель и контейнера для кофейной
гущи
Выполните следующие действия при включенной кофемашине:
Page 57

1
1
2
56
Русский
-
Когда на дисплее отображается значок опустошения контейнера для
кофейной гущи необходимо очистить этот контейнер от скопившейся
гущи.
-
Мигание индикатора в поддоне для капель свидетельствует о его
заполнении. Ежедневно опустошайте и очищайте поддон для капель.
1 Нажмите на кнопки фиксатора, расположенные по обеим сторонам
поддона для капель (1) и вытяните поддон из кофемашины (2).
2 Извлеките контейнер для кофейной гущи и опустошите его.
3 Очистите поддон для капель и промойте его под струей воды.
4 Установите контейнер для кофейной гущи обратно в поддон для капель.
5 Вставьте поддон для капель обратно в машину и надавите на него до
характерного щелчка.
Примечание. При снятии поддона для капель убедитесь, что
прибор включен. Если перед снятием поддона для капель выключить
кофемашину, то после повторного включения на дисплее будет
отображаться значок опустошения контейнера для кофейной гущи, даже
если он уже был очищен.
Очистка резервуара для воды
1 Периодически извлекайте резервуар для воды и споласкивайте его
чистой водой.
2 Наполните резервуар свежей холодной водой до отметки MAX и
установите его в кофемашину.
Очистка отделений для кофе
-
Один раз в месяц протирайте контейнер для кофейных зерен сухой
тканью.
-
При необходимости очищайте отделение для молотого кофе с помощью
сухой ткани.
Очистка варочной группы
Еженедельная очистка варочной группы
1 Выключите кофемашину и отключите ее от электросети.
2 Снятие поддона для капель и контейнера для кофейной гущи.
3 Очистите поддон для капель и промойте его под струей воды.
4 Очистите контейнер для кофейной гущи и промойте его в чуть теплой
воде.
5 Откройте эксплуатационную крышку.
Page 58

2
1
Русский
6 Нажмите кнопку PUSH (1) и потяните за ручку варочной группы, чтобы
извлечь ее из кофемашины (2).
7 Очистите выходное отверстие для кофе при помощи ручки ложки или
используя многофункциональный инструмент, который входит в комплект
поставки машины. Вставьте, как показано на рисунке.
8 Снимите контейнер для кофейной гущи, очистите его и промойте в чуть
теплой воде. Дайте контейнеру высохнуть и вставьте его на место.
57
9 Тщательно промойте варочную группу в чуть теплой воде. Аккуратно
очистите верхний фильтр.
Внимание! Не очищайте варочную группу в посудомоечной машине, а также
не используйте для ее очистки жидкие и другие чистящие средства. Это
может привести к выходу варочной группы из строя и негативно сказаться
на вкусовых качествах кофе.
10 Дайте варочной группе просохнуть на воздухе.
Примечание. Не протирайте варочную группу тканью, в противном случае
возможно ее засорение волокнами.
11 Протрите внутреннюю поверхность кофемашины мягкой влажной тканью.
12 Прежде чем установить варочную группу обратно в кофемашину,
убедитесь, что два значка-указателя на боковой панели совпадают. Если
они не совпадают, выполните следующие действия.
Page 59

58
Русский
-
Убедитесь, что рычаг соприкасается с основанием варочной группы.
13 Убедитесь, что фиксатор варочной группы находится в правильном
положении.
-
Для правильной установки фиксатора поднимайте его до крайнего
верхнего положения.
-
Если фиксатор по-прежнему находится внизу, то он расположен
неправильно.
14 Задвиньте варочную группу обратно в кофемашину по направляющим
пазам до щелчка.
Внимание! Не нажимайте кнопку PUSH.
15 Закройте эксплуатационную крышку.
Ежемесячная очистка варочной группы с использованием
таблетки для удаления жира.
-
После заварки 500 чашек кофе или один раз в месяц необходимо
выполнять цикл очистки.
-
Для цикла очистки необходимо использовать таблетку для удаления
жира.
Внимание! При очистке используйте только таблетки для удаления жира.
Они не применяются для удаления накипи.
1 Поставьте посуду под носик выхода кофе.
2 Нажмите кнопку AROMA STRENGTH, чтобы выбрать пункт PRE-
GROUND COFFEE (предварительно молотый кофе)..
Page 60

Русский
3 Положите таблетку для удаления жира в отделение для молотого кофе.
4 Нажмите кнопку ESPRESSO LUNGO. Кофемашина пропускает воду через
носик выхода кофе.
5 Когда шкала выполнения дойдет до середины, необходимо установить
переключатель питания на задней панели машины в положение OFF.
6 Оставьте раствор для удаления жира в системе примерно на 15 минут.
7 Установите переключатель питания в положение ON.
8 Нажмите кнопку режима ожидания.
9 Дождитесь пока машина выполнит цикл автоматической промывки.
10 Выполните процедуру еженедельной очистки варочной группы.
11 Снятие поддона для капель и контейнера для кофейной гущи. Очистите
поддон для капель и контейнер для кофейной гущи, а затем установите
их обратно в кофемашину.
12 Нажмите кнопку AROMA STRENGTH, чтобы выбрать пункт PRE-
GROUND COFFEE (предварительно молотый кофе)..
13 Нажмите кнопку ESPRESSO LUNGO. Кофемашина пропускает воду через
носик выхода кофе.
14 Дважды повторите шаги 12 и 13. Вылейте полученную воду.
15 Для очистки поддона для капель положите таблетку для удаления жира в
поддон для капель и наполните его горячей водой на две трети. Оставьте
таблетку для удаления жира в системе примерно на 30 минут. Затем
вылейте жидкость из поддона для капель и хорошо сполосните его.
59
Ежемесячная смазка варочной группы
После заварки 500 чашек кофе или один раз в месяц необходимо
смазывать варочную группу.
1 Выключите кофемашину и отключите ее от электросети.
2 Снимите варочную группу и промойте ее чуть теплой водой, как указано в
разделе «Еженедельная очистка варочной группы».
3 Нанесите небольшое количество смазки на поверхность вала в нижней
части варочной группы.
Page 61

60
Русский
4 Также нанесите немного смазки на направляющие с каждой из сторон
(см. рисунок).
5 Вставьте варочную группу, как указано в разделе «Еженедельная очистка
варочной группы».
Очистка сосуда для молока
Очистка сосуда для молока
Поставьте посуду под носик для молочной пены и снимите его.После
приготовления напитка на молочной основе на дисплее появляется значок,
указывающий на необходимость очистки сосуда для молока.
1 После появления этого значка нажмите кнопку ОК для проведения цикла
очистки.
Совет. Заберите чашку с напитком и поместите другую посуду под носиком
для молочной пены.
2 Поставьте посуду под носик для молочной пены и снимите его.
3 Нажмите кнопку ОК, чтобы начать цикл подачи горячей воды.
Для тщательной очистки сосуда для молока необходимо
регулярно выполнять следующие процедуры:
1 Снимите верхнюю часть сосуда для молока.
2 Снимите крышку с сосуда для молока.
3 Выньте из сосуда носик для молочной пены.
4 Извлеките из носика для молочной пены всасывающую трубку.
5 Тщательно промойте всасывающую трубку в чуть теплой воде.
Еженедельная очистка сосуда для молока
Носик для молочной пены состоит из 5 элементов. Один раз в неделю
снимайте все компоненты и выполняйте их очистку.
Page 62

1 2
5
3
4
1
2
1
2
1
Русский
1 Всасывающая трубка
2 Резиновый кронштейн
3 Вспениватель молока
4 Подключение вспенивателя молока
5 Крышка с носиком для подачи
Снятие сосуда для молока.
1 Нажмите кнопки отсоединения по обеим сторонам сосуда для молока (1)
и снимите с него верхнюю часть (2).
2 Переверните крышку с носиком для подачи и крепко удерживайте ее
рукой. Вытяните из резинового кронштейна всасывающую трубку.
61
3 Нажмите кнопки фиксатора на носике для молочной пены и снимите с
резинового кронштейна вспениватель молока.
4 Вытяните из вспенивателя соединительный кронштейн.
5 Промойте все компоненты под проточной теплой водой.
Совет. Все съемные элементы кроме самого сосуда можно мыть в
посудомоечной машине.
Установка сосуда для молока на место
1 Чтобы установить носик для молочной пены обратно выполните шаги
2—4, указанные в процедуре «Снятие носика для молочной пены» в
обратной последовательности.
2 Установите носик для молочной пены обратно на верхнюю часть сосуда
для молока.
3 Установите верхнюю часть на сосуд.
Page 63

MI
N
MAX
62
Русский
Примечание. Перед тем, как установить носик для молочной пены на
верхнюю часть сосуда, необходимо установить в нужное положение
фиксатор, расположенный в верхней части. Если этот фиксатор
расположен неправильно, вы не сможете установить носик для молочной
пены на верхней части сосуда.
Ежемесячная очистка сосуда для молока
Для выполнения этой процедуры используйте только специальное средство
для очистки контура молока SAECO CA6705.
1 Вылейте содержимое пакетика со средством для очистки контура молока
в сосуд для молока. Затем заполните сосуд для молока водой до отметки
максимально допустимого уровня (MAX).
2 Вставьте сосуд для молока в машину и поставьте посуду под носик для
молочной пены.
3 Нажмите кнопку MENU, выберите пункт «Drinks» (напитки), а затем
прокрутите меню для выбора молочной пены. Нажмите кнопку ОК, чтобы
начать цикл подачи чистящего средства.
4 Повторяйте шаг 3, пока сосуд для молока не станет пустым.
5 После того, как сосуд для молока станет пустым, уберите посуду и
извлеките сосуд для молока из кофемашины.
6 Тщательно промойте сосуд для молока и заполните его чистой водой до
отметки максимально допустимого уровня (MAX).
7 Установите в машину сосуд для молока.
8 Поставьте посуду под носик для молочной пены.
9 Нажмите кнопку MENU и выберите пункт «Milk froth» (молочная пена) в
меню «Special drinks» (особые напитки), чтобы запустить цикл промывки
сосуда для молока.
10 Повторяйте шаг 9, пока сосуд для молока не станет пустым.
Примечание. Запрещается пить раствор, который выходит из
кофемашины после выполнения этого шага.
11 Повторите шаги 6—10.
12 Цикл завершается после того, как машина перестает подавать воду.
13 Снимите все компоненты и промойте их под проточной теплой водой.
Кофемашина готова к использованию.
Процесс очистки
Сообщение «Start calc clean» (начать очистку от накипи) на дисплее
указывает на необходимость очистки накипи в кофемашине. Если после
появления на дисплее этого сообщения не провести очистку от накипи, то в
работе кофемашины возможно возникновение сбоев. В таком случае
гарантия на ремонт не распространяется.
Для удаления накипи из кофемашины используйте только соответствующие
средства Saeco. Раствор для удаления накипи Saeco гарантирует
оптимальную работу вашей машины. Использование других средств может
привести к повреждению кофемашины. Некоторое количество такого
средства может не раствориться и остаться в воде. Средство для удаления
накипи Saeco можно приобрести в интернет-магазине
www.shop.philips.com/service.Процедура очистки от накипи занимает
Page 64

START
CLEAN
CALC
REMOVE
FILTER
Русский
30 минут и состоит из цикла очистки от накипи и цикла промывки. Чтобы
поставить паузу при удалении накипи или при промывке, нажмите кнопку
ESC. Для продолжения цикла удаления накипи или цикла промывки нажмите
кнопку ОК.
63
Примечание. Не извлекайте варочную группу во время процедуры
очистки от накипи.Предупреждение. Запрещено пить раствор для
удаления накипи или воду, которая выходит из машины в процессе
удаления накипи.
1 Извлеките поддон для капель и контейнер для кофейной гущи,
опустошите и очистите их, а затем установите обратно в кофемашину.
2 Под носиком выхода кофе разместите посуду большой емкости (1,5 л).
3 Когда на дисплее появится сообщение «START CALC CLEAN» (начать
очистку от накипи), нажмите кнопку ОК для запуска соответствующей
процедуры. Снимите носик для подачи горячей воды, если он установлен.
-
На следующем дисплее отображается сообщение, предлагающее
вставить сосуд для молока.
-
На следующем дисплее отображается сообщение, предлагающее
открыть носик для подачи молока.
-
На следующем дисплее отображается сообщение, предлагающее
извлечь фильтр AquaClean.
Примечание. Нажав кнопку ESC, можно пропустить процедуру удаления
накипи. Если вы желаете выполнить удаление накипи позже, нажмите
кнопку MENU, выберите пункт «Menu» (меню) и прокрутите до пункта
«Descaling» (очистка от накипи). Нажмите кнопку OK для подтверждения.
Page 65

M
AX
CALC
CLEAN
CALC
CLEAN
1
2
64
Русский
4 Налейте раствор для удаления накипи в резервуар для воды. Наполните
резервуар чистой водой до отметки CALC CLEAN. Установите резервуар
для воды обратно в машину. Для подтверждения нажмите кнопку ОК.
-
Начнется первый этап процедуры очистки от накипи. Машина будет
пропускать через себя раствор для удаления накипи в несколько
этапов.
-
На дисплее отображается значок удаления накипи, индикатор этапа и
продолжительность выполнения. Первый этап длится 20 минут.
5 Машина должна подавать раствор для удаления накипи до опустошения
резервуара для воды.
6 Снимите и промойте резервуар для воды.
7 Наполните резервуар чистой водой до отметки CALC CLEAN. Установите
резервуар для воды обратно в машину, затем нажмите ОК.
8 Снимите и промойте сосуд для молока. Заполните сосуд для молока
водой до отметки минимально допустимого уровня (MIN). Вставьте сосуд
для молока в машину и откройте носик для молочной пены.
9 Опустошите емкость и снова установите ее под носиком выхода кофе.
Нажмите кнопку OK для подтверждения.
10 Затем начинается второй этап процедуры удаления накипи, т. е. цикл
промывки. Этот этап длится 3 минуты. На дисплее отображается значок
промывки и продолжительность выполнения.
Примечание. Если не заполнить резервуар для воды до отметки CALC
CLEAN, может потребоваться выполнение еще одного цикла промывки.
11 Дождитесь, пока машина перестанет подавать воду. После завершения
процедуры очистки от накипи на дисплее появляется галочка.
12 Нажмите кнопку OK, чтобы закрыть цикл очистки от накипи. Кофемашина
начнет нагреваться и запустит цикл автоматической промывки.
13 Уберите емкость и вылейте из нее жидкость.
14 После удаления накипи выполните процедуру еженедельной очистки
сосуда для молока.
15 Очистите варочную группу, выполнив цикл еженедельной очистки
варочной группы.
16 Установите в резервуар для воды новый фильтр AquaClean.
Совет. Использование фильтра AquaClean помогает продлить интервал
между циклами очистки от накипи!
Действия в случае прерывания процедуры очистки от накипи
После запуска процедуры удаления накипи ее необходимо довести до
конца, не выключая аппарат. Если при очистке от накипи кофемашина
зависает, нажмите кнопку режима ожидания для прерывания процедуры. В
таком случае или в случае сбоя электропитания или случайного отключения
от сети выполните следующие действия:
1 Слейте воду и тщательно промойте резервуар для воды.
2 Наполните резервуар водой до отметки CALC CLEAN и снова включите
кофемашину. Кофемашина начнет нагреваться и запустит цикл
автоматической промывки.
3 Перед приготовлением напитков выполните цикл ручной промывки
машины, см. раздел «Цикл промывки вручную».
Page 66

Примечание. Если процедура удаления накипи не была завершена,
необходимо как можно скорее выполнить эту процедуру повторно.
Значки предупреждений и коды ошибок
Предупреждающие сигналы отображаются красным цветом. Ниже
приводится список предупреждений, отображаемых на дисплее, а также их
объяснение.
-
Наполните резервуар чистой водой до отметки MAX.
-
Контейнер для кофейных зерен пустой. Добавьте в контейнер кофейные
зерна.
-
В машине не установлена варочная группа. Установите варочную группу.
Русский
65
-
Установите поддон для капель.
-
Закройте эксплуатационную крышку.
-
Извлеките контейнер для кофейной гущи и опустошите его.
Page 67

10
xx
66
Русский
-
При появлении кода ошибки см. раздел «Объяснение кодов ошибок». В
этом разделе приводится описание кодов ошибок и способы устранения.
Если на дисплее отображается этот значок, пользоваться машиной
нельзя.
Описание кодов ошибок
Код ошибки
Проблема Причина Возможное решение
1 Кофемолка засорена Выходное отверстие
3 - 4 Не удается извлечь
варочную группу.
5 Проблемы с контуром
подачи воды
Прочие коды ошибок Выключите
Если указанные выше решения не помогают убрать с дисплея код ошибки и
восстановить работу машины, обратитесь на горячую линию Philips Saeco.
Контактную информацию можно найти в гарантийном талоне или на сайте
www.saeco.com/support.
для кофе засорено
Варочная группа
расположена
неправильно.
В контуре подачи воды
присутствует воздух.
Очистите выходное
отверстие для кофе при
помощи ручки ложки
или используя
многофункциональный
инструмент.
Закройте сервисную
дверцу. Выключите
кофемашину и включите
ее снова. Дождитесь
появления экрана
«Machine ready»
(кофемашина готова к
работе) и затем
снимите варочную
группу.
Выполните процесс
снятия и установки
резервуара для воды
несколько раз.
Убедитесь, что он
установлен в
кофемашине
правильно. Убедитесь,
что отсек резервуара
для воды чистый.
кофемашину и через 30
секунд включите ее
снова. Выполните эту
процедуру 2—3 раза.
Поиск и устранение неисправностей
Проблема
Кофемашина не
включается
Причина Способы решения
Кофемашина отключена от сети,
либо переключатель питания
находится в положении OFF (выкл.).
Убедитесь в том, что шнур питания
правильно подключен к розетке
Page 68

Русский
67
Убедитесь, что переключатель
Кофемашина находится в
режиме DEMO.
Лоток для капель
заполнятся слишком
быстро.
Поставьте чашку под носик подачи
Значок заполнения
контейнера для кофейной
гущи продолжает
отображаться.
Контейнер для кофейной гущи
Кнопка питания нажата в течение
более 8 секунд.
Это нормально. Для промывки
внутренних контуров и варочной
группы кофемашина использует
воду. Часть этой воды выходит из
внутренних систем и попадает в
поддон для капель.
Очистка контейнера для кофейной
гущи была выполнена при
выключенной кофемашине.
установлен на место слишком
быстро.
питания установлен в положение
ON (вкл.).
Выключите и снова включите
кофемашину с помощью
переключателя питания,
расположенного на задней части
кофемашины.
Когда в поддоне для капель
загорается индикатор, то поддон
необходимо очистить.
для сбора воды после промывки.
Очищайте контейнер для
кофейной гущи только при
ВКЛЮЧЕННОЙ кофемашине. Если
очистить контейнер для кофейной
гущи при выключенной
кофемашине, то счетчик циклов
приготовления кофе не
сбрасывается. В этом случае на
дисплее будет отображаться
сообщение о необходимости
очистки контейнера для кофейной
гущи, даже если он полностью не
заполнен.
Устанавливать контейнер на место
следует только после того, как на
экране появится соответствующее
сообщение
Не удается извлечь
варочную группу.
Контейнер для кофейной гущи не
Не удается вставить
варочную группу.
Варочная группа расположена
неправильно.
снят.
Варочная группа расположена
неправильно.
Закройте сервисную дверцу.
Выключите кофемашину и
включите ее снова. Дождитесь
появления экрана о готовности
кофемашины к работе и затем
снимите варочную группу.
Перед снятием варочной группы
снимите контейнер для кофейной
гущи
Перед установкой на место
варочная группа не была
установлена в положение
ожидания. Убедитесь, что рычаг
соприкасается с основанием
варочной группы. Также убедитесь,
что фиксатор варочной группы
находится в правильном
положении.
Page 69

68
Русский
Выполните сброс кофемашины,
Процедура очистки кофемашины от
Слишком мало пены или
слишком жидкий кофе.
Неправильно подобрана кофейная
Кофемашина выполняет
Варочная группа загрязнена. Очистите варочную группу.
Кофе протекает через
носик выхода кофе
Кофе недостаточно
горячий.
накипи еще не завершена.
Кофемолка настроена на грубый
помол.
смесь.
самостоятельную регулировку.
Носик выхода кофе засорен. Очистите носик выхода кофе и его
Вы используете холодные чашки. Подогрейте чашки, ополоснув их
отключив питание и включив его
снова. Установите поддон для
капель и контейнер для кофейной
гущи обратно в машину. Не
устанавливайте варочную группу
обратно в машину. Закройте
сервисную дверцу, а затем
включите и выключите машину.
Затем попробуйте вставить
варочную группу на место.
Нельзя извлекать варочную группу
во время процедуры очистки от
накипи. Сначала следует
завершить процедуру очистки от
накипи и только затем снимать
варочную группу.
Отрегулируйте кофемолку,
установив более тонкий помол.
Выберите другой сорт кофе.
Приготовьте несколько чашек
кофе.
отверстия, используя ершик.
горячей водой.
Установлено слишком низкое
Вы добавляете в напиток молоко. При добавлении теплого или
Кофемашина измельчает
кофейные зерна, но не
готовит кофе.
Варочная группа загрязнена. Очистите варочную группу.
Носик выхода кофе засорен. Очистите носик выхода кофе и его
Выходное отверстие для кофе
Кофе вытекает слишком
медленно.
значение температуры. Проверьте
настройки в меню.
Выбран слишком тонкий помол. Отрегулируйте кофемолку,
заблокировано.
Слишком тонкий помол кофе. Выберите другой сорт кофе или
Выберите в меню высокую
температуру.
холодного молока температура
кофе в любом случае снижается.
установив более грубый помол.
отверстия, используя ершик.
Очистите выходное отверстие для
кофе при помощи ручки ложки или
используя многофункциональный
инструмент.
отрегулируйте кофемолку.
Page 70

Русский
Варочная группа загрязнена. Очистите варочную группу.
69
Выходное отверстие для кофе
В контурах машины образовалась
Молочная пена слишком
холодная.
Не удается получить
молочную пену.
Убедитесь в том, что носик для
Сосуд для молока собран не
Используемое молоко не пригодно
Невозможно активировать
фильтр AquaClean,
поскольку на экране не
отображается значок
галочки.
заблокировано.
накипь.
Чашки холодные. Прогрейте чашки горячей водой.
Сосуд для молока загрязнен или
вставлен неправильно.
молочной пены полностью открыт.
полностью.
для взбивания.
Фильтр уже активирован. Перед активацией нового фильтра
Очистите выходное отверстие для
кофе при помощи ручки ложки или
используя многофункциональный
инструмент.
Проведите очистку кофемашины
от накипи.
Очистите сосуд и убедитесь в том,
что он вставлен правильно.
Убедитесь в том, что носик для
молочной пены установлен в
нужное положение.
Убедитесь в том, что все
компоненты правильно собраны.
Объем и качество пены зависят от
типа молока. Следующие типы
молока обеспечивают хороший
выход пены: коровье молоко
средней жирности, цельное
коровье молоко, соевое молоко и
молоко, не содержащее лактозы.
Испытания других типов молока не
проводились, при их
использовании объем молочной
пены может уменьшаться.
нужно приготовить как минимум 10
чашек напитка (по 100 мл каждая).
Обратите внимание, что после
установки нового фильтра
количество циклов увеличивается
автоматически.
Не удается активировать
фильтр, при этом
кофемашина запрашивает
процедуру удаления
накипи.
Вы не заменили фильтр вовремя
Вы уже 8 раз заменяли фильтры
AquaClean. После 8 циклов замены
необходимо выполнить процедуру
очистки от накипи.
после появления мигающего значка,
информирующего о необходимости
замены фильтра AquaClean.
Сначала очистите машину от
накипи, а затем установите
фильтр.
Сначала очистите машину от
накипи, а затем установите
фильтр.
Page 71

70
Русский
Фильтр был установлен не при
При первой установке фильтр
Фильтр AquaClean был
установлен, однако на
дисплее отображается
сообщение о
необходимости очистки от
накипи.
Сообщение о
необходимости очистки от
накипи появляется до
того, как были выполнены
8 циклов замены
фильтров.
Фильтр AquaClean был установлен
первом подключении, а после
приготовления примерно 50 чашек
кофе (объемом 100 мл каждая).
Перед установкой фильтра
AquaClean машина должна быть
полностью очищена от накипи.
AquaClean был активирован
неправильно.
После 8 циклов замены необходимо
выполнить процедуру очистки от
накипи.
При первой установке фильтр
AquaClean не был правильно
активирован.
после использования машины в
течение некоторого периода
времени.
Сначала очистите машину от
накипи, а затем устанавливайте
новый фильтр AquaClean. После
очистки от накипи счетчик
фильтров будет сброшен в
значение 0/8. В меню машины
всегда подтверждайте активацию
фильтра. Эту процедуру также
следует выполнять после замены
фильтра.
Следуйте инструкциям на дисплее
до получения сообщения о том,
что активация фильтра прошла
успешно.
Сначала очистите машину от
накипи, а затем устанавливайте
новый фильтр AquaClean. После
этого счетчик фильтров будет
сброшен в значение 0/8. В меню
машины всегда подтверждайте
активацию фильтра. Эту
процедуру также следует
выполнять после замены фильтра.
Сначала очистите машину от
накипи, а затем устанавливайте
новый фильтр AquaClean.
Обязательно активируйте фильтр
в меню кофемашины.
Вы не активировали новый фильтр в
Вы не заменили фильтр после того,
Фильтр не
устанавливается в
машину.
В резервуаре по-прежнему
Вы пытаетесь установить фильтр,
Под машиной
присутствует вода.
меню машины.
как на дисплее начал мигать
соответствующий символ.
Из фильтра необходимо удалить
воздух.
присутствует вода.
отличный от фильтра AquaClean.
Поддон для капель переполнен. Очистите поддон для капель после
Дайте пузырькам воздуха выйти из
фильтра.
Перед установкой фильтра
очистите резервуар для воды.
Для машины подходит только
фильтр AquaClean.
появления индикатора в поддоне.
Обязательно очищайте поддон
для капель перед началом
процедуры удаления накипи.
Page 72

Русский
71
Кофемашина не установлена на
ровной горизонтальной поверхности.
Примечание. Если самостоятельно справиться с возникшими проблемами
не удается, обратитесь в центр поддержки потребителей Saeco.
Для правильной работы
индикатора поддона для капель
поместите машину на
горизонтальную поверхность.
Деморежим
В кофемашине предусмотрен демонстрационный режим.
1 Для входа в демонстрационный режим нажмите кнопку STANDBY и
удерживайте ее в течение 8 секунд.
2 Чтобы выйти из демонстрационного режима, выключите и снова
включите кнопку питания на задней панели машины.
Заказ аксессуаров Saeco
Для очистки машины и для удаления накипи используйте только
соответствующие средства Saeco. Их можно приобрести в интернетмагазине Philips (если он доступен для вашей страны) по адресу
www.shop.philips.com/service, а также у местных торговых представителей
либо в сертифицированных сервисных центрах.
Заказ продукции для обслуживания:
Номер модели
CA6700 Средство для очистки от накипи
Изделие
CA6903 Фильтр AquaClean
HD5061 Смазка для варочной группы
CA6704 Таблетки для удаления жира
CA6705 Средство для очистки контура молока
Технические характеристики
Производитель оставляет за собой право изменять технические
характеристики изделия для его улучшения. Указанные установленные
значения являются приблизительными.
Описание
Материал корпуса Термопластик
Размер (Ш x В x Г) 221 x 340 x 430 мм
Вес 7,5 кг
Значение
Page 73

72
Русский
Длина сетевого шнура 800—1200 мм
Панель управления Передняя сторона
Размер чашки до 152 мм
Резервуар для воды 1,8 литров, съемный
Вместимость контейнера для кофейных зерен 250 г
Вместимость контейнера для кофейной гущи 15 порций
Объем сосуда для молока 500 мл
Давление, создаваемое насосом 15 бар
Бойлер бойлер из нержавеющей стали
Системы безопасности плавкий предохранитель
Энергосберегающий режим < 1 Вт⋅ч
Номинальное напряжение —
энергопотребление — питание
Утилизация
-
Этот символ означает, что продукт не может быть утилизирован вместе с
бытовыми отходами (2012/19/ЕС).
-
Соблюдайте правила своей страны по раздельному сбору электрических
и электронных изделий. Правильная утилизация поможет предотвратить
негативное воздействие на окружающую среду и здоровье человека.
Гарантия и поддержка
Для получения поддержки или информации посетите веб-сайт
www.saeco.com/support или ознакомьтесь с информацией на гарантийном
талоне.
Для получения поддержки или информации звоните по телефону горячей
линии Philips Saeco в вашей стране. Контактную информацию можно найти
в отдельном гарантийном талоне или на сайте www.saeco.com/support.
См. информацию на внутренней поверхности
сервисной дверцы
Page 74

Page 75

Page 76

Page 77

Page 78

Page 79

Page 80

4219.460.2550.2 REV00
26-01-2016www.saeco.com/welcome
HD8917-HD8916_4219_460_2550_2_BOOKLET_A5_bl_BACKCOVER.indd 1 27/01/16 11:13
 Loading...