

Page 1
Register your product and get support at
www.saeco.com/welcome
HD8771/93
4219_460_3158_1_Book_Simp_A5_v2.indd 1 12/10/15 15:33
Page 2

Page 3

English 5
Page 4
ESPRES SO
CAPPUC CINO
ESPRES SO LU NGO
MILK F ROTH
CARAFE QUI CK C LEAN
MENU
A
R
O
M
A
S
T
R
E
N
G
T
H
S
P
E
C
I
A
L
D
R
I
N
K
S
1
2
29
30
4
13
14
15
16
28 27
17 18
21
22
20
19
23 24
26
25
3
8
9
6
5
10
11
7
12
Page 5

English
Contents
Introduction 6
Important safeguards 6
Caution 6
Instructions for the power supply cord 7
General description 7
Important 8
Warning 8
Caution 8
Electromagnetic fields (EMF) 9
The display 9
First installation 10
Manual rinsing cycle 10
Water filter 11
Installing the water filter 11
Replacing the water filter 12
Measuring the water hardness 12
Using the machine 13
Brewing coffee with beans 13
Brewing coffee with pre-ground coffee 13
Adjusting the coffee quantity 13
Adjusting the grind setting 13
Cappuccino, baby cappuccino and milk froth 14
Brewing special drinks 14
Descaling 14
Descaling procedure 15
Interruption of the descaling cycle 16
Cleaning and maintenance 16
Weekly cleaning of the brew group 16
Lubrication 18
Milk carafe quick clean 18
Daily cleaning of the milk carafe 18
Weekly cleaning of the milk carafe 19
Monthly full milk carafe cleaning with milk circuit cleaner 21
Warranty and support 21
Ordering maintenance products 22
Disposal 22
Warning icons and error codes 22
Meaning of error codes 23
Troubleshooting 24
5
English
Page 6

6
English
Introduction
Congratulations on buying this Intelia/Intelia Deluxe full automatic espresso
machine! The machine is suitable for preparing espresso coffee using whole
coffee beans. You can use the milk carafe to prepare perfect cappuccino in
a quick and easy way.To fully benefit from the support that Saeco offers,
please register your product at www.saeco.com/welcome. This user manual
applies to all Intelia/Intelia Deluxe models with milk carafe.
Important safeguards
When using electrical appliances, basic safety precautions should always be
followed, including the following:
1 Read all instructions.
2 Do not touch hot surfaces. Use handles or knobs.
3 To protect against fire, electric shock and injury to persons do not
immerse cord, plugs, or appliance in water or other liquid.
4 Close supervision is necessary when the appliance is used by or near
children.
5 Unplug from outlet when not in use and before cleaning. Allow to cool
before putting on or taking off parts, and before cleaning the appliance.
6 Do not operate any appliance with a damaged cord or plug or after the
appliance malfunctions, or has been damaged in any manner. Return
appliance to the nearest authorized service facility for examination, repair
or adjustment.
7 The use of accessory attachments not recommended by the appliance
manufacturer may result in fire, electric shock or injury to persons.
8 Do not use outdoors.
9 Do not let cord hang over edge of table or counter, or touch hot surfaces.
10 Do not place on or near a hot gas or electric burner, or in a heated oven.
11 Always attach plug to appliance first, then plug cord into wall outlet. To
disconnect, turn any control to “off”, then remove plug from wall outlet.
12 Do not use appliance for other than intended use.
SAVE THESE INSTRUCTIONS
Caution
This appliance is for household use only. Any servicing, other than cleaning
and user maintenance, should be performed by an authorized service
center. Do not immerse machine in water. To reduce the risk of fire or
electric shock, do not disassemble the machine. There are no parts inside
the machine serviceable by the user. Repair should be done by authorized
service personnel only.
1 Check voltage to be sure that the voltage indicated on the nameplate
corresponds with your voltage.
2 Never use warm or hot water to fill the water tank. Use cold water only.
3 Keep your hands and the cord away from hot parts of the appliance
during operation.
4 Never clean with scrubbing powders or harsh cleaners. Simply use a soft
cloth dampened with water.
Page 7

5 For optimal taste of your coffee, use purified or bottled water. Periodic
descaling is still recommended every 2-3 months.
6 Do not use caramelized or flavored coffee beans.
Instructions for the power supply cord
-
A short power-supply cord (or detachable power-supply cord) is to be
provided to reduce risks resulting from becoming entangled in or tripping
over a longer cord.
-
Longer detachable power-supply cords or extension cords are available
and may used if care is exercised in their use.
-
If a long detachable power-supply cord or extension cord is used.
1 The marked electrical rating of the detachable power-supply cord or
extension cord should be at least as great as the electrical rating of the
appliance.
2 If the appliance is of the grounded type, the extension cord should be a
grounding-type 3-wire cord, and
3 The longer cord should be arranged so that it will not drape over the
counter top or table top where it can be pulled on by children or tripped
over.
General description
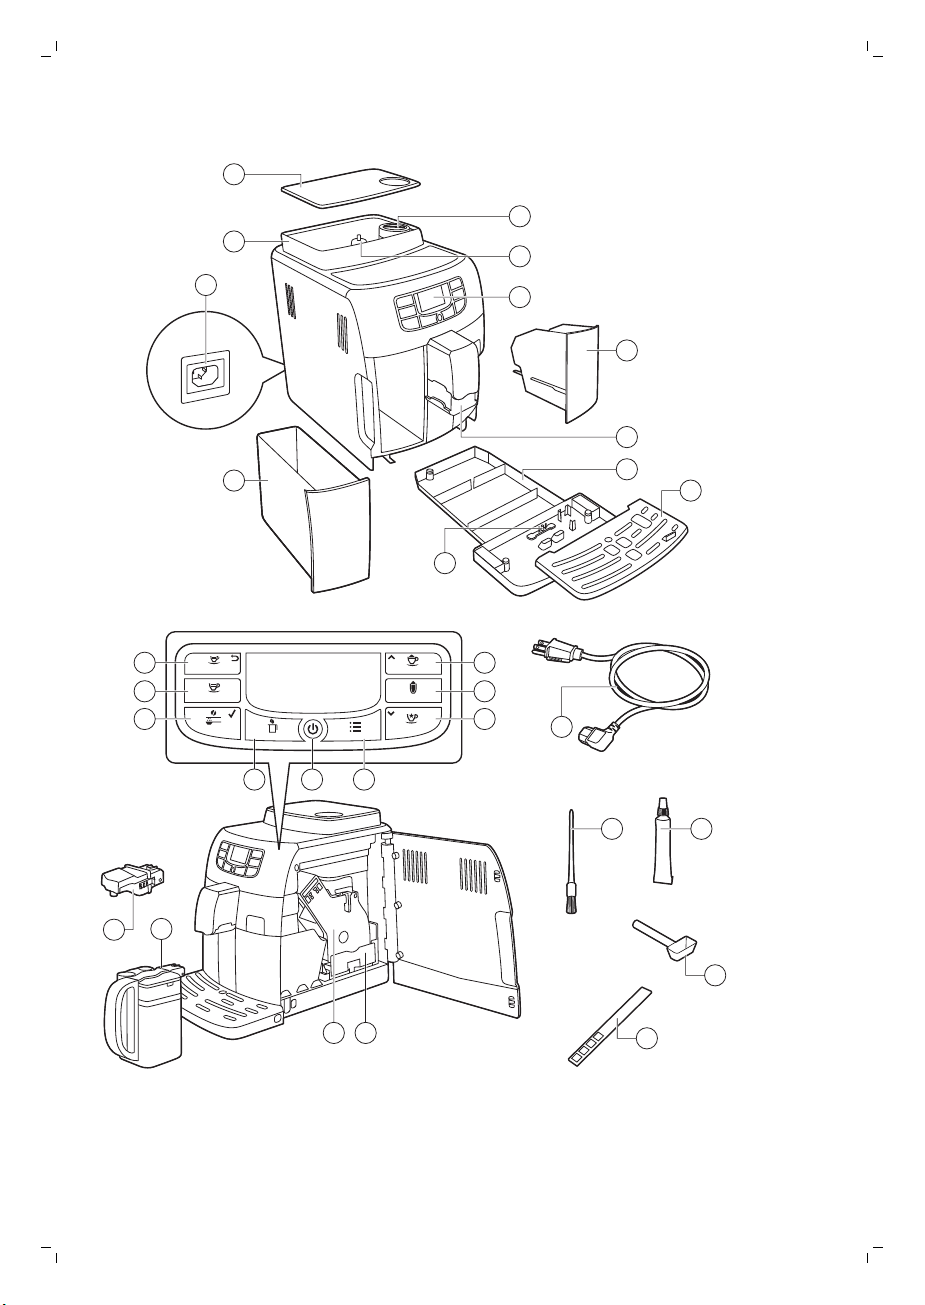
1 Coffee bean hopper lid
2 Coffee bean hopper
3 Power cord socket
4 Water tank
5 Pre-ground coffee compartment
6 Grinder adjustment knob
7 Control panel
8 Coffee grounds container
9 Coffee dispensing spout
10 Drip tray
11 Drip tray cover
12 Drip tray full indicator
13 Espresso button
14 Espresso lungo button
15 Aroma strength button
16 Carafe quick clean button
17 Standby button
18 Menu button
19 Special drinks button
20 Milk froth button
21 Cappuccino button
22 Power supply cord
23 Cleaning brush (for specific types only)
24 Grease for the brew group (for specific types only)
25 Pre-ground coffee measuring spoon
26 Water hardness test strip
27 Coffee residues drawer
28 Brew group
29 Milk carafe
30 Hot water dispensing spout
English
7
Page 8

8
English
Important
Warning
Read and follow the safety instructions carefully and only use the machine
as described in this user manual to avoid accidental injury or damage due to
improper use of the machine. Keep this user manual for future reference.
-
Check if the voltage indicated on the machine corresponds to the local
voltage before you connect the machine
-
Connect the machine to a grounded wall outlet.
-
Do not let the power supply cord hang over the edge of a table or
counter, or touch hot surfaces.
-
Never immerse the machine, power plug or power supply cord in water
(danger of electrical shock).
-
Do not pour liquids on the power supply cord connector.
-
Never direct the hot water jet towards body parts: danger of burns.
-
Do not touch hot surfaces. Use handles and knobs.
-
Remove the power plug from the wall outlet:
-
If a malfunction occurs.
-
If the machine will not be used for a long time.
-
Before cleaning the machine.
-
Pull on the power plug, not on the power supply cord. Do not touch the
power plug with wet hands.
-
Do not use the machine if the power plug, the power supply cord or the
machine itself is damaged.
-
Do not make any modifications to the machine or its power supply cord.
Only have repairs carried out by a service center authorized by Philips to
avoid a hazard.
-
The machine should not be used by children younger than 8 years old.
-
This machine can be used by children aged from 8 years and above and
persons with reduced physical, sensory or mental capabilities or lack of
experience and knowledge if they have been given supervision or
instruction concerning use of the machine in a safe way and understand
the hazards involved. Children shall not play with the machine. Cleaning
and user maintenance shall not be made by children unless they are 8
years and above and supervised.
-
Keep the appliance and its power supply cord out of reach of children
aged less than 8 years.
-
Do not spill water on the power plug.
-
Only use the machine as described in the user manual to avoid potential
injury due to misuse.
-
Never insert fingers or other objects into the coffee grinder.
Caution
-
As water is a foodstuff, the water in the water tank must be used up
within 1 to 2 days.
Page 9

ESP RESS O
A
R
O
M
A
S
T
R
E
N
G
T
H
English
-
If you are not going to use your coffee machine for a prolonged period
(e.g. a holiday), we recommend that you discard any water left inside the
tank. Before you use the coffee machine again, clean the water tank and
perform a manual rinsing cycle.
-
Do not put any of the detachable parts of the machine in the dishwasher,
except for the milk carafe.
-
The machine is for household use only. It is not intended for use in
environments such as canteens, staff kitchen of shops, offices, farms or
other work environments.
-
Always put the machine on a flat and stable surface.
-
Do not place the machine on hot surfaces, directly next to a hot oven,
heater or similar source of heat.
-
Only put roasted coffee beans into the coffee bean hopper. If ground
coffee, instant coffee, raw coffee beans or any other substance is put in
the coffee bean hopper, it may damage the machine.
-
Let the machine cool down before inserting or removing any parts.
-
Never use warm or hot water to fill the water tank. Use cold nonsparkling drinking water.
-
Never clean with scrubbing powders or harsh cleaners. Simply use a soft
cloth dampened with water.
-
Descale the machine regularly. The machine indicates when descaling is
needed. If you do not clean and descale the machine, you run the risk
that the machine stops working and that your guarantee becomes
invalid.
-
Do not keep the machine at temperatures below 32°F. Water left in the
heating system may freeze and cause damage.
-
Do not leave water in the tank when the machine is not used over a long
period of time. The water can get contaminated. Use fresh water every
time you use the machine.
9
Electromagnetic fields (EMF)
This machine complies with all applicable standards and regulations
regarding exposure to electromagnetic fields.
The display
Some buttons can be used to navigate through the menus:
-
ESPRESSO button = ESC button: you can press this button to return to
the main menu. The ESC button takes you back one level. You may have
to press the ESC button several times to get back to the main menu.
-
AROMA STRENGTH button = OK button: you can press this button to
select, confirm or stop a function.
Page 10
CA PPU CC IN O
S
P
E
C
I
A
L
D
R
I
N
K
S
10
English
-
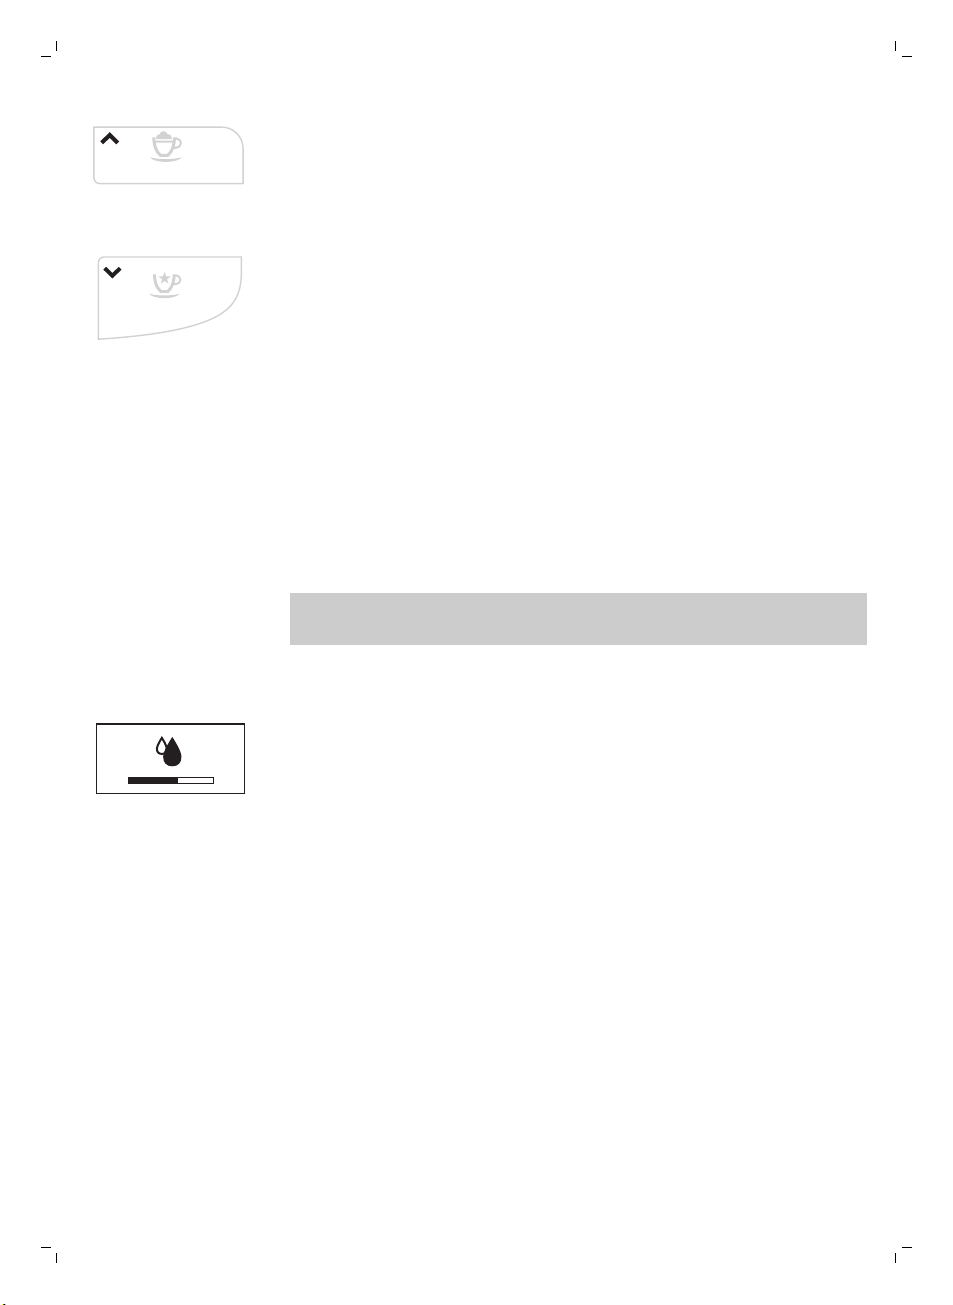
CAPPUCCINO button = UP button: press this button to scroll up through
the display menu.
-
SPECIAL DRINKS button = DOWN button: press this button to scroll down
through the display menu.
First installation
1 Slide the drip tray with drip tray cover into the machine.
2 Remove the water tank.
3 Fill the water tank to the MAX level with fresh water.
4 Fill the coffee bean hopper with coffee beans.
5 Insert the small plug into the socket located on the back of the machine.
Insert the power plug into the electrical outlet.
Note: The display reminds you have to insert the hot water dispensing
spout. If not present, press on both sides of the hot water dispensing
spout and insert it into the machine until you hear a click.
6 Place a container under the hot water and coffee dispensing spouts.
7 Press the STANDBY button.
8 Press the OK button to start the automatic circuit priming cycle.
-
The machine performs an automatic rinsing cycle.
9 Remove the water tank from the machine, empty it.
10 Fill the water tank with fresh water and place it back into the machine.
11 Continue with the next step: the manual rinsing cycle.
Manual rinsing cycle
1 Place a container under the coffee dispensing spout.
2 Press the AROMA STRENGTH button to select pre-ground coffee. Do not
add pre-ground coffee.
3 Press the ESPRESSO LUNGO button. The machine starts dispensing
water.
4 When the machine stops dispensing, empty the container. Repeat steps
1-3 twice.
5 Press the SPECIAL DRINKS button. Place a container under the hot water
dispensing spout.
6 Press the UP/DOWN buttons to scroll through the options of the display.
Press the OK button to select ‘hot water’.
-
The display reminds you have to install the hot water dispensing
spout (if not present), press the OK button to confirm.
Page 11
7 Press the OK button to start hot water dispensing.
WATER
FILTER
FILTER
FILTER
ON
OFF
-
Dispense water until the display shows the no water icon.
8 Fill the water tank with fresh water up to the MAX level and remove the
container.
The machine is ready for use.
Water filter
The “MAVEA” water filter is designed to reduce limescale deposits in your
coffee machine and provide filtered water to persevere the aroma and
flavor of each cup of coffee.
Installing the water filter
1 Remove the small white filter from the water tank and store it in a dry
place.
Note: Please keep the small white filter for future use.You will need it for
the descaling process.
2 Remove the filter from its packaging and immerse it in cold water with the
opening pointing upwards. Press the sides of the filter gently to let out
the air bubbles.
3 Place the filter in the empty water tank. Press it down until it cannot
move any further.
4 Fill the water tank with fresh water up to the MAX indication and place it
the machine.
5 Select the hot water function and dispense hot water until the water tank
is empty (see chapter ‘Using the machine’, section ‘Brewing special
drinks').
6 Refill the water tank with fresh water up to the MAX indication and place
it back into the machine.
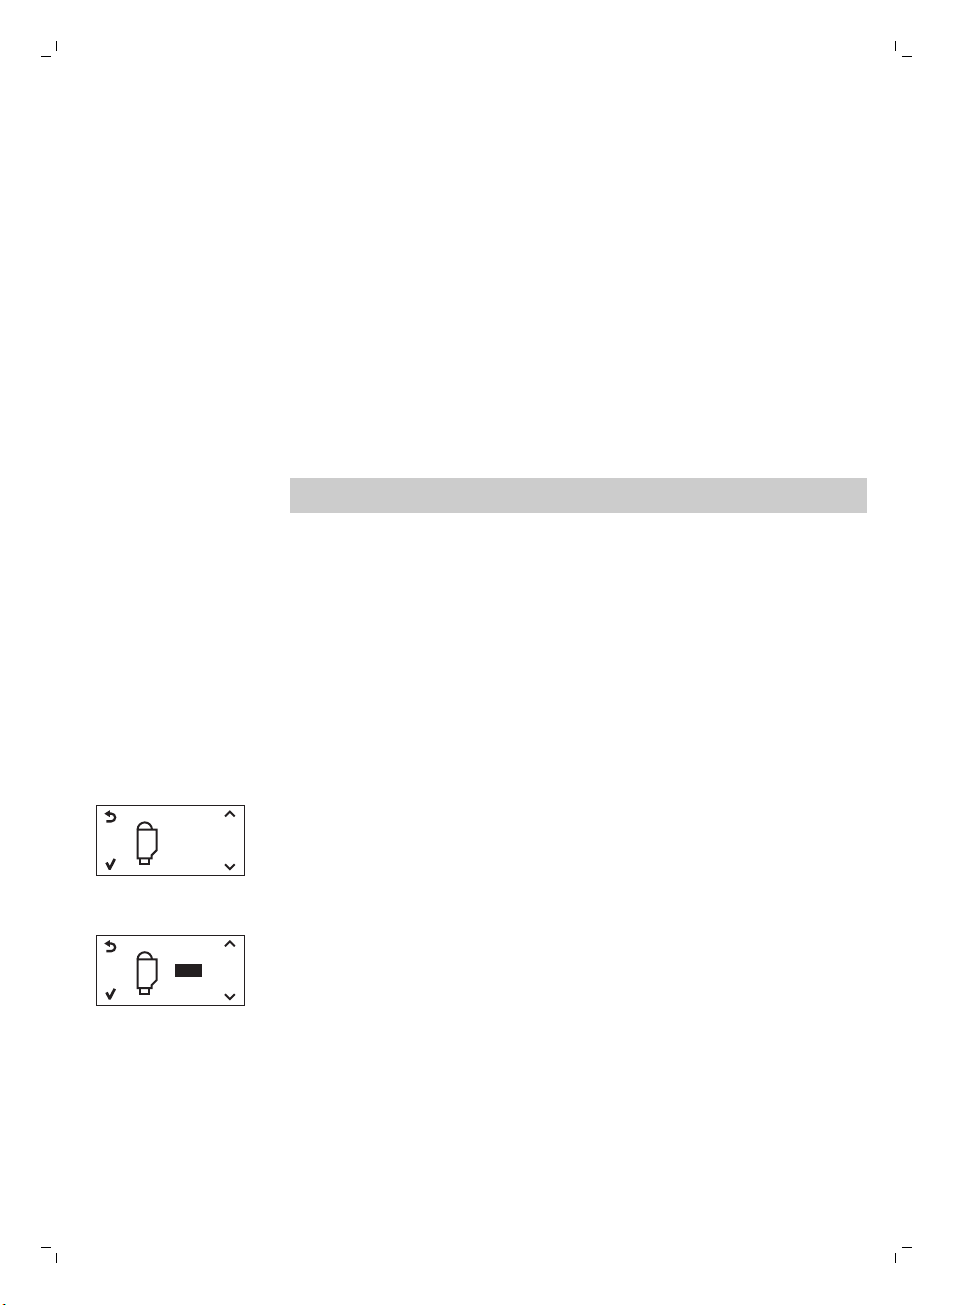
7 Press the MENU button to enter the menu.
8 Press the DOWN button until the display shows the following icon.
English
11
9 Press the UP button to select 'ON' and press the OK button to confirm.
10 Press the ESC button.
The filter and machine are now ready for use.
Page 12
FILTER
FILTER
ON
OFF
RESET
1
2
3
4
12
English
Replacing the water filter
-
The display shows the following icon to indicate the water filter needs to
be replaced.
1 Replace the filter as described in section 'Installing the water filter'.
2 Press the MENU button and press the UP/DOWN button to scroll trough
the options on the menu until the following icon is displayed.
3 Select the RESET option and press the OK button to confirm.
4 Press the ESC button to exit.
If the filter is already installed and you want to remove it and not replace it,
choose OFF
Measuring the water hardness
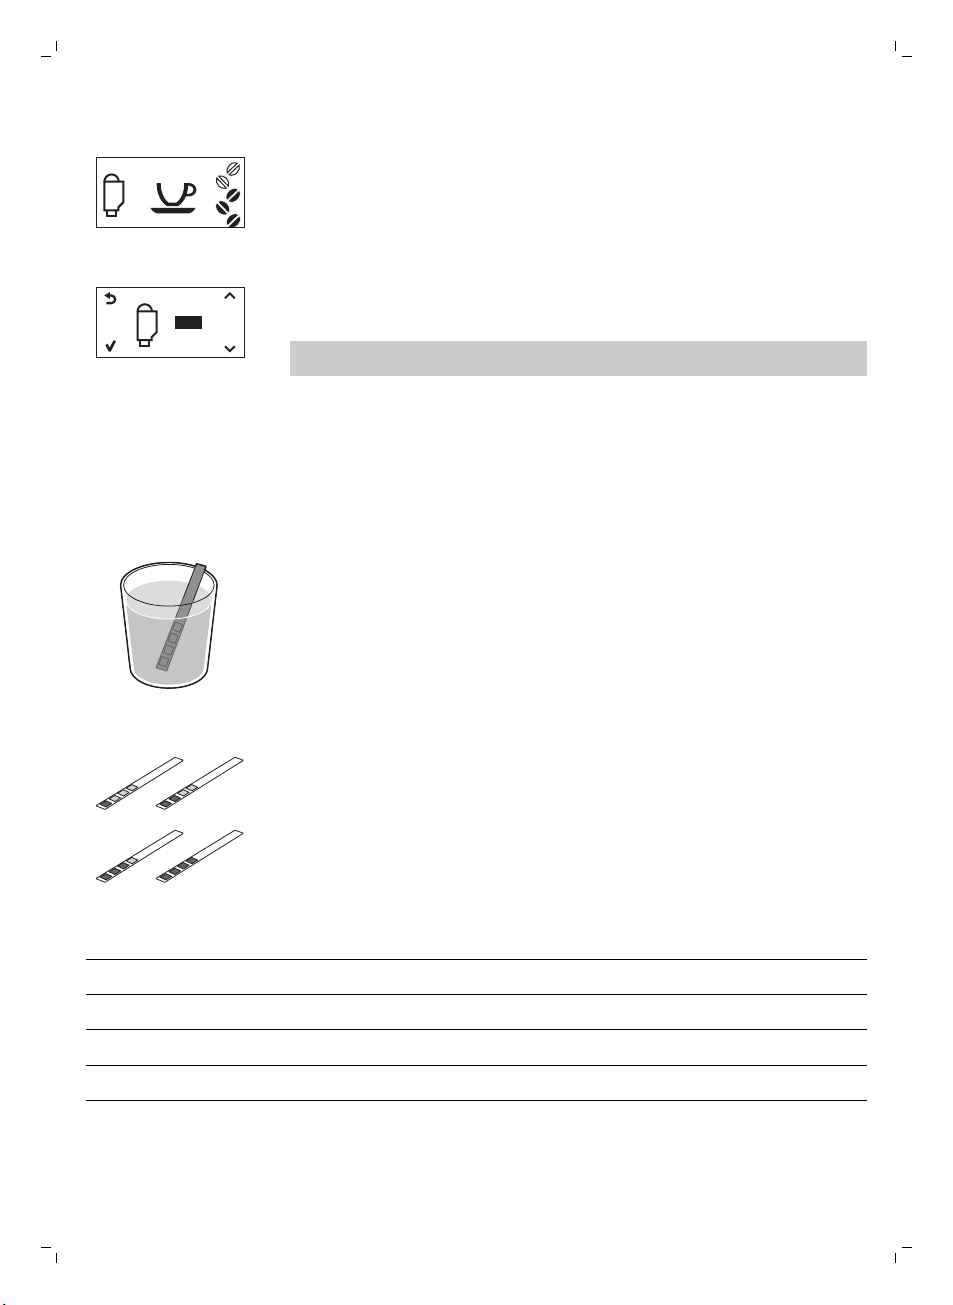
To be able to adjust the machine settings to the water in your region, please
measure the water hardness with the water hardness strip supplied.
1 Immerse the water hardness test strip (supplied with the machine) in
fresh water for 1 second.
2 Remove the water hardness strip and and wait for 1 minute.
3 Check how many squares have changed into the red color and check the
water hardness in below table.
numbers of red squares value to be set water hardness
1 1 very soft water
2 2 soft water
3 3 hard water
4 4 very hard water
Setting
1 To set the water hardness, press the MENU button, select menu and
the water hardness
scroll to select water hardness.
Page 13

2 Press the OK button and select the water hardness in your area.
3 Press the OK button to confirm.
4 Press the ESC button to return to the main menu.
Using the machine
Brewing coffee with beans
1 Adjust the coffee dispensing spout to suit the size of your cup.
2 Press the AROMA STRENGTH button to select the desired coffee
strength from 1-5 beans.
3 Press the ESPRESSO button to brew an espresso or press the ESPRESSO
LUNGO button to brew a coffee.
Brewing coffee with pre-ground coffee
When you brew coffee with pre-ground coffee, use the measuring scoop in
the multifunctional tool supplied to put the correct dose in the pre-ground
coffee compartment. If you add more pre-ground coffee, the excess coffee
will end up in the coffee grounds drawer.
1 Open the lid of the pre-ground coffee compartment.
2 Pour one measuring scoop of pre-ground coffee into the compartment.
Caution: Do not put any other substance than pre-ground coffee in the
pre-ground coffee compartment, as this may damage the machine.
3 Place the lid back on the pre-ground coffee compartment.
4 Place a cup under the coffee dispensing spout.
5 Press the AROMA STRENGTH button to select pre-ground coffee.
-
The machine automatically starts brewing coffee.
Note: You can only brew one coffee beverage at a time with pre-ground
coffee.
English
13
Adjusting the coffee quantity
1 Press and hold the ESPRESSO button or ESPRESSO LUNGO button until
the display shows the word MEMO.
2 When the cup contains the desired amount of coffee, press the OK
button to save the selected quantity.
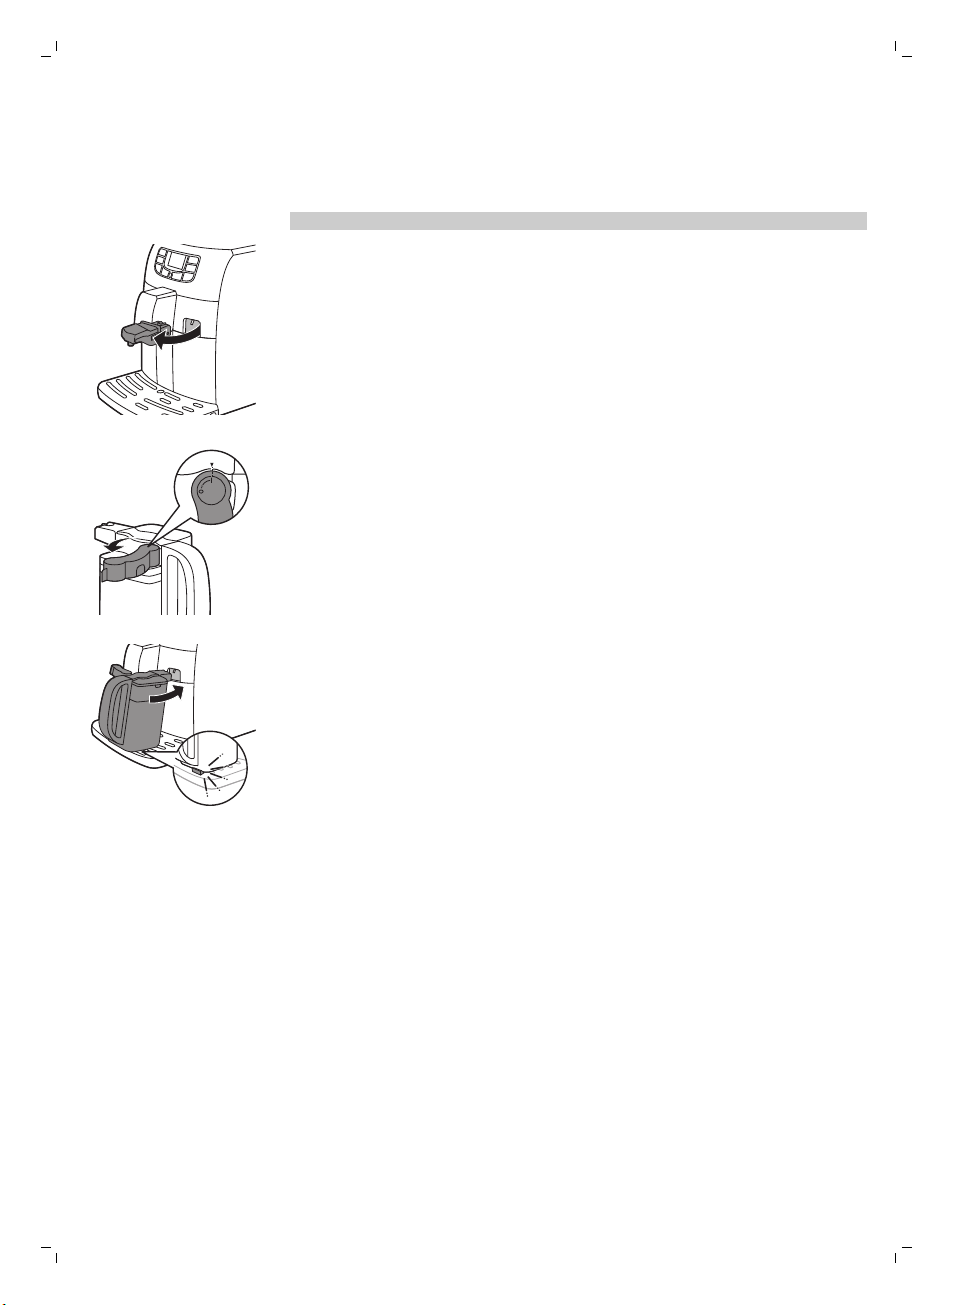
Adjusting the grind setting
1 Open the coffee bean hopper.
2 Place the end of the measuring spoon handle on the grinder adjustment
knob in the coffee bean hopper. Use the spoon to press and turn the
knob to the left or to the right one notch a time.
3 There are 10 different grinding degree settings you can choose from. The
smaller the dot, the stronger the coffee.
-
Coarse grind: lighter taste, for dark roasted coffee blends.
-
Fine grind: bolder taste, for light roasted coffee blends.
4 Place the coffee bean hopper back.
Page 14
14
English
5 Brew 2-3 coffees to taste the difference.
Cappuccino, baby cappuccino and milk froth
Note: You can adjust the cappuccino and milk froth quantity.
1 Remove the hot water dispensing spout.
2 Remove the milk carafe lid. Fill the milk carafe with milk to a level
between the MIN and MAX level and place back the lid.
3 Turn the dispensing spout on the milk carafe to ‘I’.
4 Insert the milk carafe into the machine. Make sure the carafe is inserted
properly.
5 Place a cup under the coffee and milk dispensing spouts.
6 Press the CAPPUCCINO button to brew a cappuccino. Press the MILK
FROTH button to brew a milk froth. Press the SPECIAL DRINKS button.
The machine dispenses the beverage according to the preset quantities.
Brewing special drinks
In the special drinks menu you can select hot water and baby cappuccino.
1 Press the SPECIAL DRINKS button to enter the menu. The display shows
the options for special drinks.
2 Press the UP/DOWN buttons to scroll through the options on the menu.
3 Press the OK button to confirm the desired beverage.
4 When you select HOT WATER, insert the hot water dispensing spout into
the machine and lock it into place. When you select cappuccino, milk
froth or baby cappuccino, insert the milk carafe into the machine.
Descaling
You have to descale the machine when the display shows the CALC CLEAN
icon.
Page 15
CALC CLEAN
If you do not descale when the display shows the CALC CLEAN icon, the
CA LC
CLE AN
machine may stop working properly. In this case, repairs are not covered by
the warranty.
Never drink the water with descaling mixture that you pour into
the water tank or any water with residues that comes out of the
machine during the descaling procedure.
The descaling procedure lasts approximately 30 minutes. Only use the
Saeco descaling solution to descale the machine. The Saeco descaling
solution is designed to ensure optimal performance of the machine.
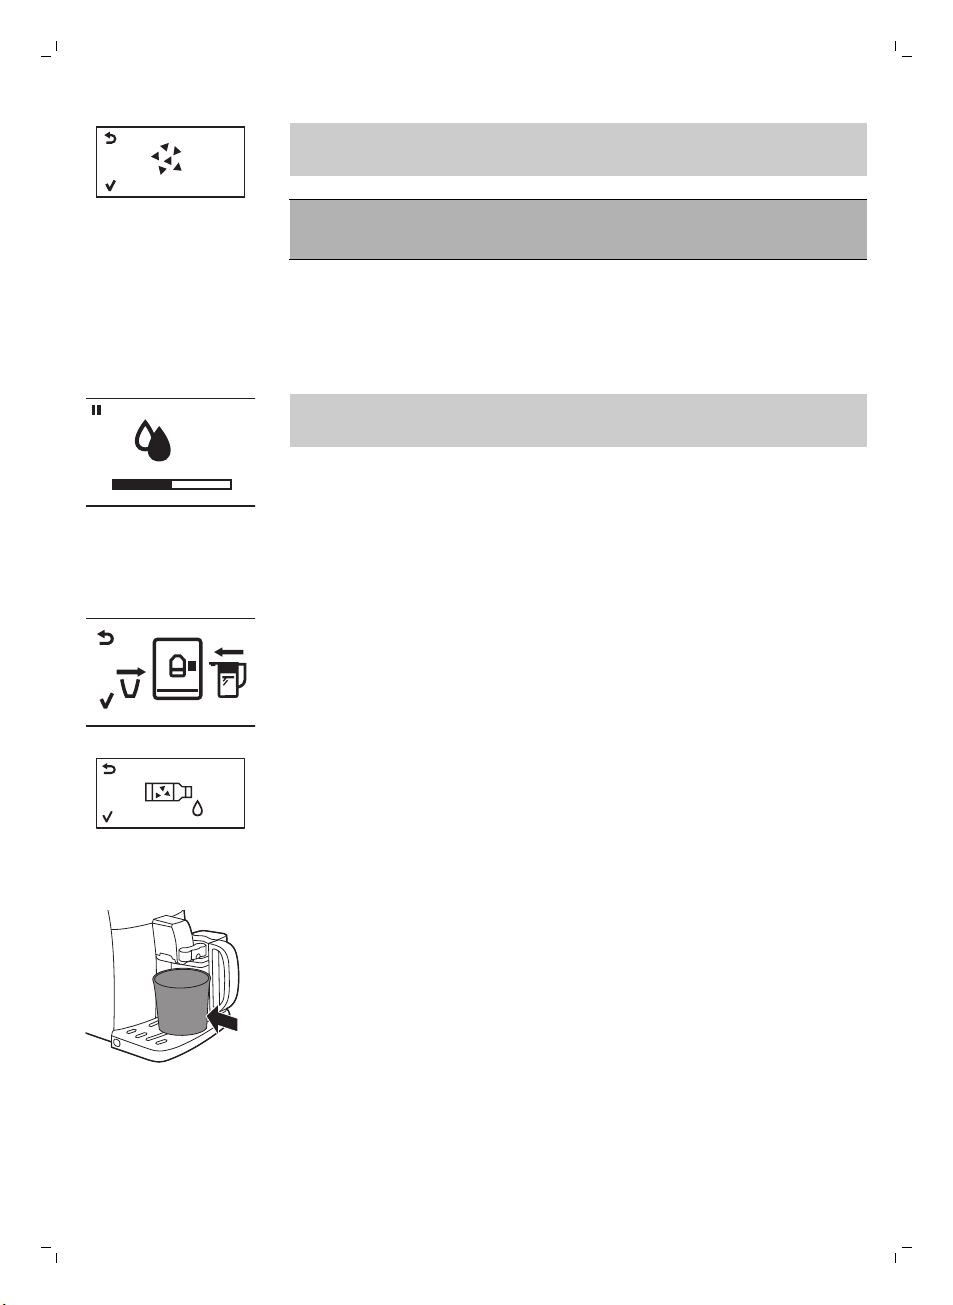
Descaling procedure
You can pause the descaling or rinsing cycle by pressing the ESC button.
The display will show the following icon. To continue the descaling or rinsing
cycle, press the OK button.
1 Remove and empty the drip tray. Slide the drip tray back into the
machine.
2 Remove the water filter from the water tank (if present).
3 Fill the milk carafe with fresh water up to the MIN level. Insert the milk
carafe into the machine. Turn the dispensing spout of the milk carafe to
the ‘I’ position.
4 Press the OK button.
-
The display shows the following icon to remind you have to place the
milk carafe in the machine.
English
15
5 The display shows the following icon to indicate that the machine enters
the descaling cycle. If you want to exit the descaling cycle, press the ESC
button.
6 Pour the entire bottle of Saeco descaling solution (250ml) into the water
tank.
7 Add water to the descaling solution in the water tank up to the CALC
CLEAN indication.
8 Place a large container (1.5 l) under the coffee and milk dispensing
spouts.
9 Press the OK button to start the descaling cycle.
-
The machine dispenses the entire descaling solution at regular intervals
through the coffee and milk dispensing spouts (this takes approximately
25 minutes).
10 Wait until all of the descaling solution has been dispensed. Remove and
empty the container and the milk carafe.
11 Remove and empty the drip tray. Slide the drip tray back into the
machine.
12 Rinse the water tank and fill it with fresh water up to the CALC CLEAN
indication. Slide the water tank back into the machine.
Page 16
CAL C
CLE AN
16
English
13 Fill the milk carafe with fresh water up to the MIN level and place it back
into the machine. Place the container back under both spouts.
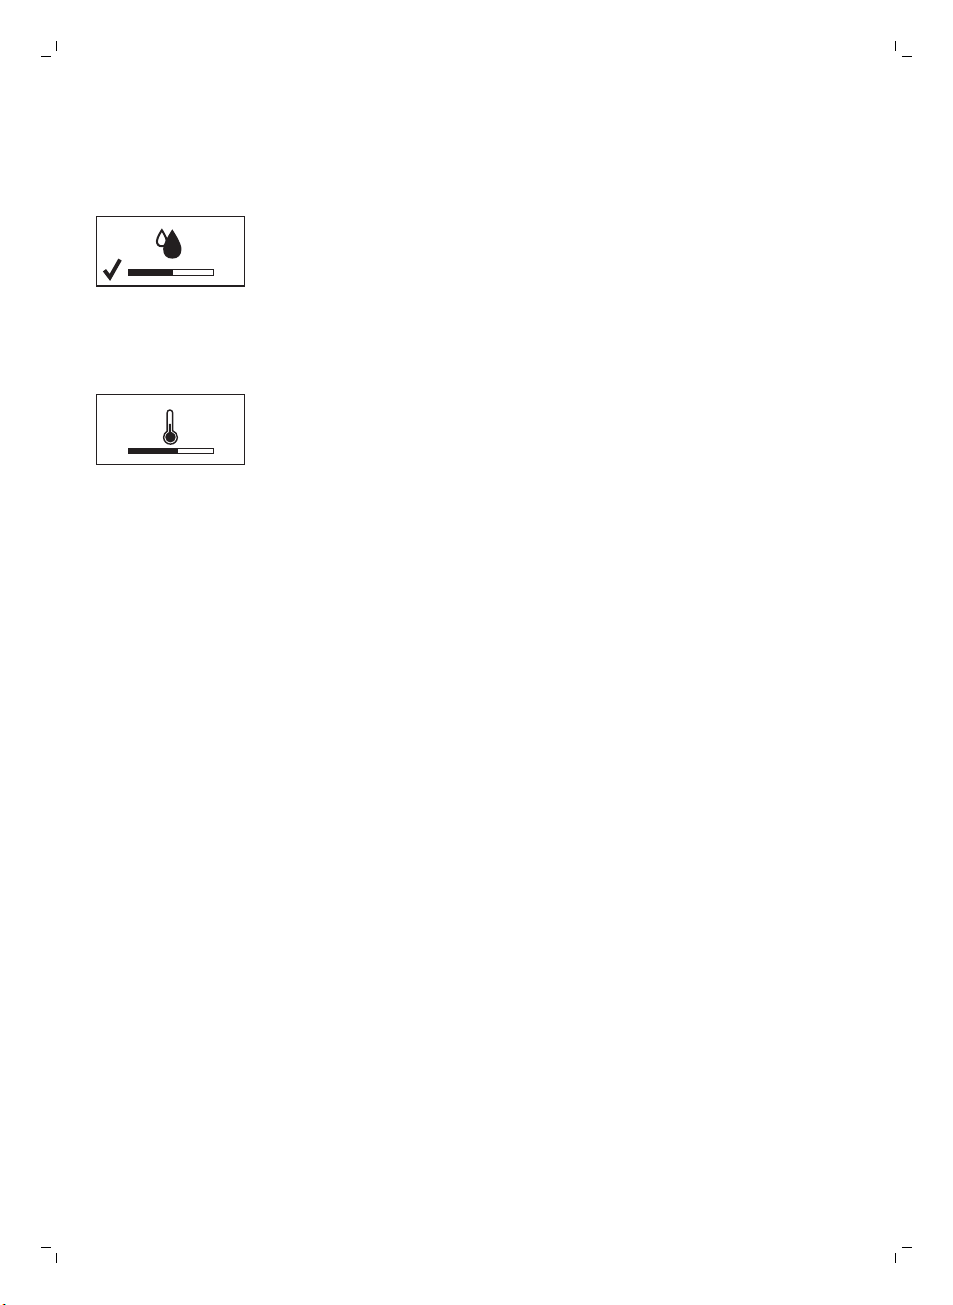
14 Press the OK button to start the rinsing cycle (this takes approximately 4
minutes).
-
The display shows the following icon to indicate that the rinsing cycle is
finished.
15 Rinse the water tank and place the water filter back into the water tank (if
it was installed).
16 Fill the water tank with fresh water up to the MAX level. Slide the water
tank back into the machine.
17 Press the OK button to end the descaling cycle.
18 Place a container under the coffee and milk dispensing spouts.
19 The display shows the following icon to indicate that the machine is
heating up.
-
The machine performs an automatic rinsing cycle.
20 Remove and clean the milk carafe see chapter ‘Cleaning and
maintenance’, section ‘Weekly cleaning of the milk carafe’. Insert the
water dispensing spout into the machine.
21 Remove and empty the drip tray. Slide the drip tray back into the
machine.
22 Remove and rinse the brew group see chapter ‘Cleaning and
maintenance’, section ‘Clean the brew group’.
The machine is now ready for use.
Interruption of the descaling cycle
Once the descaling cycle has started, you must complete it till the very end
without turning off the machine. In case you get stuck during the cycle or in
case of power failure or accidental disconnection of the power cord, you
can exit by pressing the standby button. If this occurs, empty and rinse
carefully the water tank, then fill it up to the CALC CLEAN level. Follow the
instructions in chapter ‘First installation’, section ‘Manual rinsing cycle’
before brewing any beverage. If the cycle was not completed, the machine
will require another descaling cycle to be performed at your earliest
convenience.
Cleaning and maintenance
Weekly cleaning of the brew group
Clean the brew group once per week.
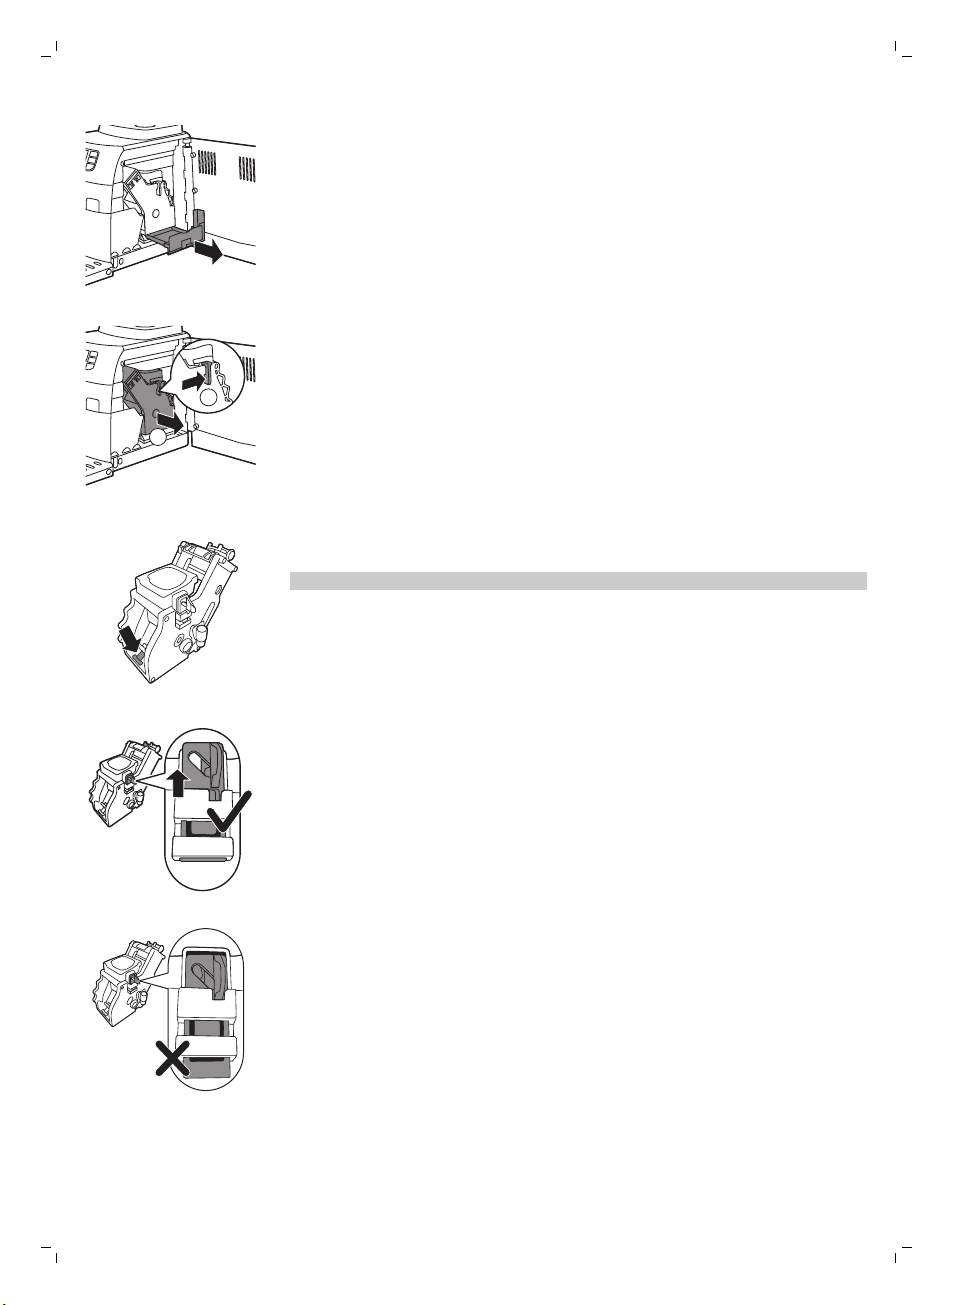
1 Remove the coffee grounds container and open the service door.
Page 17
1
2
English
2 Remove the coffee residues drawer.
3 To remove the brew group, press the lever and pull the brew group out of
the machine.
4 Rinse the brew group with fresh water and let it air dry.
5 To place the brew group back, make sure that the lever is in contact with
the base of the brewing unit.
Note: If it is not in contact with the base, push it down.
17
6 Make sure the locking hook of the brew group is in the correct position.
To position the hook correctly, push it upwards until it is in uppermost
position.
7 The hook is not correctly positioned if it is still in bottommost position.
8 Slide the brew group back into the machine along the guiding rails on the
sides until it clicks into position. Then place the coffee residues drawer
back in the machine.
Page 18
1
1
2
18
English
Lubrication
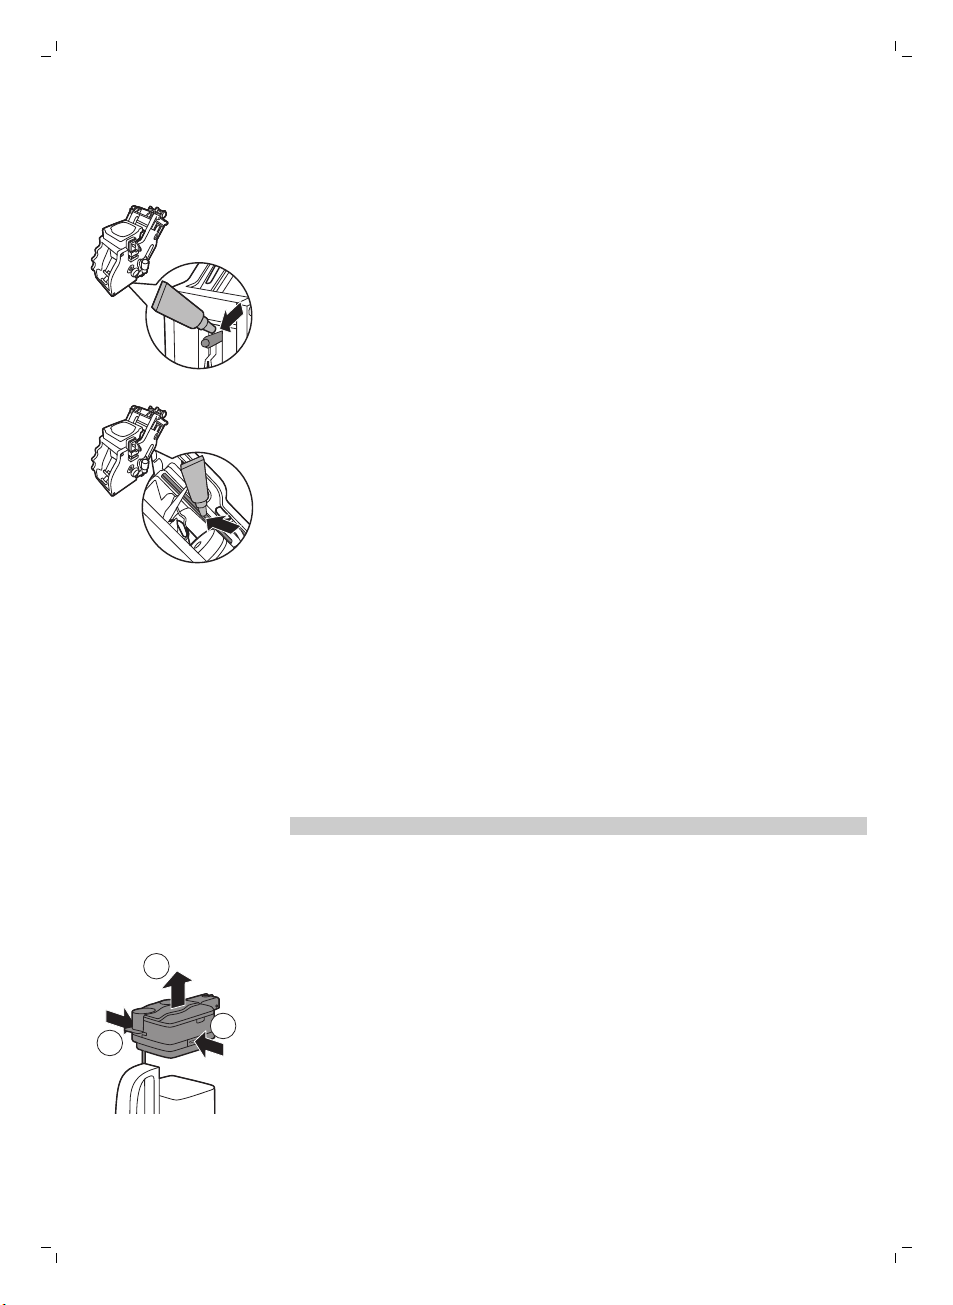
Lubricate the brew group after approximately 500 cups of coffee or once a
month.
1 Apply some lubricant around the shaft in the bottom of the brewing unit.
2 Apply lubricant to the rails on both sides, as shown in the illustration.
3 Slide the brew group back into the machine along the guiding rails on the
sides until it clicks into position. Then place the coffee residues drawer
back in the machine.
Milk carafe quick clean
Between brewing milk varieties you can rinse the spout with hot water to
make sure every milk recipe is optimal.
1 Place a cup or container under the spout to collect the water.
2 Turn the milk dispensing spout to the ‘I’ position.
3 Press the CARAFE QUICK CLEAN button.
-
The display reminds you have to insert the milk carafe, press the OK
button to confirm.
Note: Press the ESC button if you want to interrupt the milk carafe clean.
Daily cleaning of the milk carafe
It is important to clean the milk carafe every day or after you have used it, as
this preserves hygiene and ensures perfect milk froth consistency.
1 Press the release buttons to remove the lid.
Page 19
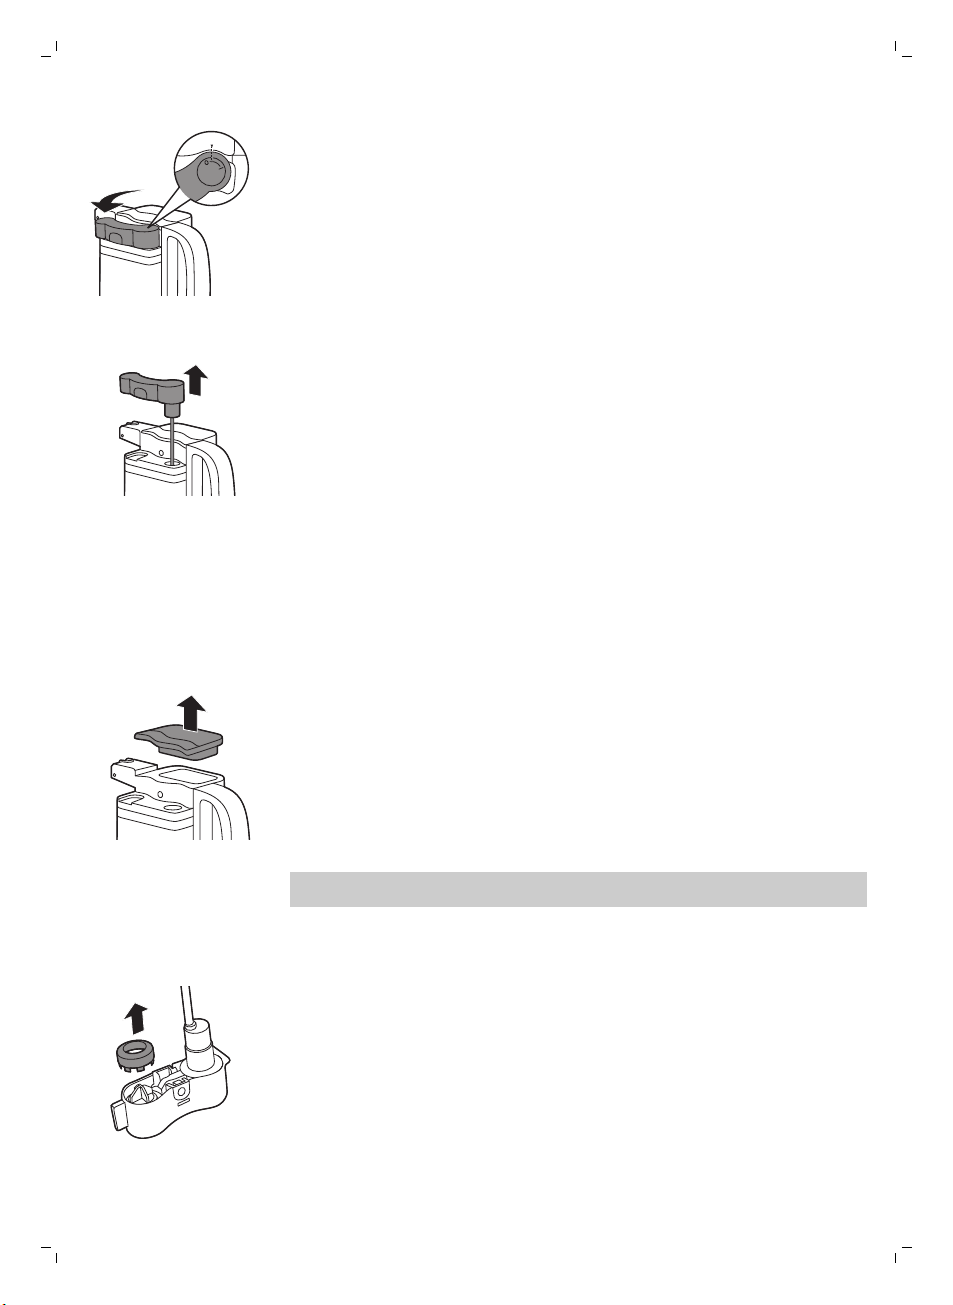
2 Turn the milk dispensing spout up to the reference mark (indicated by a
dot).
3 Lift the milk carafe dispenser to remove it from the lid and wash it with
lukewarm water. Remove all milk residues.
4 Put the milk dispensing spout back onto the milk carafe lid. To insert it,
align the dot on the spout with the indication on the lid.
Weekly cleaning of the milk carafe
1 Press the release buttons to remove the lid.
2 Rinse the lid and the milk carafe with fresh water. Remove all milk
residues.
3 Place the lid back onto the milk carafe and make sure it locks into place.
4 Remove the top of the lid and fill the milk carafe with fresh water up to
the MAX level.
5 Place the top of the lid back onto the milk carafe.
6 Insert the milk carafe into the machine. Place a container under the milk
dispensing spout.
7 Press the MILK FROTH button to select hot milk.
8 The display shows the icon to indicate that the machine is dispensing
water.
9 When the machine stops dispensing, remove and empty the milk carafe.
The display will ask you to perform a quick clean cycle, you do not need
to perform this cycle during the weekly cleaning of the milk carafe.
10 Press the release buttons to remove the lid of the milk carafe.
11 Turn the milk dispensing spout to the dot indicated on the lid.
12 Lift the milk dispensing spout off the lid.
13 Remove the ring from the milk carafe dispensing spout.
English
19
Page 20
20
English
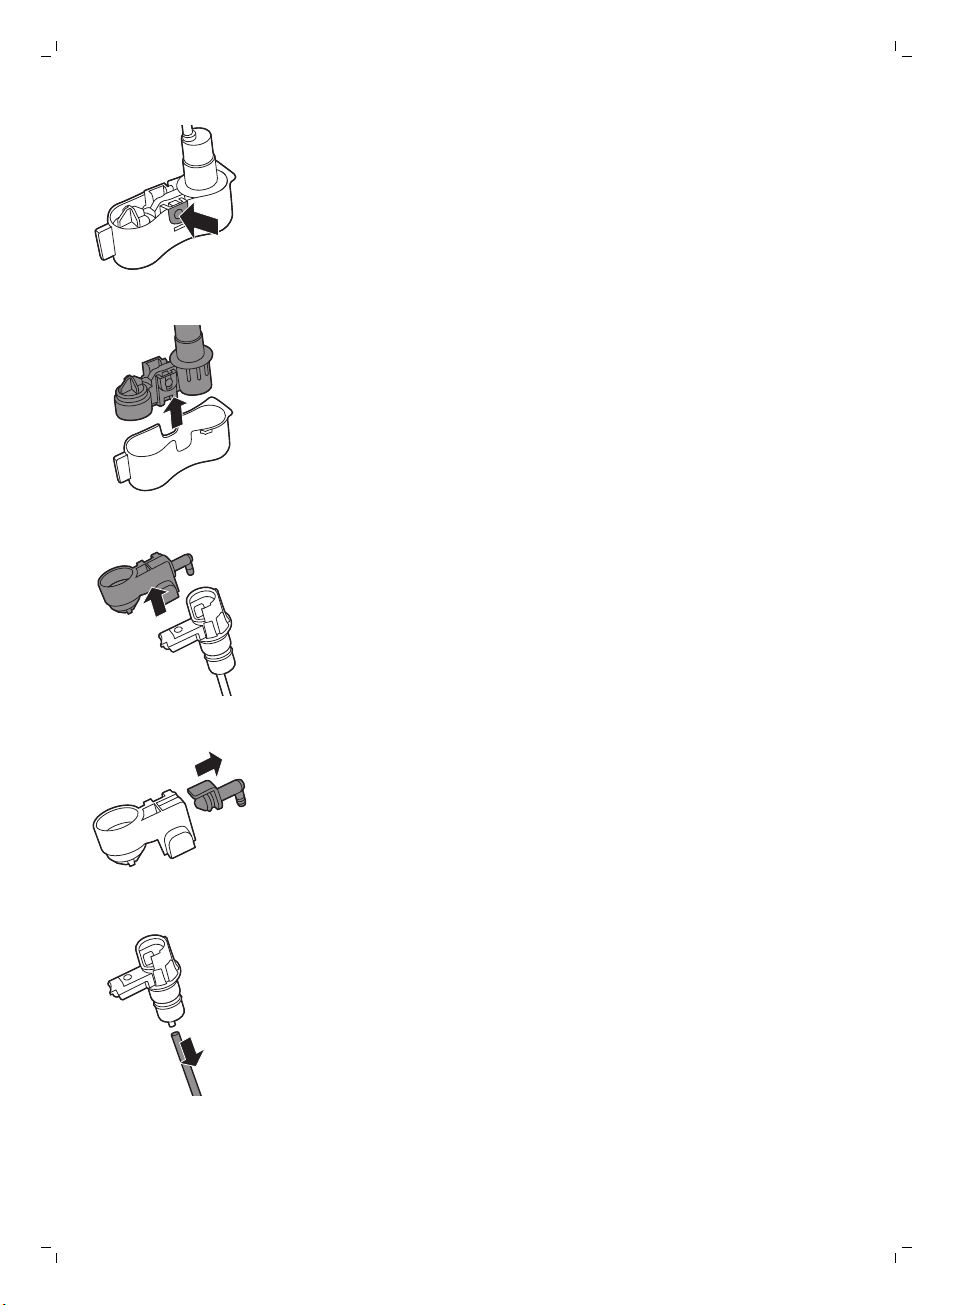
14 Press the button indicated with the arrow to unlock the cover of the milk
dispensing spout.
15 To remove the cover, press the sides of the dispensing spout lightly and
pull the cover downwards off the dispensing spout.
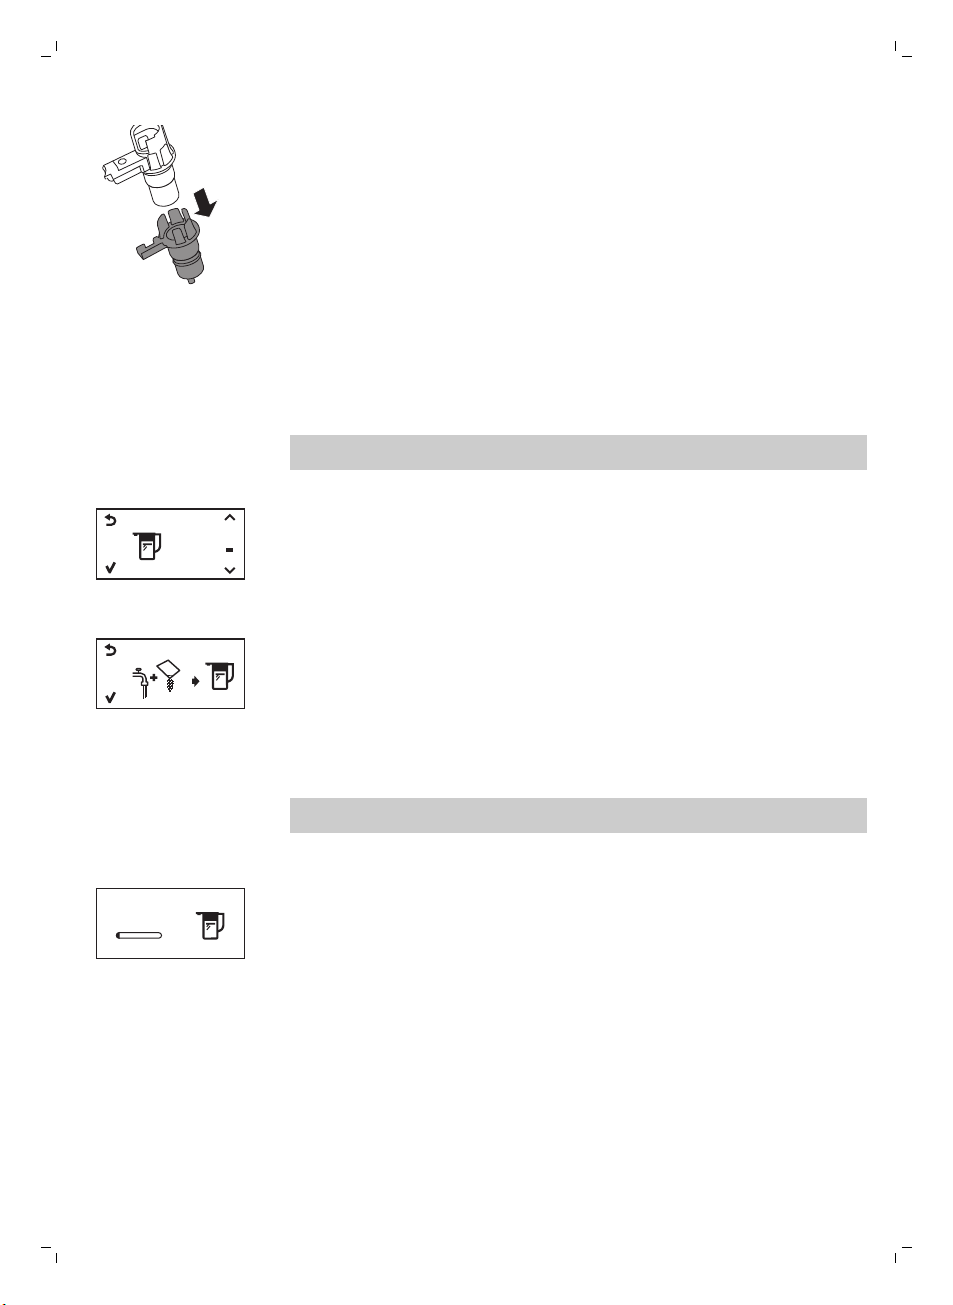
16 Pull the milk frothing unit upwards.
17 Pull the fitting outwards from the milk frothing device.
18 Remove the suction tube.
Page 21
FULL
CARAFE
CLEAN
MAX
CLE AN IN G. ..
English
19 Pull the fitting outwards and separate it from the remaining part.
20 Clean all parts with lukewarm water.
21 Reassemble all parts following in reverse order.
Monthly full milk carafe cleaning with milk circuit cleaner
To keep the entire milk circuit clean of milk residues, use the Saeco milk
circuit cleaner.
Note: Before you start the procedure, make sure that the water tank is filled
up to the MAX level.
1 Press the MENU button.
2 Scroll through the menu till you see FULL CARAFE CLEAN.
3 Press the OK button.
4 Pour the content of the milk circuit cleaner sachet into the milk carafe
and fill the milk carafe with water up to the maximum level.
5 Turn the milk dispensing spout to the 'I' position and insert the milk
carafe into the machine.
6 Place a large container under the milk dispensing spout.
7 Press the OK button to confirm.
-
The display shows the following icon.
Note: You cannot interrupt the full milk carafe cleaning. If the full milk
carafe cleaning gets interrupted, you have to restart the cycle again.
8 The display reminds you have to fill the milk carafe with fresh water, fill
the milk carafe up till the max level. Press ok button to confirm.
-
The display shows the following icon.
9 The display shows a tick icon when the carafe rinsing cycle is finished.
press the ESC button to return to the main menu.
21
Warranty and support
If you need information or support, please visit www.saeco.com/support or
read the separate worldwide guarantee leaflet.
To buy spare parts, visit www.shop.philips.com/service or go to your Saeco
dealer or authorized service center. You can also contact the Philips/Saeco
hotline in your country.
Page 22
22
English
Ordering maintenance products
-
MAVEA (CA6702)
-
Descaling solution (CA6700)
Disposal
This product may contain lead and mercury. Disposal of these materials
may be regulated due to environmental considerations. For disposal or
recycling information, please contact your local authorities or visit
www.recycle.philips.com.
Warning icons and error codes
Warning signals are displayed in red. Below you find a list of the
warnings that may appear on the display and their meaning.
-
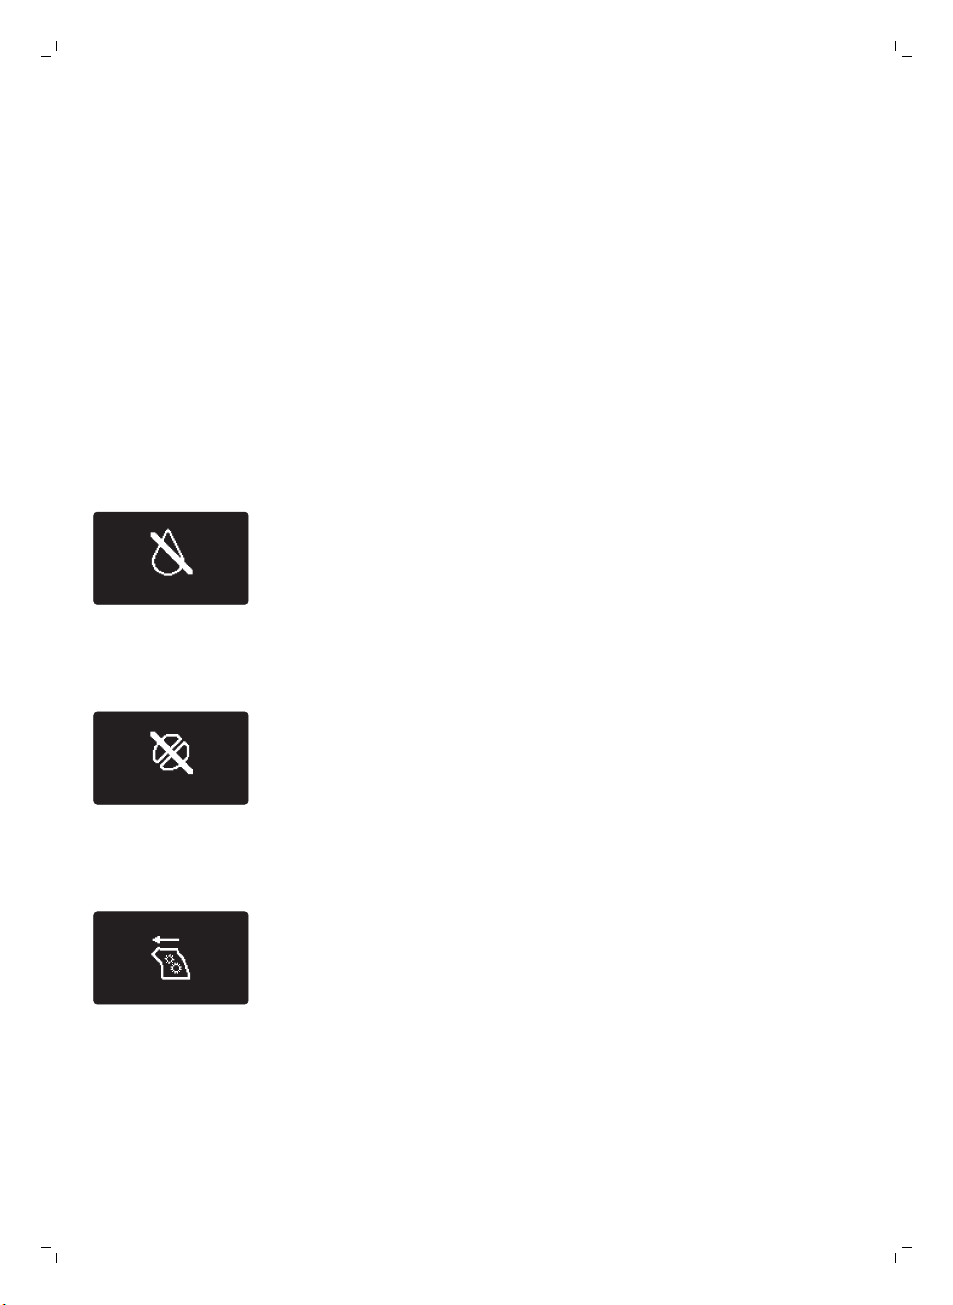
Fill the water tank with fresh water to the MAX level indication.
-
The bean hopper is empty. Put new coffee beans in the bean hopper.
-
The brew group is not in the machine. Insert the group.
Page 23
English
-
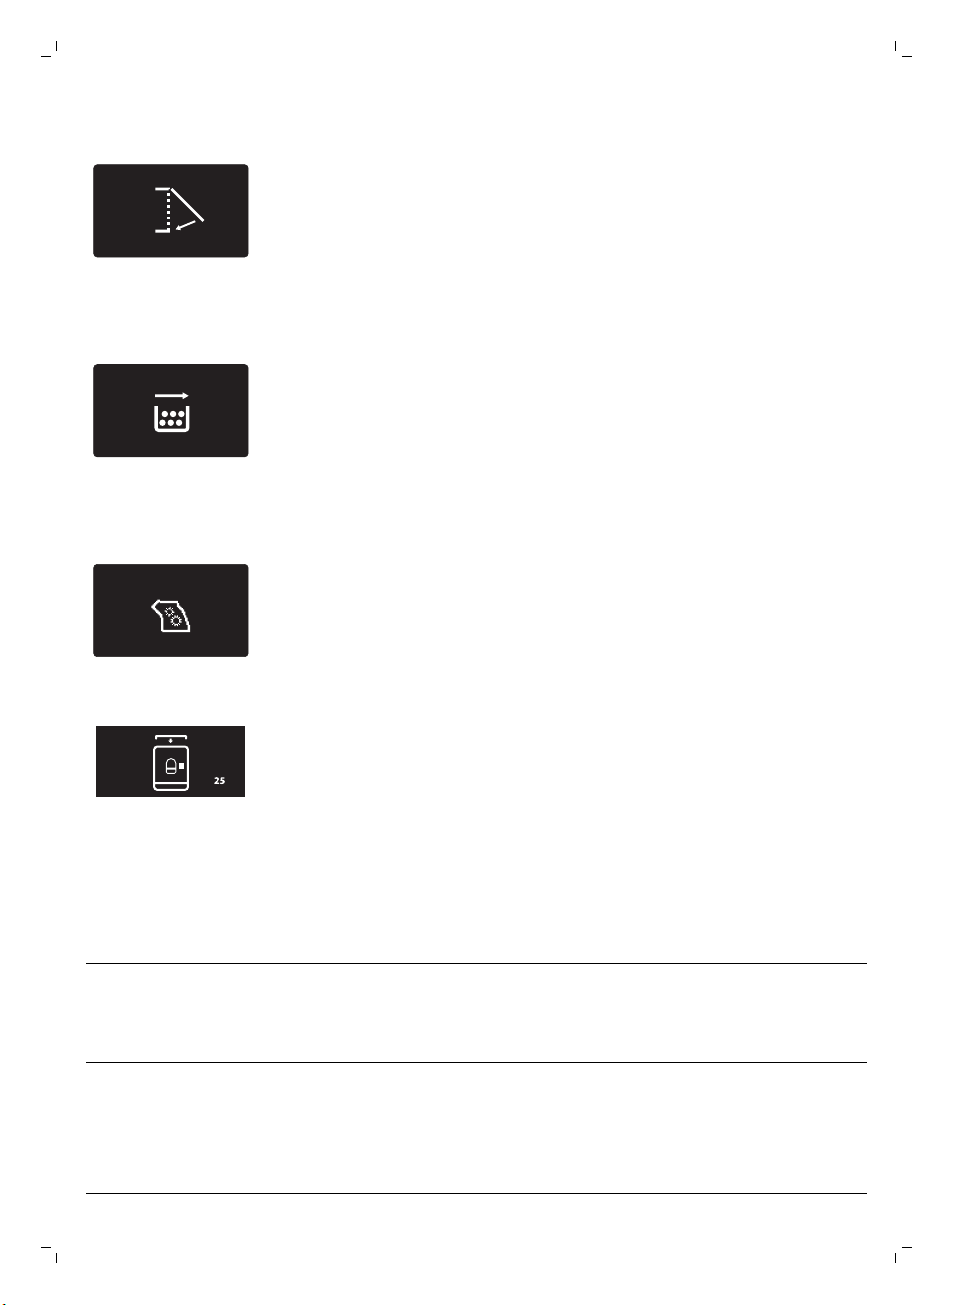
Close the service door.
-
Remove the coffee grounds container and empty it.
-
There is too much powder in the brew group. Clean the brew group.
-
If an error code is triggered, check the section 'Meaning of error codes' to
see what the code on the display means and what you can do. The
machine cannot be used when this icon is on the display.
23
-
You forgot to place the lid on the pre-ground coffee compartment. If you
do not place it back within 30 seconds the display will return to the main
menu and the brewing cycle will be stopped.
Meaning of error codes
Error code
1 Coffee grinder blocked Coffee exit duct
3 - 4 The brew group cannot
Problem Cause Possible solution
clogged
be removed.
The brew group is not
positioned correctly.
Clean the coffee exit
duct thoroughly with
the handle of the
multifunctional tool or a
spoon handle.
Close the maintenance
door. Switch the
machine off and back
on again. Wait for the
‘machine ready’ icon on
the display and then
remove the brew group.
Page 24
24
English
5 Water circuit problem There is air in the water
circuit.
Other error codes Switch the machine off
If the above solutions do not help to remove the error code icon from the
display and bring the machine back to normal working order, contact the
Philips Saeco hotline. Contact details can be found in the warranty booklet
or on www.saeco.com/support.
Remove and place back
the water tank a couple
of times. Make sure you
insert it into the
machine properly.
Check if the water tank
compartment is clean.
and switch it back on
again after 30 seconds.
Try this 2 or 3 times.
Troubleshooting
Problem Cause Solution
The machine does not
switch on
The machine is in DEMO
mode.
The drip tray is quickly
filled.
The machine is disconnected. Check if the power supply cord is
The standby button has been
pressed for more than 8 seconds.
This is normal. The machine uses
water to rinse the internal circuit and
brew group. Some water flows
through the internal system directly
into the drip tray.
inserted correctly
Switch the machine off and then
on again using the main switch on.
Empty the drip tray when the 'drip
tray full' full indicator pops up
through the drip tray cover.
The coffee grounds
container full icon remains
displayed.
The brew group cannot be
removed.
The coffee grounds container was
emptied while the machine was
switched off.
The coffee grounds container was
placed back too fast.
The brew group is not positioned
correctly.
The coffee grounds container is not
removed.
Place a cup under the dispensing
spout to collect rinsing water.
Always empty the coffee grounds
container while the machine is ON.
If the coffee grounds container is
emptied while the machine is
switched off, the coffee cycle
counter is not reset. In that case,
the 'empty coffee grounds
container' message will stay on the
display even though the container
is not full.
Do not place back the coffee
grounds container until the screen
message prompts you to put it
back
Close the maintenance door.
Switch the machine off and back
on again. Wait for the machine
ready screen to appear and then
remove the brew group
Remove the coffee grounds
container
brew group
before removing the
Page 25
English
25
The brew group cannot be
inserted.
The coffee has too little
crema or is watery.
Coffee is leaking from the
coffee dispensing spout
The brew group is not in the correct
position.
The machine is still in the descaling
procedure.
The grinder is set to a coarse setting. Adjust the grinder to a finer setting.
The coffee blend is not the correct
one.
The machine is performing its selfadjustment.
The brew group is dirty. Clean the brew group.
The coffee dispensing spout is
clogged.
The brew group was not put in rest
position before it was placed back.
Make sure that the lever is in
contact with the base of the brew
group and that the hook of the
brew group is in the correct
position.
Reset the machine by switching it
on and off. Place the drip tray and
the coffee grounds container back.
Leave the brew group out. Close
the maintenance door and switch
the machine on and off. Then try
to reinsert the brew group.
You cannot remove the brew
group when the descaling process
is active. First complete the
descaling process and then
remove the brew group.
Change the coffee blend.
Brew a few cups of coffee.
Clean the coffee dispensing spout
and its holes using a pipe cleaner.
The coffee is not hot
enough.
The machine grinds the
coffee beans, but coffee
does not come out.
The cups you use are cold. Preheat the cups by rinsing them
The temperature is set too low.
Check the menu settings.
You added milk. Whether the milk you add is warm
The grind is set too fine. Adjust the grinder to a coarser
The brew group is dirty. Clean the brew group.
The coffee dispensing spout is dirty. Clean the coffee dispensing spout
The coffee exit duct is blocked. Clean the coffee exit duct with the
with hot water.
Set the temperature to high in the
menu.
or cold, it will always decrease the
temperature of the coffee to some
extent.
setting.
and its holes with a pipe cleaner.
of the multifunctional tool
handle
or a spoon handle.
Page 26
26
English
The coffee comes out
slowly.
The milk does not froth. The milk carafe is dirty or not
There is water under the
machine.
The grind is ground too finely. Change the coffee blend or adjust
The brew group is dirty. Clean the brew group.
The coffee exit duct is blocked. Clean the coffee exit duct with the
The machine circuit is blocked by
limescale.
inserted correctly.
The milk froth dispensing spout has
not been opened fully.
The milk carafe is incompletely
assembled.
The type of milk used is not suitable
for frothing.
The drip tray is too full and
overflowed.
the grinder.
handle of the multifunctional tool
or a spoon handle.
Descale the machine.
Clean the carafe and make sure
that you position and insert it
correctly.
Check that the milk froth
dispensing spout has been set in
the correct position.
Check that all the components
have been assembled correctly.
We have tested the following milk
types which proved to deliver a
good milk froth result: semiskimmed or full-fat cow's milk, soy
milk and lactose-free milk. Other
types of milk have not been tested
and may result in a small amount
of milk froth.
Empty the drip tray when the drip
tray full indicator pops up through
the drip tray. Always empty the
drip tray before you start descaling
the machine.
The machine is not placed on a
horizontal surface.
Note: If you are unable to solve the problem with the information in this
table, contact the Philips/ Saeco hotline.
Place the machine on a horizontal
surface so that the drip tray full
indicator works properly.
Page 27

Page 28
www.saeco.com/welcome
4219.460.3158.1 REV00
4219_460_3158_1_Book_Simp_A5_v2.indd 80
13/10/15 15:33
 Loading...