

Page 1

USER MANUAL
Type HD8768 - HD8885
Read carefully before using the machine.
02
English
EN
02
Register your product and get support at
www.saeco.com/welcome
Page 2

IMPORTANT SAFEGUARDS
When using electrical appliances, basic safety precautions should always be
followed, including the following:
1. Read all instructions.
2. Do not touch hot surfaces. Use handles or knobs.
3. To protect against fire, electric shock and injury to persons do not immerse
cord, plugs, or appliance in water or other liquid.
4. Close supervision is necessary when the appliance is used by or near
children.
5. Unplug from outlet when not in use and before cleaning. Allow to cool
before putting on or taking off parts, and before cleaning the appliance.
6. Do not operate any appliance with a damaged cord or plug or after the
appliance malfunctions, or has been damaged in any manner. Return
appliance to the nearest authorized service facility for examination, repair
or adjustment.
7. The use of accessory attachments not recommended by the appliance
manufacturer may result in fire, electric shock or injury to persons.
8. Do not use outdoors.
9. Do not let cord hang over edge of table or counter, or touch hot surfaces.
10. Do not place on or near a hot gas or electric burner, or in a heated oven.
11. Always attach plug to appliance first, then plug cord into wall outlet. To
disconnect, turn any control to “off”, then remove plug from wall outlet.
12. Do not use appliance for other than intended use.
13. Save these instructions.
SAVE THESE INSTRUCTIONS
Page 3

CAUTION
This appliance is for household use only. Any servicing, other than cleaning
and user maintenance, should be performed by an authorized service center.
Do not immerse machine in water. To reduce the risk of fire or electric shock,
do not disassemble the machine. There are no parts inside the machine
serviceable by the user. Repair should be done by authorized service personnel
only.
1. Check voltage to be sure that the voltage indicated on the nameplate
corresponds with your voltage.
2. Never use warm or hot water to fill the water tank. Use cold water only.
3. Keep your hands and the cord away from hot parts of the appliance during
operation.
4. Never clean with scrubbing powders or harsh cleaners. Simply use a soft
cloth dampened with water.
5. For optimal taste of your coffee, use purified or bottled water. Periodic
descaling is still recommended every 2-3 months.
6. Do not use caramelized or flavored coffee beans.
INSTRUCTIONS FOR THE POWER
SUPPLY CORD
A. A short power-supply cord (or detachable power-supply cord) is to be
provided to reduce risks resulting from becoming entangled in or tripping
over a longer cord.
B. Longer detachable power-supply cords or extension cords are available
and may used if care is exercised in their use.
C. If a long detachable power-supply cord or extension cord is used,
1. The marked electrical rating of the detachable power-supply cord or
extension cord should be at least as great as the electrical rating of the
appliance
2. If the appliance is of the grounded type, the extension cord should be a
grounding-type 3-wire cord, and
3. The longer cord should be arranged so that it will not drape over the
counter top or table top where it can be pulled on by children or tripped
over.
Page 4

2
ENGLISH
Congratulations on your purchase of a Saeco Moltio Automatic Milk Frother fully automatic co ee machine!
To fully bene t from the support that Saeco o ers, please
register your product at www.saeco.com/welcome.
The machine is made for preparing espresso co ee using
whole co ee beans, as well as for frothing milk and dispensing hot water. In this user manual you will nd all the
information you need to install, use, clean and descale your
machine.
CONTENTS
IMPORTANT..................................................................................................... 4
Safety Instructions ...............................................................................................................................4
Warnings .............................................................................................................................................4
Cautions ..............................................................................................................................................6
Electromagnetic elds .........................................................................................................................7
Disposal ...............................................................................................................................................7
INSTALLATION ................................................................................................. 8
Product Overview ................................................................................................................................8
General Description .............................................................................................................................9
PREPARING FOR USE .......................................................................................10
Machine Packaging............................................................................................................................10
Machine Installation ..........................................................................................................................10
USING THE MACHINE FOR THE FIRST TIME ........................................................14
Circuit Priming ...................................................................................................................................14
Automatic Rinse/Self-Cleaning Cycle .................................................................................................15
Manual Rinse Cycle ............................................................................................................................ 15
Measuring and Programming Water Hardness .................................................................................. 18
“INTENZA+” Water Filter Installation ................................................................................................. 19
Replacing the “INTENZA+” Water Filter..............................................................................................21
CHANGING COFFEE BEANS ...............................................................................22
Removing the Co ee Bean Hopper ....................................................................................................22
Inserting the Co ee Bean Hopper ......................................................................................................23
Selecting Co ee Beans ......................................................................................................................25
Co ee Emptying Cycle ....................................................................................................................... 26
Page 5

ENGLISH
ADJUSTMENTS ................................................................................................27
Saeco Adapting System .....................................................................................................................27
Adjusting the Ceramic Co ee Grinder ............................................................................................... 27
Adjusting the Aroma (Co ee Strength) ..............................................................................................28
Adjusting the Co ee Dispensing Spout ..............................................................................................29
Adjusting the Co ee Length ............................................................................................................. 30
BREWING ESPRESSO AND COFFEE ....................................................................31
Brewing Espresso and Co ee Using Co ee Beans .............................................................................. 31
Brewing Espresso and Co ee Using Pre-Ground Co ee ...................................................................... 32
FROTHING MILK AND PREPARING A CAPPUCCINO .............................................33
Frothing Milk ..................................................................................................................................... 33
Brewing a Cappuccino .......................................................................................................................36
DISPENSING HOT WATER .................................................................................37
CLEANING AND MAINTENANCE ........................................................................39
Daily Cleaning of the Machine ...........................................................................................................39
Daily Cleaning of the Water Tank........................................................................................................40
Daily Cleaning of the Automatic Milk Frother ....................................................................................41
Weekly Cleaning of the Machine ........................................................................................................ 42
Weekly Cleaning of the Brew Group ...................................................................................................42
Weekly Cleaning of the Co ee Bean Hopper, Tray and Co ee Compartment ......................................46
Monthly Lubrication of the Brew Group ............................................................................................. 47
Monthly Cleaning of the Automatic Milk Frother ...............................................................................49
Monthly Cleaning of the Brew Group with “Co ee Oil Remover” ........................................................ 55
DESCALING .....................................................................................................58
ACCIDENTAL INTERRUPTION OF THE DESCALING CYCLE .....................................64
PROGRAMMING ..............................................................................................65
The following settings can be adjusted .............................................................................................. 65
How to Program the Machine ............................................................................................................ 67
MEANING OF THE DISPLAY ICONS .....................................................................69
TROUBLESHOOTING ........................................................................................73
ENERGY SAVING ..............................................................................................76
Stand-by ............................................................................................................................................76
TECHNICAL SPECIFICATIONS ............................................................................77
WARRANTY AND SERVICE ................................................................................77
Warranty ...........................................................................................................................................77
Service ............................................................................................................................................... 77
ORDERING MAINTENANCE PRODUCTS ..............................................................78
MACHINE ACCESSORIES ...................................................................................79
3
Page 6

4
ENGLISH
IMPORTANT
Safety Instructions
This machine is equipped with safety devices. Nevertheless,
read and follow the safety instructions carefully and only use
the machine properly as described in these instructions to
avoid accidental injury or damage due to improper use of the
machine. Keep this user manual for future reference.
The term WARNING and this icon warn against possible
severe injuries, danger to life and/or damage to the machine.
The term CAUTION and this icon warn against slight injuries and/or damage to the machine.
Warnings
• Connect the machine to a wall socket with a voltage matching the technical speci cations of the machine.
• Connect the machine to an earthed wall socket.
• Do not let the power cord hang over the edge of a table or
counter, or touch hot surfaces.
• Never immerse the machine, the mains plug or power cord
in water: Danger of electrical shock!
• Do not pour liquids on the power cord connector.
• Never direct the hot water jet towards body parts: Danger
of scalding!
• Do not touch hot surfaces. Use handles and knobs.
• After switching o the machine by pressing the power button on the back of the machine, remove the mains plug
from the wall socket:
- if a malfunction occurs;
Page 7

ENGLISH
5
5
- If the machine will not be used for a long time;
- before cleaning the machine.
• Pull on the mains plug, not on the power cord.
• Do not touch the mains plug with wet hands.
• Do not use the machine if the mains plug, the power cord or
the machine itself is damaged.
• Do not make any modi cations to the machine or its power
cord. Only have repairs carried out by a service centre authorised by Philips to avoid any hazard.
• The machine should not be used by children younger than
8 years old.
• The machine can be used by children of 8 years and upwards if
they have previously been instructed on the correct use of the
machine and made aware of the associated dangers or if they
are supervised by an adult.
• Cleaning and maintenance should not be carried out by
children unless they are more than 8 years old and supervised by an adult.
• Keep the machine and its power cord out of reach of children under 8 years old.
• The machine may be used by persons with reduced physical,
sensory or mental capabilities or lacking su cient experience and/or skills if they have previously been instructed
on the correct use of the machine and made aware of the
associated dangers or if they are supervised by an adult.
• Children should be supervised to ensure that they do not
play with the machine.
• Never insert ngers or other objects into the co ee grinder.
Page 8

6
ENGLISH
Cautions
• The machine is for household use only. It is not intended
for use in environments such as canteens, sta kitchens of
shops, o ces, factories or other work environments.
• Always put the machine on a at and stable surface.
• Do not place the machine on hot surfaces, directly next to a
hot oven, heater units or similar sources of heat.
• Only put roasted co ee beans into the co ee bean hopper.
If ground co ee, instant co ee, raw co ee or any other
substance is put in the co ee bean hopper, it may damage
the machine.
• Let the machine cool down before inserting or removing
any parts. The heating surfaces may retain residual heat
after use.
• Never use warm or hot water to ll the water tank. Use only
cold non-sparkling drinking water.
• Never clean with scrubbing powders or harsh cleaners.
Simply use a soft cloth dampened with water.
• Descale your machine regularly. Not doing this will make
your appliance stop working properly. In this case, repair is
not covered under your warranty!
• Do not keep the machine at temperature below 0 °C. Residue water in the heating system may freeze and cause
damage.
• Do not leave water in the water tank if the machine is not
used over a long period of time. The water can get contaminated. Use fresh water every time you use the machine.
Page 9

ENGLISH
7
7
Electromagnetic elds
This appliance complies with all the applicable standards and
regulations relating to the exposure to electromagnetic elds.
Disposal
This symbol on a product indicates that the product is covered
by EU Directive 2012/19/EU. Please inform yourself about the
local separate collection system for electrical and electronic
products. Follow local regulations and do not dispose of
the product as household waste. Appropriate disposal of
old products helps prevent negative consequences for the
environment and human health.
Page 10

8
INSTALLATION
Product Overview
12
20
21
22
23
33
10
4c
4b
32
3
4a
5
6
7
8
9
11 12 13 14
34
35
17
18
25
30
19
24
26
15
16
27
28
31
29
Page 11

ENGLISH
General Description
1. Co ee bean hopper locking/removal selector switch
2. Pre-ground co ee compartment
3. Cup stacking surface
4a. Co ee bean hopper
4b. Co ee bean hopper tray
4c. Co ee bean hopper lid
5. Control panel
6. Co ee dispensing spout
7. Cup holder grill
8. Full drip tray indicator
9. Drip tray
10. Water tank
11. Co ee grounds drawer
12. Brew group
13. Co ee residues drawer
14. Service door
15. Automatic Milk Frother
16.
Suction tube for Automatic Milk Frother
17. Power cord socket
18. Power button
19. Co ee grinder adjustment key + Pre-ground co ee measuring scoop
20. Cleaning brush (optional)
21. Grease for brew group (optional)
22. Power cord
23. Water hardness test strip
24. Espresso brew button
25. Co ee brew button
26. Cappuccino / hot water button
27. "Aroma" - Pre-ground co ee button
28. "MENU" button
29. ON/OFF button
30. Descaling solution (to be purchased separately)
31. Filter (INTENZA+) (to be purchased separately)
32. Protection lid (optional)
33. Steam/hot water wand + rubber tting for Automatic Milk Frother
34. Chrome cover (only for speci c models)
35. Rubber tting
9
9
Page 12

10
ENGLISH
PREPARING FOR USE
Machine Packaging
The original packaging has been designed and constructed to protect the
machine during transport. We recommend keeping the packaging material
for possible future transport.
Machine Installation
Remove the drip tray with grill from the packaging.
1
Remove the machine from the packaging.
2
For best use, it is recommended to:
3
• Choose a safe, level surface, where there will be no danger of overturning the appliance or being injured;
• Choose a location that is su ciently well-lit, clean and near an easily reachable socket.
• Allow for a minimum distance from the sides of the machine as
shown in the gure.
Insert the drip tray with grill into the machine. Make sure it is fully
4
inserted.
Note:
The drip tray collects the water that comes out of the co ee dispensing
spout during each rinse/self-cleaning cycle, as well as any co ee that
might be spilled during beverage brewing. Empty and wash the drip tray
daily and each time the full drip tray indicator is raised.
Caution:
NEVER remove the drip tray when the machine has just been turned
on. Wait a couple of minutes for the machine to carry out a rinse/selfcleaning cycle.
Page 13

ENGLISH
Press gently on the side of the water tank door to release the handgrip.
5
11
11
1
Remove the water tank by pulling it by the handgrip.
6
Rinse the water tank with fresh water.
7
Fill the water tank with fresh water up to the MAX level and reinsert it
8
into the machine. Make sure it is fully inserted.
Caution:
Never ll the water tank with warm, hot, sparkling water or any other
liquid, as this may cause damage to the water tank and the machine.
Note:
When the water tank is full, it must be transported as shown in the gure.
Page 14

12
1
ENGLISH
Remove the co ee bean hopper lid. Slowly pour in the co ee beans.
9
Note:
The co ee bean hopper contains a tray that vibrates during grinding and
conveys the beans into the co ee grinder.
Caution:
Only co ee beans must be put into the co ee bean hopper. If ground
co ee, instant co ee, caramelized co ee, raw co ee beans or any
other substance is put in the co ee bean hopper, it may damage the
machine.
Put the lid back on the co ee bean hopper.
10
Insert the plug into the socket located on the back of the machine.
11
Insert the plug at the other end of the power cord into a wall socket
12
with suitable power voltage.
2
Switch the power button to "I". The red light next to the " " button
13
ashes.
Page 15

ENGLISH
To turn on the machine, simply press the “ ” button.
14
Note:
By keeping the button pressed for more than 8 seconds, the machine
enters the demo mode. To exit the demo, turn the machine o and on
again using the power button.
The control panel indicates that the circuit must be primed.
15
13
13
Yellow
Page 16

14
ENGLISH
USING THE MACHINE FOR THE FIRST TIME
When using the machine for the rst time, the following activities need to
happen:
1) You need to prime the circuit.
2) The machine will perform an automatic rinse/self-cleaning cycle.
3) You need to perform a manual rinse cycle.
Circuit Priming
During this process, fresh water ows through the internal circuit of the
machine and the machine warms up. This takes a few minutes.
Place an empty container under the steam wand.
1
Press the “ ” button to start the cycle. The machine starts the auto-
2
matic priming of the circuit by dispensing some water through the
steam wand.
The bar under the icon shows the operation progress. When the pro-
3
cess has been completed, the machine stops dispensing automatically.
Yellow
The control panel now shows the machine warm-up icon.
4
Yellow
Page 17

Automatic Rinse/Self-Cleaning Cycle
When warm-up has been completed, the machine automatically performs
a rinse/self-cleaning cycle of the internal circuits with fresh water. This
takes less than a minute.
Place a container under the co ee dispensing spout to catch the small
1
amount of water which will be dispensed.
The machine shows this display. Wait for the cycle to nish automati-
2
cally.
Yellow
Note:
You can stop dispensing by pressing the “
” button.
ENGLISH
15
15
When the operations described above have been completed, the ma-
3
chine shows this display. You can now perform the manual rinse cycle.
Green
Manual Rinse Cycle
During this process you activate the co ee brewing cycle and fresh water
ows through the water circuit. This takes a few minutes.
Place a container under the co ee dispensing spout.
1
Page 18

16
ENGLISH
Check that the machine shows this display.
2
Green
Select the pre-ground co ee brewing function by pressing the “ ”
3
button. The machine shows this display.
Green
Note:
Do not add any pre-ground co ee into the compartment.
Press the " " button. The machine starts dispensing water.
4
When dispensing has nished, empty the container. Repeat the opera-
5
tions from step 1 to step 4 twice, then continue with step 6.
Place a container under the steam wand.
6
Green
Press the " " button. The machine shows this display.
7
Press the ““ ” MENU button to start dispensing hot water.
8
Page 19

Red
ENGLISH
After dispensing water, remove and empty the container.
9
Repeat steps 7 to 9 until the water tank is empty and the no water
10
warning sign appears.
Note:
Press the “
” button to stop the manual rinse cycle.
17
17
At the end of this operation, ll the water tank again up to the MAX
11
level. The machine is now ready to brew co ee.
This icon will be displayed.
Green
Note:
The automatic rinse/self-cleaning cycle starts when the machine has been
in stand-by mode, or turned o , for more than 15 minutes.
When you have not used the machine for 2 or more weeks, you will also
need to perform a manual rinse cycle.
At the end of the cycle, you can brew a co ee.
Page 20

18
ENGLISH
C
B
Measuring and Programming Water Hardness
Water hardness measuring is very important in order to de ne the descaling frequency and to install the “INTENZA+” water lter (for more details on
the water lter, see next chapter).
To measure the water hardness follow the steps below:
Immerse the water hardness test strip (supplied with the machine) in
1
water for 1 second.
Note:
The test strip can only be used for one single measurement.
Wait for one minute.
2
Check how many squares have changed to red, then consult the table.
3
Note:
The numbers on the water hardness test strip correspond to the water
hardness adjustment settings.
More precisely:
1 = 1 (very soft water)
2 = 2 (soft water)
3 = 3 (hard water)
4 = 4 (very hard water)
Intenza Aroma System
A
23 4
1
The letters correspond to the references that are located at the base of the
“INTENZA+” water lter (see next chapter).
Machine Water Hardness Setting
Press the “ ” MENU button and scroll through the options by pressing
4
Yellow Green
The machine is supplied with a standard water hardness setting, suitable
for most types of water.
” MENU button until this icon is displayed.
the “
Note:
Page 21

Press the ““ ” button to increase the value and the “ ” button to
5
decrease the value.
Press the “ ” MENU button to con rm the setting.
6
Press the “ ” button to exit the programming menu. The machine is
7
now ready for brewing.
Green Yellow
“INTENZA+” Water Filter Installation
We recommend that you install the “INTENZA+” water lter as this prevents
limescale build-up in your machine and preserves a more intense aroma of
your co ee.
ENGLISH
19
19
The “INTENZA+” water lter can be purchased separately. For further details, please refer to the maintenance products page in this user manual.
Water is a crucial part of every co ee, so it is very important to always have
it professionally ltered. Using the “INTENZA+” water lter will prevent
mineral deposits from building up and improve your water quality.
Remove the small white lter from the water tank and store it in a dry
1
place.
Page 22

20
ENGLISH
Remove the “INTENZA+” water lter from its packaging, immerse it ver-
2
tically (with the opening positioned upwards) in cold water and gently
press the sides so as to let the air bubbles out.
Set the “INTENZA+” water lter according to the measurements per-
3
formed (see previous chapter) and indicated on the base of the lter:
A = soft water – equals 1 or 2 on the test strip
B = hard water (standard) – equals 3 on the test strip
C = very hard water – equals 4 on the test strip
Put the "INTENZA +" water lter into the empty water tank. Press it
4
down until it cannot move any further.
Fill the water tank with fresh water and put it into the machine.
5
Dispense all the water in the tank by using the hot water function (see
6
the “Dispensing Hot Water” section).
Fill the water tank again.
7
GreenYellow
Press the “ ” MENU button and scroll through the options by pressing
8
” MENU button until this icon is displayed.
the “
Page 23

Press the “ ” button to select “ON”, then press the “ ” button to
9
con rm.
Yellow
To exit, press the “ ” button. The machine is now ready for brewing.
10
GreenYellowYellow
The machine is now programmed to inform the user of the need to replace
the "INTENZA+" water lter.
Replacing the “INTENZA+” Water Filter
When the “INTENZA+” water lter needs to be replaced with a new one,
this icon is displayed.
ENGLISH
21
21
Replace the “INTENZA+” water lter as described in the previous chap-
1
ter.
Yellow
Press the “ ” MENU button and scroll through the options by pressing
2
3
” MENU button until this icon is displayed.
the “
Select the “RESET” option. Press the “ ” MENU button to con rm.
Page 24

22
ENGLISH
To exit, press the “ ” button. The machine is now ready for brewing.
4
The machine is now programmed to manage a new lter.
Note:
If the “INTENZA+” water lter is already installed and you want to remove,
but not replace it, select the “OFF” option instead.
Yellow Green
If there is no “INTENZA+” water lter installed, insert the small white lter
previously removed into the water tank.
CHANGING COFFEE BEANS
The machine comes with a removable co ee bean hopper so you can
easily switch from one type of co ee bean to another and enjoy a di erent
co ee taste.
Note:
You can buy an additional co ee bean hopper as an accessory (CA6803).
To preserve their taste, you can store co ee beans in the bean hopper in
the refrigerator.
Removing the Co ee Bean Hopper
To remove the co ee bean hopper follow the steps below:
Move the selector switch to the “ ” position.
1
Caution:
It may happen that the selector switch can not be shifted as it is
blocked by co ee beans. In this case, move the selector switch back
and forth until the co ee beans are released.
Page 25

ENGLISH
Lift the sides of the co ee bean hopper with both hands as shown in
2
the gure.
Caution:
Do not remove the co ee bean hopper in a di erent way to avoid spilling co ee beans.
After removing it, put the protection lid (if any) on the machine to keep
3
it dust-free.
23
23
Note:
If the machine is turned on without the co ee bean hopper being inserted,
Red
this icon will appear. You need to insert the co ee bean hopper rst.
Inserting the Co ee Bean Hopper
To insert the co ee bean hopper, follow the steps below:
Remove the protection lid (if any) from the machine.
1
Move the selector switch to the “ ” position.
2
Page 26

24
ENGLISH
Remove any beans from the co ee bean hopper compartment.
3
Insert the co ee bean hopper into its compartment as shown in the
4
gure.
Move the selector switch to the “ ” position.
5
Warning:
Please be aware that when you change co ee beans and switch to
deca einated co ee, some ca eine traces might still be present even
after performing an emptying cycle.
Page 27
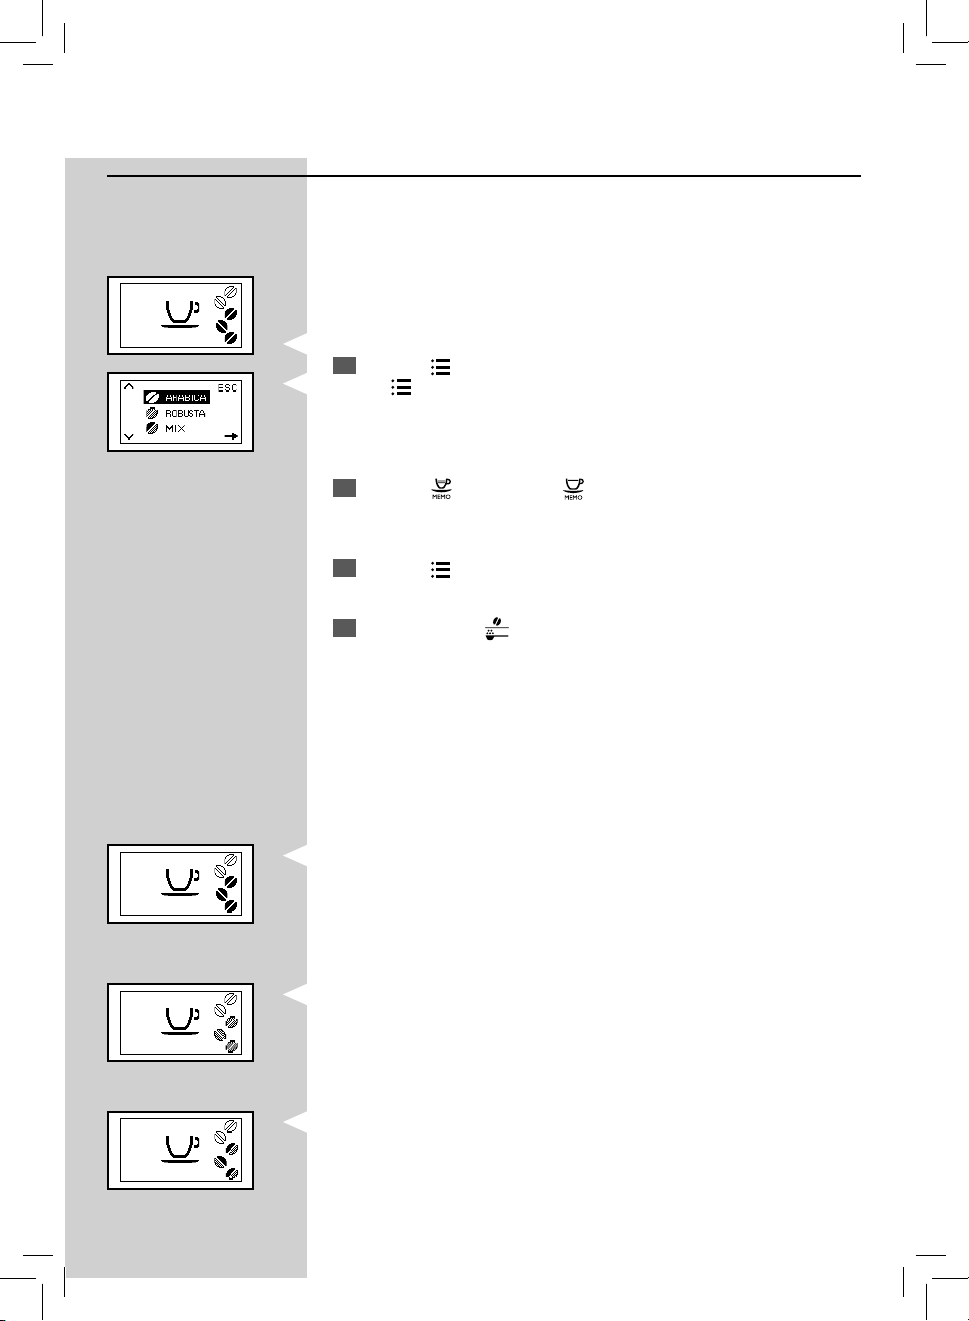
Selecting Co ee Beans
This function allows you to optimize grinding according to the selected
type of co ee beans.
Green
Press the “ ” MENU button and scroll through the options by pressing
1
YellowGreenGreen Green
2
3
4
The machine is now programmed to optimise co ee bean grinding.
” MENU button until this icon is displayed.
the “
Press the “ ” button or the “ ” button to select the type of co ee
beans in the co ee bean hopper.
Press the “ ” MENU button to con rm the setting.
To exit, press the “ ” button.
ENGLISH
25
25
The display shows the selected type of co ee beans when the machine is
ready for brewing.
- for “ARABICA” co ee beans;
- for “ROBUSTA” co ee beans;
- for “MIXED” co ee beans.
Page 28
26
ENGLISH
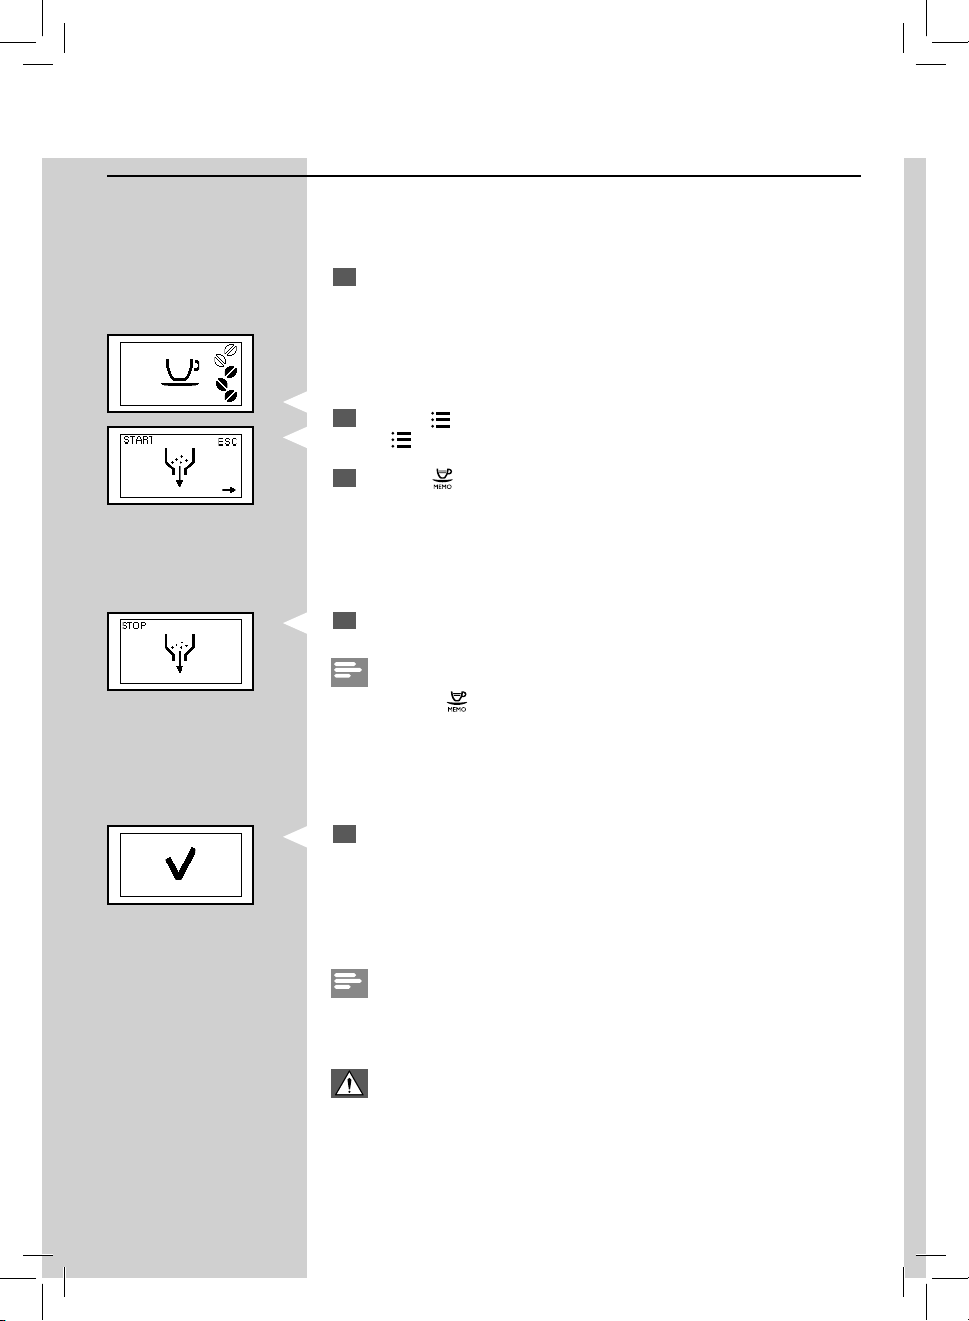
Co ee Emptying Cycle
When you change co ee beans, it is recommended to empty the co ee
outlet duct and grinder. In this way, you will be able to fully taste the aroma
of the new co ee beans. For this, follow the steps below:
Fill the co ee bean hopper with co ee beans.
1
Green
Press the “ ” MENU button and scroll through the options by pressing
2
YellowYellowGreen
3
4
If you press the “
you can stop the grinding cycle earlier.
” MENU button until this icon is displayed.
the “
Press the " " button.
The machine performs two grinding cycles without brewing co ee.
Note:
” button between the rst and second grinding cycle,
When the grinding cycles have been completed, the machine shows
5
this icon.
Note:
If you have not emptied the co ee outlet duct and grinder, you need to
brew at least two co ees before you can taste the new co ee beans.
Warning:
Please be aware that when you change co ee beans and switch to
deca einated co ee, some ca eine traces might still be present even
after performing an emptying cycle.
Page 29
ENGLISH
27
27
ADJUSTMENTS
The machine allows for certain adjustments so that you can brew the best
tasting co ee possible.
Saeco Adapting System
Co ee is a natural product and its characteristics may change according to
its origin, blend and roast. The machine is equipped with a self-adjusting
system that allows the use of all types of co ee beans available on the
market, except for raw, caramelized and avoured co ee beans.
The machine automatically adjusts itself after brewing several cups of coffee to optimize co ee extraction.
Adjusting the Ceramic Co ee Grinder
Ceramic co ee grinders always guarantee an accurate and perfect grinding
and a speci c coarseness for every co ee speciality.
This provides full aroma preservation, delivering a truly Italian taste in
every cup.
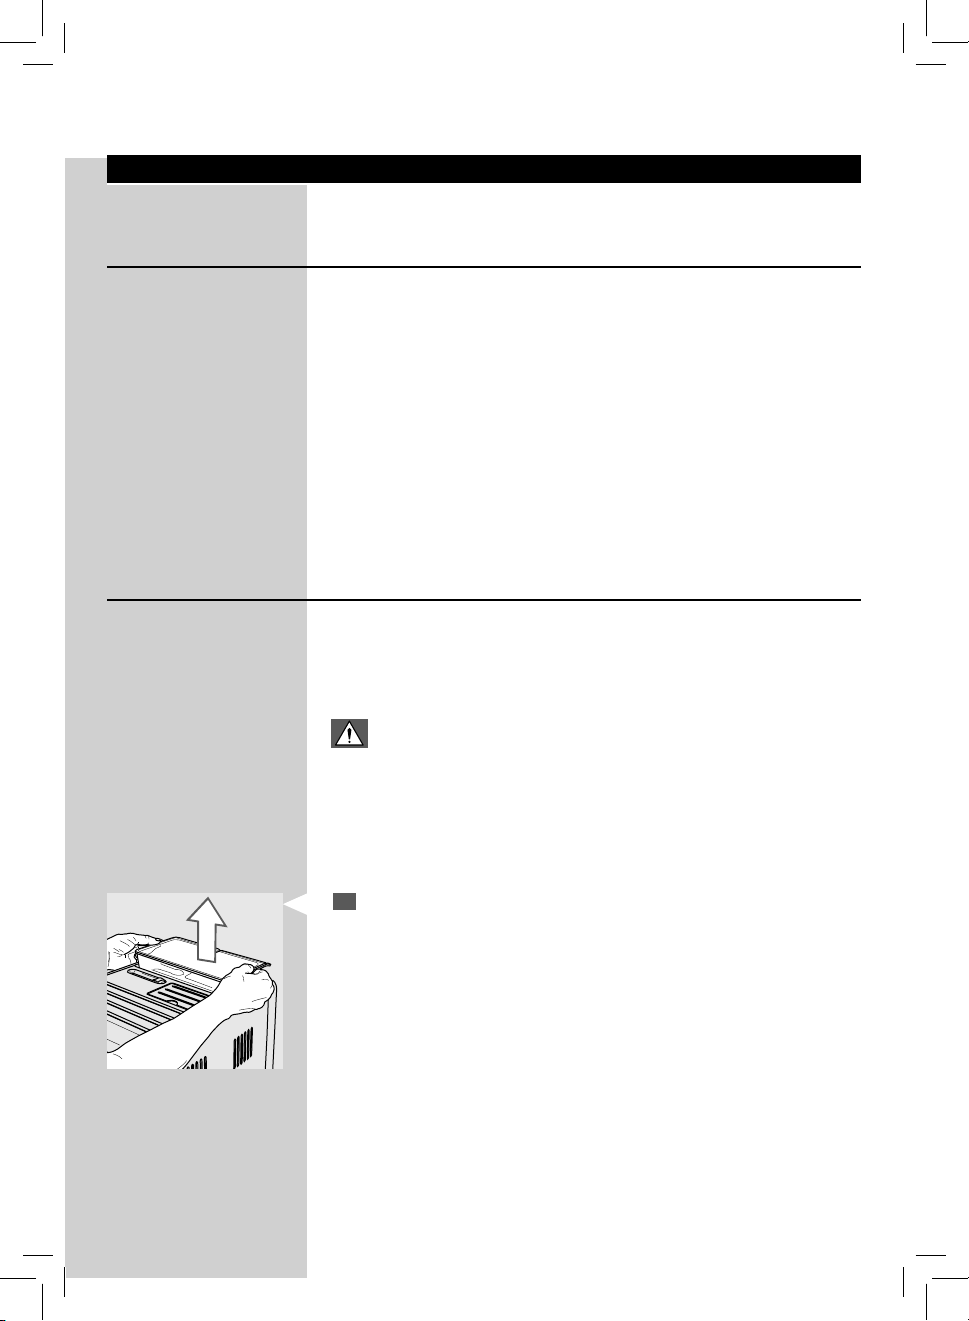
Warning:
The ceramic co ee grinder contains moving parts that may be dangerous. Do not insert ngers or other objects. Only adjust the ceramic
co ee grinder using the grinder adjustment key.
You can adjust the ceramic grinders to set the co ee grinding to your
personal taste.
Remove the co ee bean hopper as shown in the “Removing the Co ee
1
Bean Hopper” section.
Page 30
28
ENGLISH
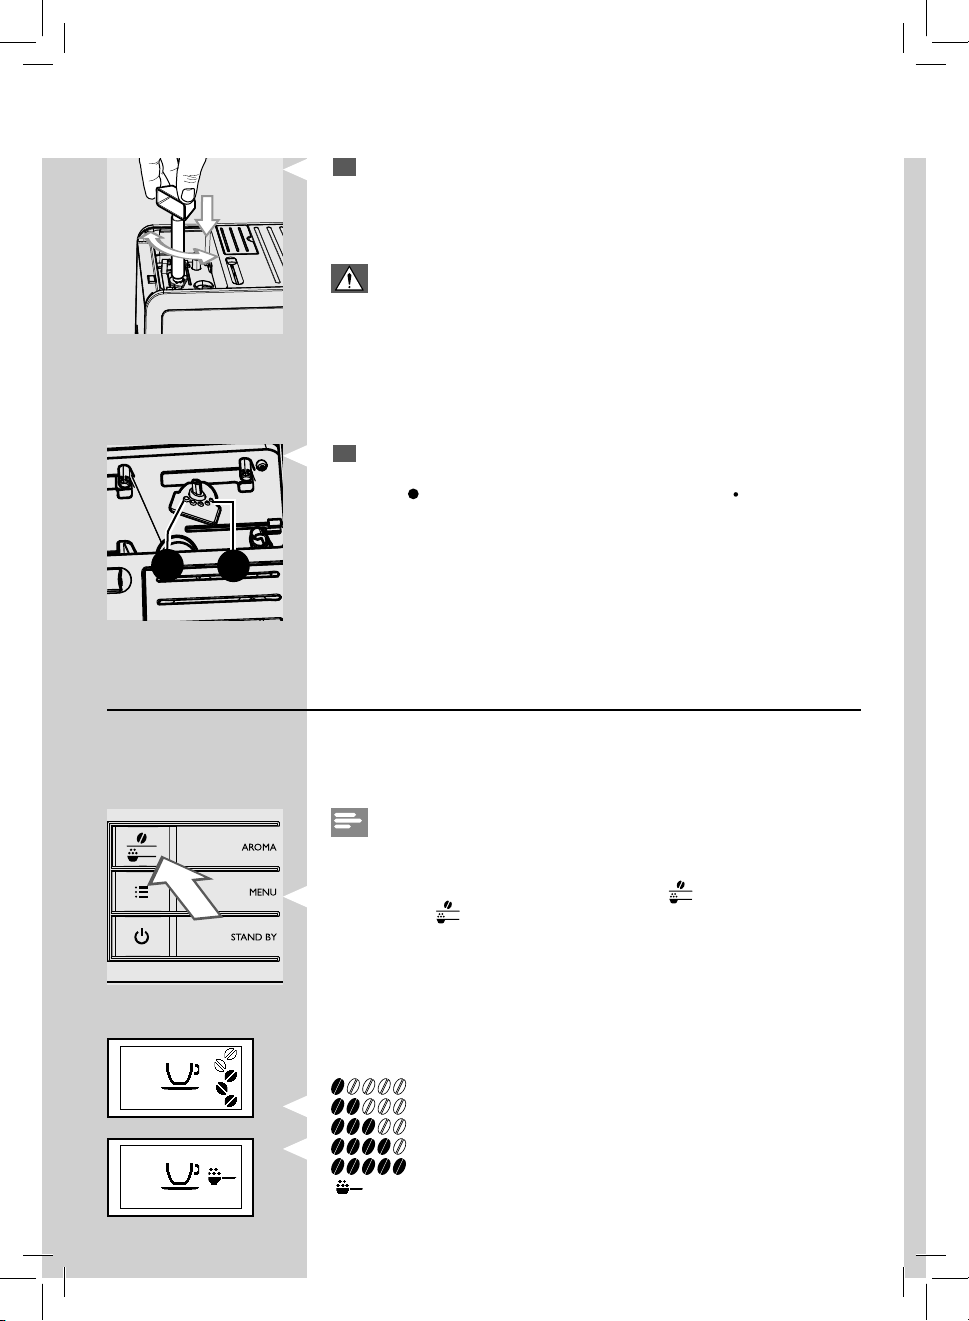
Press and turn the grinder adjustment knob inside the co ee bean
2
hopper one notch at a time. Use the special co ee grinder adjustment
key supplied. You will taste the di erence after brewing 2-3 cups of
co ee.
Warning:
Do not turn the co ee grinder more than one notch at a time to prevent damage.
The reference marks inside the co ee bean hopper indicate the grind
3
setting. There are 5 di erent grind settings to choose from, from posi-
( )
tion 1
stronger taste. If co ee is watery or is brewed slowly, change the co ee
grinder settings.
for coarse grind - lighter taste to position 2
( )
for ne grind -
1
2
Adjusting the Aroma (Co ee Strength)
Choose your favourite co ee blend and adjust the amount of co ee to
be ground according to your personal taste. You can also select the preground co ee function.
Note:
Selection must be made prior to selecting co ee.
You can choose from 5 options by pressing the “
Each time the “
according to the selected amount:
GreenGreen
” button is pressed, the aroma changes by one degree,
= extra mild aroma
= mild aroma
= medium aroma
= strong aroma
= extra strong aroma
= pre-ground co ee
” button.
Page 31
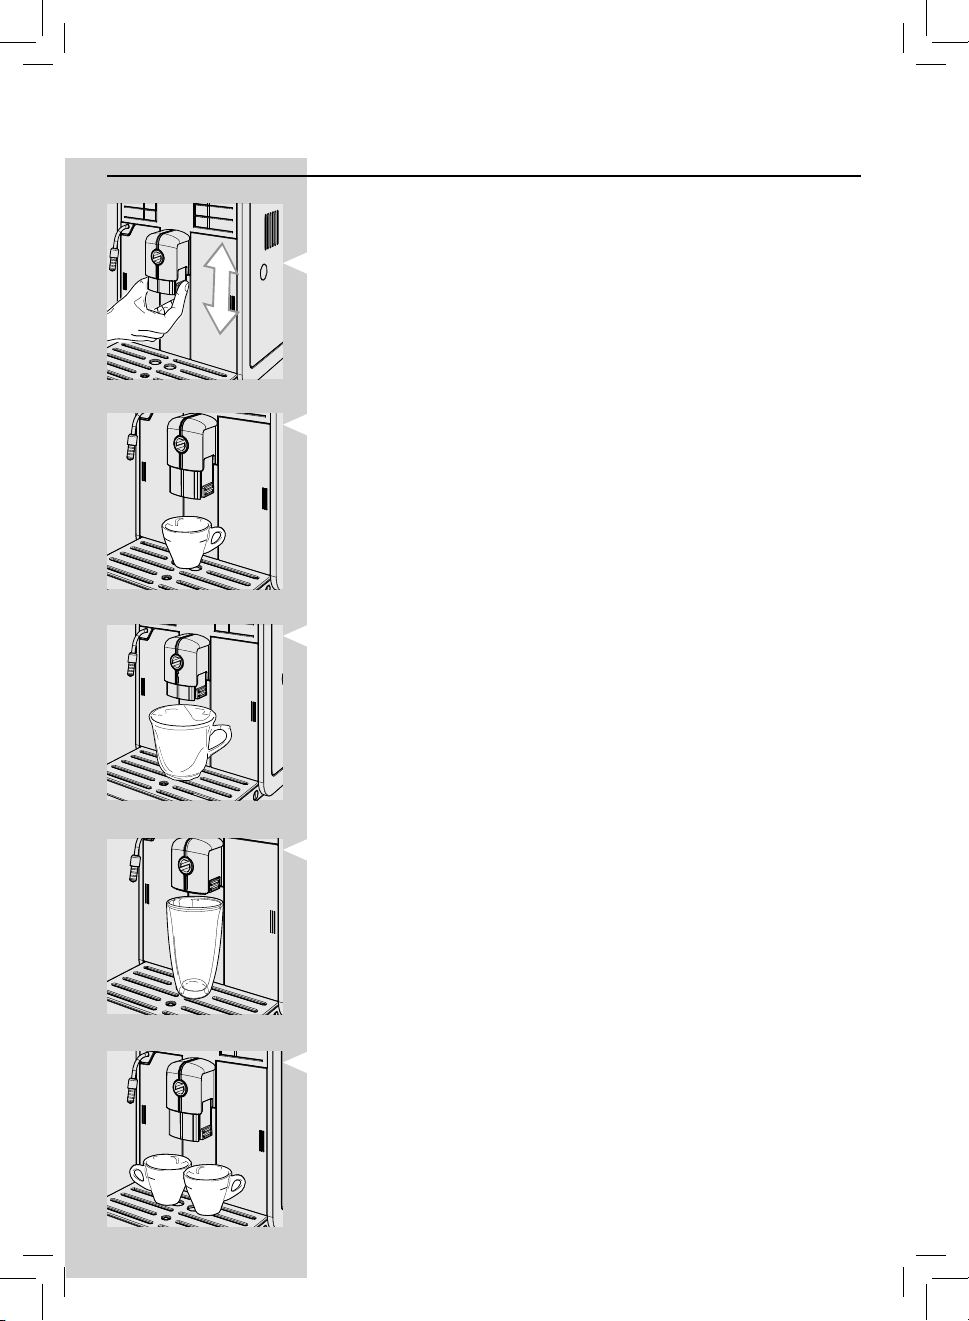
ENGLISH
Adjusting the Co ee Dispensing Spout
The height of the co ee dispensing spout can be adjusted to better t the
dimensions of the cups that you wish to use.
Move the co ee dispensing spout up or down with your ngers to adjust
its height as shown in the gure.
The recommended positions are:
For the use of small cups.
For the use of large cups.
29
29
For the use of glasses for the Latte Macchiato.
Two cups can be placed under the co ee dispensing spout to brew two
co ees at the same time.
Page 32
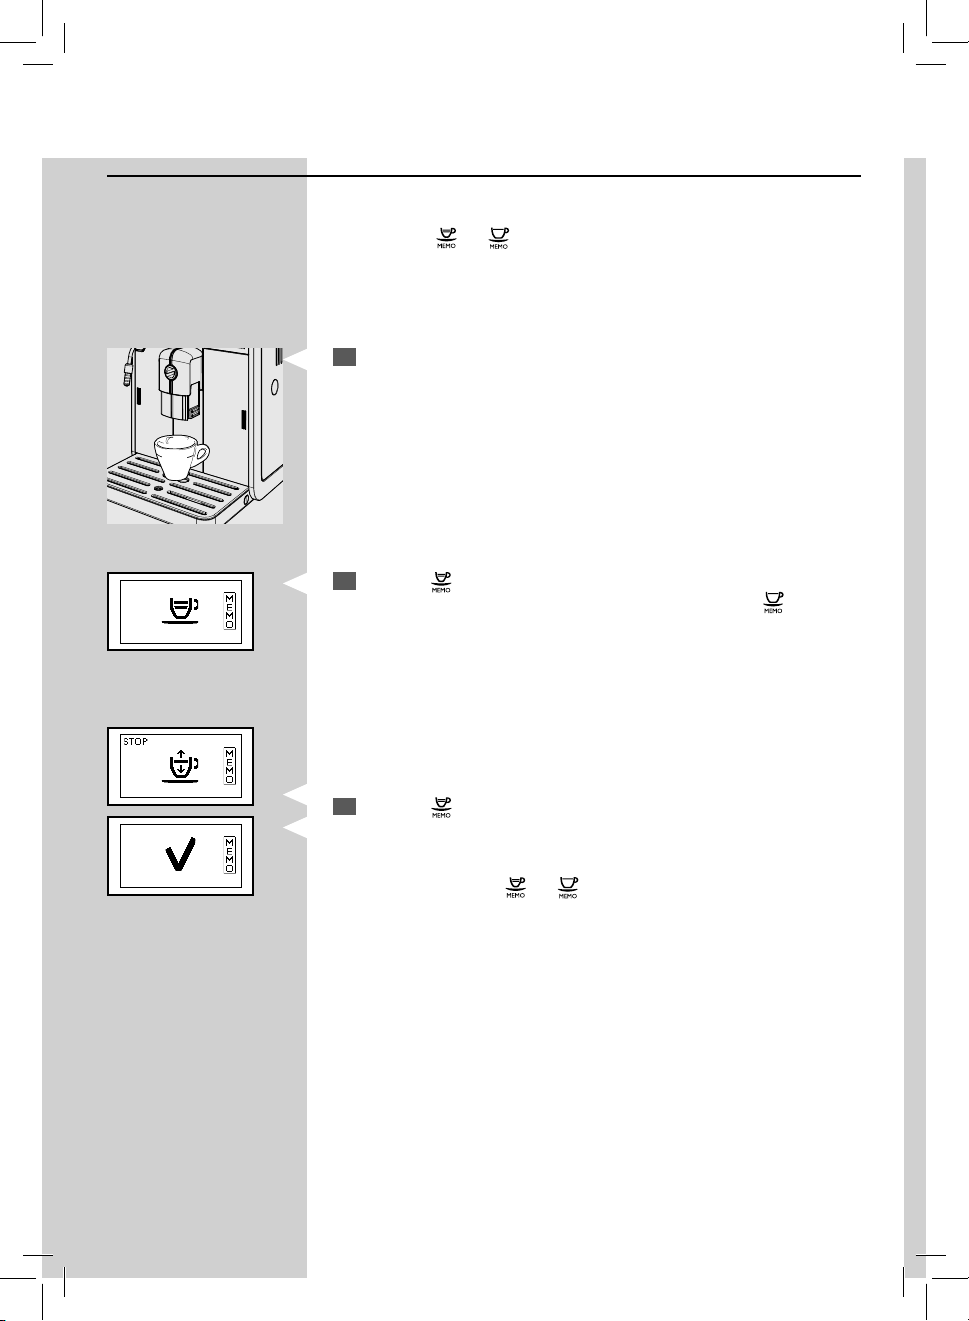
30
ENGLISH
Adjusting the Co ee Length
The machine allows you to adjust the amount of brewed co ee according
to your taste and/or the size of your cups.
Each time the “
amount of co ee. Each button may be individually programmed for a
speci c brew setting.
Place a cup under the co ee dispensing spout.
1
Keep the “ ” button pressed until the “MEMO” icon appears on the
2
display to program an espresso, or do the same with the “
GreenGreen Green
program a co ee. Then release the button. The machine is in programming mode and starts brewing the selected product.
” or “ ” button is pressed, the machine brews a pre-set
” button to
Press the “ ” button as soon as the desired amount of espresso or cof-
3
fee is reached.
The previously selected “
it is pressed, the machine will brew the same amount of espresso or co ee
that was just programmed.
” or “ ” button is now programmed; each time
Page 33
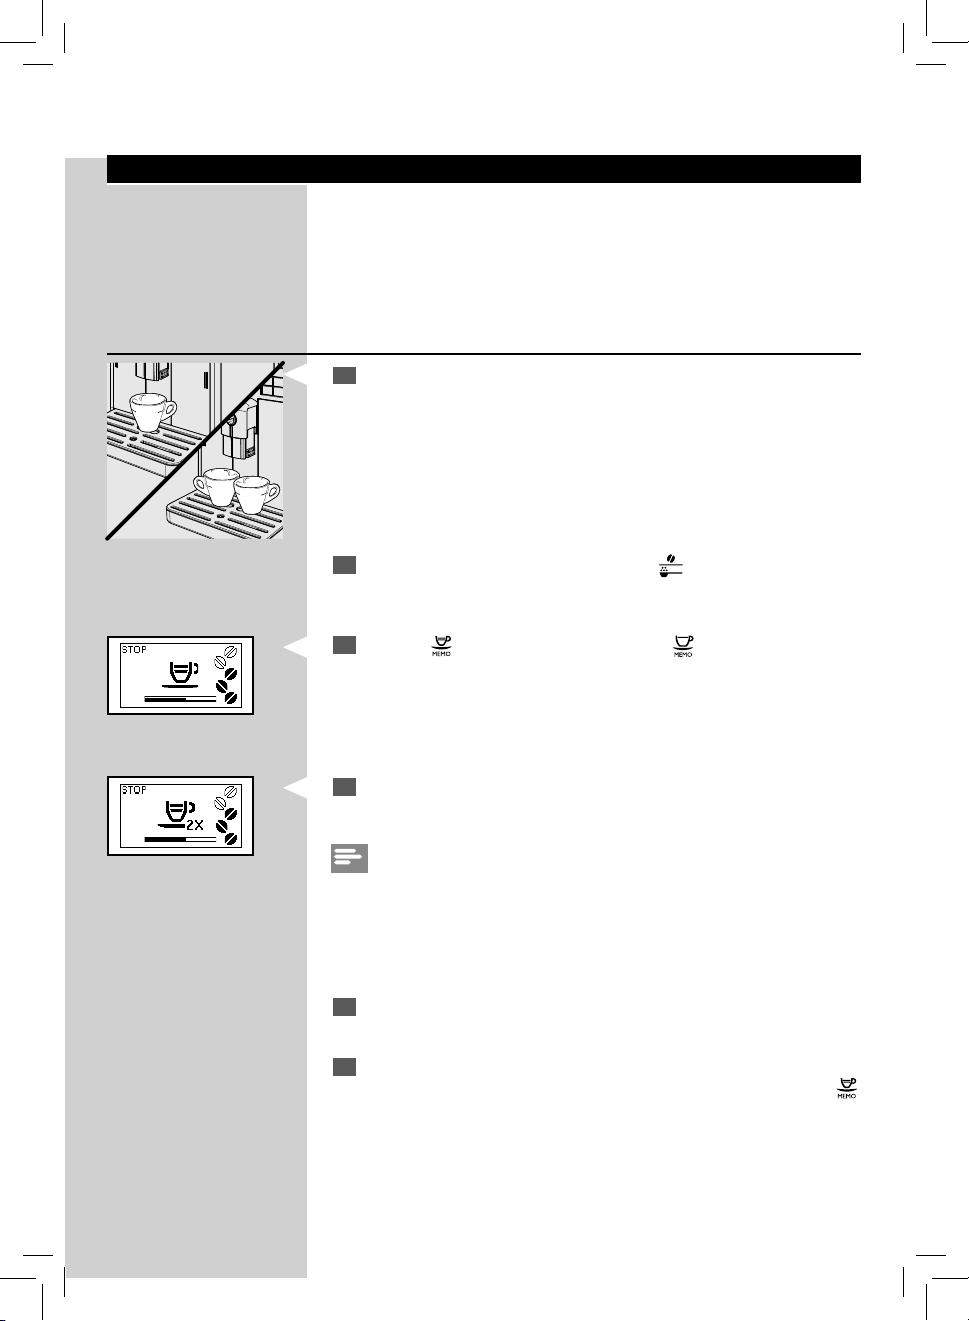
BREWING ESPRESSO AND COFFEE
Before brewing co ee, make sure that there are no warnings shown on the
control panel, and that the water tank and co ee bean hopper are lled.
Brewing Espresso and Co ee Using Co ee Beans
Place 1 or 2 cups under the co ee dispensing spout.
1
To brew an espresso or a co ee, press the “ ” button to select the
2
desired aroma.
Press the “ ” button for an espresso or the “ ” button for a co ee.
3
Green
ENGLISH
31
31
To brew 2 cups of espresso or co ee, press the desired button twice
4
consecutively. This icon will be displayed.
Green
Note:
In this operating mode, the machine automatically grinds and doses the
correct amount of co ee. Brewing two cups of espresso or co ee requires
two grinding and brewing cycles, automatically carried out by the machine.
After the prebrewing cycle, co ee begins to pour out of the co ee
5
dispensing spout.
Co ee brewing stops automatically when the set level is reached.
6
However, it is possible to stop co ee brewing early by pressing the “
” button.
Page 34
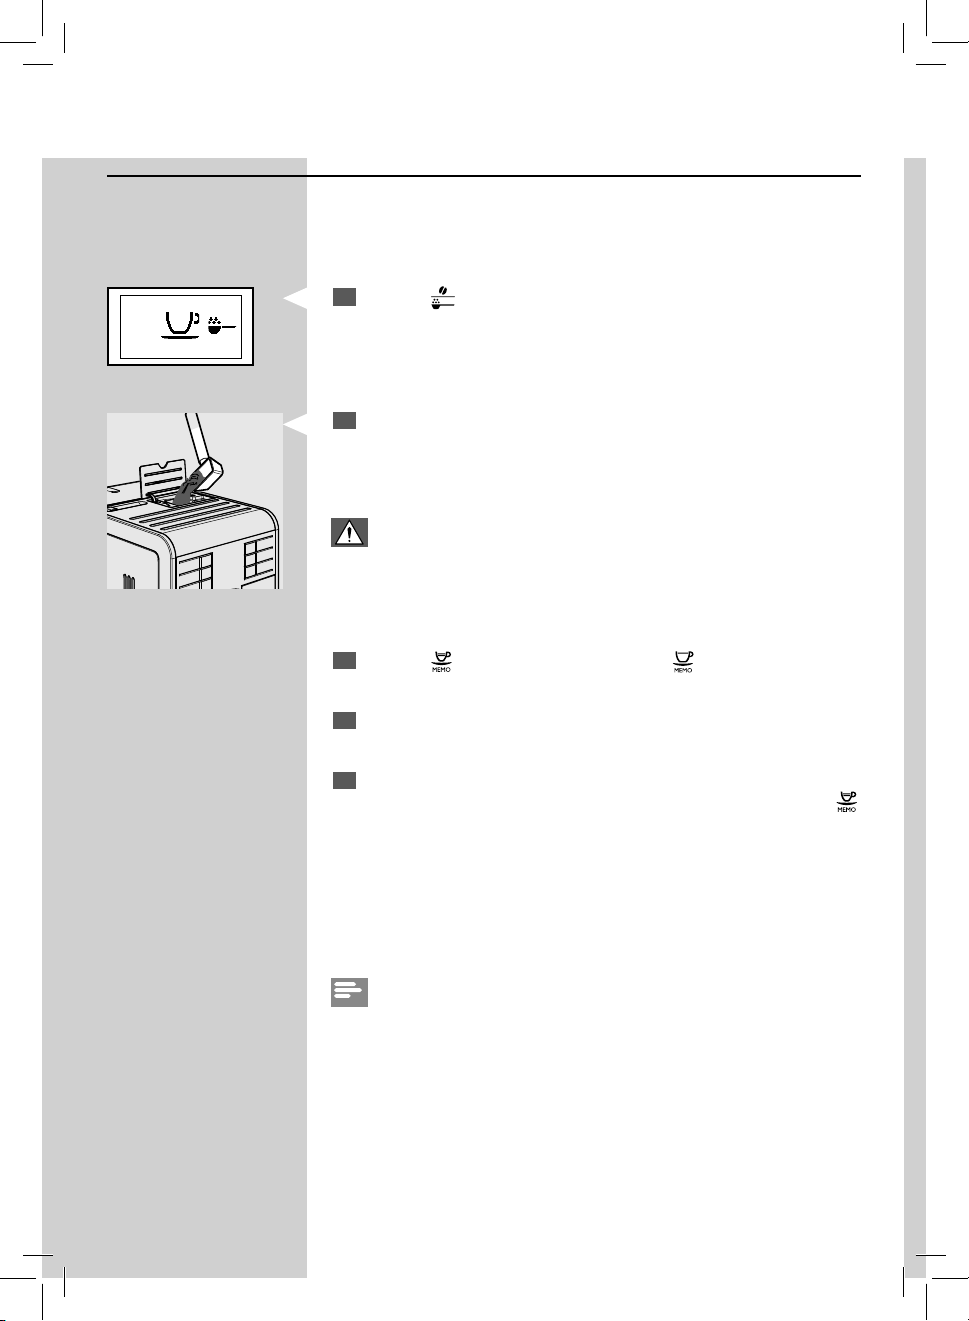
32
ENGLISH
Brewing Espresso and Co ee Using Pre-Ground Co ee
This function allows you to use pre-ground and deca einated co ee.
With the pre-ground co ee function you can only brew one co ee at a
time.
Press the “ ” button to select the pre-ground co ee function.
1
Green
Lift the pre-ground co ee compartment lid and add one level measur-
2
ing scoop of pre-ground co ee.
Use only the measuring scoop supplied with the machine. Then close
the pre-ground co ee compartment lid.
Warning:
Add only pre-ground co ee to the pre-ground co ee compartment.
Other substances and objects may cause severe damage to the machine. Such damage will not be covered by warranty.
Press the “ ” button for an espresso or the “ ” button for a co ee.
3
The brewing cycle starts.
After the prebrewing cycle, co ee begins to pour out of the co ee
4
dispensing spout.
Co ee brewing stops automatically when the set level is reached.
5
However, it is possible to stop co ee brewing early by pressing the “
” button.
After brewing, the machine returns to the main menu.
Repeat the steps described above to brew more cups of co ee using preground co ee.
Note:
If no pre-ground co ee is poured into the pre-ground co ee compartment, only water will be dispensed.
If the dose is excessive or 2 or more scoops of pre-ground co ee are added,
the machine will not brew the product and any ground co ee will be
discharged into the co ee grounds drawer.
Page 35
ENGLISH
FROTHING MILK AND PREPARING A CAPPUCCINO
Frothing Milk
Note:
Depending on the machine model, the Automatic Milk Frother is provided
either with or without chrome cover.
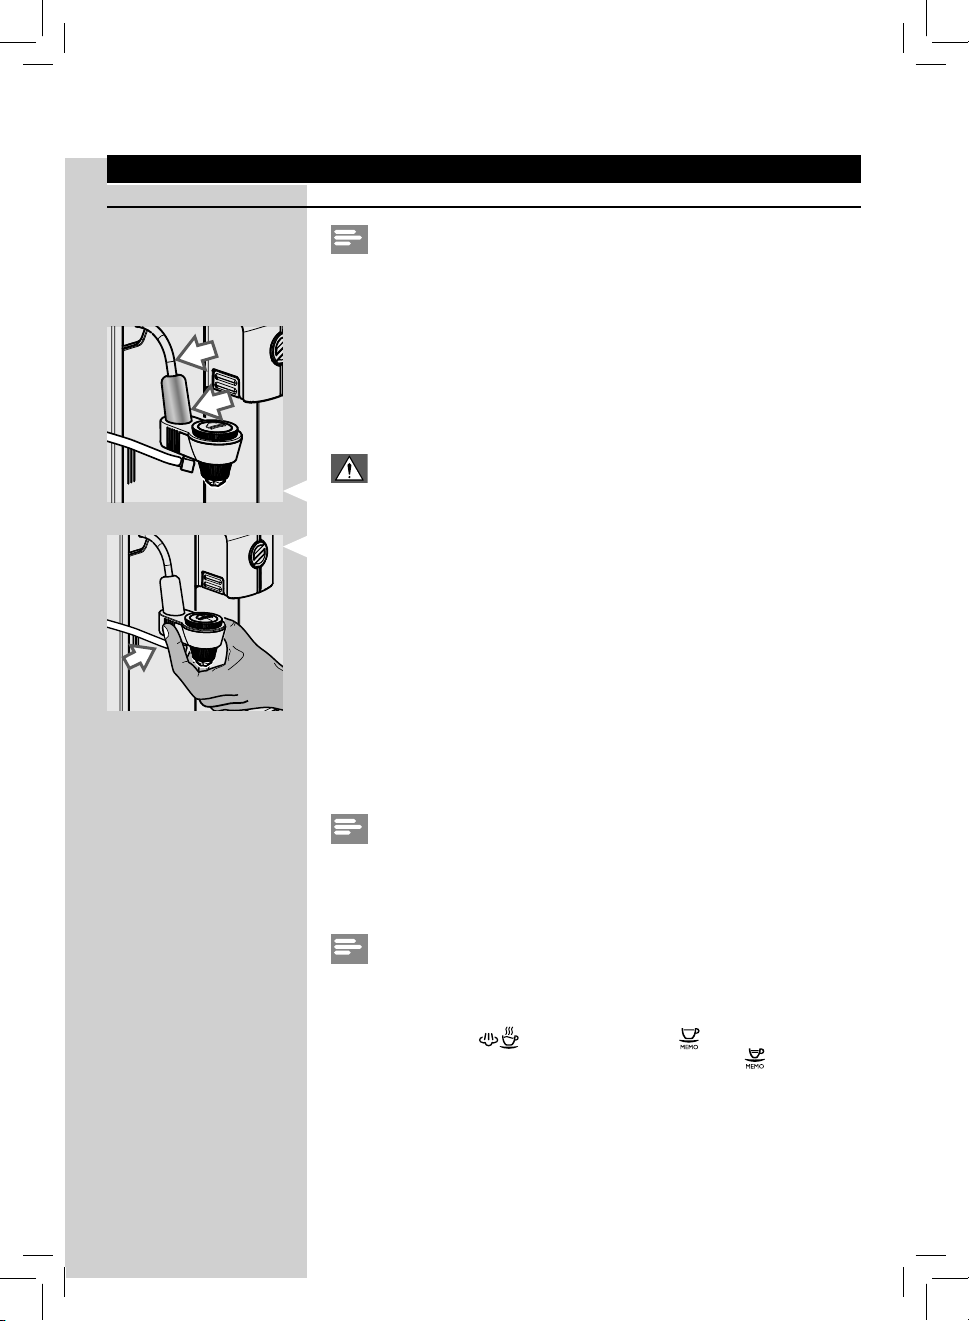
Warning:
Danger of scalding! Dispensing may be preceded by small jets of hot
water. When steam is used, the steam wand and the chrome cover
(if any) may reach high temperatures. Never touch them with bare
hands. The Automatic Milk Frother must be handled only as shown in
the gure.
33
33
Note:
When preparing your cappuccino, use cold (~5°C / 41°F) milk with a protein
content of at least 3% to ensure optimum results. Whole milk or skimmed
milk may be used depending on individual taste.
Note:
When you plan to froth milk right after turning on the machine or after
brewing a co ee, any water still in the circuit may need to be dispensed
rst.
To do this, press the “
to dispense steam for a few seconds. Thereafter press the “
stop dispensing and go to step 1.
” button and then the “ ” button
” button to
Page 36
34
ENGLISH
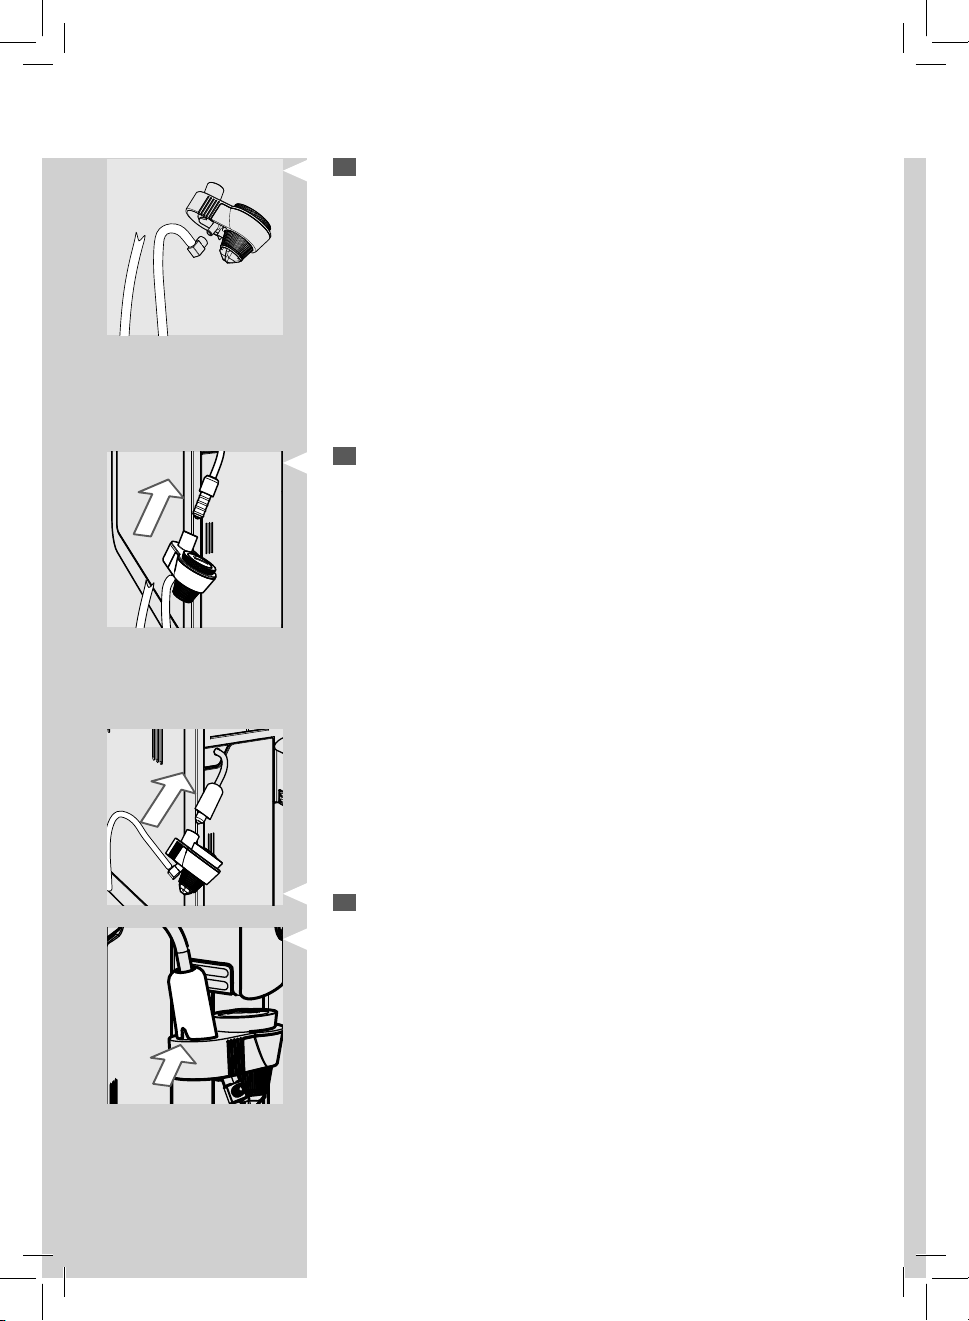
Insert the suction tube into the Automatic Milk Frother.
1
For Automatic Milk Frother without chrome cover.
Insert the Automatic Milk Frother into the steam wand seat.
2
For Automatic Milk Frother with chrome cover.
Insert the Automatic Milk Frother into the steam wand seat. Make sure
2
that it is positioned correctly. If you cannot insert the Automatic Milk
Frother, rotate the chrome cover. The Automatic Milk Frother is assembled correctly when the tooth ts into the slot.
Page 37
ENGLISH
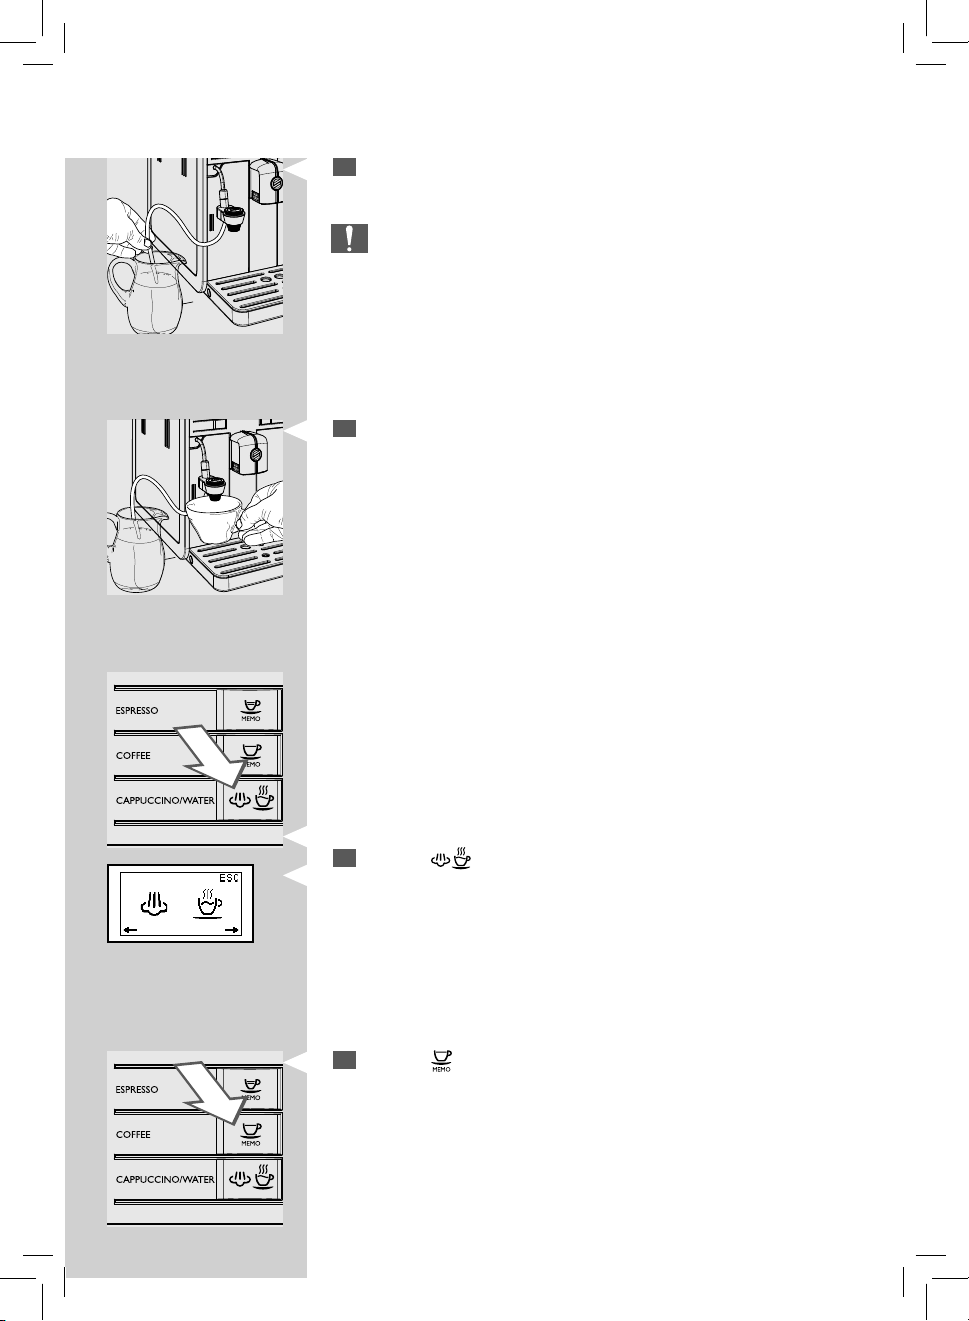
Insert the suction tube into the milk container.
3
Caution:
For hygienic reasons, make sure that the outer surface of the suction
tube is clean.
Place a cup under the Automatic Milk Frother.
4
35
35
Green
Press the “ ” button. The machine shows this display.
5
Press the “ ” button to start frothing milk.
6
Page 38

36
ENGLISH
This icon is displayed during the preheating time required by the
7
machine.
Yellow
When this icon is displayed, the machine starts dispensing frothed milk
8
directly into the cup.
Green
Press the “ ” button to stop dispensing.
9
Note:
It will take a few seconds before the machine stops dispensing steam
completely.
After use, store the suction tube as shown in the gure.
10
Caution:
After frothing milk, a small quantity of hot water must be dispensed
into a container. See the “Daily Cleaning of the Automatic Milk
Frother” chapter for detailed cleaning instructions.
Note:
It is possible to brew an espresso or dispense hot water straight after frothing milk.
Brewing a Cappuccino
To prepare a cappuccino, place a cup of frothed milk under the co ee
dispensing spout and brew an espresso.
Page 39
DISPENSING HOT WATER
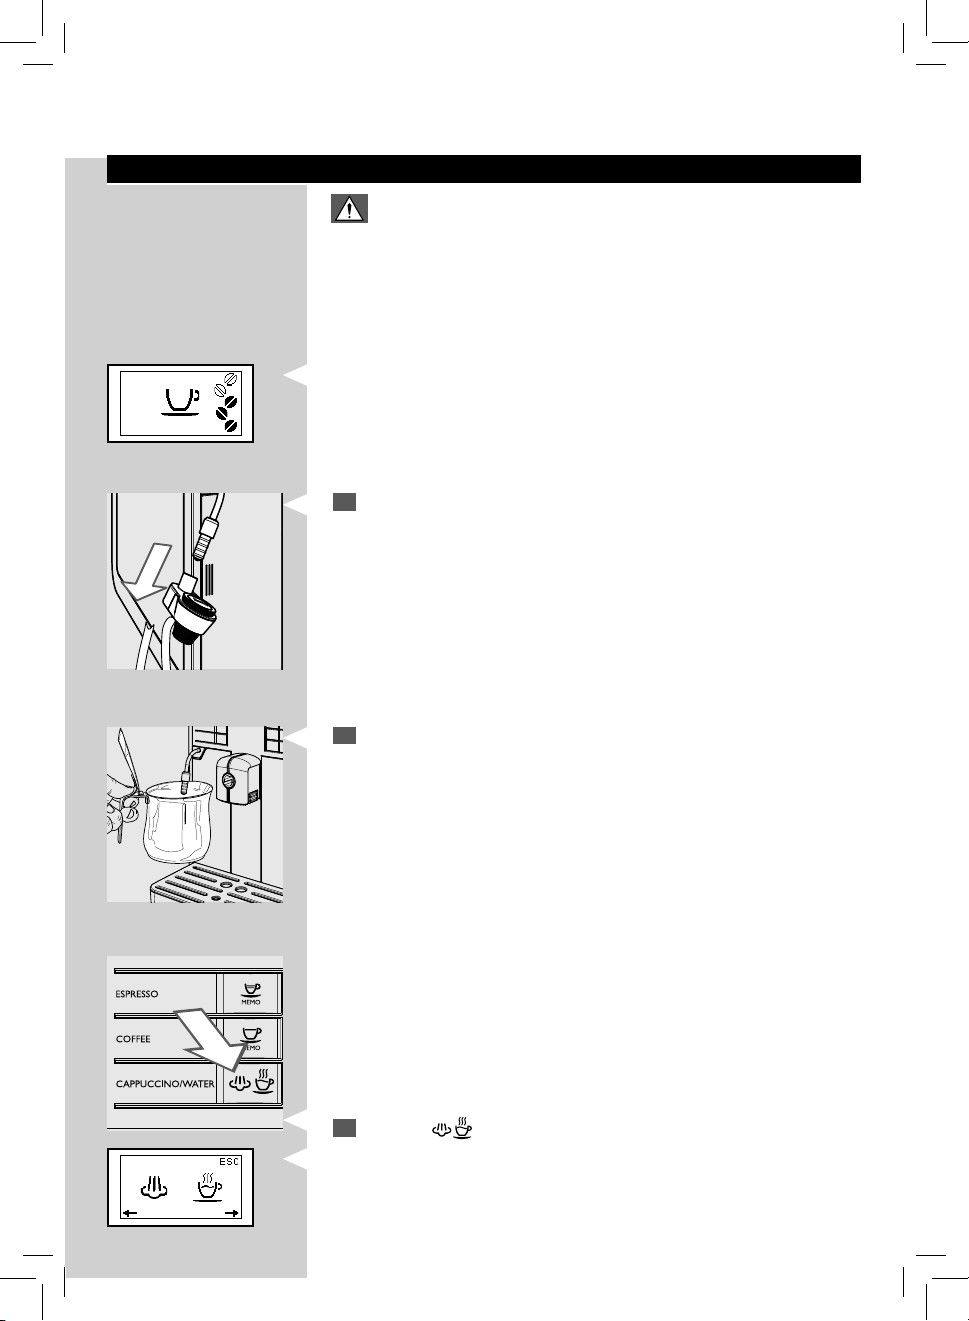
Warning:
Danger of scalding! Dispensing may be preceded by small jets of hot
water. The steam wand and the chrome cover (if any) may reach high
temperatures.
Before dispensing hot water, make sure that the machine is ready to use
and the water tank is lled.
Green
Remove the Automatic Milk Frother from the steam wand.
1
ENGLISH
37
37
Green
Place a container under the steam wand.
2
Press the " " button. The machine shows this display.
3
Page 40

38
ENGLISH
Press the ““ ” MENU button to start dispensing hot water.
4
This icon is displayed during the preheating time required by the
5
machine.
Dispense the desired amount of hot water. To stop dispensing hot
6
water, press the “
Green Yellow
” button.
Page 41
ENGLISH
CLEANING AND MAINTENANCE
Daily Cleaning of the Machine
Caution:
Timely cleaning and maintenance of your machine is very important
as it prolongs the life of your machine. The machine is continuously
exposed to humidity, co ee and limescale!
The activities you need to perform and their frequency are described
in detail in this chapter. Not doing this will ultimately make your machine stop working properly. This repair is NOT covered by warranty!
Note:
- Use a soft, dampened cloth to clean the machine.
- Only the cup holder grill can be washed in the dishwasher. Any other
components must be washed with lukewarm water.
- Do not immerse the machine in water.
- Do not use alcohol, solvents, and/or abrasive objects to clean the
machine.
- Do not dry the machine and/or its components using a microwave
and/or standard oven.
39
39
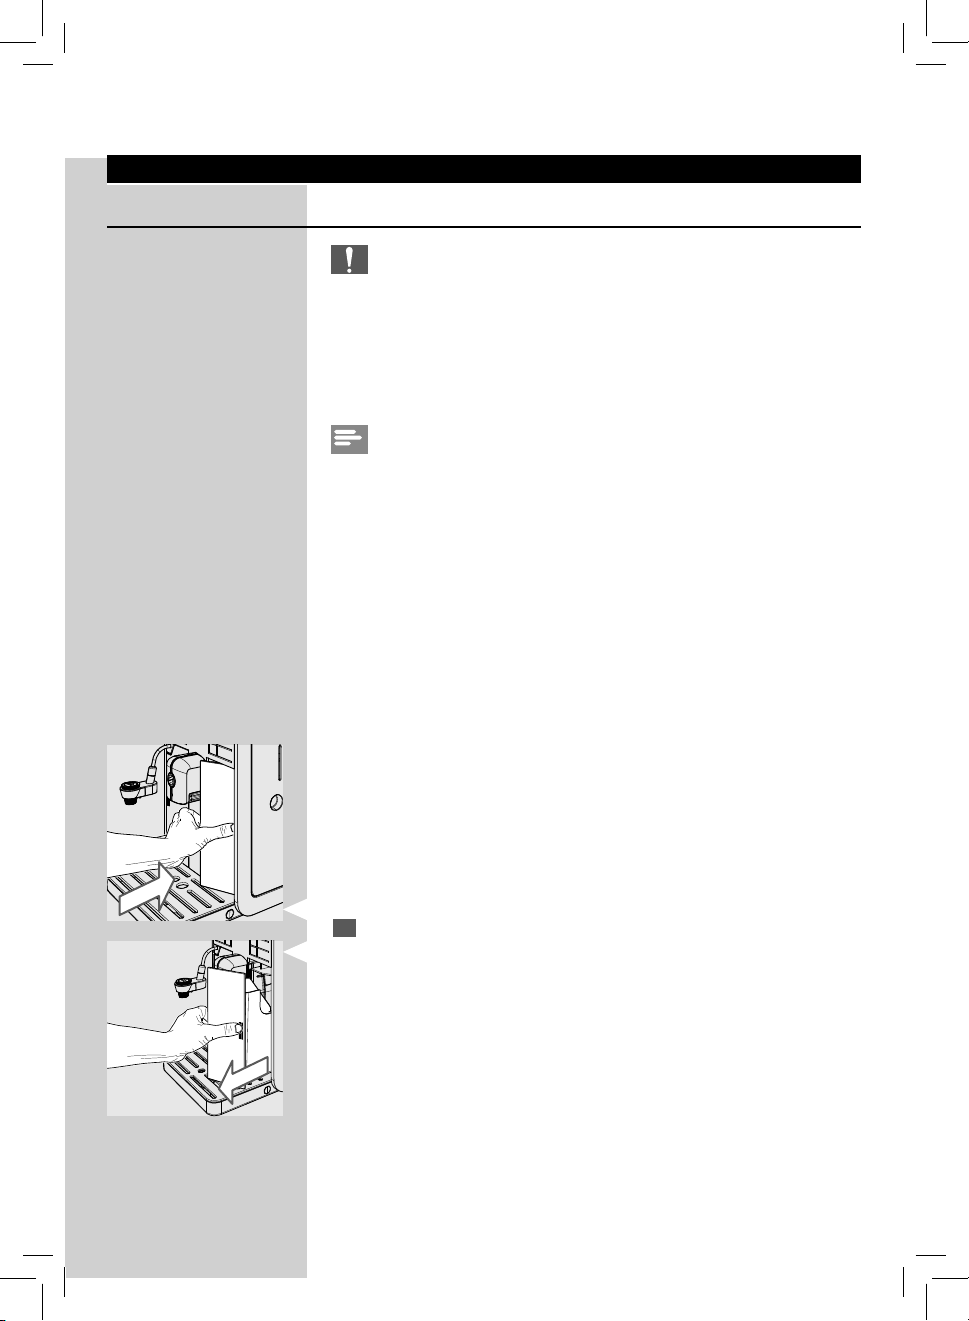
Empty and clean the co ee grounds drawer daily with the machine
1
turned on.
- Press gently on the side of the co ee grounds drawer door to
release the handgrip.
- Remove the co ee grounds drawer by pulling it by the handle.
Other maintenance operations can only be carried out when the machine
is turned o and unplugged.
Page 42
40
ENGLISH
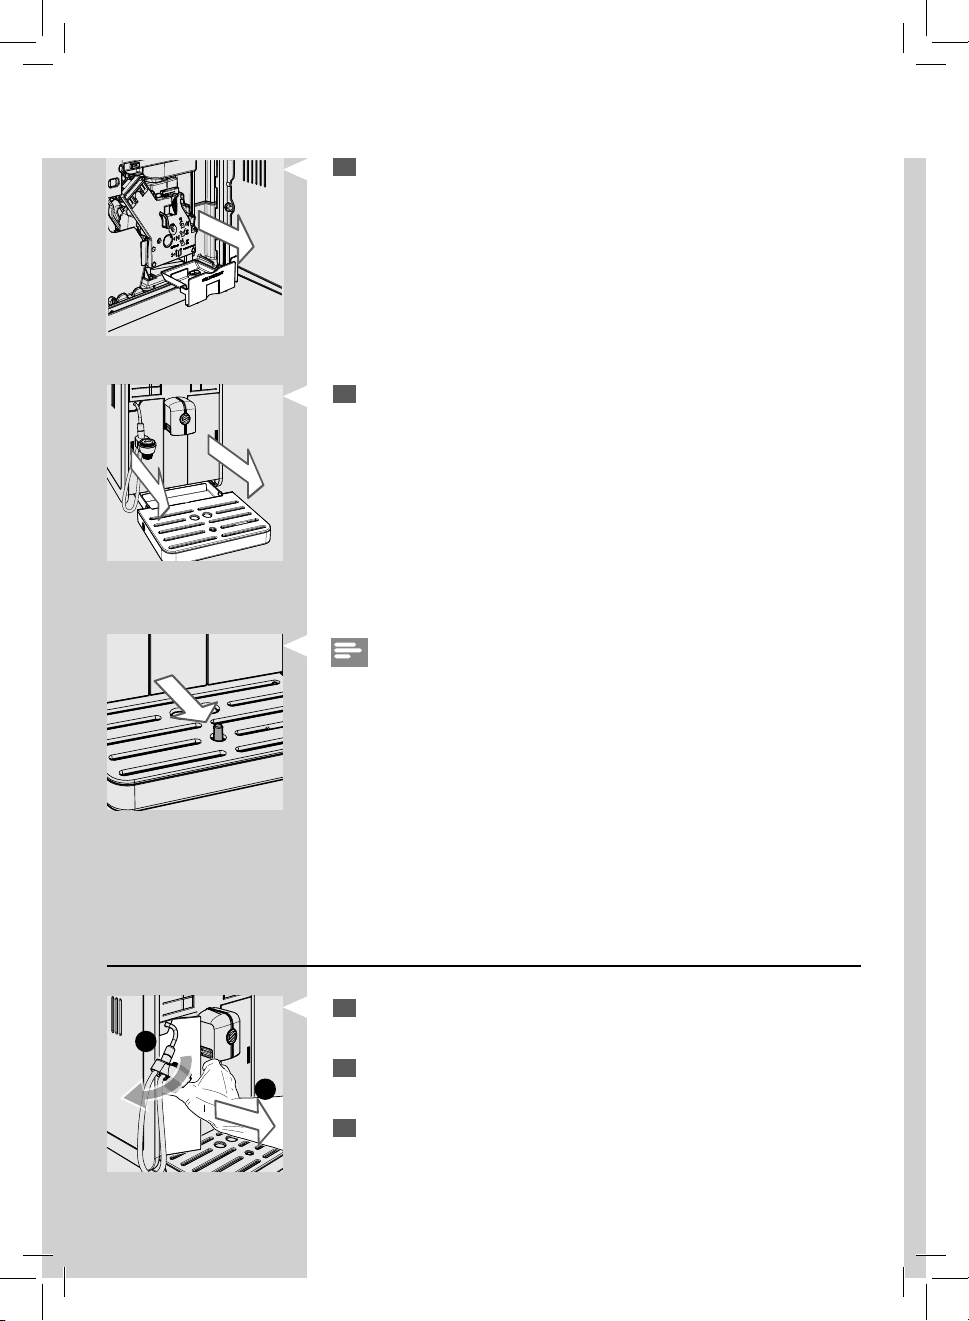
Empty and clean the co ee residues drawer located inside of the ma-
2
chine. Open the service door, remove the drawer and empty it.
Empty and clean the drip tray.
3
Note:
Empty and wash the drip tray also when the full drip tray indicator is raised.
Daily Cleaning of the Water Tank
Remove the small white lter or the INTENZA+ water lter (if installed)
1
1
2
from the water tank and wash it with fresh water.
Put the small white lter or the INTENZA+ water lter (if installed) back
2
in its housing by gently pressing and turning it at the same time.
Fill the water tank with fresh water.
3
Page 43
ENGLISH
Daily Cleaning of the Automatic Milk Frother
For hygienic reasons and to ensure a perfect frothed milk consistency, it is
important that the Automatic Milk Frother be cleaned after each use.
Warning:
Danger of scalding! Dispensing may be preceded by small jets of hot
water.
After frothing milk, you always need to:
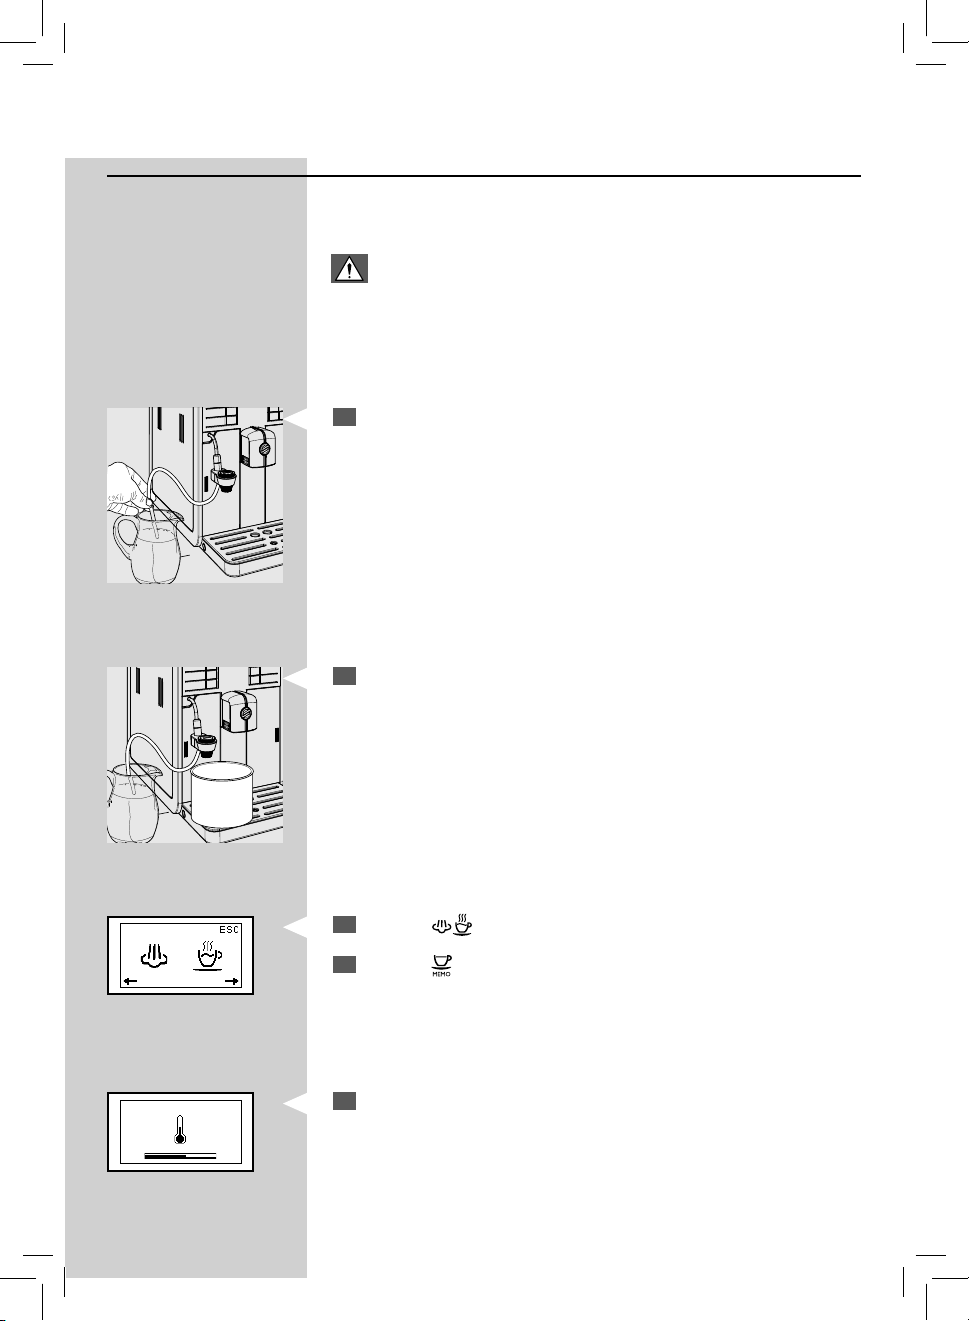
Insert the suction tube into a container lled with fresh water.
1
Place an empty container under the Automatic Milk Frother.
2
41
41
Yellow Green
Press the " " button. The machine shows this display.
3
Press the “ ” button to start dispensing steam.
4
This icon is displayed during the preheating time required by the
5
machine.
Page 44
42
ENGLISH
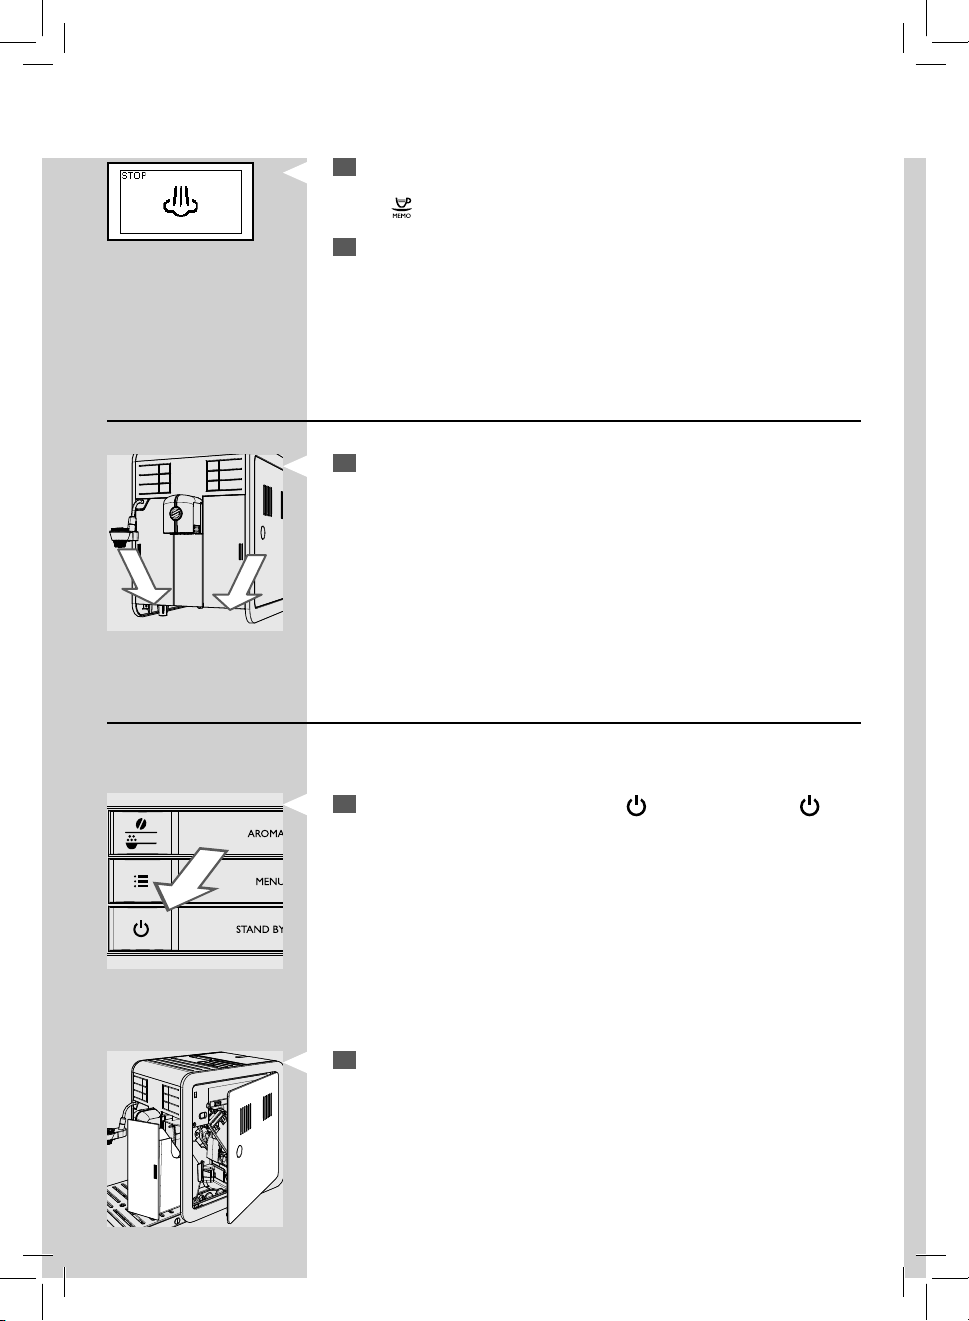
This icon will be displayed during the dispensing phase. Dispense
6
water from the Automatic Milk Frother until clear water ows out. Press
the “
Green
7
” button to stop dispensing.
Clean the suction tube with a damp cloth.
Weekly Cleaning of the Machine
Clean the seat of the drip tray.
1
Weekly Cleaning of the Brew Group
The brew group should be cleaned every time the co ee bean hopper is
lled or at least once a week.
Turn o the machine by pressing the “ ” button. Wait for the “ ” but-
1
ton to ash and unplug the power cord.
Remove the co ee grounds drawer. Open the service door.
2
Page 45
ENGLISH
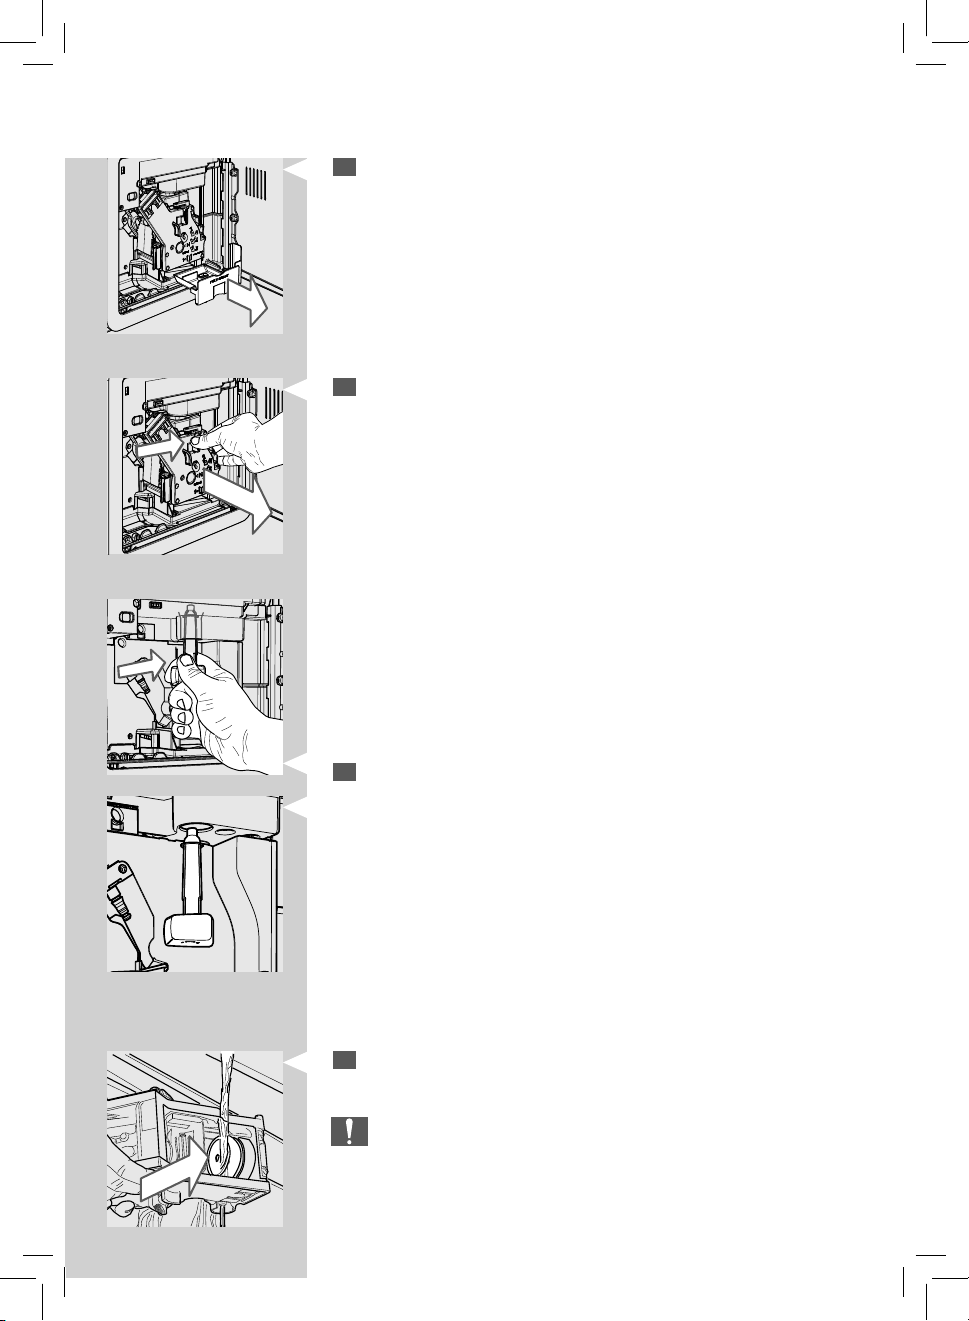
Remove and clean the co ee residues drawer.
3
To remove the brew group, press the «PUSH» button and pull it by the
4
handle.
43
43
Thoroughly clean the co ee outlet duct with the special cleaning tool
5
provided with the machine or with a spoon handle. Make sure that the
cleaning tool is inserted as shown in the gure.
Thoroughly wash the brew group with lukewarm water and carefully
6
clean the upper lter.
Caution:
Do not use detergent or soap to clean the brew group.
Page 46
44
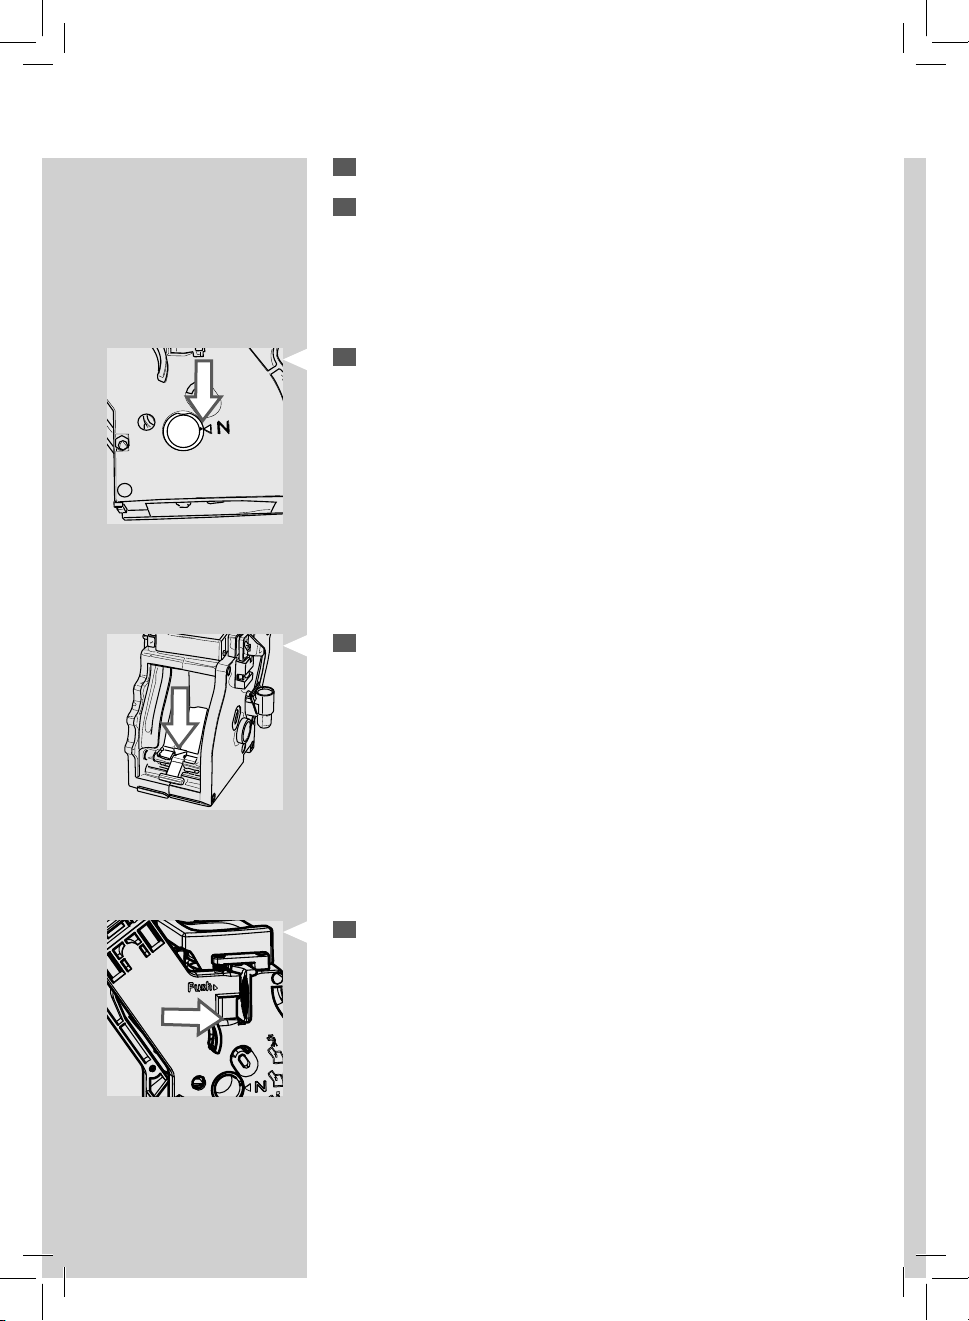
ENGLISH
Let the brew group air-dry thoroughly.
7
Thoroughly clean the inside of the machine using a soft, dampened
8
cloth.
Make sure that the brew group is in the o position; the two reference
9
marks must match. If they do no match, proceed as described in step
(10).
Gently pull down the lever until it is in contact with the brew group
10
base and the two reference marks on the side of the brew group
match.
Press the “PUSH” button rmly.
11
Page 47
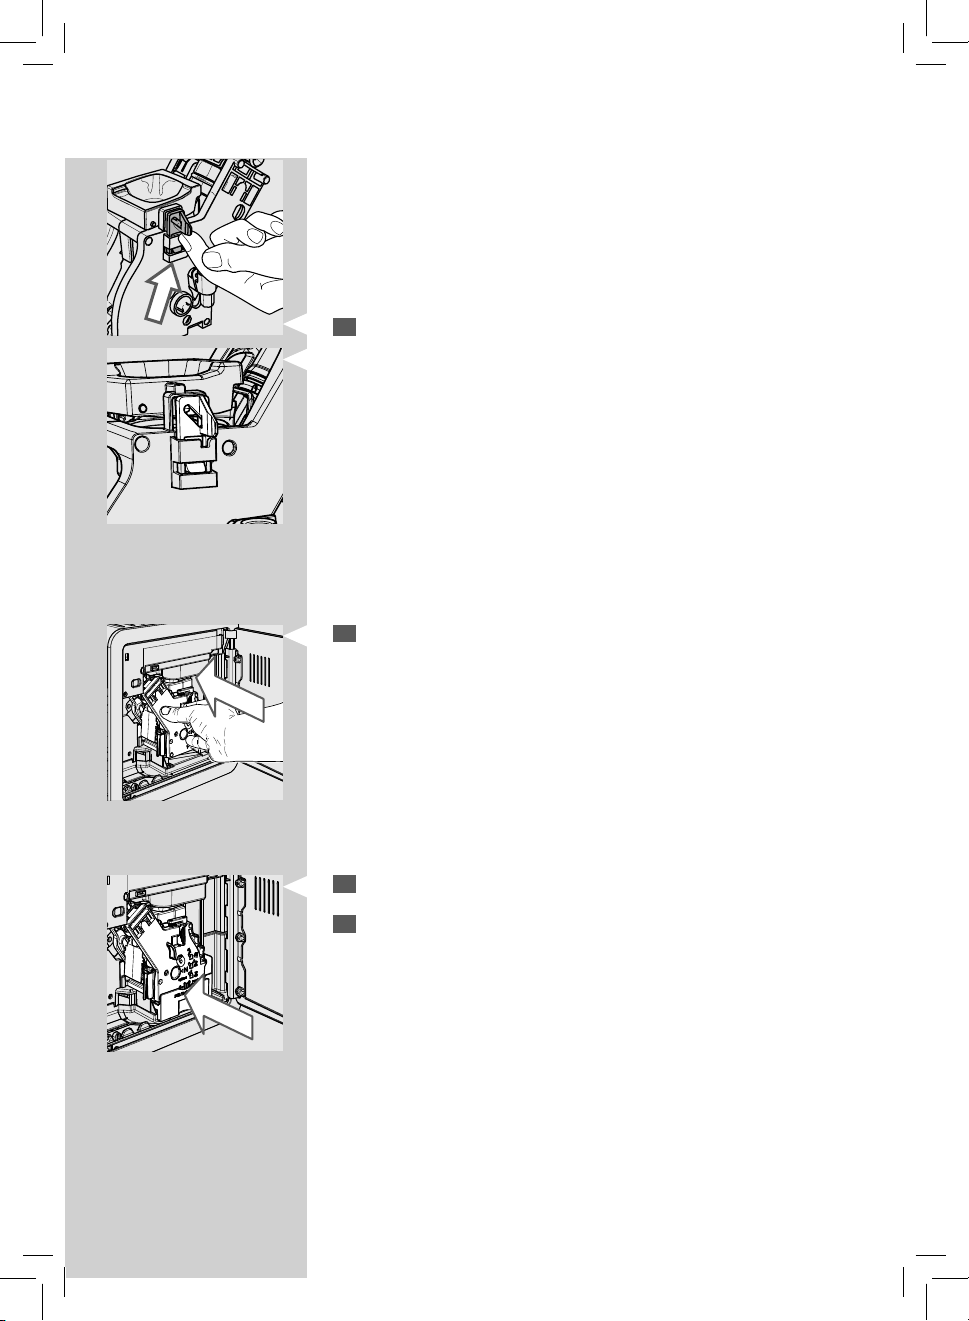
ENGLISH
Make sure that the hook which locks the brew group is in the correct
12
position. If it is still in the downward position, push it upward until it
locks correctly into place.
Insert the brew group back into its seat until it locks into place without
13
pressing the “PUSH” button.
45
45
Insert the co ee residues drawer and close the service door.
14
Insert the co ee grounds drawer.
15
Page 48
46
ENGLISH
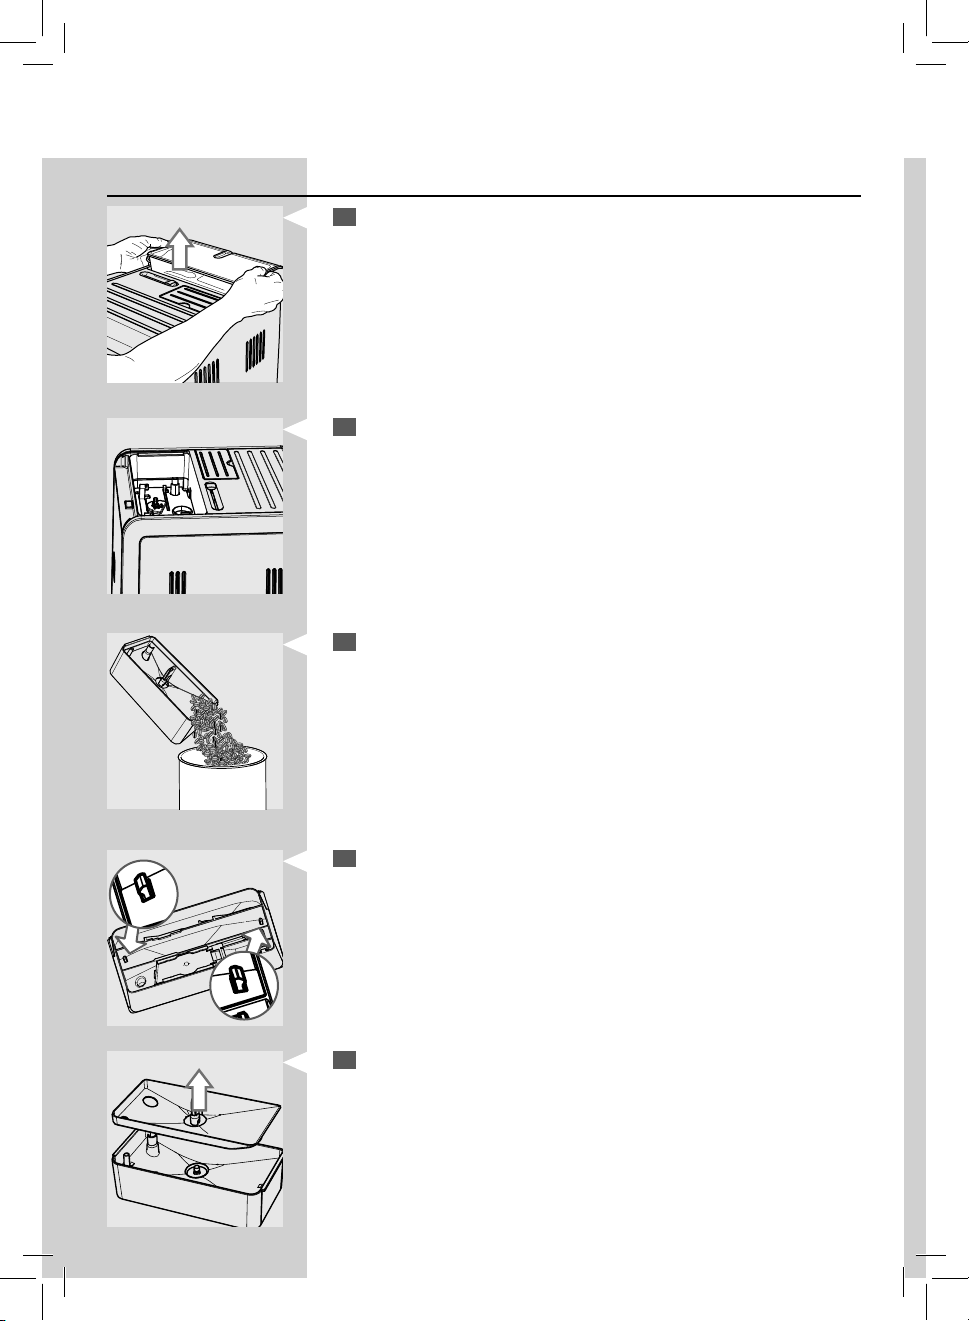
Weekly Cleaning of the Co ee Bean Hopper, Tray and Co ee Compartment
Remove the co ee bean hopper.
1
Clean the co ee bean hopper, tray and co ee compartment once a
2
week with a cloth to remove any co ee residues and dust.
Empty any beans out of the co ee bean hopper.
3
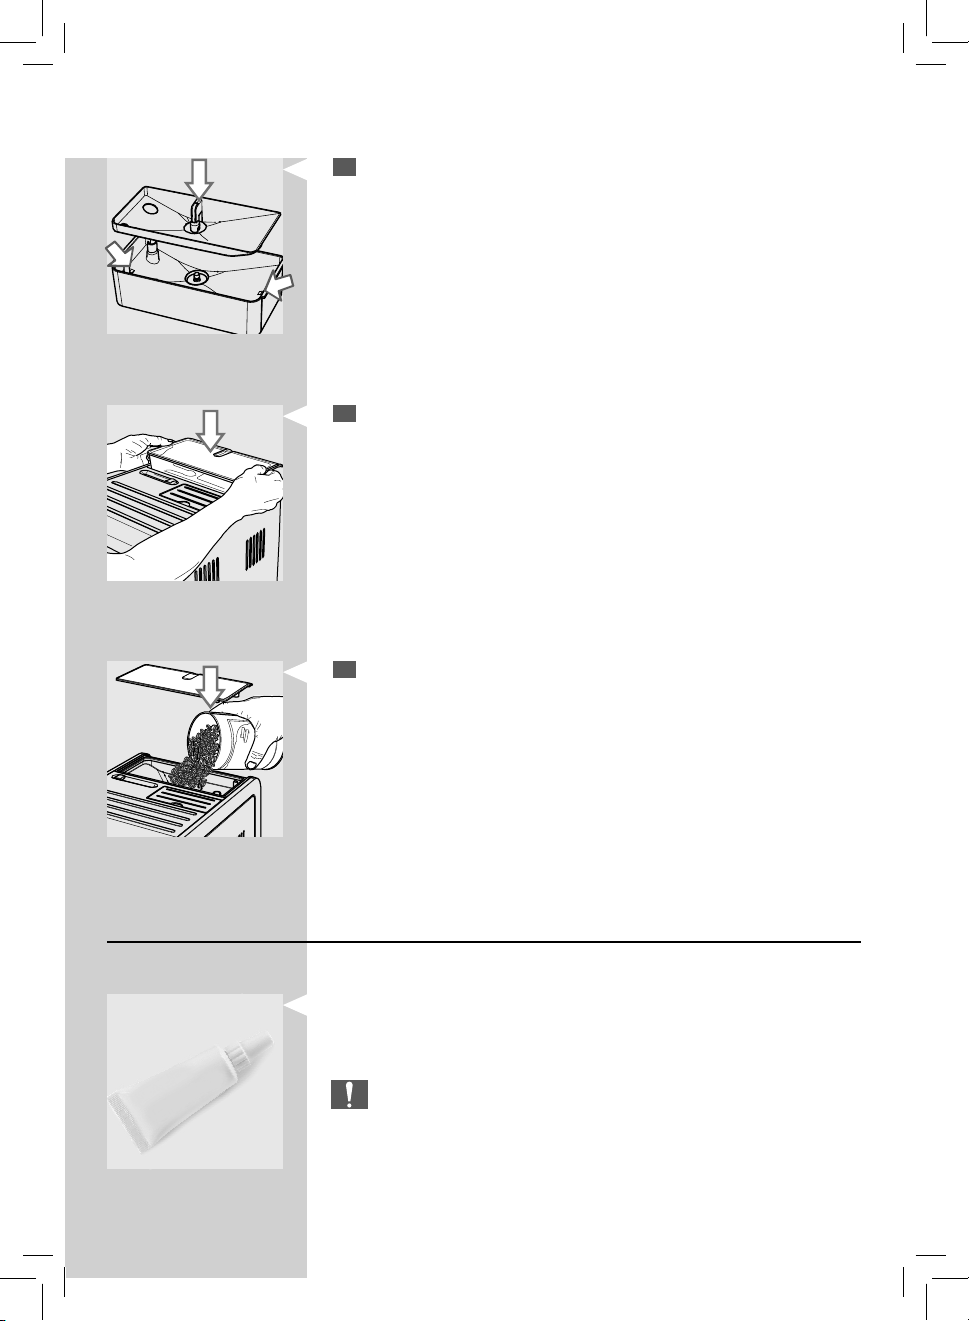
To remove the tray, press on the hooks on the bottom of the co ee
4
bean hopper as shown in the gure above.
Remove the tray. Clean the tray and the co ee bean hopper with a
5
cloth.
Page 49
ENGLISH
After cleaning, insert the tray back into the co ee bean hopper. Insert
6
the tray hooks into their seats on the co ee bean hopper.
Insert the co ee bean hopper into the compartment.
7
Slowly pour in the co ee beans. Place the lid.
8
47
47
Monthly Lubrication of the Brew Group
Lubricate the brew group after approximately 500 cups of co ee or once a
month.
You can purchase the Saeco grease to lubricate the brew group separately.
For further details, please refer to the maintenance products page in this
user manual.
Caution:
Before lubricating the brew group, clean it with lukewarm water and
let it dry, as described in the “Weekly Cleaning of the Brew Group”
chapter.
Page 50
48
ENGLISH
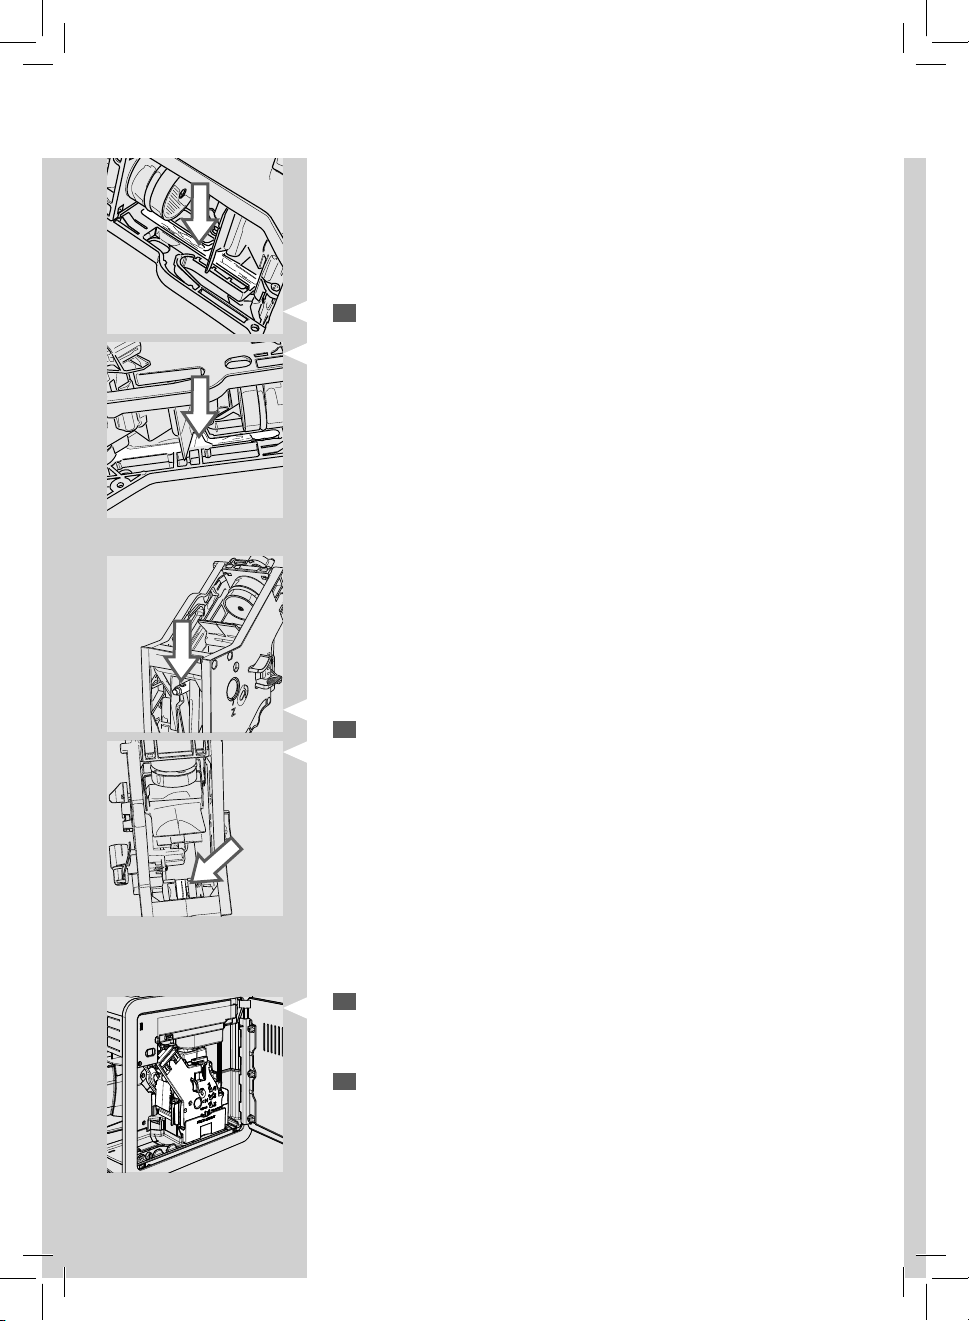
Apply the grease evenly on both side guides.
1
Also lubricate the shaft.
2
Insert the brew group into its seat until it locks into place (see the
3
“Weekly Cleaning of the Brew Group” chapter). Insert the co ee residues drawer.
Close the service door. Insert the co ee grounds drawer.
4
Page 51
ENGLISH
Monthly Cleaning of the Automatic Milk Frother
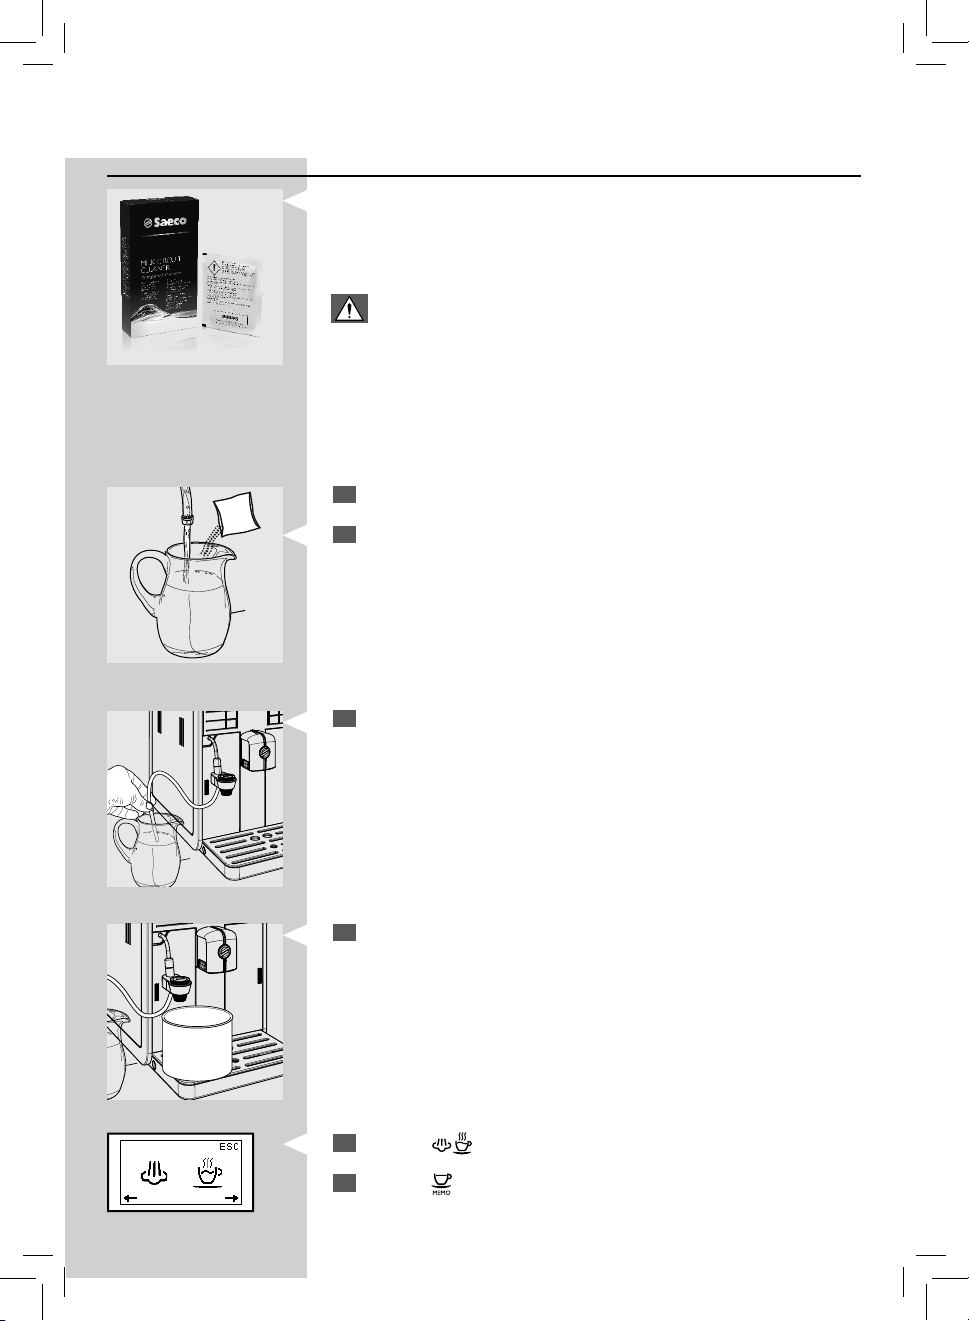
Every month you need to perform a more thorough cleaning of the Automatic Milk Frother using the “Saeco Milk Circuit Cleaner”. The “Saeco Milk
Circuit Cleaner” can be purchased separately. For further details, please
refer to the maintenance products page in this user manual.
Warning:
Danger of scalding! Dispensing may be preceded by small jets of hot
water.
Make sure that the Automatic Milk Frother is correctly installed.
1
Pour the Saeco Milk Circuit Cleaner into a container. Add ½ litre of
2
lukewarm water and wait for the product to dissolve completely.
49
49
Green
Insert the suction tube into the container.
3
Place a large container (1.5 l) under the Automatic Milk Frother.
4
Press the " " button. The machine shows this display.
5
Press the “ ” button to dispense steam.
6
Page 52
50
ENGLISH
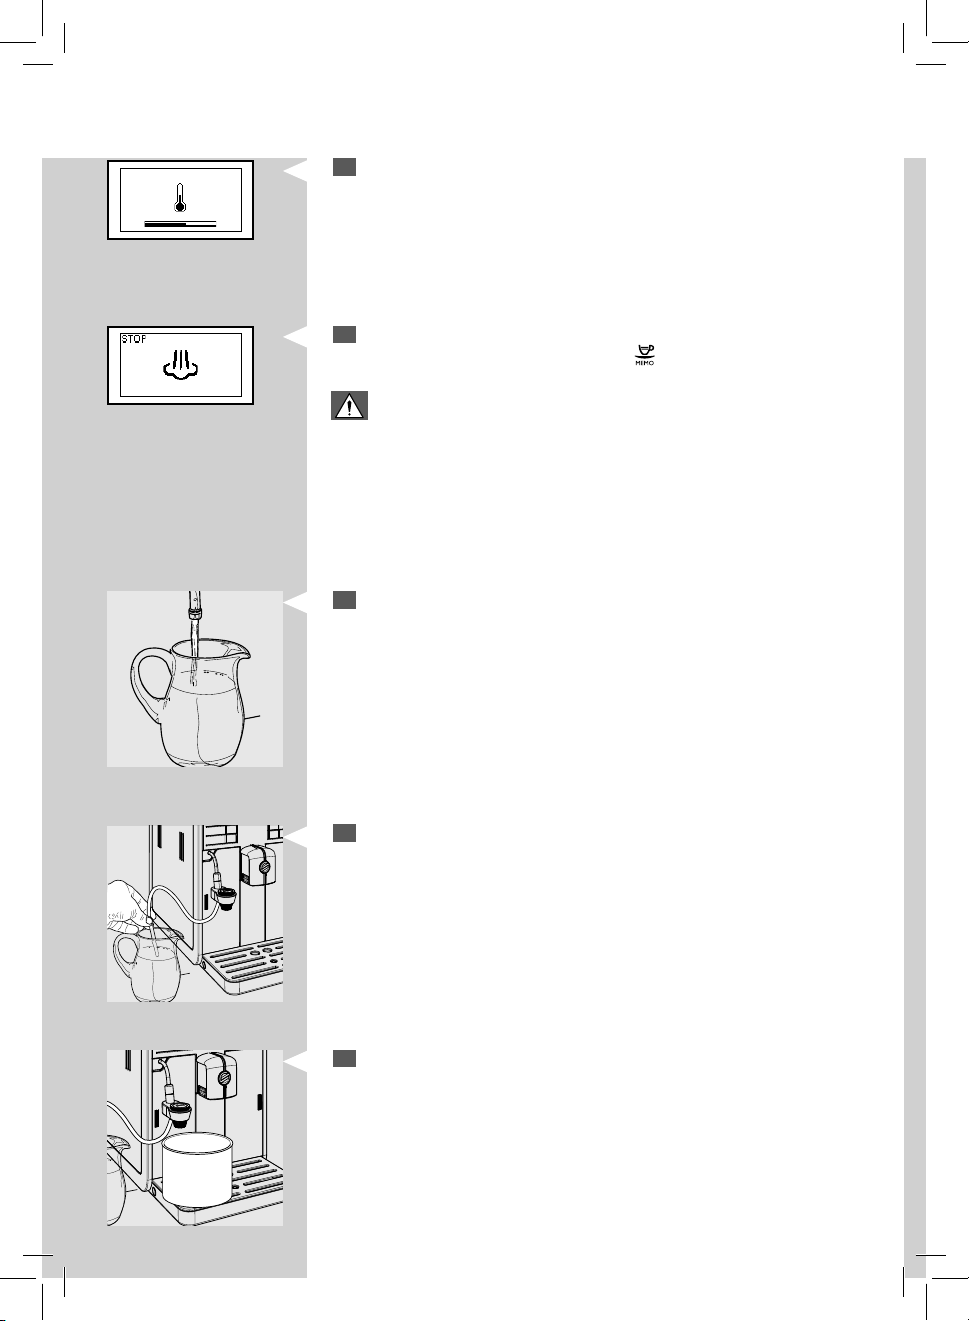
This icon is displayed during the preheating time required by the
7
machine.
This icon will be displayed during dispensing. When the solution has
8
been completely dispensed, press the “
Green Yellow
Warning:
Never drink the solution dispensed during this step.
Rinse the container thoroughly and ll it with ½ litre of fresh water to
9
be used for the rinse cycle.
” button to stop dispensing.
Insert the suction tube into the container.
10
Empty the container and place it back under the Automatic Milk
11
Frother.
Page 53
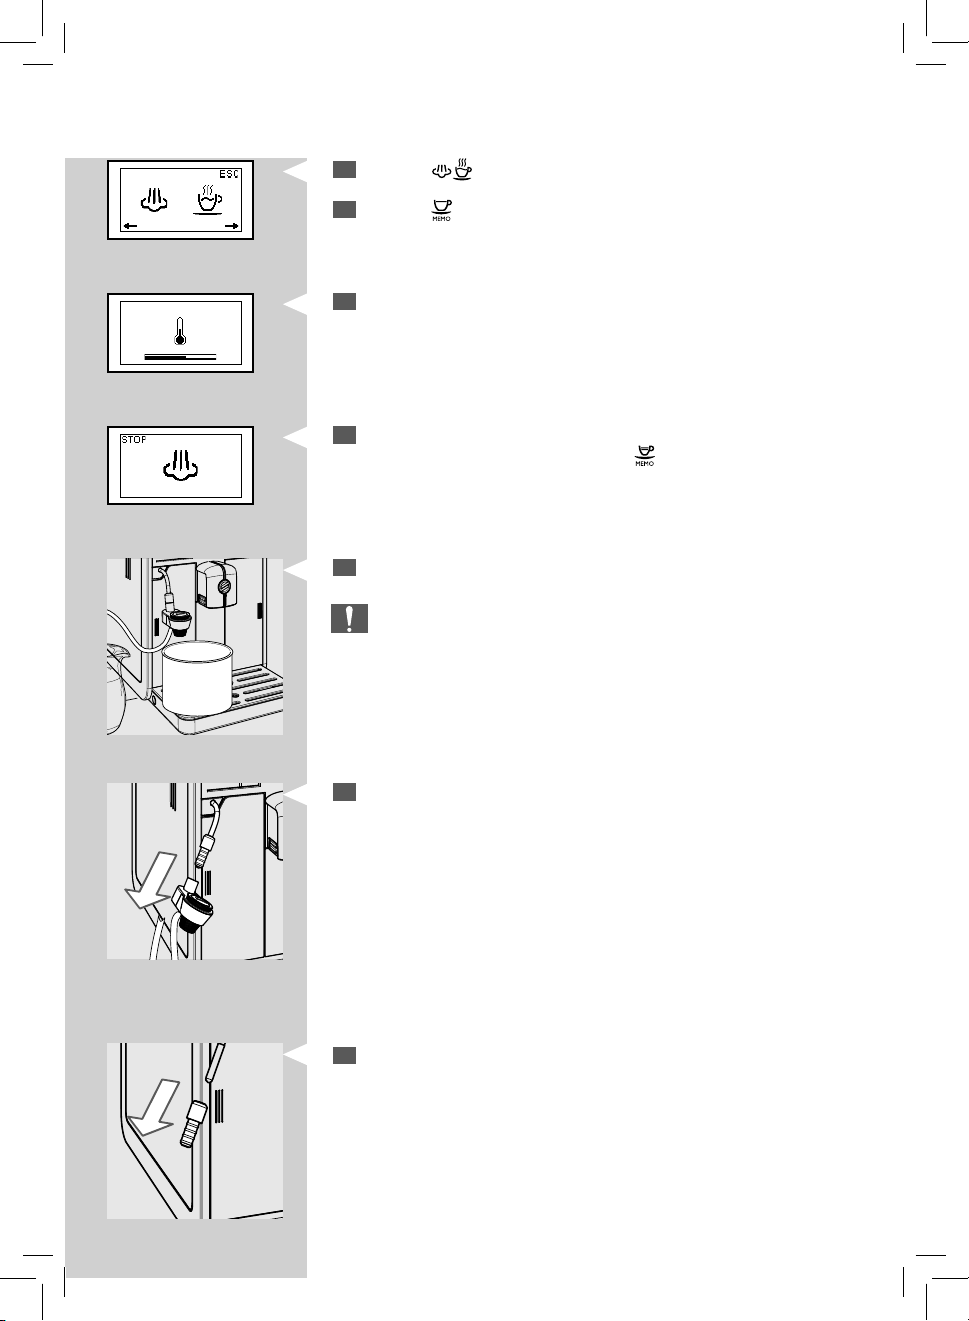
Press the " " button. The machine shows this display.
12
Press the “ ” button to dispense steam.
13
Green
This icon is displayed during the preheating time required by the
14
machine.
This icon will be displayed during dispensing. When the water has
15
been completely dispensed, press the “
Green Yellow
Empty the container.
16
Caution:
Let the steamwand cool down for a few minutes.
ENGLISH
” button to stop dispensing.
51
51
Remove the Automatic Milk Frother from the machine.
17
For Automatic Milk Frother without chrome cover.
Remove the rubber tting from the steam wand.
18
Page 54
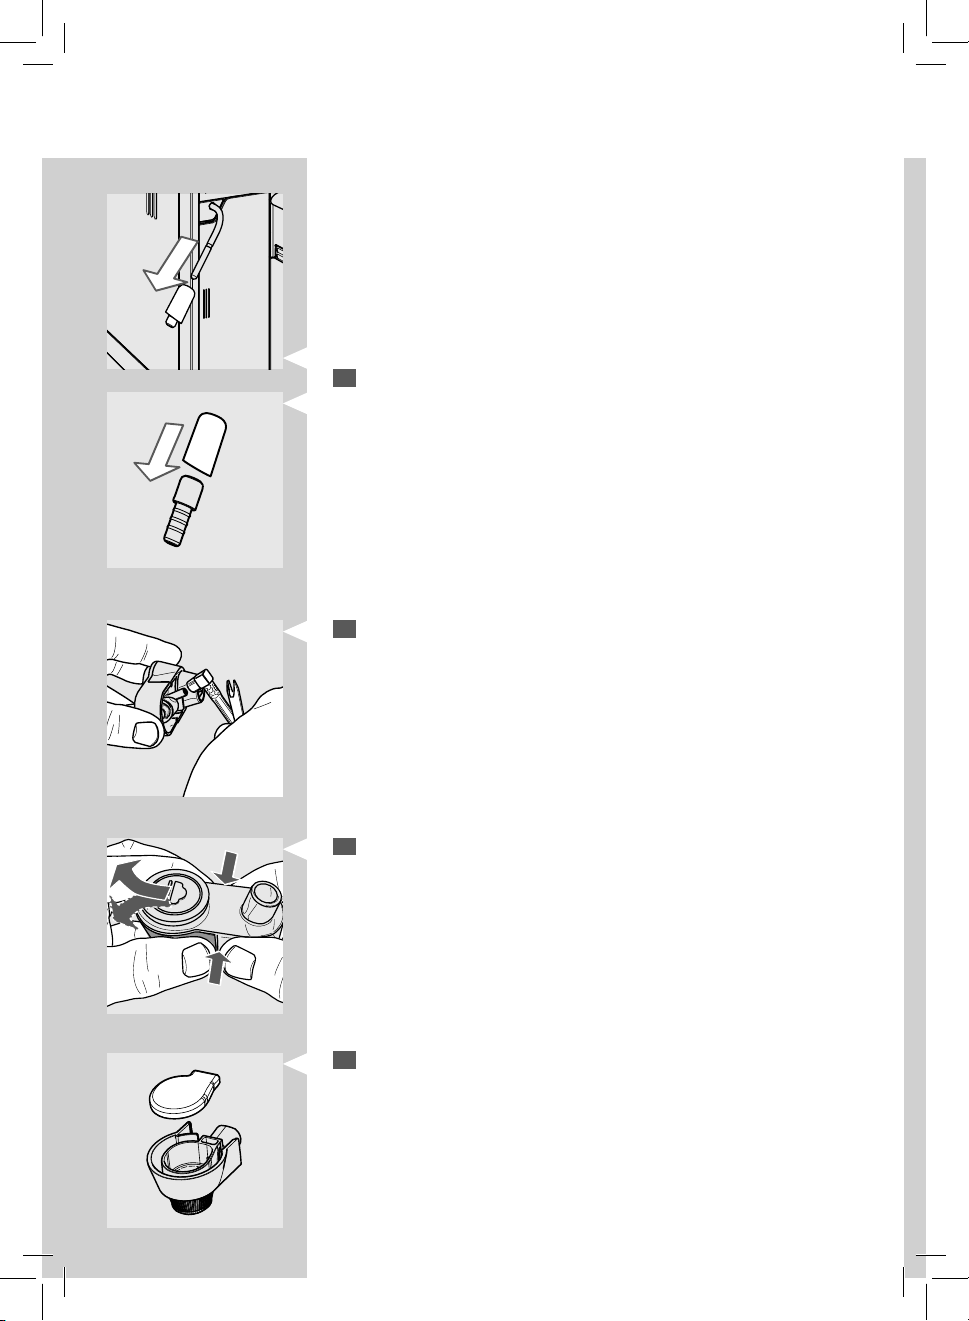
52
ENGLISH
For Automatic Milk Frother with chrome cover.
Remove the chrome cover with the rubber tting. Remove the rubber
18
tting from the cover.
Remove the suction tube.
19
Press the sides and disassemble the Automatic Milk Frother as shown
20
in the gure.
Remove the rubber lid as shown in the gure.
21
Page 55
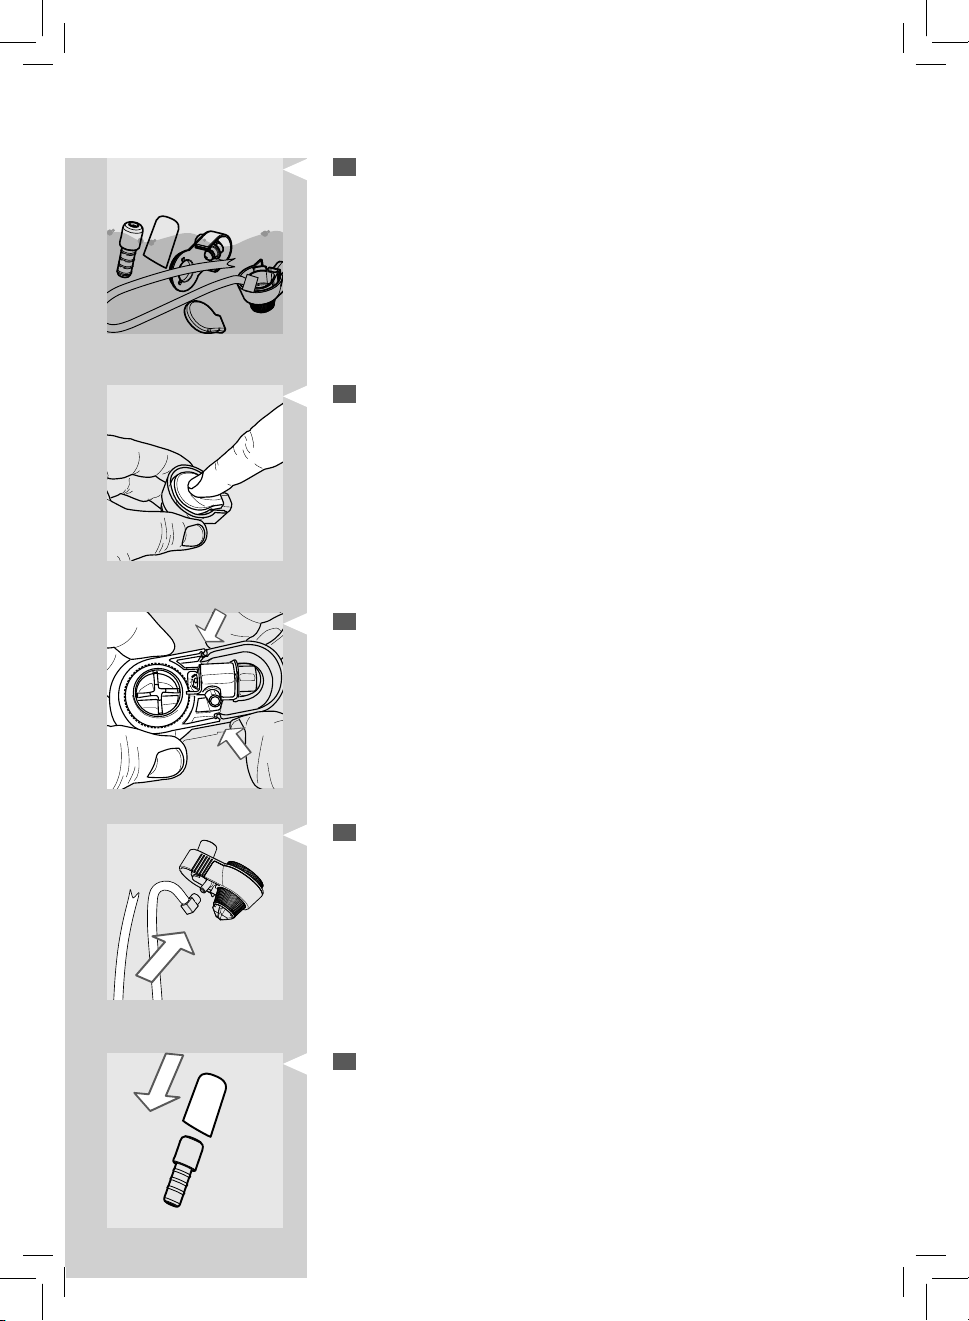
ENGLISH
Wash all the components with lukewarm water.
22
Reassemble the lid making sure that you press it in the middle to have
23
it correctly inserted.
Reassemble the Automatic Milk Frother making sure it is correctly
24
inserted.
53
53
Install the suction tube.
25
Insert the rubber tting into the chrome cover (only for Automatic Milk
26
Frother with chrome cover).
Page 56
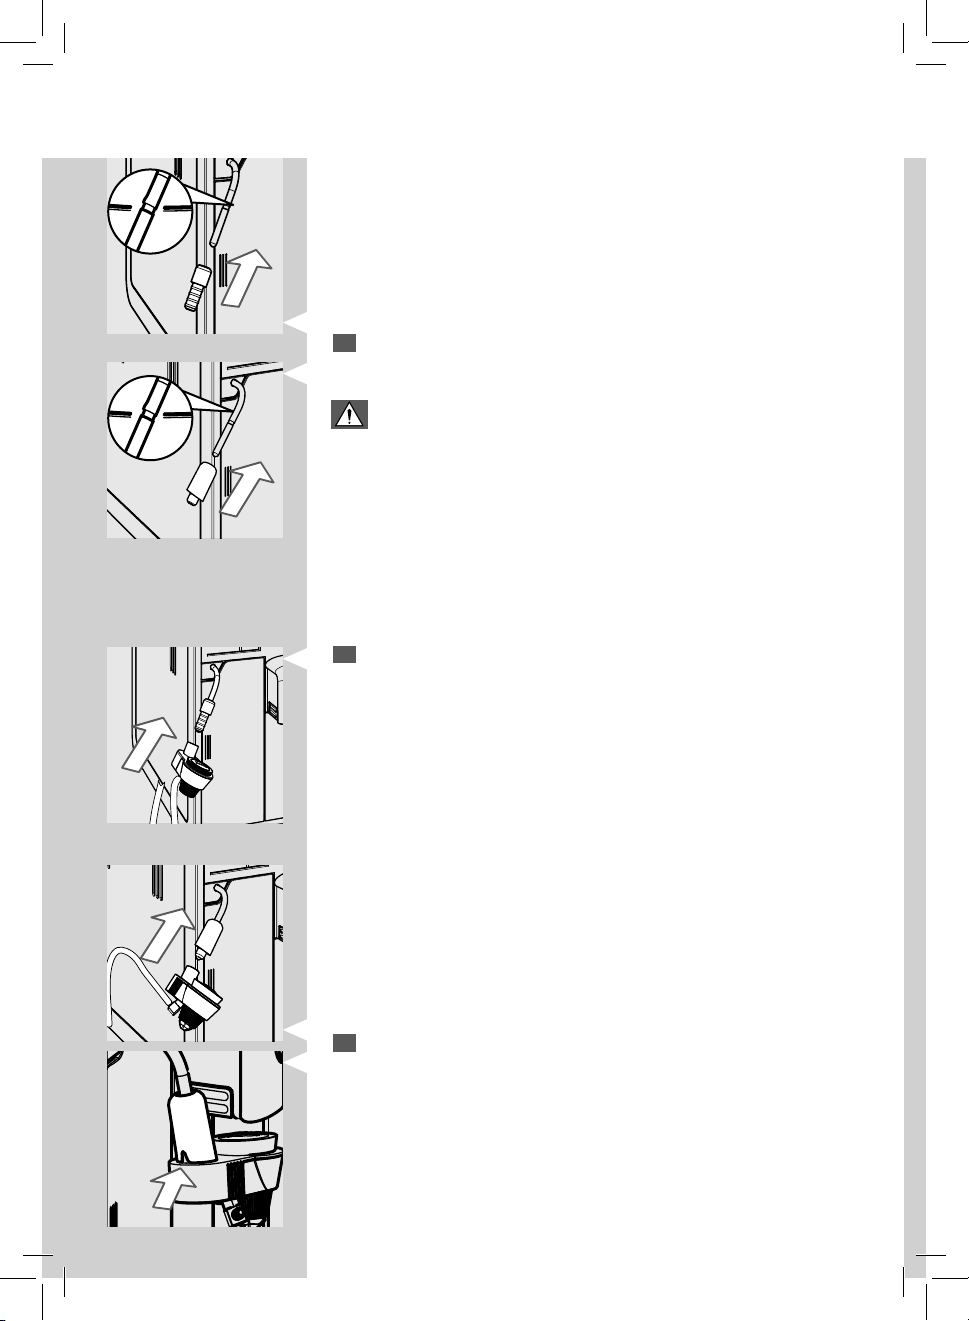
54
ENGLISH
Insert the rubber tting back and the chrome cover (if any) on the
27
steam wand.
Warning:
The tube and the chrome cover (if any) may be hot if they have recently been used!
Do not insert the rubber tting beyond the position shown. In this
case, the Automatic Milk Frother would not work correctly as it would
not be able to draw up milk.
For Automatic Milk Frother without chrome cover.
Fully insert the Automatic Milk Frother into the rubber tting.
28
For Automatic Milk Frother with chrome cover.
Insert the Automatic Milk Frother. Make sure that it is positioned cor-
28
rectly. If you cannot insert it, rotate the chrome cover. The Automatic
Milk Frother is assembled correctly when the tooth ts into the slot.
Page 57
ENGLISH
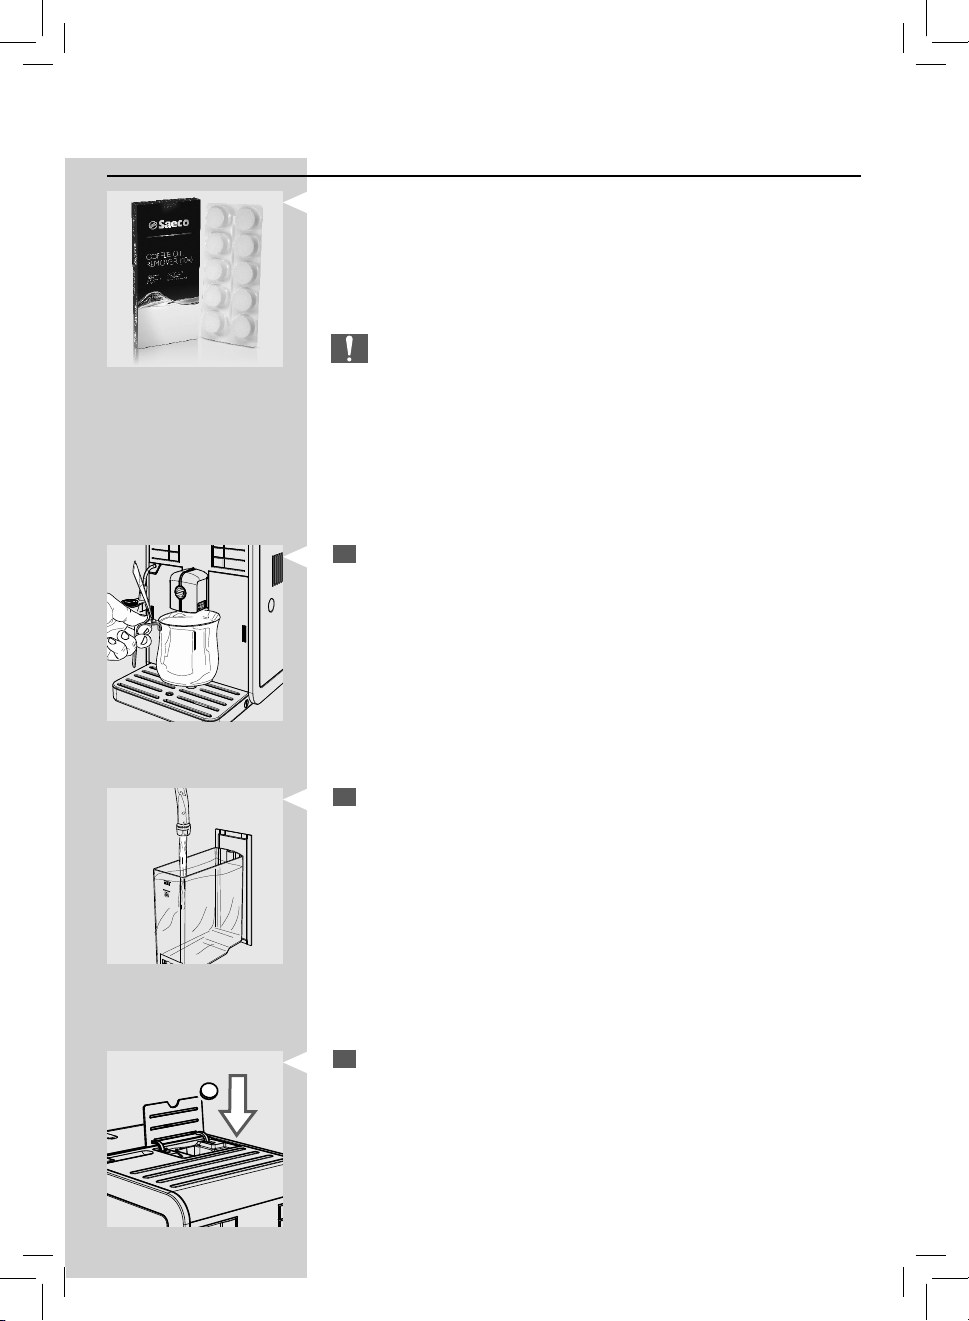
Monthly Cleaning of the Brew Group with “Co ee Oil Remover”
Besides weekly cleaning, we recommend performing a cleaning cycle
with “Co ee Oil Remover” after approximately 500 cups of co ee or once
a month. This operation completes the maintenance process for the brew
group.
You can purchase the “Co ee Oil Remover” separately. For further details,
please refer to the maintenance products page in this user manual.
Caution:
The “Co ee Oil Remover” tablets are to be used for cleaning only and
do not have a descaling function. For descaling, use the Saeco descaling solution and follow the procedure described in the “Descaling”
chapter.
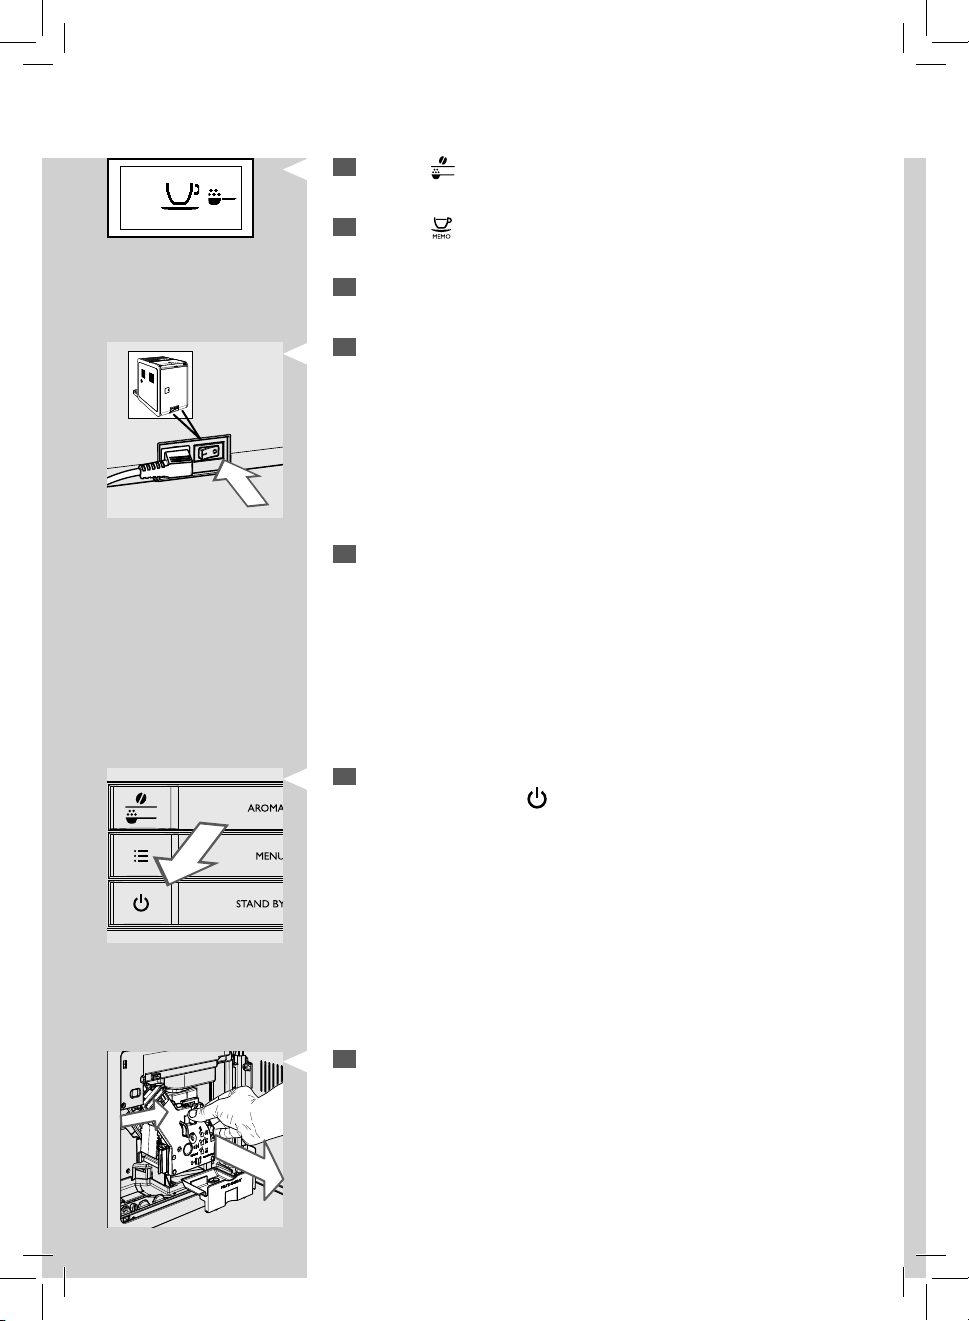
Place a container under the co ee dispensing spout.
1
55
55
Make sure the water tank is lled with fresh water up to the “MAX”
2
level.
Put a “Co ee Oil Remover” tablet in the pre-ground co ee compart-
3
ment.
Page 58
56
ENGLISH
Green
Press the “ ” button one or more times to select the pre-ground cof-
4
fee function. Do not add ground co ee.
Press the “ ” button to start a co ee brewing cycle.
5
Wait until the machine has dispensed half a cup of water.
6
Switch the power button on the back of the machine to “0”.
7
Let the solution take e ect for about 15 minutes. Make sure you dis-
8
card the dispensed water.
Switch the power button on the back of the machine to “I”. To turn on
9
the machine, press the “
Wait until the end of the automatic rinse cycle.
Remove the co ee grounds drawer and open the service door. Remove
10
the co ee residues drawer and then the brew group.
” button.
Page 59
ENGLISH
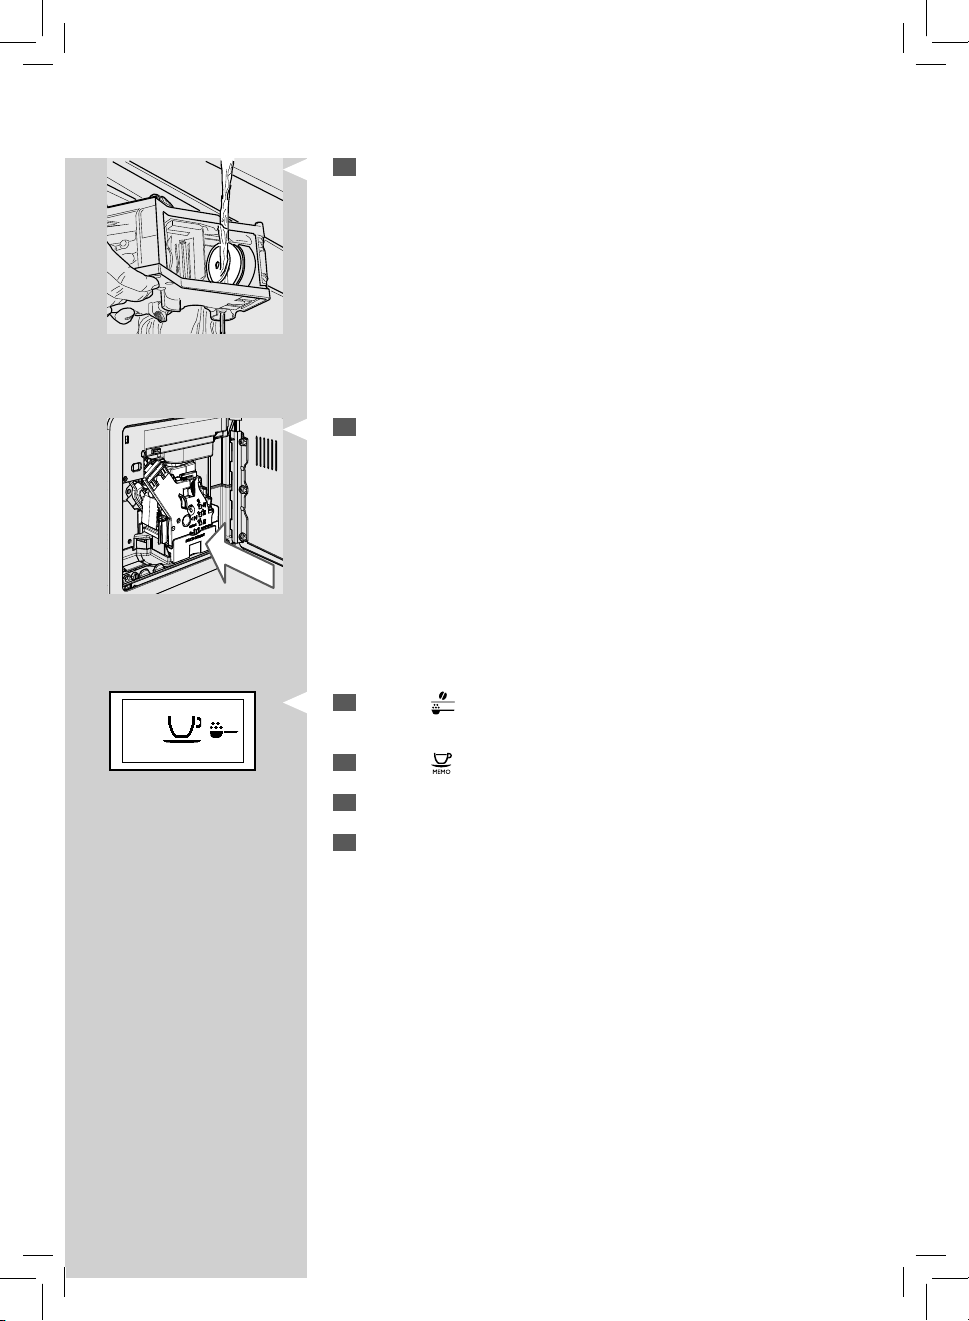
Wash the brew group thoroughly with fresh water.
11
After rinsing the brew group, insert it back into its seat until it locks
12
into place (see the “Weekly Cleaning of the Brew Group” chapter).
Insert the co ee residues drawer and the co ee grounds drawer. Close
the service door.
57
57
Green
Press the “ ” button to select the pre-ground co ee function. Do not
13
add any co ee to the pre-ground co ee department.
Press the “ ” button to start a co ee brewing cycle.
14
Repeat steps 13 to 14 twice. Empty the container.
15
To clean the drip tray, place a “Co ee Oil Remover” tablet inside and
16
ll it 2/3rds full with hot water. Let the cleaning solution take e ect for
about 30 minutes, then rinse thoroughly.
Page 60
58
ENGLISH
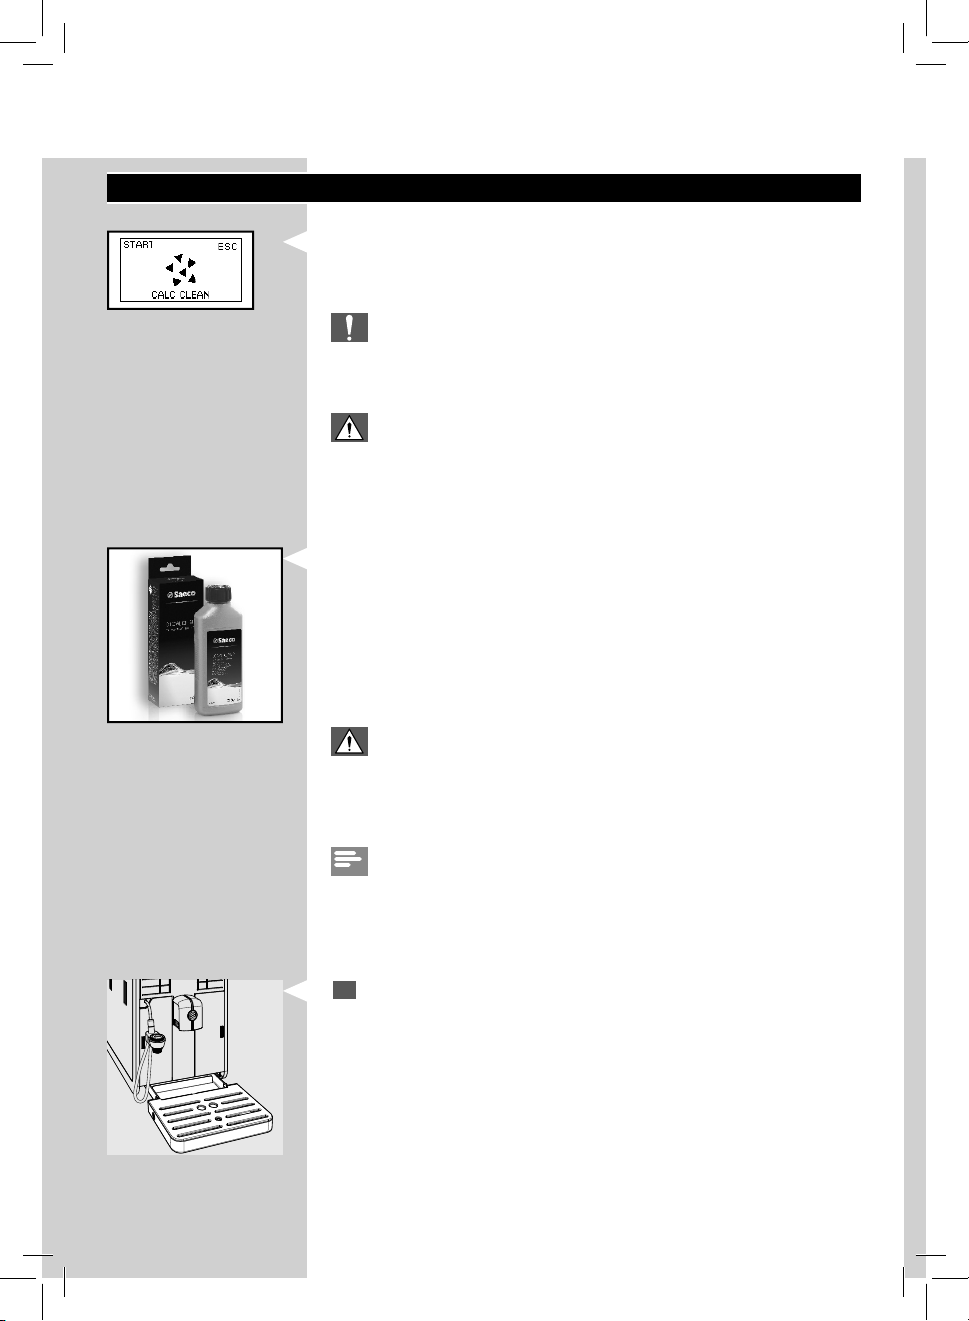
DESCALING
When the “CALC CLEAN” icon is displayed, you need to descale the
machine.
The descaling cycle takes approx. 30 minutes.
Yellow
Caution:
Not doing this will ultimately make your machine stop working
properly. In this case, repair is NOT covered by warranty.
Warning:
Use the Saeco descaling solution only. Its formula has been designed
to ensure better machine performance. The use of other products may
damage the machine and leave residues in the water.
The Saeco descaling solution can be purchased separately. For further
details, please refer to the maintenance products page in this user manual.
Warning:
Never drink the descaling solution or any products dispensed until the
cycle has been carried out to the end. Never use vinegar as a descaling
solution.
Note:
Do not remove the brew group during the descaling process.
To perform the descaling cycle, follow the steps below.
Before descaling:
Empty the drip tray.
1
Page 61
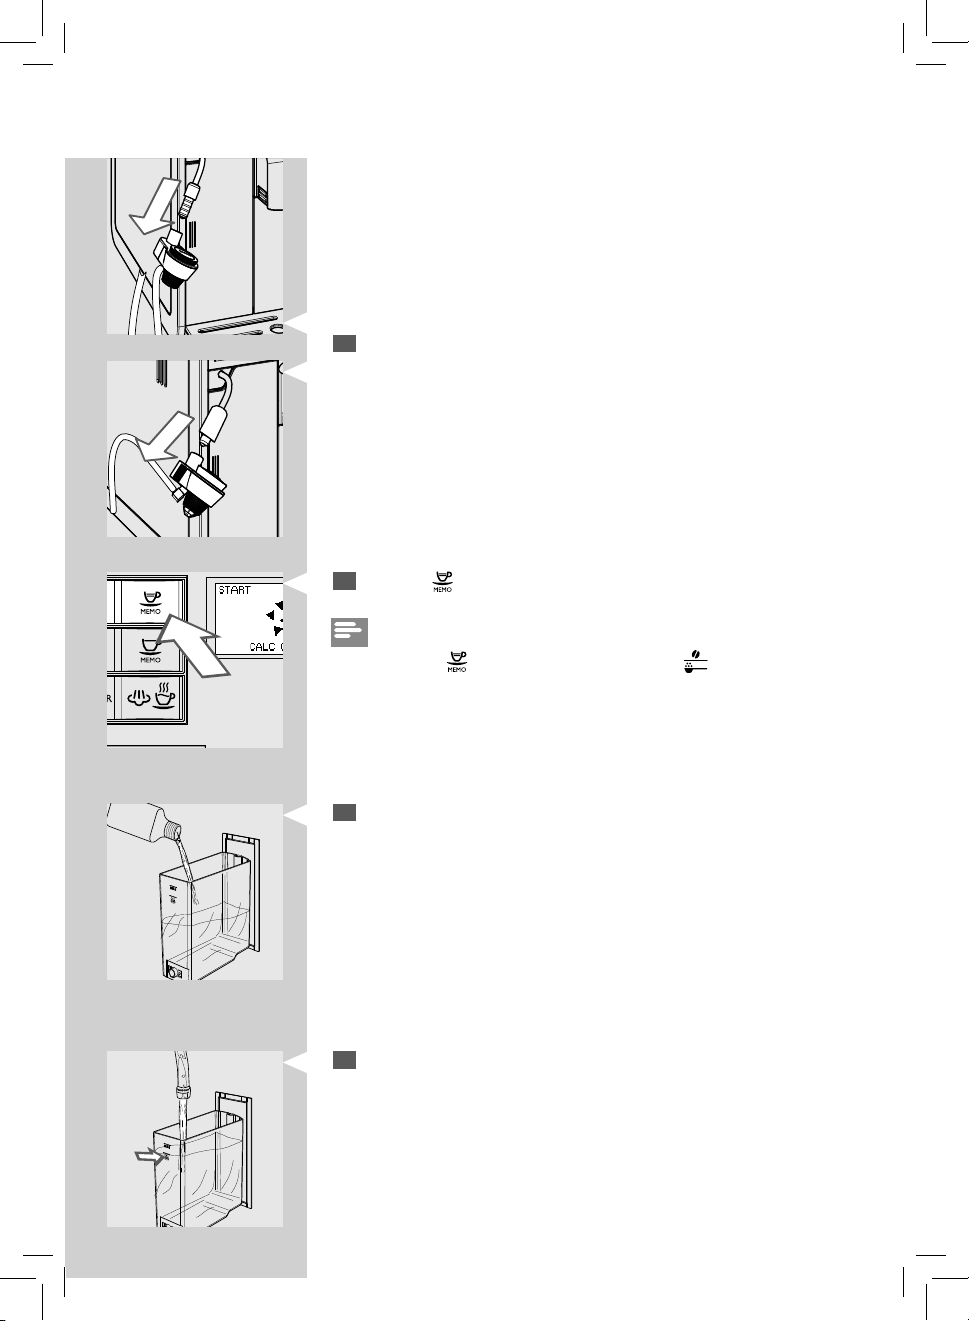
ENGLISH
Remove the Automatic Milk Frother from the steam/hot water wand.
2
Press the " " button.
3
Note:
If you press the “
” button by mistake, press the “ ” button to quit.
59
59
CALC
CLEAN
Remove the “INTENZA+” water lter (if any) from the water tank and
4
replace it with the small white original one. Pour all the descaling solution into the water tank.
Fill the water tank with fresh water up to the CALC CLEAN level and put
5
it back into the machine.
Page 62
60
ENGLISH
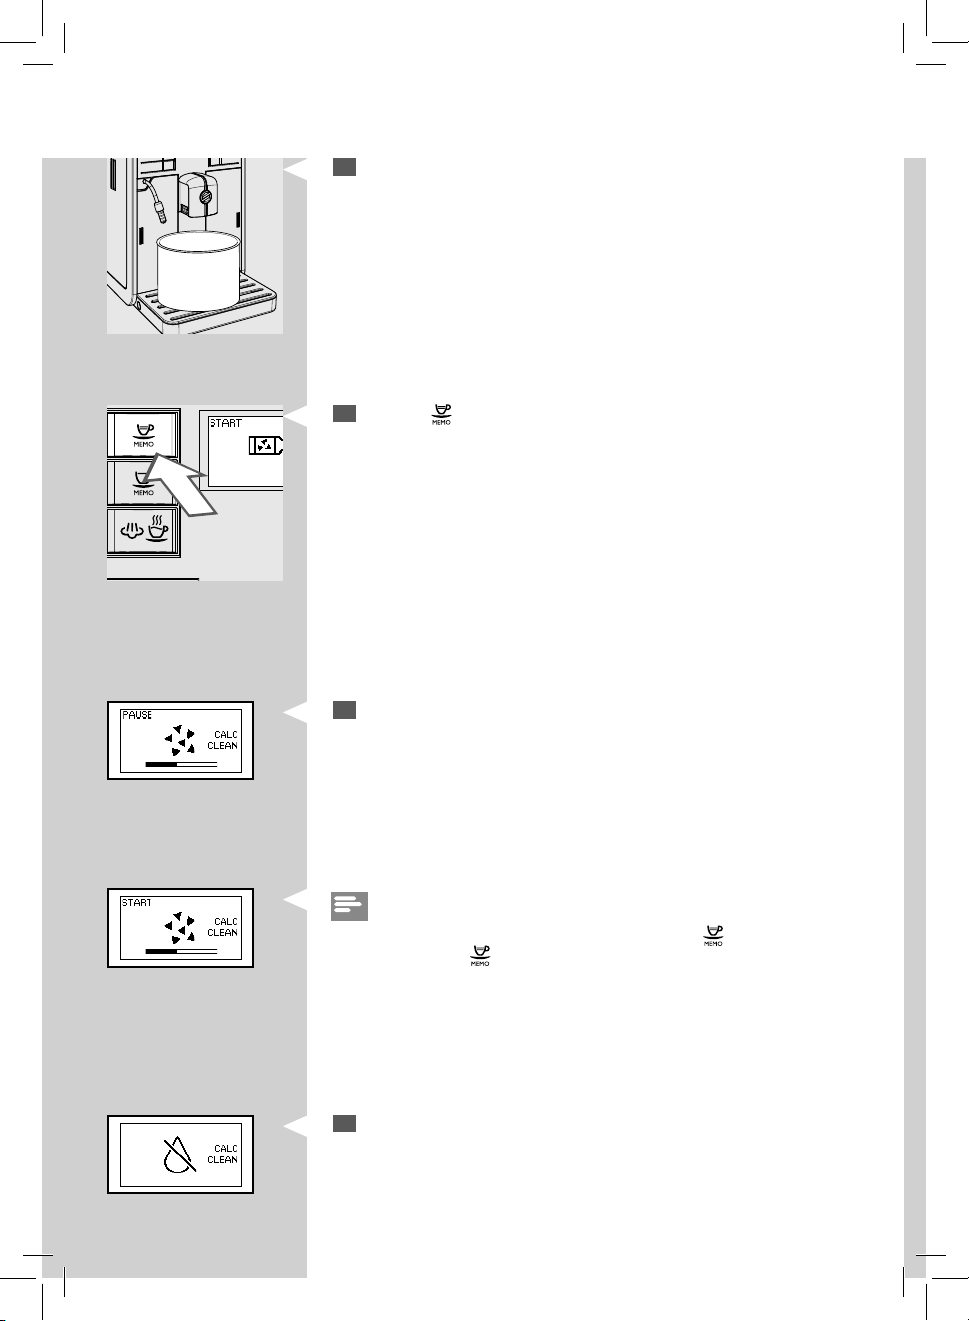
Place a large container (1.5l) under both the steam/hot water wand
6
and the co ee dispensing spout.
Press the “ ” button to start the descaling cycle.
7
The machine starts dispensing the descaling solution at regular inter-
8
vals for about 20 minutes. The bar on the control panel shows the cycle
YellowRed Yellow
progress.
Note:
The descaling cycle may be paused by pressing the “ ” button. To resume
the cycle, press the “
or to leave the machine unattended for a short time.
When this icon is displayed, the water tank is empty.
9
” button again. This allows you to empty the container
Page 63
ENGLISH
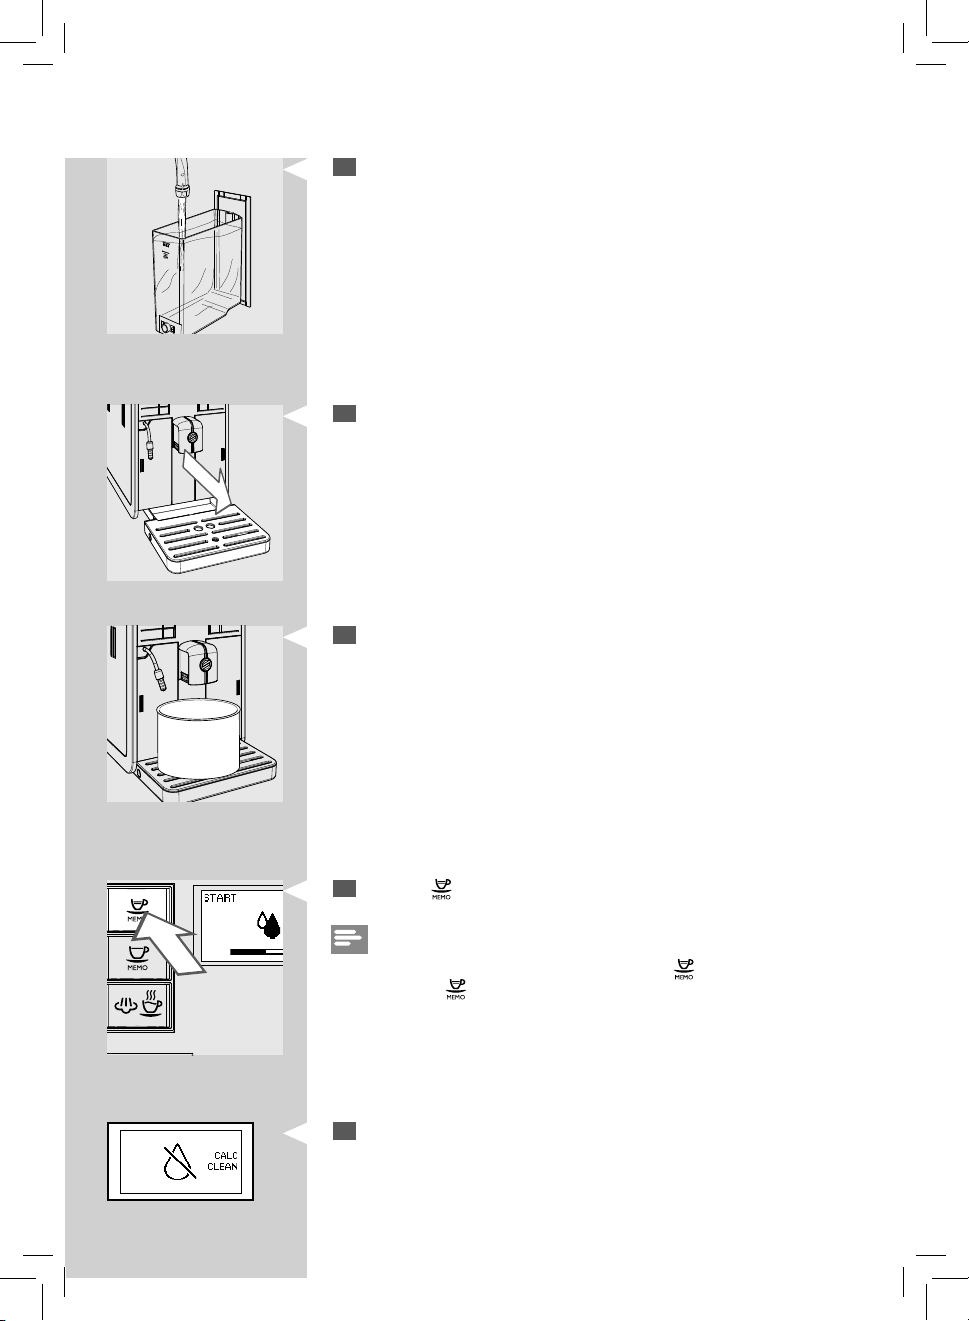
Rinse the water tank and ll it with fresh water up to the MAX level. Put
10
it back into the machine.
Empty the drip tray and place it back.
11
Empty the container and place it back.
12
61
61
Press the “ ” button to start the rinse cycle.
13
Note:
The rinse cycle may be paused by pressing the “ ” button. To resume the
cycle, press the “
to leave the machine unattended for a short time.
When this icon is displayed, the water tank is empty.
14
Red
” button again. This allows you to empty the container or
Page 64
62
ENGLISH
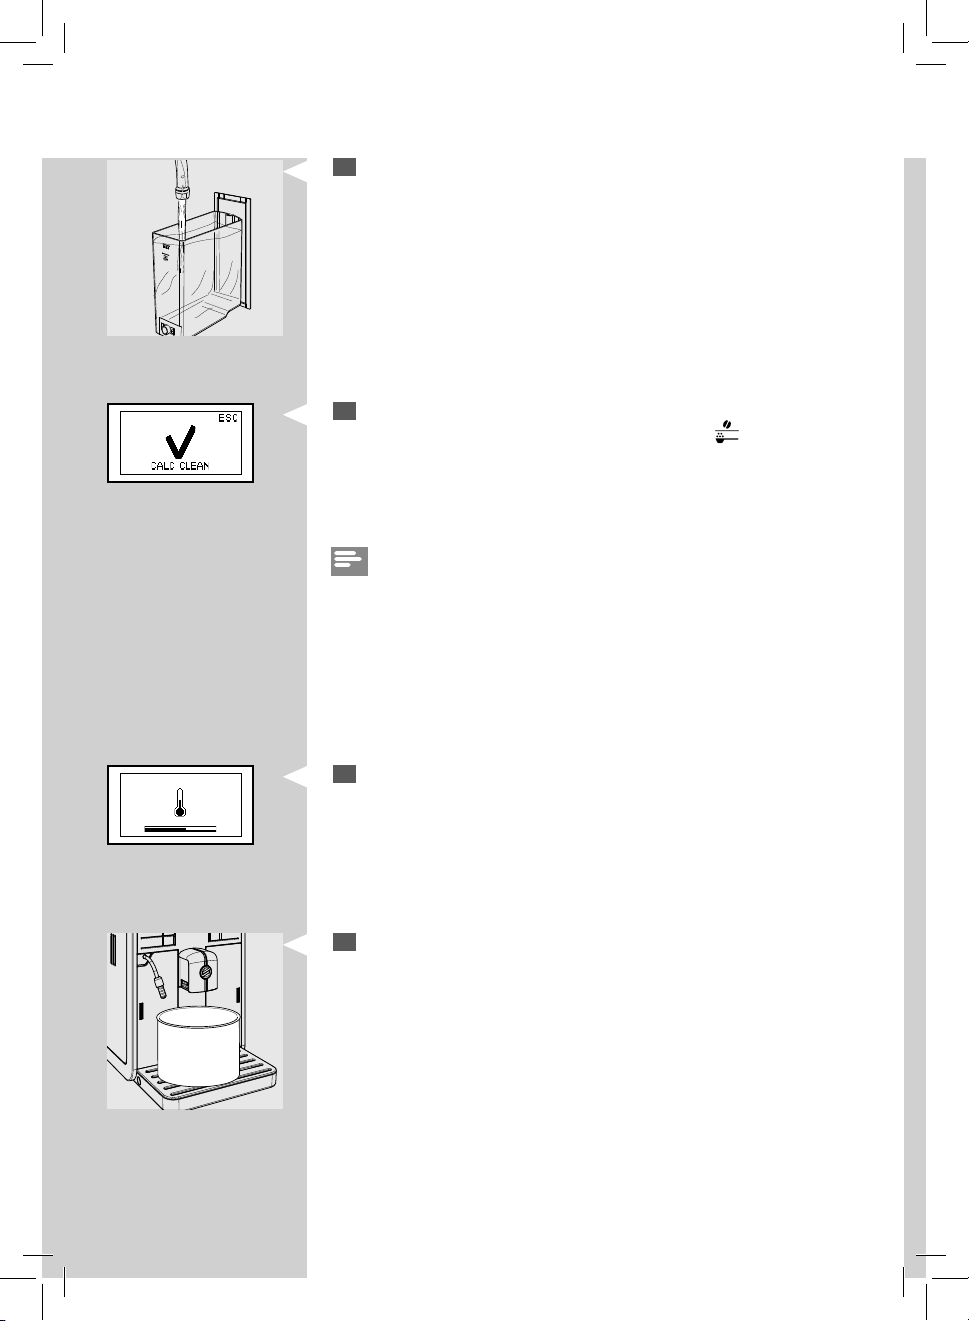
Rinse the water tank and ll it with fresh water up to the MAX level. Put
15
it back into the machine. Repeat step 13.
When the amount of water needed for the rinse cycle has been com-
16
pletely dispensed, this icon is displayed. Press the “
GreenYellow
the descaling cycle.
Note:
If you had not lled up the water tank to MAX level, the machine might
require to re ll the tank to complete the rinsing cycle.
Re ll the water tank and put it back into the machine.
Repeat from step 13.
” button to quit
The machine warms up and performs the automatic rinse cycle.
17
Empty the container.
18
Page 65
ENGLISH
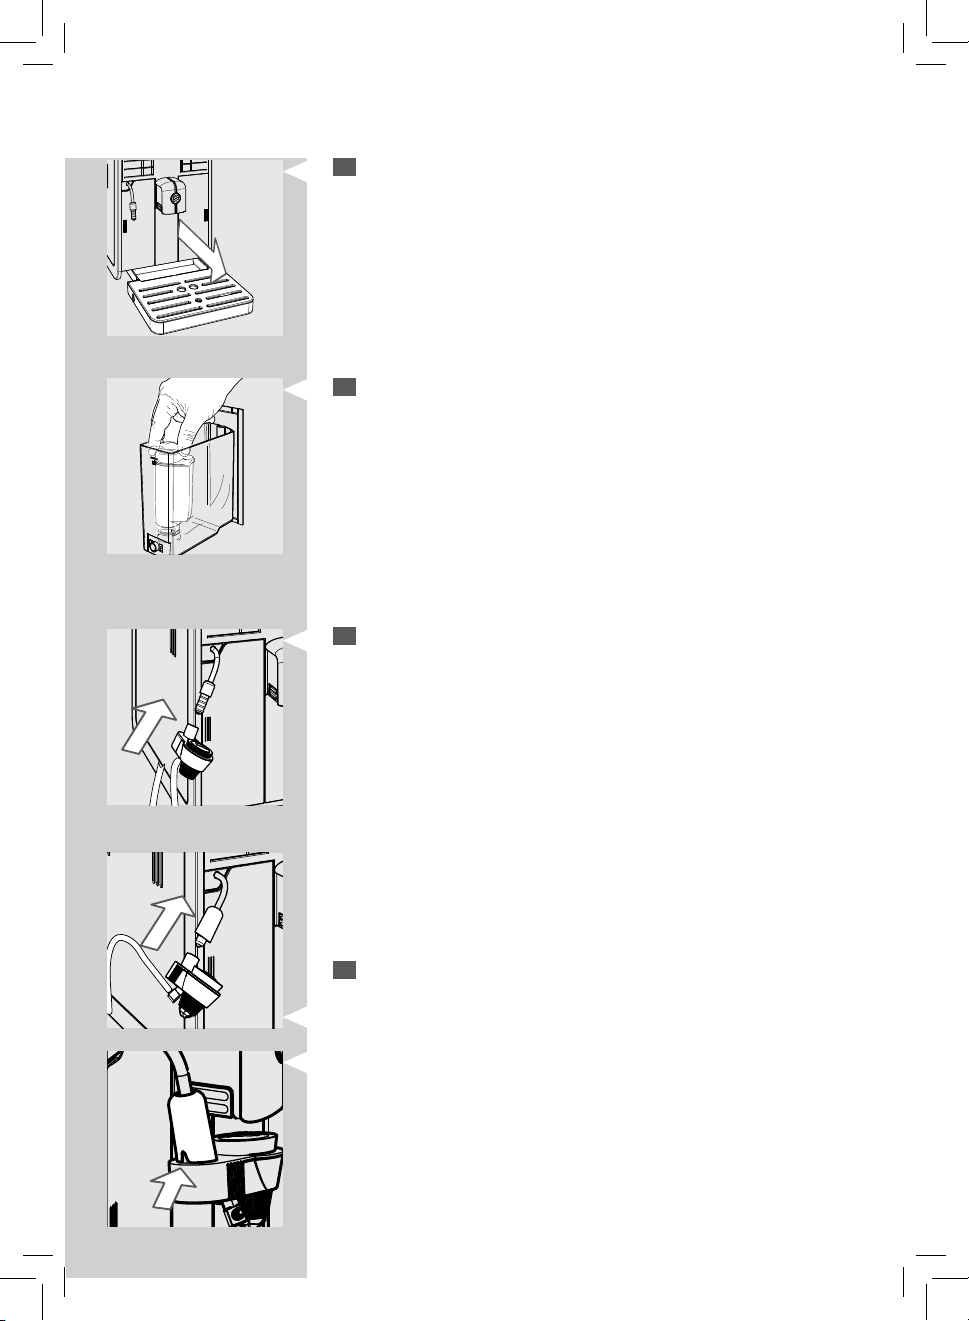
At the end of the rinse cycle, empty the drip tray and place it back.
19
Remove the small white lter and place the “INTENZA+” water lter
20
into the water tank if it was installed.
For Automatic Milk Frother without chrome cover.
Fully insert the Automatic Milk Frother into the rubber tting.
21
63
63
For Automatic Milk Frother with chrome cover.
Insert the Automatic Milk Frother. Make sure that it is positioned
21
correctly. If you cannot insert the Automatic Milk Frother, rotate the
chrome cover. The Automatic Milk Frother is assembled correctly when
the tooth ts into the slot.
Page 66
64
ENGLISH
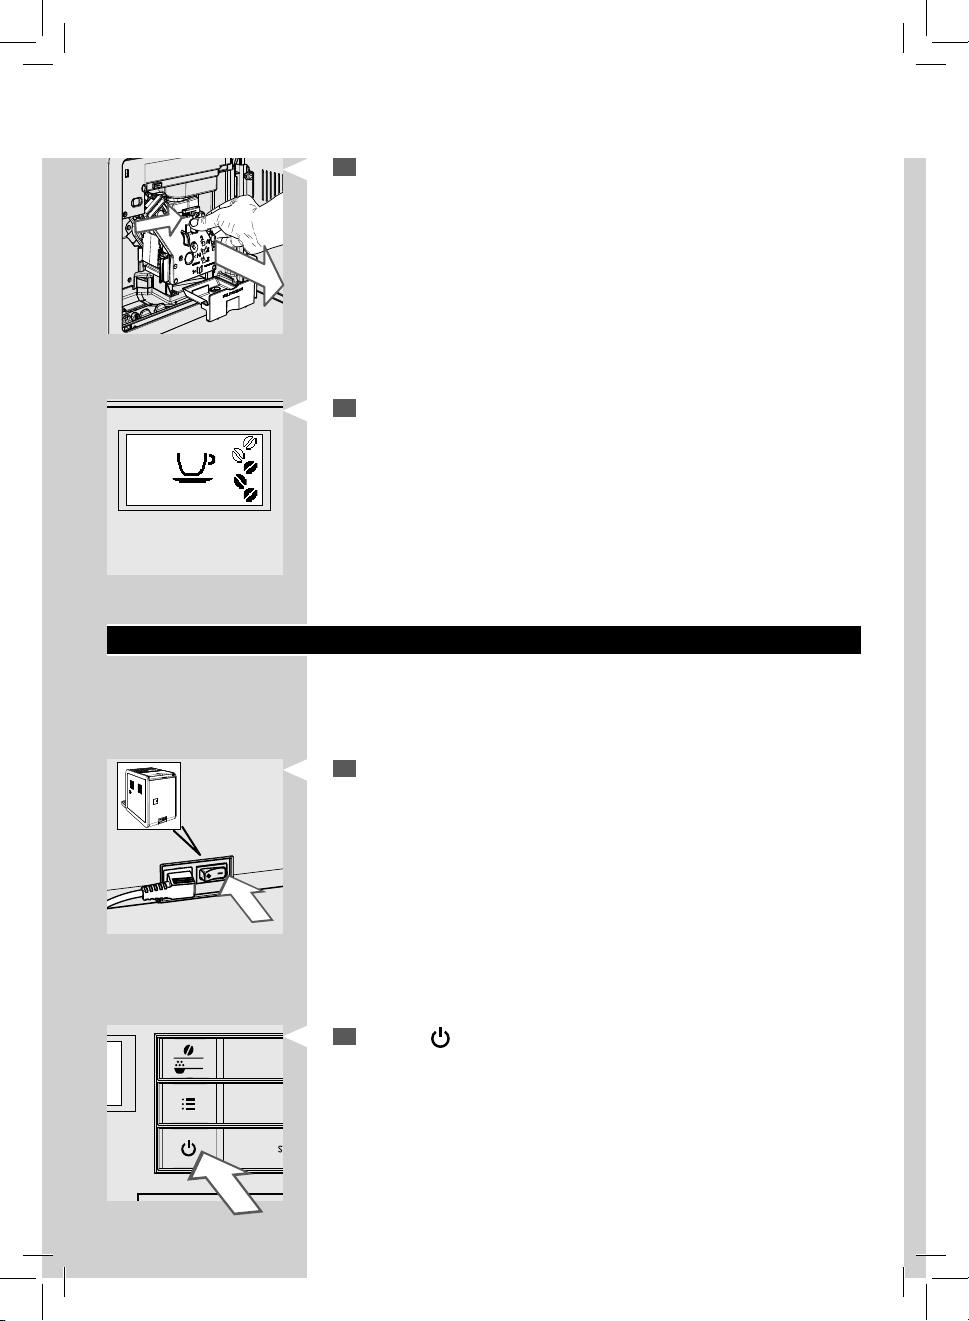
Clean the brew group. For more details, please see the “Weekly Clean-
22
ing of the Brew Group” chapter.
The machine is ready to brew co ee.
23
ACCIDENTAL INTERRUPTION OF THE DESCALING CYCLE
Once you have started the descaling cycle, you must complete it till the
very end without turning o the machine.
If the descaling process is accidentally interrupted (power failure or accidental disconnection of the power cord), follow the steps below.
Make sure that the power button is on "I".
1
Press the “ ” button to turn on the machine.
2
Page 67
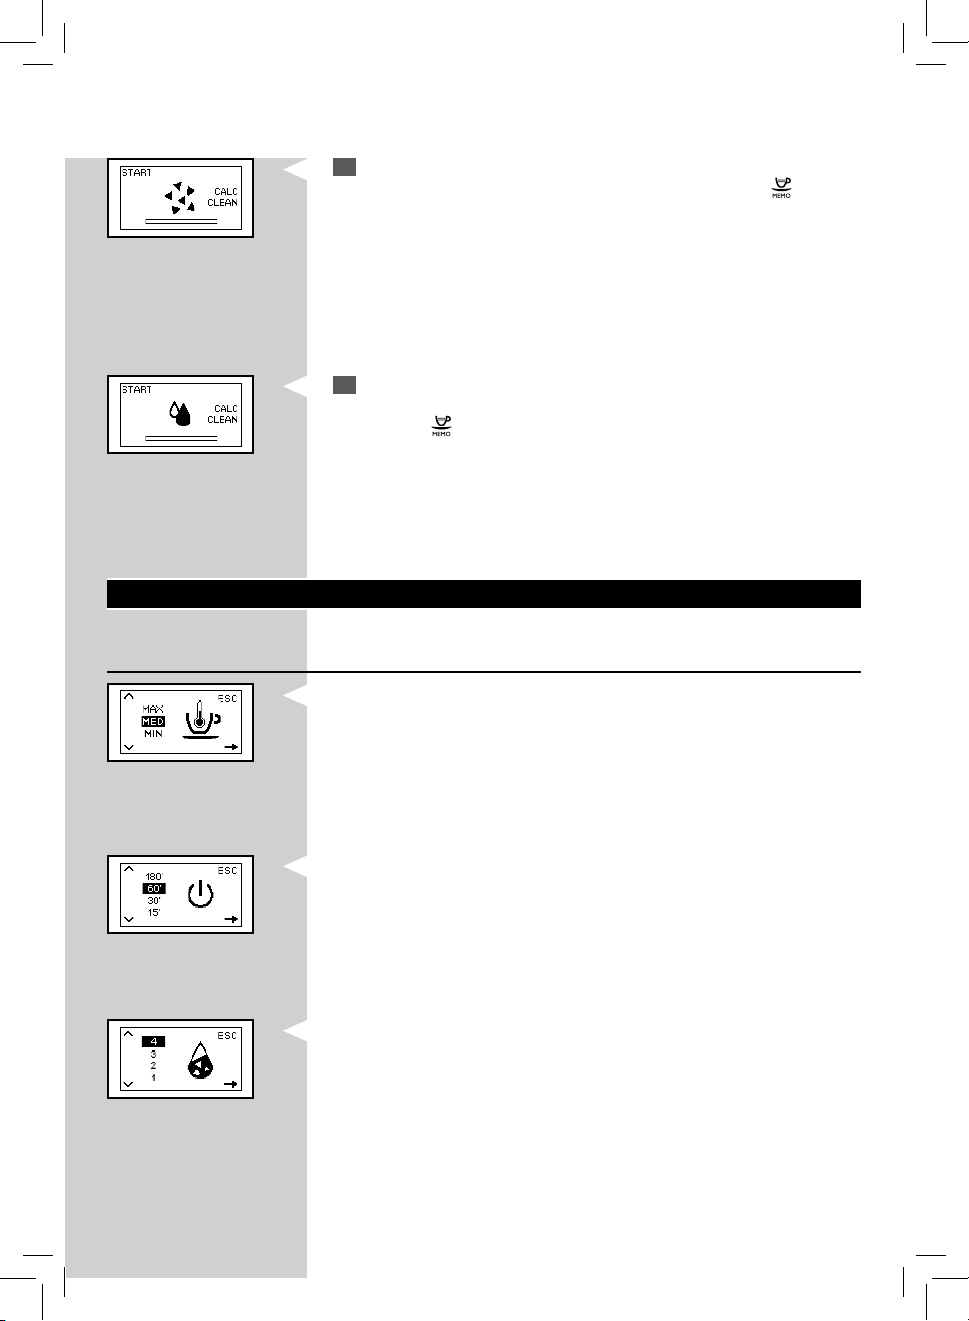
If the cycle was interrupted during the descaling phase, it will be
3
resumed from step 8 of the "Descaling" chapter. Press the “
YellowYellow
to restart the cycle.
If the cycle was interrupted during the rinse phase, it will be resumed
4
from step 13 of the "Descaling" chapter.
Press the “
” button to restart the cycle.
PROGRAMMING
You can customise the machine's functions via the programming menu.
The following settings can be adjusted
Co ee Temperature
This function allows you to adjust the co ee brewing temperature.
Yellow
ENGLISH
” button
65
65
Timer (stand-by)
This function allows you to adjust the time taken for the machine to go
into stand-by mode after the last brewing.
YellowYellow
Water Hardness
This function allows you to adjust the water hardness setting according to
the area where you live.
1 = very soft water
2 = soft water
3 = hard water
4 = very hard water
For more details, please see the “Measuring and Programming Water Hardness” chapter.
Page 68
66
ENGLISH
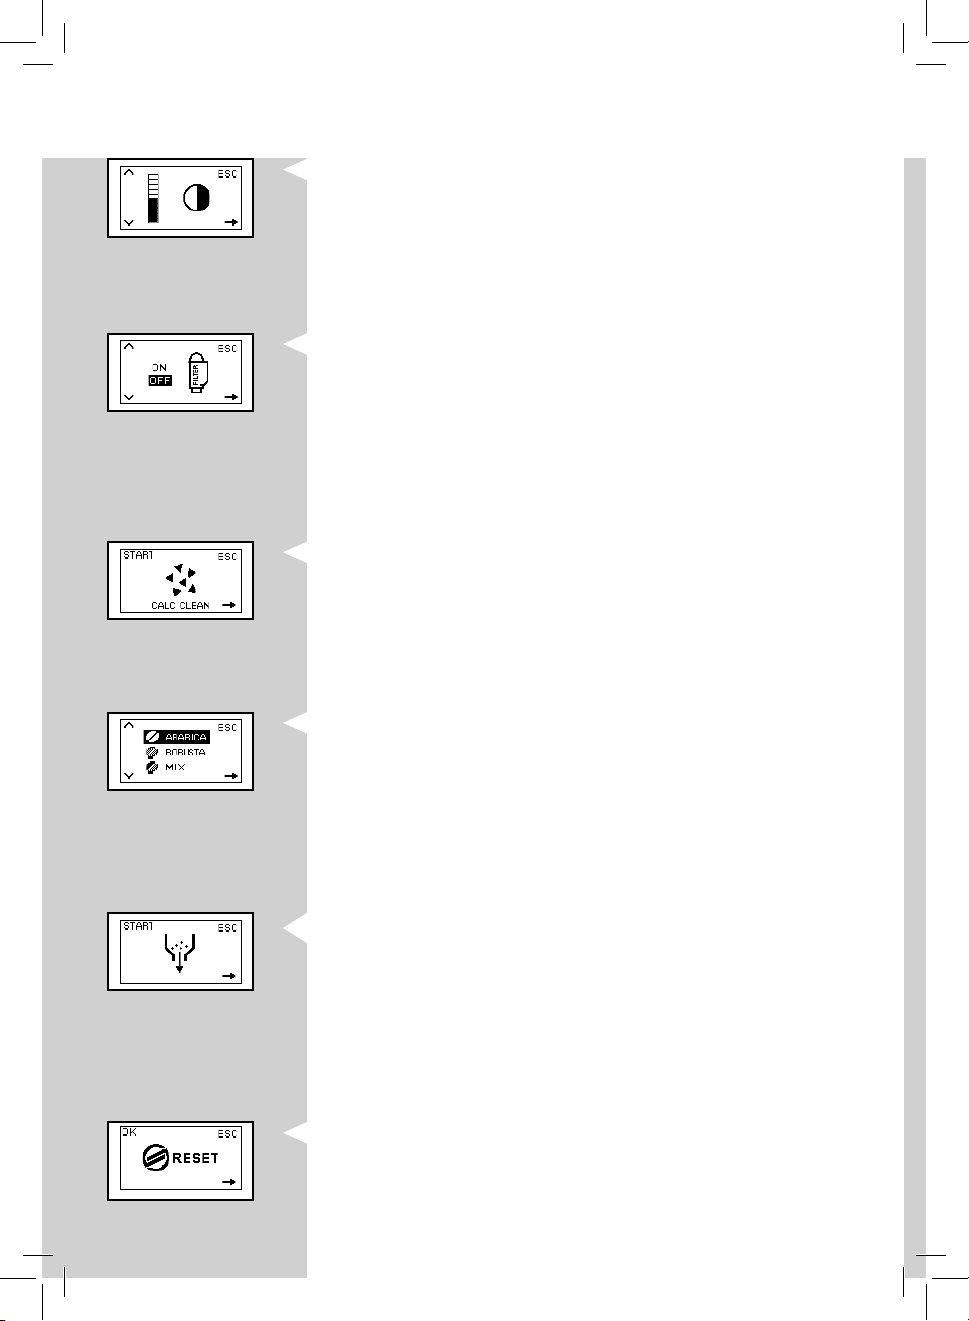
Contrast
This function allows you to adjust the contrast of the display to better view
the messages.
YellowYellow
"INTENZA+" Water Filter
This function allows you to manage the “INTENZA+” water lter.
For more details, see the chapter related to lter handling.
YellowYellow
Descaling Cycle
This function allows you to run the descaling cycle.
Co ee Bean Selection
This function allows you to optimize grinding according to the selected
type of co ee beans.
YellowYellow
Co ee Outlet Duct Emptying Cycle
This function allows you to empty the co ee outlet duct and grinder before changing co ee beans.
Factory Settings
This function allows you to reset all factory values.
Page 69
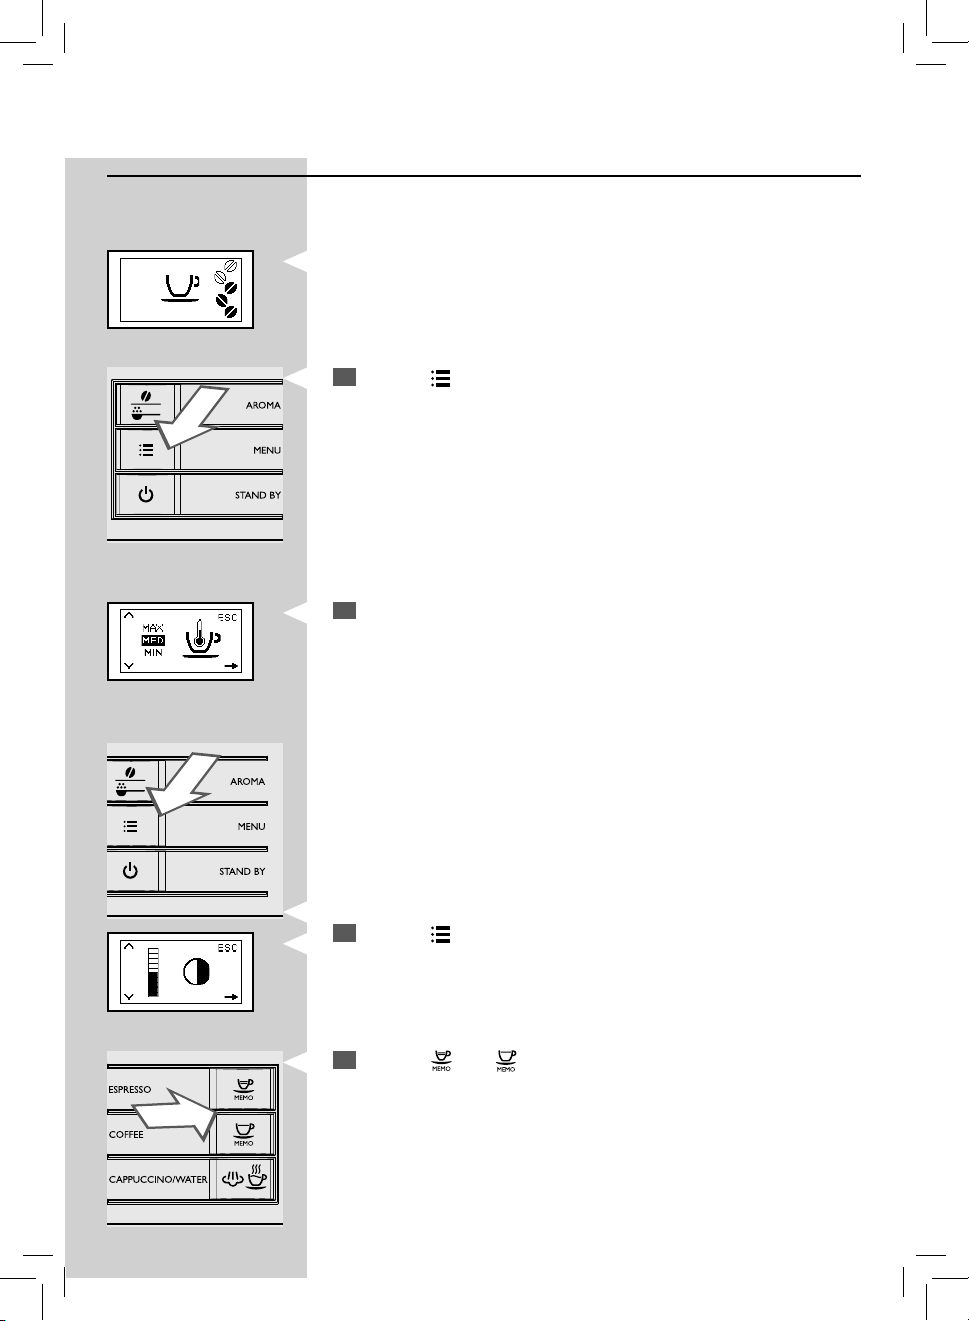
How to Program the Machine
This example shows how to set the co ee temperature. Proceed in the
same way to program the other functions.
The programming menu can only be accessed when the machine is on and
shows this display.
Green
Press the “ ” button to access the menu.
1
The main screen will be displayed.
2
YellowYellow
ENGLISH
67
67
Press the “ ” MENU button to scroll the options until the display
3
contrast function is displayed.
Press the “ ” and “ ” buttons to increase or decrease the value of the
4
function.
Page 70
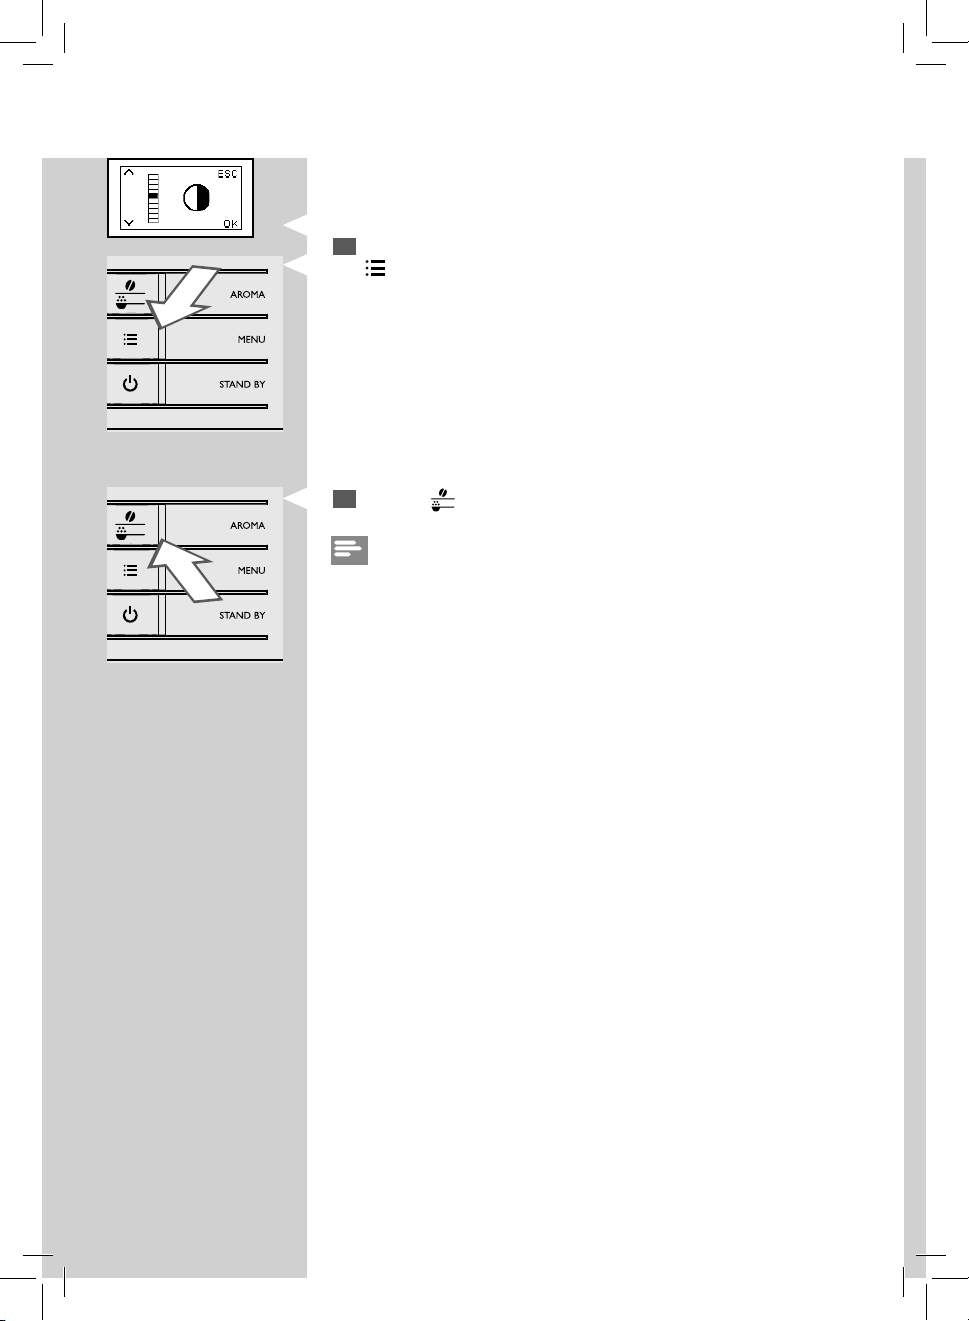
68
ENGLISH
Yellow
Once the value has been changed, the “OK” message appears. Press the
5
” MENU button to con rm the change.
“
Press the “ ” button to exit the programming menu.
6
Note:
The machine automatically exits the programming menu if no button is
pressed for 3 minutes. The values that have been changed but not con rmed will not be saved.
Page 71
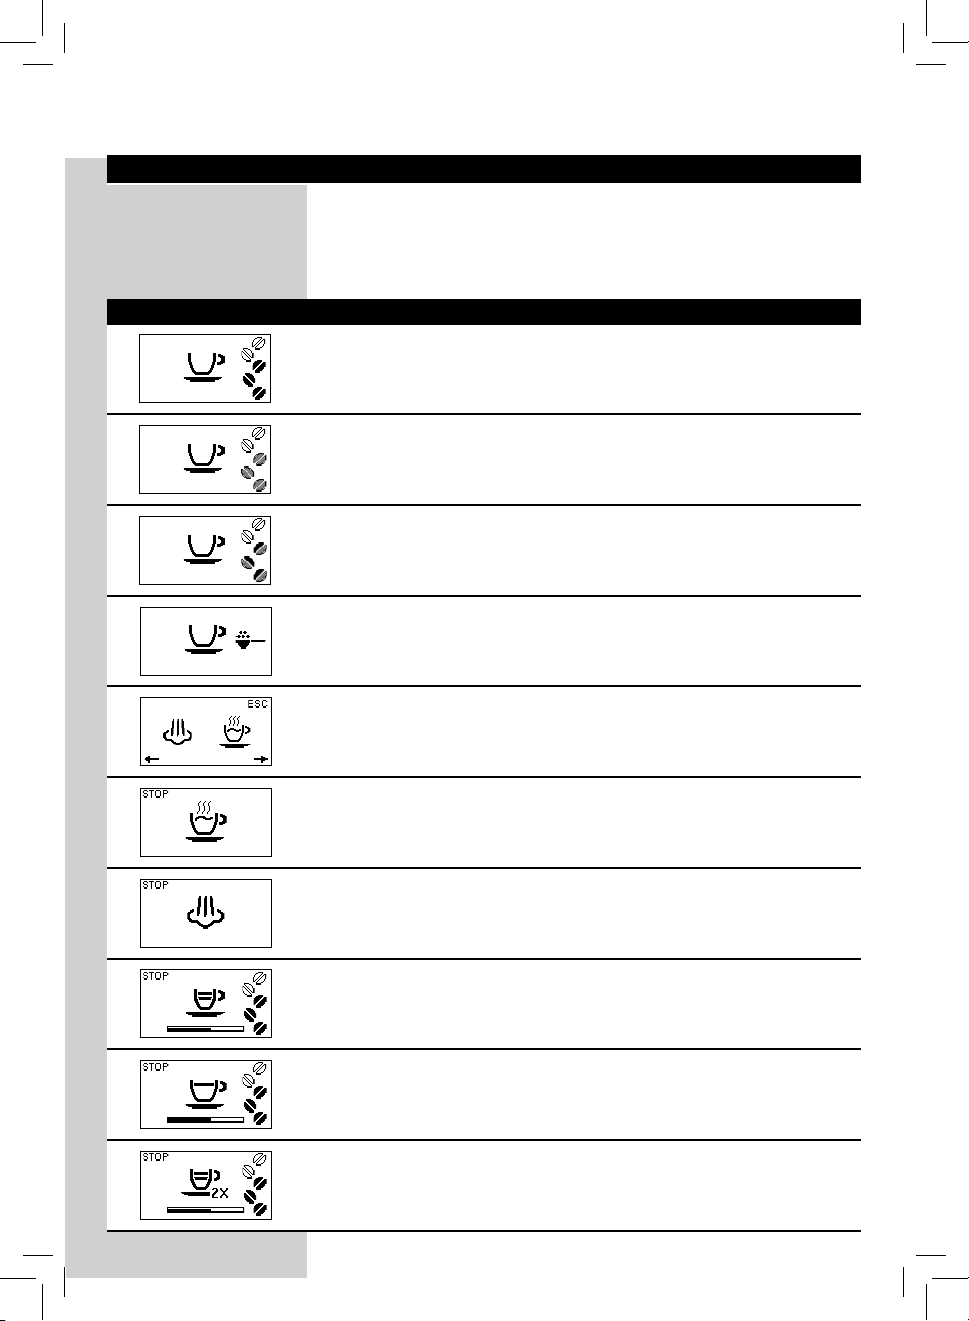
Ready Signals (Green Colour)
The machine is ready to brew co ee using Arabica co ee beans.
The machine is ready to brew co ee using Robusta co ee beans.
The machine is ready to brew co ee using Mixed co ee beans.
The machine is ready to brew pre-ground co ee.
Steam or hot water selection.
ENGLISH
MEANING OF THE DISPLAY ICONS
This machine is equipped with a colour-coded system to make the user’s
understanding of the display signals easier.
The icons are colour-coded according to the tra c light principle.
69
69
Hot water dispensing.
Steam dispensing.
The machine is brewing one cup of espresso.
The machine is brewing one cup of co ee.
The machine is brewing two cups of espresso.
Page 72
70
ENGLISH
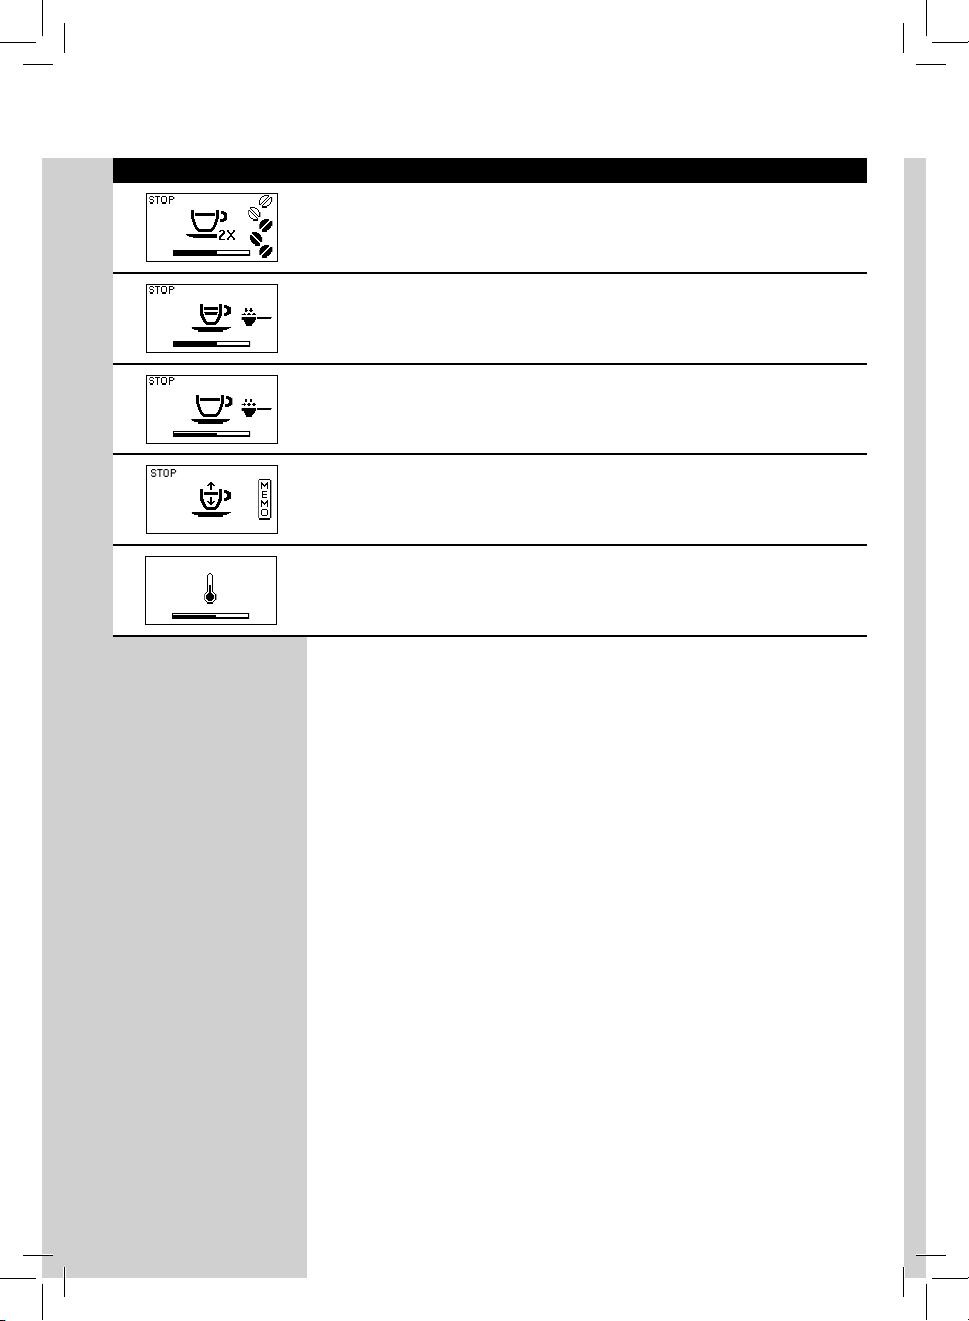
Ready Signals (Green Colour)
The machine is brewing two cups of co ee.
Espresso brewing using pre-ground co ee in progress.
Co ee brewing using pre-ground co ee in progress.
The machine is programming the amount of co ee to be brewed.
The machine is warming up to brew beverages or dispense hot water.
Page 73
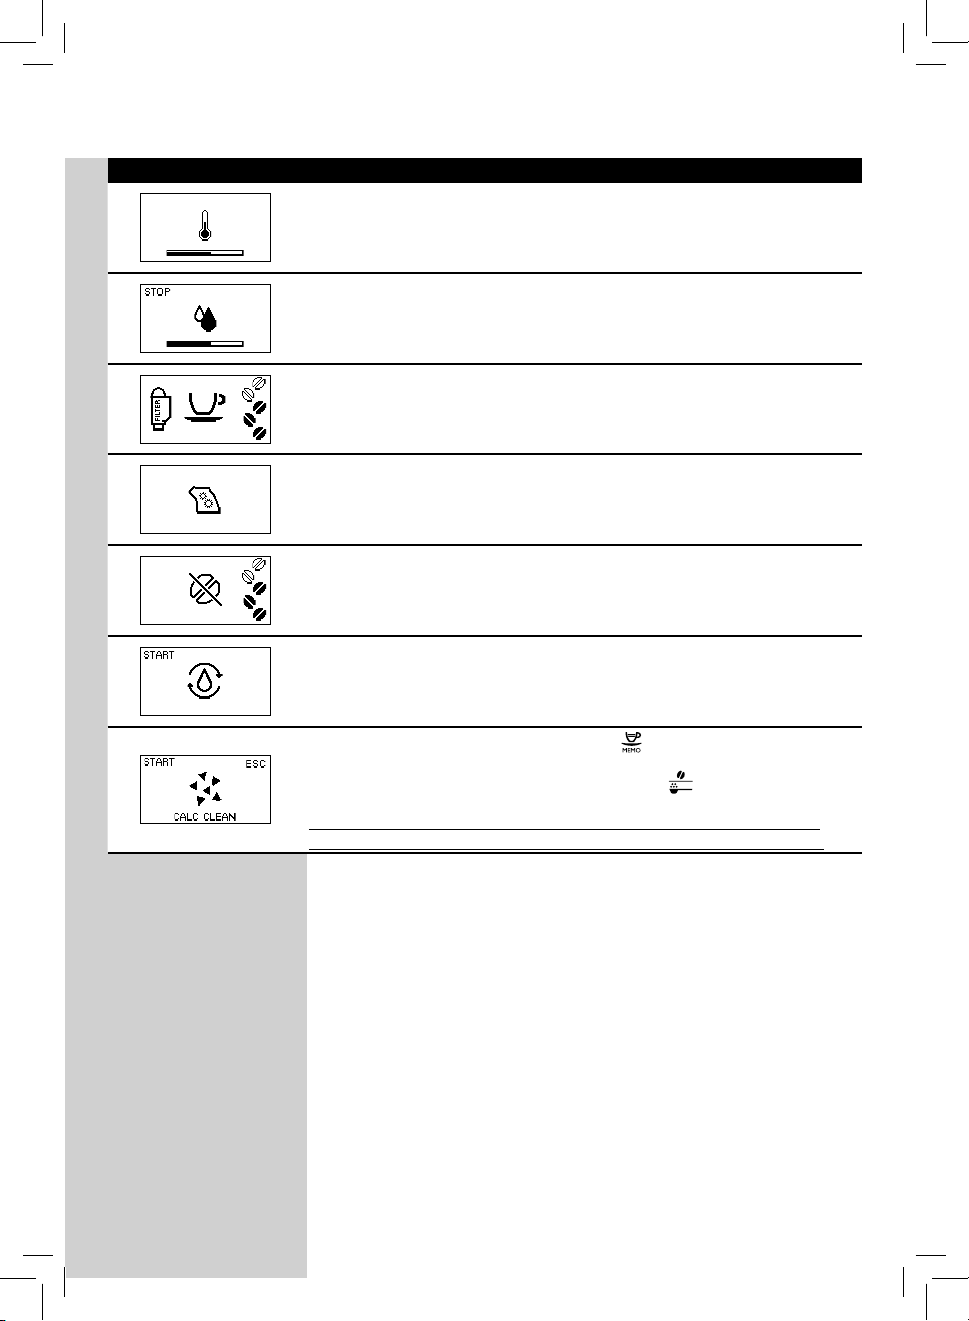
Warning Signals (Yellow Colour)
The machine is warming up.
The machine is performing a rinse cycle. Wait until the machine has completed the cycle.
The machine needs the "INTENZA+" water lter to be replaced.
The brew group is being reset due to machine reset.
Fill the co ee bean hopper with co ee beans and restart the cycle.
Prime the circuit.
ENGLISH
71
71
You need to descale the machine. Press the “ ” button to start the descaling
process. Follow the steps described in the “Descaling” chapter of this manual.
If you want to descale the machine later, press the “
using the machine.
Please note that not descaling your machine will ultimately make it stop
working properly. In this case, repair is NOT covered under your warranty.
” button to continue
Page 74
72
ENGLISH
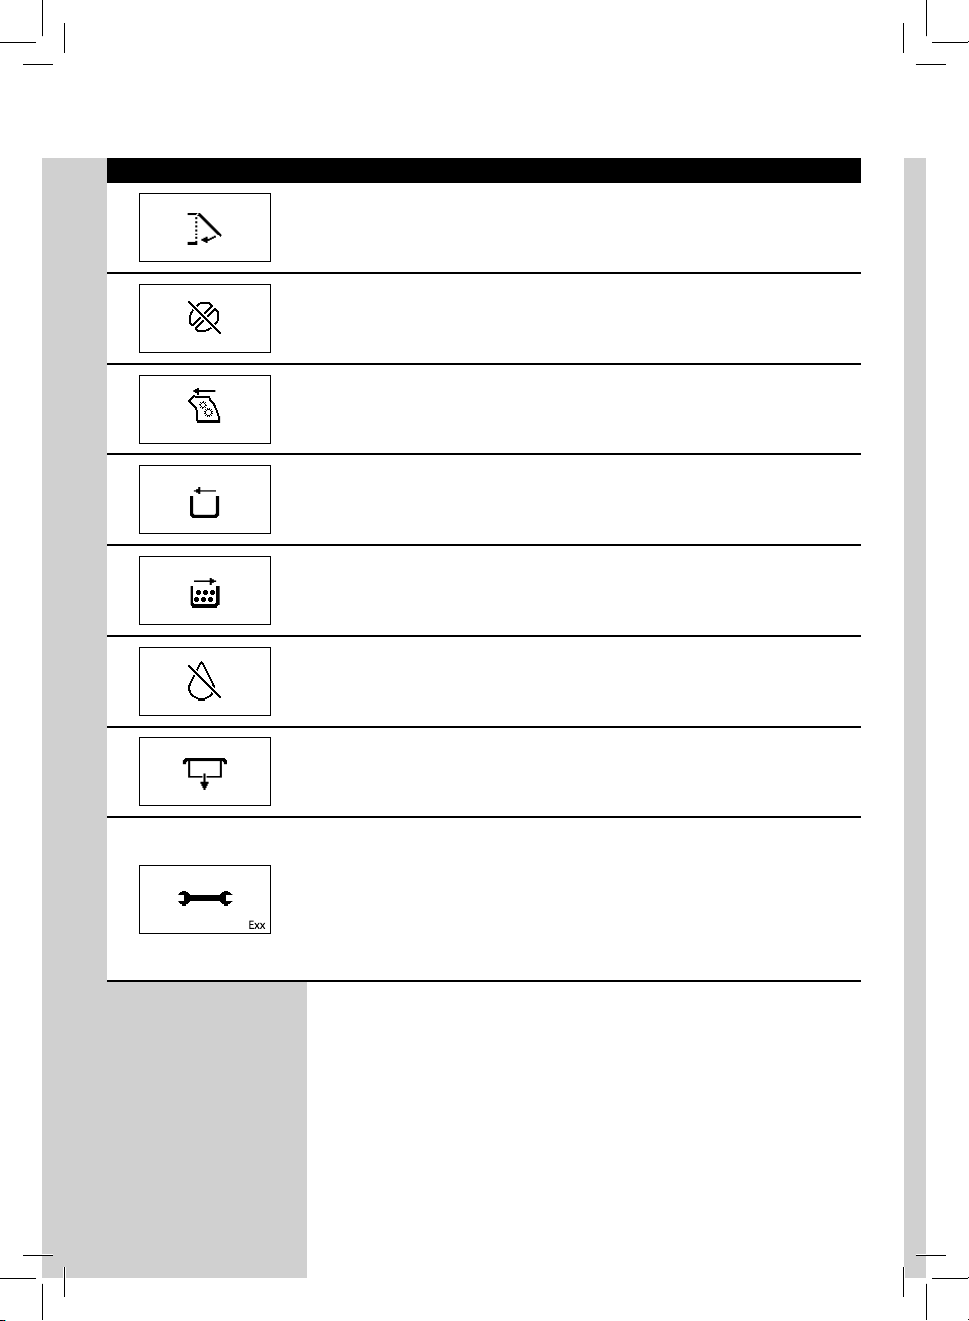
Warning Signals (Red Colour)
Close the service door.
Fill the co ee bean hopper.
The brew group must be inserted into the machine.
Insert the co ee grounds drawer.
Empty the co ee grounds drawer and the co ee residues drawer.
Fill the water tank.
Insert the co ee bean hopper.
The machine is out of order. The error code is displayed in the right bottom
corner. For error codes 1 -3 - 4 - 5, please refer to the "Troubleshooting" chapter. For any other error codes, follow the instructions below:
Turn o the machine. Turn it back on after 30 seconds. Try this 2 or 3 times.
If the machine does not start, contact the Philips SAECO hotline in your country and quote the error code shown on the display.
Contact details can be found in the warranty booklet packed separately or at
www.saeco.com/support.
Page 75
TROUBLESHOOTING
This chapter summarizes the most common problems you could encounter with your machine.
If you are unable to solve the problem with the information below, visit
www.saeco.com/support for a list of frequently asked questions or contact the Philips Saeco hotline in your country.
Contact details can be found in the warranty booklet packed separately or
at www.saeco.com/support.
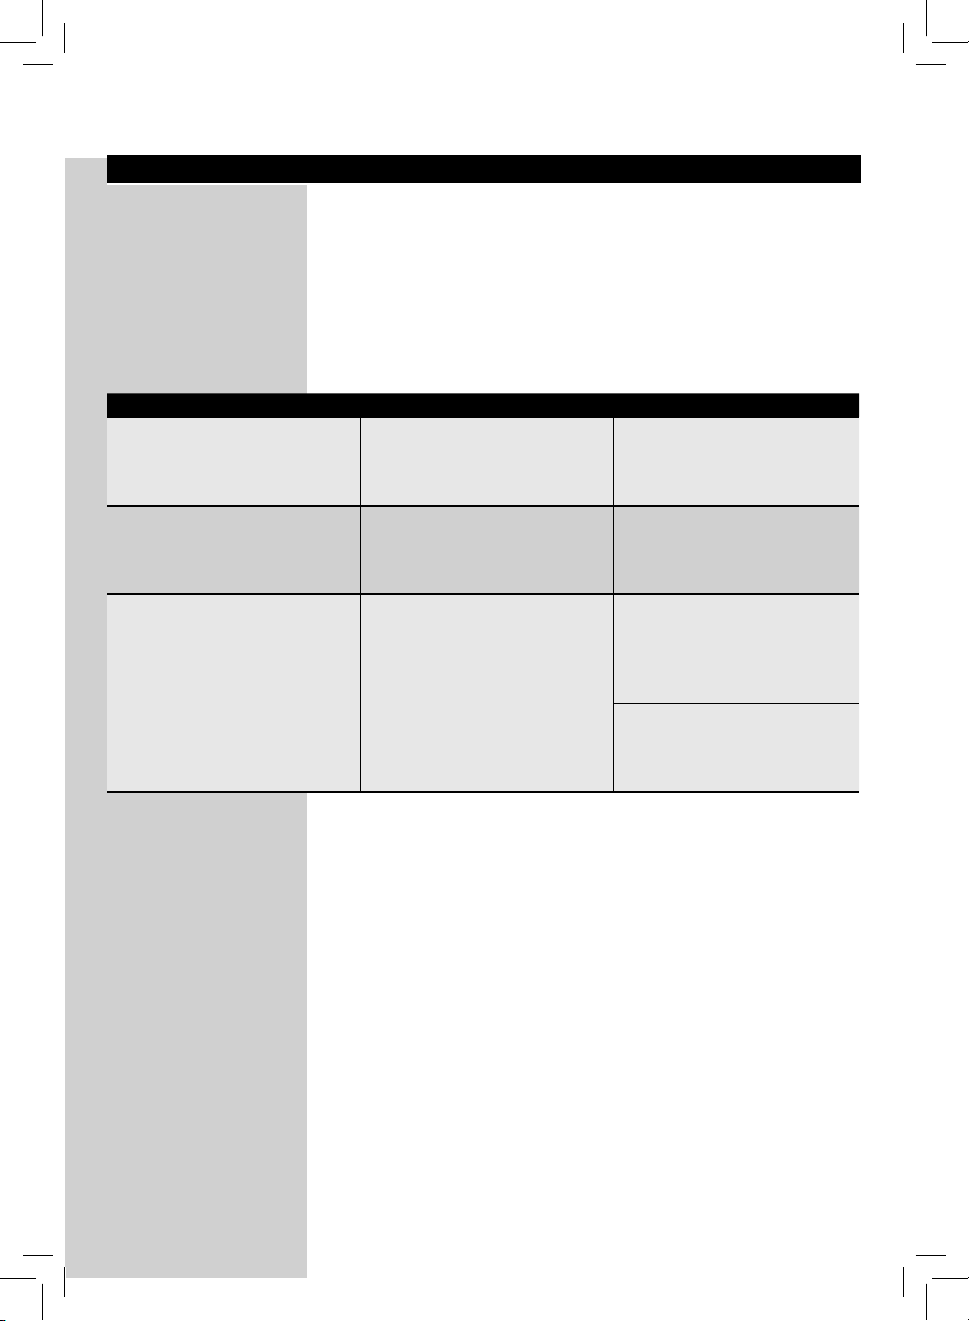
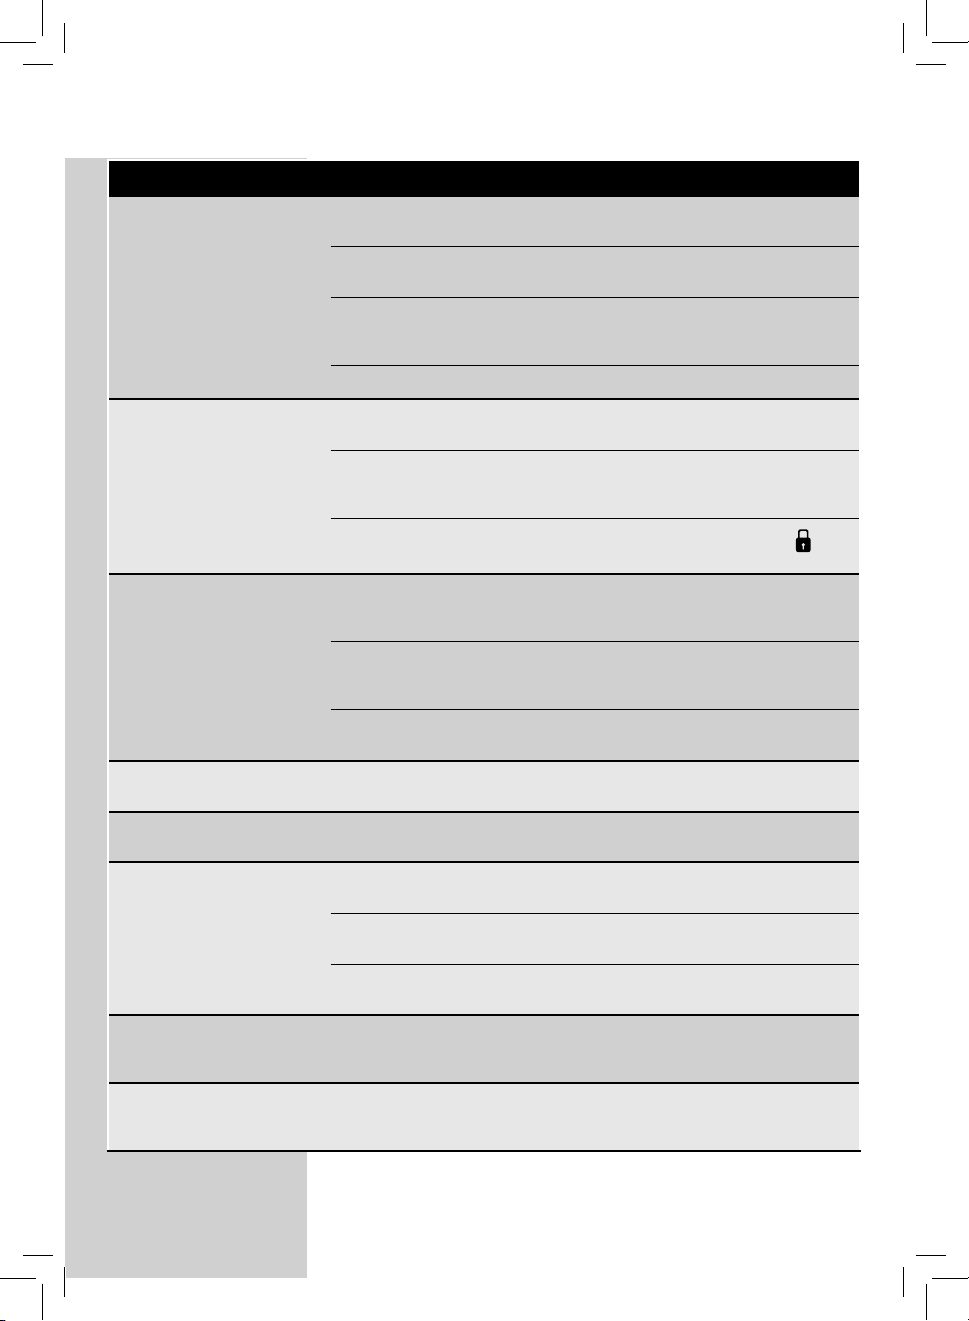
Machine actions Causes Solutions
Error Code 1
Co ee grinder blocked.
Error Code 3-4
Brew group blocked, cannot be
pulled out.
Error Code 5
Water circuit error.
Co ee outlet duct clogged. Thoroughly clean the co ee
outlet duct as described in the
“Weekly Cleaning of the Brew
Group” chapter.
The brew group is out of place. Close the service door. Turn
o and back on the machine.
The brew group automatically
returns to the initial position.
Air in the water circuit. Remove and put back the water
tank a few times, making sure
it is properly reinserted. Check
that the water tank compartment is clean.
If the Intenza+ lter is installed,
remove it. Turn o and back on
the machine. Thereafter place
the lter back.
ENGLISH
73
73
Page 76
74
ENGLISH
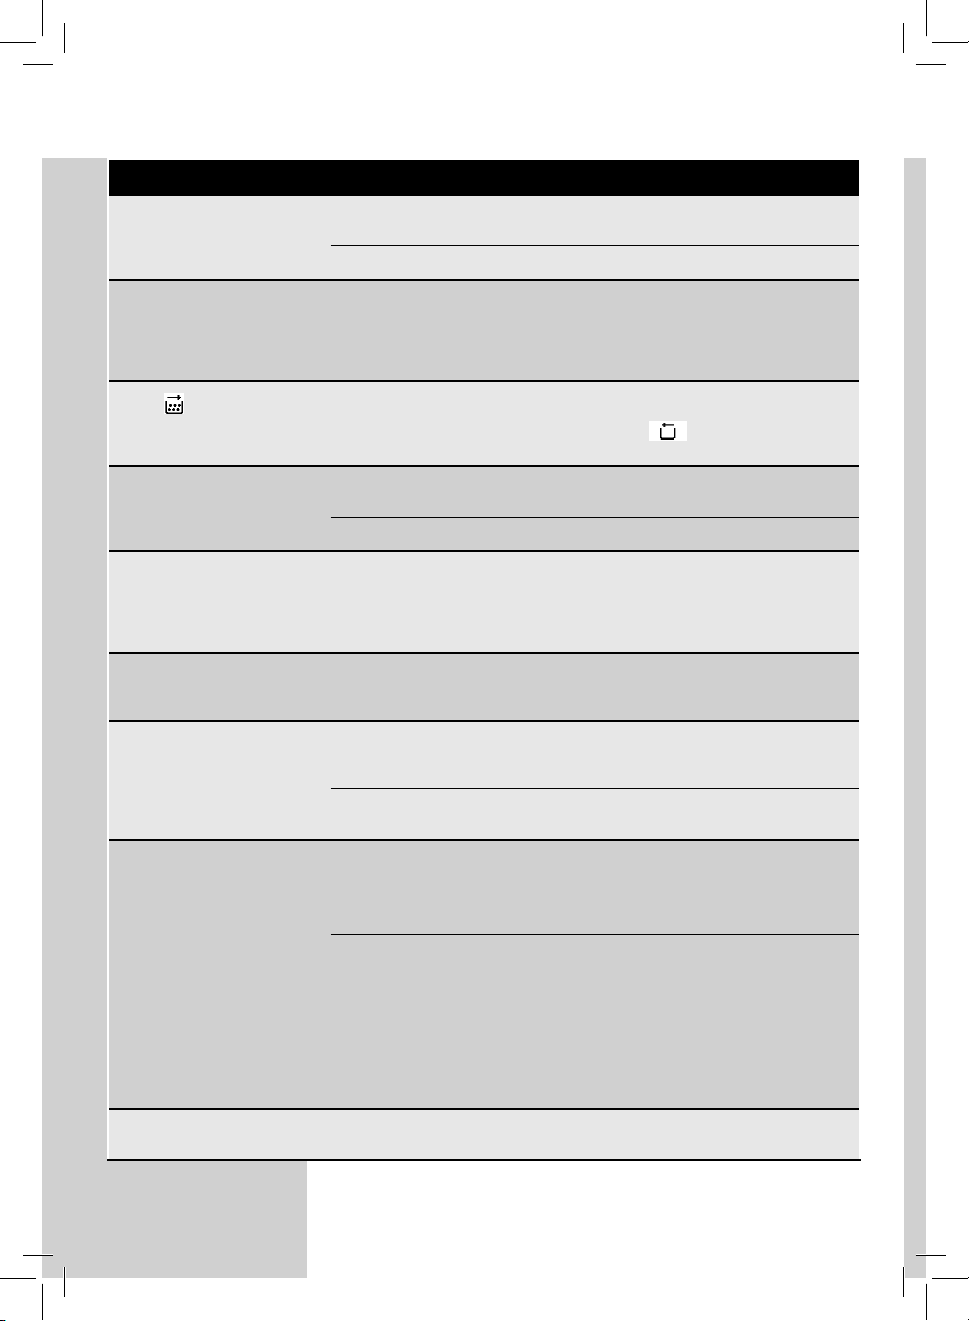
Machine actions Causes Solutions
The machine does not turn on. The machine is not connected to the
The drip tray gets lled although
no water is drained.
The red
played on the machine.
Co ee is not hot enough. The temperature is not correctly set. Set the temperature as described in the
No hot water or steam is dispensed.
Co ee does not have enough
crema (see note*).
The brew group cannot be
removed.
icon is always dis-
electric network.
The power button is on position "0". Check that the power button is set to "I".
Water is sometimes drained automatically by the machine into the drip tray
to manage the rinsing of the circuits
and ensure optimum machine performance.
The co ee grounds drawer has been
emptied with the machine o .
The cups are cold. Preheat the cups with hot water.
The hole of the steam/hot water wand
is clogged.
The blend is unsuitable, co ee is not
freshly roasted or the grind is too
coarse.
The brew group is out of place. Turn on the machine. Close the service
The co ee grounds drawer is inserted. Remove the co ee grounds drawer
Connect the machine to the electric
network.
This is a normal behaviour of the machine.
The co ee grounds drawer must always
be emptied with the machine on. Wait
until the
re tting the drawer.
"Programming" chapter.
Clean the hole of the steam wand using
a pin.
Make sure that the machine is o and
has cooled down before performing
this operation.
Change co ee blend or adjust grinding as
explained in the “Adjusting the Ceramic
Co ee Grinder” chapter.
door. The brew group automatically
returns to the initial position.
before removing the brew group.
icon is displayed before
The brew group cannot be
inserted.
There is a lot of ground co ee
under the brew group.
The brew group is not in the o
position.
The gearmotor is not in the correct
position.
Co ee is not suitable for automatic
machines.
Make sure that the brew group in
the o position, as described in the
“Weekly Cleaning of the Brew Group”
chapter.
Insert the drip tray and the co ee
grounds drawer. Close the service door.
Turn on the machine without inserting
the brew group. The gearmotor moves
back to the correct position. Turn o
the machine and reinsert the brew
group as described in the “Weekly
Cleaning of the Brew Group” chapter.
It may be necessary to change the type of
co ee or the co ee grinder settings.
Page 77
ENGLISH
Machine actions Causes Solutions
The machine grinds the co ee
beans but no co ee is brewed
(see note).
Co ee is too weak (see note). This might occur when the machine is
Co ee is brewed slowly (see
note).
Co ee leaks out of the co ee
dispensing spout.
The selector switch is blocked. Some co ee beans may have got stuck. Move the selector switch back and forth
The co ee bean hopper cannot
be inserted.
Co ee does not taste like the new
co ee beans.
Milk does not froth. The Automatic Milk Frother is inserted
The brew group is dirty. Clean the brew group (see the "Weekly
This might occur when the machine is
automatically adjusting the dose.
The circuit is not primed. Prime the circuit
The co ee dispensing spout is dirty. Clean the co ee dispensing spout.
automatically adjusting the dose.
Co ee is too coarse. Change co ee blend or adjust grinding as
The co ee bean hopper selector switch
has been shifted.
The co ee grind is too ne. Change co ee blend or adjust grinding as
The circuit is not primed. Prime the circuit
The brew group is dirty. Clean the brew group (see the "Weekly
The co ee dispensing spout is clogged. Clean the co ee dispensing spout and
The blade under the co ee bean hopper has been shifted.
There might still be some co ee beans
in the co ee compartment.
The selector switch is not in the correct
position.
The co ee outlet duct and grinder
have not been emptied.
too deep. No milk is being suctioned.
Cleaning of the Brew Group" chapter).
Brew some cups of co ee as described in
the “Saeco Adapting System” chapter.
(see the "Using the Machine for the First
Time" chapter).
Brew some cups of co ee as described in
the “Saeco Adapting System” chapter.
explained in the “Adjusting the Ceramic
Co ee Grinder” chapter.
Move the selector switch to the “
position.
explained in the “Adjusting the Ceramic
Co ee Grinder” chapter.
(see the "Using the Machine for the First
Time" chapter).
Cleaning of the Brew Group" chapter).
its holes.
until the co ee beans are released.
Slide the blade up to the end of the guide
until the hole is covered.
Remove co ee beans.
Shift the selector switch to the open
position.
You need to brew at least two cups of
co ee before you can taste the new coffee beans.
Leave the Automatic Milk Frother to
cool down. Move it slightly downwards.
Reposition it in its correct seat.
”
75
75
Page 78
76
ENGLISH
Machine actions Causes Solutions
Frothed milk is too cold. The cups are cold. Preheat the cups with hot water.
The
icon is displayed.
The machine is in demo mode.
The co ee bean hopper selector switch
has been shifted.
The co ee bean hopper and tray are
dirty.
The “
” button was pressed and held
for more than 8 seconds.
Move the selector switch to the “
position.
Clean the co ee bean hopper and tray
to remove any co ee residues (see the
"Weekly Cleaning of the Co ee Bean
Hopper, Tray and Co ee Compartment"
chapter).
Turn the machine o and on again using
the power button.
”
Note:
These problems can be considered normal if the co ee blend has been
changed or if the machine has just been installed. In this case, wait until
the machine performs a self-adjusting operation as described in the "Saeco
Adapting System" section.
ENERGY SAVING
Stand-by
The Saeco fully automatic espresso co ee machine is designed for energy
saving, as proven by the Class A energy label.
After 15 minutes of inactivity, the machine turns o automatically (unless
a di erent stand-by time has been programmed). If a product has been
brewed, the machine performs a rinse cycle.
In stand-by mode, the energy consumption is below 1Wh.
To turn on the machine, press the
“ ” button (if the power button on the
back of the machine is set to “I”). If the boiler is cold, the machine performs
a rinse cycle.
Page 79

ENGLISH
TECHNICAL SPECIFICATIONS
The manufacturer reserves the right to make changes to the technical
speci cations of the product.
77
77
Nominal Voltage - Power Rating Power Supply
Housing material ABS - Thermoplastic
Size (w x h x d) 256 x 350 x 470 mm
Weight 8.5 kg
Power cord length 800 - 1200 mm
Control panel Front panel
Cup size 142
Water tank 1.9 litres - Removable type
Co ee bean hopper capacity 300 g
Co ee grounds drawer capacity 14
Pump pressure 15 bar
Boiler Stainless Steel
Safety devices Thermal fuse
See data plate on the inside of the
service door
WARRANTY AND SERVICE
Warranty
For detailed information on your warranty and related conditions, please
read the warranty booklet supplied separately.
Service
We want to ensure that you remain satis ed with your machine.
If you have not already done so, please register your purchase on
www.saeco.com/welcome. This will allow us to stay in contact with you
and send you cleaning and descaling reminders.
For service or support, please visit the Philips website at www.saeco.com/
support or contact the Philips Saeco hotline in your country. Contact
details can be found in the warranty booklet packed separately or at www.
saeco.com/support.
Page 80
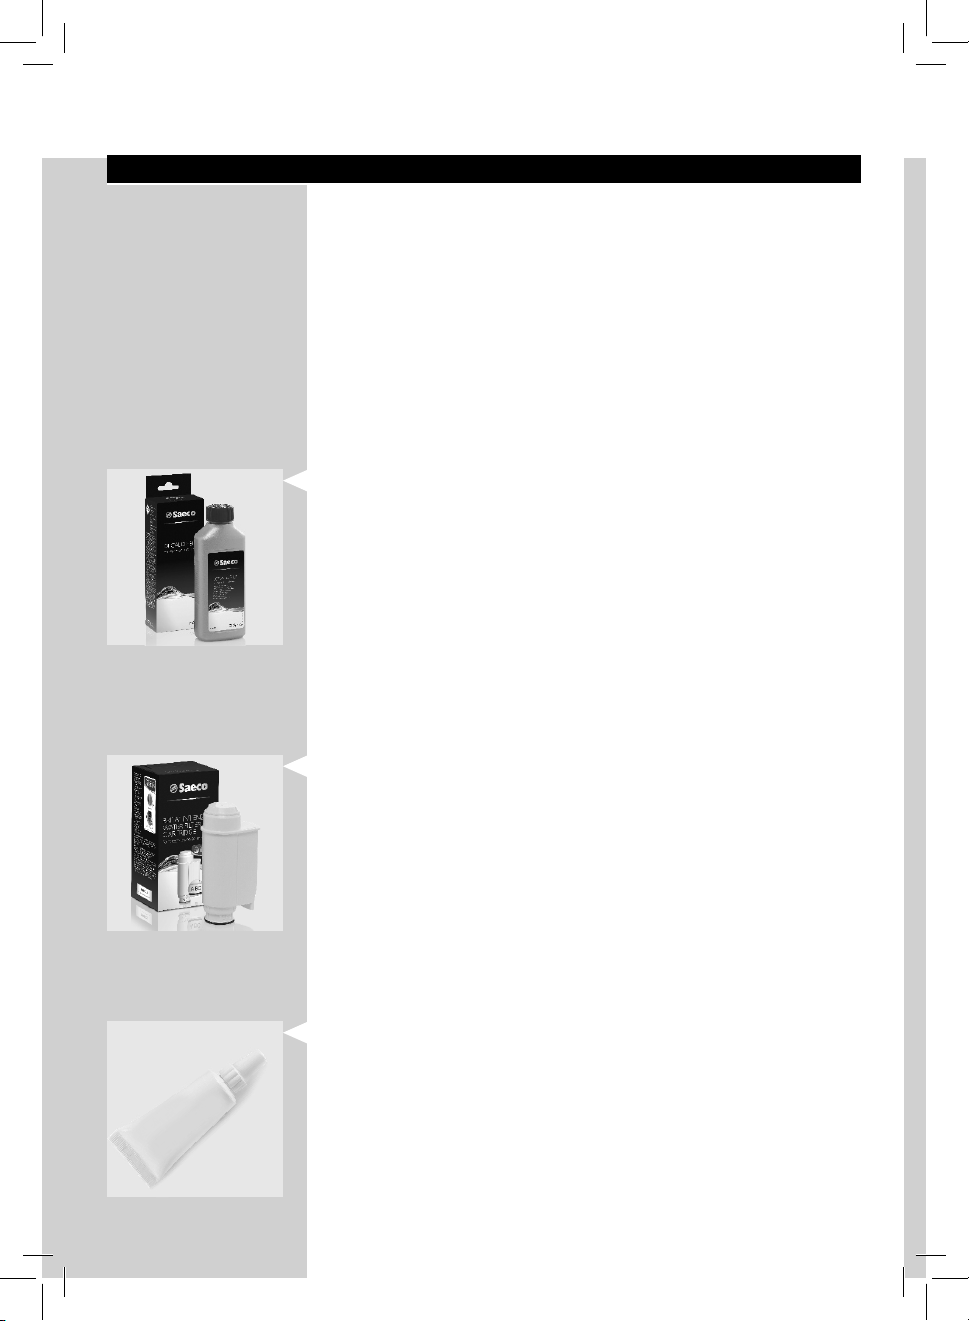
78
ENGLISH
ORDERING MAINTENANCE PRODUCTS
For cleaning and descaling, use Saeco maintenance products only.
purchase the products at the Philips online shop at www.shop.philips.com/
service, from your local dealer or at authorised service centres.
If you have any di culties obtaining maintenance products for your machine, please contact the Philips Saeco hotline in your country.
Contact details can be found in the warranty booklet packed separately or
at www.saeco.com/support.
Overview of maintenance products
- Descaling solution CA6700
You can
- INTENZA+ Water Filter CA6702
- Grease HD5061
Page 81
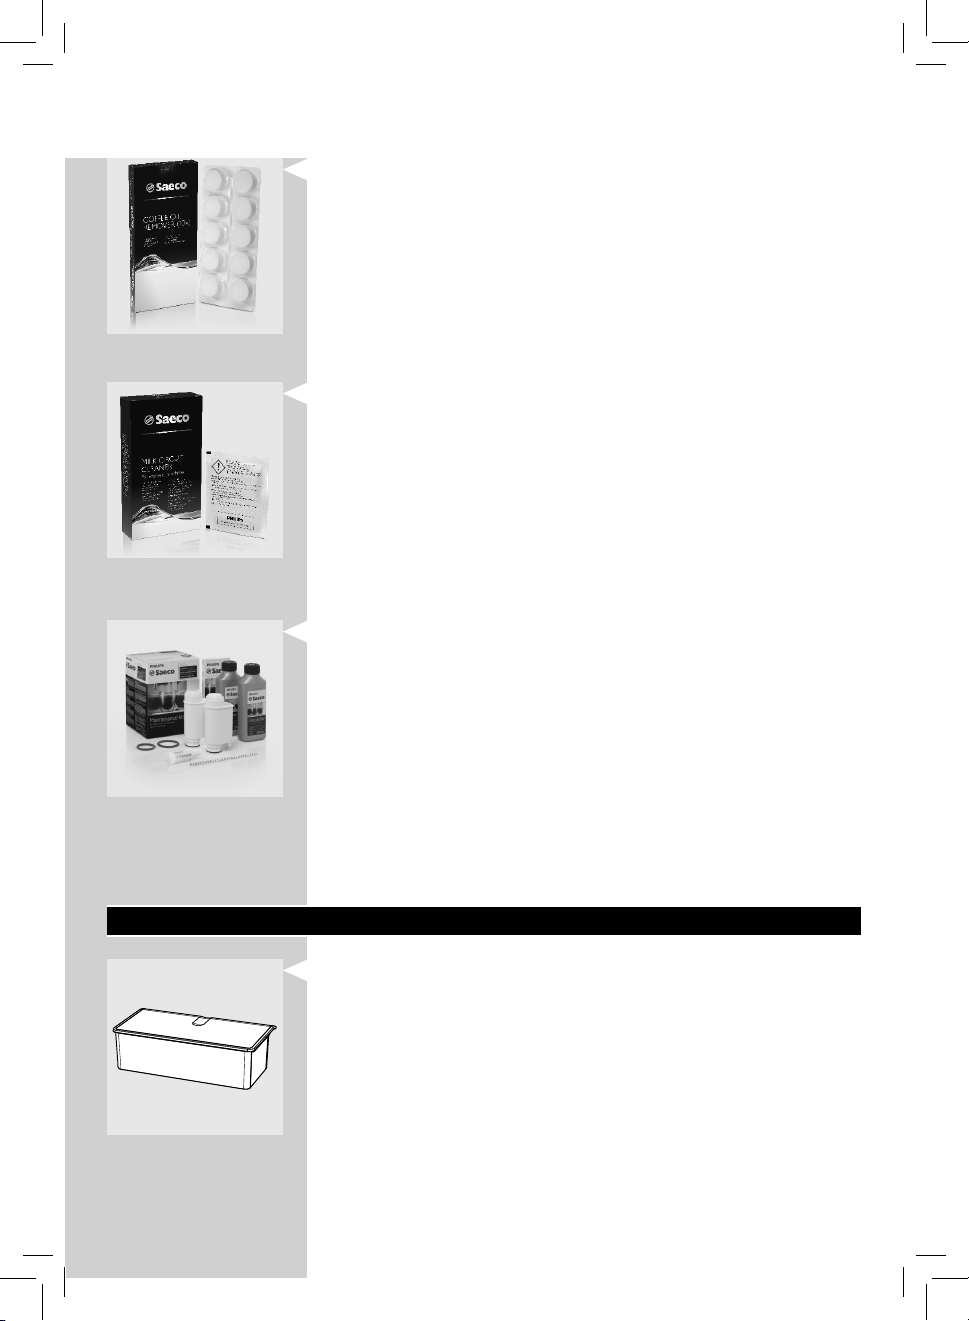
- Co ee Oil Remover CA6704
- Milk Circuit Cleaner: CA6705
- Maintenance Kit CA6706
ENGLISH
79
79
MACHINE ACCESSORIES
- Removable co ee bean hopper CA6803
Page 82

Page 83
Page 84
02
Rev.00 del 30-12-14
The manufacturer reserves the right to make changes without prior notice.
www.philips.com/saeco
EN
02
 Loading...