

Page 1
HD7872, HD7870
User manual
Brugervejledning
Benutzerhandbuch
Mode d’emploi
Gebruiksaanwijzing
Brukerhåndbok
For more support go to:
www.philips.com/senseo-twist/support
Page 2

Page 3
Page 4

Page 5
Table of contents
1 Introduction 5
2 General description 5
3 Important 6
4 Flushing the machine before
rst use 6
5 Brewing SENSEO
6 Cleaning 13
7 Descaling 14
8 Frost-free storage 17
®
coffee 9
taste and aroma are extracted from the coffee.
Discover all SENSEO
®
coffee blends at
www.senseo.com.
To ensure a smooth and full coffee taste, you
should keep the following things in mind:
Fresh coffee pods
Use the SENSEO
®
coffee pods that have been
specially developed by Douwe Egberts for your
SENSEO
Douwe Egberts SENSEO
®
coffee machine for a full, round taste.
®
coffee pods stay fresh
longer if you store them in an airtight storage
container.
Fresh water
Use fresh water every day. If you have not used
the coffee machine for one day, you have to
ush it with fresh water before you use it again
(see chapter ‘Brewing SENSEO
®
coffee, section
‘Flushing the machine after a day of non-use’).
ENGLISH
9 Ordering accessories 17
10 Environment 17
11 Guarantee and service 17
12 Troubleshooting 18
1 Introduction
Congratulations on your purchase and welcome
to Philips! To fully benet from the support
that Philips offers, register your product at
www.philips.com/welcome.
1.1 SENSEO® coffee system
Make your coffee moments truly special with
SENSEO
easy-to-use Philips SENSEO
with the specially developed Douwe Egberts
SENSEO
coffee with a delicious foam layer. Douwe Egberts
coffee in convenient SENSEO
Philips’ unique new SENSEO
are perfectly matched to ensure that the best
®
. This unique system combines the
®
coffee pods, giving you a full, smooth
®
coffee machine
®
coffee pods and
®
brewing system
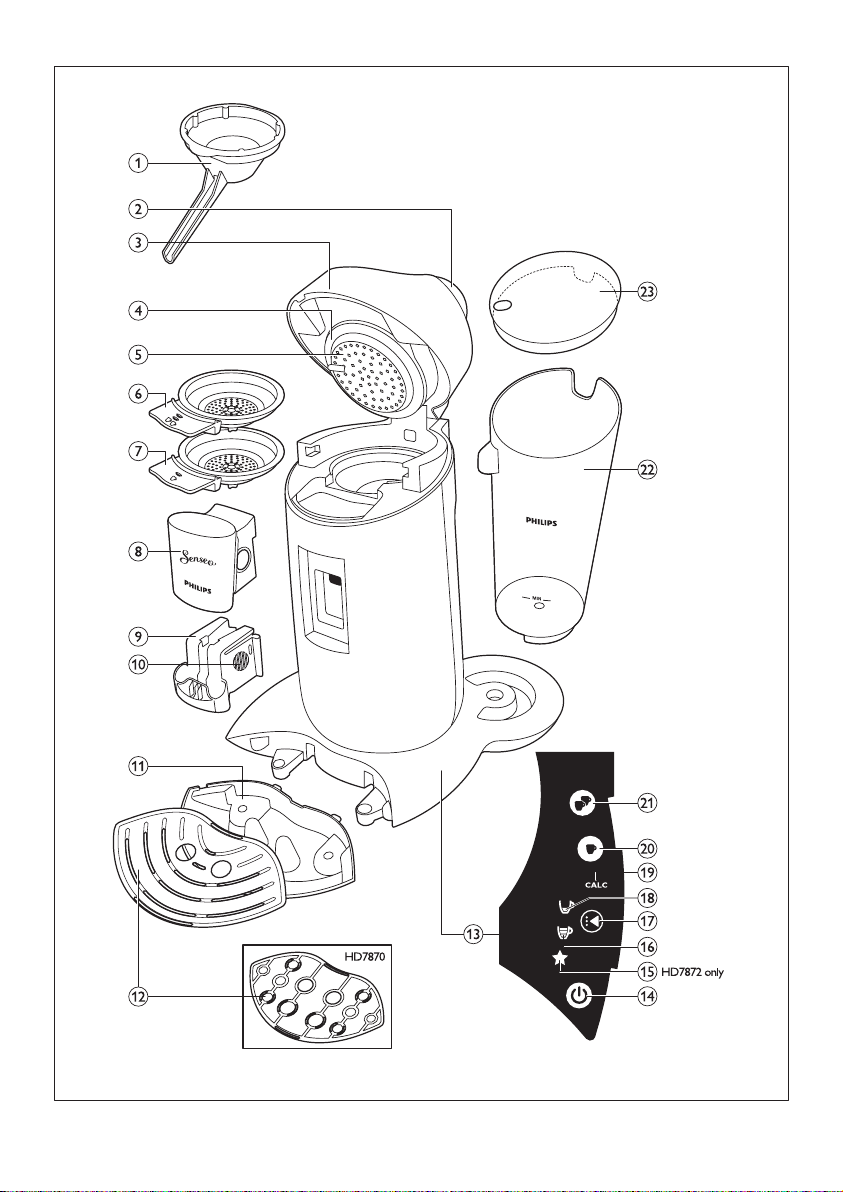
2 General description
(Fig. 1)
1 Coffee collector
2 Lid lever
3 Lid with brewing chamber
4 Sealing ring
5 Water distribution disc
6 2-cup pod holder qq
7 1-cup pod holder q
8 Coffee spout cover
9 Coffee spout
10 Spout release buttons
11 Removable drip tray
12 Cup tray
13 Touch panel
14 On/off button
15
Personal coffee memory symbol (HD7872 only)
16 Regular coffee symbol
17 Selection button
18 Strong coffee symbol
19 CALC light
20 1-cup button q
21 2-cup button qq
22 Water reservoir
23 Water reservoir lid
5
Page 6
3 Important
Read this user manual carefully before you use the
machine and save it for future reference.
Danger
• Never immerse the machine in water or any
other liquid.
Warning
• Check if the voltage indicated on the bottom
of the machine corresponds to the local mains
voltage before you connect the machine.
• This machine is not intended for use by
persons (including children) with reduced
physical, sensory or mental capabilities, or lack
of experience and knowledge, unless they
have been given supervision or instruction
concerning use of the machine by a person
responsible for their safety.
• Children should be supervised to ensure that
they do not play with the machine.
• Do not use the machine if the plug, the mains
cord or the machine itself is damaged.
• If the mains cord is damaged, you must have it
replaced by Philips, a service centre authorised
by Philips or similarly qualied persons in
order to avoid a hazard.
Caution
• After unpacking the machine, never put your
SENSEO
in upright position, also during transport.
• Always return the machine to a service centre
authorised by Philips for examination or repair.
Do not attempt to repair the machine yourself,
otherwise your guarantee becomes invalid.
• Do not use the machine in combination with
a transformer, as this could cause hazardous
situations.
• Always put the machine on a at and stable
surface.
• Do not use the machine at altitudes higher
than 2200 metres above sea level.
• Never pour milk, coffee, hot water or
carbonated water into the water reservoir.
• Never ush the machine or let it brew coffee
when the spout is not in place.
®
machine on its side. Always keep it
• This machine is intended for normal
household use only. It is not intended for
use in environments such as staff kitchens
of shops, ofces, farms or other work
environments. Nor is it intended to be used
by clients in hotels, motels, bed and breakfasts
and other residential environments.
3.1 Compliance with standards
This machine complies with all standards regarding
electromagnetic elds (EMF). If handled properly
and according to the instructions in this user
manual, the machine is safe to use based on
scientic evidence available today.
The energy consumption of this machine in
off mode is less than 1 watt. This means that
this machine complies with European Directive
2009/125/EC, which sets the ecological design
requirements for energy-using products.
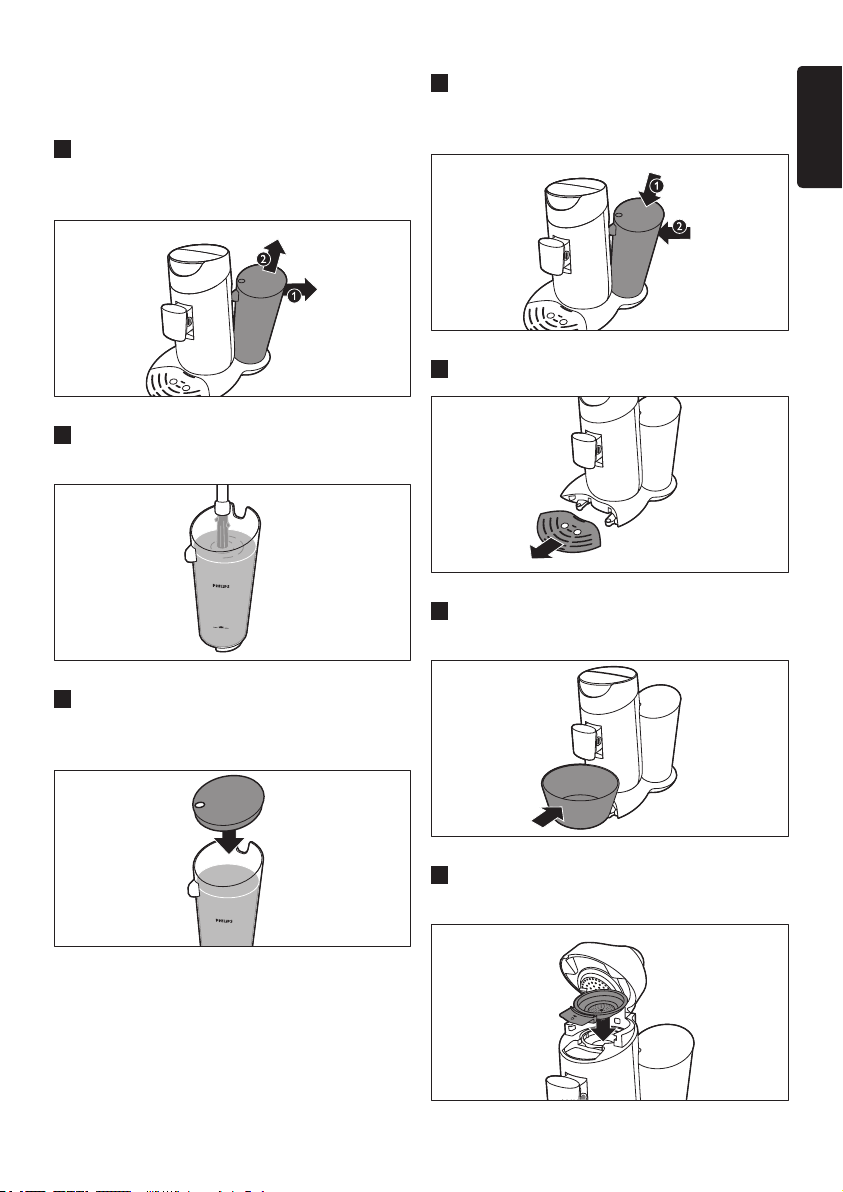
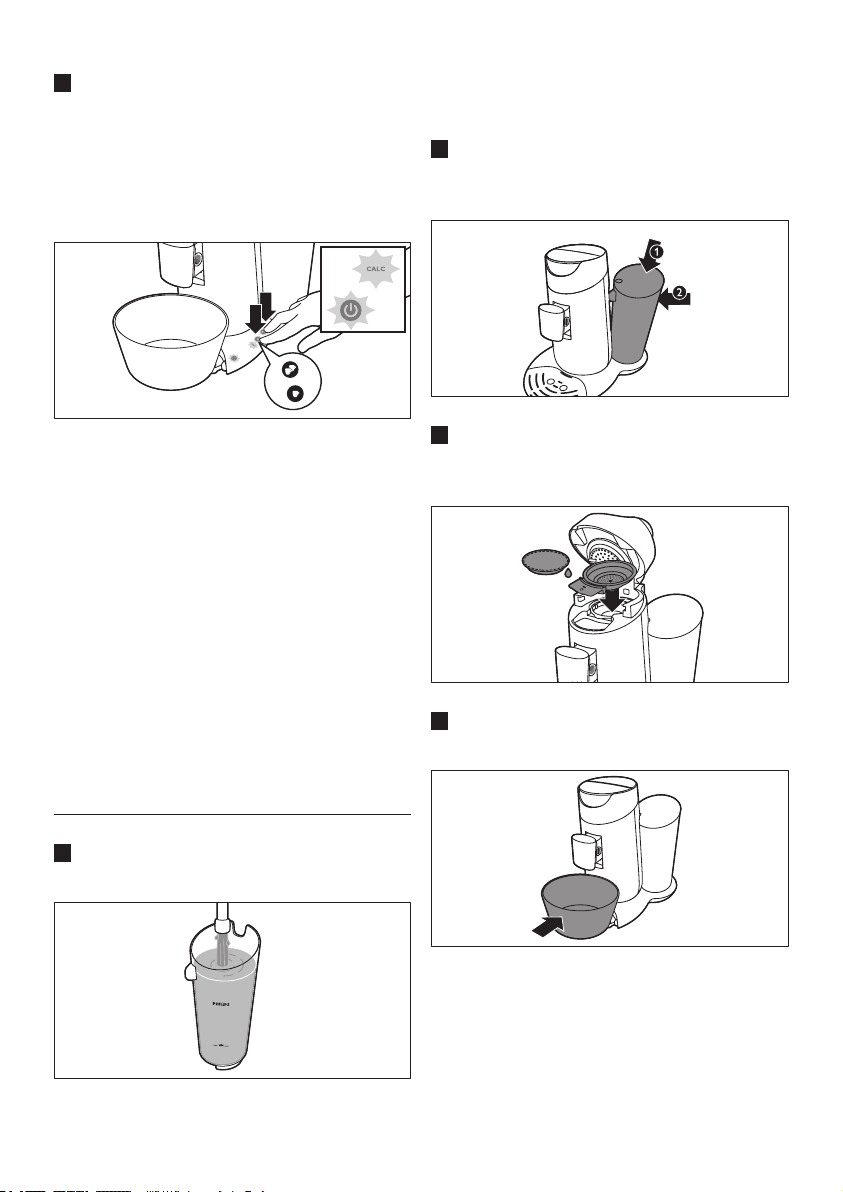
4 Flushing the machine
before rst use
It is important that you ush your SENSEO®
coffee machine before rst use. After the ushing
cycle (which only takes approx. 2 minutes), the
machine is ready for brewing SENSEO
C
Caution:
Never interrupt the ushing cycle halfway. If you
do, the boiler does not ll itself properly.
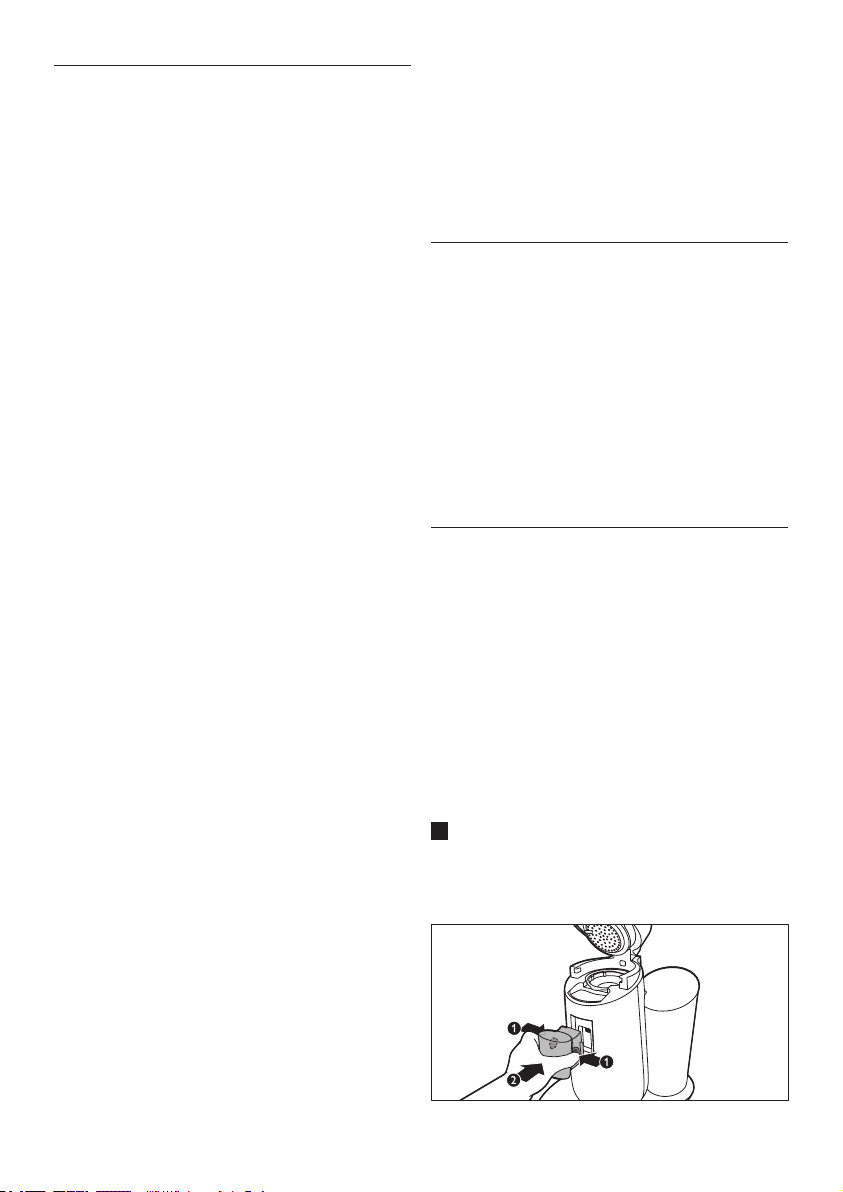
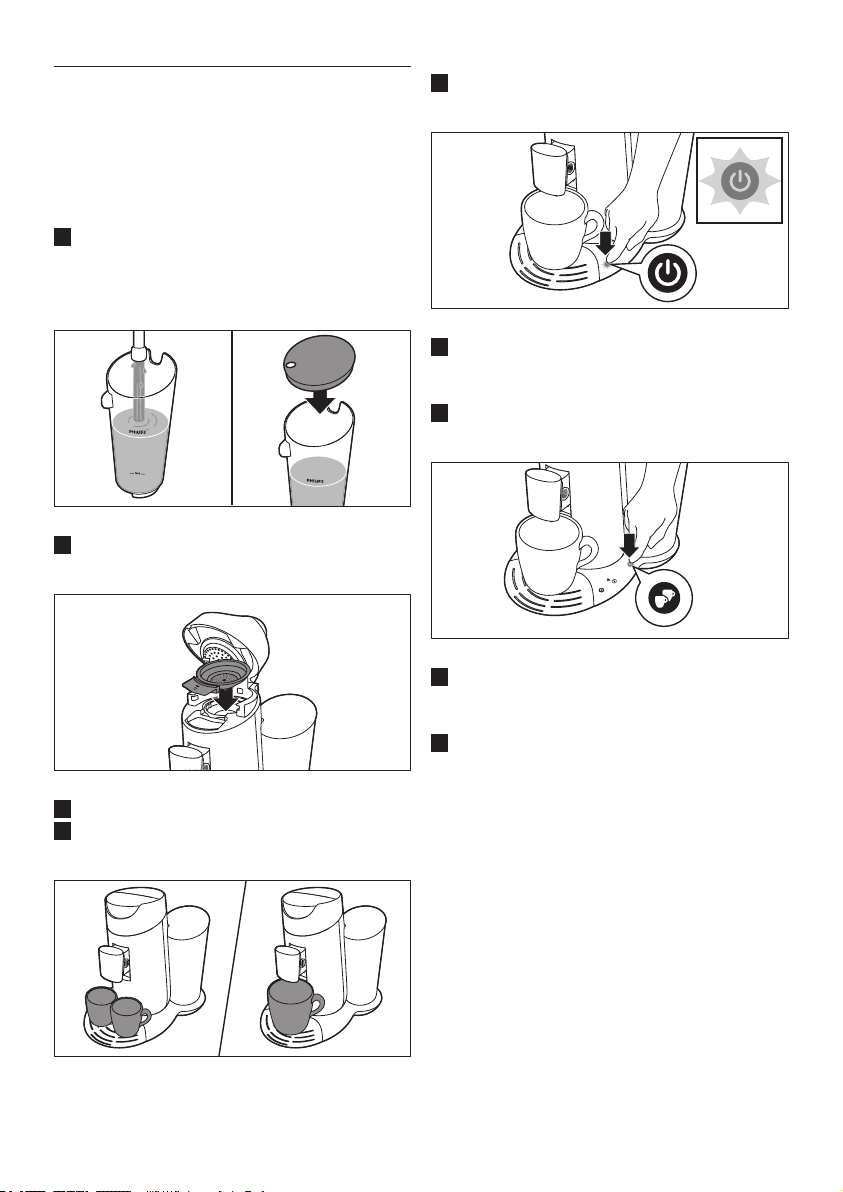
1 Attach the spout to the machine. Grab the
two ridges of the inner part of the spout and
squeeze them lightly (1). Place the spout on
the machine and release the two ridges (2).
®
coffee.
6
Page 7
C Caution:
Never ush the machine or let it brew coffee
when the spout is not in place.
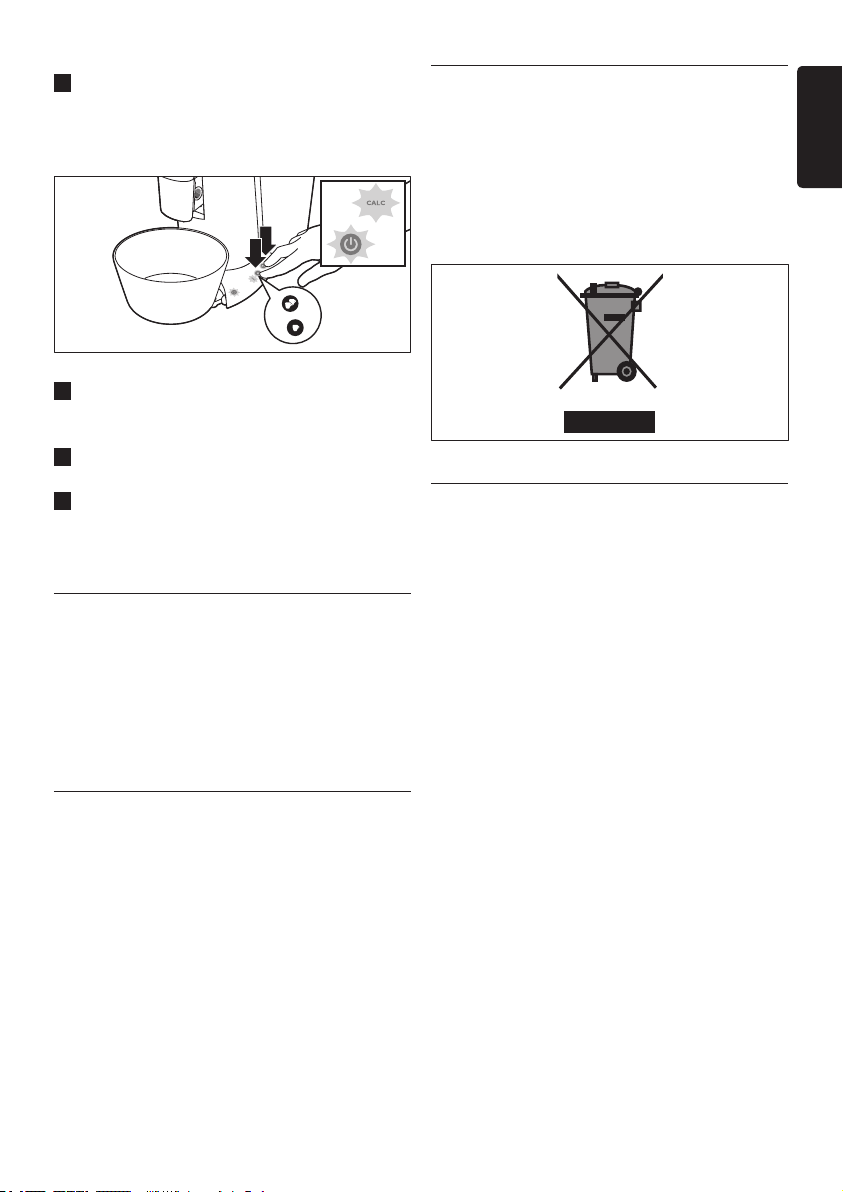
2 Tilt the top of the water reser voir backwards
(1) and lift the water reservoir off the
machine (2).
3 Fill the water reser voir to the top with cold
tap water.
5 Tilt the water reser voir and place the bottom
back onto the machine (1). Then press the top
of the water reservoir towards the machine (2).
ENGLISH
6 Remove the drip tray.
7 Place a bowl with a capacity of at least 1.5
litres under the coffee spout.
4 Place the lid on the water reser voir before
you put the water reservoir back onto the
machine.
1.5L
8 Make sure a pod holder, without pod or pods,
is in place.
7
Page 8
9 Put the plug in an ear thed wall socket.
10
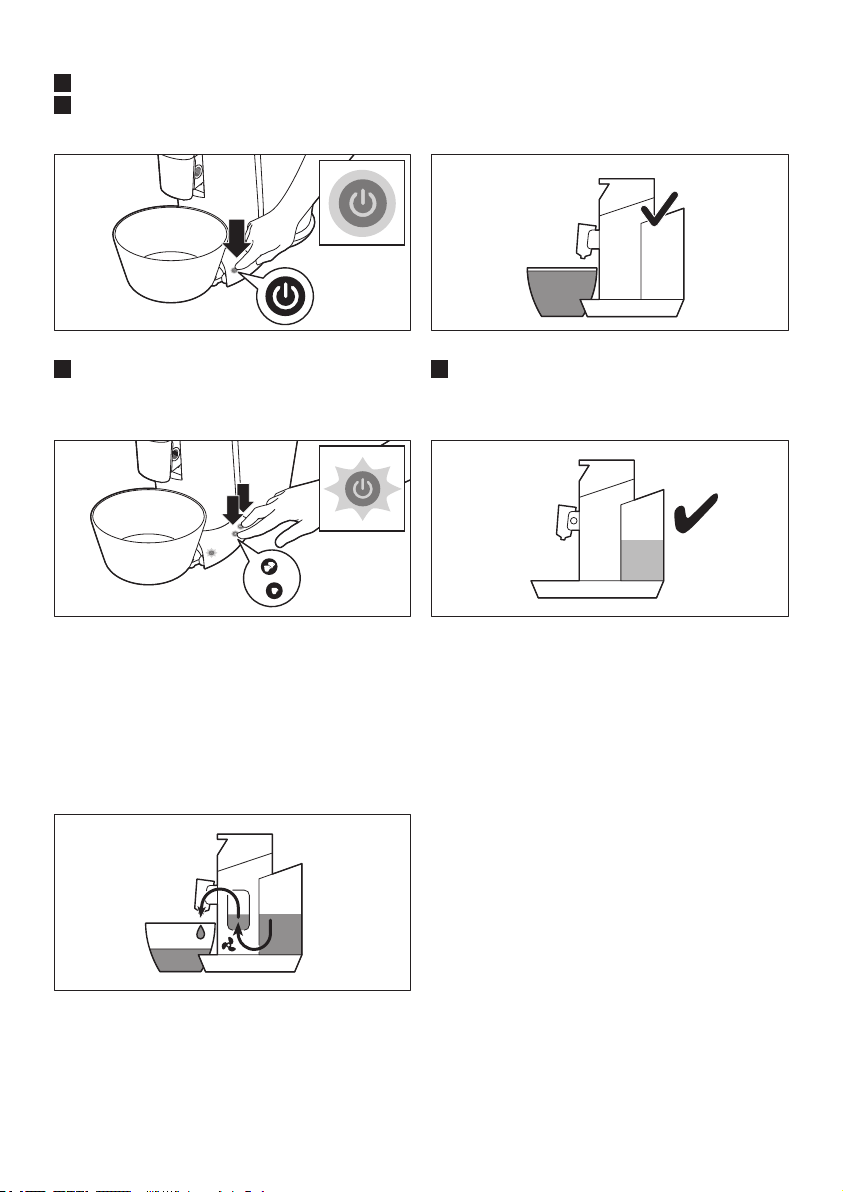
Press the on/off button 3. The button lights up
to indicate that you have to ush the machine.
• When all the water in the water reservoir
has been used up, the ushing cycle is
nished and the machine switches off.
11 To start ushing, press the 1-cup button q
and the 2-cup button qq briey at the same
time.
• The on/off button starts ashing to indicate
that the ushing cycle has started.
•
During the ushing cycle, the boiler lls itself
with water from the water reservoir and cold
water comes out of the coffee spout. During
the ushing cycle, the machine produces more
noise than during a regular brewing cycle.
12 Fill the water reser voir with fresh tap water,
put the lid on it and place it back onto the
machine.
Your SENSEO
®
machine is now ready for use
so that you can brew your rst cup of delicious
coffee.
8
Page 9
5 Brewing SENSEO®
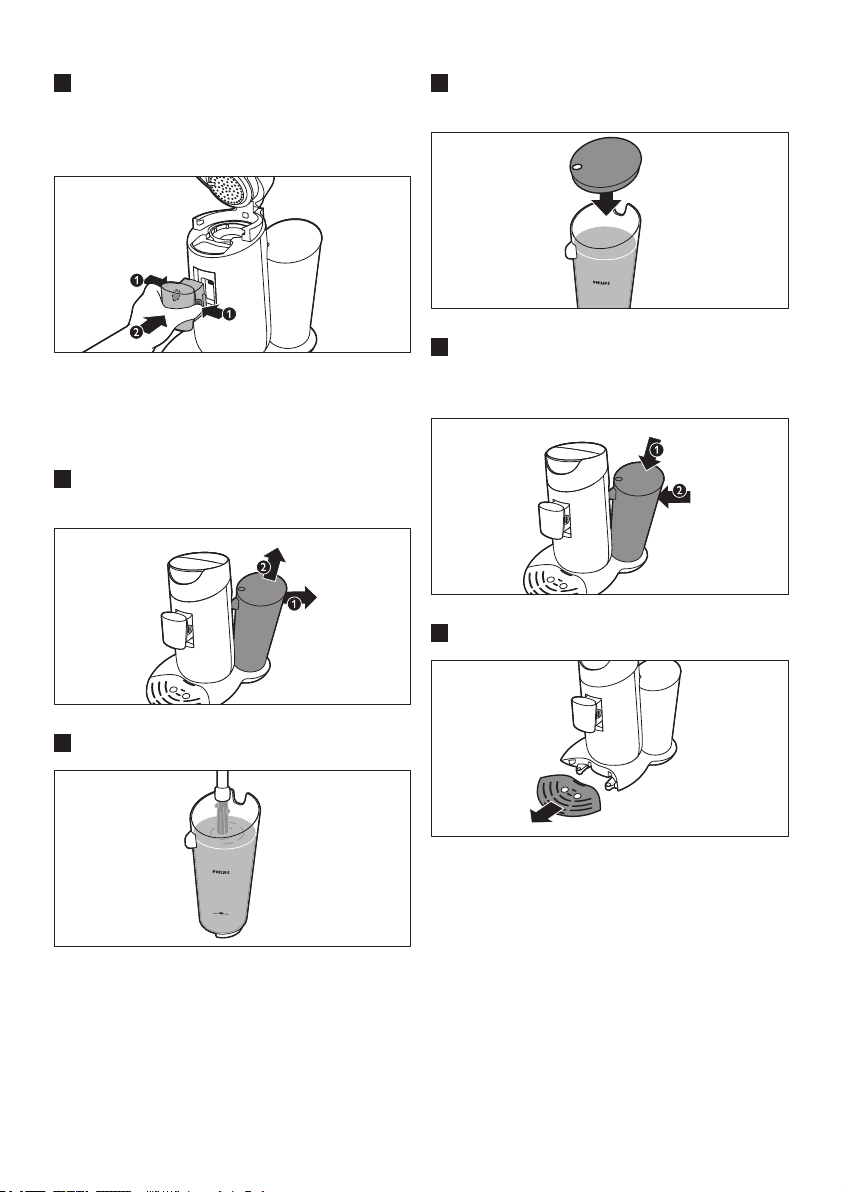
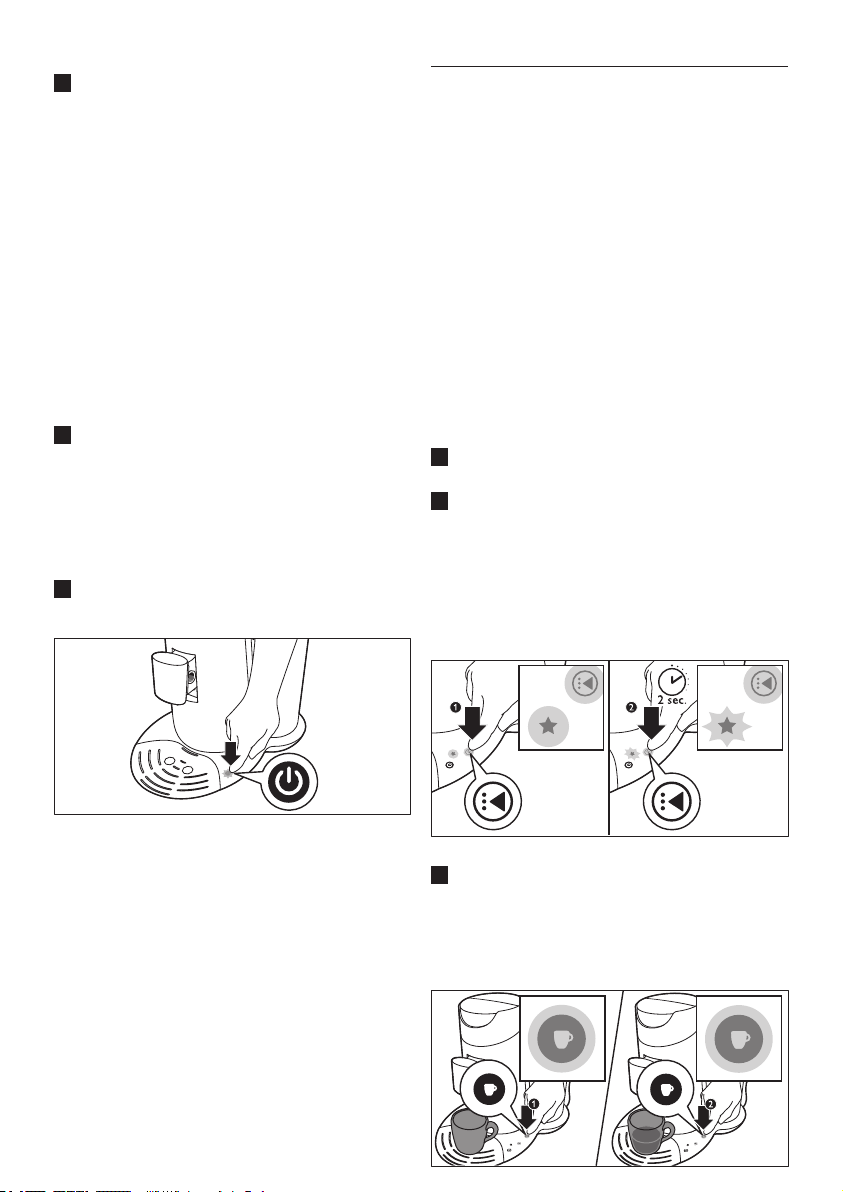
4 Pull the lid lever upwards to open the lid.
The lid opens automatically.
coffee
While the SENSEO® coffee machine is heating
up, you can select the coffee strength you prefer
and the number of cups you want to brew. The
machine then brews the cup or cups immediately
after it has heated up.
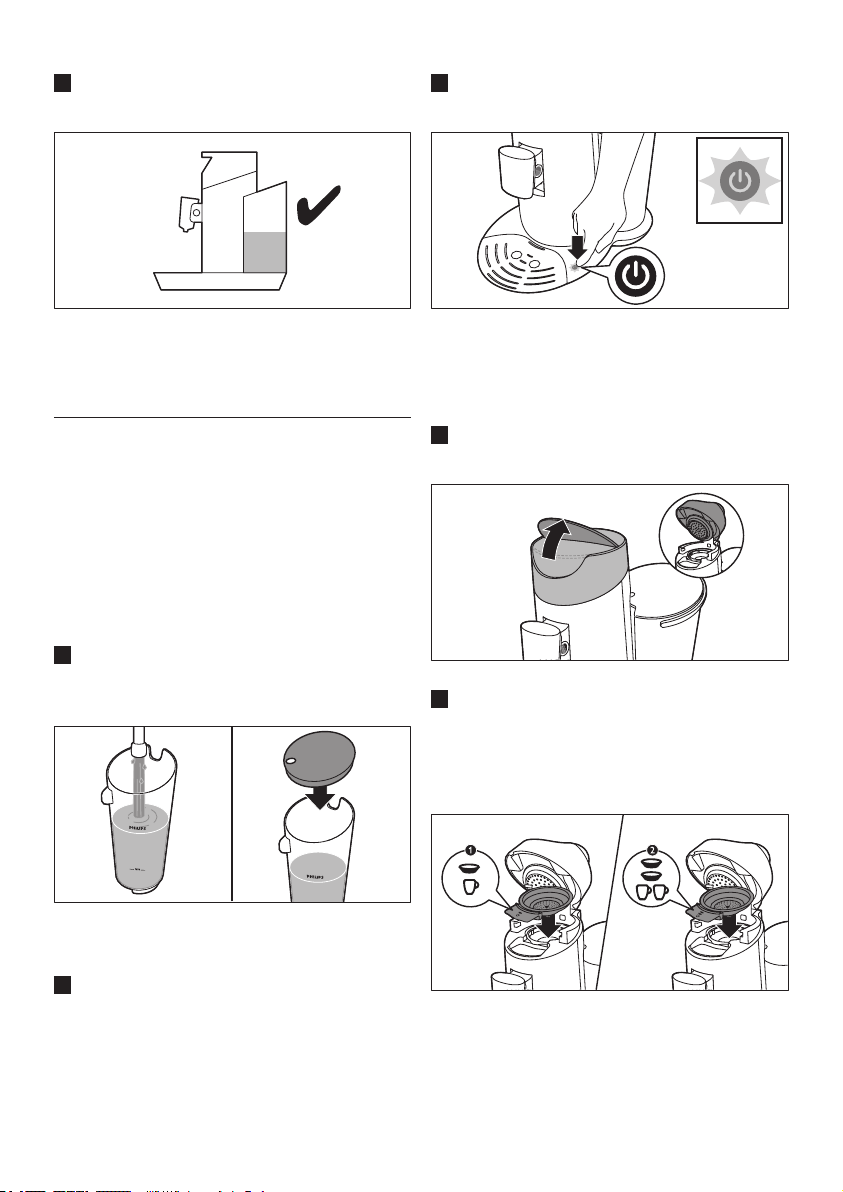
1 Make sure that the water reser voir is lled
with fresh cold tap water beyond the MIN
level and that the lid is on the water reservoir.
E
Tip:
Use fresh water every day.
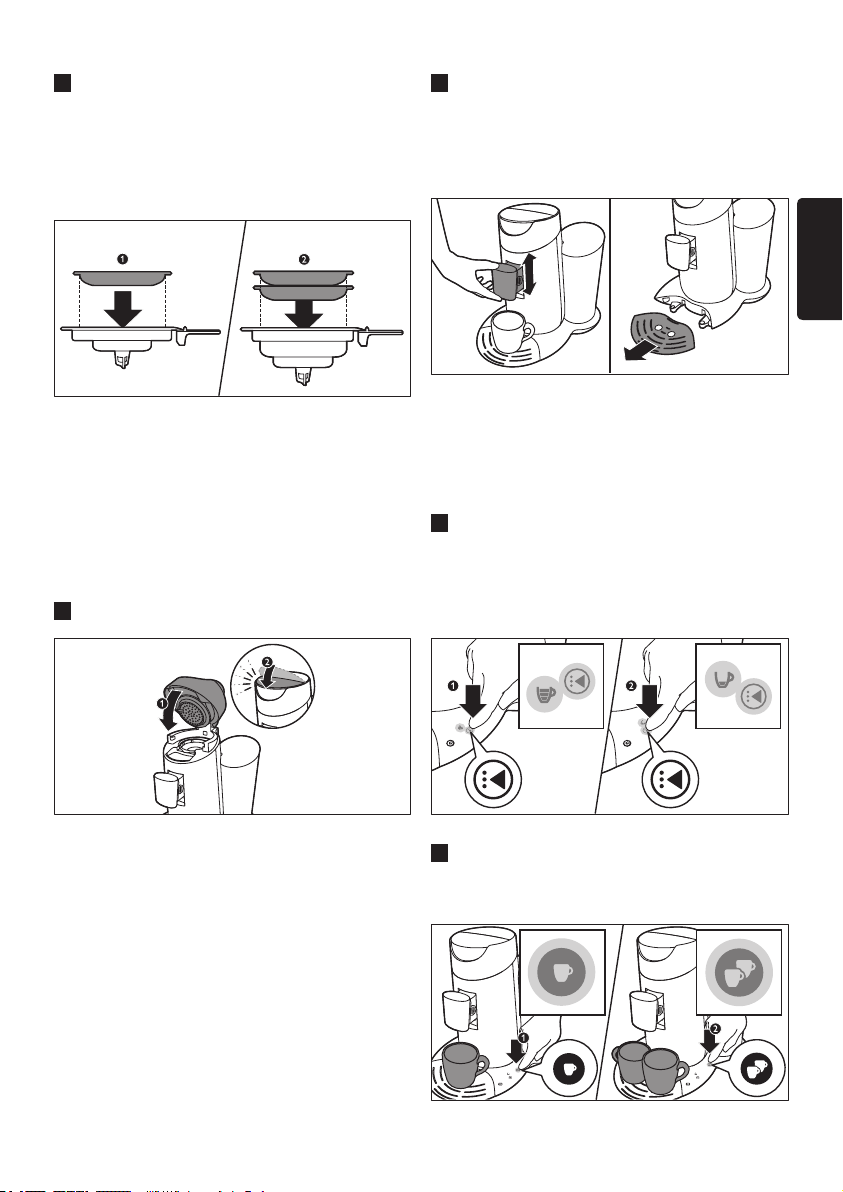
2 Put the plug in an ear thed wall socket.
3 Press the on/off button 3. The on/off button
ashes slowly while the water heats up.
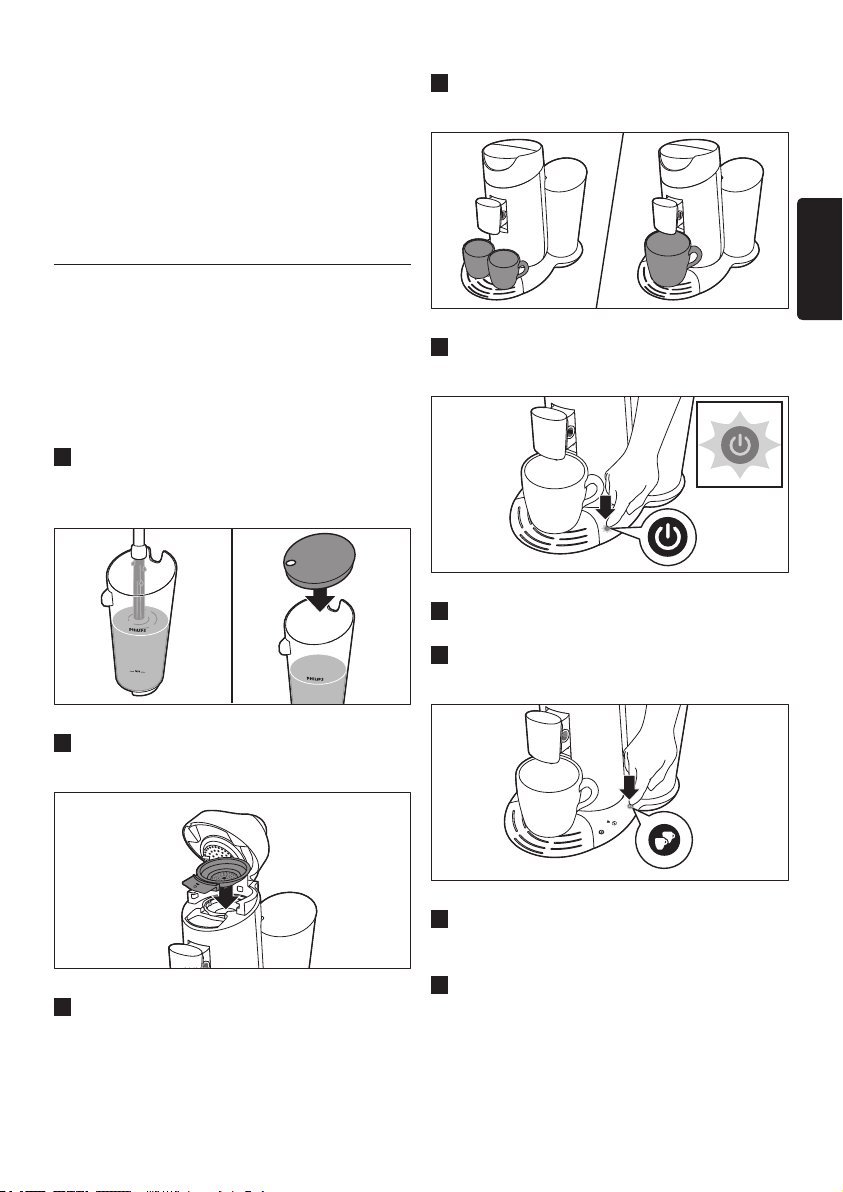
5 If you want to make one cup of SENSEO
®
coffee, place the 1-cup pod holder q in the
machine (1). If you want to make two cups,
put the 2-cup pod holder qq in the machine
(2). Make sure the pod holder is clean.
6 Place 1 coffee pod in the 1-cup pod holder
q (1) or place 2 coffee pods in the 2-cup
pod holder qq (2). Place the pod or pods
properly in the centre of the pod holder, with
the convex side pointing downwards. Press
the pod or pods lightly into the pod holder.
ENGLISH
D
Note:
If the on/off button ashes rapidly, the water
reservoir does not contain enough water for
brewing one cup of coffee.
9
Page 10
D Note:
Make sure the coffee in the pod or pods is
evenly distributed.
C
Caution:
Never put normal ground coffee or use torn
pods in the SENSEO
®
machine, as this causes
it to become blocked.
7 Close the lid (1) and lock the lever (2).
B
Warning:
Make sure the lid is closed properly and
the lid lever is locked before you start
brewing coffee.
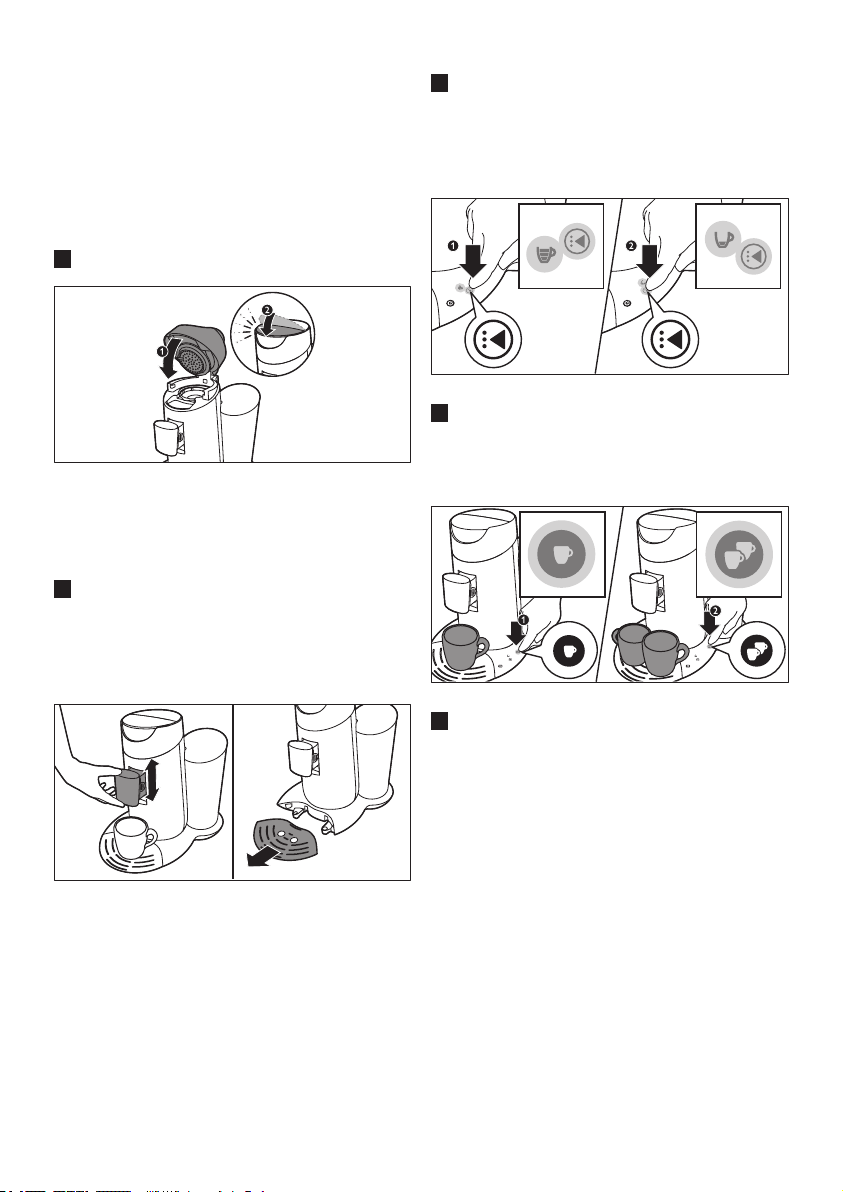
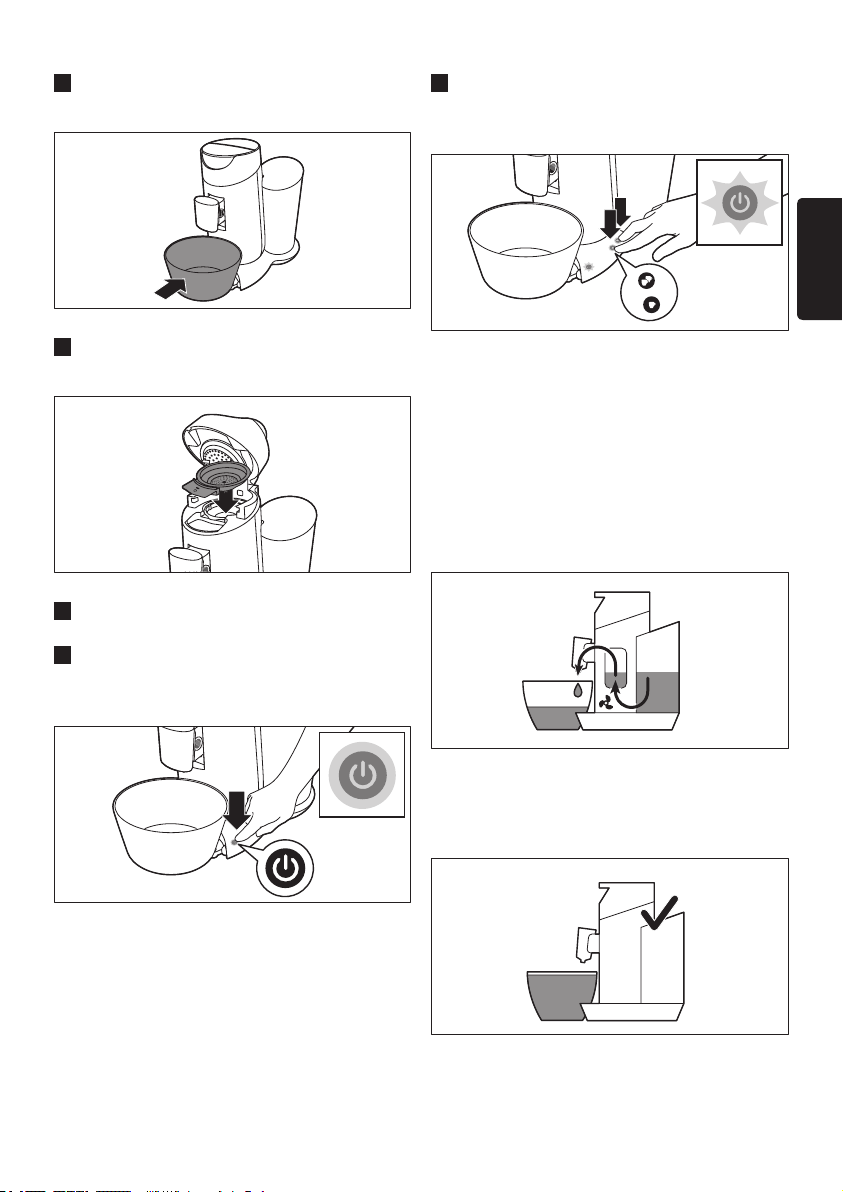
8 Place one cup or two cups under the
spout openings. You can adjust the height
of the coffee spout by sliding it upwards or
downwards. You can also remove the drip tray
to be able to place higher cups.
9 Press the selection button to select the
desired coffee strength. Select the cup symbol
with three bars for a regular cup of coffee
(125ml) (1). Select the cup symbol with one
bar for a strong cup of coffee (60ml) (2).
10 When you have selected the desired coffee
strength, press the 1-cup button q for one
cup (1) or press the 2-cup button qq for
two cups (2).
D
Note
The cups you use should have a capacity of at
least 150ml when you brew regular coffee or
100ml when you brew strong coffee. Do not
use cups that are too large, as they cause the
coffee to get cold more quickly.
10
11 When the water has heated up and the on/
off button lights up continuously, the machine
starts brewing coffee.
E
Tip:
You can interrupt the brewing cycle at any
time. To do this, press the same cup button (1cup button or 2-cup button) that you pressed
to start brewing coffee. However, if you do
this, the machine does not complete the
interrupted brewing cycle if you switch it on
again or press the same cup button again.
D
Note:
Do not remove the water reservoir during a
brewing cycle.
Page 11

12 When the coffee is ready, remove the used
coffee pod or pods. Simply lift the pod holder
out of the machine and empty it.
C
Caution:
There may still be some hot water/coffee on
the coffee pod or pods.
13 After use, press the on/off button 3 to switch
off the machine.
D
Note:
If you do not use the machine, it switches off
automatically after 15 minutes to save energy.
5.1 Personal coffee memory
(HD7872 only)
You can program the machine to brew the
amount of coffee you prefer (up to 145ml). Simply
experiment and nd out what you like best. We
advise you to brew at least 60ml for optimal taste
and temperature.
While programming, you can only use the
1-cup button. When you have completed the
programming process, you will be able to brew
one or two cups with the programmed amount
of coffee.
D
Note:
It is not possible to program your personal coffee
memory while the machine is heating up. Wait
until the on/off button lights up continuously.
1 Place 1 coffee pod in the 1-cup pod holder
and place 1 cup under the spout openings.
2 To enter the programming mode, rst select
the personal coffee memory symbol (star
symbol) with the selection button (1). Keep
the selection button pressed for 2 seconds
until the star symbol starts ashing (2) and
you hear a beep. Then release the selection
button.
3 Press the 1-cup button to make the coffee
ow into the cup (1). When the cup contains
the amount of coffee you prefer, press the
1-cup button again (2). Your preferred amount
of coffee has been set.
From now on, your SENSEO
®
machine brews one
or two cups with this amount of coffee when you
select the personal coffee memory symbol with
the selection button.
D
Note:
If you want to change the set amount of coffee,
simply perform steps 1-3 again.
ENGLISH
11
Page 12
5.2 Flushing the machine after
a day of non-use
If you have not used the coffee machine for one
day, ush it to make sure that the boiler is lled
with fresh water.
To ush the machine, brew two cups of hot
water in the following way:
1 Fill the water reser voir with cold tap water
beyond the MIN level (1). Put the lid on it (2)
and put it the water reservoir back onto the
machine.
2 Put the 1-cup pod holder q or the 2-cup pod
holder qq in the machine without pods.
5 Press the on/off button 3. The on/off button
ashes slowly while the water heats up.
6 Make sure that the coffee strength you have
selected is regular coffee (cup symbol with
three bars).
7 Press the 2-cup button qq to brew two cups
of hot water.
3 Close the lid and lock the lever.
4 Put two cups or a large mug under the coffee
spout to collect the water.
12
8 When the water has heated up, the on/off
button lights up continuously and the coffee
machine starts operating.
9 Throw away the water in the cups. Now the
machine is ready for use again.
Page 13
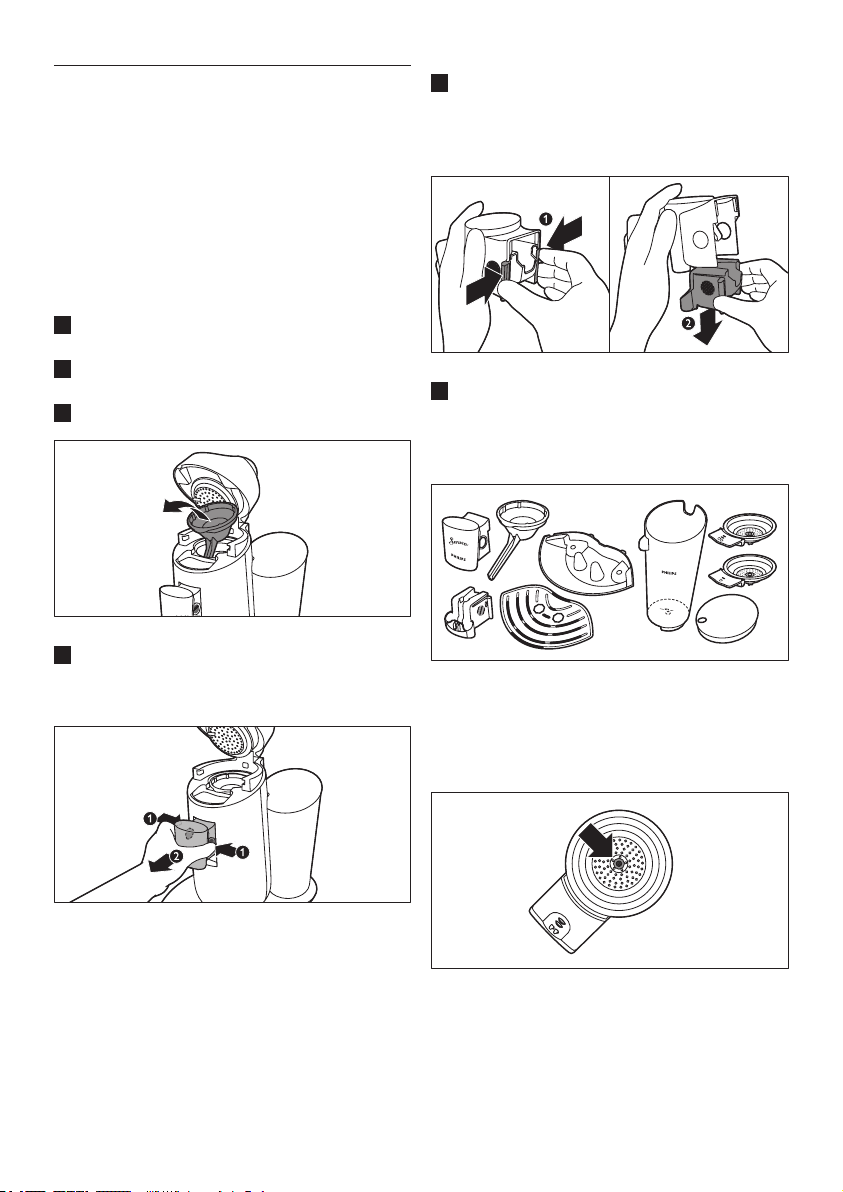
6 Cleaning
Regular cleaning of your SENSEO® is important
to ensure that the SENSEO
optimally and to optimise the lifetime of the
coffee machine.
B
Warning:
Never immerse the SENSEO® coffee machine in
water.
1 Always unplug the machine before you clean
it.
2 Clean the outside of the machine with a moist
cloth.
3 Remove the coffee collector.
4 To remove the coffee spout, press the release
buttons (1) and pull the coffee spout off the
machine (2).
®
coffee always tastes
5 To disassemble the coffee spout, grab the
two ridges of the inner part of the spout and
squeeze them lightly (1). Move the inner part
downwards to remove it from the outer part
of the spout (2).
6 Clean the water reser voir and its lid, the
coffee spout, the coffee collector, the drip tray,
the cup tray and the pod holders in hot water
or in the dishwasher.
C
Caution:
Be careful not to damage the valve in the
bottom of the water reservoir if you use a
washing-up brush to clean the water reservoir.
ENGLISH
D
Note:
Check if the sieve in the centre of the pod holder
is clogged. If this is the case, unclog the sieve by
rinsing the pod holder under the tap. If necessary,
use a washing-up brush to clean the sieve
13
Page 14
7 Clean the water distribution disc and the
rubber sealing ring with a moist cloth.
C
Caution:
Do not remove the rubber sealing ring and be
careful not to damage the tab on the water
distribution disc.
8 Clean the water inlet on the machine with a
moist cloth.
7 Descaling
Scale builds up inside the machine during use. It is
essential to descale the SENSEO
when the CALC light goes on. Use SENSEO
Descaler (HD7012, HD7011, HD7006) only.
®
coffee machine
®
When to descale
• Descale the SENSEO
®
coffee machine as
described below when the CALC light goes
on (after you have brewed approx. 400 cups
of SENSEO
®
coffee).
Why to descale
Your reasons to descale:
• It prolongs the life of your SENSEO
®
coffee
machine
• It ensures maximum cup volume
• It ensures maximum coffee temperature
• The machine produces less sound during
brewing
• It prevents malfunctioning
If the descaling procedure is not performed
correctly, scale residue remains behind in the
machine. This causes scale to build up more
quickly and may cause permanent and irreparable
damage to the machine.
Use the correct descaling agent
Use SENSEO
®
Descaler (HD7012, HD7011,
HD7006) only. It has been developed to ensure
better machine performance and operation.
Each descaling mixture can be used only once.
For more information about this descaler,
visit our website www.philips.com.
B
Warning:
Never use a descaling agent based on mineral
acids such as sulphuric acid, hydrochloric acid,
sulphamic acid and acetic acid (e.g. vinegar). These
descaling agents may damage your SENSEO
®
coffee machine.
7.1 Descaling procedure
The descaling procedure consists of a descaling
cycle and two ushing cycles. Do not interrupt the
descaling cycle and do not switch off the machine
14
before you have performed the two ushing cycles.
Page 15
1 Mix 50 grams of citric acid with 1 litre of
water in a measuring jug. Stir until the powder
has dissolved. Fill the water reservoir with the
descaling mixture.
2 Tilt the water reser voir and place the bottom
back onto the machine (1). Then press the top
of the water reservoir towards the machine (2).
4 Place the 1-cup pod holder q with a used
coffee pod in it in the coffee machine. Close
the lid and make sure it is properly locked.
D
Note:
Always put a used coffee pod in the pod
holder when you descale the machine. This
pod serves as a ‘lter’ to prevent the sieve or
hole in the pod holder from getting clogged
with scale residue.
B
Warning:
Make sure the lid is closed properly and
the lid lever is locked before you start
descaling.
5 Remove the drip tray.
ENGLISH
3 Press the on/off button 3. The on/off button
ashes slowly while the water heats up. The
machine is ready for descaling when the on/
off button lights up continuously.
6 Put a bowl with a capacity of at least 1.5
litres under the spout to collect the descaling
mixture.
1.5L
15
Page 16
7 When the on/off button lights up continuously,
press the 1-cup button q and the 2-cup
button qq at the same time for 3 seconds
until you hear a beep. Release the buttons
as soon as their lights as well as the selected
strength go out. This means that the descaling
procedure has been activated correctly.
• The CALC light and the on/off button start
ashing to indicate that the descaling cycle
is in progress.
• During the descaling cycle, the water comes
out of the machine in intervals.
• When all the water in the water reservoir
has been used up, the descaling cycle is
nished. The on/off button starts to ash
rapidly.
D Notes:
Do not rell the water reservoir with used
hot water or the used descaling mixture.
2 Tilt the water reser voir and place the bottom
back onto the machine (1). Then press the top
of the water reservoir towards the machine (2).
3 Place the 1-cup pod holder q with a used
coffee pod in it in the coffee machine. Close
the lid and make sure it is properly locked.
D
Note:
If you press the 1-cup and 2-cup button
longer than 3 seconds, the machine does not
start the descaling cycle. If this happens, press
the 1-cup button and the 2-cup button at the
same time for 3 seconds again.
7.2 Flushing after descaling
1 Rinse the water reser voir under the tap and
then ll it to the top with fresh tap water.
16
4 Put a bowl with a capacity of at least 1.5 litres
under the spout to collect the water.
1.5L
Page 17
5 Press the 1-cup button q and the 2-cup
button qq at the same time for 3 seconds
until you hear a beep to start the ushing
cycle.
6 Remove the used pod and clean the pod
holder after the ushing cycle to prevent the
sieve in the centre from getting clogged.
7 Repeat steps 1 to 6 once more to ensure a
clean machine.
8 After the descaling cycle and the ushing
cycles, the CALC light goes out and the
machine switches off automatically.
8 Frost-free storage
After you have ushed the machine for the rst
time (see chapter ‘Flushing the machine before
rst use’), it may only be used and stored in a
frost-free place to prevent damage.
9 Ordering accessories
To purchase accessories for this machine,
please visit our online shop at
www.shop.philips.com/service.
If the online shop is not available in your country,
go to your Philips dealer or a Philips service
centre. If you have any difculties obtaining
accessories for your machine, please contact the
Philips Consumer Care Centre in your country.
You nd its contact details in the worldwide
guarantee leaet.
10 Environment
• Do not throw away the machine with the
normal household waste at the end of its life,
but hand it in at an ofcial collection point for
recycling. By doing this, you help to preserve
the environment.
11 Guarantee and
service
If you need service or information or if you
have a problem, please visit the Philips website at
www.philips.com/support or contact the Philips
Consumer Care Centre in your country. You nd its
phone number in the worldwide guarantee leaet. If
there is no Consumer Care Centre in your country,
go to your local Philips dealer.
The purchase of the Philips SENSEO® coffee
machine does not exhaust any of the rights of
Sara Lee/Douwe Egberts or Philips under any
of their patents nor does it confer upon the
purchaser a licence under these patents.
Always return the machine to a service centre
authorised by Philips for examination or repair.
Do not attempt to repair the machine yourself,
otherwise your guarantee becomes invalid.
ENGLISH
17
Page 18

12 Troubleshooting
12.1 SENSEO® coffee machine
This chapter summarises the most common problems you could encounter with the machine.
If you are unable to solve the problem with the information below, visit www.philips.com/support
for a list of frequently asked questions or contact the Consumer Care Centre in your country.
Problem Solution
My cup overowed
when I used the
machine for the rst
time.
Water continued to
ow from the spout
when I used the
machine for the rst
time.
The on/off button
ashes slowly.
The CALC light
ashes.
You probably tried to brew a cup of coffee without ushing the machine
rst. Before you start brewing coffee, you have to ush the machine.
When you switch on the machine again, the on/off button either lights up
continuously or ashes slowly or rapidly.
If the on/off button lights up continuously, you have to carry out the ushing
procedure (see chapter ‘Flushing the machine before rst use’).
If the on/off button ashes slowly or rapidly, you do NOT have to carr y
out the ushing procedure. If the on/off button ashes slowly, the water
is heating up. If it ashes rapidly, there is not enough water in the water
reservoir or the water reservoir is not placed on the machine properly.
If water continued to ow from the spout until the water reservoir was
empty, the machine was performing the ushing cycle. Before you start
brewing coffee, you have to ush the machine. When you switch on the
machine again, the on/off button either lights up continuously or ashes
slowly or rapidly.
If the on/off button lights up continuously, you have to carry out the ushing
procedure (see chapter ‘Flushing the machine before rst use’).
If the on/off button ashes slowly or rapidly, you do NOT have to carr y
out the ushing procedure. If the on/off button ashes slowly, the water
is heating up. If it ashes rapidly, there is not enough water in the water
reservoir or the water reservoir is not placed on the machine properly.
You have used the SENSEO
metres above sea level. This has caused the water in the machine to start
boiling before it has reached the required temperature, which prevents the
machine from functioning properly. Switch off the machine and no longer
use it at altitudes higher than 2200 metres above sea level.
You have pressed the 1-cup button and the 2-cup button at the same time.
This started the descaling cycle. If you did not intend to start the descaling
cycle, simply press the on/off button to switch off the machine. If you did
intend to start the descaling cycle, do not interrupt this cycle but let the
appliance operate until the water reservoir is empty.
®
coffee machine at an altitude higher than 2200
18
Page 19

Problem Solution
The CALC light does
not go out after
The CALC light does not go out if the descaling procedure has not been
performed correctly. To perform the descaling procedure correctly:
descaling.
1. Make sure that you do not interrupt the descaling cycle or switch off or
unplug the machine during the descaling cycle. During the descaling cycle,
hot water comes out of the coffee spout at intervals and the machine stops
descaling 3 to 4 times to let the descaling mixture act and to heat up again.
2. Make sure that you start the descaling cycle by pressing the 1-cup
button and the 2-cup button at the same time. See chapter ‘Descaling’ for a
complete description of the descaling procedure.
3. Make sure that you use three full water reservoirs to complete the
descaling procedure: one reservoir lled with descaling mixture and two
reservoirs lled with fresh water.
The on/off button
continues to ash
Make sure that there is enough water in the water reservoir and that the
water reservoir is placed properly.
rapidly.
Make sure that the ambient temperature is not lower than 5°C. If it is, the
machine does not function properly.
Water leaks from the
coffee machine.
If you notice coffee or water leaking from your SENSEO
establish where the leakage occurs. This is important, as the location of the
leakage determines the solution.
1. If the leakage occurs near the lid or the spout, make sure that:
1a. The sieve in the centre of the pod holder is not clogged. If it is, unclog
the sieve by holding the pod holder under a running tap.
1b. The coffee pod has been put properly in the centre of the pod holder.
1c. The sealing ring has not got stuck under the edge of the water
distribution disc (see gure 1 at the beginning of this user manual).
1d. The spout and the coffee collector have been placed correctly.
2. If the leakage occurs near the bottom of the water reservoir or under the
machine, make sure that:
2a. There is not too much water in the water reservoir.
2b. You do not place the water reservoir onto the machine too roughly.
If you place the water reservoir too roughly, water may splash out of the
water reservoir.
2c. The water reservoir is not damaged or broken. Normally, water should
not start to drip from the water outlet in the bottom of the water reservoir
within 30 seconds after lling.
®
machine, try to
ENGLISH
19
Page 20

Problem Solution
I cannot open the lid. A vacuum may have temporarily formed under the lid. Switch off the
machine. Pull up the lever and wait 24 hours before you open the lid.You
may need to use quite some force.
Make sure that you do not move the SENSEO
®
machine. Moving the
machine, placing it outdoors or in a cool or cold environment does not
accelerate the unlocking of the lid.
For this not to happen again, always make sure that the pod holders are
clean and that the sieve in the centre of the pod holders is not clogged.
The coffee machine
produces less coffee
than before.
Perhaps the sieve in the centre of the pod holder is clogged. If this is the
case, unclog the sieve by rinsing the pod holder under a running tap. Use a
washing-up brush to clean the sieve, if necessary.
Descale the machine (see chapter ‘Descaling’).
I cannot close the lid
properly.
Check if a used coffee pod is sticking to the water distribution disc. If this is
the case, remove the used pod.
Check if you used the correct pod holder. Use 2 pods in combination with
the deeper 2-cup pod holder qq.
The SENSEO
is not strong enough.
®
coffee
Make sure that you have selected the coffee strength that you prefer. You
can choose between regular and strong coffee. You can also increase or
decrease the coffee strength by setting your preferred amount of coffee
with the personal coffee memory function (HD7872 only).
Make sure that you have used the correct number of pods and have
pressed the right button. Use 2 pods in combination with the 2-cup pod
holder qq and the 2-cup button qq.
Make sure that you have placed the coffee pod or pods properly in the
centre of the pod holder, to prevent water from escaping along the edge
of the pod or pods. When you use two coffee pods on top of each other,
make sure that the convex sides of both pods point downwards and press
the pods lightly into the pod holder.
Make sure that you have not used the same coffee pod twice by accident.
Make sure that the coffee in the pod is evenly distributed.
If you prefer a more robust avour, SENSEO
®
coffee pods with a stronger
blend are available.
20
Page 21

Problem Solution
The coffee is not hot
enough.
If you have used the machine for quite some time and the temperature of
the coffee decreases, we advise you to descale the machine. See chapter
‘Descaling’. Descale your SENSEO
Do not use cups that are too large, as they cause the coffee to get cold
more quickly. Make sure that the cups have a capacity of at least 150ml.
Use thin-walled cups. Thin-walled cups absorb less heat from the coffee than
thick-walled cups.
Make sure the size of the cup matches the amount of coffee. Do not brew
a small amount of coffee in a large cup.
If you drink coffee with fresh milk, preheat the milk in the cup in a
microwave.
You can preheat the coffee machine by rst brewing a cup of coffee without
placing a coffee pod in the pod holder. In this way you also heat up your
coffee cup.
The touch panel does
not work.
If there is water on the touch panel, the buttons do not work. Make sure
that the touch panel is dry and also make sure your hands are dry when
you use the touch panel.
Make sure that you press the selection button and not the symbols to the
left of the selection button.
I accidentally activate
the touch panel when
I clean it.
This happens because the touch panel is very sensitive and the buttons
only require a light touch to be activated. There is no problem when this
happens, the machine will not start brewing coffee.
Unplug the machine before you clean it.
HD7872 only: The
personal coffee
Please read section ‘Personal coffee memory’ in chapter ‘Brewing SENSEO
coffee’ and try to set the amount of coffee you prefer again.
memory button does
not produce the
amount of coffee I
prefer.
®
coffee machine regularly.
ENGLISH
®
21
Page 22

Indholdsfortegnelse
1 Introduktion 22
2 Generel beskrivelse 22
3 Vigtigt 23
4 Gennemskylning af maskinen
før brug første gang 23
5 Brygning af SENSEO
®
-kaffe 26
6 Rengøring 29
7 Afkalkning 31
8 Frostfri opbevaring 34
9 Bestilling af tilbehør 34
10 Miljøhensyn 34
11 Reklamationsret og service 34
12 Fejlnding 35
1 Introduktion
Tillykke med dit køb og velkommen til Philips!
For at få fuldt udbytte af den support, Philips
tilbyder, skal du registrere dit produkt på
www.philips.com/welcome.
1.1 SENSEO®-kaffesystem
Få en helt særlig kaffeoplevelse med SENSEO®. Dette
enestående system kombinerer Philips’ bruger venlige
®
SENSEO
Merrild SENSEO
smag med et lækkert skumlag. Merrild-kaffen i de
praktiske SENSEO
SENSEO
sikrer, at den bedste smag og aroma trækkes ud af
22
-kaffemaskine med de specialudviklede
®
-kaffepuder, der giver en fyldig, rund
®
®
-bryggesystem passer perfekt sammen og
-kaffepuder og Philips’ nye unikke
kaffen. Se alle SENSEO®-kaffeblandingerne på
www.senseo.com.
For at være sikker på at få den fyldige og runde
smag skal du huske følgende:
Friske kaffepuder
Benyt SENSEO
udviklet af Merrild til din SENSEO
®
-kaffepuderne, der er specielt
®
-kaffemaskine,
og som giver en fyldig og rund smag. Merrild
SENSEO
®
-kaffepuderne holder sig friske længere,
hvis de opbevares i en lufttæt beholder.
Frisk vand
Brug frisk vand hver dag. Hvis du ikke har
brugt kaffemaskinen i én dag, skal du skylle den
igennem med frisk vand, før du bruger den igen
(se kapitlet “Brygning af SENSEO
®
-kaffe”, afsnit
“Gennemskylning af maskinen efter en dag, hvor
den ikke er blevet brugt”).
2 Generel beskrivelse
(g. 1)
1 Tragt
2 Udløser til låg
3 Låg med bryggekammer
4 Tætningsring
5 Vandtilførselsplade
6 2-kops-pudeholder qq
7 1-kops-pudeholder q
8 Dæksel til kaffeudløb
9 Kaffeudløb
10 Udløserknapper til udløb
11 Aftagelig drypbakke
12 Koprist
13 Touch-panel
14 On/off-knap
15 Symbol til hukommelse for individuelt kaffevalg
(kun HD7872)
16 Almindelig kaffe-symbol
17 Funktionsknap
18 Symbol for stærk kaffe
19 CALC-indikator
20 1-kops-knap q
21 2-kops-knap qq
22 Vandtank
23 Låg til vandtank
Page 23

3 Vigtigt
Læs denne brugervejledning omhyggeligt igennem,
inden maskinen tages i brug, og gem den til
eventuel senere brug.
Fare
• Kom aldrig maskinen ned i vand eller anden
væske.
Advarsel
• Før maskinen tages i brug, skal du kontrollere,
om spændingsangivelsen i bunden af maskinen
svarer til den lokale netspænding.
• Denne maskine er ikke beregnet til at
blive brugt af personer (herunder børn)
med nedsatte fysiske og mentale evner,
nedsat følesans eller manglende erfaring
og viden, medmindre de er blevet vejledt
eller instrueret i maskinens anvendelse af en
person, der er ansvarlig for deres sikkerhed.
• Hold maskinen uden for børns rækkevidde
for at sikre, at de ikke kan komme til at lege
med den.
• Brug aldrig maskinen, hvis stik, netledning eller
selve maskinen er beskadiget.
• Hvis netledningen beskadiges, må den
kun udskiftes af Philips, et autoriseret
Philips-serviceværksted eller en tilsvarende
kvaliceret fagmand for at undgå enhver risiko.
Forsigtig
• Læg aldrig SENSEO
når den er pakket ud. Den skal altid opbevares
i lodret position, også under transpor t.
• Reparation og eftersyn af maskinen skal
altid foretages på et autoriseret Philipsserviceværksted. Forsøg ikke selv at reparere
maskinen, da garantien i så fald bor tfalder.
• Brug ikke maskinen i kombination med en trans-
former, da dette kan resultere i en farlig situation.
• Stil altid maskinen på et adt og stabilt underlag.
• Brug ikke maskinen steder, der ligger højere
end 2.200 meter over havets overade.
• Hæld aldrig mælk, kaffe, varmt eller destilleret
vand i vandtanken.
• Gennemskyl aldrig maskinen, og lad den heller
aldrig brygge kaffe, når udløbet ikke er på plads.
®
-kaffemaskinen på siden,
• Denne maskine er kun beregnet til normal
anvendelse i hjemmet. Den er ikke beregnet
til brug i miljøer som personalekøkkener i
butikker, på kontorer, på gårde eller andre
arbejdspladser. Den er heller ikke beregnet til
brug af gæster på hoteller, moteller, bed and
breakfasts eller i andre værelser til udlejning.
3.1 Overholdelse af standarder
Denne maskine overholder alle standarder
for elektromagnetiske felter (EMF). Ved
korrekt anvendelse i overensstemmelse med
instruktionerne i denne brugervejledning
er maskinen sikker at anvende ifølge den
videnskabelige viden, der er tilgængelig i dag.
Energiforbruget for denne maskine i slukket
tilstand er mindre end 1 watt. Det betyder, at
maskinen overholder EU-direktivet 2009/125/
EC, der angiver de økologiske designkrav for
energiforbrugende produkter.
4 Gennemskylning af
maskinen før brug
første gang
Det er vigtigt, at du gennemskyller din SENSEO®kaffemaskine før brug første gang. Efter
skyllecyklussen (som kun tager ca. 2 minutter) er
maskinen klar til at brygge SENSEO
C
Forsigtig:
Afbryd aldrig skylningsprocessen midt i forløbet,
da vandkogeren i så fald ikke fyldes ordentligt.
®
-kaffe.
DANSK
23
Page 24
1 Sæt udløbet på maskinen. Tag fat i de to riller
på den inderste del af udløbet, og tryk let på
dem (1). Placer udløbet på maskinen, og slip
de to riller (2).
C
Forsigtig:
Gennemskyl aldrig maskinen, og lad den heller
aldrig brygge kaffe, når udløbet ikke er på
plads.
2 Vip toppen af vandtanken bagover (1), og løft
den af maskinen (2).
4 Placer låget på vandtanken, før du sætter den
tilbage på maskinen.
5 Vip vandtanken, og sæt bunden tilbage på
plads på maskinen (1). Tryk derefter toppen af
vandtanken ind mod maskinen (2).
6 Fjern drypbakken.
3 Fyld vandtanken op med koldt vand fra hanen.
24
Page 25
7 Placer en skål med en kapacitet på mindst 1,5
liter på kaffeudløbet.
11 Tryk kort på 1-kops-knappen q og
2-kops-knappen qq samtidig for at starte
gennemskylningen.
1.5L
8 Sørg for, at pudeholderen, uden pude eller
puder, er på plads.
9 Sæt stikket i en stikkontakt med
jordforbindelse.
10 Tryk på on/off-knappen 3. Knappen lyser
op for at indikere, at du skal gennemskylle
maskinen.
DANSK
• On/off-knappen begynder at blinke for at
indikere, at gennemskylningsprocessen er
startet.
• Under gennemskylningsprocessen
fyldes vandkogeren automatisk med
vand fra vandtanken, og der kommer
koldt vand ud af kaffeudløbet. Under
gennemskylningsprocessen støjer maskinen
mere end under en almindelig bryggeproces.
• Når alt vandet i vandtanken er blevet brugt,
er gennemskylningsprocessen færdig, og
maskinen slukkes.
25
Page 26
12 Fyld vandtanken med frisk vand fra hanen, sæt
låget på, og sæt den tilbage på maskinen.
3 Tryk på on/off-knappen 3. On/off-knappen
blinker langsomt, mens vandet varmes op.
Din SENSEO
®
-maskine er nu klar til brug, så du
kan brygge din første kop velsmagende kaffe.
5 Brygning af
SENSEO®-kaffe
Mens SENSEO®-kaffemaskinen varmer op, kan du
vælge den kaffestyrke, du foretrækker, og det antal
kopper, du gerne vil brygge. Så brygger maskinen
koppen eller kopperne straks efter, den er varmet
op.
1 Kontroller, at vandtanken er fyldt med
friskt, koldt vand fra hanen mindst til MINmarkeringen, og at låget er sat på vandtanken.
D
Bemærk:
Hvis on/off-knappen blinker hurtigt, indeholder
vandtanken ikke nok vand til at brygge en kop
kaffe.
4 Træk låget opad for at åbne det. Låget åbnes
automatisk.
5 Hvis du vil lave en kop SENSEO
®
-kaffe, skal
du placere 1-kops-pudeholderenq i maskinen
(1). Hvis du vil lave to kopper, skal du lægge
2-kops-pudeholderen qq i maskinen (2).
Kontroller, at pudeholderen er ren.
E
Tip:
Brug friskt vand hver dag.
2 Sæt stikket i en stikkontakt med
jordforbindelse.
26
Page 27
6 Placer 1 kaffepude i 1-kops-pudeholderen
q (1), eller placer 2 kaffepuder i 2-kopspudeholderen qq (2). Placer puden eller
puderne helt i centrum af pudeholderen
med den buede side nedad. Tryk puden eller
puderne let ned i pudeholderen.
D
Bemærk:
Kontroller, at kaffen i puden eller puderne er
jævnt fordelt.
C
Forsigtig:
Kom aldrig almindelig formalet kaffe eller
beskadigede kaffepuder i SENSEO
®
-maskinen,
da den vil stoppe til.
7 Luk låget (1), og tryk låseklemmen ned (2).
8 Stil en eller to kopper under
udløbsåbningerne. Du kan justere højden på
kaffeudløbene ved at skubbe dem op eller
ned. Du kan også fjerne drypbakken for at
kunne benytte højere kopper.
D
Bemærk
De kopper, du bruger, skal kunne rumme mindst
150 ml, når du brygger almindelig kaffe, eller
100 ml, når du brygger stærk kaffe. Brug ikke for
store kopper, da kaffen så bliver hurtigere kold.
9 Tryk på funktionsknappen for at vælge den
ønskede kaffestyrke. Vælg kopsymbolet med
tre søjler for en almindelig kop kaffe (125 ml)
(1). Vælg kopsymbolet med én søjle for en
stærk kop kaffe (60 ml) (2).
DANSK
B
Advarsel:
Sørg for, at låget er lukket korrekt, og lågudløseren
sidder fast, før du starter brygningen.
10
Når du har valgt den ønskede kaffestyrke, skal
du trykke på 1-kops-knappen q for én kop (1)
eller på 2-kops-knappen qq for to kopper (2).
27
Page 28
11 Når vandet er varmet op, og on/off-knappen
lyser konstant, begynder maskinen at brygge
kaffe.
E
Tip:
Du kan afbryde bryggeprocessen på et
hvilket som helst tidspunkt. Du skal bare
trykke på den samme kop-knap (1-kops-knap
eller 2-kops-knap), som du trykkede på for
at starte bryggeprocessen. Hvis du gør det,
fuldfører maskinen dog ikke den afbrudte
bryggeproces, hvis du tænder den igen eller
trykker på den samme knap igen.
D
Bemærk:
Fjern ikke vandtanken under brygningen.
12 Når kaffen er klar, skal du fjerne den eller
de brugte kaffepuder(r). Du skal blot løfte
pudeholderen ud af maskinen og tømme den.
C
Forsigtig:
Der kan stadig være lidt varmt vand eller kaffe
i kaffepuden/-puderne.
13 Efter brug skal du trykke på on/off-knappen
for at slukke maskinen 3.
5.1 Hukommelse for individuelt
kaffevalg (kun HD7872)
Du kan programmere maskinen til at brygge den
mængde kaffe, du foretrækker (op til 145 ml). Du
kan eksperimentere og nde ud af, hvad du bedst
kan lide. Vi anbefaler, at du brygger mindst 60 ml
for at få den optimale smag og temperatur.
Når du programmerer, skal du kun bruge 1-kopsknappen. Når du er færdig med at programmere,
kan du brygge en eller to kopper med den
programmerede mængde kaffe.
D
Bemærk:
Det er ikke muligt at programmere din
hukommelse til individuelt kaffevalg, mens
maskinen varmer op. Vent, indtil on/off-knappen
lyser konstant.
1 Placer 1 kaffepude i 1-kops pudeholderen, og
placer 1 kop under udløbsåbningerne.
2 For at aktivere programmeringstilstanden skal
du først vælge symbolet til hukommelse for
individuelt kaffevalg (stjernesymbolet) med
funktionsknappen (1). Hold funktionsknappen
inde i 2 sekunder, indtil stjernesymbolet
begynder at blinke (2), og der lyder et bip. Slip
derefter knappen.
D
Bemærk:
Hvis du ikke bruger maskinen, slukkes der
automatisk for den efter 15 minutter for at
spare energi.
28
3 Tryk på 1-kops-knappen, så begynder kaffen
at løbe ned i koppen (1). Når der er så meget
kaffe i koppen, som du ønsker, skal du trykke
på 1-kops-knappen igen (2). Dermed har du
indstillet den mængde kaffe, du foretrækker.
Page 29
Fra nu af brygger SENSEO®-maskinen denne
mængde kaffe, når du vælger symbolet til
hukommelse for individuelt kaffevalg med
funktionsknappen.
D
Bemærk:
Hvis du ønsker at ændre på indstillingen for
mængden af kaffe, skal du blot udføre trin 1-3 igen.
4 Sæt to kopper eller et stort krus under
kaffeudløbet for at opsamle vandet.
5.2 Gennemskylning af
maskinen efter en dag, hvor
den ikke er blevet brugt
Hvis du ikke har brugt kaffemaskinen en dag, skal
du gennemskylle den for at være sikker på, at
vandkogeren fyldes med frisk vand.
For at gennemskylle af maskinen skal du brygge to
kopper kogende vand som følger:
1 Fyld vandtanken med koldt vand fra hanen
mindst til MIN-markeringen (1). Sæt låget på
(2), og sæt vandtanken tilbage på maskinen.
2 Sæt 1-kops-pudeholderen q eller 2-kops-
pudeholderen qq i maskinen uden puder.
DANSK
5 Tryk på on/off-knappen 3. On/off-knappen
blinker langsomt, mens vandet varmes op.
6 Kontroller, at den valgte kaffestyrke er
almindelig kaffe (kopsymbol med tre søjler).
7 Tryk på 2-kops-knappen qq for at brygge to
kopper varmt vand.
3 Luk låget og tr yk låseklemmen ned.
8 Når vandet er varmet op, lyser on/off-knappen
konstant, og maskinen begynder at brygge
kaffe.
9 Smid vandet i kopperne væk. Nu er maskinen
klar til brug igen.
29
Page 30
6 Rengøring
Regelmæssig rengøring af din SENSEO® er vigtig
for at sikre, at SENSEO
optimalt. Desuden forlænger det kaffemaskinens
levetid.
B
Advarsel:
SENSEO®-kaffemaskinen må aldrig kommes ned
i vand.
1 Tag altid stikket ud af stikkontakten, inden
maskinen rengøres.
2 Maskinen rengøres udvendigt med en fugtig
klud.
3 Fjern tragten.
4 For at fjerne kaffeudløbet skal du trykke på
udløserknapperne (1) og trække kaffeudløbet
af maskinen (2).
®
-kaffen altid smager
5 For at skille kaffeudløbet ad skal du tage fat i
de to riller på indersiden af udløbet og trykke
let på dem (1). Før den indre del nedad for at
skille den fra den ydre del af udløbet (2).
6 Rengør vandtanken og det tilhørende låg,
kaffeudløbet, tragten, drypbakken, kopristen
og pudeholderne i varmt vand eller i
opvaskemaskinen.
C
Forsigtig:
Pas på, at du ikke kommer til at beskadige
ventilen i bunden af vandtanken, hvis du bruger
en opvaskebørste til at rengøre vandtanken.
D Bemærk:
Kontroller, om sien i midten af pudeholderen
er tilstoppet. Er dette tilfældet, fjernes
tilstoppelsen ved at skylle pudeholderen under
vandhanen. Brug om nødvendigt
en opvaskebørste til at rense sien.
30
Page 31

7 Rengør vandtilførselspladen og
gummitætningsringen med en fugtig klud.
Gode grunde til at huske afkalkning:
• Det forlænger din SENSEO
®
-kaffemaskines
levetid
• Det sikrer den rette kopmængde
• Det sikrer kaffens temperatur
• Maskinen afgiver mindre støj under brygning
• Det forebygger funktionsfejl
Hvis afkalkningen ikke udføres korrekt, vil
kalkpartikler blive efterladt i maskinen. Dette gør,
at ny kalk hurtigere vil sætte sig fast, og det kan
føre til varig og uoprettelig skade på maskinen.
DANSK
C
Forsigtig:
Undlad at fjerne gummitætningsringen, og vær
opmærksom på ikke at komme til at beskadige
tappen på vandtilførselspladen.
8
Rengør maskinens vandindtag med en fugtig klud.
7 Afkalkning
Kalk aejres inde i maskinen under brug. Det er vigtigt
at afkalke SENSEO®-kaffemaskinen, når CALCindikatoren begynder at lyse. Brug kun SENSEO
afkalkningsmiddel (HD7012, HD7011, HD7006).
Tid til afkalkning
• Afkalk SENSEO
®
-kaffemaskinen som
beskrevet nedenfor, når CALC-indikatoren
begynder at lyse (når du har brygget ca. 400
kopper SENSEO
®
-kaffe).
®
Brug det rette afkalkningsmiddel
Brug kun SENSEO
®
-afkalkningsmiddel (HD7012,
HD7011, HD7006). Det er udviklet for at sikre
en bedre ydeevne og drift for maskinen. Hver
afkalkningsblanding kan kun bruges én gang.
Yderligere oplysninger om dette afkalkningsmiddel
ndes på vores websted www.philips.com.
B
Advarsel:
Brug aldrig et afkalkningsmiddel, der er baseret
på mineralsk syre som f.eks. svovlsyre, saltsyre,
sulfaminsyre eller eddikesyre (f.eks. eddike).
Disse afkalkningsmidler kan skade din SENSEO
kaffemaskine.
7.1 Afkalkningsprocedure
Afkalkningsproceduren består af en
afkalkningscyklus og to skyllecyklusser. Du må
ikke afbryde afkalkningscyklussen, og du må ikke
slukke for maskinen, før de to skyllecyklusser er
gennemført.
1 Bland 50 g citronsyre med 1 l vand i et
litermål. Rør rundt, indtil pulveret er opløst.
Fyld vandtanken med afkalkningsblandingen.
®
-
31
Page 32

2 Vip vandtanken, og sæt bunden tilbage på
plads på maskinen (1). Tryk derefter toppen af
vandtanken ind mod maskinen (2).
3 Tryk på on/off-knappen 3. On/off-knappen
blinker langsomt, mens vandet varmes op.
Kaffemaskinen er klar til afkalkning, når on/offknappen lyser konstant
B Advarsel:
Sørg for, at låget er lukket korrekt, og
lågudløseren sidder fast, før du begynder
at afkalke maskinen..
5 Fjern drypbakken.
6 Sæt en skål, der kan rumme mindst
1,5 l, under udløbet til opsamling af
afkalkningsblandingen.
1.5L
4 Placer 1-kops-pudeholderen q med en brugt
kaffepude i i kaffemaskinen. Luk låget, og
kontroller, at det er ordentligt lukket.
D
Bemærk:
Læg altid en brugt kaffepude i pudeholderen,
når maskinen afkalkes. Puden vil fungere
som et “lter”, så det undgås, at sien i
pudeholderen tilstoppes af kalkpartikler.
32
7 Når on/off-knappen lyser konstant, skal du
trykke på 1-kops-knappen q og 2-kopsknappen qq samtidigt i 3 sekunder, indtil
der lyder et bip. Slip knapperne lige så
snart, de ikke lyser længere, og der slukkes
for den valgte styrke. Det betyder, at
afkalkningsproceduren er aktiveret korrekt.
Page 33

• CALC-indikatoren og on/off-knappen
starter med at blinke for at indikere, at
afkalkningscyklussen er i gang.
• Under afkalkningscyklussen kommer der
vand ud af maskinen en gang imellem.
• Når alt vandet i vandtanken er brugt,
er afkalkningsprocessen fuldført. On/offknappen begynder at blinke hurtigt.
3 Placer 1-kops-pudeholderen q med en brugt
kaffepude i i kaffemaskinen. Luk låget, og
kontroller, at det er ordentligt lukket.
D
Bemærk:
Hvis du trykker på 1-kops- og 2-kops-knappen
ned længere end 3 sekunder, starter maskinen
ikke afkalkningscyklussen. Hvis det er tilfældet,
skal du trykke på 1-kops-knappen og 2-kopsknappen samtidigt i 3 sekunder igen.
7.2 Gennemskylning efter
afkalkning
1 Skyl vandtanken under rindende vand, og fyld
den derefter helt op med frisk vand fra hanen.
D
Bemærk:
Fyld ikke vandbeholderen med varmt vand
eller afkalkningsblanding, der har været brugt.
2 Vip vandtanken, og sæt bunden tilbage på
plads på maskinen (1). Tryk derefter toppen af
vandtanken ind mod maskinen (2).
DANSK
4 Sæt en skål, der kan rumme mindst 1,5 l,
under kaffeudløbet til opsamling af vandet.
1.5L
5 Tryk på 1-kops-knappen q og 2-kops-
knappen qq samtidigt i 3 sekunder, indtil der
lyder et bip, for at starte skyllecyklussen.
6 Fjern den brugte kaffepude, og rengør
pudeholderen efter skyllecyklussen for at
undgå tilstoppelse af sien i midten.
7 Gentag trin 1 til 6 endnu en gang for at sikre,
at maskinen er ren.
8 Efter afkalkningscyklussen og skyllecyklussen
slukkes CALC-indikatoren, og maskinen
slukkes automatisk.
33
Page 34

8 Frostfri opbevaring
11 Reklamationsret
Når maskinen er blevet gennemskyllet første
gang (se kapitlet “Gennemskylning af maskinen
før brug første gang”), må den kun bruges og
opbevares, hvor temperaturen ikke kommer
under frysepunktet, for at undgå skader.
9 Bestilling af tilbehør
Hvis du vil købe tilbehør til denne maskine,
skal du besøge vores onlinebutik på
www.shop.philips.com/service.
Hvis onlinebutikken ikke er tilgængelig
i dit land, skal du gå til din Philips-forhandler
eller et Philips Kundecenter. Hvis du har
problemer med at skaffe tilbehør til apparatet,
kan du kontakte dit lokale Philips Kundecenter.
Du kan nde kontaktoplysningerne i folderen
“World-Wide Guarantee”.
10 Miljøhensyn
• Maskinen må ikke smides ud sammen med
det almindelige husholdningsaffald, når den
til sin tid kasseres. Aevér den i stedet på en
kommunal genbrugsstation. På den måde er
du med til at beskytte miljøet.
og service
Hvis du har brug for hjælp eller oplysninger,
eller hvis der opstår et problem, skal du besøge
Philips’ websted på www.philips.com/support
eller kontakte dit lokale Philips Kundecenter.
Telefonnumre ndes i vedlagte “worldwide
guarantee”-folder. Hvis der ikke ndes et
kundecenter i dit land, bedes du kontakte din
lokale Philips-forhandler.
Ved køb af Philips SENSEO
afgiver Sara Lee/Merrild eller Philips ingen af deres
patentrettigheder – ligesom køber ikke opnår
licens i henhold til disse patenter.
Reparation og eftersyn af maskinen skal altid
foretages på et autoriseret Philips-serviceværksted.
Forsøg ikke selv at reparere maskinen, da
garantien i så fald bortfalder.
®
-kaffemaskinen
34
Page 35

12 Fejlnding
12.1 SENSEO®-kaffemaskine
Dette kapitel opsummerer de mest almindelige problemer, der kan forekomme ved brug af
maskinen. Har du brug for yderligere hjælp og vejledning, så besøg www.philips.com/support
for en liste af ofte stillede spørgsmål eller kontakt dit lokale Philips Kundecenter.
Problem Løsning
Min kop løb over, da
jeg brugte maskinen
første gang.
Vandet blev ved
med at løbe ud af
udløbet, da jeg brugte
maskinen første gang.
On/off-knappen
blinker langsomt.
CALC-indikatoren
blinker.
Du har formentlig prøvet at brygge en kop kaffe uden at gennemskylle
maskinen først. Før du starter med at brygge kaffe, skal du gennemskylle
maskinen. Når du tænder for maskinen igen, lyser on/off-knappen enten
konstant eller blinker hurtigt eller langsomt.
Hvis on/off-knappen lyser konstant, skal du foretage skylleproceduren (se
kapitlet “Gennemskylning af maskinen før brug første gang”).
Hvis on/off-knappen blinker langsomt eller hurtigt, behøver du IKKE foretage
skylleproceduren. Hvis on/off-knappen blinker langsomt, er vandet ved at
varme op. Hvis den blinker hurtigt, er der ikke nok vand i vandtanken, eller
også er vandtanken ikke sat ordentligt på maskinen.
Hvis vandet blev ved med at løbe ud af udløbet, indtil vandtanken var tom,
foretager maskinen en skyllecyklus. Før du går i gang med at brygge kaffe,
skal du gennemskylle maskinen. Når du tænder for maskinen igen, lyser on/
off-knappen konstant eller blinker langsomt eller hurtigt.
Hvis on/off-knappen lyser konstant, skal du foretage skylleproceduren (se
kapitlet “Gennemskylning af maskinen før brug første gang”).
Hvis on/off-knappen blinker langsomt eller hurtigt, behøver du IKKE foretage
skylleproceduren. Hvis on/off-knappen blinker langsomt, er vandet ved at
varme op. Hvis den blinker hurtigt, er der ikke nok vand i vandtanken, eller
også er vandtanken ikke sat ordentligt på maskinen.
Du har brugt SENSEO
overade. Dette har bevirket, at vandet i kaffemaskinen er begyndt at koge,
inden det har nået den ønskede temperatur, hvilket afholder maskinen fra
at fungere korrekt. Sluk maskinen, og brug den efterfølgende kun steder, der
ligger under 2200 meter over havets overade.
Du har trykket på 1-kops-knappen og 2-kops-knappen samtidigt.
Det startede afkalkningsprocessen. Hvis du ikke ønskede at starte
afkalkningsprocessen, skal du bare trykke på on/off-knappen for at slukke
for maskinen. Hvis du ønskede at starte afkalkningsprocessen, skal du ikke
afbryde processen, men lade maskinen køre, indtil vandtanken er tom.
®
-kaffemaskinen i over 2200 meter over havets
DANSK
35
Page 36

Problem Løsning
CALC-indikatoren
slukker ikke efter
CALC-indikatoren slukker ikke, hvis afkalkningsproceduren ikke er blevet
udført korrekt. Sådan udfører du afkalkningsproceduren korrekt:
afkalkning.
1. Sørg for ikke at afbryde afkalkningscyklussen eller tage stikket ud til
maskinen under afkalkningscyklussen. Under afkalkningscyklussen kommer
der varmt vand ud af kaffeudløbet med mellemrum, og maskinen stopper
afkalkningen 3 til 4 gange for at lade afkalkningsblandingen virke og varme
op igen.
2. Sørg for at starte afkalkningscyklussen ved at trykke på 1-kops-knappen
og 2-kops-knappen samtidig. Se kapitlet “Afkalkning” for at få en komplet
beskrivelse af afkalkningsproceduren.
3. Sørg for at bruge tre fulde vandtanke til at fuldføre afkalkningsproceduren:
en tank fyldt med afkalkningsblanding og to tanke fyldt med frisk vand.
On/off-knappen
blinker fortsat hurtigt.
Kontroller, at der er nok vand i vandtanken, og at vandtanken sidder
ordentligt på.
Kontroller, at rumtemperaturen ikke er lavere end 5 °C. Er dette tilfældet,
vil maskinen ikke fungere optimalt.
Der lækker vand fra
kaffemaskinen.
Hvis du bemærker, at der lækker kaffe eller vand fra SENSEO
skal du prøve at nde ud af, hvor lækagen er. Det er vigtigt, fordi placeringen
®
-maskinen,
af lækagen er afgørende for løsningen på problemet.
1. Hvis lækagen forekommer nær låget eller udløbet, skal du kontrollere, at:
1a. Sien i midten af pudeholderen ikke er tilstoppet. Er dette tilfældet, fjernes
tilstoppelsen ved at skylle pudeholderen under vandhanen.
1b. Kaffepuden er placeret korrekt i midten af pudeholderen.
1c. Tætningsringen ikke har sat sig fast under kanten af vandtilførselspladen
(se gur 1 forrest i bruger vejledningen).
1d. Udløbet og tragten er placeret korrekt.
2. Hvis lækagen forekommer nær bunden af vandtanken eller under
maskinen, skal du kontrollere, at:
2a. Der ikke er for meget vand i vandtanken.
2b. Du ikke har sat vandtanken for voldsomt på. Hvis du gør det, spildes der
evt. vand ud af vandtanken.
2c. Vandtanken ikke er beskadiget eller i stykker. Normalt burde vandet ikke
begynde at dryppe fra vandudløbet før 30 sekunder efter opfyldning.
Jeg kan ikke åbne låget. Der kan være dannet et midlertidigt vakuum under låget. Sluk for maskinen.
Træk udløseren op, og vent 24 timer, før du åbner låget. Du skal muligvis
bruge en del kræfter.
Sørg for ikke at ytte SENSEO
®
-maskinen. Man kan ikke fremskynde åbning
af låget ved at ytte maskinen, placere den udendørs eller ytte den til
kølige omgivelser.
For at undgå, at det sker igen, skal du altid sørge for, at pudeholderne er
rene, og at sien i midten af pudeholderne ikke er tilstoppede.
36
Page 37

Problem Løsning
Kaffemaskinen
producerer mindre
kaffe end normalt.
Måske er sien i midten af pudeholderen tilstoppet. Er dette tilfældet, skylles
pudeholderen under vandhanen. Brug om nødvendigt en opvaskebørste
eller en nål til at fjerne tilstoppelsen.
Afkalk kaffemaskinen (se kapitlet “Afkalkning”).
Jeg kan ikke lukke låget
ordentligt.
Kontrollér, om der sidder en brugt kaffepude fast i vandtilførselspladen. Er
dette tilfældet, fjernes den.
Kontroller, om du har brugt den korrekte pudeholder. Brug 2 kaffepuder
sammen med den dybere 2-kops-pudeholder qq.
®
SENSEO
-kaffen er
ikke tilstrækkelig stærk.
Kontroller, om du har valgt den kaffestyrke, du foretrækker. Du kan
vælge mellem almindelig og stærk kaffe. Du kan også øge eller mindske
kaffestyrken ved at indstille din foretrukne kaffemængde med hukommelsen
for individuelt kaffevalg (kun HD7872).
Kontroller, om du har brugt det korrekte antal kaffepuder og trykket på
den rigtige knap. Brug 2 puder sammen med 2-kops-pudeholderen qq og
2-kops-knappen qq.
Kontroller, at kaffepuden/-puderne er placeret korrekt i midten af
pudeholderen for at undgå, at der løber vand ud over kanterne på puden/
puderne. Når du anvender to kaffepuder oven på hinanden, skal du sørge
for, at de buede ader på begge kaffepuder vender nedad, og at de er
presset ned i kaffepudeholderen med et let tryk.
Kontroller, at du ikke har brugt den samme kaffepude to gange ved et uheld.
Kontroller, at kaffen i puden er jævnt fordelt.
Foretrækker du en stærkere smag og aroma, anbefales SENSEO
med en stærkere blanding.
Kaffen er ikke
tilstrækkelig varm.
Hvis du har brugt maskinen i et godt stykke tid, og temperaturen på kaffen
falder, vil vi råde dig til at afkalke maskinen. Se kapitlet “Afkalkning”. Afkalk din
SENSEO
Brug ikke for store kopper, da kaffen hurtigere vil blive kold. Sørg for, at
kopperne kan indeholde mindst 150 ml.
Brug tynde kopper, fordi de absorberer mindre varme fra kaffen end tykke
kopper.
Sørg for, at koppens størrelse svarer til mængden af kaffe. Undlad at brygge
en lille mængde kaffe i en stor kop.
Hvis du drikker kaffe med frisk mælk, skal du forvarme mælken i en kop i en
mikrobølgeovn.
Du kan forvarme kaffemaskinen ved først at brygge en kop kaffe uden
at komme en kaffepude i pudeholderen. På den måde varmer du også
kaffekoppen op.
Berøringspanelet
virker ikke.
Hvis der er vand på berøringspanelet, virker knapperne ikke. Sørg for,
at berøringspanelet er tørt, og at dine hænder er tørre, når du bruger
berøringspanelet.
Sørg for at trykke på funktionsknappen og ikke på symbolet til venstre for
funktionsknappen.
®
-kaffemaskine med jævne mellemrum.
®
-kaffepuder
DANSK
37
Page 38

Problem Løsning
Jeg kommer
til at aktivere
berøringspanelet ved
Det sker, fordi berøringspanelet er meget følsomt, og der skal kun trykkes
ganske let på knapperne for at aktivere dem. Der sker ikke noget ved det,
maskinen begynder ikke at brygge kaffe.
et uheld, når jeg gør
det rent.
Tag altid stikket ud af stikkontakten, inden maskinen rengøres.
Kun HD7872:
Knappen til
Læs afsnittet “Hukommelse for individuelt kaffevalg” i kapitel “Brygning af
SENSEO
hukommelse for
individuelt kaffevalg
sørger ikke for, at der
laves den mængde
kaffe, jeg foretrækker.
®
-kaffe”, og prøv at indstille den ønskede kaffemængde igen.
38
Page 39

Inhaltsangabe
1 Einführung 39
2 Allgemeine Beschreibung 39
3 Wichtig 40
4 Die Maschine vor dem ersten
Gebrauch durchspülen 41
5 SENSEO
6 Reinigung 47
7 Entkalken 49
8 Frostfreie Aufbewahrung 52
9 Zubehör bestellen 52
10 Umwelt 52
11 Garantie und Kundendienst 52
®
Kaffee zubereiten 43
Kaffee mit einem weichen, vollen Aroma und einer
köstlichen Crema.
Kaffee von Douwe Egberts in praktischen
SENSEO
SENSEO
®
Kaffeepads und das einzigartige
®
Brühsystem von Philips sind perfekt
aufeinander abgestimmt, sodass sich das volle
Aroma des Kaffees entfalten kann. Unter
www.senseo.com nden Sie alle SENSEO
®
Kaffeesorten.
Beachten Sie folgende Tipps, um stets den vollen
und aromatischen Kaffeegeschmack zu erhalten:
Frische Kaffeepads
Verwenden Sie die speziell von Douwe
Egberts für Ihre SENSEO
entwickelten SENSEO
®
Kaffeepadmaschine
®
Kaffeepads für ein
weiches, volles Aroma. Die Douwe Egberts
SENSEO
®
Kaffeepads bleiben länger frisch, wenn
Sie sie in einem luftdichten Behälter aufbewahren.
Frisches Wasser
Verwenden Sie täglich frisches Wasser. Wenn
die Kaffeepadmaschine einen Tag lang nicht
in Gebrauch war, lassen Sie vor der nächsten
Zubereitung frisches Wasser durchlaufen (siehe
Kapitel “SENSEO
®
zubereiten”, Abschnitt
“Durchspülen der Maschine nach eintägiger
Gebrauchspause”).
DEUTSCH
12 Fehlerbehebung 53
1 Einführung
Herzlichen Glückwunsch zu Ihrem Kauf
und willkommen bei Philips! Um das
Kundendienstangebot von Philips vollständig
nutzen zu können, sollten Sie Ihr Produkt unter
www.philips.com/welcome registrieren.
1.1 SENSEO® Kaffeesystem
Mit SENSEO® erleben Sie einen sensationellen
Kaffeegenuss. Dieses einzigartige System
kombiniert die einfach zu bedienende Philips
SENSEO
von Douwe Egberts SENSEO
Kaffeepads: Das Ergebnis ist eine perfekte Tasse
®
Kaffeepadmaschine mit den speziell
®
entwickelten
2 Allgemeine
Beschreibung (Abb. 1)
1 Kaffeesammelkammer
2 Verschlusshebel für Deckel
3 Deckel mit Brühkammer
4 Dichtungsring
5 Sprühkopf
6 Padhalter für 2 Tassenqq
7 Padhalter für 1 Tasseq
8 Abdeckung des Kaffeeauslaufs
9 Kaffeeauslauf
10 Entriegelungstasten für Kaffeeauslauf
11 Herausnehmbare Abtropfschale
12 Tassentablett
13 Touchpanel
39
Page 40

14 Ein-/Ausschalter
15 Symbol für gespeicherten persönlichen Kaffee
(nur HD7872)
16 Symbol für normalen Kaffee
17 Auswahltaste
18 Symbol für starken Kaffee
19 CALC-Anzeige
20 1-Tasse-Tasteq
21 2-Tassen-Tasteqq
22 Wasserbehälter
23 Deckel des Wasserbehälters
3 Wichtig
Lesen Sie diese Bedienungsanleitung vor dem
Gebrauch der Maschine aufmerksam durch, und
bewahren Sie sie für eine spätere Verwendung auf.
Gefahr
• Tauchen Sie die Maschine niemals in Wasser
oder andere Flüssigkeiten.
Warnhinweis
• Prüfen sie, bevor Sie das Gerät anschließen,
ob die Spannungsangabe am Boden des
Geräts mit der örtlichen Netzspannung
übereinstimmt.
• Dieses Gerät ist für Benutzer (einschl. Kinder)
mit eingeschränkten physischen, sensorischen
oder psychischen Fähigkeiten bzw. ohne
jegliche Erfahrung oder Vorwissen nur dann
geeignet, wenn eine angemessene Aufsicht
oder ausführliche Anleitung zur Benutzung
des Geräts durch eine verantwortliche Person
sichergestellt ist.
• Achten Sie darauf, dass Kinder nicht mit dem
Gerät spielen.
• Verwenden Sie die Maschine nicht, wenn der
Netzstecker, das Netzkabel oder die Maschine
selbst defekt oder beschädigt ist.
• Um Gefährdungen zu vermeiden, darf ein
defektes Netzkabel nur von einem Philips
Service-Center, einer von Philips autorisierten
Werkstatt oder einer ähnlich qualizierten
Person durch ein Original-Ersatzkabel ersetzt
werden.
Achtung
• Legen Sie die SENSEO
nach dem Auspacken niemals auf die Seite.
Achten Sie immer – auch beim Transport –
darauf, dass sie senkrecht steht.
• Geben Sie die Maschine zur Überprüfung bzw.
Reparatur stets an ein Philips Service-Center.
Versuchen Sie nicht, die Maschine selbst
zu reparieren, da andernfalls Ihre Garantie
erlischt.
• Aus Sicherheitsgründen darf das Gerät nicht
mit einem Transformator betrieben werden.
• Stellen Sie die Maschine auf eine ebene und
stabile Fläche.
• Benutzen Sie das Gerät nicht in Höhenlagen
von über 2200 m.
• Füllen Sie niemals Milch, Kaffee, heißes
oder kohlensäurehaltiges Wasser in den
Wasserbehälter!
• Spülen Sie die Maschine nicht durch, und
bereiten Sie keinen Kaffee zu, solange der
Kaffeeauslauf nicht eingesetzt ist.
• Dieses Gerät ist nur für den Gebrauch
im Haushalt bestimmt. Es ist nicht für die
Verwendung in Umgebungen wie z. B.
Personalküchen in Geschäften, Büros,
landwirtschaftlichen Betrieben oder anderen
Arbeitsumgebungen vorgesehen. Weiterhin ist
es nicht für den Gebrauch in Hotels, Motels,
Pensionen oder anderen Gastgewerben
bestimmt.
®
Kaffeepadmaschine
3.1 Normerfüllung
Diese Maschine erfüllt sämtliche Normen
bezüglich elektromagnetischer Felder (EMF).
Nach aktuellen wissenschaftlichen Erkenntnissen
ist die Maschine sicher im Gebrauch, sofern
sie ordnungsgemäß und entsprechend den
Anweisungen in dieser Bedienungsanleitung
verwendet wird.
Wenn diese Maschine ausgeschaltet ist, beträgt
ihr Energieverbrauch weniger als 1 Watt. Dies
entspricht der EU-Richtlinie 2009/125/EC, die
die ökologischen Designanforderungen für
energieverbrauchende Produkte regelt.
40
Page 41

4
Die Maschine vor
dem ersten Gebrauch
durchspülen
Es ist wichtig, dass Sie Ihre SENSEO®
Kaffeepadmaschine vor dem ersten Gebrauch
durchspülen. Nach dem Durchspülvorgang, der
ungefähr 2 Minuten in Anspruch nimmt, ist die
Maschine zur Zubereitung von SENSEO
betriebsbereit.
C Achtung:
Unterbrechen Sie keinesfalls den bereits
begonnenen Durchspülvorgang, da der Boiler
andernfalls nicht richtig gefüllt wird.
1 Befestigen Sie den Kaffeeauslauf an der
Maschine. Drücken Sie mit der Hand
die beiden Führungen im Inneren des
Kaffeeauslaufs leicht zusammen (1). Bringen
Sie den Kaffeeauslauf an der Maschine an, und
lassen Sie die beiden Schienen wieder los (2).
®
Kaffee
3 Füllen Sie den Wasserbehälter bis oben mit
kaltem Leitungswasser.
4 Setzen Sie den Deckel auf den Wasserbehälter,
bevor Sie den Wasserbehälter wieder in die
Maschine einsetzen.
DEUTSCH
5 Kippen Sie den Wasserbehälter, und setzen Sie
den unteren Teil des Behälters in die Maschine
ein (1). Drücken Sie anschließend den oberen
Teil des Wasserbehälters in Richtung der
Maschine (2).
C
Achtung:
Spülen Sie die Maschine nicht durch, und
bereiten Sie keinen Kaffee zu, solange der
Kaffeeauslauf nicht eingesetzt ist.
2 Kippen Sie das obere Teil des Wasserbehälters
nach hinten (1), und nehmen Sie den
Wasserbehälter von der Maschine (2).
41
Page 42

6 Entnehmen Sie die Abtropfschale.
7 Stellen Sie ein Gefäß mit einem
Fassungsvermögen von mindestens 1,5 Liter
unter den Kaffeeauslauf.
1.5L
8 Vergewissern Sie sich, dass sich ein Padhalter
ohne Pads in der Maschine bendet.
9 Stecken Sie den Netzstecker in eine geerdete
Steckdose.
10 Drücken Sie den Ein-/Ausschalter 3. Die
Taste leuchtet auf, um anzuzeigen, dass Sie die
Maschine durchspülen müssen.
11 Drücken Sie gleichzeitig kurz die 1-Tasse-
Taste q und die 2-Tassen-Taste qq, um das
Durchspülen zu starten.
• Der Ein-/Ausschalter beginnt zu blinken,
um anzuzeigen, dass der Durchspülvorgang
gestartet wurde.
• Während des Durchspülvorgangs füllt
sicher der Boiler mit Wasser aus dem
Wasserbehälter, und aus dem Kaffeeauslauf
tritt kaltes Wasser aus. Während des
Durchspülvorgangs erzeugt die Maschine
lautere Geräusche als während des
normalen Brühvorgangs.
42
Page 43

• Wenn das gesamte Wasser im
Wasserbehälter aufgebraucht ist, ist
der Durchspülvorgang beendet, und die
Maschine schaltet sich aus.
12 Füllen Sie den Wasserbehälter mit frischem
Leitungswasser, platzieren Sie den Deckel auf
dem Behälter, und setzen Sie ihn wieder in die
Maschine ein.
1 Vergewissern Sie sich, dass der Wasserbehälter
bis über die MIN-Anzeige hinaus gefüllt ist
und sich der Deckel auf dem Wasserbehälter
bendet.
E
Tipp:
Verwenden Sie täglich frisches Wasser.
2 Stecken Sie den Netzstecker in eine geerdete
Steckdose.
3 Drücken Sie den Ein-/Ausschalter 3. Während
das Wasser aufgeheizt wird, blinkt der Ein-/
Ausschalter langsam.
DEUTSCH
Ihre SENSEO
®
Kaffeepadmaschine ist jetzt
einsatzbereit, und Sie können Ihre erste Tasse mit
köstlichem Kaffee zubereiten.
5 SENSEO® Kaffee
zubereiten
Während die SENSEO® Kaffeepadmaschine
aufheizt, können Sie die bevorzugte Kaffeestärke
und die Anzahl der gewünschten Tassen
auswählen. Nach dem Aufheizen brüht die
Maschine dann automatisch die Tasse bzw. die
Tassen Kaffee.
D
Hinweis:
Wenn der Ein-/Ausschalter schnell blinkt,
reicht das Wasser im Wasserbehälter nicht
mehr für eine Tasse Kaffee.
4 Zum Öffnen des Deckels drücken Sie den
Verschlusshebel nach oben. Der Deckel öffnet
sich automatisch.
43
Page 44

5 Setzen Sie für die Zubereitung einer Tasse
SENSEO
®
Kaffee den Padhalter für 1 Tasse q
in die Maschine ein (1). Wenn Sie zwei Tassen
SENSEO
®
Kaffee zubereiten möchten, setzen
Sie den Padhalter für 2 Tassen qq in die
Maschine ein (2). Achten Sie darauf, dass der
Padhalter sauber ist.
6 Legen Sie 1 Kaffeepad in den Padhalter
für 1 Tasse q (1) bzw. 2 Kaffeepads in den
Padhalter für 2 Tassen qq (2). Legen Sie
das Kaffeepad bzw. die Kaffeepads mit der
gewölbten Seite nach unten in die Mitte des
Padhalters. Drücken Sie das Pad bzw. die Pads
im Padhalter leicht an.
7 Schließen Sie den Deckel (1) und den
Verschlusshebel (2).
B
Warnhinweis:
Vergewissern Sie sich vor der
Kaffeezubereitung, dass der Deckel richtig
geschlossen und der Verschlusshebel des
Deckels fest verschlossen ist.
8 tellen Sie eine bzw. zwei Tassen unter die
Öffnungen des Kaffeeauslaufs. Die Höhe des
Kaffeeauslaufs lässt sich durch Schieben nach
oben oder nach unten verstellen. Sie können
auch die Auffangschale entfernen, wenn Sie
höhere Tassen verwenden möchten.
D
Hinweis:
Achten Sie darauf, dass der Kaffee im Pad bzw.
in den Pads gleichmäßig verteilt ist.
C
Achtung:
Verwenden Sie keinesfalls normalen
gemahlenen Kaffee oder beschädigte Pads in
Ihrer SENSEO
®
Kaffeepadmaschine, da dies
das Gerät blockieren würde.
44
D
Hinweis
Verwenden Sie Tassen mit einem
Fassungsvermögen von mindestens 100 ml,
wenn Sie starken Kaffee zubereiten, bzw.
150 ml, wenn Sie normalen Kaffee zubereiten.
Die Tassen sollten nicht zu groß sein, da der
Kaffee darin schneller kalt wird.
Page 45

9 Drücken Sie die Auswahltaste, um die
gewünschte Kaffeestärke auszuwählen. Wählen
Sie das Tassensymbol mit drei Balken für eine
normale Tasse Kaffee (125 ml) (1) aus. Wählen
Sie das Tassensymbol mit einem Balken für
eine starke Tasse Kaffee (60 ml) (2) aus.
D Hinweis:
Während des Brühvorgangs dürfen Sie den
Wasserbehälter nicht entfernen.
12 Entfernen Sie die gebrauchten Kaffeepads,
wenn der Kaffee fertig ist. Nehmen Sie einfach
den Padhalter aus dem Gerät, und entsorgen
Sie das/die die Kaffeepad(s).
C
Achtung:
Es könnte sich noch Wasser oder Kaffee auf
dem (den) Kaffeepad(s) benden.
13 Drücken Sie nach Gebrauch den Ein-/
Ausschalter 3, um die Maschine
auszuschalten.
10 Wenn Sie die gewünschte Kaffeestärke
ausgewählt haben, drücken Sie die 1-TasseTaste q für eine Tasse (1), oder drücken Sie
die 2-Tassen-Taste qq für zwei Tassen (2).
11 Wenn das Wasser heiß ist und die Anzeige im
Ein-/Ausschalter konstant leuchtet, beginnt die
Maschine mit dem Brühvorgang.
E
Tipp:
Sie können den Brühvorgang jederzeit
unterbrechen. Drücken Sie hierzu dieselbe
Tassen-Taste (1-Tasse-Taste oder die 2-TassenTaste), die Sie zur Zubereitung des Kaffees
gedrückt haben. Wenn Sie den Vorgang
jedoch unterbrechen, wird der begonnene
Brühvorgang nicht fortgesetzt, wenn Sie die
Maschine wieder einschalten oder dieselbe
Tassen-Taste erneut drücken.
D
Hinweis:
Wenn die Kaffeemaschine nicht benutzt wird,
schaltet sie sich nach 15 Minuten automatisch
aus, um Energie zu sparen.
5.1 Gespeicherter persönlicher
Kaffee (nur HD7872)
Sie können die Kaffeepadmaschine so
programmieren, dass sie die bevorzugte Menge
Kaffee brüht (bis zu 145 ml). Experimentieren
Sie, und nden Sie heraus, was Ihnen am besten
schmeckt. Wir empfehlen Ihnen, für einen
optimalen Geschmack und eine ideale Temperatur
mindestens 60 ml zuzubereiten.
Bei der Programmierung können Sie nur
die 1-Tasse-Taste verwenden. Wenn Sie
die Programmierung abgeschlossen haben,
können Sie eine Tasse bzw. zwei Tassen mit der
programmierten Kaffeemenge zubereiten.
DEUTSCH
45
Page 46

D Hinweis:
Während des Aufheizens der Maschine können
Sie Ihren gespeicherten persönlichen Kaffee nicht
programmieren. Warten Sie, bis die Ein-/Aus-Taste
konstant leuchtet.
1 Legen Sie 1 Kaffeepad in den Padhalter für
1 Tasse, und stellen Sie 1 Tasse unter die
Öffnungen des Kaffeauslaufs.
2 Um in den Programmiermodus zu wechseln,
wählen Sie mithilfe der Auswahltaste (1)
das Symbol für gespeicherten persönlichen
Kaffee (Sternchensymbol). Halten Sie die
Auswahltaste 2 Sekunden lang gedrückt,
bis das Sternchensymbol blinkt (2) und ein
Piepton zu hören ist. Lassen Sie dann die
Auswahltaste los.
3 Drücken Sie die 1-Tasse-Taste, damit der
Kaffee in die Tasse ießt (1). Drücken Sie
erneut die 1-Tasse-Taste, wenn die Tasse
die gewünschte Kaffeemenge enthält
(2). Ihre bevorzugte Kaffeemenge wurde
programmiert.
D Hinweis:
Wenn Sie die eingestellte Kaffeemenge ändern
möchten, führen Sie die Schritte 1 bis 3 erneut durch.
5.2 Durchspülen der
Maschine nach eintägiger
Gebrauchspause
Wenn die Kaffeemaschine einen Tag lang nicht
in Gebrauch war, spülen Sie sie durch, um
sicherzustellen, dass der Boiler mit frischem
Wasser gefüllt wird.
Um die Maschine durchzuspülen, brühen Sie
zwei Tassen heißes Wasser auf. Gehen Sie dabei
folgendermaßen vor:
1 Füllen Sie den Wasserbehälter mindestens
bis zur Markierung MIN mit kaltem Wasser
(1). Bringen Sie den Deckel auf dem
Wasserbehälter an (2), und setzen Sie den
Wasserbehälter wieder in die Maschine ein.
2 Setzen Sie den Padhalter für 1 Tasse q oder
für 2 Tassen qq ohne Kaffeepad(s) in die
Maschine ein.
Ab jetzt bereitet Ihre SENSEO® Kaffeepadmaschine
eine Tasse bzw. zwei Tassen mit dieser Kaffeemenge
zu, wenn Sie das Symbol für den gespeicherten
persönlichen Kaffee über die Auswahltaste wählen.
46
3 Schließen Sie den Deckel und den
Verschlusshebel.
Page 47

4 Stellen Sie zwei Tassen oder einen großen
Becher unter den Kaffeeauslauf, um das
Wasser aufzufangen.
5 Drücken Sie den Ein-/Ausschalter 3. Während
das Wasser erhitzt wird, blinkt der Ein-/
Ausschalter langsam.
6 Vergewissern Sie sich, dass die ausgewählte
Kaffeestärke normaler Kaffee (Tassensymbol
mit drei Balken) ist.
7 Drücken Sie die 2-Tassen-Taste qq, um zwei
Tassen heißes Wasser zu brühen.
6 Reinigung
Ein regelmäßiges Reinigen Ihrer SENSEO®
Kaffeepadmaschine ist wichtig, um sicherzustellen,
dass der SENSEO
schmeckt, und um die Nutzungsdauer der
Kaffeepadmaschine zu verlängern.
B
Warnhinweis:
Tauchen Sie die SENSEO® Kaffeepadmaschine
niemals in Wasser.
1 Ziehen Sie vor dem Reinigen des Geräts stets
den Netzstecker aus der Steckdose.
2 Reinigen Sie die Außenwände des Geräts mit
einem feuchten Tuch.
3 Entfernen Sie die Kaffeesammelkammer.
4
Um den Kaffeeauslauf herauszunehmen, drücken
Sie die Entriegelungstasten (1), und ziehen Sie
den Kaffeeauslauf aus der Maschine (2).
®
Kaffee immer hervorragend
DEUTSCH
8 Wenn das Wasser heiß ist, leuchtet
der Ein-/Ausschalter konstant, und die
Kaffeepadmaschine ist einsatzbereit.
9 Schütten Sie das Wasser in den Tassen weg.
Die Maschine ist nun wieder betriebsbereit.
47
Page 48

5 Um den Kaffeeauslauf in seine Einzelteile zu
zerlegen, drücken Sie mit der Hand die beiden
Schienen im Inneren des Kaffeeauslaufs leicht
zusammen (1). Schieben Sie den inneren
Teil nach unten, und ziehen Sie ihn aus dem
äußeren Teil des Kaffeeauslaufs (2).
6 Reinigen Sie den Wasserbehälter und
seinen Deckel, den Kaffeeauslauf, die
Kaffeesammelkammer, die Auffangschale, das
Tassentablett und die Padhalter in heißem
Wasser oder im Geschirrspüler.
D Hinweis:
Prüfen Sie, ob das Sieb in der Mitte des
Padhalters verstopft ist. Wenn dies der Fall ist,
spülen Sie den Padhalter unter ießendem
Wasser ab. Bei Bedarf können Sie eine
Spülbürste verwenden, um das Sieb zu säubern.
7 Reinigen Sie den Sprühkopf und den
Gummidichtungsring mit einem feuchten Tuch.
C
Achtung:
Entfernen Sie nicht den Gummidichtungsring,
und achten Sie darauf, das Metallteil auf dem
Sprühkopf nicht zu beschädigen.
8 Reinigen Sie die Wassereinfüllöffnung der
Maschine mit einem feuchten Tuch.
C
Achtung:
Achten Sie darauf, dass das Ventil unten
im Wasserbehälter nicht beschädigt wird,
wenn Sie eine Spülbürste zum Reinigen des
Wasserbehälters verwenden.
48
Page 49

7 Entkalken
Im Laufe der Zeit lagert sich Kalk im Gerät ab.
Daher muss die SENSEO
entkalkt werden, sobald die CALC-Anzeige
aueuchtet. Verwenden Sie nur SENSEO
Entkalker (HD7012, HD7011, HD7006).
Wann entkalken?
• Entkalken Sie die SENSEO
wie nachstehend erläutert, wenn die
CALC-Anzeige leuchtet (nach ca. 400 Tassen
SENSEO
®
Kaffee).
Warum entkalken?
Die folgenden Gründe sprechen für das Entkalken:
• Es verlängert die Nutzungsdauer Ihrer
SENSEO
®
Kaffeepadmaschine.
• Es stellt die maximale Füllmenge pro Tasse
sicher.
• Es stellt die maximale Kaffeetemperatur sicher.
• Die Maschine verursacht während des
Brühens weniger Geräusche.
• Es verhindert Fehlfunktionen.
Wenn die Entkalkung nicht korrekt durchgeführ t
wird, verbleiben Kalkrückstände in der
Maschine. Dies führt dazu, dass sich schneller
Kalkablagerungen bilden, die dauerhafte und
irreparable Schäden der Kaffeemaschine
verursachen können.
®
Kaffeepadmaschine
®
®
Kaffeemaschine,
Maschinenleistung und einen besseren Betrieb
zu gewährleisten. Jede Entkalkermischung darf nur
einmal verwendet werden. Weitere Informationen
zu diesem Entkalker nden Sie auf unserer
Website unter www.philips.com.
B
Warnhinweis:
Verwenden Sie keine Entkalker auf Basis
von Mineralsäuren, beispielsweise Schwefel-,
Salz-, Sulfamin- oder Essigsäure (z. B. Essig).
Diese Entkalker können Ihre SENSEO
®
Kaffeepadmaschine beschädigen.
7.1 Entkalkungsvorgang
Der Entkalkungsvorgang besteht aus einem
Entkalkungszyklus und zwei Spülzyklen.
Unterbrechen Sie den Entkalkungszyklus nicht,
und schalten Sie die Maschine nicht vor Ablauf der
zwei Spülzyklen aus.
1 Mischen Sie in einem Messbecher 50 Gramm
Zitronensäure mit 1 Liter Wasser. Rühren Sie
die Flüssigkeit um, bis sich das Pulver aufgelöst
hat. Füllen Sie die Entkalkermischung in den
Wasserbehälter.
2
Kippen Sie den Wasserbehälter, und setzen Sie
den unteren Teil des Behälters in die Maschine ein
(1). Drücken Sie anschließend den oberen Teil des
Wasserbehälters in Richtung der Maschine (2).
DEUTSCH
Den richtigen Entkalker verwenden
Verwenden Sie nur SENSEO
®
Entkalker
(HD7012, HD7011, HD7006). Er wurde
speziell dafür entwickelt, um eine bessere
49
Page 50

3 Drücken Sie den Ein-/Ausschalter 3. Während
das Wasser erhitzt wird, blinkt der Ein-/
Ausschalter langsam. Das Gerät ist bereit zum
Entkalken, wenn der Ein-/Ausschalter konstant
leuchtet.
4 Setzen Sie den Padhalter für 1 Tasse q
mit einem gebrauchten Kaffeepad in die
Kaffeemaschine ein. Schließen Sie den Deckel,
und überprüfen Sie, ob er richtig eingerastet ist.
D
Hinweis:
Legen Sie beim Entkalken des Geräts immer
ein gebrauchtes Kaffeepad in den Padhalter.
Dieses Pad dient als Filter und verhindert,
dass Kalkrückstände das Sieb bzw. Loch im
Padhalter verstopfen.
5 Entnehmen Sie die Abtropfschale.
6 Stellen Sie ein Gefäß mit einem
Fassungsvermögen von mindestens 1,5 l unter
den Kaffeeauslauf, um das Wasser aufzufangen.
1.5L
7 Wenn der Ein-/Ausschalter konstant leuchtet,
drücken Sie die 1-Tasse-Taste q und
die 2-Tassen-Taste qq 3 Sekunden lang
gleichzeitig, bis Sie einen Piepton hören. Lassen
Sie die Tasten los, sobald ihre Anzeigen sowie
die Anzeige für die ausgewählte Kaffeestärke
nicht mehr leuchten. Dies weist darauf hin,
dass der Entkalkungsvorgang korrekt aktiviert
wurde.
B
Warnhinweis:
Vergewissern Sie sich vor dem Entkalken der
Maschine, dass der Deckel richtig geschlossen
und der Verschlusshebel des Deckels fest
verschlossen ist.
50
• Die CALC-Anzeige und der Ein-/Ausschalter
blinken, um anzuzeigen, dass der
Entkalkungsvorgang gestartet wurde.
• Während des Entkalkungsvorgangs kommt
das Wasser in regelmäßigen Abständen aus
der Maschine.
Page 51

• Wenn das gesamte Wasser im
Wasserbehälter aufgebraucht ist, ist der
Entkalkungsvorgang abgeschlossen. Der Ein-/
Ausschalter blinkt schnell.
D
Hinweis:
Wenn Sie die 1-Tasse-Taste und die 2-TassenTaste länger als 3 Sekunden drücken, startet
die Maschine den Entkalkungsvorgang nicht.
Wenn dies der Fall ist, drücken Sie erneut
die 1-Tasse-Taste und die 2-Tassen-Taste
gleichzeitig 3 Sekunden lang.
7.2 Spülvorgang nach dem
Entkalken
1
Spülen Sie den Wasserbehälter unter ießendem
Wasser aus, und füllen Sie den Behälter bis oben
mit frischem Leitungswasser auf.
3 Setzen Sie den Padhalter für 1 Tasse q
mit einem gebrauchten Kaffeepad in die
Kaffeemaschine ein. Schließen Sie den Deckel,
und überprüfen Sie, ob er richtig eingerastet ist.
4 Stellen Sie ein Gefäß mit einem
Fassungsvermögen von mindestens 1,5 l unter
den Kaffeeauslauf, um das Wasser aufzufangen.
1.5L
DEUTSCH
D Hinweise:
Füllen Sie den Wasserbehälter nicht
mit gebrauchtem heißem Wasser oder
gebrauchter Entkalkermischung.
2 Kippen Sie den Wasserbehälter, und setzen Sie
den unteren Teil des Behälters in die Maschine
ein (1). Drücken Sie anschließend den oberen
Teil des Wasserbehälters in Richtung der
Maschine (2).
5 Drücken Sie gleichzeitig 3 Sekunden lang die
1-Tasse-Taste q und die 2-Tassen-Taste qq,
bis Sie einen Piepton hören, um den
Durchspülvorgang zu starten.
6 Entnehmen Sie nach dem Durchspülvorgang
das gebrauchte Pad, und reinigen Sie den
Padhalter, damit das Sieb in der Mitte nicht
verstopft.
51
Page 52

7 Wiederholen Sie noch einmal die Schritte 1
bis 6, um eine saubere Maschine zu
gewährleisten.
8 Nach den Entkalkungs- und Durchspülzyklen
erlischt die CALC-Anzeige, und die Maschine
schaltet sich automatisch aus.
8 Frostfreie
Aufbewahrung
Nach dem ersten Durchspülen der Maschine
(siehe Kapitel “Die Maschine vor dem ersten
Gebrauch durchspülen”) darf sie nur an einem
frostfreien Ort benutzt und aufbewahrt werden,
um Beschädigungen zu vermeiden.
9 Zubehör bestellen
Um Zubehör für dieses Gerät zu kaufen,
besuchen Sie unseren Online-Shop unter
www.shop.philips.com/service. Wenn es
in Ihrem Land kein Online-Shop gibt, wenden
Sie sich an Ihren Philips Händler oder ein Philips
Service-Center. Sollten Sie Schwierigkeiten bei
der Beschaffung von Zubehör für Ihr Gerät haben,
wenden Sie sich bitte an ein Philips ServiceCenter in Ihrem Land. Die entsprechenden
Kontaktinformationen nden Sie in der
beiliegenden Garantieschrift.
10 Umwelt
• Werfen Sie das Gerät am Ende der
Lebensdauer nicht in den normalen Hausmüll.
Bringen Sie es zum Recycling zu einer
ofziellen Sammelstelle. Auf diese Weise
tragen Sie zum Umweltschutz bei.
11 Garantie und
Kundendienst
Benötigen Sie weitere Informationen oder treten
Probleme auf, besuchen Sie bitte die Philips
Website www.philips.com/support, oder
setzen Sie sich mit einem Philips Service-Center
in Ihrem Land in Verbindung. Die Telefonnummer
nden Sie in der internationalen Garantieschrift.
Sollte es in Ihrem Land kein Service-Center geben,
wenden Sie sich bitte an Ihren Philips Händler.
Der Kauf der Philips SENSEO
beeinusst in keiner Weise die Rechte von Sara
Lee/Douwe Egberts oder Philips hinsichtlich deren
Patente. Dem Käufer wird auch keine Lizenz im
Rahmen dieser Patente übertragen.
Geben Sie die Maschine zur Überprüfung bzw.
Reparatur stets an ein Philips Service-Center.
Versuchen Sie nicht, die Maschine selbst zu
reparieren, da andernfalls Ihre Garantie erlischt.
®
Kaffeepadmaschine
52
Page 53

12 Fehlerbehebung
12.1 SENSEO® Kaffeepadmaschine
In diesem Abschnitt sind die häugsten Probleme zusammengestellt, die mit Ihrem Gerät auftreten
können. Sollten Sie ein Problem mithilfe der nachstehenden Informationen nicht beheben können,
besuchen Sie unsere Website unter: www.philips.com/support für eine Liste mit häug gestellten
Fragen, oder wenden Sie sich an den Kundendienst in Ihrem Land.
Problem Lösung
Meine Tasse ist beim
ersten Gebrauch
der Maschine
übergelaufen.
Nach der ersten
Verwendung der
Maschine oss das
Wasser weiterhin aus
dem Kaffeeausgießer.
Der Ein-/Ausschalter
blinkt langsam.
Sie haben wahrscheinlich versucht, eine Tasse Kaffee zuzubereiten, ohne die
Maschine zuerst durchzuspülen. Bevor Sie mit der Zubereitung von Kaffee
beginnen, müssen Sie die Maschine durchspülen. Wenn Sie die Maschine
wieder einschalten, leuchtet der Ein-/Ausschalter konstant auf oder blinkt
langsam bzw. schnell.
Wenn der Ein-/Ausschalter konstant leuchtet, müssen Sie den
Durchspülvorgang ausführen (siehe Kapitel “Die Maschine vor dem ersten
Gebrauch durchspülen”).
Wenn der Ein-/Ausschalter langsam oder schnell blinkt, müssen Sie den
Durchspülvorgang NICHT ausführen. Wenn der Ein-/Ausschalter langsam
blinkt, wird das Wasser erhitzt. Wenn der Schalter schnell blinkt, bendet sich
nicht genug Wasser im Wasserbehälter oder der Wasserbehälter ist nicht
richtig in die Maschine eingesetzt.
Wenn Wasser aus dem Kaffeeausgießer geossen ist, bis der Wasserbehälter
leer war, hat die Maschine den Durchspülvorgang ausgeführt. Bevor Sie mit
der Zubereitung von Kaffee beginnen, müssen Sie die Maschine durchspülen.
Wenn Sie die Maschine wieder einschalten, leuchtet der Ein-/Ausschalter
konstant oder blinkt langsam bzw. schnell.
Wenn der Ein-/Ausschalter konstant leuchtet, müssen Sie den
Durchspülvorgang ausführen (siehe Kapitel “Die Maschine vor dem ersten
Gebrauch durchspülen”).
Wenn der Ein-/Ausschalter langsam oder schnell blinkt, müssen Sie den
Durchspülvorgang NICHT ausführen. Wenn der Ein-/Ausschalter langsam
blinkt, wird das Wasser erhitzt. Wenn der Schalter schnell blinkt, bendet sich
nicht genug Wasser im Wasserbehälter oder der Wasserbehälter ist nicht
richtig in die Maschine eingesetzt.
Sie haben die SENSEO
2200 m benutzt. In dieser Höhe beginnt das Wasser zu kochen, bevor es die
erforderliche Temperatur erreicht hat, wodurch das Gerät nicht einwandfrei
funktioniert. Schalten Sie es aus, und benutzen Sie es nicht an Orten, die
höher als 2200 m über dem Meeresspiegel liegen.
®
Kaffeemaschine in einer Höhenlage von über
DEUTSCH
53
Page 54

Problem Lösung
Die CALC-Anzeige
blinkt.
Die CALC-Anzeige
erlischt nach dem
Entkalken nicht.
Der Ein-/Ausschalter
blinkt weiterhin
schnell.
Wasser tropft aus
dem Gerät.
Sie haben die 1-Tasse-Taste und die 2-Tassen-Taste gleichzeitig gedrückt.
Dadurch wird der Entkalkungsvorgang gestartet. Wenn dies unabsichtlich
geschehen ist, drücken Sie einfach den Ein-/Ausschalter, um die Maschine
auszuschalten. Wenn Sie den Entkalkungsvorgang starten wollten,
unterbrechen Sie ihn nicht. Warten Sie, bis der Wasserbehälter leer ist.
Die CALC-Anzeige erlischt nicht, wenn der Entkalkungsvorgang nicht richtig
durchgeführt wurde. So führen Sie die Entkalkung korrekt durch:
1. Stellen Sie sicher, dass Sie den Entkalkungsvorgang nicht unterbrechen
oder die Maschine während des Entkalkungsvorgangs nicht ausschalten
bzw. den Stecker nicht abziehen. Während des Entkalkungsvorgangs tritt in
regelmäßigen Abständen heißes Wasser aus dem Kaffeeauslauf aus, und die
Maschine hält die Entkalkung drei- bis viermal an, um die Entkalkermischung
einwirken zu lassen und das Wasser aufzuheizen.
2. Vergewissern Sie sich, dass Sie den Entkalkungsvorgang durch gleichzeitiges
Drücken der 1-Tasse-Taste und der 2-Tassen-Taste starten. Eine vollständige
Beschreibung des Entkalkungsvorgangs nden Sie im Kapitel “Entkalken”.
3. Vergewissern Sie sich, dass Sie den Wasserbehälter dreimal füllen, um den
Entkalkungsvorgang abzuschließen: einen Behälter mit Entkalkermischung
und zwei Behälter mit frischem Wasser.
Vergewissern Sie sich, dass der Wasserbehälter genügend Wasser enthält
und der Wasserbehälter ordnungsgemäß eingesetzt ist.
Stellen Sie sicher, dass die Umgebungstemperatur mindestens 5 °C beträgt.
Andernfalls funktioniert die Maschine nicht ordnungsgemäß.
Wenn Sie feststellen, dass Kaffee oder Wasser aus Ihrer SENSEO
®
Kaffeepadmaschine austritt, versuchen Sie zu ermitteln, wo sich das Leck
bendet. Dies ist wichtig, da die genaue Stelle des Lecks die Lösung vorgibt.
1. Wenn die Flüssigkeit in Nähe des Deckels oder des Kaffeeauslaufs austritt,
stellen Sie sicher, dass:
1a. Das Sieb in der Mitte des Padhalters nicht verstopft ist. Spülen Sie
gegebenenfalls den Padhalter unter ießendem Wasser ab.
1b. Das Kaffeepad richtig in der Mitte des Padhalters liegt.
1c. Der Dichtungsring unter dem Rand des Sprühkopfes nicht eingeklemmt
ist (beachten Sie die Abbildung 1 am Anfang dieser Bedienungsanleitung).
1d. Der Kaffeeauslauf und die Kaffeesammelkammer ordnungsgemäß
eingesetzt sind.
2. Wenn die Flüssigkeit in Nähe des Wasserbehälterbodens oder unter der
Maschine austritt, stellen Sie sicher, dass:
2a. Sich nicht zu viel Wasser im Wasserbehälter bendet.
2b. Sie den Wasserbehälter nicht zu grob in die Maschine einsetzen. Wenn
Sie den Wasserbehälter zu grob einsetzen, spritzt möglicherweise Wasser
aus dem Wasserbehälter heraus.
54
Page 55

Problem Lösung
2c. Der Wasserbehälter nicht beschädigt oder kaputt ist. Normalerweise
sollte kein Wasser innerhalb von 30 Sekunden nach dem Einfüllen aus dem
Boden des Wasserbehälters tropfen.
In allen anderen Fällen wenden Sie sich bitte an das Philips Service-Center
in Ihrem Land.
Der Deckel lässt sich
nicht öffnen.
Möglicherweise hat sich kurzfristig unter dem Deckel ein Vakuum gebildet.
Schalten Sie die Maschine aus. Ziehen Sie den Hebel nach oben, und warten
Sie 24 Stunden, bevor Sie den Deckel öffnen. Dies kann erhebliche Kraft
erfordern.
Achten Sie darauf, die SENSEO
Wenn Sie die Kaffeepadmaschine bewegen, sie ins Freie oder eine kalte
Umgebung stellen, beschleunigen Sie damit nicht die Entriegelung des
Deckels.
Damit dieses Problem nicht erneut aufritt, stellen Sie immer sicher, dass
die Padhalter sauber sind, und das Sieb in der Mitte des Padhalters nicht
verstopft ist.
Das Gerät produziert
weniger Kaffee als
zuvor.
Möglicherweise ist das Sieb in der Mitte des Padhalters verstopft. Spülen
Sie den Padhalter gegebenenfalls unter ießendem Wasser ab. Bei Bedarf
können Sie das verstopfte Sieb auch mit einer Spülbürste säubern.
Entkalken Sie das Gerät (siehe Kapitel “Entkalken”).
Der Deckel lässt sich
nicht ordnungsgemäß
Prüfen Sie, ob ein gebrauchtes Kaffeepad am Sprühkopf klebt. Ist dies der
Fall, entfernen Sie das Pad.
schließen.
Vergewissern Sie sich, dass Sie den richtigen Padhalter verwenden. Legen Sie
2 Pads in den tieferen Padhalter für 2 Tassen ein qq.
Der SENSEO
ist nicht stark genug.
®
Kaffee
Vergewissern Sie sich, dass Sie Ihre bevorzugte Kaffeestärke ausgewählt
haben. Sie können zwischen normalem und starkem Kaffee wählen. Sie
können die Kaffeestärke durch Einstellen Ihrer bevorzugten Kaffeemenge
mit der Funktion für gespeicherten persönlichen Kaffee (nur HD7872) auch
erhöhen oder verringern.
Stellen Sie sicher, dass Sie die richtige Anzahl an Pads eingelegt und die
entsprechende Taste gedrückt haben. Legen Sie 2 Pads in den Padhalter für
2 Tassen qq, und drücken Sie die 2-Tassen-Taste qq.
Vergewissern Sie sich, dass die Kaffeepads richtig in der Mitte des Padhalters
liegen, damit kein Wasser am Rand der Pads auslaufen kann. Wenn Sie zwei
Kaffeepads übereinander verwenden, achten Sie darauf, dass die gewölbte
Seite beider Pads nach unten zeigt und Sie die Pads leicht in den Padhalter
gedrückt haben.
Überprüfen Sie, ob Sie versehentlich dasselbe Kaffeepad zum zweiten Mal
verwendet haben.
Achten Sie darauf, dass der Kaffee im Pad gleichmäßig verteilt ist.
Wenn Sie einen stärkeren Geschmack bevorzugen, sind die SENSEO
Kaffeepads auch in einer dunklen Röstung erhältlich.
®
Kaffeepadmaschine nicht zu bewegen.
DEUTSCH
®
55
Page 56

Problem Lösung
Der Kaffee ist nicht
heiß genug.
Das Bedienfeld
funktioniert nicht.
Beim Reinigen
aktiviere ich
versehentlich das
Bedienfeld.
Nur HD7872:
Die Taste für den
gespeicherten
persönlichen
Kaffee brüht nicht
den gesamten
gewünschten Kaffee.
Wenn die Maschine eine Zeit lang in Gebrauch war und die Temperatur
des Kaffees sinkt, empfehlen wir Ihnen, die Maschine zu entkalken. Lesen Sie
den Abschnitt “Entkalken”. Entkalken Sie Ihre SENSEO
®
Kaffeepadmaschine
regelmäßig.
Benutzen Sie keine zu großen Tassen, da der Kaffee darin schneller erkaltet.
Die Tassen sollten allerdings mindestens 150 ml fassen.
Verwenden Sie dünnwandige Tassen, da diese dem Kaffee weniger Wärme
entziehen als dickwandige Tassen.
Achten Sie darauf, dass die Größe der Tasse der Kaffeemenge entspricht.
Benutzen Sie für die Zubereitung einer kleinen Kaffeemenge keine große
Tasse.
Wenn Sie Kaffee mit frischer Milch trinken, wärmen Sie die Milch in der
Tasse in einer Mikrowelle vor.
Sie können die Kaffeepadmaschine vorheizen, indem Sie zuerst eine Tasse
Kaffe brühen, ohne einen Kaffeepad in den Padhalter einzulegen. Auf diese
Weise wärmen Sie auch Ihre Kaffeetasse auf.
Wenn sich Wasser auf dem Bedienfeld bendet, funktionieren die Tasten
nicht. Stellen Sie sicher, dass sowohl das Bedienfeld als auch Ihre Hände
trocken sind, wenn Sie das Bedienfeld verwenden.
Achten Sie darauf, dass Sie die Auswahltaste und nicht die Symbole links
neben der Auswahltaste drücken.
Dies geschieht, weil das Bedienfeld sehr empndlich ist und die Tasten
bereits durch leichte Berührungen aktiviert werden. Es stellt jedoch kein
Problem dar, da die Maschine daraufhin nicht mit der Kaffeezubereitung
beginnt.
Ziehen Sie vor dem Reinigen des Geräts den Netzstecker aus der
Steckdose.
Lesen Sie bitte den Abschnitt “Gespeicherter persönlicher Kaffee” im Kapitel
“SENSEO
®
Kaffee zubereiten”, und versuchen Sie erneut, die gewünschte
Kaffeemenge einzustellen.
56
Page 57

Table des matières
1 Introduction 57
2 Description générale 57
3 Important 58
4 Rinçage de l’appareil avant
la première utilisation 59
5 Préparation d’un café SENSEO
®
61
6 Nettoyage 65
7 Détartrage 67
8 Rangement à température
ambiante 70
9 Commande d’accessoires 70
10 Environnement 70
11 Garantie et service 70
12 Dépannage 71
1 Introduction
Félicitations pour votre achat et bienvenue dans
l’univers Philips ! Pour proter pleinement de
l’assistance Philips, enregistrez vos produits sur le
site à l’adresse suivante : www.philips.com/welcome.
1.1 Système à café SENSEO
Savourez des pauses café sensationnelles avec
SENSEO
SENSEO
de Douwe Egberts, pour vous offrir un café
intense et rafné avec sa délicieuse couche de
mousse, en toute simplicité.
®
. Ce système unique associe la cafetière
®
de Philips et les coffee pads SENSEO®
®
Le système innovateur de préparation du
café SENSEO
SENSEO
®
de Philips et les coffee pads
®
de Douwe Egberts sont parfaitement
associées an d’extraire du café le meilleur goût, le
meilleur arôme. Découvrez toutes les variétés de
café SENSEO
®
sur www.senseo.com.
Pour obtenir un goût intense et rafné, vous devez
respecter les recommandations suivantes :
Coffee pads
Utilisez les coffee pads SENSEO
®
spécialement
conçues par Douwe Egberts pour votre cafetière
SENSEO
en rondeur. Les coffee pads SENSEO
®
an d’obtenir un café tout en goût et
®
de Douwe
Egberts restent fraîches plus longtemps si vous les
rangez dans un récipient hermétique.
Eau fraîche
Utilisez de l’eau fraîche chaque jour. Si vous
n’avez pas utilisé la cafetière pendant une journée,
rincez-la à l’eau claire avant de la réutiliser (voir
le chapitre « Préparation d’un café SENSEO
®
»,
section « Rinçage de l’appareil après une journée
de non-utilisation »).
2 Description générale
(g. 1)
1 Récupérateur de café
2 Levier du couvercle
3 Couvercle avec chambre de préparation
4 Bague d’étanchéité
5 Disque de distribution d’eau
6 Porte-coffee pad pour deux tassesqq
7 Porte-coffee pad pour une tasseq
8 Couvercle du bec verseur
9 Bec verseur
10 Boutons de déverrouillage du bec verseur
du café
11 Plateau égouttoir amovible
12 Repose-tasses
13 Écran tactile
14 Bouton marche/arrêt
15 Symbole de mémorisation du café
personnalisé (HD7872 uniquement)
BE FRANÇAIS
57
Page 58

16 Symbole de café normal
17 Bouton de sélection
18 Symbole de café court
19 Voyant CALC
20 Bouton pour une tasse q
21 Bouton pour deux tasses qq
22 Réservoir d’eau
23 Couvercle du réservoir d’eau
3 Important
Lisez attentivement ce manuel avant d’utiliser
l’appareil et conservez-le pour un usage ultérieur.
Danger
• Ne plongez jamais l’appareil dans l’eau ou
dans tout autre liquide.
Avertissement
• Avant de brancher votre appareil, vériez que
la tension indiquée au fond de la cafetière
correspond bien à la tension secteur locale.
• Cet appareil n’est pas destiné à être utilisé
par des personnes (notamment des enfants)
dont les capacités physiques, sensorielles
ou intellectuelles sont réduites, ou par des
personnes manquant d’expérience ou de
connaissances, à moins que celles-ci ne soient
sous surveillance ou qu’elles aient reçu des
instructions quant à l’utilisation de l’appareil
par une personne responsable de leur
sécurité.
• Veillez à ce que les enfants ne puissent pas
jouer avec l’appareil.
• N’utilisez jamais l’appareil si la che, le cordon
d’alimentation ou l’appareil lui-même est
endommagé.
• Si le cordon d’alimentation est endommagé,
il doit être remplacé par Philips, un
Centre Service Agréé ou un technicien
qualié an d’éviter tout accident.
Attention
• Après avoir déballé votre cafetière SENSEO
ne la posez jamais sur le côté. Maintenez-la
toujours en position verticale, même pendant
le transport.
• Conez toujours l’appareil à un
Centre Service Agréé Philips pour réparation
ou vérication. N’essayez jamais de réparer
l’appareil vous-même ; toute intervention
par des personnes non qualiées entraîne
l’annulation de la garantie.
• N’utilisez pas la cafetière avec un
transformateur pour éviter tout accident.
• Placez toujours l’appareil sur une surface
stable et plane.
• N’utilisez pas la cafetière à une altitude
supérieure à 2 200 m.
• Ne versez jamais de lait, de café, d’eau chaude
ou d’eau gazeuse dans le réservoir d’eau.
• Ne rincez jamais l’appareil et ne le faites
jamais fonctionner lorsque le bec verseur n’est
pas en place.
• Cet appareil est destiné à un usage
domestique normal uniquement. Il n’est pas
destiné à être utilisé dans des environnements
tels que des cuisines destinées aux employés
dans les entreprises, magasins et autres
environnements de travail. Il n’est pas non
plus destiné à être utilisé par des clients dans
des hôtels, motels, chambres d’hôtes et autres
environnements résidentiels.
®
3.1 Conformité aux normes
Cet appareil est conforme à toutes les normes
relatives aux champs électromagnétiques (CEM).
Il répond aux règles de sécurité établies sur la
base des connaissances scientiques actuelles s’il
est manipulé correctement et conformément aux
instructions de ce mode d’emploi.
La consommation énergétique de cet appareil à
l’arrêt est inférieure à 1 watt. Cela signie que cet
appareil est conforme à la directive européenne
2009/125/CE, qui établit un cadre pour la
xation d’exigences en matière d’écoconception
applicables aux produits consommateurs d’énergie.
,
58
Page 59

4 Rinçage de l’appareil
avant la première
utilisation
3 Remplissez entièrement le réser voir d’eau
avec de l’eau froide du robinet.
Il est important de rincer votre cafetière
SENSEO
®
avant la première utilisation. Après le
cycle de rinçage (qui ne prend que 2 minutes
environ), la cafetière SENSEO
®
est prête à
l’emploi.
C
Attention :
N’interrompez jamais le cycle de rinçage car
vous empêcheriez la chaudière de se remplir
correctement.
1 Clipsez le bec verseur sur la cafetière. Pour
cela, pressez les deux parties intérieures du
bec verseur (1). Placez le bec verseur dans la
cafetière et relâchez (2).
C
Attention :
Ne rincez jamais l’appareil et ne le faites
jamais fonctionner lorsque le bec verseur n’est
pas en place.
2 Inclinez le sommet du réser voir d’eau vers
l’arrière (1) et soulevez le réservoir d’eau
pour le retirer de la cafetière (2).
4 Placez le couvercle sur le réservoir d’eau
avant de remettre le réservoir d’eau en place.
BE FRANÇAIS
5 Inclinez le réser voir d’eau et replacez la partie
inférieure dans la cafetière (1). Appuyez
ensuite le sommet du réservoir d’eau vers la
cafetière (2).
59
Page 60

6 Retirez le plateau égouttoir.
7 Placez un bol d’une contenance minimale de
1,5 litre sous le bec verseur.
1.5L
8 Assurez-vous qu’un porte-coffee pad vide est
dans la cafetière.
10 Appuyez sur le bouton marche/arrêt 3. Le
bouton s’allume pour indiquer que vous devez
rincer la cafetière.
11 Pour lancer le fonctionnement à l’eau claire,
appuyez sur les boutons pour une tasse q et
deux tasses qq en même temps.
• Le bouton marche/arrêt commence à
clignoter pour indiquer que le cycle de
rinçage a commencé.
• Pendant le cycle de rinçage, la chaudière se
remplit avec l’eau du réservoir et de l’eau
froide sort du bec verseur. L’appareil est plus
bruyant pendant le cycle de rinçage que
pendant le cycle de préparation du café.
9 Branchez la che sur une prise murale avec
mise à la terre.
60
Page 61

• Lorsque le réservoir d’eau est vide, le cycle
de rinçage est terminé et la cafetière
s’arrête automatiquement.
12 Remplissez le réser voir d’eau avec de l’eau
fraîche du robinet, placez le couvercle sur
celui-ci et remettez le réservoir d’eau en place
dans la cafetière.
Votre cafetière SENSEO
®
est maintenant prête
à l’emploi. Vous pouvez donc préparer votre
première tasse de délicieux café.
5 Préparation d’un
café SENSEO®
Dès l’allumage de la cafetière SENSEO®, vous
pouvez sélectionner l’intensité de votre café
et le nombre de tasses souhaitées. La cafetière
réalisera votre sélection une fois l’eau à la bonne
température.
1 Assurez-vous que le réservoir d’eau a été
rempli d’eau fraîche du robinet au-delà du
niveau minimal (MIN) et que le couvercle a
été placé sur le réservoir d’eau.
E
Conseil :
Utilisez de l’eau fraîche chaque jour.
2 Branchez la che sur une prise murale avec
mise à la terre.
3 Appuyez sur le bouton marche/arrêt 3. Le
bouton marche/arrêt clignote lentement
pendant que l’eau chauffe.
BE FRANÇAIS
D
Remarque :
Si le bouton marche/arrêt clignote
rapidement, cela signie que le réservoir ne
contient pas assez d’eau pour préparer une
tasse de café.
61
Page 62

4 Tirez le levier du couvercle vers le haut
pour ouvrir le couvercle. Celui-ci s’ouvre
automatiquement.
5
Si vous voulez préparer une tasse de café
SENSEO
®
, placez le porte-coffee pad pour
une tasse q dans la cafetière (1). Si vous voulez
préparer deux tasses, placez le porte-coffee
pad pour deux tasses qq dans la cafetière (2).
Assurez-vous que le porte-coffee pad est propre.
6 Placez une coffee pad dans le porte-coffee pad
pour une tasse q (1) ou placez deux coffee
pads dans le porte-coffee pad pour deux tasses
qq (2). Placez la ou les coffee pad(s)
correctement au centre du porte-coffee pad,
avec la partie bombée vers le bas. Appuyez
légèrement sur la ou les coffee pad(s) pour la/
les caler dans le porte-coffee pad.
D Remarque :
Vériez que le café est uniformément réparti
dans la ou les coffee pad(s).
C
Attention :
N’utilisez jamais de café moulu ordinaire ou
des coffee pads déchirées dans la cafetière
SENSEO
7
Fermez le couvercle (1) et verrouillez le levier (2).
®
car elle risquerait de se boucher.
B Remarque :
Assurez-vous que le couvercle est correctement
fermé et le levier correctement verrouillé
avant de commencer à préparer du café.
8 Placez une ou deux tasses sous les orices
d’écoulement du bec verseur. Vous pouvez
régler la hauteur du bec verseur en le faisant
glisser vers le haut ou vers le bas. Vous pouvez
aussi retirer le plateau égouttoir pour pouvoir
placer des tasses plus hautes.
D
Remarque
Les tasses que vous utilisez doivent avoir une
capacité d’au moins 150 ml lorsque vous faites
un café normal et 100 ml pour un café court.
N’utilisez pas de tasses trop grandes car le
café refroidirait plus rapidement.
62
Page 63

9 Appuyez sur le bouton de sélection
pour choisir l’intensité du café souhaitée.
Sélectionnez le symbole de tasse avec
trois barres pour préparer une tasse de café
normal (125 ml) (1). Sélectionnez le symbole
de tasse avec une barre pour préparer une
tasse de café court (60 ml) (2).
10 Après avoir sélectionné l’intensité du café
souhaitée, appuyez sur le bouton pour
une tasse q pour préparer une tasse (1) ou
sur le bouton pour deux tasses qq pour
préparer deux tasses (2).
D Remarque :
Ne retirez pas le réservoir d’eau pendant la
préparation du café.
12 Lorsque le café est prêt, retirez la ou les
coffee pad(s) usagée(s). Ôtez simplement le
porte-coffee pad de la cafetière et videz-le.
C
Attention :
La ou les coffee pad(s) peut/peuvent encore
contenir un peu d’eau chaude ou de café.
13 Après utilisation, appuyez sur le bouton
marche/arrêt 3 pour éteindre l’appareil.
D
Remarque :
Si vous n’utilisez pas la cafetière, elle s’éteint
automatiquement au bout de 15 minutes an
d’économiser de l’énergie.
BE FRANÇAIS
11 Une fois que l’eau a chauffé et que le bouton
marche/arrêt s’allume en continu, la cafetière
commence à préparer le café.
E
Conseil :
Vous pouvez interrompre le cycle de
préparation du café à tout moment. Pour ce
faire, appuyez sur le même bouton (bouton
pour une tasse ou bouton pour deux tasses)
que lors du lancement de la préparation du
café. Toutefois, si vous procédez de la sorte,
la cafetière ne terminera pas le cycle de
préparation du café interrompu si vous la
rallumez ou si vous appuyez à nouveau sur le
même bouton de préparation du café.
5.1 Mémorisation du café
personnalisé (HD7872
uniquement)
Vous pouvez programmer la cafetière pour
préparer la quantité de café que vous préférez
(jusqu’à 145 ml). Expérimentez pour trouver ce
qui vous convient le mieux. Nous vous conseillons
de préparer au moins 60 ml pour un goût et une
température optimaux.
Lors de la programmation, vous ne pouvez
utiliser que le bouton pour une tasse. Une fois
le processus de programmation terminé, vous
pouvez préparer une ou deux tasses avec la
quantité programmée de café.
63
Page 64

D Remarque :
Il n’est pas possible de programmer votre
mémoire de café personnel lorsque la cafetière
chauffe. Patientez jusqu’à ce que le bouton
marche/arrêt s’allume en continu.
1 Placez une coffee pad dans le porte-coffee
pad pour une tasse et placez une tasse sous
les orices d’écoulement.
2 Pour accéder au mode de programmation,
commencez par sélectionner le symbole de
mémorisation du café personnalisé (en forme
d’étoile) à l’aide du bouton de sélection (1).
Maintenez le bouton de sélection enfoncé
pendant 2 secondes jusqu’à ce que le symbole
en forme d’étoile commence à clignoter (2),
puis relâchez le bouton de sélection.
3 Appuyez sur le bouton pour une tasse pour
faire couler le café dans la tasse (1). Lorsque
la tasse contient la quantité de café souhaitée,
appuyez à nouveau sur le bouton pour
une tasse (2). Votre quantité de café préférée
a été dénie.
Votre cafetière SENSEO® prépare désormais une
ou deux tasses avec cette quantité de café lorsque
vous sélectionnez le symbole de mémoire de café
personnel au moyen du bouton de sélection.
D
Remarque :
Si vous voulez modier la quantité dénie de café,
répétez simplement les étapes 1 à 3.
5.2 Rinçage de l’appareil
après une journée de nonutilisation
Si vous n’avez pas utilisé la cafetière pendant une
journée, rincez-la an de vous assurer que la
chaudière est remplie avec de l’eau fraîche.
Pour rincer la cafetière, préparez deux tasses
d’eau chaude de la manière suivante :
1 Remplissez le réser voir d’eau avec de l’eau
froide du robinet au-delà du niveau minimal
(MIN) (1). Placez le couvercle sur le réservoir
d’eau (2) et replacez ce dernier dans la cafetière.
2 Placez le por te-coffee pad pour une tasse q
ou deux tasses qq dans la cafetière (sans
coffee pad).
64
Page 65

3 Replacez le couvercle et bloquez le levier.
4 Placez deux tasses ou une grande tasse sous
le bec verseur pour recueillir l’eau.
5 Appuyez sur le bouton marche/arrêt 3. Le
bouton marche/arrêt clignote lentement
pendant que l’eau chauffe.
6 Assurez-vous que vous avez sélectionné
l’intensité du café normal (symbole de tasse
avec trois barres).
7 Appuyez sur le bouton pour 2 tasses qq
pour préparer deux tasses d’eau chaude.
6 Nettoyage
Le nettoyage régulier de votre SENSEO® est
important pour que votre café SENSEO
toujours aussi bon et pour optimiser la durée de
vie de la cafetière.
B
Avertissement :
Ne plongez jamais la cafetière SENSEO® dans l’eau.
1 Débranchez toujours l’appareil avant de le
nettoyer.
2 Nettoyez l’extérieur de la cafetière à l’aide
d’un chiffon humide.
3 Retirez le récupérateur de café.
4 Pour retirer le bec verseur de la cafetière
appuyez sur les boutons de déverrouillage (1)
et retirez le bec verseur de la cafetière (2).
®
soit
BE FRANÇAIS
8 Une fois que l’eau a chauffé, le bouton
marche/arrêt s’allume en continu et la
cafetière commence à fonctionner.
9 Videz l’eau des tasses. La cafetière est
désormais prête à être réutilisée.
65
Page 66

5 Pour déclipser le bec verseur, pressez les
deux parties intérieures du bec verseur (1).
Déplacez le bec verseur vers le bas pour le
retirer (2).
6 Nettoyez le réservoir d’eau et son couvercle,
le bec verseur, le récupérateur de café, le
plateau égouttoir, le repose-tasses et les
porte-coffee pads à l’eau chaude ou au
lave-vaisselle.
D Remarque :
Vériez si le tamis au centre du porte-coffee
pad n’est pas bouché. Le cas échéant, débouchez
le tamis en rinçant le porte-coffee pad sous le
robinet. Si nécessaire, vous pouvez utiliser une
brosse à vaisselle pour nettoyer le tamis.
7 Nettoyez le disque de distribution d’eau et
la bague d’étanchéité en caoutchouc avec un
chiffon humide.
C
Attention :
Ne retirez pas la bague d’étanchéité en
caoutchouc et veillez à ne pas endommager
la plaque du disque de distribution d’eau.
8 Nettoyez l’orice de remplissage de la
cafetière à l’aide d’un chiffon humide.
C
Attention :
Veillez à ne pas endommager la soupape au fond
du réservoir d’eau si vous utilisez une brosse à
vaisselle pour nettoyer le réservoir d’eau.
66
Page 67

7 Détartrage
Des résidus de calcaire se forment lors de
l’utilisation de la cafetière. Il est essentiel de
détartrer la cafetière SENSEO
CALC s’allume. Utilisez uniquement le détartrant
spécial SENSEO
®
(HD7012, HD7011, HD7006).
À quel moment détartrer la cafetière ?
• Détartrez la cafetière SENSEO
décrit ci-dessous lorsque le voyant CALC
s’allume (après avoir préparé environ
400 tasses de café SENSEO
Pourquoi détartrer votre cafetière ?
En voici les raisons :
• Le détartrage permet de prolonger la durée
de vie de votre cafetière SENSEO
• Il garantit un volume de tasse maximal
• Il assure une température de café optimale
• La cafetière est moins bruyante lors de la
préparation du café
• Il évite les dysfonctionnements
Si vous ne respectez pas la procédure de
détartrage, les résidus de calcaire restent bloqués
dans l’appareil et le calcaire s’accumule alors plus
rapidement. À terme, cela peut endommager
dénitivement la cafetière.
®
lorsque le voyant
®
comme
®
).
®
B Avertissement :
N’utilisez jamais un agent de détartrage à base
d’acides minéraux tel que l’acide sulfurique,
l’acide chlorhydrique, l’acide sulfamique ou l’acide
acétique (le vinaigre, par ex.). Ces agents de
détartrage peuvent endommager votre cafetière
SENSEO
®
.
7.1 Procédure de détartrage
La procédure de détartrage est constituée
d’un cycle de détartrage et de deux cycles de
rinçage. N’interrompez pas le cycle de détartrage
et n’éteignez pas la cafetière avant la n des
deux cycles de rinçage.
1 Dans un verre gradué, mélangez 50 grammes
d’acide citrique avec 1 litre d’eau. Remuez
jusqu’à dissolution de la poudre. Versez la
solution de détartrage dans le réservoir d’eau.
2 Inclinez le réser voir d’eau et replacez la partie
inférieure dans la cafetière (1). Appuyez
ensuite le sommet du réservoir d’eau vers la
cafetière (2).
BE FRANÇAIS
Assurez-vous d’utiliser un agent de
détartrage approprié
Utilisez uniquement le détartrant spécial
SENSEO
®
(HD7012, HD7011, HD7006). Il a
été développé pour garantir un fonctionnement
optimal de la cafetière. Chaque mélange de
détartrage ne peut être utilisé qu’une fois. Pour
de plus amples informations sur ce détartrant,
rendez-vous sur www.philips.com.
67
Page 68

3 Appuyez sur le bouton marche/arrêt 3. Le
bouton marche/arrêt clignote lentement
pendant que l’eau chauffe. La cafetière est
prête pour le détartrage lorsque le bouton
marche/arrêt est allumé en continu.
4 Mettez une coffee pad usagée dans le
porte-coffee pad pour une tasse q, puis
placez le porte-coffee pad dans la cafetière.
Fermez le couvercle et assurez-vous qu’il est
correctement verrouillé.
D
Remarque :
Utilisez toujours une coffee pad usagée lors
du détartrage de la cafetière. Celle-ci ltre
les résidus de calcaire pour éviter que le tamis
du porte-coffee pad ne se bouche.
5 Retirez le plateau égouttoir.
6 Placez un bol d’une capacité minimale de 1,5 l
sous le bec verseur pour recueillir la solution
de détartrage.
1.5L
7 Lorsque le bouton marche/arrêt est allumé
en continu, appuyez simultanément sur
les boutons pour une tasse q et pour
deux tasses qq pendant 3 secondes jusqu’à
ce que vous entendiez un signal sonore.
Relâchez les boutons dès que leur voyant
et l’intensité sélectionnée s’éteignent. Cela
signie que la procédure de détartrage a été
correctement activée.
B
Avertissement :
Assurez-vous que le couvercle est
correctement fermé et le levier
correctementverrouillé avant de
commencer à détartrer l’appareil.
68
• Le voyant CALC et le bouton marche/arrêt
commencent à clignoter pour indiquer que le
cycle de détartrage est en cours.
• Durant le cycle de détartrage, de l’eau
s’écoule de la cafetière par intermittence.
Page 69

• Lorsque le réservoir d’eau est vide, le cycle
de détartrage est terminé. Le bouton
marche/arrêt commence à clignoter
rapidement.
D
Remarque :
Si vous appuyez sur le bouton pour une tasse
et le bouton pour deux tasses pendant plus
de 3 secondes, la cafetière ne démarre pas le
cycle de détartrage. Le cas échéant, réappuyez
simultanément sur les boutons pour une tasse
et pour deux tasses pendant 3 secondes.
7.2 Rinçage après le détartrage
1 Rincez le réser voir d’eau sous le robinet, puis
remplissez-le entièrement avec de l’eau fraîche
du robinet.
3 Mettez une coffee pad usagée dans le
porte-coffee pad pour une tasse q, puis
placez le porte-coffee pad dans la cafetière.
Fermez le couvercle et assurez-vous qu’il est
correctement verrouillé.
4 Placez un bol d’une capacité minimale de 1,5 l
sous le bec verseur an de recueillir l’eau.
BE FRANÇAIS
1.5L
D
Remarques :
Ne remplissez pas le réservoir avec de l’eau
chaude ou la solution de détartrage usagée.
2 Inclinez le réser voir d’eau et replacez la partie
inférieure dans la cafetière (1). Appuyez
ensuite le sommet du réservoir d’eau vers la
cafetière (2).
5 Appuyez simultanément sur les boutons pour
une tasse q et pour deux tasses qq pendant
3 secondes jusqu’à ce que vous entendiez un
signal sonore pour commencer le cycle de
rinçage.
6 Une fois le cycle de rinçage terminé, retirez la
coffee pad usagée et nettoyez le porte-coffee
pad pour éviter que le tamis au centre du
porte-coffee pad ne se bouche.
69
Page 70

7 Répétez à nouveau les étapes 1 à 6 pour
garantir une cafetière propre.
8 Après le cycle de détar trage et les cycles de
rinçage, le voyant CALC s’éteint et la cafetière
s’éteint automatiquement.
8 Rangement à
température
ambiante
Après avoir fait fonctionner la cafetière à l’eau
claire pour la première fois (voir le chapitre
« Rinçage de l’appareil avant la première
utilisation »), vous devez l’utiliser et la ranger dans
un endroit à température ambiante pour éviter
toute détérioration.
9 Commande
d’accessoires
Pour acheter des accessoires pour cet appareil,
rendez-vous sur notre boutique en ligne à
l’adresse www.shop.philips.com/service.
Si la boutique en ligne n’est pas disponible dans
votre pays, contactez votre revendeur Philips
ou un Centre Service Agréé Philips. Si vous
rencontrez des problèmes pour vous procurer
des accessoires pour votre appareil, contactez le
Service Consommateurs Philips de votre pays.
Vous en trouverez les coordonnées dans le
dépliant de garantie internationale.
10 Environnement
• Lorsqu’il ne fonctionnera plus, ne jetez pas
l’appareil avec les ordures ménagères, mais
adressez-vous à un site agréé, où il pourra
être recyclé. Vous contribuerez ainsi à la
protection de l’environnement.
11 Garantie et service
Si vous souhaitez obtenir des informations
supplémentaires, faire réparer l’appareil ou
si vous rencontrez un problème, rendezvous sur le site Web de Philips à l’adresse
www.philips.com/support ou contactez
le Service Consommateurs Philips de
votre pays. Vous trouverez le numéro de
téléphone correspondant sur le dépliant de
garantie internationale. S’il n’existe pas de
Service Consommateurs Philips dans votre pays,
renseignez-vous auprès de votre revendeur
Philips local.
L’achat de la cafetière SENSEO® de Philips
n’annule aucun droit de Sara Lee/Douwe Egberts
ou Philips relatif aux brevets et ne confère en
aucun cas à l’acheteur une licence ou un droit
relatif à ces brevets.
Conez toujours l’appareil à un
Centre Service Agréé Philips pour réparation ou
vérication. N’essayez jamais de réparer l’appareil
vous-même ; toute intervention par des personnes
non qualiées entraîne l’annulation de la garantie.
70
Page 71

12 Dépannage
12.1 Cafetière SENSEO
®
Ce chapitre présente les problèmes les plus courants que vous pouvez rencontrer avec votre machine.
Si vous ne parvenez pas à résoudre le problème à l’aide des informations ci-dessous, visitez le site Web
www.philips.com/support pour consulter une liste de questions fréquemment posées ou contactez
le Service Consommateurs Philips de votre pays.
Problème Solution
Ma tasse a débordé
lorsque j’ai utilisé
la cafetière pour la
première fois.
Vous avez probablement essayé de préparer une tasse de café sans avoir
rincé la cafetière préalablement. Avant de commencer à préparer du café,
vous devez rincer la cafetière. Lorsque vous allumez à nouveau la cafetière,
le bouton marche/arrêt s’allume en continu ou clignote lentement ou
rapidement.
Si le bouton marche/arrêt s’allume en continu, vous devez exécuter la
procédure de rinçage (voir le chapitre « Rinçage de l’appareil avant la
première utilisation »).
Si le bouton marche/arrêt clignote lentement ou rapidement, vous NE
devez PAS exécuter la procédure de rinçage. Si le bouton marche/arrêt
clignote lentement, cela signie que l’eau chauffe. S’il clignote rapidement,
cela signie que le réservoir d’eau ne contient pas assez d’eau ou qu’il n’a
pas été placé correctement dans la cafetière.
Lors de la première
utilisation de la
cafetière, l’eau a
continué à s’écouler
du bec verseur.
Si l’eau a continué à s’écouler du bec verseur jusqu’à ce que le réservoir
d’eau soit vide, la cafetière a exécuté le cycle de rinçage. Avant de
commencer à préparer du café, vous devez rincer la cafetière. Lorsque vous
allumez à nouveau la cafetière, le bouton marche/arrêt s’allume en continu
ou clignote lentement ou rapidement.
Si le bouton marche/arrêt s’allume en continu, vous devez exécuter la
procédure de rinçage (voir le chapitre « Rinçage de l’appareil avant la
première utilisation »).
Si le bouton marche/arrêt clignote lentement ou rapidement, vous NE
devez PAS exécuter la procédure de rinçage. Si le bouton marche/arrêt
clignote lentement, cela signie que l’eau chauffe. S’il clignote rapidement,
cela signie que le réservoir d’eau ne contient pas assez d’eau ou qu’il n’a
pas été placé correctement dans la cafetière.
Le bouton marche/
arrêt clignote
lentement.
Vous avez utilisé la cafetière SENSEO
ce cas, l’eau bout avant que la température correcte ne soit atteinte et
l’appareil ne fonctionne pas correctement. Arrêtez l’appareil et ne l’utilisez
®
à plus de 2 200 m d’altitude. Dans
pas à plus de 2 200 m d’altitude.
BE FRANÇAIS
71
Page 72

Problème Solution
Le voyant CALC
clignote.
Vous avez appuyé sur les boutons pour une tasse et deux tasses en même
temps. Cela a lancé le cycle de détartrage. Si vous ne souhaitiez pas lancer
le cycle de détartrage, appuyez simplement sur le bouton marche/arrêt
pour éteindre la cafetière. Si vous souhaitiez lancer le cycle de détartrage,
n’interrompez pas le cycle, laissez l’appareil fonctionner jusqu’à ce que le
réservoir d’eau soit vide.
Le voyant CALC ne
disparaît pas après le
détartrage.
Le voyant CALC ne disparaît pas si la procédure de détartrage n’a pas
été effectuée correctement. Pour effectuer la procédure de détartrage
correctement :
1. Veillez à ne pas interrompre le cycle de détartrage ou éteindre ou
débrancher la cafetière pendant le cycle de détartrage. Au cours de ce
cycle, de l’eau chaude sort du bec verseur par intermittence et la cafetière
interrompt le détartrage 3 à 4 fois pour laisser agir la solution de détartrage
et pour chauffer à nouveau.
2. Veillez à lancer le cycle de détartrage en appuyant simultanément sur les
boutons pour une tasse et pour deux tasses. Reportez-vous au chapitre
« Détartrage » pour une description complète de la procédure de
détartrage.
3. Veillez à utiliser trois réservoirs d’eau pleins pour effectuer la procédure
de détartrage : un réservoir rempli avec la solution de détartrage et
deux réservoirs remplis avec de l’eau fraîche.
Le bouton marche/
arrêt continue à
Assurez-vous que le réservoir d’eau contient assez d’eau et qu’il a été
correctement placé.
clignoter rapidement.
Assurez-vous que la température ambiante n’est pas inférieure à 5 °C.
Sinon, l’appareil ne fonctionnera pas correctement.
L’appareil fuit. Si vous remarquez que du café ou de l’eau s’écoule de votre cafetière
SENSEO
®
, essayez de déterminer d’où provient la fuite. Cette vérication
est importante car l’emplacement de la fuite détermine la solution au
problème.
1. Si la fuite se situe à proximité du couvercle ou du bec verseur, assurez-
vous que :
1a. le tamis au centre du porte-coffee pad n’est pas bouché. Le cas échéant,
débouchez le tamis en rinçant le porte-coffee pad sous le robinet ;
1b. la coffee pad a été placée correctement au centre du porte-coffee pad ;
1c. la bague d’étanchéité n’est pas bloquée sous le disque de distribution
d’eau (voir l’illustration 1 au début du mode d’emploi) ;
1d. le bec verseur et le récupérateur de café ont été placés correctement.
2. Si la fuite se situe à proximité du fond du réservoir d’eau ou sous la
cafetière, assurez-vous que :
2a. le réservoir d’eau ne contient pas trop d’eau ;
2b. vous n’avez pas placé le réservoir d’eau dans la cafetière trop
brutalement. Si c’est le cas, des éclaboussures d’eau peuvent se produire ;
72
Page 73

Problème Solution
2c. le réservoir d’eau n’est pas endommagé ou cassé. Aucune goutte d’eau
ne devrait normalement s’écouler de la sortie d’eau située au fond du
réservoir d’eau dans les 30 secondes suivant le remplissage.
Je n’arrive pas à ouvrir
le couvercle.
Un vide s’est peut-être formé en dessous du couvercle. Éteignez la cafetière.
Tirez le levier vers le haut et attendez 24 heures avant d’ouvrir le couvercle.
L’ouverture du couvercle peut nécessiter un peu d’effort.
Ne déplacez pas la cafetière SENSEO
déverrouillage du couvercle en déplaçant la cafetière, ni en la plaçant à
l’extérieur ou dans un environnement froid.
Pour éviter que cela ne se reproduise, assurez-vous toujours que les porte-
coffee pads sont propres et que le tamis au centre des porte-coffee pads
n’est pas bouché.
La cafetière produit
moins de café que
d’habitude.
Vériez si le tamis au centre du porte-coffee pad n’est pas bouché. Le cas
échéant, débouchez le tamis en le rinçant sous le robinet. Si nécessaire, vous
pouvez utiliser une brosse à vaisselle pour nettoyer le tamis.
Détartrez l’appareil (voir le chapitre « Détartrage »).
Je ne parviens pas à
fermer correctement
Vériez s’il n’y a pas une coffee pad collée au disque de distribution d’eau. Si
c’est le cas, retirez-la.
le couvercle.
Vériez si vous avez utilisé le porte-coffee pad adéquat. Utilisez deux coffee
pads avec le porte-coffee pad pour deux tasses (plus profond) qq.
Le café SENSEO
n’est pas sufsamment
fort.
®
Assurez-vous que vous avez sélectionné l’intensité du café souhaitée.
Vous pouvez choisir entre un café normal et un café cour t. Vous pouvez
également augmenter ou diminuer l’intensité du café en dénissant votre
quantité de café préférée grâce à la fonction de mémorisation du café
personnalisé (HD7872 uniquement).
Assurez-vous que vous avez utilisé le nombre correct de coffee pads et que
vous avez appuyé sur le bouton adéquat. Utilisez deux coffee pads avec le
porte-coffee pad pour deux tasses qq et le bouton pour deux tasses qq.
Assurez-vous que vous avez bien placé la/les coffee pad(s) au centre du
porte-coffee pad an que l’eau ne s’écoule pas autour des coffee pads.
Quand vous utilisez deux coffee pads l’une au-dessus de l’autre, les parties
bombées doivent être dirigées vers le bas et vous devez les presser
légèrement dans le porte-coffee pad.
Assurez-vous que vous n’avez pas utilisé deux fois la même coffee pad par
erreur.
Vériez que le café est uniformément réparti dans la coffee pad.
Si vous préférez une saveur plus intense, essayez les coffee pads SENSEO
avec un arôme plus fort.
®
. Vous ne pouvez pas accélérer le
BE FRANÇAIS
®
73
Page 74

Problème Solution
Le café n’est pas assez
chaud.
L’écran tactile ne
fonctionne pas.
J’active
accidentellement
l’écran tactile lorsque
je le nettoie.
HD7872 uniquement :
le bouton de
mémorisation du
café personnalisé
ne permet pas de
préparer la quantité
de café que je préfère.
Si vous avez utilisé la cafetière pendant une période prolongée et que
la température du café diminue, nous vous conseillons de détartrer
la cafetière. Reportez-vous au chapitre « Détartrage ». Détartrez
régulièrement votre cafetière SENSEO
®
.
N’utilisez pas de tasses trop grandes car le café y refroidit plus rapidement.
Utilisez des tasses d’une capacité minimale de 150 ml.
Utilisez des tasses à parois nes car celles-ci absorbent moins de chaleur
que les tasses à parois épaisses.
Assurez-vous que la taille de la tasse est adaptée à la quantité de café. Ne
préparez pas une petite quantité de café dans une grande tasse.
Si vous buvez du café avec du lait frais, préchauffez le lait dans la tasse au
micro-ondes.
Vous pouvez préchauffer la cafetière en préparant tout d’abord une tasse
de café sans placer de coffee pad dans le porte-coffee pad. De cette façon,
vous préchauffez également votre tasse à café.
S’il y a de l’eau sur l’écran tactile, les boutons ne fonctionnent pas. Assurezvous que l’écran tactile est sec ainsi que vos mains lorsque vous utilisez
l’écran tactile.
Veillez à appuyer sur le bouton de sélection et non sur les symboles situés à
gauche du bouton de sélection.
L’écran tactile est en effet très sensible et les boutons ne nécessitent qu’une
légère pression pour être activés. Cela ne pose aucun problème ; la cafetière
ne commencera pas à préparer du café.
Débranchez l’appareil avant de le nettoyer.
Veuillez lire la section « Mémorisation du café personnalisé » du chapitre
« Préparation d’un café SENSEO
®
» et essayez de dénir à nouveau la
quantité de café que vous préférez.
74
Page 75

Inhoudsopgave
1 Inleiding 75
2 Algemene beschrijving 75
3 Belangrijk 76
4 De machine doorspoelen
vóór het eerste gebruik 77
5 SENSEO
6 Schoonmaken 82
7 Ontkalken 84
8 Vorstvrije opslag 87
9 Accessoires bestellen 87
10 Milieu 87
®
kofe zetten 79
De Douwe Egberts-kofe in de handige
SENSEO
®
kofepads en het unieke SENSEO®
zetsysteem van Philips zijn perfect op elkaar
afgestemd voor de beste smaak en het beste
aroma. Ontdek alle SENSEO
®
kofevarianten op
www.senseo.com.
Om zeker te zijn van een volle, ronde kofesmaak,
dient u aan het volgende te denken:
Verse kofepads
Gebruik voor een volle, ronde smaak de
SENSEO
Egberts voor uw SENSEO
ontwikkeld. De Douwe Egberts SENSEO
®
kofepads die speciaal door Douwe
®
kofemachine zijn
®
kofepads blijven langer vers als u ze in een
hermetisch afsluitbaar opbergblik bewaart.
Vers water
Gebruik elke dag vers water. Wanneer u de
kofemachine één dag niet hebt gebruikt, moet
u de machine voor gebruik doorspoelen met
vers water (zie ‘De machine doorspoelen nadat
u deze een dag niet hebt gebruikt’ in hoofdstuk
‘SENSEO
®
kofe zetten’).
11 Garantie en service 87
12 Problemen oplossen 88
1 Inleiding
Gefeliciteerd met uw aankoop en welkom bij
Philips! Als u volledig wilt proteren van de
ondersteuning die Philips biedt, registreer uw
product dan op www.philips.com/welcome.
1.1 SENSEO® kofemachine
Maak uw kofemomenten echt speciaal met
SENSEO
de gebruiksvriendelijke Philips SENSEO
kofemachine met de speciaal ontwikkelde
Douwe Egberts SENSEO
kofe met een volle, ronde kofesmaak en
een heerlijk schuimlaagje.
®
. Dit unieke systeem combineert
®
kofepads, voor
®
2 Algemene
beschrijving (g. 1)
NEDERLANDS
1 Kofecollector
2 Hendel van deksel
3 Deksel met kofezetkamer
4 Afdichtring
5 Waterverdeelschijf
6 2-kops padhouder qq
7 1-kops padhouder q
8 Afdekkap van kofetuit
9 Kofetuit
10 Tuitontgrendelknoppen
11 Verwijderbare lekbak
12 Plateau
13 Touchpanel
14 Aan/uitknop
15 Pictogram voor uw persoonlijke
kofegeheugen (alleen HD7872)
16 Pictogram voor normale kofe
75
Page 76

17 Keuzeknop
18 Pictogram voor sterke kofe
19 CALC-lampje
20 1-kops knop q
21 2-kops knop qq
22 Waterreservoir
23 Deksel van waterreservoir
3 Belangrijk
Lees deze gebruiksaanwijzing zorgvuldig door
voordat u de machine gaat gebruiken. Bewaar
de gebruiksaanwijzing om deze indien nodig te
kunnen raadplegen.
Gevaar
• Dompel de machine nooit in water of een
andere vloeistof.
Waarschuwing
• Controleer of het voltage aangegeven op
de onderkant van de machine overeenkomt
met de plaatselijke netspanning voordat u de
machine aansluit.
• Deze machine is niet bedoeld voor gebruik
door personen (waaronder kinderen) met
verminderde lichamelijke, zintuiglijke of
geestelijke vermogens, of die gebrek aan
ervaring of kennis hebben, tenzij iemand
die verantwoordelijk is voor hun veiligheid
toezicht op hen houdt of hen heeft uitgelegd
hoe de machine dient te worden gebruikt.
• Houd toezicht op kinderen om te voorkomen
dat ze met de machine gaan spelen.
• Gebruik de machine niet indien de stekker, het
netsnoer of de machine zelf beschadigd is.
• Indien het netsnoer beschadigd is, moet u het
laten vervangen door Philips, een door Philips
geautoriseerd servicecentrum of personen
met vergelijkbare kwalicaties om gevaar te
voorkomen.
Let op
• Leg de SENSEO
zijkant nadat u deze uit de verpakking hebt
gehaald. Houd de machine altijd rechtop, ook
tijdens transport.
®
machine nooit op zijn
• Breng de machine altijd naar een door Philips
geautoriseerd servicecentrum voor onderzoek
of reparatie. Probeer niet zelf de machine te
repareren, omdat uw garantie hierdoor komt
te vervallen.
• De machine mag niet worden gebruikt in
combinatie met een transformator, aangezien
dit tot onveilige situaties kan leiden.
• Plaats de machine op een vlakke en stabiele
ondergrond.
• Gebruik de machine niet op een hoogte
boven 2200 meter NAP.
• Giet nooit melk, kofe, heet water of
koolzuurhoudend water in het waterreservoir.
• Zorg ervoor dat de tuit goed is geplaatst
voordat u de machine doorspoelt of kofe
zet.
• Deze machine is uitsluitend bedoeld
voor normaal huishoudelijk gebruik. De
machine is niet bedoeld voor gebruik in
personeelskeukens van bijvoorbeeld winkels,
kantoren, boerderijen of vergelijkbare
werkomgevingen en ook niet voor gebruik
door gasten van hotels, motels, bed &
breakfasts en andere verblijfsaccommodaties.
3.1 Naleving van richtlijnen
Deze machine voldoet aan alle richtlijnen met
betrekking tot elektromagnetische velden (EMV).
Mits de machine op de juiste wijze en volgens
de instructies in deze gebruiksaanwijzing wordt
gebruikt, is deze veilig te gebruiken volgens het nu
beschikbare wetenschappelijke bewijs.
Het energieverbruik van deze machine bedraagt,
wanneer deze is uitgeschakeld, minder dan 1 watt.
Dit betekent dat deze machine aan EU-richtlijn
2009/125/EG voldoet, waarin de ecologische
ontwerpvereisten voor energiegebruikende
producten zijn vastgelegd.
76
Page 77

4 De machine
doorspoelen vóór
het eerste gebruik
U moet uw SENSEO® kofemachine vóór het
eerste gebruik doorspoelen. Na het doorspoelen
(dat slechts circa 2 minuten in beslag neemt) is de
machine klaar voor gebruik en kunt u SENSEO
kofe zetten.
C
Let op:
Onderbreek het doorspoelen nooit. Anders
wordt de boiler niet correct gevuld.
1 Bevestig de tuit aan de machine. Pak de twee
randen van het binnendeel van de tuit en knijp
ze licht in (1). Plaats de tuit op de machine en
laat de twee randen los (2).
®
3 Vul het waterreservoir tot de bovenkant met
koud kraanwater.
4
Plaats het deksel op het waterreservoir voordat u
het waterreservoir weer op de machine plaatst.
5 Kantel het waterreservoir en plaats de
onderkant terug op de machine (1).
Duw vervolgens de bovenkant van het
waterreservoir naar de machine (2).
NEDERLANDS
C
Let op:
Zorg ervoor dat de tuit goed is geplaatst
voordat u de machine doorspoelt of kofe zet.
2 Kantel de bovenkant van het waterreservoir
naar achteren (1) en neem het waterreservoir
van de machine (2).
6 Verwijder de lekbak.
77
Page 78

7 Plaats een kom met een minimumcapaciteit
van 1,5 liter onder de kofetuit.
1.5L
8 Zorg ervoor dat een padhouder zonder
pad(s) is geplaatst.
9 Steek de stekker in een geaard stopcontact.
10 Druk op de aan/uitknop 3. De knop gaat
branden om aan te geven dat u de machine
moet doorspoelen.
11 Als u begint met doorspoelen, druk dan de
1-kops knop q en de 2-kops knop qq
tegelijkertijd kort in.
• De aan/uitknop begint te knipperen om aan
te geven dat het doorspoelen is begonnen.
• Tijdens de doorspoelcyclus vult de boiler zich
met water uit het waterreservoir en komt
er koud water uit de kofetuit. Tijdens het
doorspoelen maakt de machine meer geluid
dan tijdens gewoon kofezetten.
• Wanneer al het water in het waterreservoir
is opgebruikt, is de doorspoelcyclus voltooid
en schakelt de machine automatisch uit.
78
Page 79

12 Vul het waterreservoir met schoon
kraanwater, plaats het deksel op het
waterreservoir en plaats het waterreservoir
terug op de machine.
Uw SENSEO
®
machine is nu klaar voor gebruik
en u kunt uw eerste kop heerlijke kofe zetten.
5 SENSEO® kofe
zetten
Terwijl de SENSEO® kofemachine opwarmt, kunt
u de gewenste kofesterkte en het aantal koppen
kiezen. De machine zet de kop of koppen dan
onmiddellijk nadat het water is opgewarmd.
1 Zorg ervoor dat het waterreservoir is
gevuld met koud kraanwater tot boven
het MIN-niveau en dat het deksel op het
waterreservoir zit.
3 Druk op de aan/uitknop 3. De aan/uitknop
knippert langzaam terwijl het water wordt
opgewarmd.
D
Opmerking:
Als de aan/uitknop snel knippert, bevat het
waterreservoir niet genoeg water voor één
kop kofe.
4 Trek de hendel van het deksel omhoog
om het deksel te openen. Het deksel gaat
automatisch open.
5 Als u één kop SENSEO
®
kofe wilt zetten,
plaatst u de 1-kops padhouder q in de
machine (1). Als u twee koppen wilt zetten,
plaatst u de 2-kops padhouder qq in de
machine (2). Zorg ervoor dat de padhouder
schoon is.
NEDERLANDS
E
Tip:
Gebruik elke dag vers water.
2 Steek de stekker in een geaard stopcontact.
79
Page 80

6 Plaats 1 kofepad in de 1-kops padhouder
q (1) of plaats 2 kofepads in de 2-kops
padhouder qq (2). Plaats de pad of pads
goed in het midden van de padhouder met de
bolle zijde naar beneden. Druk de pad of pads
licht in de padhouder.
8 Plaats een kop of twee koppen onder de
tuitopeningen. U kunt de hoogte van de
kofetuit aanpassen door deze naar boven
of naar beneden te schuiven. U kunt ook de
lekbak verwijderen zodat u hogere koppen
onder de tuit kunt plaatsen.
D
Opmerking:
Zorg ervoor dat de kofe in de pad of pads
gelijkmatig is verdeeld.
C
Let op:
Gebruik nooit gewone gemalen kofe of
gescheurde pads in de SENSEO
®
machine,
aangezien hierdoor de machine verstopt raakt.
7 Sluit het deksel (1) en vergrendel de hendel (2).
B
Waarschuwing:
Zorg dat het deksel goed gesloten is en
dat de hendel van het deksel is vergrendeld
voordat u begint met kofezetten.
D
Opmerking
De koppen die u gebruikt, moeten een inhoud
van ten minste 150 ml hebben voor normale
kofe of ten minste 100 ml voor sterke kofe.
Gebruik geen koppen die te groot zijn, anders
wordt de kofe snel koud.
9 Druk op de keuzeknop om de gewenste
kofesterkte te kiezen. Kies het koppictogram
met drie balken voor een gewone kop kofe
(125 ml) (1). Kies het koppictogram met één
balk voor een sterke kop kofe (60 ml) (2).
10 Wanneer u de gewenste kofesterkte hebt
gekozen, drukt u op de 1-kops knop q voor
één kop (1) of op de 2-kops knop qq voor
twee koppen (2).
80
Page 81

11 Wanneer het water is opgewarmd en de
aan/uitknop ononderbroken brandt, zet de
machine kofe.
E
Tip:
U kunt het kofezetten altijd onderbreken.
Hiervoor drukt u op dezelfde knop (1-kops
knop of 2-kops knop) waarop u hebt gedrukt
om het kofezetten te starten. Als u dit doet,
gaat de machine echter niet verder met
kofezetten als u het apparaat weer inschakelt
of u op dezelfde knop drukt.
D
Opmerking:
Verwijder het waterreservoir niet tijdens het
kofezetten.
12 Verwijder de gebruikte kofepads wanneer
de kofe klaar is. Neem de padhouder uit de
machine en haal de kofepads eruit.
C
Let op:
Er kan zich nog wat heet water of hete kofe
op de kofepads bevinden.
13 Druk na gebruik op de aan/uitknop 3 om de
machine uit te schakelen.
Tijdens het programmeren kunt u alleen
de 1-kops knop gebruiken. Wanneer u de
kofemachine hebt geprogrammeerd, kunt
u één of twee koppen kofe zetten met de
geprogrammeerde hoeveelheid kofe.
D
Opmerking:
U kunt uw persoonlijke kofegeheugen niet
programmeren terwijl de machine aan het opwarmen
is. Wacht tot de aan/uitknop ononderbroken brandt.
1 Plaats 1 kofepad in de 1-kops padhouder en
plaats 1 kop onder de tuitopeningen.
2 Open de programmeermodus door
eerst het pictogram voor uw persoonlijke
kofegeheugen (het sterpictogram) te kiezen
met de keuzeknop (1). Houd vervolgens de
keuzeknop 2 seconden ingedrukt tot het
sterpictogram begint te knipperen (2) en u
een piepje hoort. Laat de keuzeknop dan los.
D
Opmerking:
Als u de machine niet gebruikt, schakelt deze
automatisch na 15 minuten uit om energie te
besparen.
5.1 Persoonlijk kofegeheugen
(alleen HD7872)
U kunt de machine programmeren om de door u
gewenste hoeveelheid kofe te zetten (max. 145 ml).
Experimenteer en ontdek welke hoeveelheid het
beste bij u past. Wij raden u aan om ten minste 60 ml
kofe te zetten voor optimale smaak en temperatuur.
3 Druk op de 1-kops knop om de kofe in de
kop te laten stromen (1). Wanneer de kop de
gewenste hoeveelheid kofe bevat, drukt u
opnieuw op de 1-kops knop (2). De gewenste
hoeveelheid kofe is nu ingesteld.
Vanaf nu zet uw SENSEO
®
machine één of
twee koppen met deze hoeveelheid kofe
wanneer u het pictogram voor uw persoonlijke
kofegeheugen kiest met de keuzeknop.
NEDERLANDS
81
Page 82

D Opmerking:
Als u de ingestelde hoeveelheid kofe wilt
wijzigen, hoeft u alleen maar stap 1 tot en met
3 opnieuw uit te voeren.
5.2 De machine doorspoelen
nadat u deze een dag niet
hebt gebruikt
Als u de kofemachine een dag niet hebt gebruikt,
moet u de machine doorspoelen om ervoor te
zorgen dat de boiler is gevuld met schoon water.
U kunt de machine doorspoelen door twee
koppen warm water te zetten. Doe dit als volgt:
1 Vul het waterreservoir met koud kraanwater
tot boven het MIN-niveau (1). Plaats het
deksel op het waterreservoir (2) en plaats het
waterreservoir weer op de machine.
2 Plaats de 1-kops padhouder q of 2-kops
padhouder qq zonder pads in de machine.
4 Plaats twee koppen of een grote mok onder
de kofetuit om het water in op te vangen.
5 Druk op de aan/uitknop 3. De aan/uitknop
knippert langzaam terwijl het water wordt
opgewarmd.
6 Controleer of de kofesterkte die u hebt
gekozen normale kofe is (koppictogram met
drie balken).
7 Druk op de 2-kops knop qq om twee
koppen warm water te zetten.
3 Sluit het deksel en vergrendel de hendel.
82
8 Wanneer het water is opgewarmd, brandt
de aan/uitknop ononderbroken en zet de
machine kofe.
9 Gooi het water in de koppen weg. Nu is de
machine weer klaar voor gebruik.
Page 83

6 Schoonmaken
Het is belangrijk dat u uw SENSEO® regelmatig
schoonmaakt, zodat uw SENSEO
optimaal smaakt en uw kofemachine zo lang
mogelijk meegaat.
B
Waarschuwing:
Dompel de SENSEO® kofemachine nooit in water.
1 Haal altijd de stekker uit het stopcontact
voordat u de machine schoonmaakt.
2 Maak de buitenkant van de machine schoon
met een vochtige doek.
3 Verwijder de kofecollector.
4 Verwijder de kofetuit door op de
ontgrendelknoppen te drukken (1) en de
kofetuit vervolgens van de machine te
nemen (2).
®
kofe altijd
5 Haal de kofetuit uit elkaar door de twee
randen van het binnendeel vast te pakken
en er licht in te knijpen (1). Beweeg het
binnendeel omlaag om het van het buitenste
deel van de tuit te verwijderen (2).
6 Maak het waterreservoir en het deksel, de
kofetuit, de kofecollector, de lekbak, het
plateau en de padhouders schoon in warm
water of in de vaatwasmachine.
C
Let op:
Zorg ervoor dat u het ventiel in de onderkant
van het waterreservoir niet beschadigt
als u een afwasborstel gebruikt om het
waterreservoir schoon te maken.
NEDERLANDS
83
Page 84

D Opmerking:
Controleer of het zeefje in het midden van de
padhouder verstopt is. Als dit het geval is, kunt
u het zeefje ontstoppen door de padhouder
onder de kraan af te spoelen. Gebruik indien
nodig een afwasborstel om het zeefje te
schoon te maken.
7 Maak de water verdeelschijf en de rubberen
afdichtring schoon met een vochtige doek.
C
Let op:
Verwijder de rubberen afdichtring niet
en zorg ervoor dat u het lipje op de
waterverdeelschijf niet beschadigt.
8 Maak de waterinlaat op de machine schoon
met een vochtige doek.
7 Ontkalken
Tijdens gebruik ontwikkelt zich kalk in de
machine. Het is zeer belangrijk dat de SENSEO
kofemachine wordt ontkalkt wanneer het CALC-
lampje gaat branden. Gebruik alleen de ontkalker
voor SENSEO
®
(HD7012, HD7011, HD7006).
®
Wanneer ontkalken
• Ontkalk de SENSEO
®
kofemachine zoals
hieronder beschreven wanneer het CALClampje gaat branden (nadat u circa 400
koppen SENSEO
®
kofe hebt gezet).
Waarom ontkalken
Waarom u de kofemachine zou moeten
ontkalken:
• Het verlengt de levensduur van uw SENSEO
kofemachine
• Het zorgt ervoor dat uw kop volledig wordt
gevuld
• Het zorgt ervoor dat de kofe zo warm
mogelijk is
• De machine maakt tijdens het kofezetten
minder geluid
• Het voorkomt storingen
Als de ontkalkingsprocedure niet juist wordt
uitgevoerd, blijven er kalkresten achter in de
machine. Hierdoor ontwikkelt de kalk zich sneller
en kan de machine permanent en onherstelbaar
worden beschadigd.
Gebruik de juiste ontkalker
Gebruik alleen de ontkalker voor SENSEO
(HD7012, HD7011, HD7006). Deze is ontwikkeld
voor betere machinale prestaties en bediening. Elk
ontkalkingsmengsel kan slechts eenmaal worden
gebruikt. Bezoek onze website www.philips.com
voor meer informatie over deze ontkalker..
B
Waarschuwing:
Gebruik nooit een ontkalker op basis van een
anorganisch zuur, zoals zwavelzuur, zoutzuur,
sulfaminezuur en azijnzuur (bijv. azijn). Deze
ontkalkers kunnen uw SENSEO
®
kofemachine
beschadigen.
®
®
84
Page 85

7.1 Ontkalkingsprocedure
De ontkalkingsprocedure bestaat uit een
ontkalkingscyclus en twee doorspoelcycli.
Onderbreek de ontkalkingscyclus niet en
schakel de machine niet uit voordat u de twee
doorspoelcycli hebt voltooid.
1 Meng in een maatbeker 50 gram citroenzuur
met 1 liter water. Roer het mengsel totdat
het poeder volledig is opgelost. Vul het
waterreservoir met het ontkalkermengsel.
2 Kantel het waterreservoir en plaats de
onderkant terug op de machine (1).
Duw vervolgens de bovenkant van het
waterreservoir naar de machine (2).
4 Plaats de 1-kops padhouder q met een
gebruikte kofepad in de kofemachine.
Sluit het deksel en zorg ervoor dat het goed
vergrendeld is.
D
Opmerking:
Plaats tijdens het ontkalken altijd een
gebruikte kofepad in de padhouder. Deze
pad dient als ‘lter’ om te voorkomen dat de
zeef of de opening in de padhouder tijdens
het ontkalken verstopt raakt met kalkresten.
B
Waarschuwing:
Zorg dat het deksel goed gesloten is en
dat de hendel van het deksel is vergrendeld
voordat u begint met ontkalken.
5 Verwijder de lekbak.
3 Druk op de aan/uitknop 3. De aan/uitknop
knippert langzaam terwijl het water wordt
opgewarmd. De machine kan worden ontkalkt
wanneer de aan/uitknop ononderbroken
brandt.
NEDERLANDS
6 Zet een kom met een inhoud van
minstens 1,5 liter onder de tuit om het
ontkalkermengsel op te vangen.
1.5L
85
Page 86

7 Wanneer de aan/uitknop ononderbroken
brandt, houdt u de 1-kops knop q en de
2-kops knop qq tegelijkertijd 3 seconden
ingedrukt tot u een piepje hoort. Laat de
knoppen los zodra de lampjes en de gekozen
kofesterkte uitgaan. Dit betekent dat u de
ontkalkingsprocedure hebt geactiveerd.
D Opmerkingen:
Vul het waterreservoir niet met gebruikt heet
water of met het gebruikte ontkalkermengsel.
2 Kantel het waterreservoir en plaats de
onderkant terug op de machine (1).
Duw vervolgens de bovenkant van het
waterreservoir naar de machine (2).
• Het CALC-lampje en de aan/uitknop
knipperen tijdens de ontkalkingscyclus.
• Tijdens de ontkalkingscyclus komt er met
tussenpozen water uit de machine.
• Wanneer al het water in het waterreservoir
is opgebruikt, is de ontkalkingscyclus voltooid.
De aan/uitknop begint snel te knipperen.
D
Opmerking:
Als u de 1-kop en 2-kops knop langer dan
3 seconden ingedrukt houdt, wordt de
ontkalkingscyclus niet gestart. Houd in dat
geval de 1-kops knop en de 2-kops knop
opnieuw tegelijkertijd 3 seconden ingedrukt.
7.2 Doorspoelen na ontkalken
1 Spoel het waterreservoir schoon onder de
kraan en vul het dan tot de bovenkant met
schoon water.
3 Plaats de 1-kops padhouder q met een
gebruikte kofepad in de kofemachine.
Sluit het deksel en zorg ervoor dat het goed
vergrendeld is.
4 Zet een kom met een inhoud van minstens
1,5 liter onder de kofetuit om het water op
te vangen.
1.5L
86
Page 87

5
Houd de 1-kops knop q en de 2-kops knop
qq tegelijkertijd 3 seconden ingedrukt tot u een
piepje hoort om de doorspoelcyclus te starten.
6 Verwijder de gebruikte pad en maak de
padhouder schoon na de doorspoelcyclus om
te voorkomen dat het zeefje in het midden
verstopt raakt.
7 Herhaal stap 1 tot en met 6 om ervoor te
zorgen dat de machine schoon is.
8 Na de ontkalkingscyclus en de doorspoelcycli
gaat het CALC-lampje uit en schakelt de
machine automatisch uit.
8 Vorstvrije opslag
Nadat u de machine voor de eerste keer hebt
doorgespoeld (zie hoofdstuk ‘De machine
doorspoelen vóór het eerste gebruik’), mag u
deze enkel in een vorstvrije ruimte gebruiken en
opbergen. De machine kan anders beschadigd raken.
9 Accessoires
bestellen
Ga naar onze Online Shop op
www.shop.philips.com/service om
accessoires voor deze machine te kopen.
Ga naar uw Philips-dealer of een Philipsservicecentrum als de Online Shop niet beschikbaar
is in uw land. Als u problemen hebt met het vinden
van accessoires voor uw machine, neem dan contact
op met het Philips Consumer Care Centre in uw
land. U vindt de contactgegevens in het ‘worldwide
guarantee’-vouwblad.
10 Milieu
• Gooi de machine aan het einde van zijn
levensduur niet weg met het normale huisvuil,
maar lever deze in op een door de overheid
aangewezen inzamelpunt om hem te laten
recyclen. Op die manier levert u een bijdrage
aan een schonere leefomgeving.
11 Garantie en service
Als u service of informatie nodig hebt of als
u een probleem ondervindt, bezoek dan de
ondersteuningspagina op de Philips-website
(www.philips.com/support) of neem contact
op met het Philips Consumer Care Centre in
uw land. Het telefoonnummer vindt u in het
‘worldwide guarantee’-vouwblad. Als er geen
Consumer Care Centre in uw land is, ga dan naar
uw plaatselijke Philips-dealer.
De aankoop van de Philips SENSEO
kofemachine put geen enkel recht uit dat Sara
Lee/Douwe Egberts of Philips hebben op grond
van hun patenten, ook verstrekt het de koper
geen licentie onder deze patenten.
Breng de machine altijd naar een door Philips
geautoriseerd servicecentrum voor onderzoek
of reparatie. Probeer niet zelf de machine te
repareren, omdat uw garantie hierdoor komt
te vervallen.
®
NEDERLANDS
87
Page 88

12 Problemen oplossen
12.1 SENSEO® kofemachine
Dit hoofdstuk behandelt in het kort de problemen die u kunt tegenkomen tijdens het gebruik van de
machine. Als u het probleem niet kunt oplossen met de informatie hieronder, ga dan naar
www.philips.com/support voor een lijst met veelgestelde vragen of neem contact op met het
Consumer Care Centre in uw land.
Probleem Oplossing
Mijn kop stroomde
over toen ik de
machine voor het
eerst gebruikte.
Er bleef water uit de
tuit komen toen ik
de machine voor de
eerste keer gebruikte.
De aan/uitknop
knippert langzaam.
Het CALC-lampje
knippert.
Het CALC-lampje
gaat niet uit nadat
ik de machine heb
ontkalkt.
Waarschijnlijk hebt u geprobeerd een kop kofe te zetten zonder de
machine eerst door te spoelen. Voordat u kofe gaat zetten, moet u de
machine eerst doorspoelen. Wanneer u de machine weer inschakelt, brandt
de aan/uitknop ononderbroken of knippert de aan/uitknop snel of langzaam.
Als de aan/uitknop ononderbroken brandt, moet u de machine doorspoelen
(zie hoofdstuk ‘De machine doorspoelen vóór het eerste gebruik’).
Als de aan/uitknop snel of langzaam knippert, hoeft u de machine NIET
door te spoelen. Als de aan/uitknop langzaam knippert, wordt het water
opgewarmd. Als de knop snel knippert, bevat het waterreservoir niet
voldoende water of is het waterreservoir niet goed op de machine geplaatst.
Als er water uit de tuit bleef komen tot het waterreservoir leeg was, werd
de machine doorgespoeld. Voordat u kofe kunt gaan zetten, moet u de
machine doorspoelen. Wanneer u de machine weer inschakelt, brandt de
aan/uitknop ononderbroken of knippert de aan/uitknop snel of langzaam.
Als de aan/uitknop ononderbroken brandt, moet u de machine doorspoelen
(zie hoofdstuk ‘De machine doorspoelen vóór het eerste gebruik’).
Als de aan/uitknop snel of langzaam knippert, hoeft u de machine NIET
door te spoelen. Als de aan/uitknop langzaam knippert, wordt het water
opgewarmd. Als de knop snel knippert, bevat het waterreservoir niet
voldoende water of is het waterreservoir niet goed op de machine geplaatst.
U hebt de SENSEO
meter NAP. Hierdoor gaat het water in de machine koken voordat de
gewenste temperatuur is bereikt, waardoor de machine niet goed werkt. Zet
de machine uit en gebruik deze niet op een hoogte boven 2200 meter NAP.
U hebt de 1-kops knop en de 2-kops knop tegelijkertijd ingedrukt. Hierdoor
wordt de ontkalkingscyclus gestart. Als u de machine niet wilt ontkalken,
drukt u op de aan/uitknop om de machine uit te schakelen. Als u de
machine wel wilt ontkalken, onderbreekt u de ontkalkingscyclus niet en laat
u het apparaat werken totdat het waterreservoir leeg is.
Het CALC-lampje gaat niet uit als de ontkalkingsprocedure niet juist is
uitgevoerd. Om de ontkalkingsprocedure juist uit te voeren:
®
kofemachine gebruikt op een hoogte boven 2200
88
Page 89

Probleem Oplossing
1. Onderbreek de ontkalkingscyclus niet en schakel de machine niet uit
tijdens de ontkalkingscyclus. Tijdens de ontkalkingscyclus komt er met
tussenpozen heet water uit de kofetuit en stopt het ontkalken 3 tot 4
keer zodat het ontkalkermengsel kan inwerken en opnieuw kan worden
opgewarmd.
2. Zorg ervoor dat u de ontkalkingscyclus start door tegelijkertijd op de
1-kops knop en de 2-kops knop te drukken. Zie hoofdstuk ‘Ontkalken’ voor
een volledige beschrijving van de ontkalkingsprocedure.
3. Gebruik drie volle waterreservoirs om de ontkalkingsprocedure te
voltooien: één waterreservoir gevuld met ontkalkermengsel en twee
reservoirs gevuld met schoon water.
De aan/uitknop blijft
snel knipperen.
Controleer of er genoeg water in het waterreservoir zit en of het
waterreservoir goed is geplaatst.
Zorg ervoor dat de kamertemperatuur niet lager is dan 5°C. Bij een lagere
temperatuur werkt de machine niet goed.
Er lekt water uit de
kofemachine.
Als er kofe of water uit uw SENSEO
te stellen waar het lek optreedt. Dit is belangrijk, omdat de oplossing
afhankelijk is van de locatie van het lek.
1. Als het lek nabij het deksel of de tuit optreedt, controleer dan of:
1a. Het zeefje in het midden van de padhouder niet verstopt zit. Als het
zeefje wel verstopt zit, ontstop het zeefje dan door de padhouder onder de
kraan af te spoelen.
1b. De kofepad netjes in het midden van de padhouder is geplaatst.
1c. De afdichtring niet per ongeluk onder de rand van de waterverdeelschijf
is gekomen (zie guur 1 voor in deze gebruiksaanwijzing).
1d. De tuit en de kofecollector goed zijn geplaatst.
2. Als het lek optreedt in de buurt van de onderkant van het waterreservoir
of onder de machine, controleer dan of:
2a. Het waterreservoir niet te veel water bevat.
2b. U het waterreservoir niet te ruw op de machine plaatst. Als u het
waterreservoir te ruw plaatst, kan er water uit het waterreservoir spatten.
2c. Het waterreservoir niet beschadigd of stuk is. Normaal begint er binnen
30 seconden na het vullen water uit de opening in de onderkant van het
waterreservoir te druppen.
Ik kan het deksel niet
openen.
Er kan zich een tijdelijk vacuüm onder het deksel hebben gevormd. Schakel
de machine uit. Trek de hendel omhoog en wacht 24 uur voordat u het
deksel opent. Mogelijk moet u hiervoor aanzienlijke kracht uitoefenen.
Zorg ervoor dat u de SENSEO
van het deksel gaat niet sneller als u de machine verplaatst of de machine
buiten of in een koude omgeving plaatst.
®
machine lekt, probeer dan vast
®
machine niet verplaatst. Het ontgrendelen
NEDERLANDS
89
Page 90

Probleem Oplossing
U kunt dit probleem in de toekomst voorkomen door er altijd voor te
zorgen dat de padhouders schoon zijn en dat het zeefje in het midden van
de padhouders niet verstopt raakt.
De kofemachine
zet minder kofe dan
voorheen.
Mogelijk is het zeefje in het midden van de padhouder verstopt geraakt. Als
dit het geval is, ontstop het zeefje dan door de padhouder onder de kraan
af te spoelen. Gebruik eventueel een afwasborstel om het zeefje te reinigen.
Ontkalk de machine (zie hoofdstuk ‘Ontkalken’).
Ik kan het deksel niet
goed sluiten.
Controleer of er misschien nog een gebruikte kofepad tegen de
waterverdeelschijf aanzit. Als dit het geval is, verwijder dan de gebruikte pad.
Controleer of u de juiste padhouder hebt gebruikt. Gebruik 2 kofepads in
combinatie met de diepere 2-kops padhouder qq.
De SENSEO
niet sterk genoeg.
®
kofe is
Controleer of u de gewenste kofesterkte hebt gekozen. U kunt kiezen
tussen normale en sterke kofe. U kunt ook de kofesterkte verhogen
of verlagen door de gewenste hoeveelheid kofe in te stellen met de
persoonlijke kofegeheugenfunctie (alleen HD7872).
Controleer of u het juiste aantal pads hebt gebruikt en op de juiste knop
hebt gedrukt. Gebruik 2 pads in combinatie met de 2-kops padhouder qq
en de 2-kops knop qq.
Controleer of u de kofepad(s) netjes in het midden van de padhouder
hebt geplaatst om te voorkomen dat water langs de rand van de pad(s)
loopt. Als u 2 kofepads boven op elkaar gebruikt, plaats dan de beide
kofepads met de bolle zijde naar beneden en druk de pads zachtjes in de
padhouder.
Controleer of u niet per ongeluk twee keer dezelfde kofepad hebt
gebruikt.
Zorg ervoor dat de kofe in de pad gelijkmatig is verdeeld.
Geeft u de voorkeur aan een krachtigere smaak, dan zijn sterkere SENSEO
kofepadvarianten verkrijgbaar.
De kofe is niet heet
genoeg.
Als u de machine al lange tijd gebruikt en de temperatuur van de
kofe afneemt, raden we u aan de machine te ontkalken. Zie hoofdstuk
‘Ontkalken’. Ontkalk uw SENSEO
Gebruik geen koppen die te groot zijn, omdat de kofe dan sneller afkoelt.
Gebruik koppen met een inhoud van ten minste 150 ml.
Gebruik dunwandige koppen omdat deze de hitte van de kofe minder
absorberen dan dikwandige koppen.
Zorg ervoor dat de grootte van de kop past bij de hoeveelheid kofe. Zet
geen kleine hoeveelheid kofe in een grote kop.
Als u kofe met verse melk drinkt, verwarm de melk dan voor in de kop in
een magnetron.
U kunt de kofemachine voorverwarmen door eerst een kop te zetten
zonder een kofepad in de houder te plaatsen. Zo verwarmt u de kofekop
ook voor.
®
kofemachine regelmatig.
®
90
Page 91

Probleem Oplossing
Het touchpanel werkt
niet.
Ik activeer het
touchpanel per
ongeluk wanneer ik
het schoonmaak.
Alleen HD7872:
de knop voor
uw persoonlijke
kofegeheugen
produceert niet de
gewenste hoeveelheid
kofe.
Als er water op het touchpanel ligt, werken de knoppen niet. Zorg ervoor
dat het touchpanel droog is en dat ook uw handen droog zijn wanneer u
het touchpanel gebruikt.
Druk op de keuzeknop, niet op de pictogrammen links van de keuzeknop.
Het touchpanel is erg gevoelig en de knoppen worden al door een lichte
aanraking geactiveerd. Het is niet erg als dit gebeurt; de machine zal geen
kofe gaan zetten.
Haal de stekker uit het stopcontact voordat u de machine schoonmaakt.
Lees ‘Persoonlijk kofegeheugen’ in hoofdstuk ‘SENSEO
®
kofe zetten’ en
probeer de gewenste hoeveelheid kofe opnieuw in te stellen.
91
NEDERLANDS
Page 92

Innholdsfortegnelse
1 Innledning 92
2 Generell beskrivelse 92
3 Viktig 93
4 Skylle maskinen før første
gangs bruk 93
5 Brygge SENSEO
6 Rengjøring 99
7 Avkalking 101
8 Frostfri oppbevaring 103
®
-kaffe 96
hverandre for å sikre at den aller beste smaken
og aromaen trekkes ut av kaffen. Oppdag alle
SENSEO
®
kaffeblandingene som er tilgjengelige,
på www.senseo.com.
Du bør huske følgende for å være sikker på å få
en god og fyldig kaffesmak:
Ferske kaffeputer
Bruk SENSEO
av Friele til SENSEO
fyldig og rund smak. Friele SENSEO
®
-kaffeputene, som er spesialutviklet
®
-kaffemaskinen for å få en
®
-kaffeputer
holder seg ferske lenger hvis du oppbevarer dem i
en lufttett beholder.
Friskt vann
Bruk rent vann hver dag. Hvis du ikke har brukt
kaffemaskinen på en dag, må du skylle den med
rent vann før du bruker den igjen (se avsnittet
Skylle maskinen etter en dag uten bruk under
Brygge SENSEO
®
-kaffe).
9 Bestille tilbehør 104
10 Miljø 104
11 Garanti og service 104
12 Feilsøking 105
1 Innledning
Gratulerer med kjøpet og velkommen til Philips!
Du får best mulig nytte av støtten som Philips
tilbyr, hvis du registrerer produktet ditt på
www.philips.com/welcome.
1.1 SENSEO®-kaffesystem
Gjør kaffepausene helt spesielle med SENSEO®.
Dette unike systemet kombinerer den enkle
Philips SENSEO
SENSEO
for kaffemaskinen, og gir deg en fyldig, god kaffe
med et deilig skumlag. Frieles kaffe i praktiske
SENSEO
SENSEO
92
®
-kaffemaskinen med Friele
®
-kaffeputer som er spesielt utviklet
®
-kaffeputer og Philips’ unike nye
®
-bryggesystem er perfekt tilpasset
2 Generell beskrivelse
(g. 1)
1 Kaffesamler
2 Lokkhendel
3 Lokk med bryggekammer
4 Gummipakning
5 Vannfordelingsplate
6 Puteholder for to kopper qq
7 Puteholder for én kopp q
8 Kaffetutdeksel
9 Kaffetut
10 Utløserknapper for kaffetuten
11 Avtagbart dryppbrett
12 Koppebrett
13 Berøringsskjerm
14 Av/på-knapp
15
Symbol for personlig kaffeminne (bare HD7872)
16 Symbol for vanlig kaffe
17 Valgknapp
18 Symbol for sterk kaffe
19 CALC-lampe
20 Knapp for én kopp q
21 Knapp for to kopper qq
22 Vannbeholder
23 Lokk på vannbeholder
Page 93

3 Viktig
Les denne brukerveiledningen nøye før du bruker
maskinen, og ta vare på den for senere referanse.
Fare
• Senk aldri maskinen ned i vann eller annen væske.
Advarsel
• Før du kobler til maskinen, må du kontrollere
at spenningen som er angitt på undersiden,
stemmer overens med nettspenningen.
• Denne maskinen er ikke tiltenkt bruk
av personer (inkludert barn) som har
nedsatt sanseevne eller fysisk eller psykisk
funksjonsevne, unntatt hvis de får tilsyn eller
instruksjoner om bruk av maskinen av en
person som er ansvarlig for sikkerheten.
• Pass på at barn er under tilsyn, slik at de ikke
leker med maskinen.
• Du må ikke bruke maskinen hvis støpselet,
ledningen eller selve maskinen er ødelagt.
• Hvis ledningen er ødelagt, må den alltid skiftes
ut av Philips, et servicesenter som er godkjent
av Philips, eller lignende kvalisert personell,
slik at man unngår farlige situasjoner.
Forsiktig
• Når du har pakket ut maskinen, må du aldri
legge SENSEO
at den alltid er i stående posisjon, også under
transport.
• Lever alltid maskinen til et servicesenter som
er godkjent av Philips for undersøkelse eller
reparasjon. Ikke prøv å reparere maskinen selv
– det vil føre til at garantien blir ugyldig.
• Ikke bruk maskinen sammen med en
transformator. Da kan det oppstå farlige
situasjoner.
• Sett alltid maskinen på et att og stabilt underlag.
• Ikke bruk maskinen på steder som er mer enn
2200 m over havet.
• Hell aldri melk, kaffe, varmt vann eller
kullsyreholdig vann i vannbeholderen.
• Aldri skyll maskinen eller la den brygge kaffe
når tuten ikke er på plass.
®
-maskinen på siden. Sørg for
•
Denne maskinen er kun beregnet på vanlig
bruk i hjemmet. Den er ikke beregnet på bruk
på f.eks. bedriftskjøkken, butikker, kontorer,
bondegårder eller andre arbeidsmiljøer. Den er
heller ikke beregnet på å brukes av kunder på
hoteller, moteller eller i andre typer bomiljøer.
3.1 Overholdelse av standarder
Denne maskinen overholder alle standarder
som gjelder for elektromagnetiske felt (EMF).
Hvis maskinen håndteres riktig og i samsvar med
instruksjonene i denne brukerveiledningen, er det
trygt å bruke den ut fra den kunnskapen vi har
per dags dato.
Energiforbruket til denne maskinen i avslått modus
er mindre enn én watt. Dette betyr at denne
maskinen er i samsvar med EU-direktiv 2009/125/
EF, som fastsetter de økologiske kravene til
energiforbrukende produkter.
4 Skylle maskinen før
første gangs bruk
Det er viktig å skylle SENSEO®-kaffemaskinen
før første bruk. Etter skyllingen (som bare tar
ca. to minutter) er maskinen klar for å brygge
SENSEO
C
Avbryt aldri skyllingen midt under prosessen.
Hvis du gjør det, fylles ikke kokeren ordentlig.
®
-kaffe.
Forsiktig:
NORSK
93
Page 94

1 Fest tuten til maskinen. Ta tak i de to kantene
på den innvendige delen av tuten, og trykk
lett på dem (1). Sett på tuten på maskinen,
og slipp de to kantene (2).
C
Forsiktig:
Aldri skyll maskinen eller la den brygge kaffe
når tuten ikke er på plass.
2 Vend toppen av vannbeholderen bakover (1),
og løft vannbeholderen av maskinen (2).
4 Sett på lokket på vannbeholderen før du før
du setter vannbeholderen tilbake på maskinen.
5 Sett vannbeholderen på skrå, og plasser
bunnen tilbake på maskinen (1). Trykk deretter
toppen av vannbeholderen mot maskinen (2).
6 Fjern dryppebrettet.
3 Fyll vannbeholderen helt opp med kaldt vann
fra springen.
94
7 Plasser en bolle som rommer minst 1,5 liter,
under kaffetuten.
1.5L
Page 95

8 Kontroller at en puteholder uten pute(r) er
på plass.
9 Sett støpselet i en jordet stikkontakt.
10 Trykk på av/på-knappen 3. Knappen lyser opp
for å vise at du må skylle maskinen.
11 Trykk kort på knappen for én kopp q og
knappen for to kopper qq samtidig.
• Når alt vannet i vannbeholderen er brukt
opp, avsluttes skyllingen, og maskinen slås av.
12 Fyll vannbeholderen med rent vann fra
springen, sett på lokket, og sett den tilbake på
maskinen.
• Av/på-knappen begynner å blinke for å vise
at skyllingen har begynt.
• Under skyllingen fylles kokeren med vann fra
vannbeholderen, og kaldt vann kommer ut av
kaffetuten. Under skyllingen støyer maskinen
mer enn under en normal bryggesyklus.
SENSEO
®
-maskinen er nå klar for bruk, slik at du
kan brygge den første koppen med deilig kaffe.
NORSK
95
Page 96

5 Brygge SENSEO®-
kaffe
Mens SENSEO®-kaffemaskinen varmes opp, kan
du velge kaffestyrken du vil ha, og antall kopper
du vil brygge. Maskinen brygger så koppen eller
koppene straks den er oppvarmet.
1 Pass på at vannbeholderen er fylt med rent,
kaldt vann fra springen over MIN-nivået, og at
lokket til vannbeholderen er satt på.
E
Tips:
Bruk friskt vann hver dag.
2 Sett støpselet i en jordet stikkontakt.
3 Trykk på av/på-knappen 3. Av/på-
knappen blinker sakte mens vannet varmes
opp.
4 Dra lokkhendelen oppover for å åpne lokket.
Lokket åpnes automatisk.
5 Hvis du vil lage én kopp SENSEO
®
-kaffe,
setter du puteholderen for én kopp q i
maskinen (1). Hvis du vil lage to kopper,
setter du puteholderen for to kopper qq i
maskinen (2). Pass på at puteholderen er ren.
6 Legg én kaffepute i holderen for én koppq
(1), eller legg to kaffeputer i holderen for to
kopper qq (2). Legg puten eller putene midt
i holderen, med den buede siden ned. Trykk
puten eller putene lett ned i puteholderen.
D
Merk:
Hvis av/på-knappen blinker raskt, inneholder
ikke vannbeholderen nok vann til å brygge én
kopp kaffe.
96
D
Merk:
Pass på at kaffen i puten eller putene er
jevnt fordelt.
C
Forsiktig:
Bruk aldri vanlig, malt kaffe eller revnede
kaffeputer i SENSEO
®
-maskinen. Da blir
maskinen tett.
Page 97

7 Lukk lokket (1), og lås hendelen (2).
B
Advarsel:
Kontroller at lokket er ordentlig lukket og
at lokkhendelen er lukket, før du begynner
å trakte kaffe.
8 Sett én eller to kopper under kaffetuten.
Du kan justere høyden på kaffetuten ved å
skyve den opp eller ned. Du kan også fjerne
dryppebrettet hvis du vil bruke høyere kopper.
10 Når du har valgt ønsket kaffestyrke, trykker du
på knappen for én kopp q (1) eller knappen
for to kopper qq (2).
11 Når vannet er varmet opp og av/på-knappen
lyser kontinuerlig, begynner maskinen å brygge
kaffe.
E
Tips:
Du kan avbryte bryggingen når som helst. For
å gjøre det trykker du på samme koppknapp
(knappen for én kopp eller to kopper) som
du trykte på for å starte bryggingen. Det er
imidlertid slik at hvis du gjør dette, fullfører
ikke maskinen den avbrutte bryggingen hvis
du slår den på igjen eller trykker på samme
koppknapp igjen.
D
Merk
Koppene du bruker, må ha en kapasitet på
minst 150 ml når du brygger vanlig kaffe, eller
100 ml når du brygger sterk kaffe. Ikke bruk
kopper som er for store, ettersom det gjør at
kaffen blir kald mye raskere.
9 Trykk på valgknappen for å velge ønsket
kaffestyrke. Velg koppsymbolet med tre streker
for en kopp vanlig kaffe (125 ml) (1). Velg
koppsymbolet med én strek for en kopp sterk
kaffe (60 ml) (2).
D
Merk:
Ikke fjern vannbeholderen under bryggingen.
12 Når kaffen er klar, fjerner du puten eller
putene som er brukt. Løft puteholderen uten
av maskinen, og tøm den.
C
Forsiktig:
Det kan fortsatt være litt varmt vann eller
kaffe igjen på kaffeputen eller -putene.
13 Trykk på av/på-knappen 3 for å slå av
maskinen etter bruk.
NORSK
97
Page 98

D Merk:
Hvis du ikke bruker maskinen, slår den seg
av automatisk etter 15 minutter for å spare
strøm.
5.1 Personlig kaffeminne (bare
HD7872)
Du kan programmere maskinen til å brygge den
mengden kaffe du ønsker (opptil 145 ml). Prøv deg
frem, og nn ut hva du liker best. Vi anbefaler at du
brygger minst 60 ml for optimal smak og temperatur.
Under programmeringen kan du bare bruke
knappen for én kopp. Når du har fullført
programmeringen, kan du brygge én eller to
kopper med den programmerte kaffemengden.
D
Merk:
Det er ikke mulig å programmere det personlige
kaffeminnet mens maskinen varmes opp. Vent til
av/på-knappen lyser kontinuerlig.
1 Legg én kaffepute i puteholder for én kopp, og
plasser én kopp under kaffetuten.
2 For å gå inn i programmeringsmodus må du
først velge symbolet for personlig kaffeminne
(stjernesymbol) med valgknappen (1).
Hold valgknappen inne i to sekunder til
stjernesymbolet begynner å blinke (2) og du
hører et pip, og slipp valgknappen.
3 Trykk på knappen for én kopp for å la
kaffe renne ned i koppen (1). Når koppen
inneholder kaffemengden du foretrekker,
trykker du på knappen for én kopp igjen (2).
Du har nå angitt ønsket kaffemengde.
Heretter brygger SENSEO
®
-maskinen én eller
to kopper med denne kaffemengden når du
velger symbolet for personlig kaffeminne med
valgknappen.
D
Merk:
Hvis du vil endre den angitte kaffemengden, er det
bare å gjenta trinn 1–3 på nytt.
5.2 Skylle maskinen etter en
dag uten bruk
Hvis du ikke har brukt kaffemaskinen i løpet av en
dag, må du skylle den for å sørge for at kokeren er
fylt med rent vann.
Du skyller kokeren ved å brygge to kopper med
varmt vann på følgende måte:
1 Fyll vannbeholderen med kaldt vann fra
springen over MIN-nivået (1). Sett på lokket
(2) , og sett vannbeholderen tilbake på
maskinen.
98
Page 99

2 Sett kaffeputeholderen for én kopp q eller to
kopper qq i maskinen uten puter.
7 Trykk på knappen for to kopper qq for å
brygge to kopper med varmt vann.
3 Lukk lokket, og lås hendelen.
4 Sett to kopper eller et krus under kaffetuten
for å samle opp vannet.
5 Trykk på av/på-knappen 3. Av/på-knappen
blinker sakte mens vannet varmes opp.
6 Kontroller at kaffestyrken du har valgt, er en
kopp vanlig kaffe (koppsymbolet med tre
streker).
8 Når vannet er oppvarmet, lyser av/på-knappen
kontinuerlig, og kaffemaskinen setter i gang.
9 Kast vannet i koppene. Nå er maskinen klar til
bruk igjen.
6 Rengjøring
Regelmessig rengjøring av SENSEO®-maskinen er
viktig for å sikre at SENSEO
optimalt, og for å optimalisere kaffemaskinens
levetid.
B
Advarsel:
Senk aldri SENSEO®-kaffemaskinen ned i vann.
1 Trekk alltid ut støpselet før du rengjør
maskinen.
2 Rengjør utsiden av maskinen med en fuktig klut.
3 Ta bort kaffesamleren.
®
-kaffen alltid smaker
NORSK
99
Page 100

4 For å fjerne kaffetuten trykker du på
utløserknappene (1) og drar kaffetuten av
maskinen (2).
5 For å ta kaffetuten fra hverandre tar du tak
i de to kantene på den innvendige delen av
tuten og trykker lett på dem (1). Flytt den
innvendige delen nedover for å fjerne den fra
den ytre delen av kaffetuten (2).
C Forsiktig:
Hvis du bruker en oppvaskbørste til å
rengjøre vannbeholderen, må du passe
på at du ikke skader ventilen i bunnen av
vannbeholderen.
D
Merk:
Se om silen i midten av kaffeputeholderen
er tilstoppet. Hvis det er tilfellet, renser
du silen ved å skylle kaffeputeholderen
under rennende vann. Bruk eventuelt en
oppvaskbørste til å rengjøre silen.
7 Rengjør vannfordelingsplaten og
gummipakningen med en fuktig klut.
6 Rengjør vannbeholderen og lokket, kaffetuten,
kaffesamleren dryppebrettet, koppebrettet
og puteholderne i varmt vann eller i
oppvaskmaskinen.
100
C
Forsiktig:
Ikke fjern gummipakningen, og vær
forsiktig slik at du ikke skader tappen på
vannfordelingsplaten.
8 Rengjør vanninntaket på maskinen med en
fuktig klut.
 Loading...