

Page 1
HD7872, HD7870
User manual
Felhasználói kézikönyv
For more support go to:
www.philips.com/senseo-twist/support
Page 2

Page 3
Table of contents
1 Introduction 3
2 General description 3
3 Important 5
4 Flushingthemachinebeforerstuse 5
5 Brewing SENSEO
®
coffee 8
6 Cleaning 11
7 Descaling 13
8 Frost-free storage 16
9 Ordering accessories 16
10 Environment 16
11 Guarantee and service 16
12 Troubleshooting 17
1 Introduction
Congratulations on your purchase and welcome
to Philips! To fully benet from the support that
Philips offers, register your product at www.philips.
com/welcome.
1.1 SENSEO® coffee system
Make your coffee moments truly special with
SENSEO
easy-to-use Philips SENSEO
the specially developed Douwe Egberts SENSEO
coffee pods, giving you a full, smooth coffee with a
delicious foam layer.
Douwe Egberts coffee in convenient SENSEO
coffee pods and Philips’ unique new SENSEO
brewing system are perfectly matched to ensure
®.
This unique system combines the
®
coffee machine with
®
®
that the best taste and aroma are extracted from
the coffee. Discover all SENSEO
®
coffee blends at
www.senseo.com.
To ensure a smooth and full coffee taste, you
should keep the following things in mind:
Fresh coffee pods
Use the SENSEO
®
coffee pods that have been
specially developed by Douwe Egberts for your
SENSEO
Douwe Egberts SENSEO
®
coffee machine for a full, round taste.
®
coffee pods stay fresh
longer if you store them in an airtight storage
container.
Fresh water
Use fresh water every day. If you have not used
the coffee machine for one day, you have to
ush it with fresh water before you use it again
(see chapter ‘Brewing SENSEO
®
coffee, section
‘Flushing the machine after a day of non-use’).
2 General description
1 Coffee collector
2 Lid lever
3 Lid with brewing chamber
4 Sealing ring
5 Water distribution disc
6 2-cup pod holder qq
7 1-cup pod holder q
8 Coffee spout cover
9 Coffee spout
10 Spout release buttons
11 Removable drip tray
12 Cup tray
13 Touch panel
14 On/off button
15 Personal coffee memory symbol (HD7872 only)
16 Regular coffee symbol
17 Selection button
18 Strong coffee symbol
®
19 CALC light
20 1-cup button q
21 2-cup button qq
22 Water reservoir
23 Water reservoir lid
ENGLISH
3
Page 4

4
Page 5

3 Important
Read this user manual carefully before you use the
machine and save it for future reference.
Danger
• Never immerse the machine in water or any
other liquid.
Warning
• Check if the voltage indicated on the bottom
of the machine corresponds to the local mains
voltage before you connect the machine.
• This machine is not intended for use by
persons (including children) with reduced
physical, sensory or mental capabilities, or lack
of experience and knowledge, unless they
have been given supervision or instruction
concerning use of the machine by a person
responsible for their safety.
• Children should be supervised to ensure that
they do not play with the machine.
• Do not use the machine if the plug, the mains
cord or the machine itself is damaged.
• If the mains cord is damaged, you must have it
replaced by Philips, a service centre authorised
by Philips or similarly qualied persons in
order to avoid a hazard.
Caution
• After unpacking the machine, never put your
SENSEO
in upright position, also during transport.
• Always return the machine to a service centre
authorised by Philips for examination or repair.
Do not attempt to repair the machine yourself,
otherwise your guarantee becomes invalid.
• Do not use the machine in combination with
a transformer, as this could cause hazardous
situations.
• Always put the machine on a at and stable
surface.
• Do not use the machine at altitudes higher
than 2200 metres above sea level.
• Never pour milk, coffee, hot water or
carbonated water into the water reservoir.
• Never ush the machine or let it brew coffee
when the spout is not in place.
®
machine on its side. Always keep it
• This machine is intended for normal
household use only. It is not intended for
use in environments such as staff kitchens
of shops, ofces, farms or other work
environments. Nor is it intended to be used
by clients in hotels, motels, bed and breakfasts
and other residential environments.
3.1 Compliance with standards
This machine complies with all standards regarding
electromagnetic elds (EMF). If handled properly
and according to the instructions in this user
manual, the machine is safe to use based on
scientic evidence available today.
The energy consumption of this machine in
off mode is less than 1 watt. This means that
this machine complies with European Directive
2009/125/EC, which sets the ecological design
requirements for energy-using products.
4 Flushing the machine
beforerstuse
It is important that you ush your SENSEO®
coffee machine before rst use. After the ushing
cycle (which only takes approx. 2 minutes), the
machine is ready for brewing SENSEO
C
Caution:
Never interrupt the ushing cycle halfway. If you
do, the boiler does not ll itself properly.
1 Attach the spout to the machine. Grab the
two ridges of the inner part of the spout and
squeeze them lightly (1). Place the spout on
the machine and release the two ridges (2).
®
coffee.
ENGLISH
5
Page 6

C Caution:
Never ush the machine or let it brew
coffee when the spout is not in place.
2 Tilt the top of the water reser voir backwards
(1) and lift the water reservoir off the
machine (2).
3 Fill the water reser voir to the top with cold
tap water.
5 Tilt the water reservoir and place the bottom
back onto the machine (1). Then press the top
of the water reservoir towards the machine (2).
6 Remove the drip tray.
7 Place a bowl with a capacity of at least 1.5
litres under the coffee spout.
4 Place the lid on the water reser voir before
you put the water reservoir back onto the
machine.
6
8 Make sure a pod holder, without pod or pods,
is in place.
Page 7
9 Put the plug in an ear thed wall socket.
10 Press the on/off button 3. The button lights
up to indicate that you have to ush the
machine.
11 To start ushing, press the 1-cup button q
and the 2-cup button qq briey at the same
time.
• When all the water in the water reservoir
has been used up, the ushing cycle is
nished and the machine switches off.
ENGLISH
12 Fill the water reser voir with fresh tap water,
put the lid on it and place it back onto the
machine.
• The on/off button starts ashing to indicate
that the ushing cycle has started.
• During the ushing cycle, the boiler lls itself
with water from the water reservoir and
cold water comes out of the coffee spout.
During the ushing cycle, the machine
produces more noise than during a regular
brewing cycle.
Your SENSEO
®
machine is now ready for use
so that you can brew your rst cup of delicious
coffee.
7
Page 8
5 Brewing SENSEO®
coffee
While the SENSEO® coffee machine is heating
up, you can select the coffee strength you prefer
and the number of cups you want to brew. The
machine then brews the cup or cups immediately
after it has heated up.
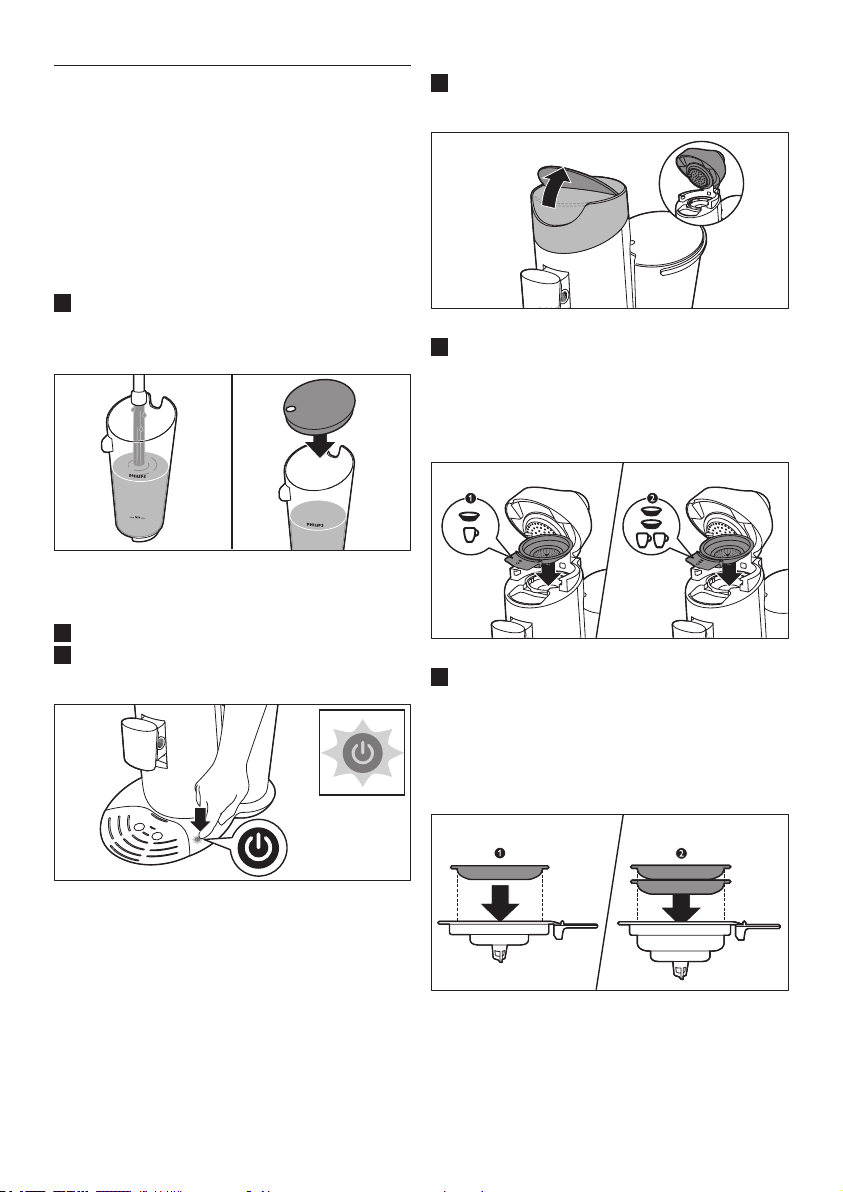
1 Make sure that the water reservoir is lled
with fresh cold tap water beyond the MIN
level and that the lid is on the water reservoir.
E
Tip:
Use fresh water every day.
2 Put the plug in an ear thed wall socket.
3 Press the on/off button 3. The on/off button
ashes slowly while the water heats up.
4 Pull the lid lever upwards to open the lid. The
lid opens automatically.
5 If you want to make one cup of SENSEO
®
coffee, place the 1-cup pod holder q in the
machine (1). If you want to make two cups,
put the 2-cup pod holder qq in the machine
(2). Make sure the pod holder is clean.
6 Place 1 coffee pod in the 1-cup pod holder
q (1) or place 2 coffee pods in the 2-cup
pod holder qq (2). Place the pod or pods
properly in the centre of the pod holder, with
the convex side pointing downwards. Press
the pod or pods lightly into the pod holder.
D
Note:
If the on/off button ashes rapidly, the water
reservoir does not contain enough water for
brewing one cup of coffee.
8
D
Note:
Make sure the coffee in the pod or pods is
evenly distributed.
Page 9
C Caution:
Never put normal ground coffee or use torn
pods in the SENSEO
®
machine, as this causes
it to become blocked.
7 Close the lid (1) and lock the lever (2).
ENGLISH
1
B
Warning:
Make sure the lid is closed properly and the
lid lever is locked before you start brewing
coffee.
8 Place one cup or two cups under the
spout openings. You can adjust the height
of the coffee spout by sliding it upwards or
downwards. You can also remove the drip tray
to be able to place higher cups.
D
Note
The cups you use should have a capacity of at
least 150ml when you brew regular coffee or
100ml when you brew strong coffee. Do not
use cups that are too large, as they cause the
coffee to get cold more quickly.
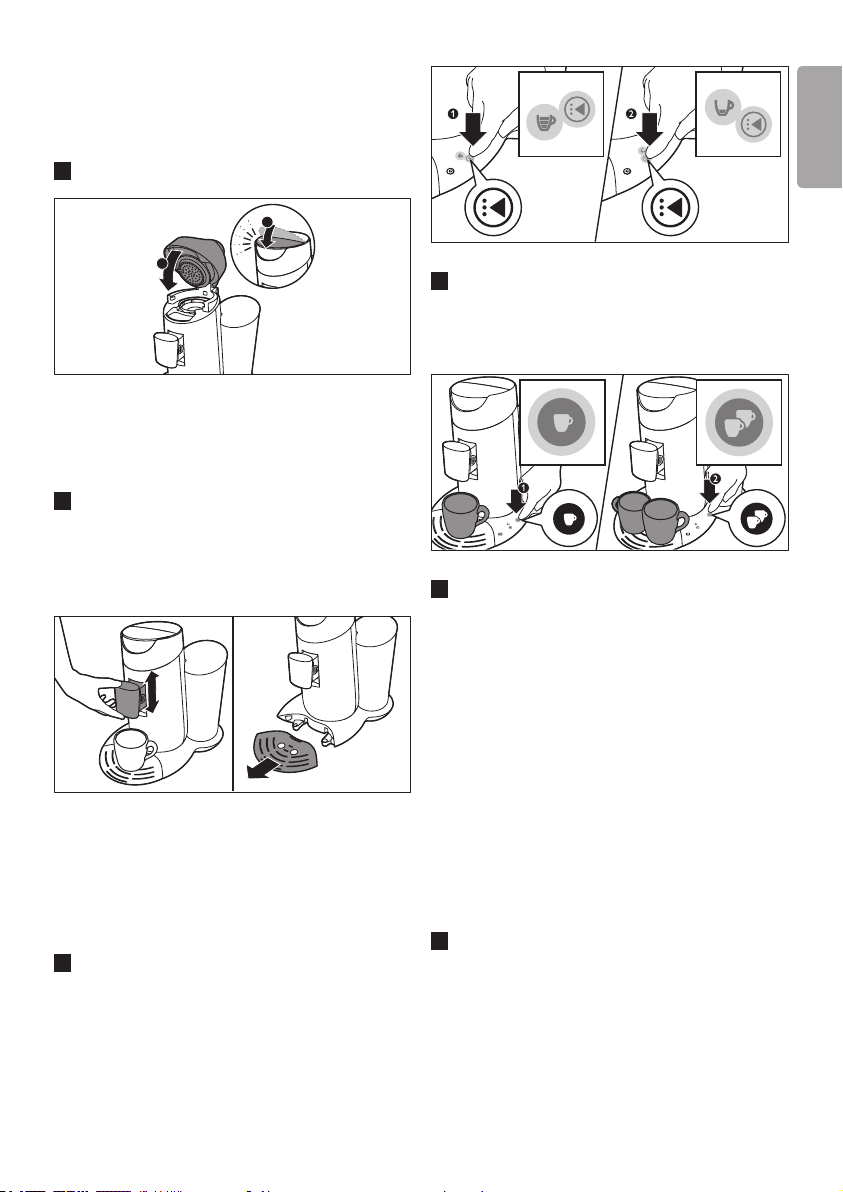
9 Press the selection button to select the
desired coffee strength. Select the cup symbol
with three bars for a regular cup of coffee
(125ml) (1). Select the cup symbol with one
bar for a strong cup of coffee (60ml) (2).
10 When you have selected the desired coffee
strength, press the 1-cup button q for one
cup (1) or press the 2-cup button qq for
two cups (2).
11 When the water has heated up and the on/
off button lights up continuously, the machine
starts brewing coffee.
E
Tip:
You can interrupt the brewing cycle at any
time. To do this, press the same cup button (1cup button or 2-cup button) that you pressed
to start brewing coffee. However, if you do
this, the machine does not complete the
interrupted brewing cycle if you switch it on
again or press the same cup button again.
D
Note:
Do not remove the water reservoir during a
brewing cycle.
12 When the coffee is ready, remove the used
coffee pod or pods. Simply lift the pod holder
out of the machine and empty it.
C
Caution:
There may still be some hot water/coffee on
the coffee pod or pods.
9
Page 10
13 After use, press the on/off button 3 to switch
off the machine.
D
Note:
If you do not use the machine, it switches off
automatically after 15 minutes to save energy.
5.1 Personal coffee memory
(HD7872 only)
You can program the machine to brew the
amount of coffee you prefer (up to 145ml). Simply
experiment and nd out what you like best. We
advise you to brew at least 60ml for optimal taste
and temperature.
While programming, you can only use the
1-cup button. When you have completed the
programming process, you will be able to brew
one or two cups with the programmed amount
of coffee.
3 Press the 1-cup button to make the coffee
ow into the cup (1). When the cup contains
the amount of coffee you prefer, press the
1-cup button again (2). Your preferred amount
of coffee has been set.
2
From now on, your SENSEO
®
machine brews one
or two cups with this amount of coffee when you
select the personal coffee memory symbol with
the selection button.
D
Note:
It is not possible to program your personal coffee
memory while the machine is heating up. Wait
until the on/off button lights up continuously.
1 Place 1 coffee pod in the 1-cup pod holder
and place 1 cup under the spout openings.
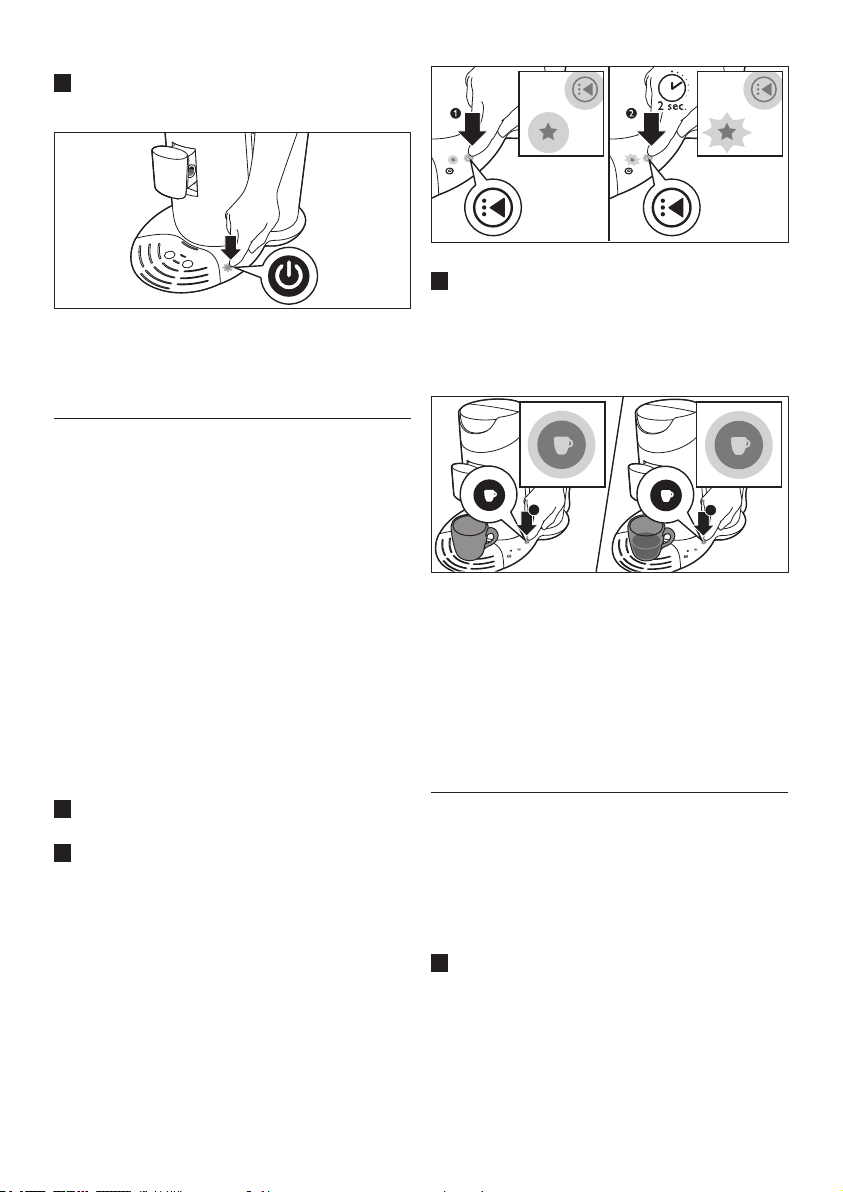
2 To enter the programming mode, rst select
the personal coffee memory symbol (star
symbol) with the selection button (1). Keep
the selection button pressed for 2 seconds
until the star symbol starts ashing (2) and
you hear a beep. Then release the selection
button.
10
D
Note:
If you want to change the set amount of coffee,
simply perform steps 1-4 again.
5.2 Flushing the machine after
a day of non-use
If you have not used the coffee machine for one
day, ush it to make sure that the boiler is lled
with fresh water.
To ush the machine, brew two cups of hot
water in the following way:
1 Fill the water reser voir with cold tap water
beyond the MIN level (1). Put the lid on it (2)
and put it the water reservoir back onto the
machine.
Page 11
2 Put the 1-cup pod holder q or the 2-cup pod
holder qq in the machine without pods.
3 Close the lid and lock the lever.
4 Put two cups or a large mug under the coffee
spout to collect the water.
6 Make sure that the coffee strength you have
selected is regular coffee (cup symbol with
three bars).
7 Press the 2-cup button qq to brew two cups
of hot water.
8 When the water has heated up, the on/off
button lights up continuously and the coffee
machine starts operating.
9 Throw away the water in the cups. Now the
machine is ready for use again.
6 Cleaning
ENGLISH
5 Press the on/off button 3. The on/off button
ashes slowly while the water heats up.
Regular cleaning of your SENSEO® is important
to ensure that the SENSEO
®
coffee always tastes
optimally and to optimise the lifetime of the
coffee machine.
B
Warning:
Never immerse the SENSEO® coffee machine
in water.
1 Always unplug the machine before you clean it.
2 Clean the outside of the machine with a moist
cloth.
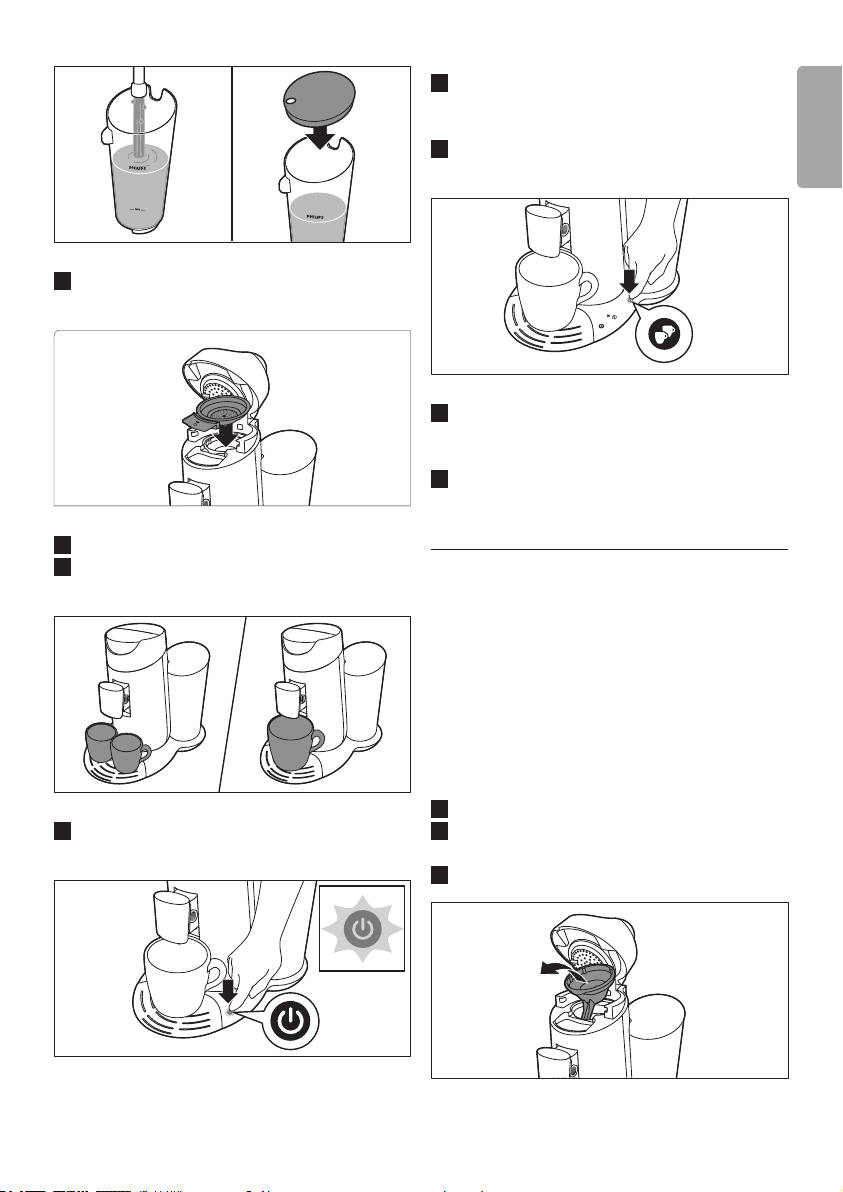
3 Remove the coffee collector.
11
Page 12
4 To remove the coffee spout, press the release
buttons (1) and pull the coffee spout off the
machine (2).
5 To disassemble the coffee spout, grab the
two ridges of the inner part of the spout and
squeeze them lightly (1). Move the inner part
downwards to remove it from the outer part
of the spout (2).
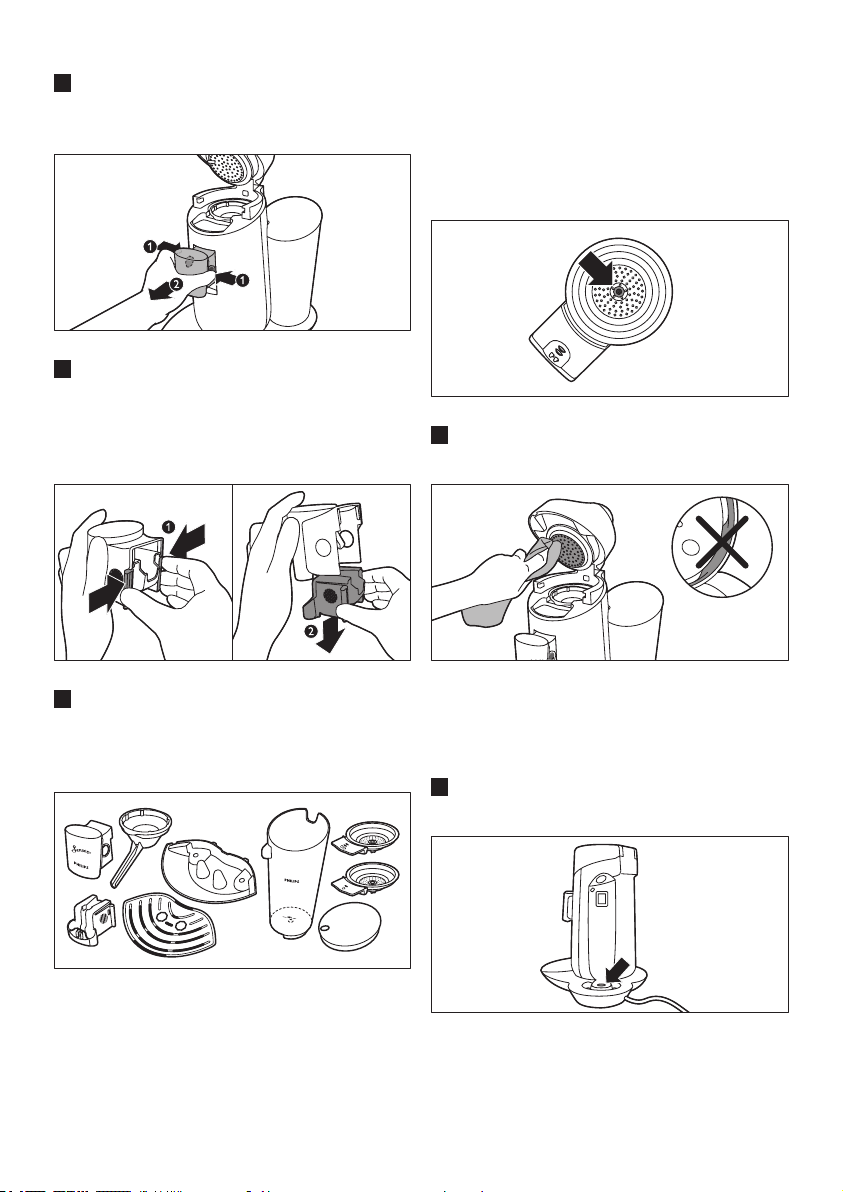
D Note:
Check if the sieve in the centre of the pod
holder is clogged. If this is the case, unclog the
sieve by rinsing the pod holder under the tap.
If necessary, use a washing-up brush to clean
the sieve
7 Clean the water distribution disc and the
rubber sealing ring with a moist cloth.
6 Clean the water reser voir and its lid, the
coffee spout, the coffee collector, the drip tray,
the cup tray and the pod holders in hot water
or in the dishwasher.
C
Caution:
Be careful not to damage the valve in the
bottom of the water reservoir if you use
a washing-up brush to clean the water
reservoir.
12
C
Caution:
Do not remove the rubber sealing ring and
be careful not to damage the tab on the
water distribution disc.
8 Clean the water inlet on the machine with a
moist cloth.
Page 13
7 Descaling
Scale builds up inside the machine during use. It is
essential to descale the SENSEO
when the CALC light goes on.
Use SENSEO
®
Descaler (HD7012, HD7011,
HD7006) only.
When to descale
• Descale the SENSEO
described below when the CALC light goes
on (after you have brewed approx. 400 cups
of SENSEO
®
coffee).
Why to descale
Your reasons to descale:
• It prolongs the life of your SENSEO
machine
• It ensures maximum cup volume
• It ensures maximum coffee temperature
• The machine produces less sound during
brewing
• It prevents malfunctioning
If the descaling procedure is not performed
correctly, scale residue remains behind in the
machine. This causes scale to build up more
quickly and may cause permanent and irreparable
damage to the machine.
Use the correct descaling agent
Use SENSEO
®
Descaler (HD7012, HD7011,
HD7006) only. It has been developed to ensure
better machine performance and operation. Each
descaling mixture can be used only once. For
more information about this descaler, visit our
website www.philips.com.
®
coffee machine
®
coffee machine as
®
coffee
B Warning:
Never use a descaling agent based on mineral
acids such as sulphuric acid, hydrochloric acid,
sulphamic acid and acetic acid (e.g. vinegar).
These descaling agents may damage your
SENSEO
®
coffee machine.
7.1 Descaling procedure
The descaling procedure consists of a descaling
cycle and two ushing cycles. Do not interrupt the
descaling cycle and do not switch off the machine
before you have performed the two ushing
cycles.
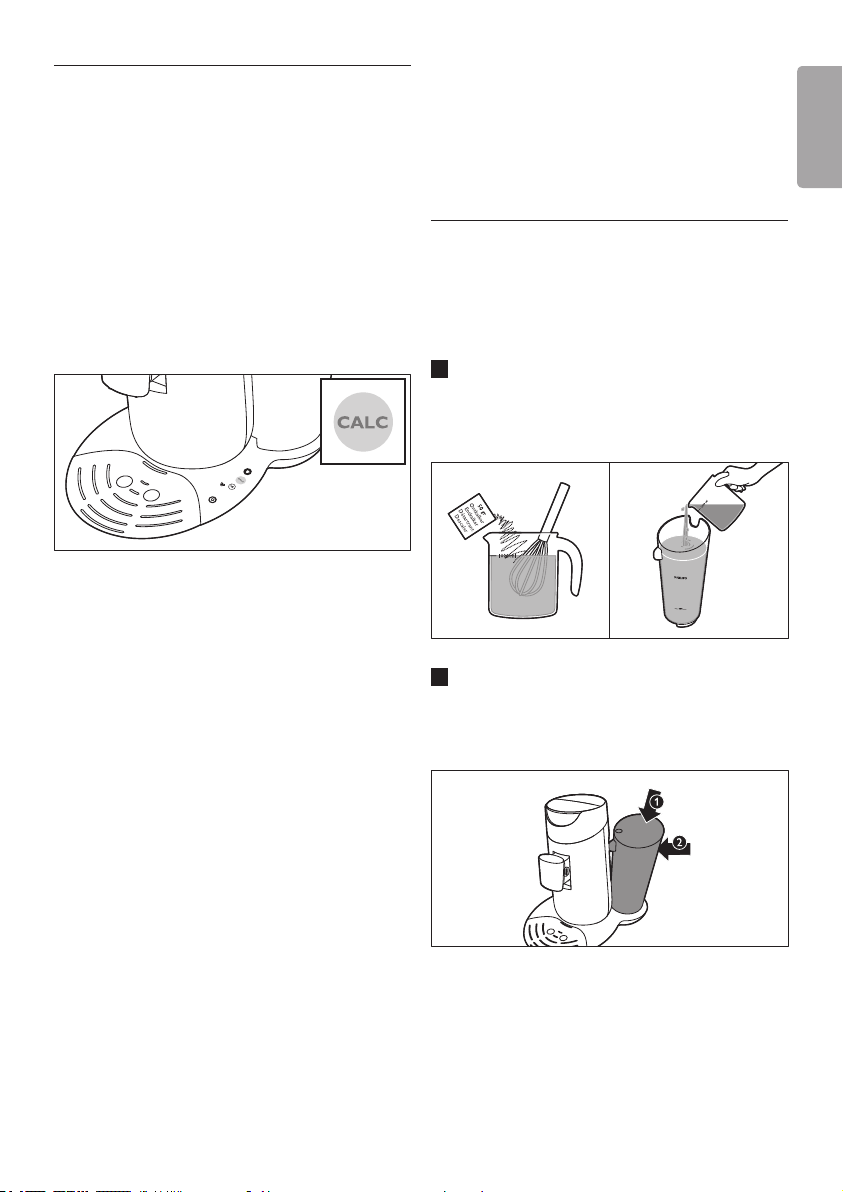
1 Mix 50 grams of citric acid with 1 litre of
water in a measuring jug. Stir until the powder
has dissolved. Fill the water reservoir with the
descaling mixture.
2 Tilt the water reser voir and place the bottom
back onto the machine (1). Then press the top
of the water reservoir towards the machine
(2).
ENGLISH
13
Page 14
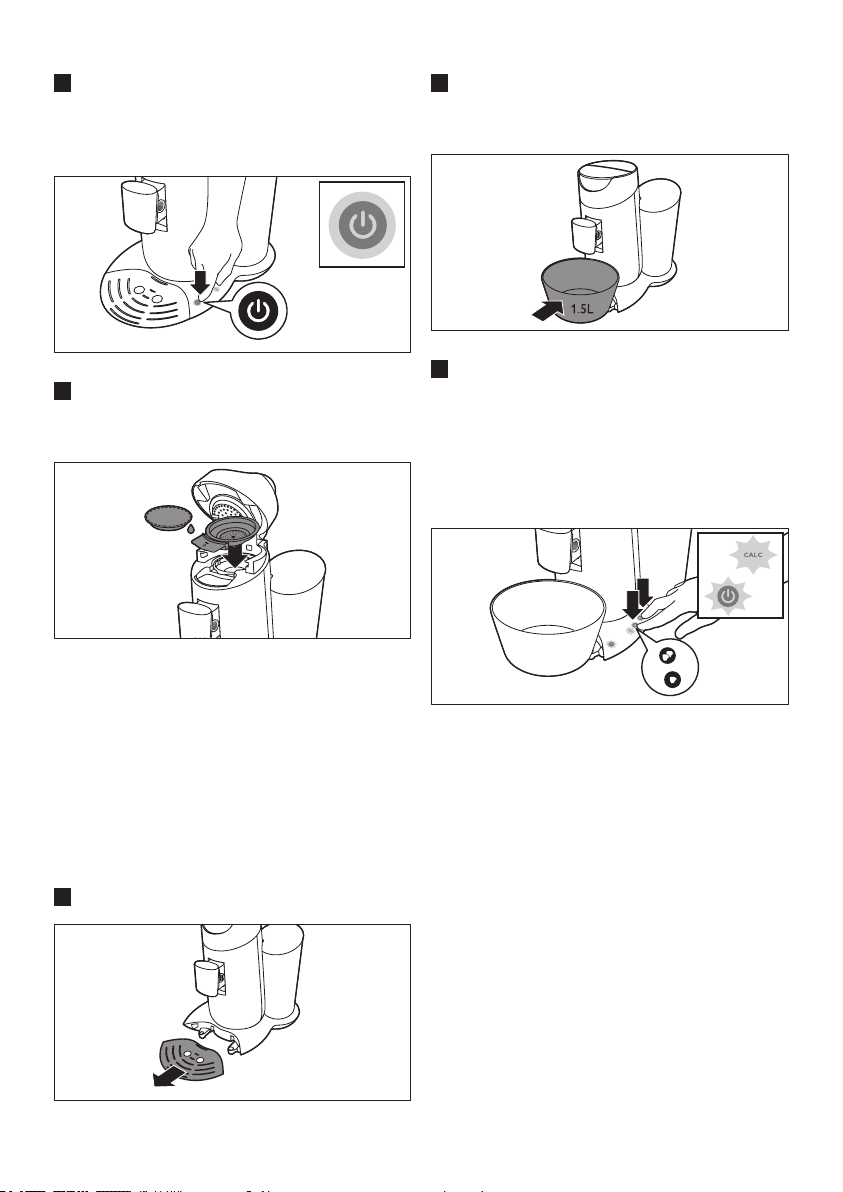
3 Press the on/off button 3. The on/off button
ashes slowly while the water heats up. The
machine is ready for descaling when the on/
off button lights up continuously.
4 Place the 1-cup pod holder q with a used
coffee pod in it in the coffee machine. Close
the lid and make sure it is properly locked.
6 Put a bowl with a capacity of at least 1.5
litres under the spout to collect the descaling
mixture.
7 When the on/off button lights up continuously,
press the 1-cup button q and the 2-cup
button qq at the same time for 3 seconds
until you hear a beep. Release the buttons
as soon as their lights as well as the selected
strength go out. This means that the descaling
procedure has been activated correctly.
D
Note:
Always put a used coffee pod in the pod holder
when you descale the machine. This pod serves
as a ‘lter’ to prevent the sieve or hole in the pod
holder from getting clogged with scale residue.
B Warning:
Make sure the lid is closed properly and the
lid lever is locked before you start descaling
the machine.
5 Remove the drip tray.
14
• The CALC light and the on/off button start
ashing to indicate that the descaling cycle
is in progress.
• During the descaling cycle, the water comes
out of the machine in intervals.
• When all the water in the water reservoir
has been used up, the descaling cycle is
nished. The on/off button starts to ash
rapidly.
D
Note:
If you press the 1-cup and 2-cup button
longer than 3 seconds, the machine does not
start the descaling cycle. If this happens, press
the 1-cup button and the 2-cup button at the
same time for 3 seconds again.
Page 15

7.2 Flushing after descaling
1 Rinse the water reser voir under the tap and
then ll it to the top with fresh tap water.
D
Notes:
Do not rell the water reservoir with used
hot water or the used descaling mixture.
2 Tilt the water reser voir and place the bottom
back onto the machine (1). Then press the top
of the water reservoir towards the machine
(2).
3 Place the 1-cup pod holder q with a used
coffee pod in it in the coffee machine. Close
the lid and make sure it is properly locked.
4 Put a bowl with a capacity of at least 1.5 litres
under the spout to collect the water.
ENGLISH
5 Press the 1-cup button q and the 2-cup
button qq at the same time for 3 seconds
until you hear a beep to start the ushing
cycle.
6 Remove the used pod and clean the pod
holder after the ushing cycle to prevent the
sieve in the centre from getting clogged.
7 Repeat steps 1 to 6 once more to ensure a
clean machine.
8 After the descaling cycle and the ushing
cycles, the CALC light goes out and the
machine switches off automatically.
15
Page 16

8 Frost-free storage
10 Environment
After you have ushed the machine for the rst
time (see chapter ‘Flushing the machine before
rst use’), it may only be used and stored in a
frost-free place to prevent damage.
9 Ordering accessories
To purchase accessories for this machine,
please visit our online shop at
www.shop.philips.com/service. If the online
shop is not available in your country, go to your
Philips dealer or a Philips service centre. If you
have any difculties obtaining accessories for your
machine, please contact the Philips Consumer
Care Centre in your country. You nd its contact
details in the worldwide guarantee leaet.
• Do not throw away the machine with the
normal household waste at the end of its life,
but hand it in at an ofcial collection point for
recycling. By doing this, you help to preserve
the environment.
11 Guarantee and
service
If you need service or information or if you
have a problem, please visit the Philips website
at www.philips.com/support or contact the
Philips Consumer Care Centre in your country.
You nd its phone number in the worldwide
guarantee leaet. If there is no Consumer Care
Centre in your country, go to your local Philips dealer.
The purchase of the Philips SENSEO
machine does not exhaust any of the rights of
Sara Lee/Douwe Egberts or Philips under any
of their patents nor does it confer upon the
purchaser a licence under these patents.
Always return the machine to a service centre
authorised by Philips for examination or repair.
Do not attempt to repair the machine yourself,
otherwise your guarantee becomes invalid.
®
coffee
16
Page 17

12 Troubleshooting
12.1 SENSEO® coffee machine
This chapter summarises the most common problems you could encounter with the machine. If you are
unable to solve the problem with the information below, visit www.philips.com/support for a list of
frequently asked questions or contact the Consumer Care Centre in your country.
Problem Solution
My cup overowed
when I used the
machine for the rst
time.
Water continued to
ow from the spout
when I used the
machine for the rst
time.
You probably tried to brew a cup of coffee without ushing the machine
rst. Before you start brewing coffee, you have to ush the machine.
When you switch on the machine again, the on/off button either lights up
continuously or ashes slowly or rapidly.
If the on/off button lights up continuously, you have to carry out the ushing
procedure (see chapter ‘Flushing the machine before rst use’).
If the on/off button ashes slowly or rapidly, you do NOT have to carry
out the ushing procedure. If the on/off button ashes slowly, the water
is heating up. If it ashes rapidly, there is not enough water in the water
reservoir or the water reservoir is not placed on the machine properly.
If you still cannot brew coffee after you have ushed the machine, we advise
you to contact the Consumer Care Centre in your country.
If water continued to ow from the spout until the water reservoir was
empty, the machine was performing the ushing cycle. Before you start
brewing coffee, you have to ush the machine. When you switch on the
machine again, the on/off button either lights up continuously or ashes
slowly or rapidly.
ENGLISH
The on/off button
ashes slowly.
If the on/off button lights up continuously, you have to carry out the ushing
procedure (see chapter ‘Flushing the machine before rst use’).
If the on/off button ashes slowly or rapidly, you do NOT have to carry
out the ushing procedure. If the on/off button ashes slowly, the water
is heating up. If it ashes rapidly, there is not enough water in the water
reservoir or the water reservoir is not placed on the machine properly.
If you still cannot brew coffee after you have ushed the machine, we advise
you to contact the Consumer Care Centre in your country.
You have used the SENSEO
metres above sea level. This has caused the water in the machine to start
boiling before it has reached the required temperature, which prevents the
machine from functioning properly. Switch off the machine and no longer
use it at altitudes higher than 2200 metres above sea level.
®
coffee machine at an altitude higher than 2200
17
Page 18

Problem Solution
The CALC light
ashes.
The CALC light does
not go out after
descaling.
The on/off button
continues to ash
rapidly.
Water leaks from the
coffee machine.
You have pressed the 1-cup button and the 2-cup button at the same time.
This started the descaling cycle. If you did not intend to start the descaling
cycle, simply press the on/off button to switch off the machine. If you did
intend to start the descaling cycle, do not interrupt this cycle but let the
appliance operate until the water reservoir is empty.
The CALC light does not go out if the descaling procedure has not been
performed correctly. To perform the descaling procedure correctly:
1. Make sure that you do not interrupt the descaling cycle or switch off or
unplug the machine during the descaling cycle. During the descaling cycle,
hot water comes out of the coffee spout at intervals and the machine stops
descaling 3 to 4 times to let the descaling mixture act and to heat up again.
2. Make sure that you start the descaling cycle by pressing the 1-cup
button and the 2-cup button at the same time. See chapter ‘Descaling’ for a
complete description of the descaling procedure.
3. Make sure that you use three full water reservoirs to complete the
descaling procedure: one reservoir lled with descaling mixture and two
reservoirs lled with fresh water.
Make sure that there is enough water in the water reservoir and that the
water reservoir is placed properly.
Make sure that the ambient temperature is not lower than 5°C. If it is, the
machine does not function properly.
If you notice coffee or water leaking from your SENSEO
®
machine, try to
establish where the leakage occurs. This is important, as the location of the
leakage determines the solution.
1. If the leakage occurs near the lid or the spout, make sure that:
1a. The sieve in the centre of the pod holder is not clogged. If it is, unclog
the sieve by holding the pod holder under a running tap.
1b. The coffee pod has been put properly in the centre of the pod holder.
1c. The sealing ring has not got stuck under the edge of the water
distribution disc (see gure 1 at the beginning of this user manual).
1d. The spout and the coffee collector have been placed correctly.
2. If the leakage occurs near the bottom of the water reservoir or under the
machine, make sure that:
18
Page 19

Problem Solution
2a. There is not too much water in the water reservoir.
2b. You do not place the water reservoir onto the machine too roughly.
If you place the water reservoir too roughly, water may splash out of the
water reservoir.
2c. The water reservoir is not damaged or broken. Normally, water should
not start to drip from the water outlet in the bottom of the water reservoir
within 30 seconds after lling.
In all other cases, contact the Philips Consumer Care Centre in your
country.
I cannot open the lid. A vacuum may have temporarily formed under the lid. Switch off the
machine. Pull up the lever and wait 24 hours before you open the lid.You
may need to use quite some force.
®
Make sure that you do not move the SENSEO
machine. Moving the
machine, placing it outdoors or in a cool or cold environment does not
accelerate the unlocking of the lid.
For this not to happen again, always make sure that the pod holders are
clean and that the sieve in the centre of the pod holders is not clogged.
If this problem continues to occur, contact the Philips Consumer Care
Centre in your country.
The coffee machine
produces less coffee
than before.
Perhaps the sieve in the centre of the pod holder is clogged. If this is the
case, unclog the sieve by rinsing the pod holder under a running tap. Use a
washing-up brush to clean the sieve, if necessary.
Descale the machine (see chapter ‘Descaling’).
ENGLISH
I cannot close the lid
properly.
The SENSEO
®
coffee
is not strong enough.
Check if a used coffee pod is sticking to the water distribution disc. If this is
the case, remove the used pod.
Check if you used the correct pod holder. Use 2 pods in combination with
the deeper 2-cup pod holder qq.
Make sure that you have selected the coffee strength that you prefer. You
can choose between regular and strong coffee. You can also increase or
decrease the coffee strength by setting your preferred amount of coffee
with the personal coffee memory function (HD7872 only).
Make sure that you have used the correct number of pods and have
pressed the right button. Use 2 pods in combination with the 2-cup pod
holder qq and the 2-cup button qq.
19
Page 20

Problem Solution
Make sure that you have placed the coffee pod or pods properly in the
centre of the pod holder, to prevent water from escaping along the edge
of the pod or pods. When you use two coffee pods on top of each other,
make sure that the convex sides of both pods point downwards and press
the pods lightly into the pod holder.
Make sure that you have not used the same coffee pod twice by accident.
Make sure that the coffee in the pod is evenly distributed.
If you prefer a more robust avour, SENSEO
blend are available.
®
coffee pods with a stronger
The coffee is not hot
enough.
The touch panel does
not work.
I accidentally activate
the touch panel when
I clean it.
If you have used the machine for quite some time and the temperature of
the coffee decreases, we advise you to descale the machine. See chapter
‘Descaling’. Descale your SENSEO
®
coffee machine regularly.
Do not use cups that are too large, as they cause the coffee to get cold
more quickly. Make sure that the cups have a capacity of at least 150ml.
Use thin-walled cups. Thin-walled cups absorb less heat from the coffee than
thick-walled cups.
Make sure the size of the cup matches the amount of coffee. Do not brew a
small amount of coffee in a large cup.
If you drink coffee with fresh milk, preheat the milk in the cup in a
microwave.
You can preheat the coffee machine by rst brewing a cup of coffee without
placing a coffee pod in the pod holder. In this way you also heat up your
coffee cup.
If there is water on the touch panel, the buttons do not work. Make sure
that the touch panel is dry and also make sure your hands are dry when
you use the touch panel.
Make sure that you press the selection button and not the symbols to the
left of the selection button.
This happens because the touch panel is very sensitive and the buttons
only require a light touch to be activated. There is no problem when this
happens, the machine will not start brewing coffee.
20
Unplug the machine before you clean it.
Page 21

Problem Solution
HD7872 only: The
personal coffee
Please read section ‘Personal coffee memory’ in chapter ‘Brewing SENSEO
coffee’ and try to set the amount of coffee you prefer again.
memory button does
not produce the
amount of coffee I
prefer.
®
ENGLISH
21
Page 22

MAGYAR
Tartalomjegyzék
1 Bevezetés 22
2 Általános leírás 22
3 Fontos! 24
4 Akészülékátöblítéseazelső
használatelőtt 24
5 KávéfőzésSENSEO
®
készülékkel 27
6 Tisztítás 31
7 Vízkőmentesítés 32
8 Fagymentes tárolás 35
9 Tartozékok rendelése 35
10 Környezetvédelem 35
11 Jótállás és szerviz 35
12 Hibaelhárítás 36
1 Bevezetés
Köszönjük, hogy Philips terméket vásárolt! A
Philips által biztosított teljes körű támogatáshoz
regisztrálja termékét a www.philips.com/welcome
oldalon.
1.1 SENSEO®kávéfőző
rendszer
Tegye a kávézás pillanatait valóban feledhetetlenné
a SENSEO
az egyszerűen használható Philips SENSEO
kávéfőző és a kifejezetten erre a célra kifejlesztett
Douwe Egberts SENSEO
teljes értékű, ízletes kávét, gazdag habréteggel.
®
rendszerrel. Ez az egyedülálló rendszer
®
kávépárnák révén nyújt
®
A kényelmes SENSEO® kávépárnákba zárt Douwe
Egberts kávé és a Philips egyedülállóan új SENSEO
®
kávéfőzési technikája olyan tökéletes párost alkotnak,
melynek segítségével a kávé legjobb ízét és aromáját
sikerül elővarázsolni. Fedezze fel az összes SENSEO
kávékeveréket a www.senseo.com oldalon.
A tökéletes kávé elkészítéséhez ne feledkezzen
meg a következőkről:
Friss kávépárnák
A teljes és gazdag íz elérése érdekében használjon
a Douwe Egberts által kifejezetten a SENSEO
kávéfőzőhöz kifejlesztett SENSEO
A Douwe Egberts SENSEO
®
kávépárnát.
®
kávépárnák tovább
®
megőrzik frissességüket, ha légmentesen zárható
tárolódobozban tartja őket.
Friss víz
Használjon minden nap friss vizet. Ha egy napig nem
használta a kávéfőzőt, öblítse át friss vízzel, és csak
ezt követően főzzön vele ismét kávét (erről lásd a
„Kávéfőzés SENSEO
®
módra” c. fejezet „A készülék
átöblítése egynapos használatszünet után” c. részét).
2 Általános leírás
1 Kávégyűjtő
2 Fedél kar
3 Fedél és kávéfőző kamra
4 Tömítőgyűrű
5 Vízelosztó lap
6 Kétcsészés kávépárna-tartóqq
7 Egycsészés kávépárna-tartóq
8 A kávékifolyó fedele
9 Kávékifolyó
10 Kifolyócső-kioldó gombok
11 Eltávolítható csepptálca
12 Csészetartó tálca
13 Érintőpanel
14 Be-/kikapcsoló gomb
15 Személyes kávémemória szimbólum (csak
HD7872 típus esetében)
16 Hagyományos kávé szimbólum
17 Kiválasztó gomb
18 Erős kávé szimbólum
19 Vízkőmentesítést jelző fény
®
22
Page 23

MAGYAR
23
Page 24

20 „1 csésze” gomb q
21 „2 csésze” gombqq
22 Víztartály
23 A víztartály fedele
3 Fontos!
A készülék első használata előtt gyelmesen
olvassa el a használati útmutatót, és őrizze meg
későbbi használatra.
Vigyázat!
• Soha ne merítse a készüléket vízbe vagy más
folyadékba.
Figyelmeztetés
• Mielőtt a készüléket az elektromos hálózatra
csatlakoztatná, ellenőrizze, hogy a készülék
alján feltüntetett feszültség egyezik-e a helyi
hálózati feszültséggel.
• A készülék működtetésében járatlan
személyek, gyerekek, nem beszámítható,
szakmai tudással vagy tapasztalattal nem
rendelkező személyek felügyelet nélkül soha
ne használják a készüléket.
• Vigyázzon, hogy gyermekek ne játsszanak a
készülékkel.
• Ne használja a készüléket, ha a hálózati
csatlakozódugó, a kábel vagy maga a készülék
sérült.
• Ha a hálózati kábel meghibásodik, a
kockázatok elkerülése érdekében Philips
szakszervizben vagy hivatalos szakszervizben ki
kell cserélni.
Figyelmeztetés!
• A készülék kicsomagolása után ne fektesse a
SENSEO
álló helyzetben, még szállítás közben is.
• A készüléket kizárólag Philips hivatalos
szakszervizbe vigye vizsgálatra, illetve javításra.
Amennyiben nem szakember próbálja
megjavítani a készüléket, a garancia érvényét
veszti.
• Ne használja a kávéfőzőt transzformátorral
együtt, mert az veszélyes helyzeteket
eredményezhet.
®
kávéfőzőt az oldalára. Mindig tartsa
• A készüléket minden esetben hideg, egyenes,
stabil felületen helyezze el.
• Ne használja a készüléket a tengerszint felett
2200 méternél magasabban fekvő helyen.
• Tilos tejet, kávét, forró vizet vagy szénsavas
vizet a víztartályba önteni.
• Tilos a készüléket átöblíteni vagy kávéfőzésre
használni, ha a kifolyócső nincs a helyén.
• A készülék általános otthoni használatra
készült. Nem ajánlott üzletek, irodák,
gazdaságok és egyéb munkahelyek személyzeti
konyhájába, valamint hotelekben, motelekben,
panziókban és egyéb vendéglátóipari
környezetekben való használatra sem.
3.1 Szabványoknak való
megfelelés
Ez a készülék megfelel az elektromágneses
mezőkre (EMF) vonatkozó szabványoknak.
Amennyiben a használati útmutatóban foglaltaknak
megfelelően üzemeltetik, a tudomány mai állása
szerint a készülék biztonságos.
Kikapcsolt állapotban a készülék energiafelvétele
kevesebb, mint 1 Watt. A készülék tehát megfelel
az Európai Bizottság 2009/125/EK irányelvének,
amely az energiafogyasztó termékek ökológiai
kialakításának követelményeit határozza meg.
4 A készülék
átöblítéseazelső
használatelőtt
Nagyon fontos, hogy az első használat előtt
átöblítse a SENSEO
átöblítés után (amely mindössze kb. 2 percet
igényel), a készülék készen áll a SENSEO
főzésére.
C
Figyelmeztetés!
Ne szakítsa félbe az átöblítést, mert ilyenkor a
forraló nem töltődik fel megfelelően.
®
kávéfőző készüléket. Az
®
kávé
24
Page 25

1 Illessze a kifolyócsövet a készülékre. Fogja meg
a kifolyócső belső részének két rögzítőjét,
és enyhén nyomja le őket (1). Helyezze a
kifolyócsövet a készülékre, és engedje fel a két
rögzítőt (2).
C
Figyelmeztetés!
Tilos a készüléket átöblíteni vagy
kávéfőzésre használni, ha a kifolyócső nincs
a helyén.
2 Döntse hátra a víztartály tetejét (1), és emelje
le a víztartályt a készülékről (2).
3 Töltse fel teljesen a víztartályt hideg csapvízzel.
5 Döntse meg a víztar tályt, és az alját helyezze
a készülékre (1). Ezután nyomja a víztartály
tetejét a készülék irányába (2).
6 Távolítsa el a cseppfelfogó tálcát.
7 Helyezzen egy legalább 1,5 liter űrtartalmú
edényt a kávékifolyó alá.
MAGYAR
4 Mielőtt a víztar tályt visszahelyezné a
készülékre, tegye rá a fedelét.
25
Page 26

8 Ellenőrizze, hogy legyen kávépárna-tartó
(párnák nélkül) a készülékben.
9 Csatlakoztassa a hálózati dugót földelt fali
konnektorba.
10 Nyomja meg a be- és kikapcsológombot 3.
A gomb világítani kezd, ami azt jelzi, hogy a
készüléket át kell öblíteni.
• Amikor a víztartályból elfogy a víz, az öblítés
befejeződik és a gép kikapcsol.
12 Töltse fel a víztartályt friss csapvízzel, tegye rá
a fedelét, és helyezze vissza a kávéfőzőre.
11 Az átöblítés indításához nyomja meg
egyszerre, röviden az „1 csésze” gombot q és
a „2 csésze” gombot qq.
• A be- és kikapcsológomb villog, így jelezve,
hogy megkezdődött az öblítési ciklus.
• Az átöblítés alatt a vízmelegítő a
víztartályból megtelik vízzel, majd a hideg
víz kifolyik a kávékifolyón. Az átöblítés a
normál kávéfőzésnél nagyobb zajjal jár.
26
Ezt követően a SENSEO
®
kávéfőző használatra
kész, és megfőzheti vele az első csésze aromás
kávét.
Page 27

5 KávéfőzésSENSEO®
készülékkel
Amíg a SENSEO® kávéfőző felmelegedik,
kiválaszthatja kedvenc kávéerősségét, és hogy hány
csésze kávét szeretne főzni. Miután a kávéfőző
felmelegedett, megfőzi a kívánt számú csésze kávét.
1 Ügyeljen arra, hogy a víztartály a MIN szint
fölé legyen feltöltve hideg csapvízzel, és hogy a
fedél rá legyen téve.
E
Tipp:
Mindennap friss vizet használjon.
2 Csatlakoztassa a hálózati dugót földelt fali
konnektorba.
3 Nyomja meg a be- és kikapcsológombot 3. A
gomb lassan villog, amíg a víz felmelegszik.
5 1 csésze SENSEO
®
kávé elkészítéséhez
helyezze be az egycsészés kávépárna-tartót q
a készülékbe (1). 2 csésze kávé elkészítéséhez
a kétcsészés kávépárna-tartót qq helyezze
be a készülékbe (2). Ellenőrizze, hogy a
kávépárna-tartó tiszta-e.
6 Helyezzen 1 kávépárnát az egycsészés
kávépárna-tartóba q (1), vagy helyezzen 2
kávépárnát a kétcsészés kávépárna-tartóba
qq (2). A kávépárnát vagy párnákat pontosan
a kávépárna-tartó közepére helyezze, úgy,
hogy a domború oldala (vagy oldaluk) lefelé
mutasson. Nyomja bele óvatosan a párnát
vagy párnákat a tartóba.
MAGYAR
D
Megjegyzés:
Ha a be- és kikapcsológomb gyorsan
villog, a víztartályban nincs egy csésze kávé
elkészítéséhez elegendő víz.
4 A fedél kar felfelé húzásával nyissa ki a fedelet.
A fedél automatikusan felnyílik.
27
Page 28

D Megjegyzés:
Ellenőrizze, hogy a párnában vagy párnákban
levő kávé egyenletesen oszlik-e el.
C
Figyelmeztetés!
Ne használjon normál őrölt kávét vagy
szakadt kávépárnát a SENSEO
®
készülékhez,
mert az annak eldugulását okozhatja.
7 Zárja le a fedelet (1), és rögzítse a kart (2).
1
B
Figyelmeztetés
A kávéfőzés megkezdése előtt győződjön
meg róla, hogy a fedél megfelelően le van
zárva és a kar rögzítve van.
8 Helyezzen egy vagy két csészét a kifolyónyílás
alá. A kifolyónyílás magasságát felfelé vagy
lefelé csúsztatva állíthatja. Magasabb csészék
behelyezéséhez eltávolíthatja a cseppfelfogó
tálcát.
9 A kiválasztógomb segítségével válassza ki
a kívánt kávéerősséget. Egy csésze normál
kávé (125 ml) készítéséhez válassza a három
vonallal ellátott csésze szimbólumot (1). Egy
csésze erős kávé (60 ml) készítéséhez válassza
az egy vonallal ellátott csésze szimbólumot (2).
10 Miután kiválasztotta a kívánt kávéerősséget,
nyomja meg az „1 csésze” gombot q egy
csésze kávé (1), vagy a „2 csésze” gombot
qq két csésze kávé főzéséhez (2).
D
Megjegyzés
A kávéscsészék űrtartalma normál kávé
esetében legalább 150 ml, erős kávé esetében
pedig 100 ml legyen. Ne használjon túlságosan
nagy méretű csészét, mert abban gyorsabban
kihűl a kávé.
28
11 Amikor a víz felmelegedett, és a be- és
kikapcsológomb folyamatosan világítani kezd, a
kávéfőző megkezdi a kávé elkészítését.
E
Tipp:
Bármikor megszakíthatja a főzési ciklust.
Ehhez nyomja meg ugyanazt a gombot („1
csésze” vagy „2 csésze” gomb), amelyet a
kávé készítéséhez megnyomott. Azonban
ebben az esetben a készülék nem fejezi be a
megszakított főzési ciklust, akkor sem, ha újra
bekapcsolja, vagy ismét megnyomja ugyanazt a
csésze gombot.
Page 29

D Megjegyzés:
Ne távolítsa el a víztartályt főzés közben.
12 Amikor a kávé elkészült, távolítsa el a használt
kávépárnát vagy párnákat. Ehhez egyszerűen
emelje ki a párnatartót a készülékből, és ürítse
ki.
C
Figyelmeztetés!
Előfordulhat, hogy maradt még forró víz /
kávé a párnában vagy párnákban.
13 Használat után a be-/kikapcsoló gomb 3
megnyomásával kapcsolja ki a készüléket.
D
Megjegyzés:
Ha nem használja a kávéfőzőt, a készülék
15 perc után automatikusan kikapcsol az
energiamegtakarítás érdekében.
1 Helyezzen 1 kávépárnát az egycsészés
kávépárna-tartóba, és helyezzen 1 csészét a
kifolyónyílás alá.
2 Ahhoz, hogy programozási módba léphessen,
először a kiválasztógomb segítségével válassza
ki a személyes kávémemória szimbólumot
(csillag szimbólum) (1). Tartsa lenyomva
a kiválasztógombot 2 másodpercig, amíg
a csillag szimbólum villogni kezd (2), és
sípolás hallatszik. Ezután engedje fel a
kiválasztógombot.
3 Nyomja meg az „1 csésze” gombot, hogy a
kávé a csészébe folyjon (1). Amikor a csésze
már a kívánt kávémennyiséget tartalmazza,
nyomja meg ismét az „1 csésze” gombot (2).
Ezzel beállította a kedvenc kávémennyiségét.
MAGYAR
5.1 Személyes kávémemória
(csak HD7872 típus
esetében)
Beprogramozhatja a kávéfőzőt úgy, hogy a kedvenc
kávémennyiségét (legfeljebb 145 ml) készítse el.
Egyszerűen kísérletezze ki, hogy melyiket szereti
legjobban. Azt javasoljuk, hogy az optimális íz és
hőmérséklet érdekében legalább 60 ml-es adagot
készítsen.
Programozás közben csak az „1 csésze” gombot
használhatja. A programozási folyamat befejezése
után a beprogramozott kávémennyiségtől függően
főzhet egy vagy két csésze kávét.
D
Megjegyzés:
A készülék melegedése közben nem
programozhatja a személyes kávémemóriáját.
Várjon, amíg a ki- és bekapcsológomb
folyamatosan világítani kezd.
2
Mostantól kezdve a SENSEO
®
kávéfőző egy vagy
két csésze kávét főz ezzel a kávémennyiséggel,
ha a kiválasztógombbal kiválasztja a személyes
kávémemória szimbólumát.
D
Megjegyzés:
A beállított kávémennyiség módosításához
egyszerűen hajtsa végre újból az 1-4. lépéseket.
29
Page 30

5.2 A készülék átöblítése
egynapos használatszünet
után
Ha egy napig nem használta a kávéfőzőt, öblítse át,
hogy a vízforraló megteljen friss vízzel.
A készülék átöblítéséhez forraljon fel két csésze
vizet a következő módon:
1 Töltse fel a víztartályt hideg csapvízzel a MIN
szintjelzés fölé (1). Helyezze rá a fedelet (2), és
helyezze vissza a víztartályt a kávéfőzőbe.
2 Helyezze az egy- q vagy a kétcsészés qq
kávépárna-tartót a készülékbe, párnák nélkül.
5 Nyomja meg a be- és kikapcsológombot 3. A
gomb lassan villog, amíg a víz felmelegszik.
6 Ellenőrizze, hogy a kiválasztott kávéerősség
normál kávé-e (csésze szimbólum három
vonallal).
7 A két csésze forró víz elkészítéséhez nyomja
meg a „2 csésze” gombot qq.
3 Zárja le a fedelet és rögzítse a kart.
4 A víz felfogásához tegyen két csészét vagy egy
nagy bögrét a kávékifolyó alá.
30
8 Amikor a víz felmelegedett, a be- és
kikapcsológomb folyamatosan világítani kezd,
és a kávéfőző működni kezd.
9 Öntse ki a csészékből a vizet. A készülék ekkor
ismét használatra kész.
Page 31

6 Tisztítás
Ahhoz, hogy a SENSEO® kávé íze mindig optimális
legyen, és a kávéfőző élettartamát optimalizálja,
nagyon fontos, hogy rendszeresen tisztítsa meg a
SENSEO
B
Tilos a SENSEO® kávéfőzőt vízbe meríteni.
1 Tisztítás előtt mindig húzza ki a készülék
2 A készülék burkolatát nedves ruhával tisztítsa.
3 Vegye le a kávégyűjtőt.
4 A kávékifolyó eltávolításához nyomja meg a
®
kávéfőzőt.
Figyelmeztetés
hálózati dugóját a fali konnektorból.
kioldógombokat (1), és húzza ki a kávékifolyót
a készülékből (2).
6 Tisztítsa meg forró vízben vagy
mosogatógépben a víztartályt és a fedelét,
a kávékifolyót, a kávégyűjtőt, a cseppfelfogó
tálcát, a csészetartó tálcát és a kávépárnatartókat.
C
Figyelmeztetés!
Ha a víztartály tisztításához mosogatókefét
használ, ügyeljen arra, hogy ne sértse meg a
víztartály aljában levő szelepet.
MAGYAR
5 A kávékifolyó szétszereléséhez fogja meg a
kifolyó belső részének két rögzítőjét, és enyhén
nyomja le őket (1). Mozgassa lefelé a belső
részt, és vegye ki a kifolyó külső részéből (2).
D
Megjegyzés:
Ellenőrizze, hogy nem tömődött-e el a
kávépárna-tartó közepén levő szűrő. Ha igen,
öblítse ki a csap alatt a kávépárna-tartót, és
szüntesse meg az eltömődést. Szükség esetén
használjon mosogatókefét a szűrő tisztításához.
31
Page 32

7 A vízelosztó lapot és a gumi tömítőgyűrűt
nedves ruhával tisztítsa meg.
C
Figyelmeztetés!
Ne távolítsa el a gumi tömítőgyűrűt, és
ügyeljen rá, nehogy megsértse a vízelosztó
lapon található fület.
8 A készülék vízbemenetét puha, nedves
törlővel tisztítsa.
7 Vízkőmentesítés
A vízkő a készülék belsejében alakul ki a használat
során. Alapvető fontosságú a SENSEO
vízkőmentesítése, amikor a CALC jelzőfény erre
gyelmeztet.
Csak SENSEO
®
vízkőmentesítő (HD7012,
HD7011, HD7006) használjon.
Avízkőzmentesítésidőpontja
• Amikor a CALC jelzőfény világítani kezd
(körülbelül 400 csésze SENSEO
készítése után), az alábbiaknak megfelelően
vízkőmentesítse a SENSEO
®
kávéfőző
®
kávé
®
kávéfőző gépet.
Avízkőmentesítésszükségessége
Azért érdemes vízkőmentesíteni, mert:
• Meghosszabbítja az Ön SENSEO
®
kávéfőzőjének élettartamát.
• Biztosítja a csészék maximális térfogatát
• Biztosítja a kávé maximális hőmérsékletét
• A gép halkabban működik, amikor vizet forral
• Elkerülhető a meghibásodás
Ha a vízkőmentesítést nem megfelelően hajtja
végre, akkor a gépben lévő vízkőmaradványok
felhalmozódhatnak tartós, javíthatatlan hibát
okozva a készülékben.
Használjonmegfelelővízkőmentesítő
szert
Csak SENSEO
®
vízkőmentesítőt (HD7012,
HD7011, HD7006) használjon. Azért fejlesztették
ki, hogy biztosítsa a készülék teljesítményét és
működését. Minden vízkőmentesítő keverék
csak egy alkalommal használható fel. A
vízkőmentesítőről további tájékoztatást a
www.philips.com weboldalon talál.
B
Figyelmeztetés
Soha ne használjon olyan vízkőmentesítő szert,
amely olyan ásványi savakat tartalmaz, mint a
kénsav, sósav, szulfát sav vagy ecetsavat (pl. ecet).
Ezek a vízkőmentesítők károsíthatják az Ön
SENSEO
®
kávéfőzőjét.
7.1Vízkőmentesítés
A vízkőmentesítés egy vízkőmentesítési és
két öblítési ciklusból áll. Ne szakítsa meg a
vízkőmentesítést, és ne kapcsolja ki a készüléket,
amíg mindkét öblítési ciklust be nem fejezte.
1 Keverjen össze 50 gramm citromsavat 1 liter
vízzel egy mérőedényben. Keverje addig, amíg
a por fel nem oldódik. Töltse meg a víztartályt
a vízkőmentesítő keverékkel.
32
Page 33

2 Döntse meg a víztar tályt, és az alját helyezze
a készülékre (1). Ezután nyomja a víztartály
tetejét a készülék irányába (2).
D Megjegyzés:
A készülék vízkőmentesítéséhez mindig
használt kávépárnát használjon. A kávépárna
„szűrőként” funkcionál és megakadályozza,
hogy a kávétartóban lévő szűrő eltömődjön a
vízkőmaradékkal.
B
Figyelmeztetés
A készülék vízkőmentesítésének megkezdése
előtt győződjön meg róla, hogy a fedél
megfelelően le van zárva és a kar rögzítve van.
5 Távolítsa el a cseppfelfogó tálcát.
MAGYAR
3 Nyomja meg a be- és kikapcsológombot 3.
A gomb lassan villog, amíg a víz felmelegszik.
Amikor a be- és kikapcsológomb folyamatosan
világítani kezd, a kávéfőző vízkőmentesítésre
kész.
4 Helyezze az egycsészés kávépárna-tartót q
egy használt kávépárnával a kávéfőzőbe. Zárja
le gondosan a fedelet.
6 A tisztítókeverék felfogásához helyezzen
egy legalább 1,5 liter űrtar talmú edényt a
kávékifolyó nyílása alá.
7 Amikor a be- és kikapcsológomb folyamatosan
világít, nyomja le 3 másodpercig egyszerre
az „1 csésze” gombot q és a „2 csésze”
gombot qq, amíg sípolást nem hall. Engedje
fel a gombokat, amint világítani kezdenek,
és megjelenik a kiválasztott erősség. Ez azt
jelenti, hogy a vízkőmentesítési folyamatot
megfelelően aktiválta.
33
Page 34

• A vízkőmentesítést jelző fény, valamint a
be- és kikapcsológomb villogni kezd jelezve,
hogy vízkőmentesítési ciklus folyamatban
van.
• A vízkőmentesítés során a víz
megszakításokkal távozik a készülékből.
• A vízkőmentesítés akkor ér véget, amikor
a víztartályból elfogy a víz. A be- és
kikapcsológomb gyorsan villogni kezd.
D
Megjegyzés:
Ha az „1 csésze” és a „2 csésze” gombot 3
másodpercnél tovább nyomja, a készülék nem
indítja el a vízkőmentesítési ciklust. Ebben
az esetben nyomja meg ismét egyszerre 3
másodpercig az „1 csésze” és a „2 csésze”
gombot.
7.2Átöblítésvízkőmentesítés
után
1 Öblítse ki a víztartályt a csap alatt, majd töltse
tele friss csapvízzel.
2 Döntse meg a víztar tályt, és az alját helyezze
a készülékre (1). Ezután nyomja a víztartály
tetejét a készülék irányába (2).
3 Helyezze az egycsészés kávépárna-tartót q
egy használt kávépárnával a kávéfőzőbe. Zárja
le gondosan a fedelet.
4 A víz felfogásához helyezzen egy legalább 1,5
liter űrtar talmú edényt a kávékifolyó nyílása alá.
D
Megjegyzés:
A víztartály ne a használt forró vízzel vagy a
vízkőmentesítő keverékkel töltse fel.
34
5 Az öblítés elindításához nyomja meg egyszerre
3 másodpercig az „1 csésze” q és a „2 csésze”
qq gombot, amíg sípolást nem hall.
Page 35

10 Környezetvédelem
• A feleslegessé vált készülék szelektív
hulladékként kezelendő. Kérjük, hivatalos
újrahasznosító gyűjtőhelyen adja le, így
hozzájárul a környezet védelméhez.
6 Távolítsa el a használt kávépárnát, és tisztítsa
ki a kávépárna-tartót az öblítés után, hogy
megakadályozza a középen található szűrő
vagy lyuk eltömődését.
7 Ahhoz, hogy biztosítsa a készülék tisztaságát,
ismételje meg még egyszer az 1-6. lépéseket.
8 A vízkőmentesítő ciklus és az öblítő ciklusok
befejezése után a vízkőmentesítést jelző fény
kialszik, és a kávéfőző automatikusan kikapcsol.
8 Fagymentes tárolás
A károsodás elkerülése érdekében a készülék az
első átöblítés után (lásd „A készülék átöblítése
az első használat előtt” c. fejezetet) kizárólag
fagymentes helyen használható és tárolható.
9 Tartozékok
rendelése
A kávéfőző tartozékainak vásárlásához
látogasson el online üzletünkbe:
www.shop.philips.com/service. Ha az
online üzlet nem érhető el az adott országban,
lépjen kapcsolatba a legközelebbi Philips
márkakereskedővel vagy a Philips szakszervizével.
Ha nehézségei adódnak a készülékhez tartozó
alkatrészek beszerzésében, kérjük, vegye fel a
kapcsolatot országa Philips vevőszolgálatával.
Ennek elérhetőségét a világszerte érvényes
garancialevélen találja.
11 Jótállás és szerviz
Ha javításra vagy információra van szüksége,
vagy ha valamilyen probléma merült fel,
látogasson el a Philips weboldalára
(www.philips.com/support), vagy forduljon
az adott ország Philips vevőszolgálatához.
A telefonszámot megtalálja a világszerte érvényes
garancialevélen. Ha országában nem működik
ilyen vevőszolgálat, forduljon a Philips helyi
szaküzletéhez.
A Philips SENSEO
érinti a Sara Lee/Douwe Egberts vagy Philips jogát
bármely védjegyre, és nem ruházza fel a védjegyek
licencjog-használatával a vásárlót.
A készüléket kizárólag Philips hivatalos
szakszervizbe vigye vizsgálatra, illetve javításra.
Amennyiben nem szakember próbálja megjavítani
a készüléket, a garancia érvényét veszti.
®
kávéfőző megvásárlása nem
MAGYAR
35
Page 36

12 Hibaelhárítás
12.1 SENSEO®kávéfőző
Ez a fejezet összefoglalja a készülékkel kapcsolatban leggyakrabban felmerülő problémákat. Ha a hibát az
alábbi útmutató segítségével nem tudja elhárítani, látogasson el a www.philips.com/support weboldalra
a gyakran felmerülő kérdések listájáért, vagy forduljon az országában illetékes ügyfélszolgálathoz.
Probléma Megoldás
A csészémből túlfolyt
a kávé, amikor
először használtam a
készüléket.
Valószínűleg úgy próbált meg egy csésze kávét főzni, hogy előtte nem
öblítette át a készüléket. Kávéfőzés előtt át kell öblítenie a készüléket.
A készülék újbóli bekapcsolásakor a be- és kikapcsológomb vagy
folyamatosan világít, vagy pedig lassan vagy gyorsan villog.
Amikor a be- és kikapcsológomb folyamatosan világít, el kell végeznie az
öblítési folyamatot (lásd „A készülék átöblítése az első használat előtt” c.
fejezetet).
Amikor a be- és kikapcsológomb lassan vagy gyorsan villog, NEM kell
elvégeznie az öblítési folyamatot. Amikor a be- és kikapcsológomb lassan
villog, a víz melegszik. Ha a gomb gyorsan villog, akkor nincs elegendő víz
a víztartályban, vagy a víztartályt nem megfelelően helyezte a készülékbe.
Ha a készülék átöblítése után sem tud kávét főzni, azt javasoljuk, hogy
forduljon az országában működő Philips vevőszolgálathoz.
Amikor először
használtam a
készüléket, nem szűnt
meg a víz folyása a
kifolyóból.
36
Ha a víz mindaddig folyt a kifolyóból, amíg a víztartály ki nem ürült,
akkor a kávéfőző az öblítési ciklust hajtotta végre. Kávéfőzés előtt át
kell öblítenie a készüléket. A készülék újbóli bekapcsolásakor a be- és
kikapcsológomb vagy folyamatosan világít, vagy pedig lassan vagy gyorsan
villog.
Amikor a be- és kikapcsológomb folyamatosan világít, el kell végeznie az
öblítési folyamatot (lásd „A készülék átöblítése az első használat előtt” c.
fejezetet).
Amikor a be- és kikapcsológomb lassan vagy gyorsan villog, NEM kell
elvégeznie az öblítési folyamatot. Amikor a be- és kikapcsológomb lassan
villog, a víz melegszik. Ha a gomb gyorsan villog, akkor nincs elegendő víz
a víztartályban, vagy a víztartályt nem megfelelően helyezte a készülékbe.
Ha a készülék átöblítése után sem tud kávét főzni, azt javasoljuk, hogy
forduljon az országában működő Philips vevőszolgálathoz.
Page 37

Probléma Megoldás
A be- és
kikapcsológomb lassan
villog.
A SENSEO
helyen használta. Ezért a víz a szükséges hőmérséklet elérése előtt
forrt fel. Ez akadályozta a készülék megfelelő működését. Kapcsolja
ki a készüléket, és ne használja a tengerszint felett 2200 méternél
magasabban fekvő helyeken.
®
kávéfőzőt 2200 méter tengerszint feletti magasság feletti
Villog a
vízkőmentesítést jelző
fény.
A vízkőmentesítést
jelző fény nem alszik ki
a vízkőmentesítés után.
A be- és
kikapcsológomb
folyamatosan gyorsan
villog.
Víz szivárog a
kávéfőzőből
Egyszerre nyomta meg az „1 csésze” és a „2 csésze” gombot, ami
elindította a vízkőmentesítést. Ha nem kíván vízkőmentesítést végezni,
egyszerűen csak kapcsolja ki a gépet a be- és kikapcsológombbal. Ha el
szeretné indítani a vízkőmentesítést, ne szakítsa meg a ciklust, hanem
várja meg, amíg a készülék kiüríti a víztartályt.
A vízkőmentesítést jelző fény nem alszik ki ha a vízkőmentesítés nem volt
megfelelő. A vízkőmentesítés megfelelő elvégzéséhez:
1. Ne szakítsa meg a vízkőmentesítést, és ne kapcsolja ki vagy ne húzza ki
a készülék hálózati dugóját a fali konnektorból a vízkőmentesítési ciklus
alatt. A meleg víz a kávékifolyón megszakításokkal távozik és a készülék
3-4 alkalommal megszakítja a folyamatot, hogy a vízkőmentesítő keverék
feloldódhasson és felmelegedhessen.
2. A vízkőmentesítés megkezdéséhez nyomja meg egyszerre az „1
csésze” és a „2 csésze” gombot. A vízkőmentesítés erre vonatkozó
leírását a „Vízkőmentesítés” című fejezetben olvashatja.
3. A vízkőmentesítéshez három teljesen feltöltött víztartályt használjon:
egyet vízkőmentesítő keverékkel és kettőt friss vízzel töltsön fel.
Ellenőrizze, hogy elég víz van-e a víztartályban, és hogy a víztartály
megfelelően van-e a helyén.
Ellenőrizze, hogy a környezeti hőmérséklet nem alacsonyabb-e 5°C-nál.
Ellenkező esetben a készülék nem működik megfelelően.
Ha észreveszi, hogy kávé vagy víz szivárog a SENSEO
®
kávéfőzőből,
próbálja megtalálni a szivárgás helyét. Ez nagyon fontos, mivel a szivárgás
helye meghatározza a megoldás módját.
MAGYAR
1. Ha a szivárgás a fedél vagy a kifolyócső közeléből ered, győződjön meg
róla, hogy:
1a. A kávépárna-tartó közepén lévő szűrő nincs eltömődve. Ha el van
tömődve, vízcsap alatt tisztítsa meg a kávépárna-tartót.
1b. A kávépárna elhelyezkedése megfelelő a kávépárna-tartó közepén.
37
Page 38

Probléma Megoldás
1c. A tömítőgyűrű nem ragadt a vízelosztó lap pereme alá (lásd a
felhasználói kézikönyv elején lévő 1. ábrát).
1d. A kávékifolyó és a kávégyűjtő megfelelően van behelyezve.
2. Ha a szivárgás a víztar tály alja közeléből, vagy a készülék alól ered,
győződjön meg róla, hogy:
2a. Nincs túl sok a víz a víztartályban.
2b. Nem helyezte túl durván a víztartályt a készülékre. Ha túl durván
bánik a víztartállyal, a víz kifröccsenhet belőle.
2c. A víztartály nem sérült vagy törött. Normális esetben a víz nem
csöpöghet ki a víztartály alján lévő vízkivezető nyílásból a feltöltést
követő 30 másodpercen belül.
Minden más esetben, forduljon az országa Philips vevőszolgálatához.
Nem tudom kinyitni a
fedelet.
A kávéfőző kevesebb
kávét főz, mint
korábban.
Nem tudom
megfelelően lezárni a
fedelet.
Átmenetileg vákuum alakulhat ki a fedél alatt. Kapcsolja ki a készüléket.
Húzza fel a kart, és várjon 24 órát a fedél kinyitása előtt. Előfordulhat,
hogy nagy erőt kell alkalmaznia.
®
Ügyeljen arra, hogy ne mozgassa a SENSEO
készüléket. A készülék
mozgatása, szabadba való kihelyezése vagy hűvös, hideg környezetbe való
áthelyezése nem gyorsítja a fedél kioldását.
Ahhoz, hogy ez ne forduljon elő még egyszer, mindig ellenőrizze, hogy
tiszták-e a kávépárna-tartók, és hogy a közepükön található szűrő nincs-e
eltömődve.
Ha a probléma többször is felmerül, forduljon az országában működő
Philips ügyfélszolgálathoz.
Előfordulhat, hogy eltömődött a kávépárna-tartó közepén levő szűrő.
Ha igen, tartsa folyó víz alá a kávépárna-tartót, és szüntesse meg az
eltömődést. Szükség esetén használjon mosogatókefét vagy tűt a szűrő
megtisztításához.
Vízkőmentesítse a készüléket (lásd a „Vízkőmentesítés” c. részt).
Ellenőrizze, hogy nem tapadt-e használt kávépárna tapadt a vízelosztó
laphoz. Ha igen, távolítsa el a kávépárnát.
Ellenőrizze, hogy megfelelő kávépárna-tartót használ-e. Használjon 2
kávépárnát a mélyebb, kétcsészés kávépárna-tartóval qq.
38
Page 39

Probléma Megoldás
A SENSEO
nem elég erős.
kávé
Ellenőrizze, hogy a kedvenc kávéerősségét választotta-e ki. Választhat
normál és erős kávé közül. A személyes kávémemória funkció
®
segítségével (csak HD7872 típus esetében) beállíthatja kedvenc
kávémennyiségét, s ezáltal növelheti vagy csökkentheti a kávé erősségét.
Ellenőrizze, hogy elegendő kávépárnát használt-e, és a megfelelő gombot
nyomta-e meg. Két kávépárnához használja a kétcsészés kávépárna-tartót
qq, és nyomja meg a „2 csésze” gombot qq.
Ellenőrizze, hogy a kávépárná(ka)t megfelelően, a kávétartó közepén
helyezte-e el, hogy így megakadályozza a víz kiszivárgását a kávépárna
széleinél. Amikor két kávépárnát használ egymásra helyezve, ügyeljen arra,
hogy mindkét kávépárna domború oldala lefelé mutasson, majd nyomja
enyhén a párnákat a kávétartóba.
Ellenőrizze, hogy nem használta-e véletlenül kétszer ugyanazt a
kávépárnát.
Ellenőrizze, hogy a párnában levő kávé egyenletesen oszlik-e el.
MAGYAR
Ha igazán erős zamatú kávéra vágyik, használja az erősebb kávéfajtákat
tartalmazó SENSEO
®
kávépárnákat.
A kávé nem elég forró. Ha hosszabb ideje használja a készüléket, és a kávé hőmérséklete
csökken, azt javasoljuk, hogy vízkőmentesítse a készüléket. Lásd
a „Vízkőmentesítés” c. részt. A SENSEO
®
kávéfőző rendszeres
vízkőmentesítést igényel.
Ne használjon túlságosan nagy méretű csészét, mert abban gyorsabban
kihűl a kávé. Győződjön meg róla, hogy a használt csésze űrtartalma
legalább 150 ml.
Használjon vékony falú csészéket, mivel azok kevesebb hőt vonnak el a
kávétól, mint a vastag falúak.
Ellenőrizze, hogy a csésze mérete megfelel-e a kávé mennyiségének. Ne
főzzön kis mennyiségű kávét nagy méretű csészében.
Ha friss tejjel issza a kávét, a csészében lévő tejet melegítse elő
mikrohullámú sütőben.
Előmelegítheti a kávéfőzőt úgy is, ha először úgy főz egy csésze kávét,
hogy nem helyez kávépárnát a kávépárna-tartóba. Így felmelegíti a
kávéscsészét is.
Az érintőpanel nem
működik.
Ha az érintőpanelre víz kerül, a gombok nem működnek. Ügyeljen rá,
hogy az érintőpanel száraz maradjon, és csak száraz kézzel érintse meg.
Ügyeljen rá, hogy a kiválasztógombot nyomja meg, és ne a
kiválasztógomb bal oldalán található szimbólumokat.
39
Page 40

Probléma Megoldás
Tisztítás közben
véletlenül aktiválom az
érintőpanelt.
Csak HD7872 típus
esetében: A személyes
kávémemória gomb
nem állítja be az
általam kedvelt
kávémennyiséget.
Ez azért fordulhat elő, mert az érintőpanel nagyon érzékeny, és a
gombok aktiválásához elég egy nom érintés. De ilyenkor nincs
probléma, a készülék nem kezd el kávét főzni.
Tisztítás előtt húzza ki a készülék hálózati dugóját a fali konnektorból.
Kérjük, olvassa el a „Kávéfőzés SENSEO
®
készülékkel” c. fejezet
„Személyes kávémemória” c. részét, majd próbálja meg újra beállítani
kedvenc kávémennyiségét.
40
Page 41

Page 42

Page 43

Page 44

© 2012 Koninklijke Philips Electronics N.V.
All rights reserved.
4222.200.0577.1
 Loading...