

Page 1
HD7466
C
D
A
1
B
E
F
G
2 3 4 5
6 7 8 9
10
Page 2

ENGLISH
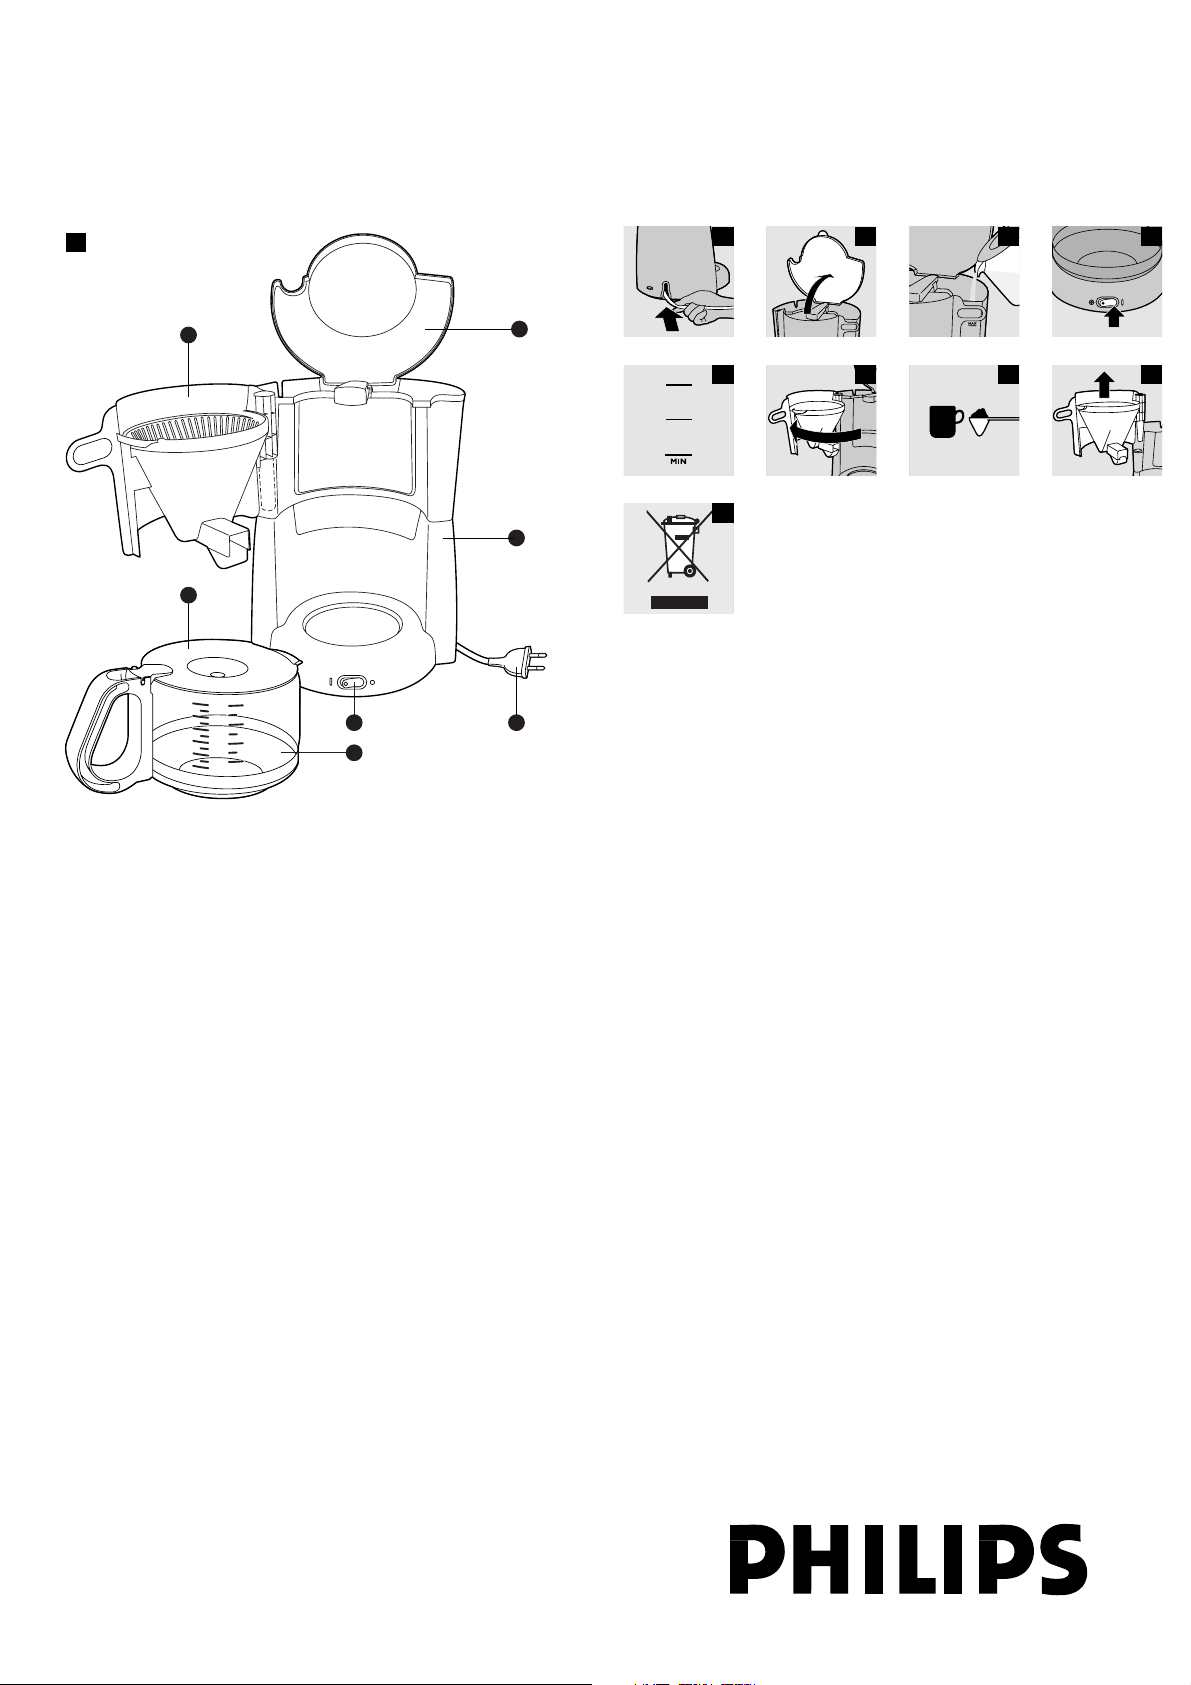
General description (fig. 1)
.
A Cord with mains plug
B On/off switch
C Coffeemaker
D Lid of coffeemaker
E Filter holder
F Lid of jug
G Jug
Important
.
Read these instructions for use carefully before using the appliance and save them for
future reference.
◗ Check if the voltage indicated on the appliance corresponds to the local mains
voltage before you connect the appliance.
◗ Do not use the appliance if the mains cord, the plug or the appliance itself is
damaged.
◗ If the mains cord is damaged, it must be replaced by Philips, a service centre
authorised by Philips or similarly qualified persons in order to avoid a hazard.
◗ Do not place the appliance on a hot surface and prevent the mains cord from
coming into contact with hot surfaces.
◗ Keep the appliance and its cord out of the reach of children. Do not let the
mains cord hang over the edge of the table or worktop on which the
appliance is standing.
◗ Never immerse the appliance in water or any other liquid.
◗ Unplug the appliance if problems occur during brewing and before cleaning it.
Preparing for use
.
1 Clean the jug and filter holder (see chapter 'Cleaning').
2 Put the appliance on a flat and stable surface.
3 Put the plug in an earthed wall socket.
◗ You can store excess cord by pushing it into the opening at the back of the
coffeemaker (fig. 2).
Flushing the appliance
1 Open the lid (fig. 3).
2 Fill the water tank with fresh, cold water to the MAX indication and put the
jug in place (fig. 4).
Do not put a filter with ground coffee in the filter holder.
3 Switch the appliance on by pressing the on/off switch (fig. 5).
The light goes on.
Let the appliance run until the water tank is completely empty.
4 Switch the appliance off when all the water is in the jug.
5 Let the appliance cool down for at least 3 minutes before you start brewing
coffee.
Using the appliance
.
1 Open the lid (fig. 3).
2 Fill the water tank with fresh, cold water (fig. 6).
The water level indicator shows the amount of water in the water tank. The
graduations correspond to large cups (125 ml). Make sure that the water level does
not exceed the MAX indication.
3 Close the lid.
4 Place the jug on the hotplate.
5 Open the filter holder (fig. 7).
6 Take a paper filter (type 1x2 or no. 2) and fold the sealed edges to prevent
tearing and folding.
In some countries this coffeemaker comes with a permanent filter. In that case you
should not use paper filters.
7 Put the filter in the filter holder.
8 Put pre-ground coffee (filter-fine grind) in the filter (fig. 8).
For large cups: use one heaped measuring spoon of ground coffee for each cup.
For small cups: use one level measuring spoon of ground coffee for each cup.
9 Close the filter holder.
10 Switch the appliance on by pressing the on/off switch (fig. 5).
B
The light goes on.
11 When all the water has passed through the filter, you can remove the jug
from the appliance.
12 Switch the appliance off after use.
13 Remove the filter holder and throw the paper filter away.
14 Clean the jug and the removable filter holder in hot water with some washing-
up liquid or in the dishwasher (fig. 9)
15 If you have used the permanent filter, empty and rinse it.
16 If you want to brew another jug of coffee, let the appliance cool down for at
least 3 minutes before you start brewing coffee again.
Cleaning
.
Always unplug the appliance before you start cleaning it.
Never immerse the appliance in water.
1 Clean the outside of the appliance with a moist cloth.
2 Clean the jug and the removable filter holder in hot water with some washing-
up liquid or in the dishwasher (fig. 9).
Descaling
.
Regular descaling will prolong the life of the appliance and will guarantee optimal
brewing results for a long time.
In case of normal use (two full jugs of coffee every day), descale the coffeemaker:
- 2 or 3 times a year if your using soft water (less than 18 DH);
- 4 or 5 times a year if you are using hard water (more than 18 DH).
Turn to your local water board for information about the water hardness in your
area.
1 Fill the water tank with white vinegar (4% acetic acid). Do not put a filter and
ground coffee in the filter holder.
2 Let the appliance complete two brewing cycles.
See chapter 'Using the appliance'. Let the appliance cool down before you start the
second run.
3 Let the appliance complete two more brewing cycles with fresh, cold water to
remove all vinegar residues.
◗ You can also use an appropriate liquid descaler. In this case, follow the
instructions on the package of the descaler.
Do not use a descaling powder.
4 Clean the separate parts (see chapter 'Cleaning').
Accessories
.
◗ You can order a new jug from your Philips dealer or a Philips service centre
under type number HD7980.
◗ You can order a permanent filter from your Philips dealer or a Philips service
centre under reference number 9965 00013 387 (permanent nylon coffee
filter).
Environment
.
1 Do not throw the appliance away with the normal household waste at the end
of its life, but hand it in at an official collection point for recycling. By doing
this you will help to preserve the environment (fig. 10).
Guarantee & service
.
If you need information or if you have a problem, please visit the Philips website at
www.philips.com or contact the Philips Customer Care Centre in your country
(you will find its phone number in the worldwide guarantee leaflet). If there is no
Customer Care Centre in your country, turn to your local Philips dealer or contact
the Service Department of Philips Domestic Appliances and Personal Care BV.
4222 001 99732
2/11
Page 3

Troubleshooting
.
Solution
Make sure that the appliance is plugged
in.
Make sure that the voltage indicated on
the appliance corresponds to the local
mains voltage.
Make sure that the appliance is switched
on.
In all other cases, contact the Philips
Customer Care Centre.
Make sure that the water tank has not
been filled beyond the MAX level.
In all other cases, contact the Philips
Customer Care Centre.
Descale the appliance (see chapter
'Descaling').
Make sure that the water tank has been
filled with COLD water.
Descale the appliance (see chapter
'Descaling').
Make sure that the coffee filter contains
the right amount of ground coffee. If
there is too much ground coffee in the
filter, the filter holder may overflow.
Make sure that the jug has been placed
correctly under the filter holder. If this
isn't the case, the filter holder may
overflow.
Make sure that the opening in the
bottom of the filter holder isn't clogged.
Make sure that the right size of paper
filter has been used.
Problem
The appliance doesn't work.
Water leaks out of the appliance.
The appliance takes a long time to brew
coffee.
The appliance produces a lot of noise
and steam during the brewing process.
Coffee grounds end up in the jug.
Solution
Make sure that the paper filter isn't torn.
Make sure that the right proportion of
coffee to water has been used.
Make sure that the paper filter hasn't
collapsed.
Make sure that the right size of paper
filter has been used.
Don't leave the jug with coffee on the
hotplate too long, especially not if it only
contains a small amount of coffee.
Make sure that the jug has been properly
placed on the hotplate.
Make sure that the hotplate and the jug
are clean (see chapter 'Cleaning').
We advise you to brew more than three
cups of coffee to ensure that the coffee
has the right temperature.
We advise you to use thin-walled cups,
because they will absorb less heat from
the coffee than thick-walled cups.
We advise you to use hot milk or milk at
room temperature instead of cold milk
from the fridge.
Make sure that the jug has been properly
placed on the hotplate. If this isn't the
case, the drip stop will prevent the
coffee from flowing out of the filter.
Problem
The coffee is too weak.
The coffee doesn't taste good.
The coffee isn't hot enough.
There is less coffee in the jug than
expected.
4222 001 99732
3/11
Page 4

BAHASA MELAYU
Gambaran umum (gamb. 1)
.
A Kord dengan plag sesalur kuasa
B Suis Hidup/mati
C Pembancuh kopi
D Tudung pembancuh kopi
E Pemegang turas
F Tudung jag
G Jag
Penting
.
Baca arahan penggunaan ini dengan teliti sebelum menggunakan perkakas dan simpan
untuk rujukan di masa depan.
◗ Periksa sama ada voltan yang ditunjukkan pada perkakas sepadan dengan
voltan sesalur setempat sebelum anda menyambungkan perkakas.
◗ Jangan gunakan perkakas jika kord sesalur kuasa, plag, atau perkakas itu sendiri
rosak.
◗ Jika kord sesalur rosak, ia mesti digantikan oleh Philips, pusat servis yang
dibenarkan oleh Philips atau pihak-pihak yang telah diluluskan bagi
mengelakkan bahaya.
◗ Jangan letakkan pembancuh kopi di atas permukaan panas dan pastikan kord
sesalur kuasa utama tidak bersentuhan dengan permukaan panas.
◗ Jauhkan perkakas daripada capaian kanak-kanak. Jangan biarkan kord sesalur
kuasa tergantung melepasi pinggir meja atau permukaan kerja tempat perkakas
disimpan.
◗ Jangan sekali-kali menenggelamkan perkakas didalam air atau apa-apa cecair lain.
◗ Cabut plag perkakas jika masalah berlaku semasa penjerangan dan sebelum
membersihkannya.
Bersedia untuk menggunakannya
.
1 Bersihkan jag dan pemegang turas (lihat bab 'Membersihkan').
2 Letak perkakas di atas permukaan yang rata dan stabil.
3 Masukkan plag ke dalam soket dinding yang dibumikan.
◗ Anda boleh menyimpan kord yang berlebihan dengan menolaknya ke dalam
bukaan di belakang pembancuh kopi (gamb. 2).
Membilas perkakas
1 Bukakan tudung (gamb. 3).
2 Isikan tangki air dengan air sejuk baru sehingga ke penunjuk MAX dan letakkan
jag di tempatnya (gamb. 4).
Jangan masukkan turas dan serbuk kopi di dalam pemegang turas.
3 Hidupkan perkakas dengan menekan butang hidup/mati (gamb. 5).
Lampu menyala.
Biarkan perkakas hidup sehingga tangki air benar-benar kering.
4 Matikan perkakas apabila semua airnya berada di dalam jag..
5 Biarkan perkakas menjadi sejuk selama 3 minit sebelum anda mula membancuh
kopi.
Menggunakan perkakas
.
1 Bukakan tudung (gamb. 3).
2 Isikan tangki air dengan air sejuk yang baru (gamb. 6).
Penunjuk paras air menunjukkan jumlah air di dalam tangki air. Senggatannya sepadan
dengan cawan besar (125ml). Pastikan paras air tidak melebihi penunjuk MAX.
3 Tutupkan tudung.
4 Letakkan jag di atas plat panas.
5 Buka pemegang turas (gamb. 7).
6 Ambil turas kertas (jenis 1x2 atau no. 2) dan lipat pinggir berkedap
supaya tidak terkoyak dan terlipat.
Di sesetengah negara pembancuh kopi ini disertakan dengan turas yang kekal. Jika
demikian, anda tidak seharusnya menggunakan turas kertas.
7 Masukkan turas ke dalam pemegang turas.
8 Masukkan kopi yang sudah dikisar (kisaran halus ditapis) ke dalam turas (gamb.
8).
Bagi cawan besar: gunakan satu sudu penyukat penuh serbuk kopi bagi setiap cawan.
Bagi cawan kecil: gunakan satu sudu penyukat rata serbuk kopi bagi setiap cawan.
9 Tutupkan pemegang turas.
10 Hidupkan perkakas dengan menekan butang hidup/mati (gamb. 5).
B
Lampu menyala.
11 Apabila semua air sudah melalui turas, anda boleh mengeluarkan jag dari
perkakas.
12 Matikan perkakas setelah digunakan.
13 Angkat pemegang turas dan buang kertas turas.
14 Bersihkan jag dan pemegang turas boleh tanggal dalam air yang panas dengan
sedikit cecair mencuci atau di dalam mesin basuh pinggan mangkuk (gamb. 9).
15 Jika anda telah menggunakan turas kekal, kosongkan dan bilasnya.
16 Jika anda hendak membancuh satu jag kopi lagi, biarkan perkakas menyejuk
selama 3 minit sebelum anda mula membancuh kopi semula.
Pembersihan
.
Cabutkan plag perkakas setiap kali sebelum anda mula membersihkannya.
Jangan sekali-kali menenggelamkan perkakas ke dalam air.
1 Bersihkan bahagian luar perkakas dengan kain lembap.
2 Bersihkan jag dan pemegang turas boleh tanggal dalam air yang panas dengan
sedikit cecair mencuci atau di dalam mesin basuh pinggan mangkuk (gamb. 9).
Penanggalan kerak
.
Penanggalan kerak secara kerap akan melanjutkan hayat perkakas dan akan menjamin
hasil pembancuhan yang unggul untuk masa yang lama.
Bagi penggunaan biasa (dua jag penuh kopi setiap hari), tanggalkan kerak pada
pembancuh kopi anda:
- 2 atau 3 kali setahun jika anda menggunakan air lembut (kurang dari 18DH).
- 4 atau 5 kali setahun jika anda menggunakan air keras (lebih dari 18DH).
Rujuk kepada lembaga air tempatan anda untuk maklumat kekerasan air di tempat
anda.
1 Isikan tangki air dengan cuka putih (4% asid asetik). Jangan masukkan turas atau
serbuk kopi ke dalam pemegang turas.
2 Biarkan sehingga perkakas melengkapkan dua kitaran menjerang.
Lihat bab 'Menggunakan perkakas. Biarkan perkakas menjadi sejuk sebeum anda
memulakan semula pusingan kedua.
3 Biarkan lagi sehingga perkakas melengkapkan dua kitaran tambahan menjerang
dengan air sejuk yang baru untuk menanggalkan apa-apa sisa cuka dan kerak.
◗ Anda juga boleh menggunakan penanggal kerak cecair yang bersesuaian. Jika
demikian, ikuti arahan yang diberikan bersama-sama penanggal kerak.
Jangan gunakan serbuk penanggal kerak.
4 Bersihkan bahagian-bahagian yang boleh ditanggalkan (lihat bab 'Pembersihan').
Aksesori
.
◗ Anda boleh memesan jag baru dari penjual Philips anda atau pusat servis Philips
di bawah nombor jenis HD7980.
◗ Anda boleh memesan turas kekal dari penjual Philips anda atau pusat servis
Philips di bawah nombor rujukan 9965 00013 387 (turas kopi nilon kekal).
Alam sekitar
.
1 Jangan buang perkakas bersama sampah rumah pada akhir hayatnya, tetapi
bawanya ke pusat pungutan rasmi untuk dikitar semula. Dengan melakukan
sedemikian anda akan membentu memelihara alam sekitar (gamb. 10).
Jaminan dan servis
.
Jika anda memerlukan maklumat atau menghadapi masalah, sila kunjungi laman web
Philips di www.philips.com atau hubungi Pusat Layanan Pelanggan Philips di negara
anda (anda boleh mendapatkan nombor telefonnya di dalam risalah jaminan sedunia).
Jika tiada Pusat Layanan Pelanggan di negara anda, hubungi wakil pengedar Philips
tempatan atau Jabatan Servis Syarikat Perkakas Domestik dan Penjagaan Diri Philips.
4222 001 99732
4/11
Page 5

Penyelesaian
Pastikan perkakas diplagkan.
Pastikan voltan yang tertulis pada alat ini
sepadan dengan voltan pada sesalur
utama.
Pastikan perkakas dihidupkan.
Dalam semua keadaan lain, hubungi
Pusat Layanan Pengguna Phillips.
Pastikan tangki air tidak diisi melepasi
paras MAX.
Dalam semua keadaan lain, hubungi
Pusat Layanan Pengguna Phillips.
Tanggalkan kerak perkakas (lihat bab
"Penanggalan Kerak').
Pastikan air tangki air telah diisi dengan
air SEJUK.
Tanggalkan kerak perkakas (lihat bab
"Penanggalan Kerak').
Pastikan bahawa turas kopi mengandungi
jumlah serbuk kopi yang mencukupi. Jika
terlalu banyak serbuk kopi di dalam turas,
pemegang turas mungkin melimpah
keluar.
Pastikan jag telah diletakkan dengan betul
di bawah pemegang turas. Jika tidak,
pemegang turasnya mungkin melimpah
keluar.
Pastikan bukaan di bawah pemegang
turas tidak tersumbat.
Pastikan saiz turas kertas yang betul telah
digunakan.
Pastikan turas kertas tidak koyak.
Pastikan kadar kopi dengan air yang betul
digunakan.
Pastikan kertas turas tidak the jatuh.
Pastikan saiz turas kertas yang betul telah
digunakan.
Jangan biarkan jag dengan kopi di atas
plat panas terlalu lama, terutamanya jika
ia hanya mengandungi kopi yang sedikit.
Pastikan jag telah diletakkan dengan betul
di atas plat panas.
Pastikan plat panas dan jag bersih (lihat
bab 'Membersihkan').
Anda disyorkan menjerang lebih daripada
tiga cawan kopi untuk memastikan suhu
kopi yang mencukupi.
Anda disyorkan menggunakan cawan
tipis, kerana ia kurang meresap haba dari
kopi berbanding dengan cawan tebal.
Anda disyorkan menggunakan susu panas
atau susu pada suhu bilik dan bukan susu
sejuk dari peti sejuk.
Periksa jika jag telah diletakkan dengan
betul di atas plat panas. Jika tidak,
titisannya akan menghalang kopi daripada
mengalir keluar dari turas.
Masalah
Perkakas tidak berfungsi.
Air keluar dari perkakas.
Perkakas mengambil masa yang lama
untuk menjerang kopi.
Perkakas mengeluarkan bunyi dan wap
yang banyak semasa proses menjerang.
Serbuk kopi tertinggal di dalam jag.
Kopi terlalu cair.
Kopi tidak sedap.
Kopi tidak cukup panas.
Kopi di dalam jag adalah kurang daripada
yang dijangkakan
Menyelesaikan masalah
.
4222 001 99732
5/11
Page 6

A
B
C
D
E
F
G
◗
◗
◗
◗
◗
◗
◗
1
2
3
◗
1
2
3
4
5
1
2
3
4
5
6
7
8
9
10
B
11
12
13
14
15
16
1
2
1
2
3
◗
4
◗
◗
1
4222 001 99732
6/11
Page 7

4222 001 99732
7/11
HD 7466
2006/03/01
Page 8

A
B
C
D
E
F
G
◗
◗
◗
◗
◗
◗
◗
1
2
3
◗
1
2
3
4
5
1
2
3
4
5
6
7
8
9
10
B
11
12
13
14
15
16
1
2
1
2
3
◗
4
◗
◗
1
4222 001 99732
8/11
Page 9

4222 001 99732
9/11
Page 10

A
B
C
D
E
F
G
◗
◗
◗
◗
◗
◗
◗
◗
B
◗
◗
◗
4222 001 99732
10/11
Page 11

4222 001 99732
11/11
 Loading...