

Page 1
HD7448, HD7446
1 2 3 4
5 6 7 8
9
Page 2
◗
◗
◗
◗
◗
◗
◗
1
2
3
◗
1
2
3
4
5
1
2
3
4
B
5
6
7
8
9
10
11
12
13
14
15
1
2
3
4
1
2
3
◗
4
◗
◗
◗
422200199351
2/15
Page 3
2005/12/12
422200199351
3/15
Page 4
◗
◗
◗
◗
◗
◗
◗
1
2
3
◗
1
2
3
4
5
3
4
B
5
6
7
8
9
10
11
12
13
14
15
1
2
3
4
1
2
3
◗
4
◗
◗
◗
422200199351
4/15
Page 5
422200199351
5/15
Page 6

◗
◗
◗
◗
◗
◗
◗
◗
B
◗
◗
◗
◗
422200199351
6/15
Page 7

422200199351
7/15
Page 8

ENGLISH
Important
.
Read these instructions for use carefully before using the appliance and save them for
future reference.
◗ Check if the voltage indicated on the appliance corresponds to the local mains
voltage before you connect the appliance.
◗ Do not use the appliance if the mains cord, the plug or the appliance itself is
damaged.
◗ If the mains cord is damaged, it must be replaced by Philips, a service centre
authorised by Philips or similarly qualified persons in order to avoid a hazard.
◗ Do not place the appliance on a hot surface and prevent the mains cord from
coming into contact with hot surfaces.
◗ Keep the appliance and its cord out of the reach of children. Do not let the
mains cord hang over the edge of the table or worktop on which the
appliance is standing.
◗ Never immerse the appliance in water or any other liquid.
◗ Unplug the appliance before cleaning it and if problems occur during brewing.
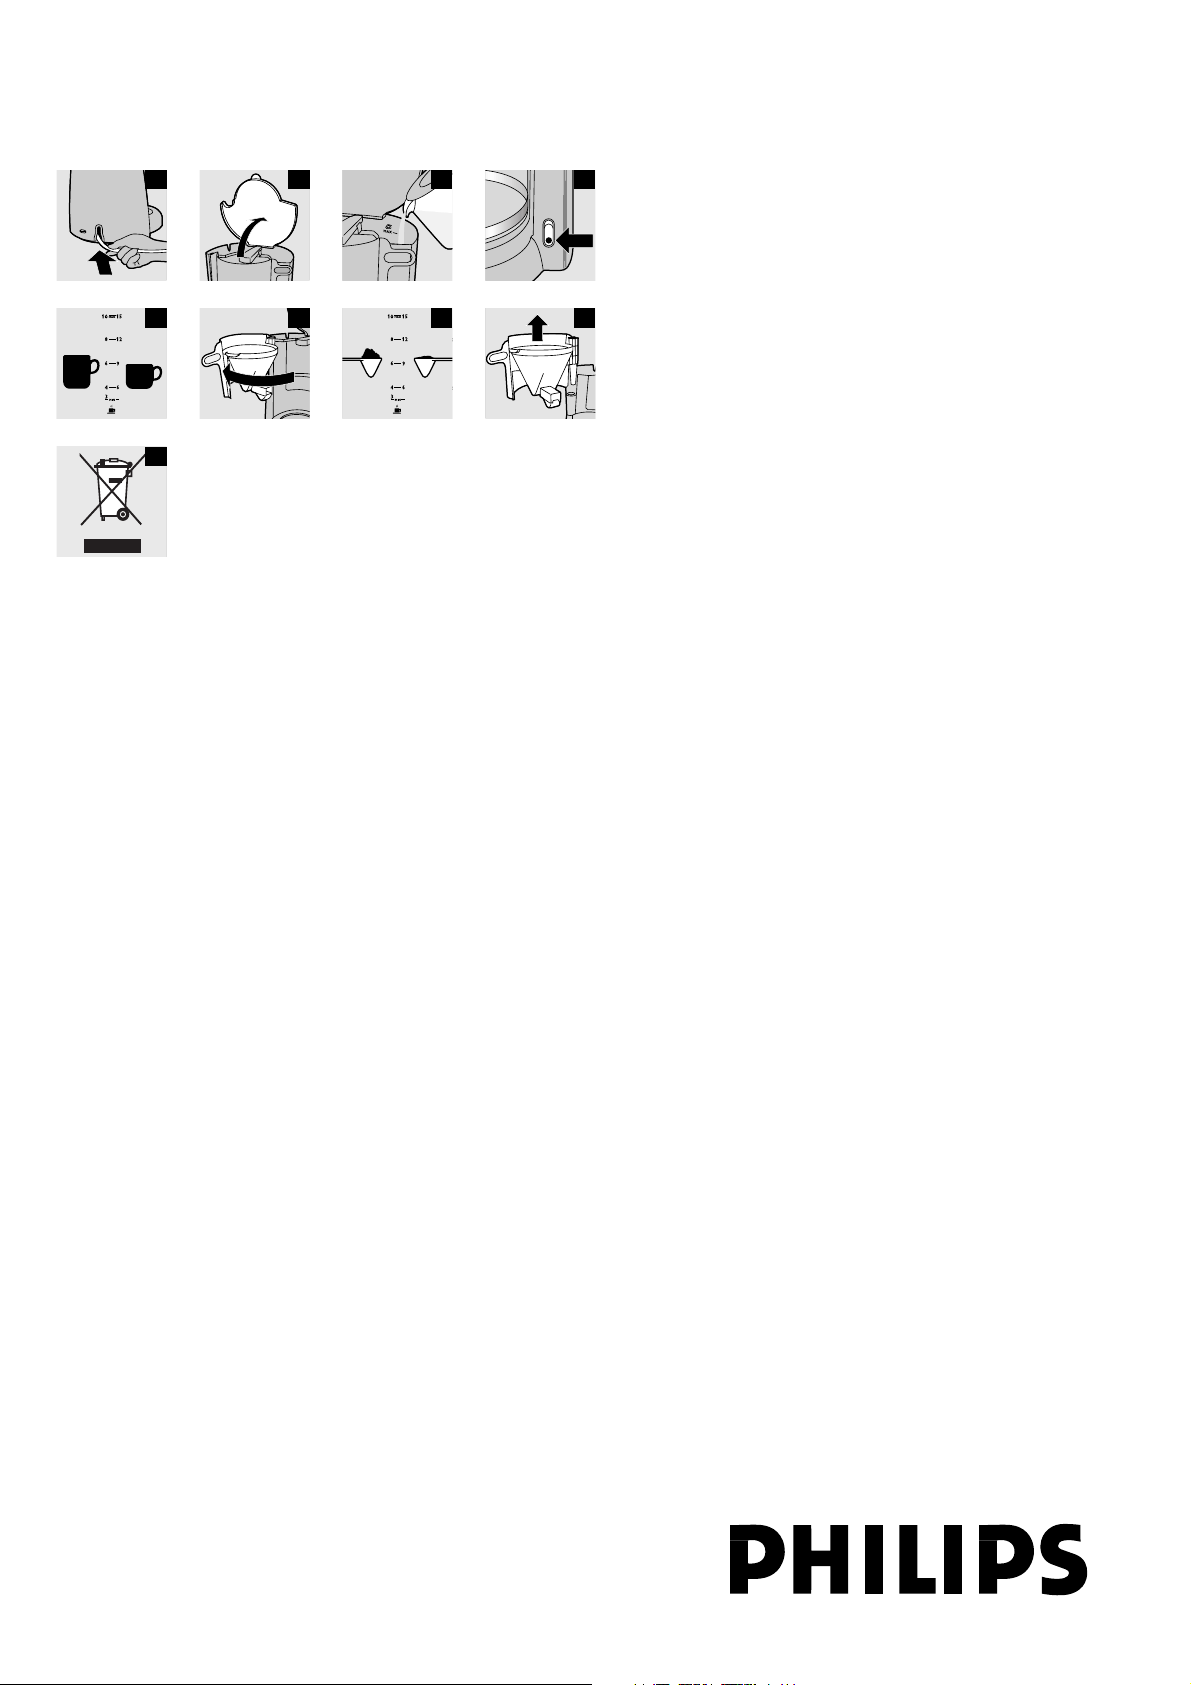
Preparing for use
.
1 Clean the jug and the filter holder (see chapter 'Cleaning').
2 Put the appliance on a flat and stable surface.
3 Put the plug in an earthed wall socket.
◗ You can store excess cord by pushing it into the opening at the back of the
coffee maker (fig. 1).
Prevent the cord from coming into contact with hot surfaces.
Flushing the appliance
1 Open the lid (fig. 2).
2 Fill the water tank with cold fresh water and put the jug in place (fig. 3).
Do not put a filter and ground coffee in the filter holder.
3 Switch the appliance on by pressing the on/off switch (fig. 4).
The light goes on (HD7448 only).
Let the appliance run until the water tank is completely empty.
4 Switch the appliance off when all the water is in the jug.
5 Let the appliance cool down for at least 3 minutes before you start brewing coffee.
Using the appliance
.
Brewing coffee
1 Open the lid (fig. 2).
2 Fill the water tank fresh cold with water (fig. 5).
The graduations on the left are for large cups (120 ml).
The graduations on the right are for small cups (80 ml).
3 Close the lid.
4 Place the jug on the hotplate.
Make sure you place the jug properly on the hotplate.
B
If you don't place the jug properly on the hotplate, the drip stop will prevent the
coffee from flowing into the jug and the filter may overflow as a result.
5 Open the filter holder (fig. 6).
6 Take a paper filter (type 1x4 or no. 4) and fold the sealed edges to prevent
tearing and folding.
In some countries this coffee maker comes with a permanent filter. In that case you
should not use paper filters.
7 Put the filter in the filter holder.
8 Put pre-ground coffee (filter-fine grind) in the filter (fig. 7).
For large cups: use one heaped measuring spoon of ground coffee for each cup.
For small cups: use one level measuring spoon of ground coffee for each cup.
9 Close the lid.
10 Switch the appliance on by pressing the on/off switch (fig. 4).
The light goes on (HD7448 only).
11 When all the water has passed through the filter, you can remove the jug
from the appliance.
12 Switch the appliance off after use.
13 Let the appliance cool down for at least 3 minutes before you start brewing
coffee again.
14 Remove the filter holder and throw the paper filter away.
15 If you have used the permanent filter, empty and rinse it.
Cleaning
.
Always unplug the appliance before you start cleaning it.
Never immerse the appliance in water.
1 Clean the outside of the appliance with a moist cloth.
2 Detach the filter holder.
3 Clean the jug and the removable filter holder in hot water with some washing-
up liquid or in the dishwasher (fig. 8).
4 After cleaning, rinse the jug with fresh hot water.
Descaling
.
Regular descaling will prolong the life of the appliance and will guarantee optimal
brewing results for a long time.
In case of normal use (two full jugs of coffee every day), descale the coffee maker:
- 2 or 3 times a year if you are using soft water;
- 4 or 5 times a year if you are using hard water.
Turn to your local water board for information about the water hardness in your area.
1 Fill the water tank with white vinegar. Do not put a filter and ground coffee in
the filter holder.
2 Let the appliance complete two brewing cycles.
See chapter 'Using the appliance'. Let the appliance cool down before you start the second run.
3 Let the appliance complete two more brewing cycles with fresh, cold water to
remove all vinegar residues.
◗ You can also use an appropriate liquid descaler. In this case, follow the
instructions on the package of the descaler.
Do not use a descaling powder.
4 Clean the separate parts (see chapter 'Cleaning').
Accessories
.
◗ You can order a new jug from your Philips dealer or a Philips service centre
under type number HD7983/70 (white) or HD7983/20 (black).
◗ You can order a permanent filter from your Philips dealer or a Philips service
centre under reference number 4822 48050 479 (permanent nylon coffee filter).
Environment
.
◗ Do not throw the appliance away with the normal household waste at the end
of its life, but hand it in at an official collection point for recycling. By doing
this you will help to preserve the environment (fig. 9).
Guarantee & service
.
If you need information or if you have a problem, please visit the Philips website at
www.philips.com or contact the Philips Customer Care Centre in your country (you
will find its phone number in the worldwide guarantee leaflet). If there is no
Customer Care Centre in your country, turn to your local Philips dealer or contact
the Service Department of Philips Domestic Appliances and Personal Care BV.
422200199351
8/15
Page 9

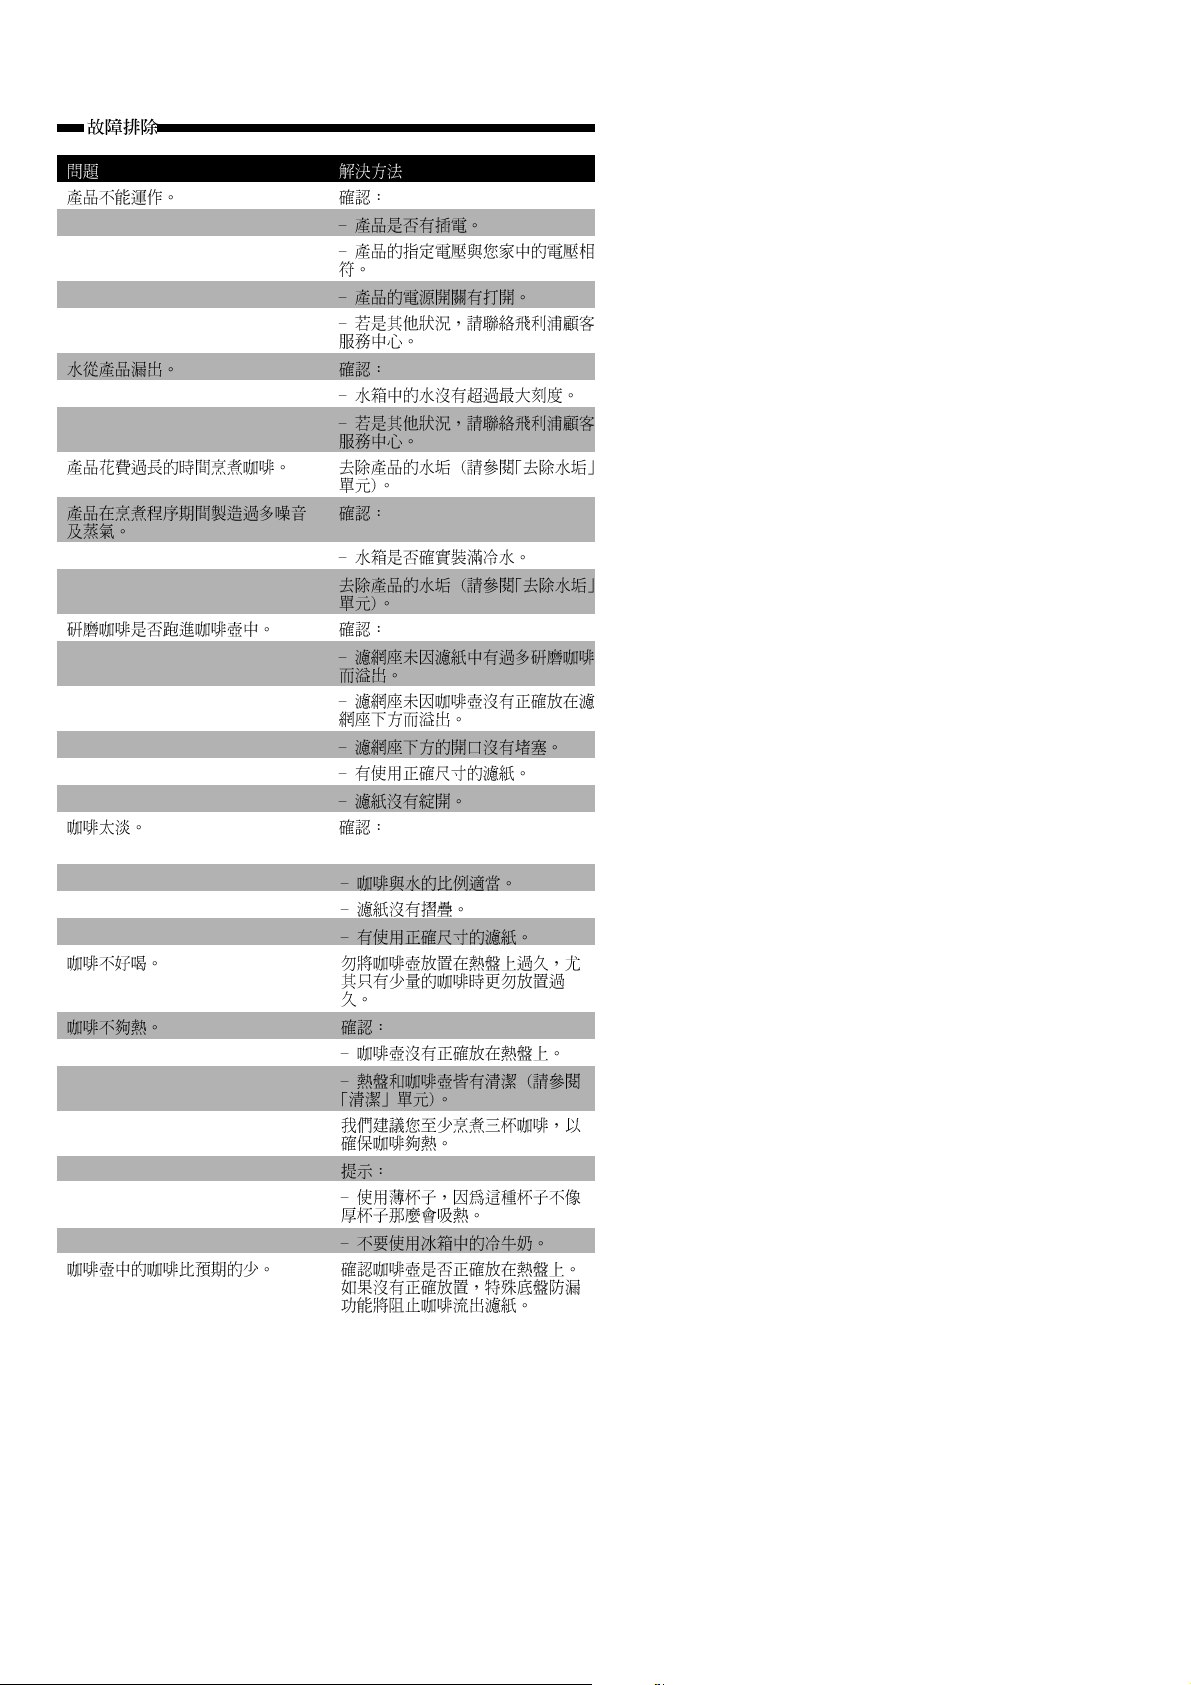
Solution
Check if:
- the appliance is plugged in.
- the voltage indicated on the appliance
corresponds to the local mains voltage.
- the appliance is switched on.
- in all other cases, contact the Philips
Customer Care Centre.
Check if:
- the water tank has not been filled
beyond the MAX level.
- in all other cases, contact the Philips
Customer Care Centre.
Descale the appliance (see chapter
'Descaling').
Check if:
- the water tank has been filled with
COLD water.
Descale the appliance (see chapter
'Descaling').
Check if:
- the filter holder hasn't overflowed
because there is too much ground coffee
in the filter.
- the filter holder hasn't overflowed
because the jug jas not been placed
correctly under the filter holder.
- the opening in the bottom of the filter
holder isn't clogged.
- the right size of paper filter has been
used.
- the paper filter isn't torn.
Problem
The appliance doesn't work.
Water leaks out of the appliance.
The appliance takes a long time to brew
coffee.
The appliance produces a lot of noise
and steam during the brewing process.
Coffee grounds end up in the jug.
Solution
Check if:
- the right proportion of coffee to water
has been used.
- the paper filter hasn't collapsed.
- the right size of paper filter has been
used.
Don't leave the jug with coffee on the
hotplate too long, especially not if it only
contains a small amount of coffee.
Check if:
- the jug has been properly placed on
the hotplate.
- the hotplate and the jug are clean (see
chapter 'Cleaning').
We advise you to brew more than three
cups of coffee to ensure that the coffee
has the right temperature.
Tips:
- use thin cups, because they will absorb
less heat from the coffee than thick cups.
- don't use cold milk from the fridge.
Check if the jug has been properly
placed on the hotplate. If this isn't the
case, the drip stop will prevent the
coffee from flowing out of the filter.
Problem
The coffee is too weak.
The coffee doesn't taste good.
The coffee isn't hot enough.
There is less coffee in the jug than
expected.
Troubleshooting
.
422200199351
9/15
Page 10

ESPAÑOL
Importante
.
Antes de usar el aparato, lea atentamente estas instrucciones de uso y consérvelas
por si necesitara consultarlas en el futuro.
◗ Antes de enchufar el aparato, compruebe si el voltaje indicado en el mismo se
corresponde con el voltaje de red local.
◗ No utilice el aparato si el cable, la clavija o el mismo aparato están dañados.
◗ Si el cable de red estuviera dañado, deberá ser sustituido por Philips o por un
centro de servicio autorizado por Philips, para evitar situaciones de peligro.
◗ No coloque el aparato sobre superficies calientes y evite que el cable entre en
contacto con superficies calientes.
◗ Cuando lo utilice, mantenga el aparato y el cable fuera del alcance de los
niños. No deje que el cable de red cuelgue del borde de la mesa o encimera
donde esté colocado el aparato.
◗ No sumerja nunca el aparato en agua u otros líquidos.
◗ Desenchufe el aparato antes de limpiarlo y si surgen problemas durante su uso.
Preparación para su uso
.
1 Limpie la jarra y el soporte del filtro (consulte el capítulo "Limpieza").
2 Coloque el aparato sobre una superficie plana y estable.
3 Conecte el aparato a un enchufe con toma de tierra.
◗ Puede recoger el cable sobrante en la abertura de la parte posterior de la
cafetera (fig. 1).
Evite que el cable entre en contacto con superficies calientes.
Purga del aparato
1 Abra la tapa (fig. 2).
2 Llene el depósito de agua con agua fría y coloque la jarra en su sitio (fig. 3).
No ponga un filtro ni café molido en el soporte del filtro.
3 Encienda el aparato mediante el interruptor de encendido/apagado (fig. 4).
Se encenderá el piloto (sólo modelo HD7448).
Deje que el aparato funcione hasta que el depósito del agua esté completamente vacío.
4 Apague el aparato cuando toda el agua esté en la jarra.
5 Deje que el aparato se enfríe durante al menos tres minutos antes de empezar
a preparar café.
Uso del aparato
.
Preparación del café
1 Abra la tapa (fig. 2).
2 Llene el depósito de agua con agua fría (fig. 5).
Las graduaciones de la izquierda corresponden a tazas grandes (120 ml).
Las graduaciones de la derecha corresponden a tazas pequeñas (80 ml).
3 Cierre la tapa.
4 Coloque la jarra sobre la placa caliente.
Asegúrese de que la jarra está bien colocada en la placa caliente.
B
Si la jarra no está correctamente colocada en la placa caliente, la función antigoteo
impedirá que el café se vierta en la jarra y, como consecuencia, el filtro puede rebosar.
5 Abra el soporte del filtro (fig. 6).
6 Coja un filtro de papel (de tipo 1 x 4 o nº 4) y doble los bordes sellados para
evitar que se rompa o arrugue.
En algunos países esta cafetera viene con un filtro permanente. En ese caso, no utilice
filtros de papel.
7 Coloque el filtro en su soporte.
8 Ponga café molido (molido fino para filtro) en el filtro (fig. 7).
Para tazas grandes: utilice un cacito dosificador colmado de café molido por taza.
Para tazas pequeñas: utilice un cacito dosificador raso de café molido por taza.
9 Cierre la tapa.
10 Encienda el aparato mediante el interruptor de encendido/apagado (fig. 4).
Se encenderá el piloto (sólo modelo HD7448).
11 Cuando toda el agua haya pasado por el filtro, puede retirar la jarra del aparato.
12 Apague el aparato después de usarlo.
13 Deje que el aparato se enfríe durante al menos 3 minutos antes de volver a
preparar café.
14 Quite el soporte del filtro y tire el filtro de papel.
15 Si ha utilizado un filtro permanente, vacíelo y enjuáguelo.
Limpieza
.
Desenchufe siempre el aparato antes de limpiarlo.
No sumerja nunca el aparato en agua.
1 Limpie el aparato por fuera con un paño húmedo.
2 Desmonte el soporte de filtro.
3 Lave la jarra y el soporte del filtro extraíble con agua caliente y un poco de
detergente o en el lavavajillas (fig. 8).
4 Después de lavarla, enjuague la jarra con agua caliente.
Eliminación de depósitos de cal
.
Si elimina los depósitos de cal con regularidad, prolongará la vida útil del aparato y
garantizará resultados óptimos durante mucho tiempo.
En caso de un uso normal (dos jarras llenas al día), elimine los depósitos de cal de la
cafetera: - 2 ó 3 veces al año si utiliza agua blanda;
- 4 ó 5 veces al año si utiliza agua dura.
Consulte a la compañía suministradora de agua para obtener información acerca de
la dureza del agua en su zona.
1 Llene el depósito de agua con vinagre blanco. No ponga filtro ni café molido
en el soporte del filtro.
2 Deje que el aparato complete dos ciclos de preparación de café.
Consulte el capítulo "Uso del aparato". Deje que el aparato se enfríe antes de
empezar el segundo ciclo.
3 Deje que el aparato complete otros dos ciclos con agua fría limpia para
eliminar todos los restos de vinagre.
◗ También puede utilizar un agente desincrustante líquido adecuado. En ese
caso, siga las instrucciones indicadas en el embalaje del desincrustante.
No utilice agentes desincrustantes en polvo.
4 Limpie todas las piezas (consulte el capítulo "Limpieza").
Accesorios
.
◗ Puede solicitar una jarra adicional a su distribuidor Philips o a un centro de servicio
Philips; el número de modelo es HD7983/70 (en blanco) o HD7983/20 (en negro).
◗ Puede solicitar un filtro permanente a su distribuidor Philips o a un centro de
servicio Philips; el número de referencia es 4822 48050 479 (filtro de café
permanente de nylon).
Medio ambiente
.
◗ Al final de su vida útil, no tire el aparato junto con la basura normal del hogar.
Llévelo a un punto de recogida oficial para su reciclado. De esta manera
ayudará a conservar el medio ambiente (fig. 9).
Garantía y servicio
.
Si necesita información o tiene algún problema, visite la página Web de Philips en
www.philips.com, o póngase en contacto con el Servicio de Atención al Cliente de Philips en
su país (hallará el número de teléfono en el folleto de la garantía). Si no hay Servicio de
Atención al Cliente de Philips en su país, diríjase a su distribuidor local Philips o póngase en
contacto con el Service Department de Philips Domestic Appliances and Personal Care BV.
422200199351
10/15
Page 11

Solución
- en todos los demás casos, póngase en
contacto con el Centro de Atención al
Cliente de Philips.
Compruebe que:
- el depósito de agua no se ha llenado
por encima de la indicación MAX.
- en todos los demás casos, póngase en
contacto con el Centro de Atención al
Cliente de Philips.
Elimine los depósitos de cal del aparato
(consulte el capítulo "Eliminación de
depósitos de cal").
Compruebe si:
- el depósito de agua se ha llenado con
agua FRÍA.
Elimine los depósitos de cal del aparato
(consulte el capítulo "Eliminación de
depósitos de cal").
Compruebe si:
- el soporte de filtro no ha rebosado
debido a un exceso de café molido en el
filtro.
- el soporte de filtro no ha rebosado
debido a que la jarra no estaba
correctamente colocada debajo del
soporte de filtro.
- la abertura de la parte inferior del
soporte del filtro no está obstruida.
- se ha utilizado el tamaño correcto de
filtro de papel.
- el filtro de papel no se ha roto.
Compruebe si:
- se ha utilizado la proporción correcta
de café y agua.
- el filtro de papel no se ha desplazado.
- se ha utilizado el tamaño correcto de
filtro de papel.
No deje la jarra con café en la placa
caliente durante mucho tiempo, sobre
todo si sólo contiene una pequeña
cantidad de café.
Compruebe si:
- la jarra se ha colocado correctamente
en la placa caliente.
- la placa caliente y la jarra están limpias
(consulte el capítulo "Limpieza").
Le aconsejamos que prepare más de tres
tazas de café para que éste tenga la
temperatura adecuada.
Consejos:
- Utilice tazas finas, ya que absorben
menos calor del café que las tazas
gruesas.
- No utilice leche fría del frigorífico.
Compruebe que la jarra se ha colocado
correctamente en la placa caliente. Si no
es así, la función antigoteo evitará que el
café salga del filtro.
Problema
El aparato gotea.
El aparato tarda mucho tiempo en
preparar café.
El aparato hace mucho ruido y sale
mucho vapor durante la preparación.
Hay posos de café en la jarra.
El café es demasiado flojo.
El café no tiene buen sabor.
El café no está suficientemente caliente.
Hay menos café del esperado en la jarra.
Solución
Compruebe que:
- el aparato está enchufado.
- el voltaje indicado en el aparato se
corresponde con el voltaje de red local.
- el aparato está encendido.
Problema
El aparato no funciona.
Guía de resolución de problemas
.
422200199351
11/15
Page 12

BAHASA MELAYU
Penting
.
Baca arahan penggunaan ini dengan teliti sebelum menggunakan perkakas dan simpan
untuk rujukan di masa depan.
◗ Periksa sama ada voltan yang ditunjukkan pada perkakas sepadan dengan
voltan sesalur setempat sebelum anda menyambungkan perkakas.
◗ Jangan gunakan perkakas jika kord sesalur kuasa, plag, atau perkakas itu sendiri rosak.
◗ Jika wayar utama rosak, ia mesti digantikan oleh Philips, pusat servis yang
dibenarkan oleh Philips atau pihak-pihak yang telah diluluskan bagi
mengelakkan bahaya.
◗ Jangan letakkan pembancuh kopi di atas permukaan panas dan pastikan kord
sesalur kuasa utama tidak bersentuhan dengan permukaan panas.
◗ Jauhkan perkakas daripada capaian kanak-kanak. Jangan biarkan kord sesalur kuasa
tergantung melepasi pinggir meja atau permukaan kerja tempat perkakas disimpan.
◗ Jangan sekali-kali menenggelamkan perkakas didalam air atau apa-apa cecair lain.
◗ Cabut plag perkakas sebelum membersihkannya dan jika masalah berlaku
semasa penjerangan.
Bersedia untuk menggunakannya
.
1 Bersihkan jag dan pemegang turas (lihat bab 'Membersihkan').
2 Letak perkakas di atas permukaan yang rata dan stabil.
3 Masukkan plag ke dalam soket dinding yang dibumikan.
◗ Anda boleh menyimpan kord yang berlebihan dengan menolaknya ke dalam
bukaan di belakang pembancuh kopi (gamb. 1).
Elakkan kord dari menyentuh permukaan panas.
Membilas perkakas
1 Buka penutup (gamb. 2).
2 Isikan tangki air dengan air sejuk baru dan letakkan jag di tempatnya (gamb. 3).
Jangan masukkan turas dan serbuk kopi di dalam pemegang turas.
3 Hidupkan perkakas dengan menekan butang hidup/mati (gamb. 4).
Lampunya menyala (HD7448 sahaja).
Biarkan perkakas hidup sehingga tangki air benar-benar kering.
4 Matikan perkakas apabila semua airnya berada di dalam jag..
5 Biarkan perkakas menjadi sejuk selama 3 minit sebelum anda mula membancuh kopi.
Menggunakan perkakas
.
Menjerang kopi
1 Bukakan tudung (gamb. 2).
2 Isi tangki air dengan air sejuk yang baru (gamb. 5).
Penyenggatan di sebelah kiri adalah untuk cawan besar (120 ml).
Penyenggatan di sebelah kanan adalah untuk cawan kecil (80 ml).
3 Tutupkan tudung.
4 Letakkan jag di atas plat panas.
Pastikan anda letakkan jag di atas plat panas dengan betul.
B
Jika anda tidak letak jag di atas plat panas dengan betul, titisannya akan menghalang air
kopi daripada mengalir ke dalam jag dan akibatnya turas mungkin melimpah keluar.
5 Buka pemegang turas (gamb. 6).
6 Ambil turas kertas (jenis 1x4 atau no. 4) dan lipat pinggir berkedap supaya
tidak terkoyak dan terlipat.
Di sesetengah negara pembancuh kopi ini disertakan dengan turas yang kekal. Jika
demikian, anda tidak seharusnya menggunakan turas kertas.
7 Masukkan turas ke dalam pemegang turas.
8 Masukkan kopi yang sudah dikisar (kisaran halus ditapis) ke dalam turas (gamb. 7).
Bagi cawan besar: gunakan satu sudu penyukat penuh serbuk kopi bagi setiap cawan.
Bagi cawan kecil: gunakan satu sudu penyukat rata serbuk kopi bagi setiap cawan.
9 Tutupkan tudung.
10 Hidupkan perkakas dengan menekan butang hidup/mati (gamb. 4).
Lampunya menyala (HD7448 sahaja).
11 Apabila semua air sudah melalui turas, anda boleh mengeluarkan jag dari perkakas.
12 Matikan perkakas setelah digunakan.
13 Biarkan perkakas menjadi sejuk selama 3 minit sebelum anda mula membancuh
kopi semula.
14 Angkat pemegang turas dan buang kertas turas.
15 Jika anda telah menggunakan turas kekal, kosongkan dan bilasnya.
Pembersihan
.
Cabutkan plag perkakas setiap kali sebelum anda mula membersihkannya.
Jangan sekali-kali menenggelamkan perkakas ke dalam air.
1 Bersihkan bahagian luar perkakas dengan kain lembap.
2 Tanggalkan pemegang turas.
3 Bersihkan jag dan pemegang turas boleh tanggal dalam air yang panas dengan
sedikit cecair mencuci atau di dalam mesin basuh pinggan mangkuk (gamb. 8).
4 Selepas dibersihkan, bilas jag dengan air panas baru.
Penanggalan kerak
.
Penanggalan kerak secara kerap akan melanjutkan hayat perkakas dan akan menjamin
hasil pembancuhan yang unggul untuk masa yang lama.
Bagi penggunaan biasa (dua jag penuh kopi setiap hari), tanggalkan kerak pada
pembancuh kopi anda:
- 2 atau 3 kali setahun jika anda menggunakan air lembut;
- 4 atau 5 kali setahun jika anda menggunakan air keras.
Rujuk kepada lembaga air tempatan anda untuk maklumat kekerasan air di tempat
anda.
1 Isikan tangki air dengan cuka putih. Jangan masukkan turas atau serbuk kopi ke
dalam pemegang turas.
2 Biarkan sehingga perkakas melengkapkan dua kitaran menjerang.
Lihat bab 'Menggunakan perkakas. Biarkan perkakas menjadi sejuk sebeum anda
memulakan semula pusingan kedua.
3 Biarkan lagi sehingga perkakas melengkapkan dua kitaran tambahan menjerang
dengan air sejuk yang baru untuk menanggalkan apa-apa sisa cuka dan kerak.
◗ Anda juga boleh menggunakan penanggal kerak cecair yang bersesuaian. Jika
demikian, ikuti arahan yang diberikan bersama-sama penanggal kerak.
Jangan gunakan serbuk penanggal kerak.
4 Bersihkan bahagian-bahagian yang boleh ditanggalkan (lihat bab 'Pembersihan').
Aksesori
.
◗ Anda boleh memesan jag baru dari penjual Philips anda atau pusat servis Philips
di bawah nombor jenis HD7983/70 (putih) atau HD7983/20 (hitam).
◗ Anda boleh memesan turas kekal dari penjual Philips anda atau pusat servis
Pilips di bawah nombor rujukan 4822 48050 479 (turas kopi nilon kekal).
Alam sekitar
.
◗ Jangan buang perkakas bersama sampah rumah pada akhir hayatnya, tetapi
bawanya ke pusat pungutan rasmi untuk dikitar semula. Dengan melakukan
sedemikian anda akan membentu memelihara alam sekitar (gamb. 9).
Jaminan dan servis
.
Jika anda memerlukan maklumat atau menghadapi masalah, sila kunjungi laman web
Philips di www.philips.com atau hubungi Pusat Layanan Pelanggan Philips di negara
anda (anda boleh mendapatkan nombor telefonnya di dalam risalah jaminan sedunia).
Jika tiada Pusat Layanan Pelanggan di negara anda, hubungi wakil pengedar Philips
tempatan atau Jabatan Servis Syarikat Perkakas Domestik dan Penjagaan Diri Philips.
422200199351
12/15
Page 13

Penyelesaian
Periksa jika:
- plag perkakas dipasang.
- voltan yang tertulis pada perkakas ini
sepadan dengan voltan sesalur kuasa.
- perkakas dihidupkan.
- dalam semua keadaan lain, hubungi
Pusat Layanan Pengguna Phillips.
Periksa jika:
- tangki air tidak diisi melepas paras
MAX.
- dalam semua keadaan lain, hubungi
Pusat Layanan Pengguna Phillips.
Tanggalkan kerak perkakas (lihat bab
"Penanggalan Kerak').
Periksa jika:
- tangki air telah diisi dengan air SEJUK.
Tanggalkan kerak perkakas (lihat bab
"Penanggalan Kerak').
Periksa jika:
- pemegang turas tidak melimpah keluar
kerana terdapat terlalu banyak serbuk
kopi di dalam turas.
- pemegang turas tidak melimpah keluar
kerana jag tidak diletakkan dengan betul
di bawah pemegang turas.
- bukaan di bawah pemegang turas tidak
tersumbat.
- saiz turas kertas yang betul telah
digunakan.
- turas kertas tidak koyak.
Periksa jika:
- kadar kopi dengan air yang betul
digunakan.
- kertas turas tidak the jatuh.
- saiz turas kertas yang betul telah
digunakan.
Jangan biarkan jag dengan kopi di atas
plat panas terlalu lama, terutamanya jika
ia hanya mengandungi kopi yang sedikit.
Periksa jika:
- jag telah diletakkan dengan betul di atas
plat panas.
- plat panas dan jag bersih (lihat bab
'Membersihkan').
Anda disyorkan menjerang lebih daripada
tiga cawan kopi untuk memastikan suhu
kopi yang mencukupi.
Petua:
- gunakan cawan tipis, kerana ia kurang
meresap haba dari kopi berbanding
dengan cawan tebal.
- jangan gunakan susu sejuk dari peti ais.
Periksa jika jag telah diletakkan dengan
betul di atas plat panas. Jika tidak,
titisannya akan menghalang kopi daripada
mengalir keluar dari turas.
Masalah
Perkakas tidak berfungsi.
Air keluar dari perkakas.
Perkakas mengambil masa yang lama
untuk menjerang kopi.
Perkakas mengeluarkan bunyi dan wap
yang banyak semasa proses menjerang.
Serbuk kopi tertinggal di dalam jag.
Kopi terlalu cair.
Kopi tidak sedap.
Kopi tidak cukup panas.
Kopi di dalam jag adalah kurang daripada
yang dijangkakan.
Menyelesaikan masalah
.
422200199351
13/15
Page 14

TI”NG VI◊T
L∑u Ω
.
Xin Û¶c kø nhªng h∑≠ng dèn s∫ d∂ng nÅy tr∑≠c khi d≥ng mÄy tr´n vÅ cåt giª Ûô tiõn
tham khÖo sau nÅy.
◗ Kiôm tra xem Ûiõn Äp ghi trìn mÄy c° t∑¨ng ∏ng v≠i Ûiõn Äp ngu®n n¨i s∫
d∂ng tr∑≠c khi bÜn nßi mÄy vÅo ngu®n Ûiõn.
◗ Kh£ng s∫ d∂ng thiót b† nóu dÇy Ûiõn ngu®n, phúch cám Ûiõn hay ngay chúnh bÖn
thÇn thiót b† b† h∑ h•ng.
◗ Nóu dÇy Ûiõn b† h∑ h•ng, bÜn nìn thay dÇy Ûiõn tÜi trung tÇm bÖo hÅnh Philips
hoãc cÄc trung tÇm bÖo hÅnh do Philips µy quyònhoãc nhªng n¨i c° khÖ nÑng
vÅ trùnh Û´ t∑¨ng Û∑¨ng Ûô trÅnh gÇy nguy hiôm.
◗ Kh£ng Ûãt thiót b† lìn trìn bò mãt n°ng vÅ kh£ng Ûô s±i dÇy nhu®n tióp x≤c
v≠i bò mãt n°ng.
◗ Ùô thiót b† nÅy xa tçm v≠i trï em. Kh£ng Ûô dÇy Ûiõn ngu®n treo l¨ l∫ng
ngang cÜnh bÅn hay mãt bóp n¨i Ûãt thiót b† nÅy.
◗ Kh£ng bao giÆ ngÇm thiót b† trong n∑≠c hoãc båt kæ chåt l•ng nÅo khÄc.
◗ ThÄo phúch cám tr∑≠c khi lau ch≥i thiót b† vÅ khi c° vån Ûò xÖy ra trong khi pha chó.
CÄch chuén b† s∫ d∂ng mÄy
.
1 Lau ch≥i ly ch∏a cÅ phì vÅ b´ l¶c (xem ch∑¨ng 'Võ sinh mÄy').
2 Ùãt thiót b† lìn bò mãt phâng vÅ cÇn bàng.
3 Cám phúch cám Ûiõn vÅo © Ûiõn t∑Æng c° tióp Ûåt.
◗ BÜn c° thô l∑u dÇy cám thπa bàng cÄch nhån n° vÅo khe hØ Ø phçn sau l∑ng
cµa mÄy pha cÅ phì (hùnh 1).
TrÄnh Ûô dÇy Ûiõn tióp x≤c v≠i bò mãt n°ng.
R∫a thiót b†
1 MØ náp ra (hùnh 2).
2 Ù© n∑≠c sÜch lÜnh vÅo ngÑn ch∏a n∑≠c vÅ Ûãt ly ch∏a cÅ phì vÅo v† trú (hùnh
3).
Kh£ng Ûãt b´ l¶c vÅ cÅ phì vÅo b´ ch∏a phçn l¶c.
3 Nhån n≤t on/off Ûô bêt mÄy (hùnh 4).
Ùín bêt sÄng (chü c° loÜi HD7448).
HÉy Ûô mÄy chÜy t≠i khi ngÑn ch∏a n∑≠c cÜn hân.
4 Tát thiót b† khi tåt cÖ n∑≠c ÛÉ Ø trong ly ch∏a cÅ phì.
5 HÉy Ûô mÄy ngu´i Ûi út nhåt 3 ph≤t tr∑≠c khi bÜn bát Ûçu pha cÅ phì.
CÄch s∫ d∂ng mÄy
.
Pha cÅ phì
1 MØ náp ra (hùnh 2).
2 Ù© n∑≠c l¶c sÜch vÅo bùnh ch∏a n∑≠c (hùnh 5).
CÄc vÜch chia Û´ bìn trÄi Û∑±c Ûo theo nhªng chën n∑≠c l≠n (120 ml).
CÄc vÜch chia Û´ bìn phÖi Û∑±c Ûo theo nhªng chën n∑≠c nh• (80 ml).
3 Ù°ng náp.
4 Ùãt ly ch∏a cÅ phì vÅo Ûûa hÇm.
Chác chán ràng bÜn ÛÉ Ûãt ly ch∏a cÅ phì Û≤ng v† trú trìn Ûûa hÇm.
B
Nóu bÜn kh£ng Ûãt ly ch∏a cÅ phì vÅo Û≤ng v† trú trìn Ûûa hÇm thù b´ ngát rü gi¶t sî
ngÑn cÅ phì chÖy vÅo bùnh vÅ do vêy, c° thô lÅm b´ l¶c chÖy trÅn ra.
5 MØ ngÑn Ûºng b´ l¶c ra (hùnh 6).
6 Låy m´t tÆ giåy l¶c (loÜi 1x4 hoãc sß 4) vÅ gåp thÅnh nhªng gÆ kún Ûô ngÑn
kh£ng cho n° b† rÄch vÅ gåp nóp.
 m´t sß n∑≠c, mÄy pha cÅ phìn nÅy Ûi kím v≠i m´t b´ l¶c vûnh c∫u. Trong tr∑Æng
h±p Û°, bÜn kh£ng nìn s∫ d∂ng giåy l¶c.
7 Ùãt b´ l¶c vÅo ngÑn Ûºng b´ l¶c.
8 Cho cÅ phì ÛÉ xay (xay m†n Ûô d≥ng v≠i b´ l¶c) vÅo b´ l¶c (hùnh 7).
Ùßi v≠i chën l≠n: s∫ d∂ng thùa Ûçy b´t cÅ phì cho m™i chën.
Ùßi v≠i chën nh•: s∫ d∂ng m´t thùa v¨i b´t cÅ phì cho m™i chën.
9 Ù°ng náp.
10 Nhån n≤t on/off Ûô bêt mÄy (hùnh 4).
Ùín bêt sÄng (chü loÜi HD7448).
11 Khi tåt cÖ n∑≠c ÛÉ chÖy qua b´ l¶c, bÜn c° thô låy ly Ûºng cÅ phì ra kh•i mÄy
pha cÅ phì.
12 Tát mÄy Ûi sau khi d≥ng.
13 HÉy Ûô mÄy ngu´i Ûi út nhåt 3 ph≤t tr∑≠c khi bÜn bát Ûçu pha cÅ phì trØ lÜi.
14 G∞ b• ngÑn Ûºng b´ l¶c vÅ v∏t giåy l¶c Ûi.
15 Nóu bÜn s∫ d∂ng b´ l¶c vûnh c∫u, hÉy tr≤t n° ra vÅ r∫a sÜch n°.
Võ sinh mÄy
.
Lu£n r≤t phúch cám Ûiõn cµa mÄy ra tr∑≠c khi võ sinh mÄy.
Kh£ng bao giÆ nh≤ng mÄy vÅo n∑≠c.
1 Lau sÜch bìn ngoÅi mÄy bàng khÑn ém.
2 ThÄo ngÑn l¶c ra.
3 Lau ch≥i ky Ûºng cÅ phì vÅ phçn ngÑn Ûºng b´ l¶c c° thô thÄo ra trong n∑≠c
n°ng v≠i m´t út dung d†ch téy r∫a hoãc trong mÄy r∫a bÄt (hùnh 8).
4 Sau khi lau ch≥i, r∫a sÜch ly Ûºng cÅ phì bàng n∑≠c l¶c n°ng.
Téy sÜch cãn bÄm
.
Th∑Æng xuyìn téy cãn bÄm sî gi≤p këo dÅi tu©i th¶ cµa thiót b† vÅ sî bÖo
ÛÖm c° Û∑±c kót quÖ pha tßi ∑u trong thÆi gian dÅi.
Trong tr∑Æng h±p s∫ d∂ng th£ng th∑Æng (hai ly ch∏a cÅ phì Ûçy m™i ngÅy), hÉy téy
sÜch cãn bÄm Ø mÄy pha cÅ phì:
- 2 hoãc 3 lçn m™i nÑm nóu bÜn d≥ng n∑≠c mòm;
- 4 hoãc 5 lçn m™i nÑm nóu bÜn d≥ng n∑≠c c∏ng.
HÉy h•i ban quÖn lΩ n∑≠c Û†a ph∑¨ng bÜn Ûô biót th£ng tin vò Û´ c∏ng n∑≠c tÜi khu
vºc cµa bÜn.
1 Ù© Ûçy giåm tráng vÅo bùnh ch∏a n∑≠c. Kh£ng Ûãt b´ l¶c vÅ cÅ phì trong
ngÑn l¶c.
2 Ùô mÄy pha hoÅn thÅnh hai chu trùnh tr´n.
Xem ch∑¨ng 'S∫ d∂ng thiót b†'. HÉy Ûô thiót b† ngu´i Ûi tr∑≠c khi bÜn bát Ûçu chu
trùnh th∏ hai.
3 Ùô thiót b† hoÅn thÅnh hai chu trùnh tr´n v≠i n∑≠c sÜch, lÜnh Ûô loÜi b• tåt cÖ
nhªng chåt cãn giåm.
◗ BÜn c¥ng c° thô s∫ d∂ng m´t chåt kh∫ cãn thúch h±p. Trong tr∑Æng h±p nÅy,
thºc hiõn theo nhªng h∑≠ng dèn ghi trìn bao bù cµa chåt kh∫ cãn.
Kh£ng s∫ d∂ng b´t kh∫ cãn.
4 Lau ch≥i nhªng phçn riìng rî (xem ch∑¨ng 'Võ sinh mÄy').
Ph∂ kiõn
.
◗ BÜn c° thô Ûãt mua ly ch∏a cÅ phì m≠i tπ ÛÜi lΩ cµa Philips hoãc trung tÇm
d†ch v∂ Philips v≠i mÉ hÅng HD7983/70 (mÅu tráng) hoãc HD7983/20 (mÅu
Ûen).
◗ BÜn c° thô Ûãt mua b´ l¶c vûnh c∫u tπ ÛÜi lΩ cµa Philips hoãc trung tÇm d†ch
v∂ Philips v≠i sß tham chióu 4822 48050 479 (b´ l¶c cÅ phì ni-l£ng vûnh cªu).
M£i tr∑Æng
.
◗ Kh£ng v∏t mÄy pha cÅ phì c≥ng chung v≠i chåt thÖi gia Ûùnh th£ng th∑Æng khi
ngπng s∫ d∂ng n°. HÉy Û∑a n° Ûón Ûiôm thu nhãt chúnh th∏c Ûô tÄi chó. LÅm
nh∑ thó, bÜn ÛÉ g°p phçn bÖo võ m£i tr∑Æng (hùnh 9).
BÖo hÅnh & d†ch v∂
.
Nóu bÜn cçn biót th£ng tin hay gãp tr∂c trãc, vui l¢ng vÅo trang web cµa Philips tÜi
www.philips.com hay liìn hõ Trung TÇm ChÑm S°c KhÄch HÅng cµa Philips Ø n∑≠c
bÜn (bÜn sî tùm thåy sß Ûiõn thoÜi cµa Trung tÇm trong tÆ bÖo hÅnh kháp thó gi≠i).
Nóu kh£ng c° Trung TÇm ChÑm S°c KhÄch HÅng nÅo Ø n∑≠c bÜn, vui l¢ng liìn hõ
ÛÜi lΩ Philips Û†a ph∑¨ng bÜn hay Ph¢ng D†ch V∂ cµa Philips Domestic Appliances and
Personal Care BV.
422200199351
14/15
Page 15

GiÖi phÄp
Kiôm tra xem liõu:
- thiót b† ÛÉ cám Ûiõn ch∑a.
- Ûiõn thó ghi trìn mÄy ph≥ h±p v≠i Ûiõn
thó ngu®n Ø n¨i s∫ d∂ng mÄy kh£ng.
- ÛÉ bêt ngu®n thiót b† ch∑a.
- trong tåt cÖ nhªng tr∑Æng h±p khÄc,
xin liìn hõ Trung TÇm ChÑm S°c KhÄch
HÅng cµa Philips.
Kiôm tra xem liõu:
- bùnh ch∏a n∑≠c c° v∑±t quÄ m∏c T›I
ÙA kh£ng.
- trong tåt cÖ nhªng tr∑Æng h±p khÄc,
xin liìn hõ Trung TÇm ChÑm S°c KhÄch
HÅng cµa Philips.
HÉy téy sÜch cãn bÄm (xem ch∑¨ng 'Téy
sÜch cãn bÄm').
Kiôm tra xem liõu:
- n∑≠c trong bùnh ch∏a n∑≠c c° phÖi lÅ
n∑≠c L≈NH kh£ng.
HÉy téy sÜch cãn bÄm (xem ch∑¨ng 'Téy
sÜch cãn bÄm').
Kiôm tra xem liõu:
- b´ Ûºng b´ l¶c b† chÖy trÅn do c° quÄ
nhiòu bÉ cÅ phì trong b´ l¶c kh£ng.
- b´ Ûºng b´ l¶c b† chÖy trÅn do bùnh
kh£ng Û∑±c Ûãt Û≤ng v† trú d∑≠i ngÑn l¶c
kh£ng.
- khe hØ Ø ÛÄy b´ Ûºng b´ l¶c kh£ng b†
tác.
- ÛÉ s∫ d∂ng Û≤ng kúch th∑≠c giåy l¶c
ch∑a.
- giåy l¶c kh£ng b† rÄch.
Kiôm tra xem liõu:
- ÛÉ s∫ d∂ng Û≤ng tü lõ cÅ phì vÅ n∑≠c.
- giåy l¶c kh£ng mëo m°.
- ÛÉ s∫ d∂ng Û≤ng kúch th∑≠c giåy l¶c
ch∑a.
Ùπng Ûô ly ch∏a cÅ phì c° ch∏a cÅ phì
trìn Ûûa hÇm quÄ lÇu, Ûãc biõt kh£ng
Û∑±c Ûô lÇu nóu n° chü ch∏a m´t l∑±ng
nh• cÅ phì.
Kiôm tra xem liõu:
- ly ch∏a cÅ phì ÛÉ Û∑±c Ûãt Û≤ng v† trú
trìn Ûûa hÇm.
- Ûûa hÇm vÅ ly ch∏a cÅ phì ÛÉ sÜch sî
ch∑a (xem ch∑¨ng 'Võ sinh mÄy').
Ch≤ng t£i khuyìn bÜn nìn pha nhiòu
h¨n ba chën cÅ phì Ûô bÖo ÛÖm ràng cÅ
phì c° Ûµ Û´ n°ng.
Mño
- s∫ d∂ng nhªng chën c° thÅnh m•ng,
do ch≤ng sî håp th∂ út nhiõt h¨n tπ cÅ
phì so v≠i chën c° thÅnh dÅy.
- kh£ng s∫ d∂ng sªa lÜnh låy ra tπ tµ
Kiôm tra xem liõu ly ch∏a cÅ phì ÛÉ
Û∑±c Ûãt Û≤ng v† trú trìn Ûûa hÇm ch∑a.
Nóu ÛÇy kh£ng phÖi lÅ tr∑Æng h±p Û° thù
b´ ngát rü gi¶t sî ngÑn cÅ phì chÖy ra
kh•i b´ l¶c.
Vån Ûò
MÄy kh£ng hoÜt Û´ng.
N∑≠c r¢ rü ra kh•i mÄy.
Måt thÆi gian lÇu Ûô pha cÅ phì.
MÄy gÇy ra nhiòu tióng ®n vÅ h¨i n∑≠c
trong khi pha.
BÉ cÅ phì nàm Ø ÛÄy ly ch∏a cÅ phì.
CÅ phì quÄ loÉng.
CÅ phì kh£ng c° v† ngon.
CÅ phì kh£ng Ûµ n°ng.
C° út cÅ phì trong ly Ûºng cÅ phì h¨n
dº kión.
CÄch khác ph∂c sº cß
.
422200199351
15/15
 Loading...