

Page 1
Register your product and get support at
www.philips.com/welcome
Аударуға мүмкіндік болмады
Индукционная плитка
HD4959
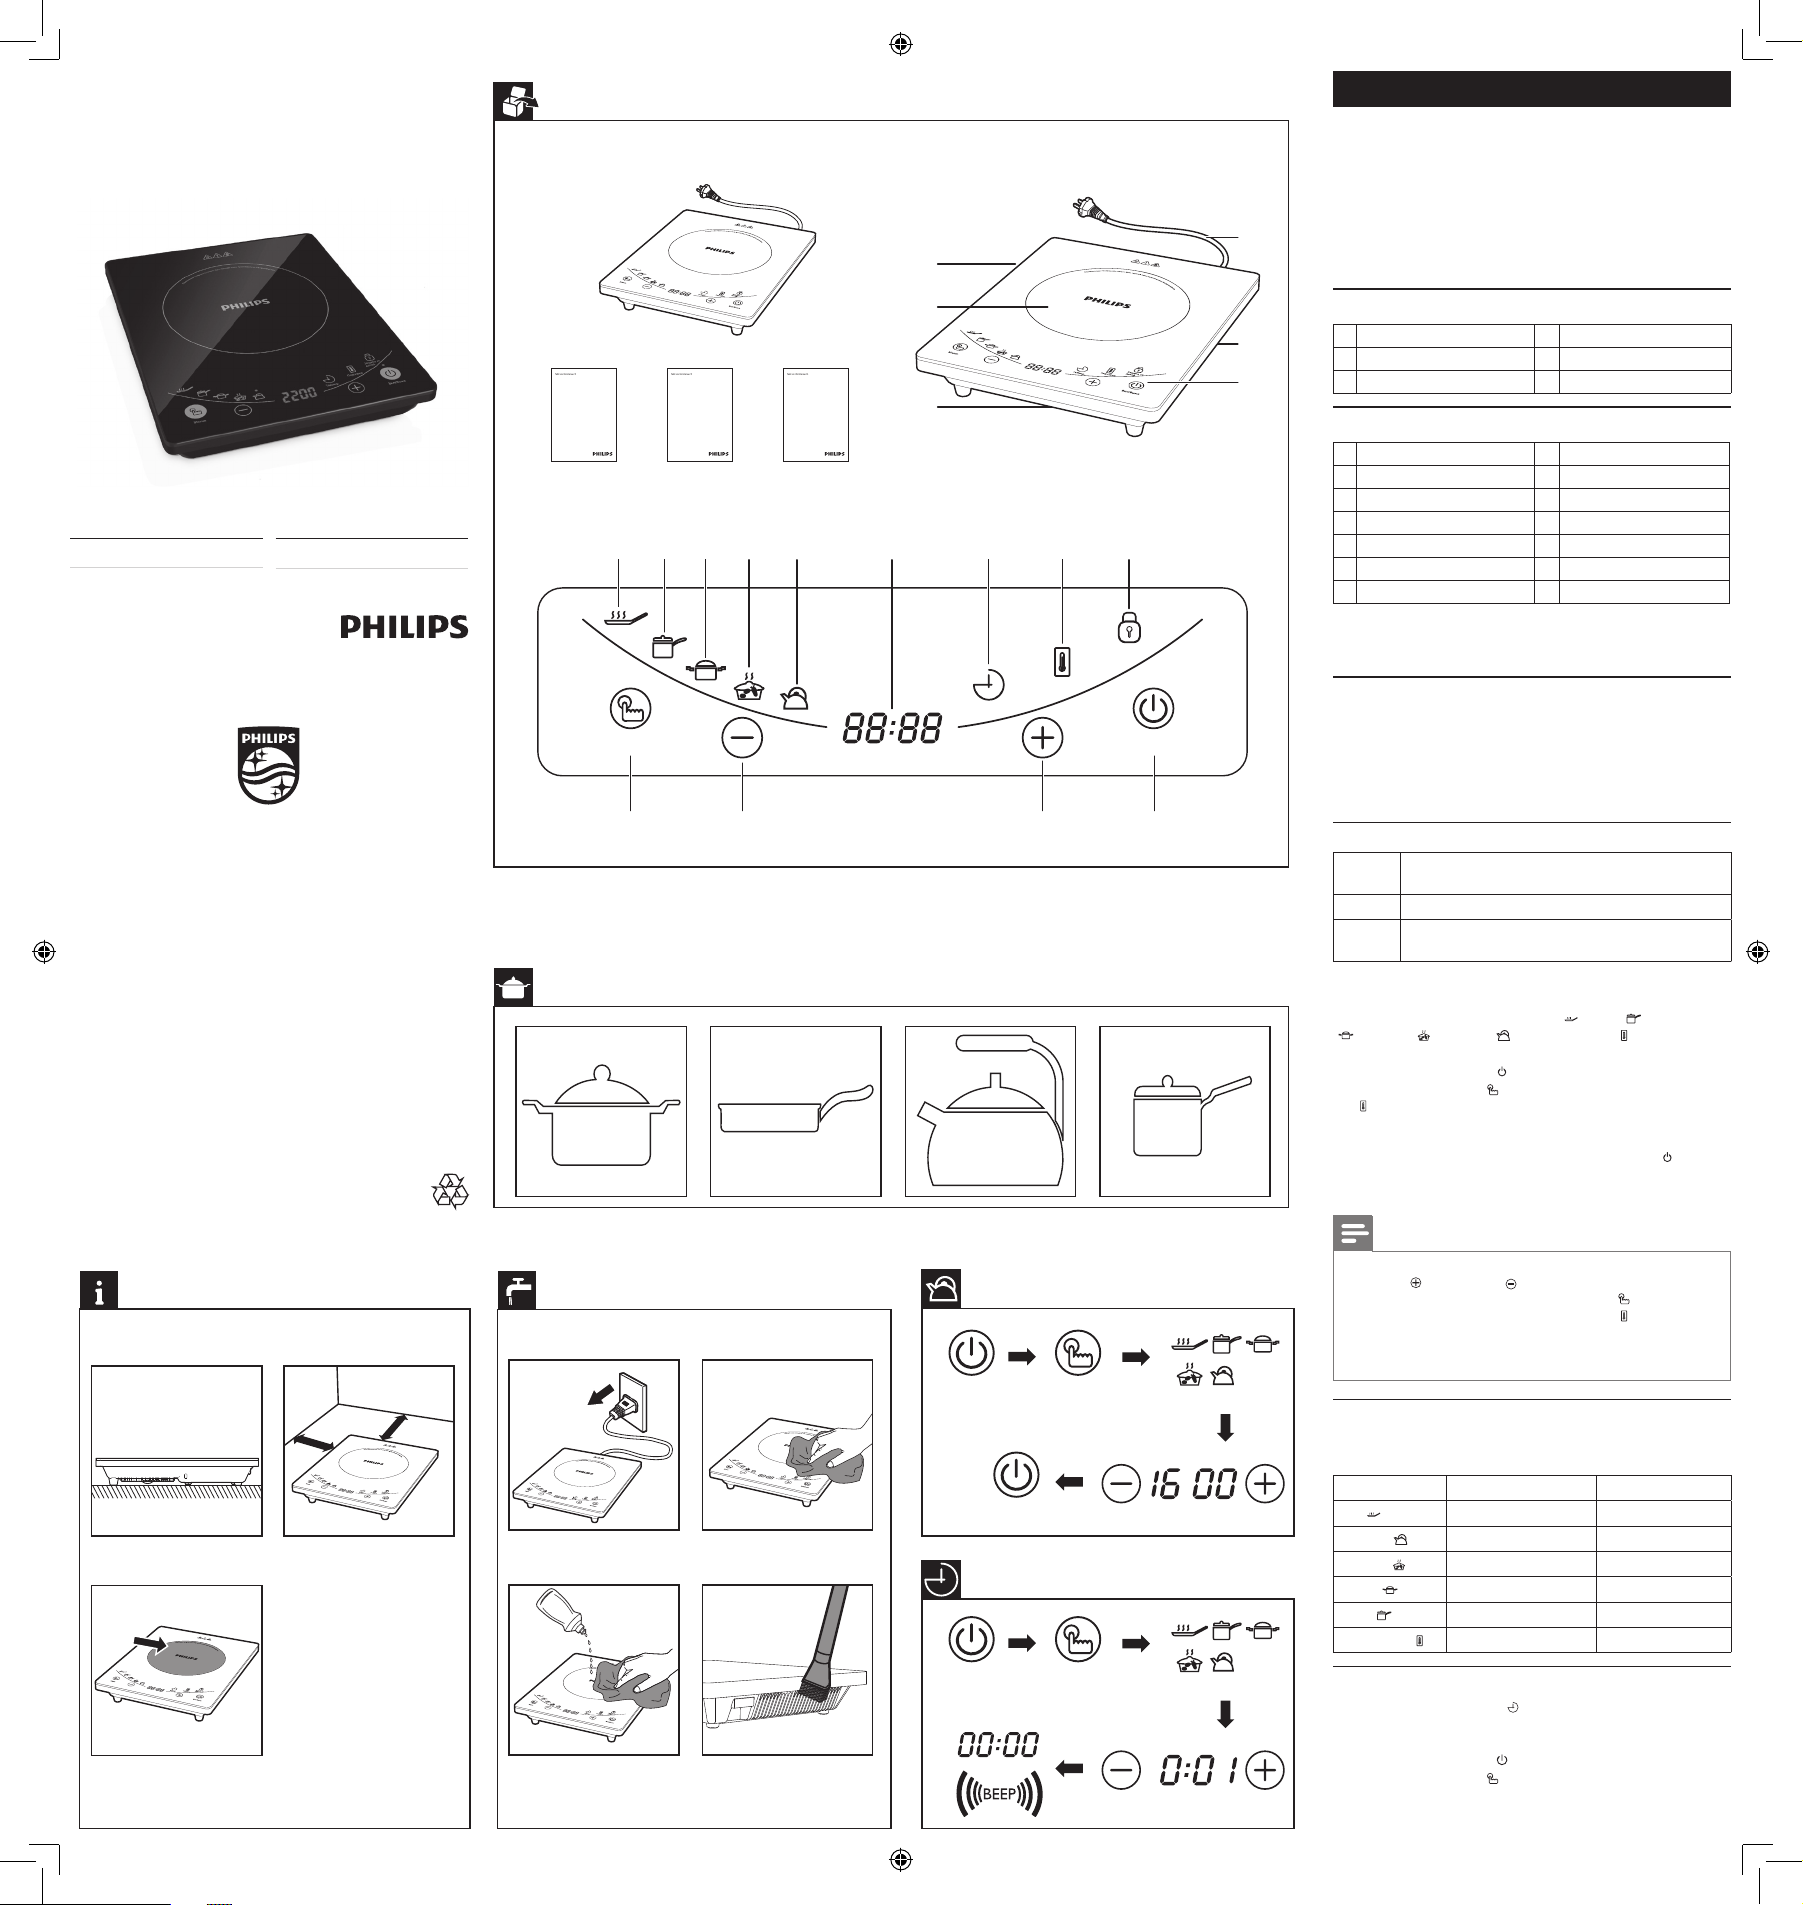
Overview
Обзор
English
1 Your induction cooker
Congratulations on your purchase and welcome to Philips! To fully
benet from the support that Philips offers, register your product at
www.philips.com/welcome.
EN User manual
Specifications are subject to change without notice
© 2014 Koninklijke Philips N.V.
All rights reserved.
RU Руководствопользователя
Preparing for use
Подготовкаприборакработе
10cm
10cm
www.philips.com/welcome
HD4959
User manual
g h i j k ml
www.philips.com/welcome
HD4959
Safety leaflet
Меню
s r q p
www.philips.com/welcome
Warranty
HD4959
Recommended types and sizes of cookware
Рекомендуемыеформыиразмерыемкостей
Cleaning
Очистка
a
b
c
on
Защита от
детей
подогрев
таймер
Вкл/Выкл
Using the induction cooker
Использованиеиндукционной
варочнойпанели
Вкл/Выкл
Вкл/Выкл
Меню
Using the timer
Использованиетаймера
Вкл/Выкл
Меню
f
e
d
2 What’s in the box
Induction cooker main unit Safety leaet
User manual Warranty card
Overview
a
Cooking plate
b
Cooking zone
c
Air inlet
d
Control panel
e
Air outlets
f
Power cord
Controls overview
g
Fry mode
h
Congee mode
i
Steam mode
j
Soup mode
k
Hot pot mode
l
Screen
m
Timer button
n
Keep warm button
o
Child lock button
p
On/Off button
q
Increase button
r
Decrease button
s
Menu button
3 Before first use
Remove all packaging materials from the induction cooker.
Preparing for use
1 Place the appliance on a dry, stable and level surface.
2 Make sure there is at least 10cm free space around the appliance to
prevent overheating.
3 Always place the cookware on the cooking zone during cooking.
4 Make sure you use cookware of the correct types and sizes (see the
table below).
Recommended types and sizes of cookware
Material Cookware with a bottom made of iron or magnetic
Shape Cookware with a at bottom
Size Cookware with a bottom diameter of 10-23cm,
stainless steel
depending on the cooking mode
4 Using the induction cooker
There are six preset cooking modes: Fry ( ), Soup ( ), Steam
( ), Congee ( ), Hot pot ( ) and Keep warm ( ).
1 Follow the steps in “Preparing for use”.
2 Press the On/Off button (
3 Press the Menu button (
) button to choose the desired cooking mode. The corresponding
(
indicator lights up and the induction cooker starts working in the
selected mode.
4 When the cooking is nished, press the On/Off button (
switch off the appliance.
5 Unplug the induction cooker after the fan stops working.
Note
During cooking, you can change the power level by pressing the
•
Increase (
For cooking modes selected by the menu button ( ), cooking
•
power is displayed on the screen; for Keep warm (
temperature is displayed on the screen.
In Steam, Soup and Congee modes, the induction cooker automatically
•
adjusts the cooking temperature for better cooking result.
) or Decrease ( ) button.
Cooking time and power
Refer to below table for the cooking time and power of different
cooking modes.
Cooking mode Cooking time (minute) Cooking Power
) 1 - 120 800W - 2200W
Fry (
Hot pot (
Congee (
Steam (
Soup (
Keep warm (
) 1 - 120 800W - 2200W
) 30 - 180 800W - 2200W
) 30 - 120 800W - 2200W
) 30 - 180 800W - 2200W
) 1 - 120 800W - 2200W
Using the timer
You can use the Timer button ( ) to decide how much time you want
the appliance to work in different cooking modes.
1 Follow the steps in “Preparing for use”.
2 Press the On/Off button (
3 Press the menu button (
desired cooking mode. The corresponding indicator lights up and the
induction cooker starts working in the selected mode.
), the On/Off indicator lights up.
) repeatedly or the Keep warm
) to
) mode, cooking
), the On/Off indicator lights up.
) once or more times to choose the
Page 2
4 Press the Timer button ( ) and the timer indicator lights up.
5 Press the Increase (
minute.
6 When the time has elapsed, you will hear a few beeps and the
induction cooker turns off automatically.
) or Decrease ( ) button to adjust the
Note
After you have selected the cooking time, wait for a few seconds
•
before the induction cooker automatically conrms it.
After the timer is set, you can press the Timer button
•
cancel the timer.
( )
again to
Setting up child lock
When the induction cooker is working, press the child lock button ( )
for three seconds to enter child lock mode.
Note
At child lock mode, only the On/Off ( ) and child lock ( ) buttons
•
are responsive.
To unlock, press the Child lock button ( ) for three seconds again.
•
5 Cleaning
Unplug the appliance after the fan stops working and let it cool down.
Clean the appliance with a damp cloth and, if necessary, with some mild
cleaning agent.
6 Environment
Do not throw away the appliance with the normal household waste
at the end of its life, but hand it in at an ofcial collection point for
recycling. By doing this, you help to preserve the environment.
7 Guarantee and service
If you need service or information or if you have a problem, please visit
the Philips website at www.philips.com or contact the Philips Consumer
Care Centre in your country (you will nd its phone number in the
worldwide guarantee leaet). If there is no Consumer Care Centre in
your country, go to your local Philips dealer.
9 Troubleshooting
If your induction cooker does not function properly or if the cooking
quality is insufcient, consult the table below. If you are unable to solve
the problem, contact a Philips service centre or the Consumer Care
Centre in your country.
Problem Solution
The On/Off button
) does not
(
respond.
The appliance beeps
continuously and
then stops working.
The cookware
does not heat up
to the required
temperature.
The appliance stops
working suddenly.
The appliance does
not switch from
one preset mode to
another.
When pressing
one of the cooking
mode buttons, the
light of the selected
mode does not go
on.
The fan works but
the appliance has
not started working.
Error code E1 or E2
is displayed on the
screen.
Error code E3 or E4
is displayed on the
screen.
Error code E5 or E6
is displayed on the
screen.
There is a connection problem. Check if the
induction cooker is connected to the mains and
if the plug is inserted rmly into the wall socket
You may have put unsuitable cookware on
the cooking plate or you may have removed
the cookware from the cooking plate during
cooking. Make sure the cookware is made of
steel, iron or aluminium with stainless steel
cladding base and has a base diameter larger
than 12cm.
You may have placed the cookware outside of
the cooking zone.
The bottom of the cookware may not be
at. Use cookware with a at bottom. If the
problem still exists, take the appliance to your
Philips dealer or a service center authorised by
Philips.
The temperature of the cookware is too high.
Let the cookware cool down for a while.
You need to switch off the appliance and
restart with another cooking mode.
The light is defective. Take the appliance to your
Philips dealer or a service centre authorised by
Philips.
You need to press the Menu (
warm ( ) button after you have pressed the
ON/OFF ( ) button.
The main sensor is in open circuit or short
circuit state. Take the appliance to your Philips
dealer or a service center authorised by Philips.
The heat sink sensor is in open circuit or short
circuit state. Take the appliance to your Philips
dealer or a service center authorised by Philips.
The voltage is either too high or too low.
Check if the voltage in your home is suitable
for the induction cooker.
) or Keep
Русский
1 Индукционнаяварочнаяпанель
Поздравляем с покупкой и приветствуем в клубе Philips! Чтобы
воспользоваться всеми преимуществами поддержки Philips,
зарегистрируйте устройство на веб-сайте www.philips.com/welcome.
2 Комплектация
Индукционная варочная панель — основное устройство
Инструкции по безопасности
Руководство пользователя
Гарантийная карточка
Обзор
a
Варочная панель
b
Варочная область
c
Входное отверстие для
воздуха
Описаниепанелиуправления
g
Режим «Обжаривание»
h
Режим «Каша»
i
Режим «Пароварка»
j
Режим «Суп»
k
Режим «Кипячение»
l
Дисплей
m
Кнопка таймера
3 Передпервымиспользованием
Снимите весь упаковочный материал с индукционной варочной
панели.
Подготовкаприборакработе
1 Установите прибор на сухой, устойчивой и ровной поверхности.
2 Для предотвращения перегрева вокруг прибора необходимо
оставить не менее 10 см свободного пространства.
3 Всегда помещайте емкость на варочную область во время
приготовления.
4 Используйте емкости только соответствующих форм и размеров
(см. таблицу ниже).
Рекомендуемыеформыиразмерыемкостей
Материал Емкость с железным основанием или основанием
Форма Емкость с плоским основанием
Размер Емкость с диаметром основания 10—23 см, в
из магнитной нержавеющей стали
зависимости от режима приготовления
4 Использованиеиндукционной
варочнойпанели
Имеется шесть предустановленных режимов приготовления:
«Обжаривание» (
«Кипячение» (
1 Следуйте инструкциям, описанным в разделе «Подготовка
прибора к работе».
2 Нажмите кнопку включения/выключения (
индикатор включения/выключения.
3 Чтобы выбрать режим приготовления, последовательно
нажимайте кнопку меню (
температуры (
индукционная варочная панель начнет работать в выбранном
режиме.
4 По окончании процесса приготовления нажмите кнопку
включения/выключения (
5 Отключите индукционную варочную панель от сети, когда
вентилятор перестанет работать.
Примечание
Во время приготовления уровень мощности можно изменить с
•
помощью кнопок увеличения (
Для режимов приготовления, выбранных с помощью кнопки
•
меню (
поддержания температуры ( ) температура также отображается
на дисплее.
В режимах «Пароварка», «Суп» и «Каша» индукционная варочная
•
панель автоматически регулирует температуру приготовления для
получения оптимального результата.
Мощностьивремяприготовления
Мощность и время приготовления для различных режимов см. в
таблице ниже.
Режим
приготовления
Обжаривание ( ) 1—120 800 Вт — 2200 Вт
Кипячение (
), «Суп»( ), «Пароварка» ( ), «Каша» ( ),
) и «Поддержание температуры» ( ).
). Загорятся соответствующие индикаторы, и
), мощность отображается на дисплее; для режима
) 1—120 800 Вт — 2200 Вт
d
Панель управления
e
Отверстия выхода воздуха
f
Шнур питания
n
Кнопка режима поддержания
температуры
o
Кнопка блокировки от детей
p
Кнопка включения/выключения
q
Кнопка увеличения значения
r
Кнопка уменьшения значения
s
Кнопка меню
) или кнопку поддержания
), чтобы выключить прибор.
) или уменьшения ( ) значения.
Время
приготовления
(минуты)
), загорится
Мощность
Режим
приготовления
Время
приготовления
Мощность
(минуты)
Каша ( ) 30—180 800 Вт — 2200 Вт
Приготовление на
)
пару (
) 30—180 800 Вт — 2200 Вт
Суп (
Поддержание
температуры (
30—120 800 Вт — 2200 Вт
1—120 800 Вт — 2200 Вт
)
Использованиетаймера
С помощью кнопки таймера ( ) можно указывать время
приготовления для различных режимов.
1 Следуйте инструкциям, описанным в разделе «Подготовка
прибора к работе».
2 Нажмите кнопку включения/выключения (
индикатор включения/выключения.
3 Последовательно нажимая кнопку меню (
приготовления. Загорятся соответствующие индикаторы, и
индукционная варочная панель начнет работать в выбранном
режиме.
4 Нажмите кнопку таймера (
5 С помощью кнопок увеличения (
настройте значение минут.
6 По истечении времени таймера прозвучит несколько звуковых
сигналов, и индукционная варочная панель выключится
автоматически.
), загорится индикатор таймера.
), загорится
), выберите режим
) и уменьшения ( )
Примечание
После выбора времени приготовления подождите несколько
•
секунд, так как индукционная варочная панель должна
автоматически его подтвердить.
Чтобы отменить таймер, после его установки нажмите кнопку
•
таймера (
) еще раз.
Установкаблокировкиотдетей
Чтобы активировать блокировку, во время работы индукционной
варочной панели нажмите и удерживайте кнопку блокировки от
детей ( ) три секунды.
Примечание
В режиме блокировки от детей активны только две кнопки: кнопка
•
включения/выключения (
Чтобы снять блокировку, нажмите и удерживайте кнопку
•
блокировки от детей (
) и кнопка блокировки от детей ( ).
) три секунды.
5 Очистка
После того как вентилятор остановится, отключите прибор от сети
и дождитесь, пока он остынет.
Очищайте прибор влажной тканью и щадящим моющим средством
(при необходимости).
6 Защитаокружающейсреды
После окончания срока службы не выбрасывайте прибор вместе с
бытовыми отходами. Передайте его в специализированный пункт
для дальнейшей утилизации. Таким образом вы поможете защитить
окружающую среду.
7 Гарантияиобслуживание
При возникновении проблемы или при необходимости получения
сервисного обслуживания или информации посетите веб-сайт www.
philips.com или обратитесь в центр поддержки покупателей Philips
в вашей стране (номер телефона центра указан на гарантийном
талоне). Если в вашей стране нет центра поддержки потребителей
Philips, обратитесь по месту приобретения изделия.
9 Поискиустранение
неисправностей
Если индукционная варочная панель не работает должным образом
или качество приготовления является неудовлетворительным, см.
таблицу ниже. Если самостоятельно решить проблему не удается,
обратитесь в сервисный центр или центр поддержки потребителей
Philips в вашей стране.
Проблема Возможныерешения
Кнопка включения/
выключения ( ) не
отвечает.
Прибор издает
продолжительные
звуковые сигналы,
а затем перестает
работать.
Неправильное подключение. Убедитесь, что
индукционная варочная панель подключена
к сети и вилка плотно вставлена в сетевую
розетку.
Возможно, вы установили на варочную
панель неподходящую емкость или убрали
емкость с варочной панели во время
приготовления. Емкость должна быть
металлической, железной или алюминиевой
и иметь основание с покрытием из
нержавеющей стали диаметром более
12 см.
Возможно, вы установили емкость вне
варочной области.
Проблема Возможныерешения
Емкость не
нагревается
до нужной
температуры.
Прибор внезапно
перестал работать.
Прибор не
переключается
из одного
предустановленного
режима в другой.
При нажатии кнопки
одного из режимов
приготовления
индикатор
выбранного режима
не загорается.
Вентилятор
запустился, но
прибор не начинает
работать.
На дисплее
отображается код
ошибки E1 или E2.
На дисплее
отображается код
ошибки E3 или E4.
На экране
отображается код
ошибки E5 или E6.
Возможно, используется емкость с
неплоским основанием. Используйте
емкость с плоским основанием. Если
проблема по-прежнему не решена,
отнесите прибор в торговую организацию
или авторизованный сервисный центр
Philips.
Емкость нагревается слишком сильно.
Дайте емкости остыть в течение
некоторого времени.
Выключите прибор и снова включите его в
другом режиме приготовления.
Индикатор неисправен. Отнесите
прибор в торговую организацию или
авторизованный сервисный центр Philips.
Нажмите кнопку меню (
поддержания температуры ( ) после
нажатия кнопки включения/выключения
( ).
Обрыв или короткое замыкание в цепи
основного датчика. Отнесите прибор в
торговую организацию или авторизованный
сервисный центр Philips.
Обрыв/короткое замыкание в цепи датчика
теплоотдачи. Отнесите прибор в торговую
организацию или авторизованный
сервисный центр Philips.
Напряжение слишком низкое или слишком
высокое. Убедитесь, что напряжение в сети
в вашем доме подходит для индукционной
варочной панели.
) или кнопку
Изготовитель:
“Филипс Консьюмер Лайфстайл Б.В.”,
Туссендиепен 4, 9206 АД, Драхтен,
Нидерланды
Импортер на территорию России и
Таможенного Союза:
ООО “ФИЛИПС”, Российская Федерация,
123022 г. Москва, ул. Сергея Макеева, д.13,
тел. +7 495 961-1111
Сделано в Китае
Дата производства указана в серийном
номере устройства. Например,
“XP1A1420000001” означает, что изделие
было произведено на 47-ой неделе 2014
года.
Өндіруші:
“Филипс Консьюмер Лайфстайл Б.В.”,
Туссендиепен 4, 9206 АД, Драхтен,
Нидерланды
Ресей және Кедендік Одақ территориясына
импорттаушы:
“ФИЛИПС” ЖШҚ, Ресей Федерациясы,
123022 Мәскеу қаласы, Сергей Макеев көшесі,
13-үй, тел. +7 495 961-1111
Қытайда жасап шығарылған
Өнімнің сериялық нөмірінен өндірілген күнін
табуға болады. Мысалы, «XP1A1420000001»
өнімнің 2014 жылдың 47-ші аптасында
шығарылғанын білдіреді.
 Loading...