

Page 1
HD 3454/55
H
O
T
S
Y
S
T
E
M
1
5
0
0
DO NOT COVER NON COPRIRE OVNEN MÅ IKKE TILDEKKES
NE PAS COUVRIR FÅR ICKE ÖVERTÄCKAS
EI SAA PEITÄÄ NÃO COBRIR NO CUBRIR
NICHT BEDECKEN NIET BEDEKKEN
HOT
S
Y
S
T
E
M
1
5
0
0
DO NOT COVER NON COPRIRE OVNEN MÅ IKKE TILDEKKES
NE PAS COUVRIR FÅR ICKE ÖVERTÄCKAS
EI SAA PEITÄÄ NÃO COBRIR NO CUBRIR
NICHT BEDECKEN NIET BEDEKKEN
Page 2
2
English Page 4
• Keep page 3 open when reading these
operating instructions.
Français Page 7
• Pour le mode d'emploi: dépliez la page 3.
Deutsch Seite 10
• Schlagen Sie beim Lesen der
Gebrauchsanweisung Seite 3 auf.
Nederlands Pagina 13
• Sla bij het lezen van de gebruiksaanwijzing
pagina 3 op.
Italiano Pagina 16
• Prima di usare l'apparecchio, aprite la pagina 3
e leggete attentamente le istruzioni per l'uso.
Español Página 19
• Desplegar la página 3 al leer las instrucciones
de manejo.
Português Página 22
• Durante a leitura do modo de emprêgo,
desdobre e verifique a pág. 3.
Dansk Side 25
• Hold side 3 opslået mens De læser
brugsanvisningen.
Norsk Side 28
• Slå opp på side 3 før De leser videre.
Svenska Sid 31
• Ha sidan 3 utvikt när ni läser bruksanvisningen.
Suomi Sivu 34
• Pidä sivu 3 auki samalla kun luet käyttöohjetta.
Ελληνικά Σελίδα 37
• Ανοίξτε την σελίδα 3 για τις οδηγίες
χρήσεως.
Page 3
HOT
S
Y
S
T
E
M
1
5
0
0
D
O
N
O
T
C
O
V
E
R
N
O
N
C
O
P
R
IR
E
O
V
N
E
N
M
Å
IK
K
E
T
IL
D
E
K
K
E
S
N
E
P
A
S
C
O
U
V
R
IR
F
Å
R
IC
K
E
Ö
V
E
R
T
Ä
C
K
A
S
E
I S
A
A
P
E
IT
Ä
Ä
N
Ã
O
C
O
B
R
IR
N
O
C
U
B
R
IR
N
IC
H
T
B
E
D
E
C
K
E
N
N
IE
T
B
E
D
E
K
K
E
N
1
H
O
T
S
Y
S
T
E
M
1
5
0
0
D
O
N
O
T
C
O
V
E
R
N
O
N
C
O
P
R
I
R
E
O
V
N
E
N
M
Å
I
K
K
E
T
I
L
D
E
K
K
E
S
N
E
P
A
S
C
O
U
V
R
I
R
F
Å
R
I
C
K
E
Ö
V
E
R
T
Ä
C
K
A
S
E
I
S
A
A
P
E
I
T
Ä
Ä
N
Ã
O
C
O
B
R
I
R
N
O
C
U
B
R
I
R
N
I
C
H
T
B
E
D
E
C
K
E
N
N
I
E
T
B
E
D
E
K
K
E
N
A
H
G
A
H
G
B2
B1
B1
I
HD 3454
HD 3455
D
F
C
E
D
C
F
628 mm
165 mm
3
Page 4
4
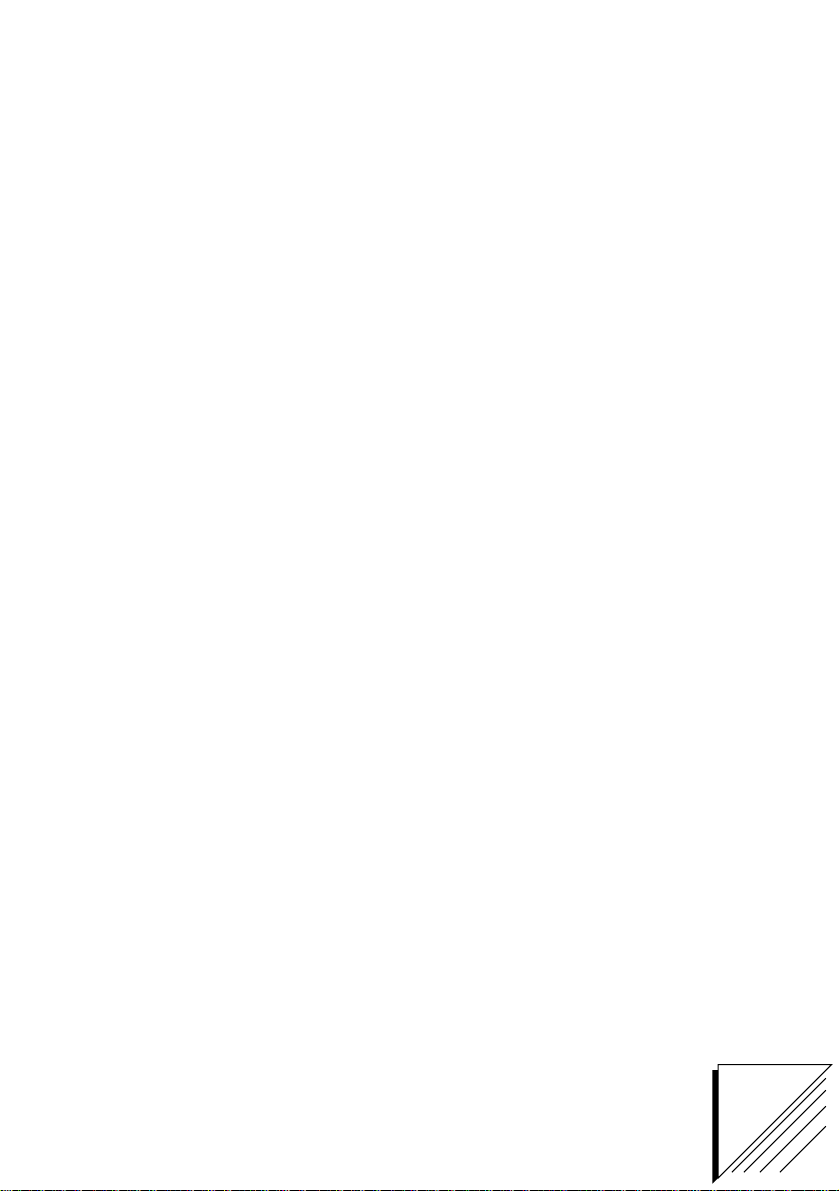
General description (fig. 1 on page 3)
A Air inlet opening
B Air outlet opening(s)
C Heat switch • (“Eco” - moderate), with pilot
light
D Heat switch •• (maximum), with pilot light
E ”Turbo” switch > (type HD 3455 only) for
forced (hot) air output, with pilot light
F Thermostat dial (to set a constant
temperature)
G Stands
H Cord storage facility
I Wall brackets
Working
The heating element inside the convector heats
the air. The heated air rises and leaves the
convector at the top (B1). At the same time, cold
air is drawn in at the bottom (A).
The built-in turbo fan (B2) in type HD 3455
accelerates the outflow of heated air, so that a
room can be heated more rapidly.
Safe positioning
• The heater must not be located below a socket
outlet.
• If the appliance is covered there is a risk of fire.
• Position the appliance in such manner that the
air flow, towards the heater and away from it,
are not obstructed.
• Select a safe spot to avoid electrical shock and
the risk of fire. Only touch the heater with dry
hands.
• This appliance can be used as a free-standing
unit by means of the stands (G). However, it
can also be mounted to a (fireproof!) wall using
the wall-brackets (I). This wall should be solid,
flat and fireproof.
English
Important
• Before connecting the appliance check that the voltage indicated on the type plate
corresponds to the mains voltage in your home.
• Read the instructions for use together with the illustrations (page 3) before using the
appliance.
• Use the heater only standing or hanging in a vertical position as illustrated in fig. 1.
• Do not use the appliance (standing upright) before mounting the two stands.
These stands are packed separately.
• Allow ample space around the heater. A safe area to be left free is 20 cm / 8” at the top and
at the sides. If the appliance is used hanging from a wall, allow 15 cm / 6” space below it as
well.
• Keep the air openings free: do not hang anything in front of it or above it. If the heater is
covered there is a fire risk.
• Keep the mains cord at a safe distance from the air inlet opening (A) and from the air outlet
openings (B1, B2).
• The appliance shall not be located below a socket outlet.
• Do not place the heater on extremely deep-pile carpets.
• It may happen, especially if the heater operates on position •• and another electrical device is
switched on as well, that a fuse or circuit breaker cuts off the mains power. In such a case,
the fuse or circuit breaker may not allow this high electrical power.
You may connect one of the involved appliances to another circuit (employing another fuse
or circuit breaker) or have the electrical installation revised by an authorized electrician.
• For your own safety and that of others: water and electricity are a dangerous combination!
Do not use this heater in the immediate surroundings of a bath, a shower or a swimming
pool.
• Do not insert any objects into the heater. Ensure that children cannot play with the
appliance.
• If the mains cord of this appliance is damaged, it must only be replaced by Philips or their
service representative, as special tools and/or parts are required.
Page 5
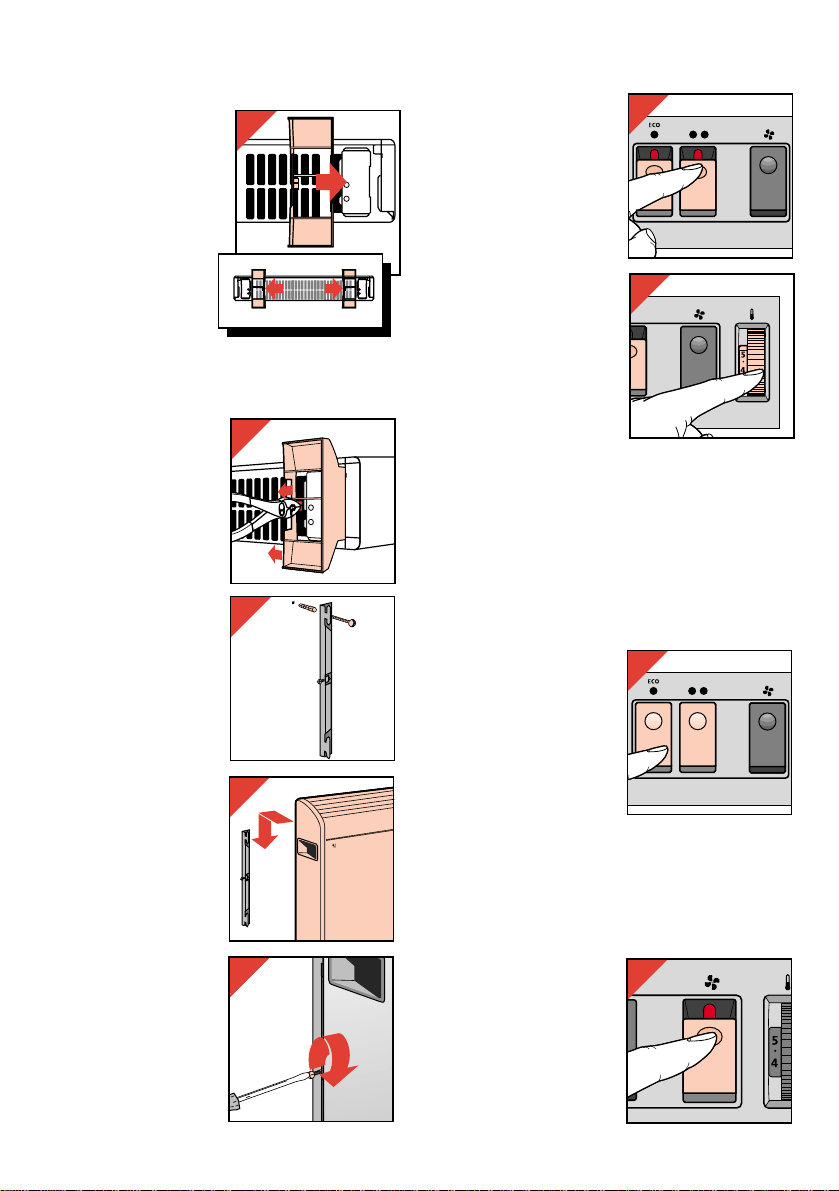
Mounting the stands (fig. 2a)
Mount the two stands
(G) before using the
heater standing upright
for the first time.
(Do not mount the
stands if you wish to
use the heater hanging
on the wall.)
- Slide the two stands
into the special
holders in the
direction of the
arrows until “Click” is
heard.
Removing the stands
(For transport, storage
or wall-mounting.
Fig. 2b)
- Pull the lip a little
upwards using a pair
of pliers while sliding
the stand out of the
holder.
Wall-mounting
- Drill the holes and fix
the brackets to the
wall using screws and
rawlplugs (fig. 3).
- Slide the appliance
correctly onto the
brackets (fig. 4).
- Secure with the two
screws on the sides
of the brackets
(fig. 5).
• Please note: do not
lead the mains cord
upward at the back
side of the wallmounted heater.
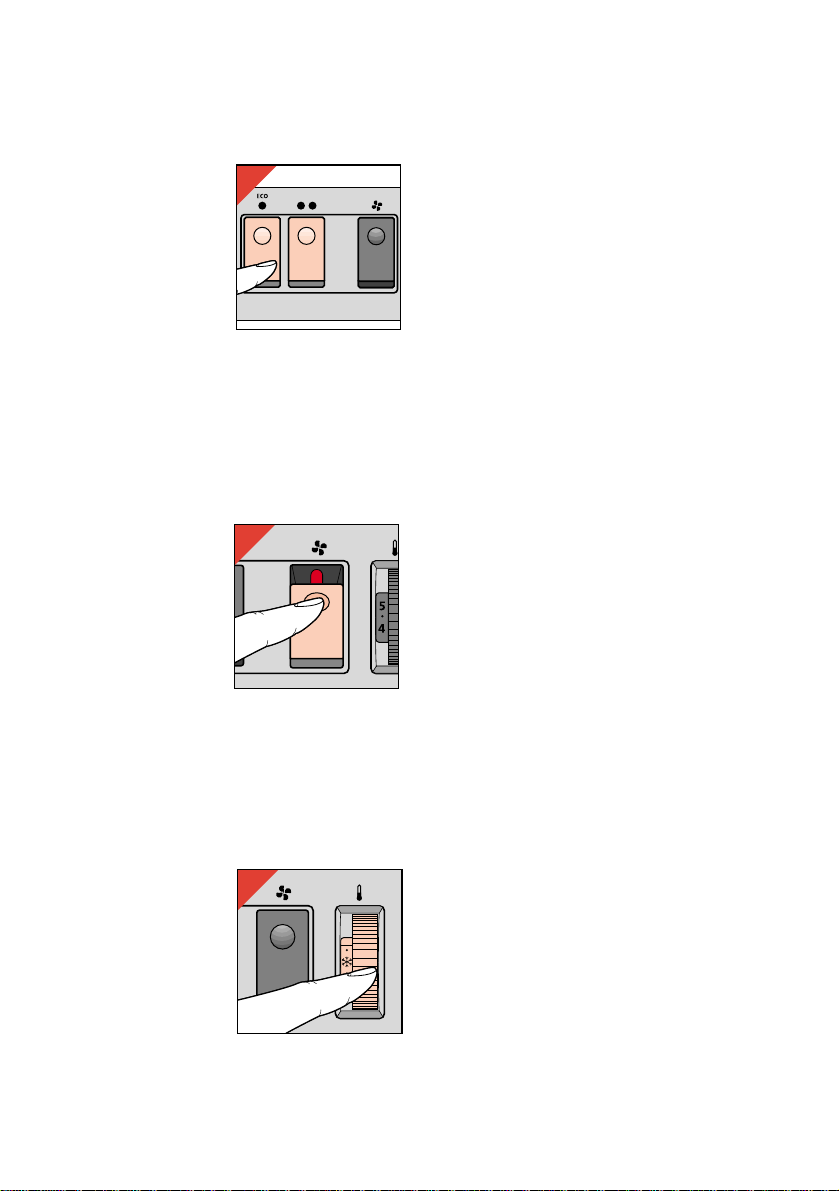
Operation
- Switch on by selecting
• or •• (fig. 6). Position
•• results in quicker
heating.
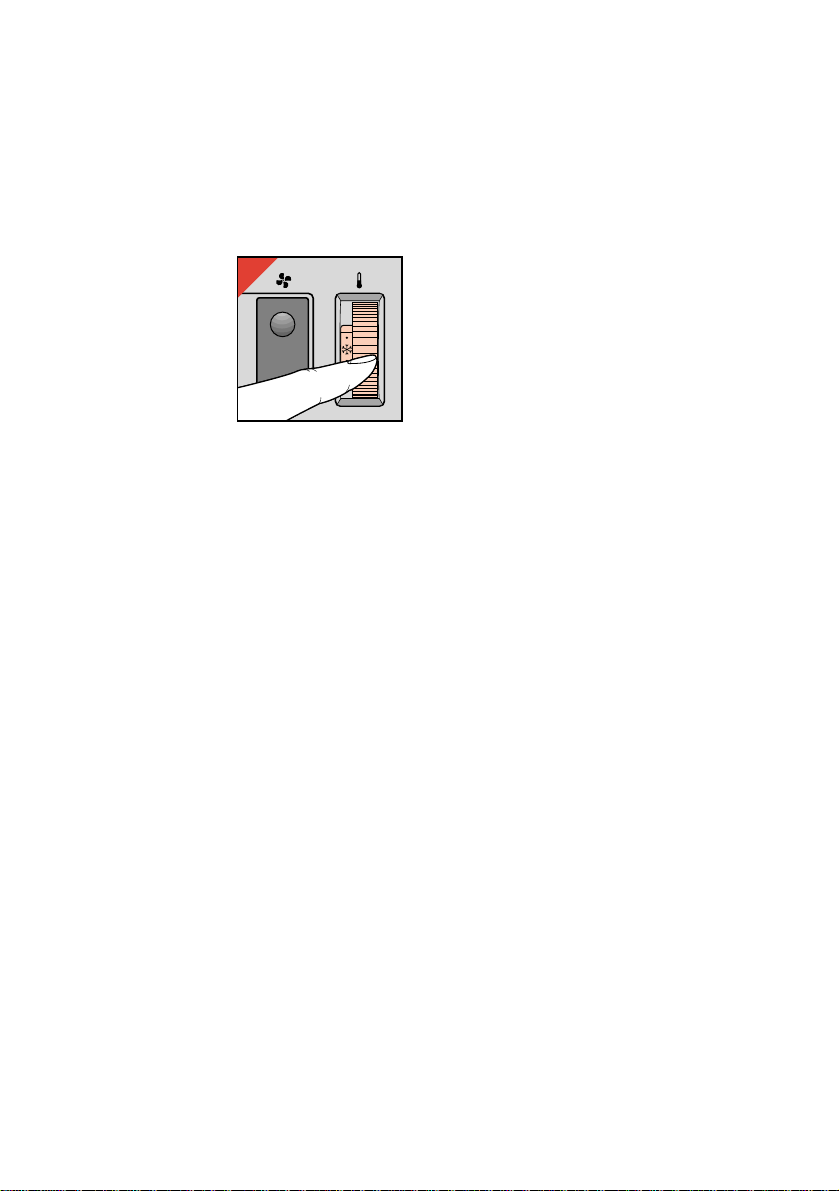
- Then set the
thermostat by means
of thermostat dial (F)
(fig. 7).
(Position 10 =
maximum,
position yy=
minimum.)
Subsequently, the
heater will keep keep
the surrounding air at
the set temperature by
switching on and off at
intervals.
You may adjust the
thermostat during use.
To find the ideal thermostat setting for you:
- First set the dial to position 10 (= maximum).
- As soon as the temperature is comfortable, turn
down the thermostat knob slowly until the
heater goes off.
- When the appliance is connected to mains
power and switched on by selecting • or •• the
pilot light will come on.
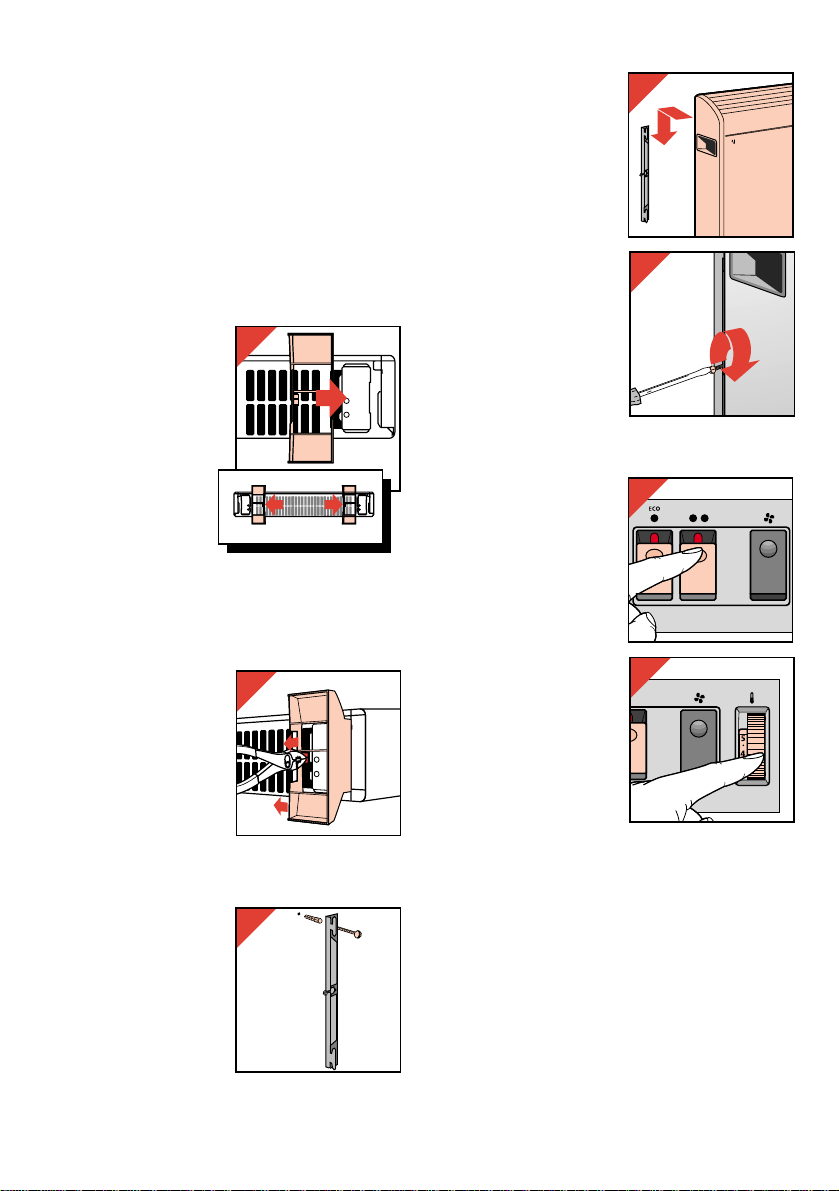
- The light will stay on
until the appliance is
switched off by setting
switch (C) or (D) back
into the original
position (fig. 8) or by
disconnecting from the
mains.
- To indicate that the
heater is still
connected and in
“switched-on” position (• or ••), the pilot light will
remain alight when the set temperature is
reached and the thermostat switches the
appliance off.
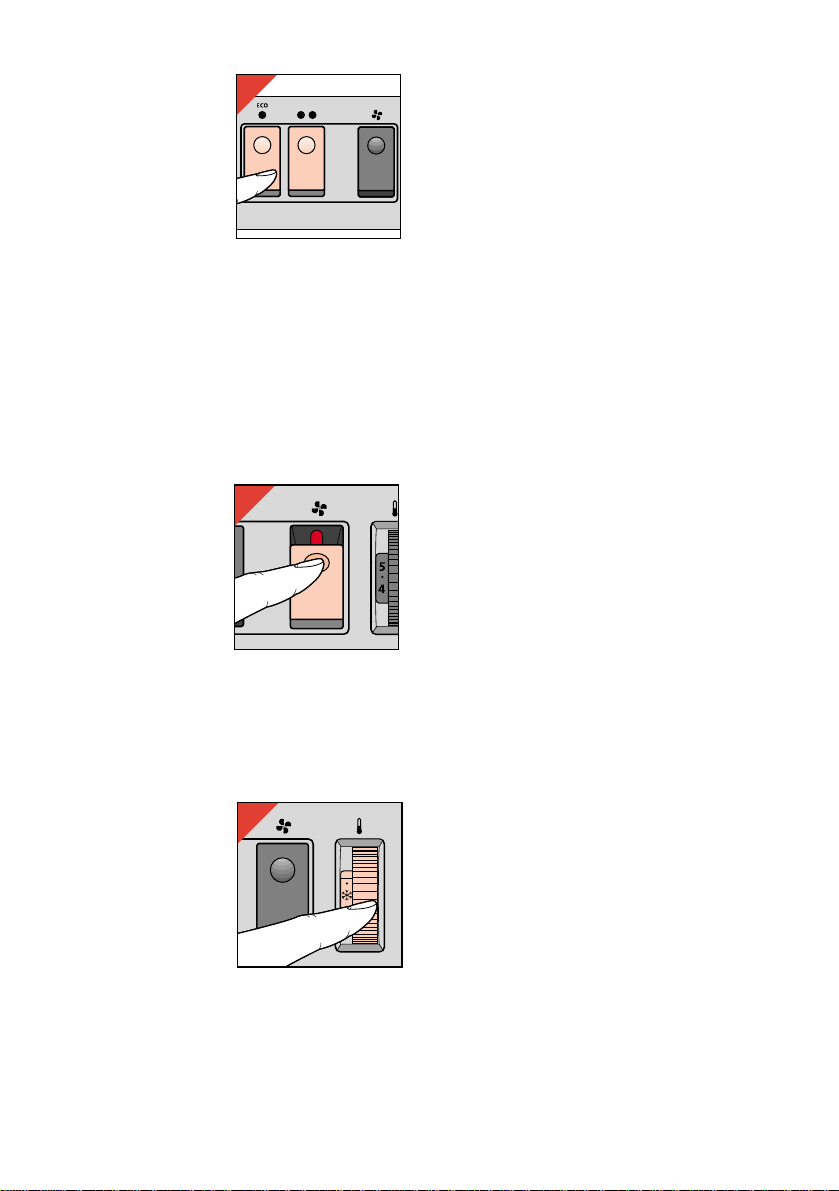
Type HD 3455: “Turbo”
position (fig. 9)
To make the
temperature rise more
rapidly, you may switch
on the fan at the extra air
outlet opening (B2). The
pilot light in the switch
will come on.
5
2a
2b
3
4
5
6
7
1
2
8
S
E
K
K
E
D
L
I
T
E
K
K
I
Å
M
N
E
N
V
O
S
E
A
R
K
I
C
R
P
Ä
T
O
R
C
E
N
V
O
Ö
N
E
K
C
R
I
E
R
V
Å
O
F
C
T
R
I
O
R
N
V
R
I
O
U
R
D
O
B
C
U
S
C
A
O
P
N
E
N
R
I
R
B
O
C
O
Ã
N
Ä
N
Ä
E
T
I
K
E
K
P
E
A
D
E
A
S
B
I
T
E
E
I
N
N
E
K
C
E
D
HOT
E
B
M
T
E
H
T
C
I
S
N
Y
S
0
0
5
1
9
Page 6
6
The fan will accelerate the flow of heated air,
especially if heat setting •• has been selected.
Do not forget to also set the thermostat dial (F) to
the required temperature.
Anti-Frost setting (fig. 10)
If e.g. a water pipe must be prevented from
freezing:
- Position the heater
(standing upright!)
close to the pipe;
- Switch the heater on
by selecting • or ••
(depending on the size
of the room, possible
draught and the
expected minimum
temperature);
- Set the thermostat dial to position yy(i.e. the
minimum thermostat setting, approx. +5 °C /
+41 °F). This position can be used to keep the
immediate vicinity of the heater free from frost.
Overheating safety device
To prevent damage and risks due to overheating,
the built-in overheating safety device cuts off the
power as soon as the heating elements become
too hot.
If this should happen:
- First ensure that it was not the thermostat which
has switched off the heater. Set the thermostat
to maximum position. If the heater does not
switch on, the safety device has been activated.
- Remove the mains plug from the wall socket.
- Let the heater cool down for 5 minutes.
- Replace the plug into the wall socket and switch
the heater on again.
If the safety device again switches off the heater:
- Have the heater inspected by a Philips Service
Centre or by your dealer.
Cleaning
- Before cleaning remove the mains plug from
the wall socket. Wait for the heater to cool down
sufficiently.
- You may clean the outside of the heater with a
damp cloth. Make sure that no water runs into
the appliance.
- The air inlet opening (A) and if necessary also
the air outlet opening(s) (B1, B2) may be
cleaned using the vacuum cleaner with small
long-haired nozzle.
For U.K. only:
Fitting a different plug
This appliance is fitted with a BS 1363 13 Amp.
plug.
Should you need to replace the plug, connect the
wires as follows:
Brown wire to the Live (L) terminal of the new
plug.
Blue wire to the Neutral (N) terminal of the new
plug.
Always fit the same value of fuse as that originally
supplied with your appliance.
Only use BS 1362 approved fuses.
As a guide only: Appliances under 700 W can
have a 3 Amp. fuse (red) and all others should
have a 13 Amp. fuse (brown).
When disposing of an old plug (particularly the
moulded type which has been cut from the mains
cord) always remove the fuse as the plug could be
dangerous if ever inserted in a live socket.
10
Page 7

7
Description générale (fig. 1, page 3)
A Ouverture d'entrée d'air
B Ouverture(s) de sortie d'air
C Commutateur de chaleur 1 ("Eco" - moyen),
avec voyant lumineux
D Commutateur de chaleur 2 (maximum),
avec voyant lumineux
E Commutateur "Turbo" > (Type HD 3455
uniquement) pour une sortie forcée de l'air
(chaud), avec voyant lumineux
F Bouton de thermostat (pour régler une
température constante)
G Pieds
H Rangement du cordon électrique
I Supports muraux
Fonctionnement
L'élément chauffant du convecteur chauffe l'air qui
se trouve à son contact. L'air chaud s'élève et sort
du convecteur par la grille supérieure (B1) créant
ainsi un mouvement d'aspiration de l'air froid par
le bas (A).
Le ventilateur intégré (B2) dans le type HD 3455
accélère la sortie de l'air chaud, permettant ainsi
un réchauffement plus rapide de la pièce.
Emplacement sûr
• Ne placez pas le convecteur sous une prise de
courant.
• Il y a risque d'incendie si l'on pose un objet sur
l'appareil ou si on le recouvre.
• Installez l'appareil de telle façon que rien ne
gêne l'entrée ou la sortie de l'air.
Important
• Avant de brancher l'appareil, vérifiez que le voltage indiqué sur la plaque signalétique
corresponde bien à la tension électrique dans votre logement.
• Lisez le mode d'emploi et examinez les illustrations (page 3) avant d'utiliser l'appareil.
• N'utilisez l'appareil que s'il est posé verticalement ou suspendu comme le montre la fig. 1.
• Avant de mettre l'appareil en marche (posé verticalement), mettez les deux pieds en place.
Ces pieds sont emballés séparément.
• Laissez un espace suffisant autour de l'appareil.
Pour votre sécurité, laissez un espace de 20 cm au-dessus de l'appareil et sur les côtés. Si
l'appareil est suspendu, laissez également 15 cm libres au-dessous.
• Laissez libres les ouvertures d'entrée et de sortie d'air: n'accrochez ni ne posez rien dessus.
Il y a risque d'incendie si le convecteur est recouvert.
• Gardez le cordon d'alimentation à une distance suffisante des ouvertures d'entrée (A) et de
sortie d'air (B1, B2).
• Ne placez pas le convecteur sous une prise de courant.
• Ne placez pas le convecteur sur un tapis ou une moquette à très longs poils.
• Il peut arriver, particulièrement si l'appareil est en position 2 et que vous branchez
également un autre appareil électrique, qu'un fusible grille ou que votre disjoncteur saute.
Le fusible ou votre disjoncteur ne sont peut-être pas prévus pour des puissances
importantes.
Dans ce cas, connectez l'un des deux appareils à un autre groupe (par le biais d'un autre
fusible) ou faites modifier votre installation par un électricien agréé.
• Pour votre sécurité et celle de votre entourage: l'eau et l'électricité forment une combinaison
dangereuse! N'utilisez jamais cet appareil à proximité d'une baignoire, d'une douche ou
d'une piscine.
• N'insérez aucun objet dans le convecteur. Assurez-vous que les enfants ne puissent pas
jouer avec l'appareil.
• Si le cordon secteur de votre appareil est endommagé, il doit impérativement être remplacé
par un réparateur indépendant agréé Philips car des équipements et des composants
spécifiques sont exigés.
Français
Page 8
• Veillez à mettre le convecteur à un
emplacement sûr afin d'éviter une décharge
électrique ou un risque d'incendie. Ne touchez
l'appareil que si vous avez les mains sèches.
• Vous pouvez poser l'appareil verticalement sur
les pieds (G). Il est également possible de fixer
le convecteur au mur à l'aide des supports
muraux (I). Ce mur doit être solide, plat et
ininflammable.
Montage des pieds (fig. 2a)
Montez d'abord les
deux pieds (G) avant
d'utiliser l'appareil pour
la première fois en
position verticale.
(Les pieds ne doivent
pas être montés si
vous utilisez l'appareil
en position
suspendue.)
- Glissez les deux
pieds dans les
supports spéciaux
dans le sens de la
flèche jusqu'au déclic.
Démontage des pieds
(Pour le transport ou le
rangement ou si vous
désirez fixer l'appareil au
mur. Fig. 2b)
- A l'aide d'une pince,
tirez la languette vers
le haut tout en faisant
glisser les pieds hors
de leur support.
Fixation au mur
- Percez les trous dans
le mur et fixez les
supports muraux à
l'aide des vis et
chevilles (fig. 3).
- Suspendez le convecteur aux supports
muraux (fig. 4).
- Vissez bien les deux
vis de sécurité sur le
côté des supports
muraux (fig. 5).
• Attention: le cordon
électrique ne doit pas
être guidé vers le haut
à l'arrière du
convecteur suspendu.
Utilisation
- Mettez le convecteur
en marche sur la position 1 ou 2 (fig. 6).
A la position 2, la
température s'élève
plus rapidement.
- Réglez le thermostat à
l'aide du bouton de
thermostat (F) (fig. 7).
(Position 10 =
maximum,
position y =
minimum).
Après cela, le
convecteur maintiendra
l'air environnant à la
température désirée
par des périodes
alternées de marche et
d'arrêt.
Le réglage du
thermostat peut être modifié pendant
l'utilisation.
Pour vous aider à trouver la position idéale du
thermostat:
- Placez d'abord le thermostat en position 10
(= maximum).
- Dès que la température vous semble agréable,
baissez doucement le bouton de réglage
jusqu'à ce que le convecteur s'arrête.
- Quand l'appareil est branché et qu'il marche en
position 1 ou 2, le voyant lumineux s'allume.
8
2a
2b
1
2
4
5
6
7
S
E
K
K
E
D
L
I
T
E
K
K
I
Å
M
N
E
N
V
O
S
E
A
R
K
I
C
R
P
Ä
T
O
R
C
E
N
V
O
Ö
N
E
K
C
R
I
E
R
V
Å
O
F
C
T
R
I
O
R
N
V
R
I
O
U
R
D
O
B
C
U
S
C
A
O
P
N
E
N
R
I
R
B
O
C
O
Ã
N
Ä
N
Ä
E
T
I
K
E
K
P
E
A
D
E
A
S
B
I
T
E
E
I
N
N
E
K
C
E
D
HOT
E
B
M
T
E
H
T
C
I
S
N
SY
00
5
1
3
Page 9
9
- Le voyant reste
allumé jusqu'à ce que
l'appareil soit mis à
l'arrêt, soit en
remettant le
commutateur (C) ou
(D) en position initiale
(fig. 8) soit en
débranchant la prise
de courant.
- Pour indiquer que le convecteur est toujours
branché et qu'il est en position de marche (1 ou
2), le voyant lumineux reste allumé quand la
température désirée est atteinte et que le
thermostat arrête l'appareil.
Type HD 3455: position "Turbo" (fig. 9)
Pour faire monter plus vite la température, vous
pouvez mettre en route le ventilateur placé près
de l'ouverture supplémentaire de sortie d'air (B2).
Le voyant lumineux du
commutateur s'allume.
Le ventilateur accélère
la sortie de l'air chaud:
surtout quand vous avez
choisi la position 2.
N'oubliez pas de régler
le bouton de thermostat
(F) à la température
désirée.
Position "Hors gel" (fig. 10)
Par exemple pour éviter qu'une conduite d'eau ne
gèle:
- Placez le convecteur (en position verticale) à
proximité de la conduite;
- Mettez le convecteur
en position 1 ou 2
(en fonction de la taille
de la pièce, du courant
d'air éventuel et de la
température minimum
attendue);
- Mettez le thermostat
en position y (la
position la plus basse
du thermostat, soit
environ + 5° C) afin de maintenir l'entourage du
convecteur hors gel.
Dispositif de securité thermique
Pour prévenir les risques et dommages dus à la
surchauffe, le dispositif de sécurité thermique
interne coupe l’alimentation dès que les éléments
de chauffage deviennent trop chauds.
Si cela arrive:
- assurez-vous d’abord que ce n’est pas le
thermostat qui a coupé le radiateur.
Pour cela, positionnez le thermostat au
maximum. Si le chauffage ne se remet pas en
marche, c’est que le dispositif de sécurité a
bien été sollicité.
- Retirez la fiche d’alimentation de la prise
murale.
Laissez l’appareil refroidir pendant 5 minutes.
- Branchez à nouveau l’appareil et mettez le en
marche.
Si la sécurité thermique coupe à nouveau
l’appareil:
- retirez la fiche d’alimentation de la prise murale
- amenez votre appareil pour vérification chez
votre distributeur ou un centre service agréé
Philips Appareils Domestiques.
Nettoyage
- Débranchez l'appareil avant de le nettoyer.
Attendez qu'il soit suffisamment refroidi.
- Nettoyez l'extérieur du convecteur avec un
chiffon humide. Veillez à ne pas faire entrer
d'eau dans l'appareil.
- Nettoyez l'ouverture d'entrée d'air (A) et si
nécessaire également l'(les) ouverture(s) de
sortie d'air (B1 et B2) à l'aide d'un aspirateur
(petit suceur avec brosse à poils longs).
8
9
10
Page 10

10
Allgemeine Beschreibung (Abb. 1 auf Seite 3)
A Lufteinlaß
B Luftauslaß
C Heizschalter • (“Eco” = Sparschaltung), mit
Kontrollampe
D Heizschalter •• (= Maximum), mit
Kontrollampe
E “Turbo”-Schalter > (nur Type HD 3455) für
verstärkte Abgabe von Heißluft, mit
Kontrollampe
F Thermostat, Drehschalter zum Einstellen
einer konstanten Temperatur
G Gerätefüße
H Kabelaufwicklung
I Wandhalterung
Arbeitsweise des Geräts
Das Heizelement heizt die Luft im Inneren des
Geräts. Die erhitzte Luft steigt auf und verläßt das
Gerät durch den Luftauslaß (B1) an der
Oberseite. Zugleich wird am Boden (A) kühle Luft
angesaugt.
Der im Geräte-Typ HD 3455 eingebaute “Turbo”Ventilator (B2) beschleunigt die Abgabe von
warmer Luft, so daß der Raum schneller erwärmt
wird.
Sichere Aufstellung
• Stellen Sie das Gerät nicht direkt unter einer
Steckdose auf.
• Wenn Sie etwas auf das Gerät legen, besteht
Brandgefahr!
Wichtig
• Prüfen Sie vor Inbetriebnahme, ob die Spannungsangabe auf dem Typenschild mit der
örtlichen Netzspannung übereinstimmt.
• Lesen Sie die Gebrauchsanweisung sorgfältig durch, und sehen Sie sich dabei die
Abbildungen (Seite 3) an, bevor Sie das Gerät zum ersten Mal benutzen.
• Verwenden Sie das Gerät nur aufrecht stehend oder hängend (Abb. 1).
• Stellen Sie das Gerät nicht auf, bevor die beiden Gerätefüße angebracht worden sind. Diese
Teile sind getrennt verpackt.
• Lassen Sie rund um das Gerät reichlich Platz. Halten Sie über dem Gerät und an den Seiten
wenigstens 20 cm frei. Wenn Sie das Gerät hängend anbringen, so lassen Sie darunter
mindestens 15 cm frei.
• Halten Sie Lufteinlaß und -auslaß frei; hängen Sie nichts davor oder darüber. Sonst besteht
Brandgefahr!
• Halten Sie das Netzkabel in sicherem Abstand von Lufteinlaß (A) und Luftauslaß
(B1 und B2).
• Der Radiator darf nicht unter einer Wandsteckdose angebracht oder aufgestellt werden.
• Stellen Sie das Gerät nicht auf einen besonders langflorigen Bodenbelag.
• Es kann vorkommen, daß die Sicherung den Strom unterbricht; besonders wenn der
Radiator auf Position •• betrieben wird oder ein weiteres Gerät an denselben Stromkreis
angeschlossen ist. Dann ist die Stromentnahme höher als zulässig.
Sie können in diesem Fall eines der Geräte ausschalten und über eine andere Sicherung an
einen anderen Stromkreis anschließen oder einen geprüften Elektriker beauftragen, die
Anlage entsprechend anzupassen.
• Beachten Sie zur persönlichen und zu fremder Sicherheit, daß jede Kombination von Wasser
und Elektrizität gefährlich ist! Beachten Sie alle Hinweise und Vorschriften, wenn Sie das
Gerät in einem Feuchtraum, z.B. einem Badezimmer oder in der Nähe eines
Schwimmbeckens, installieren oder auch nur vorübergehend verwenden.
• Stecken Sie keinerlei Gegenstände in den Radiator.
• Sorgen Sie dafür, daß Kinder nicht mit dem Gerät spielen können.
• Wenn das Netzkabel defekt oder beschädigt ist, muß es von einer durch Philips autorisierten
Werkstatt ersetzt werden, da für die Reparatur Spezial-Werkzeug und/oder spezielle Teile
benötigt werden.
Deutsch
Page 11

• Stellen Sie das Gerät so auf, daß kühle Luft frei
einströmen und warme Luft frei ausströmen
kann.
• Stellen Sie das Gerät so auf, daß keine Gefahr
für einen elektrischen Schlag oder Brandgefahr
besteht. Berühren Sie das Gerät nur mit
trockenen Händen.
• Das Gerät kann mit Hilfe der Gerätefüße (G)
freistehend aufgestellt werden, kann aber auch
an einer Wand angebracht werden. Die Wand
muß fest, flach und feuerfest sein. Verwenden
Sie dazu die mitgelieferte Halterung (I).
Gerätefüße anbringen (Abb. 2a)
Wenn Sie das Gerät
nicht an der Wand
anbringen, sondern auf
dem Boden stehend
aufstellen wollen, so
bringen Sie vor dem
ersten Gebrauch die
beiden Gerätefüße (G)
an.
- Schieben Sie die
beiden Gerätefüße
fest in die hierfür
vorgesehenen
Fassungen (“Klick”).
Gerätefüße abnehmen
(Abb. 2b)
zum Transport, zur
Aufbewahrung oder zur
Anbringung an einer
Wand.
- Halten Sie die Feder
mit einer Zange nach
oben gedrückt, und
schieben Sie den
Gerätefuß vom Gerät
ab.
Gerät fest installieren
- Bohren Sie die Löcher
und befestigen Sie die
Wandhalterung unter
Verwendung
passender Dübel und
Schrauben (Abb. 3).
- Schieben Sie das Gerät
genau auf die Wandhalterung (Abb. 4).
- Sichern Sie das Gerät
mit den beiden
Schrauben an den
beiden Seiten der
Wandhalterung
(Abb. 5).
• Wichtig: Führen Sie
das Netzkabel nicht an
der Rückseite eines an
der Wand
angebrachten Radiators entlang!
Gebrauch des Geräts
• Drücken Sie den
Schalter (C) • zum
allmählichen oder (D)
•• zum schnellen
Aufheizen (Abb. 6).
- Mit dem Schalter (F)
des Thermostaten
stellen Sie eine
konstante Temperatur
ein (Abb. 7).
Position 10 = Maximum;
Position y = Minimum.
Der Radiator hält dann die Temperatur seiner
Umgebung auf dem eingestellten Wert, indem
er sich von Zeit zu Zeit einschaltet und wieder
ausschaltet.
Dieser Schalter kann bei eingeschaltetem Gerät
bedient werden.
Verfahren Sie wie folgt, um die Ihnen angenehme
Temperatur einzustellen:
- Stellen Sie den Thermostaten zunächst auf 10
(= Maximum).
- Sobald die gewünschte Temperatur erreicht ist,
drehen Sie den Schalter langsam zurück, bis
11
2a
2b
1
2
3
4
S
E
K
K
E
D
L
I
T
E
K
K
I
Å
M
N
E
N
V
O
S
E
A
R
K
I
C
R
P
Ä
T
O
R
C
E
N
V
O
Ö
N
E
K
C
R
I
E
R
V
Å
O
F
C
T
R
I
O
R
N
V
R
I
O
U
R
D
O
B
C
U
S
C
A
O
P
N
E
N
R
I
R
B
O
C
O
Ã
N
Ä
N
Ä
E
T
I
K
E
K
P
E
A
D
E
A
S
B
I
T
E
E
I
N
N
E
K
C
E
D
HOT
E
B
M
T
E
H
T
C
I
S
N
SY
00
5
1
5
6
7
Page 12
12
sich das Gerät ausschaltet.
Ist das Gerät an das Netz angeschlossen und
der Schalter auf • oder •• eingestellt, so leuchtet
die entsprechende Kontrollampe auf.
- Die Kontrollampe
leuchtet weiter, bis
das Gerät mit dem
Schalter (C) bzw. (D)
ausgeschaltet wird
(Abb. 8) oder der
Stecker aus der
Steckdose gezogen
wird bzw. der Strom
ausfällt.
- Sobald die eingestellte Temperatur erreicht ist
und der Thermostat die Heizelemente
ausgeschaltet hat, leuchtet die Kontrollampe
weiter, um anzuzeigen, daß das Gerät noch
(auf • oder auf ••) eingeschaltet ist.
Nur Type HD 3455: “Turbo”-Einstellung
(Abb. 9)
Damit die Temperatur
schneller steigt, können
Sie den Ventilator an
der zusätzlichen
Öffnung (B2) zuschalten. Die Kontrollampe in
diesem Schalter leuchtet
dann auf.
Durch den eingebauten
Ventilator wird die Umwälzung der heißen Luft beschleunigt,
insbesondere bei Position ••.
Vergessen Sie nicht, den Thermostaten (F) auf
die von Ihnen gewünschte Temperatur
einzustellen.
Frostschutz-Einstellung (Abb. 10)
Wenn Sie z.B. dafür
sorgen wollen, daß eine
Wasserleitung nicht
einfriert ...
- stellen Sie den
Radiator (aufrecht!) in
die Nähe dieser
Wasserleitung;
- schalten Sie, je nach
Größe des Raumes,
vermutlichem Luftdurchzug und dem erwarteten
Kältegrad, das Gerät auf • oder auf ••;
- stellen Sie den Drehschalter (F) auf y, das
entspricht ca. +5° C. Mit dieser Einstellung hält
der Radiator die unmittelbare Umgebung
frostfrei.
Überhitzungsschutz
Um Risiken und Schäden zu vermeiden, die durch
starke Erhitzung entstehn, schaltet der
Überhitzungsschutz das Gerät aus, sobald die
Heizelemente sich zu stark erhitzen.
Sollte dies geschehen, so verfahren Sie wie folgt:
- Vergewissern Sie sich zunächst, ob nicht der
Thermostat das Gerät ausgeschaltet hat.
Stellen Sie dazu den Thermostatschalter (F) auf
die höchste Position ••. Wird das Gerät dann
nicht eingeschaltet, hat tatsächlich der
Überhitzungsschutz das Gerät ausgeschaltet.
- Ziehen Sie den Netzstecker aus der Steckdose.
- Lassen Sie das Gerät 5 Minuten abkühlen.
- Prüfen Sie, ob der Radiator vorschriftsmäßig
aufgestellt ist.
- Stecken Sie den Netzstecker wieder in die
Steckdose und schalten Sie das Gerät ein.
Wird das Gerät daraufhin wieder ausgeschaltet,
so ...
- ziehen Sie den Netzstecker aus der Steckdose
und
- lassen Sie das Gerät von Ihrem Philips-Händler
oder vom Philips Service Centre in Ihrem Lande
überprüfen.
Reinigung
- Ziehen Sie den Netzstecker aus der Steckdose,
und lassen Sie das Gerät ausreichend
abkühlen.
- Sie können das Äußere des Gehäuses mit
einem angefeuchteten Tuch abwischen. Achten
Sie darauf, daß kein Wasser in das Innere des
Geräts eindringt.
- Reinigen Sie Lufteinlaß- (A) und
Luftauslaßöffnung (B1 und gfs. auch B2) mit
einem Staubsauger, unter Verwendung der
Langhaarbürste.
8
9
10
Page 13

13
Algemene beschrijving (fig. 1 op pag. 3)
A Luchtinlaatopening
B Luchtuitstroomopening(en)
C Warmteschakelaar • (“Eco” - matig), met
controlelampje
D Warmteschakelaar •• (maximum), met
controlelampje
E ”Turbo” schakelaar > (alleen type
HD 3455) voor geforceerde uitstroom van
(hete) lucht, met controlelampje
F Thermostaatregelaar (voor instellen van
constante temperatuur)
G Steunen
H Snoeropbergmogelijkheid
I Muurbeugels
Werking
Het verwarmingselement in de kachel verwarmt
de lucht. De verwarmde lucht stijgt op en verlaat
de kachel aan de bovenzijde (B1).
Tegelijkertijd wordt vanzelf koude lucht aan de
onderzijde (A) aangezogen.
Bij type HD 3455 versnelt de ingebouwde
ventilator (B2) de uitstroming van de verwarmde
lucht, zodat een ruimte sneller wordt verwarmd.
Veilig plaatsen
• Plaats de kachel niet onder een stopcontact.
• Als er iets op of over het apparaat wordt
gelegd, kan dit brandgevaar opleveren.
• Stel het apparaat zodanig op, dat de toe- en
afvoer van lucht niet wordt gehinderd.
Belangrijk
• Controleer, voordat u het apparaat aansluit, of het voltage dat op het typeplaatje is vermeld
overeenkomt met de netspanning in uw woning.
• Lees de gebruiksaanwijzing en bekijk de tekeningen (pag. 3) voordat u het apparaat in
gebruik neemt.
• Gebruik de kachel alleen rechtopstaand of -hangend, zoals afgebeeld in fig. 1.
• Voordat u het apparaat in gebruik neemt (rechtopstaand), moeten de twee steunen worden
aangebracht.
Deze steunen zijn apart verpakt.
• Laat voldoende ruimte open rondom de kachel.
Een veilige vrije ruimte rondom de kachel is 20 cm aan de bovenkant en aan de zijkanten.
Als de kachel hangend wordt gebruikt, laat dan ook 15 cm vrij aan de onderzijde.
• Houd de luchtopeningen vrij: hang er dus niets vóór of overheenå. Als de kachel wordt
afgedekt kan brandgevaar ontstaan.
• Houd het snoer op veilige afstand van de luchtinlaatopening (A) en luchtuitstroomopeningen
(B1, B2).
• Plaats de kachel niet onder een stopcontact.
• Zet de kachel niet op zeer hoogpolige vloerbedekking.
• Het kan voorkomen, vooral wanneer het apparaat werkt op stand •• en u nog een ander
elektrisch apparaat inschakelt, dat een zekering in de meterkast doorbrandt of uitschakelt.
De zekering is wellicht niet op grote stroomsterkte berekend.
Sluit in zo’n geval één van beide apparaten op een andere “groep” aan (via een andere
zekering) of laat uw installatie wijzigen door een erkend installateur.
• Voor uw eigen veiligheid en die van anderen: water en elektriciteit vormen een gevaarlijke
combinatie! Gebruik dit apparaat niet in de onmiddellijke omgeving van een bad, douche of
zwembad.
• Steek geen voorwerpen in de kachel. Zorg ervoor dat kinderen niet met de kachel kunnen
spelen.
• Indien het snoer van dit apparaat is beschadigd, dient het uitsluitend te worden vervangen
door een door Philips daartoe aangewezen reparateur, omdat voor de reparatie speciale
gereedschappen en/of onderdelen vereist zijn.
Nederlands
Page 14

• Zorg voor een veilige plaats, om elektrische
schok en brandgevaar te vermijden. Raak het
apparaat alleen met droge handen aan.
• U kunt het apparaat vrijstaand opstellen met
behulp van de steunen (G). Maar het is ook
mogelijk de kachel met behulp van de
muurbeugels (I) aan een muur te bevestigen.
Deze muur dient stevig, vlak en niet brandbaar
te zijn.
Steunen aanbrengen (fig. 2a)
Monteer de beide
steunen (G) voordat u
het apparaat voor de
eerste keer
rechtopstaand gebruikt.
(De steunen worden
niet aangebracht
wanneer u het
apparaat hangend
gebruikt.)
- Schuif de beide
steunen in de
speciale houders in
de richting van de pijlen tot u “Klik” hoort.
Steunen verwijderen
(Voor transport,
opbergen of indien u het
apparaat aan de muur
wilt bevestigen. Fig. 2b)
- Trek de lip met een
tang wat omhoog,
terwijl u de steun uit
de houder schuift.
Aan de muur bevestigen
- Boor de gaten en
bevestig de
muurbeugels met
behulp van pluggen en
schroeven (fig. 3).
- Apparaat aan de
ophangbeugels hangen
(fig. 4).
- Beide borgschroefjes
aan de zijkant van de
ophangbeugels
vastdraaien (fig. 5).
• Let op: het snoer mag
niet langs de
achterzijde van de
hangende kachel
omhooggevoerd
worden.
Gebruik
- Schakel in op stand •
of •• (fig. 6). Bij stand
•• stijgt de kamertemperatuur sneller.
- Stel dan de
thermostaat in met
behulp van regelaar
(F) (fig. 7).
(Stand 10 = maximaal,
stand y = minimaal.)
De kachel houdt
daarna de lucht in zijn
omgeving constant op
de ingestelde
temperatuur door van
tijd tot tijd aan en uit te
schakelen.U kunt de
instelling van de
thermostaat tijdens het
gebruik bijregelen.
Om de voor u meest geschikte stand van de
thermostaat te vinden:
- Zet eerst de thermostaatknop op stand 10
(= maximum).
- Zodra u de temperatuur behaaglijk vindt, draait
u de knop langzaam terug totdat de kachel
uitschakelt.
- Wanneer het apparaat is aangesloten en
ingeschakeld op stand • of ••, gaat het
controlelampje branden.
14
4
S
E
K
K
E
D
L
I
T
E
K
K
I
Å
M
N
E
N
V
O
S
E
A
R
K
I
C
R
P
Ä
T
O
R
C
E
N
V
O
Ö
N
E
K
C
R
I
E
R
V
Å
O
F
C
T
R
I
O
R
N
V
R
I
O
U
R
D
O
B
C
U
S
C
A
O
P
N
E
N
R
I
R
B
O
C
O
Ã
N
Ä
N
Ä
E
T
I
K
E
K
P
E
A
D
E
A
S
B
I
T
E
E
I
N
N
E
K
C
E
D
HOT
E
B
M
T
E
H
T
C
I
S
N
SY
00
5
1
2a
2b
1
2
3
5
6
7
Page 15

15
- Het lampje blijft
branden totdat het
apparaat wordt
uitgeschakeld door
schakelaar (C) of (D)
weer in de oorspronkelijke stand te zetten
(fig. 8) of de stekker
uit het stopcontact te
nemen.
- Om aan te geven dat het apparaat nog steeds
is aangesloten en in stand “ingeschakeld” (• of
••) staat, blijft het controlelampje branden
wanneer de ingestelde temperatuur is bereikt
en de thermostaat het apparaat uitschakelt.
Type HD 3455: “Turbo” stand (fig. 9)
Om de temperatuur
vlugger te doen stijgen,
kunt u de ventilator bij
de extra luchtuitstroomopening (B2)
inschakelen. Het
controlelampje in de
schakelaar gaat dan
branden.
De ventilator versnelt de
uitstroming van de hete
lucht: vooral wanneer u warmtestand •• heeft
gekozen.
Vergeet niet ook de thermostaatregelaar (F) in te
stellen op de gewenste temperatuur.
“Vorstvrij” stand (fig. 10)
Om bijvoorbeeld een
waterleiding vorstvrij te
houden:
- Zet de kachel
(rechtopstaand!) dicht
bij de leiding;
- Schakelt u de kachel in
op stand • of ••
(afhankelijk van de
grootte van de ruimte,
eventuele tocht en de
verwachte minimumtemperatuur);
- Draait u de thermostaatregelaar op stand y (de
laagste thermostaatstand, d.i. ca. +5 °C). Deze
stand kan worden gebruikt om de direkte
omgeving van de kachel vorstvrij te houden.
Beveiliging tegen oververhitting
Om schade en risico als gevolg van oververhitting
te voorkomen, schakelt de ingebouwde
beveiliging de stroom uit zodra de
verwarmingselementen te heet worden.
Indien dit mocht gebeuren:
- Overtuig u er eerst van dat het niet de
thermostaat was, waardoor de kachel werd
uitgeschakeld. Zet de thermostaat in de
hoogste stand. Als de kachel niet gaat werken,
was het inderdaad de beveiliging die het
apparaat heeft uitgeschakeld.
- Neem de stekker uit het stopcontact.
- Laat de kachel 5 minuten afkoelen.
- Steek de stekker weer in het stopcontact en
schakel de kachel weer in.
Als de beveiliging de kachel opnieuw mocht
uitschakelen:
- Laat de kachel door uw leverancier of in een
Philips Service Centrum controleren.
Schoonmaken
- Haal, vóórdat u het apparaat gaat
schoonmaken, de stekker uit het stopcontact.
Wacht totdat de kachel voldoende is afgekoeld.
- U kunt de buitenkant van de kachel
schoonmaken met een vochtige doek. Zorg
ervoor dat er geen water in het apparaat komt.
- Met behulp van de stofzuiger (kleine zuigmond
met langharige borstel) kunt u de
luchtinlaatopening (A) en zonodig ook de
luchtuitstroomopening(en) (B1, B2)
schoonmaken.
8
9
10
Page 16

16
Descrizione dell’apparecchio (fig. 1 a pag. 3)
A Presa di entrata dell’aria
B Presa/e di uscita dell’aria
C Interruttore di calore • (“Eco” - graduale),
con spia luminosa
D Interruttore di calore •• (Massimo), con spia
luminosa
E Interruttore “Turbo” > (solo per il modello
HD 3455) per la fuoriuscita di aria (calda)
forzata, con spia luminosa.
F Manopola termostato (per impostare una
temperatura costante)
G Supporti
H Scomparto per riporre il cavo
I Tasselli per fissaggio a muro
Come funziona l’apparecchio
La resistenza posta all’interno del convettore
riscalda l’aria. L’aria calda va verso l’alto ed esce
dalla parte superiore del convettore (B1) mentre
l’aria fredda viene spinta verso il basso (A).
La ventola turbo incorporata (B2) nel modello
HD 3455 accelera la fuoriuscita dell’aria calda per
permettere di riscaldare più velocemente gli
ambienti.
Posizionamento di sicurezza
• Non posizionate l’apparecchio direttamente
sotto una presa.
• Non coprite l’apparecchio, per evitare il rischio
di incendio.
• Posizionate l’apparecchio in modo che l’aria
Importante
• Prima di collegare l’apparecchio controllate che la tensione indicata sulla targhetta
corrisponda a quella della rete locale.
• Leggete le istruzioni guardando le relative illustrazioni (pag. 3) con molta attenzione prima
di usare l’apparecchio.
• Usate l’apparecchio solo in posizione verticale o appeso così come descritto nella figura 1.
• Non fate funzionare l’apparecchio per uso da terra senza avere prima montato i supporti.
I supporti si trovano in una confezione separata.
• Lasciate spazio libero attorno all’apparecchio. L’area di sicurezza è 20 cm. sopra e ai lati
dell’apparecchio. Se l’apparecchio è usato mentre è appeso al muro, lasciate 15 cm. anche
sotto (l’apparecchio).
• Lasciate libere le aperture per il passaggio dell’aria: non appendete niente di fronte o sopra
di esse. Non coprite l’apparecchio per evitare il rischio di incendio.
• Tenete il cavo d’alimentazione a distanza di sicurezza dalla presa d’entrata (A) e dalla/e
presa/e d’uscita dell’aria (B1, B2).
• Non mettete l’apparecchio sotto una presa di corrente.
• Non mettete l’apparecchio su tappeti a pelo folto.
• Soprattutto se l’interruttore del termoconvettore si trova in posizione
22
e se
contemporaneamente un altro apparecchio elettronico è acceso, c’è la possibilità che un
fusibile o un salvavita interrompa l’alimentazione di corrente. In questo caso, il fusibile o il
salvavita potrebbero non essere in grado di sopportare un’erogazione di potenza elevata.
Collegate l’elettrodomestico a un’altra presa (che sia collegata a un fusibile o un salvavita
diverso) oppure rivolgetevi ad un elettricista qualificato per far revisionare l’impianto.
• Per la vostra sicurezza personale e per quella degli altri, ricordate che acqua ed elettricità
sono una combinazione pericolosa! Non usate il termoconvettore accanto all’acqua (in
bagno o vicino alla doccia o piscina).
• Non inserite oggetti nel termoconvettore. Assicuratevi che l’apparecchio venga posizionato
lontano dalla portata dei bambini.
• Se il cavo di alimentazione di questo apparecchio si dovesse rovinare, occorrerà farlo
sostituire da un Centro Assistenza autorizzato Philips perchè occorrono speciali attrezzature
e/o ricambi.
Italiano
Page 17

possa entrare ed uscire senza ostruzioni.
• Scegliete un posto sicuro per evitare scosse
elettriche e il rischio di incendio. Toccate
l’apparecchio con le mani perfettamente
asciutte.
• L’apparecchio può essere usato come unità
indipendente mediante gli appositi supporti (G).
Naturalmente può essere fissato ad un muro
(antincendio) usando le apposite viti e i tasselli
(I). La parete deve essere solida, liscia e
antincendio.
Come montare i supporti (fig. 2a)
- Montate i due
supporti (G) prima di
usare l’apparecchio
per la prima volta.
(Non montate i
supporti se
desiderate
l’apparecchio fissato
al muro).
- Fate scivolare i due
supporti negli
appositi spazi fino a
quando sentirete un
“Click!”.
Come togliere i supporti (per trasportare, riporre
o fissare al muro l’apparecchio) (Fig. 2b)
- Spingete la linguetta
verso l’alto usando un
paio di tenaglie,
facendo scivolare il
supporto fuori
dall’apposito spazio.
Fissaggio a muro
- Trapanate e fissate
l’attacco al muro
usando viti e tasselli
(fig. 3).
- Fate scivolare l’apparecchio nella posizione
corretta (fig. 4).
- Fissate l’apparecchio
ai lati con due viti
(fig. 5).
- Attenzione: non
direzionate verso l’alto
il cavo di alimentazione posto sul retro
dell’apparecchio
fissato a muro.
Come usare l’apparecchio
- Accendete l’apparecchio selezionando
la posizione • o ••
(fig. 6). Scegliete la
posizione •• per
riscaldare più
rapidamente.
- Impostate il termostato
utilizzando l’apposita
manopola (F) (fig. 7).
(Posizione 10 =
massimo;
posizione y = minimo).
A partire da questo
momento, l’apparecchio manterrà
invariata la temperatura dell’aria selezionata, accendendosi e
spegnendosi a ripetizione.
Potete comunque regolare il termostato durante
l’uso.
Per trovare l’impostazione maggiormente adatta
alle vostre esigenze:
- Per prima cosa, spostate la manopola sulla
posizione 10 (= massimo).
- Non appena avrete trovato la temperatura più
adatta, girate la manopola del termostato
lentamente fino a quando l’apparecchio non si
spegne.
17
2a
2b
1
2
3
4
T
E
K
K
I
Å
M
N
E
N
V
O
E
R
I
R
P
O
C
E
N
V
O
Ö
N
E
K
C
R
I
E
R
V
Å
O
F
C
T
R
I
O
R
N
V
O
U
D
O
C
S
A
P
N
E
N
R
I
R
B
O
C
O
Ã
N
Ä
Ä
T
I
E
P
A
A
S
B
I
T
E
E
I
N
N
E
K
C
E
D
HOT
E
B
M
T
E
H
T
C
I
S
N
SY
00
5
1
5
6
7
S
E
K
K
E
D
L
I
S
A
K
C
Ä
T
R
R
I
R
B
U
C
O
N
E
K
K
E
D
E
Page 18

18
- Quando l’apparecchio è collegato alla presa di
alimentazione ed è stato acceso selezionando •
o ••, la spia luminosa si accenderà.
- La spia luminosa
resterà accesa fino a
quando l’apparecchio
non verrà spento
riportando l’interruttore (C) o (D) nella
posizione originale
(fig. 8) o staccando la
spina dalla presa.
- Per indicare che
l’apparecchio è
ancora collegato e che si trova nella posizione
“acceso” (• o ••), la spia luminosa resterà
illuminata al raggiungimento della temperatura
impostata. A quel punto, il termostato spegnerà
l’apparecchio.
Tipo HD 3455: Posizione “Turbo” (fig. 9)
Per far aumentare più
rapidamente la
temperatura, potete
accendere la ventola
posta sulla presa di
uscita dell’aria (B2). In
questo modo il flusso
d’aria calda potrà
fuoriuscire più
rapidamente, soprattutto
se avrete selezionato la posizione ••.
Non dimenticate inoltre di selezionare la
manopola del termostato (F) sulla temperatura
desiderata.
Regolazione antigelo (fig. 10)
Se ad esempio volete
evitare che le tubazioni
dell’acqua gelino:
- Posizionate
l’apparecchio (in
poszione verticale)
vicino al tubo
dellèacqua.
- Accendete
l’apparecchio
selezionando l’interruttore • o •• (in base alle
dimensioni della stanza, possibile correnti d’aria
e temperatura minima prevista).
- Regolate il disco del termostato sulla
posizione y (ad esempio sulla regolazione
minima del termostato, circa +5°C). Questa
posizione può essere usata per evitare che geli
la zona immediatamente vicino all’apparecchio.
Dispositivo di sicurezza antisurriscaldamento
Per prevenire danni ed evitare rischi dovuti al
surriscaldamento, il dispositivo di sicurezza
antisurriscaldamento toglie corrente appena le
resistenze diventano troppo calde.
Se si presenta una simile evenienza:
- Per prima cosa assicuratevi che non sia stato il
termostato a spegnere l’apparecchio. Regolate
il termostato mettendolo sulla posizione
massima. Se l’apparecchio non si accende,
vuol dire che il dispositivo di sicurezza è stato
inserito.
- Togliete la spina dalla presa di alimentazione.
- Lasciare raffreddare l’apparecchio per 5 minuti.
- Inserite nuovamente la spina nella presa di
alimentazione e riaccendete l’apparecchio.
Se il dispositivo di sicurezza dovesse spegnere
nuovamente l’apparecchio:
- Fate controllare l’apparecchio contattando il
Centro di Assistenza Philips o il vostro
rivenditore di fiducia.
Pulizia
- Prima di procedere alle operazioni di pulizia,
togliete la spina dalla presa di alimentazione e
aspettate che l’apparecchio si raffreddi.
- Pulite le parti esterne dell’apparecchio con un
panno umido. Fate attenzione a non far entrare
acqua nell’apparecchio.
- Pulite regolarmente la presa d’entrata (A) e se
necessario anche le prese di uscita (B1, B2)
con un aspirapolvere su cui avrete montato
l’accessorio a spazzola con setole lunghe.
8
9
10
Page 19

19
Descripción general ( fig. 1 de la página 3 )
A Abertura de entrada de aire.
B Abertura(s) de salida de aire.
C Interruptor de calor • ( “ Eco “ - moderado ),
con lámpara piloto.
D Interruptor de calor •• ( máximo ), con
lámpara piloto.
E Interruptor “ Turbo “ > ( solo modelo
HD 3455 ) para forzar la salida de aire
( caliente ), con lámpara piloto.
F Regulador del termostato ( para mantener
una temperatura constante ).
G Pies.
H Lugar para almacenar el cable de red.
I Bridas para la pared.
Funcionamiento
El aire se calienta en los elementos calefactores
que hay dentro del convector. El aire caliente
asciende y sale por la parte superior ( B1 ) del
convector. Al mismo tiempo, el aire frío es atraído
por la parte inferior ( A ).
El turboventilador incorporado ( B2 ) en el modelo
HD 3455 acelera el flujo de salida del aire
caliente, con lo cual un ambiente puede ser
calentado más rápidamente.
Posicionamiento seguro
• El convector no debe colocarse
inmediatamente debajo de una base de
enchufe.
• Si se tapa el aparato, hay riesgo de fuego.
• Posicionen el aparato de un modo tal que el
flujo de aire entrante y saliente del convector no
esté obstruido.
• Elijan un lugar seguro para evitar choques
eléctricos y el riesgo de fuego. Toquen el
convector solo con las manos secas.
Importante
• Antes de conectar el aparato, comprueben que el voltaje indicado en la placa de
características se corresponde con el de su hogar.
• Antes de usar el aparato, lean las instrucciones de uso junto con las ilustraciones ( pág. 3).
• Usen el convector solo en una posición vertical o colgado tal como se indica en la fig. 1.
• No usen el aparato ( en posición vertical ) antes de montar los dos pies. Esos pies están
embalados separadamente.
• Dejen un amplio espacio alrededor del convector.
El área de seguridad a ser mantenida libre es de 20 cm por encima y por los lados. Si el
aparato es usado colgado, dejen también un espacio de 15 cm por debajo.
• Mantengan libres las aberturas del aire. No cuelguen nada en la parte frontal ni pongan nada
encima del aparato. Si el convector es tapado, existe un riesgo de fuego.
• Mantengan el cable de red a una distancia segura de la abertura ( A ) de entrada del aire y de
la(s) abertura(s) de salida de aire ( B1, B2 ).
• No coloquen el aparato bajo una base de enchufe.
• No coloquen el convector sobre alfombras de pelos extremadamente largos.
• Puede suceder, especialmente si el convector funciona en la posición 22y otro aparato
eléctrico es también puesto en marcha, que un fusible o cortacircuitos corte la red eléctrica.
En tal caso, el fusible o cortacircuitos no permite esa alta potencia eléctrica. Pueden
conectar uno de los aparatos involucrados a otro circuito ( que emplee otro fusible o
cortacircuitos ) o hacer revisar la instalación por un electricista autorizado.
• Para su propia seguridad y la de otros :
¡ El agua y la electricidad forman una combinación peligrosa!
No usen este convector en las cercanías de un cuarto de baño, de una ducha o de una
piscina.
• No introduzcan ningún objeto en el convector. Asegúrense de que los niños no puedan
jugar con el aparato.
• Si el cable de red de este aparato es deteriorado, solo puede ser reemplazado por Philips o
por su servicio oficial, ya que se requieren herramientas y / o piezas especiales.
Español
Page 20

• Este aparato puede usarse como una unidad a
colocar donde deseen, usando los pies ( G ).
Sin embargo, puede también montarse en una
pared ( ¡ A prueba de fuego ! ), usando las
bridas para la pared ( I ). La pared deberá ser
sólida, plana y a prueba de fuego.
Montaje de los pies ( fig. 2a )
Monten los dos pies
( G ) antes de usar el
convector, en posición
vertical, por vez
primera ( No monten
los pies si desean usar
el convector colgando
de la pared ).
- Siguiendo las
direcciones de las
flechas, deslicen los
dos pies en los
soportes especiales
hasta oír “ Click “.
Desmontaje de los pies
( Para transporte,
almacenamiento o
montaje en la pared )
( fig. 2b ).
- Estiren un poco la
lengüeta hacia arriba
usando unas pinzas
mientras deslizan el
pie fuera del soporte.
Montaje en la pared
- Taladren los agujeros y
fijen las bridas a la
pared usando tacos y
tornillos ( fig. 3 ).
- Deslicen el aparato
correctamente en las
bridas ( fig. 4 ).
- Asegúrenlo con los
dos tornillos de los
laterales de las bridas
( fig. 5 ).
Nota : No pasen el
cable de red por
encima de la parte
trasera del convector
montado en la pared.
Manejo
- Pónganlo en marcha
seleccionando • o ••
( fig. 6 ).
La posición •• da como
resultado un más
rápido calentamiento.
- Ajusten entonces el
termostato por medio
de su regulador (F)
( fig. 7 ).
( Posición 10 =
máximo y
posición y = mínimo.)
Subsiguientemente, el
convector mantendrá
el aire de los
alrededores a la temperatura fijada, mediante
intérvalos de marcha y paro.
Pueden ajustar el termostato durante el uso.
Para hallar el ajuste ideal del termostato :
- Ajusten primero el regulador en la posición 10
( = máximo ).
- Tan pronto como la temperatura sea
confortable giren, hacia abajo y lentamente, el
regulador del termostato hasta que el convector
se desconecte.
- Cuando el aparato esté conectado a la red y
puesto en marcha seleccionando • o ••, la
lámpara piloto se encenderá.
- La lámpara piloto
permanecerá
encendida hasta que
el aparato sea
apagado, tornando el
interruptor ( C ) o el
interruptor ( D ) a la
posición original
( fig. 8 ) o desconectándolo de la red.
- Para indicar que el
convector todavía está conectado y en posición
de “ marcha “ ( • o •• ), la lámpara piloto
20821
2a
2b
1
2
3
4
S
E
K
K
E
D
L
I
T
E
K
K
I
Å
M
N
E
N
V
O
S
E
A
R
K
I
C
R
P
Ä
T
O
R
C
E
N
V
O
Ö
N
E
K
C
R
I
E
R
V
Å
O
F
C
T
R
I
O
R
N
V
R
I
O
U
R
D
O
B
C
U
S
C
A
O
P
N
E
N
R
I
R
B
O
C
O
Ã
N
Ä
N
Ä
E
T
I
K
E
K
P
E
A
D
E
A
S
B
I
T
E
E
I
N
N
E
K
C
E
D
HOT
E
B
M
T
E
H
T
C
I
S
N
Y
S
0
0
5
1
5
6
7
Page 21

permanecerá encendida cuando se haya
alcanzado la temperatura fijada y el termostato
haya parado el aparato.
Modelo HD 3455 : Posición “ Turbo “ ( fig. 9 )
Para hacer que la
temperatura aumente
más rápidamente,
pueden poner en
marcha el ventilador de
la abertura de salida
extra de aire ( B2 ). La
lámpara piloto del
interruptor se encenderá.
El ventilador acelerará el flujo de aire caliente,
especialmente si ha sido seleccionada la posición
2 de calor.
No olviden ajustar también el regulador ( F ) del
termostato a la temperatura requerida.
Ajuste “ Anticongelación “ ( fig. 10 )
Si, por ejemplo, debe
impedirse la congelación
de una tubería de agua :
- Coloquen el convector
( ¡ En posición vertical
! ) cerca de la tubería,
- Pongan en marcha el
convector
seleccionando la
posición 1 o 2
( dependiendo del tamaño de la habitación, de
la posible corriente de aire y de la esperada
temperatura mínima ).
- Ajusten el regulador del termostato en la
posición ( por ejemplo, el ajuste mínimo del
termostato, aproximadamente 5 ºC ). Esta
posición puede usarse para mantener libres de
congelación las inmediaciones del convector.
Dispositivo de seguridad contra
sobrecalentamientos
Para impedir deterioros y riesgos debidos al
sobrecalentamiento, el incorporado dispositivo de
seguridad contra sobrecalentamientos corta la
corriente tan pronto como los elementos
calefactores se calientan demasiado.
Si esto sucediera :
- Primero, asegúrense de que no ha sido el
termostato lo que ha desconectado el
convector. Ajusten el termostato a la posición
máxima. Si el convector no se pone en marcha,
significa que se ha activado el dispositivo de
seguridad.
- Quiten la clavija de la base de enchufe.
- Dejen enfriar el convector durante 5 minutos.
- Inserten la clavija en la base de enchufe y
pongan, de nuevo, el convector en marcha.
Si el dispositivo de seguridad desconecta de
nuevo el convector:
- Hagan que el convector sea comprobado por
un Centro de Servicio Philips o por su
vendedor.
Limpieza
- Antes de limpiar, quiten la clavija de la base de
enchufe. Aguarden a que el convector esté
suficientemente frío.
- Pueden limpiar el exterior del convector con un
paño húmedo.
Asegúrense de que no entre agua en el
aparato.
- La abertura ( A ) de entrada de aire y, si es
necesario, la(s) abertura(s) ( B1, B2 ) de salida
de aire pueden limpiarse usando un aspirador
con una pequeña boquilla para pelusa.
9
10
Page 22

22
Descrição geral (fig. 1 na página 3)
A Abertura para a entrada do ar
B Abertura(s) para a saída do ar
C Comutador de aquecimento •
(“Eco” = moderado)
D Comutador de aquecimento •• (máximo)
E Comutador “Turbo” > (só no tipo HD 3455)
para a saída de ar (quente) forçado
F Botão do termostato (para regular uma
temperatura constante)
G Suportes
H Compartimento para guardar o cabo
eléctrico
I Suportes de parede
Funcionamento
O elemento de aquecimento no interior do
convector aquece aí o ar. O ar quente sobe e
deixa o convector através do topo (B1). Ao mesmo tempo, o ar frio é conduzido para baixo (A).
A ventoinha incorporada (B2) no tipo HD 3455
acelera a saída do fluxo de ar quente, de modo
que o ambiente ficará aquecido mais depressa.
Instalação de segurança
• O aquecedor não deverá ser instalado mesmo
junto a uma tomada de corrente.
• Se o aparelho estiver coberto, existirá o risco
de incêndio.
• Instale o aparelho de tal maneira que o fluxo de
ar, em direcção ao aquecedor e proveniente
dele, não seja obstruído.
Importante
• Antes de ligar o aparelho, verifique se a tensão indicada na placa de identificação,
corresponde à da sua residência.
• Antes de usar o aparelho, leia atentamente estas instruções, juntamente com as gravuras
(página 3).
• Use o aquecedor unicamente nos suportes ou suspenso em posição vertical como se
mostra na fig. 1.
• Não utilize o aparelho (mesmo verticalmente) sem ter montado os dois suportes. Estes
apoios estão embalados em separado.
• Deixe um espaço amplo à volta do aquecedor. Deve ser deixada livre uma área de seguraça
de 20 cm no cimo e nos lados. Se o aparelho for usado suspenso de uma parede, deixe
também um espaço de 15 cm por baixo dele.
• Mantenha desobstruídas as aberuras do ar: não pendure nada à frente ou por cima dele. Se
o aquecedor estiver tapado, haverá o risco de incêndio.
• Mantenha o cabo de corrente a uma distância segura da entrada de ar (A) e da(s) abertura(s)
de saída (B1, B2).
• Não coloque o aquecedor sobre carpetes com pêlos muito compridos.
• Há uma possibilidade, sobretudo se o selector estiver na posição de •• e um outro aparelho
eléctrico estiver também ligado, que um fusível ou circuito de corte desligue a alimentação.
Neste caso, o fusível ou o circuito de corte, não poderão ser condutores da corrente
eléctrica. Poderá ligar um dos aparelhos a outro circuito (com um fusível separado ou
circuito de corte), ou ter a instalação eléctrica revista por um electricista credenciado.
• Para sua própria segurança e dos outros: a água e a electricidade são uma combinação
perigosa! Não use o aquecedor nas proximidades de água (por exemplo, em casas de
banho, piscina, ou perto do chuveiro).
• Não introduza quaisquer objectos no aquecedor. Assegure-se de que as crianças não
possam brincar com o aparelho.
• Se o cabo eléctrico deste aparelho estiver danificado, apenas deverá ser substituído pela
Philips ou pelos seus serviços de assistência, uma vez que serão necessárias ferramentas
especiais e/ou peças.
Português
Page 23

• Escolha um local seguro para evitar choques
eléctricos e incêndios. Manuseie somente o
aquecedor se tiver as mãos secas.
• Este aparelho pode ser usado sem estar fixo,
através dos suportes (G). No entanto, também
pode ser instalado numa parede (à prova de
fogo!), por meio dos suportes para parede (I).
Esta parede terá de ser sólida, lisa e à prova de
fogo.
Montagem dos suportes (fig. 2a)
Monte os dois suportes
(G) antes de usar o
aquecedor pela
primeira vez.
- Faça deslizar os dois
suportes nos
orifícios especiais
até ser ouvido um
“Clique!”.
Desmontagem dos
suportes
(Para transporte,
arrumação ou montagem
na parede. Fig. 2b)
- Puxe a patilha para
cima por meio de duas
pinças enquanto for
fazendo deslizar o
suporte para fora do
ponto de fixação.
Montagem na parede
- Faça os furos e fixe os
dois suportes na
parede, usando os
parafusos e as buchas
(fig. 3).
- Faça deslizar
correctamente o
aparelho nos suportes
(fig. 4).
- Prenda com os dois
parafusos nos lados
dos suportes (fig. 5).
Funcionamento
- Ligue a corrente,
colocando o comutador em • ou em ••
(fig. 6). Na posição ••
o aquecimento é mais
rápido.
- Regule depois o
termostato através do
respectivo botão (F)
(fig. 7).
(Posição 10 = máximo,
posição yy= mínimo).
Como resultado, o
aquecedor manterá o
ar ambiente na
temperatura regulada,
ligando e desligando em intervalos regulares.
Poderá alterar a regulação do termostato
durante o funcionamento.
Para encontrar a sua regulação ideal do
termostato:
- Primeiro coloque o botão na posição 10
(= máximo).
- Assim que a temperatura se tiver tornado
confortável, baixe suavemente o botão do
termostato até que o aquecedor se desligue.
Para desligar: coloque
o comutador (C) ou
(D) na posição original
que tinha anteriormente (fig. 8).
23824
5
2a
2b
3
4
6
7
1
2
S
E
K
K
E
D
L
I
T
E
K
K
I
Å
M
N
E
N
V
O
S
E
A
R
K
I
C
R
P
Ä
T
O
R
C
E
N
V
O
Ö
N
E
K
C
R
I
E
R
V
Å
O
F
C
T
R
I
O
R
N
V
R
I
O
U
R
D
O
B
C
U
S
C
A
O
P
N
E
N
R
I
R
B
O
C
O
Ã
N
Ä
N
Ä
E
T
I
K
E
K
P
E
A
D
E
A
S
B
I
T
E
E
I
N
N
E
K
C
E
D
HOT
E
B
M
T
E
H
T
C
I
S
N
Y
S
0
0
5
1
Page 24

Tipo HD 3455: posição “Turbo” (fig. 9)
Para conseguir que a
temperatura suba mais
depressa, poderá ligar a
ventoinha de modo a
fazer uma saída extra
de ar (B2).
Isto acelerará o fluxo de
ar aquecido,
especialmente se a
regulação •• de
aquecimento tiver sido seleccionada.
Não se esqueça de também regular o botão do
termostato (F) para a temperatura desejada.
Regulação “Anti-Frost” (fig. 10)
Se, por exemplo, quer
evitar que a água
congele dentro dos
canos de sua casa:
- Coloque o aparelho
(ao alto) junto do cano;
- Ligue o aquecedor
escolhendo • ou ••
(consoante o tamanho
da sala, a capacidade
do cano e a temperatura mínima esperada);
- Regule o botão do termostato na posição
yy
(isto é, na regulação mínima do termostato, ou
seja, aprox. + 5° C). Esta posição pode ser
usada para manter as proximidades imediatas
do aquecedor isentas de geada.
Dispositivo de segurança de sobreaquecimento
Para evitar danos e risco de sobreaquecimento, o
dispositivo embutido no aparelho, corta a corrente
assim que as resistências aquecem damais.
Se isto acontecer:
- Em primero lugar, certifique-se que não foi o
térmostato que desligou o aparelho. Regule o
térmostato para a posição máxima. Se o
aparelho não ligar de novo, o dispositivo foi
activado.
- Desligue o aparelho.
- Deixe o aparelho arrefecer durante 5 minutos.
- Ligue o aparelho novamente à corrente.
Se o dispositivo voltar a desligar o aparelho dirijase ao Concessionário Philips mais próximo.
Limpeza
- Antes de limpar retire a ficha da tomada da
parede. Espere que o aquecedor arrefeça o
suficiente.
- Poderá limpar a parte exterior do aquecedor
com um pano húmido. Tenha cuidado para que
não entre água para dentro dele.
- A abertura de entrada do ar (A) e, se for
preciso, também a(s) abertura(s) de saída do ar
(B1, B2) podem ser limpas com um aspirador,
servindo-se da escova pequena de pêlos
compridos.
9
10
Page 25

25
Generel beskrivelse (fig. 1, side 3).
A Åbning til luftindsugning.
B Åbning/åbninger til luftafgivelse.
C Varmluftsknap 1 (“Eco” - moderat varme),
med kontrollampe.
D Varmluftsknap 2 (maksimum varme), med
kontrollampe.
E ”Turbo”-omskifter > (kun type HD 3455) til
ekstra hurtig (varm)luftafgivelse, med
kontrollampe.
F Termostatknap (til indstilling af en konstant
temperatur).
G Fødder.
H Opbevaring af netledningen.
I Vægbeslag.
Sådan fungerer varmeovnen.
Varmelegemet indvendigt i varmeovnen opvarmer
luften. Den varme luft stiger til vejrs og strømmer
ud af åbningen foroven (B1). Samtidig suges der
kølig luft ind forneden (A).
Turboblæseren (B2) i type HD 3455 sætter fart i
strømmen af varm luft, så rummet opvarmes
hurtigere.
Sikker placering af varmeovnen.
• Apparatet må ikke placeres umiddelbart under
en stikkontakt.
• Dæk aldrig varmeovnen til, da der derved
opstår stor brandfare.
• Apparatet skal placeres på en sådan måde, at
luftstrømmen til og fra apparatet ikke hindres.
• Vælg et sikkert sted for placeringen så fare for
elektrisk stød og brand undgås. Rør altid kun
ved varmeovnen, når Deres hænder er helt
tørre.
Vigtigt!
• Før der sluttes strøm til apparatet, kontrolleres det, at spændingsangivelsen på typepladen
svarer til den lokale netspænding.
• Læs brugsanvisningen og studér illustrationerne grundigt (side 3), før apparatet tages i
brug.
• Varmeovnen må kun bruges opretstående eller ophængt i lodret stilling som vist i fig.1.
• Brug aldrig apparatet (opretstående) før de 2 medfølgende fødder er monteret.
• Sørg for at der altid er tilstrækkeligt med fri plads rundt om apparatet, d.v.s. 20 cm over og
20 cm på hver side. Hvis apparatet hænger på væggen, skal der ligeledes være mindst 15 cm
afstand til gulvet.
•Åbningerne til luftindsugning/afgivelse skal altid være fri. Hæng aldrig noget foran eller over
apparatet. Hvis varmeovnen er tildækket, er der stor risiko for brand.
• Sørg for at ledningen er i sikker afstand fra åbningen til luftindsugning (A) og
åbningen/åbningerne til luftafgivelse (B1, B2).
• Anbring aldrig varmeovnen umiddelbart under en stikkontakt.
• Undlad at stille varmeovnen på meget tykke gulvtæpper.
• Hvis apparatet er sat i stilling oo (højeste varmeafgivelse), og der samtidig er tændt for andet
elektrisk udstyr, kan det ske, at en sikring eller et relæ afbryder strømforsyningen. I så fald
kan årsagen være, at sikringen, relæet eller ledningsnettet ikke kan klare belastningen. Man
skal da slutte noget af udstyret til en anden strømkreds (en anden gruppe), der sikres af en
anden sikring/et andet relæ, eller man kan bede en installatør om at efterse de elektriske
installationer.
• Husk - af hensyn til Deres egen og andres sikkerhed - at vand og elektricitet er en farlig
kombination! Brug derfor aldrig varmeovnen i umiddelbar nærhed af badekar, bruser eller
swimmingpool.
• Stik aldrig genstande ind i varmeovnen og sørg for, at børn ikke kan komme til at lege med
apparatet.oHvis apparatets netledning beskadiges, skal den udskiftes af Philips, da der skal
anvendes specialværktøj og/eller specielle dele i forbindelse med udskiftningen.
Dansk
Page 26

• Varmeovnen kan anvendes som fritstående
apparat ved hjælp af de medleverede fødder
(G), men den kan også monteres på en (ikke
brandbar!) væg ved
hjælp af
vægbeslagene (I).
Væggen skal være
solid, jævn og af ikke
brandbart materiale.
Påmontering af
fødderne (fig. 2a).
De to fødder (G) skal
monteres på
varmeovnen, inden den
tages i brug som
fritstående apparat
(Fødderne skal ikke
monteres, hvis apparatet
skal hænges op på
væggen).
- Skub de to fødder ind i
de specielle holdere i
pilens retning, til der
høres et “klik”.
Afmontering af
fødderne (ved transport,
opbevaring eller
vægmontering, fig. 2b).
- Træk tappen opad ved
hjælp af en tang og
træk samtidig foden ud
af holderen.
Vægmontering.
- Bor hullerne og skru
beslagene fast på
væggen ved hjælp af
skruer og rawlplugs
(fig. 3).
- Skyd varmeovnen
korrekt ned på plads i
beslagene (fig. 4).
- Lås varmeovnen fast
ved hjælp af de to
skruer på siderne af
beslagene (fig. 5).
• Bemærk: Af sikkerhedsmæssige hensyn, må
netledningen ikke føres op bag varmeovnen,
når den er monteret på væggen.
Sådan bruges varmeovnen.
- Tænd for apparatet
ved at trykke på 1 eller
2 (fig. 6).
Valg af 2 giver
hurtigere opvarmning.
- Indstil derefter
termostaten ved hjælp
af drejeknappen (F)
(fig. 7).
Stilling 10 =maksimum,
stilling yy= minimum.
Når den ønskede
rumtemperatur er nået,
vil varmeovnen holde
den omgivende luft på
denne temperatur ved
at slå til og fra med
jævne mellemrum. Termostatknappen kan
justeres, medens varmeovnen er tændt.
Sådan findes den rigtige termostatstilling:
- Sæt termostatknappen i stilling 10
(= maksimum).
- Når den ønskede temperatur i rummet er nået,
drejes termostatknappen langsomt tilbage til det
punkt, hvor varmeovnen slukker.
- Kontrollampen lyser, når varmeovnen er sluttet
til lysnettet, og den er tændt på 1 eller 2.
- Kontrollampen bliver
ved med at lyse, indtil
der slukkes for
varmeovnen ved at
trykke på knappen (C)
eller (D), så den går
tilbage til sin oprindelige stilling (fig. 8), eller
til man slukker for
stikkontakten.
- Når kontrollampen
lyser, betyder det, at der stadig er sluttet strøm
til varmeovnen, og at den er tændt (1 eller 2),
også selvom den ønskede rumtemperatur er
nået, og termostaten har slukket for apparatet.
26827
2a
6
2b
7
1
2
3
4
S
E
K
K
E
D
L
I
T
E
K
K
I
Å
M
N
E
N
V
O
S
E
A
R
K
I
C
R
P
Ä
T
O
R
C
E
N
V
O
Ö
N
E
K
C
R
I
E
R
V
Å
O
F
C
T
R
I
O
R
N
V
R
I
O
U
R
D
O
B
C
U
S
C
A
O
P
N
E
N
R
I
R
B
O
C
O
Ã
N
Ä
N
Ä
E
T
I
K
E
K
P
E
A
D
E
A
S
B
I
T
E
E
I
N
N
E
K
C
E
D
HOT
E
B
M
T
E
H
T
C
I
S
N
Y
S
0
0
5
1
5
Page 27

Type HD 3455: “Turbo”-stilling (fig. 9).
Hvis man ønsker
hurtig opvarmning af
rummet, kan man
tænde for blæseren
til den ekstra åbning
for varmeafgivelse
(B2). Kontrollampen
i knappen lyser, når
blæseren er tændt.
Dette sætter fart i
strømmen af opvarmet luft, især hvis man har
valgt stillingen 2.
Husk også at indstille termostatknappen (F) på
den ønskede temperatur.
Frostfri indstilling (fig. 10).
Dette kan være aktuelt,
hvis man f.eks. vil
forhindre, at et vandrør
fryser til.
- Anbring varmeovnen
(stående) tæt på
vandrøret.
- Tænd for
varmeovnen ved
enten at trykke på 1
eller 2 (afhængig af rummets størrelse,
trækforhold i rummet og forventet
minimumstemperatur).
- Drej termostatknappen til stilling yy(minimum
termostatindstilling der giver en temperatur på
ca.5°C). Denne stilling sikrer, at området i
umiddelbar nærhed af varmeovnen holdes
frostfrit.
Overophedningssikring.
For at undgå skader og anden risiko i.f.m.
eventuel overophedning, vil en indbygget overophedningssikring afbryde strømmen til varmeovnen, hvis varmelegemerne bliver for varme.
Hvis dette sker, gøres følgende:
- Kontrollér først, at det ikke er termostaten, der
har slukket for apparatet ved at dreje
termostatknappen til maksimum-stilling. Hvis
varmeovnen ikke tænder, er det sikkerhedsafbryderen, der har slukket for den.
- Tag stikket ud af stikkontakten.
- Lad apparatet køle af i 5 minutter.
- Sæt igen stikket i stikkontakten og tænd for
varmeovnen.
Hvis overophedningssikringen igen afbryder
strømmen til varmeovnen, skal De aflevere den til
eftersyn og eventuel reparation hos Deres
forhandler eller hos Philips.
Rengøring.
- Før rengøring af varmeovnen tages stikket ud
af stikkontakten. Vent derefter til ovnen er kølet
tilstrækkeligt af.
- Apparatet kan rengøres udvendigt med en
fugtig klud. Sørg for at der ikke trænger vand
ind i varmeovnen.
- Åbningen til luftindsugning (A) og, om
nødvendigt, åbningen/åbningerne til
luftafgivelse (B1, B2) kan rengøres med en
støvsuger påsat et lille børstemundstykke.
9
10
Page 28

Generell beskrivelse (fig. 1 på side 3)
A Luftinntak
B Utblåsningsåpning(er)
C Varmebryter 1(“Eco”-moderat), med
indikatorlampe
D Varmebryter 2 (“maksimum”), med
indikatorlampe
E “Turbo” bryter > (bare for Type HD 3455)
For varmluftsvifte, med indikatorlampe
F Termostathjul (for å stille inn en konstant
temperatur)
G Føtter
H Oppbevaringsplass for ledning
I Veggbrakett
Ovnens arbeidsmåte
Varmeelementet i ovnen varmer opp luften inne i
ovnen. Den oppvarmede luften stiger og forlater
ovnen på toppen (B). Samtidig trekkes kald luft
inn fra bunnen (A).
Den innebygde Turbo viften i HD 3455 øker
utblåsningen av varm luft slik at et område kan
varmes opp raskere.
Sikker plassering
• Ovnen må ikke plasseres rett nedenfor et
nettuttak.
• Hvis apparatet tildekkes vil det kunne være en
risiko for brann.
• Plasser apparatet på en slik måte at
luftstrømmen til ovnen og fra den ikke er
hindret.
• Velg et sikkert sted for å unngå elektriske støt
og risiko for brann. Berør bare ovnen med tørre
hender.
• Apparatet kan brukes som en frittstående enhet
ved hjelp av føttene (G). Den kan også
monteres på en (brannsikker) vegg ved hjelp av
veggbrakettene (I). Denne veggen må være
solid, plan og brannsikker.
Viktig
• Kontroller at spenningen på apparatets typeskilt stemmer overens med nettspenningen i
Deres hjem før apparatet tilkobles.
• Les bruksanvisningen nøye sammen med illustrasjonene (side 3) før appparatet tas i bruk.
• Bruk kun ovnen stående eller hengende i vertikal posisjon som vist i fig. 1.
• Bruk ikke ovnen i rom mindre enn 4 m2.
• Bruk ikke apparatet (stående) før de to føttene er montert. Føttene er pakket separat.
• Sørg for at det er tilstrekkelig avstand rundt ovnen. Det frie området må minst være 20 cm på
toppen og på sidene. Hvis apparatet blir brukt hengende på veggen la det også være 15 cm
fritt område under ovnen. Hold alltid luftinntaket og utblåsningsåpningen fri: Heng ikke noe
foran eller over ovnen. Hvis ovnen tildekkes er det en risiko for brann.
• Hold nettledningen på sikker avstand fra luftinntaksåpningen (A) og fra
luftutblåsningsåpningen(e) (B1 og B2).
• Ovnen må ikke plasseres rett nedenfor et nettuttak.
• Plasser ikke ovnen på langflossede tepper.
• Det er mulig spesielt hvis ovnen er innstilt i posisjon 22og annet elektrisk utstyr er slått på,
at sikringen kan gå. Hvis dette skulle skje, er kursen overbelastet. Da må et av apparatene
kobles til en annen kurs (med egen sikring) eller så må den elektriske installasjon
kontrolleres av en autorisert elektriker.
• For Deres og andres sikkerhet: vann og elektrisitet er en farlig kombinasjon! Bruk ikke
apparatet i nærheten av bad, dusj eller svømmebasseng.
• Stikk aldri noen ting inn i ovnen.
Forsikre Dem om at barn ikke kan leke med apparatet.
• Hvis nettledningen til apparatet er ødelagt må den bare erstattes av Philips eller autorisert
servicerepresentant da spesielt verktøy og/eller deler er nødvendig.
Norsk
28
Page 29

Montering av føttene
(fig. 2A)
Monter de to føttene
(G) før ovnen tas i bruk
for første gang.
(monter ikke føttene
hvis De ønsker å la
ovnen henge på
veggen).
- Skyv de to føttene
inn i spesialholderene i pilenes
retning til et
“klikk”høres.
Fjerning av føttene
(for transport,
oppbevaring eller
veggmontering, fig. 2B)
- Trekk tungen oppover
ved hjelp av en tang
samtidig som føttene
skyves ut av holderen.
Veggmontering
- Bore hullene og fest
brakettene til veggen
ved hjelp av skruer og
plugger (fig. 3).
- Skyv apparatet riktig
inn på brakettene
(fig. 4).
- Fest ovnen ved hjelp
av de to skruene på
siden av brakettene
(fig. 5).
NB! Led ikke
nettledningen oppover
på baksiden av den
veggmonterte ovnen.
Betjening
- Slå på apparatet ved å
velge 1 eller 2 (fig.
6). Posisjon 2
resulterer i en raskere
oppvarming.
- Still inn termostaten
ved hjelp av
termostathjulet (F)
(fig. 7) (posisjon
10=maksimum,
posisjon
yy
=minimum).
Deretter vil ovnen
holde luften på innstilt
temperatur ved å slå
ovnen av og på med
jevne mellomrom.
Termostaten kan
forandres under bruk.
For å finne den ideelle termostatinnstilling for
Dem:
- Still først inn hjulet til posisjon 10 (=maksimum).
- Så snart temperaturen er behagelig vri ned
termostatknappen sakte til ovnen slår seg av.
- Når apparatet er tilkoblet nettet og slått på ved
hjelp av bryteren merket 1 eller 2 vil
indikatorlampen lyse.
- Indikatorlampen vil
lyse til apparatet slåes
av ved å trykke bryter
(C) eller (D) tilbake i
original posisjon
(fig. 8) eller ved å
trekke ut ledningen.
- For å vise at ovnen
fortsatt er tilkoblet
strøm og slått på
(1 eller 2) vil indikatorlampen fortsatt lyse selv
om innstilt temperatur er nådd og termostaten
har slått apparatet av.
For Type HD 3455: “Turbo” posisjon (fig. 9).
For å øke temperaturen
raskere kan De slå på
viften ved den ekstra
utblåsningsåpningen
(B2). Indikatorlampen i
bryteren vil tennes.
Viften vil øke strømmen
av oppvarmet luft,
spesielt hvis
varmeinnstilling 2 er
valgt. Glem ikke å sette
29
2a
2b
6
7
1
2
3
8
4
S
E
K
K
E
D
L
I
T
E
K
K
I
Å
M
N
E
N
V
O
S
E
A
R
K
I
C
R
P
Ä
T
O
R
C
E
N
V
O
Ö
N
E
K
C
R
I
E
R
V
Å
O
F
C
T
R
I
O
R
N
V
R
I
O
U
R
D
O
B
C
U
S
C
A
O
P
N
E
N
R
I
R
B
O
C
O
Ã
N
Ä
N
Ä
E
T
I
K
E
K
P
E
A
D
E
A
S
B
I
T
E
E
I
N
N
E
K
C
E
D
HOT
E
B
M
T
E
H
T
C
I
S
N
Y
S
0
0
5
1
5
9
Page 30

30
termostathjulet (F) til ønsket temperatur.
Frostfri innstilling (fig. 10)
Hvis en vannledning må
hindres fra å fryse:
- Plasser ovnen
(stående) nær
vannledningen.
- Slå på ovnen ved å
velge 1 eller 2
(avhengig av størrelsen
på rommet, mulig trekk
og forventet
minimumstemperatur).
- Sett termostathjulet til posisjon yy(med andre
ord minimum termostatinnstilling ca. + 5°C/
+ 41°F). Denne posisjonen kan brukes for å
holde den umiddelbare nærhet av ovnen
frostfri.
Overopphetingssikring
For å hindre skade og risiko på grunn av overoppheting, er det bygget inn en overopphetingssikring som slår av strømmen så snart
varmeelementet blir for varmt. Hvis dette skjer:
- Forsikre Dem om at det ikke er termostaten
som har slått av ovnen. Sett termostaten til
maksimum posisjon. Hvis ovnen ikke slåes på
har overopphetingssikringen blitt aktivisert.
- Trekk støpselet ut fra stikkontakten.
- La ovnen avkjøles i ca. 5 min.
- Sett støpselet i stikkontakten og slå ovnen på
igjen.
Hvis termosikringen aktiviseres igjen:
- Sørg for at ovnen blir kontrollert av Philips eller
Deres forhandler.
Rengjøring
- Før rengjøring trekk støpselet ut av
stikkontakten. Vent til ovnen er tilstrekkelig
avkjølt.
- De kan rengjøre utsiden av ovnen med en
fuktig klut.
Sørg for at det ikke kommer noe vann inn i
ovnen.
- Rengjør luftinntaket (A) og hvis nødvendig også
utblåsningsåpningen(e) (B1, B2) ved hjelp av
en støvsuger med børste.
10
Page 31

31
Konvektorelementets delar
A Luftintag.
B Luftutsläpp.
C Värmeknapp 1 = ekonomiläge med
signallampa.
D Värmeknapp 2 = maximiläge med
signallampa.
E Fläktknapp >, med signallampa för forserad
luftcirkulation. Finns endast på typ HD 3455.
F Termostatratt för inställning av konstant
temperatur.
G Fötter
H Förvaringsutrymme för nätsladden.
I Vägghållare.
Funktion
Värmeslingorna inuti konvektorelementet värmer
luften, som stiger uppåt och strömmar ut genom
luftutsläppet (B1). Den utströmmande luften
ersätts med kall luft, som strömmar in genom
luftintaget (A) nertill.
Typ HD 3455 är försedd med en fläkt, som kan
startas så att luft strömmar ut genom luftutsläppet
B2. På så sätt får luften i rummet snabbare
spridning och jämnare temperatur
Säker uppställning
• Konvektorelementet skall inte placeras
omedelbart under ett vägguttag.
• Konvektorelementet får inte täckas över. Då
kan brandfara uppstå.
• Konvektorelementet får användas endast i
bostadsrum. Det får inte användas i fuktiga rum
t ex i badrum duschrum eller bastu och inte
som kupévärmare i fordon. Under inga
omständigheter får konvektorelementet
placeras så att den kan falla i t ex ett badkar,
tvättfat el dyl.
• Placera konvektorelementet så att inkommande
luft har fritt tillträde till luftintaget (A) och att
luften kan strömma ut fritt från luftutläppet (B).
• Välj en säker plats för att undvika elektriska
Viktigt för säker användning
• Innan du ansluter konvektorelementet till ett vägguttag kontrollera att den spänning (Volt),
som står på konvektorelementets typskylt, stämmer med nätspänningen i ditt hem. Om så
inte är fallet, kontakta inköpsstället.
• Konvektorelementet får användas endast i bostadsrum. Det får inte användas i fuktiga rum t
ex i badrum duschrum eller bastu och inte som kupévärmare i fordon. Under inga
omständigheter får konvektorelementet placeras så att det kan falla i t ex ett badkar, tvättfat
swimming pool el dyl.
• Konvektorelementet får användas endast i upprätt läge stående på sina fötter som fig 1 visar
eller korrekt monterat på vägg.
• Konvektorelementet får inte användas fristående innan fötterna monterats på. Fötterna är
packade separat.
• Det skall vara fritt omkring konvektorelementet. Säkerhetsavståndet är 20 cm fritt utrymme
ovanför och på sidorna. Om konvektorelementet används hängande på vägg skall det fria
utrymmet till golvet vara 20 cm.
• Håll luftöppningarna fria. Häng ingenting omedelbart ovanför eller framför
konvektorelementet. Om konvektorelementet täcks över uppstår brandrisk.
• Led nätsladden på säkert avstånd från luftintaget (A) och från luftutsläppen (B1, B2).
• Ställ inte konvektorelementet på matta med lång lugg.
• Konvektorelementet skall anslutas till vägguttag i det rum där det skall användas.
• Om säkringen löser ut - “proppen går” - kan detta bero på att även någon annan elektrisk
apparat är kopplad till samma propp. Anslut i så fall denna andra apparat till ett vägguttag,
som tillhör en annan propp.
• Stick inte in föremål, framför allt inte metallföremål t ex verktyg i konvektorelementet.
• Se till att inte barn leker med konvektorelementet.
Svenska
Läs först hela bruksanvisningen och studera samtidigt illustrationerna! Spara bruksanvisningen!
Spara köpbevis och kvitto!
Page 32

stötar och risk för brand. Berör
konvektorelementet endast med torra händer.
• Konvektorelementet kan användas fritt stående
på fötterna (G) men även monterat på vägg
med vägghållaren (I). Väggen skall vara slät,
hållfast och brandsäker.
Montera fötterna, fig 2a och 2b
Montera båda fötterna
(G) innan
konvektorelementet
används fristående.
Gör så här:
- Vänd
konvektorelementet
upp och ner.
- Skjut in foten i
hållaren under
konvektorelementet
så att det fäster med
ett “klick”, fig 2a.
Montera den andra foten på samma sätt.
Fötterna kan tas av t ex
om konvektorelementet
skall hängas på vägg
eller vid transport och
förvaring. Gör så här:
- Vänd konvektorelementet upp och
ner.
- Drag upp spärrtungan
med en tång som
fig 2b visar och drag av foten i pilens riktning.
Väggmontage
Fötterna (G) skall inte sitta på om
konvektorelementet skall hänga på vägg.
- Borra hålen och fäst
hållarna i väggen med
hjälp av lämpliga
skruvar och plugg,
fig 3.
- Häng upp
konvektorelementet på
vägghållarna, fig 4. Se
till att det blir korrekt
upphängt.
- Säkra genom att
skruva in skruvarna,
en på vardera sidan,
fig 5.
• OBS! Led inte sladden
uppåt bakom ett på
väggen monterat
konvektorelement.
Användning
- Koppla på värmen
genom att trycka in
värmeknappen 1 (C)
eller 2 (D), fig 6.
Värmeknapparna är
“vipptangenter”. Om
du trycker in
värmeknappen 2,
följer värmeknappen 1
med automatiskt för
maximal värmeeffekt.
- Ställ in önskad
temperatur med
teremostatratten (F),
fig 7.
Läge 10 = maximitemperatur,
läge yy= minimitemperatur.
Konvektorelementet
håller automatiskt
inställd omgivningstemperatur gemom att det
kopplas på och stängs av i intervaller.
Termostaten kan ställas om under användning.
För att hitta önskvärd temperaturinställning, gör så
här:
- Vrid termostatratten till läge 10.
- Så snart du finner rumstemperaturen i rummet
lämplig, vrid termostatratten långsamt mot lägre
siffra precis så långt att ett “knäpp” hörs och
konvektorelementet stängs av.
- Är konvektorelementet anslutet till ett vägguttag
och någon av värmeknapparna är intryckt lyser
motsvarande signallampa.
32
4
S
E
K
K
E
D
L
I
T
E
K
K
I
Å
M
N
E
N
V
O
S
E
A
R
K
I
C
R
P
Ä
T
O
R
C
E
N
V
O
Ö
N
E
K
C
R
I
E
R
V
Å
O
F
C
T
R
I
O
R
N
V
R
I
O
U
R
D
O
B
C
U
S
C
A
O
P
N
E
N
R
I
R
B
O
C
O
Ã
N
Ä
N
Ä
E
T
I
K
E
K
P
E
A
D
E
A
S
B
I
T
E
E
I
N
N
E
K
C
E
D
HOT
E
B
M
T
E
H
T
C
I
S
N
Y
S
0
0
5
1
2a
2b
1
2
3
5
6
7
Page 33

33
Avstängning
- Vippa tillbaka
värmeknapparna (C)
och (D), fig 8.
Typ HD 3455: Start av fläkten, fig 9
Typ HD 3455 är försedd
med en fläkt, som kan
startas så att luft
strömmar ut genom
luftutsläppet B2. På så
sätt får luften i rummet
snabbare spridning och
temperaturen i rummet
blir jämnare, vilket blir
mest påtagligt om
maximiläget valts, d v s värmeknappen 2 (D) är
intryckt.
Kom ihåg att ställa termostatratten i önskat läge.
Antifrostläge, fig 10
Används för att t ex
förhindra att en
vattenledning fryser.
- Ställ konvektorelementet nära
vattenledningen.
- Starta konvektorelementet med ett
tryck på 1 eller 2.
Välj inställning med
hänsyn till rummets storlek, luftväxling och
förväntad lägsta temperatur.
- Ställ termostatratten i läge yy, vilket motsvarar
lägsta temperaturinställning, ca +5°C (+ 41°F).
Denna inställning kan användas för att hålla
temperaturen i konvektorelementets
omedebara närhet frostfri.
Överhettningsskydd
Konvektorelementet är skyddat mot överhettning
med ett överhettningsskydd, som löser ut och
stänger av om värmeslingorna skulle bli för
varma.
Om så sker, gör så här:
- Kontrollera först att det inte var termostaten
som stängt av värmen. Ställ termostatratten (F)
i maximiläge. Om värmeslingorna då inte blir
varma har överhettningsskyddet löst ut.
- Drag ut stickproppen ur vägguttaget.
- Låt konvektorelementet stå och kallna i 5
minuter.
- Kontrollera att konvektorelementet är placerat
på rätt sätt, se avsnittet "Säker uppställning".
- Sätt stickproppen i vägguttaget och koppla på.
Om överhettningsskyddet löser ut på nytt, lämna
in konvektorelementet till av Philips
rekommenderad serviceverkstad.
Rengöring
- Drag först ut stickproppen ur vägguttaget och
vänta tills konvektorelementet kallnat.
- Konvektorelementets utsida kan torkas av med
en väl urvriden fuktig trasa. Se till att inget
vatten kommer in i konvektorelementet.
- Rengör luftintaget och luftutsläppet(-en) med en
dammsugare. Använd dammsugarens
dammborste.
8
9
10
Page 34

34
Laitteen osat (kuva 1, sivu 3)
A Ilmanottoaukko
B Ilmanpoistoaukko (-aukot)
C Lämpökytkin • (“säästö” - keskilämpö),
merkkivalo
D Lämpökytkin •• (maksimi), merkkivalo
E “Turbo”-kytkin > (vain malli HD 3455)
tuulettimelle (kuumaa ilmaa), merkkivalo
F Lämpötilansäädin (termostaatti pitää
lämpötilan tasaisena)
G Jalat
H Johtopesä
I Seinäpidikkeet
Toimintaperiaate
Lämpövastus kuumentaa huonelämmittimen
sisällä olevan ilman. Lämmin ilma nousee ylös
lämmittimestä yläreunan (B1) kautta. Samalla
kylmää ilmaa virtaa tilalle pohjan (A) kautta.
Mallissa HD 3455 oleva tuuletin (B2) nopeuttaa
lämpimän ilman kiertoa, jolloin huone lämpiää
nopeammin.
Asennuspaikka
- Lämmitintä ei saa sijoittaa suoraan pistorasian
alle.
- Jos laite peitetään, se saattaa aiheuttaa
tulipalon.
- Asenna laite siten, ettei mikään estä ilman
virtausta lämmittimeen ja siitä poispäin.
- Valitse sähkö- ja paloturvallisuuden kannalta
sopiva paikka.
Koske laitteeseen vain kuivin käsin.
- Laitetta voidaan käyttää vapaasti seisovana
kiinnittävien jalkojen (G) päällä. Mutta se
voidaan myös kiinnittää (paloturvalliseen!)
seinään pidikkeiden (I) avulla. Seinän tulee olla
tukeva, tasainen ja paloturvallinen.
Tärkeää
• Tarkista, että laitteen arvokilvessä mainittu käyttöjännite vastaa paikallista verkkojännitettä,
ennen kuin yhdistät laitteen sähköverkkoon.
• Lue käyttöohje ja katsele kuvat (sivu 3), ennen kuin otat laitteen käyttöön.
• Käytä laitetta vain pystyasennossa seisomassa tai seinään asennettuna, niin kuin kuvassa 1
näytetään.
•Älä käytä laitetta (pystyssä seisomassa), ennen kuin olet kiinnittänyt molemmat jalat
paikoilleen. Jalat on pakattu erikseen.
• Jätä lämmittimen ympärille riittävästi tilaa. Yläpuolella ja sivuilla tulee olla 20 cm vapaata.
Jos laitetta käytetään seinään kiinnitettynä, jätä myös sen alapuolelle vapaata 15 cm.
• Pidä ilmanotto- ja ilmanpoistoaukot vapaina: älä ripusta mitään laitteen eteen tai päälle.
Peitettynä laite saattaa aiheuttaa tulipalon.
• Pidä liitosjohto riittävän kaukana ilmanotto- (A) ja ilmanpoistoaukoista (B1, B2).
•Älä käytä lämmitintä pitkänukkaisten mattojen päällä.
• On mahdollista, erityisesti jos on valittu asento •• ja käytetään samaan aikaan jotain toista
sähkölaitetta, että sulake palaa. Tämä merkitsee sitä, että sulake tai sähköjohdot eivät kestä
näin suurta kuormitusta.
Tällöin toinen laitteista on kytkettävä toiseen pistorasiaan (toisen sulakkeen piiriin) tai
sähköasentajan on muutettava asennusta.
• Muista, että sähkölaitteet ja vesi ovat vaarallinen yhdistelmä! Noudata tarkoin ohjeita! Älä
käytä lämmitintä kosteassa tilassa (kylpy- tai suihkuhuoneessa).
•Älä työnnä mitään vieraita esineitä lämmittimeen.
Älä anna lasten leikkiä laitteella.
• Varo laitteen kuumaa pintaa (ja laitteesta purkautuvaa kuumaa ilmaa).
• Tarkista liitosjohdon kunto säännöllisesti. Jos tämän laitteen verkkoliitosjohto vaurioituu, se
on korvattava erikoisjohdolla. Ota yhteys lähimpään Philips-myyjään tai Philips-huoltoon.
Suomi
Page 35

Jalkojen kiinnitys
(kuva 2a)
Kiinnitä molemmat jalat
(G), ennen kuin alat
käyttää laitetta.
(Älä kiinnitä jalkoja, jos
aiot asentaa
lämmittimen seinään.)
- Työnnä kumpikin
jalka pitimeen, niin
että ne napsahtavat
paikalleen.
Jalkojen irrotus
(kuljetusta, säilytystä tai
seinään kiinnittämistä
varten, kuva 2b)
- Vedä kielekettä
ylöspäin sopivilla
pihdeillä ja työnnä
jalka samalla ulos
pitimestä.
Seinäkiinnitys
- Poraa reiät ja kiinnitä
pidikkeet seinään
ruuveilla ja
muovitulpilla (kuva 3).
- Työnnä laite
paikalleen pidikkeisiin
(kuva 4).
- Kiinnitä pidikkeiden
sivussa olevalla
kahdella ruuvilla
(kuva 5).
• Huomaa: älä vedä
liitosjohtoa ylöspäin
seinään kiinnitetyn
lämmittimen takana.
Käyttö
- Kytke toiminta
kytkimellä • tai ••
(kuva 6). Asennossa ••
lämpeneminen
tapahtuu nopeammin.
- Aseta termostaatti
kääntämällä säädintä
(F) (kuva 7).
(Asento 10 = maksimi,
asento yy= minimi.)
Lämmitin pitää
ympärillä olevan ilman
asetetun lämpöisenä
kytkemällä ja
katkaisemalla
lämmityksen välillä.
Termostaattia voi säätää laitteen toimiessa.
Termostaatin sopivan asennon löytäminen:
- Aseta säädin ensin asentoon 10 (= maksimi).
- Heti kun lämpötila on sopiva, käännä säädintä
hitaasti takaisin, kunnes lämmittimen toiminta
katkeaa.
- Kun laite liitetään sähköverkkoon ja kytketään
toimintaan kytkimellä • tai ••, merkkivalo syttyy.
- Merkkivalo palaa niin kauan, kunnes toiminta
katkaistaan
palauttamalla kytkin
(C) tai (D) alkuasentoon (kuva 8) tai
irrottamalla liitosjohto
pistorasiasta.
- Merkkivalo jää
palamaan osoittaen
lämmittimen olevan
toiminnassa (• tai ••),
silloin kun asetettu
lämpötila on saavutettu ja termostaatti
katkaisee laitteen toiminnan.
Malli HD 3455: Tuulettimen käyttö (kuva 9)
Jos haluat lämpötilan
nousevan nopeammin,
voit käynnistää toisessa
ilmanpoistoaukossa (B2)
olevan tuulettimen.
Kytkimen merkkivalo
syttyy.
Tuuletin nopeuttaa
lämpimän ilman kiertoa,
varsinkin jos lämmitysasennoksi on valittu ••.
35
2a
2b
6
7
1
2
3
8
4
S
E
K
K
E
D
L
I
T
E
K
K
I
Å
M
N
E
N
V
O
S
E
A
R
K
I
C
R
P
Ä
T
O
R
C
E
N
V
O
Ö
N
E
K
C
R
I
E
R
V
Å
O
F
C
T
R
I
O
R
N
V
R
I
O
U
R
D
O
B
C
U
S
C
A
O
P
N
E
N
R
I
R
B
O
C
O
Ã
N
Ä
N
Ä
E
T
I
K
E
K
P
E
A
D
E
A
S
B
I
T
E
E
I
N
N
E
K
C
E
D
HOT
E
B
M
T
E
H
T
C
I
S
N
Y
S
0
0
5
1
5
9
Page 36

36
Muista myös kääntää lämpötilan säädin (F)
haluamaasi asentoon.
Peruslämpöasento
(kuva 10)
Jos on esim. estettävä
vesiputken jäätyminen:
- Aseta lämmitin
(pystyasennossa!)
vesiputken lähelle;
- Käynnistä lämmitin
kytkimellä • tai ••
(riippuen huoneen
koosta, mahdollisesta vedosta ja halutusta
minimilämpötilasta);
- Käännä lämpötilansäädin asentoon yy(eli
pienimpään asentoon, noin +5°C). Tässä
asennossa lämmittimen ympärillä oleva alue ei
pääse jäätymään.
Lämpötilanrajoitin
Ylikuumenemisen estämiseksi laitteen
sisäänrakennettu lämpötilanrajoitin katkaisee
virran heti kun lämpöelementit kuumenevat liikaa.
Jos näin tapahtuu:
- Varmista ensin, ettei termostaatti ole katkaissut
laitteen toimintaan. Aseta lämpötilanvalitsin
maksimiasentoon. Jos lämmitin ei käynnisty,
lämpötilanrajoitin on kytketty.
- Irrota pistotulppa pistorasiasta.
- Anna lämmittimen jäähtyä 5 minuuttia.
- Yhdistä pistotulppa takaisin pistorasiaan ja
käynnistä lämmitin uudelleen.
Jos lämpötilanrajoitin katkaisee toiminnan
uudelleen:
- Irrota pistotulppa pistorasiasta ja toimita laite
huoltoon tarkistettavaksi.
Puhdistus
- Irrota pistotulppa pistorasiasta. Anna
lämmittimen jäähtyä riittävästi.
- Voit pyyhkiä lämmittimen ulkovaipan kostealla
liinalla. Laitteen sisään ei saa päästä vettä.
- Puhdista ilmanotto- (A) ja ilmanpoistoaukot (B1,
B2) tarvittaessa pölynimurin pienellä harjalla.
Oikeus muutoksiin varataan.
10
Page 37

37
Γενική Περιγραφή (Eικ. 1 σελ. 3)
A Aνοιγµα εισδου αέρα.
B Aνοίγµατα εξδου αέρα.
C ∆ιακπτης θερµοκρασίας 1 («Eco»
moderate) µε ενδεικτικ' λαµπάκι.
D ∆ιακπτης θερµοκρασίας 2 (Mέγιστη) µε
ενδεικτικ' λαµπάκι.
E ∆ιακπτης «Turbo» > (µ'νο για τον τύπο
HD 3455) για πιο γρήγορη έξοδο ζεστού
αέρα, µε ενδεικτικ' λαµπάκι.
F Θερµοστάτης (για σταθερ'τητα της
θερµοκρασίας).
G Bάσεις.
H Aποθήκευση καλωδίου ρεύµατος.
I Bραχίονες για στερέωµα στον τοίχο.
Λειτουργία
Tο θερµαντικ' στοιχείο που βρίσκεται στη
συσκευή ζεσταίνει τον αέρα. O ζεστ'ς αέρας
ανεβαίνει πάνω και βγαίνει απ' το πάνω
µέρος (B1) της συσκευής. Tαυτ'χρονα
ψυχρ'ς αέρας εισέρχεται απ' την είσοδο (A)
στο κάτω µέρος.
O ανεµιστήρας turbo (B2) του αερ'θερµου
HD 3455 επιταχύνει τη ροή του ζεστού αέρα,
έτσι ο χώρος ζεσταίνεται πιο γρήγορα.
ΣHMANTIKO
• Πριν συνδέσετε τη συσκευή µε το ρεύµα βεβαιωθείτε τι η τάση που αναγράφεται στην
πινακίδα µε τα τεχνικά χαρακτηριστικά της συσκευής συµφωνεί µε την τάση της περιοχής
σας.
• Πριν χρησιµοποιήσετε τη συσκευή διαβάστε προσεκτικά τις οδηγίες χρήσεως βλέποντας
συγχρνως και τις αντίστοιχες εικνες στη σελίδα 3.
• Mην χρησιµοποιήσετε τη συσκευή πριν συναρµολογήσετε τις δύο βάσεις. Oι βάσεις είναι
συσκευασµένες χωριστά.
• Tο θερµαντικ σώµα πρέπει να βρίσκεται πάντα σε κάθετη θέση µε το πάτωµα (ρθιο)
(Eικ. 1).
• Aφήστε αρκετ χώρο γύρω απ τη συσκευή.
Aσφαλής απσταση είναι 20 εκ. απ το επάνω µέρος και απ τα πλάγια. Aν
χρησιµοποιήσετε το θερµαντικ σώµα κρεµασµένο στο τοίχο αφήστε 15 εκ. απ το κάτω
µέρος.
Aφήστε ελεύθερα τα ανοίγµατα για τον αέρα και µην κρεµάτε τίποτα µπροστά ή επάνω απ
το θερµαντικ σώµα. Aν καλύψετε το θερµαντικ σώµα υπάρχει κίνδυνος φωτιάς.
• Προσέξτε ώστε το καλώδιο ρεύµατος να βρίσκεται µακριά απ τα ανοίγµατα εισαγωγής και
εξαγωγής αέρος (A) & (B1, B2) αντίστοιχα.
• Mη τοποθετείτε το θερµαντικ σώµα κάτω απ πρίζα τοίχου.
• Mη τοποθετείτε το θερµαντικ σώµα πάνω σε χοντρά χαλιά.
• Iσως συµβεί να πέσει ο γενικς διακπτης ή να καεί η ασφάλεια ταν το κουµπί λειτουργίας
(D) έχει ρυθµιστεί σε υψηλή θερµοκρασία και κάποια άλλη ηλεκτρική συσκευή να
λειτουργεί στο ίδιο κύκλωµα.Tτε συνδέστε τη µία συσκευή σε ένα άλλο κύκλωµα (µε άλλο
διακπτη ή ασφάλεια) ή καλέστε κάποιο ηλεκτρολγο να ελέγξει το κύκλωµα.
Για την δική σας ασφάλεια και των άλλων: Tο νερ και ο ηλεκτρισµς αποτελούν
επικίνδυνο συνδυασµ.
• Aποφεύγετε να έχετε το θερµαντικ σώµα ταν λειτουργεί κοντά σε νερ (πως βρύσες,
µπάνιο κτλ).
• Mη βάζετε ή αφήνετε να πέσουν αντικείµενα µέσα στη συσκευή και αποµακρύνετε τα
παιδιά απ αυτή ταν λειτουργεί.
• Aν το καλώδιο ρεύµατος του αερθερµου υποστεί βλάβη πρέπει να αντικατασταθεί απ
την Φίλιπς ή απ εξουσιοδοτηµένο αντιπρσωπο διτι χρειάζονται ειδικά εργαλεία και/ή
ανταλλακτικά.
EΛΛHNIKA
Page 38

Aσφαλής τοποθέτηση της συσκευής.
• Mη τοποθετείσετε τη συσκευή κάτω απ'
πρίζα ρεύµατος.
• Aν σκεπάσετε τη συσκευή υπάρχει
κίνδυνος φωτιάς.
• Tοποθετείστε τη συσκευή κατά τέτοιο
τρ'πο ούτως ώστε να µη παρεµποδίζεται η
ροή του αέρα προς και απ' τη συσκευή.
• ∆ιαλέξτε ένα ασφαλές µέρος ούτως ώστε
να µην υπάρχει κίνδυνος ηλεκτροπληξίας
και φωτιάς. Oταν αγγίζετε τη συσκευή τα
χέρια σας πρέπει να είναι στεγνά.
• H συσκευή µπορεί να χρησιµοποιηθεί µ'νη
της σαν ανεξάρτητη µονάδα,
στερεώνοντας τις βάσεις (G). Oµως µπορεί
να στερεωθεί σε τοίχο χρησιµοποιώντας
τους βραχίονες (I). O τοίχος πρέπει να
είναι στερε'ς, επίπεδος και να µην έχει
εύφλεκτα υλικά.
Πως θα στερεώσετε τις βάσεις (Eικ. 2 a)
Στερεώστε τις δύο
βάσεις (G) πριν
χρησιµοποήσετε τη
συσκευή για πρώτη
φορά. (Mη
τοποθετήσετε τις
βάσεις αν θέλετε να
χρησιµοποιήτε τη
συσκευή
στερεώνοντάς την
στον τοίχο.)
– Bάλτε τις δύο
βάσεις στις ειδικές
υποδοχές µέχρι να ακούσετε ένα «KΛIK».
Πως θα βγάλετε τις βάσεις.
(Για την µεταφορά, αποθήκευση ή
τοποθέτηση της συσκευής στο τοίχο εικ. 2 b).
– Tραβήξτε µε µία
τσιµπίδα το πτερύγιο
προς τα πάνω
σύροντας
συγχρ'νως τη βάση
απ' την υποδοχή.
Πως θα στερεώσετε τη συσκευή στον τοίχο
– Aνοίξτε τις τρύπες
και στερεώστε τα
ελάσµατα στον
τοίχο.
Xρησιµοποιώντας
βίδες και ούπα
(Eικ. 3).
– Tοποθετείστε τη
συσκευή σωστά στα
ελάσµατα (Eικ. 4).
– Aσφαλίστε την µε
τις δύο βίδες στις
πλευρές των
ελασµάτων (Eικ. 5).
Σηµείωση: Mη
κατευθύνετε το
καλώδιο ρεύµατος
προς τα πάνω στη πίσω
πλευρά της συσκευής
αν την έχετε
στερεώσει στον τοίχο.
Λειτουργία
– Θέστε σε
λειτουργία το
θερµαντικ' σώµα
επιλέγοντας 1 ή 2
(Eικ. 6). H θέση 2
είναι για πιο
γρήγορο ζέσταµα.
– Mετά ρυθµίστε τη
θερµοκρασία µε τον
θερµοστάτη (F)
(Eικ. 7).
(Θέση 10 = µέγιστη
θερµοκρασία θέση yy= ελάχιστη θερµοκρασία).
38
2a
3
4
S
E
K
K
E
D
L
I
T
E
K
K
I
Å
M
N
E
N
V
O
S
E
A
R
K
I
C
R
P
Ä
T
O
R
C
E
N
V
O
Ö
N
E
K
C
R
I
E
R
V
Å
O
F
C
T
R
I
O
R
N
V
R
I
O
U
R
D
O
B
C
U
S
C
A
O
P
N
E
N
R
I
R
B
O
C
O
Ã
N
Ä
N
Ä
E
T
I
K
E
K
P
E
A
D
E
A
S
B
I
T
E
E
I
N
N
E
K
C
E
D
HOT
E
B
M
T
E
H
T
C
I
S
N
Y
S
0
0
5
1
5
6
2b
1
2
7
Page 39

39
Tο θερµαντικ' σώµα θα διατηρεί το χώρο
γύρω ζεστ' στη θερµοκρασία που το
ρυθµίσατε, ενώ θα ανάβει και θα σβήνει µ'νο
του κατά διαστήµατα καθώς θα χαµηλώνει η
θερµοκρασία. Mπορείτε να ρυθµίζετε τη
θερµοκρασία κατά τη λειτουργία του.
O καλύτερος τρ'πος για να βρείτε τη
κατάλληλη θερµοκρασία είναι ο ακ'λουθος:
– Πρώτα ρυθµίστε τον θερµοστάτη στη θέση
10 (= µέγιστη).
– Oταν η θερµοκρασία γύρω σας θα είναι
ευχάριστη, χαµηλώστε τον θερµοστάτη
µέχρις 'του σβήσει το θερµαντικ' σώµα.
– Oταν συνδέσετε το θερµαντικ' σώµα στο
ρεύµα και το βάλετε σε λειτουργία
επιλέγοντας τη θέση 1 ή 2 το ενδεικτικ'
λαµπάκι θ’ ανάψει.
Tο λαµπάκι θα
παραµείνει
αναµµένο µέχρι να
σβήσετε το
αερ'θερµο βάζονται
τον διακ'πτη (C) ή
(D) στην αρχική του
θέση (Eικ. 8) ή
αποσυνδέοντάς το
απ' το ρεύµα.
Για να φαίνεται 'τι το θερµαντικ' σώµα
είναι ακ'µη συνδεδεµένο στο ρεύµα και
«σε λειτουργία», θέση 1 ή 2, το ενδεικτικ'
λαµπάκι θα παραµείνει αναµµένο 'ταν το
θερµαντικ' σώµα φθάσει την θερµοκρασία
που το ρυθµίσατε και ο θερµοστάτης το
θέσει εκτ'ς λειτουργίας.
Tύπος HD 3455: Θέση «Turbo» (Eικ. 9)
Για να θερµάνετε τον
χώρο πιο γρήγορα,
θέστε σε λειτουργία
τον ανεµιστήρα στο
επιπρ'σθετο άνοιγµα
εξ'δου του αέρα (B2).
Tο ενδεικτικ' λαµπάκι
στο θερµαντικ' σώµα
θα ανάψει.
O ανεµιστήρας θα
επιταχύνει τη ροή του ζεστού αέρα, κυρίως αν
επιλέξετε τη ρύθµιση 2 Mη ξεχνάτε να
ρυθµίζετε πάντα το θερµοστάτη (F) στη
σωστή θερµοκρασία
Aντιψυκτική ρύθµιση (Eικ. 10).
Π.χ. Θέλετε να
προστατεύσετε ένα
σωλήνα νερού απ' το
πάγωµα.
– Bάλτε το
αερ'θερµο ('ρθιο)
κοντά στο σωλήνα.
– Πιέστε 1 ή 2
(ανάλογα µε το
µέγεθος του δωµατίου, το ρεύµα αέρα που
µπορεί να υπάρχει ή την επιθυµητή
χαµηλ'τερη θερµοκρασία.
– Bάλτε το θερµοστάτη στη θέση
yy
(περίπου + 5° C/+ 41° F) Aυτή η θέση
προφυλάσσει απ' το πάγωµα.
Aσφάλεια προστασίας της συσκευής απ
υπερθέρµανση.
Για την αποφυγή βλάβη και κινδύνων λ'γω
υπερθέρµανσης η εσωτερική ασφάλεια
διακ'πτει την τροφοδοσία της συσκευής 'ταν
υπερθερµανθούν τα θερµαντικά στοιχεία.
Σε περίπτωση υπερθέρµανσης:
– Bεβαιωθείτε πρώτα 'τι η συσκευ ή δεν
τέθηκε εκτ'ς λειτουργίας απ' τον
θερµοστάτη. Pυθµίστε τον θερµοστάτη στη
µέγιστη θερµοκρασία. Aν η συσκευή δεν
τεθεί σε λειτουργία, η εσωτερική ασφάλεια
έχει ενεργοποιηθεί.
– Bγάλτε το φις απ' τη πρίζα του τοίχου.
– Aφήστε τη συσκευή να κρυώσει για 5 λεπτά.
– Bάλτε το φις στη πρίζα του τοίχου και
θέστε πάλι τη συσκευή σε λειτουργία.
Aν η ασφάλεια θέσει πάλι τη συσκευή εκτ'ς
λειτουργίας η συσκευή πρέπει να ελεγχεί
απ' το SERVICE η αντιπρ'σωπο της Φίλιπς.
Kαθαρισµς της συσκευής
– Πριν καθαρίσετε τη συσκευή βγάλτε το φις
απ' τη πρίζα και περιµένετε να κρυώσει η
συσκευή τελείως.
– Mπορείτε να καθαρίσετε το εξωτερικ' της
συσκευής µε ένα υγρ' πανί, προσέχοντας
να µη πέσει νερ' µέσα στη συσκευή.
– Kαθαρίστε τα ανοίγµατα είσοδου (A) και
εξ'δου του αέρα (B1, B2) µε την ηλεκτρική
σας σκούπα χρησιµοποιώντας το λεπτ'
ρύγχος.
10
8
9
Page 40

4222 000 91675
;
 Loading...