

HC 8520
Instructions for use
English 3
Mode d'emploi
Français 15
Instrucciones de manejo
Español 27
Need help? Call us!
Philips representatives are ready to help you with
any questions about your new product. We can guide you
If you have any problems, Philips Representatives can
through Connections, First-time Setup, or any of the Features.
We want you to start enjoying your new product right away!
CALL US BEFORE YOU CONSIDER
RETURNING THE PRODUCT!
1-800-531-0039
or
Visit us on the web at www.philips.com
S
E
E
W
H
Y
I
N
S
I
D
E
I
M
P
O
R
T
A
N
T
!
Return
your Warranty
Registration Card
within 10 days
A
B
3
IMPORTANT SAFETY INSTRUCTIONS
Clean onl
Do not use this apparatus near water.
y with a piece of dry cloth.
materials
The socket-outlet
shall be installed near the equipment and
shall be easily accessible.
Hearing Safety!
Continuous use at high volume may
permanently damage your hearing.

This warranty gives you specific legal rights.You may have other rights which vary from state/province to state/province.
EL6584E001 / 01-04
Six (6) Months Labor and Parts Repair (Facility)
PHILIPS LIMITED WARRANTY
PHILIPS CONSUMER ELECTRONICS warrants this
product against defect in material or workmanship, subject to
any conditions set forth as follows:
PROOF OF PURCHASE:
You must have proof of the date of purchase to receive
warranted repair on the product.A sales receipt or other
document showing the product and the date that you
purchased the product, as well as the authorized retailer
included, is considered such proof.
COVERAGE:
(If this product is determined to be defective)
LABOR: For a period of six (6) months from the date of
purchase, Philips will repair or replace the product, at its
option, at no charge, or pay the labor charges to the Philips
authorized repair facility (see warranty service phone
numbers in next column).After the period of six (6) months,
Philips will no longer be responsible for charges incurred.
PARTS: For a period of six (6) months from the date of
purchase, Philips will supply, at no charge, new or rebuilt
replacement parts in exchange for defective parts. Philips
authorized repair facility will provide removal and installation
of the part under the specified labor warranty.
EXCLUDED FROM WARRANTY COVERAGE
Your warranty does not cover:
• Labor charges for installation or setup of the product,
adjustment of customer controls on the product, and
installation or repair of antenna systems outside of the
product.
• Product repair and/or part replacement because of
improper installation, connections to improper voltage
supply, abuse, neglect, misuse, accident, unauthorized
repair or other cause not within the control of Philips.
• A product that requires modification or adaptation to
enable it to operate in any country other than the
country for which it was designed, manufactured,
approved and/or authorized, or repair of products
damaged by these modifications.
• Damage occurring to product during shipping when
improperly packaged or cost associated with packaging.
• Product lost in shipment and no signature verification of
receipt can be provided.
• A product used for commercial or institutional purposes
(including but not limited to rental purposes).
• Products sold AS IS or RENEWED.
SHIP-IN WARRANTY
For Ship-In warranty repair, ship the product to a Philips
authorized service facility for repair in its original carton and
packing material. If you do not have the original carton or
packing material, have your product professionally packed for
shipping. Ship product via a traceable carrier.When it is
necessary for you to ship the product to Philips for repair,
you will pay the shipping cost for shipment to Philips.Philips
will pay the shipping costs when returning the product to you.
TO OBTAIN WARRANTY SERVICE IN THE U.S.A.,
PUERTO RICO, OR U.S.VIRGIN ISLANDS…
Contact Philips Customer Care Center at:
1-800-531-0039
TO OBTAIN WARRANTY SERVICE IN CANADA…
1-800-661-6162 (French Speaking)
1-800-531-0039 (English or Spanish Speaking)
REPAIR OR REPLACEMENT AS PROVIDED UNDER THIS
WARRANTY IS THE EXCLUSIVE REMEDY FOR THE
CONSUMER. PHILIPS SHALL NOT BE LIABLE FOR ANY
INCIDENTAL OR CONSEQUENTIAL DAMAGES FOR
BREACH OF ANY EXPRESS OR IMPLIED WARRANTY ON
THIS PRODUCT. EXCEPT TO THE EXTENT PROHIBITED
BY APPLICABLE LAW,ANY IMPLIED WARRANTY OF
MERCHANTABILITY OR FITNESS FOR A PARTICULAR
PURPOSE ON THIS PRODUCT IS LIMITED IN DURATION
TOTHE DURATION OF THIS WARRANTY.
Some states do not allow the exclusions or limitation of
incidental or consequential damages, or allow limitations on
how long an implied warranty lasts, so the above limitations
or exclusions may not apply to you. In addition, if you enter
into a service contract agreement with the PHILIPS
partnership within ninety (90) days of the date of sale, the
limitation on how long an implied warranty lasts does not
apply.
Philips, P.O. Box 520890, Miami, FL 33152 (402) 536-4171
5

6 ENGLISH
Index
Important Safety Instructions ................................................................................................3
Warranty Card ................................................................................................................................4
Limited Warranty ...........................................................................................................................5
Functional overview .....................................................................................................................6
Safety precautions .........................................................................................................................7
System compatibility ....................................................................................................................7
Using your FM wireless headphone system .........................................................8-10
Problem Solving ....................................................................................................................10-12
Technical Specification .............................................................................................................12
Extra Information ........................................................................................................................13
FM Wireless Headphone System
SBC HC8520
Congratulations! You have just bought one of the most sophisticated
FM wireless headphone system.
This system implements the latest FM wireless technology, which offers you
complete freedom of movement while enjoying your favourite movie or
music.With energizing docking station, your headphone can be recharged in
ease while it is not in use.This allows your headphone to be fully charged
and always be ready for use whenever you need to enjoy a movie.
To ensure you achieve the best performance from your FM wireless
headphone system, please read this manual carefully and keep it for future
reference.
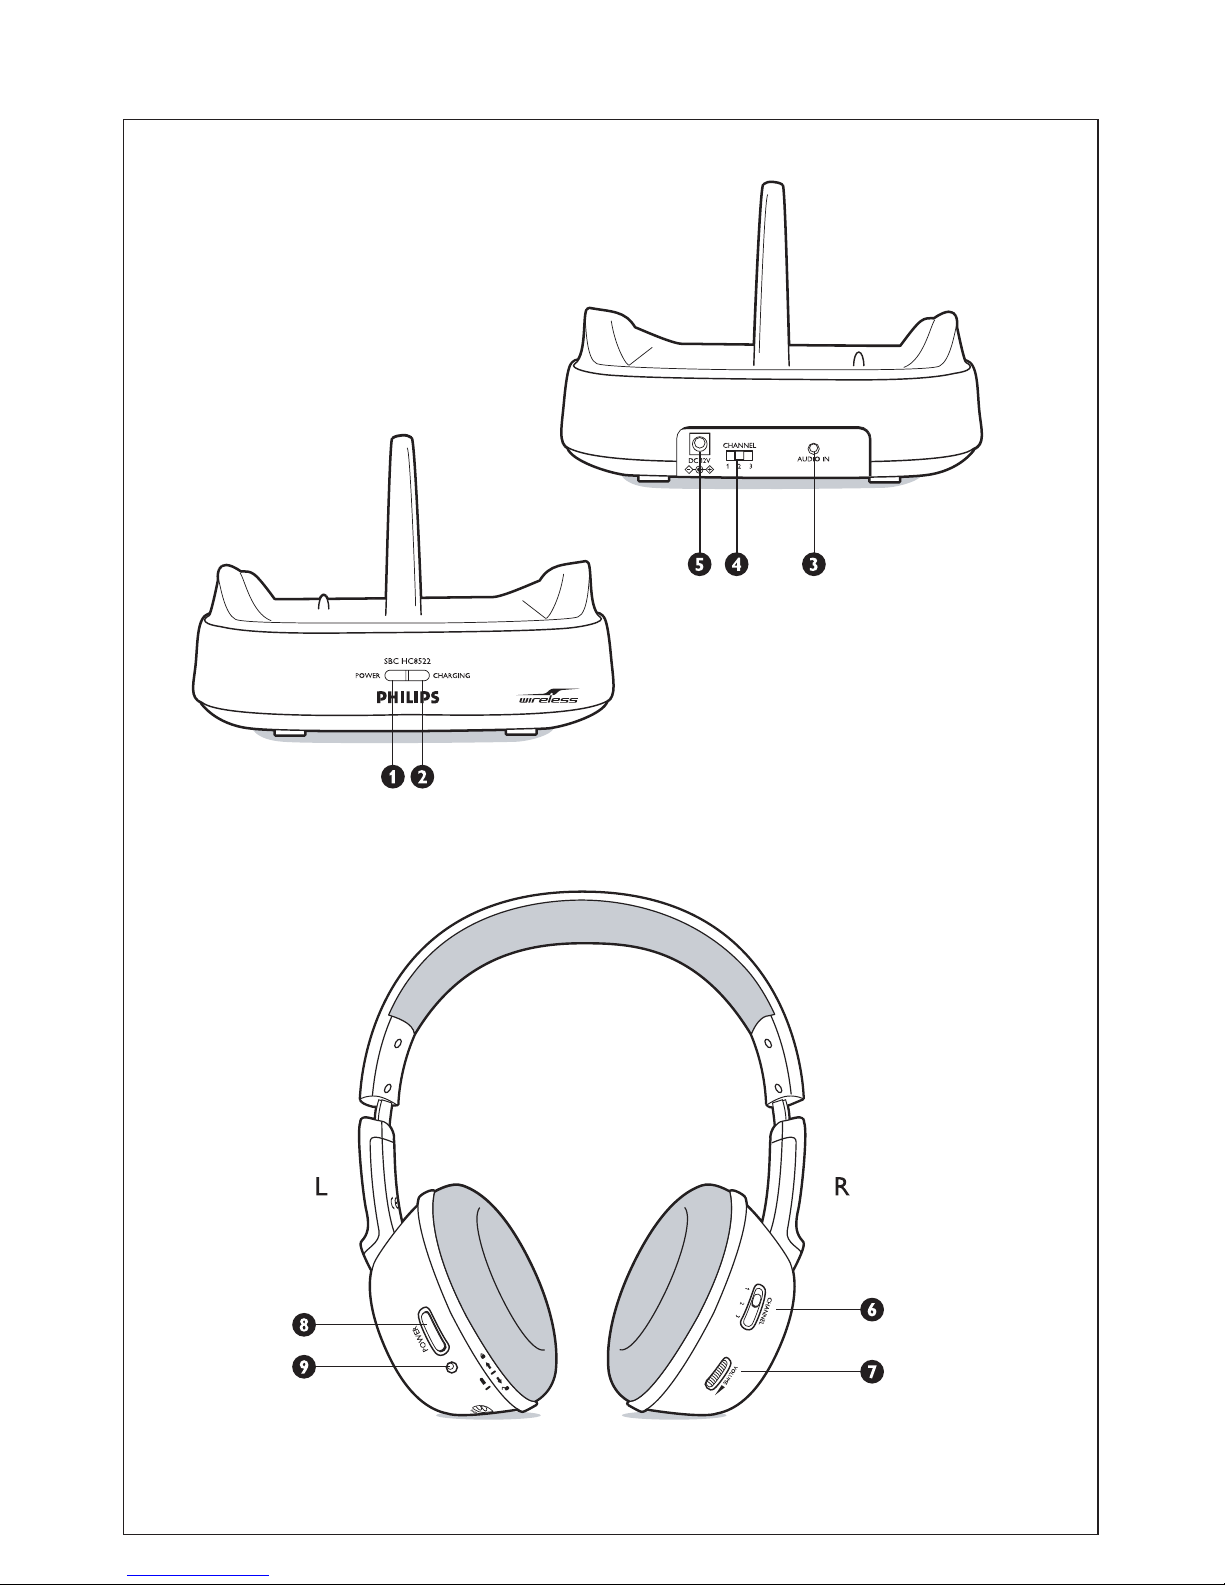
Functional overview Product illustrations on inside flap
A) Transmitter
1 Power on/off indicator
2 Charging indicator
3 3.5 mm stereo input jack
4 Channel switch
5 DC power input jack
B) Receiver
6 Manual tuning switch
7 Volume control
8 Power on/off button
9 Power on/off indicator/ low battery indicator

ENGLISH 7
Important information
• All redundant packing material has been omitted.
We have done our best to make the packaging easily separable into two
materials: cardboard and polyethylene.
• Your unit consists of materials which can be recycled if disassembled by
a specialized company.
Please observe the local regulations regarding the disposal of packing
materials, exhausted batteries and old equipment.
• This equipment has been tested and found to comply with the limits for
a Class B digital device, pursuant to Part 15 of the FCC Rules.These
limits are designed to provide reasonable protection against harmful
interference in a residential installation.This equipment generates, uses
and can radiate radio frequency energy and, if not installed and used in
accordance with the instructions, may cause harmful interference to
radio communications. However, there is no guarantee that interference
will not occur in a particular installation.
If this equipment does cause harmful interference to radio or television
reception, which can be determined by turning the equipment off and
on, the user is encouraged to try to correct the interference by one or
more of the following measures:
– Reorient or relocate the receiving antenna.
– Increase the separation between the equipment and receiver.
– Connect the equipment into an outlet on a circuit different from that
to which the receiver is connected.
– Consult the dealer or an experienced radio/TV technician for help.
• Use of controls or adjustments or performance of procedures other
than herein may result in hazardous radiation exposure or other unsafe
operation.
System compatibility
It is technically possible to use an additional number of FM wireless
headphones or Philips FM wireless speakers with a single transmitter if
they all*:
– operate in the 914 MHz band
– work according to the same modulation scheme
– can detect a 19kHz pilot tone
Please consult the appliance’s electrical specification sheets for
confirmation on compatibility.
This statement is to be interpreted from a technical point of view
only and does therefore not constitute any guarantee nor obligation
whatsoever regarding the commercial availability of single
FM wireless headphones /speakers compatible with SBC HC8522.
8 ENGLISH
Using your FM wireless headphone system
IMPORTANT!
• Use only Philips SBC CS030/33
12V/200mA AC/DC adapter.
• Use only Philips’ shortened sleeve rechargeable batteries NiMH
(R03/AAA, type number: SBC HB550S, partnumber 996500015757).
• Do not use NiCd batteries or alkaline batteries as they may
damage your FM wireless headphone system.
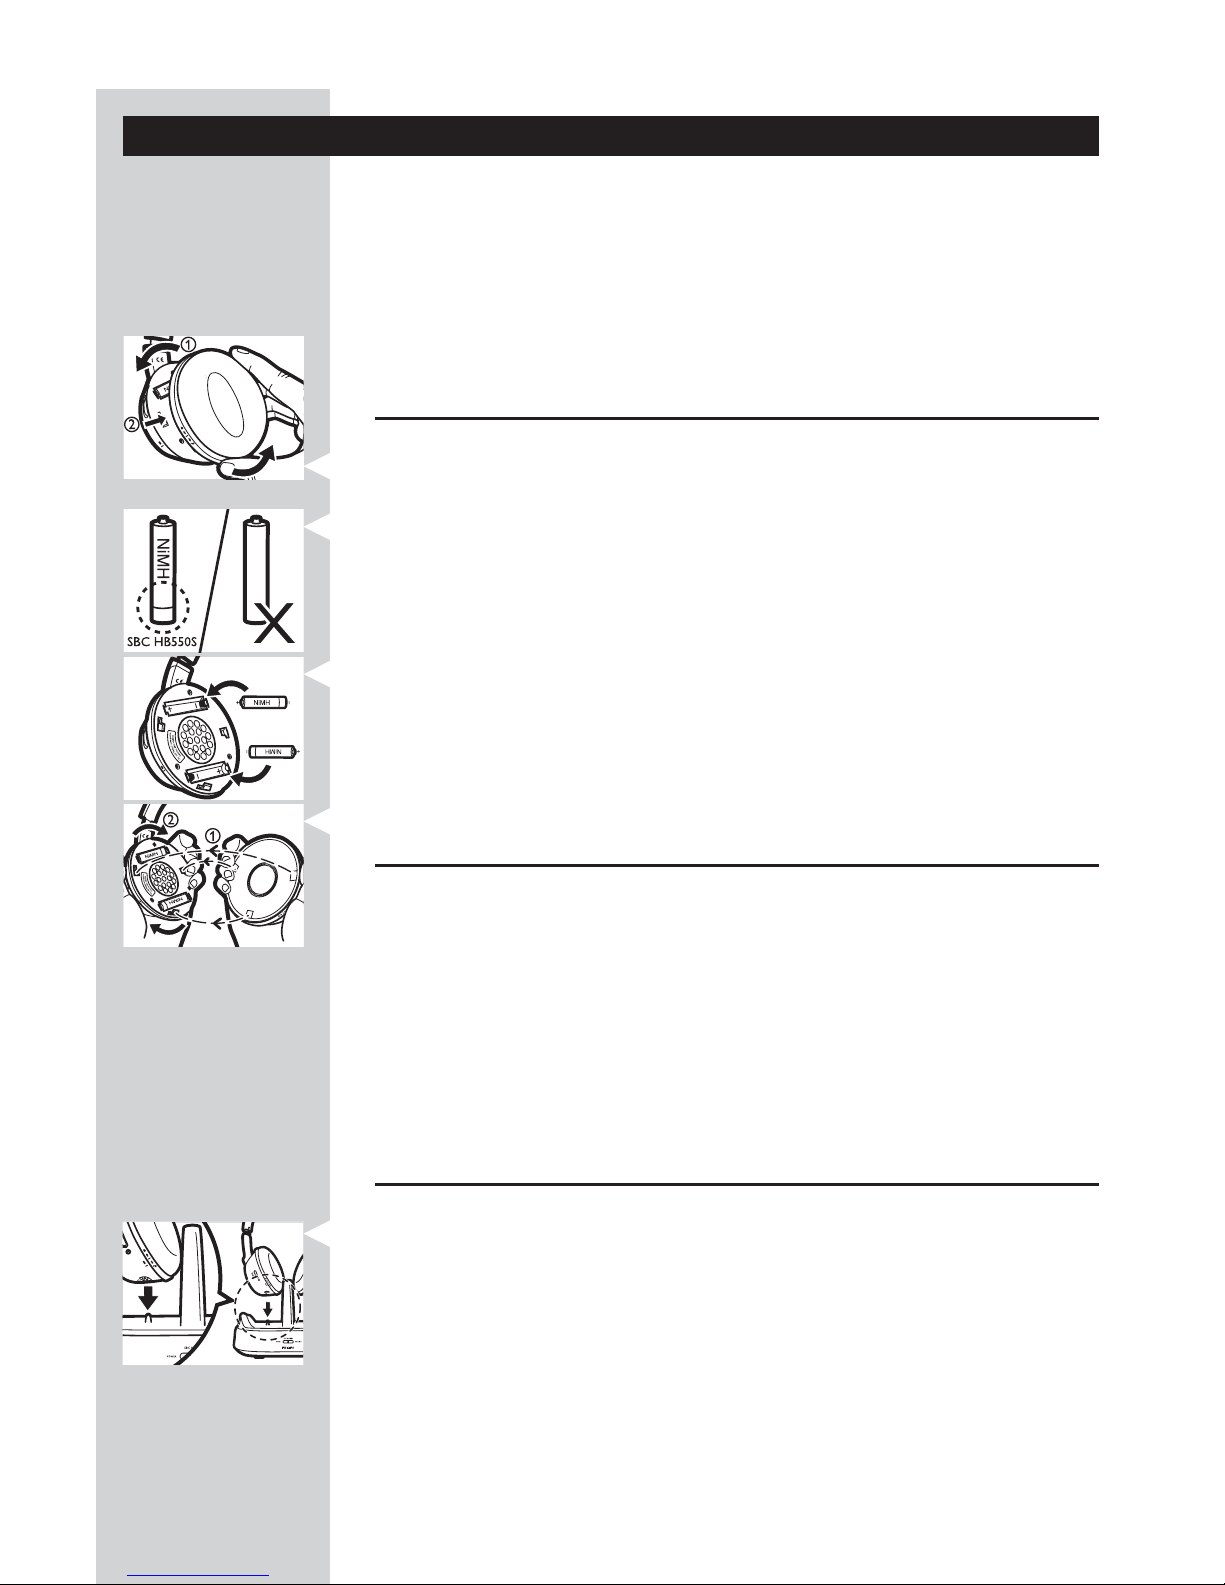
Installing/replacing batteries
1 Unscrew and remove the left ear cushion of the headphone.
2 Insert the rechargeable batteries into the battery compartment.
Use only Philips’ shortened sleeve rechargeable batteries NiMH
(R03/AAA, type number: SBC HB550S, partnumber 996500015757).
3 Make sure the batteries are correctly inserted as indicated by the
engraved polarity symbol in the battery compartment.
Always remove the batteries from the headphone if the system will not be
used for a long period of time.
4 Put the left ear cushion back into place.
Setting up the transmitter
5 Make sure the adapter’s rated voltage indicated on the type plate
corresponds to the mains voltage supply.
6 Connect the DC power output connector of the 12 Volt/ 200mA AC/DC
adapter to the DC POWER INPUT JACK at the back of the transmitter.
7 Connect the 12 Volt/200mA AC/DC adapter to the mains socket.
Always remove the adapter from the mains socket if the transmitter will not
be used for a period of time.
Charging the headphone
8 Place the headphone onto the energizing docking station, and make sure
the charging pins of the transmitter and the charging contact of the
headphone are well aligned.
The CHARGING INDICATOR light will be on automatically indicating
charging is taking place. At the same time, the headphone will power off
automatically (i.e. POWER ON/OFF INDICATOR lights off).
When charging is finished (which takes approximately 16 hours), the green
CHARGING INDICATOR light will also be off automatically.
IMPORTANT!
• The energizing docking station does not transmit audio signal
when charging is activated.
WARNING!
• Before using the FM headphone for the first time, please ensure
that the batteries are fully charged for at least 16 hours.
This will guarantee a longer operating lifetime of batteries.
• This product complies with the latest safety regulations.
Please only charge the batteries with the docking station provided
(SBC HC8522) or with fully compatible charger.
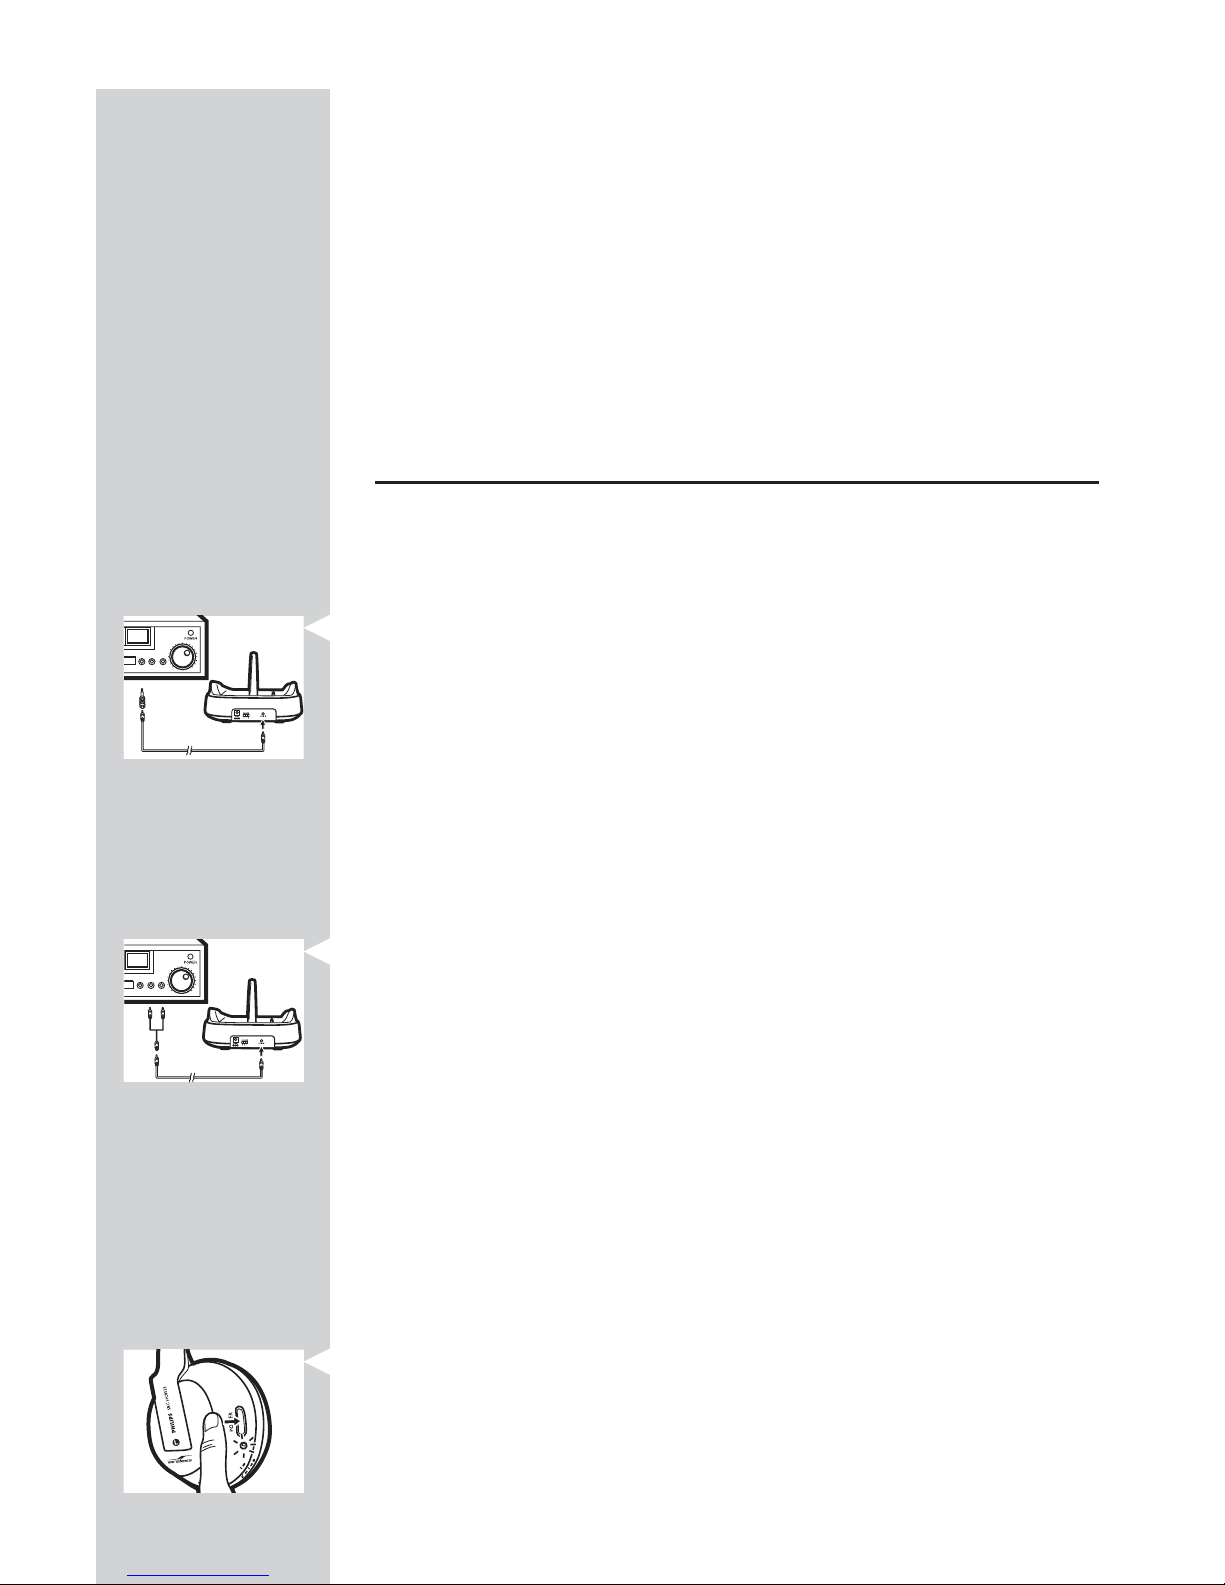
Audio Connection
9 Connect one end of the audio cable (3.5 mm stereo plug) to the
transmitter’s 3.5 mm STEREO INPUT JACK.
10 Connect the other end of the 3.5 mm stereo cable to either:
a) The headphone output of an audio source, such as TV, HiFi or PC.
Adjust the volume level of the audio source to a fixed reasonably high level;
for example 25% of the maximum level.
• In case your audio source has a 6.3mm headphone output, use the
supplied 3.5mm to 6.3mm stereo adapter plug.
IMPORTANT!
• In case of certain TVs, the headphone jack output level can only
be adjusted after accessing the TV on-screen menu.
b) The line output of an audio source, such as REC OUT or LINE OUT
(with the Y-cable supplied).
• Check if the red RCA plug (right channel) is connected to the right
channel (red) of the audio source.
• Check if the white RCA plug (left channel) is connected to the left
channel (white) of the audio source.
• In case the audio source has an adjustable RCA output level,
adjust the output level to the highest acceptable undistorted level.
11 Switch on your audio source and carefully increase the volume of the
audio source.
The POWER ON/OFF INDICATOR of the transmitter lights up when
signals are received.
12 Switch on the POWER ON/OFF button of the headphone.
The POWER ON/OFF INDICATOR will be switched on automatically.
ENGLISH 9

10 ENGLISH
13 Press and hold the AUTO-TUNING BUTTON on the headphone for
about 1 second to tune to the correct transmission channel.
The headphone will automatically tune to the transmitter.
14 In case interference from neighbouring transmitters has occured, adjust
the transmission channel of the transmitter, then repeat step 13 to tune
the headphone to the transmitter.
15 Adjust the volume of the headphone to the desired listening level.
IMPORTANT!
• Avoid adjusting the listening volume level at the audio source as
this may compromise the audio quality on too low input levels.
Problem solving
If a fault occurs, first check the points listed below. If you are unable to
remedy a problem by following these hints, contact the helpline
(see ‘Need help?’) or consult your dealer.
Never try to open the set yourself as this will void the guarantee.
First, check all cables to ensure that they are connected correctly.
Problem Possible Cause Solution
Headphone fails No battery installed Follow step 1 to 4 of
to charge ‘Installing/replacing the batteries’
Wrong battery orientation Reposition the batteries according to
the engraved polarity symbol.
No power supply Make sure the docking station is
connected to the local mains power
supply through an adapter and follow
steps 5 to 7.
Charging pin of the docking station Lock the headphone in place, and
not in contact with the metal make sure the CHARGE
plate of the headphone INDICATOR light is on.
Wrong headphone orientation Reposition the headphone with
when placed onto the charging correct orientation.
dock
No sound/ Headphone power off Push the POWER ON/OFF
distorted sound BUTTON. The POWER ON/OFF
INDICATOR light turns on automatically
indicating the headphone is on.
No battery installed Follow step 1 to 4 of
‘Installing/replacing the batteries’

Wrong battery orientation Reposition the batteries according to
the engraved polarity symbol.
No power supply to transmitter Make sure the docking station is
connected to the local mains power
supply through an adapter and follow
step 5 to 7.
Battery power running low Follow steps 5 to 7 to recharge the
system.
Audio source not connected Make sure the audio output of your
audio source is connected to the
3.5 mm STEREO INPUT JACK of
your transmitter. Follow step 9 to 12.
Audio source is off Turn on your audio source.
Volume level set too low Adjust the volume level of your
audio source or the headphone.
Hearing Safety: Continuous use at a
high volume may permanently damage
your hearing.
Audio output level low In case of audio sources with
adjustable output level, adjust the
output level to a higher and
non-distorted level.
IMPORTANT: In case of certain TVs,
the headphone jack output level can
only be adjusted after accessing the TV
on-screen menu.
Headphone not tuned to Push and hold the AUTO-TUNING
the transmitter BUTTON for about 1 sec, then the
headphone will automatically search
for the best possible reception.
Interference from other 1) Alter the transmitter’s frequency
radio sources channel. Select 1 of the 3 options for
best reception.We advise you to
select channel 1 as the first option.
Next adjust the headphone’s tuning
channel as described above.
2) Move transmitter or headphone
elsewhere
Receiver too far away from Move closer for reception
transmitter
Transmitter other than Make use of the SBC HC8522
SBC HC8522 is used transmitter provided. Some
transmitters already built into other
equipment may not be compatible
with the SBC HC8525 headphone
because of the advanced
technologies used.
ENGLISH 11

12 ENGLISH
No sound The energizing docking station If you want to enjoy music with
(multiple does not transmit audio signal other Philips wireless headphones or
headphones or when charging is taking place. speakers which is compatible with
Philips wireless Therefore other Philips the SBC HC8522 docking station,
speaker) headphones or wireless speaker be sure to remove the SBC HC8525
cannot receive any signal, headphone from the docking station.
even if they are compatible with
the SBC HC8522 docking station.
Technical specifications*
Transmitter System: Radio Frequency (RF)
Modulation: Frequency Modulation (FM)
Pilot Tone: 19kHz
Carrier Frequency: (/33) Channel 1: 914MHz
Channel 2: 914.5MHz
Channel 3: 915MHz
Radiated Output Power <10mW
Effective Transmission Range Up to 150 feet **,
omni directional (360°)
Input Level: 500 mV
Power supply: 12 Volts/ 200mA DC, center positive;
type number: SBC CS030/33
Headphone Reception Frequency: (/33) 914MHz – 915MHz
S/N ratio: > 70dB (1kHz sine wave,A-weighted)
Distortion: 2% THD
Channel Separation: 30 dB
Audio frequency range: 20-20,000 Hz
Power Supply: 2 x R03/AAA rechargeable batteries
(Philips, NiMH, type number:
SBC HB550S, partnumber
996500015757)
Battery Life Time: ~ 15 hours
*) All specifications are subject to change
**) Depending on ambient conditions

• This device complies with Part 15 of the FCC Rules and with RSS-210
of Industry Canada.
Operation is subject to the following two conditions:
1) this device may not cause harmful interference, and
2) this device must accept any interference received, including
interference that may cause undesired operation.
Warning: Changes or modifications made to this equipment not expressly
approved by Philips may void the FCC authorization to operate
this equipment.
CAUTION: RISK OF EXPLOSION IF BATTERY IS REPLACED BY AN
INCORRECT TYPE. DISPOSE OF USED BATTERIES
ACCORDING TO THE INSTRUCTIONS.
ENGLISH 13

CONSIGNES DE SÉCURITÉ IMPORTANTES
15
La prise de courant doit être située près
de l'équipement et être facile d'accès.
Sécurité d’écoute!
Une utilisation continue à volume élevé
peut endommager votre ouïe de façon
permanente.


Cette garantie vous donne des droits légaux spécifiques.
Il est possible que vous bénéficiiez de droits supplémentaires variant d’un état/province à l’autre.
EL6584F001 / 01-04
Six (6) mois sur la main d’oeuvre et la réparation des pièces (Centre de service)
GARANTIE LIMITÉE PHILIPS
PHILIPS CONSUMER ELECTRONICS garantit ce
produit contre tout défaut de matière ou de main d’œuvre,
sous réserve de toutes les conditions énoncées, comme suit:
PREUVE D’ACHAT:
Vous devez fournir une preuve de la date d’achat afin de
bénéficier du service de réparation garanti pour votre
produit. Un reçu ou tout autre document faisant preuve de la
date d’achat du produit et du détaillant agréé est considéré
comme une preuve d’achat.
COUVERTURE:
(S’il est déterminé que le produit est défectueux)
MAIN D’OEUVRE : Pour une période de six (6) mois à partir
de la date d’achat, Philips s’engage, à son choix, à réparer ou à
remplacer le produit gratuitement, ou à rembourser les frais
de main d’?uvre du centre de service agréé Philips (voir les
numéros de téléphone de service de garantie à la colonne
suivante). Suivant cette période de six (6) mois, Philips ne sera
plus responsable d’aucun frais encouru.
PIÈCES : Pour une période de six (6) mois à partir de la date
d’achat, Philips fournira, gratuitement, des pièces de rechange
neuves ou remises à neuf en échange des pièces défectueuses.
Un centre de réparation agréé Philips effectuera le démontage
et le montage de la pièce sous la garantie de main d’oeuvre
spécifiée.
EXCLUSIONS DE LA GARANTIE
Votre garantie ne couvre pas:
• les frais de main d’œuvre pour l’installation ou la
configuration du produit, le réglage des commandes sur le
produit du client ainsi que l’installation ou la réparation
du système d’antenne externe au produit.
• la réparation du produit et/ou le remplacement des pièces
à cause d’une mauvaise installation, d’un raccordement à
une alimentation électrique incorrecte, d’un emploi abusif,
d’une négligence, d’un mauvais usage, d’un accident, d’une
réparation non autorisée ou de toute autre cause non
contrôlable par Philips.
• un produit nécessitant une modification ou adaptation afin
de permettre l’utilisation dans tout pays autre que celui
pour lequel il était désigné, fabriqué, approuvé et/ou
autorisé ou toute réparation du produit endommagé par
ces modifications.
• tout dommage au produit lors de l’expédition lorsque
celui-ci n’a pas été emballé correctement ou tout frais
associé à l’emballage.
• un produit perdu lors de l’expédition sans preuve signée
de la réception.
• un produit utilisé à des fins commerciales ou
institutionnelles (y compris mais non de façon limitative
les fins de location).
• un produit vendu TEL QUEL ou RÉNOVÉ.
GARANTIE D’UN PRODUIT EXPÉDIÉ
Pour la réparation en garantie d’un produit expédié, expédiez
le produit à un centre de service autorisé Philips dans sa
boîte et son emballage d’origine. Si vous ne disposez pas de la
boîte et de l’emballage d’origine, faites emballer votre produit
par un service d’expédition professionnel. Expédiez votre
produit via un service d’expédition identifiable.Au cas où vous
devez expédier le produit à Philips pour réparations, vous
êtes responsable des frais d’expédition à Philips. Philips paiera
les frais d’expédition pour le renvoi de votre produit, à votre
domicile.
POUR OBTENIR UN SERVICE DE GARANTIE AUX
ÉTATS-UNIS, À PORTO RICO OU AUX ÎLES
VIERGES AMÉRICAINES…
Communiquez avec le centre de service à la clientèle
de Philips au: 1-800-531-0039.
POUR OBTENIR UN SERVICE DE GARANTIE AU
CANADA…
1-800-661-6162 (pour un service en français)
1-800-531-7278 (pour un service en anglais ou en espagnol)
LA RÉPARATION OU LE REMPLACEMENT
CONFORMÉMENT À CETTE GARANTIE CONSTITUE LE
SEUL REMÈDE POUR LE CONSOMMATEUR. PHILIPS N’EST
AUCUNEMENT RESPONSABLE DE TOUT DOMMAGE
ACCESSOIRE OU INDIRECT RÉSULTANT DE LA
VIOLATION DE TOUTE GARANTIE EXPRESSE OU
IMPLICITE SUR CE PRODUIT. SAUF DANS LA MESURE
INTERDITE PAR LES LOIS APPLICABLES,TOUTE
GARANTIE IMPLICITE DE QUALITÉ LOYALE ET
MARCHANDE OU D’UTILITÉ PARTICULIÈRE DU
PRODUIT EST LIMITÉE DANS LE TEMPS À LA DURÉE DE
CETTE GARANTIE.
Certains états ne reconnaissent pas l’exclusion ou la limitation
de la responsabilité pour dommages indirects ou accessoires,
ou autorisent des limitations sur la durée d’une garantie
implicite, il est donc possible que les limitations ou exclusions
mentionnées ci-dessus soient sans effet dans votre cas.
En outre, si vous concluez une entente de contrat de service
avec la société PHILIPS dans les quatre-vingt-dix (90) jours
suivant la date d’achat, la limitation sur la durée de la garantie
implicite ne s’applique pas.
Philips, P.O. Box 520890, Miami, FL 33152 (402) 536-4171
17

18 FRANÇAIS
Index
Consignes de sécurité importantes ...................................................................................3
Garantie ...............................................................................................................................................4
Garantie limitée ..............................................................................................................................5
Vue d’ensemble du fonctionnement ...............................................................................18
Précautions d'utilisation ..........................................................................................................19
Compatibilité du casque ......................................................................................................119
Utilisation de votre casque FM sans fil .................................................................20-22
Dépannage ...............................................................................................................................22-24
Spécifications techniques .......................................................................................................24
Extra Information ........................................................................................................................25
Casque FM sans fil
SBC HC8520
Félicitations! Vous venez d’acheter l’un des casques numériques FM sans fil
les plus perfectionnés.
Ce système intègre la technologie FM sans fil la plus récente, qui vous
donne une liberté de mouvement complète lorsque vous regardez un film
ou que vous écoutez votre morceau de musique préféré. Grâce à sa station
d’accueil de recharge, votre casque peut être rechargé facilement lorsqu’il
n’est pas utilisé. Ainsi, votre casque se recharge entièrement et il est
toujours prêt à être utilisé, où que vous souhaitiez regarder un film.
Pour tirer le meilleur parti de votre casque numérique FM sans fil, lisez ce
manuel soigneusement et conservez-le pour vous y reporter à l’avenir.
Vue d’ensemble du fonctionnement Illustrations du produit sur le rabat intérieur
A) Émetteur
1 Indicateur marche/arrêt
2 Indicateur de chargement
3 Jack d’entrée stéréo 3,5 mm
4 Sélecteur de canaux
5 Jack d’entrée d’alimentation cc
B) Récepteur
6 Commutateur de réglage automatique
7 Contrôle du volume
8 Bouton marche/arrêt
9 Indicateur marche/arrêt / Indicateur piles faibles

FRANÇAIS 19
Informations importantes
• Tous les matériaux d’emballage superflus ont été supprimés.
Nous nous sommes efforcés de rendre l'emballage facile à séparer en
deux matériaux: carton et polyéthylène.
• Votre appareil est composé de matériaux pouvant être recyclés s’il est
démonté par une firme spécialisée.
Veuillez observer les règlements locaux lorsque vous vous débarrassez
des matériaux d’emballage, des piles usagées et de votre ancien appareil.
• Soumis aux tests en vigueur, cet appareil est certifié conforme aux
limites d’un matériel numérique de classe B et répond aux spécifications
de la partie 15 des recommandations de la FCC.
Ces limites ont été conçues pour apporter une certaine protection
contre les brouillages nuisibles en environnement résidentiel. Cet
équipement crée, utilise et peut émettre de l’énergie radioélectrique. S’il
n’est pas installé et utilisé conformément aux instructions, il risque de
brouiller la réception radio et télévision. Cependant, il ne garantit pas
l’absence totale de brouillages dans certaines installations.
Si cet équipement se révèle être la source de brouillages de ce type (ce
qui peut être vérifié en le mettant sous puis hors tension),
prenez les mesures suivantes pour y remédier:
– changez l’orientation ou l’emplacement de l’antenne de réception.
– éloignez l’appareil du récepteur.
– branchez l’appareil à une prise secteur différente de celle utilisée pour
le récepteur.
– demandez de l’aide à un fournisseur ou à un technicien
radio/télévision qualifié.
• L’emploi de commandes, de réglages ou l’application de procédures
autres que ceux mentionnés dans ce manuel peuvent occasionner des
radiations d’exposition ou un fonctionnement dangereux.
Compatibilité du système
Il est techniquement possible d'utiliser plusieurs autres casques FM sans fil
ou des enceintes FM sans fil Philips avec un seul émetteur à condition que*:
– ils fonctionnent tous dans la bande 914 MHz
– ils utilisent tous le même système de modulation
– ils détectent tous une tonalité pilote de 19 kHz
Consultez les fiches de spécifications électriques de l'appareil pour
connaître sa compatibilité.
Cette déclaration doit être interprétée seulement d'un point de vue
technique et, par conséquent, ne constitue pas une garantie ni une
obligation de quelque nature que ce soit concernant la disponibilité
commerciale de casques/enceintes FM sans fil compatibles
SBC HC8522.

20 FRANÇAIS
Utilisation de votre système de casque FM sans fil
IMPORTANT!
• Utilisez uniquement un adaptateur ca/cc Philips SBC CS030/33
12 V/200 mA.
• Utilisez uniquement les piles rechargeables à enveloppe raccourcie
NiMH Philips (R03/AAA, type : SBC HB550S, numéro de référence
996500015757).
• N’utilisez pas de piles NiCd ni de piles alcalines, qui pourraient
endommager votre casque FM sans fil.
Installation/remplacement des piles
1 Dévissez et retirez le coussinet de l’oreille gauche du casque.
2 Insérez les piles rechargeables dans le compartiment des piles.
Utilisez uniquement les piles rechargeables à enveloppe raccourcie NiMH
Philips (R03/AAA, type : SBC HB550S, numéro de référence 996500015757).
3 Vérifiez que les piles sont correctement insérées, de la façon indiquée par
le symbole de polarité gravé dans le compartiment des piles.
Retirez toujours les piles du casque si vous ne l’utilisez pas pendant une
longue période.
4 Replacez le coussinet de l’oreille gauche.
Configuration de l’émetteur
5 Vérifiez que la tension nominale de l’adaptateur, indiquée sur la plaquette
d’identification, correspond à la tension d’alimentation du secteur.
6 Connectez le connecteur de sortie cc de l’adaptateur ca/cc 12 volts/200 mA
au jack d’entrée d’alimentation DC 12V situé à l’arrière de l’émetteur.
7 Connectez l’adaptateur ca/cc 12 volts/200 mA à une prise secteur.
Retirez toujours l’adaptateur de la prise secteur si vous n’utilisez pas
l’émetteur pendant une certaine période.
Chargement du casque
8 Placez le casque dans la station de d’accueil de chargement et vérifiez que
les broches de chargement de l’émetteur et le contact de chargement du
casque sont bien alignés.
L’indicateur CHARGING s’allumera automatiquement durant le chargement.
En même temps, le casque se mettra automatiquement hors tension (les
indicateurs marche/arrêt POWER s’éteindront).
Quand le chargement sera fini (après environ 16 heures), l’indicateur vert
CHARGING s’éteindra automatiquement.

IMPORTANT!
• La station d’accueil de chargement n’émet pas de signal audio
quand le chargement est activé.
ATTENTION!
• Avant d'utiliser le casque FM pour la première fois, vérifiez que les
piles sont entièrement chargées (au moins 16 heures de
rechargement).Vous prolongerez ainsi l'utilisation des piles.
• Ce produit est conforme aux règlements de sécurité les plus récents.
Chargez les piles uniquement avec la station d’accueil fournie
(SBC HC8522) ou avec un chargeur entièrement compatible.
Connexion audio
9 Connectez une extrémité du câble audio (prise stéréo 3,5 mm) au jack
d’entrée stéréo 3,5 mm de l’émetteur.
10 Connectez l’autre extrémité du câble stéréo 3,5 mm à:
a) la sortie casque d’une source audio (téléviseur, chaîne hi-fi ou PC).
Réglez le volume de la source audio à un niveau fixe assez haut, par
exemple à 25 % du niveau maximum.
• Si votre source audio a une sortie casque 6,3 mm, utilisez la prise
de l’adaptateur stéréo 3,5 mm vers 6,3 mm fournie.
IMPORTANT!
• Sur certains téléviseurs, le jack de niveau de sortie du casque ne
peut être réglé qu’en accédant au menu sur l’écran du téléviseur.
b) la sortie ligne d’une source audio (REC OUT ou LINE OUT) à l’aide
du câble Y fourni.
• Vérifiez que la prise RCA rouge (canal droit) est connectée au canal droit
(rouge) de la source audio.
• Vérifiez que la prise RCA blanche (canal gauche) est connectée au canal
gauche (blanc) de la source audio.
• Si la source audio a un niveau de sortie RCA réglable, réglez le
niveau de sortie au niveau le plus acceptable sans distorsions.
11 Mettez votre source audio sous tension et augmentez doucement le
volume de la source audio.
L’indicateur POWER marche/arrêt de l’émetteur s’allume quand les signaux
sont reçus.
12 Appuyez sur le bouton POWER marche/arrêt du casque.
L’indicateur POWER marche/arrêt s’allumera automatiquement.
FRANÇAIS 21

22 FRANÇAIS
13 Pour régler le casque sur le canal d’émission correct, choisissez 1 des
3 canaux disponibles (le canal d’émission sélectionné de l’émetteur).
Le casque se réglera rapidement sur l’émetteur.
14 En cas d’interférence provenant d’autres émetteurs, réglez le canal
d’émission, puis répétez l’étape 13 pour régler le casque sur l’émetteur.
15 Réglez le volume du casque sur le niveau d’écoute désiré.
IMPORTANT!
• Évitez de régler le niveau de volume d’écoute sur la source audio,
car vous risquez de diminuer la qualité audio en obtenant un
niveau d’entrée trop faible.
Dépannage
En cas de problème, vérifiez tout d’abord les points suivants. Si les conseils
ci-dessous ne vous aident pas à résoudre le problème, consultez votre
revendeur ou le service après-vente (voir Besoin d’aide ?). N’essayez jamais
d’ouvrir l’appareil vous-même car vous annuleriez la garantie.
D’abord, vérifiez que tous les câbles sont connectés correctement.
Problème Cause possible Solution
Le casque ne se Aucune pile installée Suivez les étapes 1 à 4
charge pas Installation/remplacement des piles.
Orientation incorrecte des piles Replacez les piles conformément au
symbole de polarité gravé.
Pas d’alimentation Vérifiez que la station d’accueil est
connectée au secteur à travers un
adaptateur et suivez les étapes 5 à 7.
La broche de chargement de la Vérifiez que le casque est bien en
station d’accueil n’est pas en place et que l’indicateur CHARGING
contact avec la plaque métallique est allumé.
du casque
Orientation incorrecte du casque Orientez le casque dans la position
dans la station de chargement correcte.
Pas de son/ Casque hors tension Appuyez sur le bouton POWER
son distordu marche/arrêt. L’indicateur POWER
marche/arrêt s’allume
automatiquement, indiquant que le
casque est sous tension.
Aucune pile installée Suivez les étapes 1 à 4
Installation/remplacement des piles.

Orientation incorrecte des piles Replacez les piles conformément au
symbole de polarité gravé.
Pas d’alimentation vers l’émetteur Vérifiez que la station d’accueil est
connectée au secteur à travers un
adaptateur et suivez les étapes 5 à 7.
Piles faibles Suivez les étapes 5 à 7 pour
recharger le système.
Source audio non connectée Vérifiez que la sortie audio de votre
source audio est connectée au jack
d’entrée stéréo 3,5 mm de votre
émetteur. Suivez les étapes 9 à 12.
Source audio hors tension Mettez votre source audio sous
tension.
Volume réglé trop bas Réglez le volume du casque de votre
source audio ou du casque. Sécurité
d’écoute: Une utilisation continue à
volume élevé peut endommager votre
ouïe de façon permanente.
Niveau de sortie audio trop faible Si les sources audio ont un niveau de
sortie réglable, réglez le niveau de
sortie sur un niveau plus élevé et
sans distorsions.
IMPORTANT: Sur certains téléviseurs,
le jack de niveau de sortie du casque
ne peut être réglé qu’en accédant au
menu sur l’écran du téléviseur.
Le casque n’est pas réglé sur Vérifiez que le sélecteur de canaux
l’émetteur du casque et de la station de base
sont sur le même canal.
Interférence d’autres sources radio 1) Réglez l’émetteur sur un autre
canal de fréquence. Sélectionnez
l’une des 3 options pour obtenir la
meilleure réception possible. Nous
vous conseillons de sélectionner le
canal 1 comme première option.
Ensuite, réglez le canal du casque de
la façon décrite ci-dessus.
2) Placez l'émetteur ou le casque à
un autre endroit
Récepteur trop éloigné de Rapprochez-le
l’émetteur
Émetteur utilisé autre que Utilisez l’émetteur SBC HC8522
SBC HC8522 fourni. Certains émetteurs intégrés
peuvent ne pas être compatibles avec
le casque SBC HC8525 en raison des
technologies avancées utilisées.
FRANÇAIS 23

24 FRANÇAIS
Pas de son La station d’accueil de chargement Si vous voulez écouter de la musique
(casques ou n’émet pas de signal audio avec d’autres casques ou enceintes
enceintes sans pendant le chargement. sans fil Philips compatibles avec la
fil Philips) Par conséquent, les casques ou station d’accueil SBC HC8522,
enceintes sans fil Philips ne retirez le casque SBC HC8525 de la
peuvent pas recevoir de signal, station d’accueil.
même s’ils sont compatibles avec
la station d’accueil SBC HC8522.
Spécifications*
Émetteur Système: Radiofréquence (RF)
Modulation: Modulation de fréquence (FM)
Fréquence pilote: 19kHz
Fréquence porteuse: (/33) Canal 1: 914MHz
Canal 2: 914.5MHz
Canal 3: 915MHz
Puissance de sortie rayonnée: <10mW
Portée d’émission efficace: jusqu'à 100 mètres,
omnidirectionnelle (360º)
Niveau d’entrée: 500 mV
Alimentation électrique: 12 volts/200 mA CC, centre positif;
type: SBC CS030/33
Casque d'écoute Fréquence de réception: (/33) 914MHz – 915MHz
Rapport signal/bruit: > 70 dB (onde sinusoïdale de 1 kHz,
pondérée A)
Distorsion: distorsion harmonique totale 2 %
Séparation des canaux: 30 dB
Portée de fréquence audio: 20-20,000 Hz
Alimentation électrique: 2 x piles rechargeables R03/AAA
(Philips, NiMH, type: SBC HB550S,
numéro de référence 996500015757)
Durée des piles: ~ 15 heures
*) Caractéristiques sujettes à des modifications sans avis préalable
**) Selon les conditions écifications ambiantes

• Cet appareil est conforme à la partie 15 du règlement de la FCC et à
RSS-210 d’Industrie Canada. Son utilisation est soumise aux
deux conditions suivantes:
1) Cet appareil ne doit pas causer de brouillage nuisible
2) Cet appareil doit accepter tous les brouillages reçus, y compris
ceux susceptibles de compromettre son fonctionnement.
Avertissement:Toute modification apportée à l’appareil sans l’autorisation
expresse de Philips peut annuler l’autorisation du FCC
d’utiliser cet appareil.
REMARQUE IMPORTANTE:
Déclaration de la FCC concernant l’exposition aux rayonnements:
Cet appareil est conforme aux limites FCC d’exposition aux rayonnements
fixées pour un environnement non contrôlé. Cet équipement doit être
installé et utilisé à au moins 20 cm de sources de rayonnement éventuelles
et de votre corps. Cet émetteur ne doit pas être situé à proximité de,
ni utilisé en conjonction avec, une antenne ni un autre émetteur.
PRÉCAUTION: RISQUE D'EXPLOSION SI UNE BATTERIE DE TYPE
INCORRECT EST INSÉRÉE DANS L'APPAREIL.
DÉBARRASSEZ-VOUS DES BATTERIES USAGÉES
CONFORMÉMENT AUX INSTRUCTIONS.
FRANÇAIS 25

INSTRUCCIONES IMPORTANTES DE SEGURIDAD
27
El tomacorriente estará instalado cerca del
equipo y se podrá acceder fácilmente al
mismo.
¡Proteja el oído!
El uso continuo del equipo a alto volumen puede dañar su oído de forma permanente.


Esta garantía le otorga derechos legales específicos.
Usted puede tener otros derechos que varían entre los diferentes estados y provincias.
EL6584S001 / 01-04
Seis (6) meses de mano de obra y de reparación de piezas (Instalación)
GARANTÍA LIMITADA PHILIPS
PHILIPS CONSUMER ELECTRONICS garantiza este
producto contra defectos en el material o en la mano de
obra, sujeto a las condiciones que se establecen a
continuación:
COMPROBANTE DE COMPRA:
Para obtener la reparación garantizada del producto, debe
presentar un comprobante de la fecha de la compra.
Se considera como tal comprobante un recibo de venta o
algún otro documento que indique tanto el producto y la
fecha en que lo compró, como también el distribuidor
minorista autorizado.
COBERTURA:
(Si se determina que este producto tiene defectos)
MANO DE OBRA: Durante un período de seis (6) meses
desde la fecha de compra, Philips reparará o reemplazará el
producto, según sea su criterio, sin ningún costo o pagará los
cargos por concepto de mano de obra a la instalación de
reparación autorizada de Philips (consulte los números de
teléfono de servicio técnico de la garantía en la columna
siguiente). Después de un período de seis (6) meses, Philips
no será responsable de los gastos en que se incurra.
PIEZAS: Durante un período de seis (6) meses desde la fecha
de compra, Philips proporcionará, sin ningún costo, piezas de
repuesto nuevas o reacondicionadas a cambio de las piezas
defectuosas. La instalación de reparación autorizada de Philips
proporcionará el retiro y la instalación de la pieza de acuerdo
con lo que indique la garantía de mano de obra específica.
SIN COBERTURA DE GARANTÍA
Su garantía no cubre:
• Los costos de mano de obra por la instalación o
preparación del producto, el ajuste de controles del
cliente en el producto y la instalación o reparación de los
sistemas de antena externos al producto.
• La reparación del producto y/o el reemplazo de piezas
debido a la instalación inadecuada, a conexiones hechas a
un suministro de voltaje inadecuado, al abuso, descuido,
mal uso, accidentes, reparaciones no autorizadas u otras
causas que no se encuentren en control de Philips.
• Un producto que requiera modificación o adaptación para
permitir su operación en cualquier país que no sea el país
para el que se diseñó, fabricó, aprobó y/o autorizó o la
reparación de productos dañados por estas
modificaciones.
• Los daños al producto durante el envío cuando el
empaque no ha sido el adecuado o los costos asociados
con el empaque.
• La pérdida del producto en el traslado y cuando no se
pueda proporcionar una firma que verifique el recibo.
• Un producto que se use para propósitos comerciales o
institucionales (lo que incluye, entre otros, los de alquiler).
• Los productos vendidos TAL COMO ESTÁN o
RENOVADOS.
GARANTÍA DE ENVÍO
En el caso que deba ocupar la garantía de envío para la
reparación, envíe el producto en su caja y material de
embalaje original a una instalación de servicio técnico
autorizada de Philips para que lo reparen. Si no tiene la caja ni
el material de embalaje original, embale el producto de
manera profesional para enviarlo. Envíe el producto por una
empresa de transporte rastreable. Cuando deba enviar el
producto a Philips para que lo reparen, usted deberá pagar los
costos del envío. Philips pagará los costos de envío al
regresarle el producto.
PARA OBTENER EL SERVICIO TÉCNICO DE LA
GARANTÍA EN EE.UU., PUERTO RICO O EN LAS
ISLAS VÍRGENES DE EE.UU...
Comuníquese con el Centro de Atención al Cliente al:
1-800-531-0039
PARA OBTENER EL SERVICIO TÉCNICO DE LA
GARANTÍA EN CANADÁ...
1-800-661-6162 (si habla francés)
1-800-531-0039 (si habla inglés o español)
LA REPARACIÓN O EL REEMPLAZO, SEGÚN LO DISPONE
ESTA GARANTÍA, ES LA SOLUCIÓN EXCLUSIVA PARA EL
CLIENTE. PHILIPS NO SERÁ RESPONSABLE DE LOS
DAÑOS CASUALES O IMPORTANTES QUE INFRINJAN
ALGUNA GARANTÍA EXPRESA O IMPLÍCITA SOBRE ESTE
PRODUCTO. CON EXCEPCIÓN DE LO QUE PROHÍBA LA
LEY VIGENTE,TODA GARANTÍA IMPLÍCITA DE
COMERCIABILIDAD Y ADECUACIÓN PARA UN
PROPÓSITO PARTICULAR EN ESTE PRODUCTO ESTÁ
LIMITADA EN DURACIÓN A LO QUE ESPECIFIQUE ESTA
GARANTÍA.
Algunos estados no permiten las exclusiones o la limitación
de los daños casuales o importantes, ni permiten limitaciones
sobre la duración de la garantía implícita, de modo que es
posible que las limitaciones o exclusiones anteriores no se
apliquen a usted.
Además, si usted celebra un contrato de servicio con la
sociedad PHILIPS en un plazo de noventa (90) días desde la
fecha de venta, no se aplicará la limitación sobre la duración
de la garantía implícita.
Philips, P.O. Box 520890, Miami, FL 33152 (402) 536-4171
29

30 ESPAÑOL
Índice
Instrucciones importantes de seguridad ......................................................................27
Garantía .............................................................................................................................................28
Garantía limitada .........................................................................................................................29
Perspectiva funcional ................................................................................................................30
Precauciones de seguridad ....................................................................................................31
Compatibilidad del sistema ...................................................................................................31
Utilización del sistema de auriculares inalámbricos FM .............................32-34
Resolución de problemas ...............................................................................................34-36
Especificaciones técnicas ........................................................................................................36
Extra Información .......................................................................................................................37
Sistema de auriculares inalámbricos FM
SBC HC8520
¡Enhorabuena! Acaba de comprar uno de los sistemas de auriculares
inalámbricos FM más sofisticados.
Este sistema implementa la tecnología inalámbrica FM más avanzada, que le
ofrece completa libertad de movimiento mientras disfruta de su película o
música favorita. Mediante la estación de carga, sus auriculares pueden
recargarse con facilidad cuando no se utilicen. Esto permite que estén
siempre cargados y listos para utilizarse cuando quiera disfrutar de una
película.
Para asegurarse de conseguir el mejor rendimiento posible de su sistema de
auriculares inalámbricos FM, lea cuidadosamente este manual y guárdelo
para consultarlo en el futuro.
Perspectiva funcional Ilustraciones de producto en la solapa interna
A) Transmisor
1 Indicador de encendido/apagado
2 Indicador de carga
3 Conector de entrada de estéreo de 3,5 mm
4 Conmutador de canales
5 Conector de entrada de CC
B) Receptor
6 Conmutador de sintonización automática
7 Control de volumen
8 Botón de encendido/apagado
9 Indicador de encendido/apagado/indicador de pila descargada

ESPAÑOL 31
Información importante
• Se ha omitido todo el material de embalaje innecesario.
Hemos hecho todo lo posible para hacer que el material de embalaje
pueda separarse fácilmente en 2 materiales: cartón y polietileno.
• Su aparato está construido con materiales que pueden reciclarse si la
unidad es desmontada por una compañía especializada.
Observe el reglamento local relacionado con la eliminación de
materiales de embalaje, pilas agotadas y equipo viejo.
• Este equipo ha sido examinado y creado para cumplir con los límites
para un dispositivo digital Clase B, según el apartado 15 de las reglas
FCC. Estos límites tienen el objeto de proporcionar protección
razonable contra interferencias nocivas en una instalación residencial.
Este equipo genera, usa y puede irradiar energía de radiofrecuencias y, si
no se instala y usa de acuerdo con las instrucciones, puede causar
interferencias perjudiciales en las comunicaciones por radio. Sin
embargo, no hay garantía de que esa interferencia no ocurra en una
instalación particular. Si este equipo causa interferencias perjudiciales en
la recepción de radio o televisión, que pueden determinarse al encender
o apagar el equipo, se sugiere al usuario que intente corregir la
interferencia a través de una o más de las siguientes medidas:
– Reoriente o vuelva a colocar la antena receptora.
– Aumente la separación entre el equipo y el receptor.
– Conecte el equipo a una toma en un circuito diferente al que esté
conectado el receptor.
– Consulte a su proveedor o a un técnico experimentado en radio/TV
para más ayuda.
• El uso de mandos o ajustes o la ejecucción de métodos que no sean los
aquí descritos puede ocasionar peligro de exposición a radiación.
Compatibilidad del sistema
Es técnicamente posible utilizar un número adicional de auriculares
inalámbricos FM o auriculares inalámbricos FM de Philips con un solo
transmisor si todos *:
– funcionan en la banda de 914 MHz
– funcionan de acuerdo con el mismo esquema de modulación
– pueden detectar un tono piloto de 19 kHz
Consulte las hojas de especificaciones eléctricas del aparato para
confirmar la compatibilidad.
Esta declaración debe interpretarse solamente desde un punto de
vista técnico y no constituye ninguna garantía ni obligación
respecto a la disponibilidad comercial de auriculares/altavoces
inalámbricos FM compatibles con SBC HC8522.

32 ESPAÑOL
Utilización de su sistema de auriculares
inalámbricos FM
IMPORTANTE!
• Utilice solamente un adaptador de 12V/200mA, CA/CC
SBC CS030/33 de Philips.
• Utilice solamente las pilas NiMH recargables de manguito
recortado de Philips (R03/AAA, número de tipo: SBC HB550S,
número de pieza 996500015757).
• No utilice pilas NiCd ni pilas alcalinas ya que pueden dañar su
sistema de auriculares inalámbricos FM.
Colocación/cambio de pilas
1 Destornille y retire la almohadilla para la oreja izquierda de los auriculares.
2 Inserte las pilas recargables en el compartimiento de las pilas.
Utilice solamente pilas NiMH recargables de manguito acortado de Philips
(R03/AAA, número de tipo: SBC HB550S, número de pieza 996500015757).
3 Asegúrese de que las pilas estén colocadas correctamente, de acuerdo
con el símbolo de polaridad grabado en el compartimiento de las pilas.
Retire siempre las pilas de los auriculares si el sistema no va a utilizarse
durante un largo período de tiempo.
4 Vuelva a colocar la almohadilla para la oreja izquierda.
Preparación del transmisor
5 Asegúrese de que la tensión nominal del adaptador indicada en la placa
de especificaciones corresponda a la de la red eléctrica.
6 Conecte el conector de salida de CC del adaptador de CA/CC de 12 V/
200 mA al conector de entrada de corriente DC 12V situado en la parte
posterior transmisor.
7 Conecte el adaptador de CA/CC de 12 V/ 200 mA 12 al tomacorriente
de la red eléctrica. Retire siempre el adaptador del tomacorriente de la red
si el transmisor no va a utilizarse durante un período de tiempo.
Carga de los auriculares
8 Coloque los auriculares en la estación de carga y asegúrese de que las
espigas de carga del transmisor y del contacto de carga de los auriculares
estén bien alineadas. La luz del indicador CHARGING se encenderá
automáticamente indicando que la carga se está realizando. Al mismo
tiempo, los auriculares se desactivarán automáticamente (es decir, las luces
de indicador de encendido/apagado POWER se apagarán). Cuando la carga
haya terminado (lo que lleva aproximadamente 16 horas), la luz indicadora
verde CHARGING también se apagará automáticamente.

¡IMPORTANTE!
• La estación de carga no transmite ninguna señal de audio cuando
la carga está activada.
¡ADVERTENCIA!
• Antes de utilizar los auriculares por primera vez, asegúrese de que
las pilas estén completamente cargadas para 16 horas como
mínimo. Esto le garantizará una vida útil más larga para las pilas.
• Este producto cumple con las normas de seguridad más recientes.
Cargue solamente las pilas con la estación de carga provista
(SBC HC8522) o con un cargador completamente compatible.
Conexión de audio
9 Conecte el extremo del cable de audio (enchufe estéreo de 3,5 mm) al
conector de entrada de estéreo de 3,5 mm del transmisor.
10 Conecte el otro extremo del cable de estéreo de 3,5 mm a:
a) La salida de auriculares de una fuente de audio, como un televisor, un
sistema de HiFi o un PC.
Ajuste el nivel de volumen de la fuente de audio a un nivel fijo
razonablemente alto; por ejemplo, 25% del nivel máximo.
• En el caso de que su fuente de audio tenga una salida de
auriculares de 6,3 mm, utilice el enchufe adaptador de estéreo de
3,5 mm a 6,3 mm.
¡IMPORTANTE!
• En el caso de ciertos televisores, el nivel de salida del conector de
los auriculares solamente puede ajustarse después de acceder al
menú en pantalla del televisor.
b) La salida de línea de una fuente de audio, como REC OUT o
LINE OUT (con el cable Y suministrado.
• Compruebe si el enchufe RCA rojo (canal derecho) está conectado al
canal derecho (rojo) de la fuente de audio.
• Compruebe si el enchufe RCA blanco (canal izquierdo) está conectado al
canal izquierdo (blanco) de la fuente de audio.
• En el caso de que la fuente de audio tenga un nivel de salida de
RCA ajustable, ajuste el nivel de salida al nivel aceptable más alto
sin distorsión.
11 Active su fuente de audio y aumente cuidadosamente el volumen de la
misma.
El indicador de encendido/apagado POWER del transmisor se enciende
cuando se reciben señales.
12 Active el botón de encendido/apagado POWER de los auriculares.
El indicador de encendido/apagado POWER se encenderá automáticamente.
ESPAÑOL 33

34 ESPAÑOL
13 Para sintonizar los auriculares con el canal de transmisión correcto,
seleccione 1 de las 3 opciones de canal proporcionadas (el canal de
transmisión seleccionado del transmisor).
Los auriculares se sintonizarán rápidamente con el transmisor.
14 En caso de interferencias producidas por transmisores cercanos, ajuste el
canal de transmisión del transmisor, y repita el paso 13 para sintonizar los
auriculares con el transmisor.
15 Ajuste el volumen de los auriculares al nivel de escucha deseado.
¡IMPORTANTE!
• Evite ajustar el nivel del volumen en la fuente de audio ya que
esto puede dañar la calidad del audio en niveles de entrada
demasiado bajos.
Resolución de problemas
Si surge un problema, en primer lugar compruebe los puntos detallados a
continuación. Si no puede solucionar un problema siguiendo estos consejos,
póngase en contacto con la línea telefónica de ayuda (véase ‘¿Necesita
ayuda?’) o consulte a su concesionario. Nunca intente abrir el aparato usted
mismo, ya que esto anulará la garantía. En primer lugar, compruebe todos los
cables para asegurar que están conectados correctamente.
Problema Posible causa Solución
Los auriculares No hay pila colocada Siga los pasos 1 a 4 de
no se cargan ‘Colocación / cambio de las pilas’
Pilas mal orientadas Reposicione las pilas de acuerdo con
el símbolo de polaridad grabado.
No hay fuente de alimentación Asegúrese de que la estación de
conectada carga está conectada a la red
eléctrica a través de un adaptador y
siga los pasos 5 a 7.
La espiga de carga de la estación Sujete los auriculares en su sitio, y
de carga no está en contacto con asegúrese de que la luz indicadora
la placa metálica de los auriculares CHARGING está encendida.
La orientación de los auriculares Reposicione los auriculares en la
es incorrecta cuando se colocan orientación correcta.
en la estación de carga
No hay sonido/ Los auriculares están desactivados Pulse el botón de encendido/apagado
sonido POWER. La luz indicadora de
distorsionado encendido/apagado POWER se
enciende automáticamente indicando
que los auriculares están activados.
No hay pila colocada Siga los pasos 1 a 4 de
‘Colocación / cambio de las pilas’

Orientación de pila incorrecta Reposicione las pilas de acuerdo con
el símbolo de polaridad grabado.
El transmisor no recibe Asegúrese de que la estación de
alimentación eléctrica carga está conectada a la red
eléctrica a través de un adaptador y
siga los pasos 5 a 7.
La pila está casi descargada Siga los pasos 5 a 7 para recargar el
sistema.
La fuente de audio no está Asegúrese de que la salida de audio
conectada de su fuente de audio está conectada
al conector de entrada de estéreo
de 3,5 mm de su transmisor.
Siga los pasos 9 a 12.
La fuente de audio está desactivada Active la fuente de audio.
El nivel de volumen está puesto Ajuste el nivel de volumen de la
demasiado bajo fuente de audio o los auriculares.
Protección del oído: El uso continuo
a alto volumen puede dañar su oído de
forma permanente.
El nivel de salida de audio es En el caso de fuentes de audio con
demasiado bajo un nivel de salida ajustable, ajuste el
nivel de salida a un nivel más alto y
no distorsionado. IMPORTANTE:
En el caso de ciertos televisores, el nivel
de salida del conector de auriculares
sólo puede ajustarse después de acceder
al menú en pantalla del televisor.
Los auriculares no están Asegúrese de que el conmutador
sintonizados con el transmisor selector de canales de los auriculares
y de la estación base están puestos al
mismo canal.
Interferencias de otras fuentes 1) Altere el canal de frecuencias del
de radio transmisor. Seleccione 1 de las 3
opciones para mejor recepción. Le
aconsejamos seleccionar el canal 1
como la primera opción.
Seguidamente, ajuste el canal de
sintonización de los auriculares de la
forma descrita anteriormente.
2) Coloque el transmisor o
auriculares en otro lugar
El receptor está demasiado lejos Acérquelos para obtener una
del transmisor recepción mejor
Se utiliza un transmisor que no Utilice el transmisor SBC HC8522
es el SBC HC8522 suministrado. Es posible que algunos
transmisores ya integrados en otro
equipo no sean compatibles con los
auriculares SBC HC8525 debido a
las avanzadas tecnologías utilizadas.
ESPAÑOL 35

36 ESPAÑOL
No hay sonido La estación de carga no transmite Si quiere disfrutar de la música con
(altavoces una señal de audio cuando se está otros auriculares o altavoces
múltiples o realizando una carga. inalámbricos Philips que sean
altavoz Por consiguiente, otros auriculares compatibles con la estación de carga
inalámbrico o altavoces inalámbricos Philips SBC HC8522, asegúrese de retirar
Philips) no pueden recibir ninguna señal, los auriculares SBC HC8525 de la
aunque sean compatibles con la estación de carga.
estación de carga SBC HC8522.
Especificaciones*
Transmisor Sistema: Radiofrecuencia (RF)
Modulación: Modulación de frecuencia (FM)
Tono piloto: 19kHz
Frecuencia de portadora: (/33) Canal 1: 914MHz
Canal 2: 914.5MHz
Canal 3: 915MHz
Potencia de salida radiada: <10mW
Alcance de transmisión efectivo: hasta 100 metros, omnidireccional
(360º)
Nivel de entrada: 500 mV
Suministro eléctrico: 12 V/ 200 mA CC, central positivo;
número de tipo: SBC CS030/33
Auriculares Frecuencia de recepción: (/33) 914MHz – 915MHz
Relación señal-ruido: > 70dB (onda sinusoidal 1kHz, con
ponderación A)
Distorsión: 2% de distorsión armónica total
Separación de canales: 30 dB
Gama de audiofrecuencias: 20-20,000 Hz
Suministro eléctrico: 2 pilas recargables R03/AAA
(Philips NiMH, número de tipo:
SBC HB550S, número de pieza
996500015757)
Vida útil de la pila: ~ 15 horas
*) Todas las especificaciones están sujetas a cambios sin notificación previa
**) Según las condiciones ambientales

• El dispositivo cumple con el apartado 15 de las reglas FCC y con
RSS-210 de Industry Canada. El funcionamiento está sujeto a las dos
condiciones siguientes:
1) este dispositivo no puede causar interferencias dañinas y
2) este dispositivo debe aceptar cualquier interferencia recibida,
incluyendo interferencias que puedan causar un funcionamiento
deficiente.
Advertencia: Los cambios y modificaciones realizadas en este equipo y no
aprobados expresamente por Philips pueden anular la
autorización concedida por la FCC para utilizar este equipo.
NOTA IMPORTANTE:
Declaración sobre exposición a la radiación de la FCC:
Este equipo cumple con los límites de exposición a la radiación de la FCC
establecidos para un entorno no controlado. Este equipo debe ser instalado y
funcionar con una distancia mínima de 20 cm entre el radiador y el cuerpo
de usted. Este transmisor no debe colocarse ni funcionar junto con ninguna
otra antena o transmisor.
PRECAUCIÓN: EXISTE RIESGO DE EXPLOSIÓN SI SE SUSTITUYE LA
PILA POR OTRA DE UN TIPO QUE NO SEA EL
ADECUADO. DESECHE LAS PILAS DE ACUERDO CON
LAS INSTRUCCIONES.
ESPAÑOL 37

www.philips.com
This document is printed on chlorine free produced paper
Data subject to change without notice
Printed in China
HC8520/37
FCC ID: OYMHC8582
IC: 135M-SBCHC8582
Philips Consumer Electronics Company,Atlanta, GA 30346-6400, U.S.A.
 Loading...