

Page 1
ENGLISH 6
EESTI 16
LATVISKI 25
LIETUVIŠKAI 35
HB955, HB952, HB951, HB950
Page 2

Introduction
The tanning appliance
With this tanning appliance you can suntan comfortably at home.The tanning lamps emit visible
light, heat and ultraviolet light, giving you the impression you are sunbathing in real sunlight.The
special UV filters only pass the light that is required to get a tan.
The tanning lamps emit sufficient infrared light to provide a comfortable warmth.
Type HB955: besides a tanning session, you can take a relax session by just switching on the special
infrared lamps.
A timer ensures that each session does not last longer than 30 minutes. Just as with natural sunlight,
overexposure must be avoided (see chapter 'Tanning and your health').
Important
◗ Check if the voltage indicated on the appliance corresponds to the mains voltage in your
home before you connect the appliance.
◗ If the plug has not been inserted properly into the wall socket, it may become hot. Make sure
you insert the plug properly into the wall socket.
◗ The appliance must be connected to a circuit that is protected with a 16A standard fuse or
automatic fuse.
◗ Always unplug the appliance after use.
◗ Water and electricity are a dangerous combination! Do not use this appliance in wet
surroundings (e.g. in the bathroom or near a shower or swimming pool).
◗ If you have just been swimming or have just taken a shower, dry yourself thoroughly before
using the appliance.
◗ Let the appliance cool down after use for approx. 15 minutes before folding it back into
transport position and storing it.
◗ Make sure the vents in the lamp units and in the base remain open during use.
◗ The appliance has been fitted with an automatic protection against overheating.If the
appliance is insufficiently cooled (e.g. because the vents are covered), the appliance will switch
off automatically. Once the cause of overheating has been removed and the appliance has
cooled down, the appliance can be switched on again.
◗ The UV filters become very hot when using the appliance. Do not touch them.
◗ The appliance contains hinging parts, so be careful not to get your fingers stuck between
these parts.
◗ Never use the appliance when a UV filter is damaged, broken or missing.
◗ Make sure children do not play with the appliance.
◗ Do not exceed the recommended session time and the maximum number of tanning hours
(see 'Tanning sessions: how often and how long?').
◗ Do not take a tanning and/or relax session if you have a disease and/or if you use a
medication or cosmetics that increase the sensitivity of your skin. Be extra careful if you are
hypersensitive to UV light or infrared light. Consult your doctor in case of doubt.
◗ Do not tan a particular part of your body more than once a day.Avoid excessive exposure to
natural sunlight on the same day.
◗ Consult your doctor if ulcers, moles or persistent lumps develop on the skin.
◗ The appliance is not to be used by people who get sunburnt without tanning when exposed
to the sun, by persons suffering from sunburn, by children, or by persons who suffer (or have
previously suffered) from skin cancer or who are predisposed to skin cancer.
◗ Always wear the protective goggles provided with the appliance while tanning to protect
your eyes from excessive doses of visible light, UV light and infrared light (also see the
chapter 'Tanning and your health').
◗ Remove creams, lipstick and other cosmetics well in advance of a tanning session.
◗ Do not use any quick-tan lotions or creams meant to speed up the tanning process.
ENGLISH6
Page 3

◗ Do not use sun creams or lotions meant to protect your skin against sunburn.
◗ If your skin should feel taut after the tanning session, you may apply a moisturising cream.
◗ To acquire an even tan you should lie directly below the lamp units.
◗ Do not choose a tanning distance of less than 65 cm.
◗ Only move the appliance when it is in transport position. Make sure that the two parts of the
appliance have been properly fastened before you move it. Do not attempt to lift the
appliance on your own.
◗ Colours may fade under the influence of the sun.The same effect may occur when using this
appliance.
◗ Do not expect the appliance to yield better results than the natural sun.
Tanning and your health
The sun, UV and tanning
The sun
◗ The sun supplies various types of energy.Visible light enables us to see, ultraviolet (UV) light
gives us a tan and the infrared (IR) light in sunrays provides the heat in which we like to bask.
UV, tanning and your health
Just as with natural sunlight, the tanning process will take some time.The first effect will only become
visible after a few sessions (see chapter 'Tanning sessions: how often and how long?').
Overexposure to UV light (natural sunlight or artificial light from your tanning appliance) can cause
sunburn.
Besides many other factors, such as overexposure to natural sunlight, incorrect and excessive use of
a tanning appliance may increase the risk of skin and eye problems.The degree to which these
effects occur is determined by the nature, intensity and duration of the exposure on the one hand
and the sensitivity of the person involved on the other hand.
The more the skin and the eyes are exposed to UV light, the higher the risk of keratitis,
conjunctivitis, damage to the retina, cataracts, premature skin ageing and the development of skin
tumours will be. Some medications and cosmetics increase the sensitivity of the skin.
Therefore it is highly important:
B
that you follow the instructions in chapters 'Important' and 'Tanning sessions: how often and
how long?'.
B
that the tanning distance (distance between the UV filters and the body) is 65 cm.
B
that you do not exceed the maximum number of tanning hours per year (i.e. 20 hours or 1200
minutes).
B
that you always wear the goggles provided while tanning.
IR, relaxation and your health (HB955 only)
Warmth has a relaxing effect.Think of what a hot bath or lazing in the sunshine does to you.You can
enjoy the same relaxing effect by switching on the infrared lamps.
Bear in mind the following when you have a relax session:
- Avoid getting too hot. Increase the distance between yourself and the lamps, if necessary.
- If your head gets too hot, cover it or move your body so that less heat is emitted towards your
head.
- Close your eyes during a relax session.
- Do not let the relax session last too long (see chapter 'Relax sessions: how often and how
long?').
ENGLISH 7
Page 4
Tanning sessions: how often and how long?
◗ Do not take more than one tanning session per day, over a period of five to ten days.
◗ Allow an interval of at least 48 hours between the first and the second session.
◗ After this 5- to 10-day course, we advise you to give your skin a rest for a while.
◗ Approximately one month after a course, your skin will have lost much of its tan.You can
then start a new course.
◗ If you want to keep your tan,do not stop tanning after the course, but continue taking one
or two tanning sessions a week.
◗ Whether you choose to stop tanning for a while or whether you continue tanning on a
lower frequency, do remember that you must not exceed the maximum number of tanning
hours.
◗ For this appliance the maximum is 20 tanning hours (=1200 minutes) a year.
This maximum also holds if you use the appliance for the tanning of parts of your body (function º
and ªº).
Example
Suppose you take a 10-day tanning course, with an 8-minute session on the first day and a 20minute session on the nine following days.
The entire course will then last (1 x 8 minutes) + (9 x 20 minutes) = 188 minutes.
This means you can take 6 of these courses in a year, as 6 x 188 minutes = 1128 minutes.
Of course, the maximum number of tanning hours applies to each separate part or side of the body
that is tanned (e.g. the back or front of the body).
As is shown in the table, the first session of a tanning course should always last 8 minutes,
irrespective of the sensitivity of the skin.
B
If you think that the sessions are too long for you (e.g. because your skin feels taut and tender
after the session), we advise you to reduce the length of the sessions by e.g. 5 minutes.
B
For a beautiful all-over tan, turn your body slightly during the session so that the sides of your
body are better exposed to the tanning light.
*) or longer, depending on your skin sensitivity.
ENGLISH8
For persons with less
sensitive skin
8 minutes
30 minutes*
30 minutes*
30 minutes*
30 minutes*
30 minutes*
30 minutes*
30 minutes*
30 minutes*
30 minutes*
For persons with
normal sensitive skin
8 minutes
20-25 minutes
20-25 minutes
20-25 minutes
20-25 minutes
20-25 minutes
20-25 minutes
20-25 minutes
20-25 minutes
20-25 minutes
For persons with very
sensitive skin
8 minutes
10 minutes
10 minutes
10 minutes
10 minutes
10 minutes
10 minutes
10 minutes
10 minutes
10 minutes
Duration of the
tanning session for
each separate part of
the body
1st session
rest of at least 48 hours
2nd session
3rd session
4th session
5th session
6th session
7th session
8th session
9th session
10th session
Page 5
If your skin feels slightly taut after tanning, you can apply a moisturising cream.
B
Note: If you are only tanning a part of your body, you can also use the tanning schedules
mentioned in the table above, together with the information in the chapter 'Tanning sessions:
how often and how long?'
Relax sessions: how often and how long?
HB955 only
If you do not want to get up right away after the tanning session, you can switch on the infrared
lamps for a relax session, during which the infrared lamps keep you warm.
You can also take a relax session without a tanning session.You can do this several times a day (e.g.
30 minutes in the morning and in the evening).
Preparing for use
◗ The appliance can be easily moved and stored in transport position (fig. 2).
◗ If you want to give your face an extra tan (types HB951 and HB952 only) or if you only want
to tan a part of your body (i.e. just the legs or the upper half of your body; types HB952 and
HB955 only), make sure you place the appliance at the correct side of the bed (fig. 3).
1 Open the appliance by pulling the catches on both sides of the base out as indicated by the
arrow (fig. 4).
The upper part of the appliance is now unlocked.
2 The upper part comes slightly up (by itself or with a little help) (fig. 5).
3 Grab the handle with both hands and put one foot against the appliance to prevent it from
sliding away.Tilt the upper part by pulling the handle and tracing an arc with it (fig. 6).
Do not tilt the upper part too far.
4 Pull the upper part up and towards you at the same time (fig. 7).
This requires some effort.
5 Move both lamp units sideways as far as possible, until they are in line with each other (fig.8).
6 The distance between the UV filters and your body must be 65 cm.The distance between
the UV filters and the surface on which you are lying down (e.g. a bed) must be 85 cm (fig. 9).
7 Support the upper part of the stand when you set or adjust the height of the appliance (fig.
10).
Loosen knob 'A' by turning it anti-clockwise (two or three turns).
8 Put your hand under the horizontal part of the stand and extend the stand to the required
height (fig. 11).
9 Firmly fasten knob 'A' again and release the stand (fig. 12).
◗ You can determine whether the appliance has been set to the required height by pulling out
the measuring tape (fig. 13).
◗ The measuring tape will automatically rewind if you move the red tab sideways (fig. 14).
The appliance is now ready for use.
ENGLISH 9
Page 6

Using the appliance
1 Fully unwind the mains cord.
2 Put the plug in the wall socket.
◗ The remote control will show all the functions that need to be adjusted by the user.The
tanning or relax time is shown as 00 (fig. 15).
◗ Only types HB951 and HB952 show the symbol ª: the symbol to tan your face.
◗ Only types HB952 and HB955 show the symbol º: the symbol to tan a part of the body .
◗ Only type HB955 shows the symbol – (relax).
Adjusting functions
1 Use the ¡™buttons to switch from function to function (fig. 16).
The underlined symbol shows the function you are programming.
2 Selecting tanning, facial tanning, tanning a part of the body or relaxing.
Choose symbol • if you want to tan your whole body.
Choose symbol • and ª if you want to tan your whole body and give your face an extra tan (types
HB951 and HB952).
Choose º if you want to tan just a part of the body (types HB952 and HB955 only).
Choose symbols ª and º if you want to tan just a part of the body, including an extra facial tanning
(type HB952 only).
Choose symbol – if you prefer a relax session (warmth) for the whole body (type HB955 only).
Note: In these directions for use, functions ;ªare used as examples of what may be shown on the
display.
Setting the time for a tanning or relax session.
1 Set the time of the tanning or relax session by pushing the + button to put the time forward
or by pushing the - button to put the time backward (fig. 17).
Keep the button pressed in to adjust the time more quickly.
2 Lie down directly under the lamp units of the appliance to ensure that the sides of your body
are also tanned properly.
3 Put on the protective goggles provided.
4 Switch on the tanning lamps or the infrared lamps by pressing the start button ∞ (fig. 18).
B
Note: During start-up the tanning lamps may produce a humming sound.This sound will stop as
soon as the lamps are burning properly.
B
Note:The tanning lamps will start to emit a visibly stronger light after about 60 seconds, which
means they are now burning at full power. From this moment onwards you can switch the facial
tanner on or off.
B
Note: If the lamps fail to go on after about 20 seconds, switch the appliance off (∞), let the
lamps cool down for 3 minutes, set the tanning time and switch the appliance back on again
(∞).
◗ A blinking signal will appear; the set time is shown on the display (25 minutes in this case)
(fig. 19).
The countdown of the set tanning or relax time will now start.
◗ You can switch the facial tanner (• , ª) on or off during the session without having to switch
off the whole appliance (fig. 20).
B
(This also holds for the extra face tan in combination with º).
The chosen symbols stay visible in the display, but the other symbols do not.
◗ During the last minute of the session you will hear an intermittent beeping sound (fig. 21).
ENGLISH10
Page 7

◗ During this minute, you can press the pause/repeat button § to repeat the set time (fig. 22).
◗ The display shows the set time and starts to count down.The beeping stops.
◗ It is also possible to set a new time.
By doing this, you can avoid the 3-minute waiting time which is necessary to allow the tanning lamps
to cool down after they have been switched off.
This waiting time does not apply to the infrared lamps (type HB955 only).
5 Set a new time by pushing the ¢ or £ buttons.Then push the start button ∞ (fig. 23).
The beeping stops and the time that has just been set starts counting down.
◗ When you do not repeat the session by pressing § or set a new time during the last minute
of the session, the countdown continues and the appliance will automatically switch off as
soon as the set time has passed.
Interrupting the tanning or relax session
1 Interrupt the tanning session by pushing the pause/repeat § button (fig. 24).
The lamps will be switched off, P appears in the display together with the remaining time. For 3
minutes the remaining time will blink. During this time the lamps cool down.When the blinking has
stopped, you can switch the appliance back on again by pushing the ∞ button.The remaining time
will now be counted down.
2 Interrupt the relax session by pushing the pause/repeat § button.
The lamps will be switched off, P appears in the display together with the remaining time (not
blinking).You can switch the appliance back on immediately by pushing the ∞ button.The waiting
time does not apply to the infrared lamps.The remaining time will be counted down.
Changing the tanning or relax time during a session
1 When you are tanning, you can change the set time by pushing the ∞ button.The lamps will
be switched off.Then set a new time by pushing the ¢£buttons.Wait until the set time has
stopped blinking (this will take 3 minutes because the lamps have to cool down first) and
push the ∞ button again.
2 When relaxing (–), you can change the set time by pushing the ∞ button.The lamps will be
switched off.You can set a new time and switch the appliance back on immediately by pushing
the ∞ button.The waiting time does not apply to the infrared lamps (the newly set time does
not blink on the display).
◗ Make sure the right lamps are on:(HB955 only)
B
Tanning: four lamps emitting bluish light.
B
Relax: four lamps emitting reddish light.
After the tanning session
1 Keep track of the number of sessions you have had by means of the memory knobs (types
HB952 and HB955 only).The appliance has two memory knobs: one per person (fig. 25).
Cooling
The appliance is cooled by means of fans to prevent materials and parts from becoming too hot.
The tanning lamps won't go on if they are too hot (see for instance "Interrupting the tanning or
relax session").
◗ After you have switched off the tanning lamps or infrared lamps, the fans will continue to
work for three more minutes.
This is convenient, because it enables you to use the tanning lamps again only 3 minutes after
switching them off.
B
The infrared lamps do not require a cooling down period before they can be switched on again.
B
If you have switched the tanning appliance off by removing the plug from the wall socket, the
fans won't provide cooling for three more minutes, of course.
B
If you have switched the tanning appliance off by removing the plug from the wall socket and
another person wishes to use the appliance for a tanning session right away, the newly set time won't
ENGLISH 11
Page 8
blink on the display.This means that the next person will have to keep track of the three-minute coolingdown period himself.
B
HB955 only: if you want to use the appliance for a tanning session immediately after having
used it for a relax session (–), you should also let the appliance cool down for three minutes.As
a result of the relax session, the tanning lamps will have become hot and will need to cool down
before they can be switched on.
Cleaning
1 Always unplug the appliance and let it cool down before you start cleaning it.
2 Clean the outside of the appliance with a damp cloth.
Do not let any water run into the appliance.
3 Do not use scouring pads.
Never use abrasive liquids like scouring agents, petrol or acetone to clean the appliance.
◗ You can clean the outside of the UV filters with a soft cloth sprinkled with some methylated
spirits.
Storage
1 Let the appliance cool down for 15 minutes before you put it in transport position and store
it.
◗ In the meantime, you can wind up the cords and put them in the base of the appliance.
2 Make sure the cords and remote control unit are stored properly, as they might otherwise
get stuck between parts of the appliance when you put the appliance in transport position
(fig. 26).
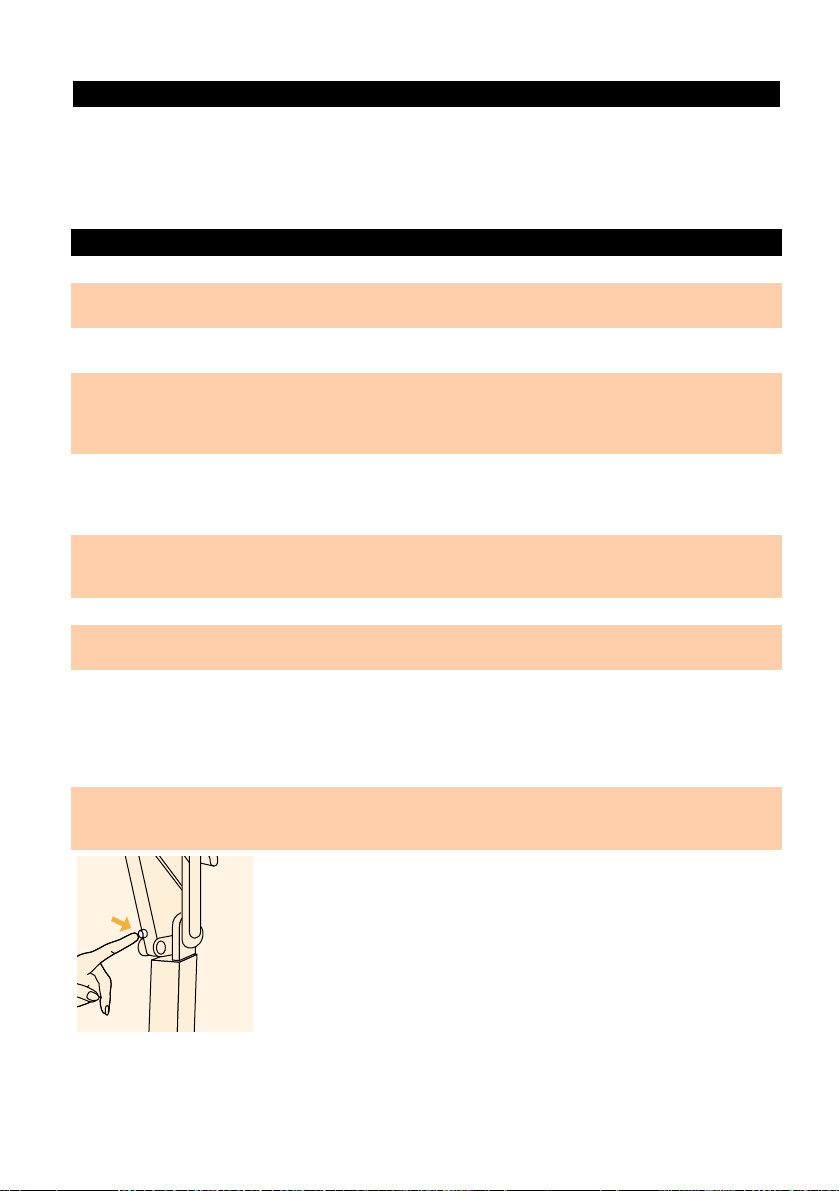
3 Firmly hold the upper part of the stand with one hand and loosen the height adjustment
knob (A) by turning it anti-clockwise (fig. 27).
4 Slide in the stand fully (fig. 28).
5 Firmly fasten the height adjustment knob (A) by turning it clockwise (fig. 29).
6 Turn the two lamp units towards each other (fig. 30).
7 Grab the handle with both hands, put one foot against the appliance to prevent it from sliding
away and tilt the upper part with the stand backward (fig. 31).
The automatic unlocking system will only work if you tilt the upper part with the stand
backward far enough. However, you should be careful not to tilt it backward too far because you
might lose your balance if you do.
8 Push the upper part down (fig. 32).
9 Lower it slowly onto the base (fig. 33).
10 Fasten the lamp units to the base by pushing both catches in the direction of the arrow (fig.
34).
Replacement
The light emitted by the tanning lamps will become less bright in time (i.e. after a few years in case
of normal use). When this happens, you will notice a decrease in the tanning capacity of the
appliance.You can solve this problem by setting a slightly longer tanning time or by having the
tanning lamps replaced.
ENGLISH12
Page 9
◗ Types HB952 and HB955 only:The remote control of the appliance includes a counter that
registers the number of operating hours.
1 Choose function •. Set the time to 00 and hold down the pause/repeat § button to display
the number of operating hours (fig. 35).
The maximum number of hours the counter can display is 999. After it has reached this number, it
will continue to count up from 000.
2 When you release the pause/repeat button, the number of operating hours disappears from
the display.
◗ After 750 burning hours, an L will appear on the left-hand side of the display.This means that
the tanning power of the appliance has decreased so much that replacement of the tanning
lamps is advisable (fig. 36).
Of course, you can choose to postpone replacement for a while by setting a longer tanning time.
3 To remove the L from the display, press the pause/repeat § button, with time indication 00
and function symbol• on the display.Hold down the pause/repeat button and press first the
¢ button and then the £ button and the L will disappear from the display (fig. 37).
The UV filters protect against undesired exposure. It is therefore important to have a damaged or
broken filter replaced right away.
For type HB955 only: have the infrared lamps replaced when they stop functioning.
Have the tanning lamps (Philips HPA flex power 400-600), the infrared lamps (no. 4222 062
95590), the UV filters and the mains cord replaced by a service centre authorised by Philips. Only
they have the knowledge and skills required for this job and the original spare parts for the
appliance.
Environment
The lamps of the appliance contain substances that can be harmful to the environment.When you
discard the lamps, make sure they are not thrown away with the normal household waste but are
handed in at an official collection point.
Guarantee & service
If you need service or information or if you have a problem, please visit the Philips Web site at
www.philips.com or contact the Philips Customer Care Centre in your countr y (you will find its
phone number in the worldwide guarantee leaflet). If there is no Customer Care Centre in your
country, turn to your local Philips dealer or contact the Service Department of Philips Domestic
Appliances and Personal Care BV.
Guarantee restrictions
The tanning lamps are not covered by the terms of the international guarantee.
ENGLISH 13
Page 10
Possible cause
The plug has not been (properly) inserted into the wall socket.
There is a power failure. Check if the power supply works by
connecting another appliance.
The lamps are still too hot to go on. Let them cool down for 3 minutes
first.
The appliance was not sufficiently cooled and the overheating
protection switched the appliance off automatically. Remove the cause
of overheating (e.g. remove a towel that is blocking one or more vents).
Wait for 10 minutes and switch the appliance back on.
Check the fuse of the circuit to which the tanning appliance is
connected.The correct fuse type is a 16A standard fuse or an automatic
fuse.The fuse may also blow because you have connected too many
appliances to the same circuit.
You are using an extension cord that is too long and/or does not have
the correct rating (16A). Consult your dealer. Our general advice is not
to use an extension cord.
You are not following the tanning schedule suitable for your skin type.
The distance between the lamps and the surface you lie on is larger
than prescribed.
When the lamps have been used for a long time, the tanning capacity
will decrease.This effect only becomes noticeable after several years.
You can solve this problem by selecting a slightly longer tanning time or
by having the lamps replaced.After 750 operating hours an L will
appear on the display telling you that it is advisable to have the lamps
replaced.
You have not pushed the upper part of the appliance backward far
enough. Make sure you first push the upper par t backward before
pushing it down (see 'Storage').
The appliance fails to unlock automatically. In that case you first have to
press unlocking button (B), after which you can fold the appliance back
into its transport position in the manner indicated in the chapter
'Storage'. If the appliance fails to unlock several times, contact your
dealer or a Philips service centre.
Problem
The appliance does not start
The fuse cuts off the power when
you switch on the tanning appliance
or during use.
Poor tanning results
The appliance cannot be put back
into transport position.
Troubleshooting
If the appliance does not work properly, this may be due to a defect. In that case we advise
you to contact your dealer or a Philips service centre.
The appliance may also fail to work properly because it has not been installed or is not used
in accordance with the instructions. In that case you are able to solve the problem yourself by
following the troubleshooting tips below.
ENGLISH
14
Page 11

ENGLISH 15
Solution
Check the openings of the vents (see 'appliance does
not start' in the 'Troubleshooting guide').
Check the UV filters (the special glass panes that cover
the lamps). If these filters are broken, damaged or
missing, stop using the appliance and contact your
dealer or a Philips service centre.
Contact your local dealer or a Philips service centre.
Error code
E01
E02 and codes with a higher number
Note: E01 appears in the display for 5 seconds and at the same time you hear a beeping
sound.
Note: E02 and codes with a higher number remain visible on the display. If these codes appear,
the appliance has a serious problem and must not be used any longer.
Error codes
The display of the remote control may show error codes. Below we will explain what you should do
if an error code appears on the display.
Page 12

Kasutusjuhend
Päevitamisseade
Selle päevitusseadmega saate mugavasti kodus päevitada. Päevituslambid lähetavad valgust, soojust ja
ultraviolettkiirgust, mis tekitavad tunde, nagu viibiksite loodusliku päikese käes. Spetsiaalsed UV filtrid
sobivad ainult valgusega, mis tekitavad päevitust.
Päevituslambid edastavad piisavalt infrapunast valgust ja annavad meeldivat soojust.
Mudel HB955: koos päevitusseansiga saate teha ka lõdvestusseansse, lülitades sisse spetsiaalsed
infrapunalambid.
Taimer tagab, et päevitusseanss ei kestaks kauem kui 30 minutit. Nagu loodusliku päikesega võib ka
sellega liialdamine olla ohtlik (vt pt `Päevitamine ja tervisÍ).
Tähtis!
◗ Enne, kui ühendate seadme vooluvõrku,kontrollige, kas seadmele märgitud pinge vastab
kohalikule võrgupingele.
◗ Kui pistik ei ole seinapistikupesas korralikult sees, võib see tuliseks minna.Kontrollige, et
pistik oleks korralikult seinapistikupesas.
◗ Seade peab olema ühendatud vooluvõrku, mis on varustatud 16 A standard- või
automaatkaitsekorkidega.
◗ Alati pärast kasutamist eemaldage pistik pistikupesast.
◗ Vesi ja elektriseadmed ei sobi kokku! Seepärast ärge kasutage seadet niiskes keskkonnas (nt.
vannitoas või dushis ega basseini läheduses).
◗ Kui olete just käinud ujumas või dushi all,kuivatage end hoolikalt enne seadme kasutamist.
◗ Enne hoiukohta panekut laske seadmel maha jahtuda umbes 15 minutit.
◗ Kontrollige, et lampide ja aluse ventilatsiooniavad ei oleks mingil moel takistatud seadme
kasutamise ajal.
◗ Seade on varustatud automaatse ülekuumenemiskaitsega. Kui seadet on ebapiisavalt jahutatud
(või on ventialatsiooniavad olnud kaetud),lülitub seade automaatselt välja. Kui
ülekuumenemise põhjus on kõrvaldatud ja seade on maha jahtunud, lülitub seade jälle sisse.
◗ UV filtrid on kasutamise ajal väga kuumad. Ärge katsuge neid!
◗ Seadmel on hingedega ühendatud osi, seetõttu olge ettevaatlik ja ärge jätke oma sõrmi nende
osade vahele.
◗ Ärge kasutage seadet, kui UV filter on rikutud, katki või puudub.
◗ Ärge lubage lastel seadmega mängida.
◗ Ärge kunagi ületage lubatud päevitusseansside kestust ega -tundide arvu (vt
`Päevitusseansside kestus ja sagedus`).
◗ Ärge kasutage päevitusseadet ja/või tehke lõdvestusseansse,kui tunnete end haigena ja/või
tarvitate nahatundlikkust suurendavaid ravimeid.Kui olete ülitundlik UV kiirguse suhtes,peate
olema eriti ettevaatlik. Kahtluse korral pidage nõu arstiga.
◗ Ärge päevitage üksiku keha osa sagedamini kui kord päevas. Ärge viibige päikese käes samal
päeval.
◗ Pöörduge arsti poole, kui nahale tekivad haavandid, pigmendilaigud või muhud.
◗ Seadet ei tohi kasutada inimesed, kelle nahk ei päevitu või kes saavad kergelt päikesepõletuse,
lapsed ja inimesed, kes põevad (või on põdenud) nahavähki või kellel on selleks eelsoodumus.
◗ Kandke alati kaitseprille, mis säästavad teie silmi liigsete valgus-, UV- ja infrapuna
kiirgusannuste eest (vt ka `Päevitamine ja tervisÍ).
◗ Enne päevitamist eemaldage näolt kreem, huulepulk ja muu kosmeetika.
◗ Ärge kasutage päevituspiima või -kreemi, mis kiirendab päevitusprotsessi.
◗ Ärge kasutage mingeid päevituskreeme ega -piima, mis kaitseb nahka päikesepõletuse eest.
◗ Kui nahk tundub pärast päevitamist kuiv, võite nahale määrida niisutavat kreemi.
◗ Ühtlase päevituse saamiseks lamage otse lampide all.
◗ Päevituskaugus olgu vähemalt 65 cm.
EESTI16
Page 13

◗ Seadet tohib liigutada ainult juhul, kui ta on transportimisasendis. Enne liigutamist kontrollige,
et seadme kaks osa oleks korralikult kinnitatud.
◗ Värvid võivad pleekida päikesekiirte mõjul. Sama võib juhtuda ka seadet kasutades.
◗ Ärge oodake seadmelt paremaid tulemusi kui looduslikult päikesekiirguselt.
Päevitamine ja tervis
Päike, UV ja päevitamine
Päike
◗ Päikeseenergia avaldab mitut laadi toimet:annab valgust,soojendab (IR) ja päevitab nahka (UV).
UV, päevitamine ja tervis
Nagu loodusliku päikesega, nii ka päevitusseadmega päevitamine võtab aega. Esmane efekt on nähtav
pärast mitut päevitusseanssi (vt `Päevitusseansside kestus ja sagedus`).
Ülemäärane ultraviolettkiirguse käes olemine (looduslik päikesekiirgus või päevitusseadme poolt
loodud kunstlik kiirgus) võib põhjustada päikesepõletust.
Paljude teiste tegurite kõrval suurendab ka päevitusseadme vale ja ülemäärane kasutamine, nagu
looduslikus päikesekiirguses päevitamisega liialdamine, teie naha ja silmade haigestumise riski.
Kahjustuste tekke tõenäosus sõltub ühelt poolt kiirguse iseloomust, intensiivsusest ja kestusest, teiselt
poolt inimese kiirgustundlikkusest.
Mida rohkem nahk ja silmad UV kiirgust saavad, seda suurem on oht, et tekivad silma sarvkesta,
sidekesta põletikud, võrkkesta kahjustus, kae, naha enneaegne vananemine ja nahakasvajad.Teatud
ravimid ja kosmeetikavahendid suurendava naha tundlikkust.
Seepärast on väga oluline, et Te:
B
järgiksite kasutusjuhendi pt ÍTähtisÍ ja ÍPäevitusseansside kestus ja sagedusÍ antud õpetusi.
B
järgite, et päevituskaugus (kaugus UV filtri ja keha vahel) on 65 cm.
B
ei ületa lubatud päevitustundide aastamäära (s.o. 20 tundi ehk 1200 minutit).
B
panete alati päevitamise ajaks ette kaitseprillid.
IR, lõõgastus ja tervis (ainult HB955)
Soojus omab lõõgastusefekti. Kujuta ette kuumas vannis või päikesepaistel lebamist.Teil on võimalus
nautida lõõgastusefekti, kui lülitate sisse infrapunalambid.
Tehes lõõgastusseanssi pidage meeles järgnevat:
- Ärge laske end liiga kuumaks.Vajaduse korral suurendage vahemaad lampide ja keha vahel.
- Pea ülekuumenemise vältimiseks pange katke pea või muutke kehaasendit, et pea ei soojeneks
liigselt.
- Lõõgastusseansi ajal sulgege silmad.
- Ärge tehke liialt pikki lõõgastusseansse (vt pt ÍLõõgastusseansside kestus ja sagedus).
Päevitusseansside sagedus ja kestus
◗ Te võite nahka päevitada üks kord päevas, 5-10 päeva järjest.
◗ Peate vähemalt 48 tundi esimese ja viimase päevitusseansi vahel vahet.
◗ Pärast 5 kuni 10 päevast kuuri laske näonahal mõnda aega puhata.
◗ Umbes üks kuu pärast päevituskuuri on päevitus tublisti kahvatunud.Siis soovite ehk alustada
uut samasugust kuuri.
◗ Teine võimalus päevituse säilitamiseks on hakata pärast igapäevaste seansside kuuri päevitama
1-2 korda nädalas.
◗ Kumba võimalust Te ka ei eelistaks,jälgige, et Te ei ületaks päevitustundide aastamäära.
◗ Selle seadmega on maksimaalne päevitustundide aastamäär 20 tundi (=1200 minutit).
See kehtib ka kehaosade päevitamisel (funktsioon º ja ªº).
EESTI 17
Page 14

Näide
Kujutage ette, et te päevitate 10 päeva, esimesel päeval 8 minutit ja üheksal järgneval päeval 20
minutit.
Kogu kuuri kestus on seega (1 x 8 minutit) + ( 9 x 20 minutit) = 188 minutit.
Aasta jooksul võite läbi teha 6 sellist seanssi, 6 x 188 min = 1128 minutit.
Loomulikult sõltub maksimaalne päevitustundide kestus iga kehaosa või -poole päevitamise kohta
eraldi (näit keha esi- ja tagapool).
Tabelist nähtub, et kuuri esimene seanss peaks kestma 8 minutit, olenemata naha tundlikkusest.
B
Kui arvate, et päevitusseanss on Teie jaoks liiga pikk (näit.Teie nahk on pärast päevitamisseanssi
kuiv ja hell), soovitame päevitusseanssi lühendada näit. 5 minutile.
B
Kena päevituse saamiseks keerake oma keha päevitamise ajal, et kehaosad ja -pooled saaksid
paremini päevitusvalgust.
*) või kauem, olenevalt Teie naha tundlikkusest.
Kui nahk tundub pärast päevitamist kuiv, võite nahale määrida niisutavat kreemi.
B
Märkus: kui päevitate ainult osa oma kehast, võite kasutada päevituskava,mis on esitatud
tabelis koos infoga pt `Päevituseansside kestus ja sagedus`.
Lõõgastusseansside kestus ja sagedus
Ainult HB955
Kui te ei soovi kohe pärast päevitusseanssi lahkuda, võite sisse lülitada infrapunalambid
lõõgastusseansiks, et need soojendaksid teid lõõgastumise ajal.
Võite teha lõõgastusseanssi ka ilma päevitamiseta. Seda võib teha mitu korda päevas (näit 30 min
hommikul ja õhtul).
EESTI18
Vähetundlik nahk
8 minutit
30 minutit*
30 minutit*
30 minutit*
30 minutit*
30 minutit*
30 minutit*
30 minutit*
30 minutit*
30 minutit*
Normaalne nahk
8 minutit
20-25 minutit
20-25 minutit
20-25 minutit
20-25 minutit
20-25 minutit
20-25 minutit
20-25 minutit
20-25 minutit
20-25 minutit
Ülitundlik nahk
8 minutit
10 minutit
10 minutit
10 minutit
10 minutit
10 minutit
10 minutit
10 minutit
10 minutit
10 minutit
Päevituseansi ajal
igale kehaosale eraldi
esimene seanss
laske nahal 48 tundi
puhata
teine seanss
kolmas seanss
neljas seanss
viies seanss
kuues seanss
seitsmes seanss
kaheksas seanss
üheksas seanss
kümnes seanss
Page 15

Ettevalmistus kasutamiseks
◗ Seadet on lihtne ringi paigutada ja hoida transportimisasendis (joon 2).
◗ Kui soovite päevitada ainult nägu (ainult mudel HB951 ja HB952) või kui tahate päevitada
ainult mingit teatud kehaosa (näit jalgu või ülakeha;ainult mudel HB952, HB955) veenduge, et
seade oleks asemest õigel pool (joon 3).
1 Avage seade tõmmates lingid, mis paiknevad aluse mõlemil pool, välja ja on märgistatud
noolega (joon 4).
Seadme ülemine osa on nüüd lahti.
2 Ülemine osa tõuseb natuke üles (iseenesest või aidates) (joon 5).
3 Võtke sangast mõlema käega kinni ja pange üks jalg seadme vastu, et välitida libisemist.
Sangast tõmmates kallutage ülemist osa ja hoidke sellega kaant (joon 6).
Ärge kallutage ülemist osa liiga palju.
4 Lükake ülemist osa üheaegselt üles ja enda poole (joon 7).
See nõuab jõupingutust.
5 Tõugake mõlemad lambid nii kaugele äärte suunas kui võimalik, kuni need on üksteise suhtes
ühel joonel (joon 8).
6 UV filtrite ja teie keha vaheline vahemaa olgu 65 cm. UV filtrite ja pinna vaheline vahemaa,
millel te lebate (näit. ase), olgu 85 cm (joon 9).
7 Kui paigaldate või täpsustate seadme kõrgust,toetage hoidiku ülemist osa (joon 10).
Vabastage nupp 'A' seda vastupäeva pöörates (kaks või kolm pööret).
8 Pange oma käsi hoidiku horisontaalse osa alla ja pikendage hoidik valitud kõrgusele (joon 11).
9 Kinnitage nupp 'A' uuesti ja vabastage hoidik (joon 12).
◗ Tõmmake välja vahemaa määraja, et kindlaks teha, kas seade on asetatud nõutud kõrgusele
(joon 13).
◗ Vahemaa määraja kerib end automaatselt sisse, kui liigutate punast nuppu külitsi (joon 14).
Seade on valmis kasutamiseks.
Seadme kasutamine
1 Kerige juhe täielikult lahti.
2 Pange pistik pistikupesasse.
◗ Kaugjuhtimispult näitab kõiki funktsioone, mida tuleb reguleerida.Päevitus- või lõõgastusaja
näit on 00 (joon 15).
◗ Ainult mudelid HB951 ja HB952 näitavad sümbolit ª:näopäevitussümbol.
◗ Ainult mudelid HB952 ja HB955 näitavad sümbolit º:mingi kehaosa päevitussümbol.
◗ Ainult mudel HB955 näitab sümbolit – (lõõgastus).
Reguleerimisfunktsioonid
1 Kasutage ¡™nuppe, et lülitada ühelt funktsioonilt teisele (joon 16).
Allakriipsutatud sümbol näitab funktsiooni, mis on programmeeritud.
2 Päevitamise, näo-, kehaosa päevitamine või lõõgastuse valimine.
Valige sümbol • kui soovite päevitada kogu keha.
Valige sümbol • ja ª kui soovite päevitada kogu keha ja anda näole ekstrapäevituse (mudelid
HB951 ja HB952).
Valige º kui sooivte päevitada teatud kehaosa (ainult mudelid HB952 ja HB955).
Valige ª ja º kui soovite päevitada teatud kehaosa k.a. ekstra näopäevitus (ainult mudel HB952).
EESTI 19
Page 16

Valige ª ja – kui eelistate lõõgastusseanssi (soojendav) kogu kehale (ainult mudle HB955).
Märkus: Selles kasutamisõpetuses funktsioonid ;ªon esitatud näidetena, mis võivad kuvarile
ilmuda.
Ajaseadistus päevitus- või lõõgastusseansiks.
1 Seadistage päevitus- või lõõgastusseansi aeg vajutades + nuppu, et panna aega edasi või
lükates - nuppu, et panna aega tagasi (joon 17).
jätke nupp sisse vajutatuks, et reguleerimine toimuks kiiremini.
2 Heitke pikali täpselt seadme lampide alla, et ka keha küljed saaksid päevitust.
3 Pange kaitseprillid ette.
4 Lülitage päevitus- või infrapunalambid sisse vajutages stardinuppu ∞ (joon 18).
B
Märkus:Tööle hakkamise käigus päevituslambid surisevad. See kaob kohe, kui lambid on
korralikult põlema hakanud.
B
Märkus: päevituslambid hakkavad lähetama nähtavalt tugevamat valguskiirgust umbes 60 sek
pärast, sest põlevad täisvõimsusega. Sellest hetkest alates võite näopäevitaja sisse või välja
lülitada.
B
Märkus: kui lambid lakkavad töötamast,umbes 20 sekundi pärast, lülitage seade välja (∞), laske
lampidel jahtuda 3 minutit, seadke uus päevitamisaeg ja lülitage seade uuesti sisse (∞).
◗ Ilmub vilkuv signaal, seatud aeg on nähtav kuvaril (antud juhul 25 minutit) (joon 19).
Päevitus või lõõgastusaja arvestus algab.
◗ Võite näopäevitaja (• , ª) sisse või välja lüitada päevitamisseansi ajal ilma seadet välja
lülitamata (joon 20).
B
(See kehtib ka näopäevitaja kohta kombinatsioonis º).
Valitud sümbolid ilmuvad kuvarile, teised mitte.
◗ Päevitamisseansi viimase minuti ajal kuulete katkendlikku piibitavat heli (joon 21).
◗ Sel ajal võite vajutada paus/korrata nuppu § seatud aja kordamiseks (joon 22).
◗ Kuvarile ilmub uus aeg ja minutite lugemine hakkab tööle.Signaal katkeb.
◗ On võimalik seada uut aega.
Nii ei ole Teil vaja oodata 3 minutit seadme järgnevaks kasutamiseks, sest kui seade lülitub välja,
peavad päevituslambid jahtuma enne järgmist kasutamist.
Ooteaeg ei kehti infrapunalampide kohta (ainult HB955).
5 Seadke uus aeg vajutades ¢ või £ nuppe. Seejärel vajutage stardinuppu ∞ (joon 23).
Signaal katkeb ja uus aeg hakkab käima.
◗ Kui te ei korda seanssi ja ei vajuta § või ei seadista uut aega seansi viimase minuti kestel,
ajaarvestus jätkub ja seade lülitub automaatselt välja kohe, kui aeg on läbi.
Päevitus- või lõõgastusseansi katkestamine
1 Võite katkestada päevitamisseansi vajutades paus/korrata nuppu § (joon 24).
Lambid lülituvad välja, P ilmub displeile koos järelejäänud ajaga.3 minutit vilgub järelejäänud aeg. Selle
aja kestel lambid jahtuvad. Kui vilkumine lõpeb,saate seadme uuesti sisse lülitada vajutades nuppu ∞
Hakatakse arvestama järelejäänud aega.
2 Lõõgastusseansi katkestamine toimub paus/korrata § nupuvajutamisega.
Lambid lülituvad välja, P ilmub displeile koos järelejäänud ajaga.3 minutit vilgub järelejäänud aeg. Selle
aja kestel lambid jahtuvad. Kui vilkumine lõpeb,saate seadme uuesti sisse lülitada vajutades nuppu ∞.
Hakatakse arvestama järelejäänud aega.
Päevitus- või lõõgastusaja muutmine seansi ajal
1 Päevitamise ajal on võimalik ajaseadet muuta vajutades nuppu ∞. Kiirguslambid lülituvad välja.
Seejärel seadke uus aeg vajutades nuppudele ¢£Oodake, kuni seatud aeg lõpetab vilkumise
EESTI20
Page 17

(umbes 3 minutit, sest kiirguslambid peavad maha jahtuma) ja vajutage uuesti nupule ∞.
2 Lõõgastusseansi (–), aega saate muuta vajutades nuppu (∞), Lambid lülituvad välja.Võite seada
uue aja ja lülitada seadme kohe tagasi sisse nupuga ∞. Ooteaeg ei kehti infrapunalampide
kohta (uuestiseatud aeg ei vilgu displeil).
◗ Kontrollige, et lambid paremal on sisse lülitatud (ainult HB955).
B
Päevitamine: neli lampi annavad sinakat valgust.
B
Lõõgastus: neli lampi annavad punakat valgust.
Pärast päevitusseanssi
1 Pidage seansi number mälunupu abil meeles (ainult mudelid HB952 ja HB955).Seadmel on
kaks mälunuppu: kummalegi isikule oma (joon 25).
Jahtumine
Seadet jahutavad föönid, et vältida materjali ja osade ülekuumenemist. Päevituslambid ei lülitu sisse,
kui need on liialt kuumad (vt "Päevitsu- või lõõgastusseansi katkestamine").
◗ Pärast päevitus- või infrapunalampide väljalülitamist jätkavad föönid tööd umbes 3 minutit.
See on mugav, sest päevituslampe on võimalik uuesti kasutada alles 3 minuti möödudes pärast
nende välja lülitamist.
B
Infrapunalampe ei pea jahutama enne järgnevat sisselülitamist.
B
Muidugi, kui olete seadme toitejuhtme seinapistikust välja tõmmanud, siis ventilaatorid ei jahuta.
B
Kui olete seadme toitejuhtme seinapistikust välja tõmmanud ja keegi soovib seadet otsekohe
kasutada, ei vilgu kuvaril uuesti seatud aega. See tähendab, et järgmine kasutaja peab ootama
3 minutit, kuni seade maha jahtub.
B
Ainult HB955: kui te sooivte kasutada seadet päevitusseansiks otsekohe pärast lõõgastusseanssi
(–), peate laskma seadmel jahtuda kolm minutit. Kui lõõgastusseansi tagajärjel on
päevituslambid kuumaks läinud, peate neid enne sisselülitamist jahtuda laskma.
Puhastamine
1 Enne puhastamist võtke alati pistik pistikupesast välja ja laske seadmeil maha jahtuda.
2 Seadme välispinda võite puhastada niiske lapiga.
Jälgige, et seadme sisemusse ei satuks vett.
3 Ärge kasutage küürimiskäsnu.
Seadme puhastamiseks ärge kunagi kasutage küürimiskäsnu, bensiini või atsetooni.
◗ UV filtrite välispinda võite puhastada pehme lapi ja metüülpiiritusega.
Hoidmine
1 Laske seadmel jahtuda 15 minutit enne panemist transportimisasendisse ja pange seade
hoiule.
◗ Vaheaegadel võite toitejuhtme kokku kerida ja panna seadme alusesse.
2 Kontrollige, et toitejuhe ja kaugjuhtimispult oleks korralikult hoiule pandud,vastasel korral
võivad need kinni jääda seadme osade vahele, kui panete seadme transportimisasendisse
(joon 26).
3 Hoidke tugevasti ühe käega hoidiku ülemist osa ja vabastage kõrguse regulaatornupp (A)
keerates seda vastupäeva (joon 27).
4 Lükake täielikult hoidikusse (joon 28).
5 Kinnitage kindlalt kõrguse regulaatornupp (A) keerates seda päripäeva (joon 29).
EESTI 21
Page 18

6 Pöörake kaks lampi teineteise vastu (joon 30).
7 Hoidke mõlema käega käepidemest kinni, pange üks jalg seadme vastu, et seade ei libiseks ja
kallutage ülemine osa koos hoidikuga tahapoole (joon 31).
Automaatne lukustaja töötab ainult siis, kui olete ülemist osa koos hoidikuga kallutanud piisavalt
tahapoole. Olge ettevaatlik, et Te ei kallutaks liiga palju,võite tasakaalu kaotada.
8 Lükake ülemine osa alla (joon 32).
9 Laske aeglaselt alusele (joon 33).
10 Kinnitage lambid alusele lükates mõlemaid linke noole suunas (joon 34).
Toitejuhtme vahetamine
Aja jooksul (tavalisel kasutamisel mõne aasta pärast) valgus päevituslampidest väheneb. Sel juhul
väheneb solaariumi päevitamisjõudlus. On võimalik seda lahendada päevitamisaja kestust pikendades
või päevituslampe vahetades.
◗ Ainult mudelid HB952 ja HB955: seadme kaugjuhtimispult on ka loendaja, mis registreerib
töötunde.
1 Valige funktsioon •.Seadke aeg 00 ja hoidke paus/korrata nupp § all, et kuvarile ilmuks
töötundide arv (joon 35).
Maksimaalne tundide arv, mis võib kuvarile ilmuda, on 999. Kui töötundide arv on selle numbrini
jõudnud, jätkub tundide lugemine 000 -st.
2 Kui vabastate paus/korrata nupu, kaob töötundide arv displeilt.
◗ Pärast 750 päevitustunni möödumist ilmub kuvari vasakusse ossa L. See tähendab, et seadme
päevitusjõudlus on vähenenud ja kiirguslampe oleks soovitav vahetada (joon 36).
Muidugi, võite asendamise edasi lükata ja päevitamisaega vastavalt pikendada.
3 L eemaldamiseks kuvarilt vajutage paus/korrata § nuppu, ajanäiduga 00 ja funktsiooni
sümboliga• kuvaril. Hoidke nuppu paus/korrata all ja vajutage esmalt ¢ nuppu ja seejärel £
nuppu ning L kaob kuvarilt (joon 37).
UV filter kaitseb kahjuliku valguskiirguse eest. Seepärast on tähtis, et kõrvaldaksite otsekohe
vigastatud või katkise filtri.
Ainult mudel HB955: vahetage infrapunalambid, kui need lakkavad töötamast.
Laske päevituslampe (Philips HPA flex power 400-600), infrapunalampe (nr.4222 062 95590), UV
filtrid ja juhtmed vahetada Philipsi poolt volitatud hooldekeskuses.Ainult sealsetel töötajatel on
vastavad teadmised, kogemused ning tööriistad ja lisaosad.
Keskkonnakaitse
Seadme lambid sisaldavad keskkonda saastavaid aineid.Ärge visake vanu lampe tavaliste
olmejäätmete hulka, vaid viige need selleks ettenähtud kohta.
Garantii ja hooldus
Kui te vajate infot või on seadme töös tekkinud mingid probleemid, külastage www.philips.om või
võtke ühendus Philipsi hoolduskeskusega Teie riigis (telefoninumbri leiate garantiilehelt). Kui Teie riigis
ei ole hoolduskeskust, otsige abi Philpsi toodete levitajalt.
Garantii
Päevituslampidel ei ole garantiiaega.
EESTI22
Page 19

Võimalik põhjus
Pistik ei ole (korralikult) pistikupesas.
See on voolu häire. Kontrollige voolutoidet mingi muu seadmega.
Lambid on liiga kuumad. Laske neil jahtuda 3 minutit.
Seade ei ole korralikult maha jahtunud ja ülekuumenemise kaitse on
seadme automaatselt välja lülitanud. Kõrvaldage ülekuumenemise põhjus
(nt. käterätik,mis takistab avaust või mitut avaust).Oodake 10 minutit ja
lülitage seade sisse.
Kontrollige vooluvõrku, kuhu päevitusseade on lülitatud. Pinge olgu 16 A
standard-või automaatkorkide puhul.Voolkatkestus võib tekkida ka siis,
kui võrku on lülitatud liiga palju seadmeid.
Te kasutate liiga pikka pikendusjuhet ja/või selle võimsus ei ole vastav
(16 A).Pidage nõu tootemüüjaga. Soovitame pikendusjuhet mitte
kasutada .
Te ei jälgi päevitusgraafikut, mis sobib Teie naha tüübile.
Vahemaa Teie ja lambi vahel on suurem vajalikust.
Kui lampe on pikemat aega kasutatud, väheneb nende jõudlus. Kuid see
on märgatav mitme kasutusaasta pärast. Seadke päevitusaeg pikemaks
või vahetage lambid uute vastu. Pärast 750 töötundi ilmub L displeile ja
teatab sellest, et lampe tuleks vahetada.
Te ei ole seadme ülemist osa piisavalt taha lükanud. Enne selle alla
panemist kontrollige, et see oleks lükatud taha (vt pt Hoidmine).
Seade ei tule automaatselt lukustusest lahti. Sel juhul esmalt vajutage
lukustusest vabastusnuppu (B), mille järel saate seadme tõsta taha
transportimisasendisse, mida on kirjeldatud pt `HoidmineÍ.Kui seade ei
tule lukustusest lahti mitu korda, võtke ühendus toodetemüüja või
Philipsi hooldekeskusega.
Häired
Seade ei hakka tööle
Kaitsekorgid katkestavad voolu
solaariumi sisse lülitades või selle
kasutamise ajal.
Ebarahuldav päevitustuelmus
Solaariumit ei ole võimalik panna
transportimisasendisse.
Häirete kõrvaldamine
Kui seade ei tööta korralikult, võib olla, et see on defektne. Soovitame pöörduda
toodetemüüja või Philipsi hooldekeskuse poole.
Seade võib valesti töötada ka siis, kui ei ole korralikult paigaldatud või järgitud juhendit. Sel
juhul soovitame häirete lahendamisel järgida häirete kõrvaldamise õpetust.
EESTI
23
Page 20

Häirete koodid
Kaugjuhtimispult võib näidata häirete koode. Järgnevalt kirjeldame, mida tuleb teha, kui puldile ilmub
mõni kood nendest.
EESTI24
Lahendus
Kontrollige, kas avaused on vabad (vt 'seade ei hakka
tööle' osas 'Häirete eemaldamine').
Kontrollige UV filtreid (lampe katab spetsiaalne klaas).
Kui filter on katki, vigastatud või puudub, ärge seadet
kasutage ja pöörduge toodetemüüja või
hoolduskeskuse poole.
Võtke ühendus kohaliku toodetemüüja või
hoolduskeskusega.
Häirete kood
E01
E02 ja suurema numbriga koodid
Märkus: E01 ilmub displeile 5 sekundiks ja samal ajal kuulete piibitavat signaali.
Märkus: E02 ja suurema numbriga koodid püsivad displeil. Kui koodid ilmuvad, on seadmel
tõsised häire ja seda kasutada enam ei tohi.
Page 21

Ievads
Sauļošanās ierīce
Izmantojot šo sauļošanās ierīci, varat ērti sauļoties mājās. Lampas izdala redzamu gaismu, karstumu un
ultravioletos starus, radot sajūtu, ka sauļojaties saulē. Īpašie ultravioleto staru filtri atdala tikai tos
starus, kas ir nepieciešami, lai iegūtu iedegumu.
Lampas izdala pietiekamu daudzumu infrasarkano staru, lai būtu jūtams patīkams siltums.
Modelim HB955: bez sauļošanās seansa varat veikt arī relaksācijas seansu, vienkārši ieslēdzot īpašās
infrasarkano staru lampas.
Taimers nodrošina, ka sauļošanās seansa ilgums nepārsniedz 30 minūtes.Tāpat kā dabīgajā saules
gaismā, ir jāizvairās no pārlieku ilgas sauļošanās (sk. nodaļu "Sauļošanās un veselība").
Svarīgi
◗ Pirms ierīces pievienošanas elektrotīklam pārliecinieties,vai uz tās norādītais spriegums atbilst
elektrotīkla spriegumam jūsu mājā.
◗ Ja elektrovada kontaktsraudnis nav līdz galam iesprausts elektrotīkla sienas kontaktrozetē,tas
sakarst. Pārliecinieties, ka kontaktspraudnis rūpīgi iesprausts elektrotīkla sienas kontaktrozetē.
◗ Ierīce jāpievieno elektroķēdē,ko aizsargā 16 A standarta drošinātājs vai automātiskais
drošinātājs.
◗ Pēc lietošanas vienmēr atvienojiet ierīci no elektrotīkla.
◗ Ūdens un elektrība ir bīstams savienojums! Tāpēc nelietojiet solāriju mitrā vidē (piemēram,
vannas istabā, dušas telpā vai baseina tuvumā).
◗ Ja esat tikko peldējies vai mazgājies dušā, pirms ierīces lietošanas rūpīgi noslaukieties.
◗ Ļaujiet ierīcei atdzist apmēram 15 minūtes, pirms saliekat to pārvietošanai pēc lietošanas.
◗ Raugieties, lai atveres lampu komplektos un pie pamata virsmas būtu atvērtas sauļošanās
laikā.
◗ Ierīce ir aprīkota ar automātisku aizsardzību pret pārkaršanu. Ja ierīce netiek pietiekami
dzesēta (piemēram, ventilācijas atveres ir aizklātas), tā automātiski izslēdzas. Ja ierīces
pārkaršanas cēlonis ir novērsts, un tā ir atdzisusi, to var atkal ieslēgt.
◗ Ierīces lietošanas laikā ultravioleto staru filtri sakarst. Neaiztieciet tos.
◗ Ierīcē ir daļas, kas stiprinātas ar eņģēm, tāpēc uzmanieties un nesaspiediet pirkstus starp tām.
◗ Nekad nelietojiet ierīci bez ultravioleto staru filtra vai, ja tas ir bojāts vai salūzis.
◗ Raugieties, lai bērni nerotaļājas ar ierīci.
◗ Nepārsniedziet ieteikto seansa laiku un maksimālo sauļošanās stundu skaitu (sk. nodaļu
"Sauļošanās seansi: cik bieži un cik ilgi?").
◗ Neveiciet sauļošanās un/vai relaksācijas seansus,ja slimojat un/vai izmantojat medikamentus
vai kosmētikas līdzekļus, kas paaugstina ādas jutīgumu. Īpaši uzmanieties, ja esat ļoti jutīgs pret
ultravioletajiem vai infrasarkanajiem stariem. Šaubu gadījumā konsultējieties ar savu ārstu.
◗ Atsevišķas ķermeņa daļas sauļojiet tikai vienu reizi dienā.Dienās, kad lietots solārijs,
izvairieties no pārāk ilgas uzturēšanās saulē.
◗ Konsultējieties ar ārstu,ja uz ādas izveidojas čūlas, dzimumzīmes vai ilgi nezūdoši uztūkumi.
◗ Šis solārijs nav paredzēts cilvēkiem,kuri saulē apdeg, bet neiedeg; tiem, kas cieš no saules
apdegumiem; bērniem; personām,kurām ir bijis ādas vēzis, vai kurām ir paaugstināta iespēja
saslimt ar to.
◗ Sauļošanās laikā vienmēr uzlieciet komplektā esošās aizsargbrilles, lai pasargātu acis no
pārlieku ilgas redzamās gaismas, ultravioleto un infrasarkano staru iedarbības (sk. arī nodaļu
"Sauļošanās un veselība").
◗ Pirms sauļošanās seansa rūpīgi notīriet no ķermeņa krēmu, lūpukrāsu un pārējo kosmētiku.
◗ Nelietojiet nekādus krēmus vai losjonus, kas paredzēti iedeguma paātrināšanai.
◗ Neizmantojiet sauļošanās krēmus un losjonus, kas pasargā ādu no apdegšanas.
◗ Ja pēc sauļošanās seansa jūtat, ka āda ir saspringta, varat lietot mitrinošu krēmu.
◗ Lai iegūtu vienmērīgu iedegumu, ir jāguļ tieši zem lampām.
LATVISKI 25
Page 22

◗ Attālumam līdz lampām jābūt ne mazākam par 65 cm.
◗ Ierīci drīkst pārvietot tikai tad, ja tā ir salikta pārvietošanai.Pirms pārvietošanas
pārliecinieties, vai ierīces abas daļas ir rūpīgi sastiprinātas. Nemēģiniet viens pats pacelt ierīci.
◗ Saules gaismas iedarbībā mēdz izbalot krāsas.Tas pats var notikt solārija izstarotajā gaismā.
◗ Negaidiet, ka solārijā nosauļosieties labāk nekā saulē.
Sauļošanās un veselība
Saule, ultravioletie stari un sauļošanās
Saule
◗ Saules enerģijai ir dažādi veidi.Tās gaismā mēs redzam apkārtni, ultravioleto staru ietekmē
mēs gūstam iedegumu, un infrasarkanie stari rada siltumu, kurā mums tā patīk gozēties.
Ultravioletais starojums,sauļošanās un jūsu veselība
Līdzīgi kā dabiskajā saules gaismā, sauļošanās process aizņems kādu laiku. Pirmie rezultāti kļūs redzami
tikai pēc dažiem seansiem (sk. nodaļu "Sauļošanās seansi: cik bieži un cik ilgi?").
Pārlieku ilga uzturēšanās ultravioletajos staros (dabiskajā saules gaismā vai mākslīgajā solārija gaismā)
var izraisīt apdegumus.
Līdzīgi citiem faktoriem, piemēram, pārlieku ilga uzturēšanās dabiskajā saules gaismā, nepareiza un
pārmērīga solārija izmantošana var palielināt iespēju saslimt ar ādas un acu slimībām. Iespēja saslimt ir
atkarīga gan no sauļošanās veida, intensitātes un ilguma, gan no cilvēka ādas jutīguma.
Jo ilgāk āda un acis ir pakļautas ultravioleto staru iedarbībai, jo ir augstāka iespēja, ka veidosies
konjunktivīts, acs tīklenes bojājumi, katarakta, pāragra ādas novecošanās, ādas audzēji u.c. Daži
medikamenti un kosmētikas līdzekļi paaugstina ādas jutību.
Tāpēc ir ļoti svarīgi:
B
rīkoties atbilstoši norādījumiem, kas doti nodaļās "Svarīgi" un "Sauļošanās seansi: cik bieži un cik
ilgi?";
B
lai sauļojoties attālums starp ultravioleto staru filtriem un ķermeni būtu 65 cm;
B
nepārsniegt maksimāli pieļaujamo sauļošanās stundu skaitu gadā (t. i.20 stundas jeb 1200
minūtes);
B
sauļošanās laikā vienmēr lietot komplektā esošās aizsargbrilles.
Infrasarkanie stari, relaksācija un veselība (tikai modelim HB955)
Siltumam ir relaksējoša iedarbība. Iedomājieties sajūtas, ko rada karsta vanna vai gozēšanās saulē.
Tādu pašu relaksējošu efektu izjutīsiet ieslēdzot infrasarkano staru lampas.
Relaksācijas seansa laikā ievērojiet:
- Nepārkarstiet. Ja nepieciešams, palieliniet attālumu starp sevi un lampām.
- Ja galva pārāk stipri sakarst, apsedziet to vai pārvietojiet ķermeni tā, lai galvu skartu mazāks
karstums.
- Relaksācijas seansa laikā aizveriet acis.
- Nepieļaujiet, lai relaksācijas seanss pārāk ieilgst (sk. nodaļu "Relaksācijas seansi: cik bieži un cik
ilgi?").
Sauļošanās seansi: cik bieži un cik ilgi?
◗ 5 līdz 10 dienas sauļojieties ne biežāk kā vienu reizi dienā.
◗ Starp pirmo un otro sauļošanās seansu ievērojiet vismaz 48 stundu pārtraukumu.
◗ Pēc šī 5-10 dienu kursa iesakām kādu laiku atpūtināt ādu.
◗ Apmēram vienu mēnesi pēc kursa beigām āda būs zaudējusi iedeguma intensitāti.Varat sākt
jaunu kursu.
◗ Lai iedegums saglabātos ilgāk, pēc kursa beigām turpiniet veikt vienu vai divus sauļošanās
seansus nedēļā.
LATVISKI26
Page 23

◗ Ja nolemjat uz laiku pārtraukt sauļošanos vai arī turpmāk sauļoties retāk, raugieties, lai netiktu
pārsniegts maksimālais gada laikā pieļaujamais sauļošanās stundu daudzums.
◗ Šai ierīcei maksimālais sauļošanās stundu skaits ir 20 stundas (= 1200 minūtes) gadā.
Maksimālais stundu skaits attiecas arī uz atsevišķu ķermeņa daļu sauļošanu (funkcija º un ªº).
Piemērs
Pieņemsim, ka veicat 10 dienu sauļošanās kursu, kas sastāv no 8 minūšu seansa pirmajā dienā un 20
minūšu seansa deviņās nākamajās dienās.
Viss kurss ilgst (1 x 8 minūtes) + (9 x 20 minūtes) = 188 minūtes.
Tas nozīmē, ka gada laikā varat veikt 6 šādus kursus, jo 6 x 188 minūtes = 1128 minūtes.
Protams, maksimālais sauļošanās stundu skaits attiecas uz katru atsevišķu ķermeņa sauļojamo daļu vai
pusi (piemēram, ķermeņa aizmuguri vai priekšpusi).
Kā norādīts tabulā, pirmajam sauļošanās seansam jābūt 8 minūtes ilgam, neatkarīgi no ādas
jutīguma.
B
Ja domājat, ka sauļošanās seansi ir pārāk ilgi (piemēram, jūtat, ka āda pēc seansa ir sausa un
saspringta), iesakām samazināt seansu ilgumu par, piemēram,piecām minūtēm.
B
Lai iegūtu skaistu visa ķermeņa iedegumu, seansa laikā nedaudz pagrieziet ķermeni, lai
sauļošanās stari labāk piekļūtu sāniem.
*) vai ilgāk, atkarībā no ādas jutīguma.
Ja āda pēc sauļošanās ir saspringta, varat lietot mitrinošu krēmu.
B
Ievērojiet: arī tad, ja sauļojat tikai noteiktu ķermeņa daļu, varat izmantot tabulā norādīto
sauļošanās plānu kopā ar pamācībām, kas sniegtas nodaļā "Sauļošanās seansi: cik bieži un cik
ilgi?".
LATVISKI
27
Cilvēkiem ar mazāk
jutīgu ādu
8 minūtes
30 minūtes*
30 minūtes*
30 minūtes*
30 minūtes*
30 minūtes*
30 minūtes*
30 minūtes*
30 minūtes*
30 minūtes*
Cilvēkiem ar vidēji
jutīgu ādu
8 minūtes
20-25 minūtes
20-25 minūtes
20-25 minūtes
20-25 minūtes
20-25 minūtes
20-25 minūtes
20-25 minūtes
20-25 minūtes
20-25 minūtes
Cilvēkiem ar ļoti
jutīgu ādu
8 minūtes
10 minūtes
10 minūtes
10 minūtes
10 minūtes
10 minūtes
10 minūtes
10 minūtes
10 minūtes
10 minūtes
Sauļošanās seansa
ilgums atsevišķai
ķermeņa daļai
1. seanss
pagaidiet vismaz 48
stundas
2. seanss
3. seanss
4. seanss
5. seanss
6. seanss
7. seanss
8. seanss
9. seanss
10. seanss
Page 24

Relaksācijas seansi: cik bieži un cik ilgi?
Tikai modelim HB955
Ja pēc sauļošanās seansa nevēlaties tūlīt celties, varat veikt relaksācijas seansu, ieslēdzot infrasarkanās
lampas, kas uzturēs siltumu.
Varat veikt relaksācijas seansu arī bez sauļošanās seansa.To iespējams veikt vairākas reizes dienā
(piemēram, 30 minūtes no rīta un vakarā).
Sagatavošana lietošanai
◗ Varat viegli pārvietot un uzglabāt ierīci transportējamā stāvoklī (attēls 2).
◗ Ja vēlaties, lai seja iegūtu papildu iedegumu (tikai modeļiem HB951 un HB952) vai nosauļot
tikai noteiktu ķermeņa daļu (piemēram, tikai kājas vai ķermeņa augšdaļu; tikai modeļiem
HB952 un HB955), pārliecinieties, ka novietojat ierīci pareizajā gultas pusē (attēls 3).
1 Atveriet ierīci, velkot stiprinājumu pamatnes abās pusēs uz āru bultiņas norādītajā virzienā
(attēls 4).
Ierīces augšējā daļa ir atbrīvota no stiprinājuma.
2 Augšējā daļa ir viegli paceļama (tā paceļas pati vai ar nelielu palīdzību) (attēls 5).
3 Satveriet rokturi ar abām rokām un atspiediet pēdu pret ierīci, lai tā neslīdētu prom.Ar
lokveida kustību velkot rokturi, paceliet ierīces augšējo daļu (attēls 6).
Neatlieciet augšējo daļu pārāk tālu.
4 Velciet augšējo daļu vienlaikus uz augšu un uz sevi (attēls 7).
Nepieciešama neliela piepūle.
5 Pagrieziet abus lampu nodalījumus katru uz savu pusi tik tālu,kamēr tie veido vienu taisnu
līniju (attēls 8).
6 Attālumam starp ultravioleto staru filtriem un ķermeni jābūt 65 cm.Attālumam starp
ultravioleto staru filtriem un virsmu,uz kuras guļat (piemēram, gultu), jābūt 85 cm (attēls 9).
7 Atbalstiet statīva augšējo daļu, kad uzstādāt vai pielāgojat ierīces augstumu (attēls 10).
Atskrūvējiet regulētājskrūvi 'A', griežot to pretēji pulksteņrādītāju kustības virzienam (divi vai trīs
apgriezieni).
8 Palieciet roku zem statīva horizontālās daļas un izvelciet statīvu nepieciešamajā augstumā
(attēls 11).
9 Stingri pieskrūvējiet regulētājskrūvi 'A' un atlaidiet statīvu (attēls 12).
◗ Izvelkot mērlenti,varat noteikt, vai ierīce uzstādīta pareizā augstumā (attēls 13).
◗ Pabīdot sarkano plāksnīti, mērlente automātiski saritināsies atpakaļ (attēls 14).
Ierīce ir gatava lietošanai.
Ierīces lietošana
1 Pilnīgi attiniet ierīces elektrovadu.
2 Iespraudiet ierīces elektrovada kontaktspraudni sienas kontaktrozetē.
◗ Tālvadības pults uzrādīs visas funkcijas, kas lietotājam jānoregulē. Sauļošanās un relaksācijas
laiks tiek rādīts kā 00 (attēls 15).
◗ Tikai modeļi HB951 un HB952 rāda simbolu ª: simbolu sejas sauļošanai.
◗ Tikai modeļi HB952 un HB955 rāda simbolu º: simbolu noteiktas ķermeņa daļas sauļošanai.
◗ Tikai modelis HB955 rāda simbolu – (relaksācija).
LATVISKI28
Page 25

Funkciju izmantošana
1 Pārejiet no vienas funkcijas uz citu ar taustiņiem ¡™(attēls 16).
Pasvītrotais simbols parāda funkciju, kas tiek uzstādīta.
2 Sauļošanās, sejas sauļošanas, noteiktas ķermeņa daļas sauļošanas vai relaksācijas izvēle.
Izvēlieties simbolu •, ja vēlaties nosauļot visu ķermeni.
Izvēlieties simbolus • un ª, ja vēlaties nosauļot visu ķermeni, kā arī iegūt papildu iedegumu sejai
(modeļiem HB951 un HB952).
Izvēlieties simbolu º, ja vēlaties nosauļot tikai noteiktu ķermeņa daļu (tikai modeļiem HB952 un
HB955).
Izvēlieties simbolus ª un º, ja vēlaties nosauļot tikai noteiktu ķermeņa daļu, kā arī iegūt papildu
iedegumu sejai (tikai modelim HB952).
Izvēlieties simbolu –, ja dodat priekšroku relaksācijas seansam (siltumam) visam ķermenim (tikai
modelim HB955).
Ievērojiet: šajā lietošanas pamācībā funkcijas ;ªtiek izmantotas par piemēru tam, kas var būt
attēlots ekrānā.
Sauļošanās vai relaksācijas seansa ilguma uzstādīšana.
1 Uzstādiet sauļošanās vai relaksācijas seansa ilgumu, piespiežot taustiņu +, lai palielinātu ilgumu,
vai piespiežot taustiņu -, lai samazinātu ilgumu (attēls 17).
Seansa ilguma uzstādīšanu var veikt ātrāk, ja atbilstošo taustiņu tur nepārtraukti piespiestu.
2 Apgulieties tieši zem solārija lampām, lai pilnīgi nosauļotu abus sānus.
3 Uzlieciet komplektā esošās aizsargbrilles.
4 Ieslēdziet sauļošanās lampas vai infrasarkano staru lampas, piespiežot starta taustiņu ∞
(attēls 18).
B
Ievērojiet: sākumā sauļošanās lampas var radīt dūcošu skaņu.Šī skaņa izzūd, tiklīdz lampas ir
pilnīgi ieslēgušās.
B
Ievērojiet: sauļošanās lampas sāks izdalīt ievērojami spēcīgāku gaismu pēc aptuveni 60
sekundēm, kas nozīmē, ka tās darbojas ar pilnu jaudu. Sākot no šā brīža varat ieslēgt vai izslēgt
sejas sauļotāju.
B
Ievērojiet: ja lampas neieslēdzas aptuveni pēc 20 sekundēm, izslēdziet ierīci (∞), ļaujot tām 3
minūtes atdzist, tad uzstādiet sauļošanās laiku un vēlreiz ieslēdziet ierīci (∞).
◗ Signāllampiņa mirgo,ekrānā redzams uzstādītais seansa ilgums (šajā gadījumā 25 minūtes)
(attēls 19).
Tagad sākas uzstādītā sauļošanās vai relaksācijas laika skaitīšana.
◗ Seansa laikā varat ieslēgt vai izslēgt sejas sauļotāju (•ª), neizslēdzot visu ierīci (attēls 20).
B
(Kopā ar º arī var uzstādīt sejas sauļotāju.)
Izvēlētie simboli ir redzami ekrānā, pārējie simboli netiek parādīti.
◗ Sauļošanās seansa pēdējās minūtes laikā atskan pīkstieni (attēls 21).
◗ Šīs minūtes laikā varat piespiest pauze/atkārtot taustiņu §, lai atkārtotu jau iepriekš uzstādīto
seansa ilgumu (attēls 22).
◗ Ekrānā parādās uzstādītais seansa laiks, un sākas tā skaitīšana. Pīkstieni vairs nav dzirdami.
◗ Iespējams uzstādīt arī jaunu seansa ilgumu.
Tā darot, jums nebūs jāgaida 3 minūtes, kas ir nepieciešamas, lai sauļošanās lampas pēc izslēgšanas
atdzistu.
Šis gaidīšanas laiks neattiecas uz infrasarkano staru lampām (tikai modelim HB955).
5 Uzstādiet jauno sauļošanās seansa ilgumu, piespiežot taustiņu ¢ vai £. Pēc tam piespiediet
starta taustiņu ∞ (attēls 23).
Pīkstieni vairs nav dzirdami, un sākas jaunā seansa laika skaitīšana.
LATVISKI 29
Page 26

◗ Ja neatkārtojat seansu, piespiežot taustiņu §, vai seansa pēdējā minūtē neuzstādāt jaunu laiku,
laika skaitīšana turpinās un ierīce automātiski izslēgsies, tiklīdz uzstādītais laiks būs pagājis.
Sauļošanās vai relaksācijas seansa pārtaukšana
1 Sauļošanās seansu var pārtraukt, piepiežot pauze/atkārtot taustiņu § (attēls 24).
Lampas izslēdzas, ekrānā parādās simbols P un atlikušais laiks.Atlikušais laiks mirgo 3 minūtes. Šajā
laikā lampas atdziest. Kad mirgošana beigusies, varat vēlreiz ieslēgt ierīci, piespiežot taustiņu ∞. Sāksies
atlikušā laika skaitīšana.
2 Relaksācijas seansu var pārtraukt, piespiežot pauze/atkārtot taustiņu §.
Lampas izslēdzas, ekrānā parādās simbols P un atlikušais laiks (nemirgo).Varat nekavējoties vēlreiz
ieslēgt ierīci, piespiežot taustiņu ∞. Gaidīšanas laiks neattiecas uz infrasarkano staru lampām. Sāksies
atlikušā laika skaitīšana.
Sauļošanās vai relaksācijas ilguma maiņa seansa laikā
1 Sauļojoties varat mainīt iepriekš uzstādīto ilgumu, piespiežot taustiņu ∞. Lampas izslēdzas.Tad
uzstādiet jaunu seansa ilgumu, piespiežot taustiņus ¢£. Nogaidiet,līdz pārstāj mirgot
uzstādītais laiks (tam nepieciešamas 3 minūtes, jo lampām vispirms ir jāatdziest), un tad vēlreiz
piespiediet taustiņu ∞.
2 Relaksējoties (–) varat mainīt iepriekš uzstādīto ilgumu, piespiežot taustiņu ∞. Lampas
izslēdzas.Tad uzstādiet jaunu seansa ilgumu un ieslēgt ierīci, nekavējoties piespiežot taustiņu
∞. Uz infrasarkano staru lampām neattiecas gaidīšanas laiks (ekrānā nemirgo tikko uzstādītais
seansa ilgums).
◗ Pārliecinieties, ka ir ieslēgtas vajadzīgās lampas: (tikai modelim HB955)
B
Sauļošanās: četras lampas, kas izdala zilganu gaismu.
B
Relaksācija: četras lampas, kas izdala sarkanīgu gaismu.
Pēc sauļošanās seansa
1 Atzīmējiet veiktos seansus, izmantojot atmiņas slēdžus (tikai modeļiem HB952 un HB955).
Ierīcei ir divi atmiņas slēdži: katrs vienam cilvēkam (attēls 25).
Atdzišana
Lai ierīces materiāli un detaļas pārāk nesakarstu, ierīci atdzesē ventilatori. Sauļošanās lampas
neiedegsies, ja būs pārāk karstas (sk., piemēram, nodaļu "Sauļošanās vai relaksācijas seansa
pārtraukšana").
◗ Pēc tam, kad ir izslēgtas sauļošanās lampas vai infrasarkano staru lampas, ventilatori turpinās
darboties vēl trīs minūtes.
Tas ir izdevīgi, jo jūs atkal varat lietot sauļošanās lampas trīs minūtes pēc izslēgšanas.
B
Infrasarkano staru lampām pirms atkārtotas ieslēgšanas nav nepieciešams atdzišanas periods.
B
Ja ierīce izslēgta, izvelkot elektrovada kontaktspraudni no elektrotīkla sienas kontaktrozetes, tad,
protams, ventilatori pārstāj darboties.
B
Ja ierīce izslēgta, izvelkot elektrovada kontaktspraudni no elektrotīkla sienas kontaktrozetes, un
uzreiz pēc tam solāriju vēlas lietot cits cilvēks, jaunais uzstādītais seansa ilgums ekrānā
nemirgo.Tas nozīmē, ka nākamajam solārija lietotājam pašam jāuzņem trīs minūtes atdzišanas
periodam.
B
Tikai modelim HB955: ja vēlaties izmantot ierīci sauļošanās seansam tūlīt pēc tam, kad esat
veicis relaksācijas seansu (–), ierīcei jāļauj trīs minūtes atdzist. Pēc relaksācijas seansa
sauļošanās lampas būs sakarsušas un pirms ieslēgšanas tām jāatdziest.
Tīrīšana
1 Pirms tīrīšanas vienmēr atvienojiet ierīci no elektrotīkla un ļaujiet tai atdzist.
2 Ierīces korpusu tīriet ar mitru drānu.
LATVISKI30
Page 27

Neļaujiet ūdenim iekļūt ierīcē.
3 Neizmantojiet drānas, kas piesūcinātas ar ķīmiskiem mazgāšanas līdzekļiem.
Ierīci aizliegts tīrīt ar abrazīviem šķidrumiem, ķīmiskiem tīrīšanas līdzekļiem, benzīnu vai acetonu.
◗ Ultravioleto staru filtra korpusu var tīrīt ar spirtā samitrinātu mīkstu drānu.
Uzglabāšana
1 Pirms salikt ierīci pārvietošanai, ļaujiet tai 15 minūtes atdzist.
◗ Šajā laikā varat satīt vadus un novietot tos ierīces pamatnē.
2 Raugieties, lai vadi un tālvadības pults tiktu novietoti pareizi, citādi tie var iesprūst starp
ierīces detaļām, novietojot ierīci transportēšanas stāvoklī (attēls 26).
3 Stingri paceliet statīva augšējo daļu ar vienu roku un atskrūvējiet augstuma regulētājskrūvi
(A), griežot to pretēji pulksteņrādītāju kustības virzienam (attēls 27).
4 Ļaujiet statīvam pilnīgi ieslīdēt (attēls 28).
5 Stingri pieskrūvējiet augstuma regulētājskrūvi (A), griežot to pulksteņrādītāju kustības virzienā
(attēls 29).
6 Pagrieziet abus lampu nodalījumus vienu pret otru (attēls 30).
7 Satveriet rokturi ar abām rokām,atspiediet pēdu pret ierīci, lai tā neslīd prom, un augšējo daļu
ar statīvu nolieciet atpakaļ (attēls 31).
Automātiskā atbrīvošanas sistēma darbojas tikai tad, ja augšējo daļu ar statīvu atliecat pietiekami
tālu. Uzmanieties to atliekt pārāk tālu, jo tad varat zaudēt līdzsvaru.
8 Grūdiet augšējo daļu lejup (attēls 32).
9 Lēni nolaidiet to uz pamatnes (attēls 33).
10 Nostipriniet abus lampu nodalījumus pie pamatnes, bīdot abus stiprinājumus bultiņas
norādītajā virzienā (attēls 34).
Aizstāšana
Laika gaitā (pēc vairāku gadu ilgas parastas lietošanas) sauļošanās lampu izstarotā gaisma kļūs vājāka.
Kad tas notiek, novērojama iedeguma intensitātes samazināšanās. Šo problēmu var atrisināt, uzstādot
nedaudz ilgāku sauļošanās laiku vai nomainot lampas.
◗ Tikai modeļiem HB952 un HB955: ierīces tālvadības pultī ir skaitītājs, kas reģistrē sauļošanās
stundu skaitu.
1 Izvēlieties funkciju •. Uzstādiet laiku uz 00 un piespiediet pauze/atkārtot taustiņu §, lai
ekrānā parādītos sauļošanās stundu daudzums (attēls 35).
Maksimālais stundu daudzums, ko var parādīt skaitītājs, ir 999. Kad ir parādījies šis skaitlis, skaitīšana
turpināsies no 000.
2 Atlaižot pauze/atkārtot taustiņu, sauļošanās stundu skaits pazūd no ekrāna.
◗ Pēc 750 lietošanas stundām simbols L parādās ekrāna kreisajā pusē.Tas nozīmē, ka ir
ievērojami samazinājusies sauļošanas jauda,un ieteicams nomainīt lampas (attēls 36).
Protams, varat uz kādu laiku atlikt lampu nomaiņu, izvēloties ilgāku sauļošanās laiku.
3 Lai nodzēstu no ekrāna simbolu L, piespiediet taustiņu § ar laika norādi 00 un funkcijas
simbolu • ekrānā.Turiet piespiestu pauze/atkārtot taustiņu un vispirms piespiediet ¢ taustiņu
un tad £ taustiņu. Simbols L no ekrāna pazūd (attēls 37).
LATVISKI 31
Page 28

Ultravioleto staru filtri pasargā no nevēlama starojuma.Tādēļ ir ļoti svarīgi nekavējoties nomainīt
bojātu vai saplēstu filtru.
Tikai modelim HB955: nomainiet infrasarkano staru lampas, tiklīdz tās pārstāj darboties.
Nomainiet sauļošanās lampas (Philips HPA flex power 400-600), infrasarkano staru lampas (nr.
4222 062 95590), ultravioleto staru filtrus un elektrovadu Philips pilnvarotā remontdarbnīcā.Tikai
tur strādājošiem speciālistiem ir šim darbam nepieciešamās zināšanas un pieredze, kā arī ierīces
oriģinālās detaļas.
Vides aizsardzība
Solārija lampas satur videi kaitīgas vielas. Neizmetiet lampas kopā ar parastajiem saimniecības
atkritumiem, bet gan tam paredzētā vietā.
Garantija un apakalpošana
Ja nepieciešama palīdzība vai informācija, lūdzu,apmeklējiet Philips mājas lapu internetā
www.philips.com vai sazinieties ar Philips pakalpojumu centru savā valstī (tā telefona numurs
atrodams pasaules garantijas brošūrā). Ja jūsu valstī nav Philips pakalpojumu centra, lūdziet palīdzību
Philips produkcijas izplatītājiem vai Philips Mājturības un personīgās higiēnas ierīču nodaļas
pakalpojumu dienestam.
Garantijas ierobežojumi
Starptautiskās garantijas nosacījumi neattiecas uz sauļošanās lampām.
LATVISKI32
Page 29

Iespējamais iemesls
Elektrovada kontaktspraudnis nav līdz galam iesprausts elektrotīkla sienas
kontaktrozetē.
Nenotiek strāvas padeve. Pārbaudiet,vai strāva tiek pievadīta,
pievienojot kontaktrozetei citu ierīci.
Lampas vēl ir pārāk karstas, lai tās varētu atkal ieslēgt. Ļaujiet tām
vispirms atdzist 3 minūtes.
Ierīce netika pietiekami atdzesēta un pārkaršanas aizsargmehānisms
automātiski izslēdza solāriju. Atrodiet pārkaršanas cēloni (piemēram,
noņemiet dvieli, kas aizklāj vienu vai vairākas atveres). Nogaidiet 10
minūtes un vēlreiz ieslēdziet ierīci.
Pārbaudiet elektroķēdes, kurā pievienots solārijs, drošinātāju. Pareizais
drošinātāja veids ir 16 A standarta vai automātiskais drošinātājs.
Drošinātājs var pārdegt arī tāpēc, ka vienā elektroķedē pievienots pārāk
daudz elektroierīču.
Tiek izmantots pagarinātājvads, kas ir pārāk garš un/vai tam ir nepareizs
šķērsgriezums (strāvas stiprums 16 A).Vērsieties pie produkcijas
izplatītāja. Iesakām neizmantot pagarinātājvadu.
Izvēlētais sauļošanās plāns neatbilst ādas tipam.
Attālums starp lampām un virsmu, uz kuras guļat, ir daudz lielāks par
pamācībā norādīto.
Kad lampas ir izmantotas ilgu laiku, iedeguma intensitāte mazinās.Tas
kļūst pamanāms tikai pēc vairākiem gadiem. Šo problēmu iespējams
atrisināt, izvēloties mazliet ilgāku sauļošanās laiku vai nomainot lampas.
Pēc 750 sauļošanās stundām ekrānā parādīsies simbols L, kas norāda,ka
lampas ieteicams nomainīt.
Ierīces augšējā daļa nav pietiekami tālu atliekta atpakaļ.Vispirms atlieciet
augšējo daļu atpakaļ un pēc tam spiediet to uz leju (sk. nodaļu
"Uzglabāšana").
Nedarbojas automātiskā atbrīvošanas sistēma.Tādā gadījumā vispirms
jāpiespiež atbrīvošanas taustiņš B, pēc tam būs iespējams saliekt ierīci
atpakaļ transportēšanas stāvoklī tā, kā aprakstīts nodaļā "Uzglabāšana". Ja
automātiskā atbrīvošanas sistēma nedarbojas vairākas reizes, vērsieties
pie Philips produkcijas izplatītāja vai Philips remontdrabnīcā
Problēma
Ierīci nevar ieslēgt.
Ieslēdzot ierīci vai arī tās lietošanas
laikā drošinātājs pārtrauc
elektroenerģijas padevi.
Vājš iedegums
Solāriju nevar saliekt transportējamā
stāvoklī.
Kļūmju novēršana
Ja ierīce nedarbojas pareizi, iespējams, tai ir kāds defekts.Tādā gadījumā iesakām vērsties pie
Philips produkcijas izplatītāja vai Philips remontdarbnīcā.
Ierīce var nedarboties kā nākas arī tādēļ, ka ir nepareizi uzstādīta vai netiek lietota saskaņā ar
pamācību.Tādā gadījumā spēsiet atrisināt problēmu patstāvīgi,rīkojoties atbilstoši šeit
sniegtajiem kļūmju novēršanas padomiem.
LATVISKI
33
Page 30

Kļūdu kodi
Tālvadības pults ekrānā parādās kļūdu kodi.Turpmāk ir norādīts, kā jārīkojas, ja ekrānā parādās kļūdas
kods.
LATVISKI34
Risinājums
Pārbaudiet, vai atveres nav aizklātas (sk. apakšnodaļu
'Ierīci nevar ieslēgt' nodaļā "Kļūmju novēršana").
Pārbaudiet ultravioleto staru filtrus (īpašas stikla rūtis,
kas aizsedz lampas). Ja šie filtri ir saplēsti, bojāti vai to
vispār nav,pārtrauciet ierīces izmantošanu un vērsieties
pie Philips produkcijas izplatītāja vai Philips
remontdarbnīcā.
Vērsieties pie Philips produkcijas izplatītāja vai Philips
remontdarbīcā.
Kļūdas kods
E01
E02 un kodi ar lielākiem skaitļiem
Ievērojiet: simbols E01 ekrānā ir redzams 5 sekundes un tajā pašā laikā atskan skaņas signāls.
Ievērojiet: simbols E02 un kodi ar lielākiem skaitļiem paliek redzami ekrānā.Ja šie kodi parādās,
tas nozīmē, ka ierīces darbībā ir radušās nopietnas problēmas un turpmāk to vairs
nedrīkst izmantot.
Page 31

Įžanga
Aparatūra skirta įdegiui
Šio soliariumo pagalba galima patogiai įdegti namie. Įdegio lempos skleidžia matomą šviesą, karštį ir
ultravioletinę šviesą, sudarydamos įspūdį, kad deginatės tikroje saulės šviesoje. Specialūs UV filtrai
praleidžia tik tiek šviesos, kiek reikia įdegiui.
Įdegio lempos skleidžia pakankamai infraraudonųjų spindulių, užtikrinančių malonią šilumą.
HB955 modelis: be įdegio seansų, jūs galite turėti poilsio seansus, vos tik įjungus spacialaias
infraraudonąsias lempas.
Laikmatis neleis įdegio seansui trukti ilgiau, nei 30 minučių. Reikia vengti pernelyg ilgo buvimo tiek
soliariumo, tiek ir natūralioje saulės šviesoje (žr. skyrelį "Įdegis ir jūsų sveikata").
Svarbu žinoti
◗ Prieš įjungdami aparatą patikrinkite, ar įtampa, nurodyta ant aparato sutampa su įtampa jūsų
namuose.
◗ Jei aparato laidas netinkamai įjungtas į rozetę,jis gali įkaisti. Įsitikinkite, kad laidas tinkamai
įjungtas į rozetę.
◗ Aparatas turi būti įjungtas į grandinę, apsaugotą 16A standartiniu saugikliu arba lėtai
išmušamu automatiniu saugikliu.
◗ Po panaudojimo aparatą visada išjunkite iš rozetės.
◗ Vanduo ir elektra yra pavojingas derinys.Todėl nenaudokite šio aparato drėgnoje aplinkoje
(pvz., vonioje, duše ar prie baseino).
◗ Jei ką tik plaukiojote ar maudėtės po dušu, prieš naudodami aparatą gerai nusišluostykite.
◗ Prieš aparatą sudėdami transportavimui ar padėdami į vietą palikite atvėsti maždaug15
minučių.
◗ Seansų metu ventiliacijos angos lempų blokuose ir pagrinde turi būti atdaros.
◗ Aparatas apsaugotas nuo perkaitimo.Jei aparatas nepakankamai atvėsinamas (pvz., dėl
uždengtų angų), jis išsijungia automatiškai. Kai tik perkaitinimo priežastis pašalinama ir
aparatas atvėsta, jis automatiškai įsijungia.
◗ Naudojant aparatą UV filtrai įkaista. Nelieskite jų.
◗ Aparate yra besisukančių dalių, tad būkite atsargūs ir neįkiškite tarp jų savo pirštų.
◗ Niekada nenaudokite aparato su pažeistu, sugedusiu UV filtru ar tuo atveju, kai filtro nėra.
◗ Neleiskite vaikams žaisti su aparatu.
◗ Niekada neviršykite rekomenduojamo įdegio laiko ir didžiausio nurodyto įdegio valandų
skaičiaus (žr. "Įdegio seansai:kaip dažnai ir kiek ilgai?).
◗ Nepriiminėkite įdegio ir/ar poilsio seansų, jei sergate ir/arba naudojate vaistus ar kosmetikos
priemones, didinančias jūsų odos jautrumą. Būkite ypatingai atsargūs, jei esate labai jautrūs UV
spinduliams. Jei abejojate, pasitarkite su savo gydytoju.
◗ Nekaitinkite kurios nors vienos kūno dalies daugiau, nei kartą per dieną.Venkite tą pačią
dieną ilgai būti natūralioje saulės šviesoje.
◗ Jei ant odos atsiranda opelės, apgamai ar nuolatiniai patinimai, pasitarkite su gydytoju.
◗ Aparatu negali naudotis žmonės, lengvai nudegantys, tačiau neįdegantys saulės šviesoje, nuo
saulės nudegę žmonės, vaikai ir žmonės, kenčiantys ar anksčiau kentėję nuo odos vėžio bei
linkę susirgti odos vėžiu.
◗ Visada dėvėkite apsauginius akinius, esančius rinkinyje, kad apsaugotumėte akis nuo per
didelio šviesos kiekio, UV ir infraraudonųjų spindulių (žr."Įdegis ir jūsų sveikata").
◗ Prieš įdegio seansą nuvalykite kremą,lūpų dažus ir kitas kosmetines priemones.
◗ Niekada nenaudokite greito įdegio kremų ar losjonų,pagreitinančių įdegį.
◗ Nenaudokite jokių apsauginių kremų ir losjonų, saugančių odą nuo įdegio.
◗ Jei po deginimosi oda sustingsta, galite pasitepti drėkinančiu kremu.
◗ Jei norite lygaus įdegio,turite gulėti tiesiai po lempomis.
◗ Nesigulkite po lempomis mažesniu, nei 65 cm atstumu.
LIETUVIŠKAI 35
Page 32

◗ Aparatą judinkite tik sudėtą transportavimui. Prieš judindami įsitikinkite ar abi dalys tinkamai
pritvirtintos. Nebandykite patys pakelti aparato.
◗ Nuo saulės spalvos gali išblukti.Taip pat gali nutikti, naudojantis aparatu.
◗ Nesitikėkite, kad aparatas duos geresnius rezultatus, nei natūrali saulės šviesa.
Įdegis ir jūsų sveikata
Saulė, UV spinduliai ir įdegis
Saulė
◗ Saulė išskiria įvairią energiją. Matoma šviesa leidžia mums regėti, ultravioletinė (UV) leidžia
įdegti, o infraraudona šildo.
UV, deginimasis ir jūsų sveikata
Deginimasis soliariume, kaip ir natūralioje saulės šviesoje, šiek tiek užtrunka. Pirmas efektas bus
matomas tik po kelių seansų (žr. "Įdegio seansai: kaip dažnai ir kiek ilgai?).
Pernelyg ilgas buvimas UV šviesoje (tiek natūralioje saulėje, tiek jūsų soliariumo) gali nudeginti.
Be kitų faktorių, tokių kaip pernelyg ilgas buvimas natūralioje saulės šviesoje, neteisingas ar per ilgas
soliariumo naudojimas gali padidinti odos ir akių problemas. Jų stiprumas iš vienos pusės priklauso
nuo radiacijos kilmės, intensyvumo ir trukmės, o iš kitos - nuo žmogaus jautrumo.
Kuo daugiau oda ir akys būna ultravioletinėje šviesoje, tuo didesnis keratito, konjuktyvito, tinklainės
pažeidimo, kataraktos, priešlaikinio odos senėjimo ir odos auglių susidarymo pavojus. Kai kurie vaistai
ir kosmetinės priemonės didina odos jautrumą.
Todėl labai svarbu:
B
laikytis instrukcijų, esančių skyreliuose "Svarbu žinoti" ir "Įdegio seansai: kaip dažnai ir kiek ilgai?;
B
laikytis tinkamo atstumo (nuotolio tarp UV filtrų ir kūno), t.y. 65 cm;
B
kad neviršijate maksimalaus metinio deginimosi valandų skaičiaus (t.y. 20 valandų arba 1200
minučių).
B
deginantis visada užsidėti apsauginius akinius.
Infraraudonieji spinduliai, poilsis ir jūsų sveikata
Šiluma atpalaiduoja.Tai jaučiate mėgaujantis karšta vonia ar saulės spinduliais.Tokį patį atsipalaidavimo
efektą pajusite, įsijungę infraraudonųjų spindulių lempas.
Poilsio seanso metu atminkite:
- Venkite per didelio karščio. Jei reikia, pasitraukite toliau nuo lempų.
- Jei įkaista jūsų galva, užsidenkite ją arba pasitraukite taip, kad karštis kuo mažiau sklistų galvos link.
- Poilsio seanso metu užmerkite akis.
- Netęskite per ilgai poilsio seanso (žr. skyrelį "Poilsio seansai: kaip dažnai ir kiek ilgai?").
Deginimosi seansai : kaip dažnai ir kiek ilgai ?
◗ Deginkitės ne dažniau, nei vieną kartą per dieną, viso penkias - dešimt dienų.
◗ Tarp pirmo ir antro įdegio seanso turi praeiti mažiausiai 48 valandos.
◗ Mes patariame po 5-10 dienų kurso leisti odai pailsėti.
◗ Praėjus maždaug mėnesiui nuo kurso pabaigos, jūsų oda praras didesnę įdegio dalį.Tada galite
pradėti naują įdegio kursą.
◗ Tačiau, jei norite išlaikyti įdegį, kursui pasibaigus galite degintis vieną - du kartus per savaitę.
◗ Jeigu nuspręsite kuriam laikui nutraukti įdegio seansus ar tęsti rečiau,nepamirškite, kad
neturite viršyti didžiausio leistino įdegio valandų skaičiaus.
◗ Maksimalus deginimosi šiuo prietaisu valandų skaičius yra 20 valandų (1200 minučių) per
metus.
Šis didžiausias valandų skaičius per metus paskaičiuotas, naudojant aparatą tam tikros kūno dalies
įdegiui (funkcija º ir ªº).
LIETUVIŠKAI36
Page 33

Pavyzdys
Sakykime, kad deginatės 10 dienų, 7 minutes pirmą dieną ir po 20 minučių kitas dienas.
Visas kursas tokiu būdu truks (1 x8 min.) + (9 x20 min.) = 188 minutes.
Tai reiškia, kad per metus galite turėti 6 tokius kursus, nes 6 x 188 min.= 1128 min.
Aišku, didžiausias įdegio valandų skaičius skirtas atskirai kiekvienos kūno pusės ar kūno dalies įdegiui (
priekinei kūno pusei ir kitai kūno pusei).
Kaip parodyta lentelėje, pirmas įdegio seansas visada turi trukti 8 minutes, nepriklausomai nuo
odos jautrumo.
B
Jei manote, kad seansai jums yra per ilgi (pvz., jei po seanso oda sustingata, tampa jautri),
patariame sutrumpinti seansus, pvz., 5 minučių.
B
Jei norite gražiai ir lygiai įdegti, seanso metu kiek pasisukite, kad visos kūno pusės vienodai
įdegtų.
*) ar ilgiau, priklausomai nuo jūsų odos jautrumo.
Jei jūsų oda po įdegio seanso sustingsta, galite pasitepti drėkinančiu kremu.
B
Pastaba: jei norite, kad įdegtų tik kuri nors kūno dalis, laikykitės lentelėje pateikto deginimosi
plano, bei skirsnio "Deginimosi ultravioletiniais spinduliais seansai: kaip dažnai ir kiek ilgai?"
instrukcijų.
Poilsio seansai: kaip dažnai ir kiek ilgai?
Tik HB955 modelis
Jeigu nenorite keltis iš karto po įdegio seanso, galite įsijungti infraraudonųjų spindulių lempas poilsio
seansui, kurio metu infraraudonųjų spindulių lempos skleis šilumą.
Ilsėtis galite ir nesideginant.Tai galite daryti kelis kartus per dieną (pvz., 30 minučių ryte ir vakare).
LIETUVIŠKAI 37
Žmonėms su mažiau
jautria oda
8 minutės
30 minučių*
30 minučių*
30 minučių*
30 minučių*
30 minučių*
30 minučių*
30 minučių*
30 minučių*
30 minučių*
Žmonėms su
normalaus jautrumo
oda
8 minutės
20-25 minutės
20-25 minutės
20-25 minutės
20-25 minutės
20-25 minutės
20-25 minutės
20-25 minutės
20-25 minutės
20-25 minutės
Žmonėms su labai
jautria oda
8 minutės
10 minučių
10 minučių
10 minučių
10 minučių
10 minučių
10 minučių
10 minučių
10 minučių
10 minučių
Įdegio seansų trukmė
atskiroms kūno dalims
Pirmas seansas
pailsėkite mažiausiai 48
valandas
Antras seansas
Trečias seansas
Ketvirtas seansas
Penktas seansas
Šeštas seansas
Septintas seansas
Aštuntas seansas
Devintas seansas
Dešimtas seansas
Page 34

Paruošimas naudojimui
◗ Aparatą lengva stumdyti ir patogu saugoti (pav. 2).
◗ Jei norite, kad truputelį daugiau įdegtų veidas (tik HB951 ir HB952 modeliai), ar kad įdegtų tik
kuri nors kūno dalis (t.y. tik kojos ar viršutinė kūno dalis; tik HB952 ir HB955 modeliams),
pagalvokite, iš kurios pusės turite pasistatyti aparatą (pav.3).
1 Prietaisą atidarykite stumdami slankiklius į abi puses nuo pagrindo rodyklės nurodyta
kryptimi (pav.4).
Viršutinė aparato dalis dabar atrakinta.
2 Viršutinė dalis šiek tiek pajuda į viršų (pati ar truputį pastūmus) (pav. 5).
3 Abejomis rankomis suimkite rankeną ir pastatykite vieną koją prieš aparatą, kad jis nenuslystų.
Pakreipkite viršutinę dalį, pastumdami rankeną ir nubrėždami ja lanką (pav. 6).
Nekreipkite viršutinės dalies per toli.
4 Keldami sukite viršutinę dalį (pav. 7).
Tam reikės šiek tiek pastangų.
5 Abu lempų blokus atitraukite kiek galima toliau į šonus taip,kad jie atsidurtų vienoje linijoje
(pav. 8).
6 Atstumas tarp UV filtrų ir jūsų kūno turi būti 65 cm.Atstumas tarp UV filtrų ir paviršiaus,ant
kurio gulite (pvz., lovos), turi būti 85 cm (pav. 9).
7 Reguliuodami aparato aukštį prilaikykite viršutinę stovo dalį (pav. 10).
Atlaisvinkite "A" rankenėlę, sukdami ją prieš laikrodžio rodyklę (du ar tris kartus).
8 Pakiškite ranką po horizontalia stovo dalimi ir ištempkite stovą iki norimo aukščio (pav. 11).
9 Vėl stipriai užsukite "A" rankenėlę ir atlaisvinkite stovą (pav. 12).
◗ Jūs galite nustatyti reikiamą aparato aukštį,patraukdami mato juostą (pav.13).
◗ Mato juosta automatiškai atsivynios, jei patrauksite į šoną raudoną kilpą (pav. 14).
Dabar aparatas paruoštas naudojimui
Aparato naudojimas
1 Pilnai išvyniokite laidą.
2 Įjunkite kyštuką į rozetę.
◗ Distancinio valdymo pultelyje rasite visas funkcijas, kurias turi nusistatyti pats vartotojas.
Rodomas deginimosi laikas yra 00 (pav. 15).
◗ Tik modeliuose HB951 ir HB952 rodomas simbolis ª: tai simbolis, skirtas veido įdegimui.
◗ Tik modeliuose HB952 ir HB955 rodomas simbolis º: tai simbolis, skirtas kūno dalies
įdegimui.
◗ Tik modelyje HB955 rodomas simbolis – (poilsis).
Funkcijų nustatymas
1 Funkcijų perjungimui naudokite ¡ ir ™ mygtukus (pav. 16).
Pabraukti simboliai rodo funkcijas, kurias jūs programuojate.
2 Rinkdamiesi deginimąsi, veido įdegį, kūno dalies įdegį ar poilsį.
Jei norite įdegti visą kūną, pasirinkite • simbolį.
Jei norite, kad įdegtų visas kūnas ir truputį daugiau įdegtų veidas, pasirinkite • ir ª simbolius (tik
HB951 ir HB952 modeliai).
Jei norite, kad įdegtų kūno dalis, pasirinkite º simbolį (tik HB952 ir HB955 modeliai).
Jei norite, kad įdegtų visas kūno dalis ir truputį daugiau įdegtų veidas, pasirinkite ªir ºsimbolius (tik
HB952 modelis).
LIETUVIŠKAI38
Page 35

Jei norite poilsio seanso (šilto), skirto visam kūnui, pasirinkite – simbolį (tik HB955 modelis).
Pastaba: šiuose nurodymuose kaip naudotis, funkcijos ; ir ª yra naudojamos kaip pavyzdys ekrane
matomo vaizdo.
Laiko nustatymas įdegio ar poilsio seansui
1 Seanso laikas nustatomas spaudžiant mygtukus + arba - ,priklausomai nuo to, ar reikia
nustatyti vėlesnį ar ankstesnį laiką (pav. 17).
Norėdami laiką nustatyti greičiau, mygtuką laikykite nuspaudę.
2 Atsigulkite tiesiai po aparato lempomis taip,kad kūno šonai tinkamai įdegtų.
3 Užsidėkite apsauginius akinius.
4 Įjunkite lempas mygtuku ∞ (pav. 18).
B
Pastaba: įsijungiant įdegio lempoms, turi pasigirsti zvimbiantis garsas. Šis garsas nutils, kai
lempos tinkamai užsidegs.
B
Pastaba: įdegio lempos pradės skleisti stiprią regimą šviesą maždaug po 60 sekundžių, ir tai
reikš, kad lempos šviečia pilnu pajėgumu. Nuo šios akimirkos jūs galite įjungti ar išjungti veido
įdegio lempą.
B
Pastaba: jei lempos neįsidegs po 20 sekundžių, išjunkite aparatą (∞),leiskite lempoms atvėsti 3
minutes, nustatykite įdegio laiką ir vėl įjunkite aparatą (∞).
◗ Įsijungs mirkčiojanti lemputė, ekrane pasirodys nustatytas laikas (šiuo atveju 25 minutės) (pav.
19).
Prasidės įdegio ar poilsio seanso laiko atbulinis skaičiavimas.
◗ Jūs galite įjungti ar išjungti veido įdegio lempą (• , ª) seanso metu,neįjungiant viso aparato
(pav. 20).
B
(Taikoma papildomai veido įdegio lempai kartu su º).
Ekrane bus matomas tik pasirinktas simbolis, kiti simboliai bus nematomi.
◗ Paskutinę seanso minutę jūs girdėsite trūkinėjantį pypsėjimą (pav. 21).
◗ Norėdami dar kartą pakartoti nustatytą laiką, pypsėjimo metu paspauskite
pauzė/pakartojimas mygtuką § (pav.22).
◗ Ekranas rodo laiko nustatymą ir laikas pradedamas skaičiuoti.Pypsėjimas nutyla.
◗ Įmanoma nustatyti ir naują laiką.
Šiuo atveju jums nereikės laukti 3 minučių, kol atvės įdegio lempos, kad galėtų išsijungti.
Laukimo laikas netaikomas infraraudonųjų spindulių lempoms (tik HB955 modelis).
5 Nustatykite naują laiką spausdami ¢ar £ mygtukus.Tada paspauskite paleidimo mygtuką ∞
(pav. 23).
Pypsėjimas nutils ir nustatytas laikas bus pradėtas skaičiuoti atbuline tvarka.
◗ Kai jūs nepakartojate laiko nustatymo,paspausdami § mygtuką ar nustatote naują laiką
paskutinėmis seanso minutėmis, skaičiavimas atbuline tvarka tebevyks ir aparatas automatiškai
išsijungs, kai baigsis nustatytas laikas.
Įdegio ar poilsio seanso nutraukimas
1 Įdegio seansą galite nutraukti paspausdami pauzė/pakartojimas § mygtuką (pav.24).
Lempos išsijungs, ekrane atsiras simbolis P, kartu su likusio laiko parodymais. Po trijų minučių
parodymai su likusiu laiku pradės mirksėti. Per tą laiką lempos atvės.Kai baigsis mirgsėjimas, jūs galite
vėl įjungti aparatą, paspausdami ∞ mygtuką. Likęs laikas bus pradėtas skaičiuoti atbuline tvarka.
2 Poilsio seansą galite nutraukti, paspausdami pauzė/pakartojimas § mygtuką.
Lempos išsijungs, ekrane atsiras simbolis P, kartu su likusio laiko parodymais (nemirkčios). Jūs galite
nedelsiant vėl įjungti aparatą, paspausdami ∞ mygtuką. Laukimo laikas netaikomas infraraudonųjų
spindulių lempoms. Likęs laikas bus pradėtas skaičiuoti atbuline tvarka.
LIETUVIŠKAI 39
Page 36

Laiko pakeitimas įdegio ar poilsio seanso metu
1 Įdegio metu jūs galite pakeisti seanso laiko nustatymą,paspaudami mygtuką ∞.Lempos
išsijungs. Dabar galite nustatyti naują laiką, paspausdami mygtukus¢ ir £. Palaukite, kol
nustatyto laiko parodymai nustos mirkčioti (tai truks 3 minutes, nes turi atvėsti lempos) ir
dar kartą paspauskite ∞ mygtuką.
2 Poilsio metu (–) jūs galite pakeisti seanso laiko nustatymą, paspaudami mygtuką ∞. Lempos
išsijungs. Dabar galite nustatyti naują laiką ir vėl nedelsiant įjungti aparatą, paspausdami ∞
mygtuką. Laukimo laikas netaikomas infraraudonųjų spindulių lempoms. Likęs laikas bus
pradėtas skaičiuoti atbuline tvarka.
◗ Įsitikinkite, kad lempos dešinėje yra įjungtos (tik HB955 modelis).
B
Įdegis: keturios lempos skleidžia melsvą šviesą.
B
Poilsis: keturios lempos skleidžia rausvą šviesą.
Įdegio seansui pasibaigus
1 Seansų skaičių galite pasižymėti atminties rankenėlių pagalba (tik HB952 ir HB955 modeliai).
Šiame aparate yra dvi atminties rankenėlės:skirtos dviems asmenims (pav.25).
Atvėsinimas
Kad neįkaistų medžiagos ir dalys, aparatas aušinamas ventiliatoriais. Lempos neužsidega, jei yra per
daug įkaitusios (pavyzdys pateikiamas skirsnyje "Įdegio ar poilsio seansų nutraukimas").
◗ Išjungus lempas, ventiliatoriai veikia dar tris minutes.
Tai yra patogu, nes vos po trijų minučių galite vėl naudotis lempomis.
B
Infraraudonųjų spindulių lempų prieš vėl įjungiant nereikia atvėsinti.
B
Jei įdegio aparatūrą išjungsite ištraukdami laidą iš rozetės, ventiliatoriai nevėsins ilgiau nei tris
minutes.
B
Jei veido įdegio aparatūrą išjungsite ištraukdami laidą iš rozetės, o kitas asmuo norės naudotis
aparatu iš karto, laiko nustatymo parodymai nemirkčios ekrane.Tai reiškia, kad reikia palaukti
tris-keturias minutes, kol aparatas atvės.
B
Tik HB955 modeliui: jei norite naudoti aparatą įdegio seansui, nedelsiant iš karto po poilsio
seanso (–), palikite aparatą atvėsti 3 minutes. Poilsio seanso metu įdegio lempos įkaista ir
išsijungs tik atvėsusios.
Valymas
1 Prieš valydami aparatą visada išjunkite iš rozetės ir palikite atvėsti.
2 Aparato išorę nuvalykite drėgna skepetėle.
Neleiskite į aparatą patekti vandeniui.
3 Nenaudokite šiurkščių kempinių.
Valydami aparatą niekada nenaudokite šveičiančių valiklių ir ėsdinančių skysčių, tokių kaip
benzinas ar acetonas.
◗ UV filtrų išorę galite nuvalyti minkšta skepetėle, suvilgyta metilo spiritu.
Saugojimas
1 Prieš sudėdami aparatą į transportuojamą padėtį ar padėdami saugoti, palikite jį atvėsti 15
minučių.
◗ Tuo tarpu susuktą laidą galite padėti aparato apačioje.
2 Įsitikinkite, kad laidas ir distancinis pultelis padeti tinkamai, nes, nešant aparatą, jie gali įstrigti
tarp aparato dalių (pav. 26).
3 Stipriai laikydami viena ranka viršutinę stovo dalį, atsukite aukščio reguliavimo rankenėlę (A),
sukdami ją prieš laikrodžio rodyklę (pav. 27).
LIETUVIŠKAI40
Page 37

4 Iki galo sustumkite stovą (pav. 28).
5 Stpriai užsukite aukščio reguliavimo rankenėlę (A), sukdami laikrodžio rodyklės kryptimi (pav.
29).
6 Pasukite abi lempas viena į kitą (pav. 30).
7 Abejomis rankomis paimkite rankeną,pastatykite vieną koją prieš aparatą, kad šis nenuslystų
ir viršutinę dalį su stovu lenkite atgal (pav. 31).
Automatinė atblokavimo sistema ims veikti,jei pakreipsite viršutinę dalį su stovu atgal. Būkite
atsargūs, nes kreipiant galite prarasti lygsvarą.
8 Viršutinę dalį pastumkite žemyn (pav. 32).
9 Lėtai nuleiskite ją ant pagrindo (pav. 33).
10 Pritaisykite lampų įtaisus, pastumdami abu slankiklius strėlytės kryptimi (pav. 34).
Pakeitimas
Po kiek laiko (po kelių metų,naudojant įprastai) įdegio lempų šviesa silpnėja. Kai taip nutinka,
pastebėsite silpnėjantį aparato poveikį. Šią problemą galite išspręsti, nustatę kiek ilgesnę seanso
trukmę arba pakeitę lempas.
◗ Tik HB952 ir HB955 modeliai: distancinis prietaiso valdymo pultas turi skaičiavimo įrenginį,
registruojantį darbo valandų skaičių.
1 Pasirinkite • funkciją. Norėdami pamatyti ekrane veikimo valandų skaičių,nustatykite laiko
parodymus ant 00padalos ir laikykite nuspaudę pauzė/pakartojimas § mygtuką (pav. 35).
Didžiausias veikimo valandų skaičius rodomas ekrane yra 999. Kai pasiekiamas šis skaičius, toliau
pradedama skaičiuoti nuo 000.
2 Veikimo valandų skaičius išnyks iš ekrano, išjungus pauzė/pakartojimas mygtuką.
◗ Po 750 veikimo valandų,kairiajame ekrano kampe atsiras L simbolis.Tai reiškia,kad aparato
įdegio poveikis taip nusilpo,kad patartina pakeisti veido įdegio lempas (pav. 36).
Žinoma, jūs galite tam tikram laiko tarpui atidėti įdegio lempų keitimą, nustatant ilgesnį įdegio laiką.
3 Simbolio L pašalinimui iš ekrano,paspauskite mygtuką pauzė/ pakartoti §, kai ekrane rodomo
laiko indikacija yra 00, o rodomas funkcijos simbolis - •. Laikydami paspaustą mygtuką
pauzė/pakartoti, pirma paspauskite mygtuką ¢,o po jo - mygtuką £ - L išnyks iš ekrano (pav.
37).
UV filtrai apsaugo nuo nepageidautinų sveikatai reiškinių.Todel svarbu tuoj pat pakeisti pažeistą ar
sugadintą filtrą.
Tik HB955 modeliui: kai tik infraraudonų spindulių lempos nebeveikia, jas reikia pakeisti.
Lempas (Philips HPA flex power 400-600), infraraudoųjų spindulių lempas (nr.4222 062 95590),
UV filtrus ir elektros maitinimo laidą galima keisti tik Philips įgaliotame aptarnavimo centre.Tik
centro darbuotojai turi pakankamai žinių ir patirties, o taip pat ir atsarginių dalių, reikalingų šiems
darbams atlikti.
Aplinka
Aparato lempose yra medžiagų, galinčių pakenkti aplinkai.Atsikratydami lempomis išmeskite jas ne
įpraston šiukšlių dėžėn, bet pristatykite į oficialų surinkimo punktą.
LIETUVIŠKAI 41
Page 38

Galima priežastis
Kištukas neįkištas (tinkamai) į rozetę.
Nėra srovės. Patikrinkite, ar yra srovė, įjungę kitą aparatą.
Lempos neatvėsta ir neįsijungia. Pirmiausiai palikite jas atvėsti 3
minutėms.
Aparatas nepakankamai atvėsta ir perkaitimo apsauga išjungia aparatą
automatiškai. Pašalinkite perkaitimo priežastį (t.y. nuimkite rankšluostį,
kuris uždengia vieną ar daugiau angų). Palaukite 10 minučių ir vėl įjunkite
aparatą.
Patikrinkite elektros grandinės, prie kurios prijungtas aparatas, saugiklį.
Tinkamas yra 16A standartinis saugiklis ar lėtai išmušamas automatinis
saugiklis. Saugiklis gali iššokti,nes prie tos pačios elektros grandinės yra
prijungta per daug prietaisų.
Naudojate prailgintuvą, kuris yra per ilgas, pažeistas ir/ arba jo srovės
stiprumas yra ne 16A. Pasitarkite su parduotuve. Mes jums patariame
nenaudoti prailgintuvo.
Jūs nepasirinkote teisingo įdegio grafiko, tinkančio jūsų odai.
Atstumas tarp lempų ir paviršiaus, ant kurio jūs gulite, yra didesnis nei
nurodytas.
Jei lempos naudojamos ilgą laiką, mažėja įdegis.Toks efektas bus
pastebimas tik po kelių naudojimo metų. Šią problemą galite išspręsti,
ilgiau degindamiesi arba pekeitę lempas. Po 750 darbo valandų, ekrane
atsiras L simbolis, rekomenduojantis pakeisti lempas.
Nepakankamai atstumėte viršutinę aparato dalį. Pirmiausiai viršutinę dalį
stumkite atgal ir tik tada žemyn. (žr.skyrelį "Saugojimas").
Aparatas neatsiblokuoja automatiškai. Pirmiausia paspauskite
atblokavimo mygtuką (B), dabar galite aparatą sulankstyti, kaip nurodyta
skyrelyje "Saugojimas". Jei aparatas neatsiblokuoja keletą kartų, susisiekite
su pardavėju ar Philips aptarnavimo centru.
Problema
Aparatas neįsijungia
Saugiklis atjungia srovę, kai įjungiate ar
naudojatės aparatu.
Nepakankamas įdegio rezultatas.
Aparatas nesusilanksto.
Problemų sprendimas
Jei aparatas tinkamai neveikia, jis gali būti sugedęs.Šiuo atveju, mes patariame kreiptis į pardavėją
ar Philips aptarnavimo centrą.
Aparatas gali veikti netinkamai, jei buvo negerai ar ne pagal instrukcijas įrengtas.Tokiu atveju
problemą galite išspręsti patys, remdamiesi žemiau esančiais patarimais.
Garantija ir aptarnavimas
Jei jums reikalinga informacija, jei turite problemų, prašome aplankyti Philips tinklalapį
(www.philips.com) arba kreiptis į vietinį Philips platintoją.
Garantijos apribojimai
Įdegio lempoms negalioja tarptautinės garantijos terminai.
LIETUVIŠKAI42
Page 39

LIETUVIŠKAI 43
Neteisingas kodas
Valdymo pultelio ekrane gali būti rodomas neteisingas kodas.Vėliau mes paaiškinsime, ką turite
daryti, atsiradus ekrane neteisingam kodui.
Sprendimas
Patikrinkite, ar atidarytos angos ( žiūrėkite "aparatas
neįsijungia" skyrelyje "Problemų sprendimų vadovas").
Patikrinkite UV filtrus (tai specialūs stikliniai gaubtai,
dengiantys lempas). Jei šie filtrai yra netinkami
naudojimui, sugadinti ar jų iš viso nėra, nebesinaudokite
prietaisu ir kreipkitės į Philips aptarnavimo centrą.
Susisiekite su pardavėju arba su Philips aptarnavimo
centru.
Neteisingas kodas
E01
E02 ir kadai su dideliais numeriais
Pastaba: ekrane pasirodo ženklas E01 bei pasigirsta pypsėjimas, trunkantis 5 sekundes.
Pastaba: ekrane matomas ženklas E02 bei kodai su didesniais skaičiais. Šių skaičių pasirodymas
ekrane reiškia, kad prietaisas turi rimtą gedimą ir juo nebegalima naudotis.
Page 40

44
4222 002 26072
 Loading...