


GC8700 series


21 3
6 75
9 8
11 1012
4
13


English 6
Hrvatski 18
Română 30
Slovenščina 42
Srpski 54
Български 66

6
English
Introduction
Congratulations on your purchase and welcome to Philips! To fully benefit
from the support that Philips offers, register your product at
www.philips.com/welcome.
Read this user manual, the important information leaflet, and the quick start
guide carefully before you use the appliance. Save them for future
reference.
Exclusive technology from Philips
OptimalTemp technology
The OptimalTemp technology enables you to iron all types of ironable
fabrics, in any order, without adjusting the iron temperature and without
sorting your garments.
It is safe to just rest the hot soleplate directly on the ironing board without
putting back to the iron platform. This will help reduce the stress on your
wrist.
This iron has been approved by The Woolmark Company Pty Ltd for the
ironing of wool-only products, provided that the garments are ironed
according to the instructions on the garment label and those issued by the
manufacturer of this iron. R1602. In the United Kingdom, Eire, Hong Kong
and India, the Woolmark trademark is a certification trademark.
Compact ProVelocity Technology
This technology delivers continuous steam that penetrates deeply to
remove creases easily. At the same time, it keeps the appliance more
compact and lighter than traditional steam generators, for easier storage.
Product overview (Fig. 1)
1 Water supply hose
2 Steam trigger/Steam boost
3 'Iron ready' light
4 Soleplate
5 Iron platform
6 Carry lock release button
7 Detachable water tank
8 Water supply hose storage compartment
9 Mains cord with plug
10 CALC-CLEAN button with light
English

11 On/off button with power-on light and auto-off light
12 ECO button with light
13 Smart Calc-Clean container
Preparing for use
Type of water to use
This appliance has been designed to be used with tap water. However, if
you live in an area with hard water, fast scale build-up may occur.
Therefore, it is recommended to use distilled or demineralized water to
prolong the lifetime of the appliance.
Warning: Do not use perfumed water, water from the tumble
dryer, vinegar, starch, descaling agents, ironing aids, chemically
descaled water or other chemicals, as they may cause water
spitting, brown staining or damage to your appliance.
Filling the water tank
1 Fill the water tank before every use or when the water level in the water
tank drops below the minimum level. You can refill the water tank at any
time during use.
2 Remove the water tank from the base.
English
7
3 Fill the water tank up to the MAX indication.

8
English
4 Put the water tank back into the appliance by fitting the bottom part into
the appliance first.
5 Push in the top part of the water tank until it locks into place ('click').
Using the appliance
Ironable fabrics
Do not iron non-ironable fabrics.
Fabrics with these symbols are ironable, for example linen, cotton,
polyester, silk, wool, viscose and rayon.
Ironing
Fabrics with this symbol are not ironable. These fabrics include synthetic
fabrics such as Spandex or elastane, Spandex-mixed fabrics and polyolefins
(e.g. polypropylene). Prints on garments are not ironable either.
1 Place the steam generator on a stable and even surface.
Note: In order to ensure safe ironing we recommend to always place the
base on a stable ironing board.
2 Make sure that there is enough water in the water tank.

English
3 Put the mains plug in an earthed wall socket and press the on/off button
to switch on the steam generator. Wait until the 'iron ready' light lights up
continuously. This takes approx. 2 minutes.
4 Remove the water supply hose from the water supply hose storage
compartment.
5 Press the carry lock release button to unlock the iron from the iron
platform.
6 Press and hold the steam trigger to start ironing.
Warning: Never direct steam at people.
7 For best ironing results, after ironing with steam, perform the last strokes
without steam.
Note: When you use the appliance for the first time, it may take 30 seconds
for steam to come out of the appliance.
9
Note: The pump is activated each time you press the steam trigger. It
produces subtle rattling sound, which is normal. When there is no water in
the water tank, the pump sound is louder. Fill up the water tank with water
when the water level drops below the minimum level.
For more powerful steam, you can use the TURBO steam mode, which is
safe on all ironable fabrics.
For fabrics such as cotton, jeans and linen, you are recommended to use the
TURBO steam mode.
1 Press and hold the on/off button for 2 seconds until the light turns white.
2 To deactivate the TURBO mode, press and hold the on/off button for 2
seconds again until the light turns blue.
Steam boost function
Use the steam boost function to remove stubborn creases.

2x
10
English
Vertical ironing
1 Press the steam trigger twice quickly.
Warning: Hot steam is emitted from the iron. Never attempt to
remove wrinkles from a garment while someone is wearing it. Do
not apply steam near your or someone else's hand.
You can use the steam iron in vertical position to remove wrinkles from
hanging fabrics.
1 Hold the iron in vertical position, press the steam trigger and touch the
garment lightly with the soleplate and move the iron up and down.
Safe rest
Resting the iron while rearranging your garment
While rearranging your garment, you can rest the iron either on the iron
platform or horizontally on the ironing board. The OptimalTemp technology
ensures the soleplate will not damage the ironing board cover.

Energy saving
Eco mode
By using the ECO mode (reduced amount of steam), you can save energy
without compromising on the ironing result.
1 To activate the ECO mode, press the ECO button. The green ECO light
goes on.
2 To deactivate the ECO mode, press the ECO button again. The green
ECO light goes out.
Safety auto-off mode (specific types only)
-
To save energy, the appliance switches off automatically when it has not
been used for 5 minutes. The auto-off light in the on/off button starts to
flash.
-
To activate the appliance again, press the on/off button. The appliance
then starts to heat up again.
Warning: Never leave the appliance unattended when it is
connected to the mains. Always unplug the appliance after use.
English
11
Cleaning and maintenance
Smart Calc-Clean System
Your appliance has been designed with a Smart Calc-Clean system to
ensure that descaling and cleaning is done regularly. This helps to maintain
a strong steam performance and prevents dirt and stains coming out of the
soleplate over time. To ensure that the cleaning process is performed, the
steam generator gives regular reminders.
Sound and light Calc-Clean reminder
After 1 to 3 months of use, the Calc-Clean light starts flashing and the
appliance starts beeping to indicate that you have to perform the CalcClean process.

12
English
Besides that, a second defense step to protect the steam generator from
scale is integrated: the steam function gets disabled if descaling is not done.
After descaling is done, the steam function will be restored. This takes place
regardless of the type of water used.
Note: The Calc-Clean process can be performed at any time, even when the
sound and light reminder is not activated yet.
Performing the Calc-Clean process with the Calc-Clean container
Warning: Do not leave the appliance unattended during the CalcClean process.
Caution: Always perform the Calc-Clean process with the Calc-Clean
container. Do not interrupt the process by lifting the iron up from the
Calc-Clean container, as hot water and steam will come out of the
soleplate.
1 Fill up the water tank halfway.
Note: Make sure that the appliance is plugged in and switched ON during
the Calc-Clean process.
2 Place the Calc-Clean container on the ironing board or any other even,
stable surface.
3 Place the iron stably on the Calc-Clean container.

2 sec.
2 min.
English
4 Press and hold the CALC-CLEAN button for 2 seconds until you hear
short beeps.
Note: The Calc-Clean container has been designed to collect scale
particles and hot water during the Calc-Clean process. It is perfectly safe
to rest the iron on this container during the entire process.
5 During the Calc-Clean process, you hear short beeps and a pumping
sound.
6 Wait approximately 2 minutes for the appliance to complete the process.
When the Calc-Clean process is completed, the iron stops beeping and
the CALC-CLEAN light stops flashing.
13
7 Wipe the iron with a piece of cloth and put it back on the base station.
Caution: The iron is hot.
8 As the Calc-Clean container becomes hot during the Calc-Clean process,
wait approx. 5 minutes before you touch it. Then carry the Calc-Clean
container to the sink, empty it and store it for future use.
9 If necessary, you can repeat steps 1 to 8. Make sure that you empty the
Calc-Clean container before you start the Calc-Clean process.
Note: During the Calc-Clean process, clean water may come out of the
soleplate if no scale has accumulated inside the iron. This is normal.
For more information on how to carry out the Calc-Clean process, refer to
the videos in this link: http://www.philips.com/descaling-iron.

14
English
Cleaning the soleplate
To properly maintain your appliance, clean it regularly.
1 Clean the appliance with a moist cloth.
2 To easily and effectively remove stains, let the soleplate heat up and
move the iron over a moist cloth.
Tip: Clean the soleplate regularly to ensure smooth gliding.
Storage
1 Switch off the steam generator and unplug it.
2 Pour the water out of the water tank into the sink.
3 Fold the water supply hose. Wind the water supply hose inside the water
supply hose storage compartment and secure it inside the storage hook.
4 Fold the mains cord and fasten it with the Velcro strip.

5 Push the carry lock release button to lock the iron onto the iron platform.
6 You can carry the appliance with one hand by the handle of the iron
when the iron is locked on the iron platform.
Troubleshooting
This chapter summarizes the most common problems you could encounter
with the appliance. If you are unable to solve the problem with the
information below, visit www.philips.com/support for a list of frequently
asked questions or contact the Consumer Care Center in your country.
Problem
The iron does not
produce any steam.
Possible cause Solution
There is not enough water in
the water tank.
English
Fill the water tank beyond the MIN
indication. Press and hold the steam trigger
until steam comes out. It may take up to 30
seconds until steam comes out.
15
The light of the CALCCLEAN button flashes
and the appliance beeps.
You did not press the steam
trigger.
The steam function has
been disabled until you
have performed the CalcClean process.
The water tank is not placed
in the appliance properly.
At the start of your ironing
session, the steam trigger
has not been pressed long
enough.
This is the Calc-Clean
reminder.
Press and hold the steam trigger until steam
comes out.
Perform the Calc-Clean process to restore
the steam function. (see chapter ' Cleaning
and maintenance')
Fit the water tank back into the appliance
firmly ('click').
Press and hold the steam trigger until steam
comes out. It may take up to 30 seconds
until steam comes out.
Perform the Calc-Clean after the CalcClean reminder is given (see chapter
'Cleaning and maintenance').

16
English
Problem Possible cause Solution
No steam comes out of
the soleplate, the light of
the CALC-CLEAN button
flashes and the appliance
beeps.
You have not done or have
not completed the CalcClean process.
Perform the Calc-Clean process to enable
the steam function again (see chapter
'Cleaning and maintenance').
The appliance has
switched off.
The appliance produces
a loud pumping sound.
Water droplets come out
of the soleplate.
Dirty water and impurities
come out of the
soleplate.
The safety auto-off function
is activated automatically
when the appliance has not
been used for more than 5
minutes.
The water tank is empty. Fill the water tank with water and press the
After the Calc-Clean process
remaining water may drip
out of the soleplate.
The Calc-Clean process has
not been completed.
Steam condenses into water
in the hose when you use
steam for the first time or
have not used it for a long
time.
Impurities or chemicals
present in the water have
deposited in the steam vents
and/or soleplate.
To activate the appliance again, press the
on/off button. The appliance then starts to
heat up again.
steam trigger until the pumping sound
becomes softer and steam comes out of the
soleplate.
Wipe the soleplate dry with a piece of cloth.
If the Calc-Clean light still flashes and the
appliance still beeps, perform the CalcClean process (see chapter 'Cleaning and
maintenance').
You have to perform the Calc-Clean
process again (see chapter 'Cleaning and
maintenance').
This is normal. Hold the iron away from the
garment and press the steam trigger.Wait
until steam instead of water comes out of
the soleplate.
Perform the Calc-Clean process regularly
(see chapter 'Cleaning and maintenance').
Water flushes out of the
soleplate.
The Calc-Clean process
does not start.
The iron leaves a shine or
an imprint on the
garment.
You have accidentally
started the Calc-Clean
process (see chapter
'Cleaning and
maintenance').
You have not pressed the
CALC-CLEAN button for 2
seconds until the appliance
started beeping.
The surface to be ironed was
uneven, for instance
because you were ironing
over a seam or a fold in the
garment.
Switch off the appliance. Then switch it
back on again. Let the iron heat up until the
'iron ready' light lights up steadily.
See chapter 'Cleaning and maintenance'.
PerfectCare is safe on all garments. The
shine or imprint is not permanent and will
come off if you wash the garment.Avoid
ironing over seams or folds or you can place
a cotton cloth over the area to be ironed to
avoid imprints.

Problem Possible cause Solution
There was not enough felt in
the ironing board cover.
Put an extra layer of felt material under the
ironing board cover.
English
17
The ironing board cover
becomes wet, or there
are water droplets on the
floor/garment.
Steam has condensed on
the ironing board cover after
a long ironing session.
You have an ironing board
that is not designed to cope
with the high steam rate of
the appliance.
Replace the ironing board cover if the foam
or felt material has worn out. You can also
add an extra layer of felt material under the
ironing board cover to prevent
condensation on the ironing board.
Put an extra layer of felt material under the
ironing board cover to prevent
condensation on the ironing board.

18
Hrvatski
Uvod
Čestitamo na kupnji i dobro došli u Philips! Kako biste potpuno iskoristili
podršku koju nudi tvrtka Philips, registrirajte svoj proizvod na
www.philips.com/welcome.
Prije uporabe aparata pažljivo pročitajte ovaj korisnički priručnik, letak s
važnim informacijama i kratki početni vodič. Sačuvajte ih za buduću
uporabu.
Ekskluzivna tehnologija iz tvrtke Philips
Tehnologija OptimalTemp
Tehnologija OptimalTemp omogućuje vam glačanje svih vrsta tkanina koje
se mogu glačati, bilo kojim redoslijedom, bez prilagodbe postavki
temperature i bez razvrstavanja odjeće.
Vruću površinu za glačanje možete bez brige odložiti izravno na dasku za
glačanje bez potrebe za vraćanjem natrag na platformu za glačanje. To će
vam pomoći pri smanjenju opterećenja zgloba.
Tvrtka Woolmark Company Pty Ltd odobrila je ovo glačalo za glačanje
proizvoda koji se sastoje isključivo od vune uz uvjet da se odjeća glača u
skladu s uputama na oznaci na odjeći i u uputama koje je izdao proizvođač
ovog glačala. R1602. U Ujedinjenoj Kraljevini, Irskoj, Hong Kongu i Indiji
zaštitni znak Woolmark je certifikacijski znak.
Kompaktna tehnologija ProVelocity
Ta tehnologija omogućuje neprestanu paru koja prodire duboko kako bi
jednostavno uklonili nabore. Istodobno, održava aparat kompaktnijim i
lakšim od tradicionalnih generatora pare, radi lakšeg spremanja.
Pregled proizvoda (sl. 1)
1 Crijevo za dovod vode
2 Gumb za paru/Dodatna količina pare
3 Indikator spremnosti za glačanje
4 Površina za glačanje
5 Postolje za glačalo
6 Gumb za otpuštanje mehanizma za fiksiranje prilikom nošenja
7 Odvojivi spremnik za vodu
8 Spremnik za pohranu crijeva za dovod vode
9 Kabel za napajanje s utikačem
10 Gumb CALC-CLEAN s indikatorom
Hrvatski

11 Gumb za uključivanje/isključivanje s indikatorom za uključivanje i
indikatorom za automatsko isključivanje
12 Gumb ECO s indikatorom
Priprema za uporabu
Vrsta vode koju treba upotrebljavati
Aparat je namijenjen za uporabu s vodom iz slavine. Međutim, ako živite u
području s tvrdom vodom, može doći do brzog nakupljanja kamenca. Stoga,
preporučuje se uporaba destilirane ili demineralizirane vode kako bi se
produljio vijek trajanja aparata.
Upozorenje: Nemojte upotrebljavati vodu s parfemom, vodu iz
sušilice, ocat, izbjeljivač, sredstva protiv kamenca, sredstva za
olakšavanje glačanja, vodu koja je kemijski očišćena od kamenca
ili druge kemikalije jer mogu prouzročiti prskanje vode, smeđe
mrlje ili oštećenje aparata.
Punjenje spremnika za vodu
1 Napunite spremnik za vodu prije svake uporabe ili kada se razina vode u
njemu spusti ispod minimalne razine. Spremnik za vodu možete napuniti
u bilo koje vrijeme tijekom uporabe.
2 Izvadite spremnik za vodu iz baze.
Hrvatski
19
3 Napunite spremnik za vodu do oznake MAX.

20
Hrvatski
4 Stavite spremnik za vodu natrag u aparat tako da najprije postavite donji
dio u aparat.
5 Gurnite gornji dio spremnika za vodu dok se ne uglavi na mjesto („klik”).
Upotreba aparata
Tkanine koje se glačaju
Upozorenje:Nemojte glačati tkanine koje se ne glačaju.
-
Tkanine s ovim simbolima mogu se glačati, na primjer lan, pamuk,
poliester, svila, vuna, viskoza i umjetna svila.
Glačanje
-
Tkanine s ovim simbolom ne mogu se glačati. Te tkanine obuhvaćaju
sintetičke tkanine kao što je spandeks ili elastan, tkanine s mješavinom
spandeksa i poliolefini (npr. polipropilen). Grafike na odjeći također se ne
smiju glačati.
1 Stavite generator pare na stabilnu i ravnu površinu.
Napomena: Kako biste osigurali sigurno glačanje, preporučujemo da
bazu uvijek postavite na stabilnu dasku za glačanje.
2 Provjerite ima li u spremniku za vodu dovoljno vode.

Hrvatski
3 Utikač uključite u uzemljenu zidnu utičnicu i pritisnite gumb za
uključivanje/isključivanje kako biste uključili generator pare. Pričekajte da
indikator spremnosti za glačanje počne neprekidno svijetliti. To traje o. 2
minute.
4 Izvadite crijevo za dovod vode iz spremnika za pohranu crijeva za dovod
vode.
5 Pritisnite gumb za otpuštanje mehanizma za fiksiranje pri nošenju kako
biste otpustili glačalo s platforme za glačalo.
6 Pritisnite i zadržite gumb za paru kako biste započeli glačati.
Upozorenje: Paru nikada nemojte usmjeravati prema ljudima.
7 Kako biste postigli najbolje rezultate glačanja, nakon glačanja parom
izvršite posljednje poteze bez upotrebe pare.
Napomena: Pri prvoj uporabi aparata, može biti potrebno 30 sekundi da
para počne izlaziti iz aparata.
21
Napomena: Pumpa se aktivira svaki put kada pritisnete gumb za paru.
Proizvodi suptilan zvuk zveckanja, što je normalno. Kada u spremniku za
vodu nema vode, zvuk pumpe je glasniji. Nadopunite spremnik za vodu
vodom kada razina vode bude ispod minimalne razine.
Možete se koristiti načinom TURBO pare za snažno strujanje pare koji je
siguran na svim tkaninama koje se glačaju.
Preporučuje se da se koristite načinom rada pare TURBO za tkanine kao što
je pamuk, traper i posteljina.
1 Pritisnite i zadržite gumb za uključivanje/isključivanje 2 sekunde dok
indikator ne počne svijetliti bijelo.
2 Kako biste deaktivirali način rada TURBO, pritisnite gumb za
uključivanje/isključivanje i zadržite ga 2 sekunde sve dok indikator ne
počne svijetliti plavo.
Funkcija za dodatnu količinu pare
Koristite se funkcijom za dodatnu količinu pare radi izravnavanja postojanih
nabora.

2x
22
Hrvatski
Okomito glačanje
1 Dvaput brzo pritisnite gumb za paru.
Upozorenje: Iz glačala izlazi vruća para. Nikad nemojte pokušati
uklanjati nabore s odjevnog predmeta dok ga netko nosi. Nemojte
pariti u blizini svoje ili tuđe ruke.
Parno glačalo možete upotrebljavati u okomitom položaju kako biste uklonili
nabore s izvješenih tkanina.
1 Glačalo držite u okomitom položaju, pritisnite gumb za paru i lagano
dodirnite tkaninu površinom za glačanje te pomičite glačalo gore-dolje.
Sigurno odlaganje
Odlaganje glačala tijekom preslagivanja odjeće
Tijekom preslagivanja odjeće, glačalo možete odložiti na platformu za
glačalo ili vodoravno na dasku za glačanje. Tehnologijom OptimalTemp
osigurano je da površina za glačanje neće oštetiti navlaku daske za glačanje.

Hrvatski
Ušteda energije
Način rada ECO
Koristeći se načinom rada ECO (smanjena količina pare), možete uštedjeti
energiju bez kompromisa u rezultatu glačanja.
1 Kako biste aktivirali način rada ECO, pritisnite gumb ECO. Uključuje se
zeleni indikator ECO.
2 Kako biste deaktivirali način rada ECO, ponovno pritisnite gumb ECO.
Isključuje se zeleni indikator ECO.
Način rada sigurnosnog automatskog isključivanja (samo određeni modeli)
-
Kako bi se uštedjela energija, aparat se automatski isključuje ako se ne
upotrebljava 5 minuta. Svjetlo s automatskim isključivanjem na gumbu za
uključivanje/isključivanje počne bljeskati.
-
Kako biste ponovno aktivirali aparat, pritisnite gumb za
uključivanje/isključivanje. Aparat se tada ponovno počinje zagrijavati.
23
Upozorenje: Aparat nikada nemojte ostavljati bez nadzora dok je
spojen na mrežno napajanje. Uvijek isključite uređaj iz utičnice
nakon uporabe.
Čišćenje i održavanje
Napredni sustav Calc-Clean
Vaš aparat osmišljen je s pomoću sustava Smart Calc-Clean kako bi se
osiguralo redovito uklanjanje kamenca i čišćenje. Time se održava učinkovito
stvaranje pare te se sprječava da prljavština i mrlje prodru iz površine za
glačanje tijekom vremena. Kako bi se osiguralo izvršavanje postupka
čišćenja, generator pare redovito daje podsjetnike.

24
Hrvatski
Zvučni i svjetlosni podsjetnik za Calc-Clean
Nakon 1 do 3 mjeseca uporabe indikator Calc-Clean počet će treperiti i
aparat će se početi oglašavati zvučnim signalom kako bi vas upozorio da
morate izvršiti postupak Calc-Clean.
Osim toga, ugrađen je i drugi obrambeni korak za zaštitu generatora pare od
kamenca: funkcija stvaranja pare bit će onemogućena ako se ne provede
uklanjanje kamenca. Nakon što se izvrši uklanjanje kamenca, funkcija
stvaranja pare bit će ponovno uključena. To se odvija bez obzira na vrstu
vode koja se upotrebljava.
Napomena: Postupak Calc-Clean može se izvršiti u bolo kojem trenutku, čak
i kada se zvučni i svjetlosni podsjetnik još nije aktivirao.
Izvršavanje postupka Calc-Clean sa spremnikom Calc-Clean
Upozorenje: Tijekom postupka Calc-Clean nemojte ostavljati
aparat bez nadzora.
Oprez: Uvijek izvršite postupak Calc-Clean sa spremnikom Calc-Clean.
Nemojte prekidati postupak podizanjem glačala sa spremnika Calc-Clean
jer će iz površine za glačanje izaći vruća voda i para.
1 Napunite spremnik za vodu do polovice.
Napomena: Tijekom postupka Calc-Clean aparat mora biti priključen u
izvor napajanja i uključen.
2 Spremnik Calc-Clean postavite na dasku za glačanje ili na bilo koju ravnu
i stabilnu površinu.

2 sec.
2 min.
Hrvatski
3 Glačalo stabilno postavite na spremnik Calc-Clean.
4 Pritisnite gumb CALC-CLEAN i držite ga 2 sekunde dok ne začujete kratke
zvučne signale.
Napomena: Spremnik Calc-Clean osmišljen je za skupljanje čestica
kamenca i vruće vode tijekom postupka Calc-Clean. Potpuno je sigurno
odložiti glačalo na spremnik tijekom čitavog postupka.
5 Tijekom postupka Calc-Clean čut ćete kratke zvučne signale i zvuk
pumpanja.
25
6 Pričekajte približno 2 minute da aparat dovrši postupak. Nakon dovršetka
postupka Auto Calc Clean, glačalo prestaje proizvoditi zvučni signal i
indikator CALC-CLEAN prestane treperiti.
7 Obrišite glačalo komadom tkanine i vratite ga na baznu stanicu.
Oprez: Glačalo je vruće.

26
Hrvatski
8 Budući da spremnik Calc-Clean postaje vruć tijekom postupka Calc-
Clean, nemojte ga dodirivati o. 5 minuta. Zatim odnesite spremnik CalcClean do sudopera, ispraznite ga i spremite za buduću uporabu.
9 Ako je potrebno, možete ponoviti korake od 1 do 8. Pobrinite se da
ispraznite spremnik Calc-Clean prije nego što započnete postupak CalcClean.
Napomena: Tijekom postupka Calc-Clean čista voda može izlaziti iz
površine za glačanje ako se unutar glačala nije nakupio kamenac. To je
uobičajeno.
Više informacija o izvođenju postupka Calc-Clean pogledajte u
videozapisima na sljedećoj poveznici: http://www.philips.com/descalingiron.
Čišćenje površine za glačanje
Redovito održavanje aparata podrazumijeva redovito čišćenje.
1 Aparat čistite vlažnom krpom.
2 Mrlje ćete lako i učinkovito ukloniti brisanjem vlažnom krpom kad se
površina za glačanje zagrije.
Savjet: Površinu za glačanje morate redovito čistiti kao bi ona glatko klizila.
Pohranjivanje
1 Isključite generator pare i iskopčajte ga.
2 Izlijte vodu iz spremnika u umivaonik.
3 Savijte crijevo za dovod vode. Presavijte crijevo za dovod vode u
spremnik za crijevo za dovod vode i osigurajte ga kukicom za pohranu.

Hrvatski
4 Presavijte kabel napajanja i pričvrstite ga čičak trakom.
5 Pritisnite tipku za otpuštanje bravice za nošenje da zaključate glačalo na
platformu glačala.
6 Aparat možete nositi držeći ga jednom rukom za ručku glačala dok je
glačalo fiksirano na platformi.
27
Rješavanje problema
U ovom je poglavlju sažetak većine osnovnih problema s uređajem s kojima
se možete susresti. Ako problem ne možete riješiti s pomoću informacija u
nastavku, posjetite www.philips.com/support kako biste pronašli popis
često postavljanih pitanja ili se obratite centru za korisničku podršku u svojoj
državi.
Problem
Glačalo ne proizvodi
paru.
Mogući uzrok Rješenje
U spremniku nema dovoljno
vode.
Nemojte pritiskati gumb za
paru.
Funkcija pare onemogućena
je dok ne izvršite postupak
Calc-Clean.
Napunite spremnik za vodu iznad oznake
MIN. Pritisnite gumb za paru i zadržite ga
dok para ne počne izlaziti. Može potrajati
do 30 sekundi da para iziđe.
Pritisnite gumb za paru i zadržite ga dok
para ne počne izlaziti.
Izvršite postupak Calc-Clean kako biste
ponovno pokrenuli funkciju pare.
(pogledajte poglavlje „Čišćenje i
održavanje”)

28
Hrvatski
Problem Mogući uzrok Rješenje
Spremnik za vodu nije
ispravno postavljen na
aparat.
Čvrsto postavite spremnik za vodu natrag u
aparat („klik”).
Gumb za paru pri
započinjanju glačanja nije
bio pritisnut dovoljno dugo.
Indikator gumba CALCCLEAN treperi i/ili se
aparat oglašava zvučnim
signalom.
Iz površine za glačanje ne
izlazi para, indikator
gumba CALC-CLEAN
treperi i aparat proizvodi
zvučni signal.
Aparat se isključio. Sigurnost funkcije
Aparat proizvodi glasan
zvuk pumpanja.
Iz površine za glačanje
kapa voda.
Ovo je podsjetnik za CalcClean.
Niste izvršili ili dovršili
postupak Calc-Clean.
automatskog isključivanja
automatski se aktivira kada
se aparat ne upotrebljava
duže od 5 minuta.
Spremnik za vodu je prazan. Napunite spremnik vodom i pritišćite gumb
Nakon postupka Calc-Clean
preostala voda može kapati
iz površine za glačanje.
Pritisnite gumb za paru i zadržite ga dok
para ne počne izlaziti. Može potrajati do 30
sekundi da para iziđe.
Izvršite postupak Calc-Clean nakon
aktivacije podsjetnika za Calc-Clean
(pogledajte poglavlje „Čišćenje i
održavanje”).
Izvršite postupak Calc-Clean kako biste
ponovo omogućili funkciju pare (pogledajte
poglavlje „Čišćenje i održavanje”).
Kako biste ponovno aktivirali aparat,
pritisnite gumb za uključivanje/isključivanje.
Aparat se tada ponovno počinje zagrijavati.
za paru dok zvuk pumpanja ne postane
blaži i dok para ne počne izlaziti iz površine
za glačanje.
Površinu za glačanje obrišite komadom
krpe. Ako indikator Calc-Clean i dalje treperi
i aparat i dalje proizvodi zvučni signal,
izvršite postupak Calc Clean (pogledajte
poglavlje „Čišćenje i održavanje”).
Iz površine za glačanje
izlaze prljava voda i
kamenac.
Voda ispire površinu za
glačanje.
Postupak Calc-Clean nije
dovršen.
Prilikom prve uporabe pare
ili ako je duže vrijeme niste
koristili, para u crijevu
kondenzira se u vodu.
Nečistoće ili kemikalije u
vodi nakupile su se otvorima
za paru i/ili na površini za
glačanje.
Slučajno ste pokrenuli
postupak Calc-Clean
(pogledajte poglavlje
„Čišćenje i održavanje”).
Morate ponoviti postupak Calc-Clean
(pogledajte poglavlje „Čišćenje i
održavanje”).
To je uobičajeno. Udaljite glačalo od
odjevnog predmeta i pritisnite gumb za
paru. Pričekajte da iz površine za glačanje
počne izlaziti para umjesto vode.
Redovito izvršavajte postupak Calc-Clean
(pogledajte poglavlje „Čišćenje i
održavanje”).
Isključite aparat. A zatim ga ponovno
uključite aparat. Ostavite glačalo da se
zagrije dok indikator spremnosti za glačanje
ne počne svijetliti bez prekidanja.

Problem Mogući uzrok Rješenje
Ne pokreće se postupak
Calc-Clean.
Niste pritisnuli gumb CALCCLEAN na 2 sekunde dok se
aparat ne oglasi zvučnim
signalom.
Pogledajte poglavlje „Čišćenje i
održavanje”.
Hrvatski
29
Glačalo na odjevnim
predmetima ostavlja
odsjaj ili otiske.
Navlaka za dasku postaje
vlažna ili se na
podu/odjevnim
predmetima pojavljuju
kapi vode.
Površina glačala bila je
neravna, primjerice zbog
glačanja preko šavova ili
nabora.
Na navlaci daske za glačanje
nije bilo dovoljno filca.
Para se kondenzirala na
navlaci za dasku nakon
dugotrajnog glačanja.
Imate dasku za glačanje koja
nije predviđena za veliku
količinu pare iz aparata.
PerfectCare je siguran za sve odjevne
predmete. Odsjaj ili otisak nije trajan i nestat
će kada operete odjevni predmet.
Izbjegavajte glačanje preko šavova ili
nabora ili preko područja za glačanje stavite
pamučnu tkaninu kako bi se izbjeglo
stvaranje otisaka.
Stavite dodatni sloj materijala od filca na
navlaku daske za glačanje.
Zamijenite navlaku dasku za glačanje ako se
pjenasti materijal ili filc istrošio. Također
možete dodati dodatni sloj filca ispod
navlake za dasku za glačanje kako biste
spriječili kondenzaciju na dasci za glačanje.
Stavite dodatni sloj filca ispod navlake za
dasku za glačanje kako biste spriječili
kondenzaciju na dasci za glačanje.

30
Română
Introducere
Felicitări pentru achiziţie şi bun venit la Philips! Pentru a beneficia pe deplin
de asistenţa oferită de Philips, înregistraţi-vă produsul la
www.philips.com/welcome.
Citiţi acest manual de utilizare, broşura cu informaţii importante şi ghidul de
iniţiere rapidă înainte de a utiliza aparatul. Păstraţi-le pentru consultare
ulterioară.
Tehnologie unică de la Philips
Tehnologie OptimalTemp
Tehnologia OptimalTemp vă permite să călcaţi toate tipurile de materiale
care se calcă, în orice ordine, fără a regla temperatura fierului de călcat şi
fără a fi necesar să sortaţi articolele vestimentare.
Este sigură oprirea tălpii fierbinţi direct pe masa de călcat fără punerea
înapoi pe suportul pentru fierul de călcat. Aceasta vă ajută să reduceţi
efortul încheieturii mâinii.
Acest fier de călcat a fost aprobat de The Woolmark Company Pty Ltd
pentru călcarea produselor din lână pură, cu condiţia ca articolele să fie
călcate conform instrucţiunilor de pe eticheta articolului şi celor emise de
producătorul acestui fier de călcat. R1602. În Marea Britanie, Irlanda, Hong
Kong şi India, marca comercială Woolmark este o marcă comercială de
certificare.
Tehnologia Compact ProVelocity
Această tehnologie furnizează abur continuu, care penetrează adânc pentru
a îndepărta cutele cu uşurinţă. În acelaşi timp, aceasta face ca aparatul să fie
mai compact şi uşor decât generatoarele tradiţionale de abur, pentru o
depozitare facilă.
Prezentare de ansamblu a produsului (Fig. 1)
1 Furtun de alimentare cu apă
2 Activator abur/Jet de abur
3 Led „Fier de călcat gata”
4 Talpă
5 Suport pentru fier de călcat
6 Buton declanşator blocare la transport
7 Rezervor de apă detaşabil
8 Compartiment de stocare a furtunului de alimentare cu apă
9 Cablu de alimentare cu ştecher
10 Buton CALC-CLEAN (detartrare) cu indicator luminos
Română

11 Buton pornit/oprit cu indicator luminos de alimentare şi indicator luminos
de oprire automată
12 Buton ECO cu led
Pregătirea pentru utilizare
Tipul de apă de utilizat
Acest aparat a fost conceput pentru a fi utilizat cu apă de la robinet. Totuşi,
dacă locuiţi într-o zonă cu apă dură, este posibil să apară rapid depuneri de
calcar. De aceea, este recomandat să utilizaţi apă distilată sau
demineralizată pentru a prelungi viaţa aparatului.
Avertisment: Nu utiliza apă parfumată, apă din maşina de uscat
prin centrifugare, oţet, amidon, agenţi de detartrare, aditivi de
călcare, apă dedurizată chimic sau alte substanţe chimice,
deoarece acestea pot provoca vărsarea apei, colorarea în maro
sau deteriorarea aparatul tău.
Umplerea rezervorului de apă
1 Umpleţi rezervorul de apă înainte de fiecare utilizare sau dacă nivelul
apei din rezervor scade sub nivelul minim. Puteţi reumple rezervorul de
apă oricând în timpul utilizării.
2 Scoateţi rezervorul de apă de pe bază.
Română
31
3 Umpleţi rezervorul de apă până la indicatorul MAX.

32
Română
4 Puneţi rezervorul de apă înapoi în aparat prin fixarea mai întâi a părţii
inferioare în aparat.
5 Apăsaţi partea superioară a rezervorului de apă până când acesta se
blochează în poziţie („clic”).
Utilizarea aparatului
Materiale care se calcă
Avertisment:Nu călcaţi materialele care nu se calcă.
-
Materialele cu aceste simboluri sunt materiale care se calcă, de exemplu
in, bumbac, poliester, mătase, lână, vâscoză şi mătase artificială.
Călcatul
-
Materialele cu acest simbol nu pot fi călcate. Aceste materiale includ
materiale sintetice precum Spandex sau elastan, materiale cu conţinut de
Spandex şi poliolefine (de ex. polipropilenă). De asemenea, imprimeurile
de pe articolele vestimentare nu pot fi călcate.
1 Așează sta ia de călcat pe o suprafaţă stabilă şi plană.
Notă: Pentru a asigura un călcat în siguranţă vă recomandăm să aşezaţi
întotdeauna baza pe o masă de călcat stabilă.
2 Asiguraţi-vă că existe suficientă apă în rezervorul de apă.

Română
3 Introduceţi ştecherul de alimentare într-o priză de perete cu
împământare şi apăsaţi butonul pornit/oprit pentru a porni generatorul
de abur. Aşteptaţi până când indicatorul luminos „fier de călcat pregătit”
iluminează continuu. Aceasta durează aproximativ 2 minute.
4 Scoateţi furtunul de alimentare cu apă din compartimentul de stocare a
furtunului de alimentare cu apă.
5 Apăsaţi butonul declanşator blocare la transport pentru a debloca fierul
de pe suportul pentru fierul de călcat.
6 Menţineţi apăsat declanşatorul de aburi pentru a începe călcarea.
33
Avertisment: Nu direcţionaţi niciodată aburul înspre oameni.
7 Pentru cele mai bune rezultate de călcare, după călcarea cu abur,
realizaţi ultimele mişcări fără abur.
Notă: Atunci când utilizaţi aparatul pentru prima dată este posibil să dureze
30 secunde pentru ca aparatul să genereze abur.
Notă: Pompa este activată de fiecare dată când apăsaţi declanşatorul de
aburi. Aceasta produce o huruială discretă, ceea ce este normal. Când nu
există apă în rezervor, zgomotul pompei este mai puternic. Umpleţi
rezervorul cu apă când nivelul apei scade sub nivelul minim.
Pentru abur mai puternic, puteţi utiliza modul TURBO de abur, care poate fi
utilizat în siguranţă pe toate materialele care pot fi călcate.
Pentru materiale precum bumbac, denim şi in vă recomandăm să utilizaţi
modul TURBO de abur.
1 Apasă şi menţine apăsat butonul pornit/oprit timp de 2 secunde până ce
ledul devine alb.
2 Pentru a dezactiva modul TURBO, apasă şi menţine apăsat butonul
Pornit/Oprit timp de 2 secunde din nou până când se aprinde albastru.
Funcţia de jet de abur
Utilizaţi funcţia de jet de abur pentru a netezi cutele persistente.

2x
34
Română
Călcare verticală
1 Apăsaţi declanşatorul de abur de două ori, rapid.
Avertisment: Din fierul de călcat se emite abur fierbinte. Nu
încercaţi niciodată să eliminaţi cutele unui articol vestimentar în
timp ce o persoană este îmbrăcată cu acesta. Nu aplicaţi abur
lângă mâinile dvs. sau ale altor persoane.
Poţi utiliza fierul de călcat cu aburi în poziţie verticală pentru a îndepărta
cutele de pe materialele atârnate.
1 Ţineţi fierul de călcat în poziţie verticală, apăsaţi declanşatorul de abur şi
atingeţi uşor articolul vestimentar cu talpa fierului şi deplasaţi fierul de
călcat în sus şi în jos.
Repaus în siguranţă
Repausul fierului de călcat în timpul rearanjării articolului
vestimentar
În timp ce rearanjaţi articolul dvs. vestimentar, puteţi poziţiona fierul de
călcat fie pe suportul pentru fierul de călcat, fie orizontal pe masa de călcat.
Tehnologia OptimalTemp asigură că talpa nu va deteriora husa mesei de
călcat.

Română
Reducerea consumului de energie
Modul Eco
Utilizând modul ECO (cantitate redusă de abur), poţi economisi energie fără
a compromite rezultatele de călcare.
1 Pentru a activa modul ECO, apăsaţi butonul ECO. Se aprinde indicatorul
luminos ECO.
2 Pentru a dezactiva modul ECO, apăsaţi din nou butonul ECO. Indicatorul
luminos ECO se stinge.
Mod oprire automată de siguranţă (doar la anumite tipuri)
-
Pentru a economisi energie, aparatul se opreşte automat dacă nu este
utilizat timp de 5 minute. Indicatorul luminos de oprire automată din
butonul de pornire/oprire începe să lumineze intermitent.
-
Pentru a activa din nou aparatul, apăsaţi butonul de pornire/oprire.
Aparatul începe atunci să se încălzească din nou.
Avertisment: Aparatul nu trebuie lăsat nesupravegheat în timp ce
este conectat la priză. Scoate întotdeauna aparatul din priză
după utilizare.
35
Curăţare şi întreţinere
Sistem de detartrare inteligent
Aparatul dvs. a fost conceput cu un sistem de detartrare inteligentă pentru a
asigura faptul că detartrarea şi curăţarea se realizează cu regularitate.
Aceasta ajută la menţinerea unor performanţe ridicate ale funcţiei de abur şi
previne transferul în timp a mizeriei şi petelor de pe talpa. Pentru a asigura
faptul că procesul de curăţare este realizat, generatorul de abur oferă
memento-uri periodice.

36
Română
Memento pentru detartrare cu LED şi avertizare sonoră
După 1 până la 3 luni de utilizare, indicatorul luminos de detartrare începe să
lumineze intermitent, iar aparatul începe să emită sunete bip pentru a vă
indica faptul că trebuie să efectuaţi procesul de detartrare.
În afară de aceasta, este integrat un al doilea pas de apărare pentru a
proteja generatorul de abur de depunerile de tartru: funcţia de abur este
dezactivată dacă nu este efectuată detartrarea. După efectuarea detartrării,
funcţia de abur va fi reactivată. Aceasta are loc indiferent de tipul de apă
utilizat.
Notă: Procesul de detartrare poate fi efectuat oricând, chiar şi atunci când
memento-ul luminos şi sonor nu este încă activat.
Efectuarea procesului de detartrare cu recipientul pentru detartrare
Avertisment: Nu lăsa aparatul nesupravegheat în timpul
procesului de detartrare.
Atenţie: Efectuaţi întotdeauna procesul de detartrare cu recipientul
pentru detartrare. Nu întrerupe procesul ridicând fierul de călcat de pe
recipientul pentru detartrare, deoarece apă şi aburi fierbinţi se vor scurge
prin talpa fierului de călcat.
1 Umpleţi până la jumătate rezervorul de apă.
Notă: Asigură-te că aparatul este conectat la priză şi PORNIT în timpul
procesului de detartrare.

2 sec.
2 min.
Română
2 Aşează recipientul pentru detartrare pe masa de călcat sau pe altă
suprafaţă plată şi stabilă.
3 Poziţionaţi fierul de călcat stabil pe recipientul pentru detartrare.
4 Apăsaţi şi menţineţi apăsat butonul CALC-CLEAN timp de 2 secunde
până când auziţi sunete bip scurte.
Notă: Recipientul pentru detartrare a fost conceput pentru a colecta
particulele de tartru şi apa fierbinte în cursul procesului de detartrare.
Este perfect sigură menţinerea fierului de călcat pe acest recipient pe
durata întregului proces.
37
5 În cursul procesului de detartrare, auziţi sunete bip scurte şi un sunet de
pompare.
6 Aşteptaţi aproximativ 2 minute pentru ca aparatul să finalizeze procesul.
Când procesul de detartrare este finalizat, fierul de călcat nu mai emite
sunete bip şi indicatorul luminos de detartrare nu mai luminează
intermitent.

38
Română
Curăţarea tălpii
7 Ştergeţi fierul de călcat cu o bucată de material şi poziţionaţi-l înapoi pe
staţia de bază.
Atenţie: Fierul de călcat este fierbinte.
8 Deoarece recipientul pentru detartrare se încălzeşte în timpul procesul de
detartrare, aşteaptă aprox. 5 minute înainte de a atinge-l. Apoi duceţi
recipientul pentru detartrare la chiuvetă, goliţi-l şi depozitaţi-l pentru
utilizare ulterioară.
9 Dacă este necesar, puteţi repeta paşii de la 1 la 8. Asiguraţi-vă că goliţi
recipientul pentru detartrare înainte de a începe procesul de detartrare.
Notă: În timpul procesului de detartrare, este posibil să iasă apă curată
din talpă dacă nu s-a acumulat calcar în interiorul fierului de călcat. Acest
lucru este normal.
Pentru mai multe informaţii despre modul de realizare a procesului de
detartrare, urmăriţi videoclipurile de la această adresă:
http://www.philips.com/descaling-iron.
Pentru a- i întreţine corespunzător aparatul, curăţă-l regulat.
1 Curăţă aparatul cu o cârpă umedă.
2 Pentru a curăţa petele uşor şi eficient, lasă talpa să se încingă şi mişcă
fierul de călcat pe o lavetă umedă.
Sugestie: Curăţă regulat talpa fierului de călcat, pentru a asigura alunecarea
lină.
Depozitare
1 Opriţi generatorul de abur şi scoateţi-l din priză.
2 Vărsaţi apa din rezervorul de apă în chiuvetă.

Română
3 Înfăşuraţi furtunul de alimentare cu apă. Înfăşuraţi furtunul de alimentare
cu apă în compartimentul de stocare a furtunului de alimentare cu apă şi
fixaţi-l în cârligul pentru depozitare.
4 Înfăşuraţi cablul de alimentare şi prindeţi-l cu bandă Velcro.
5 Apăsaţi butonul declanşator de blocare la transport pentru a bloca fierul
pe suportul pentru fier de călcat.
39
Depanare
6 Puteţi să transportaţi aparatul cu o mână, de mânerul fierului, când fierul
de călcat este blocat pe suportul pentru fierul de călcat.
Acest capitol rezumă cele mai frecvente probleme care pot surveni la
utilizarea aparatului. Dacă nu puteţi rezolva problema cu ajutorul
informaţiilor de mai jos, accesaţi www.philips.com/support pentru o listă de
întrebări frecvente sau contactaţi Centrul de asistenţă pentru clienţi din ţara
dvs.

40
Română
Problemă Cauză posibilă Soluţie
Aparatul nu produce
abur.
Nu este suficientă apă în
rezervor.
Umpleţi rezervorul de apă peste nivelul
MIN. Apăsaţi şi menţineţi apăsat
declanşatorul de aburi până când iese abur.
Este posibil să dureze până la 30 de
secunde până la apariţia aburului.
Nu aţi apăsat declanşatorul
de aburi.
Funcţia de aburi a fost
dezactivată până când
efectuaţi procesul de
detartrare.
Rezervorul de apă nu este
aşezat corect în aparat.
La începutul sesiunii dvs. de
călcat, declanşatorul de
aburi nu a fost apăsat un
timp suficient de lung.
Indicatorul luminos al
butonului CALC-CLEAN
(detartrare) luminează
intermitent şi aparatul
emite sunete bip.
Nu iese abur din talpă,
indicatorul luminos al
butonului CALC-CLEAN
luminează intermitent şi
aparatul emite sunete
bip.
Aparatul s-a oprit. Funcţia de oprire automată
Acesta este mementoul
pentru detartrare.
Nu aţi efectuat sau nu aţi
finalizat procesul de
detartrare.
de siguranţă este activată
automat când aparatul nu
este utilizat mai mult de 5
minute.
Apăsaţi şi menţineţi apăsat declanşatorul de
aburi până când iese abur.
Efectuaţi procesul de detartrare pentru a
reface funcţia de aburi. (consultaţi capitolul
„Curăţare şi întreţinere”)
Fixaţi rezervorul de apă înapoi în aparat cu
fermitate („clic”).
Apăsaţi şi menţineţi apăsat declanşatorul de
aburi până când iese abur. Este posibil să
dureze până la 30 de secunde până la
apariţia aburului.
Efectuaţi procesul de detartrare după
apariţia mementoului de detartrare
(consultaţi capitolul „Curăţare şi
întreţinere”).
Efectuaţi procesul de detartrare pentru a
activa din nou funcţia de aburi (consultaţi
capitolul „Curăţare şi întreţinere”).
Pentru a activa din nou aparatul, apăsaţi
butonul de pornire/oprire. Aparatul începe
atunci să se încălzească din nou.
Aparatul produce un
sunet puternic specific
pompării.
Din talpa fierului se scurg
picături de apă.
Rezervorul de apă este gol. Umpleţi rezervorul cu apă şi apăsaţi
După procesul de detartrare,
este posibil ca apa rămasă
să picure prin talpă.
declanşatorul de aburi până când sunetul
specific pompării devine mai estompat şi
aburul iese din talpa fierului.
Uscaţi talpa cu o bucată de material. Dacă
indicatorul luminos CALC-CLEAN încă mai
luminează intermitent şi aparatul încă emite
sunete bip, efectuaţi procesul de detartrare
(consultaţi capitolul „Curăţare şi
întreţinere”).

Problemă Cauză posibilă Soluţie
Procesul de detartrare nu a
fost finalizat.
Trebuie să efectuaţi procesul de detartrare
din nou (consultaţi capitolul „Curăţare şi
întreţinere”).
Română
41
Din talpă ies apă murdară
şi impurităţi.
Apa este eliminată prin
talpă.
Procesul de detartrare nu
porneşte.
Fierul de călcat lasă o
urmă lucioasă sau o
amprentă pe articolul de
îmbrăcăminte.
Aburul se transformă în apă
în furtun atunci când folosiţi
abur pentru prima dată sau
nu l-aţi utilizat pentru o
perioadă lungă de timp.
Impurităţile sau substanţele
chimice din apă s-au
depozitat în orificiile pentru
abur şi/sau pe talpă.
Aţi pornit din greşeală
procesul de detartrare
(consultaţi capitolul
„Curăţare şi întreţinere”).
Nu aţi apăsat butonul CALCCLEAN timp de 2 secunde,
până când aparatul începe
să emită sunete bip.
Suprafaţa care trebuie
călcată a fost neuniformă,
de exemplu deoarece călcaţi
un tighel sau o cută de pe
articolul de îmbrăcăminte.
Nu a existat suficient fetru în
husa mesei de călcat.
Acest lucru este normal. Ţineţi fierul de
călcat la distanţă de articolul de
îmbrăcăminte şi apăsaţi declanşatorul de
aburi. Aşteptaţi până când din talpă iese
abur în locul apei.
Efectuaţi procesul de detartrare în mod
regulat (consultaţi capitolul „Curăţare şi
întreţinere”).
Opriţi aparatul. Apoi porniţi-l din nou.
Aşteptaţi ca fierul de călcat să se
încălzească, până în momentul în care
indicatorul luminos „fier de călcat pregătit”
luminează continuu.
Consultaţi capitolul 'Curăţare şi întreţinere'.
PerfectCare poate fi utilizat în siguranţă pe
toate articolele de îmbrăcăminte. Urma
lucioasă sau amprenta nu este permanentă
şi va dispărea dacă spălaţi articolul de
îmbrăcăminte. Evitaţi să călcaţi tighele şi
cute sau puteţi aşeza o cârpă de bumbac
peste zona care trebuie călcată, pentru a
evita urmele.
Puneţi un strat suplimentar de fetru sub
husa mesei de călcat.
Husa mesei de călcat se
umezeşte sau există
picături de apă pe
articolul de
îmbrăcăminte/podea.
Aburul s-a condensat pe
husa mesei de călcat după o
sesiune lungă de călcat.
Aveţi o husă pentru masa de
călcat care nu este
concepută pentru a face faţă
debitului mare de abur de la
aparat.
Înlocuiţi husa mesei de călcat dacă
materialul spumos sau fetrul s-au uzat. De
asemenea, puteţi adăuga un strat
suplimentar de postav sub husa mesei de
călcat pentru a preveni condensul pe masa
de călcat.
Puneţi un strat suplimentar de fetru sub
husa mesei de călcat, pentru a preveni
condensul pe masa de călcat.

42
Slovenščina
Uvod
Čestitamo za nakup in pozdravljeni pri Philipsu! Če želite popolnoma
izkoristiti podporo, ki jo ponuja Philips, izdelek registrirajte na spletnem
mestu www.philips.com/welcome.
Pred uporabo aparata natančno preberite ta uporabniški priročnik, letak s
pomembnimi informacijami in vodnik za hiter začetek. Shranite jih za
prihodnjo uporabo.
Philipsova ekskluzivna tehnologija
Tehnologija OptimalTemp
Tehnologija OptimalTemp omogoča likanje vseh vrst tkanin, primernih za
likanje, v poljubnem vrstnem redu, in sicer brez prilagajanja temperature
likalnika in brez sortiranja oblačil.
Vročo likalno ploščo lahko brez nevarnosti odložite neposredno na likalno
desko in je ni treba dajati nazaj na ploščo za likalnik. Tako boste zmanjšali
obremenitev svojega zapestja.
Družba Woolmark Company Pty Ltd je ta likalnik odobrila za likanje izdelkov,
narejenih samo iz volne, če pri likanju upoštevate navodila na etiketi oblačil
in navodila proizvajalca likalnika. R1602. Blagovna znamka Woolmark je v
Združenem kraljestvu, Hongkongu, Indiji in na Irskem certificirana blagovna
znamka.
Tehnologija Compact ProVelocity
Ta tehnologija omogoča stalen dotok pare, ki prodira globoko in z lahkoto
gladi gube. Obenem je aparat kompaktnejši in lažji od tradicionalnih
generatorjev pare ter ga je zato tudi lažje shranjevati.
Pregled izdelka (slika 1)
1 Dovodna cev za vodo
2 Sprožilnik pare/izpust pare
3 Lučka za pripravljenost likalnika
4 Likalna plošča
5 Plošča za likalnik
6 Gumb za sprostitev zaklepa za prenašanje
7 Snemljivi zbiralnik za vodo
8 Prostor za shranjevanje dovodne cevi za vodo
9 Omrežni kabel z vtičem
10 Gumb CALC-CLEAN z lučko
Slovenščina

11 Gumb za vklop/izklop z lučko za vklop in lučko za samodejni izklop
12 Gumb ECO z lučko
Priprava pred uporabo
Vrsta vode, ki jo morate uporabiti
Aparat je oblikovan tako, da se uporablja voda iz pipe. Vendar se lahko hitro
nabere vodni kamen, če živite na območju s trdo vodo. Zato priporočamo
uporabo destilirane ali demineralizirane vode, da podaljšate življenjsko
dobo aparata.
Opozorilo: Ne uporabljajte odišavljene vode, vode iz sušilnika,
kisa, škroba, sredstev za odstranjevanje vodnega kamna,
dodatkov za likanje, kemično omehčane vode ali drugih kemikalij,
ker to lahko povzroči uhajanje vode, pojav rjavih madežev ali
poškodovanje aparata.
Polnjenje zbiralnika za vodo
1 Zbiralnik za vodo napolnite pred vsako uporabo ali ko voda v njem pade
pod minimalno raven. Zbiralnik za vodo lahko med uporabo kadar koli
napolnite.
2 Iz osnovne enote odstranite zbiralnik za vodo.
Slovenščina
43
3 Zbiralnik za vodo napolnite do oznake MAX.

44
Slovenščina
4 Zbiralnik za vodo namestite nazaj v aparat tako, da najprej vstavite
spodnji del.
5 Zgornji del zbiralnika za vodo potisnite naprej, da se zaskoči.
Uporaba aparata
Tkanine, primerne za likanje
Opozorilo:Ne likajte tkanin, ki niso primerne za likanje.
-
Tkanine s temi simboli so primerne za likanje; na primer tkanine iz lana,
bombaža, poliestra, svile, volne, viskoze in umetne svile.
Likanje
-
Tkanine s tem simbolom niso primerne za likanje. Mednje sodijo
sintetične tkanine, kot so spandeks ali elastan, tkanine z vsebnostjo
spandeksa in poliolefini (npr. polipropilen). Tudi tisk na oblačilih ni
primeren za likanje.
1 Generator pare postavite na stabilno in ravno površino.
Opomba: Za varno likanje priporočamo, da podstavek vedno postavite
na stabilno likalno desko.
2 V zbiralniku za vodo naj bo dovolj vode.

Slovenščina
3 Vtič omrežnega kabla vstavite v ozemljeno omrežno vtičnico in pritisnite
gumb za vklop/izklop, da vklopite generator pare. Počakajte, da začne
lučka za pripravljenost likalnika svetiti neprekinjeno. To bo trajalo
približno dve minuti.
4 Dovodno cev za vodo odstranite iz prostora za njeno shranjevanje.
5 Pritisnite gumb za sprostitev zaklepa za prenašanje, da likalnik ločite od
plošče za likalnik.
6 Pridržite sprožilnik pare, da začnete likati.
45
Opozorilo: Pare nikoli ne usmerjajte v ljudi.
7 Za najboljše rezultate likanja zadnjih nekaj potegov z likalnikom naredite
brez uporabe pare, čeprav ste prej likali s paro.
Opomba: Ko aparat uporabljate prvič, lahko traja 30 sekund, preden iz njega
začne prihajati para.
Opomba: Črpalka se vklopi vsakič, ko pritisnete sprožilnik pare. Oddaja rahel
drdrajoč zvok, kar je normalno. Ko v zbiralniku za vodo ni vode, je zvok
črpalke glasnejši. Zbiralnik za vodo napolnite z vodo, ko raven vode pade
pod najnižjo raven.
Za močnejši izpust pare lahko uporabite način TURBO, ki je varen za vse
vrste tkanin, ki se lahko likajo.
Za tkanine, kot so bombaž, džins in lan, priporočamo uporabo načina za
izpust pare TURBO.
1 Za dve sekundi pridržite gumb za vklop/izklop, da lučka zasveti belo.
2 Način TURBO izklopite tako, da za dve sekundi pridržite gumb za
vklop/izklop, da lučka zasveti modro.
Funkcija za močnejši izpust pare
Trdovratne gube lahko zgladite s funkcijo za izpust pare.

2x
46
Slovenščina
Navpično likanje
1 Sprožilnik pare dvakrat hitro pritisnite.
Opozorilo: Likalnik oddaja vročo paro. Nikdar ne likajte oblačil na
človeku. Pare ne izpuščajte blizu svojih rok ali rok koga drugega.
S parnim likalnikom v navpičnem položaju lahko gladite gube na visečih
oblačilih.
1 Likalnik držite v navpičnem položaju, pritisnite sprožilnik pare in se
oblačila rahlo dotaknite z likalno ploščo ter pomikajte likalnik gor in dol.
Varno odlaganje
Odlaganje likalnika med naravnavanjem oblačila
Medtem ko naravnavate oblačilo, lahko likalnik odložite na ploščo za likalnik
ali vodoravno na likalno desko. Tehnologija OptimalTemp zagotavlja, da
likalna plošča ne bo poškodovala prevleke za likalno desko.

Slovenščina
Varčevanje z energijo
Način Eco
Z načinom ECO (manjši izpust pare) lahko varčujete z energijo ob enako
učinkovitem likanju.
1 Če želite aktivirati način ECO, pritisnite gumb ECO. Prižge se zelena lučka
ECO.
2 Če želite deaktivirati način ECO, znova pritisnite gumb ECO. Zelena lučka
ECO ugasne.
Način varnostnega samodejnega izklopa (samo pri določenih modelih)
-
Če aparata ne uporabljate 5 minut, se samodejno izklopi in tako varčuje z
energijo. Lučka za samodejni izklop v gumbu za vklop/izklop začne
utripati.
-
Aparat ponovno vklopite s pritiskom na gumb za vklop/izklop. Aparat se
nato spet začne segrevati.
47
Opozorilo: Na električno omrežje priklopljenega aparata nikoli ne
puščajte brez nadzora. Po uporabi aparat vedno izključite.
Čiščenje in vzdrževanje
Pametni sistem za odstranjevanje vodnega kamna
Aparat vsebuje pametni sistem za odstranjevanje vodnega kamna, ki
zagotavlja njegovo redno odstranjevanje in čiščenje. To pomaga ohranjati
učinkovito delovanje pare ter preprečuje, da bi iz likalne plošče čez čas
uhajala umazanija in povzročala madeže. Generator pare z rednimi
opomniki opominja, da je treba izvesti postopek čiščenja.

48
Slovenščina
Zvočni in svetlobni opomnik za odstranjevanje vodnega kamna
Lučka za odstranjevanje vodnega kamna začne utripati po enem do treh
mesecih uporabe, aparat pa začne piskati, kar pomeni, da morate izvesti
postopek odstranjevanja vodnega kamna.
Poleg tega je vgrajen drugi zaščitni korak za zaščito generatorja pare pred
vodnim kamnom: funkcija za izpust pare je onemogočena, če vodni kamen
ni odstranjen. Ko izvedete postopek odstranjevanja vodnega kamna, je
funkcija za izpust pare spet na voljo. To se zgodi ne glede na vrsto
uporabljene vode.
Opomba: Postopek odstranjevanja vodnega kamna lahko izvedete kadar
koli, tudi če zvočni in svetlobni opomnik še nista aktivirana.
Odstranjevanje vodnega kamna s posodo za odstranjevanje vodnega kamna
Opozorilo: Aparata med odstranjevanjem vodnega kamna ne
puščajte brez nadzora.
Pozor: Odstranjevanje vodnega kamna vedno izvedite z uporabo posode
za odstranjevanje vodnega kamna. Postopka ne prekinjajte tako, da
likalnik dvignete s posode za odstranjevanje vodnega kamna, ker iz
likalne plošče začneta uhajati vroča voda in para.
1 Zbiralnik vode napolnite do polovice.
Opomba: Poskrbite, da bo aparat med odstranjevanjem vodnega kamna
priključen na elektriko in vklopljen.

2 sec.
2 min.
Slovenščina
2 Posodo za odstranjevanje vodnega kamna postavite na likalno desko ali
drugo ravno in stabilno površino.
3 Likalnik stabilno postavite na posodo za odstranjevanje vodnega kamna.
4 Pritisnite in za dve sekundi pridržite gumb CALC-CLEAN, da zaslišite
kratke piske.
Opomba: Posoda za odstranjevanje vodnega kamna je oblikovana tako,
da se v njej med odstranjevanjem vodnega kamna zbirajo delci vodnega
kamna in vroča voda. Likalnik lahko med postopkom povsem varno
postavite na to posodo.
49
5 Med postopkom odstranjevanja vodnega kamna slišite kratke piske in
zvok črpanja.
6 Počakajte približno dve minuti, da aparat konča postopek. Ko je
odstranjevanje vodnega kamna končano, likalnik neha piskati in lučka
gumba CALC-CLEAN neha utripati.

50
Slovenščina
7 Likalnik obrišite s krpo in postavite nazaj na osnovno enoto.
Pozor: Likalnik je vroč.
8 Posoda za odstranjevanje vodnega kamna med odstranjevanjem
vodnega kamna postane vroča, zato počakajte približno pet minut,
preden se je dotaknete. Potem odnesite posodo za odstranjevanje
vodnega kamna k umivalniku, jo izpraznite in shranite za prihodnjo
uporabo.
9 Po potrebi ponovite korake od 1 do 8. Posodo za odstranjevanje vodnega
kamna izpraznite, preden začnete postopek odstranjevanja vodnega
kamna.
Opomba: Med odstranjevanjem vodnega kamna lahko iz likalne plošče
uhaja čista voda, če v likalniku ni vodnega kamna. To je običajno.
Za več informacij o tem, kako izvajati postopek odstranjevanja vodnega
kamna, si oglejte videoposnetke na tej povezavi:
http://www.philips.com/descaling-iron.
Čiščenje likalne plošče
Aparat redno čistite, da bo pravilno vzdrževan.
1 Aparat očistite z vlažno krpo.
2 Madeže preprosto in učinkovito odstranite tako, da počakate, da se
likalna plošča segreje, nato pa likalnik povlečete čez vlažno krpo.
Nasvet: Gladko drsenje zagotovite tako, da redno čistite likalno ploščo.
Shranjevanje
1 Izklopite in izključite generator pare.
2 Vodo iz zbiralnika za vodo iztočite v korito.

Slovenščina
3 Zvijte dovodno cev za vodo. Dovodno cev za vodo navijte v prostor za
njeno shranjevanje in jo pritrdite v zapenec za shranjevanje.
4 Zvijte omrežni kabel in ga pritrdite z ježkom.
5 Pritisnite gumb za sprostitev zaklepa za prenašanje, da likalnik zaklenete
na ploščo za likalnik.
51
6 Ko je likalnik pritrjen na ploščo za likalnik, ga lahko z eno roko prenašate
tako, da ga držite za ročaj.
Odpravljanje težav
V tem poglavju je povzetek najpogostejših težav, ki se lahko pojavijo pri
uporabi aparata. Če težave ne morete odpraviti s spodnjimi nasveti, na strani
www.philips.com/support poiščite seznam pogostih vprašanj ali se obrnite
na center za pomoč uporabnikom v svoji državi.
Težava
Likalnik ne oddaja pare. V zbiralniku za vodo ni
Možni vzrok Rešitev
dovolj vode.
Zbiralnik za vodo napolnite čez oznako MIN.
Pridržite sprožilnik pare, dokler ne začne iz
njega prihajati para. Traja lahko do 30
sekund, preden začne prihajati para.

52
Slovenščina
Težava Možni vzrok Rešitev
Niste pritisnili sprožilnika
pare.
Pridržite sprožilnik pare, dokler ne začne iz
njega prihajati para.
Funkcija za paro je
onemogočena, dokler ne
izvedete postopka za
odstranjevanje vodnega
kamna.
Zbiralnik za vodo ni pravilno
nameščen v aparat.
Na začetku likanja niste
dovolj dolgo pritiskali
sprožilnika pare.
Lučka gumba CALCCLEAN utripa in aparat
zapiska.
Likalna plošča ne oddaja
pare, lučka gumba CALCCLEAN utripa in aparat
zapiska.
Aparat se je izklopil. Če aparata ne uporabljate
Aparat oddaja glasen
zvok črpanja.
To je opomnik, da je treba
odstraniti vodni kamen.
Niste izvedli ali dokončali
postopka odstranjevanja
vodnega kamna.
več kot 5 minut, se
samodejno vklopi funkcija
varnostnega samodejnega
izklopa.
Zbiralnik za vodo je prazen. Napolnite zbiralnik za vodo in pridržite
Izvedite postopek odstranjevanja vodnega
kamna, da boste spet lahko uporabljali
funkcijo za paro. (glejte poglavje »Čiščenje
in vzdrževanje«)
Zbiralnik za vodo vstavite nazaj v aparat,
tako da se zaskoči.
Pridržite sprožilnik pare, dokler ne začne iz
njega prihajati para. Traja lahko do 30
sekund, preden začne prihajati para.
Vodni kamen odstranite v eni uri po
opomniku za odstranjevanje vodnega
kamna (glejte poglavje »Čiščenje in
vzdrževanje«).
Izvedite postopek odstranjevanja vodnega
kamna, da boste spet lahko uporabljali paro
(glejte poglavje »Čiščenje in vzdrževanje«).
Aparat znova vklopite s pritiskom na gumb
za vklop/izklop. Aparat se nato spet začne
segrevati.
sprožilnik pare, dokler zvok črpanja ne
postane tišji in iz likalne plošče ne začne
prihajati para.
Iz likalne plošče uhajajo
vodne kapljice.
Iz likalne plošče uhajajo
delci nečistoče in
umazana voda.
Po odstranjevanju vodnega
kamna lahko iz likalne
plošče kaplja preostala
voda.
Postopek odstranjevanja
vodnega kamna se ni
dokončal.
Para v cevi kondenzira v
vodo, ko prvič uporabljate
paro ali če je dlje časa niste
uporabljali.
V parnih ventilih in/ali na
likalni plošči so se nabrale
nečistoče in kemikalije v
vodi.
Likalno ploščo do suhega obrišite s krpo. Če
lučka za odstranjevanje vodnega kamna še
vedno utripa in aparat še piska, izvedite
postopek odstranjevanja vodnega kamna
(glejte poglavje »Čiščenje in vzdrževanje«).
Znova morate izvesti postopek
odstranjevanja vodnega kamna (glejte
poglavje »Čiščenje in vzdrževanje«).
To je običajno. Likalnik držite proč od
oblačila in pritisnite sprožilnik pare.
Počakajte, da začne iz likalne plošče
namesto vode prihajati para.
Redno odstranjujte vodni kamen (glejte
poglavje »Čiščenje in vzdrževanje«).
Težava Možni vzrok Rešitev
Iz likalne plošče brizga
voda.
Pomotoma ste začeli
odstranjevati vodni kamen
(glejte poglavje »Čiščenje in
vzdrževanje«).
Izklopite aparat. Nato ga spet vklopite.
Pustite likalnik, naj se segreva, dokler ne
začne neprekinjeno svetiti lučka za
pripravljenost likalnika.
Slovenščina
53
Postopek odstranjevanja
vodnega kamna se ne
začne.
Po likanju je na oblačilu
viden sijaj ali odtis
likalnika.
Prevleka za likalno desko
postane mokra ali med
likanjem se na
oblačilu/tleh pojavijo
vodne kapljice.
Gumba CALC-CLEAN niste
pridržali za dve sekundi, da
bi aparat začel piskati.
Površina oblačila, ki ste jo
likali, ni bila ravna, ker ste na
primer likali čez šiv ali pregib.
V prevleki za likalno desko ni
dovolj klobučevine.
Po dolgotrajnejšem likanju je
para na prevleki za likalno
desko kondenzirala.
Morda imate likalno desko,
ki ne prenese visokega
izpusta pare iz aparata.
Glejte poglavje »Čiščenje in vzdrževanje«.
PerfectCare je varen za vsa oblačila. Sijaj ali
odtis ni trajen in bo izginil po pranju
oblačila. Ne likajte čez šive ali pregibe. Na
površino za likanje lahko tudi položite
bombažno krpo, da preprečite odtise.
Pod prevleko za likalno desko položite
dodatno plast klobučevine.
Zamenjajte prevleko za likalno desko, če se
je pena ali klobučevina obrabila. Pod
prevleko za likalno desko lahko tudi
položite dodatno plast klobučevine, da
preprečite kondenzacijo na likalni deski.
Pod prevleko za likalno desko položite
dodatno plast klobučevine, da preprečite
kondenzacijo na likalni deski.

54
Srpski
Uvod
Čestitamo na kupovini i dobro došli u Philips! Da biste na najbolji način
iskoristili podršku koju nudi kompanija Philips, registrujte svoj proizvod na
stranici www.philips.com/welcome.
Pažljivo pročitajte ovaj korisnički priručnik, brošuru sa važnim informacijama i
vodič za brzi početak pre upotrebe aparata. Sačuvajte ih za buduće potrebe.
Ekskluzivna tehnologija kompanije Philips
Tehnologija OptimalTemp
Tehnologija OptimalTemp omogućava vam da peglate sve vrste tkanina koje
mogu da se peglaju, bilo kojim redosledom, bez podešavanja temperature
pegle i bez sortiranja odevnih predmeta.
Možete bezbedno da stavite grejnu ploču pegle direktno na dasku za
peglanje ne vraćajući peglu na postolje. Time ćete smanjiti opterećenje koje
trpi vaš ručni zglob.
Kompanija The Woolmark Company Pty Ltd odobrila je ovu peglu za
peglanje odeće od vune pod uslovom da se pegla u skladu sa uputstvima
na etiketi na odeći i u skladu sa uputstvima proizvođača pegle. R1602. U
Ujedinjenom Kraljevstvu, Irskoj, Hongkongu i Indiji zaštitni žig Woolmark je
certifikaciona oznaka.
Kompaktna tehnologija ProVelocity
Ova tehnologija omogućava neprekidno ispuštanje pare koja prodire
duboko za lako uklanjanje nabora. Istovremeno, ona čini aparat
kompaktnijim i lakšim od tradicionalnih posuda za paru, radi lakšeg
skladištenja.
Prikaz proizvoda (Slika 1)
1 Crevo za dovod vode
2 Dugme za paru/dodatna količina pare
3 Indikator „Pegla je spremna“
4 Grejna ploča
5 Postolje za peglu
6 Dugme za otpuštanje brave za nošenje
7 Odvojiva posuda za vodu
8 Pregrada za odlaganje creva za dovod vode
9 Kabl za napajanje sa utikačem
10 Dugme CALC-CLEAN sa indikatorom
Srpski

11 Dugme za uključivanje/isključivanje sa indikatorom napajanja i
indikatorom automatskog isključivanja
12 Dugme ECO sa indikatorom
Pre upotrebe
Tip vode koji bi trebalo koristiti
Ovaj aparat je predviđen za korišćenje sa vodom sa česme. Međutim, ako
živite u oblasti u kojoj je voda izuzetno tvrda, može da dođe do brzog
stvaranja naslaga kamenca. Stoga se preporučuje korišćenje destilovane ili
demineralizovane vode radi produžavanja radnog veka aparata.
Upozorenje: Nemojte da koristite parfemisanu vodu, vodu iz
mašine za sušenje veša, sirće, štirak, sredstva za uklanjanje
kamenca, aditive za peglanje, vodu čiji je sadržaj kamenca
smanjen hemijskim putem niti druge hemikalije zato što to može
da dovede do prskanja vode, pojave braon fleka ili oštećenja
aparata.
Punjenje posude za vodu
1 Napunite rezervoar za vodu pre svake upotrebe ili kada nivo vode u
rezervoaru padne ispod oznake za minimalni nivo. Rezervoar za vodu
možete da dopunite u bilo kom trenutku tokom upotrebe.
2 Uklonite rezervoar za vodu iz postolja.
Srpski
55
3 Napunite rezervoar vodom sve do oznake MAX.

56
Srpski
4 Vratite posudu za vodu u aparat postavljajući prvo donji deo na aparat.
5 Pritisnite gornji deo posude za vodu tako da legne na mesto (da se čuje
„klik“).
Upotreba aparata
Tkanine koje se peglaju
Upozorenje:Nemojte da peglate tkanine koje ne mogu da se
peglaju.
-
Tkanine sa ovim simbolima se mogu peglati, na primer lan, pamuk,
poliester, svila, vuna, viskoza i veštačka svila.
Peglanje
-
Tkanine sa ovim simbolom se ne mogu peglati. U ove tkanine spadaju
sintetičke tkanine, kao što je spandeks ili elastin, tkanine sa sadržajem
spandeksa i poliolefina (npr. polipropilen). Ni odštampani motivi na
odevnim predmetima se ne mogu peglati.
1 Stavite posudu za paru na stabilnu i ravnu površinu.
Napomena: Radi bezbednog peglanja, preporučuje se da postolje uvek
postavite na stabilnu dasku za peglanje.
2 Pazite da u posudi za vodu bude dovoljno vode.

Srpski
3 Uključite utikač u uzemljenu zidnu utičnicu i pritisnite dugme za
uključivanje/isključivanje da biste uključili posudu za paru. Pričekajte da
indikator „pegla je spremna“ pare počne da svetli neprekidno. Ovo traje
približno 2 minuta.
4 Izvadite crevo za dovod vode iz odeljka za odlaganje creva za dovod
vode.
5 Pritisnite dugme za otpuštanje brave za nošenje da biste oslobodili peglu
sa postolja.
6 Pritisnite i zadržite dugme za paru kako biste počeli peglanje.
57
Upozorenje: Nemojte da usmeravate paru prema ljudima.
7 Da biste postigli najbolje rezultate peglanja nakon peglanja parom,
tokom poslednjih poteza peglom nemojte koristiti paru.
Napomena: Prilikom prve upotrebe aparata može da prođe 30 sekundi pre
nego što aparat počne da ispušta paru.
Napomena: Pumpa se aktivira svaki put kada pritisnete dugme za paru.
Proizvodi suptilan zvuk čegrtanja, što je normalno. Ako u rezervoaru za vodu
nema vode, zvuk pumpe je glasniji. Napunite rezervoar za vodu kada nivo
vode padne ispod oznake za minimalni nivo.
Za snažniju paru, možete da koristite TURBO režim pare, koji je bezbedan za
sve tkanine koje mogu da se peglaju.
Za tkanine kao što su pamuk, teksas i lan, preporučujemo da koristite
TURBO režim pare.
1 Pritisnite dugme za uključivanje/isključivanje i zadržite ga 2 sekunde dok
indikator ne promeni boju u belu.
2 Da biste deaktivirali TURBO režim, ponovo pritisnite i zadržite dugme za
uključivanje/isključivanje 2 sekunde dok ne zasvetli plavo svetlo na
indikatoru.
Funkcija dodatne količine pare
Koristite funkciju dodatne količine pare za uklanjanje većih nabora.

2x
58
Srpski
1 Pritisnite dvaput brzo dugme za paru.
Vertikalno peglanje
Upozorenje: Iz pegle izlazi vrela para. Nikada ne pokušavajte da
uklonite nabore sa tkanine dok je neko nosi na sebi. Nemojte
nanositi paru blizu vaše ili nečije ruke.
Peglu na paru možete da koristite u vertikalnom položaju radi uklanjanja
nabora sa visećih tkanina.
1 Držite peglu u vertikalnom položaju, pritisnite dugme za paru i lagano
dodirnite odeću grejnom pločom i pomerajte peglu nagore i nadole.
Bezbedna pauza
Mirovanje pegle tokom pomeranja odeće
Dok pomerate odeću, možete da ostavite peglu u postolje ili horizontalno
na dasku za peglanje. Tehnologija OptimalTemp omogućava da grejna
ploča ne oštetiti navlaku za dasku za peglanje.

Ušteda energije
Režim Eco
Korišćenjem režima ECO (smanjena količina pare) možete da uštedite
energiju bez kompromisa po pitanju rezultata peglanja.
1 Da biste aktivirali Režim ECO (Ekološki), pritisnite dugme ECO. Zeleni
indikator ECO će se upaliti.
2 Da biste deaktivirali Režim ECO (Ekološki), ponovo pritisnite dugme ECO.
Zeleni indikator ECO će se isključiti.
Režim bezbednosnog automatskog isključivanja (samo određeni modeli)
-
Radi uštede energije, aparat će se automatski isključiti ako se ne koristi 5
minuta. Lampica za automatsko isključivanje na dugmetu za
uključivanje/isključivanje počinje da treperi.
-
Da biste ponovo aktivirali aparat, pritisnite dugme za
uključivanje/isključivanje. Aparat će tada početi ponovo da se zagreva.
Srpski
59
Upozorenje: Aparat nikada ne ostavljajte bez nadzora dok je
priključen na električnu mrežu. Aparat nakon upotrebe uvek
isključite iz struje.
Čišćenje i održavanje
Inteligentni sistem za čišćenje kamenca
Ovaj aparat ima inteligentni sistem za čišćenje kamenca koji obezbeđuje
redovno čišćenje kamenca i čišćenje aparata. To doprinosi održavanju
dobrog učinka pare i sprečavanju pojave da vremenom iz grejne ploče
počnu da izlaze prljavština i fleke. Posuda za paru redovno pruža
podsetnike kako bi se osiguralo obavljanje procesa čišćenja.

60
Srpski
Zvučni i svetlosni podsetnik za čišćenje kamenca
Indikator za čišćenje kamenca počeće da svetli nakon 1 do 3 meseca
upotrebe i aparat će početi da se oglašava zvučnim signalom, što ukazuje
na to da je potrebno da obavite proces čišćenja kamenca.
Pored toga, postoji i drugi nivo zaštite posude za paru od kamenca: funkcija
pare se onemogućava ako se funkcija čišćenja kamenca ne obavi. Nakon što
se obavi čišćenje kamenca, funkcija pare će ponovo biti omogućena. Ovo se
obavlja bez obzira na vrstu vode koja se koristi.
Napomena: Proces čišćenja kamenca može da se obavi u bilo koje vreme,
čak i ako još nije aktiviran zvučni i svetlosni podsetnik.
Obavljanje procesa čišćenja kamenca pomoću posude za čišćenje kamenca
Upozorenje: Aparat nemojte da ostavljate bez nadzora tokom
procesa čišćenja kamenca.
Oprez: Uvek obavljajte proces čišćenja kamenca pomoću posude za
čišćenje kamenca. Nemojte da prekidate proces podizanjem pegle iz
posude za čišćenje kamenca pošto će iz grejne ploče izlaziti vruća voda i
para.
1 Napunite rezervoar za vodu do pola.
Napomena: Uverite se da je aparat priključen na električnu mrežu i
uključen tokom procesa čišćenja kamenca.

2 sec.
2 min.
Srpski
2 Stavite posudu za čišćenje kamenca na dasku za peglanje ili bilo koju
drugu ravnu i stabilnu površinu.
3 Stabilno postavite peglu na posudu za čišćenje kamenca.
4 Pritisnite dugme CALC-CLEAN za čišćenje kamenca i zadržite ga 2
sekunde dok ne budete čuli kratke zvučne signale.
Napomena: Posuda za čišćenje kamenca je napravljena tako da prikuplja
čestice kamenca i vruću vodu tokom procesa čišćenja kamenca. Potpuno
je bezbedno držati peglu na ovoj posudi tokom čitavog procesa.
61
5 Tokom procesa čišćenja kamenca, čućete kratke zvučne signale i zvuk
nalik pumpanju.
6 Sačekajte oko 2 minuta da se proces završi. Kada se završi proces
čišćenja kamenca, pegla prestaje da se oglašava zvučnim signalom i
lampica CALC-CLEAN prestaje da treperi.

62
Srpski
7 Obrišite peglu parčetom tkanine i vratite je na baznu stanicu.
Oprez: Pegla je vrela.
8 Pošto posuda za čišćenje kamenca postaje vruća tokom procesa čišćenja
kamenca, sačekajte približno 5 minuta pre nego što je dodirnete. Zatim je
odnesite do sudopere, ispraznite je i odložite za buduću upotrebu.
9 Ako bude potrebno, ponovite korake od 1 do 8. Proverite da li ste
ispraznili posudu za čišćenje kamenca pre nego što započnete proces
čišćenja kamenca.
Napomena: Tokom procesa čišćenja kamenca, iz grejne ploče će možda
izlaziti čista voda ako se unutar pegle nije nakupio kamenac. To je
normalno.
Više informacija o tome kako da obavite proces čišćenja kamenca
pogledajte u video zapisima na ovoj adresi:
http://www.philips.com/descaling-iron.
Čišćenje grejne ploče
Redovno čistite aparat da biste ga održavali u dobrom stanju.
1 Očistite aparat vlažnom tkaninom.
2 Da biste lako i efikasno uklonili fleke, pustite da se grejna ploča zagreje i
pomerajte peglu preko vlažne krpe.
Savet: Redovno čistite grejnu ploču da biste obezbedili glatko kretanje.
Odlaganje
1 Isključite posudu za paru i isključite je iz električne mreže.
2 Prospite vodu iz posude za vodu u sudoperu.

Srpski
3 Savijte crevo za dovod vode. Namotajte crevo za dovod vode unutar
pregrade za odlaganje creva za dovod vode i učvrstite ga unutar kukice
za odlaganje.
4 Savijte kabl za napajanje i pričvrstite ga čičak trakom.
5 Pritisnite dugme za otpuštanje brave za nošenje da biste zaključali peglu
na postolje.
63
6 Aparat možete da nosite jednom rukom pomoću drške pegle kada je
pegla fiksirana na postolje.
Rešavanje problema
U ovom poglavlju su u kratkim crtama navedeni najčešći problemi sa kojima
možete da se susretnete dok koristite aparat. Ukoliko ne možete da rešite
problem pomoću liste mogućih problema u nastavku, posetite
www.philips.com/support da biste pronašli listu najčešćih pitanja ili se
obratite centru za korisničku podršku u svojoj zemlji.

64
Srpski
Problem Mogući uzrok Rešenje
Pegla ne proizvodi paru. U rezervoaru za vodu nema
dovoljno vode.
Napunite rezervoar vodom iznad oznake
MIN. Pritisnite dugme za paru i zadržite ga
dok para ne počne da izlazi. Ponekad može
proći i do 30 sekundi dok para ne počne da
izlazi.
Niste pritisnuli dugme za
paru.
Funkcija pare je
onemogućena dok ne
obavite proces čišćenja
kamenca.
Posuda za vodu nije
propisno postavljena na
aparat.
Na početku peglanja, dugme
za paru nije bilo pritisnuto
dovoljno dugo.
Indikator na dugmetu
CALC-CLEAN treperi i
aparat se oglašava
zvučnim signalom.
Para ne izlazi iz grejne
ploče, indikator na
dugmetu CALC-CLEAN
treperi i aparat se
oglašava zvučnim
signalom.
Aparat se isključio. Funkcija bezbednosnog
Ovo je podsetnik za čišćenje
kamenca.
Niste obavili ili niste dovršili
proces čišćenja kamenca.
automatskog isključivanja se
automatski aktivira ako se
aparat ne koristi duže od 5
minuta.
Pritisnite dugme za paru i zadržite ga dok
para ne počne da izlazi.
Obavite proces čišćenja kamenca da biste
ponovo mogli da koristite funkciju pare.
(pogledajte poglavlje „Čišćenje i
održavanje“)
Pričvrstite posudu za vodu na aparat (da se
čuje „klik“).
Pritisnite dugme za paru i zadržite ga dok
para ne počne da izlazi. Ponekad može
proći i do 30 sekundi dok para ne počne da
izlazi.
Obavite proces čišćenja kamenca nakon što
se aktivira podsetnik (pogledajte poglavlje
„Čišćenje i održavanje“).
Obavite proces čišćenja kamenca da biste
ponovo omogućili funkciju pare (pogledajte
poglavlje „Čišćenje i održavanje“).
Da biste ponovo aktivirali aparat, pritisnite
dugme za uključivanje/isključivanje. Aparat
će tada početi ponovo da se zagreva.
Aparat proizvodi glasan
zvuk nalik pumpanju.
Iz grejne ploče se
pojavljuju kapi vode.
Rezervoar za vodu je prazan. Napunite rezervoar vodom i pritiskajte
Preostala voda može da
kaplje iz grejne ploče nakon
procesa čišćenja kamenca.
dugme za paru dok zvuk nalik pumpanju ne
postane blaži i para ne počne da izlazi iz
grejne ploče.
Parčetom tkanine obrišite grejnu ploču tako
da bude suva. Ako indikator za čišćenje
kamenca i dalje treperi i aparat se oglašava
zvučnim signalom, obavite proces čišćenja
kamenca (pogledajte poglavlje „Čišćenje i
održavanje“)

Problem Mogući uzrok Rešenje
Proces čišćenja kamenca
nije dovršen.
Morate ponovo da obavite proces čišćenja
kamenca (pogledajte poglavlje „Čišćenje i
održavanje“).
Srpski
65
Prljava voda i prljavština
izlaze iz grejne ploče.
Voda izlazi iz grejne
ploče.
Proces čišćenja kamenca
ne počinje.
Pegla uglačava odevne
predmete ili ostavlja
otiske na njima.
Para se kondenzuje u vodu
u crevu prilikom prve
upotrebe pare ili kada duže
vreme niste koristili paru.
Nečistoće ili hemikalije
prisutne u vodi nataložile su
se u otvorima za paru i/ili na
grejnoj ploči.
Slučajno ste pokrenuli
proces čišćenja kamenca
(pogledajte poglavlje
„Čišćenje i održavanje“).
Niste pritisnuli dugme CALCCLEAN za čišćenje kamenca
i zadržali ga 2 sekunde dok
aparat nije počeo da se
oglašava zvučnim signalom.
Površina za peglanje bila je
neravna, na primer, zato što
ste peglali preko šava ili
preklopa na odevnom
predmetu.
Nema dovoljno filca u
navlaci za dasku.
To je normalno. Držite peglu dalje od
odevnog predmeta i pritisnite dugme za
paru. Sačekajte da iz grejne ploče počne da
izlazi para umesto vode.
Redovno obavljajte proces čišćenja
kamenca (pogledajte poglavlje „Čišćenje i
održavanje“).
Isključite aparat. Zatim ga ponovo uključite.
Ostavite peglu da se greje sve dok indikator
„Pegla je spremna“ ne počne da svetli.
Pogledajte poglavlje „Čišćenje i
održavanje“.
Sistem PerfectCare je bezbedan za sve
tkanine. Uglačanost ili otisak nije trajan i
nestaće nakon pranja odevnog predmeta.
Izbegavajte peglanje preko šavova ili
preklopa ili postavite pamučnu tkaninu
preko oblasti koju peglate kako biste sprečili
pojavu otisaka.
Stavite dodatni sloj filcanog materijala ispod
navlake za dasku za peglanje.
Navlaka za dasku za
peglanje postaje vlažna
ili se na podu/odevnim
predmetima pojavljuju
kapljice vode.
Para se kondenzovala na
navlaci za dasku za peglanje
nakon duge sesije peglanja.
Posedujete dasku za
peglanje koja nije
napravljena tako da može
da izdrži veliku snagu pare
koju proizvodu aparat.
Zamenite navlaku za dasku za peglanje u
slučaju da se penasti materijal ili filc
pohabao. Možete dodati i dodatni sloj
filcanog materijala ispod navlake za dasku
za peglanje kako biste sprečili
kondenzovanje na dasci za peglanje.
Stavite dodatni sloj filcanog materijala ispod
navlake za dasku za peglanje kako biste
sprečili kondenzovanje na dasci za
peglanje.

66
Български
Въведение
Поздравяваме ви за покупката и добре дошли във Philips! За да се
възползвате изцяло от предлаганата от Philips поддръжка, регистрирайте
продукта си на www.philips.com/welcome.
Преди да използвате уреда, внимателно прочетете това ръководство на
потребителя, брошурата с важна информация и ръководството за бърз
старт. Запазете ги за бъдещи справки.
Ексклузивна технология от Philips
Технология OptimalTemp
Технологията OptimalTemp ви позволява да гладите всички видове
подходящи за гладене тъкани, без да регулирате температурата на ютията и
да сортирате дрехите.
Безопасно е просто да оставите горещата гладеща плоча директно върху
дъската за гладене, без да я връщате върху поставката за ютията. Това ще
намали натоварването на китката ви.
Тази ютия е одобрена от The Woolmark Company Pty Ltd за гладене на
артикули изцяло от вълна, при условие че се гладят според инструкциите на
етикета на дрехата и тези на производителя на ютията. R1602. Във
Великобритания, Ейре, Хонконг и Индия търговската марка Woolmark е
търговска марка за сертифициране.
Компактна технология ProVelocity
Тази технология осигурява постоянна пара, която прониква дълбоко за
лесно премахване на гънките. В същото време тя прави уреда по-компактен
и лек от традиционните парни генератори за по-лесно съхранение.
Общ преглед на продукта (фиг. 1)
1 Маркуч за подаване на вода
2 Спусък за пара/парен удар
3 Индикатор за готовност на ютията
4 Гладеща плоча
5 Поставка за ютията
6 Бутон за освобождаване на плъзгача за заключване при носене
7 Подвижен воден резервоар
8 Отделение за прибиране на маркуча за вода
9 Захранващ кабел с щепсел
10 Бутон CALC-CLEAN с индикатор
Български
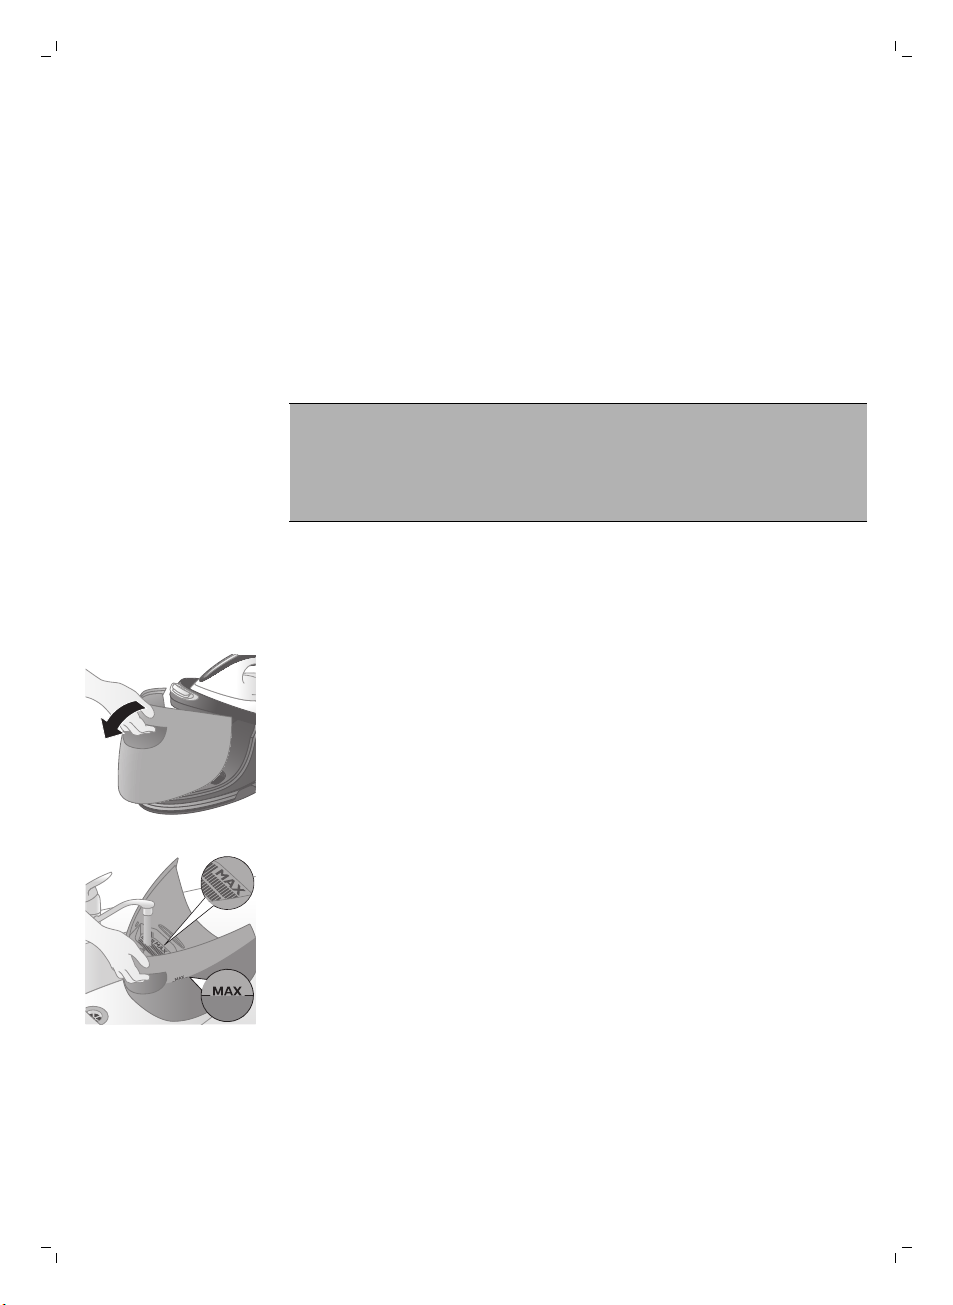
11 Бутон за вкл. /изкл. с индикатори за включено захранване и автоматично
изключване
12 Бутон ECO с индикатор
Подготовка за употреба
Тип вода за използване
Този уред е предназначен за използване с чешмяна вода. Ако живеете в
район с твърда вода обаче, може да се образува бързо накип. Поради това е
препоръчително да използвате дестилирана или деминерализирана вода за
удължаване на живота на уреда.
Предупреждение: Не използвайте парфюмирана вода, вода от
сушилна машина, оцет, нишесте, препарати за почистване на накип,
помощни препарати за гладене, химически декалцирана вода или
други химикали, тъй като те могат да причинят изхвърляне на вода,
кафяво оцветяване или повреда на вашия уред.
Пълнене на водния резервоар
1 Пълнете водния резервоар преди всяка употреба или когато водата в
резервоара спадне под минималното ниво. Можете да пълните водния
резервоар по всяко време при гладене.
2 Извадете водния резервоар от основата.
Български
67
3 Напълнете водния резервоар до знака MAX.

68
Български
4 Сложете водния резервоар обратно в уреда, като поставите най-напред
долната му част.
5 Вкарайте горната част на водния резервоар, докато застане на мястото
си (с щракване).
Използване на уреда
Подходящи за гладене тъкани
Предупреждение:Не гладете тъкани, които не са подходящи за
гладене.
-
Тъканите с тези символи са подходящи за гладене, например лен, памук,
полиестер, коприна, вълна, вискоза и изкуствена коприна.
Гладене
-
Тъканите с този символ не са подходящи за гладене. Те включват
синтетични тъкани, като например ликра или еластан, тъкани с ликра и
полиолефини (напр. полипропилен). Дрехи с щампа също не са
подходящи за гладене.
1 Сложете парния генератор върху стабилна и хоризонтална повърхност.
Забележка: За осигуряване на безопасно гладене ви препоръчваме
винаги да поставяте основата върху стабилна дъска за гладене.
2 Проверете дали има достатъчно вода в резервоара.

Български
3 Включете щепсела в заземен контакт и натиснете бутона за вкл./изкл., за
да включите парния генератор. Изчакайте, докато индикаторът за
готовност на ютията не започне да свети постоянно. Това отнема около 2
минути.
4 Извадете маркуча за подаване на вода от отделението за прибиране на
маркуча за подаване на вода.
5 Натиснете бутона за освобождаване на плъзгача за заключване, за да
отключите ютията от поставката.
6 Натиснете и задръжте спусъка за пара, за да започнете да гладите.
69
Предупреждение: Никога не насочвайте парата към хора.
7 За най-добри резултати след гладене с пара извършете последните
движения без пара.
Забележка: Когато използвате уреда за първи път, може да минат 30
секунди, докато от него започне да излиза пара.
Забележка: Помпата се задейства всеки път когато натиснете спусъка за
пара. Тя издава лек тракащ звук, което е нормално. Когато водният
резервоар е празен, помпата издава по-силен звук. Напълнете водния
резервоар с вода, когато равнището на водата спадне под минималното
ниво.
За по-мощна пара можете да използвате режима за ТУРБО пара, който е
безопасен върху всички подходящи за гладене тъкани.
За тъкани, като например памучни, дънкови и ленени, се препоръчва да
използвате режима за ТУРБО пара.
1 Натиснете и задръжте бутона за вкл./изкл. в продължение на 2 секунди,
докато индикаторът светне в бяло.
2 За да деактивирате ТУРБО режима, отново натиснете и задръжте бутона
за вкл. /изкл. в продължение 2 секунди, докато индикаторът светне в
синьо.
Функция за допълнителна пара
Използвайте функцията за допълнителна пара за премахване на упорити
гънки.

2x
70
Български
1 Натиснете спусъка за пара два пъти бързо.
Вертикално гладене
Предупреждение: От ютията излиза гореща пара. Никога не се
опитвайте да премахвате гънки от дреха, докато някой я е облякъл.
Не насочвайте пара близо до своята или до нечия чужда ръка.
Можете да използвате парната ютия във вертикално положение за
премахване на гънки от висящи на закачалка дрехи.
1 Дръжте ютията във вертикално положение, натискайте спусъка за пара и
докосвайте дрехата внимателно с гладещата плоча, като движите ютията
нагоре и надолу.
Безопасно оставяне
Оставяне на ютията, докато обръщате дреха
Докато обръщате дреха, можете да оставите ютията върху поставката или
хоризонтално върху дъската за гладене. Технологията OptimalTemp не
позволява на гладещата плоча да повреди покритието на дъската за
гладене.

Български
Енергоспестяване
Режим Eco
Като използвате режима ECO (по-малко количество пара), можете да
пестите енергия без компромис с качеството на гладене.
1 За да активирате режим ECO, натиснете бутона ECO. Зеленият
индикатор за режим ECO светва.
2 За да деактивирате режим ECO, натиснете бутона ECO отново. Зеленият
индикатор за режим ECO изгасва.
Режим на предпазно автоматично изключване (само за определени модели)
-
За да пести енергия, уредът се изключва автоматично, ако не се
използва в продължение на 5 минути. Индикаторът за автоматично
изключване на бутона за вкл./изкл. започва да мига.
-
За да активирате уреда отново, натиснете бутона за вкл./изкл. Уредът
започва да отново да се нагрява.
71
Предупреждение: Никога не оставяйте уреда без наблюдение,
когато е включен в електрическата мрежа. След употреба винаги
изключвайте уреда от контакта.
Почистване и поддръжка
Интелигентна система за почистване на накип Calc-Clean
Вашият уред е проектиран с интелигентна система за почистване на накип
Calc-Clean, за да се гарантира, че редовно се извършва премахване и
почистване на накипа. Това спомага за поддържане на качествено гладене с
пара и избягване на замърсявания и петна, които се причиняват след време
от гладещата плоча. За да се осигури извършването на почистващия
процес, парният генератор използва редовни напомняния.

72
Български
Звуково и светлинно напомняне за почистване на накип
След 1 до 3 месеца употреба индикаторът Calc-Clean започва да мига и
уредът започва да издава звуков сигнал, за да покаже, че трябва да се
извърши процедурата за почистване на накип.
Освен това е включен втори етап за защита на парния генератор от накип:
функцията за пара се изключва ако не бъде извършено почистване на
накипа. След като се извърши почистване на накипа, функцията за пара се
възстановява. Това се извършва независимо от типа на използваната вода.
Забележка: Процедурата за почистване на накип може да се извършва по
всяко време дори когато звуковото и светлинно напомняне още не се е
активирало.
Извършване на процедурата за почистване на накип с контейнера Calc-Clean
Предупреждение: Не оставяйте уреда без наблюдение по време на
процедурата за почистване на накип.
Внимание: Винаги изпълнявайте процедурата за почистване на накип с
контейнера Calc-Clean. Не прекъсвайте процедурата чрез повдигане на
ютията от контейнера Calc-Clean, тъй като от гладещата плоча ще излезе
гореща вода и пара.
1 Напълнете водния резервоар до половината.
Забележка: Уверете се, че уредът е включен по време на процедурата за
почистване на накип.

2 sec.
2 min.
Български
2 Поставете контейнера Calc-Clean върху дъската за гладене или която и
да е друга равна и стабилна повърхност.
3 Сложете ютията стабилно върху контейнера Calc-Clean.
4 Натиснете и задръжте бутона CALC-CLEAN в продължение на 2 секунди,
докато чуете кратки звукови сигнали.
Забележка: Контейнерът Calc-Clean е проектиран да събира частиците
накип и горещата вода по време на процедурата за почистване на накип.
Напълно безопасно е да оставяте ютията върху него по време на цялата
процедура.
73
5 По време на процедурата за почистване на накип ще чувате кратки
звукови сигнали и бълбукащ звук.
6 Изчакайте около 2 минути, докато уредът завърши процедурата. Когато
процедурата за почистване на накип завърши, индикаторът CALC-CLEAN
спира да мига.

74
Български
7 Почистете ютията с парче плат и я поставете обратно върху основата на
уреда.
Внимание: Ютията е гореща.
8 Тъй като контейнерът Calc-Clean се нагрява по време на процедурата,
изчакайте около 5 минути, преди да го докосвате. След това го занесете
до мивката, изпразнете го и го приберете за бъдеща употреба.
9 При нужда можете да повторите стъпки от 1 до 8. Уверете се, че сте
изпразнили контейнера Calc-Clean, преди да започнете процедурата за
почистване на накип.
Забележка: По време на процедурата за премахване на накип от
гладещата плоча може да излиза чиста вода, ако във вътрешността на
ютията не се е натрупал накип. Това е нормално.
За повече информация относно извършването на процедурата за
почистване на накип гледайте видеоклиповете на този адрес:
http://www.philips.com/descaling-iron.
Почистване на гладещата плоча
Поддържайте уреда в добро състояние, като го почиствате редовно.
1 Почистете уреда с влажна кърпа.
2 За лесно и ефикасно отстраняване на петна оставате гладещата плоча
да се нагрее и движете ютията върху мокро парче плат.
Съвет: Почиствайте редовно гладещата плоча, за да запазите гладкото
плъзгане.
Съхранение
1 Изключете парния генератор и извадете щепсела от контакта.
2 Излейте водата от водния резервоар в мивката.

Български
3 Навийте маркуча за подаване на вода. Навийте маркуча за подаване на
вода в отделението за прибиране на маркуча за подаване на вода и го
закрепете в скобата за прибиране.
4 Навийте захранващия кабел и го вържете с лепящата лента.
5 Натиснете бутона за освобождаване на плъзгача за заключване, за да
заключите ютията върху поставката.
75
6 Можете да пренасяте уреда, като го държите за дръжката на ютията с
една ръка, когато ютията е заключена върху поставката за ютия.
Отстраняване на неизправности
В тази глава са обобщени най-честите проблеми, които може да срещнете
при използване на уреда. Ако не можете да разрешите проблема с помощта
на информацията по-долу, вижте списъка с често задавани въпроси на
адрес www.philips.com/support или се свържете с Центъра за
обслужване на потребители във вашата държава.

76
Български
Проблем Възможна причина Решение
Ютията не подава пара. Във водния резервоар няма
достатъчно вода.
Напълнете водния резервоар над
означението MIN. Натиснете и задръжте
спусъка за пара, докато започне да излиза
пара. Може да отнеме до 30 секунди, преди
да започне да излиза пара.
Не сте натиснали спусъка за
пара.
Функцията за допълнителна
пара е била изключена,
докато сте извършвали
процедурата за почистване
на накип.
Водният резервоар не е
поставен правилно в уреда.
Спусъкът за пара не е бил
натиснат достатъчно
продължително в началото
на гладенето.
Индикаторът на бутона
CALC-CLEAN мига и
уредът издава звуков
сигнал.
От гладещата плоча не
излиза пара, индикаторът
на бутона CALC-CLEAN
мига и уредът издава
звуков сигнал.
Уредът се е изключил. Функцията за предпазно
Това е напомнянето за
почистване на накип.
Не сте изпълнили или не сте
завършили процедурата за
почистване на накип.
автоматично изключване се
активира автоматично,
когато уредът не се използва
повече от 5 минути.
Натиснете и задръжте спусъка за пара,
докато започне да излиза пара.
Извършете процедурата за почистване на
накип, за да възстановите функцията за
пара. (вижте глава „Почистване и
поддръжка“)
Поставете стабилно водния резервоар на
място в уреда (с щракване).
Натиснете и задръжте спусъка за пара,
докато започне да излиза пара. Може да
отнеме до 30 секунди, преди да започне да
излиза пара.
Извършете процедурата за почистване на
накип, след като чуете и видите
напомнянето за почистване на накип (вижте
глава „Почистване и поддръжка“).
Изпълнете процедурата за почистване на
накип, за да активирате функцията за пара
отново (вижте глава „Почистване и
поддръжка“).
За да активирате уреда отново, натиснете
бутона за вкл./изкл. Уредът започва отново
да се нагрява.
Уредът издава силен
бълбукащ звук.
От гладещата плоча
излизат капки вода.
Водният резервоар е празен. Напълнете резервоара с вода и натискайте
След като извършите
процедурата за почистване
на накип, от гладещата
плоча може да изтече
останалата в резервоара
вода.
Процедурата за почистване
на накип не е завършена.
спусъка за пара, докато бълбукащият звук
стане по-тих и от гладещата плоча започне
да излиза пара.
Подсушете гладещата плоча с парче плат.
Ако индикаторът Calc-Clean продължава да
мига и уредът продължава да издава звуков
сигнал, извършете процедурата за
почистване на накип (вижте глава
„Почистване и поддръжка“).
Трябва да изпълните процедурата за
почистване на накип отново (вижте глава
„Почистване и поддръжка“).

Проблем Възможна причина Решение
Парата кондензира в
маркуча, когато я използвате
за пръв път или когато не
сте я използвали дълго
време.
Това е нормално. Задръжте ютията
настрани от дрехата и натиснете спусъка за
пара. Изчакайте, докато от гладещата плоча
започне да излиза пара вместо вода.
Български
77
От гладещата плоча
излизат нечистотии и
мръсна вода.
От гладещата плоча тече
вода.
Процедурата за
почистване на накип не
стартира.
Ютията оставя лъскави
места или отпечатъци
върху дрехата.
Покритието на дъската за
гладене се овлажнява
или на пода/по дрехата
има капки вода.
Във вентилационните
отвори за пара и/или върху
гладещата плоча са
останали примеси или
химикали от водата.
Стартирали сте процедурата
за почистване на накип по
невнимание (вижте глава
„Почистване и поддръжка“).
Не сте натиснали бутона
CALC-CLEAN в
продължение на 2 секунди,
докато уредът започне да
издава звуков сигнал.
Гладили сте върху неравна
повърхност, например шев
или гънка на дрехата.
Нямало е достатъчно филц в
покритието на дъската за
гладене.
Парата е кондензирала
върху покритието на дъската
за гладене, след като сте
гладили дълго време.
Извършвайте процедурата за почистване на
накип редовно (вижте глава „Почистване и
поддръжка“).
Изключете уреда. След това го включете
отново. Оставете ютията да се нагрее,
докато индикаторът за готовност започне да
свети постоянно.
Вижте глава „Почистване и поддръжка“.
PerfectCare е безопасна върху всякакви
дрехи. Лъскавите места или отпечатъците
не остават за постоянно, а изчезват при
следващото пране на дрехата. Избягвайте
да гладите върху шевове и гънки, или
гладете през парче памучен плат, за да
избегнете отпечатъци.
Сложете допълнителен слой филц под
покритието на дъската за гладене.
Сменете покритието на дъската за гладене,
ако пенестият материал или филцът се е
изтъркал. Можете също така да добавите
допълнителен слой филц под покритието на
дъската за гладене, за да предотвратите
появата на конденз върху дъската за
гладене.
Вашата дъска за гладене
може да не е предназначена
за толкова силна пара като
тази на уреда.
Сложете допълнителен слой филц под
покритието на дъската за гладене, за да
предотвратите появата на конденз.


empty page before backcover

© 2016 Koninklijke Philips N.V.
All rights reserved
4239.001.0365.2 (12/2016)
>75% recycled paper
>75% papier recyclé
 Loading...