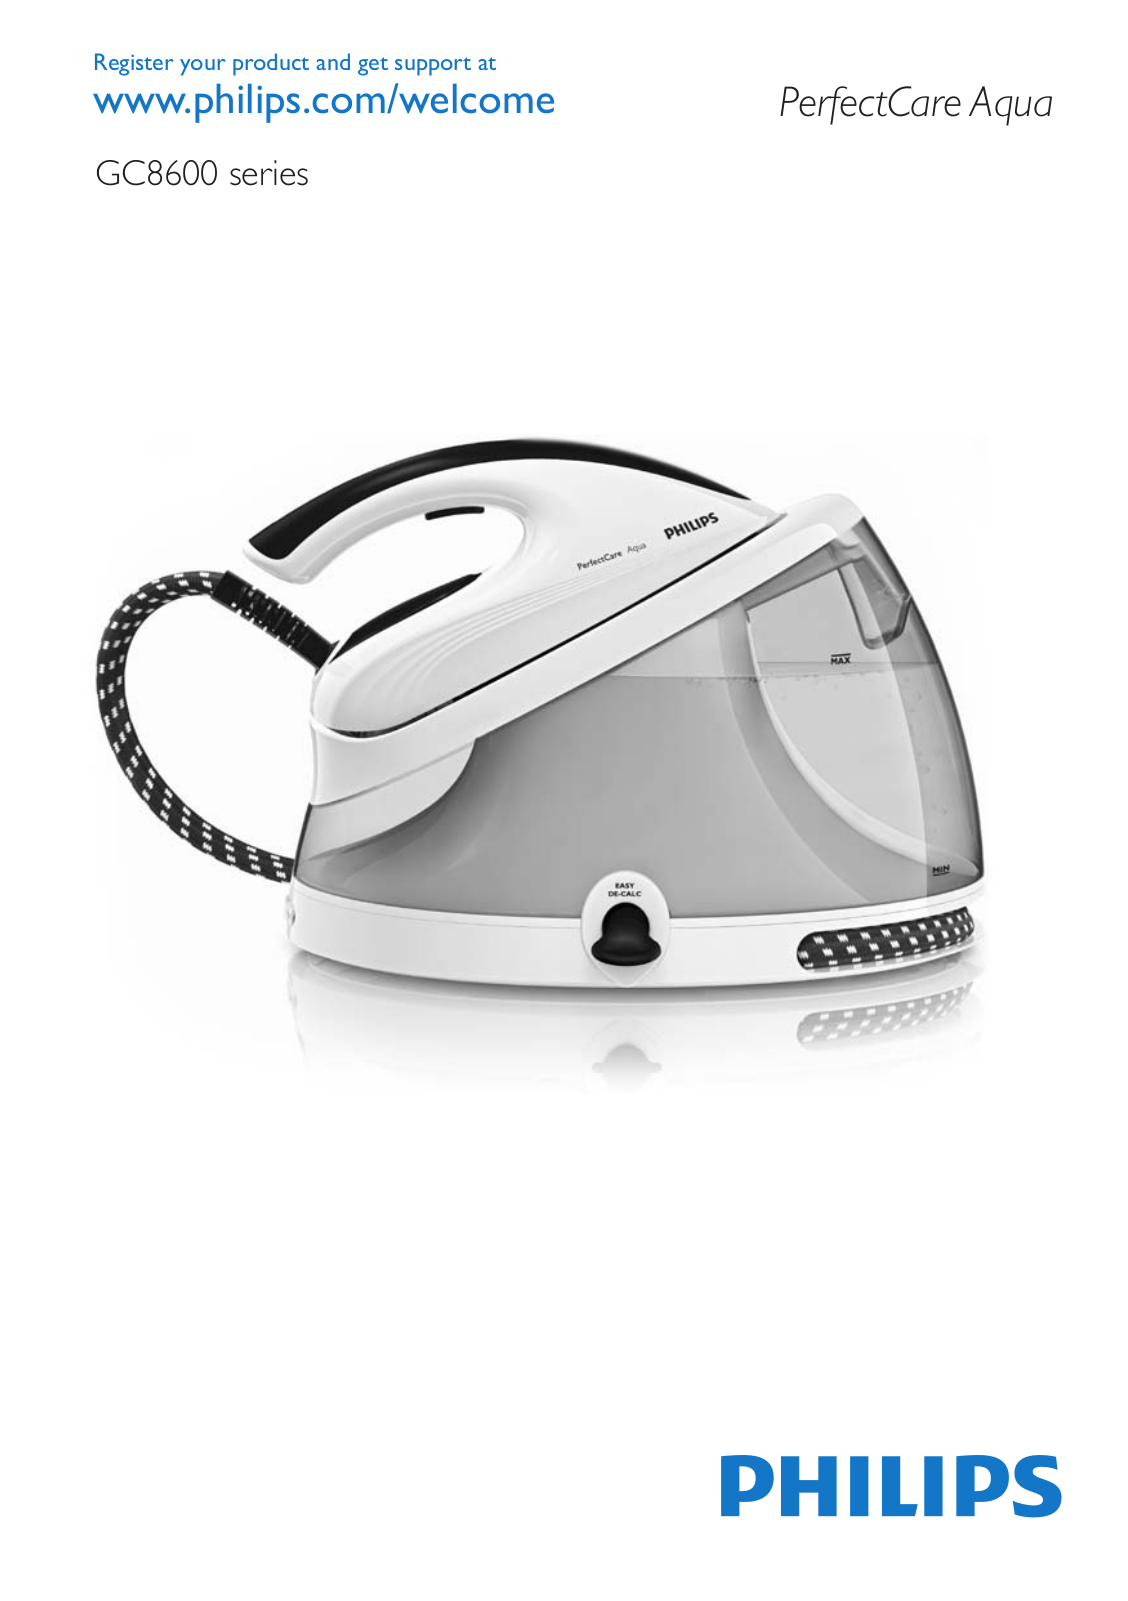
Philips GC8600 series User Manual [th]

0 (0)

Register your product and get support at

PerfectCare Aqua

www.philips.com/welcome

GC8600 series

English 4 Indonesia 24

44

Bahasa Melayu 64

84

TiếngViệt 102

122

140

GC86xx series PerfectCare Aqua

4 English

Table of contents


Important 4


Introduction 7


Product overview 8


Before first use 9


Using your steam generator 9


Filling the water tank 9


Heating up 10


Carry lock (specific types only)

11

Temperature and steam setting

12

Ironing 12

Putting down the iron during ironing 14 ECO mode 14

Ironing tips 14

Auto-off mode (specific types only) 15 Cleaning and maintenance 15 IMPORTANT - DESCALING 15

Descaling the soleplate of the iron 17

Storage 19

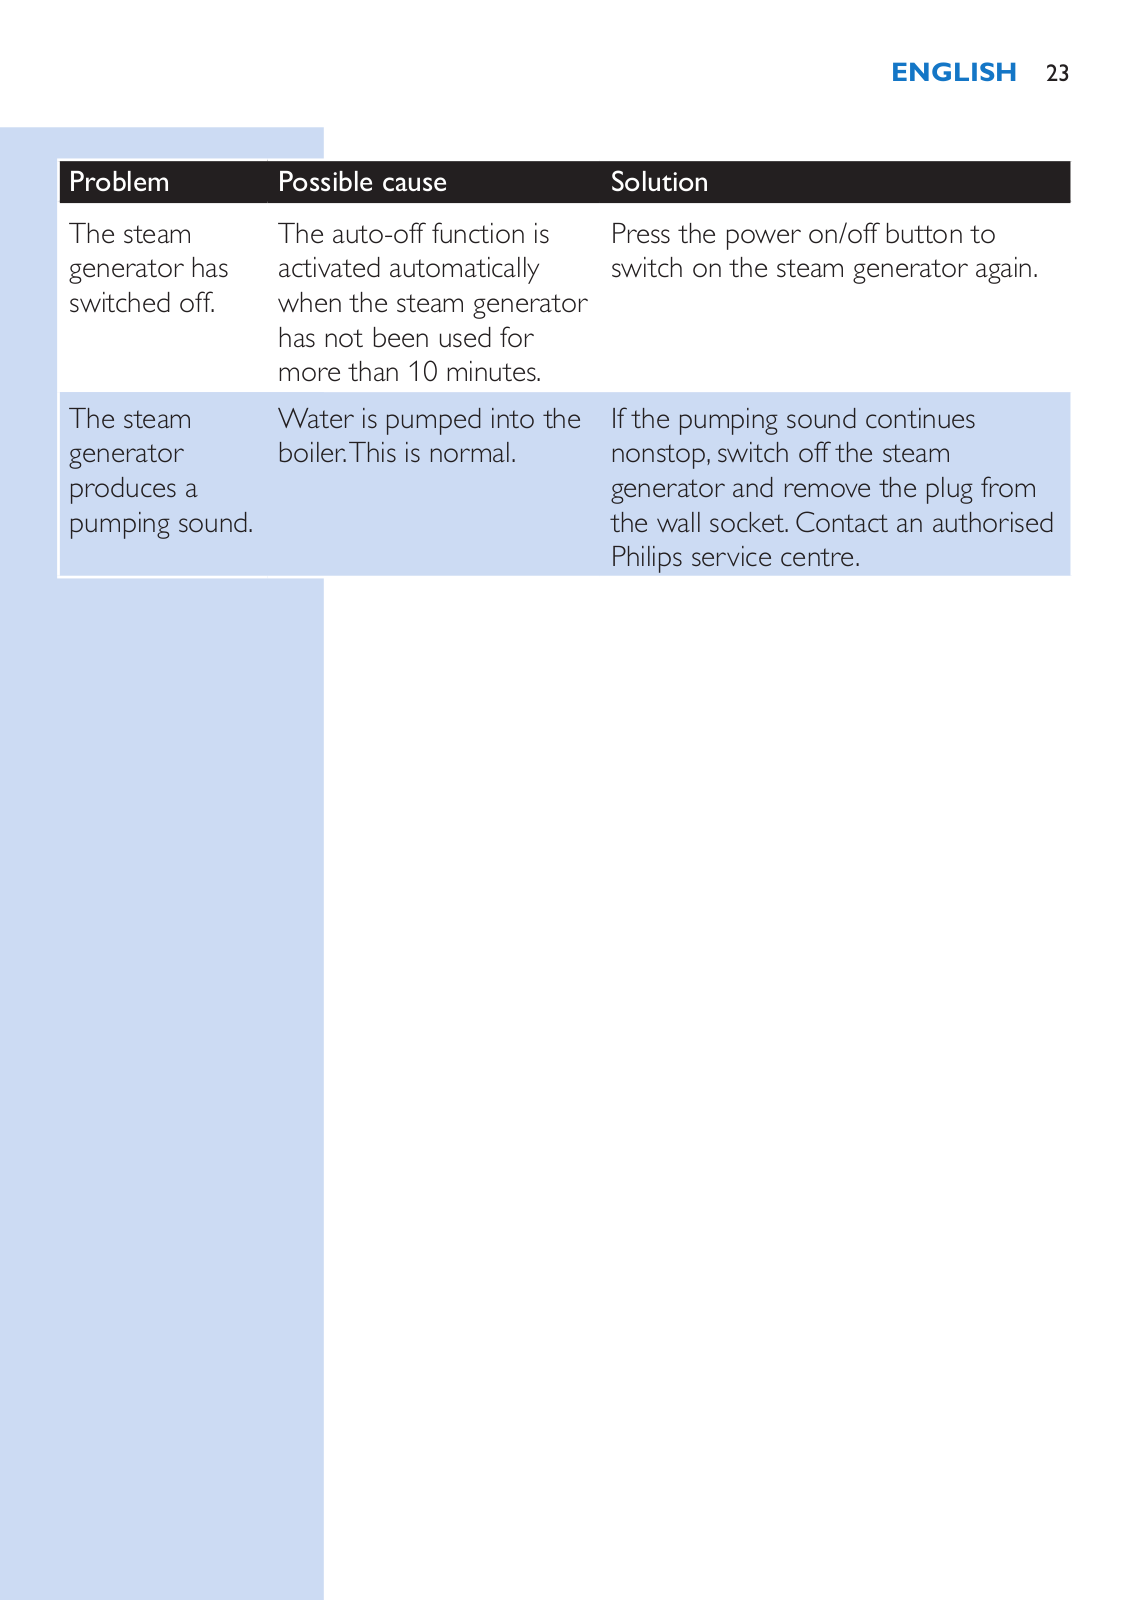
Troubleshooting 21

Important

Read this user manual carefully before you use the appliance and save it for future reference.

Danger

-- Never immerse the iron or the steam generator in water.

Warning

-- Check if the voltage indicated on the type plate corresponds to the local mains voltage before you connect the appliance.

-- Do not use the appliance if the plug, the mains cord, the supply hose or the appliance itself shows visible damage, or if the appliance has been dropped or leaks.

-- If the mains cord or the supply hose is damaged, you must have it replaced by Philips, a service centre authorised by

Philips or similarly qualified persons in order to avoid a hazard.

-- Never leave the appliance unattended when it is connected to the mains.

English 5

-- This appliance can be used by children aged 8 or above and by persons with reduced physical, sensory or mental capabilities or lack of experience and knowledge if they have been given instructions in safe use of the appliance or supervision to establish safe use and if they have been made aware of the hazards involved.

-- Do not allow children to play with the appliance.

-- Keep the iron and its mains cord out of the reach of children aged 8 or under when the appliance is switched on or cooling down.

-- Children are not allowed to clean the appliance and perform the Calc-Clean procedure without supervision.

-- Do not let the mains cord and supply hose come into contact with the hot soleplate of the iron.

-- If steam or hot water droplets escape from under the EASY DE-CALC knob when the appliance heats up, switch off the appliance and let it cool down for 2

hours.Then reinsert the EASY DE-CALC knob. If steam continues to escape when the appliance heats up, switch off the appliance and contact a service centre authorised by Philips.

-- Do not remove the EASY DE-CALC knob from the steam generator when the steam generator is still hot or under pressure.

-- Do not use any other cap on the steam generator than the EASY DE-CALC knob that has been supplied with the appliance.

Caution

-- Only connect the appliance to an earthed wall socket. -- Always place and use the steam generator on a stable,

level and horizontal surface.

-- Check the mains cord and the supply hose regularly for possible damage.

-- Fully unwind the mains cord before you plug it in the wall socket.

-- The iron platform and the soleplate of the iron can become extremely hot and may cause burns if touched. If you want to move the steam generator, do not touch the iron platform.

6 English

-- Always switch off the appliance and remove the plug from the wall socket when you have finished ironing.

-- Put the iron back on the iron platform, switch off the appliance and remove the mains plug from the wall socket: 

-- a. when you have finished ironing

-- b. when you clean the appliance

-- b. when you fill or empty the water tank

-- c. when you leave the iron, even if it is only for a short while

-- Descale the steam generator regularly according to the instructions in chapter ‘Cleaning and maintenance’.

-- This appliance is intended for indoor household use only.

Electromagnetic fields (EMF)

This Philips appliance complies with all standards regarding electromagnetic fields (EMF). If handled properly and according to the instructions in this user manual, the appliance is safe to use based on scientific evidence available today.

Disposal

-- Do not throw away the appliance with the normal household waste at the end of its life, but hand it in at an official collection point for recycling. By doing this, you help to preserve the environment.

-- To make recycling possible, the plastic parts used for this appliance have been coded.The cardboard packaging is made of 90% recycled material and is fully recyclable.

English 7

Introduction

Thank you for buying this Philips steam generator.

-- The new Philips PerfectCare offers you an innovative way to iron your garments.We all know the fuss with traditional irons: choosing the right temperature for your

tough and delicate fabrics, waiting for the iron to warm up and cool down to avoid the risk of damaging clothes with a too hot iron.  Those hassles are things of the past with the new Philips PerfectCare.

-- In principle, wrinkle removal is done by transferring heat to fabric. Historically, this was done with a very hot

soleplate.Then steam was added to enhance heat transfer, thus making ironing much faster. Our research confirmed that the best way to remove wrinkles effectively is

a perfect combination of intense steam and optimal soleplate temperature.The key to effective wrinkle removal is the steam not the soleplate temperature.The soleplate temperature needs to be just above the steam temperature to remove any moisture.This is the optimal temperature.

-- In the past, high amount of steam at this optimal temperature would have led to water leakage.We developed a unique patented cyclonic chamber to maintain high-pressure steam that penetrates deep into the fabric for fast ironing with no risk of water leakage.

-- Ironing is now truly simple - no temperature adjustment, no scorching, no waiting time on heating up and cooling down. It is faster, no matter who does the ironing.With this OptimalTemp technology, every single garment can be ironed effectively and safely.

-- This iron has been approved by The Woolmark Company Pty Ltd for the ironing of wool only products provided that the garments are ironed according to the instructions on the garment label and those issued by the manufacturer of this iron. R1101. In United Kingdom, Eire, Hong Kong and India, the Woolmark trademark is a

Certification trademark.

8 English

Product overview

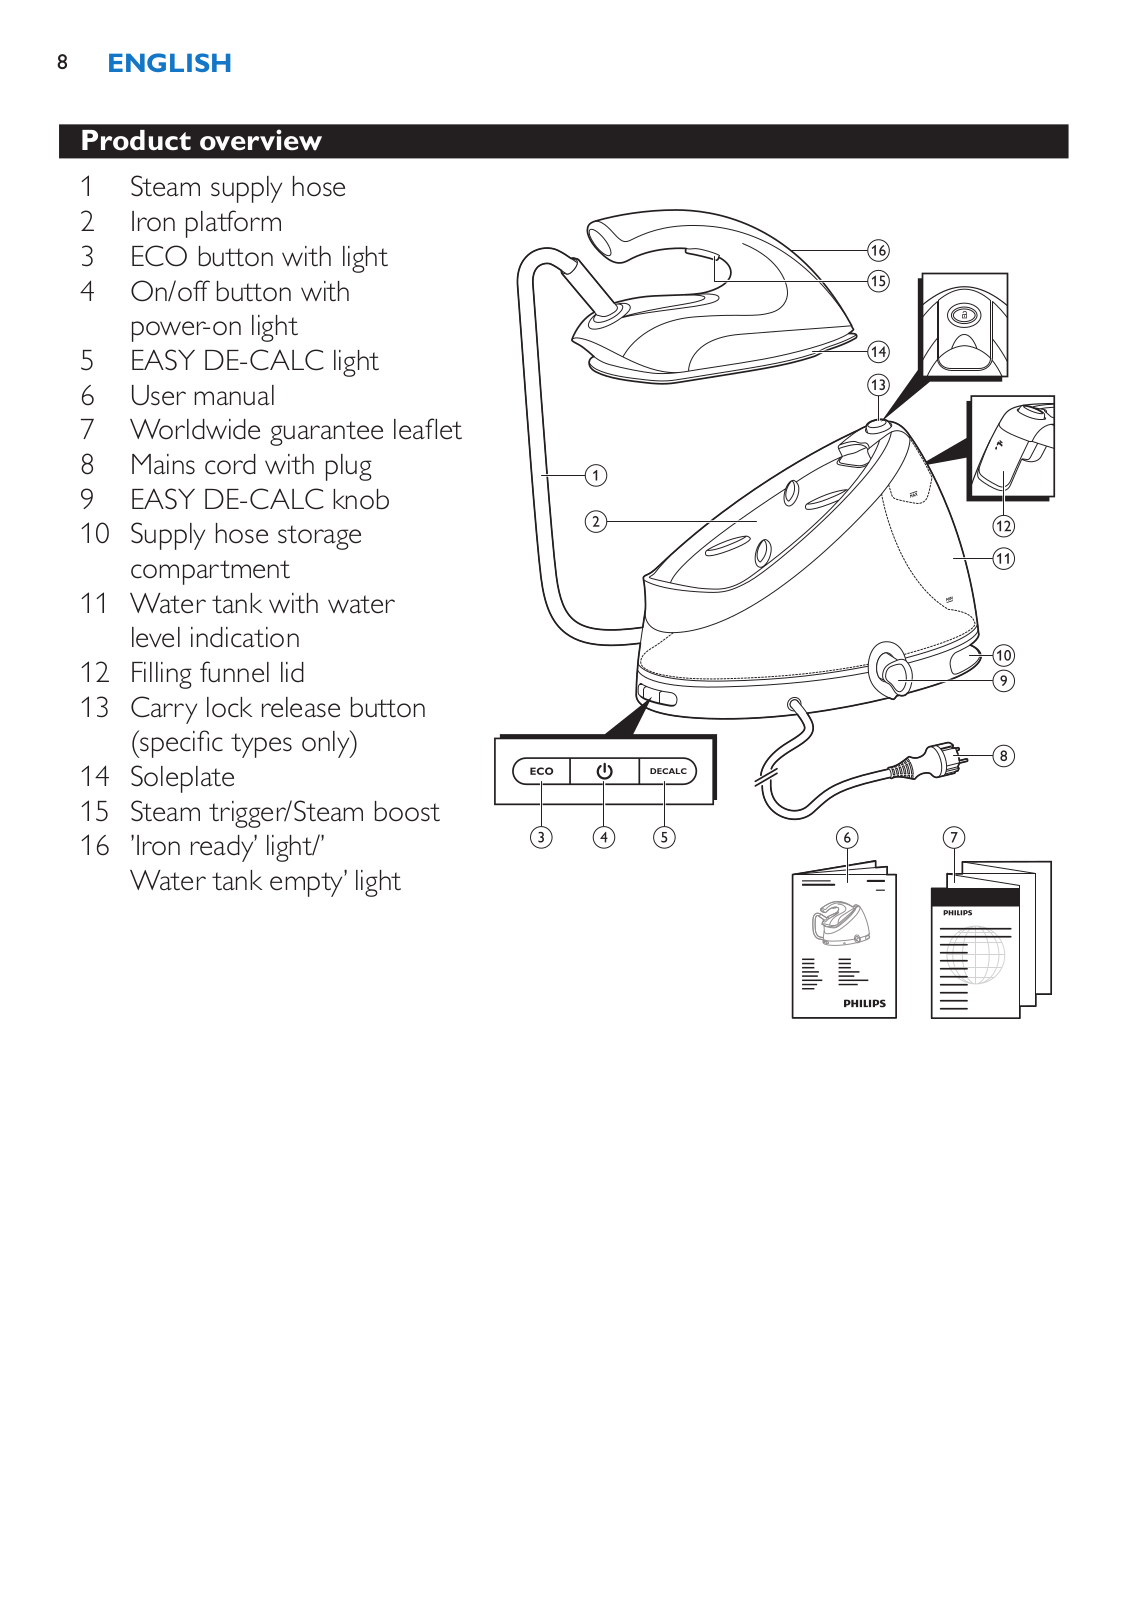
1Steam supply hose

2Iron platform

3ECO button with light

4On/off button with power-on light

5 EASY DE-CALC light

6 User manual

7 Worldwide guarantee leaflet

8 Mains cord with plug 

9EASY DE-CALC knob

10Supply hose storage compartment

11Water tank with water level indication

12Filling funnel lid

13Carry lock release button

(specific types only)

14Soleplate

15Steam trigger/Steam boost

16’Iron ready’ light/’ Water tank empty’ light

English 9

Before first use

This steam generator is intended for ironing and refreshing fabrics only.

Remove all packaging material and stickers.

Remove the protective cover from the soleplate before you use the steam generator.

Always place the steam generator on a stable and horizontal surface.

Fill the water tank before every use (see chapter ‘Using your steam generator’, section‘Filling the water tank’).

Using your steam generator

Filling the water tank

Fill the water tank before every use, when the water level in the water tank drops below the minimum level or when the

‘water tank empty’ light flashes quickly.

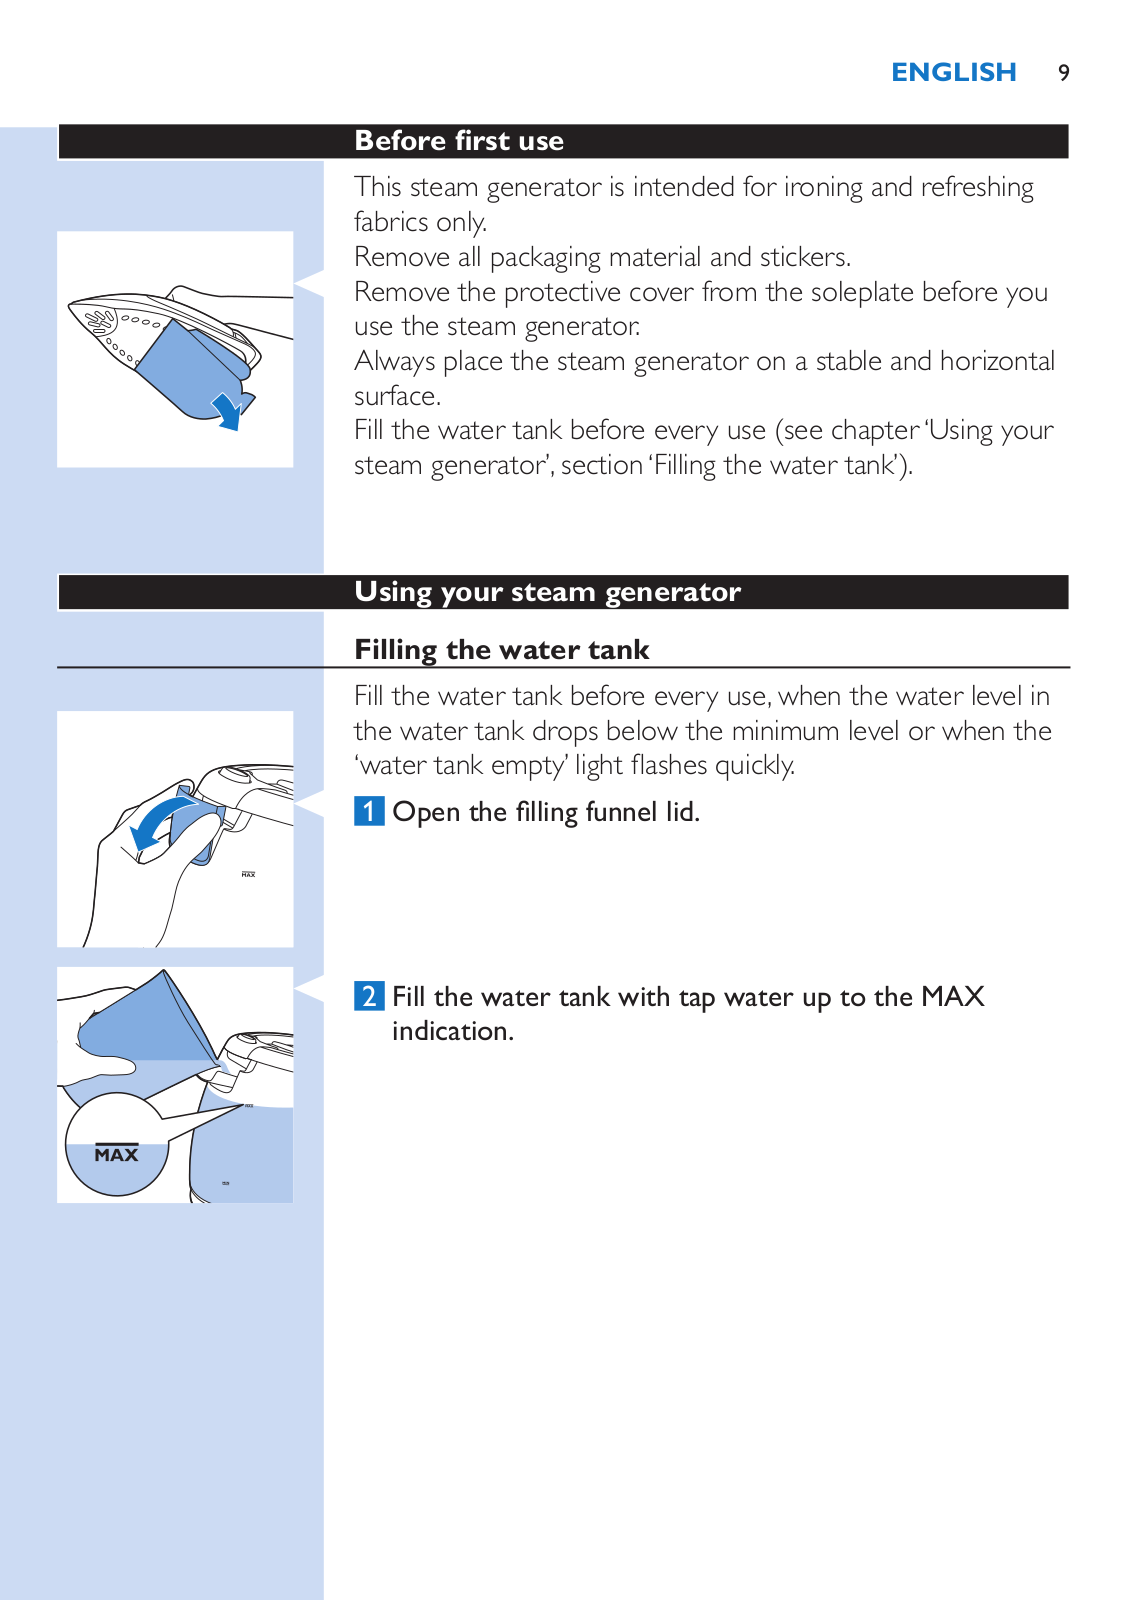
1Open the filling funnel lid.

2Fill the water tank with tap water up to the MAX indication.

10 English

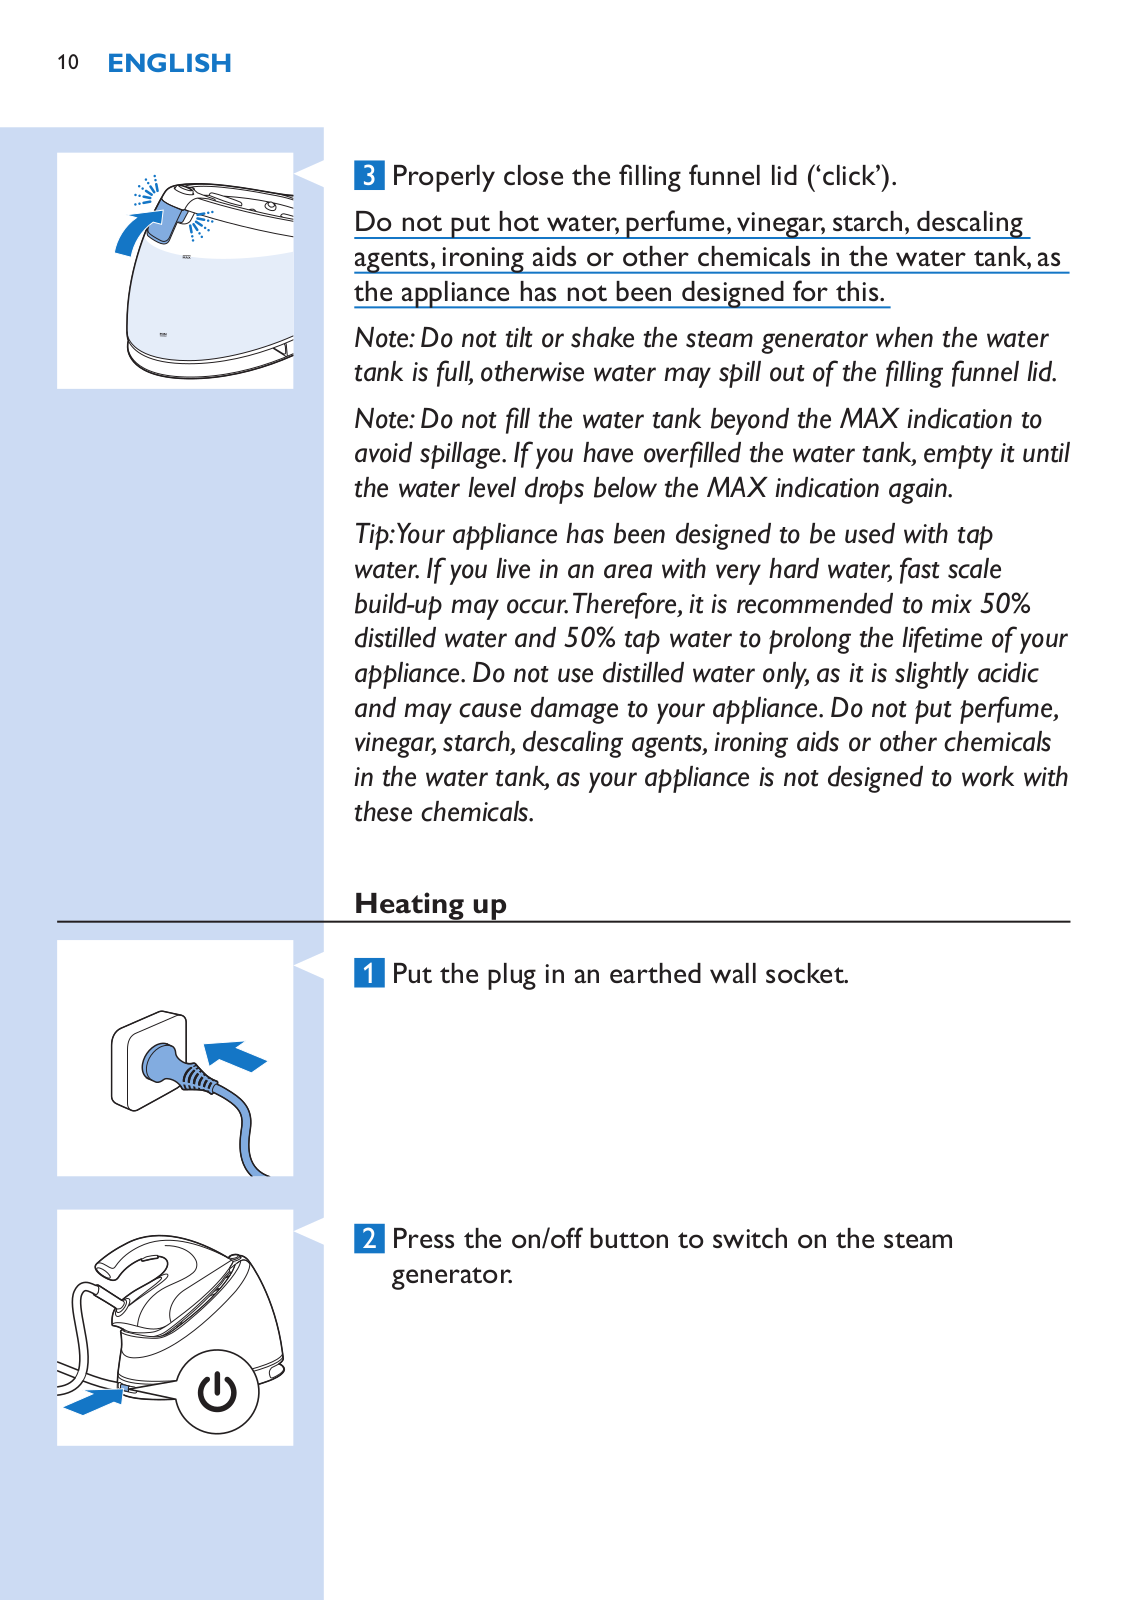
3 Properly close the filling funnel lid (‘click’).

Do not put hot water,perfume,vinegar,starch,descaling agents, ironing aids or other chemicals in the water tank, as the appliance has not been designed for this.

Note: Do not tilt or shake the steam generator when the water tank is full,otherwise water may spill out of the filling funnel lid.

Note:Do not fill the water tank beyond the MAX indication to avoid spillage.If you have overfilled the water tank,empty it until the water level drops below the MAX indication again.

Tip:Your appliance has been designed to be used with tap water.If you live in an area with very hard water,fast scale build-up may occur.Therefore,it is recommended to mix 50% distilled water and 50% tap water to prolong the lifetime of your appliance.Do not use distilled water only,as it is slightly acidic and may cause damage to your appliance.Do not put perfume, vinegar,starch,descaling agents,ironing aids or other chemicals in the water tank,as your appliance is not designed to work with these chemicals.

Heating up

1Put the plug in an earthed wall socket.

2Press the on/off button to switch on the steam

generator.

English 11

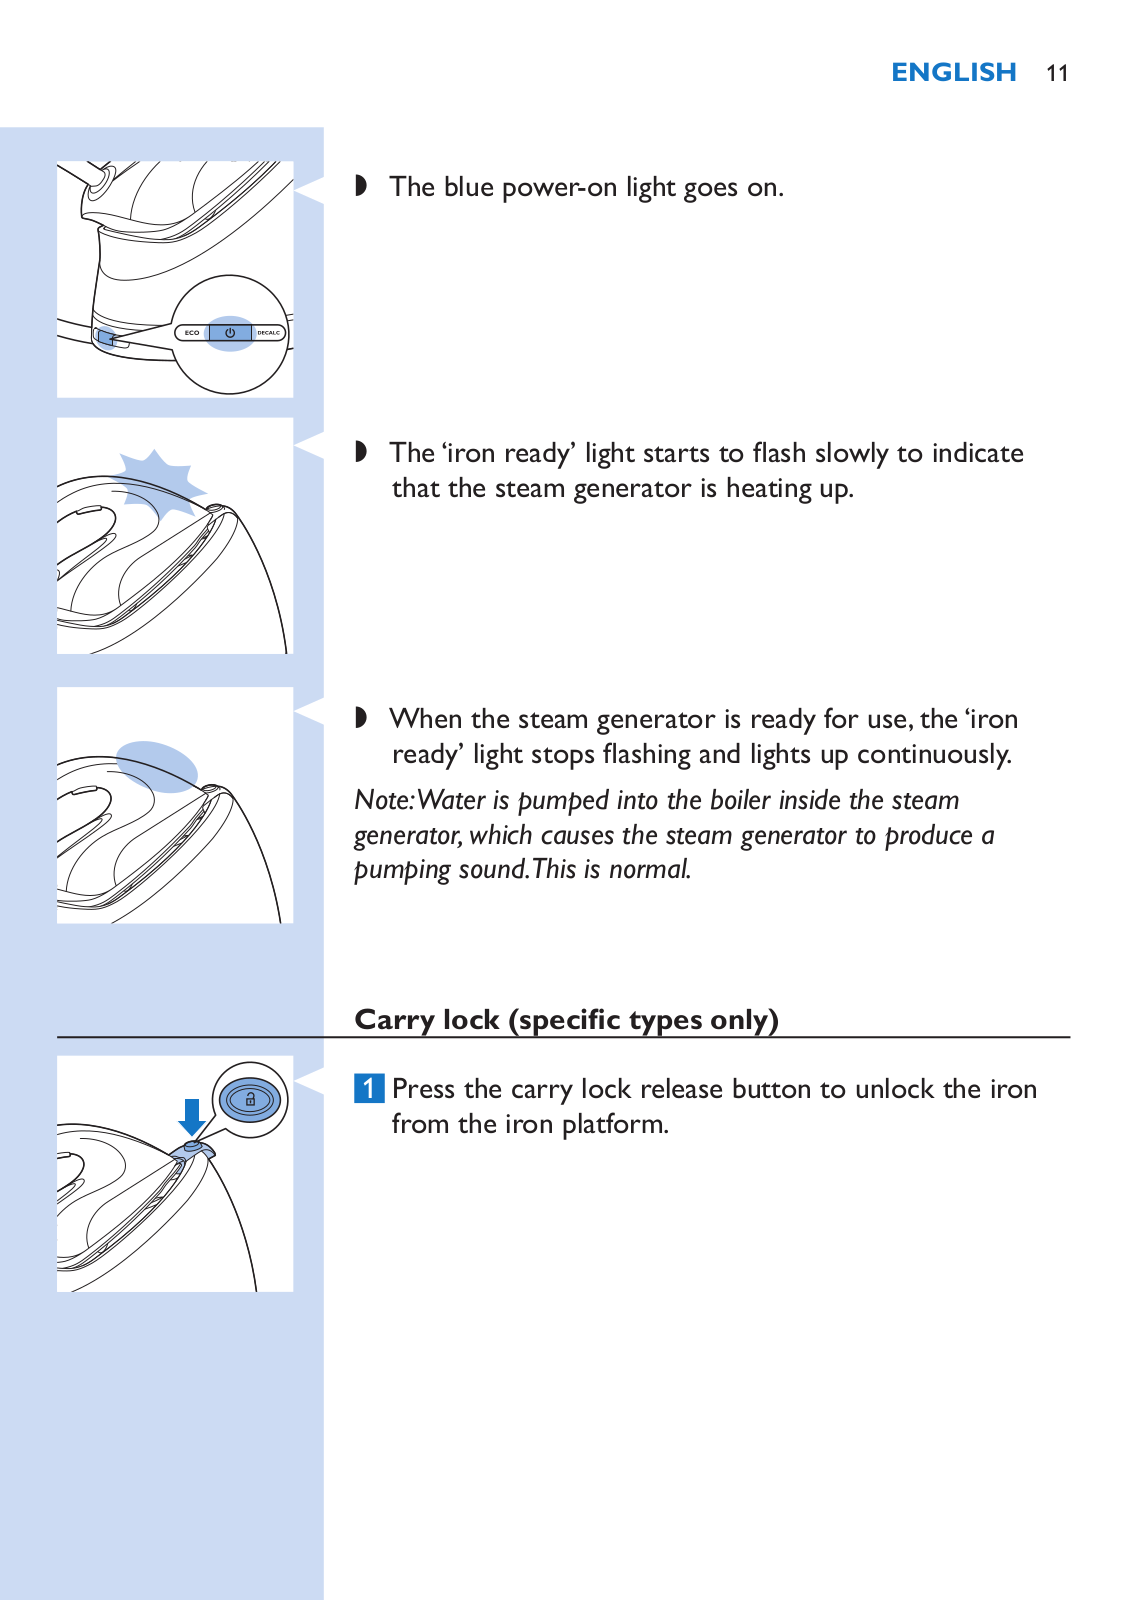
,, The blue power-on light goes on.

,, The‘iron ready’ light starts to flash slowly to indicate that the steam generator is heating up.

,, When the steam generator is ready for use,the‘iron ready’ light stops flashing and lights up continuously.

Note:Water is pumped into the boiler inside the steam generator,which causes the steam generator to produce a pumping sound.This is normal.

Carry lock (specific types only)

1Press the carry lock release button to unlock the iron from the iron platform.

12 English

Temperature and steam setting

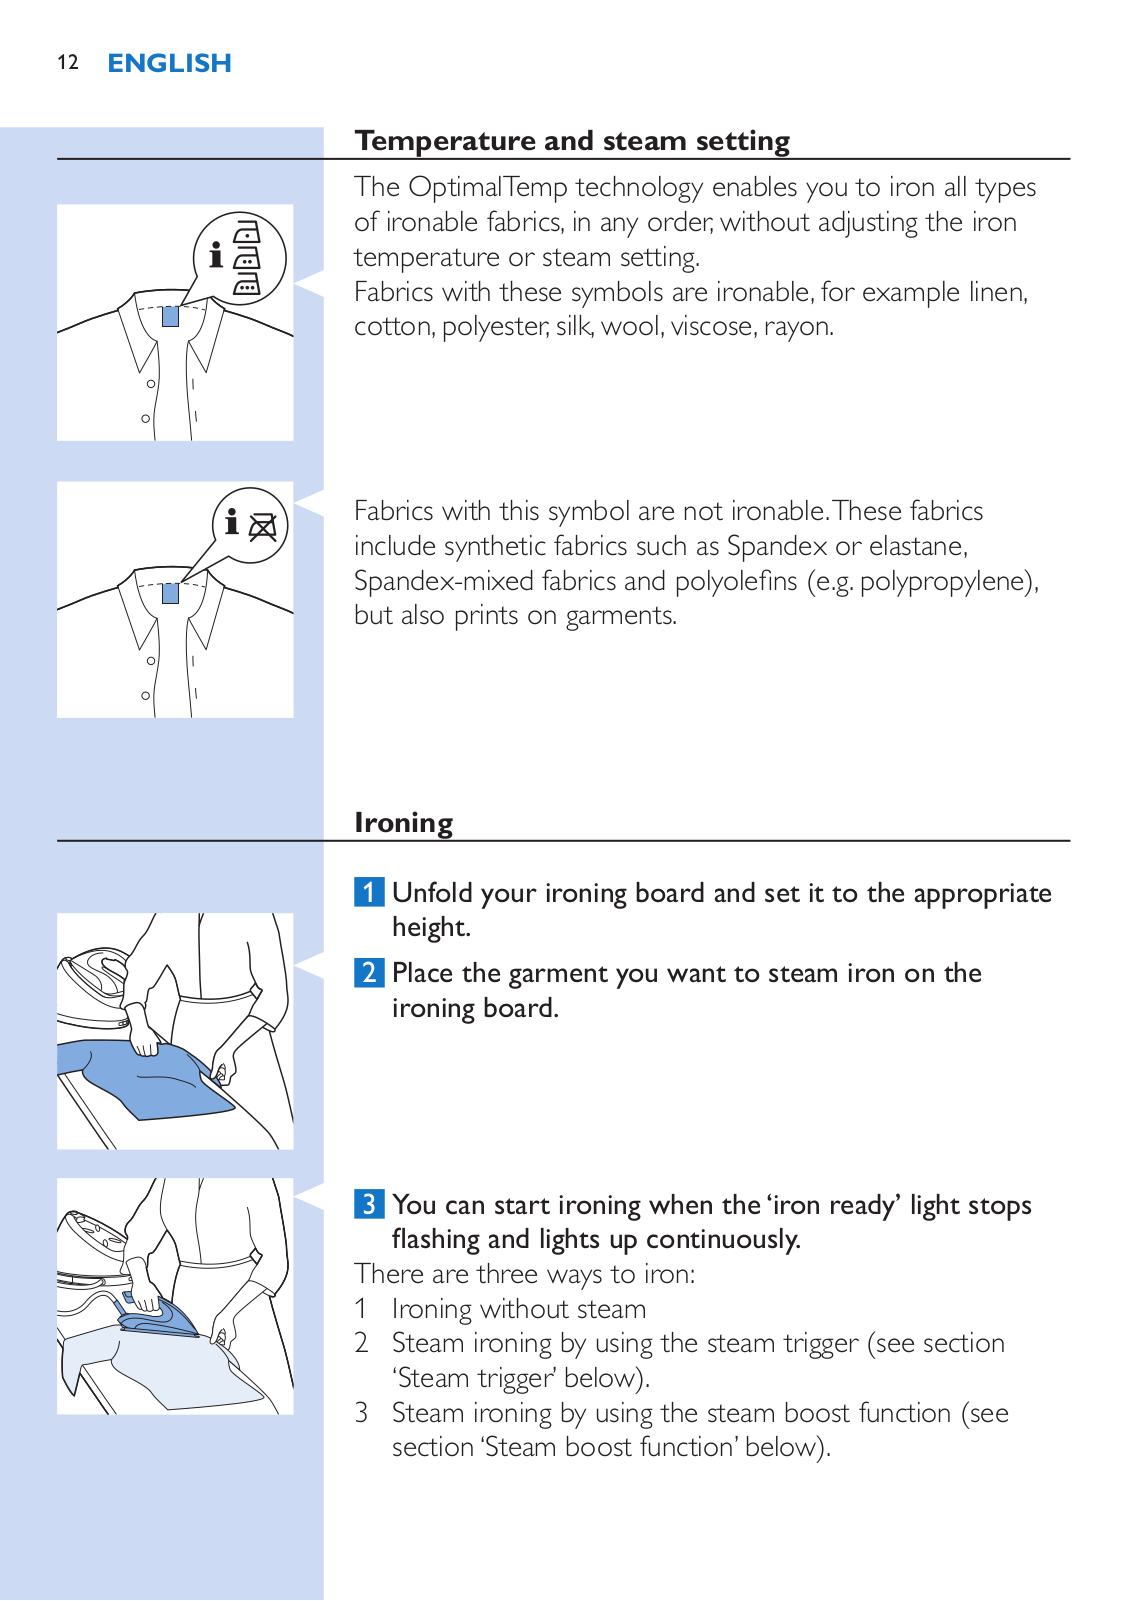
The OptimalTemp technology enables you to iron all types of ironable fabrics, in any order, without adjusting the iron temperature or steam setting.

Fabrics with these symbols are ironable, for example linen, cotton, polyester, silk, wool, viscose, rayon.

Fabrics with this symbol are not ironable.These fabrics include synthetic fabrics such as Spandex or elastane,

Spandex-mixed fabrics and polyolefins (e.g. polypropylene), but also prints on garments.

Ironing

1Unfold your ironing board and set it to the appropriate height.

2 Place the garment you want to steam iron on the ironing board.

3You can start ironing when the‘iron ready’ light stops flashing and lights up continuously.

There are three ways to iron:

1Ironing without steam

2Steam ironing by using the steam trigger (see section

‘Steam trigger’ below).

3Steam ironing by using the steam boost function (see section‘Steam boost function’ below).

English 13

Steam trigger

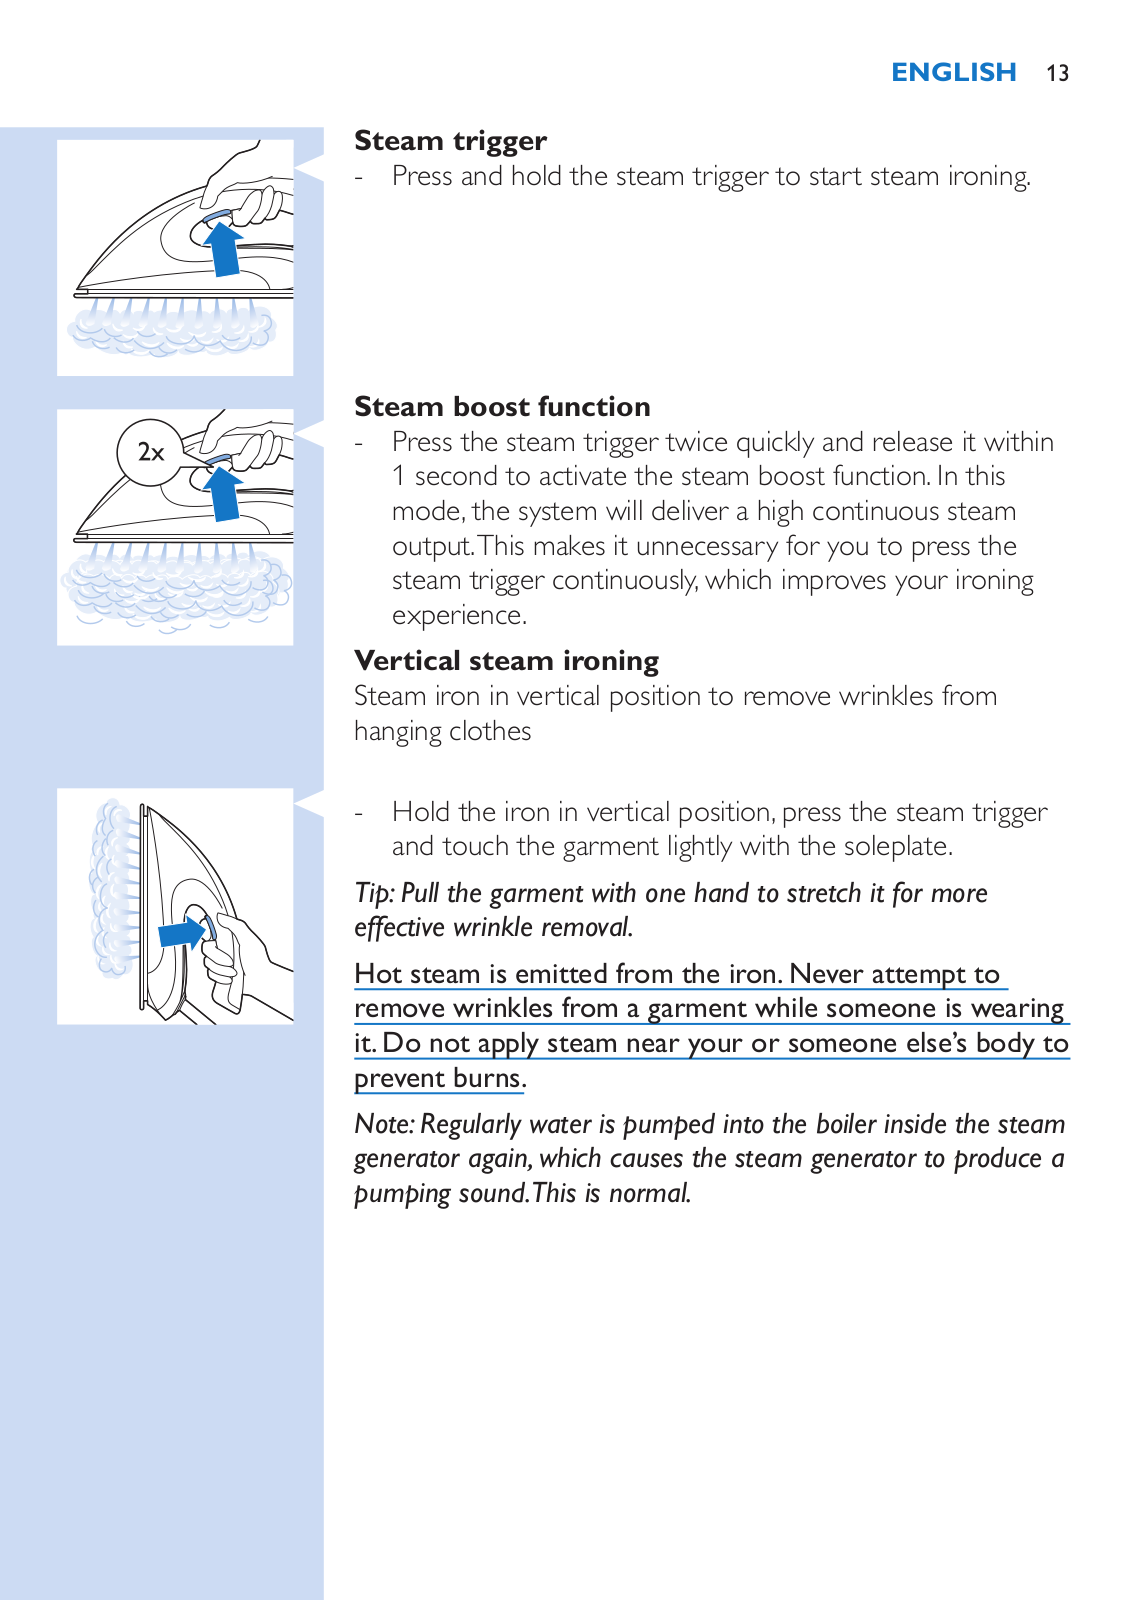
-- Press and hold the steam trigger to start steam ironing.

Steam boost function

-- Press the steam trigger twice quickly and release it within 1 second to activate the steam boost function. In this mode, the system will deliver a high continuous steam output.This makes it unnecessary for you to press the steam trigger continuously, which improves your ironing experience.

Vertical steam ironing

Steam iron in vertical position to remove wrinkles from hanging clothes

-- Hold the iron in vertical position, press the steam trigger and touch the garment lightly with the soleplate.

Tip:Pull the garment with one hand to stretch it for more effective wrinkle removal.

Hot steam is emitted from the iron.Never attempt to remove wrinkles from a garment while someone is wearing it.Do not apply steam near your or someone else’s body to prevent burns.

Note:Regularly water is pumped into the boiler inside the steam generator again,which causes the steam generator to produce a pumping sound.This is normal.

14 English

Putting down the iron during ironing

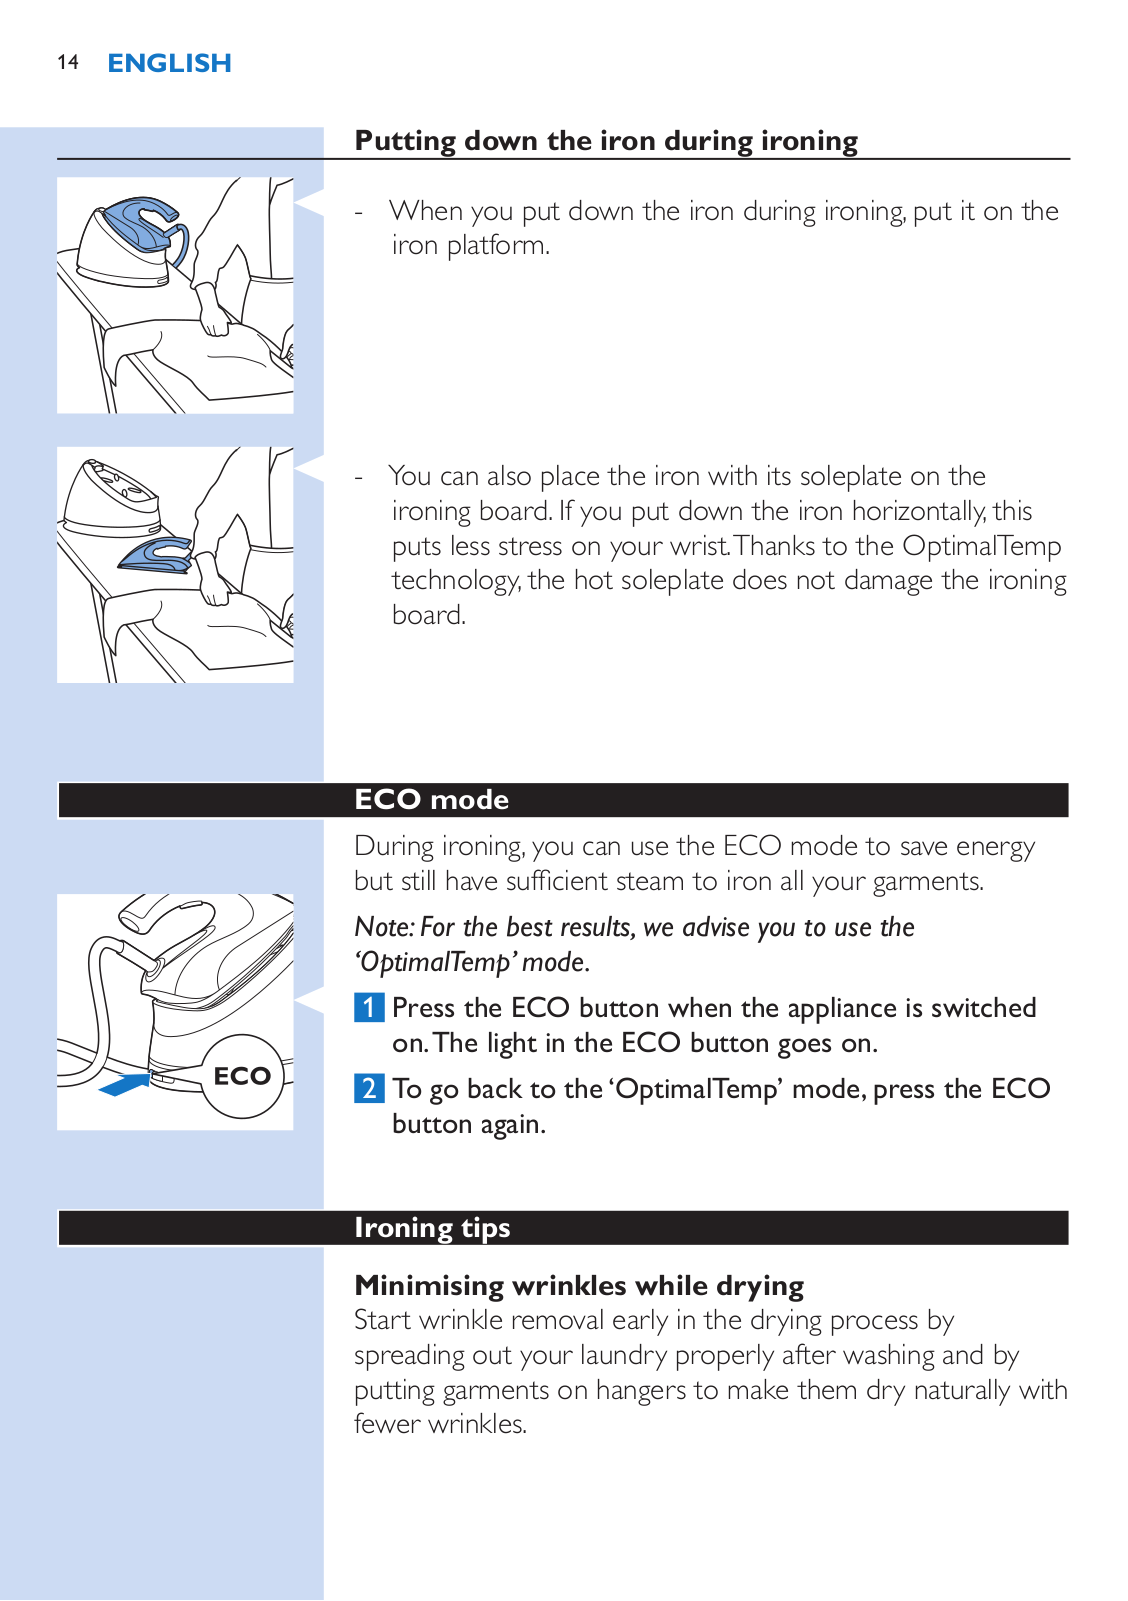
-- When you put down the iron during ironing, put it on the iron platform.

-- You can also place the iron with its soleplate on the ironing board. If you put down the iron horizontally, this puts less stress on your wrist.Thanks to the OptimalTemp technology, the hot soleplate does not damage the ironing board.

ECO mode

During ironing, you can use the ECO mode to save energy but still have sufficient steam to iron all your garments.

Note:For the best results,we advise you to use the ‘OptimalTemp’ mode.

1 Press the ECO button when the appliance is switched on.The light in the ECO button goes on.

2 To go back to the‘OptimalTemp’ mode,press the ECO button again.

Ironing tips

Minimising wrinkles while drying

Start wrinkle removal early in the drying process by spreading out your laundry properly after washing and by putting garments on hangers to make them dry naturally with fewer wrinkles. 

English 15

Best practice shirt ironing

Start with the time-consuming parts like collar, cuff links and sleeves. Next, iron the bigger parts like front and back to prevent wrinkling the bigger parts when you are busy ironing the time-consuming parts.

Collar: When you iron a collar, start on its underside and work from the outside (the pointy end) inwards.Turn over and repeat. Fold down the collar and press the edge for a more crisp finish.

Buttons: Iron on the reverse side of the buttons for more effective and faster ironing.

Auto-off mode (specific types only)

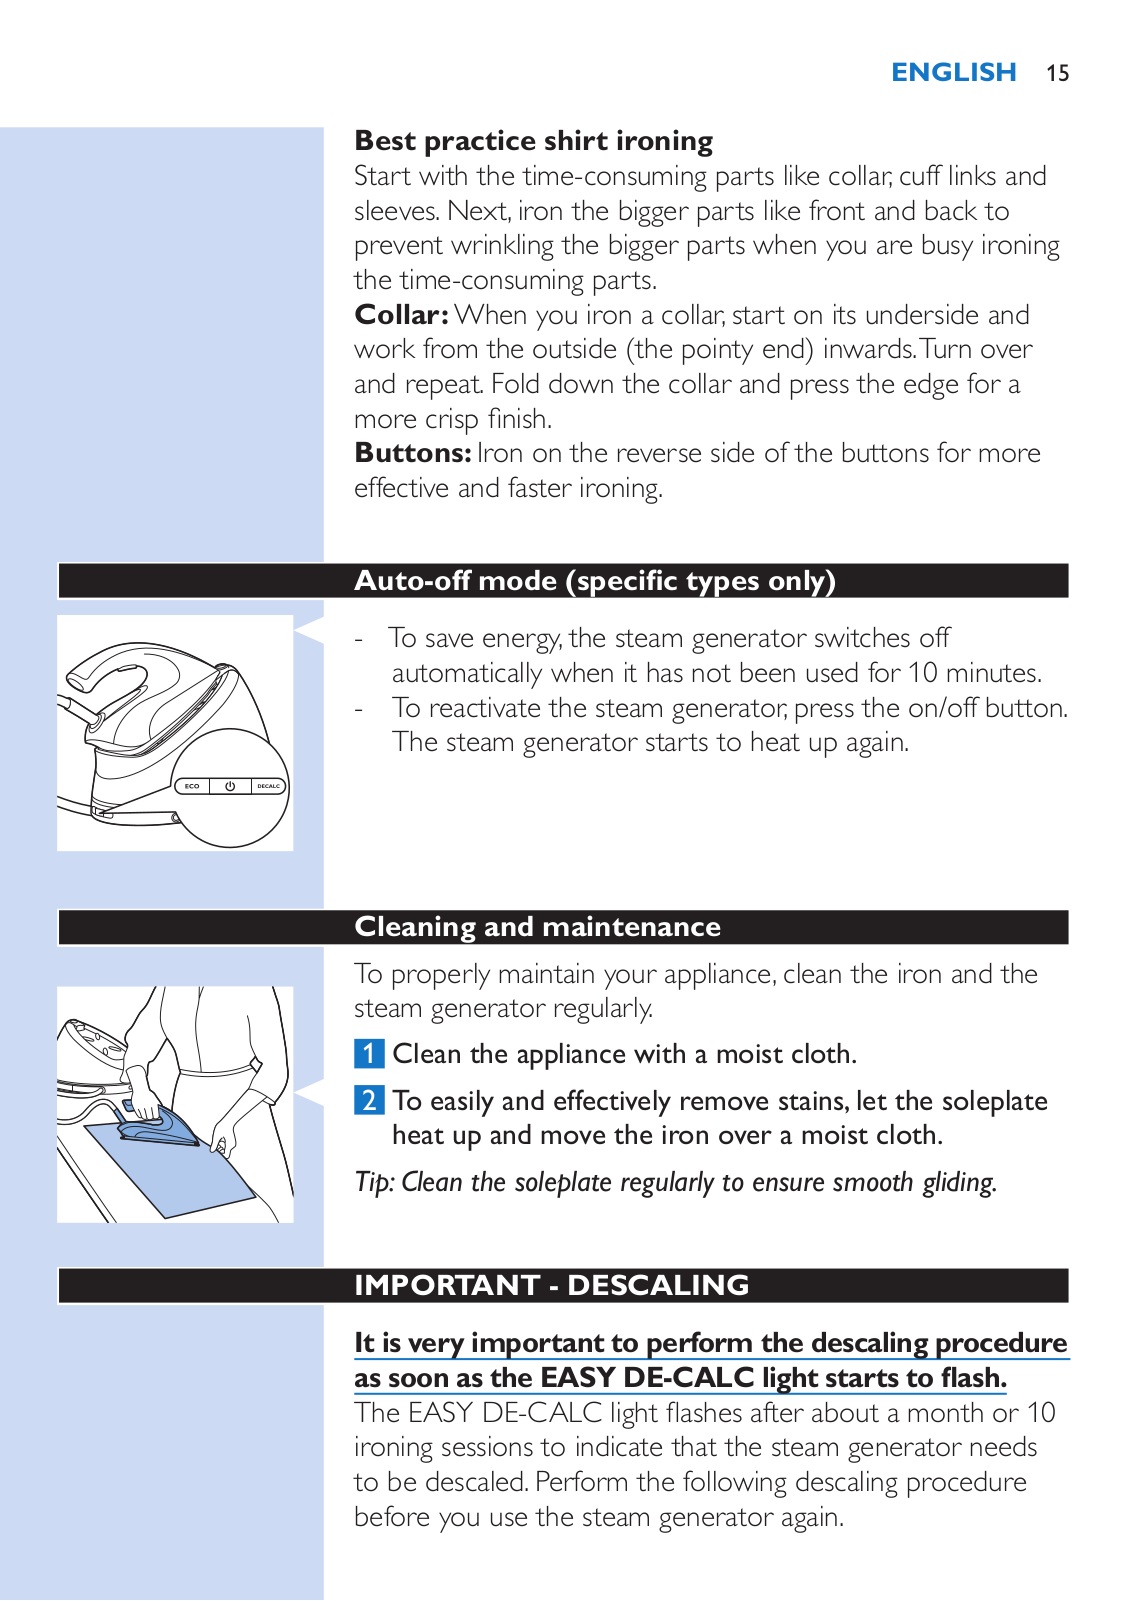
-- To save energy, the steam generator switches off automatically when it has not been used for 10 minutes.

-- To reactivate the steam generator, press the on/off button. The steam generator starts to heat up again.

Cleaning and maintenance

To properly maintain your appliance, clean the iron and the steam generator regularly.

1 Clean the appliance with a moist cloth.

2 To easily and effectively remove stains,let the soleplate heat up and move the iron over a moist cloth.

Tip:Clean the soleplate regularly to ensure smooth gliding.

IMPORTANT - DESCALING

It is very important to perform the descaling procedure as soon as the EASY DE-CALC light starts to flash.

The EASY DE-CALC light flashes after about a month or 10 ironing sessions to indicate that the steam generator needs to be descaled. Perform the following descaling procedure before you use the steam generator again.

16 English

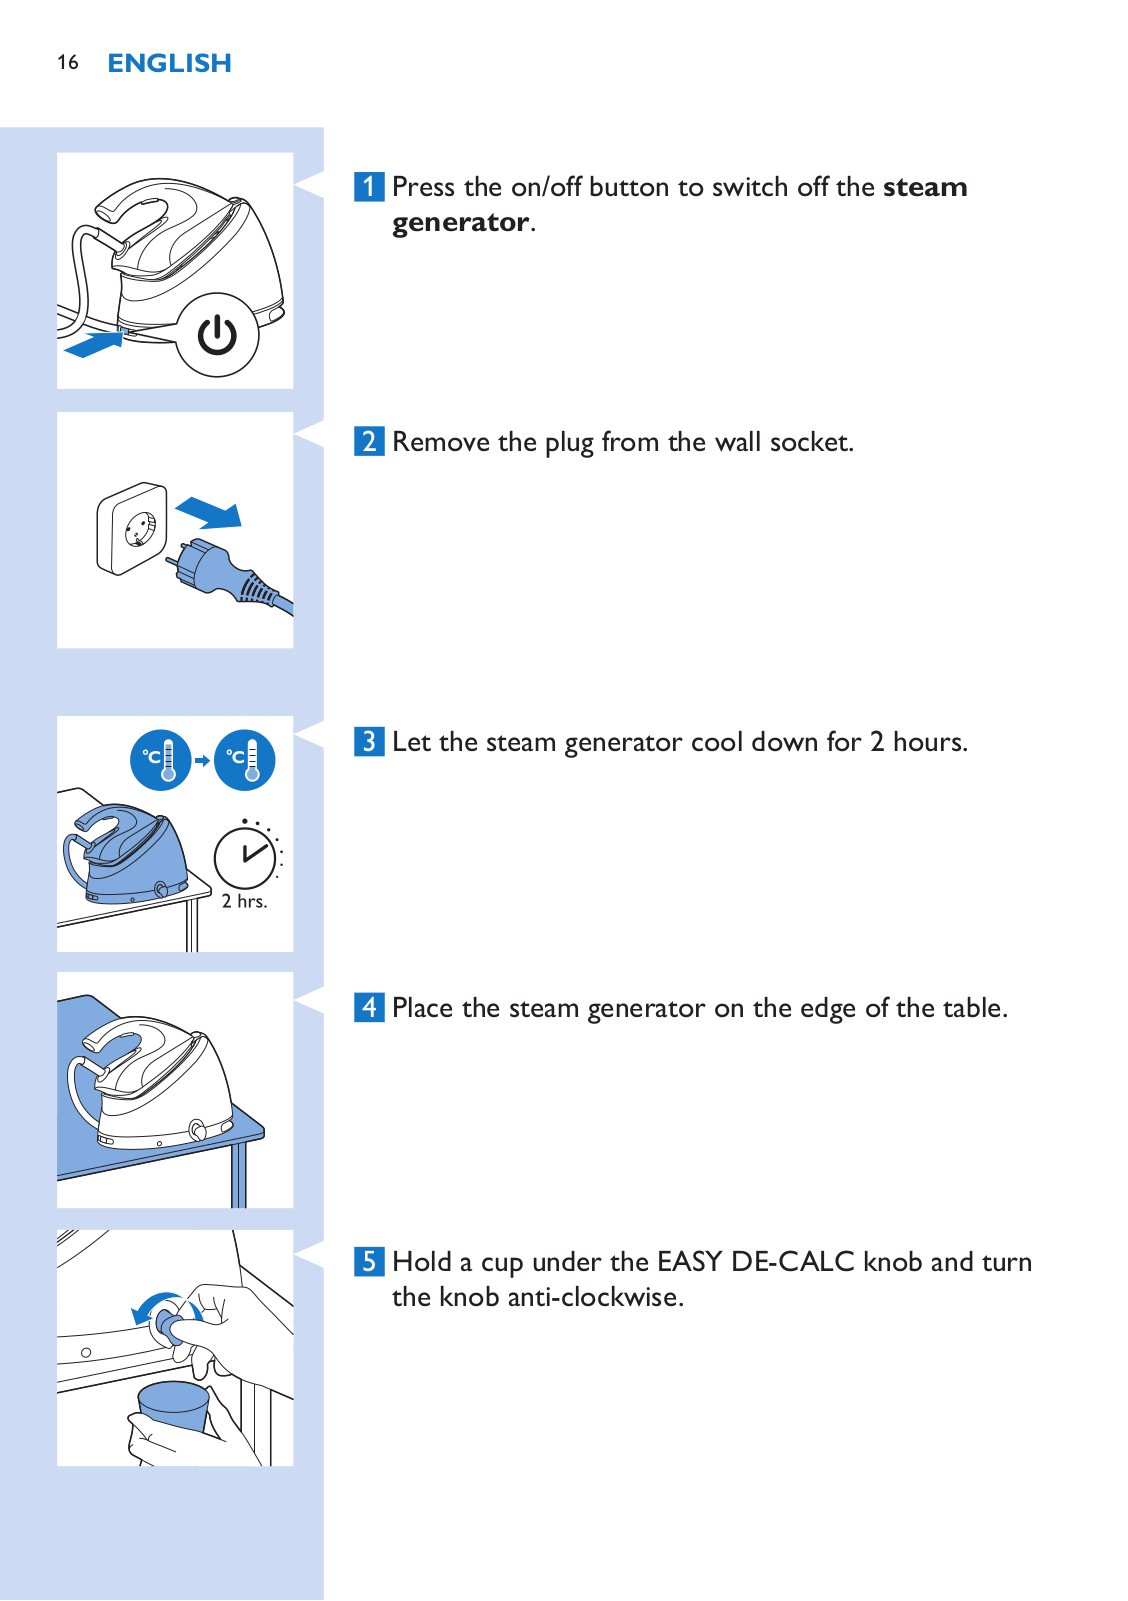
1 Press the on/off button to switch off the steam generator.

2 Remove the plug from the wall socket.

3 Let the steam generator cool down for 2 hours.

4 Place the steam generator on the edge of the table.

5 Hold a cup under the EASY DE-CALC knob and turn the knob anti-clockwise.

English 17

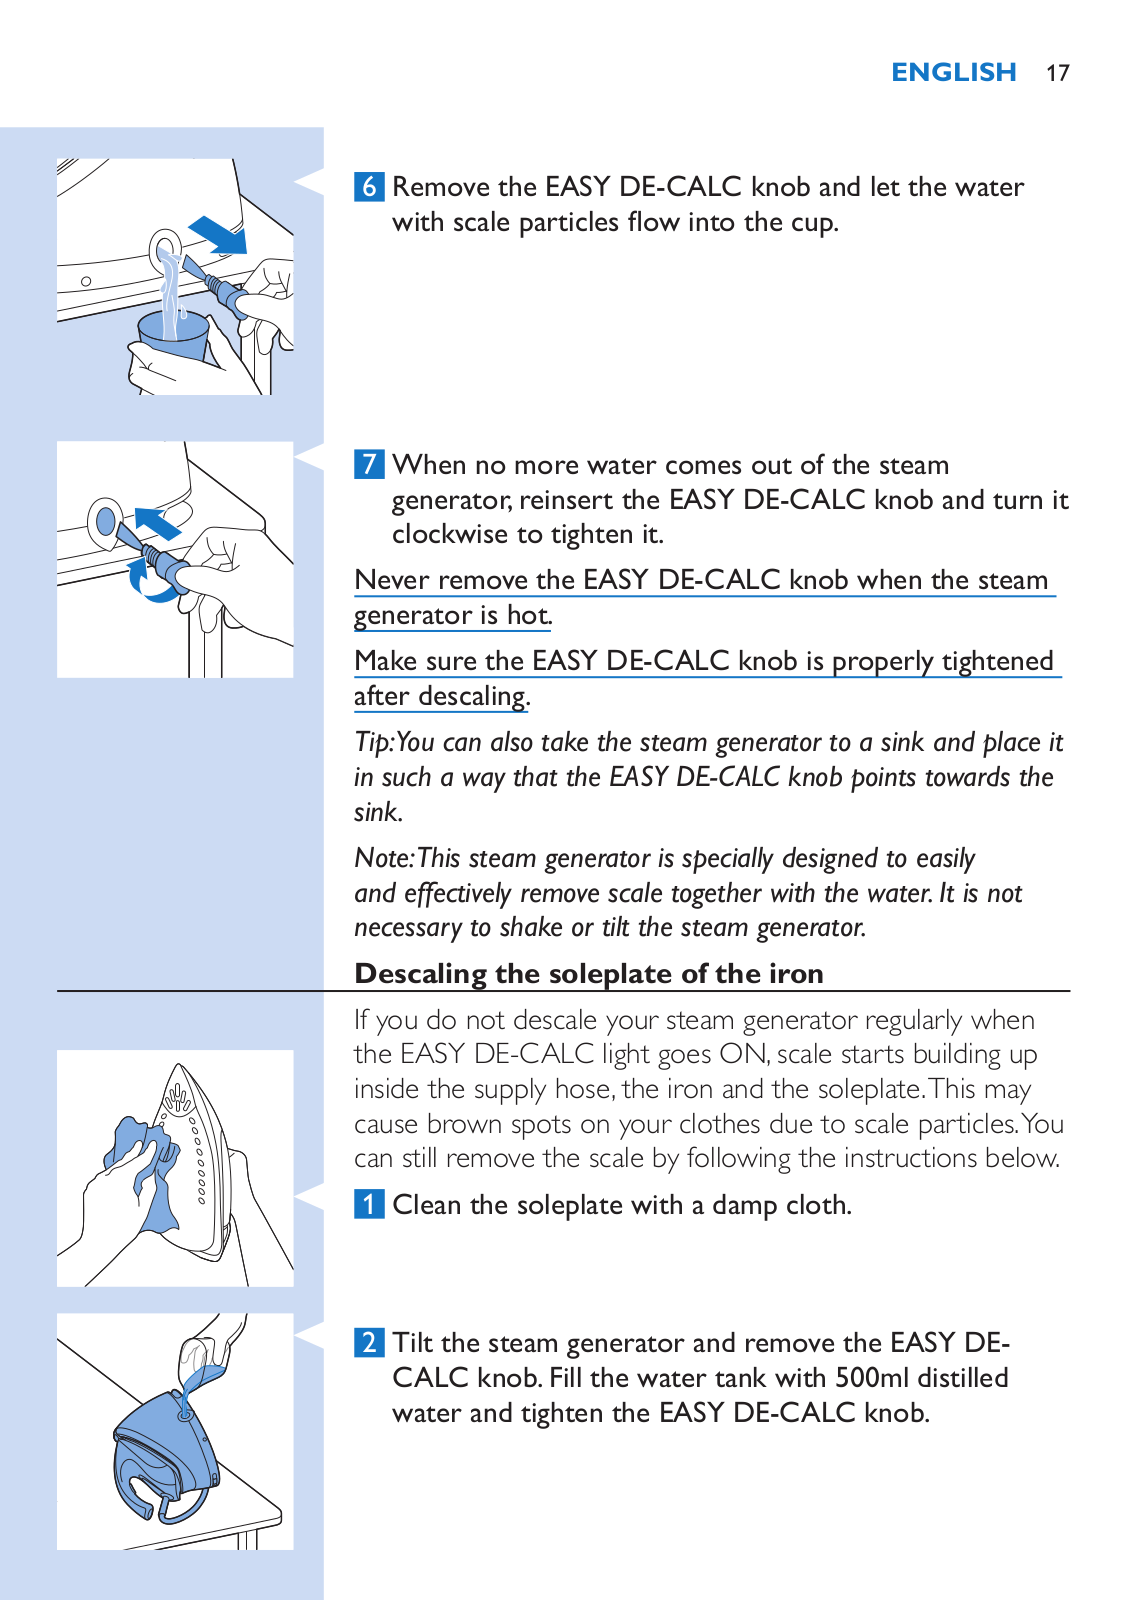
6Remove the EASY DE-CALC knob and let the water with scale particles flow into the cup.

7When no more water comes out of the steam generator, reinsert the EASY DE-CALC knob and turn it clockwise to tighten it. 

Never remove the EASY DE-CALC knob when the steam generator is hot.

Make sure the EASY DE-CALC knob is properly tightened after descaling.

Tip:You can also take the steam generator to a sink and place it in such a way that the EASY DE-CALC knob points towards the sink.

Note:This steam generator is specially designed to easily and effectively remove scale together with the water.It is not necessary to shake or tilt the steam generator.

Descaling the soleplate of the iron

If you do not descale your steam generator regularly when the EASY DE-CALC light goes ON, scale starts building up inside the supply hose, the iron and the soleplate.This may cause brown spots on your clothes due to scale particles.You can still remove the scale by following the instructions below. 

1Clean the soleplate with a damp cloth.

2Tilt the steam generator and remove the EASY DE-

CALC knob. Fill the water tank with 500ml distilled water and tighten the EASY DE-CALC knob.

18 English

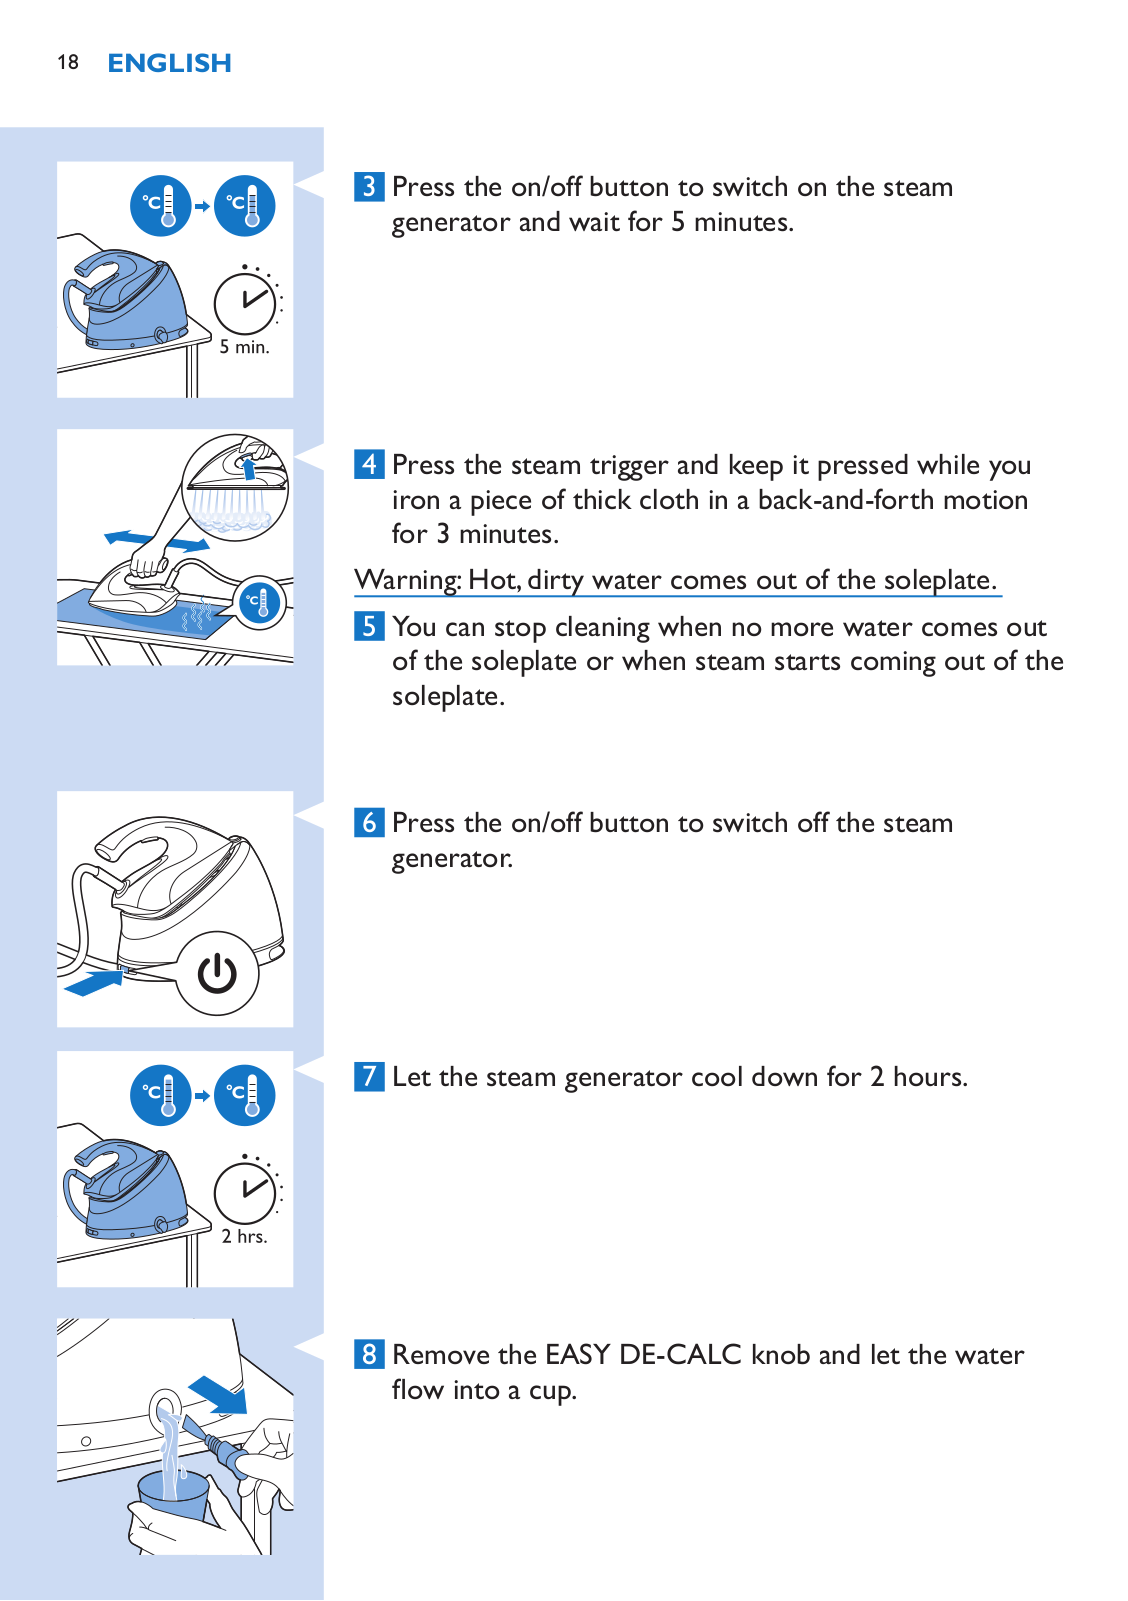
3 Press the on/off button to switch on the steam generator and wait for 5 minutes.

4 Press the steam trigger and keep it pressed while you iron a piece of thick cloth in a back-and-forth motion for 3 minutes.

Warning:Hot,dirty water comes out of the soleplate.

5 You can stop cleaning when no more water comes out of the soleplate or when steam starts coming out of the soleplate.

6 Press the on/off button to switch off the steam generator.

7 Let the steam generator cool down for 2 hours.

8 Remove the EASY DE-CALC knob and let the water flow into a cup.

Philips GC8600 series User Manual

English 19

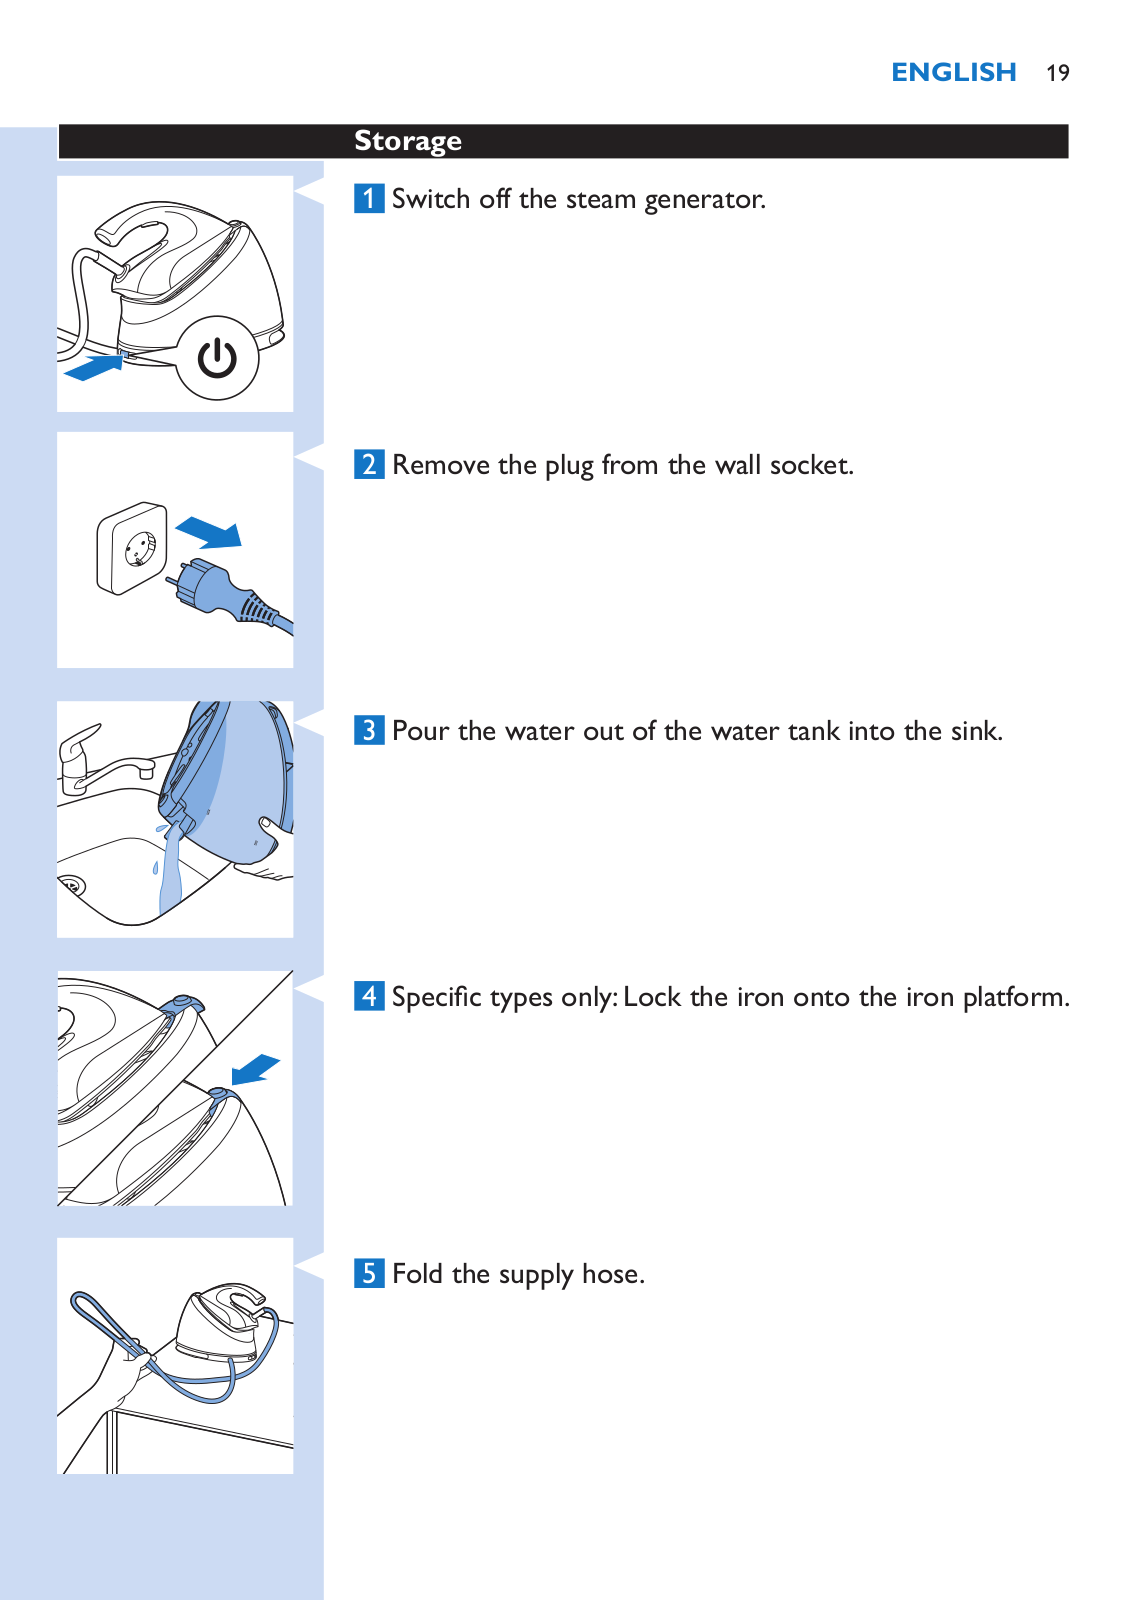
Storage

1Switch off the steam generator.

2Remove the plug from the wall socket.

3Pour the water out of the water tank into the sink.

4Specific types only:Lock the iron onto the iron platform.

5Fold the supply hose.

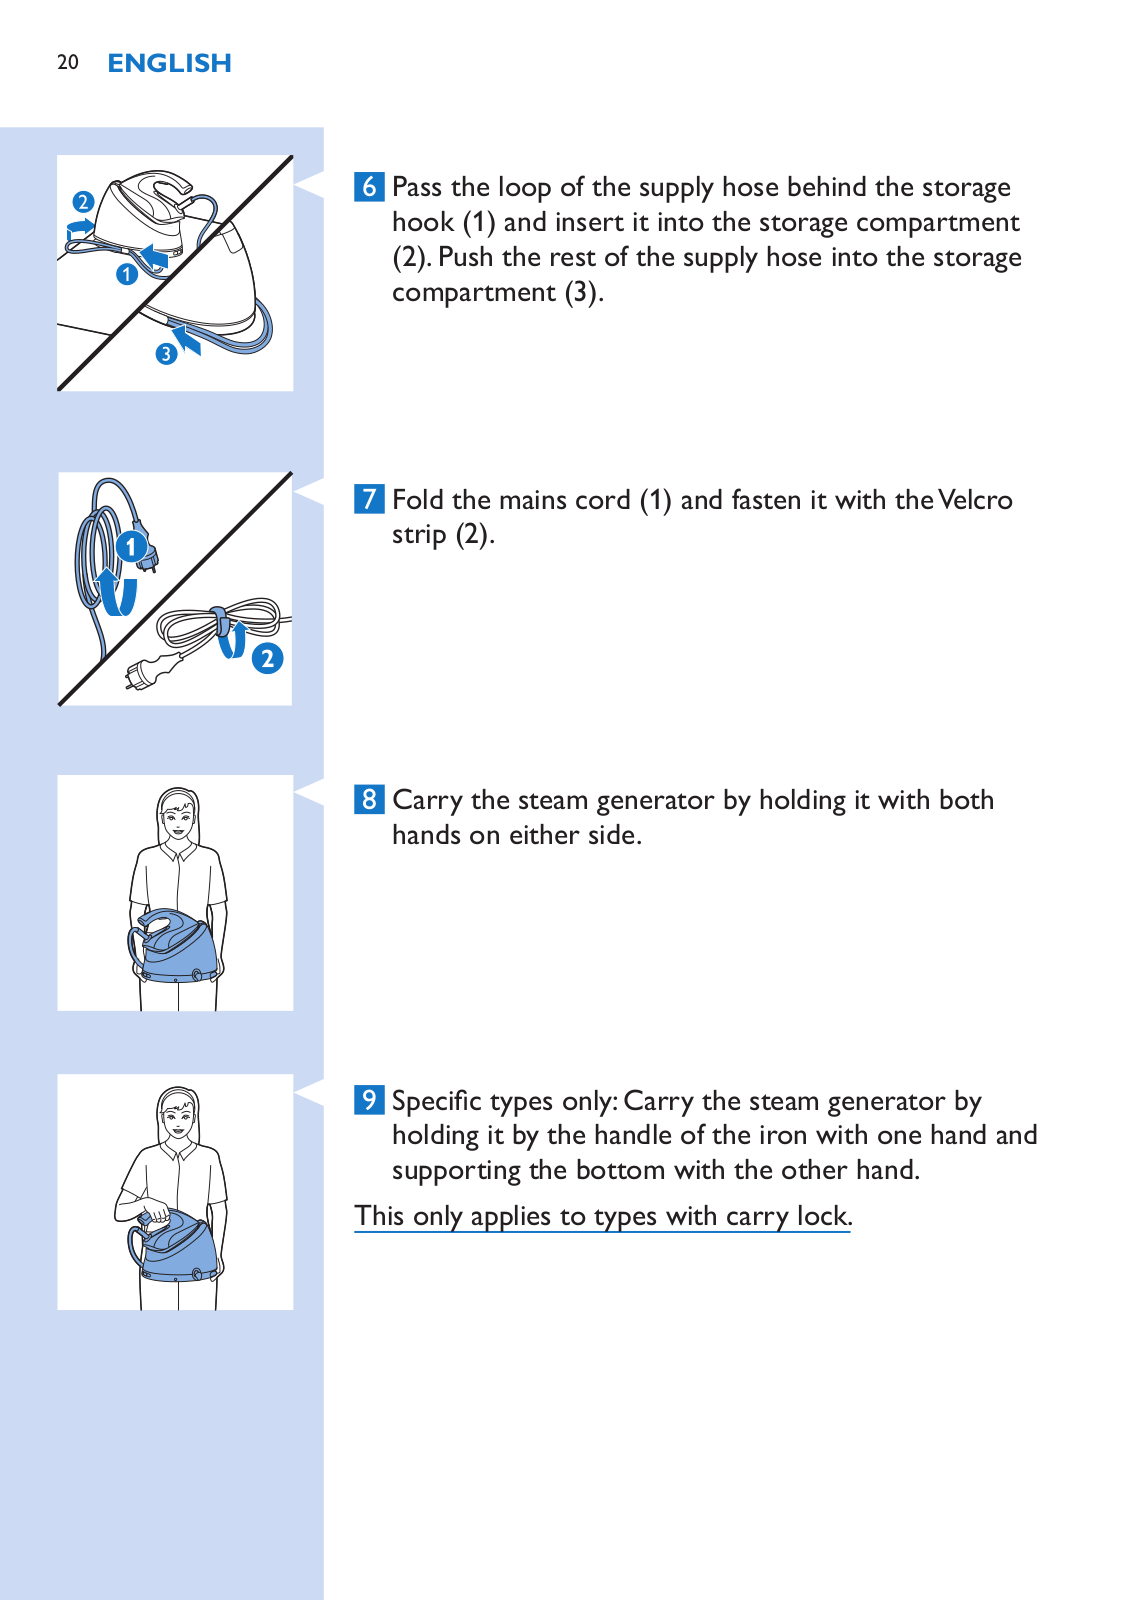
20 English

6

7

8

9

Pass the loop of the supply hose behind the storage hook (1) and insert it into the storage compartment

(2).Push the rest of the supply hose into the storage compartment (3).

Fold the mains cord (1) and fasten it with theVelcro strip (2).

Carry the steam generator by holding it with both hands on either side.

Specific types only:Carry the steam generator by holding it by the handle of the iron with one hand and supporting the bottom with the other hand.

This only applies to types with carry lock.

English 21

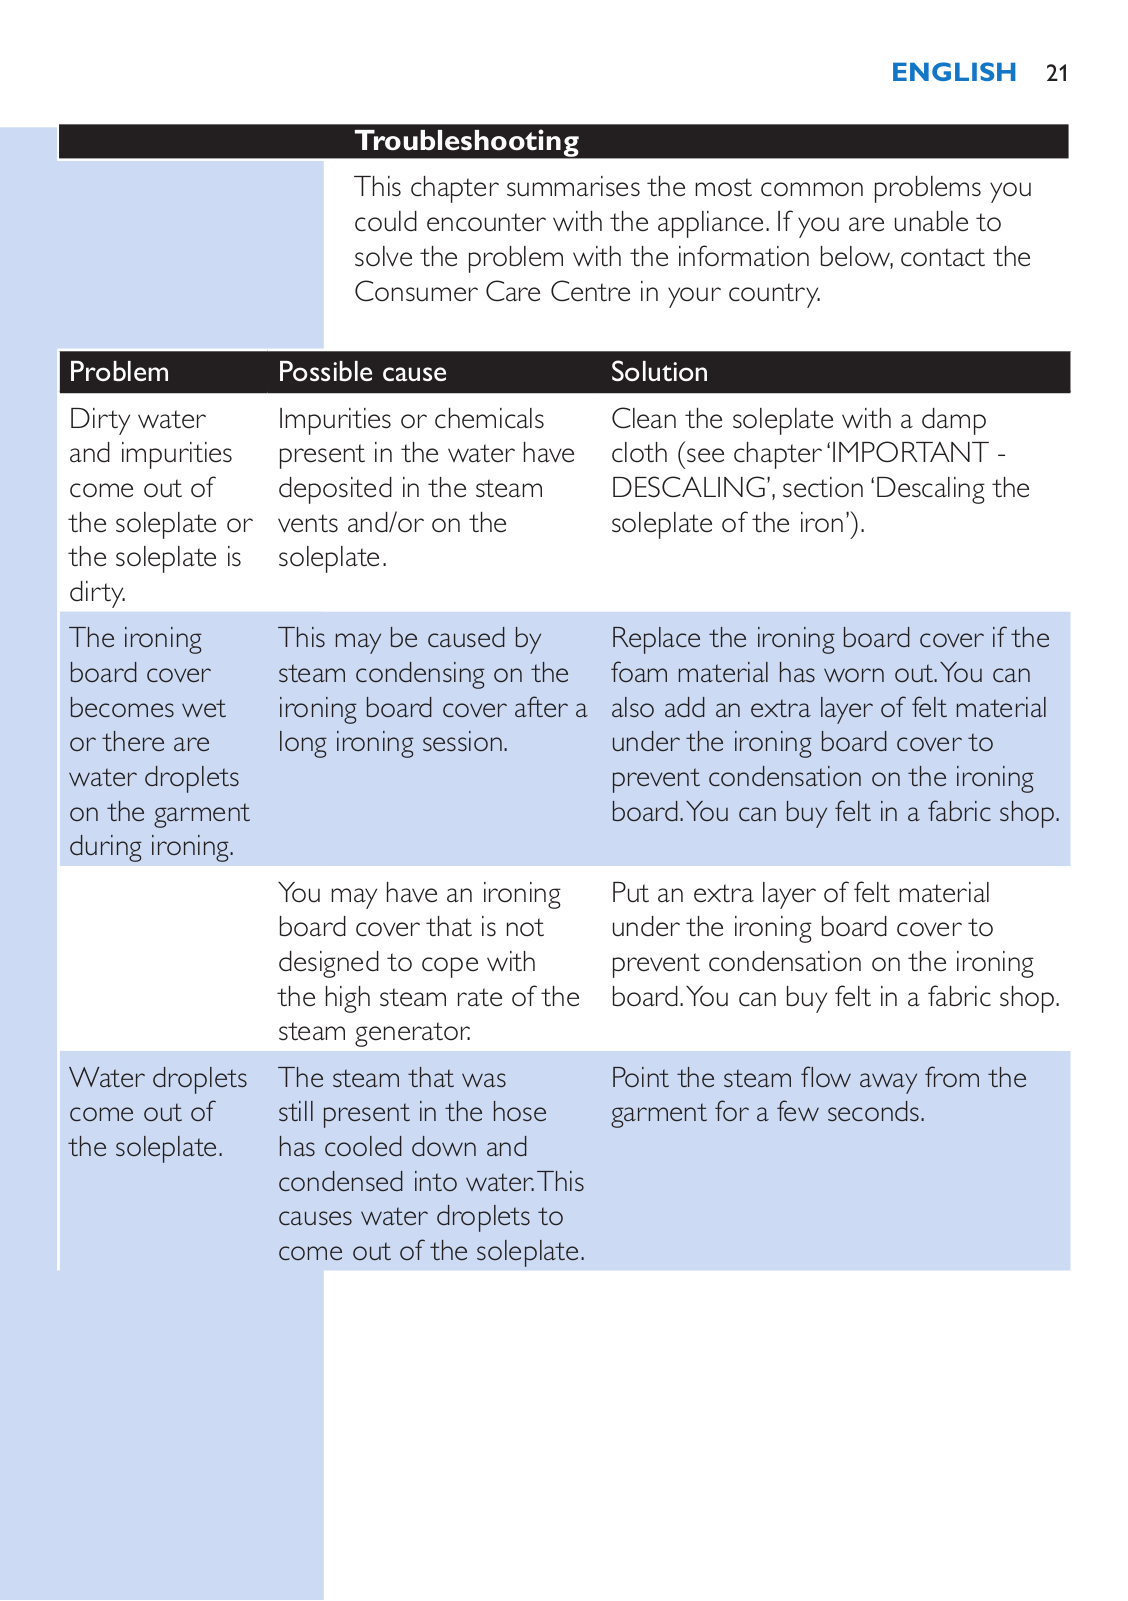
Troubleshooting

This chapter summarises the most common problems you could encounter with the appliance. If you are unable to solve the problem with the information below, contact the Consumer Care Centre in your country.

Problem

Possible cause

Solution

Dirty water

Impurities or chemicals

Clean the soleplate with a damp

and impurities

present in the water have

cloth (see chapter ‘IMPORTANT -

come out of

deposited in the steam

DESCALING’, section ‘Descaling the

the soleplate or

vents and/or on the

soleplate of the iron’).

the soleplate is

soleplate.


dirty.


The ironing

This may be caused by

board cover

steam condensing on the

becomes wet

ironing board cover after a

or there are

long ironing session.

water droplets


on the garment


during ironing.


Replace the ironing board cover if the foam material has worn out.You can also add an extra layer of felt material under the ironing board cover to prevent condensation on the ironing board.You can buy felt in a fabric shop.


You may have an ironing


board cover that is not


designed to cope with


the high steam rate of the


steam generator.

Water droplets

The steam that was

come out of

still present in the hose

the soleplate.

has cooled down and


condensed into water.This


causes water droplets to


come out of the soleplate.

Put an extra layer of felt material under the ironing board cover to prevent condensation on the ironing board.You can buy felt in a fabric shop.

Point the steam flow away from the garment for a few seconds.

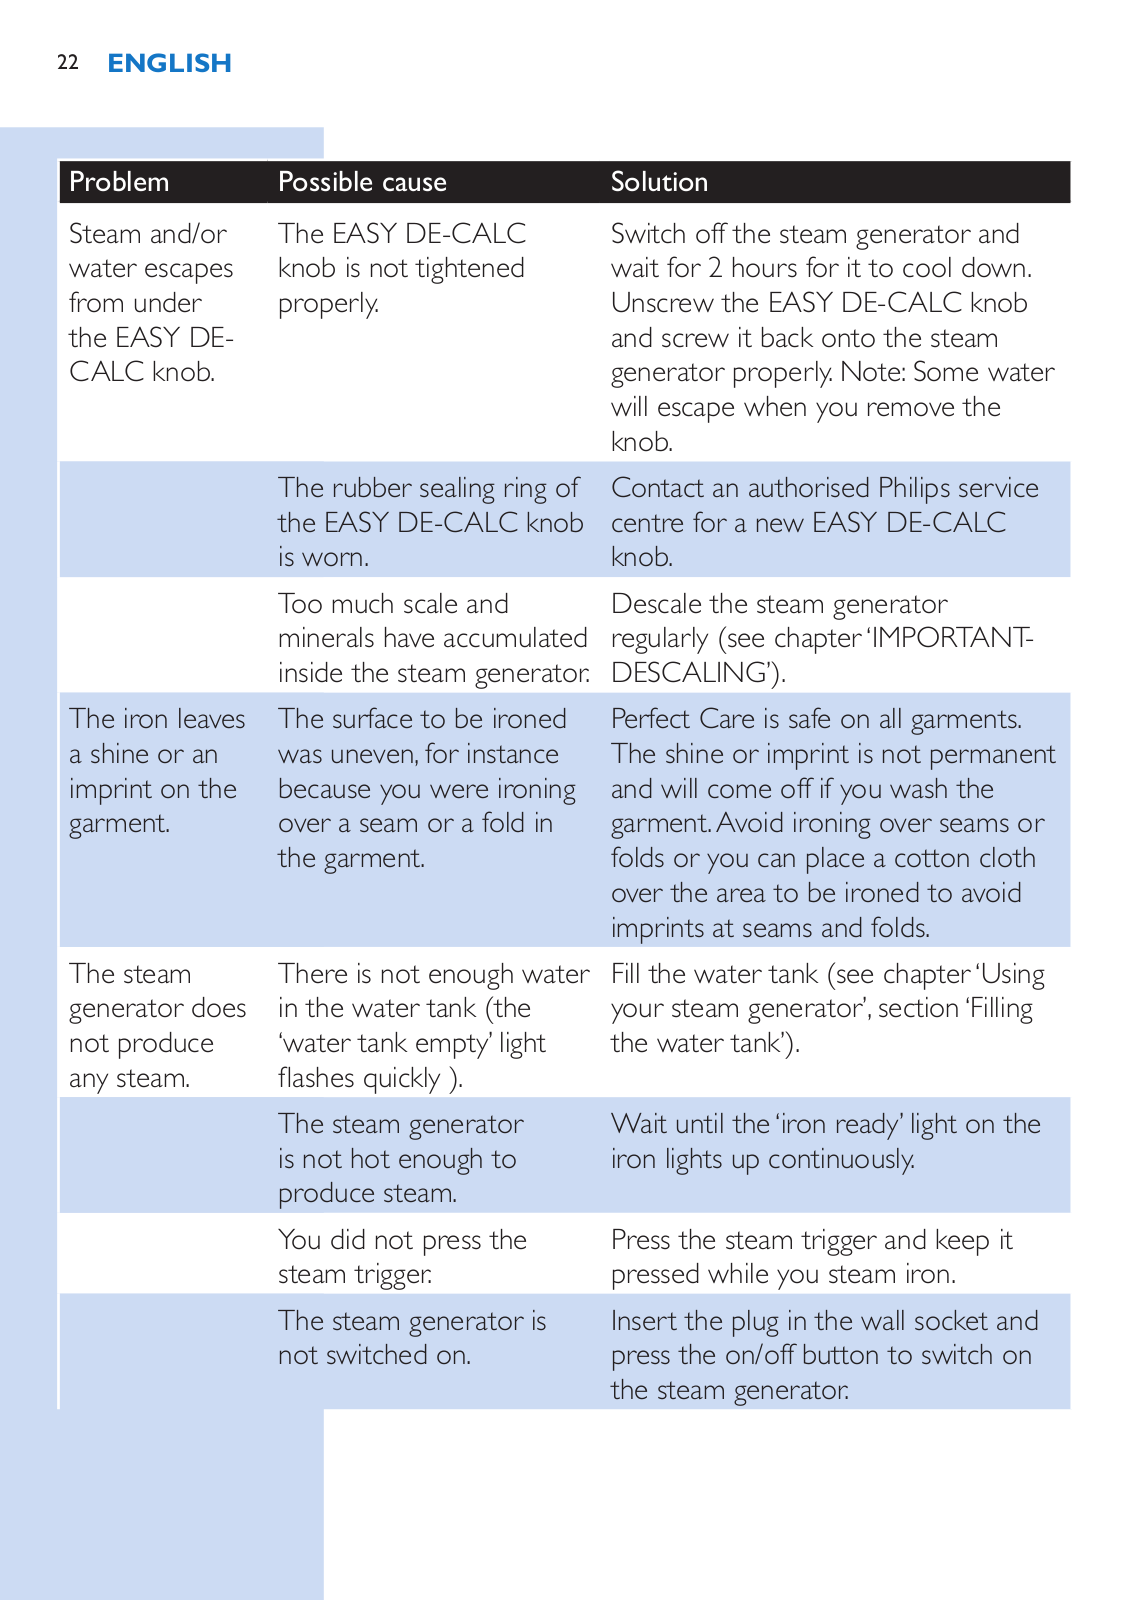
22 English

Problem

Possible cause

Solution

Steam and/or

The EASY DE-CALC

Switch off the steam generator and

water escapes

knob is not tightened

wait for 2 hours for it to cool down.

from under

properly.

Unscrew the EASY DE-CALC knob

the EASY DE-


and screw it back onto the steam

CALC knob.


generator properly. Note: Some water


will escape when you remove the


knob.


The rubber sealing ring of


the EASY DE-CALC knob


is worn.


Too much scale and


minerals have accumulated


inside the steam generator.

The iron leaves

The surface to be ironed

a shine or an

was uneven, for instance

imprint on the

because you were ironing

garment.

over a seam or a fold in


the garment.

The steam

There is not enough water

generator does

in the water tank (the

not produce

‘water tank empty’ light

any steam.

flashes quickly ).


The steam generator


is not hot enough to


produce steam.

Contact an authorised Philips service centre for a new EASY DE-CALC knob.

Descale the steam generator regularly (see chapter ‘IMPORTANT-

DESCALING’).

Perfect Care is safe on all garments. The shine or imprint is not permanent and will come off if you wash the garment. Avoid ironing over seams or folds or you can place a cotton cloth over the area to be ironed to avoid imprints at seams and folds.

Fill the water tank (see chapter ‘Using your steam generator’, section ‘Filling the water tank’).

Wait until the ‘iron ready’ light on the iron lights up continuously.

You did not press the

Press the steam trigger and keep it

steam trigger.

pressed while you steam iron.

The steam generator is

Insert the plug in the wall socket and

not switched on.

press the on/off button to switch on


the steam generator.


English 23

Problem

Possible cause

Solution

The steam

The auto-off function is

Press the power on/off button to

generator has

activated automatically

switch on the steam generator again.

switched off.

when the steam generator


has not been used for


more than 10 minutes.


The steam

Water is pumped into the

generator

boiler.This is normal.

produces a


pumping sound.


If the pumping sound continues nonstop, switch off the steam generator and remove the plug from the wall socket. Contact an authorised Philips service centre.

24 Indonesia

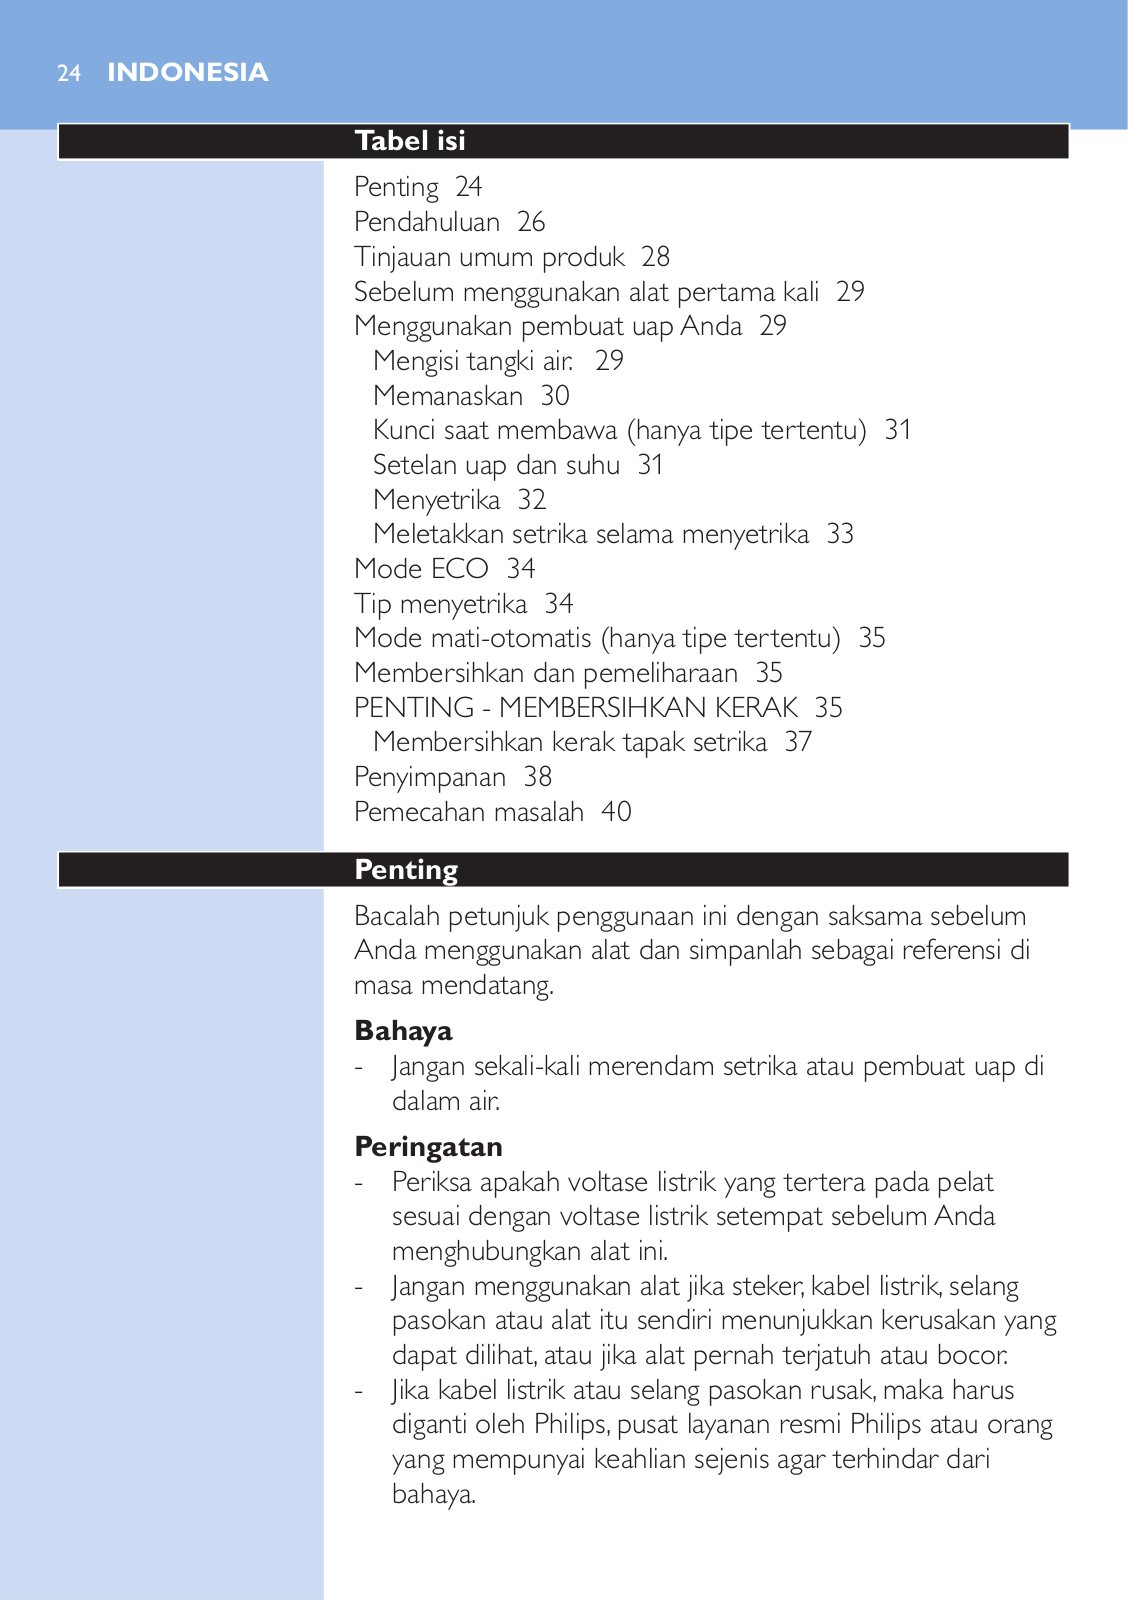
Tabel isi

Penting 24 Pendahuluan 26

Tinjauan umum produk 28

Sebelum menggunakan alat pertama kali 29 Menggunakan pembuat uap Anda 29 Mengisi tangki air. 29

Memanaskan 30

Kunci saat membawa (hanya tipe tertentu) 31

Setelan uap dan suhu 31 Menyetrika 32

Meletakkan setrika selama menyetrika 33 Mode ECO 34

Tip menyetrika 34

Mode mati-otomatis (hanya tipe tertentu) 35 Membersihkan dan pemeliharaan 35 PENTING - MEMBERSIHKAN KERAK 35

Membersihkan kerak tapak setrika 37 Penyimpanan 38

Pemecahan masalah 40

Penting

Bacalah petunjuk penggunaan ini dengan saksama sebelum Anda menggunakan alat dan simpanlah sebagai referensi di masa mendatang.

Bahaya

-- Jangan sekali-kali merendam setrika atau pembuat uap di dalam air.

Peringatan

-- Periksa apakah voltase listrik yang tertera pada pelat sesuai dengan voltase listrik setempat sebelum Anda menghubungkan alat ini.

-- Jangan menggunakan alat jika steker, kabel listrik, selang pasokan atau alat itu sendiri menunjukkan kerusakan yang dapat dilihat, atau jika alat pernah terjatuh atau bocor.

-- Jika kabel listrik atau selang pasokan rusak, maka harus diganti oleh Philips, pusat layanan resmi Philips atau orang yang mempunyai keahlian sejenis agar terhindar dari bahaya.

Indonesia 25

-- Jangan sekali-kali meninggalkan alat tanpa pengawasan saat masih tersambung ke arus listrik.

-- Alat ini dapat digunakan oleh anak-anak yang telah berusia

8 tahun ke atas dan oleh orang dengan cacat fisik, indera atau kecakapan mental yang kurang, atau oleh orang yang kurang pengalaman dan pengetahuan, asalkan mereka telah diberikan pengarahan tentang cara menggunakan alat ini dengan aman atau diawasi agar menggunakan dengan aman dan jika mereka telah diberitahu tentang bahaya yang bisa timbul.

-- Jangan biarkan anak-anak memainkan alat ini.

-- Jauhkan alat dan kabel listrik dari jangkauan anak-anak yang berusia di bawah 8 tahun bila alat telah dinyalakan atau sedang didinginkan.

-- Anak-anak tidak boleh membersihkan alat ini dan melakukan prosedur Calc-Clean tanpa pengawasan.

-- Pastikan kabel listrik dan selang pasokan tidak mengenai tapak setrika saat sedang panas.

-- Jika uap atau tetesan air panas keluar dari bawah kenop EASY DE-CALC saat alat sedang dipanaskan, matikan alat dan biarkan dingin selama 2 jam. Kemudian masukkan lagi kenop EASY DE-CALC. Jika uap terus keluar saat alat sedang dipanaskan, matikan alat dan hubungi pusat layanan resmi Philips.

-- Jangan melepaskan kenop EASY DE-CALC dari pembuat uap bila pembuat uap masih panas atau bertekanan.

-- Jangan gunakan tutup apa pun pada pembuat uap selain kenop EASY DE-CALC yang disertakan bersama alat.

Perhatian

-- Alat hanya boleh dihubungkan ke stopkontak dinding yang memiliki arde.

-- Selalu simpan dan gunakan pembuat uap pada permukaan yang stabil, rata dan pada posisi rebah.

-- Periksalah kabel listrik dan selang pasokan secara teratur, kalau-kalau ada kerusakan.

-- Ulurkan sepenuhnya kabel listrik sebelum Anda memasang steker ke stopkontak dinding.

-- Platform setrika dan tapak setrika dapat menjadi sangat panas dan menyebabkan luka bakar jika tersentuh. Jika

26 Indonesia

Anda ingin memindahkan pembuat uap, jangan sentuh platformnya.

-- Selalu matikan alat dan lepaskan stekernya dari stopkontak dinding bila Anda selesai menyetrika.

-- Letakkan kembali setrika pada dudukan setrika, matikan alat, dan lepaskan steker listrik dari stopkontak dinding: 

-- a. bila Anda selesai menyetrika -- b. bila Anda membersihkan alat

-- b. bila Anda mengisi atau mengosongkan tangki airnya

-- c. bila Anda meninggalkan setrika, sekalipun hanya sebentar -- Hilangkan kerak pada pembuat uap secara teratur sesuai petunjuk dalam bab ‘Membersihkan dan pemeliharaan’.

-- Alat ini hanya ditujukan untuk keperluan rumah tangga, di dalam ruangan.

Medan elektromagnet (EMF)

Alat dari Philips ini telah mematuhi semua standar yang berkenaan dengan medan elektromagnet (EMF). Jika ditangani dengan benar dan sesuai dengan instruksi yang diberikan dalam petunjuk penggunaan ini, alat ini aman digunakan berdasarkan pada bukti ilmiah yang kini tersedia.

Pembuangan

-- Jangan membuang alat bersama limbah rumah tangga biasa jika alat sudah tidak dapat dipakai lagi, tetapi serahkan ke tempat pengumpulan barang bekas yang resmi

untuk didaur ulang. Dengan melakukan hal ini, Anda ikut membantu melestarikan lingkungan.

-- Untuk memungkinkan daur ulang, komponen plastik yang digunakan untuk alat ini telah diberi kode. Kemasan kardus terbuat dari 90% bahan daur ulang dan dapat didaur ulang sepenuhnya.

Pendahuluan

Terima kasih telah membeli pembuat uap Philips ini.

-- Philips PerfectCare yang baru menawarkan cara inovatif kepada Anda untuk menyetrika pakaian. Kita semua tahu repotnya menggunakan setrika biasa: memilih suhu yang tepat untuk kain yang kuat dan halus, menunggu

Indonesia 27

setrika hingga panas dan dingin untuk menghindari risiko merusak pakaian dengan setrika yang terlalu panas. Semua kerepotan itu kini tinggal cerita dengan adanya Philips PerfectCare.

-- Pada prinsipnya, kerutan dihilangkan dengan mentransfer panas ke kain. Dulunya, hal ini dilakukan dengan tapak setrika yang sangat panas. Kemudian ditambahkan

uap untuk menyempurnakan transfer panas, sehingga menyetrika jadi jauh lebih cepat. Riset kami memastikan bahwa cara terbaik untuk menghilangkan kerut secara efektif adalah kombinasi yang pas dari uap yang banyak dan suhu tapak setrika yang optimum. Kunci agar efektif dalam menghilangkan kerut adalah uap, bukan suhu tapak setrika. Suhu tapak setrika cukup hanya di atas suhu

uap untuk menghilangkan kelembapan. Inilah suhu yang optimum.

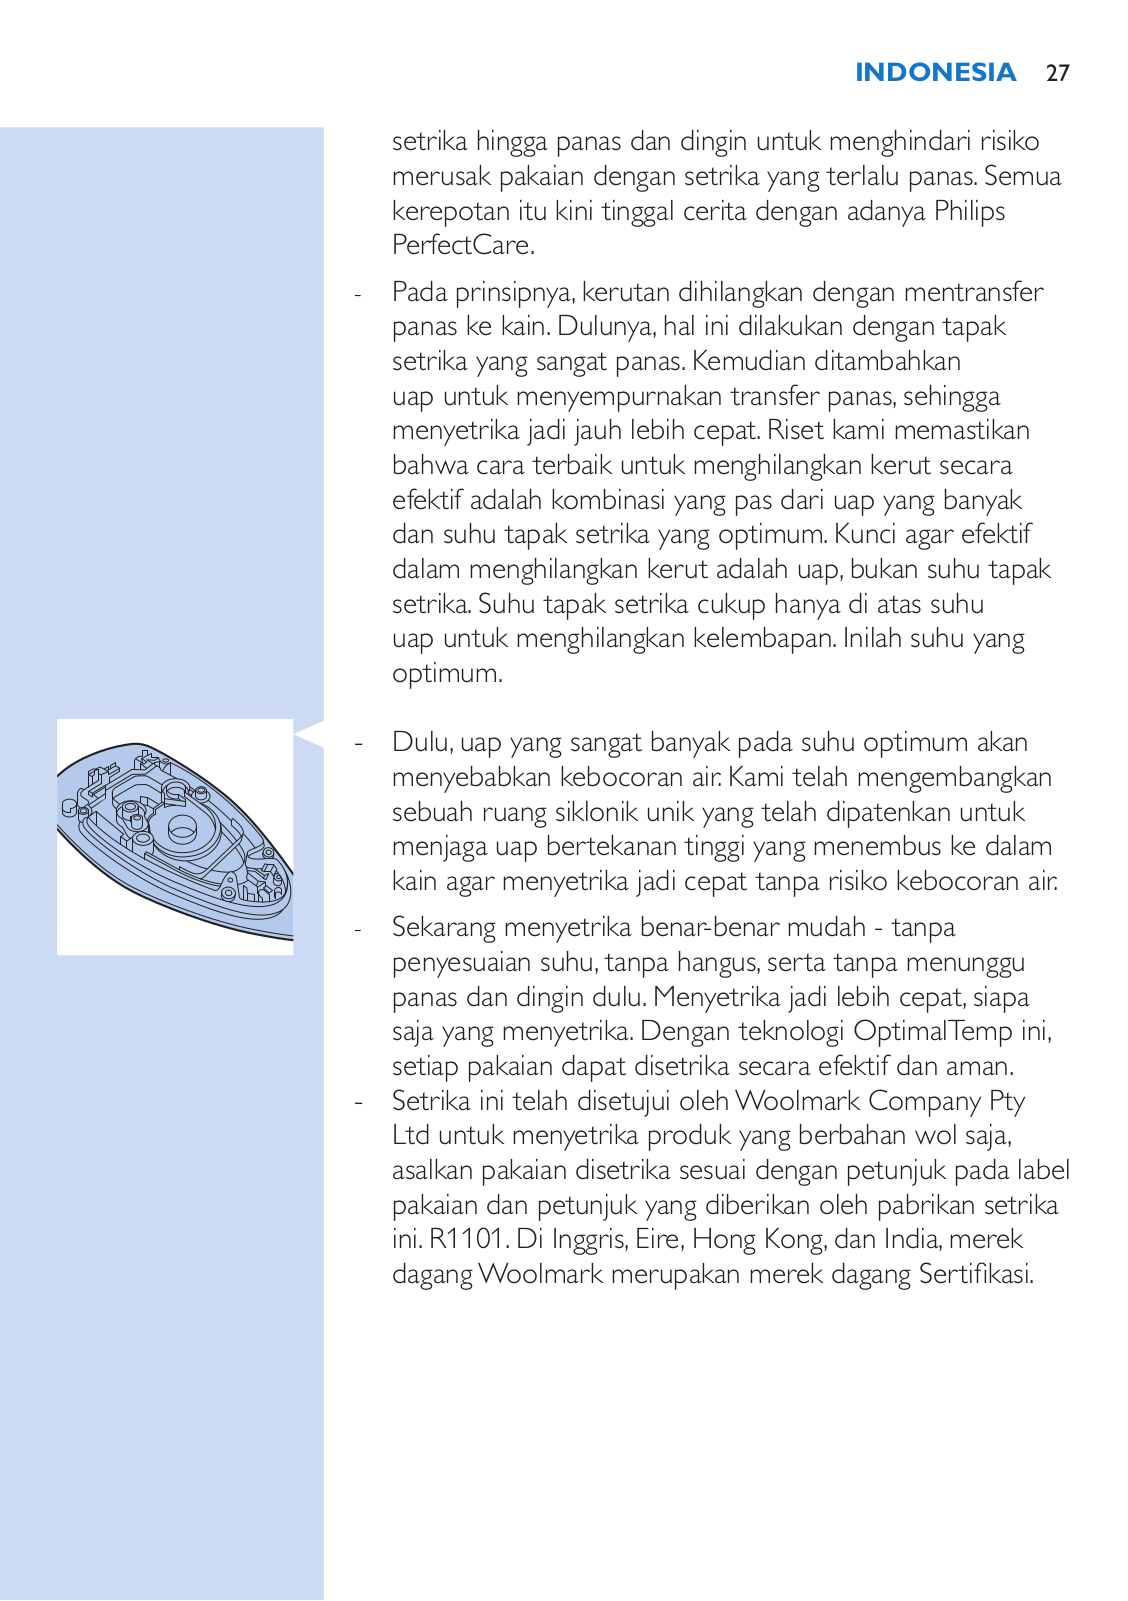
-- Dulu, uap yang sangat banyak pada suhu optimum akan menyebabkan kebocoran air. Kami telah mengembangkan sebuah ruang siklonik unik yang telah dipatenkan untuk menjaga uap bertekanan tinggi yang menembus ke dalam kain agar menyetrika jadi cepat tanpa risiko kebocoran air.

-- Sekarang menyetrika benar-benar mudah - tanpa penyesuaian suhu, tanpa hangus, serta tanpa menunggu panas dan dingin dulu. Menyetrika jadi lebih cepat, siapa saja yang menyetrika. Dengan teknologi OptimalTemp ini, setiap pakaian dapat disetrika secara efektif dan aman.

-- Setrika ini telah disetujui oleh Woolmark Company Pty Ltd untuk menyetrika produk yang berbahan wol saja, asalkan pakaian disetrika sesuai dengan petunjuk pada label pakaian dan petunjuk yang diberikan oleh pabrikan setrika ini. R1101. Di Inggris, Eire, Hong Kong, dan India, merek dagangWoolmark merupakan merek dagang Sertifikasi.

28 Indonesia

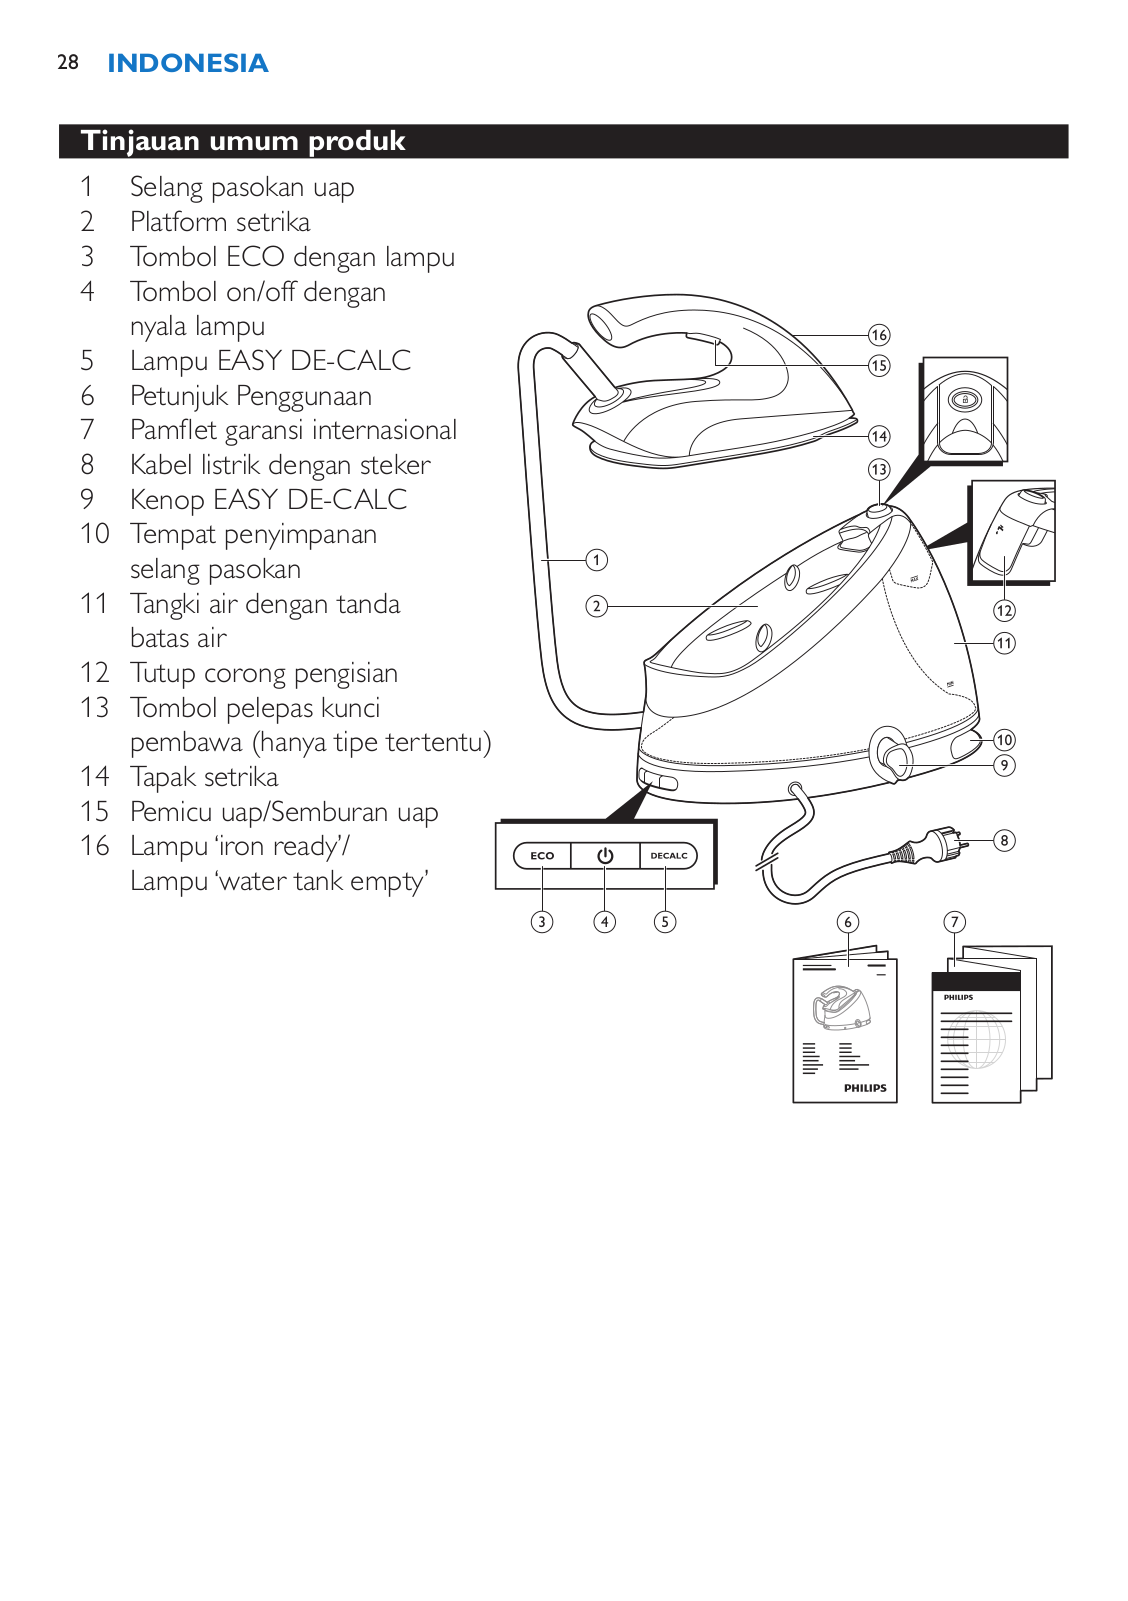
Tinjauan umum produk 

1Selang pasokan uap

2Platform setrika

3Tombol ECO dengan lampu

4Tombol on/off dengan

nyala lampu

5 Lampu EASY DE-CALC

6 Petunjuk Penggunaan

7 Pamflet garansi internasional

8 Kabel listrik dengan steker 

9 Kenop EASY DE-CALC

10 Tempat penyimpanan selang pasokan

11 Tangki air dengan tanda batas air

12Tutup corong pengisian

13Tombol pelepas kunci

pembawa (hanya tipe tertentu)

14 Tapak setrika

15 Pemicu uap/Semburan uap

16 Lampu ‘iron ready’/ Lampu ‘water tank empty’

Indonesia 29

Sebelum menggunakan alat pertama kali

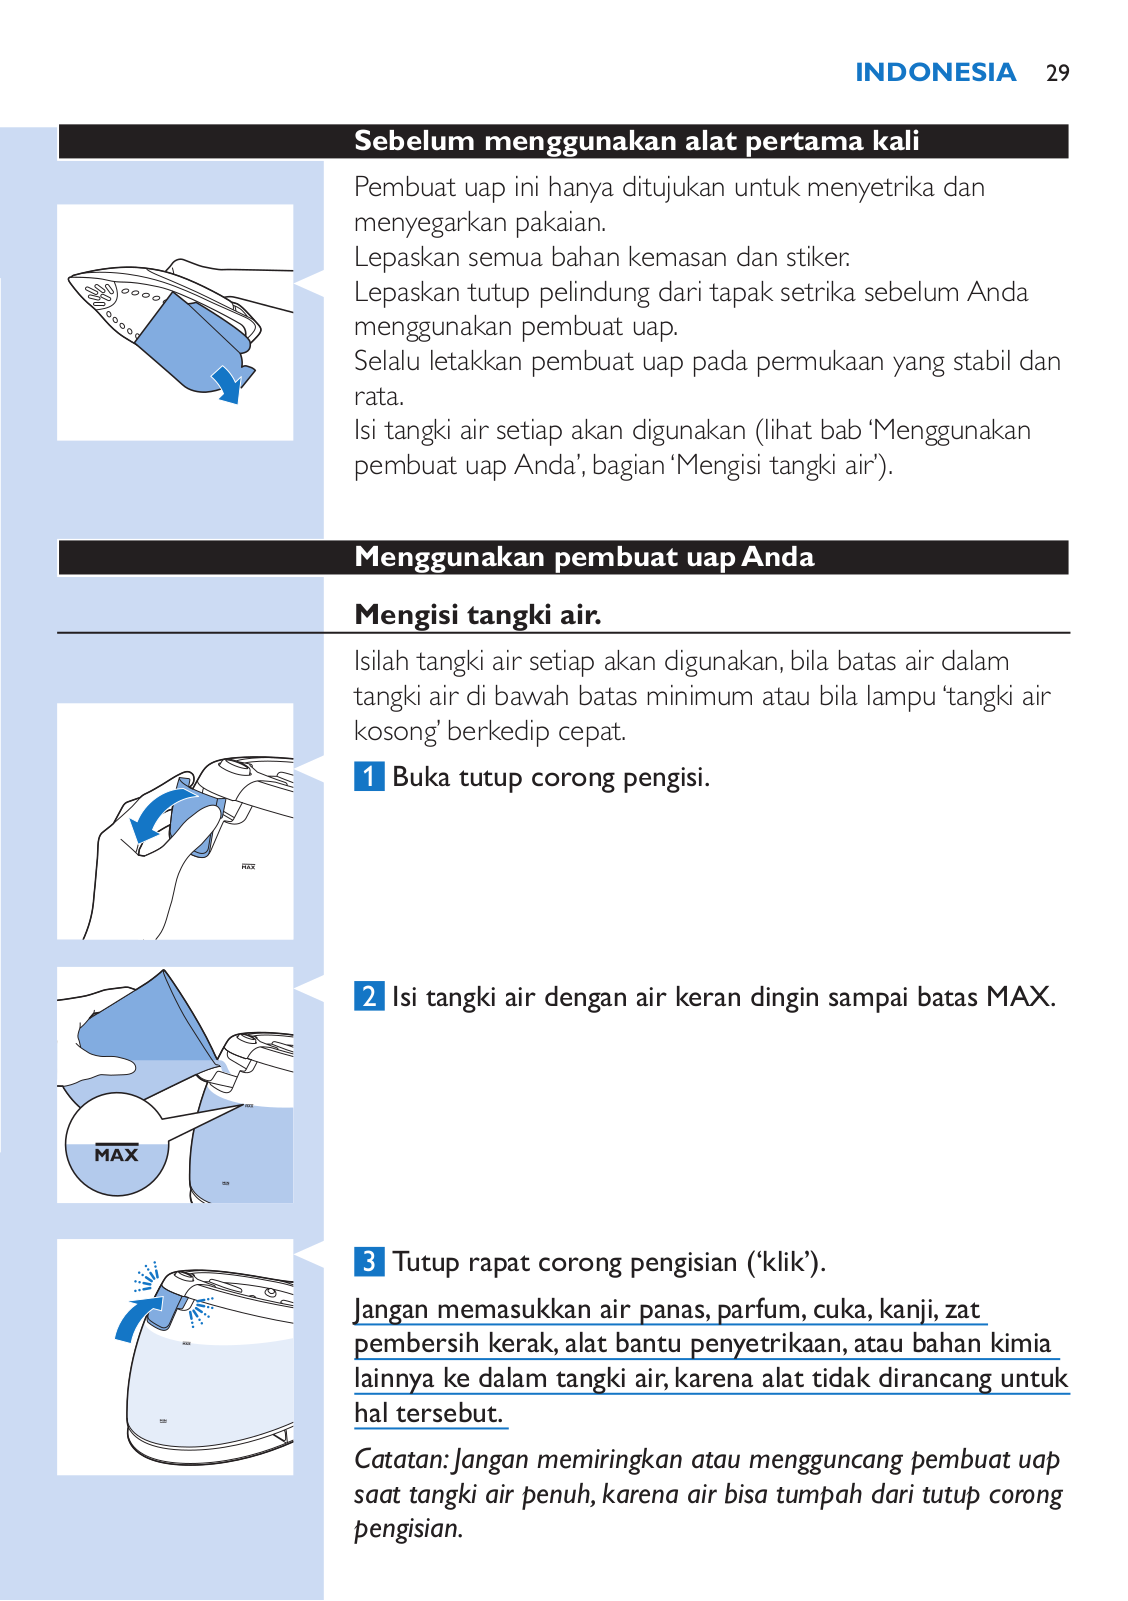
Pembuat uap ini hanya ditujukan untuk menyetrika dan menyegarkan pakaian.

Lepaskan semua bahan kemasan dan stiker.

Lepaskan tutup pelindung dari tapak setrika sebelum Anda menggunakan pembuat uap.

Selalu letakkan pembuat uap pada permukaan yang stabil dan rata.

Isi tangki air setiap akan digunakan (lihat bab ‘Menggunakan pembuat uap Anda’, bagian‘Mengisi tangki air’).

Menggunakan pembuat uapAnda

Mengisi tangki air.

Isilah tangki air setiap akan digunakan, bila batas air dalam tangki air di bawah batas minimum atau bila lampu ‘tangki air kosong’ berkedip cepat.

1 Buka tutup corong pengisi.

2 Isi tangki air dengan air keran dingin sampai batas MAX.

3 Tutup rapat corong pengisian (‘klik’).

Jangan memasukkan air panas,parfum,cuka,kanji,zat pembersih kerak, alat bantu penyetrikaan, atau bahan kimia lainnya ke dalam tangki air, karena alat tidak dirancang untuk hal tersebut.

Catatan:Jangan memiringkan atau mengguncang pembuat uap saat tangki air penuh,karena air bisa tumpah dari tutup corong pengisian.

30 Indonesia

Catatan:Jangan mengisi tangki air melewati tanda batas MAX untuk menghindari tumpahan.Jika Anda berlebihan mengisi tangki air,kurangi hingga batas air di bawah tanda MAX lagi.

Tip:Alat Anda dirancang untuk digunakan dengan air keran.Jika Anda tinggal di area dengan kesadahan air yang sangat tinggi, kerak cepat terbentuk.Karena itu,disarankan untuk mencampur air suling 50% dan air keran 50% untuk memperpanjang masa pakai alat Anda.Jangan hanya menggunakan air suling,karena sedikit asam dan mungkin menyebabkan kerusakan pada alat Anda.Jangan memasukkan parfum,cuka,kanji,zat pembersih kerak,alat bantu penyetrikaan,atau bahan kimia lainnya ke dalam tangki air,karena alat Anda tidak dirancang untuk menggunakan bahan-bahan kimia ini.

Memanaskan

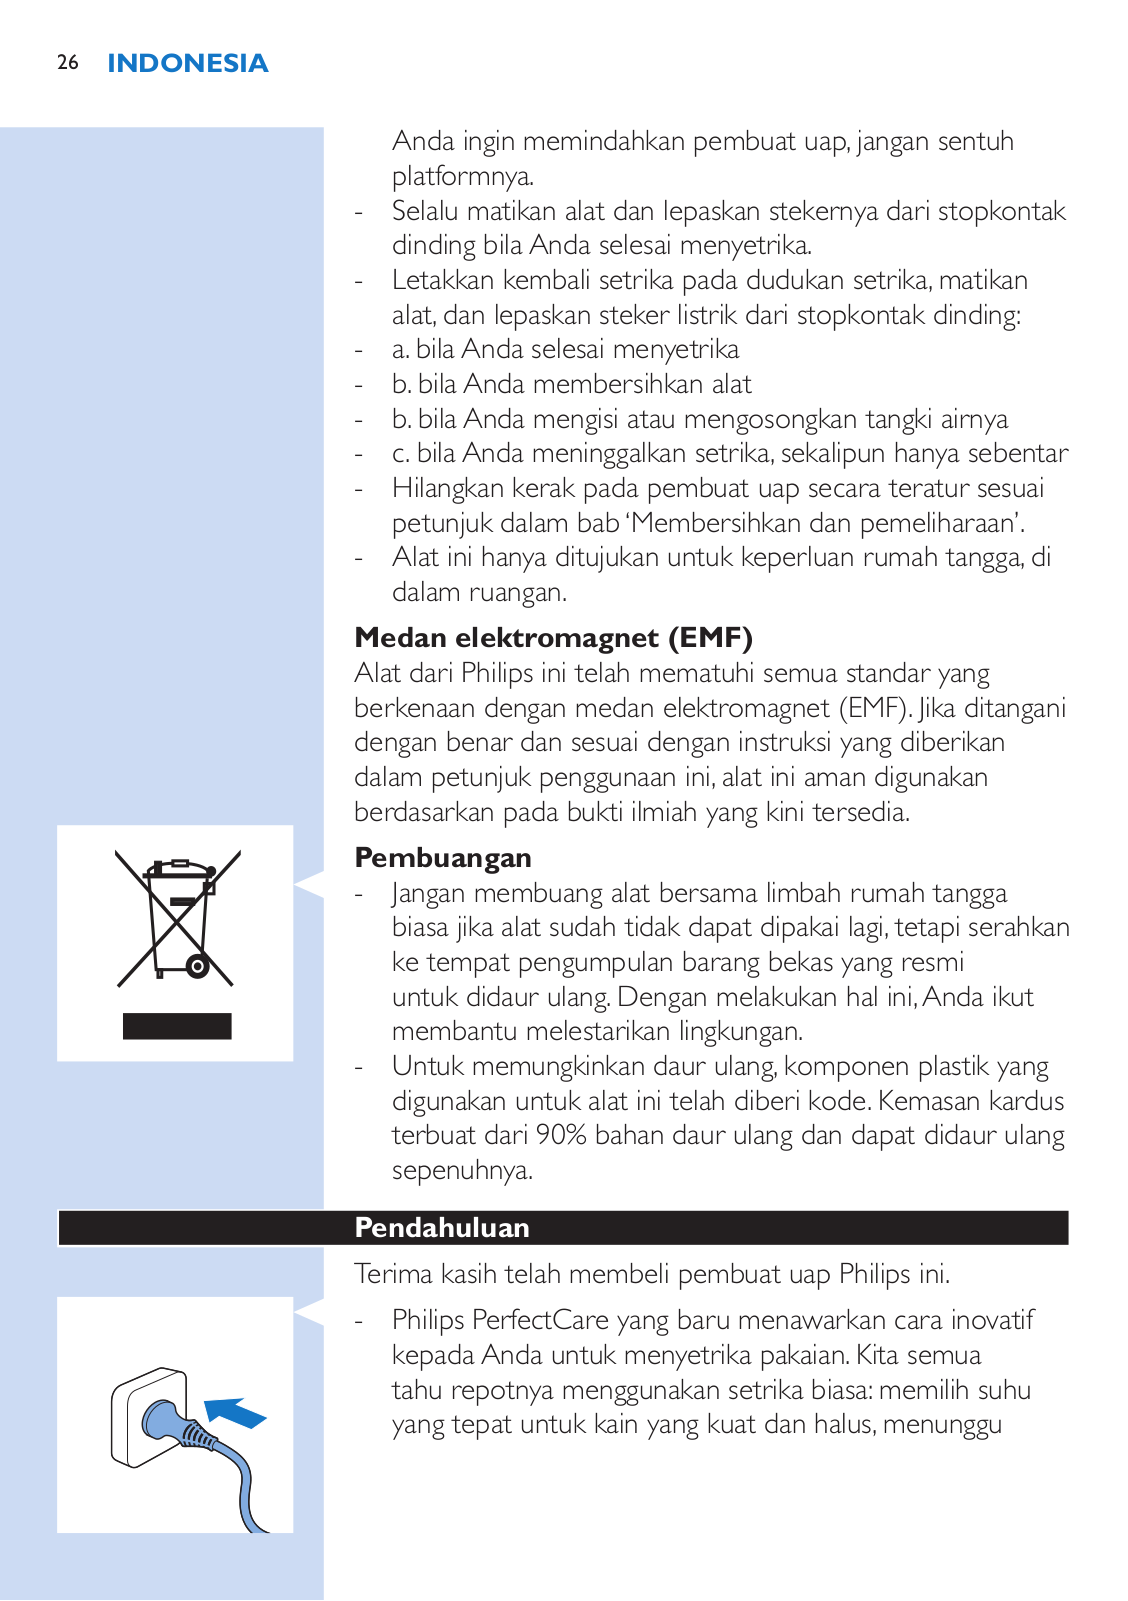
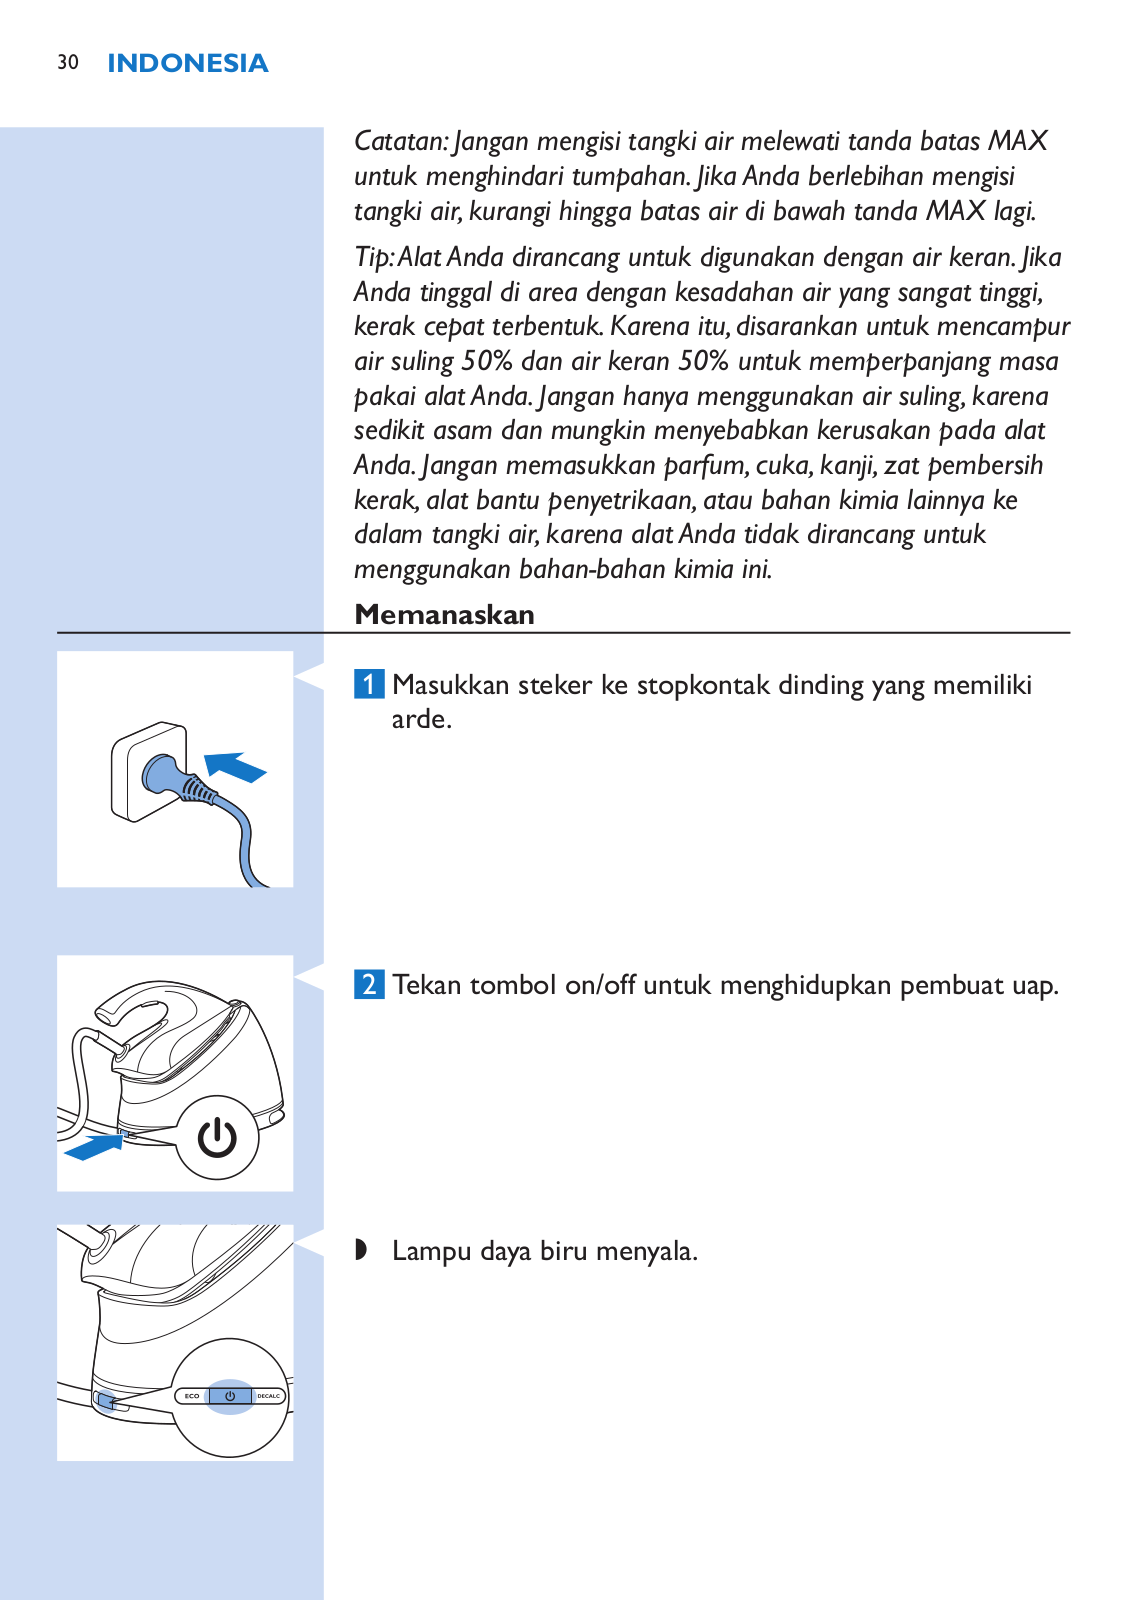
1Masukkan steker ke stopkontak dinding yang memiliki arde.

2Tekan tombol on/off untuk menghidupkan pembuat uap.

,, Lampu daya biru menyala.

Loading...
+ 130 hidden pages