


Register your product and get support at
www.philips.com/welcome
GC4800 series

1


ENGLISH 6
ESPAÑOL 23
ITALIANO 42
PORTUGUÊS 60
TÜRKÇE 78
GC4800 series

6
ENGLISH
Introduction
Congratulations on your purchase and welcome
to Philips! To fully benefit from the support that
Philips offers, register your product at
www.philips.com/welcome.
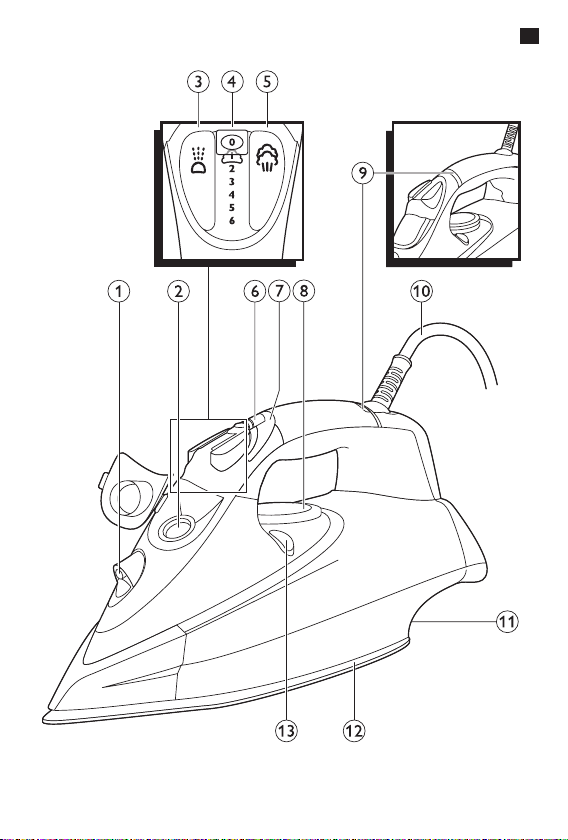
General description (Fig. 1)
1 Spray nozzle
2 Filling opening
3 Spray button
4 Steam control
5 Steam boost button
6 Ionic DeepSteam button (GC4880, GC4875,
GC4870 only)
7 Ionic DeepSteam light (GC4880, GC4875,
GC4870 only)
8 Temperature dial
9 Amber temperature light (all types)/red auto-
off light GC4891/GC4890/GC4880/GC4875/
GC4870/GC4865/GC4860/GC4856/GC4855/
GC4852/GC4851/ GC4850 only).
10 Mains cord
11 Type plate
12 Soleplate
13 Calc-Clean button
Not shown: Heat-resistant protective cover
(GC4880 only)
Not shown: filling cup
Important
Read this user manual carefully before you use the
appliance and save it for future reference.
Danger
- Never immerse the iron in water.

ENGLISH 7
Warning
- Check to make sure the mains socket has the
correct rating (16A, depending on the type)
before you connect the appliance.
- Check if the voltage indicated on the type plate
corresponds to the local mains voltage before you
connect the appliance.
- Do not use the appliance if the plug, the mains
cord or the appliance itself shows visible damage,
or if the appliance has been dropped or leaks.
- If the mains cord is damaged, you must have it
replaced by Philips, a service centre authorised by
Philips or similarly qualified persons in order to
avoid a hazard.
- Never leave the appliance unattended when it is
connected to the mains.
- This appliance is not intended for use by persons
(including children) with reduced physical, sensory
or mental capabilities, or lack of experience
and knowledge, unless they have been given
supervision or instruction concerning use of the
appliance by a person responsible for their safety.
- Children should be supervised to ensure that they
do not play with the appliance.
- Do not let the mains cord come into contact with
the hot soleplate of the iron.
- Only use the iron if the electrical system in your
home has a rating of 16A. It is not allowed to use
this iron if the rating of the electrical system is
lower than 16A
Caution
- Only connect the appliance to an earthed wall
socket.
- Check the mains cord regularly for possible
damage.

ENGLISH8
- The soleplate of the iron can become extremely
hot and may cause burns if touched.
- When you have finished ironing, when you clean
the appliance, when you fill or empty the water
tank and also when you leave the iron even for
a short while: set the steam control to position
0, put the iron on its heel and remove the mains
plug from the wall socket.
- Always place and use the iron on a stable, level
and horizontal surface.
- Do not put perfume, vinegar, starch, descaling
agents, ironing aids or other chemicals in the
water tank.
- This appliance is intended for household use only.
Electromagnetic fields (EMF)
This Philips appliance complies with all standards
regarding electromagnetic fields (EMF). If handled
properly and according to the instructions in this
user manual, the appliance is safe to use based on
scientific evidence available today.
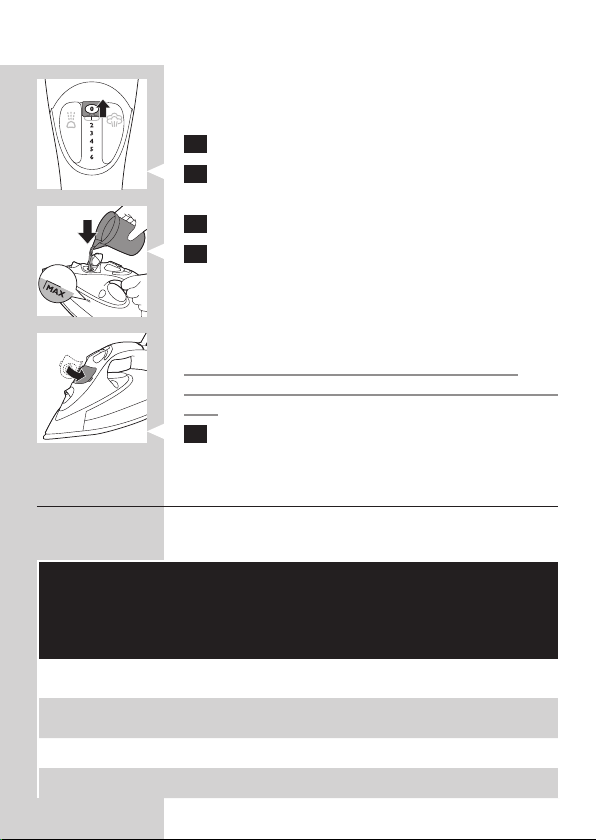
Before first use
1 Remove any sticker, protective foil or plastic
from the soleplate.
2 Rinse and dry the filling cup.
Preparing for use
Filling the water tank
Type of water to be used
You can use normal tap water to fill the water tank.
ENGLISH 9
Tip: If the tap water in your area is very hard, we
advise you to mix it with an equal amount of distilled
water. Do not use distilled water only.
1 Make sure the appliance is unplugged.
2 Set the steam control to position 0 (= no
steam).
3 Open the cap of the filling opening.
4 Tilt the iron backwards and use the filling cup
to fill the water tank with tap water up to the
maximum level.
Do not fill the water tank beyond the MAX
indication.
Do not put perfume, vinegar, starch, descaling
agents, ironing aids or other chemicals in the water
tank.
5 Close the cap of the filling opening (‘click’).
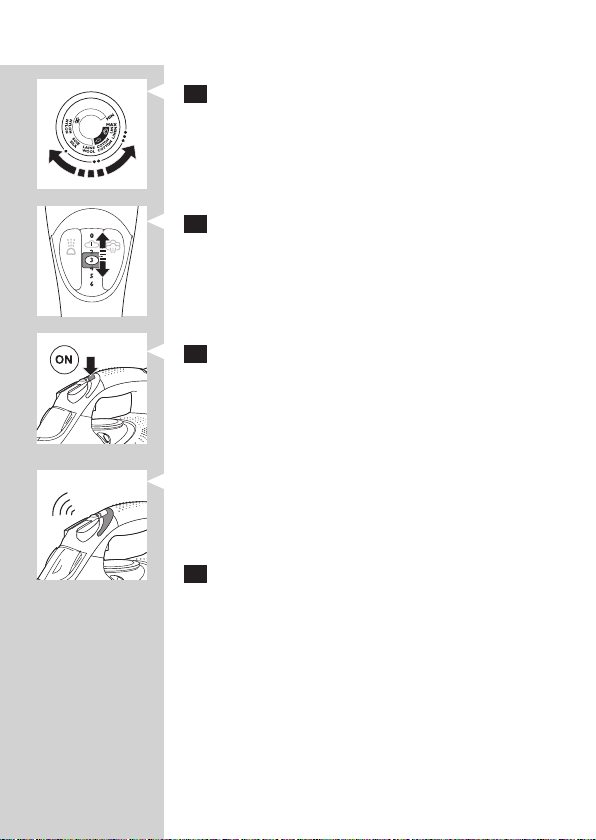
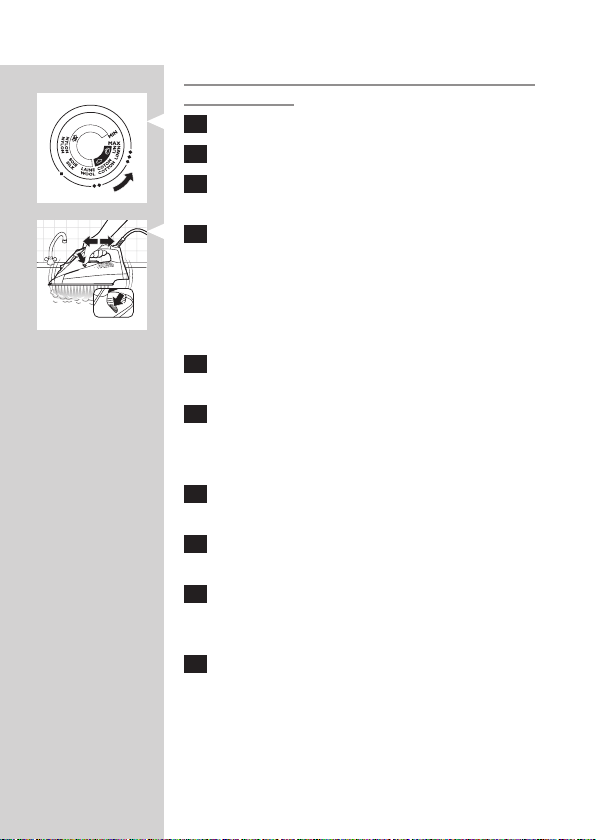
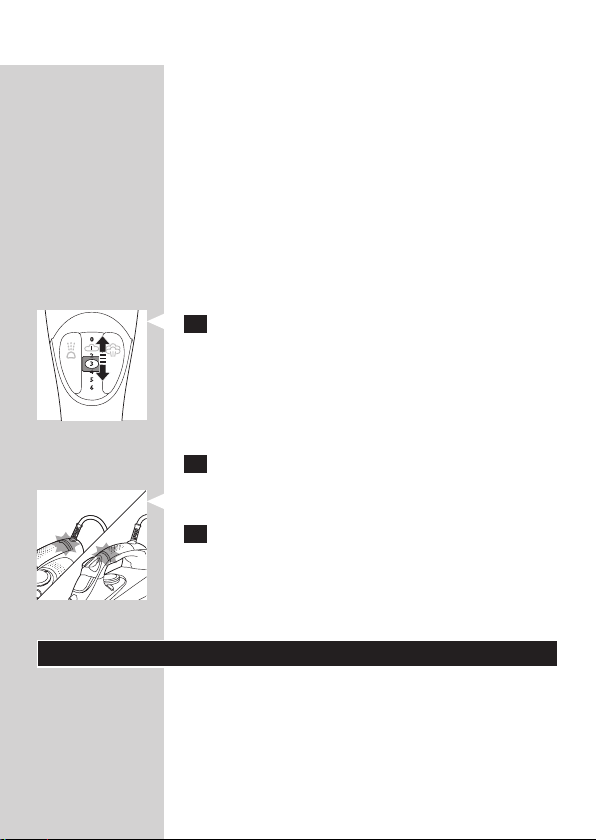
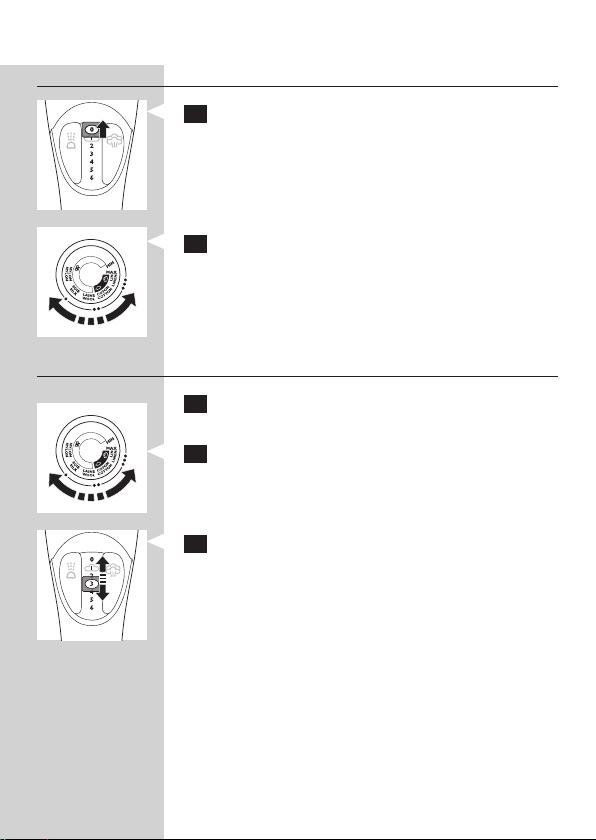
Selecting the temperature and steam
setting
Temperature and steam settings
Fabric type Temperature
setting
Linen MAX 5-6
Cotton 3 3-4
Wool 2 1-2 N.A. yes
Silk 1 0 N.A. N.A.
Steam
setting
Steam
boost
\
\
Ionic
DeepSteam
(specific
types only)
yes
yes

ENGLISH10
Fabric type Temperature
Synthetic
fabrics (e.g.
acrylic, nylon,
polyamide,
polyester)
setting
1
1 Specific types only: remove the heat-resistant
protective cover.
Do not leave the heat-resistant protective cover
on the soleplate during ironing.
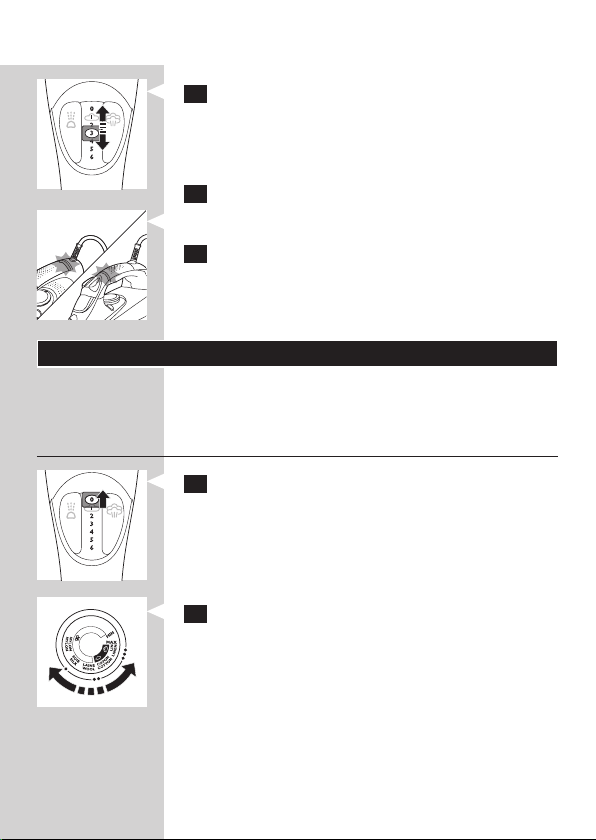
2 Put the iron on its heel.
3 To set the required ironing temperature,
turn the temperature dial to the appropriate
position (see the ‘Temperature and steam
settings’ table above).
Check the laundry care label for the fabric type.
If you do not know what kind or kinds of fabric
an article is made of, determine the right ironing
temperature by ironing a part that is not visible
when you wear or use the article.
Silk, woollen and synthetic materials: iron the reverse
side of the fabric to prevent shiny patches. To
prevent stains, do not use the spray function.
Start ironing the articles that require the lowest
ironing temperature, such as those made of synthetic
fibres.
Steam
setting
0 N.A. N.A.
Steam
boost
Ionic
DeepSteam
(specific
types only)
ENGLISH 11
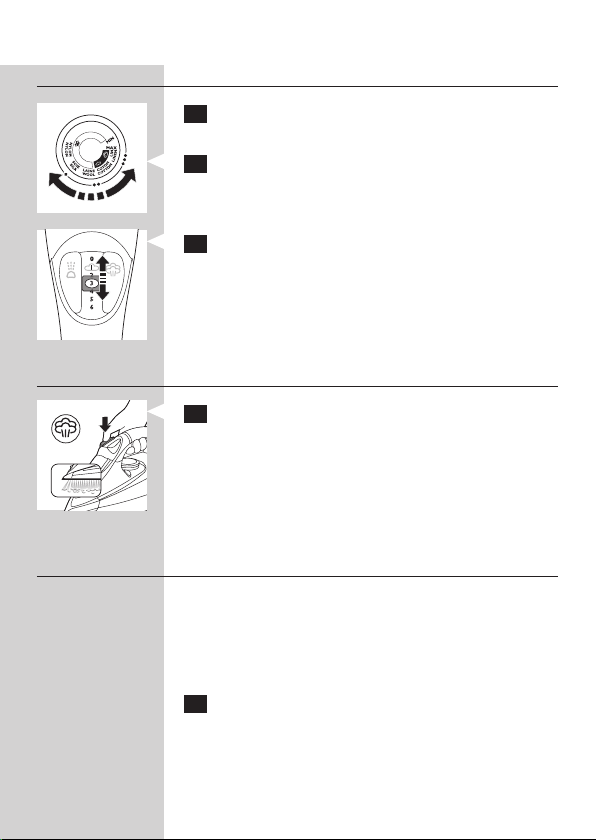
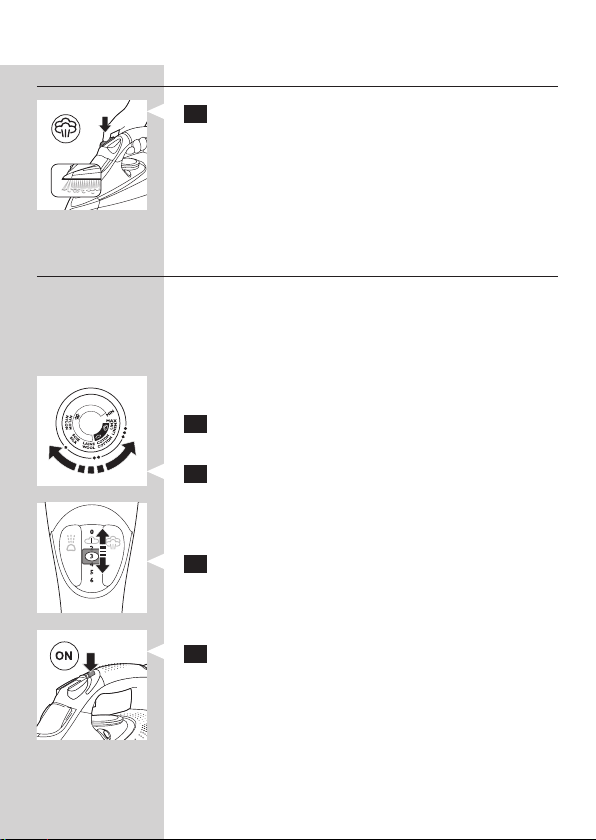
4 Set the appropriate steam setting (see the
‘Temperature and steam settings’ table above).
Note: Make sure that the steam setting you select is
suitable for the set ironing temperature.
5 Put the mains plug in an earthed wall socket.
, The amber temperature light goes on.
6 When the amber temperature light has gone
out, wait a while before you start ironing.
, The temperature light goes on from time to
time during ironing.
Using the appliance
Note: The iron may give off some smoke when you use
it for the first time. This ceases after a short while.
Ironing without steam
1 Set the steam control to position 0 (= no
steam).
2 Set the required ironing temperature (see
chapter ‘Preparing for use’, section ‘Selecting
the temperature and steam setting’).
ENGLISH12
Steam ironing
1 Make sure that there is water in the water
tank.
2 Set the required ironing temperature (see
chapter ‘Preparing for use’, section ‘Selecting
the temperature and steam setting’).
3 Set the appropriate steam setting (see
chapter ‘Preparing for use’, section ‘Selecting
the temperature and steam setting’).
Note: The iron starts to produce steam as soon as it
reaches the set temperature.
Steam ironing with extra steam
1 For extra steam during ironing, press and hold
the steam boost button.
Ironing with Ionic DeepSteam (specific
types only)
When you use the Ionic DeepSteam function during
steam ironing, the steam produced is finer than
during regular steam ironing. Fine steam reaches
deeper, especially into thick fabrics. This helps you
to remove stubborn creases easily.
1 Make sure that there is water in the water
tank.
ENGLISH 13
2 Set the required ironing temperature (see
chapter ‘Preparing for use’, section ‘Selecting
the temperature and steam setting’).
3 Set the appropriate steam setting (see chapter
‘Preparing for use’, section ‘Selecting the
temperature and steam setting’).
4 Press the Ionic DeepSteam button once to
switch on the Ionic DeepSteam function.
, The blue Ionic DeepSteam light goes on and you
hear a humming sound.
, The iron now produces Ionic DeepSteam to
help you remove even the toughest creases.
5 Press the Ionic DeepSteam button again to
switch off the Ionic DeepSteam function.
Note: The Ionic DeepSteam function is only effective
when it is used in combination with a steam setting
and a temperature setting between 2 and MAX.
Note: Do not use the Ionic DeepSteam function when
you iron without steam and/or at low temperature
settings. However, ironing at low temperatures without
steam with the Ionic DeepSteam function switched on
will not damage the iron.

ENGLISH14
Note: The Ionic DeepSteam output may vary from time
to time, depending on the ironing temperature.
Features
Spray function
You can use the spray function at any temperature
to moisten the article to be ironed. This helps
remove stubborn creases.
1 Make sure that there is water in the water
tank.
2 Press the spray button several times to
moisten the article to be ironed.
Steam boost function
A steam boost from the special Steam Tip soleplate
helps remove stubborn creases. The steam boost
enhances the distribution of steam into every par t of
your garment.
The steam boost function can only be used at
temperature settings between 3 and MAX.
1 Press and release the steam boost button.
Vertical steam boost
1 You can also use the steam boost
function when you hold the iron in vertical
position.
This is useful for removing creases from hanging
clothes, curtains etc.
Never direct the steam at people.

ENGLISH 15
Drip stop
This iron is equipped with a drip-stop function: the
iron automatically stops producing steam when
the temperature is too low, to prevent water from
dripping out of the soleplate. When this happens,
you may hear a sound.
Automatic shut-off function (specific types
only)
The automatic shut-off function automatically
switches off the iron if it has not been moved for a
while.
, The red auto-off light flashes to indicate that
the iron has been switched off by the automatic
shut-off function.
To let the iron heat up again:
1 Pick up the iron or move it slightly.
, The red auto-off light goes out.
, If the temperature of the soleplate has dropped
below the set ironing temperature, the amber
temperature light goes on.
2 If the amber temperature light goes on after
you have moved the iron, wait for it to go out
before you start ironing.
Note: If the amber temperature light does not go on
after you move the iron, the soleplate still has the right
temperature and the iron is ready for use.

ENGLISH16
Cleaning and maintenance
Cleaning
1 Set the steam control to position 0, remove
the plug from the wall socket and let the iron
cool down.
2 Wipe flakes and any other deposits off the
soleplate with a damp cloth and a non-abrasive
(liquid) cleaning agent.
To keep the soleplate smooth, avoid hard contact
with metal objects. Never use a scouring pad,
vinegar or other chemicals to clean the soleplate.
3 Clean the upper part of the iron with a damp
cloth.
4 Regularly rinse the water tank with water.
Empty the water tank after you have rinsed it.
Double-Active Calc System
- The Anti-Calc tablet prevents scale from clogging
the steam vents. This tablet is constantly active and
does not need to be replaced.
- The Calc-Clean function removes the scale
particles from the iron.
Using the Calc-Clean function
Use the Calc-Clean function once every two weeks.
If the water in your area is very hard (i.e. when flakes
come out of the soleplate during ironing), use the
Calc-Clean function more frequently.
1 Make sure the appliance is unplugged.
2 Set the steam control to position 0.
3 Fill the water tank to the MAX level.
ENGLISH 17
Do not put vinegar or other descaling agents in
the water tank.
4 Set the temperature dial to MAX.
5 Put the plug in an earthed wall socket.
6 Unplug the iron when the temperature
light goes out.
7 Hold the iron over the sink, press and hold the
Calc-Clean button and gently shake the iron to
and fro.
, Steam and boiling water come out of the
soleplate. Impurities and flakes (if any) are
flushed out.
8 Release the Calc-Clean button as soon as all
the water in the tank has been used up.
9 Repeat the Calc-Clean process if the iron still
contains a lot of impurities.
After the Calc-Clean process
1 Put the plug back into the wall socket and let
the iron heat up to let the soleplate dry.
2 Unplug the iron when it has reached the set
ironing temperature.
3 Move the hot iron gently over a piece of used
cloth to remove any water stains that may have
formed on the soleplate.
4 Let the iron cool down before you store it.
ENGLISH18
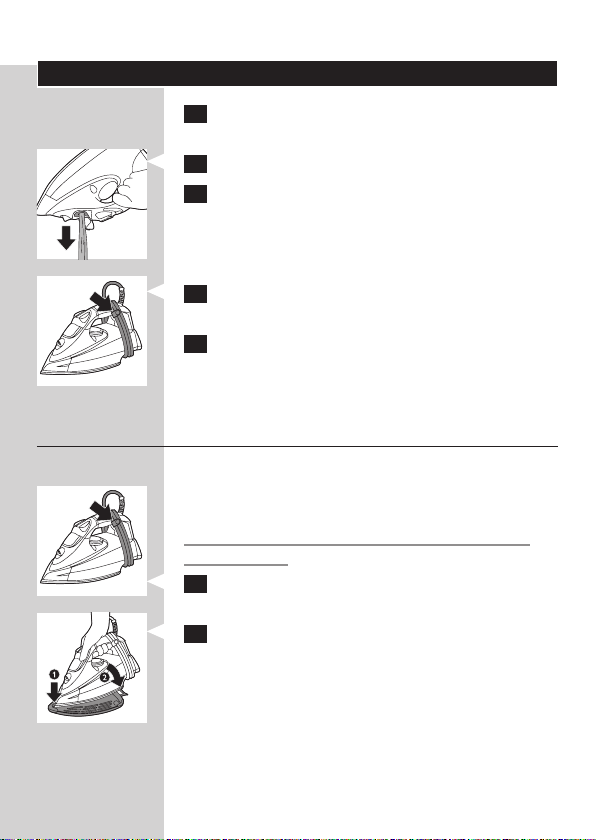
Storage
1 Set the steam control to position 0 and unplug
the iron.
2 Empty the water tank.
3 Let the iron cool down in a safe place.
4 Wind the mains cord around the cord storage
facility and fix it with the cord clip.
5 Store the iron on its heel in a dry and safe
place.
Heat-resistant protective cover (specific
types only)
You can store the iron on the heat-resistant
protective cover immediately after ironing. It is not
necessary to let the iron cool down first.
Do not use the heat-resistant protective cover
during ironing.
1 Wind the mains cord around the cord storage
facility and fix it with the cord clip.
2 Put the iron on the heat-resistant protective
cover.

Environment
- Do not throw away the appliance with the normal
household waste at the end of its life, but hand
it in at an official collection point for recycling. By
doing this, you help to preserve the environment.
Guarantee and service
If you need information or if you have a problem,
please visit the Philips website at www.philips.
com or contact the Philips Consumer Care Centre
in your country (you find its phone number in
the worldwide guarantee leaflet). If there is no
Consumer Care Centre in your country, go to your
local Philips dealer.
Troubleshooting
If the appliance does not work or does not work
properly, first check the list below. If the problem
is not mentioned in this list, the appliance probably
has a defect. In that case we advise you to take the
appliance to your dealer or to an authorised Philips
service centre.
Problem Possible cause Solution
ENGLISH 19
The iron
is plugged
in, but the
soleplate is
cold.
There is a
connection
problem.
The temperature
dial is set to MIN.
Check the mains cord, the plug
and the wall socket.
Set the temperature dial to the
required position.

ENGLISH20
Problem Possible cause Solution
The iron
does not
produce any
steam.
The iron
does not
produce a
steam boost.
Water
droplets drip
onto the
fabric during
ironing.
There is not
enough water in
the water tank.
The steam control
is set to position 0.
The iron is not hot
enough and/or the
drip-stop function
has been activated.
You have used
the steam boost
function too often
within a very short
period.
The iron is not hot
enough.
You have not closed
the cap of the filling
opening properly.
Fill the water tank (see chapter
‘Preparing for use’, section ‘Filling
the water tank’).
Set the steam control to a
position between 1 and 6 (see
chapter ‘Using the appliance’,
section ‘Steam ironing’).
Set an ironing temperature that
is suitable for steam ironing ( 2
to MAX). Put the iron on its heel
and wait until the temperature
light has gone out before you
start ironing.
Continue ironing in horizontal
position and wait a while before
you use the steam boost function
again.
Set an ironing temperature at
which the steam boost function
can be used ( 3 to MAX). Put
the iron on its heel and wait until
the temperature light has gone
out before you use the steam
boost function.
Press the cap until you hear a
click.

Problem Possible cause Solution
ENGLISH 21
Water drips
from the
soleplate
after the
iron has
cooled
down or has
been stored.
Flakes and
impurities
come out of
the soleplate
during
ironing.
You have put an
additive in the
water tank.
The set
temperature is
too low for steam
ironing.
You have used
the steam boost
function at a
temperature setting
below 3.
You have put the
iron in horizontal
position with water
still left in the water
tank.
Hard water forms
flakes inside the
soleplate.
Rinse the water tank and do not
put any additive in the water tank.
Set a temperature of or 2
higher.
Set the temperature dial to a
setting between 3 and MAX.
Empty the water tank.
Use the Calc-Clean function
one or more times (see chapter
‘Cleaning and maintenance’,
section ‘Using the Calc-Clean
function’).

ENGLISH22
Problem Possible cause Solution
The red
light flashes
(specific
types only).
The iron
makes a
humming
sound.
The
humming
sound stops,
although
the Ionic
DeepSteam
function is
on.
The automatic
shut-off function
has switched off the
iron (see chapter
‘Features’, section
‘Automatic shut-off
function’).
The Ionic
DeepSteam
function is on.
The sound stopped
because you placed
the iron on its heel.
Move the iron slightly to
deactivate the automatic shut-off
function. The red auto-off light
goes out.
If you hear the humming
sound when you iron without
steam, press the Ionic DeepSteam
button to switch off the Ionic
DeepSteam function. The Ionic
DeepSteam function has no effect
when you iron without steam.
The humming sound resumes as
soon as you continue to iron.

ESPAÑOL
Introducción
Enhorabuena por la compra de este producto y
bienvenido a Philips. Para sacar el mayor partido
de la asistencia que Philips le ofrece, registre su
producto en www.philips.com/welcome.
Descripción general (fig. 1)
1 Boquilla del spray
2 Abertura de llenado
3 Botón spray
4 Control de vapor
5 Botón Supervapor
6 Botón Ionic DeepSteam (sólo en los modelos
GC4880, GC4875, GC4870)
7 Piloto Ionic DeepSteam (sólo en los modelos
GC4880, GC4875, GC4870)
8 Control de temperatura
9 Piloto ámbar de temperatura (todos los
modelos) / piloto rojo de desconexión
automática (sólo en los modelos GC4891/
GC4890/GC4880/GC4875/GC4870/GC4865/
GC4860/GC4856/GC4855/GC4852/GC4851/
GC4850).
10 Cable de alimentación
11 Placa de modelo
12 Suela
13 Botón Calc-Clean
No se muestra: cubierta protectora resistente al
calor (sólo modelo GC4880)
No se muestra: vaso de llenado
23
Importante
Antes de usar el aparato, lea atentamente este
manual de usuario y consérvelo por si necesitara
consultarlo en el futuro.

ESPAÑOL24
Peligro
- No sumerja nunca la plancha en agua.
Advertencia
- Antes de conectar el aparato, compruebe que
la toma de corriente tiene la corriente correcta
(16 A, dependiendo del modelo).
- Antes de enchufar el aparato, compruebe si
el voltaje indicado en la placa de modelo se
corresponde con el voltaje de red local.
- No utilice el aparato si la clavija, el cable de
alimentación o el propio aparato tienen daños
visibles, o si el aparato se ha caído o está
goteando.
- Si el cable de alimentación está dañado, debe
ser sustituido por Philips o por un centro de
servicio autorizado por Philips, con el fin de evitar
situaciones de peligro.
- No deje nunca el aparato desatendido cuando
esté enchufado a la toma de corriente.
- Este aparato no debe ser usado por personas
(adultos o niños) con su capacidad física, psíquica
o sensorial reducida, ni por quienes no tengan
los conocimientos y la experiencia necesarios, a
menos que sean supervisados o instruidos acerca
del uso del aparato por una persona responsable
de su seguridad.
- Asegúrese de que los niños no jueguen con este
aparato.
- No permita que el cable de alimentación entre en
contacto con la suela caliente de la plancha.
- Utilice la plancha sólo si el sistema eléctrico de su
hogar tiene una corriente de 16 A. No se permite
el uso de esta plancha si la corriente del sistema
eléctrico es inferior a 16 A.

ESPAÑOL 25
Precaución
- Conecte el aparato sólo a un enchufe con toma
de tierra.
- Compruebe el cable de alimentación con
regularidad por si estuviera dañado.
- La suela de la plancha puede calentarse mucho y,
si se toca, puede causar quemaduras.
- Cuando haya acabado de planchar, cuando limpie
el aparato, cuando llene o vacíe el depósito de
agua, y cuando deje la plancha aunque sólo sea
durante un momento, ajuste el control de vapor a
la posición “0”, ponga la plancha sobre su base de
apoyo y desenchúfela de la red.
- Ponga y utilice siempre la plancha sobre una
superficie estable, plana y horizontal.
- No eche en el depósito de agua perfume, vinagre,
almidón, productos desincrustantes, productos
que ayuden al planchado ni otros productos
químicos.
- Este aparato es sólo para uso doméstico.
Campos electromagnéticos (CEM)
Este aparato Philips cumple todos los estándares
sobre campos electromagnéticos (CEM). Si se utiliza
correctamente y de acuerdo con las instrucciones
de este manual, el aparato se puede usar de
forma segura según los conocimientos científicos
disponibles hoy en día.
Antes de utilizarlo por primera vez
1 Quite cualquier pegatina, lámina protectora o
plástico de la suela.
2 Enjuague y seque el vaso de llenado.

ESPAÑOL26
Preparación para su uso
Llenado del depósito de agua
Tipo de agua recomendada
Puede usar agua del grifo para llenar el depósito de
agua.
Consejo: Si el agua del grifo de su zona es muy dura, le
aconsejamos que la mezcle a partes iguales con agua
destilada. No utilice únicamente agua destilada.
1 Asegúrese de que el aparato está
desenchufado.
2 Ponga el control de vapor en la posición 0 (=
sin vapor).
3 Abra la tapa de la abertura de llenado.
4 Incline la plancha hacia atrás y utilice el vaso
de llenado para llenar el depósito de agua con
agua del grifo hasta el nivel máximo.
No llene el depósito de agua por encima de la
indicación MAX.
No eche en el depósito de agua perfume, vinagre,
almidón, productos desincrustantes, productos que
ayuden al planchado ni otros productos químicos.
5 Cierre la tapa de la abertura de llenado (“clic”).
Selección de las posiciones de temperatura
y de vapor
Posiciones de temperatura y de vapor

ESPAÑOL 27
Tipo de
tejido
Lino MAX 5-6
Algodón 3 3 - 4
Lana 2 1 - 2 N.D. sí
Seda 1 0 N.D. N.D.
Fibras
sintéticas
(por
ejemplo,
acrílico,
nylon,
poliamida,
poliéster)
Posición de
temperatura
1 0 N.D. N.D.
1 Sólo en modelos específicos: quite la cubierta
No deje puesta en la suela la cubierta protectora
resistente al calor mientras plancha.
2 Ponga la plancha sobre su base de apoyo.
3 Para seleccionar la temperatura de planchado
Posición
de vapor
protectora resistente al calor.
adecuada, gire el control de temperatura hasta
la posición correspondiente (consulte la tabla
anterior “Posiciones de temperatura y de
vapor”).
Supervapor Ionic
\
\
DeepSteam
(sólo en
modelos
específicos)
sí
sí
ESPAÑOL28
Compruebe en la etiqueta de la prenda el tipo de
tejido.
Si no sabe de qué tipos de tejido está compuesta
la prenda, determine la temperatura correcta
planchando una parte de la misma que no se vea
cuando la use o la lleve puesta.
Seda, lana y fibras sintéticas: planche las prendas por
el revés para evitar que aparezcan brillos en la tela.
Para evitar manchas, no use la función spray.
Empiece planchando las prendas que requieran la
temperatura más baja de planchado, como las de
fibras sintéticas.
4 Seleccione la posición de vapor adecuada
(consulte la tabla anterior “Posiciones de
temperatura y de vapor”).
Nota: Asegúrese de que la posición de vapor elegida
es adecuada para la temperatura de planchado
seleccionada.
5 Conecte el aparato a un enchufe con toma de
tierra.
, Se encenderá el piloto ámbar de temperatura.
6 Cuando el piloto ámbar de temperatura
se apague, espere un momento antes de
comenzar a planchar.
, Durante el planchado el piloto de temperatura
se ilumina de vez en cuando.
Uso del aparato
Nota: Puede que salga un poco de humo de la plancha
cuando la use por primera vez. Esto cesará al cabo de
un rato.
ESPAÑOL 29
Planchado sin vapor
1 Ponga el control de vapor en la posición 0 (=
sin vapor).
2 Seleccione la temperatura de planchado
adecuada (consulte el capítulo “Preparación
para su uso”, apartado “Selección de las
posiciones de temperatura y de vapor”).
Planchado con vapor
1 Asegúrese de que haya agua en el depósito de
agua.
2 Seleccione la temperatura de planchado
adecuada (consulte el capítulo “Preparación
para su uso”, apartado “Selección de las
posiciones de temperatura y de vapor”).
3 Seleccione la posición de vapor adecuada
(consulte el capítulo “Preparación para su
uso”, apartado “Selección de las posiciones de
temperatura y de vapor”).
Nota: La plancha empieza a producir vapor en cuanto
alcanza la temperatura seleccionada.
ESPAÑOL30
Planchado con vapor adicional
1 Para conseguir vapor adicional durante el
planchado, mantenga pulsado el botón de
supervapor.
Planchado con Ionic DeepSteam (sólo en
modelos específicos)
Cuando utilice la función Ionic DeepSteam durante
el planchado con vapor, el vapor producido será
más fino que durante el planchado con vapor
normal. El vapor fino penetra más a fondo en el
tejido, especialmente si éste es grueso, ayudándole a
eliminar fácilmente las arrugas rebeldes.
1 Asegúrese de que haya agua en el depósito de
agua.
2 Seleccione la temperatura de planchado
adecuada (consulte el capítulo “Preparación
para su uso”, apartado “Selección de las
posiciones de temperatura y de vapor”).
3 Seleccione la posición de vapor adecuada
(consulte el capítulo “Preparación para su
uso”, apartado “Selección de las posiciones de
temperatura y de vapor”).
4 Pulse el botón Ionic DeepSteam una vez para
activar la función Ionic DeepSteam.
 Loading...