

Page 1
Always there to help you
Question?
Question?
Contact
Contact
Philips
Philips
Azur Freemotion
GC4590 series
Specifications are subject to change without notice
© 2016 Koninklijke Philips N.V.
All rights reserved.
4239 000 98011
User manual
Page 2
ENGLISH
j
i
h
a
b
c
d
e
1
2 3 4
7 86
5
9
a
b
c
10 11 12 13
g
n k
l
m
f
14
18
15 16 17
Page 3

ENGLISH 6
ESPAÑOL 14
ITALIANO 22
FRANÇAIS 30
PORTUGUÊS 39
Azur Freemotion_GC4590 series
Page 4

6 ENGLISH
Important
Read the separate important information leaet and the user manual
carefully before you use the appliance. Save both documents for future
reference.
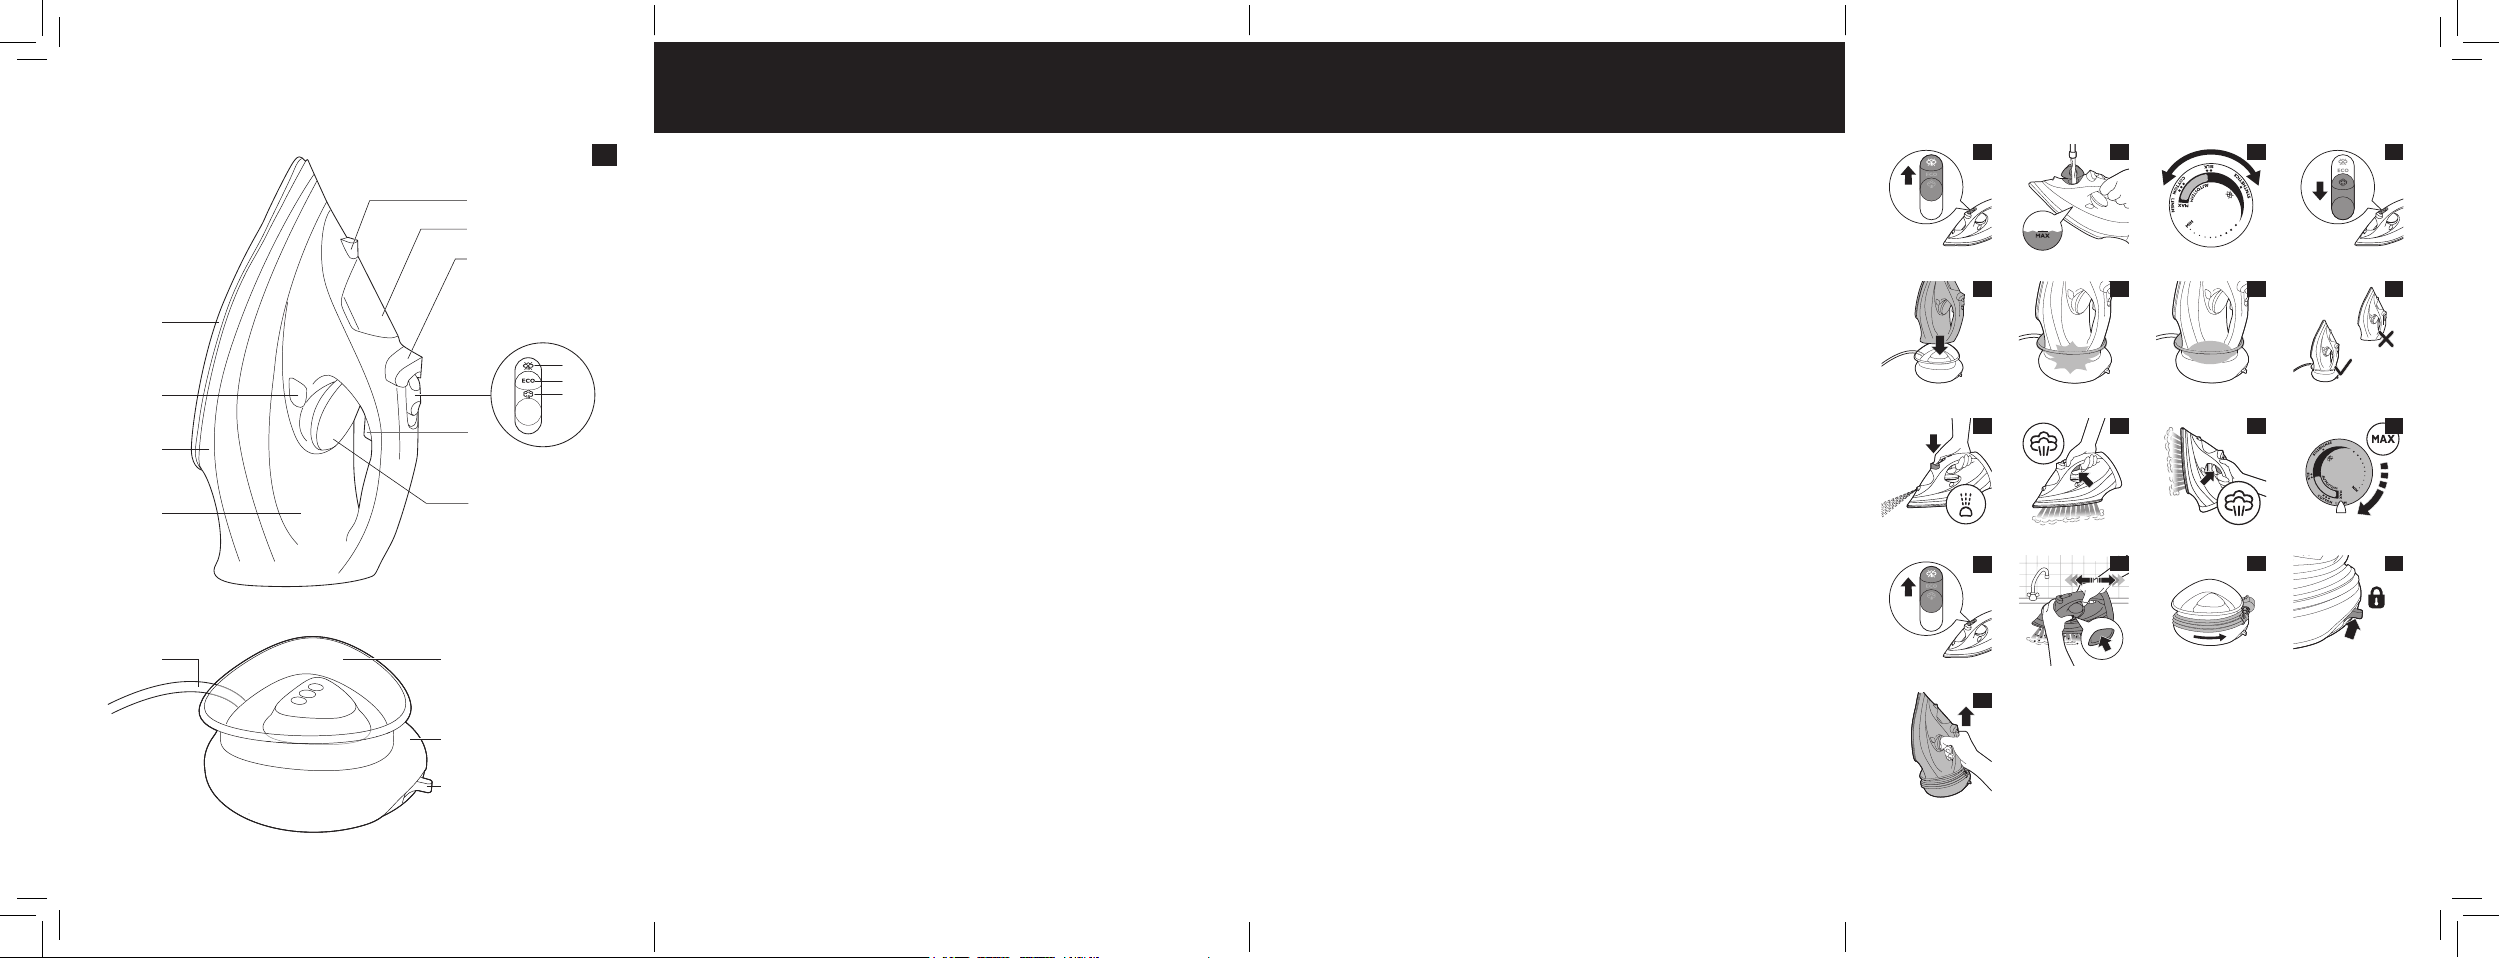
General description (Fig. 1)
1 Spray nozzle
2 Water lling door
3 Spray button
4 Steam slider
a. Dry setting
b. ECO setting
c. Auto steam setting
5 Steam boost trigger
6 Temperature dial with Auto steam control
7 Water tank
8 Typeplate
9 Calc clean button
10 Soleplate
11 Light ring
12 Base
13 Iron storage lock
14 Mains cord
Using the appliance
Filling the water tank
Note: Your appliance has been designed to be used with tap water. In case
you live in an area with hard water, fast scale build-up may occur. Therefore,
it is recommended to use distilled or de-mineralized water to prolong the
lifetime of your appliance.
Note: Do not add perfume, water from tumble dryer, vinegar, magnetically
treated water (e.g., Aqua+), starch, descaling agents, ironing aids, chemically
descaled water or other chemicals as they may cause water spitting, brown
staining, or damage to your appliance.
Page 5

7
ENGLISH
1 Set the steam control to position . (Fig. 2)
2 Fill the water tank up to the MAX indication (Fig. 3).
3 Closethewaterllingdoor.
Selecting temperature and steam setting
Table 1
Fabric type Temperature
setting
Linen MAX Automatically
Cotton ●●● Yes
Auto steam
control
adjusted to the
optimal amount
Steam
boost
Yes
Wool ●● No
Silk ●● No
Synthetic fabric
● No steam No
(e.g. acrylic, nylon,
polyamide, polyester)
Note: As indicated in the table above, do not use steam or steam boost at a
low temperature, otherwise hot water may leak from the iron.
1 Consult table 1 to set the temperature dial to the appropriate
setting for your garment. (Fig. 4)
2 Select Auto steam setting in the steam slider. (Fig. 5)
This iron is equipped with Auto steam control. According to the
temperature you select, the iron automatically provides the optimal
amount of steam for the best result.
3 Place the iron on its base and connect the base to a power socket.
(Fig. 6)
Page 6

8
ENGLISH
Note: Make sure that the base sits on a stable and level surface. It is
recommended to place the base on the soft part of the ironing board.
4 Thelightringstartstoashbluelight,indicatingtheironisheating
up. (Fig. 7)
5 When the blue light turns steady, you can start ironing. (Fig. 8 )
Operation of Smart Charging base
The iron is equipped with Smart Charging base. The light will indicate
the status of the iron, and remind you to charge the iron after 20 to
25 seconds to ensure a good wrinkle removal performance. Please
refer to table 2 for the operation of the base.
Note: to ensure good wrinkle removal performance, always put the iron on
its base during the resting period. Do not place the iron on its heel. (Fig.9)
Table 2
Light status Iron status Instructions
Flashing blue Heating up Wait for iron to be ready.
Steady blue Ready for use You can start ironing.
Flashing orange The iron needs to
be charged now
Slow breathing
blue (specic
Safety auto-off has
been activated
types only)
Put the iron back to the
base to charge it.
Refer to Chapter
“Features”, section “safety
auto-off”.
Features
Spray function
- Press the spray button to moisten the garment to be ironed. This
helps remove stubborn creases (Fig. 10).
Page 7

9
ENGLISH
Steam boost function
- Press and release the steam boost trigger for a powerful boost of
steam to remove stubborn creases (Fig. 11).
- For optimal steam boost performance, it is recommended to press
the steam boost trigger at a 5 seconds interval.
Vertical steam
- You can use the steam boost function when you hold the iron in
vertical position for removing creases from hanging clothes, curtains
etc. (Fig. 12)
Ironing with extra steam
- For extra steam during ironing, press and hold the steam boost
trigger.
Eco steam setting / Dry ironing
- In stead of Auto steam, you could choose ECO setting in the steam
slider to save energy, yet to achieve satisfactory ironing results
- To iron without steam, select dry setting in the steam slider.
Safety auto-off function
- The iron switches off automatically if the iron is not in use for
8 minutes. The light ring starts to slowly breath in blue to indicate
the safety auto-off mode is activated.
- To let the iron heat up again, remove the iron (if the iron is on the
base) and put it back to the base.
Cleaning and maintenance
Cleaning
1 Set the steam control to , unplug the base and let the iron cool
down. (Fig. 2)
2 Pour any remaining water out of the water tank.
Page 8

10
ENGLISH
3 Wipeakesandanyotherdepositsoffthesoleplatewithadamp
cloth and a non-abrasive (liquid) cleaning agent.
Caution: To keep the soleplate smooth, avoid hard contact with metal
objects. Never use a scouring pad, vinegar or other chemicals to clean
the soleplate.
Note: Regularly rinse the water tank with tap water. Empty the water tank
after rinsing it.
Calc-Clean function
IMPORTANT: To prolong the lifetime of your appliance and
to maintain good steaming performance, use the Calc-Clean
function once every two weeks. If the water in your area is
very hard (i.e. when akes come out of the soleplate during
ironing), use the Calc-Clean function more frequently.
1 Make sure the steam control is set to . (Fig. 2)
2 Fill the water tank to the MAX indication. (Fig. 3)
Do not pour vinegar or other descaling agents into the water tank.
3 Set the temperature dial to MAX. (Fig. 13)
4 Plug in the base, put the iron on the base and let the iron heat up.
(Fig. 6)
5 Remove the iron when the light ring turns steady blue. (Fig. 8)
6 Hold the iron over the sink. Keep pushing the calc clean button
and gently shake the iron forth and back until all water in the
water tank has been used up.
Caution:Whilescaleisushedout,steamandboilingwateralsocome
out of the soleplate.
7 Set the steam control back to . (Fig. 2)
Page 9

11
ENGLISH
Note: Repeat the Calc-Clean process if the water that comes out of the iron
still contains scale particles.
After the Calc-Clean process
1 Put the iron on the base. Let the iron heat up to dry the soleplate.
2 Take the iron from the base when the light ring turns steady blue.
3 Move the iron gently over a piece of cloth to remove any water
stains on the soleplate.
Storage
1 Set the steam control back to . (Fig. 2)
2 Pour out any remaining water from the water tank.
3 Unplug the mains cord and wind the mains cord around the base.
(Fig. 16)
Remove iron from the base when you wind the cord, as the soleplate
could still be hot.
4 Put the iron on the base. Lock the iron to its base. (Fig. 17)
5 Let the iron cool down before you store it.
You can carry the iron and base by the iron handle. (Fig. 18)
Troubleshooting
This chapter summarises the most common problems you could
encounter with the appliance. If you are unable to solve the problem
with the information below, visit www.philips.com/support for a list of
frequently asked questions or contact the Consumer Care Centre in
your country (see the worldwide guarantee leaet for contact details).
Problem Possible cause Solution
The iron does
not produce
steam.
Cordless iron cools
down after a while. It
needs to be recharged.
Put the iron back to the
base until the light ring
turns steady blue light,
indicating that the iron is
ready for use again.
Page 10

12
ENGLISH
Problem Possible cause Solution
The steam control is
set to .
The water tank is empty. Fill the water tank.
You are using a
temperature of below
2 dots.
The iron leaks. Cordless iron cools
down after a while. It
needs to be recharged.
You are using steam
boost at a low
temperature.
You have used the
steam boost function
too often within a very
short period.
The water tank is
overlled.
The water lling door
is not closed properly.
Set the steam control to
a steam setting (consult
Table 1 in Chapter “using
the appliance”).
Consult Table 1
in Chapter “using
the appliance” for
temperature and steam
setting.
Put the iron back to its
base to heat up and dry
the soleplate.
Put the iron back to its
base to heat up and dry
the soleplate.
Consult Table 1 for use
of steam boost.
Put the iron back to its
base to heat up and dry
the soleplate. Use the
steam boost function
less frequently.
Do not ll the water
tank beyond the MAX
indication.
Make sure that the
water lling door is
closed properly.
Page 11

ENGLISH
Problem Possible cause Solution
Flakes and
impurities come
out of the soleplate
during ironing.
Only part of
the light ring is
lighted in safety
auto-off mode.
The base is not
lighted up when
I place the iron
on it.
You have not
performed Calc-Clean
function for some time.
The iron need to be
cleaned.
This is normal. This
is intended to save
energy in safety auto-
off mode.
The iron is not
connected to the base
properly.
Use the Calc-Clean
function (see chapter
‘Cleaning and
maintenance’, section
‘Calc-Clean function’).
Take out the iron and
put it back to the base
again.
13
N/A
Page 12

14 ESPAÑOL
Importante
Lea atentamente el folleto de información importante y el manual de
usuario antes de utilizar el aparato. Guarde ambos documentos para
consultarlos en el futuro.
Descripción general (Imagen 1)
1 Boquilla pulverizadora
2 Abertura de llenado de agua
3 Botón pulverizador
4 Botón deslizante de vapor
a. Posición en seco
b. Posición ECO
c. Ajuste de vapor automático
5 Botón de golpe de vapor
6 Control de temperatura con control de vapor automático
7 Depósito de agua
8 Placa de modelo
9 Botón Calc Clean
10 Suela
11 Anillo luminoso
12 Base
13 Bloqueo de almacenamiento de la plancha
14 Cable de alimentación
Uso del aparato
Llenado del depósito de agua
Nota: El aparato se ha diseñado para utilizarse con agua del grifo. Si vive
en una zona con agua dura, la cal se puede acumular rápidamente. Por lo
tanto, es recomendable utilizar un agua destilada o desmineralizada para
prolongar la vida útil del aparato.
Nota: No añada perfume, agua de una secadora, vinagre, agua tratada
magnéticamente (por ejemplo, Aqua+), almidón, productos desincrustantes ni
otros productos químicos, ya que pueden provocar fugas de agua, manchas
marrones o daños en el aparato.
Page 13

15
ESPAÑOL
1 Ajuste el control de vapor a la posición . (Imagen 2)
2 Llene el depósito de agua hasta la indicación MAX. (Imagen 3)
3 Cierre la abertura de llenado de agua.
Selección de las posiciones de temperatura y de vapor
Tabla 1
Tipo de tejido Ajuste de
temperatura
Linen MAX Se ajusta
Algodón ●●● Sí
Lana ●● No
Control de vapor
automático
automáticamente
a la cantidad
óptima
Golpe de
vapor
Sí
Silk ●● No
Fibras sintéticas (por
● Sin vapor No
ejemplo, acrílico,
nylon, poliamida,
poliéster)
Nota: Tal y como se indica en la tabla anterior, no utilice las funciones de
vapor o golpe de vapor a baja temperatura, ya que podrían producirse fugas
de agua caliente.
1 Consulte la tabla 1 para ajustar el control de temperatura en la
posición adecuada para su prenda. (Imagen 4)
2 Seleccione el ajuste de vapor automático en el botón deslizante de
vapor. (Imagen 5)
Esta plancha dispone de control de vapor automático. En función de la
temperatura que seleccione, la plancha proporciona automáticamente
la cantidad óptima de vapor para obtener el mejor resultado.
Page 14
16
ESPAÑOL
3 Coloque la plancha en su base y enchufe la base en una toma de
corriente. (Imagen 6).
Nota: Asegúrese de que la base repose sobre una supercie estable y
nivelada. Se recomienda colocarla en la parte blanda de la tabla de
planchar.
4 El anillo de iluminación empieza a parpadear con una luz azul para
indicar que la plancha se está calentando. (Imagen 7)
5 Cuandolaluzpasaailuminarseenazuljoquieredecirquepuede
comenzar a planchar. (Imagen 8)
Funcionamiento de la base de carga inteligente
Esta plancha está equipada con una base de carga inteligente. La luz
indicará el estado de la plancha y le recordará cargarla tras 20-25
segundos para garantizar una correcta eliminación de las arrugas.
Consulte en la tabla 2 el funcionamiento de la base.
Nota: Para garantizar una correcta eliminación de las arrugas, coloque
siempre la plancha en su base durante los descansos de planchado. No
coloque la plancha sobre su base de apoyo. (Imagen 9)
Tabla 2
Estado de la luz Estado de la plancha Instrucciones
Azul intermitente Calentamiento Espere a que la plancha esté
lista.
Azul jo Lista para utilizarse Puede comenzar a planchar.
Naranja
intermitente
Parpadeo azul
lento (solo
modelos
especícos)
Es necesario cargar
la plancha ahora.
Se ha activado
la desconexión
automática de
seguridad.
Vuelva a colocar la plancha
en su base para cargarla.
Consulte la sección
"Desconexión automática
de seguridad" del capítulo
"Características".
Page 15

17
ESPAÑOL
Características
Pulverizador
- Pulse el botón pulverizador para humedecer el artículo que vaya a
planchar. Esto ayuda a eliminar las arrugas más difíciles. (Imagen 10)
Función golpe de vapor
- Pulse y suelte el botón de golpe de vapor para emitir un potente
golpe de vapor y eliminar las arrugas más difíciles. (Imagen 11)
- Para obtener un rendimiento óptimo del golpe de vapor, es
recomendable pulsar el botón de golpe de vapor a intervalos de
5 segundos.
Vapor vertical
- Puede utilizar la función golpe de vapor con la plancha en posición
vertical para eliminar las arrugas de prendas colgadas, cortinas,
etc. (Imagen 12)
Planchado con vapor adicional
- Para conseguir vapor adicional durante el planchado, mantenga
pulsado el botón de golpe de vapor.
Posición de vapor ECO/planchado en seco
- En lugar del ajuste de vapor automático, puede seleccionar la
posición ECO en el botón deslizante de vapor para ahorrar energía
mientras conserva unos resultados de planchado satisfactorios.
- Para planchar sin vapor, seleccione la posición en seco en el botón
deslizante de vapor.
Función de desconexión automática de seguridad
- La plancha se apaga automáticamente si no se utiliza durante un
periodo de 8 minutos. El anillo de iluminación comienza a parpadear
lentamente en azul para indicar que se ha activado el modo de
desconexión automática.
Page 16

18
ESPAÑOL
- Para que la plancha vuelva a calentarse de nuevo, levántela (en caso
de que esté en la base) y vuelva a colocarla en la base.
Limpieza y mantenimiento
Limpieza
1 Ajuste el control de vapor a la posición y desenchufe la base
para dejar que la plancha se enfríe. (Imagen 2)
2 Vacíe el agua restante del depósito.
3 Limpie con un paño húmedo y un limpiador líquido no abrasivo
los restos de cal y las impurezas que puedan haber quedado en la
suela.
Precaución:Conelndemantenerlasuelalisa,eviteuncontacto
fuerte con objetos metálicos. No utilice nunca estropajos, vinagre ni
productos químicos para limpiar la suela.
Nota: Enjuague con regularidad el depósito de agua utilizando agua del
grifo. Vacíe el depósito de agua una vez enjuagado.
Función Calc-Clean
IMPORTANTE: Para prolongar la vida útil del aparato y
mantener un buen rendimiento del vapor, utilice la función
Calc-Clean una vez cada dos semanas. Si el agua de su zona
es muy dura (es decir, salen partículas de cal de la suela
durante el planchado), utilice la función Calc-Clean con
mayor frecuencia.
1 Asegúrese de que el control esté establecido en . (Imagen 2)
2 Llene el depósito de agua hasta la indicación MAX. (Imagen 3)
No eche vinagre ni otros agentes desincrustantes en el depósito del agua.
3 Coloque el control de temperatura en la posición
MAX. (Imagen 13)
Page 17

19
ESPAÑOL
4 Enchufe la base, coloque la plancha en ella y deje que se caliente.
(Imagen 6).
5 Extraiga la plancha una vez que el anillo luminoso se encienda en
azul estable. (Imagen 8)
6 Sujete la plancha encima de un fregadero. Siga pulsando el botón
Calc Clean y sacuda suavemente la plancha hacia delante y hacia
atrás hasta que se vacíe el depósito de agua.
Precaución: Mientras se elimina la cal, también sale vapor y agua
hirviendo por la suela.
7 Vuelva a ajustar el control de vapor en . (Imagen 2)
Nota: Repita el proceso Calc-Clean si el agua que sale de la plancha sigue
conteniendo partículas de cal.
Una vez realizado el proceso Calc-Clean
1 Coloque la plancha en la base. Deje que la plancha se caliente para
que se seque la suela.
2 Extraiga la plancha de la base una vez que la luz azul se ilumine de
formaja.
3 Para eliminar las manchas de agua que hayan quedado en la suela,
pase suavemente la plancha sobre un trozo de tela.
Almacenamiento
1 Vuelva a ajustar el control de vapor en . (Imagen 2)
2 Vacíe el agua restante del depósito.
3 Desenchufe el cable de alimentación y enróllelo alrededor de la
base. (Imagen 16)
Extraiga la plancha de la base antes de enrollar el cable, ya que la suela
podría seguir caliente.
4 Coloque la plancha en la base. Bloquee la plancha en su base. (Imagen 17)
Page 18

20
ESPAÑOL
5 Deje que la plancha se enfríe antes de guardarla.
Puede transportar la plancha y la base sujetando el asa de la plancha.
(Imagen 18)
Solución de problemas
En este capítulo se resumen los problemas más frecuentes que pueden
surgir con el aparato. Si no puede resolver el problema con la siguiente
información, visite www.philips.com/support para consultar una lista de
preguntas más frecuentes o póngase en contacto con el Servicio de
Atención al Cliente en su país (consulte el folleto de garantía mundial
para encontrar los datos de contacto).
Problema Posible causa Solución
La plancha no
produce vapor.
La plancha
gotea.
La plancha sin cable se
enfría después de un rato,
por lo que es necesario
recargarla.
El control del vapor está
ajustado en .
El depósito de agua está
vacío.
Está utilizando una
temperatura inferior a 2
puntos.
La plancha sin cable se
enfría después de un rato,
por lo que es necesario
recargarla.
Vuelva a colocar la plancha
en su base hasta que el anillo
de iluminación se encienda
en azul estable, indicando
que puede volver a utilizar la
plancha.
Coloque el control de vapor
en una posición de vapor
(consulte la tabla 1 del
capítulo "Uso del aparato").
Llene el depósito de agua.
Consulte las opciones de
temperatura y vapor en la
tabla 1 del capítulo "Uso del
aparato".
Vuelva a colocar la plancha
en su base para que esta se
caliente y la suela se seque.
Page 19

ESPAÑOL
Problema Posible causa Solución
Está utilizando la función
de vapor o de golpe de
vapor a una temperatura
baja.
Ha utilizado la función
golpe de vapor con
demasiada frecuencia en
un período de tiempo muy
corto.
El depósito de agua está
demasiado lleno.
La puerta de la aber tura
de llenado de agua no se
ha cerrado correctamente.
Durante el
planchado salen
partículas de cal
e impurezas por
la suela.
Solo se ilumina
una parte del
anillo luminoso
en el modo de
desconexión
automática de
seguridad.
La base no se
ilumina cuando
coloco la
plancha en ella.
No ha realizado la
operación Calc-Clean
durante un tiempo
prolongado. Es necesario
limpiar la plancha.
Esto es normal. Se debe a
que el propósito del modo
de desconexión automática
es ahorrar energía.
La plancha no está
conectada correctamente
a la base.
Vuelva a colocar la plancha
en su base para que esta se
caliente y la suela se seque.
Consulte el uso de la función
de vapor y de golpe de
vapor en la tabla 1.
Vuelva a colocar la plancha
en su base para que esta se
caliente y la suela se seque.
Utilice la función de golpe de
vapor con menos frecuencia.
No llene el depósito de agua
por encima de la indicación
MAX.
Asegúrese de que la puerta
de la abertura de llenado de
agua esté bien cerrada.
Utilice la función Calc-Clean
(consulte la sección "Función
Calc-Clean" del capítulo
"Limpieza y mantenimiento").
Extraiga la plancha y, a
continuación, vuelva a
colocarla en la base.
21
No disponible
Page 20

22 ITALIANO
Importante
Prima di utilizzare l'apparecchio, leggere attentamente la brochure
informativa e il manuale dell'utente. Conservare entrambi i documenti
come riferimento futuro.
Descrizione generale (Fig. 1)
1 Ugello spray
2 Sportello di riempimento dell'acqua
3 Pulsante spray
4 Cursore del vapore
a. Impostazione stiratura a secco
b. Impostazione ECO
c. Impostazione vapore automatico
5 Pulsante colpo di vapore
6 Termostato con regolatore di vapore automatico
7 Serbatoio dell'acqua
8 Targhetta
9 Pulsante Calc-Clean
10 Piastra
11 Anello luminoso
12 Base
13 Blocco per riporre il ferro
14 Cavo di alimentazione
Modalità d'uso dell'apparecchio
Riempimento del serbatoio dell'acqua
Nota: l'apparecchio è stato progettato per essere usato con l'acqua del
rubinetto. Se nella zona in cui si abita l'acqua è molto dura, potrebbe
accumularsi rapidamente del calcare. Si consiglia quindi di utilizzare acqua
distillata o demineralizzata per prolungare la durata dell'apparecchio.
Nota: non aggiungere profumo, acqua proveniente dall'asciugatrice, aceto,
acqua trattata magneticamente (es. Aqua+), amido, agenti disincrostanti,
prodotti per la stiratura, acqua decalcicata chimicamente o altre sostanze
chimiche, poiché potrebbero causare la fuoriuscita di acqua, la comparsa di
macchie marroncine oppure danni all'apparecchio.
Page 21

23
ITALIANO
1 Impostare il regolatore di vapore in posizione (Fig. 2).
2 Riempired'acquailserbatoionoallivellomassimoindicato
(MAX) (Fig. 3).
3 Chiudere lo sportello di riempimento dell'acqua.
Regolazione della temperatura e del vapore
Tabella 1
Tipo di tessuto Regolazione
della
temperatura
Lino MAX Regolazione
Cotone ●●● Sì
Lana ●● No
Seta ●● No
Tessuti sintetici (ad es.
● Senza
acrilico, nylon, poliammide,
Regolatore
di vapore
automatico
automatica
della
quantità
ottimale
vapore
Colpo di
vapore
Sì
No
poliestere)
Nota: non utilizzare la funzione vapore o colpo di vapore a basse
temperature, come indicato nella tabella sopra; in caso contrario, l'acqua
calda potrebbe fuoriuscire dal ferro.
1 Consultare la tabella 1 per impostare il termostato
sull'impostazione corretta per il tessuto da stirare. (Fig. 4)
2 Posizionare il cursore del vapore sull'impostazione automatica del
vapore appropriata (Fig. 5)
Il ferro da stiro è dotato di regolatore di vapore automatico. In base
alla temperatura selezionata, il ferro fornisce automaticamente la
quantità di vapore ottimale per il migliore risultato.
Page 22

24
ITALIANO
3 Posizionare il ferro da stiro sulla base e collegare quest'ultima a
una presa di alimentazione (Fig. 6)
Nota: assicurarsi che la base poggi su una supercie piana e stabile.
Si consiglia di posizionare la base sulla parte morbida dell'asse da stiro.
4 L'anello luminoso inizia a lampeggiare in blu, il che indica che il
ferro si sta riscaldando (Fig. 7)
5 Quandolaspiabludiventassa,èpossibileiniziareastirare(Fig.8)
Funzionamento della base Smart Charging
Il ferro da stiro è dotato di base Smart Charging. La spia indicherà
lo stato del ferro e ricorderà di caricarlo dopo 20-25 secondi per
garantire prestazioni di stiratura ottimali. Fare riferimento alla tabella 2
per il funzionamento della base.
Nota: per garantire prestazioni di stiratura ottimali, posizionare sempre il
ferro da stiro sulla base quando non lo si utilizza. Non appoggiare il ferro in
posizione verticale (Fig. 9).
Tabella 2
Stato della spia Stato del ferro Istruzioni
Blu lampeggiante Riscaldamento Attendere che il ferro si
riscaldi.
Blu sso Pronto per l'uso È possibile iniziare a stirare.
Arancione
lampeggiante
Blu con
lampeggiamento
lento (solo
modelli specici)
Il ferro deve essere
ricaricato subito
È stato attivato
lo spegnimento
automatico di
sicurezza
Ricollocare il ferro sulla base
per ricaricarlo.
Fare riferimento al
capitolo "Funzioni", sezione
"Spegnimento automatico di
sicurezza".
Page 23

25
ITALIANO
Caratteristiche
Funzione spray
- Premere il pulsante spray per inumidire il capo da stirare. In questo
modo sarà possibile rimuovere le pieghe più ostinate (Fig. 10).
Colpo di vapore
- Premere e rilasciare il pulsante colpo di vapore per ottenere un
getto potente di vapore e rimuovere le pieghe più ostinate (Fig. 11).
- Per prestazioni ottimali della funzione colpo di vapore, si consiglia di
premere il relativo pulsante con intervalli di 5 secondi.
Vapore verticale
- La funzione colpo di vapore può essere utilizzata anche tenendo
il ferro in posizione verticale per eliminare le pieghe da capi appesi,
tende, ecc... (Fig. 12).
Stiratura con vapore extra
- Per ottenere una quantità di vapore maggiore durante la stiratura,
tenete premuto il pulsante colpo di vapore.
Impostazione vapore ECO/Ferro a secco
- Al posto del controllo automatico del vapore è possibile selezionare
l'impostazione ECO dal cursore del vapore per risparmiare energia
e ottenere comunque risultati di stiratura soddisfacenti
- Per stirare senza vapore, impostare il cursore del vapore sulla
stiratura a secco.
Funzione di spegnimento automatico di sicurezza
- Il ferro da stiro si spegne automaticamente se non viene utilizzato
per 8 minuti. L'anello luminoso inizia a lampeggiare lentamente in blu
per indicare che la modalità di spegnimento automatico di sicurezza
è attiva.
- Per riscaldare nuovamente il ferro, rimuoverlo (se è sulla base) e
riposizionarlo sulla base.
Page 24

26
ITALIANO
Pulizia e manutenzione
Pulizia
1 Impostare il regolatore di vapore su , scollegare il ferro da stiro
e lasciare che si raffreddi (Fig. 2).
2 Svuotare il serbatoio dell'acqua rimanente.
3 Per eliminare pelucchi o altri residui depositati sulla piastra,
utilizzare un panno umido e un detergente (liquido) non abrasivo.
Attenzione: per mantenere la piastra perfettamente liscia, evitare il
contatto con oggetti metallici. Non utilizzate pagliette, aceto o altre
sostanze chimiche per pulire la piastra.
Nota: sciacquare regolarmente il serbatoio dell'acqua con l'acqua del
rubinetto. Svuotare il serbatoio dell'acqua dopo averlo sciacquato.
Funzione Calc-Clean
IMPORTANTE: per prolungare la durata dell'apparecchio
e preservare una buona erogazione del vapore, utilizzare
la funzione Calc-Clean ogni due mesi. Se l'acqua della zona
è molto dura (ad esempio in caso di fuoriuscita di pezzi di
calcare dalla piastra durante la stiratura), usare la funzione
Calc-Clean con maggior frequenza.
1 Assicurarsi che il regolatore di vapore sia impostato su (Fig. 2).
2 Riempired'acquailserbatoionoallivellomassimoindicato
(MAX) (Fig. 3).
non aggiungete aceto o altri agenti disincrostanti nel serbatoio dell'acqua.
3 Impostare il termostato su MAX (Fig. 13).
4 Collegare la base, posizionarvi sopra il ferro e lasciarlo riscaldare
(Fig. 6)
Page 25

27
ITALIANO
5 Rimuovere il ferro quando la luce blu dell'anello luminoso diventa
ssa(Fig.8)
6 Tenere il ferro sospeso sopra il lavandino .Tenere premuto
il pulsante Calc-Clean e scuotere delicatamente il ferro no
all'esaurimento di tutta l'acqua contenuta nel serbatoio.
Attenzione: mentre viene espulso il calcare, fuoriesce anche vapore e
acqua bollente dalla piastra.
7 Impostare il regolatore di vapore nuovamente su (Fig. 2).
Nota: ripetere la procedura Calc-Clean se l'acqua che fuoriesce dal ferro
contiene ancora particelle di calcare.
Al termine della procedura Calc-Clean
1 Posizionare il ferro sulla base. Lasciare riscaldare il ferro per
asciugare la piastra.
2 Solleva il ferro dalla base quando la luce blu dell'anello luminoso
diventassa.
3 Fare scorrere delicatamente il ferro su un panno per rimuovere
eventuali macchie di acqua dalla piastra.
Conservazione
1 Impostare il regolatore di vapore nuovamente su (Fig. 2).
2 Svuotare il serbatoio dell'acqua rimanente.
3 Scollegare il cavo di alimentazione e avvolgerlo attorno alla base
(Fig. 16).
Quando si avvolge il cavo, rimuovere il ferro dalla base, poiché la
piastra potrebbe essere ancora calda.
4 Posizionare il ferro sulla base. Bloccare il ferro sulla base (Fig. 17)
5 Lasciare raffreddare il ferro prima di riporlo.
È possibile trasportare il ferro e la base tramite l'impugnatura del
ferro (Fig. 18).
Page 26

28
ITALIANO
Risoluzione dei problemi
Questo capitolo riassume i problemi più comuni che si potrebbero
riscontrare con l'apparecchio. Se non si riesce a risolvere il problema
con le informazioni riportate sotto, visitare il sito www.philips.com/
support per un elenco di domande frequenti o contattare il centro
assistenza clienti del proprio paese (per i dettagli di contatto, consultare
l'opuscolo della garanzia internazionale).
Problema Possibile causa Soluzione
Il ferro non emette
vapore.
Il ferro perde
acqua.
Il ferro cordless dopo
un po' si raffredda. È
necessario ricaricarlo.
Il regolatore di vapore è
impostato su .
Il serbatoio dell'acqua è
vuoto.
Si sta utilizzando una
temperatura di 2
posizioni inferiore.
Il ferro cordless dopo
un po' si raffredda. È
necessario ricaricarlo.
Ricollocare il ferro sulla
base nché la luce blu
dell'anello luminoso non
diventa ssa, il che indica
che il ferro è nuovamente
pronto per l'uso.
Impostare il regolatore di
vapore su un'impostazione
del vapore (consultare
la tabella 1 del capitolo
"Modalità d'uso
dell'apparecchio").
Riempite il serbatoio
dell'acqua.
Consultare la tabella 1 del
capitolo "Modalità d'uso
dell'apparecchio" per
l'impostazione del vapore e
della temperatura.
Ricollocare il ferro sulla
base per riscaldarlo e
asciugare la piastra.
Page 27

29
ITALIANO
Problema Possibile causa Soluzione
Si sta utilizzando la
funzione colpo di vapore
a una temperatura bassa.
La funzione colpo di
vapore è stata usata
troppo frequentemente in
un breve lasso di tempo.
Il serbatoio dell'acqua è
troppo pieno.
Lo sportello di
riempimento
dell'acqua non è chiuso
correttamente.
Durante
la stiratura
fuoriescono
impurità e residui
di calcare dalla
piastra.
In modalità di
spegnimento
automatico,
l'anello luminoso
è illuminato solo
parzialmente.
La base non si
illumina quando vi
viene posizionato
sopra il ferro.
La funzione Calc-Clean
non viene eseguita
da un po' di tempo. È
necessario pulire il ferro.
Si tratta di un fenomeno
del tutto normale. Serve
a risparmiare energia in
modalità di spegnimento
automatico.
Il ferro non è collegato
correttamente alla base.
Ricollocare il ferro sulla
base per riscaldarlo e
asciugare la piastra.
Consultare la tabella 1 per
l'uso della funzione colpo
di vapore.
Ricollocare il ferro sulla base
per riscaldarlo e asciugare la
piastra. Utilizzare la funzione
colpo di vapore con meno
frequenza.
Non superare il livello
massimo di riempimento
del serbatoio.
Assicurarsi che lo spor tello
di riempimento dell'acqua
sia chiuso correttamente.
Utilizzare la funzione CalcClean (vedere capitolo
"Pulizia e manutenzione",
sezione "Funzione Calc-
Clean").
Sollevare il ferro e
riposizionarlo nuovamente
sulla base.
nd
Page 28

30 FRANÇAIS
Important
Veuillez lire la brochure séparée sur les informations importantes et le
mode d'emploi avant d'utiliser l'appareil. Conservez les deux documents
an de pouvoir vous y référer ultérieurement.
Description générale (fig. 1)
1 Spray
2 Ouverture de remplissage d'eau
3 Bouton spray
4 Curseur de vapeur
a. Réglage à sec
b. Réglage ECO
c. Réglage de vapeur automatique
5 Gâchette vapeur
6 Thermostat avec contrôle automatique de vapeur
7 Réservoir d'eau
8 Plaque signalétique
9 Bouton Calc-Clean
10 Semelle
11 Anneau lumineux
12 Socle
13 Verrou de sécurité de rangement du fer
14 Cordon d'alimentation
Utilisation de l'appareil
Remplissage du réservoir
Remarque : votre appareil a été conçu pour être utilisé avec de l'eau du
robinet. Si vous habitez dans une zone où l'eau est calcaire, des dépôts de
calcaire peuvent se former rapidement. Par conséquent, il est recommandé
d'utiliser de l'eau distillée ou déminéralisée pour prolonger la durée de vie de
votre appareil.
Remarque : n'ajoutez pas de parfum, d'eau provenant du sèche-linge,
de vinaigre, d'eau magnétique (par ex. Aqua+), d'amidon, de détartrants,
de produits d'aide au repassage ou d'autres agents chimiques dans le
Page 29

31
FRANÇAIS
réservoir d'eau car ils peuvent entraîner des projections d'eau, des taches
marron ou des dommages à votre appareil.
1 Réglez la commande de vapeur sur la position . (Fig. 2)
2 Remplissez le réservoir d'eau jusqu'au niveau MAX (Fig. 3).
3 Fermez l'ouverture de remplissage d'eau.
Sélection de la température et réglage de la vapeur
Tableau 1
Type de tissu Réglage de
température
Contrôle
automatique de
Effet
pressing
vapeur
Lin MAX Adaptation
Coton ●●● Oui
automatique à la
quantité optimale
Oui
Laine ●● Non
Soie ●● Non
Fibres synthétiques
● Pas de vapeur Non
(par ex. acrylique,
nylon, polyamide,
polyester)
Remarque : n'utilisez pas la vapeur ni l'effet pressing à faible température,
comme indiqué dans le tableau ci-dessous. De l'eau chaude pourrait
s'écouler du fer à repasser le cas échéant.
1 Consultez le tableau 1 pour régler le thermostat sur la position
appropriée pour votre vêtement. (Fig. 4)
2 Sélectionnez le réglage de vapeur automatique avec le curseur de
vapeur. (Fig. 5)
Page 30

32
FRANÇAIS
Ce fer est équipé d'un contrôle automatique de vapeur. Selon la
température sélectionnée, le fer produit automatiquement la quantité
idéale de vapeur un résultat optimal.
3 Placez le fer à repasser sur sa base et branchez la base sur une
prise secteur. (Fig. 6)
Remarque : veillez à placer la base sur une surface stable et plane. Il est
recommandé de placer la base sur la zone molletonnée de la planche à
repasser.
4 L'anneau lumineux commence à clignoter en bleu pour indiquer
que le fer chauffe. (Fig. 7)
5 Lorsque le voyant bleu s'allume de façon continue, vous pouvez
commencer le repassage. (Fig. 8)
Fonctionnement de la base Smart Charging
Le fer à repasser est doté d'une base Smart Charging Le voyant
indique l'état du fer à repasser et vous rappelle de charger le fer après
20 à 25 secondes pour une élimination optimale des plis. Veuillez
consulter le tableau 2 pour plus d'informations sur le fonctionnement
de la base.
Remarque : pour une élimination optimale des plis, placez systématiquement
le fer à repasser sur sa base pendant la période de repos. Ne posez pas le
fer à repasser sur son talon. (Fig. 9)
Page 31

33
FRANÇAIS
Tableau 2
État du voyant État du fer à
repasser
Instructions
Bleu clignotant Temps de chauffe Attendez que le fer soit
prêt.
Bleu xe Prêt à l'emploi Vous pouvez commencer
le repassage.
Orange
clignotant
Bleu clignotant
lentement
(certains
modèles
Le fer doit être
rechargé
Arrêt automatique
de sécurité activé
Placez le fer sur sa base
pour le charger.
Consultez le chapitre
« Caractéristiques »,
section « Arrêt
automatique de sécurité ».
uniquement)
Caractéristiques
Fonction Spray
- Appuyez sur le bouton spray an d'humidier le vêtement à
repasser. Ceci permet d'enlever les faux plis les plus tenaces (Fig. 10).
Fonction Effet pressing
- Appuyez sur la gâchette vapeur, puis relâchez pour un jet de vapeur
puissant an d'éliminer les faux plis les plus tenaces (Fig. 11).
- Pour un effet pressing optimal, il est recommandé d'appuyer sur la
gâchette vapeur par intervalles de 5 secondes.
Défroissage vertical
- Vous pouvez également utiliser la fonction Effet pressing lorsque
vous tenez le fer en position verticale pour enlever les faux plis des
vêtements sur cintre ou des rideaux, etc. (Fig. 12)
Page 32

34
FRANÇAIS
Repassage avec plus de vapeur
- Pour plus de vapeur lors du repassage, maintenez la gâchette vapeur
enfoncée.
Réglage de vapeur ECO / Repassage à sec
- Au lieu de la fonction de vapeur automatique, vous pouvez choisir
le réglage ECO avec le curseur de vapeur an d'économiser de
l'énergie tout en obtenant des résultats de repassage satisfaisants.
- Pour repasser sans vapeur, sélectionnez le réglage à sec avec le
curseur de vapeur.
Fonction Arrêt automatique
- Le fer à repasser s'éteint automatiquement s'il n'a pas été utilisé
pendant 8 minutes. L'anneau lumineux commence à clignoter
lentement en bleu lorsque le mode d'arrêt automatique de sécurité
est activé.
- Pour que le fer à repasser se réchauffe, retirez-le de la base (le cas
échéant) puis replacez-le dessus.
Nettoyage et entretien
Nettoyage
1 Réglez la commande de vapeur sur , débranchez la base et
laissez le fer refroidir. (Fig. 2)
2 Videz l'eau qui se trouve encore dans le réservoir.
3 Ôtez les particules de calcaire et autres impuretés de la semelle au
moyen d'un chiffon humide et d'un détergent (liquide) non abrasif.
Attention:évitezlecontactdelasemelleavectoutobjetmétalliquean
de ne pas l'endommager. N'utilisez jamais de tampons à récurer, vinaigre
ou autres produits chimiques pour nettoyer la semelle.
Remarque : rincez régulièrement le réservoir avec de l'eau du robinet. Videz
le réservoir après le rinçage.
Page 33

35
FRANÇAIS
Fonction anticalcaire
IMPORTANT : pour prolonger la durée de vie de votre
appareil et maintenir de bonnes performances de vapeur,
utilisez la fonction anticalcaire toutes les deux semaines.
Si l'eau de votre région est calcaire (par exemple, si des
particules de calcaire s'écoulent de la semelle pendant le
repassage), utilisez la fonction anticalcaire plus fréquemment.
1 Assurez-vous que la commande de vapeur est réglée sur . (Fig. 2)
2 Remplissez le réservoir d'eau jusqu'au niveau MAX (Fig. 3)
Ne versez pas de vinaigre ou d'autres détartrants dans le réservoir d'eau.
3 Réglez le thermostat sur la position MAX. (Fig. 13)
4 Branchez la base, placez le fer à repasser sur la base et laissez le
fer chauffer. (Fig. 6)
5 Retirez le fer à repasser lorsque l'anneau lumineux reste allumé en
permanence. (Fig. 8)
6 Tenez le fer à repasser au-dessus de l'évier. Maintenez enfoncé le
bouton Calc-Clean et secouez légèrement le fer en avant et en
arrière jusqu'à ce que toute l'eau du réservoir d'eau soit vidée.
Attention : lorsque les résidus de calcaire sont évacués, de la vapeur et
de l'eau bouillante sortent également de la semelle.
7 Réglez à nouveau la commande de vapeur sur . (Fig. 2)
Remarque : répétez cette opération si l'eau qui s'écoule du fer contient
encore des résidus de calcaire.
Après le traitement anticalcaire
1 Posez le fer à repasser sur sa base. Laissez le fer à repasser
chauffer pour sécher la semelle.
2 Retirez le fer à repasser de la base lorsque l'anneau lumineux reste
allumé en permanence.
Page 34

36
FRANÇAIS
3 Repassezunmorceaudetissuand'éliminerlesdernièresgouttes
d'eau qui se sont formées sur la semelle.
Rangement
1 Réglez à nouveau la commande de vapeur sur . (Fig. 2)
2 Videz l'eau qui se trouve encore dans le réservoir.
3 Débranchez le cordon et enroulez-le autour de la base. (Fig. 16)
Retirez le fer à repasser de la base lorsque vous enroulez le cordon, la
semelle pouvant être encore chaude.
4 Posez le fer à repasser sur sa base. Verrouillez le fer sur sa base.
(Fig. 17)
5 Laissez toujours refroidir le fer avant de le ranger.
Vous pouvez transporter le fer à repasser et la base avec la poignée
du fer. (Fig. 18)
Dépannage
Cette rubrique présente les problèmes les plus courants que vous
pouvez rencontrer avec votre appareil. Si vous ne parvenez pas à
résoudre le problème à l'aide des informations ci-dessous, rendez-vous
sur www.philips.com/support pour consulter les questions fréquemment
posées, ou contactez le Service Consommateurs de votre pays (voir le
dépliant de garantie internationale pour les coordonnées).
Page 35

FRANÇAIS
Problème Cause possible Solution
Le fer ne produit
pas de vapeur.
De l'eau
s'écoule du fer.
Le fer à repasser
sans l refroidit au
bout d'un moment.
Il doit être rechargé.
La commande de
vapeur est réglée
sur .
Le réservoir d'eau
est vide.
La température
dénie est inférieure
à 2 points.
Le fer à repasser
sans l refroidit au
bout d'un moment.
Il doit être rechargé.
Vous utilisez l'effet
pressing à faible
température.
Placez le fer à repasser
sur sa base jusqu'à ce que
l'anneau lumineux s'allume
en bleu de façon continue
pour indiquer que le fer est
à nouveau prêt à l'emploi.
Réglez la commande de
vapeur sur un réglage
vapeur (voir le tableau 1
du chapitre « Utilisation de
l'appareil »).
Remplissez le réservoir
d'eau.
Consultez le tableau 1
du chapitre « Utilisation
de l'appareil » pour plus
d'informations sur les
réglages concernant la
température et la vapeur.
Replacez le fer sur sa base
pour le réchauffer et sécher
la semelle.
Replacez le fer sur sa base
pour le réchauffer et sécher
la semelle.
Consultez le tableau 1 pour
plus d'informations sur les
réglages concernant l'effet
pressing.
37
Page 36

38
FRANÇAIS
Problème Cause possible Solution
Des particules
de calcaire et
des impuretés
s'écoulent de la
semelle pendant
le repassage.
Seule une partie
de l'anneau
lumineux
s'allume en
mode d'arrêt
automatique de
sécurité.
La base ne
s'allume pas
lorsque je place
le fer à repasser
dessus.
Vous avez utilisé
la fonction Effet
pressing trop
souvent dans un
laps de temps trop
court.
Le réservoir d'eau
est trop rempli.
L'ouverture de
remplissage d'eau
n'est pas fermée
correctement.
Vous n'avez pas
utilisé la fonction
anticalcaire depuis
un certain temps. Le
fer à repasser doit
être nettoyé.
Ce phénomène est
normal. Cela a pour
but d'économiser
de l'énergie en
mode d'arrêt
automatique de
sécurité.
Le fer à repasser
n'est pas relié
correctement à la
base.
Replacez le fer sur sa base
pour le réchauffer et sécher
la semelle. Utilisez moins
fréquemment la fonction
Effet pressing.
Ne remplissez pas le
réservoir au-delà de
l'indication MAX.
Assurez-vous que
l'ouverture de remplissage
d'eau est correctement
fermée.
Utilisez la fonction
anticalcaire (voir le chapitre
« Nettoyage et entretien »,
section « Fonction
anticalcaire »).
Retirez le fer à repasser et
replacez-le sur la base.
N/A
Page 37

PORTUGUÊS
PORTUGUÊS
Importante
Leia cuidadosamente o folheto de informações importantes em
separado e o manual do utilizador antes de utilizar o aparelho. Guarde
estes dois documentos para consultas futuras.
Descrição geral (Fig. 1)
1 Bocal do pulverizador
2 Abertura de enchimento de água
3 Botão do pulverizador
4 Selector de vapor
a. Regulação a seco
b. Denição ECO
c. Regulação para vapor automático
5 Botão do jacto de vapor
6 Botão da temperatura com controlo de vapor automático
7 Depósito da água
8 Etiqueta
9 Botão Calc-clean
10 Base do ferro
11 Anel luminoso
12 Base de carregamento
13 Bloqueio para armazenamento do ferro
14 Cabo de alimentação
Utilizar o aparelho
Encher o depósito de água
39
39
Nota: o seu aparelho foi concebido para ser utilizado com água canalizada.
Se residir numa área com água dura, pode ocorrer uma rápida acumulação
de calcário. Por isso, recomenda-se a utilização de água destilada ou
desmineralizada para prolongar a vida útil do seu aparelho.
Nota: não adicione perfume, água de uma máquina de secar, vinagre, água tratada
magneticamente (por ex., Aqua+), goma, agentes anticalcário, produtos para ajudar
a engomar, água descalcicada quimicamente nem outros químicos, pois estes
podem causar expelição de água, manchas castanhas ou danos no aparelho.
Page 38

40
PORTUGUÊS
1 Regule o controlo do vapor para a posição . (Fig. 2)
2 Encha o depósito da água até à indicação MAX (Fig. 3).
3 Feche a abertura de enchimento de água.
Seleccionar a regulação da temperatura e do vapor
Tabela 1
Tipo de tecido Deniçãode
temperatura
Controlo
de vapor
Jacto de
vapor
automático
Linen MÁX Ajustado
Algodão ●●● SIM
Lã ●● Não
automaticamente
para a quantia
optimizada
SIM
Silk ●● Não
Tecido sintético (p.
● Sem vapor Não
ex.: acrílico, nylon,
poliamida, poliéster)
Nota: Como indicado na tabela acima, não utilize o vapor ou o jacto de vapor
a uma baixa temperatura, caso contrário o ferro pode verter água quente.
1 Consulte a tabela 1 para colocar o botão da temperatura na
regulação apropriada para a sua peça de roupa. (Fig. 4)
2 Seleccione a regulação para vapor automático no selector de
vapor. (Fig. 5)
Este ferro está equipado com um controlo de vapor automático.
De acordo com a temperatura seleccionada, o ferro fornece
automaticamente a quantia optimizada de vapor para obter os
melhores resultados.
3 Coloque o ferro na sua base de carregamento e ligue-a a uma
tomada eléctrica. (Fig. 6)
Page 39

PORTUGUÊS 41
Nota: Assegure-se de que a base de carregamento está assente numa
superfície estável e nivelada. Recomendamos que posicione a base de
carregamento na parte macia da tábua de engomar.
4 Oanelluminosocaintermitenteaazulparaindicarqueoferro
está a aquecer. (Fig. 7)
5 Quando a luz azul se mantiver continuamente acesa, pode
começar a engomar. (Fig. 8)
Funcionamento da base de carregamento inteligente
O ferro está equipado com uma base de carregamento inteligente.
A luz indicará o estado do ferro e avisá-lo-á que tem de carregar o
ferro após 20 a 25 segundos para assegurar um bom desempenho
na remoção dos vincos. Consulte a tabela 2 relativamente ao
funcionamento da base de carregamento.
Nota: Para assegurar um bom desempenho na remoção de vincos, coloque
sempre o ferro na base de carregamento durante períodos inactivos. Não
coloque o ferro no seu descanso. (Fig. 9)
Tabela 2
Estado da luz Estado do ferro Instruções
Intermitente a
azul
Continuamente
acesso a azul
Intermitente a
cor-de-laranja
Intermitência
lenta a azul
(apenas
modelos
especícos)
Aquecimento Aguarde até o ferro estar
pronto a usar.
Pronto a usar Pode começar a engomar.
O ferro tem de ser
carregado agora
A função de
desactivação
automática de
segurança foi
Volte a colocar o ferro na
base de carregamento.
Consulte o capítulo
"Características", secção
"Função de desactivação
automática de segurança".
activada
Page 40

42 PORTUGUÊS
Características
Função de borrifador
- Prima o botão do borrifador para humedecer a peça de roupa que
estiver a engomar. Isto ajuda a eliminar vincos difíceis (Fig. 10).
Função de jacto de vapor
- Prima e solte o botão do jacto de vapor para um jacto potente de
vapor para eliminar vincos difíceis (Fig. 11).
- Para um desempenho perfeito do jacto de vapor, recomendamos
que prima o botão do jacto de vapor em intervalos de 5 segundos.
Vapor vertical
- A função de jacto de vapor pode ser utilizada quando tem o
ferro na posição vertical para eliminar vincos de roupa pendurada,
cortinados, etc. (Fig. 12)
Engomar com vapor extra
- Para obter vapor extra durante o engomar, mantenha premido o
botão do jacto de vapor.
Regulação de vapor Eco/ Passar a ferro a seco
- Em vez do vapor automático, pode seleccionar a regulação ECO
com o selector de vapor para poupar energia, continuando a obter
resultados de engomar satisfatórios.
- Para passar a ferro sem vapor, seleccione a regulação a seco com o
selector de vapor.
Função de desactivação automática de segurança
- O ferro desliga-se automaticamente se não for utilizado durante
8 minutos. O anel luminoso apresenta uma intermitência lenta a azul
para indicar que o modo da desactivação automática de segurança
foi activado.
- Para o ferro aquecer novamente, retire o ferro (se este estiver na
base de carregamento) e volte a colocá-lo na base.
Page 41

43PORTUGUÊS
Limpeza e manutenção
Limpeza
1 Regule o controlo de vapor para ,desligueachadabasede
carregamento e deixe o ferro arrefecer. (Fig. 2)
2 Esvazie a água que restar no depósito de água.
3 Limpe os resíduos de calcário e outros depósitos da base do
ferro com um pano húmido e um produto de limpeza (líquido) não
abrasivo.
Atenção: Para manter a base do ferro lisa, evite o contacto directo
com objectos metálicos. Nunca utilize esfregões, vinagre ou outros
produtos químicos para limpar a base do ferro.
Nota: Enxagúe regularmente o depósito de água com água canalizada.
Esvazie o depósito depois de o enxaguar.
Função Calc-Clean (limpeza do calcário)
IMPORTANTE: Para prolongar a vida útil do seu aparelho e
para manter um bom desempenho de vapor, utilize a função
Calc-Clean uma vez a cada duas semanas. Se a água na sua
área for muito dura (ou seja se saírem ocos de calcário pela
base do ferro quando estiver a engomar), utilize a função
Calc-Clean com maior frequência.
1 Assegure-se de que o controlo do vapor está regulado para .
(Fig. 2)
2 Encha o depósito da água até à indicação MAX. (Fig. 3)
Nãodeitevinagrenemoutrosprodutosdescalcicantesnodepósito
de água.
3 Regule o botão da temperatura para MAX. (Fig. 13)
Page 42

PORTUGUÊS44
4 Ligueachadabasedecarregamento,coloqueoferronestae
deixe-o aquecer. (Fig. 6)
5 Retire o ferro quando o anel luminoso permanecer continuamente
aceso a azul. (Fig. 8)
6 Segure o ferro sobre o lava-loiça. Mantenha o botão Calc-clean
premido e agite suavemente o ferro de um lado para o outro até
acabar toda a água no depósito de água.
Atenção: Enquanto o calcário é expelido, também saem vapor e água a
ferver pela base.
7 Volte a regular o controlo de vapor para . (Fig. 2)
Nota: Repita o procedimento Calc-Clean se a água que sair do ferro ainda
tiver resíduos de calcário.
Após o processo Calc-Clean
1 Coloque o ferro na base de carregamento. Deixe o ferro aquecer
para secar a sua base.
2 Retire o ferro da base de carregamento quando o anel luminoso
se mantiver continuamente aceso a azul.
3 Deslize o ferro suavemente sobre um pano para retirar quaisquer
manchas de água da base.
Armazenamento
1 Volte a regular o controlo de vapor para . (Fig. 2)
2 Esvazie qualquer água que restar no depósito de água.
3 Desligueachadocabodealimentaçãoeenrole-oàvoltadabase
de carregamento. (Fig. 16)
Retire o ferro da base de carregamento quando enrolar o cabo, pois a
base do ferro pode ainda estar quente.
Page 43

4 Coloque o ferro na base de carregamento. Bloqueie o ferro na sua
base de carregamento. (Fig. 17)
5 Deixe o ferro arrefecer antes de o arrumar.
Pode transportar o ferro e a base de carregamento agarrando na
pega do ferro. (Fig. 18)
Resolução de problemas
Este capítulo resume os problemas mais comuns que podem surgir no
aparelho. Se não conseguir resolver o problema com as informações
fornecidas a seguir, visite www.philips.com/support para consultar uma lista
de perguntas frequentes ou contacte o Centro de Apoio ao Cliente no
seu país (consulte os detalhes de contacto no folheto da garantia mundial).
Problema Possível causa Solução
O ferro não
produz vapor.
O ferro tem uma
fuga.
O ferro sem os arrefece
depois de algum tempo.
Este precisa de ser
recarregado.
O controlo do vapor está
regulado para .
O depósito de água está
vazio.
Está a utilizar uma
temperatura inferior à
regulação com 2 pontos.
O ferro sem os arrefece
depois de algum tempo.
Este precisa de ser
recarregado.
Volte a colocar o ferro na
base de carregamento até
o anel luminoso se mantiver
continuamente aceso a azul,
indicando que o ferro está
pronto para ser utilizado
novamente.
Regule o controlo de vapor
para uma regulação de
vapor (consulte a tabela
1 no capítulo "Utilizar o
aparelho").
Encha o depósito de água.
Consulte a tabela 1 no
capítulo "Utilizar o aparelho"
para obter informações
sobre as regulações de
temperatura e vapor.
Volte a colocar o ferro na
base de carregamento para
aquecer e secar a base do
ferro.
45PORTUGUÊS
Page 44

46
PORTUGUÊS
Problema Possível causa Solução
Saem resíduos
de calcário e
impurezas da base
do ferro durante o
engomar.
Apenas parte do
anel luminoso está
acesa no modo
de desactivação
automática de
segurança.
A base de
carregamento não
se acende quando
coloco o ferro
nesta.
Está a utilizar o jacto
de vapor a uma baixa
temperatura.
Utilizou a função de jacto
de vapor com demasiada
frequência num curto
espaço de tempo.
O depósito de água está
demasiado cheio.
A abertura de
enchimento de água
não está fechada
correctamente.
Não executa a função
Calc-Clean há algum
tempo. O ferro precisa de
ser limpo.
É normal. Isto destina-
se a poupar energia no
modo de desactivação
automática de segurança.
O ferro não está ligado
correctamente à base.
Volte a colocar o ferro na
base de carregamento para
aquecer e secar a base do
ferro.
Consulte a tabela 1
relativamente à utilização do
jacto de vapor.
Volte a colocar o ferro na
base de carregamento para
aquecer e secar a base do
ferro. Utilize a função do
jacto de vapor com menor
frequência.
Não encha o depósito de
água acima da indicação
MAX.
Assegure-se de que a
abertura de enchimento
de água está fechada
correctamente.
Utilize a função Calc-
Clean (consulte o capítulo
"Limpeza e manutenção",
secção "Função Calc-Clean").
Retire o ferro e volte a
colocá-lo na base.
N/A
Page 45

Page 46

 Loading...