

Page 1
Mistral
GC2225, GC2220, GC2215, GC2130, GC2126, GC2125, GC2120,
GC2115, GC2110, GC2105
Page 2

2
Page 3

ENGLISH 4
FRANÇAIS 13
NEDERLANDS 23
GC2225, GC2220, GC2215, GC2130, GC2126, GC2125, GC2120, GC2115, GC2110,
GC2105
Page 4

Important
Read these instructions for use carefully before using the appliance and
save them for future reference.
◗ Check if the voltage indicated on the type plate corresponds to
the local mains voltage before you connect the appliance.
◗ Never leave the iron unattended when it is connected to the
mains.
◗ Never immerse the iron in water.
◗ Keep the appliance out of the reach of children.
◗ The soleplate of the iron can become extremely hot and may
cause burns if touched. Do not allow the cord to come into
contact with the soleplate when it is hot.
◗ Do not put perfume, vinegar, starch, descaling agents, ironing aids
or other chemicals in the water tank.
◗ When you have finished ironing, when you clean the appliance,
when you fill or empty the water tank and also when you leave
the iron even for a short while: set the steam control to position
O, put the iron on its heel and remove the mains plug from the
wall socket.
◗ If the mains cord is damaged, it must be replaced by Philips, a
service centre authorised by Philips or similarly qualified persons
in order to avoid a hazard.
◗ Never use the appliance if it is damaged in any way.
◗ This appliance is intended for household use only.
Before first use
1 Check if the voltage indicated on the type plate corresponds to
the local mains voltage before you connect the appliance.
C
2 Remove any sticker or protective foil from the soleplate.
3 Heat up the iron to maximum temperature and pass the iron
over a piece of damp cloth for several minutes to remove any
residues from the soleplate.
The iron may give off some smoke when you use it for the first time
This will cease after a short while.
ENGLISH4
Page 5
Preparing for use
Filling the water tank
1 Remove the mains plug from the wall socket.
C
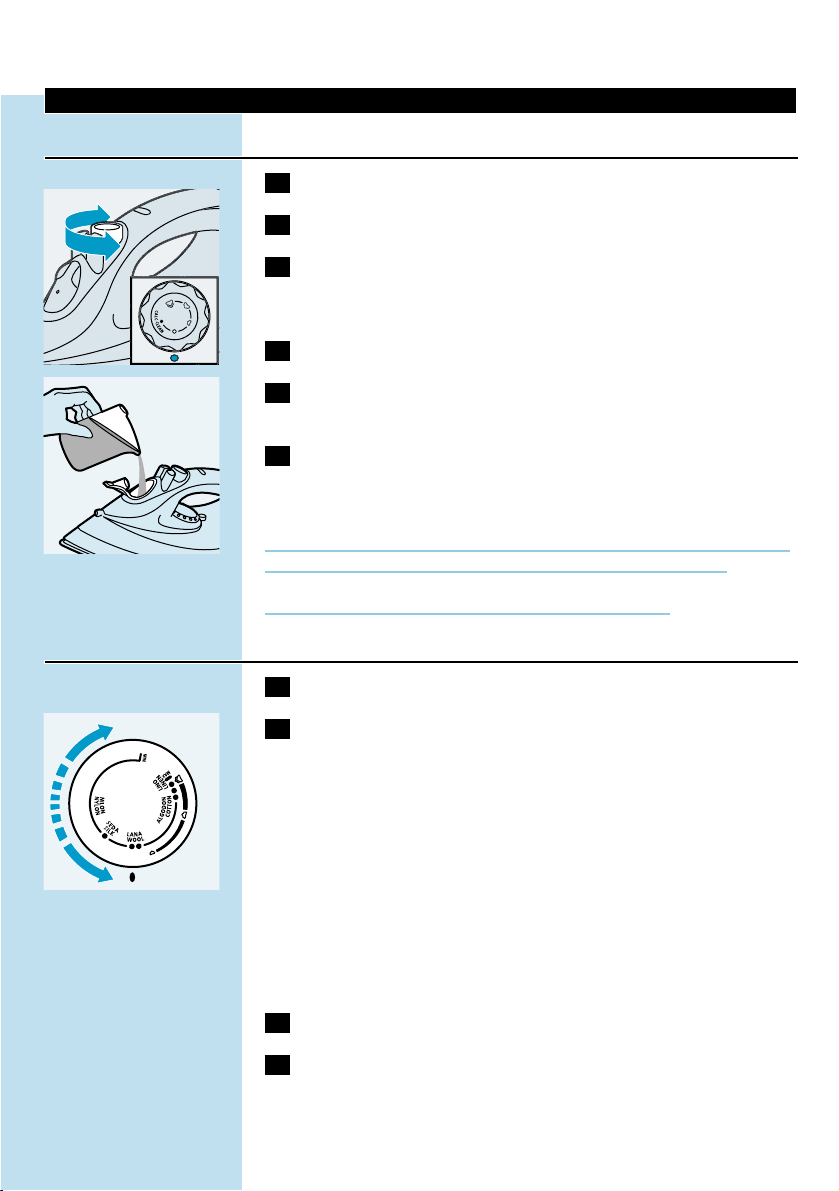
2 Set the steam control to position O (= no steam).
3 Open the filling cap.
(types GC2225, GC2220, GC2215, GC2130, GC2126, GC2125 and
GC2120 only)
4 Tilt the iron.
C
5 Use a measuring cup to fill the water tank up to maximum
level.
6 Close the filling cap (click!).
(types GC2225, GC2220, GC2215, GC2130, GC2126, GC2125 and
GC2120 only)
If the tap water in your area is very hard, we advise you to use distilled
water. Do not use vinegar, starch or chemically descaled water.
Do not fill the water tank beyond the MAX indication.
Setting the temperature
1 Put the iron on its heel.
C
2 Set the temperature dial to the required ironing temperature
by turning it to the appropriate position.
- Check the garment label for the required ironing temperature.
- 1 Synthetic fabrics (e.g. acrylic, viscose, polyamide, polyester)
- 1 Silk
- 2 Wool
- 3 Cotton, linen
- If you do not know what kind of fabric(s) a garment is made of,
determine the right ironing temperature by ironing a part that will
be invisible when you wear the garment.
- Silk, woollen and synthetic materials; iron the reverse side of the
fabric to prevent shiny patches. Avoid using the spray function to
prevent stains.
3 Put the mains plug in an earthed wall socket.
4 When the amber temperature light has gone out, wait a while
before you start ironing.
B
The amber pilot light will go on from time to time during ironing.
ENGLISH 5
Page 6
For versions with auto shut-off (types GC2225 and
GC2130 only) (see also 'Other features')
C
◗ If the automatic shut-off function has been activated (red pilot
light blinks), move the iron slightly to deactivate this function (red
pilot light stops blinking).
Using the appliance
Steam ironing
Make sure that there is enough water in the water tank.
1 Set the temperature dial to the recommended position.
See 'Setting the temperature'.
C
2 Set the steam control to the appropriate steam position.
- Á for minimum steam (temperature settings 2 and 3).
- Ë for moderate steam (temperature settings 3 to MAX)
(Types GC2225, GC2220, GC2215, GC2130, GC2126, GC2125
and GC2120 only).
- È for maximum steam (temperature settings 3 to MAX).
B
Steaming will start as soon as the set temperature has been reached.
Types GC2215, GC2120, GC2115, GC2110 and GC2105
only
Water may leak from the soleplate if the set temperature is too low
(MIN to 2).
GC2225, GC2220, G2130, GC2126 and GC2125 only.
The iron is equipped with a drip stop system (see also 'Other
features).
Ironing without steam
1 Set the steam control to position O (= no steam).
2 Set the temperature dial to the recommended position.
See 'Setting the temperature'.
ENGLISH6
Page 7
Other features
Spraying
To remove stubborn creases at any temperature
1 Make sure that there is enough water in the water tank.
C
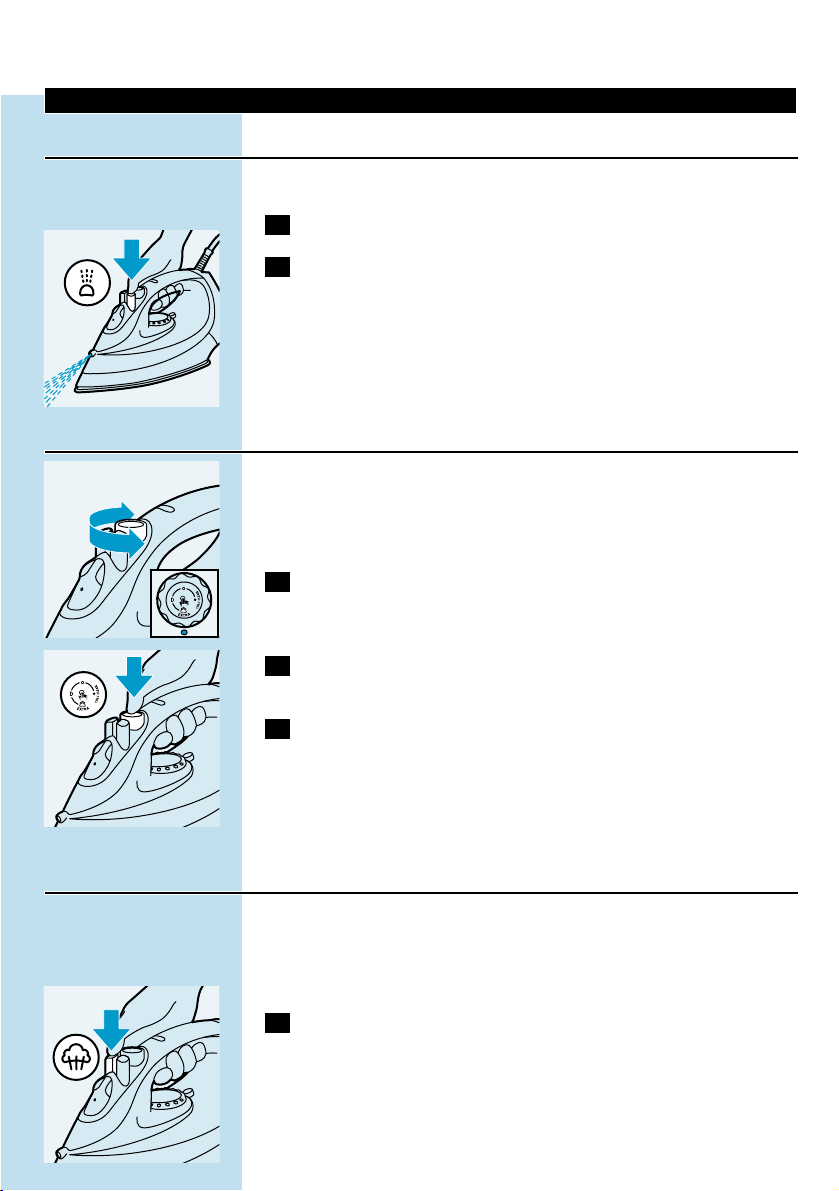
2 Press the spray button several times to moisten the garment to
be ironed.
Extra Steam (type GC2105 only)
This function provides extra steam to remove really stubborn creases.
The Extra Steam function only works at temperature settings between
3 and MAX.
C
1 Set the steam control to maximum position È.
C
2 Press and hold the Steam Control button down for max.5
seconds.
3 Wait at least 1 minute before using Extra Steam again to
prevent water from dripping out of the soleplate.
Shot of Steam (GC2225, GC2220, GC2215, GC2130, GC2126
GC2125, GC2120, GC2115 and GC2110 only)
A powerful shot of steam helps to remove very stubborn creases.
The Shot-of-Steam function only works at temperature settings
between 2 and MAX.
C
1 Press and release the Shot-of-Steam button.
ENGLISH 7
Page 8

Vertical Shot of Steam (types GC2225, GC2220, GC2215,
GC2130, GC2126, GC2125, GC2120 and GC2115 only)
C
1 The Shot-of-Steam function can also be used when you are
holding the iron in vertical position.This is useful for removing
creases from hanging clothes, curtains, etc.
Never direct the steam towards people.
Drip Stop (types GC2225, GC2220, GC2130, GC2126 and
GC2125 only)
This iron is equipped with a drip stop function: the iron automatically
stops steaming when the temperature is too low to prevent water from
dripping out of the soleplate. When this happens you will hear a click.
Automatic shut-off (types GC2225 and GC2130 only)
An electronic safety device will automatically switch the heating
element off if the iron has not been moved for a while.
C
◗ To indicate that the heating element has been switched off, the
red auto-off pilot light will start blinking.
To heat up the iron again:
1 Pick up the iron or move it slightly.
2 The red auto-off pilot light will go out.The amber temperature
pilot light will go on, depending on the soleplate temperature.
3 If the amber pilot light goes on after the iron has been moved,
wait for it to go out before you start ironing.
4 If the amber light does not go on after the iron has been
moved, the iron is ready for use.
Cleaning and maintenance
Calc-Clean
The Calc-Clean function removes scale and impurities.
Use the Calc-Clean function once every two weeks. If the water in
your area is very hard (i.e. when flakes come out of the soleplate
during ironing), the Calc-Clean function should be used more
frequently.
ENGLISH8
Page 9
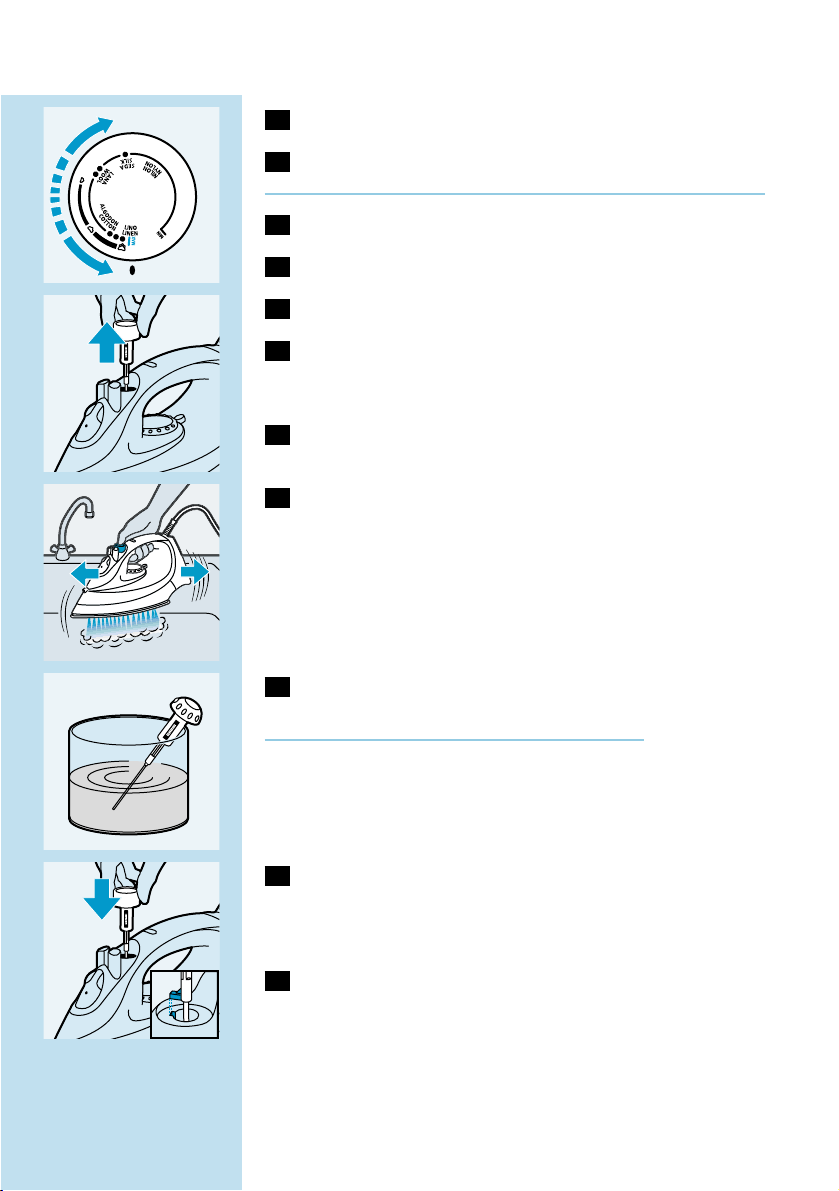
1 Set the steam control to position O.
2 Fill the water tank to the maximum level.
Do not pour vinegar or other descaling agents into the water tank..
C
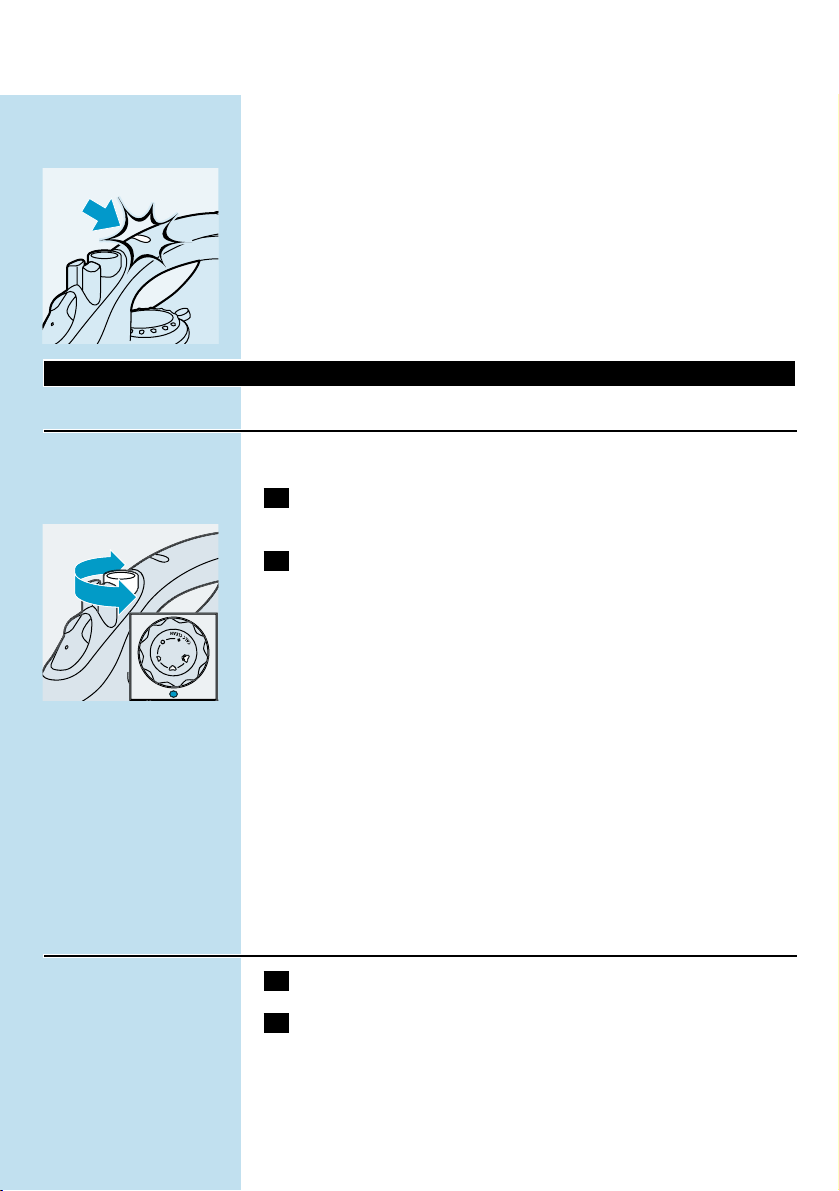
3 Set the temperature dial to MAX.
4 Put the plug in the wall socket.
5 Unplug the iron when the amber pilot light has gone out.
6 Hold the iron over the sink and set the steam control to
position 1 (Calc-Clean).The steam control knob will spring up
slightly.
C
7 Pull the steam control knob upwards to remove the steam
control needle.
C
8 Move the iron to and fro.
B
Steam and boiling water will come out of the soleplate. Impurities and
scale (if any) will be flushed out.
C
9 Use vinegar to remove scale, if any, from the needle.
Do not bend or damage the steam control needle.
C
10 Put the steam control needle back by inserting the point of the
needle exactly in the centre of the hole and by fitting the small
projection on the side of the needle into the slot. Set the
steam control knob to position O.
11 Repeat the Calc-Clean process if the iron still contains a lot of
impurities.
ENGLISH 9
Page 10
After the Calc-Clean process
1 Plug the iron in to let the soleplate dry up.
2 Unplug the iron when the amber pilot light has gone out.
3 Move the iron gently over a piece of used cloth to remove any
water stains that may have formed on the soleplate.
4 Let the iron cool down before you store it.
After ironing
1 Remove the mains plug from the wall socket and let the iron
cool down.
2 Wipe scale and any other deposits off the soleplate with a
damp cloth and a non-abrasive (liquid) cleaner.
Keep the soleplate smooth: avoid hard contact with metal objects.
Never use a scouring pad, vinegar or other chemicals.
3 Clean the upper part of the appliance with a damp cloth.
4 Regularly rinse the water tank with water. Empty the water
tank after cleaning.
Storage
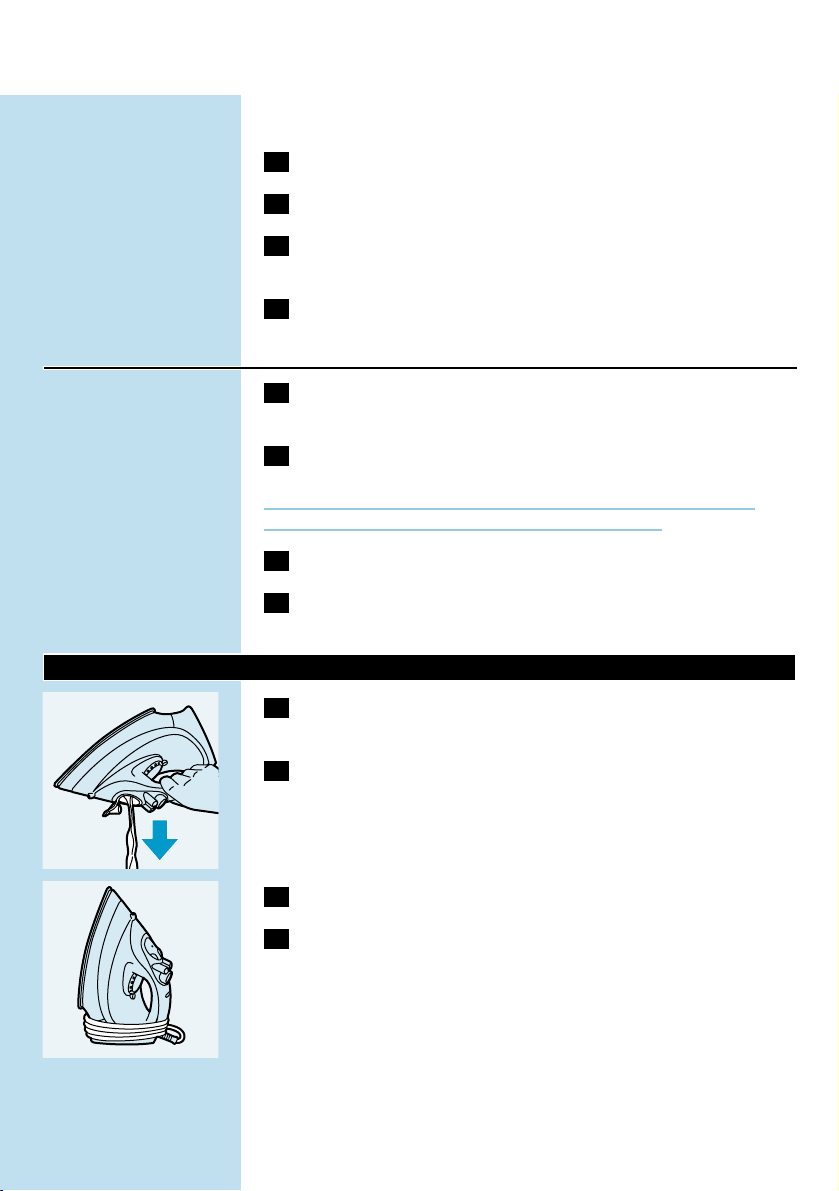
1 Remove the mains plug from the wall socket, let the iron cool
down and set the steam control to position O.
C
2 Empty the water tank.
C
3 Wind the mains cord round the cord storage facility.
4 Always store the iron standing on its heel in a safe and dry
place.
ENGLISH10
Page 11

Guarantee & service
If you need information or if you have a problem, please visit the Philips
website at www.philips.com or contact the Philips Customer Care
Centre in your country (you will find its phone number in the
worldwide guarantee leaflet). If there is no Customer Care Centre in
your country, turn to your local Philips dealer or contact the Service
Department of Philips Domestic Appliances and Personal Care BV.
ENGLISH 11
Page 12

Solution
Check the mains cord, the plug and
the wall socket.
Set the temperature dial to the
required position.
Tilt the iron during filling.
Fill the water tank (see 'Preparing for
use'; section 'Filling the watertank'.)
Set the steam position to Á, Ë or È
(see 'Using the appliance', section
'Steam ironing').
Set the temperature dial to a position
in the steam area (2 to MAX). Put
the iron on its heel and wait until the
amber pilot light has gone out before
you start ironing.
Put the iron in horizontal position and
wait a while before using the (Vertical)
Shot of Steam function again.
Set the temperature dial to a position
in the steam area (2 to MAX). Put
the iron on its heel and wait until the
amber pilot light has gone out before
you start ironing.
Use the Calc-Clean function a few
times (see 'Cleaning and maintenance',
section 'Calc-Clean').
Shake the iron lightly to deactivate the
auto shut-off function: the pilot light
will stop blinking.
Press the filling cap until you hear a
click.
Set the temperature dial to a position
in the steam area (2 to MAX). Put
the iron on its heel and wait until the
amber pilot light has gone out before
you start ironing.
Possible cause(s)
Connection problem
Temperature dial set at MIN
You have tried to fill the iron in
horizontal position.
Not enough water in the water tank.
The steam control has been set to
position O.
The soleplate is not hot enough
and/or the Drip stop function (types
GC2225, GC2220, GC2130, GC2126
and GC2125 only) has been activated.
The (Vertical) Shot of Steam function
has been used too often within a very
short period.
The soleplate is not hot enough.
Hard water forms flakes inside the
soleplate.
The auto shut-off function has been
activated. See "Automatic shut-off"
section.
The filling cap has not been closed
properly.
The temperature has been set too
low.
Problem
The iron is plugged in but the soleplate
is cold.
I'm unable to fill the water tank to
maximum level.
No steam
No shot of steam (types GC2225,
GC2220, GC2215, GC2130, GC2126,
GC2125, GC2120, GC2115 and
GC2110 only) or no Vertical Shot of
Steam (types GC2225, GC2220,
GC2215, GC2130, GC2126, GC2125,
GC2120 and GC2115 only).
Flakes and impurities come out of the
soleplate during ironing.
Red pilot light is blinking (types
GC2225 and GC2130 only).
Water droplets on fabric (types
GC2225, GC2220, GC2215, GC2130,
GC2126, GC2125 and GC2120 only)
Water droplets on fabric (types
GC2215, GC2120, GC2115, GC2110
and GC2105 only)
Troubleshooting
This chapter summarises the most common problems you could encounter with your iron. Please
read the different sections for more details. If you are unable to solve the problem, please contact the
Philips Customer Care Centre in your country.
ENGLISH12
Empty the water tank before you store
the iron. Set the steam control to
position O and store the iron standing
on its heel.
The iron has been put in horizontal
position while there was still water in
the water tank.
Water drips from the soleplate after
the iron has been stored or cooled
down.
Page 13

Important
Avant d'utiliser l'appareil, lisez soigneusement ces instructions et
conservez-les pour un usage ultérieur.
◗ Vérifiez que la tension indiquée sur la plaque signalétique de
l'appareil correspond bien à la tension de votre secteur avant de
le brancher.
◗ Ne laissez jamais le fer à repasser sans surveillance pendant qu'il
est branché.
◗ Ne plongez jamais le fer dans l'eau.
◗ Tenez l'appareil hors de portée des enfants.
◗ La semelle du fer à repasser peut devenir très chaude et donc
peut causer des brûlures si vous la touchez. Eviter le contact du
cordon d'alimentation avec la semelle lorsqu'elle est chaude.
◗ Ne mettez pas de parfum, de vinaigre, d'amidon, de détartrants ou
d'autres agents chimiques dans le réservoir d'eau.
◗ Lorsque vous avez fini de repasser, pendant que vous nettoyez,
remplissez ou videz le réservoir d'eau, et même si vous laissez le
fer pour un bref instant, réglez la commande de vapeur sur la
position O, placez le fer à repasser sur le talon et débranchez
l'appareil.
◗ Si le cordon d'alimentation est endommagé, il ne doit être
remplacé que par un Centre Service Agréé Philips ou par une
personne autorisée pour éviter tout accident.
◗ N'utilisez jamais le fer à repasser s'il est endommagé.
◗ Cet appareil est destiné à usage domestique uniquement.
Avant la première utilisation
1 Vérifiez que la tension indiquée sur la plaque signalétique de
l'appareil correspond bien à la tension de votre secteur avant
de le brancher.
C
2 Retirez tout auto-collant ou film de protection qui se trouve
sur la semelle.
3 Laissez le fer chauffer à température maximale et repassez
quelques minutes un chiffon humide pour enlever tout résidu
de la semelle.
Le fer peut fumer légèrement quand on le branche pour la première
fois. Cela cessera après un bref instant.
13FRANÇAIS
Page 14

Préparation à l'emploi
Remplissage du réservoir
1 Débranchez la fiche de la prise de courant.
C
2 Réglez la commande de vapeur sur la position O (pas de
vapeur).
3 Soulevez le couvercle de l'orifice de remplissage.
(modèles GC2225, GC2220, GC2215, GC2130, GC2126, GC2125
et GC2120 uniquement)
4 Inclinez le fer.
C
5 Utilisez une tasse graduée pour remplir le réservoir d'eau
jusqu'au niveau maximum.
6 Fermez le couvercle de l'orifice de remplissage (clic!).
(modèles GC2225, GC2220, GC2215, GC2130, GC2126, GC2125
et GC2120 uniquement)
Si l'eau du robinet de votre région est très calcaire, il est conseillé
d'utiliser de l'eau déminéralisée. N'utilisez pas de vinaigre, d'amidon ou
d'eau détartrée chimiquement.
Ne remplissez pas le réservoir au-delà de l'indication MAX.
Réglage de la température
1 Posez le fer à repasser sur son talon.
C
2 Mettez le thermostat sur la position souhaitée en tournant.
- Vérifiez l'étiquette d'instructions de repassage pour vérifier la
température nécessaire de repassage.
- 1 Tissus synthétiques (par ex. acr ylique, viscose, polyamide,
polyester).
- 1 Soie
- 2 Laine
- 3 Coton, lin.
- Si vous ne connaissez pas la composition des tissus, repassez en
commençant par la température la plus basse sur une partie interne
du vêtement et invisible de l'extérieur.
- La soie, la laine et autres fibres synthétiques: Repassez sur l'envers
pour éviter les taches. N'utilisez pas la fonction spray pour éviter de
lustrer les tissus.
3 Branchez la fiche dans la prise de courant.
4 Attendez que le témoin lumineux orange s'éteigne avant de
commencer à repasser.
14 FRANÇAIS
Page 15

15
B
Le témoin lumineux orange s'allume de temps en temps pendant le
repassage.
Pour les modèles avec arrêt automatique (modèles
GC2225 et GC2130 uniquement) (voir aussi "Autres
caractéristiques")
C
◗ Si la fonction arrêt automatique a été activée (le témoin rouge
clignote), remuez légèrement le fer pour désactiver cette fonction
(le témoin rouge ne clignotera plus).
Utilisation de l'appareil
Repassage à la vapeur
Assurez-vous qu'il y a suffisamment d'eau dans le réservoir.
1 Mettez le thermostat sur la position conseillée.
Voir le chapitre "Réglage de la température".
C
2 Réglez la commande de vapeur sur la position appropriée.
- Á vapeur minumum (réglages température 2 et 3).
- Ë vapeur modérée (réglages température: 3 à MAX) (Modèles
GC2225, GC2220, GC2215, GC2130, GC2126, GC2125 et
GC2120 uniquement).
- È vapeur maximum (réglage stempérature: 3 à MAX).
B
La vapeur commence à se dégager une fois que la température réglée a
été atteinte.
Modèles GC2215, GC2120, GC2115, GC2110 et GC2105
uniquement
L'eau peut sortir par la semelle si la température réglée est trop basse
(MIN à 2).
GC2225, GC2220, G2130, GC2126 et GC2125
uniquement.
Le fer est doté d'un système anti-goutte (voir aussi "Autres
caractéristiques").
Repassage sans vapeur
1 Réglez la commande de vapeur sur la position O (pas de
vapeur).
FRANÇAIS
Page 16

16
2 Mettez le thermostat sur la position conseillée.Voir le chapitre
"Réglage de la température".
Autres caractéristiques
Le spray
Pour enlever les faux plis difficiles à éliminer.
1 Assurez-vous qu'il y a suffisamment d'eau dans le réservoir.
C
2 Appuyez sur le bouton spray plusieurs fois pour humidifier
l'article à repasser.
Extra vapeur (modèle GC2105 uniquement)
Cette fonction dégage plus de vapeur pour enlever les faux plis très
difficiles à éliminer.
La fonction Extra Vapeur ne peut être utilisée qu'à des températures
comprises entre 3 et MAX.
C
1 Réglez la commande de vapeur sur la position È.
C
2 Appuyez et maintenez appuyée la commande de vapeur
pendant 5 secondes au maximum.
3 Attendez au moins 1 minute avant d'utiliser à nouveau cette
fonction pour éviter que l'eau s'écoule par la semelle.
Jet de vapeur (GC2225, GC2220, GC2215, GC2130, GC2126,
GC2125, GC2120, GC2115 et GC2110 uniquement)
Un puissant jet de vapeur permet d'enlever les faux plis résistants.
Le jet de vapeur ne peut être utilisé qu'à des températures comprises
entre 2 et MAX.
C
1 Appuyez et relâchez le bouton jet de vapeur.
FRANÇAIS
Page 17

17
Défroissage vertical (modèles GC2225, GC2220, GC2215,
GC2130, GC2126, GC2125, GC2120 et GC2115 uniquement)
C
1 Le jet de vapeur peut être également utilisé en tenant le fer en
position verticale. Il est utile pour enlever les faux plis des
vêtements en position verticale, rideaux, etc.
Ne dirigez jamais le jet de vapeur vers des personnes.
Anti-goutte (modèles GC2225, GC2220, GC2130, GC2126 et
GC2125 uniquement)
Ce fer à repasser est doté d'un système anti-goutte : lorsque la
température de la semelle est trop basse, la production de vapeur est
interrompue afin d'empêcher que la semelle ne goutte trop.Vous
entendrez un clic si cela ce produit.
Arrêt automatique (modèles GC2225 et GC2130
uniquement)
Une sécurité électronique arrêtera automatiquement le fer s'il reste
inutilisé pendant un certain temps.
C
◗ Pour indiquer que le fer est arrêté, le témoin lumineux rouge
arrêt automatique se met à clignoter.
Pour faire chauffer le fer à nouveau:
1 Prenez le fer en main et bougez-le légèrement.
2 Le témoin rouge s'éteint. Le témoin orange s'allume selon la
température de la semelle.
3 Si le témoin orange s'allume juste après avoir repris le fer,
attendez que celui-ci s'éteigne avant de commencer à repasser.
4 Si le témoin reste éteint vous pouvez commencer le repassage.
FRANÇAIS
Page 18

Nettoyage et entretien
Auto-nettoyage
La fonction auto-nettoyage permet de retirer les particules de calcaire
et les impuretés.
Utilisez la fonction auto-nettoyage toutes les deux semaines. Si l'eau de
votre région est très calcaire (par ex: lorsque des particules de calcaire
sortent par la semelle) vous devez utiliser cette fonction plus souvent.
1 Réglez la commande de vapeur sur la position 0.
2 Remplissez le réservoir d'eau jusqu'au niveau maximum.
Ne versez pas de vinaigre ou d'autres agents détartrants dans le
réservoir d'eau.
C
3 Mettez le bouton de réglage de la température sur MAX.
4 Branchez l'appareil.
5 Quand le témoin lumineux orange s'éteint, débranchez
l'appareil.
6 Tenez le fer au-dessus de l'évier et réglez la commande de
vapeur sur la position 1 (auto-nettoyage). Le bouton se
détachera un peu.
C
7 Pour enlever la tige de la commande de vapeur, tirez le bouton
de vapeur en haut.
C
8 Secouez légèrement le fer.
B
De l'eau bouillante et de la vapeur s'échappent alors de l'orifice de la
semelle. Les impuretés et le tartre (s'il y en a) seront éliminés du fer à
repasser.
C
9 Utilisez un peu de vinaigre pour enlever les particules de
calcaire de la tige, si nécessaire.
Ne courbez ou n'endommagez pas la tige de commande.
18 FRANÇAIS
Page 19

19
C
10 Réinsérez la pointe de la tige exactement dans le centre de
l'orifice et fixez-la dans sa fente. Réglez la commande de vapeur
sur la position O.
11 Répétez cette opération aussi souvent que nécessaire.
Après l'auto-nettoyage
1 Insérez la fiche dans la prise murale et laissez le fer réchauffer
pour sécher la semelle.
2 Quand le témoin lumineux orange s'éteint, débranchez
l'appareil.
3 Repassez un vieux morceau de tissu pour vous assurer que la
semelle est bien sèche.
4 Laissez l'appareil refroidir avant de le ranger.
Après le repassage
1 Débranchez l'appareil et laissez-le refroidir.
2 Nettoyez la semelle avec un chiffon humide et un détergent
(liquide) non-abrasif.
Maintenez la semelle lisse : évitez le contact avec des objets
métalliques.
N'utilisez jamais de tampons à récurer, du vinaigre ou d'autres produits
chimiques.
3 Nettoyez la partie supérieure du fer à repasser avec un chiffon
humide.
4 Rincez régulièrement le réservoir avec de l'eau.Videz le
réservoir après le nettoyage.
Rangement
1 Débranchez l'appareil, laissez-le refroidir et réglez la
commande de vapeur sur la position O.
C
2 Videz le réservoir.
FRANÇAIS
Page 20

20
C
3 Enroulez le cordon d'alimentation autour du support de
rangement.
4 Rangez toujours le fer sur son talon et placez-le sur une
surface stable et sèche.
Garantie et service
Pour plus d'informations, visitez notre Philips Web site: www.philips.com
ou veuillez contacter le Service Consommateurs Philips de votre pays
(vous trouverez le numéro de téléphone dans le dépliant sur la garantie
internationale). S'il n'y a aucun Service Consommateurs Philips dans votre
pays, contactez votre distributeur ou le Service Depar tment of Philips
Domestic Appliances and Personal Care BV.
FRANÇAIS
Page 21

21
Solution
Vérifiez le cordon d'alimentation, la
fiche et la prise de courant.
Réglez le thermostat sur la position
nécessaire.
Inclinez le fer pendant le remplissage.
Remplissez le réservoir d'eau (voir
"Préparation à l'emploi" et
"Remplissage du réservoir d'eau").
Réglez la commande de vapeur sur Á,
Ë ou È (voir "Utilisation de l'appareil"
et "Repassage à la vapeur").
Sélectionnez une température de
repassage appropriée pour le
repassage à la vapeur (2 au MAX).
Placez le fer sur son talon et attendez
jusqu'à ce que le témoin orange
s'éteigne avant de continuer le
repassage.
Mettez le fer en position horizontale
et attendez quelque temps avant
d'utiliser la fonction jet de vapeur
(vertical) à nouveau.
Sélectionnez une température de
repassage appropriée pour le
repassage à la vapeur (2 au MAX).
Placez le fer sur son talon et attendez
jusqu'à ce que le témoin orange
s'éteigne avant de continuer le
repassage.
Utilisez la fonction auto-nettoyage
quelques fois (voir "Nettoyage et
entretien", section "Auto-nettoyage").
Remuez le fer doucement pour
désactiver la fonction arrêt
automatique: le témoin lumineux
s'éteint.
Appuyez-le jusqu'à ce que vous
entendiez un clic.
Cause(s) possible (s)
Problème de connexion
Thermostat réglé sur MIN
Vous avez essayé de le remplir en
position horizontale.
Il n'y a pas assez d'eau dans le
réservoir.
La commande de vapeur a été réglée
sur la position O.
La semelle n'est pas suffisamment
chaude et/ou la fonction anti-goutte
(modèles GC2220, GC2130, GC2126
et GC2125 uniquement) a été activée.
Le jet de vapeur a été utilisé trop
souvent et la semelle n'a pas eu le
temps de reprendre la température
initiale.
La semelle n'est pas suffisament
chaude.
L'eau est trop dure et entartre
l'intérieur de la semelle.
L'arrêt automatique est activé.Voir
paragraphe "Arrêt automatique".
Le couvercle de l'orifice de
remplissage n'a pas été correctement
fermé.
Problème
Le fer à repasser est branché mais la
semelle est froide.
Je ne peux pas remplir le réservoir
jusqu'au niveau maximum.
Pas de vapeur
Pas de jet de vapeur (modèles
GC2225, GC2220, GC2215, GC2130,
GC2126, GC2125, GC2120, GC2115
et GC2110 uniquement) ou pas de jet
de vapeur vertical (modèles GC2225,
GC2220, GC2215, GC2130, GC2126,
GC2125, GC2120 et GC2115
uniquement).
Des particules de calcaire et des
impuretés sortent par la semelle
pendant le repassage.
Le témoin lumineux rouge clignote
(modèles GC2225 et GC2130
uniquement).
Des gouttes d'eau sur le tissu
(modèles GC2225, GC2220, GC2215,
GC2130, GC2126, GC2125 et
GC2120 uniquement)
Dépannage
Ce chapitre résume les problèmes les plus courants problèmes susceptibles d'être rencontrés. Lisez
les sections suivantes pour plus de détails. Si vous ne pouvez pas résoudre le problème, contactez
votre revendeur ou un Centre Service Agréé Philips.
FRANÇAIS
Page 22

22
Solution
Sélectionnez une température de
repassage appropriée pour le
repassage à la vapeur (2 au MAX).
Placez le fer sur son talon et attendez
jusqu'à ce que le témoin orange
s'éteigne avant de continuer le
repassage.
Videz le réservoir d'eau avant de
ranger le fer. Réglez la commande de
vapeur sur la position O et rangez le
fer sur le talon.
Cause(s) possible (s)
La commande de vapeur a été réglée
sur une position inférieure.
Le fer a été mis en position
horizontale tandis que le réservoir
d'eau n'était pas vide.
Problème
Des gouttes d'eau sur le tissu
(modèles GC2215, GC2120, GC2115,
GC2110 et GC2105 uniquement)
Des gouttes d'eau sortent par la
semelle après avoir rangé ou refroidi le
fer à repasser.
FRANÇAIS
Page 23

Waarschuwing
Lees deze gebruiksaanwijzing zorgvuldig door voordat u het apparaat
gaat gebruiken. Bewaar de gebruiksaanwijzing om hem indien nodig te
kunnen raadplegen.
◗ Controleer of het voltage aangegeven op het typeplaatje
overeenkomt met de plaatselijke netspanning voordat u het
apparaat aansluit.
◗ Laat het apparaat nooit onbeheerd achter terwijl het op de
netspanning is aangesloten.
◗ Dompel het strijkijzer nooit in water.
◗ Houd het apparaat buiten het bereik van kinderen.
◗ De zoolplaat van het strijkijzer kan zeer heet worden en bij
aanraking brandwonden veroorzaken.Voorkom dat het snoer in
aanraking komt met de hete zoolplaat.
◗ Doe geen reukstof, azijn, stijfsel, ontkalkers,strijkconcentraat of
andere chemicaliën in de stoomtank.
◗ Haal altijd de stekker uit het stopcontact, zet de stoomregelaar
op 0 en zet het strijkijzer op zijn achterkant als u klaar bent met
strijken, als u bij het strijkijzer wegloopt (ook al is het maar heel
even), als u het strijkijzer gaat schoonmaken en tijdens het vullen
of legen van het waterreservoir.
◗ Indien het netsnoer beschadigd is, moet het vervangen worden
door Philips, een door Philips geautoriseerd servicecentrum of
personen met vergelijkbare kwalificaties om gevaar te voorkomen.
◗ Gebruik het apparaat nooit als het op de een of andere manier
beschadigd is.
◗ Dit apparaat is uitsluitend bedoeld voor huishoudelijk gebruik.
Voor het eerste gebruik
1 Controleer of het voltage aangegeven op het typeplaatje
overeenkomt met de plaatselijke netspanning voordat u het
apparaat aansluit.
C
2 Verwijder stickers of beschermfolie van de zoolplaat, indien
aanwezig.
3 Warm het strijkijzer op tot de maximumtemperatuur en
beweeg het strijkijzer vervolgens gedurende een paar minuten
over een vochtige doek om eventuele verontreinigingen van de
zoolplaat te verwijderen
Er kan wat rook uit het strijkijzer komen wanneer u het voor de eerste
keer gebruikt. Dit houdt na enige tijd op.
23NEDERLANDS
Page 24

Klaarmaken voor gebruik
Het waterreservoir vullen
1 Haal de stekker uit het stopcontact.
C
2 Zet de stoomregelaar op stand 0 (=geen stoom).
3 Open het klepje van de vulopening.
(alleen types GC2225, GC2220, GC2215, GC2130, GC2126, GC2125
en GC2120)
4 Houd het strijkijzer gekanteld.
C
5 Gebruik een maatbeker om het waterreservoir tot het
maximumniveau te vullen.
6 Sluit het klepje van de vulopening (u hoort een klik).
(alleen types GC2225, GC2220, GC2215, GC2130, GC2126, GC2125
en GC2120)
Als het kraanwater in uw woongebied erg hard is, raden wij u aan
gedistilleerd water te gebruiken. Gebruik geen azijn, stijfsel of chemisch
onthard water.
Vul het reservoir nooit verder dan het MAX-teken.
Temperatuur instellen
1 Zet het strijkijzer op zijn achterkant.
C
2 Stel de gewenste temperatuur in door de temperatuurregelaar
naar de juiste temperatuurindicatie te draaien.
- Raadpleeg het label in uw kledingstuk voor de gewenste
strijktemperatuur.
- 1 Synthetische stoffen (bijv. acryl, viscose, polyamide, polyester)
- 1 Zijde
- 2 Wol
- 3 Katoen, linnen
- Als u niet zeker weet van welk materiaal uw kledingstuk is gemaakt,
probeer de gekozen strijktemperatuur dan eerst uit op een plek die
niet zichtbaar is tijdens het dragen.
- Zijde, wol en synthetische materialen: strijk de binnenkant van de
stoffen om glimmende plekken te voorkomen. Gebruik de
sproeifunctie niet, omdat hierdoor vlekken zouden kunnen ontstaan.
3 Steek de stekker in een geaard stopcontact.
4 Wanneer het oranje temperatuurcontrolelampje uit is gegaan,
wacht dan even voordat u begint te strijken.
24 NEDERLANDS
Page 25

25
B
Het oranje controlelampje gaat tijdens het strijken af en toe aan en uit.
Voor types met automatische uitschakelfunctie (GC2225 en
GC2130) (zie ook 'Overige functies')
C
◗ Als de automatische uitschakelfunctie geactiveerd is (het rode
lampje knippert), beweeg het strijkijzer dan even om deze functie
weer te deactiveren (het rode lampje stopt met knipperen). Zie
ook 'Overige functies'.
Gebruik van het apparaat
Stoomstrijken
Controleer of er genoeg water in het waterreservoir zit.
1 Zet de temperatuurregelaar op de gewenste stand.
Zie 'Temperatuur instellen'.
C
2 Zet de stoomregelaar op de juiste stand.
- Á voor weinig stoom (temperatuurstand 2 tot 3).
- Ë voor normale stoom (temperatuurstand 3 tot MAX) (alleen
types GC2225, GC2220, GC2215, GC2130, GC2126, GC2125 en
GC2120).
- È voor veel stoom (temperatuurstand 3 tot MAX).
B
Het apparaat begint te stomen zodra het de ingestelde temperatuur
heeft bereikt.
Alleen types GC2215, GC2120, GC2115, GC2110 en
GC2105:
Als de ingestelde temperatuur te laag is (MIN tot 2), kan er water uit
de zoolplaat lekken.
Alleen types GC2225, GC2220, G2130, GC2126 en
GC2125:
Het strijkijzer is uitgerust met een druppelstopsysteem (zie ook
'Overige functies').
Strijken zonder stoom
1 Zet de stoomregelaar op stand 0 (=geen stoom).
2 Zet de temperatuurregelaar op de gewenste stand.
Zie 'Temperatuur instellen'.
NEDERLANDS
Page 26

Overige functies
Sproeien
Voor het verwijderen van hardnekkige kreuken op elke temperatuur.
1 Controleer of er genoeg water in het waterreservoir zit.
C
2 Druk een paar keer op de sproeiknop om de stof vochtig te
maken.
Extra-stoomfunctie (alleen type GC2105)
De extra-stoomfunctie helpt zeer hardnekkige kreuken te verwijderen.
De extra-stoomfunctie werkt alleen als de temperatuur is ingesteld op
een stand tussen 3 en MAX.
C
1 Zet de stoomregelaar op de maximumstand È.
C
2 Druk de stoomregelaar in en houdt deze gedurende maximaal
5 seconden ingedrukt.
3 Wacht minstens 1 minuut voordat u de extra-stoomfunctie
opnieuw gebruikt, om te voorkomen dat er water uit de
zoolplaat druppelt.
Stoomstoot (alleen types GC2225, GC2220, GC2215,
GC2130, GC2126, GC2125, GC2120, GC2115 en GC2110)
Deze krachtige stoomstoot helpt hardnekkige kreuken te verwijderen.
De stoomstootfunctie werkt alleen als de temperatuur is ingesteld op
een stand tussen 2 en MAX.
C
1 Druk de stoomstootknop even in en laat deze daarna weer los.
26 NEDERLANDS
Page 27

27
Verticale stoomstoot (alleen types GC2225, GC2220,
GC2215, GC2130, GC2126, GC2125, GC2120 en GC2115)
C
1 U kunt de stoomstootfunctie ook gebruiken als u het strijkijzer
verticaal houdt. Zo kunt u kreuken verwijderen uit hangende
kleren, gordijnen enz.
Richt de stoom nooit op mensen.
Druppelstop (alleen types GC2225, GC2220, GC2130,
GC2126 en GC2125)
Dit strijkijzer is uitgerust met een druppelstopsysteem: het strijkijzer
stopt automatisch met stomen bij te lage temperaturen, zodat er geen
water uit de zoolplaat druppelt. Als dit systeem wordt ingeschakeld,
hoort u een klik.
Automatische uitschakelfunctie (alleen types GC2225 en
GC2130)
Een elektronisch beveiligingssysteem zorgt ervoor dat het strijkijzer
automatisch wordt uitgeschakeld als het een tijdje heeft stilgestaan.
C
◗ Het rode waarschuwingslampje zal gaan knipperen om aan te
geven dat de automatische uitschakelfunctie het apparaat heeft
uitgeschakeld.
Om het strijkijzer weer te laten opwarmen:
1 Til het strijkijzer een stukje op of beweeg het even heen en
weer.
2 Het rode waarschuwingslampje gaat dan uit.Als de
temperatuur van de zoolplaat inmiddels lager is dan de
ingestelde strijktemperatuur, gaat het oranje
temperatuurcontrolelampje aan.
3 Als het oranje controlelampje gaat branden nadat u het
strijkijzer heen en weer bewogen heeft, wacht dan totdat het
uit is gegaan voordat u begint te strijken.
4 Als het oranje controlelampje niet gaat branden nadat u het
strijkijzer heen en weer bewogen heeft, dan is het strijkijzer
klaar voor gebruik.
NEDERLANDS
Page 28

Schoonmaken en onderhoud
Calc-Clean
Met deze ontkalkingsfunctie kunt u kalksteen en andere
verontreinigingen verwijderen.
Gebruik de ontkalkingsfunctie om de twee weken. Als het water in uw
regio erg hard is (d.w.z. wanneer er tijdens het strijken schilfertjes uit de
zoolplaat komen), moet u deze functie vaker gebruiken.
1 Zet de stoomregelaar op stand 0.
2 Vul het waterreservoir tot aan het maximumniveau.
Giet geen azijn of andere ontkalkingsmiddelen in het waterreservoir.
C
3 Draai de temperatuurregelaar naar MAX.
4 Steek de stekker in het stopcontact.
5 Haal, nadat het oranje controlelampje is uitgegaan, de stekker
uit het stopcontact.
6 Houd het strijkijzer boven de gootsteen en zet de
stoomregelaar op stand 1 (Calc-Clean). De stoomregelaar
springt een klein stukje omhoog.
C
7 Trek de stoomregelaar verder omhoog en verwijder deze uit
het strijkijzer.
C
8 Beweeg het strijkijzer heen en weer.
B
Er komt stoom en kokend water uit de zoolplaat, en tegelijkertijd worden
vuil en kalk (indien aanwezig) weggespoeld.
C
9 Als er kalkaanslag op de naald van de stoomregelaar zit, kunt u
de naald in een beetje azijn zetten om de kalkaanslag te
verwijderen.
Zorg ervoor dat de naald niet verbogen of beschadigd raakt.
28 NEDERLANDS
Page 29

29
C
10 Plaats de naald terug in het apparaat door de punt van de naald
precies in het midden van het gat te steken en het
uitsteekseltje aan de zijkant van de naald in de groef te laten
vallen. Zet de stoomregelaar op stand 0.
11 Herhaal het ontkalkingsproces als het strijkijzer nog steeds veel
verontreinigingen bevat.
Na het ontkalkingsproces
1 Steek de stekker in het stopcontact om de zoolplaat te laten
drogen.
2 Haal, nadat het oranje controlelampje is uitgegaan, de stekker
uit het stopcontact.
3 Beweeg het hete strijkijzer voorzichtig over een schone oude
lap om eventuele watervlekken van de zoolplaat te
verwijderen.
4 Laat het strijkijzer afkoelen voordat u het opbergt.
Na het strijken
1 Haal de stekker uit het stopcontact en laat het strijkijzer
afkoelen.
2 Veeg kalk en andere onzuiverheden met een vochtige doek en
schoonmaakmiddel (geen schuurmiddel!) van de zoolplaat.
Voorkom beschadiging van de zoolplaat door aanraking met metalen
voorwerpen te vermijden.
Gebruik nooit een schuurspons, azijn of andere chemicaliën om de
zoolplaat te reinigen.
3 Maak de bovenkant van het strijkijzer schoon met een vochtige
doek.
4 Spoel het waterreservoir regelmatig schoon met water. Leeg
het waterreservoir na het schoonmaken.
Opbergen
1 Haal de stekker uit het stopcontact, laat het strijkijzer afkoelen
en zet de stoomregelaar op stand 0.
NEDERLANDS
Page 30

30
C
2 Leeg het waterreservoir.
C
3 Wind het snoer rond de snoerhaspel.
4 Berg het stijkijzer altijd op door het op zijn achterkant op een
veilige en droge plaats neer te zetten.
Garantie & service
Als u informatie nodig heeft of als u een probleem heeft, bezoek dan
onze website (www.philips.com), of neem contact op met het Philips
Customer Care Centre in uw land (u vindt het telefoonnummer in het
'worldwide guarantee' vouwblad). Als er geen Customer Care Centre
in uw land is, ga dan naar uw Philips dealer of neem contact op met de
afdeling Service van Philips Domestic Appliances and Personal Care BV.
NEDERLANDS
Page 31

31
Oplossing
Controleer het netsnoer, de stekker en
het stopcontact.
Stel de temperatuurregelaar in op de
vereiste strijktemperatuur.
Kantel het strijkijzer achterover
wanneer u het vult.
Vul het waterreservoir (zie 'Het
waterreservoir vullen' in het hoofdstuk
'Klaarmaken voor gebruik).
Stel de stoomregelaar in op stand Á,
Ë of È (zie 'Stoomstrijken' in het
hoofdstuk 'Gebruik').
Stel de temperatuurregelaar in op een
stand die geschikt is voor
stoomstrijken (2 tot MAX). Zet het
strijkijzer op zijn achterkant en wacht
tot het temperatuurcontrolelampje is
uitgegaan voordat u begint met
strijken.
Zet het strijkijzer horizontaal en wacht
even voordat u de (verticale)
stoomstootfunctie opnieuw gaat
gebruiken.
Stel de temperatuurregelaar in op een
stand die geschikt is voor
stoomstrijken (2 tot MAX). Zet het
strijkijzer op zijn achterkant en wacht
tot het temperatuurcontrolelampje is
uitgegaan voordat u begint met
strijken.
Gebruik de Calc-Clean functie enkele
keren (zie 'Calc-Clean functie' in het
hoofdstuk 'Schoonmaken en
onderhoud').
Beweeg het strijkijzer even heen en
weer om de automatische
uitschakelfunctie uit te schakelen. Het
waarschuwingslampje houdt dan op
met knipperen.
Mogelijke oorzaak/oorzaken
Er is een aansluitprobleem.
De temperatuurregelaar staat op MIN.
U heeft het strijkijzer horizontaal
gehouden tijdens het vullen.
Onvoldoende water in het
waterreservoir.
De stoomregelaar staat op stand 0.
De zoolplaat is niet heet genoeg en/of
het druppelstopsysteem (alleen types
GC2225, GC2220, GC2130, GC2126
en GC2125) is in werking getreden.
De (verticale) stoomstootfunctie is te
vaak achter elkaar gebruikt in korte
tijd.
De zoolplaat is niet warm genoeg.
Door hard water vormen zich
schilfterjes in de zoolplaat.
De automatische uitschakelfunctie is
geactiveerd. Zie 'Automatische
uitschakelfunctie'.
Probleem
De stekker zit in het stopcontact, maar
de zoolplaat is koud.
Ik kan het waterreservoir niet tot het
maximumniveau vullen.
Geen stoom.
De stoomstootfunctie (alleen types
GC2225, GC2220, GC2215, GC2130,
GC2126, GC2125, GC2120, GC2115
en GC2110) of de verticale
stoomstootfunctie (alleen types
GC2225, GC2220, GC2215, GC2130,
GC2126, GC2125, GC2120 en
GC2115) werkt niet.
Er komen schilfertjes en
verontreinigingen uit de zoolplaat
tijdens het strijken.
Het rode lampje knippert (alleen types
GC2225 en GC2130).
Problemen oplossen
Dit hoofdstuk behandelt in het kort de problemen die u tegen kunt komen tijdens het gebruik van
uw strijkijzer. Lees de betreffende hoofdstukken voor verdere details. Als u er niet in slaagt het
probleem op te lossen, neem dan contact op met het Philips Customer Care Centre in uw land.
NEDERLANDS
Page 32

32
Oplossing
Zorg ervoor dat het klepje goed dicht
zit. U hoort een klik.
Stel de temperatuurregelaar in op een
stand die geschikt is voor
stoomstrijken (2 tot MAX). Zet het
strijkijzer op zijn achterkant en wacht
tot het oranje
temperatuurcontrolelampje is
uitgegaan voordat u begint met
strijken.
Leeg het waterreservoir voordat u het
strijkijzer opbergt, zet de
stoomregelaar op 0 en plaats het
strijkijzer op zijn achterkant.
Mogelijke oorzaak/oorzaken
Het klepje van de vulopening is niet
goed gesloten.
De temperatuur is te laag ingesteld.
Het strijkijzer is horizontaal neergezet
terwijl er nog water in het
waterreservoir zat.
Probleem
Er vallen druppeltjes water op de stof
(types GC2225, GC2220, GC2215,
GC2130, GC2126, GC2125 en
GC2120).
Er vallen druppeltjes water op de stof
(types GC2215, GC2120, GC2115,
GC2110 en GC2105).
Er druppelt water uit de zoolplaat
nadat het strijkijzer is afgekoeld of
opgeborgen.
NEDERLANDS
Page 33

33
Page 34

u
4239 000 51922
www.philips.com
 Loading...