

Page 1
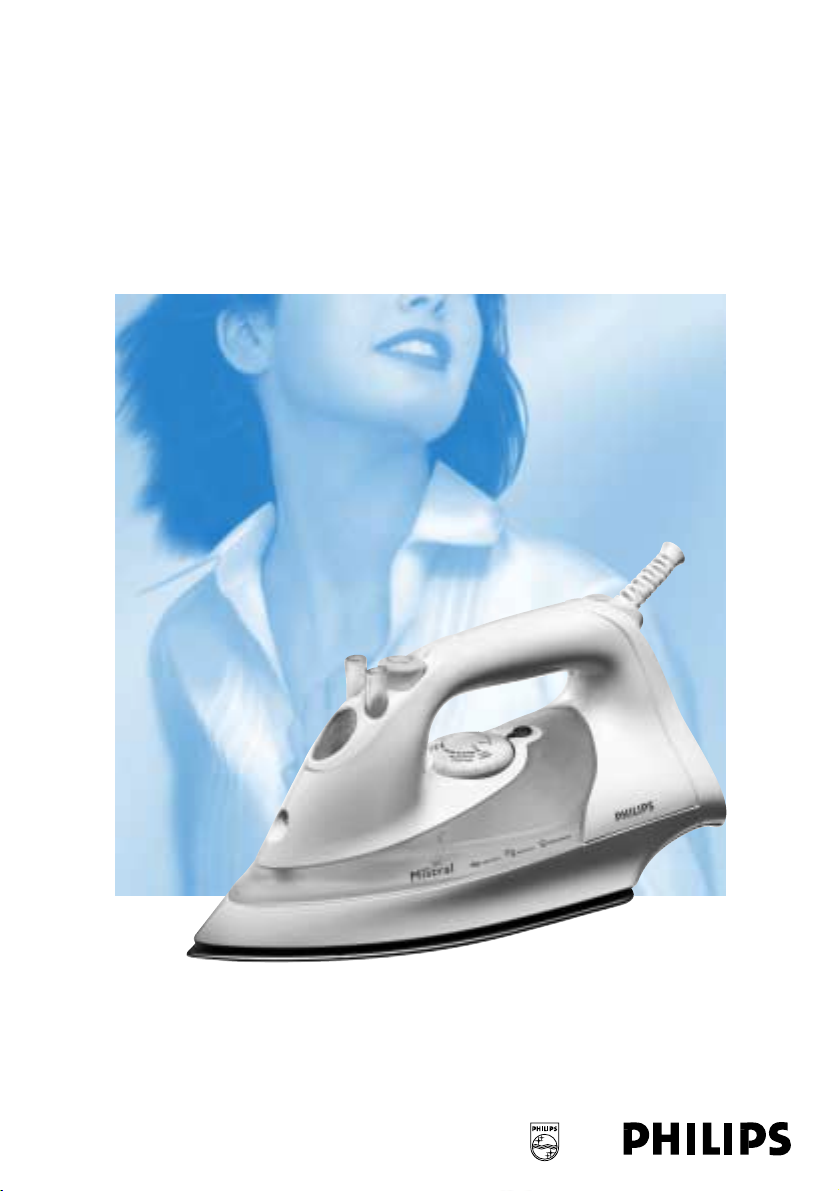
Mistral
GC2030, GC2025, GC2020, GC,2016, GC2015,
GC2011, GC2010, GC2006, GC2005
Page 2

2
Page 3
ENGLISH 4
POLSKI 12
ROMÂNĂ 20
РУССКИЙ 28
ČESKY 37
MAGYAR 44
SLOVENSKY 52
УКРАЇНСЬКА 60
HRVATSKI 68
EESTI 76
LATVISKI 84
LIETUVIŠKAI 92
SLOVENŠČINA 100
БЪЛГАРСКИ 108
SRPSKI 116
GC2030, GC2025, GC2020, GC2016, GC2015, GC2011, GC2010, GC2006, GC2005
3
Page 4

Important
For optimal safety, read these instructions carefully and look at the
illustrations before you start using the appliance.
- Never leave the iron unattended when it is connected to the mains.
- Young children should not be allowed to use the appliance without
supervision. Keep an eye on children to make sure that they do not
play with the appliance.
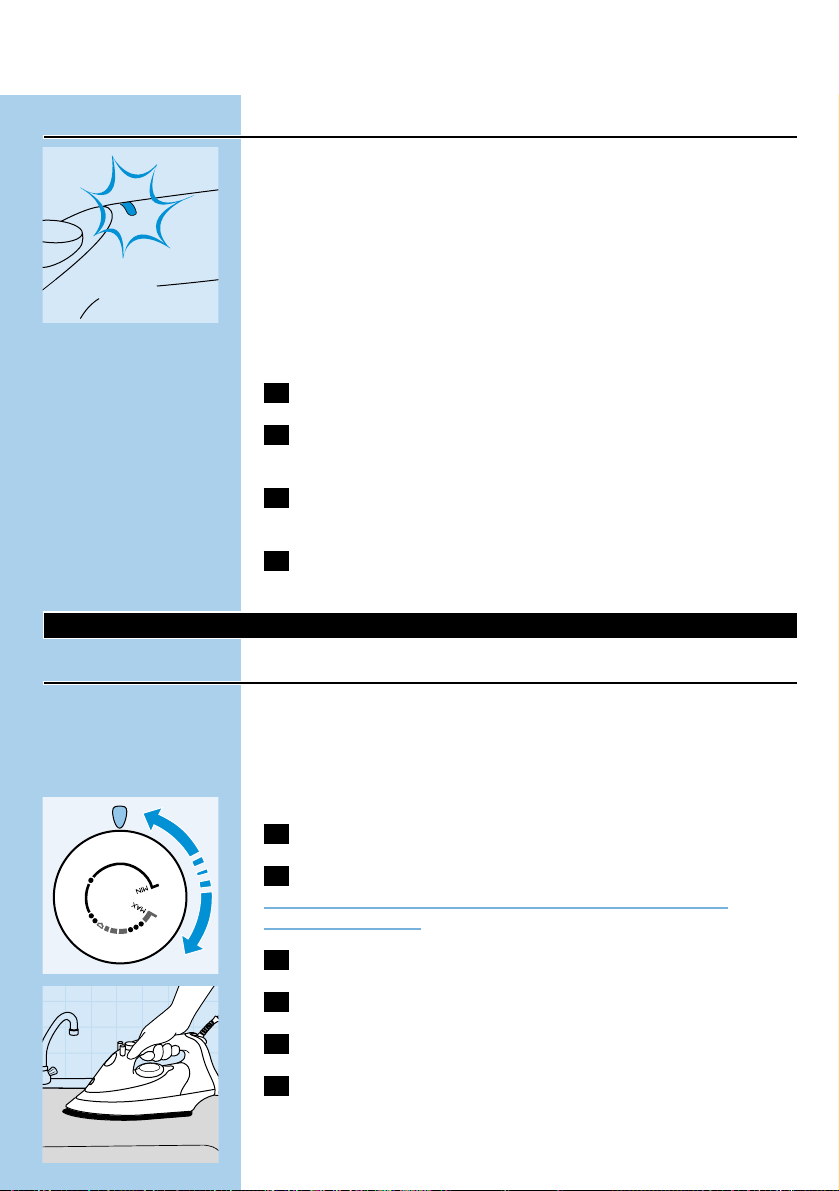
- The soleplate of the iron can become extremely hot and may cause
burns if touched. Do not allow the cord to come into contact with
the soleplate when it is hot.
- When you have finished ironing, when you clean the appliance, when
you fill or empty the water tank and also when you leave the iron
even for a short while: set the steam control to position O, put the
iron on its heel and remove the mains plug from the wall socket.
- If the mains cord of this appliance is damaged, it must always be
replaced by Philips or a service centre authorised by Philips, as
special tools and/or parts are required.
- Never use the appliance if it is damaged in any way.
Before first use
1 Check if the voltage indicated on the type plate corresponds to
the mains voltage in your home before you connect the
appliance.
2 Remove any sticker, protective foil or storage cover from the
soleplate.
3 Heat up the iron to maximum temperature and pass the iron
over a piece of damp cloth for several minutes to remove any
residues from the soleplate.
The iron may give off some smoke when you use it for the first time.
This will cease after a short while.
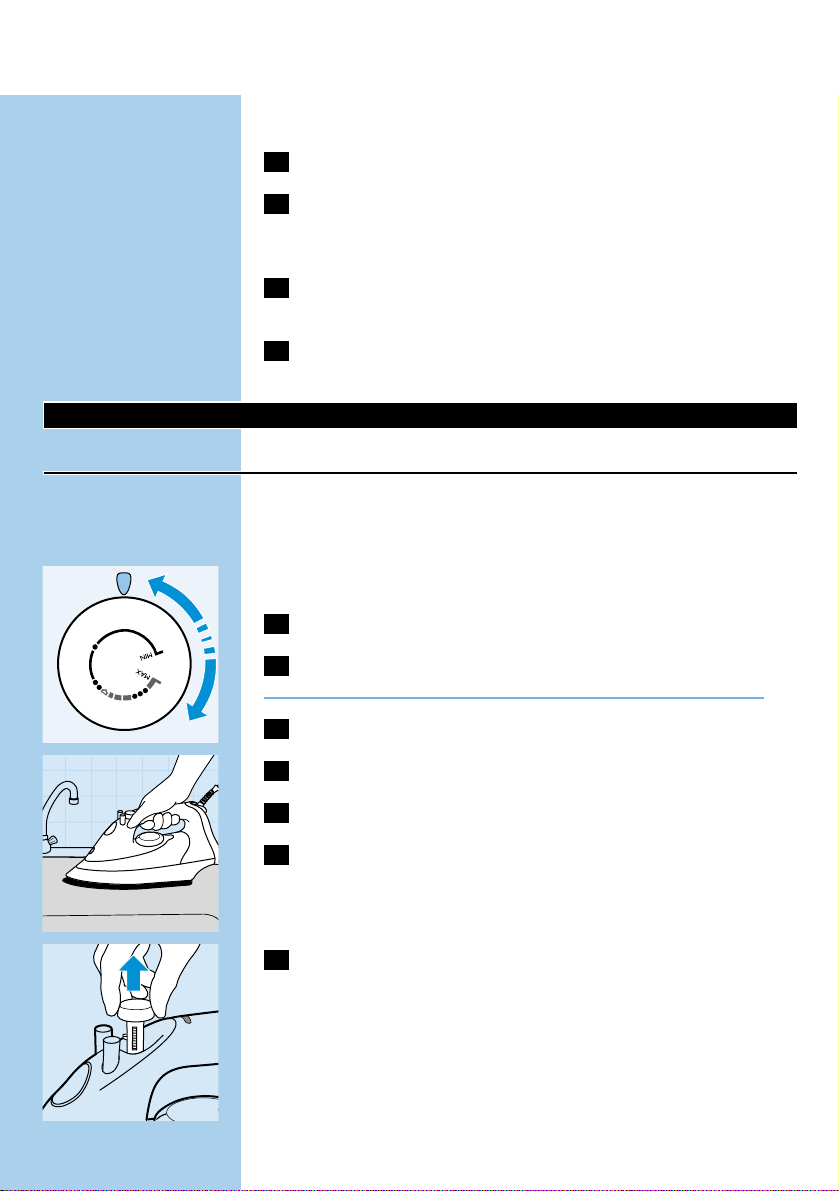
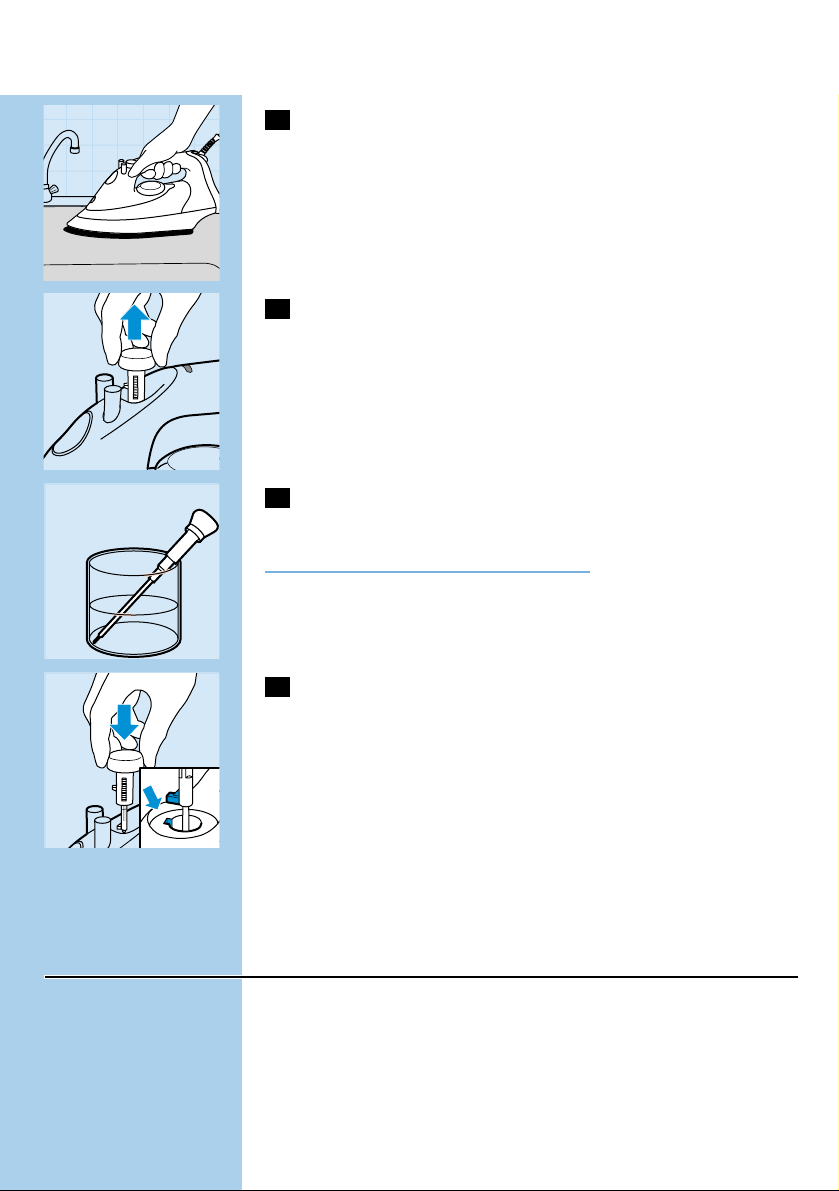
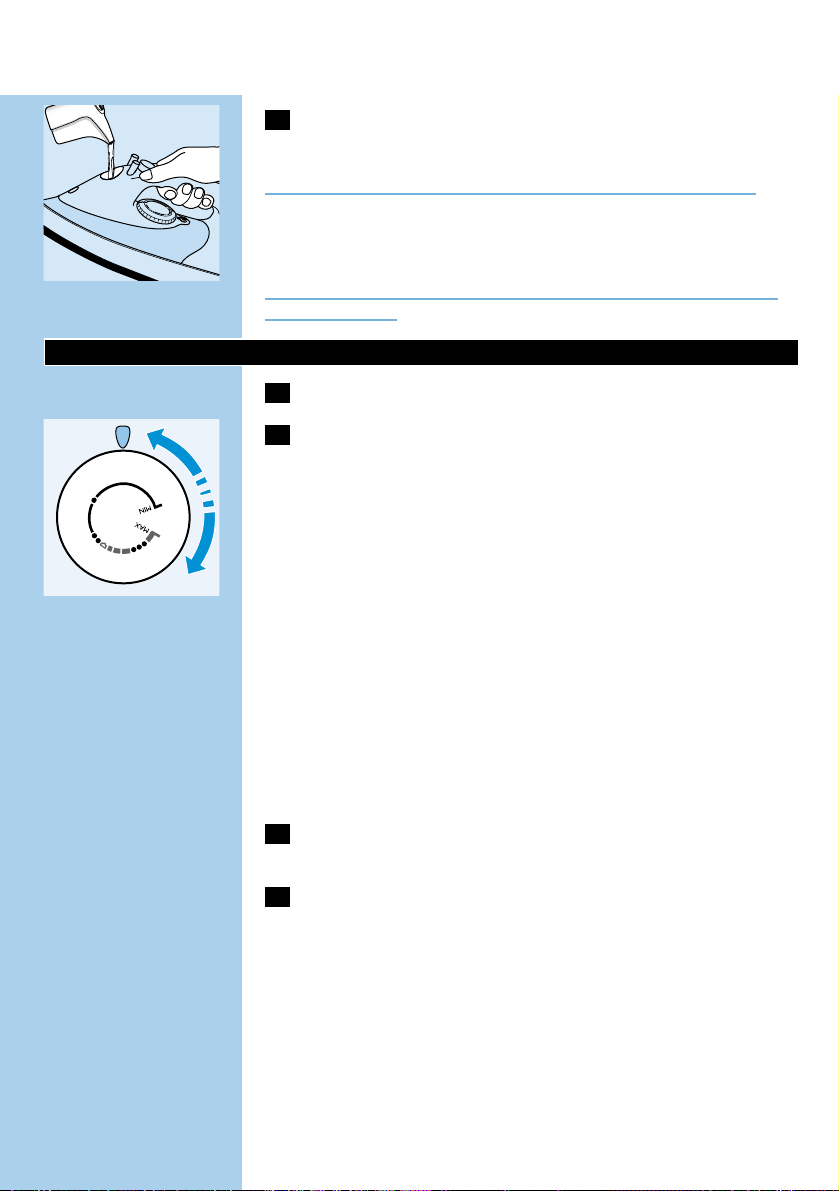
Filling the water tank
Never immerse the iron in water.
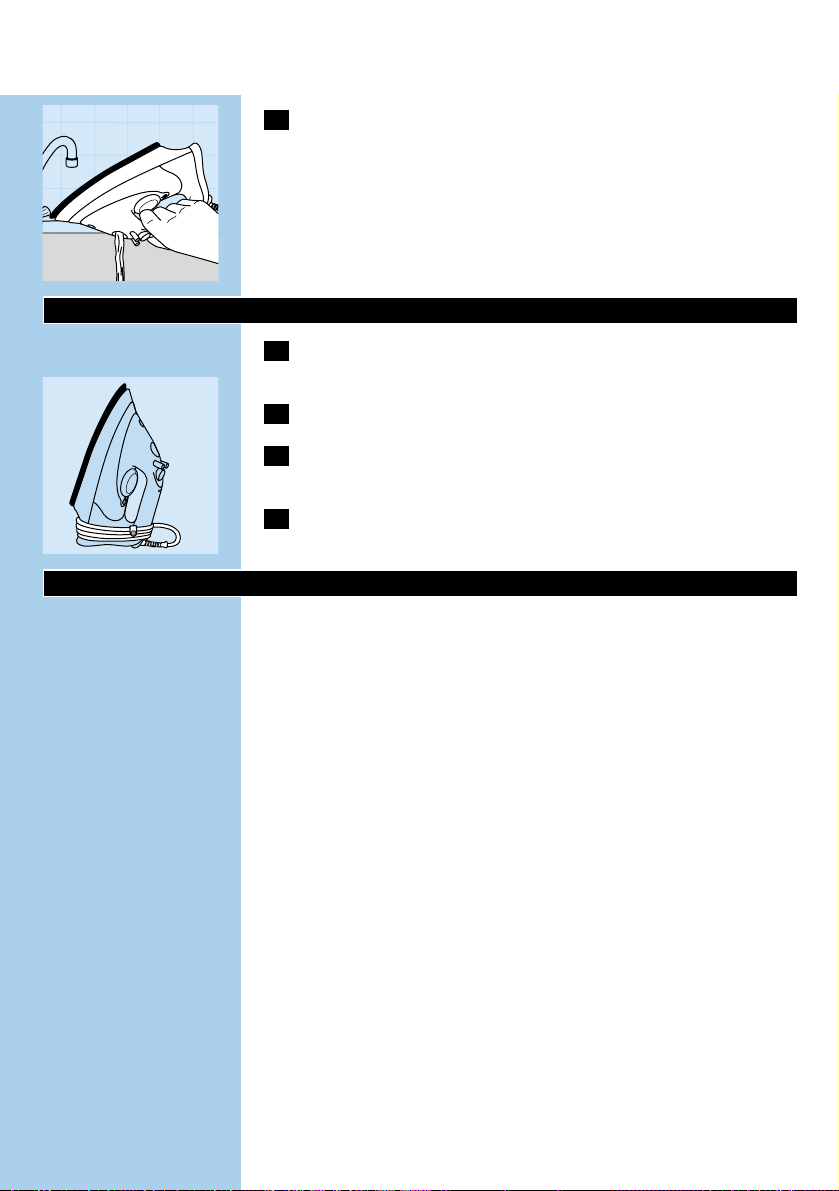
1 Remove the mains plug from the wall socket.
C
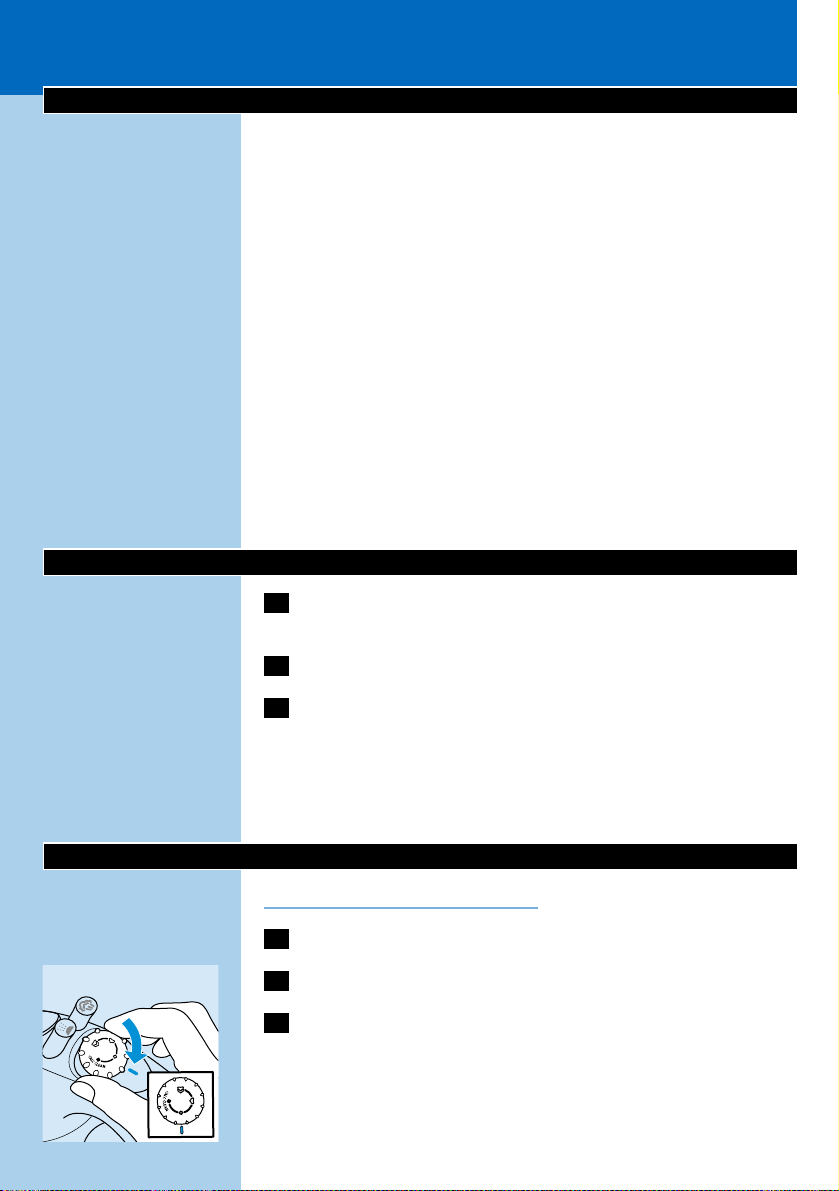
2 Set the steam control to position O (= no steam).
3 Tilt the iron.
ENGLISH4
Page 5
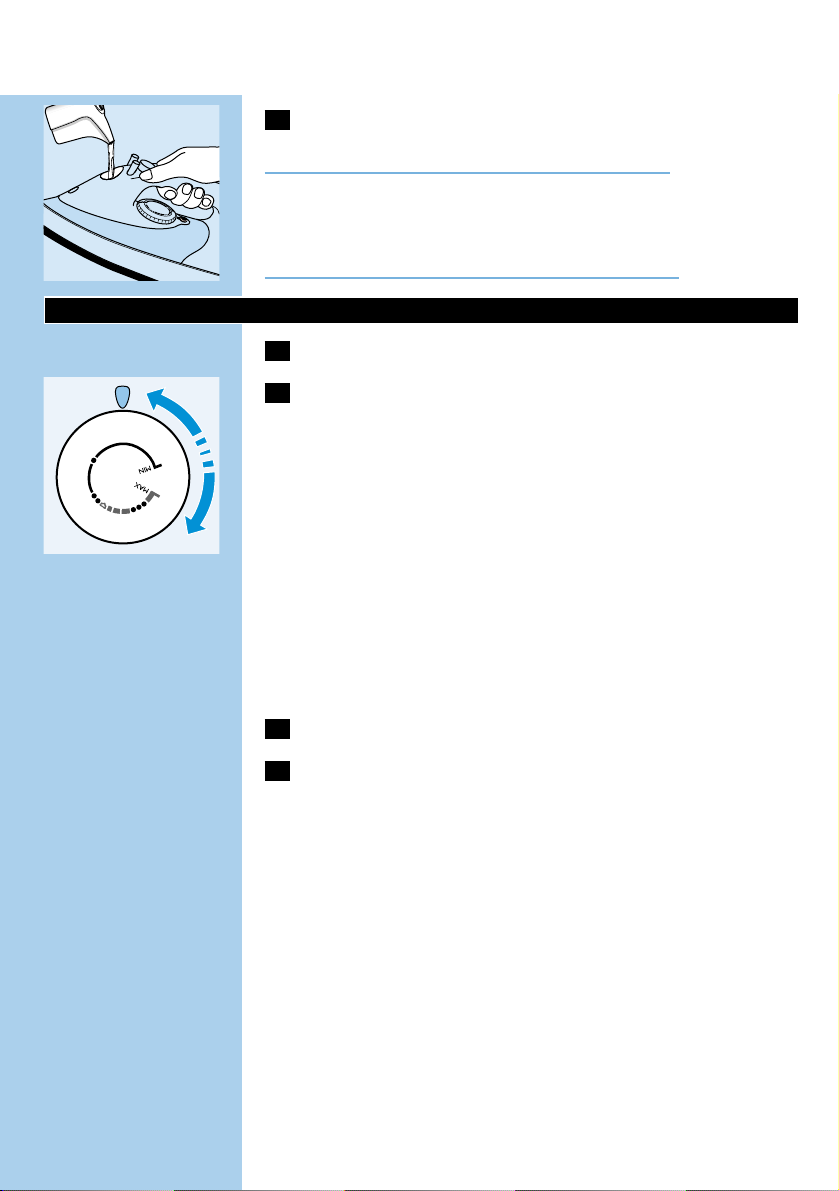
C
4 Pour tap water into the water tank by means of the filling jug
and fill the tank to maximum level.
Do not fill the water tank beyond the MAX indication.
If the tap water in your area is very hard, we advise you to use distilled
water.
Do not use vinegar, starch or chemically descaled water.
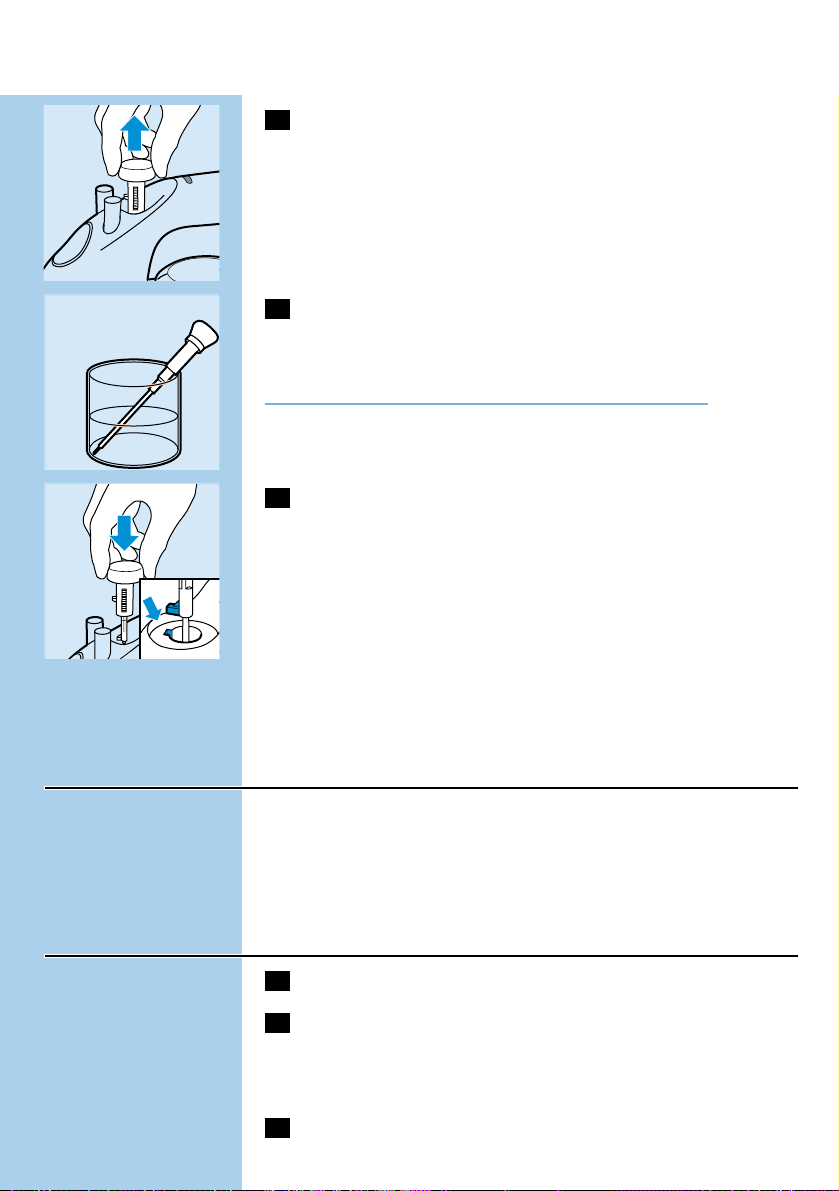
Setting the temperature
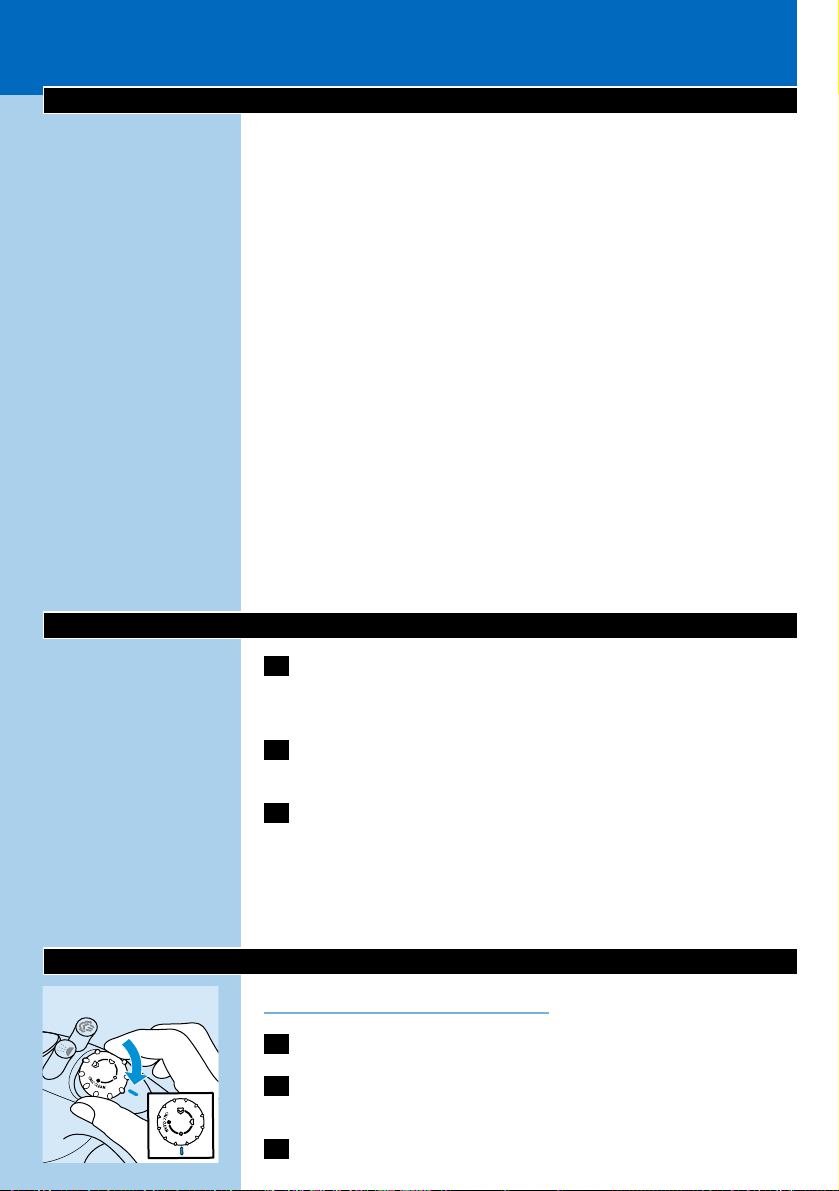
1 Put the iron on its heel.
C
2 Set the temperature dial to the required ironing temperature
by turning it to the position of the temperature indicator.
- Check the garment label for the required ironing temperature.
- 1 Synthetic fabrics (e.g. acrylic, viscose, polyamide, polyester)
- 1 Silk
- 2 Wool
- 3 Cotton, linen
- If you do not know what kind of fabric(s) a garment is made of,
determine the right ironing temperature by ironing a part that will
be invisible when you wear the garment.
- Silk, woollen and synthetic materials: iron the reverse side of the
fabric to prevent shiny patches.To prevent stains, avoid using the
spray function.
- Start ironing the articles that require the lowest ironing temperature,
such as those made of synthetic fibres.
3 Put the mains plug in an earthed wall socket.
4 When the amber temperature pilot light has gone out, wait a
while before you start ironing.
B
The amber pilot light will come on from time to time during ironing.
For auto-shut-off versions (only type GC2030):
If the auto-shut-off function has been activated (red pilot light blinks),
move the iron slightly to deactivate it (red pilot light stops blinking).
ENGLISH 5
N
Y
L
O
N
N
Y
L
O
N
S
S
I
O
L
K
I
E
L
A
W
I
N
O
E
O
L
N
N
I
E
L
N
I
L
N
O
T
O
N
C
O
T
T
O
C
Page 6

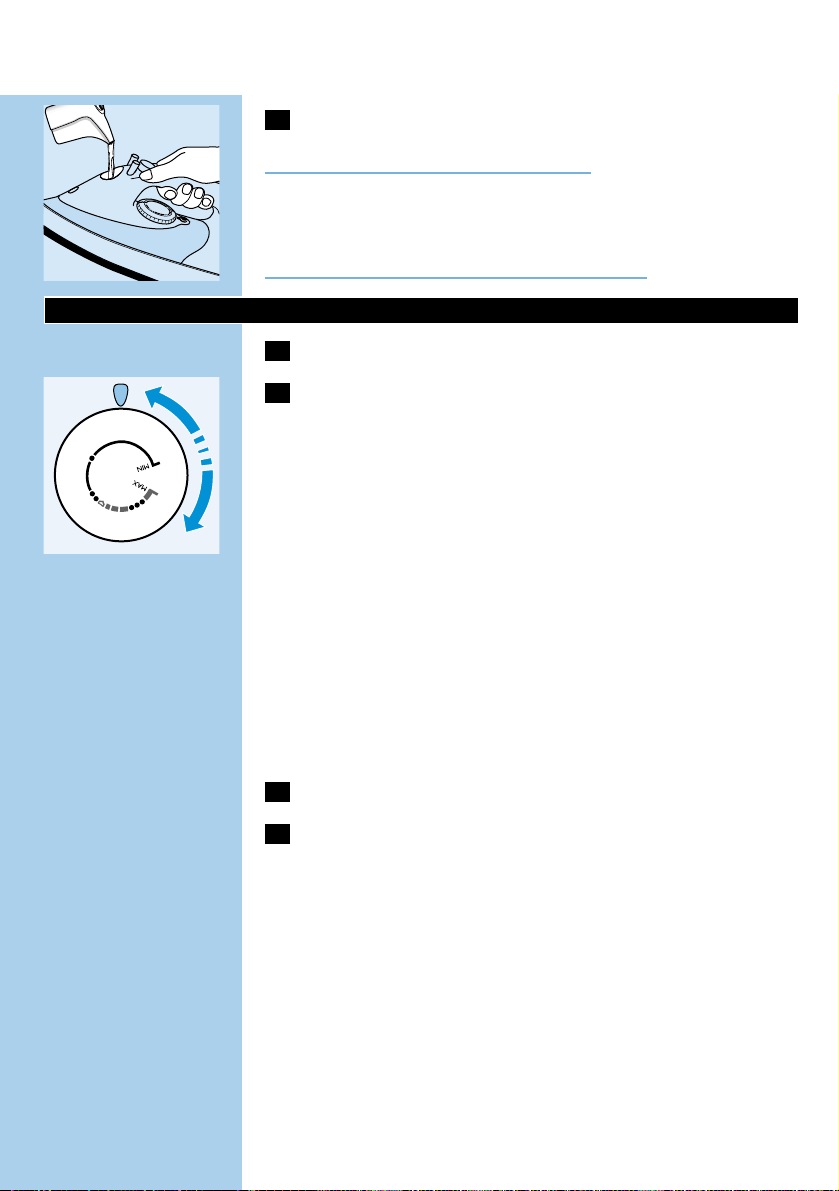
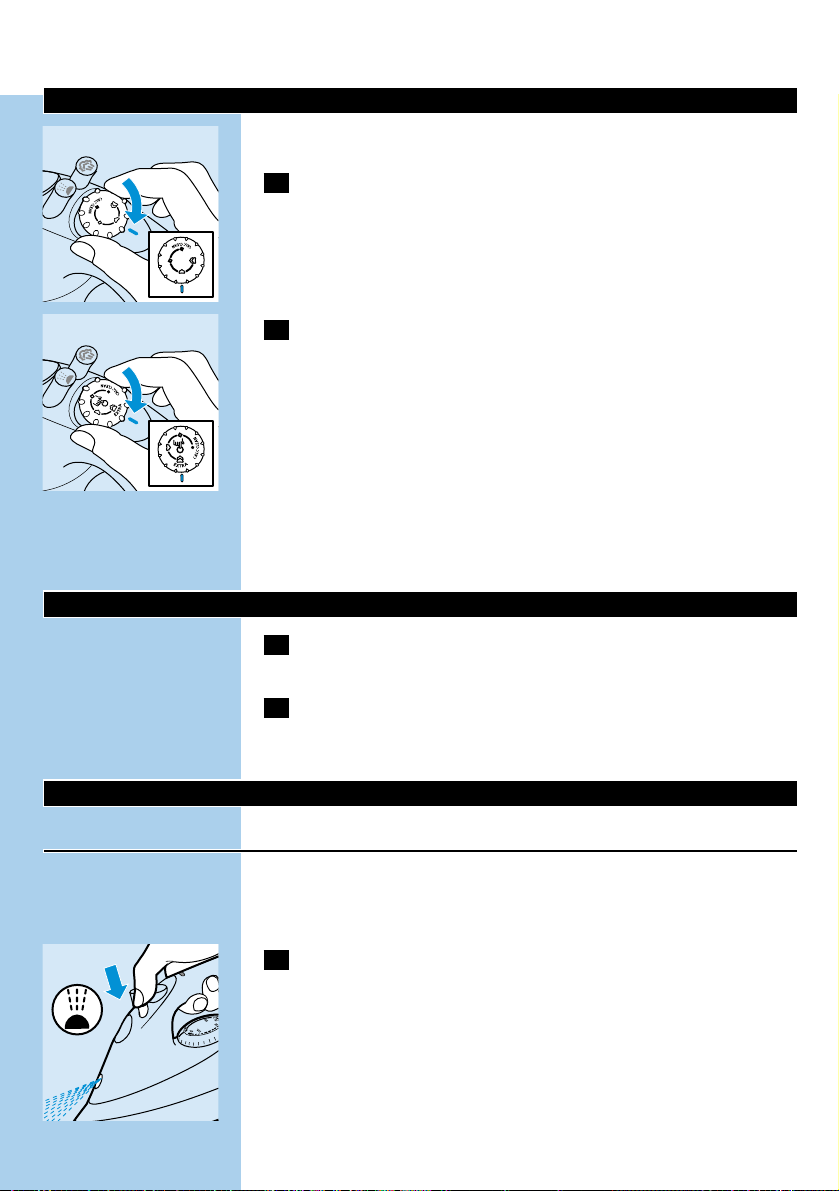
Steam ironing
Make sure that there is enough water in the water tank.
C
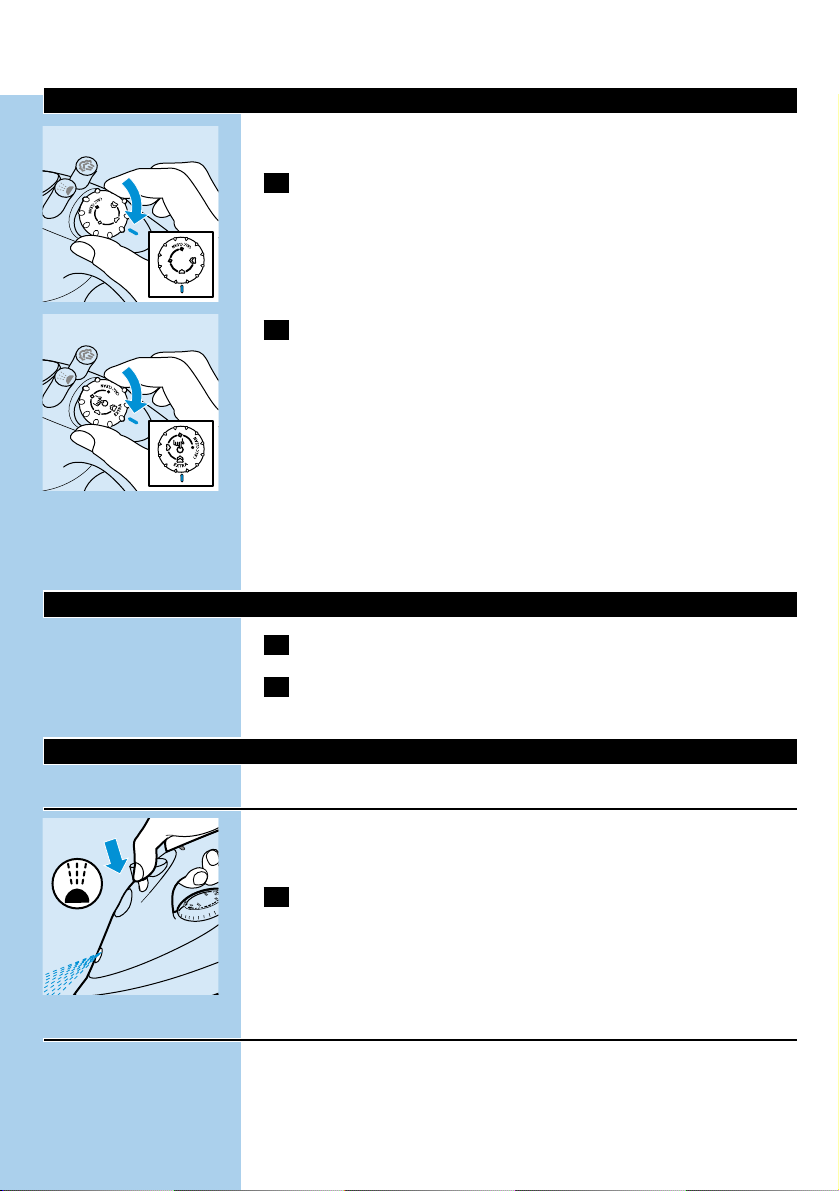
1 Set the temperature dial to the recommended position.
See 'Setting the temperature'.
C
2 Set the steam control to the appropriate steam position.
- q for moderate steam (temperature settings 2 to 3)
- w for maximum steam (temperature settings 3 to MAX)
B
Steaming will start as soon as the set temperature has been reached.
◗ Types GC2005, 2006,2010, 2011,2015, 2016:Water may leak from
the soleplate if the set temperature is too low (MIN to 2).
Ironing without steam
1 Set the steam control to position O ( = no steam).
2 Set the temperature dial to the recommended position.
See 'Setting the temperature'.
Other features
Spraying
To remove stubborn creases at any temperature
Make sure that there is enough water in the water tank.
C
1 Press the spray button a couple of times to moisten the
laundry.
Extra Steam (types GC2020, 2006, 2005 only)
This function provides extra stream to remove stubborn creases.
The Extra Steam function only works at temperature settings between
3 and MAX.
C
1 Set the steam control to highest position w.
ENGLISH6
Page 7
C
2 Press and hold the Extra Steam button down for max. 5
seconds.
3 Wait for at least 1 minute before you use the Extra Steam
function again to prevent water from dripping out of the
soleplate.
Shot of Steam (types GC2030, 2025, 2016, 2015, 2011, 2010
only)
A powerful shot of steam helps to remove stubborn creases.
The Shot-of-Steam function only works at temperature settings
between 2 and MAX.
C
1 Press and release the Shot-of-Steam button.
Vertical Shot of Steam (types GC2030, 2025, 2016, 2015 only)
C
1 The Shot of Steam function can also be used when you hold
the iron in vertical position.
Never direct the steam towards people.
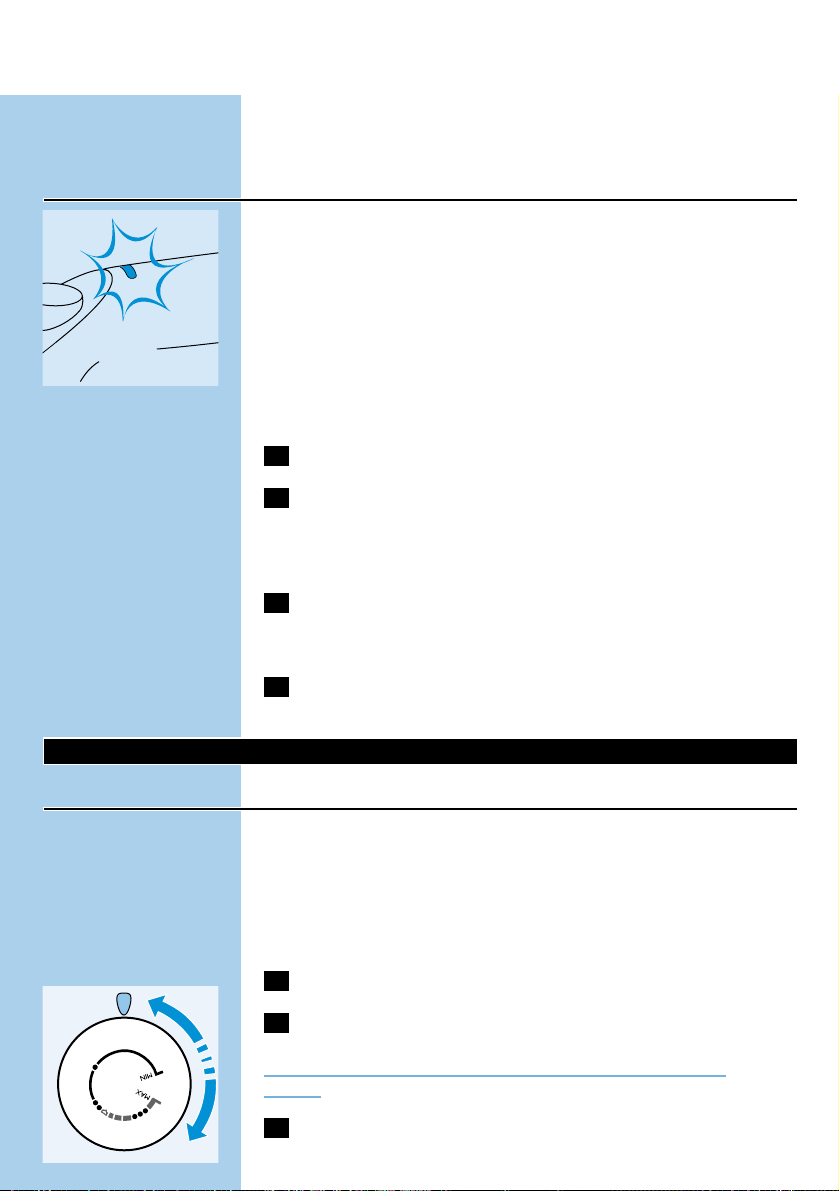
Drip Stop (types GC2030, 2025, 2020 only)
This iron is equipped with a drip stop function: the iron automatically
stops steaming when the temperature is too low to prevent water
from dripping out of the soleplate. When this happens you will hear a
click.
Automatic shut-off (type GC2030 only)
C
◗ An electronic safety device will automatically switch the heating
element off if the iron has not been moved for a while.
◗ To indicate that the heating element has been switched off, the red
auto-off pilot light will start blinking.
ENGLISH 7
Page 8
To heat up the iron again:
1 Pick up the iron or move it slightly.
2 The red auto-off pilot light will go out.The amber temperature
pilot light will come on, depending on the soleplate
temperature.
3 If the amber pilot light comes on after the iron has been
moved, wait for it to go out before you start ironing.
4 If the amber light does not come on after the iron has been
moved, the iron is ready for use.
Cleaning and maintenance
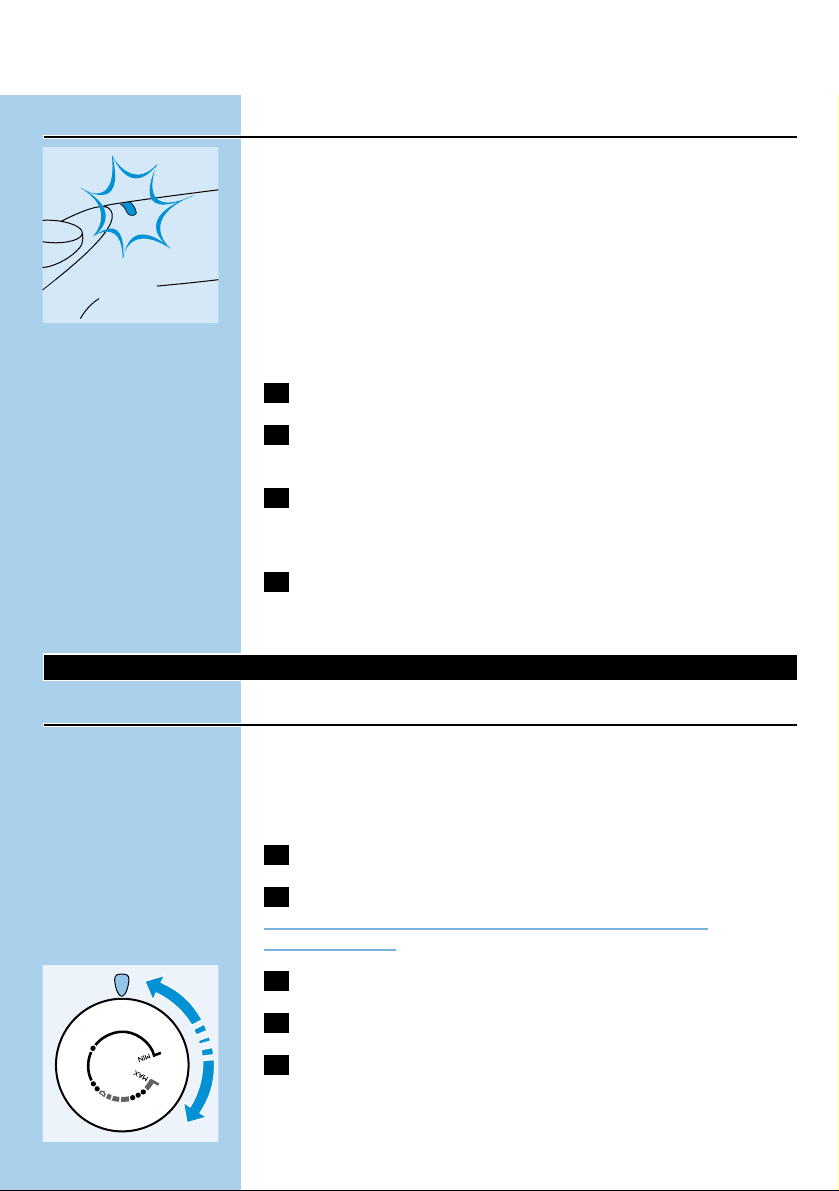
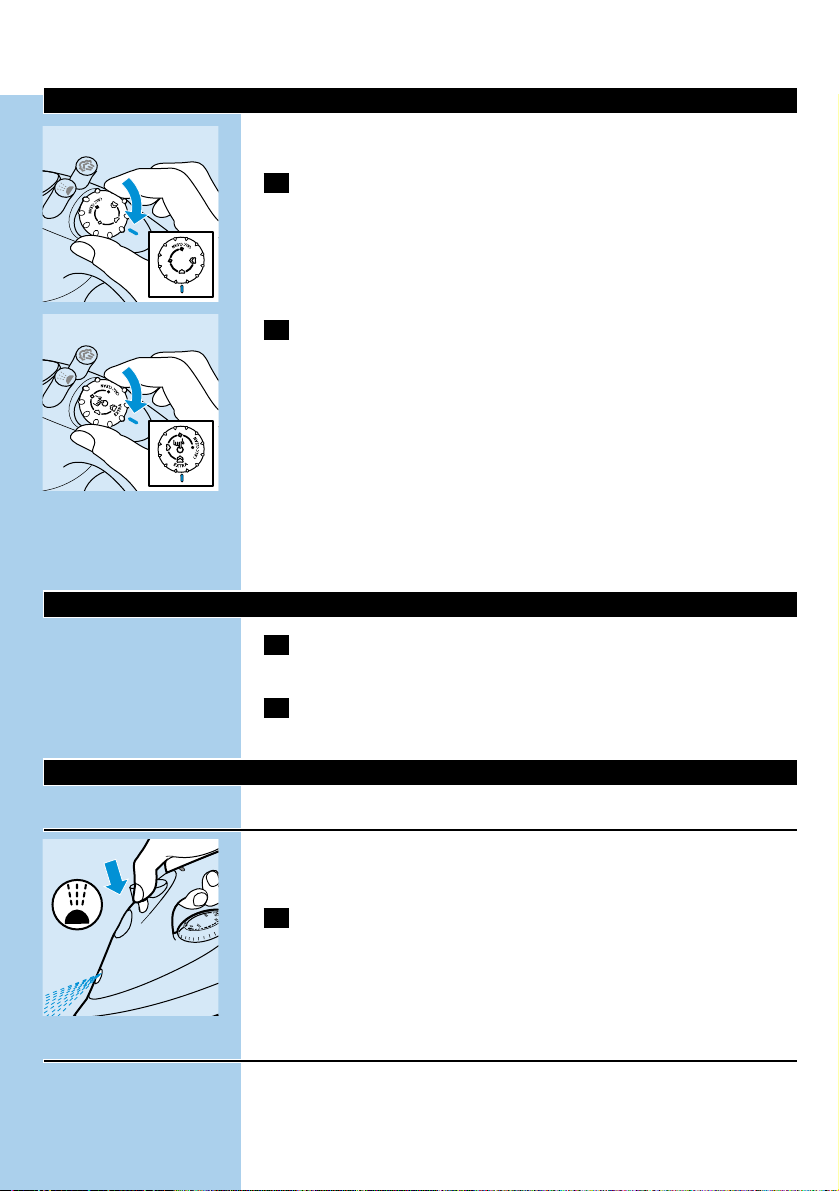
Calc-Clean
The Calc-Clean function removes scale and impurities.
Use the Calc-Clean function once every two weeks. If the water in
your area is very hard (i.e. when flakes come out of the soleplate
during ironing), the Calc-Clean function should be used more
frequently.
1 Set the steam control to position O.
2 Fill the water tank to the maximum level.
Do not pour vinegar or other descaling agents into the water tank..
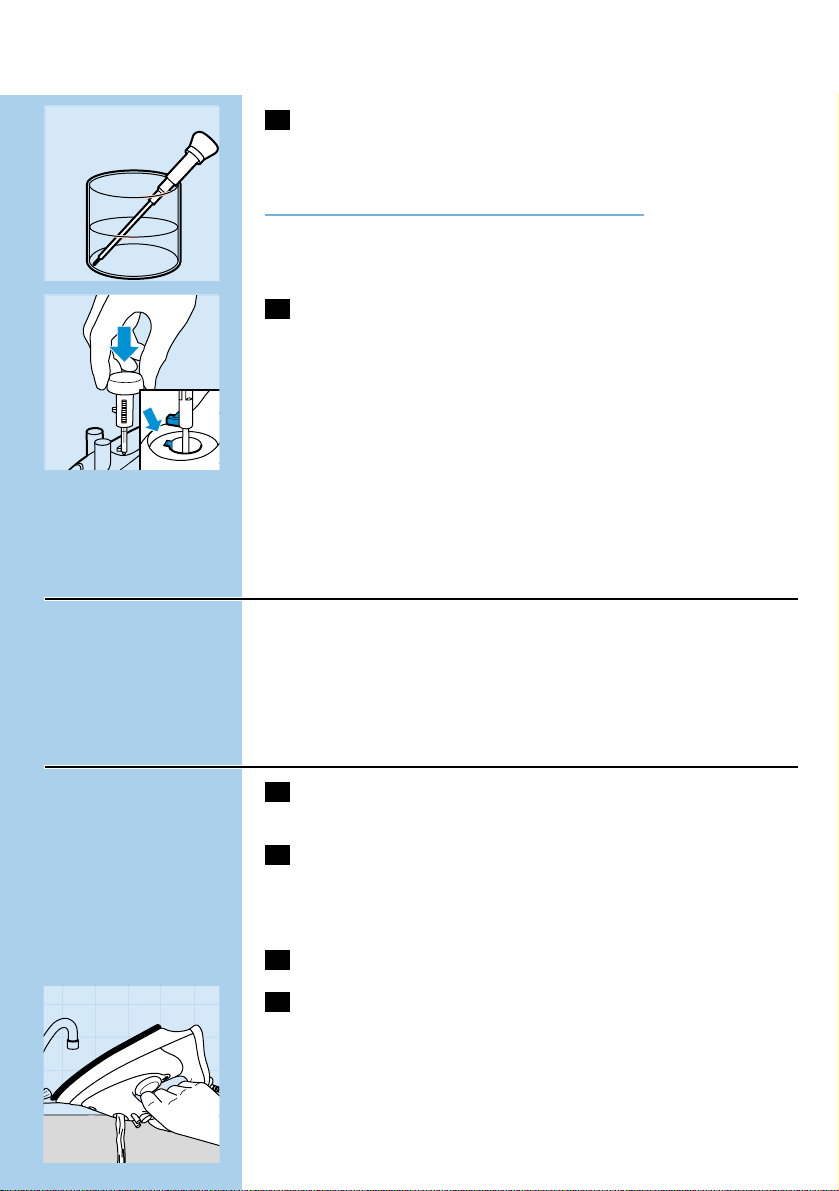
C
3 Set the temperature dial to MAX.
4 Put the plug in the wall socket.
5 Unplug the iron when the amber pilot light has gone out.
C
6 Hold the iron over the sink and set the steam control to
position v (Calc-Clean).The steam control knob will spring up
slightly.
C
7 Pull the steam control up slightly and gently shake the iron.
B
Steam and boiling water will come out of the soleplate. Impurities and
scale (if any) will be flushed out.
ENGLISH8
N
Y
L
O
N
N
Y
L
O
N
S
S
I
O
L
K
I
E
L
A
W
I
N
O
E
O
L
N
N
I
E
L
N
I
L
N
O
T
O
N
C
O
T
T
O
C
Page 9
C
8 Pull the steam control knob further up to remove the steam
control needle. Use vinegar to remove scale, if any, from the
needle.
Do not bend or damage the steam control needle.
C
9 Put the steam control needle back by inserting the point of the
needle exactly in the centre of the hole and by fitting the small
projection on the side of the needle into the slot. Set the
steam control knob to position O.
Repeat the Calc-Clean process if the iron still contains a lot
of impurities.
After the Calc-Clean process
- Plug in the iron to let the soleplate dry up.
- Unplug the iron when the amber pilot light has gone out.
- Move the iron gently over a piece of used cloth to remove any water
stains that may have formed on the soleplate.
- Let the iron cool down before you store it.
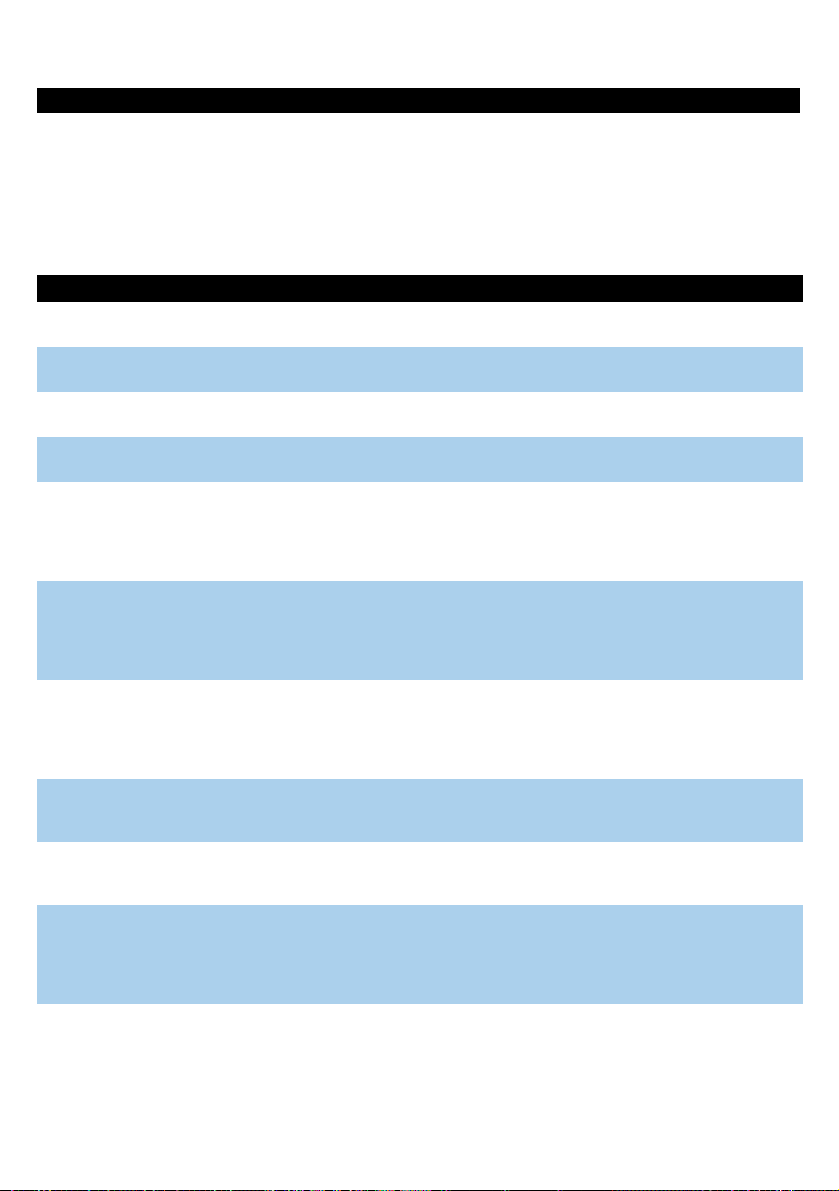
After ironing
1 Remove the mains plug from the wall socket and let the iron
cool down.
2 Wipe scale and any other deposits off the soleplate with a
damp cloth and a non-abrasive (liquid) cleaner.
Keep the soleplate smooth: avoid hard contact with metal objects.
3 Clean the upper part of the appliance with a damp cloth.
C
4 Regularly rinse the water tank with water. Empty the water
tank after cleaning.
ENGLISH 9
Page 10
Storage
1 Remove the mains plug from the wall socket and set the steam
control to position O.
2 Empty the water tank.
C
3 Let the iron cool down.Wind the mains cord round the cord
storage facility and fix it with the cord clip.
4 Always store the iron standing on its heel in a safe and dry
place.
Information & service
If you need information or if you have a problem, please visit the Philips
Web site at www.philips.com or contact the Philips Customer Care
Centre in your country (you will find its phone number in the
worldwide guarantee leaflet). If there is no Customer Care Centre in
your country, turn to your local Philips dealer or contact the Service
Department of Philips Domestic Appliances and Personal Care BV.
ENGLISH10
Page 11
Solution
Check the mains cord, the plug and
the wall socket.
Set the temperature dial to the
required temperature.
Fill the water tank (see Filling the
water tank).
Set to steam position q or w (see
Steam ironing).
Set the temperature dial to a
temperature in the steam area (2 to
MAX). Put the iron on its heel and
wait until the amber pilot light has
gone out before you start ironing.
Put the iron in horizontal position and
wait for a while before using the
(Vertical) Shot of Steam function
again.
Set the temperature dial to a
temperature in the steam area (2 to
MAX). Put the iron on its heel and
wait until the amber pilot light has
gone out before you start ironing.
Use the Calc-Clean function a few
times (see 'Calc-Clean').
Shake the iron lightly to deactivate the
auto shut-off function: the pilot light
will stop blinking.
Set the temperature dial to a
temperature in the steam area (2 to
MAX). Put the iron on its heel and
wait until the amber pilot light has
gone out before you start ironing.
Possible cause(s)
Connection problem.
Temperature dial set at MIN.
Not enough water in the water tank.
The steam control has been set to
position O.
The soleplate is not hot enough
and/or the Drip Stop function (types
GC2030, 2025, 2020) has been
activated.
The (Vertical) Shot of Steam function
has been used too often within a very
short period.
The soleplate is not hot enough.
Hard water forms flakes inside the
soleplate.
The auto shut-off function has been
activated. See "Automatic shut-off"
section.
The temperature has been set too
low.
Problem
The iron is plugged in but the soleplate
is cold.
No steam
No Shot of Steam (type GC2010,
2011, 2015, 2016, 2025, 2030 only) or
no Vertical Shot of Steam (Types
GC2030, 2025,2016, 2015 only)
Flakes and impurities come out of the
soleplate during ironing.
Red pilot light is blinking (type GC2030
only).
Water drips out of the soleplate (types
GC2016, 2015, 2011, 2010, 2006, 2005
only).
ENGLISH 11
Troubleshooting
This chapter summarises the most common problems you could encounter with your iron. Please
read the different sections for more details. If you are unable to solve the problem, please contact
the Philips Customer Care Centre in your country. See the worldwide guarantee leaflet for
telephone numbers of the or visit our website at www.philipsonline.com.
Page 12
Ważne
Aby zapewnić bezpieczne użytkowanie urządzenia, zanim włączysz je
po raz pierwszy,uważnie przeczytaj poniższą instrukcję i zapoznaj się z
ilustracjami.
- Nigdy nie zostawiaj podłączonego do sieci żelazka bez nadzoru.
- Osoby upośledzone nie powinny używać żelazka bez nadzoru. Nie
pozwól dzieciom bawić się urządzeniem.
- Stopa żelazka może być bardzo gorąca i w przypadku dotknięcia
może spowodować oparzenia.Uważaj, by przewód zasilający nie
stykał się z gorącą stopą żelazka.
- Po skończeniu prasowania, podczas mycia żelazka, podczas
napełniania lub opróżniania zbiornika na wodę, a także gdy
zostawiasz żelazko choćby na krótką chwilę: ustaw regulator pary na
pozycję O,ustaw żelazko w pozycji pionowej i wyjmij wtyczkę z
gniazdka ściennego.
- Jeśli przewód zasilający urządzenia zostanie uszkodzony, należy
wymienić go w autoryzowanym punkcie serwisowym firmy Philips,
gdyż w tym celu potrzebne są specjalne narzędzia i / lub części
zamienne.
- Nigdy nie używaj żelazka, jeśli jest uszkodzone.
Przed pierwszym użyciem
1 Sprawdź, czy napięcie znamionowe odpowiada napięciu
sieciowemu w Twoim domu.
2 Usuń ze stopy wszelkie naklejki, folię ochronną lub osłonkę.
3 Rozgrzej żelazko do maksymalnej temperatury i przesuwaj je
przez kilka minut po niepotrzebnym kawałku wilgotnego
materiału, aby usunąć wszelkie zanieczyszczenia ze stopy.
Podczas pierwszego użycia,z żelazka może wydostawać się dym.
Zjawisko to ustanie po krótkiej chwili.
Napełnianie zbiornika na wodę
Nigdy nie zanurzaj żelazka w wodzie.
1 Wyjmij wtyczkę z gniazdka ściennego.
C
2 Ustaw regulator pary na pozycję 0 (= brak pary).
3 Przechyl żelazko.
POLSKI12
Page 13

C
4 Wlej do zbiornika za pomocą pojemnika wodę z kranu,
napełniając zbiornik do poziomu maksymalnego.
Nie napełniaj zbiornika powyżej oznaczenia MAX.
Jeśli woda wodociągowa w Twoim rejonie jest bardzo twarda, zalecamy
używanie wody destylowanej.
Nie używaj octu, krochmalu ani wody chemicznie destylowanej.
Ustawianie temperatury
1 Postaw żelazko na tylnej ściance.
C
2 Ustaw termostat na wybraną temperaturę prasowania,
przekręcając pokrętło na pozycję oznaczającą daną temeraturę.
- Sprawdź na wszywce z informacją o zalecanym praniu i prasowaniu,
jaka powinna być temperatura prasowania.
- 1 włókna syntetyczne (np. akryl, wiskoza, poliamid, poliester).
- 1 jedwab
- 2 wełna
- 3 bawełna, len
- Jeśli nie wiesz, z jakiego materiału uszyte jest ubranie, wypróbuj
właściwą temperaturę prasowania, prasując je najpierw w miejscu
niewidocznym podczas noszenia.
- Materiały jedwabne, wełniane i syntetyczne prasuj po lewej stronie,
aby zapobiec wyświeceniu.Aby uniknąć zacieków, nie używaj funkcji
spryskiwania.
- Zacznij prasowanie od rzeczy wymagających najniższej temperatury,
np. uszytych z włókien syntetycznych.
3 Włącz wtyczkę do uziemionego gniazdka.
4 Jeśli zgasła pomarańczowa lampka kontrolna, odczekaj chwilę,
zanim przystąpisz do prasowania.
B
Podczas prasowania pomarańczowa lampka kontrolna będzie się co
jakiś czas zapalać.
Dla modeli z automatycznym wyłącznikiem (tylko model GC2030)
Jeśli zadziałała funkcja automatycznego wyłącznika (miga czerwona
lampka kontrolna), przesuń żelazko delikatnie, by zdezaktywować tę
funkcję (czerwona lampka kontrolna przestanie migać).
POLSKI 13
N
Y
L
O
N
N
Y
L
O
N
S
S
I
O
L
K
I
E
L
A
W
I
N
O
E
O
L
N
O
T
O
N
C
O
T
T
O
C
N
N
I
E
L
N
I
L
Page 14
Prasowanie parowe
Upewnij się, czy w zbiorniku jest wystarczająca ilość wody.
C
1 Ustaw termostat na zalecaną temperaturę.
Patrz rozdział "Ustawianie temperatury".
C
2 Ustaw regulator pary na odpowiednią pozycję.
- q umiarkowana ilość pary
(ustawienia temperatury od 2 do 3)
- w maksymalna ilość pary
(ustawienia temperatury od 3 do maksymalnej).
B
Para zacznie się wydobywać, gdy tylko zostanie osiągnięta wybrana
temperatura.
◗ Modele: GC2005, 2006, 2010, 2015, 2016: Jeśli została ustawiona za
niska temperatura (od minimumalnej do 2), ze stopy żelazka
może wyciekać woda.
Prasowanie bez pary
1 Ustaw pokrętło pary na pozycję O (= bez pary).
2 Ustaw termostat na zalecaną temperaturę.
Patrz rozdział "Ustawianie temperatury".
Inne funkcje
Spryskiwanie
Usuwa uporczywe zagniecenia przy każdej temperaturze prasowania.
Upewnij się, czy w zbiorniku jest wystarczająca ilość wody.
C
1 Wciśnij kilkakrotnie przycisk spryskiwacza, by zwilżyć rzeczy
przeznaczone do prasowania.
Dodatkowa para (tylko modele GC 2020, 2006, 2005).
Funkcja ta zapewnia dodatkową ilość pary, umożliwiającą usunięcie
uporczywych zagnieceń.
Funkcja dodatkowej pary działa tylko przy ustawieniach temperatury
od 3 do maksymalnej.
POLSKI14
Page 15
C
1 Ustaw pokrętło pary ma pozycję maksymalną w.
C
2 Wciśnij i przytrzymaj przez 5 sekund przycisk dodatkowej pary.
3 Odczekaj co najmniej minutę zanim ponownie użyjesz funkcji
dodatkowej pary.W ten sposób zapobiegniesz kapaniu wody ze
stopy żelazka.
Uderzenie parowe (tylko modele GC2030, 2025,2016,2015,
2011, 2010)
Mocne uderzenie pary pomaga usuwać uporczywe zagniecenia.
Funkcja ta działa tylko przy ustawieniach temperatury od 2 do
maksymalnej.
C
1 Wciśnij i zwolnij przycisk "uderzenie parowe".
Pionowe uderzenie parowe (tylko modele GC2030,2025,
2016, 2015)
C
1 Funkcji Uderzenia parowego możesz również użyć, trzymając
żelazko w pozycji pionowej.
Nigdy nie kieruj pary w stronę ludzi.
Drip Stop - funkcja zapobiegająca kapaniu (tylko modele
GC2030, 2025, 2020)
Modele te zostały wyposażone w funkcje zapobiegającą kapaniu:
żelazko automatycznie zatrzymuje wytwarzanie pary, jeśli temperatura
jest za niska. Dzięki temu woda nie kapie spod stopy żelazka.W chwili
uaktywnienia tej funkcji usłyszysz kliknięcie.
POLSKI 15
Page 16
Automatyczny wyłącznik (tylko model GC2030)
C
◗ Elektoniczne zabezpieczenie automatycznie wyłącza żelazko, gdy
nie jest ono w ruchu przez jakiś czas.
◗ Czerwona migająca lampka kontrolna sygnalizuje wyłączenie
elementu grzejnego.
Aby ponownie rozgrzać żelazko:
1 Porusz delikatnie żelazkiem.
2 Czerwona lampka kontrolna zgaśnie. Pomarańczowa lampka
kontrolna zaświeci się,w zależności temperatury stopy żelazka.
3 Jeśli pomarańczowa lampka kontrolna zaświeci się po
poruszeniu żelazkiem, odczekaj aż zgaśnie, zanim zaczniesz
prasować.
4 Jeśli pomarańczowa lampka kontrolna nie zaświeci się po
poruszeniu żelazkiem, możesz od razu przystąpić do
prasowania.
Mycie i konserwacja
Funkcja Calc-Clean
Funkcja Calc-Clean usuwa kamień i inne zanieczyszczenia.
Korzystaj z tej funkcji raz na dwa tygodnie. Jeśli woda w Twoim rejonie
jest bardzo twarda (tzn. jeśli podczas prasowania spod stopy żelazka
wydostają się osady), używaj tej funkcji częściej.
1 Ustaw regulator pary na pozycję 0.
2 Napełnij zbiornik na wodę do poziomu MAX.
Nie wlewaj do zbiornika na wodę octu ani innych substancji
odkamieniających.
C
3 Ustaw termostat na pozycję MAX.
4 Włącz wtyczkę do gniazdka ściennego.
5 Gdy pomarańczowa lampka kontrolna zgaśnie,wyjmij wtyczkę
z gniazdka ściennego.
POLSKI16
N
Y
L
O
N
N
Y
L
O
N
S
S
I
O
L
K
I
E
L
A
W
I
N
O
E
O
L
N
O
T
O
N
C
O
T
T
O
C
N
N
I
E
L
N
I
L
Page 17
C
6 Trzymając żelazko nad zlewem, ustaw pokrętło pary na pozycję
v (Calc-Clean). Pokrętło pary wyskoczy nieco ku górze.
C
7 Pociągnij delikatnie za pokrętło pary i potrząśnij żelazkiem.
B
Para i wrzątek będą wydostawać się ze stopy żelazka.W ten sposób
kamień i inne zanieczyszczenia zostaną usunięte.
C
8 Wyciągnij pokrętło pary jeszcze bardziej, by wyjąć igłę pokrętła.
Użyj octu do usunięcia osadów z igły pokrętła.
Nie zginaj ani nie uszkodź igły pokrętła pary.
C
9 Włóż igłę z powrotem, umieszczając ją dokładnie pośrodku
otworu i wpasowując mały występ w boku igły w zagłębienie.
Ustaw pokrętło pary na pozycję O.
Jeśli żelazko nadal jest zanieczyszczone kamieniem,powtórz
całą procedurę.
Po usunięciu kamienia
- Włącz wtyczkę do gniazdka ściennego, by wysuszyć stopę żelazka.
- Gdy pomarańczowa lampka kontrolna zgaśnie, wyjmij wtyczkę z
gniazdka ściennego.
- Przesuwaj żelazko delikatnie po kawałku zużytego materiału, by
usunąć pozostałości wody, które mogłyby poplamić inne tkaniny.
- Odczekaj, aż żelazko ostygnie, zanim je schowasz.
POLSKI 17
Page 18

Po zakończeniu prasowania
1 Wyjmij wtyczkę z gniazdka ściennego i odczekaj,aż żelazko
ostygnie.
2 Zetrzyj kamień i inne pozostałości ze stopy żelazka wilgotną
szmatką i płynnym nieszorującym środkiem czyszczącym.
Dbaj, by stopa żelazka była gładka: unikaj kontaktu z ostrymi
przedmiotami.
3 Górną część żelazka przetrzyj wilgotną szmatką.
C
4 Regularnie płucz zbiornik czystą wodą. Po wypłukaniu zbiornika
opróżnij go.
Przechowywanie
1 Wyjmij wtyczkę z gniazdka ściennego i ustaw pokrętło pary na
pozycję O.
2 Opróżnij zbiornik na wodę.
C
3 Odczekaj, aż żelazko ostygnie.Owiń przewód zasilający wokół
miejsca do tego przeznaczonego i zapnij klipsem.
4 Przechowuj żelazko w pozycji pionowej,w suchym i
bezpiecznym miejscu.
Informacja i serwis
Jeśli potrzebujesz dodatkowych informacji lub zetknąłeś się z jakimś
problemem, skontaktuj się z Działem Obsługi Klienta Philipsa w swoim
kraju (numer telefonu znajdziesz w Karcie Gwarancyjnej lub najbliższym
punktem serwisowym AGD autoryzowanym przez firmę Philips.
POLSKI18
Page 19

Rozwiązanie problemu
Sprawdź kabel zasilający,wtyczkę i
gniazdko sieciowe.
Ustaw termostat na odpowiednią
temperaturę.
Napełnij zbiornik wodą (patrz:
"Napełnianie zbiornika na wodę).
Ustaw pokrętło pary na pozycję q lub
w (patrz: Prasowanie parowe").
Ustaw termostat na temperaturę w
zakresie prasowania parowego (od
2 do maksymamalnej). Postaw
żelazko pionowo i odczekaj, aż zgaśnie
pomarańczowa lampka kontrolna,
zanim zaczniesz prasować.
Ustaw żelazko poziomo i poczekaj
chwilę przed ponownym
skorzystaniem z funkcji (Pionowego)
Uderzenia Pary
Ustaw termostat na temperaturę w
zakresie prasowania parowego (od
2 do maksymamalnej). Postaw
żelazko pionowo i odczekaj, aż zgaśnie
pomarańczowa lampka kontrolna,
zanim zaczniesz prasować.
Kilkakrotnie zastosuj funkcję CalcClean (patrz: "Calc-Clean").
Porusz delikatnie żelazkiem, by
zdezaktywować funkcję
automatycznego wyłącznika: zgaśnie
czerwona lampka kontrolna.
Ustaw termostat na temperaturę w
zakresie prasowania parowego (od
2 do maksymamalnej). Postaw
żelazko pionowo i odczekaj, aż zgaśnie
pomarańczowa lampka kontrolna,
zanim zaczniesz prasować.
Ewentualna przyczyna (y)
Problem z połączeniem.
Termostat ustawiony na pozycji MIN.
W zbiorniku nie ma wystarczającej
ilości wody.
Regulator pary został przestawiony na
pozycję 0.
Stopa żelazka nie jest wystarczająco
nagrzana lub włączyła się funkcja Drip
Stop (modele GC2030, 2025,2020).
Funkcja (Pionowego) Uderzenia Pary
była zbyt często używana w bardzo
krótkim okresie czasu.
Stopa żelazka nie jest wystarczająco
nagrzana.
Twarda woda powoduje tworzenie się
osadów wewnątrz stopy żelazka.
Włączyła się funkcja automatycznego
wyłącznika (patrz fragment:
"Automatyczny wyłącznik").
Ustawiona została za niska
temperatura.
Problem
Żelazko jest podłączone do sieci, ale
stopa jest zimna.
Brak pary
Brak uderzenia parowego (tylko
modele GC2030, 2025,2016, 2015,
2011, 2010) lub pionowego uderzenia
parowego (tylko modele GC2030,
2025, 2016,2015, 2010).
Podczas prasowania ze stopy żelazka
wydostają się zanieczyszczenia.
Miga czerwona lampka kontrolna (tylko
model GC 2030)
Woda kapie ze stopy żelazka (modele
GC2016, 2015,2011, 2010, 2006, 2005)
POLSKI 19
Rozwiązywanie problemów
Ten rozdział omawia najczęściej występujące problemy związane z prasowaniem. Zapoznaj się z
poszczególnymi fragmentami, by dowiedzieć się szczegółów. Jeśli nie jesteś w stanie poradzić sobie z
danym problemem, skontaktuj się z Działem Obsługi Klienta firmy Philips lub najbliższym punktem
serwisowym AGD, autoryzowanym przez firmę Philips. Numery telefonów znajdziesz w Karcie
Gwarancyjnej.
Page 20
Important
Pentru o siguranţă optimă, citiţi aceste instrucţiuni de utilizare cu
atenţie şi priviţi imaginile înainte de a utiliza aparatul.
- Aparatul nu trebuie lăsat nesupravegheat atâta timp cât este
conectat la priză.
- Acest aparat nu poate fi folosit de copii sau persoane infirme fără
supraveghere. Aveţi grijă să nu se joace copiii cu aparatul.
- Talpa fierului de călcat se încinge foarte tare şi poate cauza arsuri la
atingere. Feriţi cablul de alimentare de contactul cu talpa încinsă.
- După ce aţi terminat de călcat, când curăţaţi aparatul, în timp ce
umpleţi sau goliţi rezervorul de apă sau chiar când faceţi o scurtă
pauză: poziţionaţi butonul pentru reglarea jetului de abur pe poziţia
0, puneţi fierul în poziţie verticală şi scoateţi aparatul din priză.
- În cazul în care cablul de alimentare este deteriorat, acesta trebuie
înlocuit la firma Philips sau la un centru service autorizat, întrucât
sunt necesare unelte şi/sau componente speciale.
- Nu folosiţi niciodată aparatul dacă acesta este deteriorat.
Înainte de prima utilizare
1 Asiguraţi-vă că tensiunea indicată pe talpa aparatului
corespunde sursei locale.
2 Îndepărtaţi orice etichetă, folie protectoare sau alt înveliş de pe
talpă.
3 Încălziţi fierul de călcat la temperatura maximă şi călcaţi o
bucată umedă de material timp de câteva minute pentru a
îndepărta eventualele reziduuri de pe talpă.
Din fierul de călcat poate ieşi puţin fum când este folosit pentru prima
oară.Acest lucru va înceta după puţin timp.
Umplerea rezervorului de apă
Nu introduceţi niciodată fierul de călcat în apă.
1 Scoateţi ştecherul din priză.
C
2 Poziţionaţi butonul de reglare a aburului pe poziţia 0 ( = fără
abur).
3 Înclinaţi fierul.
ROMÂNĂ20
Page 21
C
4 Turnaţi apă de la robinet în rezervor cu ajutorul recipientul de
umplere şi umpleţi rezervorul până la gradaţia maximă.
Nu umpleţi rezervorul peste gradaţia MAX.
Dacă apa de la robinet din cartierul dumneavoastră este foarte dură, vă
sfătuim să folosiţi apă distilată.
Nu folosiţi oţet, amidon sau apă decalcitrată chimic.
Reglarea temperaturii
1 Aşezaţi fierul de călcat în poziţie verticală.
C
2 Reglaţi termostatul la temperatura necesară pentru călcare
răsucindu-l pe poziţia indicatorului de temperatură.
- Verificaţi eticheta de pe articolul de îmbrăcăminte pentru a verifica
temperatura de călcare necesară.
- 1 Materiale sintetice (de ex. fibre acrilice, vâscoză, poliamide,
poliester)
- 1 Mătase
- 2 Lână
- 3 Bumbac, pânză
- Dacă nu cunoaşteţi tipul de material al articolului de îmbrăcăminte,
încercaţi să călcaţi o porţiune de material ce nu se vede când purtaţi
articolul respectiv, pentru a determina temperatura corectă de
călcare.
- Mătasea, lâna şi materialele sintetice: călcaţi ţesătura pe dos pentru a
nu lăsa pete strălucitoare. Pentru evitarea petelor, nu folosiţi funcţia
spray.
- Începeţi să călcaţi materialele care necesită temperatura cea mai
coborâtă, cum sunt cele din fibre sintetice.
3 Introduceţi ştecherul în priza cu legătură la pământ.
4 Când ledul portocoliu indicator de temperatură se stinge,
aşteptaţi puţin înainte de a începe să călcaţi.
B
Ledul portocaliu va continua să se aprindă din când în când, în timp ce
călcaţi.
Pentru versiuni cu funcţie de oprire automată (doar model GC2030):
Dacă funcţia oprire automată este activată (ledul roşu clipeşte
intermitent), mişcaţi uşor fierul pentru a dezactiva funcţia (ledul roşu se
opreşte).
ROMÂNĂ 21
N
Y
L
O
N
N
Y
L
O
N
S
S
I
O
L
K
I
E
L
A
W
I
N
O
E
O
L
N
N
I
E
L
N
I
L
N
O
T
O
N
C
O
T
T
O
C
Page 22
Călcarea cu aburi
Asiguraţi-vă că este suficientă apă în rezervor.
C
1 Poziţionaţi termostatul pe poziţia indicată.
Consultaţi capitolul "Reglarea temperaturii".
C
2 Poziţionaţi butonul de reglare a jetului de abur pe poziţia
potrivită.
- q pentru jet de abur moderat (reglaje de temperatură de la 2
până la 3)
- w pentru jet de abur maxim (reglaje de temperatură de la 3
până la MAX)
B
Jetul de abur va porni imediat ce temperatura selectată va fi atinsă.
◗ Modelele GC2005, 2006, 2010, 2015, 2016: Apa s-ar putea scurge
din talpa fierului dacă termostatul este reglat pe o temperatură
prea scăzută (MIN până la 2).
Călcarea fără abur
1 Poziţionaţi butonul de reglare a aburului pe poziţia 0 ( = fără
abur).
2 Reglaţi termostatul pe poziţia recomandată.
Consultaţi capitolul "Reglarea temperaturii".
Alte caracteristici
Pulverizare
Pentru a netezi cutele mai dure la orice temperatură.
Asiguraţi-vă că este suficientă apă în rezervor.
C
1 Apăsaţi butonul de pulverizare de câteva ori pentru a înmuia
materialul.
Extra Jet de Abur (doar modelele GC2020, 2006, 2005)
Această funcţie asigură un jet de abur extrem de puternic pentru
netezirea celor mai şifonate cute.
Funcţia Extra Jet de Abur nu poate fi folosită decât la temperaturi între
w şi MAX.
ROMÂNĂ22
Page 23

C
1 Reglaţi termostatul pe poziţia MAX w
C
2 Apăsaţi şi ţineţi apăsat butonul Extra Jet de Abur timp de max.
5 secunde.
3 Aşteptaţi cel puţin 1 minut înainte de a folosi funcţia Extra Jet
de Abur din nou pentru a preveni scurgerea apei prin talpă.
Jet de abur (doar modele GC2030, 2025, 2016,2015, 2011,
2010)
Un jet de abur puternic ajută la netezirea cutelor mai dure.
Funcţia Jet de Abur poate fi folosită doar la temperaturi între &@4,050
şi MAX.
C
1 Apăsaţi scurt butonul Jet de Abur.
Jet de Abur Vertical (doar modelele GC2030, 2025, 2016,
2015).
C
1 Funcţia Jet de Abur poate fi folosită şi atunci când ţineţi
aparatul în poziţie verticală.
Nu dirijaţi niciodată aburul spre oameni.
Oprirea scurgerii apei (doar modelele GC2030, 2025,2020)
Acest fier de călcat este echipat cu un sistem de blocare automată a
aburului: fierul de călcat opreşte automat aburul la temperaturi scăzute
pentru a preveni scurgerea apei prin talpă. Când se întâmplă acest
lucru veţi auzi un semnal acustic.
ROMÂNĂ 23
Page 24
Oprire automată (doar modelul GC2030).
C
◗ Un dispozitiv electronic de siguranţă va opri automat fierul de
călcat dacă acesta nu a fost mişcat o perioadă de timp.
◗ Pentru a vă indica că elementul de încălzire a fost oprit,ledul roşu
pentru oprire automată va începe să clipească intermitent.
Pentru repornirea aparatului.
1 Ridicaţi fierul de călcat sau mişcaţi-l uşor.
2 Ledul roşu se stinge. În funcţie de temperatura tălpii aparatului,
ledul portocaliu se poate aprinde.
3 Dacă ledul portocaliu se aprinde după ce aţi mişcat fierul,
aşteptaţi ca acesta să se stingă înainte de începe călcarea.
4 Dacă ledul portocaliu nu se aprinde după ce mişcaţi aparatul,
fierul este gata de utilizare.
Curăţare şi întreţinere
Auto-Curăţare
Această funcţie de Auto-Curăţare îndepărtează calcarul şi impurităţile.
Folosiţi funcţia de Auto-Curăţare o dată la două săptămâni.Dacă apa
din zona dumneavoastră este foarte dură (când ies mici depuneri de
calcar prin talpa fierului în timpul călcării), funcţia auto-curăţare trebuie
folosită mai des.
1 Poziţionaţi butonul de reglare a jetului de abur pe poziţia 0.
2 Umpleţi rezervorul până la nivelul maxim.
Nu turnaţi oţet sau alţi agenţi de curăţare pentru îndepăr tarea
calcarului în rezervor.
C
3 Poziţionaţi termostatul pe poziţia MAX.
4 Introduceţi ştecherul în priză.
5 Scoateţi ştecherul din priză când ledul portocaliu se stinge.
C
6 Ţineţi fierul deasupra chiuvetei şi reglaţi butonul de abur pe
poziţia v (Auto-Curăţare). Butonul de abur va sări uşor.
ROMÂNĂ24
N
Y
L
O
N
N
Y
L
O
N
S
S
I
O
L
K
I
E
L
A
W
I
N
O
E
O
L
N
N
I
E
L
N
I
L
N
O
T
O
N
C
O
T
T
O
C
Page 25
C
7 Împingeţi butonul de abur uşor în sus şi agitaţi uşor fierul.
B
Aburul şi apa fiartă vor ieşi din talpa aparatului. Impurităţile şi calcarul
(dacă este) vor fi eliminate.
C
8 Trageţi de butonul pentru abur în sus pentru a scoate tubul
subţire al acestuia. Folosiţi oţetul pentru îndepărtarea
calcarului, dacă este cazul, de pe tub.
Nu îndoiţi sau deterioraţi tubul subţire al butonului de abur.
C
9 Reintroduceţi tubul subţire al butonului de abur cu vârful exact
în centrul orificiului şi fixaţi protuberanţa de pe tub exact în
nişă. Reglaţi butonul de abur pe poziţia O.
Repetaţi procesul de auto-curăţare dacă mai sunt impurităţi
în aparat.
După procesul de auto-curăţare
- Introduceţi fierul în priză pentru a lăsa talpa să se usuce.
- Scoateţi ştecherul din priză când ledul por tocaliu se stinge.
- Mişcaţi uşor fierul încins peste o bucată de material uzat pentru a
îndepărta petele de apă care ar fi putut să se formeze pe talpă.
- Lăsaţi fierul de călcat să se răcească înainte de a-l depozita.
După călcare
1 Scoateţi ştecherul din priză şi lăsaţi fierul să se răcească.
2 Ştergeţi talpa aparatului cu o cârpă umedă şi un detergent
neabraziv (lichid).
Pentru a păstra talpa netedă: evitaţi contactul dur cu obiecte metalice.
3 Curăţaţi partea superioară a fierului de călcat cu o cârpă
umedă.
ROMÂNĂ 25
Page 26
C
4 Clătiţi rezervorul cu apă în mod regulat. Goliţi rezervorul după
curăţare.
Depozitare
1 Scoateţi ştecherul din priză şi poziţionaţi reglajul de abur pe
poziţia 0.
2 Goliţi rezervorul de apă.
C
3 Lăsaţi fierul să se răcească. Înfăşuraţi cablul în jurul suportului
de depozitare a cablului şi prindeţi-l cu clema de prindere.
4 Depozitaţi întotdeauna fierul sprijinit în poziţie verticală într-un
loc sigur.
Informaţii şi service
Dacă doriţi informaţii sau în cazul unor probleme, vizitaţi site-ul de web
Philips la www.philips.com sau contactaţi Centrul Consumatori Philips
din ţara dumneavoastră (veţi găsi numărul de telefon în foaia de
garanţie internaţională). Dacă nu există un astfel de centru în ţara
dumneavoastră, apelaţi la furnizorul dumneavoastră Philips sau
contactaţi Departamentul Service pentru Aparate Electrocasnice şi de
Ingrijire Personală.
ROMÂNĂ26
Page 27
Soluţie
Verificaţi cablul,ştecherul şi priza de
perete.
Reglaţi termostatul pe poziţia
necesară.
Umpleţi rezervorul cu apă (consultaţi
capitolul "Umplerea rezervorului").
Reglaţi butonul de abur pe q sau w (a
se vedea Călcare cu abur)
Reglaţi termostatul pe poziţia de abur
(2 până la MAX). Aşezaţi fierul în
poziţie verticală şi aşteptaţi până ce
ledul pilot portocaliu se stinge înainte
de a reîncepe călcarea.
Puneţi fierul de călcat în poziţie
orizontală şi aşteptaţi puţin timp
înainte de a folosi funcţia Jet de Abur
(Vertical).
Reglaţi termostatul pe poziţia de abur
(2 până la MAX). Aşezaţi fierul în
poziţie verticală şi aşteptaţi până ce
ledul pilot portocaliu se stinge înainte
de a reîncepe călcarea.
Folosiţi funcţia Auto-Curăţare de
câteva ori (a se vedea capitolul "AutoCurăţare").
Mişcaţi uşor fierul de călcat pentru a
dezactiva funcţia de oprire automată:
ledul nu va mai clipi.
Reglaţi termostatul pe poziţia de abur
(2 până la MAX). Aşezaţi fierul în
poziţie verticală şi aşteptaţi până ce
ledul pilot portocaliu se stinge înainte
de a reîncepe călcarea.
Cauză posibilă
Problemă de conectare.
Termostat reglat pe poziţia MIN.
Nu este suficientă apă în rezervor.
Butonul de reglare a jetului de abur a
fost setat pe poziţia 0.
Talpa fierului de călcat nu este suficient
de încinsă şi/sau sistemul de oprire a
scurgerii apei (modele GC2030, 2025,
2020) este activat.
Funcţia Jet de Abur (Vertical) a fost
folosită prea des într-o perioadă foarte
scurtă de timp.
Talpa fierului de călcat nu este suficient
de încinsă.
Apa dură formează depozite de calcar
în interiorul tălpii.
Funcţia oprire automată a fost
activată.A se vedea capitolul "Oprire
automată".
Temperatura este prea scăzută.
Problemă
Aparatul este conectat la priză dar talpa
este rece.
Din fierul de călcat nu iese abur
Nu funcţionează Jetul de Abur (doar
modelele GC2030, 2025,2016, 2015,
2011, 2010) sau Jetul Vertical de Abur
(doar modelele GC2030, 2025,2016,
2015, 2010)
Ies impurităţi din talpă în timpul călcării.
Ledul roşu clipeşte intermitent (doar
modelul GC2030).
Apa se scurge prin talpă (doar
modelele GC2016, 2015,2011, 2010,
2006, 2005).
ROMÂNĂ 27
Ghid pentru rezolvarea eventualelor probleme
Acest capitol cuprinde problemele cele mai întâlnite.Vă rugăm să citiţi toate capitolele pentru mai
multe detalii. Dacă nu reuşiţi să rezolvaţi problema, vă rugăm să contactaţi cel mai apropiat Centru
Service Philips sau o reprezentanţă a acestuia. Consultaţi foaia de garanţie internaţională pentru
numerele de telefon ale Biroului de Informaţii sau vizitaţi site-ul nostru de web la
www.philipsonline.com.
Page 28
Внимание
В целях безопасной эксплуатации, прежде чем пользоваться
утюгом, прочитайте настоящее руководство и ознакомьтесь с
иллюстрациями.
- Не оставляйте включенный в сеть утюг без присмотра.
- Дети и пожилые люди могут пользоваться этим
электроприбором только под наблюдением. Не позволяйте
детям играть с прибором.
- Прикосновение к сильно нагретой подошве утюга может
привести к ожогам. Не допускайте контакта шнура питания с
горячей подошвой утюга.
- По окончании глажения, при очистке электроприбора, во время
заполнения или опорожнения водонаборного контейнера и
даже если вы отходите от утюга на короткое время,
устанавливайте парорегулятор в положение О, ставьте утюг
вертикально на задний торец корпуса и вынимайте вилку шнура
питания из розетки электросети.
- В случае повреждения сетевого шнура электроприбора, его
следует заменять только в торговой организации «Филипс» или
уполномоченном сервисном центре компании «Филипс»,
поскольку для ремонта могут потребоваться специальные
инструменты и/или детали.
- Запрещается включать поврежденный прибор.
Перед началом эксплуатации
1 Убедитесь, что номинальное напряжение, указанное на
заводской табличке, соответствует напряжению
электросети у Вас дома.
2 Удалите с подошвы утюга все наклейки, защитную фольгу
или чехол, используемый при хранении.
3 Нагрейте утюг до максимальной температуры и
проглаживайте в течение нескольких минут влажную ткань
для удаления остаточного налета с подошвы.
При первом включении утюга в сеть возможно выделение дыма,
которое вскоре прекратится.
Заполнение водонаборного контейнера
Запрещается погружать утюг в воду.
1 Выньте вилку шнура питания из розетки электросети
C
2 Установите парорегулятор в положение О (= отсутствие
пара).
3 Наклоните утюг.
РУССКИЙ28
Page 29
C
4 С помощью специального кувшина залейте в
водонаборный контейнер водопроводную воду до отметки
максимального уровня.
Не заполняйте водонаборный контейнер выше отметки МАХ.
В случае если водопроводная вода в вашей местности слишком
жесткая, рекомендуется использовать дистиллированную воду.
Не добавляйте в воду уксус, крахмал или химические средства дл
удаления накипи.
Установка температуры
1 Поставьте утюг вертикально на задний торец корпуса.
C
2 Установите диск терморегулятора на требуемую
температуру глажения, повернув его в нужное положение
относительно указателя температуры.
- Убедитесь в том, что температура глажения соответствует
указанной на этикетке изделия.
- 1 синтетические ткани (например, акрил, вискоза, полиамид,
полиэфир)
- 1 шелк
- 2 шерсть
- 3 хлопок, лен
- Если вы не знаете, из какой ткани сшито изделие, попробуйте
сначала прогладить его на участке, незаметном при носке.
- Изделия, изготовленные из шелка, шерсти и синтетических
материалов, следует гладить с изнанки, чтобы не допустить
появления лоснящихся пятен. Во избежание появления пятен не
используйте функцию разбрызгивания.
- Начинайте глажение с изделий из синтетических волокон, для
которых требуется минимальная температура глажения.
3 Вставьте вилку шнура питания в заземленную розетку
электросети.
4 Начинать глажение следует через минуту после того, как в
первый раз погаснет желтый сигнальный индикатор.
B
Во время глажения желтый сигнальный индикатор будет время
от времени загораться.
Модели с автоматическим выключателем (только модель GC2030):
При срабатывании автоматического выключателя
(сопровождающегося миганием красного сигнального индикатора)
немного переместите утюг, чтобы отключить автоматический
выключатель (мигание прекратится).
РУССКИЙ 29
N
Y
L
O
N
N
Y
L
O
N
S
S
I
O
L
K
I
E
L
A
W
I
N
O
E
O
L
N
N
I
E
L
N
I
L
N
O
T
O
N
C
O
T
T
O
C
Page 30
Глажение с отпариванием
Убедитесь, что в водонаборном контейнере достаточно воды.
C
1 Установите диск терморегулятора в рекомендованное
положение.
См. раздел «Установка температуры».
C
2 Установите парорегулятор в соответствующее положение.
- q для умеренного отпаривания (при положениях
терморегулятора в области от 2 до 3).
- w для усиленного отпаривания (при положениях
терморегулятора в области от 3 до MAX).
B
Отпаривание начнется, как только температура подошвы
утюга достигнет установленного значения.
◗ Модели GC2005, 2006, 2010, 2015, 2016: если установлена
недостаточно высокая температура, из подошвы утюга может
вытекать вода.
Сухое глажение
1 Установите парорегулятор в положение О (= отсутствие
пара).
2 Установите диск терморегулятора в рекомендуемое
положение.
См. раздел «Установка температуры».
Прочие характеристики
Разбрызгивание.
Для разглаживания неподатливых складок при любой температуре
глажения.
Убедитесь, что в водонаборном контейнере достаточно воды.
C
1 Для увлажнения изделий, подлежащих глажению, дважды
нажмите кнопку разбрызгивателя.
РУССКИЙ30
Page 31

Усиленное отпаривание (только модели GC2020, 2006,
2005)
Функция усиленного отпаривания позволяет разгладить
неподатливые складки.
Функция усиленного отпаривания может быть использована
только при установке температуры в диапазоне от 3 до МАХ.
C
1 Установите парорегулятор на МАХ при положении
терморегулятора w.
C
2 Нажмите кнопку "Усиленное отпаривание" и удерживайте
ее в нажатом положении не более 5 секунд.
3 Перед тем как повторно воспользоваться функцией
усиленного отпаривания, подождите не менее 1 минуты,
чтобы избежать появления капель из отверстий подошвы
утюга.
Выброс пара (только модели GC2030, 2025, 2016, 2015,
2010)
Мощный выброс пара позволяет разгладить неподатливые складки.
Функция «Выброс пара» может быть использована только при
установке температуры в диапазоне от 2 до МАХ.
C
1 Нажмите, а затем отпустите кнопку «Выброс пара».
Вертикальный выброс пара (только модели GC2030, 2025,
2016, 2015)
C
1 Вы можете использовать функцию вертикального
отпаривания также в тех случаях,когда гладите утюгом в
вертикальном положении.
Запрещается направлять струю пара на людей.
Каплеотсекатель (только модели GC2030, 2025, 2020)
Утюг снабжен каплеотсекателем "Drip Stop": при слишком низкой
температуре подошвы отпаривание автоматически отключается,
РУССКИЙ 31
Page 32
что предотвращает появление капель из отверстий подошвы.
Когда это происходит, раздается щелчок.
Автоматический выключатель (только модель GC2030)
C
◗ Электронное защитное устройство автоматически отключает
утюг, если его не перемещать в течение некоторого времени.
◗ При срабатывании автоматического выключателя начинает
мигать красный сигнальный индикатор, указывающий на
отключение нагревательного элемента.
Для того, чтобы снова нагреть утюг:
1 Поднимите утюг или немного переместите его.
2 Красный сигнальный индикатор автоматического
отключения погаснет. В зависимости от температуры
подошвы утюга может загораться желтый сигнальный
индикатор.
3 Если после начала перемещения утюга загорается желтый
сигнальный индикатор, то, прежде чем приступить к
глажению, подождите, пока он погаснет.
4 Если после начала перемещения утюга желтый сигнальный
индикатор не загорается, утюг готов к применению.
Очистка и уход
Удаление известкового налета
Функция очистки от известкового налета позволяет удалять из
подошвы утюга накипь и загрязнения.
Используйте функцию очистки от известкового налета один раз в
две недели. Если вода в вашей местности очень жесткая (в этом
случае при глажении из подошвы утюга выпадают хлопья), функцию
очистки от известкового налета необходимо использовать чаще.
1 Установите парорегулятор в положение О.
2 Заполните водонаборный контейнер до отметки
максимального уровня.
Не добавляйте в воду уксус и другие средства для удалени
накипи.
C
3 Установите диск терморегулятора в положение МАХ.
РУССКИЙ32
N
Y
L
O
N
N
Y
L
O
N
S
S
I
O
L
K
I
E
L
A
W
I
N
O
E
O
L
N
N
I
E
L
N
I
L
N
O
T
O
N
C
O
T
T
O
C
Page 33

4 Вставьте вилку шнура питания в розетку электросети.
5 Отключите утюг, когда желтый сигнальный индикатор
погаснет.
C
6 Удерживая утюг над раковиной,установите парорегулятор
в положение
C
7 Немного оттяните парорегулятор и осторожно покачайте
утюгом.
B
Из отверстий подошвы утюга будут выходить пар и кипящая
вода, вымывающие наружу загрязнение и хлопья накипи (если они
имеются).
C
8 Оттяните кнопку парорегулятора еще больше, чтобы
извлечь иглу парорегулятора. Если игла покрыта накипью,
удалите накипь с помощью уксуса.
Не изгибайте иглу парорегулятора и не наносите ей други
повреждений.
C
9 Поместите иглу парорегулятора на место, вставив ее кончик
точно в центр отверстия и установив небольшой выступ
иглы напротив соответствующей канавки. Установите
парорегулятор в положение О.
Если в утюге еще осталось значительное загрязнение,
процедуру очистки от известкового налета следует
повторить.
После очистки от известкового налета
- Включите утюг в сеть для того, чтобы высушить подошву.
- Отключите утюг, когда желтый сигнальный индикатор погаснет.
- Мягко проведите нагретым утюгом по куску ненужной ткани,
для того чтобы удалить остатки скопившейся на подошве воды.
- Прежде чем убрать утюг на хранение, дайте ему остыть.
РУССКИЙ 33
Page 34

После глажения.
1 Выньте вилку шнура питания из розетки электросети и
дайте утюгу остыть.
2 Протрите подошву влажной тканью,смоченной в
неабразивном (жидком) чистящем средстве, чтобы удалить
хлопья и другой налет.
Следите за тем, чтобы поверхность подошвы утюга оставалась
гладкой: не допускайте ее резких соприкосновений с
металлическими поверхностями.
3 Очищайте верхнюю часть утюга с помощью влажной
ткани.
C
4 Регулярно промывайте водонаборный контейнер водой.
После промывки воду необходимо слить.
Хранение
1 Отключите утюг от сети и установите парорегулятор в
положение О.
2 Слейте воду из водонаборного контейнера.
C
3 Дайте утюгу остыть. Сверните шнур питания вокруг
приспособления для хранения шнура и закрепите его
зажимом для шнура.
4 Всегда храните утюг в вертикальном положении, установив
его на задний торец корпуса в сухом и безопасном месте.
Гарантия и обслуживание
По поводу дополнительной информации или в случае
возникновения каких-либо проблем обращайтесь на Web-сайт
компании «Филипс» по адресу: www.philips.com или в центр
компании «Филипс» по обслуживанию потребителей в вашей
стране (вы найдете его номер телефона на международном
гарантийном талоне). Если подобный центр в вашей стране
отсутствует, обратитесь в вашу местную торговую организацию
компании «Филипс» или в сервисное отделение компании Philips.
РУССКИЙ34
Page 35

Обнаружение и устранение неисправностей
В данном разделе перечислены наиболее распространенные неполадки, с которыми Вы
можете столкнуться при использовании Вашего утюга. Для более подробной информации
просьба
прочитать другие части руководства. Если Вы не можете устранить неполадки
самостоятельно, обращайтесь в ближайший сервисный центр компании «Филипс» или к
представителям этого центра. Номера телефонов справочных служб компании «Филипс» Вы
найдете в международном гарантийном талоне или в Web-сайте нашей компании по адресу
www. philipsonline.com.
РУССКИЙ 35
Способ устранения
Проверьте исправность шнура
питания, вилки и розетки
электросети.
Установите диск терморегулятора
на требуемую температуру
глажения.
Заполните водонаборный
контейнер (см. раздел «Заполнение
водонаборного контейнера»).
Установите парорегулятор в
положение q или w (см. раздел
«Глажение с отпариванием»).
Установите диск терморегулятора
на область отпаривания (от 2 до
МАХ). Поставьте утюг на задний
торец корпуса и начинайте гладить
только после того, как погаснет
желтый сигнальный индикатор.
Придайте утюгу горизонтальное
положение и подождите некоторое
время перед повторным
использованием функции
(вертикального) выброса пара.
Установите диск терморегулятора
на область отпаривания (от 2 до
МАХ). Поставьте утюг на задний
торец корпуса и начинайте гладить
только после того, как погаснет
желтый сигнальный индикатор.
Воспользуйтесь несколько раз
функцией очистки от известкового
налета (см. раздел «Удаление
звесткового налета»).
Возможная(ые) причина(ы)
Проблема с подключением.
Терморегулятор установлен в
положение MIN.
Недостаточное количество воды в
водонаборном контейнере.
Парорегулятор установлен в
положение О.
Утюг недостаточно нагрет, или
включен каплеотсекатель Drip Stop
(модели GC2030, 2025, 2020)
Функцию (вертикального) выброса
пара использовали слишком часто в
течение короткого периода
времени.
Утюг недостаточно нагрет.
Из-за использования жесткой воды
внутри подошвы утюга образуются
хлопья.
Неполадка
Утюг включен в сеть, но подошва
холодная.
Отсутствие пара
Не происходит выброса пара
(только модели GC2030, 2025,
2016, 2015, 2011, 2010) или
вертикального выброса пара
(только модели GC2030, 2025,
2016, 2015, 2010).
Во время глажения из отверстий
подошвы выпадают хлопья и
Page 36

РУССКИЙ36
Способ устранения
Немного покачайте утюгом, чтобы
отключить автоматический
выключатель, мигание лампы
прекратится.
Установите диск терморегулятора
на область отпаривания (от 2 до
МАХ). Поставьте утюг на задний
торец корпуса и начинайте гладить
только после того, как погаснет
желтый сигнальный индикатор.
Возможная(ые) причина(ы)
Сработал автоматический
выключатель. См. раздел
«Автоматический выключатель».
Терморегулятор установлен на
слишком низкую температуру.
Неполадка
Мигает красный сигнальный
индикатор (только модель GС2030).
Из отверстий на подошве
появляются капли воды (только
модели GС2016, 2015, 2011, 2010,
2006, 2005).
Page 37

Důležité
Z bezpečnostních důvodů pročtěte pečlivě následující pokyny a
sledujte přitom příslušná vyobrazení.
- Nikdy nenechávejte žehličku bez dozoru, pokud je zapnutá.
- Nepoučeným osobám nedovolte s žehličkou pracovat bez dozoru.
Dbejte též na to, aby děti nepoužívaly žehličku na hraní.
- Dno žehličky je velmi horké a při dotyku je nebezpečí popálenin.
Proto se ho nikdy nedotýkejte.
- Když žehlení ukončíte, když žehličku čistíte, když její zásobník plníte
vodou a také když od ní třeba jen na malou chvíli odcházíte: vždy
předem nastavte regulátor páry do polohy O, postavte žehličku na
zadní stěnu a vytáhněte její zástrčku ze zásuvky.
- Pokud by se u žehličky poškodil síťový přívod, musí být vyměněn
pouze v autorizované opravně nebo přímo v servisu firmy Philips,
protože k jeho výměně jsou potřebné nejen speciální díly, ale i
speciální nástroje.
- Žehličku nikdy nepoužívejte, pokud zjistíte její jakékoli poškození.
Před prvním použitím
1 Nejprve zkontrolujte, zda napětí ve vaší světelné síti, souhlasí s
údajem na typovém štítku přístroje.
2 Odstraňte všechny nálepky a ochranné fólie ze dna žehličky.
3 Ohřejte žehličku na maximální teplotu a přežehlete kousek
navlhčené textilie abyste z jejího dna odstranili případné
nečistoty.
Žehlička může při prvním zapnutí trochu kouřit.Tento jev však za
okamžik zmizí.
Plnění zásobníku vodou
Žehličku nesmíte nikdy ponořit do vody.
1 Vytáhněte síťovou zástrčku ze zásuvky.
C
2 Regulátor páry nastavte do polohy O (=bez páry).
3 Žehličku nakloňte.
ČESKY 37
Page 38

C
4 Pomocí nádobky nalejte do zásobníku vodu z vodovodu až po
označení maxima.
Zásobník vody nikdy neplňte nad značku MAX.
Pokud by voda z vodovodu ve vaší oblasti byla nadměrně tvrdá,
doporučujeme vám používat destilovanou vodu.
Nepoužívejte však ocet, škrob nebo chemicky upravovanou vodu.
Nastavení teploty
1 Žehličku postavte na zadní stěnu.
C
2 Regulátor teploty nastavte na požadovanou teplotu jeho
otočením k údaji této teploty.
- Postupujte podle údajů v tabulce doporučených teplot.
- 1 syntetické textilie (akrylát, viskóza, polyamid,polyestér)
- 1 hedvábí
- 2 vlna
- 3 bavlna, plátno
- Jestliže neznáte druh žehlené textilie, zvolte správnou teplotu tak, že
zkušebně přežehlíte tu část textilie, která není běžně viditelná.
- Hedvábné, vlněné a syntetické materiály: žehlete je na rubové straně,
abyste zamezili vzniku lesklých míst.
- Začněte vždy žehlit ty textilie, které vyžadují nejnižší teplotu, což
bývají syntetické tkaniny.
3 Zasuňte zástrčku do síťové zásuvky.
4 Když žlutá kontrolka teploty zhasne, vyčkejte ještě malou chvíli,
než začnete žehlit.
B
Žlutá kontrolka během žehlení střídavě zhasíná a znovu se rozsvěcuje.
Pro žehličky s automatickým vypínáním (pouze typ GC 2030)
Pokud bylo automatické vypínání aktivováno (červená kontrolka bliká),
mírným pohnutím žehličku zapněte (červená kontrolka přestane blikat).
Žehlení s parou
Zkontrolujte, zda je v zásobníku dostatek vody.
C
1 Nastavte regulátor teploty do požadované polohy.
Viz odstavec "Nastavení teploty".
ČESKY38
N
Y
L
O
N
N
Y
L
O
N
S
S
I
O
L
K
I
E
L
A
W
I
N
O
E
O
L
N
N
I
E
L
N
I
L
N
O
T
O
N
C
O
T
T
O
C
Page 39

C
2 Regulátor páry nastavte do vhodné polohy.
- q pro střední množství páry (nastavení teploty 2 až 3)
- w pro největší množství páry (nastavení teploty 3 až MAX)
B
Pára začne být produkována, jakmile je nastavená teplota dosažena.
◗ Typy GC 2005, 2006,2010, 2011, 2015, 2016: kdyby byla nastavena
příliš nízká teplota (MIN až 2), mohla by ze dna žehličky
odkapávat voda.
Žehlení bez páry
1 Regulátor páry nastavte do polohy O (= bez páry).
2 Regulátor teploty nastavte do požadované polohy.
Viz odstavec "Nastavení teploty".
Další funkce žehličky
Postřik vodou
K odstranění nadměrného zmačkání při libovolné teplotě.
Zkontrolujte, zda je v zásobníku dostatek vody.
C
1 Stiskněte vícekrát tlačítko postřiku vodou a textilii navlhčete.
Velké množství páry (pouze typy GC 2020, 2006,2005)
Tato funkce zajistí mimořádné množství páry pro odstranění
nadměrného zmačkání.
Tuto funkci však lze realizovat pouze při nastavené teplotě 3 a
MAX.
C
1 Regulátor teploty nastavte do polohy MAX w.
C
2 Stiskněte a podržte nejdéle 5 sekund tlačítko maximálního
množství páry (Extra Steam).
3 Před dalším použitím této funkce vyčkejte asi 1 minutu,abyste
zabránili odkapávání vody ze dna žehličky.
ČESKY 39
Page 40

Parní impuls (pouze typy GC 2030, 2025,2016, 2015,2011 a
2010)
Mohutný impuls páry pomáhá vyrovnat velmi zmačkaná místa.
Parní impuls lze realizovat pouze při teplotě nastavené mezi 2 a
MAX.
C
1 Stiskněte a uvolněte tlačítko impulsu páry.
Parní impuls ve svislé poloze žehličky (pouze typy GC 2030,
2025, 2016 a 2015)
C
1 Impuls páry lze využít i když držíte žehličku ve svislé poloze.
Impulsem páry nikdy nemiřte proti osobám.
Funkce Drip Stop (pouze typy 2030, 2025 a 2020)
Funkce Drip Stop zabraňuje výstupu páry v případě, že byla nastavena
nedostačující teplota žehličky. Pokud k uzavření výstupu páry dojde,
uslyšíte zřetelné klapnutí.
Automatické vypnutí žehličky (pouze typ GC 2030)
C
◗ Elektronický obvod žehličku automaticky vypne, jestliže s ní po
určitou dobu není pohnuto.
◗ Jestliže se tak stane, začne blikat červená kontrolka automatického
vypnutí.
Obnovení funkce žehličky:
1 Žehličku nazvedněte nebo s ní pohněte.
2 Červená kontrolka automatického vypnutí zhasne. Žlutá
kontrolka teploty se rozsvítí (pokud již žehlička částečně
vychladla).
ČESKY40
Page 41

3 Jestliže se po pohnutí žehličkou žlutá kontrolka teploty rozsvítí,
vyčkejte s žehlením než opět zhasne.
4 Jestliže se po pohnutí žehličkou žlutá kontrolka teploty
nerozsvítí, můžete s žehlením začít okamžitě.
Čištění a údržba
Funkce Calc-Clean
Funkce Calc-Clean odstraní vodní kámen i případné nečistoty.
Tuto funkci používejte vždy po dvou týdnech. Pokud by byla voda ve
vaší oblasti nadměrně tvrdá (ze dna žehličky by se během žehlení
odlupovaly částice vodního kamene), používejte funkci Calc-Clean
častěji.
1 Regulátor páry nastavte do polohy O.
2 Zásobník vody naplňte až po označení maximální hladiny.
Nenalévejte do zásobníku ocet nebo jiné prostředky k odstranění
vodního kamene.
C
3 Regulátor teploty nastavte do polohy MAX.
4 Zasuňte síťovou zástrčku do zásuvky.
5 Když žlutá kontrolka zhasne, žehličku vypněte.
C
6 Podržte žehličku nad výlevkou a regulátor páry nastavte do
polohy v (Calc-Clean). Regulátor páry mírně povyskočí.
C
7 Lehce regulátor páry povytáhněte a žehličkou mírně potřepte.
B
Ze dna žehličky začne vystupovat pára a současně jsou vyplaveny i
zbytky vodního kamene a případné nečistoty.
C
8 Vytáhněte ještě dále regulátor páry, abyste vyjmuli jeho jehlu.
Octem zbavte jehlu případného nánosu vodního kamene.
Dbejte na to, abyste jehlu neohnuli nebo jinak nepoškodili.
ČESKY 41
N
Y
L
O
N
N
Y
L
O
N
S
S
I
O
L
K
I
E
L
A
W
I
N
O
E
O
L
N
N
I
E
L
N
I
L
N
O
T
O
N
C
O
T
T
O
C
Page 42

C
9 Regulátor páry vložte zpět tak, že jehlu zasunete přesně do
středu jeho otvoru. Regulátor páry nastavte do polohy O.
Pokud by nebyly odstraněny všechny nečistoty, celý postup
opakujte.
Po ukončeném odstranění vodního kamene a nečistot
- Zapněte žehličku, aby se její dno usušilo.
- Když žlutá kontrolka zhasne, žehličku vypněte.
- Přežehlete žehličkou kus staré textilie abyste odstranili případné
vodní skvrny, které by zůstaly na dně žehličky.
- Než žehličku uklidíte, nechte ji zcela vychladnout.
Po ukončeném žehlení
1 Vytáhněte síťovou zástrčku ze zásuvky a nechte žehličku
vychladnout.
2 Otřete dno žehličky od všech případných usazenin a zbytků
vodního kamene navlhčeným hadříkem, případně s přidáním
neabrasívního (tekutého) čisticího prostředku.
Dno žehličky udržujte čisté: zabraňte jeho styku s kovovými předměty,
které by mohly dno poškrábat.
3 Horní části žehličky čistěte pouze vlhkým hadříkem.
C
4 Pravidelně vyplachujte zásobník vody vodou. Po čištění ho
vyprázdněte.
Uchovávání žehličky
1 Vytáhněte zástrčku síťového přívodu ze zásuvky a nastavte
regulátor páry do polohy O.
2 Vylijte vodu ze zásobníku.
C
3 Nechte žehličku vychladnout. Síťový přívod naviňte kolem
žehličky a zajistěte ho svorkou.
4 Žehličku vždy uchovávejte postavenou ve svislé poloze na zadní
stěně.
ČESKY42
Page 43
Informace a servis
Pokud by se vám vyskytl jakýkoli problém nebo jste potřebovali nějakou
informaci, můžete si otevřít internetovou stránku www.philips.com.
Můžete se též spojit s Informačním centrem firmy Philips (kontakty na
Infolinku firmy Philips najdete na letáčku s celosvětovou zárukou).
Řešení případných problémů0
Zde naleznete nejčastěji se vyskytující problémy, s nimiž byste se mohli
v praxi setkat. Pokud by se vám přesto nepodařilo problém nebo
případnou závadu odstranit, spojte se s pracovníky Informačního
střediska firmy Philips.Telefonní číslo Informačního střediska najdete na
letáčku s celosvětovou zárukou. Můžete též použít informace z
internetové stránky www.philipsonline.com.
ČESKY 43
Řešení
Zkontrolujte přívodní kabel, síťovou
zástrčku i zásuvku.
Regulátor teploty nastavte na
požadovanou teplotu.
Naplňte zásobník (viz "Plnění
zásobníku vodou").
Regulátor páry nastavte do polohy q
nebo w (viz "Žehlení s parou").
Nastavte regulátor teploty do polohy
(2 až MAX). Postavte žehličku na
její zadní stěnu a vyčkejte dokud žlutá
kontrolka nezhasne. Pak začněte žehlit.
Postavte žehličku do svislé polohy a
vyčkejte chvíli než znovu realizujete
impuls páry.
Nastavte regulátor teploty do polohy
(20 až MAX). Postavte žehličku na
její zadní stěnu a vyčkejte dokud žlutá
kontrolka nezhasne. Pak začněte žehlit.
Realizujte několikrát funkci Calc-Clean
(viz "Funkce Calc-Clean").
Potřepte jemně žehličkou aby se tato
funkce deaktivovala: kontrolka této
funkce přestane blikat.
Nastavte regulátor teploty do polohy
(2 až MAX). Postavte žehličku na
její zadní stěnu a vyčkejte dokud žlutá
kontrolka nezhasne. Pak začněte žehlit.
Možná příčina (příčiny)
Do žehličky nejde proud.
Regulátor teploty nastavte do polohy
MIN.
Nedostatek vody v zásobníku.
Regulátor páry je v poloze O.
Dno žehličky není dostatečně horké
a/nebo byla aktivována funkce Drip
Stop (typy GC 2030, 2025,2020).
Impulsy páry (ve svislé poloze
žehličky) byly realizovány několikrát
těsně za sebou.
Dno žehličky není dostatečně horké.
Byla použita nadměrně tvrdá voda.
Byla aktivována funkce automatického
vypnutí (viz "Automatické vypnutí
žehličky").
Nastavena příliš nízká teplota.
Problém
Žehlička je zapnuta do sítě, ale
nehřeje.
Není produkována pára
Nelze realizovat impuls páry (pouze
typy GC 2030, 2025,2016, 2015,
2011, 2010 ) nebo impuls páry ve
svislé poloze žehličky (pouze typy GC
2030, 2025,2016, 2015, 2010)
Ze dna žehličky se při žehlení odlupují
šupinky a jiné nečistoty.
Červená kontrolka bliká (pouze typ
GC 2030).
Ze dna žehličky odkapává voda
(pouze typy GC 2016, 2015, 2011,
2010, 2006,2005)
Page 44

MAGYAR44
Fontos
Optimális biztonság okából a készülék használata előtt olvassa el
gondosan ezt a használati útmutatót és nézze meg az ábrákat.
- Ha a vasaló csatlakoztatva van a hálózathoz, soha ne hagyja felügyelet
nélkül.
- Illetéktelen személyek nem használhatják a készüléket ellenőrzés
nélkül.Tartsa a szemét a gyerekeken, hogy biztosan ne játszodjanak a
készülékkel.
- A vasaló talpa nagyon felforrósodhat és érintés esetén égést okozhat.
Ha a vasalótalp forró, vigyázzon arra, hogy a kábel ne érjen hozzá.
- Ha befejezte a vasalást, ha tisztítja a készüléket, ha vizet tesz a
tartályba vagy kiüríti azt és akkor is, ha rövid ideig eltávozik a
vasalótól: állítsa a gőzszabályzót 0 pozícióra, állítsa a vasalót a sarkára
és húzza ki a hálózati dugót a fali konnektorból.
- Ha ennek a készüléknek a hálózati kábele megsérül, mindig csak a
Philips vagy a Philips által felhatalmazott szerviz cserélheti ki, mivel
ehhez speciális szerszámok és/vagy anyagok kellenek.
- Legkisebb sérülés esetén se használja a készüléket.
Első használat előtt
1 Ellenőrizze, hogy az adattáblán jelzett tápfeszültség megegyezik-
e az otthonában lévő hálózati feszültséggel.
2 Távolítson el a vasaló talpról minden tapadó címkét, védőfóliát
vagy tároló burkolatot.
3 Melegítse fel a vasalót a legnagyobb hőmérsékletre és húzza
végig néhány percig egy darab nedves ruhán,hogy a talpról
eltávolítson minden maradványt.
Mikor a vasalót először használja, kissé füstölni fog. Ez rövid idő múlva
megszűnik.
A víztartály feltöltése
Soha ne merítse a vasalót vízbe.
1 Húzza ki a hálózati csatlakozó dugót a fali konnektorból.
C
2 Állítsa a gőzszabályzó gombot O (= nincs gőz) pozícióba.
3 Billentse meg a vasalót.
MAGYAR
Page 45

45
C
4 Öntsön csapvizet a víztartályba a tölcsérrel és töltse fel a
tartályt a legnagyobb szintig.
Ne töltse a tartályt a MAX jelzés fölé.
Ha a körzetében lévő víz nagyon kemény, javasoljuk, hogy használjon
desztillált vizet.
Ne használjon ecetet, keményítőt vagy vegyileg vízkőtlenített vizet.
Hőmérséklet szabályozás
1 Állítsa a vasalót a végére.
C
2 Állítsa be a kívánt vasalási hőmérsékletet a hőmérséklet
tárcsával úgy, hogy elforgatja a hőmérséklet jelző pozíciójára.
- Ellenőrizze a ruha címkéjét az előírt vasalási hőmérséklet
szempontjából.
- 1 Műszál (pl. akril, viszkóza, poliamid, poliészter)
- 1 Selyem
- 2 Gyapjú
- 3 Pamut, vászon
- Ha nem tudja, hogy egy ruha milyen anyagból készült, úgy határozza
meg a vasalási hőmérsékletet, hogy kipróbálja a ruha olyan részén,
ami használat közben nem látszik.
- Selyem, gyapjú és műszálas anyagok: vasalja az anyag fonákján, hogy
elkerülje a fényes foltokat. Ne használja a spray funkciót, nehogy
foltok keletkezzenek.
- Kezdje a vasalást olyan ruhákkal, amelyekhez a legkisebb hőmérséklet
kell, mint amilyenek a műszálas anyagok.
3 A vasaló hálózati csatlakozó dugóját földelt fali konnektorba
csatlakoztassa.
4 Ha a sárga jelzőlámpa elalszik, várjon egy kicsit, mielőtt elkezd
vasalni.
B
A borostyánsárga jelzőlámpa vasalás közben időnként világít.
Automatikusan kikapcsolódó változatoknál (csak a GC2030 típus):
Ha az automatikus kikapcsolás funkció működésbe lépett (a piros
jelzőlámpa villog), mozgassa meg kissé a vasalót, hogy kikapcsolja
működését (a piros jelzőlámpa villogása megszűnik).
MAGYAR
N
Y
L
O
N
N
Y
L
O
N
S
S
I
O
L
K
I
E
L
A
W
I
N
O
E
O
L
N
N
I
E
L
N
I
L
N
O
T
O
N
C
O
T
T
O
C
Page 46

Vasalás gőzzel
Győződjön meg róla, hogy elég víz van-e a tartályban.
C
1 Állítsa a hőmérséklet tárcsát a javasolt pozícióra.
Lásd a "Hőmérséklet szabályozás" c. részt.
C
2 Állítsa a gőzszabályzó gombot a megfelelő gőzpozícióba.
- qkevés gőz (hőmérséklet beállítás 2 to 3)
- w legerősebb gőz (hőmérséklet beállítás 3 to MAX)
B
Amint a készülék eléri a beállított hőmérsékletet, elkezdheti a gőzölős
vasalást.
◗ GC2005, 2006, 2010, 2015, 2016 típus: a víz szivároghat a
vasalótalpból, ha a beállított hőmérséklet túl alacsony (MIN - 2).
Vasalás gőz nélkül
1 Állítsa a gőzszabályzót O pozícióba ( = nincs gőz).
2 Állítsa a hőmérséklet tárcsát a javasolt pozícióra.
Lásd a "Hőmérséklet szabályozás" c. részt.
Egyéb tulajdonságok
Vízpermet
Makacs ráncok eltávolítása bármilyen hőmérsékleten
Győződjön meg róla, hogy elég víz van-e a tartályban.
C
1 A permetező gomb néhány megnyomásával a ruhaneműt
megnedvesítheti.
Extra gőz (csak GC2020, 2006, 2005 típusnál)
Ez a funkció extra gőzt kelt makacs ráncok eltávolítására.
Az Extra gőz funkció csak ooo és MAX közötti hőmérséklet
beállításoknál működik.
C
1 Állítsa a gőzszabályzót MAX w pozícióra.
46 MAGYAR
Page 47

47
C
2 Nyomja meg és tartsa megnyomva az Extra gőz gombot max.5
másodpercig.
3 Mielőtt az Extra gőz gombot újra használná, várjon legalább 1
percig, hogy elkerülje a víz csepegését a vasalótalpból.
Gőzlöket (csak GC2030, 2025,2016,2015, 2010 típusok)
Egy erőteljes gőzlöket segít a makacs gyűrődések eltávolításában.
A gőzlöket funkció csak oo és MAX hőmérséklet beállítások között
működik.
C
1 Nyomja meg és engedje el a gőzlövet gombot.
Függőleges gőzlöket (csak GC2030, 2025,2016, 2015 típusnál)
C
1 A gőzlöket funkciót akkor is lehet használni,ha a vasalót
függőleges helyzetben tartja.
Ne irányítsa a gőzt emberek felé.
Csepegés gátló (csak GC2030, 2025, 2020 típusnál)
Ennek a vasalónak van csepegés gátló funkciója: a vasaló automatikusan
leállítja a gőzölést, ha a hőmérséklet túl alacsony, hogy elkerülje a
vízcsepegést a vasalótalpból. Ilyenkor kattanó hang hallható.
Automatikus kikapcsolás (csak GC2030 típusnál)
C
◗ Egy elektronikus biztonsági szerkezet automatikusan kikapcsolja a
fűtőelemet, ha a vasalót egy ideig nem mozdítja meg.
◗ Annak jelzésére, hogy a fűtőelem kikapcsolódott, a piros
automatikus kikapcsolás jelző lámpa elkezd villogni.
A vasaló újbóli felfűtése:
1 Emelje fel a vasalót vagy mozgassa meg kissé.
MAGYAR
Page 48

48
2 A piros automatikus kikapcsolás jelzőlámpa elalszik.A sárga
hőmérséklet jelző lámpa világít, a talphőmérséklettől függően.
3 Ha a sárga jelzőlámpa a vasaló megmozdítása után
bekapcsolódik, a vasalás elkezdése előtt várja meg, míg elalszik.
4 Ha a sárga lámpa nem gyullad ki a vasaló megmozgatása után, a
vasaló kész a használatra.
Tisztítás és karbantartás
Vízkőtisztítás
A vízkő tisztító funkció eltávolítja a vízkövet és a szennyeződéseket.
Használja a vízkő tisztító funkciót minden két hétben egyszer. Ha a víz
körzetében túl kemény (tehát ha vasalás közben pikkelyek jönnek ki a
talpból), a vízkő tisztító funkciót gyakrabban kell használnia.
1 Állítsa a gőzszabályzó gombot O pozícióba.
2 Töltse fel a víztartályt a maximális szintig.
Ne tegyen a tartályba ecetet vagy más vízkőtlenítő anyagot.
C
3 Állítsa a hőmérsékletet MAX-ra.
4 Dugja a hálózati csatlakozó dugót a fali konnektorba.
5 Húzza ki a hálózati csatlakozó dugót a fali konnektorból,amikor
a borostyánsárga jelzőlámpa elalszik.
C
6 Tartsa a vasalót a köntő fölé és állítsa a gőzszabályzót v-re
(vízkő tisztítás).A gőzszabályzó gomb kissé ki fog ugrani.
C
7 Húzza ki kissé a gőzszabályzót és enyhén rázza meg a vasalót.
B
A vasalótapból gőz és fövő víz fog kijönni.A szennyeződés és a vízkő (ha
van) eltávozik.
MAGYAR
N
Y
L
O
N
N
Y
L
O
N
S
S
I
O
L
K
I
E
L
A
W
I
N
O
E
O
L
N
N
I
E
L
N
I
L
N
O
T
O
N
C
O
T
T
O
C
Page 49

49
C
8 Húzza ki még jobban a gőzszabályzót, hogy kivehesse a
gőzszabályzó tűt. Ha a tűn van vízkő,távolítsa el ecettel.
Ne hajlítsa meg vagy ne sértse meg a gőzszabályzó tűt.
C
9 Tegye vissza a gőzszabályzó tűt úgy,hogy a tű hegyét pontosan
a lyuk közepébe dugja és illessze a tű oldalán lévő kis kiálló
részt a résbe. Állítsa a gőzszabályzót gombot O pozícióba.
Ha a vasalóban még mindig van szennyeződés,ismételje
meg a vízkő tisztítási eljárást.
Vízkő tisztítási eljárás után
- Dugja a hálózati csatlakozó dugót a fali konnektorba és hagyja
megszáradni a vasalótalpat.
- Húzza ki a hálózati csatlakozó dugót a fali konnektorból, amikor a
borostyánsárga jelzőlámpa elalszik.
- Mozgassa könnyedén a vasalót egy használt ruhadarabon, hogy
eltávolítson minden vízfoltot, ami a vasalótalpon keletkezhetett.
- Tárolás előtt hagyja lehűlni a vasalót.
Vasalás után
1 Húzza ki a hálózati csatlakozó dugót a fali konnektorból és
hagyja lehűlni a vasalót.
2 Törölje le a vasalótalpról a vízkövet és minden más lerakódást
egy nedves ruhával és nem karcoló (folyékony) tisztítószerrel.
Védje a vasalótalpat: kerülje fémtárggyal való érintkezését.
3 Tisztítsa le a készülék felső részét nedves ruhával.
C
4 Rendszeresen öblítse ki vízzel a víztartályt.Tisztítás után ürítse
ki a víztartályt.
MAGYAR
Page 50

Tárolás
1 Húzza ki a hálózati dugót a fali konnektorból és állítsa a
gőzszabályzót O pozícióra.
2 Ürítse ki a víztartályt.
C
3 Hagyja a vasalót lehűlni. Csévélje a hálózati kábelt a kábeltároló
köré és rögzítse a kábelcsipesszel.
4 A vasalót mindig a sarkára állítva tárolja biztos és száraz helyen.
Információ és szerviz
Ha információra van szüksége vagy problémája van, látogassa meg a
Philips Web oldalát a www.philips.com címen vagy lépjen kapcsolatba
országa Philips Customer Care Centre osztályával (telefonszámát az
egész világra vonatkozó garancia nyomtatványon találja meg). Ha
országában nincs Philips Customer Care Centre, forduljon helyi Philips
kereskedőjéhez vagy vegye fel a kapcsolatot a Philips Háztartási
kisgépek és Szépségápolási termékek üzletága szervíz részlegével.
50 MAGYAR
Page 51

51
Elhárítás
Ellenőrizze a hálózati kábelt, a dugót
és a fali konnektort.
Állítsa a hőmérséklet szabályzót a
kívánt hőmérsékletre.
Töltse fel a víztartályt (lásd a
"Víztartály feltöltése" c. részt).
Állítsa a gőzszabályzót a q or w
pozícióra (lásd gőzölő vasalás).
Állítsa a hőmérséklet szabályzót a
gőzölési tartománynak megfelelő
hőmérsékletre(2 to MAX). Állítsa a
vasalót a sarkára és a vasalás
elkezdése előtt várjon, míg a sárga
jelzőlámpa elalszik.
Helyezze a vasalót vízszintes helyzetbe
és mielőtt ismét használná a
(függőleges) gőzlöket funkciót, várjon
rövid ideig.
Állítsa a hőmérséklet szabályzót a
gőzölési tartománynak megfelelő
hőmérsékletre(2 to MAX). Állítsa a
vasalót a sarkára és a vasalás
elkezdése előtt várjon, míg a sárga
jelzőlámpa elalszik.
Használja a vízkő tisztító funkciót rövid
ideig (lásd 'Vízkő tisztítás').
Rázza meg kissé a vasalót, hogy
kikapcsolja az automatikus kikapcsoló
funkciót: a jelzőlámpa villogása
megszűnik.
Állítsa a hőmérséklet szabályzót a
gőzölési tartománynak megfelelő
hőmérsékletre(2 to MAX). Állítsa a
vasalót a sarkára és a vasalás
elkezdése előtt várjon, míg a sárga
jelzőlámpa elalszik.
Lehetséges ok(ok)
Csatlakoztatási probléma
A hőmérséklet szabályzó MIN
pozícióban van.
Nincs elég víz a víztartályban.
A gőzszabályzó gombot O pozícióra
állította.
A vasaló nem elég forró és/vagy a
csepegés gátló funkció bekapcsolódott
(GC2030, 2025,2020 típus).
A (függőleges) gőzlöketet túl gyakran
használta rövid időn belül.
A vasalótalp nem elég forró.
A kemény víz pikkelyeket képez a
vasalótalp belsejében.
Az automatikus kikapcsoló funkció
működésbe lépett. Lásd az
"Automatikus kikapcsolás" fejezetet.
A hőmérsékletet túl alacsonyra
állította.
Hiba
A vasaló hálózati csatlakozó dugóját a
fali konnektorba csatlakoztatta, a
vasalótalp mégis hideg.
Nincs gőz
Nincs gőzlöket (csak GC2030, 2025,
2016, 2015,2011, 2010 típus) vagy
nincs függőleges gőzlöket (csak
GC2030, 2025,2016, 2015, 2010 típus)
Vasalás közben pikkelyek és
szennyeződések jönnek ki a
vasalótalpból.
A piros jelzőlámpa villog (csak GC2030
típus).
Víz csepeg a vasalótalpból (csak
GC2016, 2015,2010, 2006, 2005 típus).
MAGYAR
Hibaelhárítás
Ez a fejezet a vasaló használatával kapcsolatban leggyakrabban előforduló hibákat foglalja össze.A
részletes tudnivalókat a különböző részek elolvasásával tudhatja meg. Ha a hibát nem tudja
elhárítani, lépjen kapcsolatba a Philips készülékeket árusító szaküzlettel vagy a Philips szakszervízzel. A
Philips Helpdesk telefonszámait megtalálhatja a világ minden részére érvényes garancia levélen vagy
látogassa meg a www.philipsonline.com web oldalt.
Page 52

Dôležité upozornenie
Skôr, ako začnete zariadenie používať, si kvôli dodržaniu bezpečnosti pri
práci pozorne prečítajte tento návod na použitie a pozrite ilustrácie.
- Pokým je žehlička pripojená do siete nesmiete ju nikdy nechať bez
dozoru.
- Nedospelé osoby nesmú používať zariadenie bez dozoru. Dajte
pozor na deti, aby ste sa uistili, že sa nehrajú so zariadením.
- Žehliaca platňa zariadenia môže byť zohriata na vysokú teplotu a pri
dotyku môže spôsobiť popáleniny. Dajte pozor, aby sa napájací kábel
nedotýkal žehliacej platne, kým je horúca.
- Keď skončíte žehlenie, keď čistíte zariadenie, keď plníte, alebo
vyprázdňujete zásobník na vodu a tiež keď necháte žehličku čo len na
krátku chviľu bez používania: nastavte ovládač naparovania do polohy
0, postavte žehličku do jej stojana a odpojte ju zo siete.
- Ak je napájací kábel zariadenia poškodený, o výmenu sa musí postrať
personál firmy Philips, alebo servisného strediska autorizovaného
firmou Philips, pretože pri výmene sú potrebné špeciálne nástroje
a/alebo súčiastky.
- Zariadenie nikdy nepoužívajte, ak je akýmkoľvek spôsobom
poškodené.
Pred prvým použitím
1 Skôr ako pripojíte zariadenie do siete, skontrolujte či napätie
vyznačené na výrobnom štítku zariadenia súhlasí s napätím v
elektrickom rozvode Vášho domu.
2 Zo žehliacej platne odstráňte všetky nálepky, ochrannú fóliu a
obal na skladovanie.
3 Vyhrejte žehličku na najvyššiu teplotu a prechádzajte ňou
niekoľko minút po navlhčenej tkanine, aby ste odstránili všetky
nečistoty z povrchu žehliacej platne.
Pri prvom použití žehličky sa môže objaviť aj trochu dymu. Dym sa však
čoskoro stratí.
Napĺňanie zásobníka vody
Žehličku nikdy neponárajte do vody.
1 Vytiahnite sieťovú zástrčku zo zásuvky el. siete.
C
2 Ovládač pary nastavte na pozíciu O (=bez pary).
3 Nakloňte žehličku.
52 SLOVENSKY
Page 53

5353
C
4 Zásobník na vodu naplňte cez plniaci otvor vodou priamo z
vodovodu po maximum.
Hladina vody v zásobníku nesmie prekročiť označenú maximálnu
úroveň.
Ak je voda vo vodovode príliš tvrdá, odporúčame Vám použiť
destilovanú vodu.
Nepoužívajte vodu upravenú octom, škrobom, alebo chemicky.
Nastavenie teploty
1 Žehličku postavte vzpriamene.
C
2 Otočením nastavte ukazovateľ teploty tak,aby ukazoval na
požadovanú žehliacu teplotu.
- Správna teplota žehlenia by mal byť uvedený na štítku žehleného
oblečenia.
- 1 Syntetické tkaniny (napr. akryl, viskóza, polyamid, polyester)
- 1 Hodváb
- 2 Vlna
- 3 Bavlna, ľan
- Ak neviete z akého materiálu je oblečenie zhotovené, správnu
teplotu žehlenia určíte tak, že ožehlíte niektorú časť oblečenia, ktorú
pri nosení nebude vidieť.
- Hodváb, vlnený a syntetický materiál: žehlite vnútornú stranu, aby na
oblečení nevznikli lesklé pásy. Aby na oblečení nezostali hrdzavé
škvrny, nepoužívajte pri žehlení týchto materiálov sprejovanie.
- Najskôr žehlite oblečenie, ktoré vyžaduje najnižšiu teplotu žehlenia,
ako napr. oblečenie vyrobené zo syntetických vlákien.
3 Sieťovú zástrčku pripojte k uzemnenej zásuvke el.siete.
4 Keď zhasne žlté svetlo indikujúce ohrev žehliacej platne,
počkajte ešte chvíľu a potom môžete začať žehliť.
B
Žlté kontrolné svetlo sa počas žehlenia z času na čas rozsvieti .
Automatické vypnutie (len model GC2030):
Ak je aktivovaná funkcia automatického vypnutia žehličky (bliká červené
kontrolné svetlo), nepatrne pohnite žehličkou, aby ste túto funkciu
dezaktivovali.
SLOVENSKY
N
Y
L
O
N
N
Y
L
O
N
S
S
I
O
L
K
I
E
L
A
W
I
N
O
E
O
L
N
N
I
E
L
N
I
L
N
O
T
O
N
C
O
T
T
O
C
Page 54

Naparovanie
Presvedčte sa, či je v zásobníku vody dostatok vody.
C
1 Nastavte ukazovateľ teploty do správnej polohy.
Pozrite "Nastavenie teploty".
C
2 Ovládač pary nastavte do zodpovedajúcej polohy naparovania.
- q bežné naparovanie (nastavenie teploty 2 až 3)
- w maximálne naparovanie (nastavenie teploty 3 až MAX)
B
Naparovanie začne ihneď po dosiahnutí nastavenej teploty.
◗ Modely GC2005, 2006,2010, 2015,2016:Ak je nastavená teplota
príliš nízka, z otvorov na žehliacej platni môže vytekať voda (MIN
až 2).
Žehlenie bez naparovania
1 Ovládanie naparovania nastavte do polohy 0 (= žiadna para).
2 Otočte ukazovateľ teploty do požadovanej polohy.
Pozrite "Nastavenie teploty".
Ďalšie vlastnosti
Kropenie
Vyhladenie pokrčených miest pri ktorejkoľvek teplote
Presvedčte sa, či je v zásobníku vody dostatok vody.
C
1 Prádlo navlhčíte niekoľkonásobným stlačením tlačidla kropenia.
Extra naparovanie (len modely GC2020,2006, 2005)
Táto funkcia žehličky umožňuje použiť paru na vyhladenie pokrčených
miest, ktoré inak odolávajú žehleniu.
Funkciu Extra naparovanie môžete použiť len pri nastavení teploty
medzi3 a MAX.
C
1 Nastavte ovládač naparovania do polohy MAX w.
54 SLOVENSKY
Page 55

55
C
2 Stlačte a maximálne 5 sekúnd držte stlačené tlačidlo Extra
naparovanie.
3 Počkajte aspoň 1 minútu, kým opäť použijete Extra
naparovanie. Predídete tak kvapkaniu vody z otvorov v žehliacej
platni.
Impulz pary (len modely GC2030, 2025, 2016, 2015, 2011,
2010)
Silný impulz pary pomáha pri vyhladení pokrčených miest, ktoré
odolávajú bežnému žehleniu.
Funkciu Impulz pary môžete použiť len pri nastavení teploty medzi 2
a MAX.
C
1 Stlačte a uvoľnite impulz pary.
Impulz pary vo zvislej polohe (len modely GC2030, 2025,
2016, 2015)
C
1 Funkciu Impulz pary môžete použiť aj vtedy,ak držíte žehličku
vo vertikálnej polohe.
Paru nikdy neotáčajte smerom k ľuďom.
Zastavenie odkvapkávania (len modely GC2030, 2025, 2020)
Žehlička umožňujúca použitie funkcie Zastavenie odkvapkávania:
žehlička automaticky zablokuje naparovanie, ak je teplota príliš nízka na
úplné odparenie vody pretekajúcej cez otvory v žehliacej platni. Ak sa
tak stane, budete počuť kliknutie.
Automatické vypnutie (len model GC2030)
C
◗ Ak ste žehličkou určitý čas nepohli, elektronický bezpečnostný
senzor automaticky vypne ohrevné teleso.
◗ Automatické vypnutie ohrevného telesa senzorom indikuje
červené svetlo,ktoré začne blikať
SLOVENSKY
Page 56

56
Opätovné rozohriatie žehličky:
1 Zdvihnite žehličku, alebo ňou pomaly pohýbte.
2 Červené svetlo indikujúce automatické vypnutie prestane
svietiť. Podľa toho, aká je teplota žehliacej platne, sa rozsvieti
žlté svetlo.
3 Ak sa po pohnutí žehličkou rozsvieti žlté svetlo, počkajte kým
neprestane svietiť.
4 Ak sa po pohnutí žehličkou žlté svetlo nerozsvieti, žehlička je
pripravená na prácu.
Čistenie a údržba
Odstránenie vodného kameňa
Funkcia Odstránenie vodného kameňa umožňuje odstrániť usadeniny a
nečistoty.
Funkciu Odstránenie vodného kameňa použite vždy po uplynutí dvoch
týždňov.Ak je voda, ktorú používate príliš tvrdá (napr. ak z otvorov v
žehliacej platni vychádzajú počas žehlenia šupiny usadenín), používajte
funkciu Odstránenie vodného kameňa častejšie.
1 Ovládač pary nastavte na pozíciu O.
2 Zásobník vody naplňte na maximálnu úroveň.
Nepridávajte do zásobníka ocot, ani iný prostriedok na odstránenie
vodného kameňa.
C
3 Otočte ukazovateľ teploty na MAX.
4 Zástrčku vložte do zásuvky el. siete.
5 Žehličku odpojte, keď vypne žlté kontrolné svetlo.
C
6 Držte žehličku nad výlevkou a nastavte ovládač naparovania do
polohy v (odstránenie vodného kameňa). Gombík ovládača
naparovania sa zľahka nadvihne.
C
7 Zľahka povytiahnite ovládač naparovania a jemne potraste
žehličkou.
B
Z otvorov v žehliacej platni vytečie para a vriaca voda. Spolu s ňou sa
vyplavia nečistoty a vodný kameň (ak už vznikol).
SLOVENSKY
N
Y
L
O
N
N
Y
L
O
N
S
S
I
O
L
K
I
E
L
A
W
I
N
O
E
O
L
N
N
I
E
L
N
I
L
N
O
T
O
N
C
O
T
T
O
C
Page 57

57
C
8 Gombík ovládača naparovania potiahnite ďalej von, aby ste
uvoľnili ihlu ovládača naparovania. Na očistenie ihly, ak je to
potrebné, použite ocot.
Neohnite, ani inak nepoškoďte ihlu ovládača naparovania.
C
9 Vráťte ihlu ovládača naparovania späť tak,že jej špičku
zasuniete presne do stredu otvoru a výstupok na ihle do
drážky. Nastavte gombík ovládača naparovania do polohy O.
V prípade, že je v žehličke stále veľa nečistôt, proces
odstraňovania vodného kameňa zopakujte .
Po odstránení vodného kameňa
- Žehličku zapojte do el. siete a žehliacu platňu nechajte vysušiť.
- Žehličku odpojte, keď vypne žlté kontrolné svetlo.
- Jemne prejdite žehličkou po kúsku použitej tkaniny, aby ste odstránili
škvrny, ktoré sa pri odparovaní vody mohli vytvoriť na povrchu
žehliacej platne.
- Žehličku nechajte pred uložením vychladiť.
Po dožehlení
1 Vytiahnite sieťovú zástrčku zo zásuvky el. siete a nechajte
žehličku vychladiť.
2 Pomocou navlhčenej tkaniny a čistiaceho prostriedku
(kvapalného), ktorý nepoškodí povrch žehliacej platne,
odstráňte z neho vodný kameň a všetky ostatné usadeniny.
Udržujte žehliacu platňu hladkú: vyvarujte sa kontaktu kovových
predmetov.
3 Vrchnú časť zariadenia očistite pomocou navlhčenej tkaniny.
C
4 Vodou pravidelne vyplachujte zásobník na vodu. Po vyčistení ho
vyprázdnite.
SLOVENSKY
Page 58

Uloženie
1 Odpojte napájací kábel zo siete a nastavte ovládač naparovania
do polohy O.
2 Vyprázdnite zásobník vody.
C
3 Nechajte žehličku ochladiť. Naviňte napájací kábel na určené
miesto a upevnite ho pomocou svorky.
4 Žehličku odkladajte vždy uloženú na jej podložke na
bezpečnom suchom mieste.
Informácie a servis
Ak potrebujete informácie, alebo máte problém,prosíme Vás, aby ste sa
zoznámili s webovou stránkou firmy Philips - www.philips.com,alebo sa
obrátili na Oddelenie služieb zákazníkom vo Vašej krajine (telefónne
číslo Oddelenia nájdete v priloženom letáčiku s celosvetovo platnou
zárukou). Ak sa vo Vašej krajine toto oddelenie nenachádza, obráťte sa
na miestneho predajcu Philips, alebo sa skontaktujte s Oddelením
služieb Philips - divízia domáce spotrebiče a osobná starostlivosť.
58 SLOVENSKY
Page 59

59
Riešenie
Skontrolujte sieťový kábel, zástrčku a
sieťovú zásuvku.
Nastavte ovládanie teploty na
požadovanú hodnotu.
Naplňte zásobník vody (viď Napĺňanie
zásobníka vody).
Nastavte polohu q alebo w (pozri
Naparovanie).
Nastavte ovládanie teploty na
hodnotu, ktorá sa nachádza v oblasti
použitia naparovania. Pred žehlením
uložte žehličku do jej stojana a
počkajte, kým nezhasne žlté svetlo.
Žehličku dajte do vodorovnej polohy
a pred opätovným použitím funkcie
Impulz pary (vo zvislej polohe) chvíľu
počkajte.
Nastavte ovládanie teploty na
hodnotu, ktorá sa nachádza v oblasti
použitia naparovania. Pred žehlením
uložte žehličku do jej stojana a
počkajte, kým nezhasne žlté svetlo.
Opakovane použite funkciu
odstránenia vodného kameňa (pozri
"Odstránenie vodného kameňa").
Jemne potraste žehličkou, aby ste
dezaktivovali funkciu automatické
vypnutie: červené svetlo prestane
blikať.
Nastavte ovládanie teploty na
hodnotu, ktorá sa nachádza v oblasti
použitia naparovania. Pred žehlením
uložte žehličku do jej stojana a
počkajte, kým nezhasne žlté svetlo.
Možná príčina(y)
Problém pripojenia.
Ovládač teploty je nastavený na MIN.
Nie je dostatok vody v zásobníku
vody.
Ovládač pary bol nastavený do polohy
O.
Žehliaca platňa nie je dostatočne
zohriata a/alebo bola aktivovaná
funkcia Zastavenie odkvapkávania
(modely GC2030, 2025,2020).
Funkciu Impulz pary (vo zvislej
polohe) ste použila príliš veľakrát,
alebo vo veľmi krátkom čase.
Žehliaca platňa nie je dostatočne
zohriata.
Tvrdosť používanej vody spôsobuje
vznik usadenín.
Bola aktivovaná funkcia automatického
vypnutia. Pozri časť "Automatické
vypnutie".
Nastavili ste príliš nízku teplotu.
Problém
Žehlička je pripojená do siete, ale
žehliaca platňa je studená.
Nejde para
Nefunguje funkcia Impulz pary (modely
GC2030, 2025,2020, 2016, 2015, 2011,
2010) alebo Impulz pary vo zvislej
polohe (modely GC2030, 2025,2020,
2016, 2015).
Počas žehlenia z otvorov v žehliacej
platni vychádzajú usadeniny a nečistoty.
Bliká červené svetlo (len model
GC2030).
Z otvorov v žehliacej platni odkvapkáva
voda (len modely GC2016, 2015,2011,
2010, 2006,2005).
SLOVENSKY
Riešenie problémov
Táto kapitola sumarizuje najčastejšie sa vyskytujúce problémy, ktoré môžu nastať pri používaní Vašej
žehličky. Prosíme Vás, aby ste sa podrobne oboznámili s jednotlivými odstavcami.Ak nie ste schopný
vyriešiť problém, prosíme Vás, aby ste sa obrátili na najbližšie servisné centrum Philips alebo ich
zástupcov.Telefónne čísla služby zákazníkom nájdete na celosvetovom záručnom liste, alebo na
webovej stránke www.philipsonline.com.
Page 60

Увага!
В цілях максимально безпечної експлуатації пристрою уважно
прочитайте ці інструкції та продивіться ілюстрації перед тим, як
почнете користуватися пристроєм.
- Ніколи не залишайте підключений до електромережі пристрій
без нагляду.
- Слабкі особи не повинні користуватися пристроєм без нагляду.
Наглядайте за дітьми, щоб вони не гралися з пристроєм.
- "Підошва" пристрою стає дуже гарячою і може призвести до
займання. Тому електричний шнур не повинен торкатися нагрітої
"підошви".
- Коли після закінчення прасування Ви чистите пристрій, коли Ви
заповнюєте або спустошуєте водяний резервуар, а також якщо
Ви залишаєте праску навіть на короткий час, ставте регулятор
інтенсивності пари у положення 0, встановлюйте праску на п'яту
та витягайте штепсель з розетки.
- Якщо шнур пошкоджено, він має бути замінений тільки фірмою
Philips, або сервісним центром, уповноваженим Philips, оскільки
необхідні спеціальні запчастини та обладнання.
- Якщо прилад має будь-яке пошкодження, використовувати його
заборонено!
Перед першим використанням праски
1 Перевірте, чи відповідає напруга, показана на бирці, напрузі
у мережі електропостачання у вашому домі.
2 Зніміть усі етикетки, захисну фольгу або захисний шар з
"підошви" пристрою.
3 Нагрійте пристрій до максимальної температури та поводіть
праскою по вологій ганчірці щоб усунути найменші
забруднення з "підошви" пристрою.
На початку використання праска може давати невеличкий дим. Це
незабаром припиниться.
Заливка води у резервуар праски
Ніколи не занурюйте пристрій у воду.
1 Вимкніть вилку праски з розетки.
C
2 Поставте регулятор подачі пару в положення O (= пар не
подається).
3 Нахилить праску.
60 УКРАЇНСЬКА
Page 61

61
C
4 Налийте до водяного резервуару водопровідної води за
допомогою лійки для води.
Не наливайте воду вище максимального рівня.
Якщо водопровідна вода у вашій місцевості занадто жорстка, ми
рекомендуємо вам використовувати дистильовану воду.
Не використовуйте оцет, крохмаль та засоби для видаленн
накипу.
Установлення температури
1 Поставте праску на її п'ятку.
C
2 Встановіть терморегулятор на необхідну для прасування
температуру, користуючись шкалою температур.
- Температура прасування наведена на бирках речах, які ви
збираєтесь прасувати.
- 1 Синтетичні речі ( такі як акріл, віскоза, поліамід, поліефір )
- 1 Шовк
- 2 Вовна
- 3 Льон, бавовна
- Якщо ви не знаєте, з якої тканини зроблено річ, спробуйте
спочатку попрасувати шматочок там, де його не буде видно при
носінні.
- Шовкові, вовняні та синтетичні речі необхідно прасувати з
зворотного боку, щоб уникнути появи лискучих плям. Щоб
уникнути плям, використовуйте функцію розбризкувача.
- Починайте прасування з речей, що потребують найнижчої
температури, наприклад, з синтетики.
3 Ввімкніть вилку у заземлену розетку.
4 Коли жовта сигнальна лампочка згасне, заждіть трохи і
можете приступати до прасування.
B
Під час прасування цей індикатор буде періодично вмикатися і
вимикатися.
Для автовідключення (тільки модель GC2030 ):
Якщо функція автовідключення активована (при цьому блимає
червона сигнальна лампочка), трошки зсуньте праску для
відключення функції (червоний вогник перестає блимати).
УКРАЇНСЬКА
N
Y
L
O
N
N
Y
L
O
N
S
S
I
O
L
K
I
E
L
A
W
I
N
O
E
O
L
N
N
I
E
L
N
I
L
N
O
T
O
N
C
O
T
T
O
C
Page 62

Прасування з паром
Перевірте, щоб у прасці було досить води.
C
1 Встановіть регулятор температури у рекомендовану
позицію.
Дивіться розділ "Встановлення температури".
C
2 Поставте регулятор подачі пару у відповідне положення.
- q для середньої пари (значення температури від 2 до 3 )
- w для максимальної пари (значення температури від 3 до
MAX; )
B
Пар почне створюватися відразу ж після того, як буде досягнута
задана температура.
◗ Моделі GC2005, 2006, 2010, 2015, 2016: Вода може трошки
сочитися з "підошви", якщо виставлено занадто низький
температурний режим (від MIN до 2).
Прасування без пару
1 Поставте регулятор пари в позицію О ( немає пари).
2 Поставте регулятор температури у рекомендовану позицію.
Дивіться розділ "Встановлення температури".
Інші параметри
Обприскування
Для видалення важких зморшок при будь-якій температурі.
Перевірте, щоб у прасці було досить води.
C
1 Щоб волога потрапила на тканину, пару раз натисніть на
кнопку обприскування.
"Extra Steam" (Додаткова пара) (лише моделі GC2020,
2006, 2005).
Ця функція дає надзвичайно потужну пару для розрівнювання
важких зморшок.
Функція "Extra Steam" працює лише при установках температури
від 3 до MAX.
62 УКРАЇНСЬКА
Page 63

63
C
1 Встановіть регулятор пари у положення MAX w
C
2 Натисніть та утримуйте кнопку "Extra Steam" максимум 5
секунд.
3 Зачекайте не менше хвилини перед тим, як знову
використовувати функцію "Extra Steam", інакше вода може
почати капати з "підошви".
"Shot of Steam" (Викид пари) ( тільки моделі GC2030, 2025,
2016, 2015, 2011, 2010).
Потужний викид пари допомагає усунути зморшки, які важко
розправити.
Функція "Shot of Steam" працює при температурних установках від
2 до MAX.
C
1 Натисніть і відпустіть кнопку "Shot-of-Steam".
"Vertical Shot of Steam" (Вертикальний викид пари) (тільки
моделі GC2030, 2025, 2016, 2015).
C
1 Функція вертикального викиду пару може
використовуватися лише коли праска знаходиться у
вертикальному положенні.
Ні в якому разі не направляйте струмінь пару на людей.
"Drip Stop" (Припинення капання) (тільки моделі GC2030,
2025, 2020).
В цій прасці передбачена функція припинення капання: праска
автоматично перестає виділяти пар якщо температура стає
занизькою, щоб вода не почала сочитися через "підошву". У цьому
випадку ви почуєте звуковий сигнал.
УКРАЇНСЬКА
Page 64

64
"Automatic shut-off" (Автоматичне відключення) (лише
модель GC2030 ).
C
◗ Пристрій електронної безпеки автоматично відключає
нагрівальний елемент, якщо праску деякий час не рухали з
місця.
◗ При автоматичному відключенні нагрівального елементу буде
блимати червоний сигнальний вогник.
Щоб вимкнути електронне блокування:
1 Підніміть або злегка зсуньте праску.
2 Червоний сигнальний вогник відключиться. Індикатор
температури загориться жовтим світлом, в залежності від
температури "підошви".
3 Якщо жовтий вогник загориться після того, як ви зсунули
праску, дочекайтеся його відключення перед тим, як
починати прасування.
4 Якщо жовтий вогник не загорівся після того, як ви зсунули
праску, праска готова до роботи.
Чистка і догляд за праскою
Видалення
Функція "Calc-Clean" (Видалення вапна) видаляє накип та домішки.
Використовуйте функцію видалення вапна кожні два тижні. Якщо
вода у вашій місцевості дуже жорстка (тобто коли пластівці
з'являються на "підошві" в процесі прасування), цю функцію
необхідно використовувати частіше.
1 Поставте регулятор подачі пару у положення O.
2 Залийте воду у праску до максимального рівня.
Не заливайте в праску оцет та інші речовини для видалення накипу.
C
3 Встановіть регулятор температури на MAX.
4 Ввімкніть вилку у розетку.
5 Після того, як жовтий індикатор погасне, вимкніть праску з
розетки.
УКРАЇНСЬКА
N
Y
L
O
N
N
Y
L
O
N
S
S
I
O
L
K
I
E
L
A
W
I
N
O
E
O
L
N
O
T
O
N
C
O
T
T
O
C
N
N
I
E
L
N
I
L
Page 65

65
C
6 Тримайте праску над раковиною та виставте регулятор пари
в позицію v ("Calc-Clean"). Регулятор пари трохи
висунеться.
C
7 Трохи висуньте регулятор пари і обережно потрусіть
праску.
B
Пара і кипляча вода будуть виділятися з "підошви". Домішки та
накип (якщо є ) вимиваються.
C
8 Висуньте регулятор пари далі, щоб висунути стержень
регулятора пари. Використовуйте оцет, щоб видалити накип
(якщо є ) зі стержня.
Не зігніть та не пошкодьте стержень регулятора пари.
C
9 Поставте стержень на місце, точно по центру отвору і
попадаючи маленьким виступом на боці стержня в паз.
Поставте регулятор пари в позицію О.
Якщо в прасці лишилася деяка кількість домішок,
повторіть процедуру чищення.
Після процесу видалення вапна.
- Ввімкніть праску, щоб нагрівальний елемент висох.
- Після того, як жовтий індикатор погасне, вимкніть праску з
розетки.
- Порухайте обережно праску по непотрібній ганчірці для того,
щоб видалити залишки води з "підошви".
- Дайте прасці охолонути.
УКРАЇНСЬКА
Page 66

66
Після прасування
1 Вимкніть вилку з розетки і дайте прасці охолонути.
2 Вапняний наліт та інші забруднення видаляються з
"підошви" за допомогою вологої ганчірки та неабразивного
(рідкого) засобу для чищення.
Оберігайте нагрівальний елемент від подряпин: уникайте його
контактів з металічними предметами.
3 Верхню частину праски чистіть вологою ганчіркою.
C
4 Регулярно промивайте водою резервуар праски для води.
Після закінчення промивки злийте воду з резервуару
праски.
Зберігання
1 Вийміть штепсель з розетки та встановіть регулятор пари в
позицію О.
2 Вилийте воду з резервуару праски.
C
3 Дайте прасці охолонути. Намотайте шнур на місце і
зафіксуйте затискачем.
4 Завжди зберігайте праску у вертикальному положенні "на
п'яті" у надійному та сухому місці.
Інформація та сервіс
Якщо вам потрібна інформація або якщо у вас виникли проблеми,
просимо відвідати сторінку компанії Philips у мережі Інтернет за
адресою www.philips.com або зверніться у Центр обслуговування
клієнтів компанії Philips у вашій країні (телефонні номери таких
центрів для різних країн світу наведені у гарантійному талоні).
Якщо у вашій країні немає Центру обслуговування клієнтів компанії
Philips, зверніться до вашого місцевого дилера компанії Philips або
зверніться у Відділ обслуговування (Service Department) компанії
Philips Domestic Appliances and Personal Care BV.
УКРАЇНСЬКА
Page 67

67
Можливі несправності.
У цій главі підсумовано проблеми, з якими можна стикнутися при користуванні Вашою
праскою. Будь ласка, щоб дізнатися про подробиці, прочитайте окремі пункти. Якщо Ви не в
змозі вирішити проблему, будь-ласка, звертайтеся до найближчого Сервісного Центру Philips
або до одного з його представників. Телефонні
номери Ви знайдете на гарантійному талоні або відвідавши сторінку Philips Helpdesk в
Інтернеті: www.philipsonline.com.
УКРАЇНСЬКА
спосіб усунення
Перевірте стан шнуру живлення,
вилки і розетки.
Виставте регулятор на потрібну
температуру.
Залийте воду у резервуар праски
для води (дивіться розділ
"Заливання води у резервуар
праски").
Виставляйте регулятор пари від
q доw.
Виставте регулятор температури
від 2 до MAX. Поставте праску
на "п'яту" та дочекайтеся, доки не
згасне жовтий сигнальний вогник.
Тоді можете прасувати.
Поставте праску у горизонтальне
положення і, перед тим, як знову
використовувати функцію
(вертикального) викиду пару,
деякий час почекайте.
Виставте регулятор температури
від 2 до MAX. Поставте праску
на "п'яту" та дочекайтеся, доки не
згасне жовтий сигнальний вогник.
Тоді можете прасувати.
Використати функцію Видалення
вапна (див. "Calc-Clean").
Зсуньте злегка праску для
відключення функції: червоний
вогник перестане блимати.
Виставте регулятор температури
від 2 до MAX. Поставте праску
на "п'яту" та дочекайтеся, доки не
згасне жовтий сигнальний вогник.
Тоді можете прасувати.
Можлива причина (причини)
Ненадійні електричні контакти.
Регулятор температури стоїть на
MIN.
Не достатньо води у резервуарі
праски для води.
Регулятор подачі пару поставлений
у положення O.
"Підошва" недостатньо гаряча і/або
функція Не працює система краплястоп (тільки моделі GC2030, 2025,
2020).
Протягом короткого часу функція
(вертикального) викиду пару
використовувалася занадто часто.
"Підошва" недостатньо гаряча.
Жорстка вода формує пластівці на
"підошві".
Активовано функцію авто
відключення. Дивіться розділ "авто
відключення".
Виставлено занадто низьку
температуру.
Несправність
Праска ввімкнута в розетку, але
нагрівальний елемент холодний
Немає пару
Немає Викиду пари тільки моделі
GC2030, 2025, 2016, 2015, 2011, 2010)
або Вертикального викиду пари
(тільки моделі GC2030, 2025, 2016,
2015).
Пластівці та інші забруднення
виділяються з праски під час
прасування.
Блимає червоний сигнальний вогник
(тільки модель GC2030).
Вода протікає через "підошву"
(моделі GC2016, 2015, 2011, 2010,
2006, 2005).
Page 68

Važno
Za optimalnu sigurnost, prije uporabe pažljivo pročitajte ove upute i
pogledajte slike.
- Nikada ne ostavljajte glačalo bez nadzora kad je priključeno na
napajanje.
- Bolesne ili hendikepirane osobe ne smiju koristiti glačalo bez
nadzora. Ne dozvolite djeci igranje glačalom.
- Grijaća ploča glačala se može jako zagrijati i prouzročiti opekotine
ako se dodiruje. Pazite da mrežni kabel ne doūe u kontakt s vrućom
pločom.
- Po završetku glačanja, tijekom čišćenja, punjenja ili pražnjenja
spremnika za vodu i kad nakratko ostavite glačalo: postavite kontrolu
pare na položaj O,postavite glačalo u uspravni položaj i izvucite
mrežni kabel iz zidne utičnice.
- Ako se mrežni kabel glačala ošteti, potrebno ga je zamijeniti isključivo
u ovlaštenom servisu jer su za to potrebni posebni alati i/ili dijelovi.
- Nikada ne koristite glačalo ako je oštećeno na bilo koji način
Prije prve uporabe
1 Provjerite da li napon označen na pločici s podacima odgovara
naponu Vaše mreže.
2 S grijaće ploče uklonite sve naljepnice, zaštitnu foliju ili pokrov.
3 Zagrijte glačalo na maksimalnu temperaturu i nekoliko minuta
glačajte vlažnu krpu kako biste uklonili ostatke ljepila s grijaće
ploče.
Kod prve uporabe možda ćete primijetiti malo dima.Ta pojava nakon
kraćeg vremena nestaje.
Punjenje spremnika za vodu
Nikada ne uranjajte glačalo u vodu.
1 Izvucite mrežni kabel iz utičnice.
C
2 Postavite kontrolu pare na položaj O (= bez pare).
3 Nagnite glačalo.
HRVATSKI68
Page 69

C
4 Pomoću mjerice ulijte vodu iz slavine u spremnik. Napunite ga
do maksimalne razine.
Ne punite spremnik iznad oznake MAX.
Ako je voda u Vašem području vrlo tvrda, savjetujemo uporabu
destilirane vode.
Ne koristite ocat, sredstvo za škrobljenje ili vodu kojoj je kemijskim
putem uklonjen kamenac.
Podešavanje temperature
1 Postavite glačalo uspravno.
C
2 Postavite kontrolu temperature na podešenje potrebno za
glačanje.
- Provjerite oznake na odjevnim predmetima za potrebnu
temperaturu glačanja.
- 1 Sintetika (akril, viskoza,polijamid, poliester)
- 1 Svila
- 2 Vuna
- 3 Pamuk, lan
- Ako ne znate koji je materijal posrijedi, odredite odgovarajuću
temperaturu tako da prvo izglačate dio koji je nevidljiv pri nošenju
odjeće.
- Svila, vuna i sintetika: glačajte ih s obrnute strane kako bi spriječili
pojavu sjajnih mrlja.Takoūer, nemojte koristiti funkciju prskanja.
- Započnite s glačanjem tkanina kojima je potrebna najniža
temperatura, poput sintetike.
3 Utaknite mrežni kabel u uzemljenu zidnu utičnicu.
4 Kad se žuta kontrolna žaruljica ugasi,kratko pričekajte prije
početka glačanja.
B
Žuta kontrolna žaruljica se povremeno pali tijekom glačanja.
Modeli s funkcijom automatskog isključenja (samo GC2030):
Ako se aktivira funkcija automatskog isključenja (crvena kontrolna
žaruljica trepće), lagano pomaknite glačalo za ponovno uključenje
(žaruljica prestaje treptati).
HRVATSKI 69
N
Y
L
O
N
N
Y
L
O
N
S
S
I
O
L
K
I
E
L
A
W
I
N
O
E
O
L
N
N
I
E
L
N
I
L
N
O
T
O
N
C
O
T
T
O
C
Page 70

Parno glačanje
Provjerite ima li u spremniku dovoljno vode.
C
1 Postavite kontrolu temperature u odgovarajući položaj.
Pogledajte odjeljak "Podešavanje temperature".
C
2 Postavite kontrolu pare u odgovarajući položaj.
- q za umjerenu paru (podešenja 2 do 3)
- w za maksimalnu paru (podešenja 3 do MAX)
B
Para počinje izlaziti čim je dosegnuta podešena temperatura.
◗ Modeli GC2005, 2006, 2010, 2015 2016:Ako je podešena
temperatura preniska (MIN do 2), iz grijaće ploče može istjecati
voda.
Glačanje bez pare
1 Postavite kontrolu pare na položaj O (= bez pare).
2 Postavite kontrolu pare u odgovarajući položaj.
Pogledajte odjeljak "Podešavanje temperature".
Druge značajke
Prskanje vodom
Za glačanje tvrdih nabora pri bilo kojoj temperaturi.
Provjerite ima li u spremniku dovoljno vode.
C
1 Pritisnite tipku za prskanje nekoliko puta za vlaženje rublja.
Extra Steam funkcija (samo modeli GC2020, 2006, 2005)
Ova funkcija omogućuje uporabu dodatnog mlaza pare za uklanjanje
tvrdih nabora.
Extra Steam funkcija radi samo pri temperaturama izmeūu
3 i
MAX.
C
1 Postavite kontrolu pare na MAX položaj w.
HRVATSKI70
Page 71
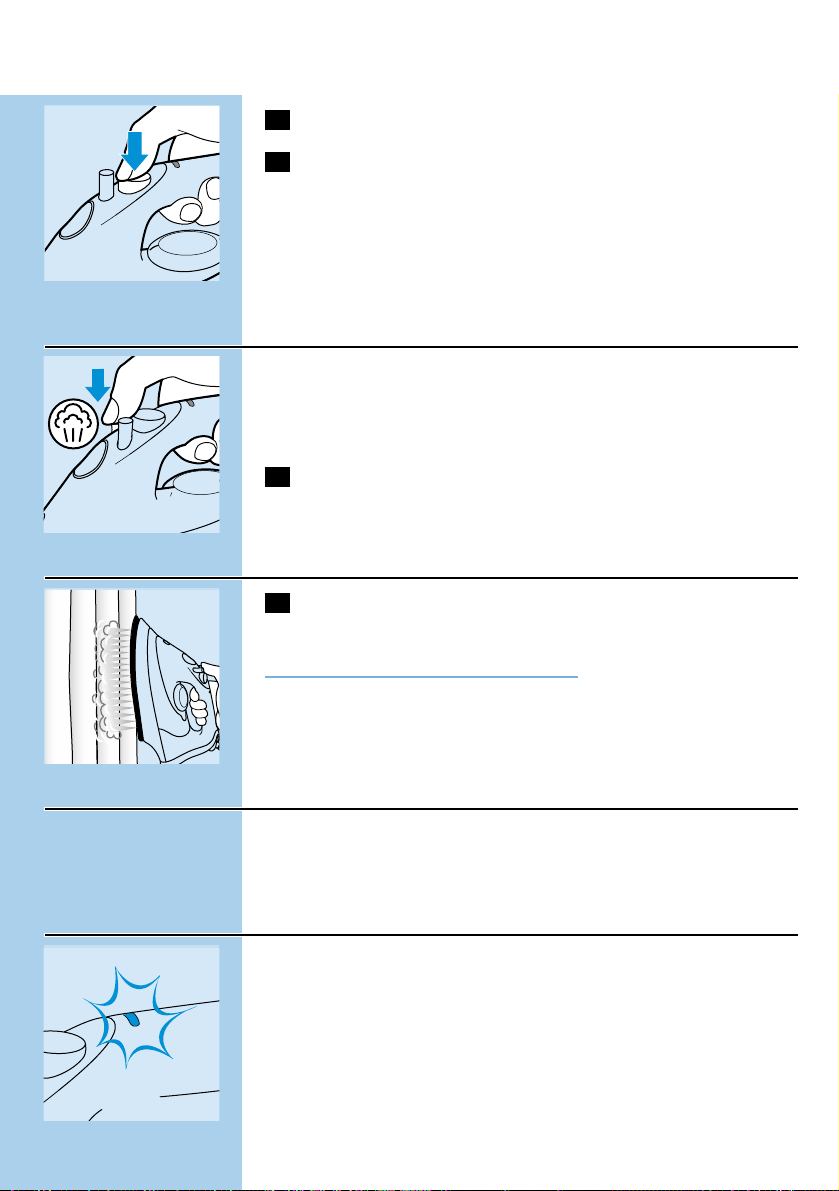
C
2 Pritisnite i zadržite tipku Extra Steam maks. 5 sekundi.
3 Pričekajte najmanje 1 minutu prije ponovne uporabe Extra
Steam funkcije kako bi spriječili kapanje vode iz grijaće ploče.
Shot of Steam (samo modeli GC2030, 2025, 2016, 2015,2011,
2010)
Ova funkcija omogućuje uporabu jakog mlaza pare za uklanjanje tvrdih
nabora.
Shot of Steam funkcija radi samo pri temperaturama izmeūu 2 i
MAX.
C
1 Pritisnite i otpustite tipku za mlaz pare.
Okomiti mlaz pare (samo modeli GC2030,2025, 2016,2015)
C
1 Funkcija mlaza pare se takoūer može koristiti kada držite
glačalo u okomitom položaju.
Nikada ne usmjerujte paru prema ljudima.
Drip Stop funkcija (samo modeli GC2030, 2025, 2020)
Ovo glačalo je opremljeno funkcijom sprječavanja kapanja: para se
automatski zaustavlja kad je temperatura preniska kako bi se spriječilo
kapanje vode iz grijaće ploče. Kad se to desi, začuje se "klik":
Automatsko isključenje (samo model GC2030)
C
◗ Elektronički sigurnosni sklop automatski isključuje grijaći element
ako neko vrijeme niste pomaknuli glačalo.
◗ U znak da je grijaći element isključen, crvena kontrolna žaruljica
trepće.
HRVATSKI 71
Page 72

Ponovno zagrijavanje glačala:
1 Podignite glačalo ili ga lagano pomaknite.
2 Crvena kontrolna žaruljica se gasi.Žuta kontrolna žaruljica se
pali, ovisno o temperaturi grijaće ploče.
3 Ako se žuta žaruljica upali nakon pomicanja glačala,prije
glačanja pričekajte da se ugasi.
4 Ako se žuta žaruljica ne upali nakon pomicanja glačala,ono je
spremno za uporabu.
Čišćenje i održavanje
Calc-Clean funkcija
Ova funkcija služi uklanjanju kamenca i nečistoće.
Koristite je jednom u dva tjedna. Ako je voda u Vašem području vrlo
tvrda (odnosno, kad tijekom glačanja iz grijaće ploče izlaze djelići
kamenca), ovu je funkciju potrebno koristiti češće.
1 Postavite kontrolu pare u položaj O.
2 Napunite spremnik za vodu do najviše razine.
U spremnik za vodu ne ulijevajte ocat ili druga sredstva za uklanjanje
kamenca.
C
3 Postavite kontrolu temperature na MAX.
4 Utaknite mrežni kabel u zidnu utičnicu.
5 Izvadite mrežno glačalo kada se žuta kontrolna žaruljica ugasi.
C
6 Držite glačalo iznad sudopera i postavite kontrolu pare na
položaj v (Calc-Clean). Kontrola pare se lagano podiže.
C
7 Lagano podignite kontrolu pare i nježno protresite glačalo.
B
Iz grijaće ploče izlazi para i kipuća voda. Nečistoća i kamenac (ako ga
ima) se ispire.
HRVATSKI72
N
Y
L
O
N
N
Y
L
O
N
S
S
I
O
L
K
I
E
L
A
W
I
N
O
E
O
L
N
N
I
E
L
N
I
L
N
O
T
O
N
C
O
T
T
O
C
Page 73

C
8 Još podignite kontrolu pare za odvajanje igle kontrole pare.Ako
na igli ima kamenca, operite ga octom.
Nemojte savijati ili oštetiti iglu kontrole pare.
C
9 Vratite iglu kontrole pare tako da njen vrh umetnete točno u
središte otvora,a malu izbočinu s bočne strane igle u utor.
Postavite kontrolu pare na položaj O.
Ako u glačalu još ima nečistoće, ponovite Calc-Clean
postupak.
Nakon Calc-Clean postupka
- Uključite glačalo u napajanje kako bi se donja ploča osušila.
- Izvadite mrežno glačalo kada se žuta kontrolna žaruljica ugasi.
- Lagano prijeūite glačalom preko stare krpe kako bi uklonili
eventualne mrlje od vode s grijaće ploče.
- Prije spremanja ostavite glačalo da se ohladi.
Nakon glačanja
1 Izvucite mrežni kabel iz zidne utičnice i ostavite glačalo da se
ohladi.
2 Očistite kamenac i druge nečistoće s grijaće ploče vlažnom
krpom i neabrazivnim (tekućim) sredstvom.
Izbjegavajte kontakt donje ploče sa metalnim predmetima.
3 Gornji dio glačala obrišite vlažnom krpom.
C
4 Redovito vodom ispirite spremnik za vodu.Ispraznite ga nakon
čišćenja.
HRVATSKI 73
Page 74

Pohranjivanje
1 Izvucite mrežni kabel iz utičnice i postavite kontrolu pare na
položaj O.
2 Ispraznite spremnik za vodu.
C
3 Pustite da se glačalo ohladi. Omotajte mrežni kabel oko
spremnika i učvrstite ga hvataljkom.
4 Uvijek spremite glačalo u uspravnom položaju na sigurno i suho
mjesto.
Informacije i servis
Ako Vam je potrebna informacija ili imate problem, posjetite Philips
web stranicu www.philips.com ili se obratite Philips predstavništvu u
Vašoj zemlji (brojevi telefona nalaze se u priloženom jamstvenom listu).
Ako takvo predstavništvo ne postoji,obratite se ovlaštenom servisu.
HRVATSKI74
Page 75

Rješenje
Provjerite mrežni kabel, utikač i
utičnicu.
Postavite je na odgovarajuću
temperaturu.
Napunite spremnik za vodu
(pogledajte odgovarajući odjeljak).
Postavite je na položaj q ili w
(pogledajte "Parno glačanje")
Postavite kontrolu temperature
izmeūu 2 i MAX. Postavite glačalo u
uspravni položaj i prije glačanja
pričekajte da se žuta kontrolna
žaruljica ugasi.
Postavite glačalo u vodoravni položaj i
pričekajte prije ponovne uporabe
(okomitog) mlaza pare.
Postavite kontrolu temperature
izmeūu 2 i MAX. Postavite glačalo u
uspravni položaj i prije glačanja
pričekajte da se žuta kontrolna
žaruljica ugasi.
Koristite Calc-Clean funkciju nekoliko
puta (pogledajte poglavlje o CalcClean funkciji).
Lagano pomaknite glačalo kako bi
ponovo uključili glačalo: kontrolna
žaruljica prestaje treptati.
Postavite kontrolu temperature
izmeūu 2 i MAX. Postavite glačalo u
uspravni položaj i prije glačanja
pričekajte da se žuta kontrolna
žaruljica ugasi.
Mogući uzrok (uzroci)
Problem kod priključenja.
Kontrola temperature je postavljena
na MIN.
Nema dovoljno vode u spremniku.
Kontrola pare je pomaknuta na
položaj O.
Grijaća ploča nije dovoljno vruća i/ili je
aktivirana Drip Stop funkcija (modeli
GC2030, 2025,2020).
Funkcija (okomitog) mlaza pare je
prečesto korištena u vrlo kratkom
razdoblju.
Grijaća ploča nije dovoljno vruća.
Tvrda voda stvara kamenac u grijaćoj
ploči.
Aktivirana je funkcija automatskog
isključenja. Pogledajte poglavlje s
opisom te funkcije.
Temperatura je preniska.
Problem
Glačalo je priključeno u napajanje ali
donja ploča je hladna.
Nema pare
Nema mlaza pare (samo modeli
GC2030, 2025,2016, 2015, 2011, 2010)
ili okomitog mlaza pare (samo modeli
GC2030, 2025,2016, 2015, 2010)
Tijekom glačanja iz grijaće ploče izlaze
komadići nečistoće i kamenca.
Crvena kontrolna žaruljica trepće
(samo model GC2030).
Iz grijaće ploče kaplje voda (samo
modeli GC2016, 2015,2010, 2006,
2005)
HRVATSKI 75
U slučaju problema
Ovo poglavlje opisuje najčešće probleme na koje možete naići pri uporabi ovoga glačala.Više detalja
potražite u različitim odjeljcima. Ne možete li riješiti problem, molimo obratite se najbližem
ovlaštenom servisu.Telefonske brojeve pronaći ćete u priloženom jamstvu, ili posjetite Philips web
stranicu www.philipsonline.com .
Page 76

Pange tähele!
Optimaalse ohutuse tagamiseks tutvuge enne seadme kasutamist
käesoleva juhendi ja joonistega.
- Ärge jätke vooluvõrku ühendatud triikrauda järelvalveta.
- Seade ei ole mõeldud kasutamiseks järelvalveta jäetud laste ega
haigete poolt. Ärge jätke väikseid lapsi järelvalveta ja kontrollige, et
nad seadmega ei mängiks.
- Triikraua tald võib minna väga kuumaks ja puudutamise korral
põhjustada põletusi.Toitejuhe ei tohi puutuda vastu kuuma triikraua
talda.
- Kui lõpetate triikimise või puhastate seadet, kui täidate või tühjendate
veenõud või lahkute triikraua juurest kas või hetkeks, siis: keerake
aururegulaator O-asendisse, pange triikraud toele seisma ja
eemaldage pistik pistikupesast.
- Kui toitejuhe on vigastatud, asendage see vaid spetsiaaljuhtmega,
selleks pöörduge Philipsi toodete müüja või hooldustöökoja poole.
- Ärge kunagi kasutage vigastatud triikrauda.
Enne esmakasutust
1 Enne esmakasutust kontrollige, kas seadme andmeplaadile
märgitud pinge vastab kohalikule võrgupingele.
2 Eemaldage triikraua tallalt kleebis või kaitsekile.
3 Laske triikraual kuumeneda maksimaalse temperatuurini ja
triikige paar minutit niisket lappi,et eemaldada jääke tallalt.
Esimakasutusel võib triikraud veidi suitseda. See nähtus kaob kiiresti.
Veepaagi täitmine
Ärge pange triikrauda vette.
1 Enne veepaagi täitmist eemaldage pistik pistikupesast.
C
2 Keerake aururegulaator asendisse O (= kuivtriikimine).
3 Asetage triikraud kaldu.
C
4 Valage veepaaki mõõtenõuga kraanivett ja täitke veepaak MAX-
tähiseni.
Ärge kunagi täitke veepaaki üle MAX-tähise.
Kui kraanivesi on väga kare, soovitame kasutada puhastatud vett.
Ärge kasutage äädikat, tärklist ega keemiliselt puhastatud vett.
EESTI76
Page 77

Temperatuuri valik
1 Pange triikraud püstiasendisse.
C
2 Seadke temperatuur vajalikule triikimistempratuurile pöörates
regulaatorit..
- Kontrollige triigitava riide triikimistemperatuuri.
- 1 Sünteetiline materjal (näit. akrüül, viskoos, polüamiid,polüester)
- 1 Siid
- 2 Vill
- 3 Puuvill, lina
- Kui Te ei tea, millis(t)est materjali(de)st ese on valmistatud, tehke
triikimisproov kohas, mida eseme kandmisel ei ole näha.
- Siid, villane ja sünteetiline materjal: triikige pahemalt poolt, et vältida
esemete läikima hakkamist.Triikige kuivalt, sest veest võivad jääda
plekid.
- Alustage nende esemete triikimist, mis nõuavad madalamat
triikimistemperatuuri, nagu näiteks esemed sünteetilistest kiududest.
3 Ühendage pistik maandatud pistikupessa.
4 Kui kollane märgutuli on kustunud, oodake pisut, enne kui
hakkate triikima.
B
Triikimise ajal kollane märgutuli aeg-ajalt süttib.
Automaatse väljalülitamisega (ainult mudelil GC2030):
Kui automaatne väljalülitamisfunktsioon on aktiveeritud (punane
märgutuli vilgub), liigutage kergelt triikrauda, et seadet deaktiveerida
(punane märgutuli lakkab vilkumast).
Aurtriikimine
Jälgige, kas veepaagis on piisavalt vett.
C
1 Seadke temperatuuri regulaator nõutavasse asendisse.
Vt lõiku „Temperatuuri valik".
EESTI 77
N
Y
L
O
N
N
Y
L
O
N
S
S
I
O
L
K
I
E
L
A
W
I
N
O
E
O
L
N
N
I
E
L
N
I
L
N
O
T
O
N
C
O
T
T
O
C
Page 78

C
2 Seadke aururegulaator vajalikku asendisse.
- q normaalaur (temperatuuri seaded 2 to 3)
- w maksimaalne aur (temperatuuri seaded 3 MAX)
B
Auru hakkab eralduma kohe, kui vajalik temperatuur on saavutatud.
◗ Mudelitel GC2005, 2006, 2010, 2015, 2016: Liiga madalal
temperatuuril võib vesi triikraua tallalt välja voolata (MIN 2).
Kuivtriikimine
1 Keerake aururegulaator asendisse O (=auruta)
2 Keerake temperatuuriregulaator soovitud kuumusele.
Vt lõiku „Temperatuuri valik".
Lisafunktsioonid
Niisutamine
Raskesti eemaldatavate kortsude kõrvaldamine igal temperatuuril.
Jälgige, kas veepaagis on piisavalt vett.
C
1 Vajutage riide niisutamiseks paar korda piserdusnupule.
Lisaaur (ainult mudelitel GC2020, 2006, 2005)
Funktsioon tagab ekstra auru eriti raskesti kõrvaldatavate kortsude
triikimisel.
Lisaauru on võimalik kasutada ainult 3 ja MAX temperatuuride
seadete vahel.
C
1 Keerake aururegulaator MAX asendisse r.
C
2 Vajutage ja hoidke lisaaurunuppu max 5 sekundit allavajutatuna.
3 Pidage 1 minutiline paus, enne kui kasutate uuesti lisaauru,et
vältida vee lekkimist triikraua tallast.
EESTI78
Page 79

Auru pihustamine (ainult mudelitel GC2030, 2025, 2016,2015,
2010)
Triikraua tallast tuleb rohkesti auru, mida võite kasutada tugevate
kortsude triikimisel.
Auru saab piserdada vaid 2 ja MAX temperatuuride vahel.
C
1 Vajutage aurupahvakunuppu ja seejärel vabastage.
Aurpihustamine püsti asendis (ainult mudelitel GC2030, 2025,
2016, 2015)
C
1 Aurupihustust võib kasutada siis kui triikraud on püstiasendis.
Ärge kunagi suunake aurujuga inimeste poole.
Tilgalukusti (ainult mudelitel GC2030, 2025, 2020)
Sellel triikraual on funktsioon, mis väldib tilkumist: madalamal
temperatuuril katkeb auru teke triikraual automaatselt, et vältida vee
tilkumist triikraua tallast. Funktsiooni käivitudes kuulete klõpsatust.
Automaatne väljalülitus (ainult mudelil GC2030)
C
◗ Kui triikraud on olnud paigal (liigutamata) mõne aja, lülitub
soojenduselement automaatselt välja.
◗ Punane signaallamp hakkab vilkuma, et teatada soojenduselemendi
väljalülitamisest.
Triikraua uuesti sisselülitamiseks:
1 Tõstke või kergelt liigutage triikrauda.
2 Punane märgutuli kustub. Kollane märgutuli süttib, kui triikraua
tald on piisavalt kuum.
3 Kui kollane märgutuli süttib peale triikraua liigutamist, oodake,
kuni see kustub ja jätkake siis triikimist
EESTI 79
Page 80
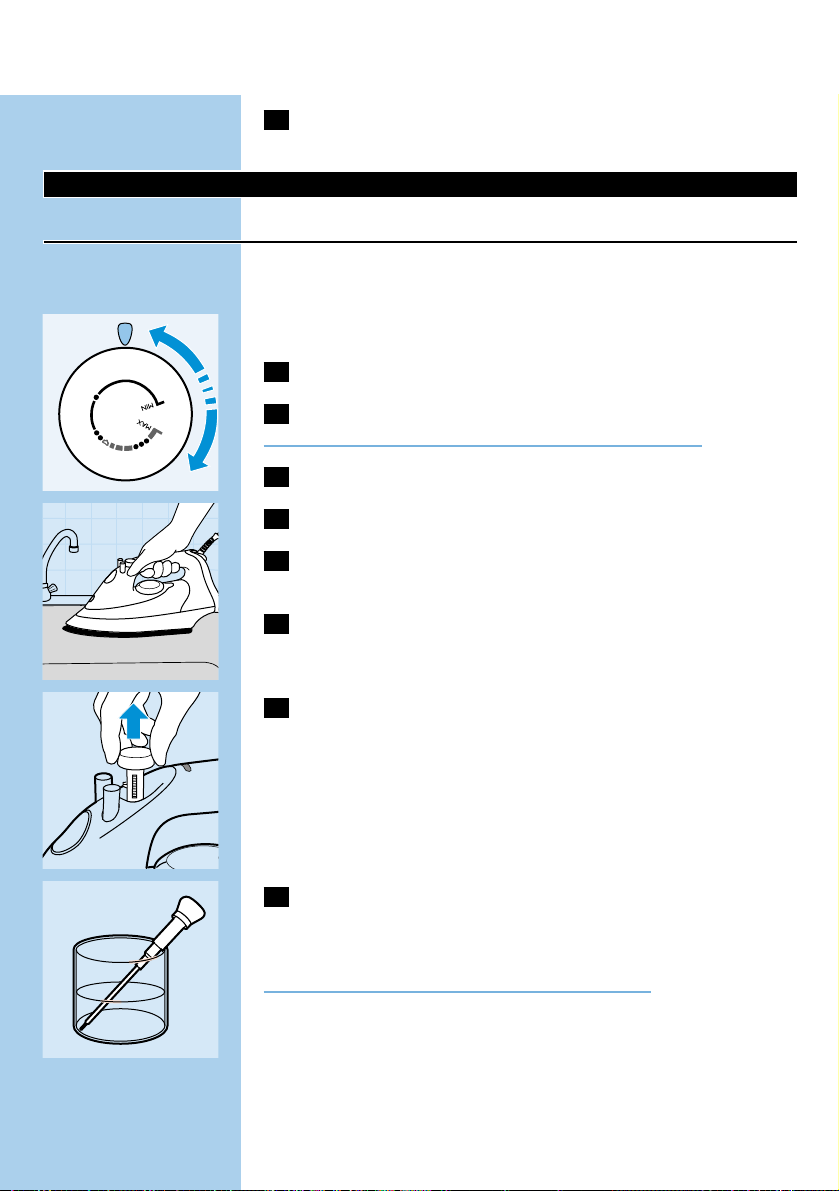
4 Kui kollane signaallamp ei sütti peale triikraua liigutamist, ei või
triikimist jätkata .
Puhastamine ja hooldus
Katlakivi eemaldamine
Katlakivi eemaldamise funktsioon kõrvaldab katlakivi ja mustust.
Kasutage katlakivi eemaldamisfunktsiooni kord kahe nädala jooksul. Kui
vesi on väga kare (nt. kui triikraua tallast väljuvad triikimise ajal helbed),
eemaldage katlakivi sagedamini.
1 Keerake aururegulaator asendisse O.
2 Valage veepaak vett täis (kuni MAX-tähiseni).
Ärge valage veepaaki kunagi äädikat ega katlakivikõrvaldeid.
C
3 Keerake temperatuuriregulaator MAX.asendisse.
4 Ühendage pistik pistikupessa.
5 Eemaldage pistik pistikupesast, kui kollane märgutuli on
kustunud.
C
6 Hoidke triikrauda kraanikausi kohal ja seadke aururegulaator
asendisse v (katlakivi kõrvaldamine).Auru kontrollnupp tõuseb
pisut üles.
C
7 Tõmmake kergelt aururegulaatorit üles ja liigutage õrnalt
triikrauda.
B
Kuum vesi ja aur väljub triikraua tallast. Mustus ja katlakivi (kui on) on
vee abil kõrvaldatud.
C
8 Tõmmake aururegulaatori nuppu veel üles, et eemaldada auru
reguleerimisnõela. Nõela puhastamiseks katlakivist võite
kasutada äädikat.
Ärge painutage ega vigastage aurureguleerimisnõela.
EESTI80
N
Y
L
O
N
N
Y
L
O
N
S
S
I
O
L
K
I
E
L
A
W
I
N
O
E
O
L
N
N
I
E
L
N
I
L
N
O
T
O
N
C
O
T
T
O
C
Page 81

C
9 Pange aurureguleerimisnõel tagasi nii, et nõela terav ots oleks
täpselt augu keskel.Seadke aururegulaator asendisse O.
Korrake katlakivi kõrvaldamist kui triikrauda on jäänud veel
sadet.
Peale katlakivi eemaldamist
- Ühendage pistik pistikupessa ja laske triikraual soojeneda, kuni tald on
kuiv.
- Eemaldage pistik pistikupesast, kui kollane märgutuli on kustunud.
- Triikige mõnd vanemat riideeset, et eemaldada, kui on,vett triikraua
tallast.
- Laske triikraual enne hoiukohta panemist maha jahtuda.
Pärast triikimist
1 Eemaldage pistik pistikupesast ja laske triikraual maha jahtuda.
2 Tallale tekkinud katlakivi ja mustust saab eemaldada niiske lapi
ja mitte- abrasiivse (vedela) puhastusvahendiga.
Hoiduge talda kriimustamast: talda ei tohi metallesemetega puudutada.
3 Puhastage seadme ülemine osa niiske lapiga.
C
4 Aeg-ajalt loputage paaki veega. Seejärel valage vesi minema.
Hoidmine
1 Võtke võrgupistik seinakontaktist välja ja seadke aururegulaator
asendisse O.
2 Tühjendage veepaak.
C
3 Laske triikraual maha jahtuda. Kerige toitejuhe ümber hoidiku ja
fikseerige see juhtme klambriga.
4 Hoidke triikrauda alati selle alusel kindlas ja kuivas kohas.
EESTI 81
Page 82

Info & teenindus
Kui Te vajate teenuseid või informatsiooni või teil on tekkinud
probleeme, külastage Philips internet- lehte www.philips.com või võtke
ühendus Philipsi hoolduskeskusega oma riigis (telefoninumbrid leiate
garantiitalongilt). Kui Teie riigis ei ole hoolduskeskust, pöörduge oma
Philipsi toodete müüja poole või võtke ühendus Philipsi koduseadmete
Teeninduskeskusega.
EESTI82
Page 83

Lahendus
Kontrollige toitejuhet, kontakti ja seina
pistikupesa.
Seadke temperatuur soovitatavale
triikimistemperatuurile.
Täitke veepaak (vt Veepaagi täitmine).
Seadke aurutamise asend q or w (vt.
Auruga triikimine)
Seadke temperatuuri regulaator
temperatuurile aurupiirkonnas (2
kuni MAX).Asetage triikraud püsti
asendisse ja enne triikima hakkamist
oodake, kuni kollane märgutuli kustub.
Asetage triikraud horisontaalsesse
asendisse ja oodake pisut enne
püstiasendi aurupihusti funktsiooni
kasutamist.
Seadke temperatuuri regulaator
temperatuurile aurupiirkonnas (2
kuni MAX).Asetage triikraud püsti
asendisse ja enne triikima hakkamist
oodake, kuni kollane märgutuli kustub.
Kasutage Katlakivi kõrvaldamise
funktsiooni mitu korda (vt. 'Katlakivi
eemaldamine').
Automaatse väljalülitusfunktsiooni
deaktiveerimiseks liigutage triikrauda
veidi: märgutuli kustub.
Seadke temperatuuri regulaator
temperatuurile aurupiirkonnas (2
kuni MAX).Asetage triikraud püsti
asendisse ja enne triikima hakkamist
oodake, kuni kollane märgutuli kustub.
Võimalik(ud) põhjus(ed)
Vigane toide.
Temperatuuri regulaator on
madalaimal positsioonil MIN.
Paagis ei ole piisavalt vett.
Aururegulaator on asendis O.
Triikraua tald ei ole piisavalt kuum
ja/või Tilgalukusti funktsioon on
aktiveeritud (mudelitel GC2030, 2025,
2020).
(püsti) asendi aurupihusti funktsiooni
on kasutatud liiga tihti ja liiga lühikeste
vaheaegadega.
Triikraua tald ei ole piisavalt tuline
Kare vesi tekitab katlakivi helbeid
triikraua tallas.
Automaatne väljalülitusfunktsioon on
aktiveeritud.Vt. "Automaatne
väljalülitus".
Temperatuur on liiga madal.
Probleem
Triikraud on sisse lülitatud, kuid tald ei
soojene
Auru ei tule
Ei tööta aurupihusti funktsioon (ainult
mudelid GC2030, 2025,2016, 2015,
2011, 2010) või püstiasendi aurupihusti
funktsioon (ainult mudelid GC2030,
2025, 2016,2015, 2010)
Katlakivi helbed ja mustus väljuvad
triikimise ajal tallast.
Vilgub punane märgutuli (ainult mudelil
GC2030).
Triikraua tallast tilgub vett (ainult
mudelid GC2016, 2015, 2011, 2010,
2006, 2005).
EESTI 83
Rikete kõrvaldamine
Selles peatükis on kirjeldatud kõige enam triikimisel ettetulevaid probleeme.Täpsemat infot saate
erinevatest peatükkidest. Kui Te ise ei tule probleemi lahendamisega toime, võtke ühendus lähima
Philips Hoolduskeskuse või mõne volitatud esindajaga. Philipsi abiteeninduse telefoninumbri leiate
garantiitalongilt või webleheküljelt www.philipsonline.com.
Page 84

Svarīgi
Drošības apsvērumu dēļ pirms ierīces lietošanas rūpīgi izlasiet šīs
pamācības un apskatiet zīmējumus.
- Nekādā gadījumā neatstājiet elektrotīklam pievienotu gludekli bez
uzraudzības.
- Vājinieki nedrīkst lietot ierīci bez uzraudzības. Raugieties, lai bērni
nerotaļājas ar ierīci.
- Gludekļa klātne darbības laikā stipri sakarst, un pieskāriens tai var
izraisīt nopietnus apdegumus. Raugieties, lai elektrovads nepieskaras
karstai klātnei.
- Pēc gludināšanas, tīrot ierīci, piepildot vai iztukšojot ūdens tvertni un
arī atstājot gludekli bez uzraudzības kaut uz pavisam īsu brīdi:
noregulējiet tvaika padeves slēdzi O stāvoklī, novietojiet gludekli
vertikāli un izvelciet elektrovada kontaktspraudni no elektrotīkla
sienas kontaktrozetes.
- Bojāts elektrovads ir jānomaina Philips pilnvarotā remontdarbnīcā, jo
tam nepieciešami īpaši darbarīki un/vai detaļas.
- Nekādā gadījumā nelietojiet ierīci, ja tā ir bojāta.
Pirms pirmās lietošanas
1 Pārliecinieties, vai uz ierīces marķējuma norādītais spriegums
atbilst elektrības tīkla spriegumam jūsu mājā.
2 Noņemiet no klātnes jebkuras uzlīmes, aizsargmateriālus vai
glabāšanas pārvalku.
3 Ļaujiet gludeklim uzkarst līdz maksimālajai temperatūrai un
pāris minūtes pagludiniet mitru drānu, lai notīrītu no klātnes
ražošanas pārpalikumus.
Pirmajā lietošanas reizē gludeklis var nedaudz kūpēt. Pēc neilga laika
tvaiki izzudīs.
Ūdens tvertnes piepildīšana
Nekādā gadījumā nemērciet gludekli ūdenī.
1 Atvienojiet gludekli no elektrības tīkla.
C
2 Noregulējiet tvaika kontroles slēdzi stāvoklī O (= gludināšana
bez tvaika).
3 Paceliet gludekli ieslīpi.
LATVISKI84
Page 85

C
4 Piepildiet ūdens tvertni no krūzes ar krāna ūdeni līdz maksimālā
līmeņa iezīmei.
Nepārsniedziet maksimālā līmeņa atzīmi MAX.
Ja krāna ūdens jūsu rajonā ir ļoti ciets, iesakām lietot destilētu ūdeni.
Nelietojiet etiķi, cieti vai ķīmiski atkaļķotu ūdeni.
Temperatūras regulēšana
1 Novietojiet gludekli vertikālā stāvoklī.
C
2 Uzstādiet temperatūras regulatoru nepieciešamajā stāvoklī,
pagriežot to atbilstoši norādēm.
- Pārbaudiet uz apģērba etiķetes noteikto nepieciešamo gludināšanas
temperatūru.
- 1 Sintētiskie audumi (piem., akrila audums, viskoze, poliamīds,
poliesteris)
- 1 Zīds
- 2 Vilna
- 3 Kokvilna, linu audums
- Ja nezināt, no kāda auduma apģērbs izgatavots, noskaidrojiet
nepieciešamo gludināšanas temperatūru, pagludinot apģērbu vietā,
kas valkājot nav redzama.
- Zīda, vilnas un sintētiskie audumi: gludiniet auduma otru pusi, lai
nerastos spīdīgi plankumi. Lai novērstu traipu rašanos, nelietojiet
smidzināšanu.
- Vispirms gludiniet tos apģērbus, kuriem nepieciešama pati zemākā
gludināšanas temperatūra, piemēram, sintētisko šķiedru izstrādājumus.
3 Iespraudiet kontaktdakšu iezemēta elektrotīkla sienas
kontaktligzdā.
4 Kad dzeltenā signāllampiņa ir nodzisusi, mazliet pagaidiet un
sāciet gludināšanu.
B
Gludināšanas laikā dzeltenā signāllampiņa ik pa laikam iedegsies un
nodzisīs.
Automātiskā izslēgšanās (tikai modelim GC2030):
Ja darbojas automātiskās izslēgšanas funkcija (mirgo sarkanā
signāllampiņa), nedaudz pakustiniet gludekli, lai to deaktivētu (sarkanā
signāllampiņa pārstāj mirgot).
LATVISKI 85
N
Y
L
O
N
N
Y
L
O
N
S
S
I
O
L
K
I
E
L
A
W
I
N
O
E
O
L
N
N
I
E
L
N
I
L
N
O
T
O
N
C
O
T
T
O
C
Page 86

Gludināšana ar tvaiku
Pārliecinieties, vai tvertnē ir pietiekami daudz ūdens.
C
1 Uzstādiet temperatūras regulatoru stāvoklī,kas atbilst
gludināmā auduma veidam.
Sk. nodaļu "Temperatūras regulēšana".
C
2 Noregulējiet tvaika padeves slēdzi nepieciešamajā stāvoklī.
- q mērenam tvaikam (temperatūra no līdz 3)
- w maksimālam tvaikam (temperatūra no 3 līdz iedaļai MAX)
B
Tvaika padeve būs iespējama tad, kad tiks sasniegta noregulētā
temperatūra.
◗ Modeļiem GC2005, 2006, 2010, 2015, 2016: ja uzstādītā
temperatūra ir pārāk zema, ūdens var iztecēt no klātnes
(temperatūra no iedaļas MIN līdz 2)
Gludināšana bez tvaika
1 Noregulējiet tvaika padeves slēdzi O stāvoklī ( = gludināšana
bez tvaika).
2 Uzstādiet temperatūras regulatoru stāvoklī,kas atbilst
gludināmā auduma veidam.
Sk. nodaļu "Temperatūras regulēšana".
Gludekļa papildfunkcijas
Ūdens strūkla
Šo funkciju var izmantot, gludinot jebkurā temperatūrā, lai atbrīvotos no
grūti izgludināmām krokām.
Pārliecinieties, vai tvertnē ir pietiekami daudz ūdens.
C
1 Pāris reizes piespiediet ūdens strūklas pogu, lai samitrinātu
gludināmo audumu.
Papildus tvaika padeve (tikai modeļiem GC2020,2006,2005)
Papildus tvaika padeves funkciju var izmantot, lai atbrīvotos no grūti
izgludināmām krokām.
Papildus tvaika padeve ir iespējama, ja temperatūras regulators ir
uzstādīts stāvoklī no 3 līdz MAX.
LATVISKI86
Page 87

C
1 Noregulējiet tvaika padeves slēdzi stāvoklī MAX q.
C
2 Piespiediet un turiet papildus tvaika padeves pogu ne ilgāk par 5
sekundēm.
3 Pirms atkārtoti lietojat papildus tvaika padeves funkciju,
pagaidiet vismaz vienu minūti, lai novērstu ūdens pilēšanu no
gludekļa klātnes.
Forsēta tvaika padeve (tikai modeļiem GC2030,2025, 2016,
2015, 2011, 2010)
Šo funkciju var izmantot, gludinot augstā temperatūrā, lai atbrīvotos no
grūti izgludināmām krokām.
Forsēta tvaika padeve ir iespējama, ja temperatūras regulators ir
uzstādīts stāvoklī no 2 līdz MAX.
C
1 Īslaicīgi piespiediet forsētas tvaika padeves pogu.
Vertikāla forsēta tvaika padeve (tikai modeļiem GC2030, 2025,
2016, 2015)
C
1 Forsētu tvaika padevi var izmantot arī turot gludekli vertikāli.
Nekad nevērsiet tvaika plūsmu pret cilvēkiem.
Pilienapture (tikai modeļiem GC2030, 2025,2020)
Šī ierīce ir aprīkota ar pilienaptures funkciju: gludeklis automātiski atslēdz
tvaika padevi, ja noregulētā gludināšanas temperatūra ir pārāk zema,
tādējādi novēršot ūdens pilēšanu no gludekļa klātnes. Iedarbojoties
pilienaptures funkcijai, atskanēs klikšķis.
LATVISKI 87
Page 88

Automātiskā izslēgšanās (tikai modelim GC2030)
C
◗ Ja gludeklis kādu laiku netiek izmantots, iebūvētais elektroniskais
sensors automātiski izslēdz sildelementu.
◗ Lai norādītu, ka sildelements izslēdzies automātiski, sāk mirgot
sarkanā signāllampiņa.
Lai atkal iedarbinātu gludekli:
1 Paceliet gludekli vai viegli to pakustiniet.
2 Sarkanā automātiskās izslēgšanās signāllampiņa izslēdzas.
Atkarībā no gludekļa klātnes temperatūras, var ieslēgties
dzeltenā temperatūras signāllampiņa.
3 Ja pēc gludekļa pakustināšanas ieslēdzas dzeltenā signāllampiņa,
pagaidiet, līdz tā izslēdzas, pirms sākat gludināšanu.
4 Ja pēc gludekļa pakustināšanas dzeltenā signāllampiņa
neieslēdzas, gludeklis ir gatavs lietošanai.
Tīrīšana un kopšana
Attīrīšana no kaļķa
Attīrīšana no kaļķa ļauj atbrīvoties no kaļķa un netīrumu nogulsnēm.
Attīrīšanu no kaļķa veiciet vienu reizi divās nedēļās. Ja jūsu rajonā ir ļoti
ciets ūdens (t. i., ja gludināšanas laikā no gludekļa klātnes izplūst
nolobījušās daļiņas), attīrīšana no kaļķa nogulsnēm jāveic biežāk.
1 Noregulējiet tvaika kontroles slēdzi stāvoklī O.
2 Piepildiet ūdens tvertni līdz maksimālā līmeņa atzīmei MAX.
Nelejiet ūdens tvertnē etiķi vai citu katlakmens notīrīšanas ķīmisko
līdzekli.
C
3 Uzstādiet temperatūras regulatoru MAX stāvoklī.
4 Iespraudiet kontaktdakšu elektrotīkla kontaktligzdā.
5 Kad nodzisusi dzeltenā signāllampiņa, atvienojiet gludekli no
elektrības tīkla.
C
6 Turot gludekli virs izlietnes, noregulējiet tvaika padeves slēdzi v
stāvoklī (Attīrīšana no kaļķa).Tvaika padeves slēdzis mazliet
pabīdās uz augšu.
LATVISKI88
N
Y
L
O
N
N
Y
L
O
N
S
S
I
O
L
K
I
E
L
A
W
I
N
O
E
O
L
N
N
I
E
L
N
I
L
N
O
T
O
N
C
O
T
T
O
C
Page 89

C
7 Pavelciet tvaika padeves slēdzi nedaudz uz augšu un viegli
sakratiet gludekli.
B
No gludekļa klātnes nāks ārā tvaiks un verdošs ūdens. Netīrumi un
katlakmens (ja tāds ir) tiks izskalots ārā.
C
8 Pavelciet tvaika padeves slēdzi uz augšu, lai noņemtu tvaika
padeves adatu. Lietojiet etiķi, lai notīrītu no adatas katlakmeni,
ja tāds ir.
Nelieciet un nebojājiet tvaika padeves adatu.
C
9 Ielieciet tvaika padeves adatu atpakaļ, ievietojot adatas galu tieši
atveres centrā un iestipriniet spraugā mazo izvirzījumu,kas
atrodas adatas sānā. Noregulējiet tvaika padeves slēdzi O
stāvoklī.
Ja gludeklī vēl ir daudz netīrumu, atkārtojiet attīrīšanu no
kaļķa.
Pēc attīrīšanas no kaļķa
- Iespraudiet kontaktdakšu elektrotīkla kontaktligzdā un ļaujiet klātnei
nožūt.
- Kad nodzisusi dzeltenā signāllampiņa, atvienojiet gludekli no elektrības
tīkla.
- Uzmanīgi pagludiniet nevajadzīgu audumu, lai atbrīvotos no ūdens
nogulšņu traipiem, kas varētu būt izveidojušies uz gludekļa klātnes.
- Ļaujiet gludeklim atdzist, pirms novietojiet to glabāšanā.
Pēc gludināšanas
1 Izvelciet kontaktdakšu no elektrotīkla kontaktligzdas un ļaujiet
gludeklim atdzist.
2 Noslaukiet katlakmeni un citas nogulsnes no klātnes ar mitru
drānu un ar neabrazīvu tīrīšanas šķidrumu.
LATVISKI 89
Page 90

Klātni nedrīkst bojāt! Raugieties, lai tā nenonāktu spēcīgā saskarē ar
metāla priekšmetiem.
3 Noslaukiet gludekļa augšdaļu ar mitru drānu.
C
4 Regulāri izskalojiet ūdens tvertni ar ūdeni. Pēc tīrīšanas to
iztukšojiet.
Glabāšana
1 Izvelciet elektrovada kontaktspraudni no sienas kontaktrozetes
un noregulējiet tvaika padeves slēdzi O stāvoklī.
2 Iztukšojiet ūdens tvertni.
C
3 Ļaujiet gludeklim atdzist.Aptiniet elektrovadu ap tā
uzglabāšanas tītavu un nostipriniet ar skavu.
4 Gludeklis vienmēr jāuzglabā vertikāli drošā un sausā vietā.
Garantija un apkalpošana
Ja jums nepieciešama palīdzība vai informācija, lūdzu izmantojiet Philips
mājas lapu internetā www.philips.com vai sazinieties ar Philips
Pakalpojumu centru savā valstī (tā tālruņa numurs atrodams pasaules
garantijas kartē). Ja jūsu valstī nav Philips Pakalpojumu centra, lūdziet
palīdzību Philips produkcijas izplatītājiem vai Philips Mājturības un
personīgās higiēnas ierīču nodaļas pakalpojumu dienestam.
LATVISKI90
Page 91

Risinājums
Pārbaudiet elektrovadu,
kontaktspraudni un sienas
kontaktrozeti.
Uzstādiet temperatūras regulatoru
stāvoklī, kas atbilst gludināmā auduma
veidam.
Piepildiet ūdens tvertni (sk. nodaļu
"Ūdens tvertnes piepildīšana").
Noregulējiet tvaika padeves slēdzi uz
q vai w (Sk. nodaļu "Gludināšana ar
tvaiku").
Uzstādiet temperatūras regulatoru
stāvoklī, kas piemērots gludināšanai ar
tvaiku (no 2 līdz MAX).
Novietojiet gludekli vertikāli un
pagaidiet, līdz nodziest dzeltenā
signāllampiņa.Tad varat sākt
gludināšanu.
Novietojiet gludekli horizontāli un
nedaudz pagaidiet, pirms atkal
izmantojat (vertikālo) forsēto tvaika
padevi.
Uzstādiet temperatūras regulatoru
stāvoklī, kas piemērots gludināšanai ar
tvaiku (no 2 līdz MAX). Novietojiet
gludekli vertikāli un pagaidiet, līdz
nodziest dzeltenā signāllampiņa.Tad
varat sākt gludināšanu.
Pāris reizes veiciet attīrīšanu no kaļķa
(Sk. nodaļu 'Attīrīšana no kaļķa').
Pakustiniet gludekli, lai deaktivētu
automātisko izslēgšanos: lampiņa
pārstās mirgot.
Uzstādiet temperatūras regulatoru
stāvoklī, kas piemērots gludināšanai ar
tvaiku (no 2 līdz MAX). Novietojiet
gludekli vertikāli un pagaidiet, līdz
nodziest dzeltenā signāllampiņa.Tad
varat sākt gludināšanu.
Iespējamais cēlonis
Gludeklis nesaņem strāvu.
Temperatūras regulators ir uzstādīts
pret iedaļu MIN.
Tvertnē nav pietiekami daudz ūdens.
Tvaika padeves slēdzis atrodas O
stāvoklī.
Gludekļa klātne nav pietiekami
sakarsusi un/vai ir iedarbojusies
pilienaptures funkcija (tikai modeļiem
GC2030, 2025,2020).
(Vertikālā) forsēta tvaika padeve ir
lietota pārāk bieži īsā laika posmā.
Gludekļa klātne nav pietiekami
sakarsusi.
Gludekļa klātnes iekšpusē ir ciets
ūdens.
Darbojas automātiskā izslēgšanās
funkcija. Sk.nodaļu ''Automātiskā
izslēgšanās''.
Noregulētā temperatūra ir pārāk
zema.
Problēma
Gludeklis ir pievienots elektrotīklam,
taču klātne ir auksta.
Nedarbojas tvaika padeve
Nav forsētas tvaika padeves (tikai
modeļiem GC2030, 2025,2016, 2015,
2011, 2010) vai vertikālas forsētas
tvaika padeves (tikai modeļiem
GC2030, 2025,2016, 2015, 2010)
Gludināšanas laikā no gludekļa klātnes
izplūst netīrumi un nolobījušās daļiņas.
Mirgo sarkanā signāllampiņa (tikai
modelim GC2030).
No gludekļa klātnes pil ūdens (tikai
modeļiem
GC2016,2015,2010,2006,2005).
LATVISKI 91
Problēmu novēršana
Šajā nodaļā iekļautas pašas izplatītākās problēmas, ar kurām jūs varat saskarties, lietojot gludekli.
Sīkākas informācijas iegūšanai lasiet atsevišķas apakšnodaļas. Ja jūs nespējat atrisināt problēmu,
vērsieties tuvākajā Philips pilnvarotā remontdarbnīcā vai sazinieties ar Philips produkcijas izplatītājiem.
Philips pakalpojumu biroja numuru meklējiet pasaules garantijas kartē vai arī izmantojiet mūsu mājas
lapu internetā www.philipsonline.com.
Page 92

Svarbu žinoti
Siekiant didžiausio saugumo, prieš naudodami prietaisą atidžiai
peržiūrėkite iliustracijas ir perskaitykite instrukcijas.
- Niekada nepalikite įjungto lygintuvo be priežiūros.
- Neįgaliems žmonėms negalima aparatu naudotis be priežiūros.
Stebėkite ir prižiūrėkite, kad vaikai nežaistų su aparatu.
- Lygintuvo padas gali labai įkaisti ir jį palietus, nudeginti. Laidas negali
liestis prie karšto lygintuvo pado.
- Kai pabaigiate lyginti, valote prietaisą, pripildote at ištuštinate vandens
rezervuarą ar netgi trumpam atsitraukiate nuo lygintuvo: nustatykite
garų reguliatorių ties 0 padėtimi, pastatykite lygintuvą ant jo kulno ir
ištraukite kištuką iš lizdo.
- Jei aparato laidas pažeistas, jį reikia pakeisti tik "Philips" parduotuvėje
arba aptarnavimo centre tik specialiais įrankiais.
- Niekada nesinaudokite kaip nors sugedusiu aparatu.
Prieš pirmąjį naudojimą
1 Patikrinkite, ar įtampa, nurodyta ant pado, sutampa su įtampa
jūsų namuose.
2 Nuo pado nuimkite visus lipdukus ir apsauginę putą ir
nuvalykite jį sausa skepetėle.
3 Įkaitinkite lygintuvą iki maksimalios temperatūros ir lyginkite
drėgną drabužį kelias minutes,kad išsivalytų lygintuvo padas.
Pirmą kartą naudojamas lygintuvas gali skleisti šiek tiek dūmų.Tai
netrukus liausis.
Vandens rezervuaro užpildymas
Neįmerkite lygintuvo į vandenį.
1 Ištraukite laidą iš elektros lizdo.
C
2 Nustatykite garų reguliatorių ties 0 padėtimi ("nenaudojant
garų").
3 Pakreipkite lygintuvą.
C
4 Per užpildymo angelę pripildykite rezervuarą iki maksimalios
atžymos.
Neužpildykite rezervuaro virš MAX atžymos.
Jei jūsų naudojamas vanduo yra labai kietas, siūlome naudoti jį, maišant
su distiliuotu vandeniu arba naudoti tik distiliuotą vandenį.
Nenaudokite acto, krakmolo ar chemiškai nevalyto vandens.
LIETUVIŠKAI92
Page 93

Temperatūros nustatymas
1 Pastatykite lygintuvą ant jo kulno.
C
2 Nustatykite temperatūros reguliatorių ties norima lyginimo
temperatūra, pasukdami jį ties atitinkama temperatūros atžyma.
- Reikiama lyginimo temperatūra nurodyta ant gaminio etiketės.
- 1 sintetiniai audiniai (t. y., akrilas, viskozė, poliamidas, poliesteris);
- 1 Šilkas
- 2 Vilna
- 3 Medvilnė, linas
- Jei nežinote, iš kokio audinio rūbas pagamintas,pabandykite nustatyti
reikiamą lyginimo temperatūrą, lygindami tą rūbo vietą, kurios dėvint
nesimato.
- Šilkiniai, vilnoniai ir sintetiniai audiniai : lyginkite išvirkščią audinio pusę,
taip išvengsite švytinčįų dėmių. Stengiantis išvengti dėmių, venkite
naudoti purškimo funkciją.
- Pradėkite lyginti nuo audinių, reikalaujančių mažiausios lyginimo
temperatūros, t. y., pagamintų iš sintetinio pluošto.
3 Įjunkite laidą į įžemintą elektros lizdą.
4 Prieš pradėdami lyginti, palaukite kol užges gintarinė lemputė.
B
Lyginant gintarinė lemputė laikas nuo laiko vis užsidegs.
Modeliui su automatiniu išsijungimu (tik GC2030 modeliui)
Jei veikia automatinis išsijungimo režimas (mirksi raudona lemputė),
lengvai lyginkite lygintuvu, kol jis išsijungs (raudona lemputė nustos
mirgsėti).
Lyginimas su garais
Įsitikinkite, ar vandens rezervuare yra pakankamai vandens.
C
1 Nustatykite temperatūros reguliatorių į siūlomą padėtį.
Žr. "Temperatūros nustatymas".
LIETUVIŠKAI 93
N
Y
L
O
N
N
Y
L
O
N
S
S
I
O
L
K
I
E
L
A
W
I
N
O
E
O
L
N
N
I
E
L
N
I
L
N
O
T
O
N
C
O
T
T
O
C
Page 94

C
2 Nustatykite garų reguliatorių ties atitinkama garų padėtimi.
- q įprastiniam garų srautui (temperatūra nuo 2 iki 3)
- w didžiausiam garų srautui (temperatūra nuo 3 iki MAX
žymens)
B
Garinimas prasidės, vos bus pasiekta nustatyta temperatūra.
◗ Modeliams: GC2005, 2006, 2010, 2015, 2016: vanduo gali tekėti pro
lygintuvo padą, jei temperatūra yra per žema (MIN iki 2)
Lyginimas be garų
1 Nustatykite garų reguliatorių ties 0 padėtimi ("nenaudojant
garų").
2 Nustatykite temperatūros reguliatorių ties siūloma padėtimi.
Žr. "Temperatūros nustatymas".
Kitos savybės
Purškimas
Lyginti susigulėjusioms raukšlėms bet kokioje temperatūroje.
Įsitikinkite, ar vandens rezervuare yra pakankamai vandens.
C
1 Drėkindami skalbinius, porą kartų paspauskite purškimo
mygtuką.
Stiprūs garai (tik GC2020, 2006, 2005 tipams)
Stiprių garų funkcija padeda išlyginti susigulėjusias raukšles.
Stiprių garų funkciją naudokite tik nustačius temperatūros reguliatorių
nuo 3 iki MAX atžymos.
C
1 Nustatykite garų kontrolę ties MAX atžyma w.
C
2 Nuspauskite ir palaikykite papildomų garų srauto mygtuką
maksimaliai 5 sekundes.
3 Vengiant vandens išsiliejimo iš pado, palaukite bent minutę, iki
vėl pasinaudosite papildomų garų funkcija.
LIETUVIŠKAI94
Page 95

Garų srautas (tik GC2030, 2025, 2016, 2015,2011, 2010
tipams)
Galingas garų "srautas" padeda išlyginti susigulėjusias raukšles.
Garų srauto funkcija veikia tik nustačius temperatūros reguliatorių nuo
2 iki MAX atžymos.
C
1 Nuspauskite ir atleiskite garų srauto mygtuką.
Vertikalus garų srautas (tik GC2030,2025,2016,2015 tipams)
C
1 Garų srautą galima paleisti ir laikant lygintuvą vertikaliai.
Niekada nenukreipkite garų srauto į žmones.
Lašėjimo blokavimas (tik GC2030, 2025,2020 tipams)
Lašėjimo blokavimo funkciją turintis lygintuvas: lygintuvas automatiškai
nustoja leisti garus, kai per žema temperatūra neleidžia vandeniui
varvėti iš lygintuvo pado. Kai taip atsitiks, išgirsite spragtelėjimą.
Automatinis išsijungimas (tik GC2030 aparatams).
C
◗ Elektroninis saugiklis automatiškai išjungs lygintuvą, jei šis kurį laiką
buvo nejudinamas.
◗ Po to ims blykčioti raudona automatinio išsijungimo lemputė.
Norint lygintuvą vėl įkaitinti :
1 Paimkite lygintuvą ir lėtai pajudinkite.
2 Užges raudona automatinio išsijungimo lemputė. Užsidegs
gintarinė temperatūros reguliavimo lemputė, nurodanti
lygintuvo pado įkaitimo temperatūrą.
3 Jei gintarinė lemputė užsidega pajudinus lygintuvą,prieš
pradėdami lyginti palaukite, kol ji užges.
LIETUVIŠKAI 95
Page 96

4 Jei gintarinė lemputė neužsidega pajudinus lygintuvą,lygintuvas
yra paruoštas naudojimui.
Valymas ir priežiūra
Kalkių šalinimas
Kalkių šalinimo funkcija išvalo nuosėdas ir nešvarumus.
Naudokitės kalkių šalinimo funkcija tik kas dvi savaitės. Jei jūsų
naudojamas vanduo yra labai kietas, išsivalymo funkcija reikėtų naudotis
dažniau.
1 Nustatykite garų reguliatorių ties 0 padėtimi.
2 Pilnai užpildykite vandens rezervuarą.
Nustatykite garų reguliatorių ties 0 padėtimi.
C
3 Nustatykite temperatūros reguliatorių ties atžyma MAX.
4 Įjunkite kyštuką į elektros lizdą.
5 Kai tik gintarinė lemputė užges, išjunkite lygintuvą iš elektros
lizdo.
C
6 Laikykite lygintuvą virš kriauklės, nustatykite garų reguliatorių
ties v pozicija (kalkių šalinimas). Garų reguliatoriaus rankenėlė
lengvai spragtels.
C
7 Truputį pastumkite garų reguliatorių ir švelniai pakratykite
lygintuvą.
B
Garas ir verdantis vanduo išbėgs iš pado. Nešvarumai ir nuosėdos (jei
tokių bus) iškris.
C
8 Stumkite garų reguliatorių ir išimkite adatą. Jeigu reikia,
nuosėdų valymui naudokite actą.
Nelankstykite ir nepažeiskite garų reguliatoriaus adatos.
LIETUVIŠKAI96
N
Y
L
O
N
N
Y
L
O
N
S
S
I
O
L
K
I
E
L
A
W
I
N
O
E
O
L
N
N
I
E
L
N
I
L
N
O
T
O
N
C
O
T
T
O
C
Page 97

C
9 Įkiškite garų reguliatoriaus adatą atgal, kišdami adatos smaigalį
tiesiai į kiaurymės centrą taip, kad adatos siauroji dalis būtų
prie kiaurymės krašto. Nustatykite garų kontrolę ties O
padėtimi.
Pakartokite kalkių šalinimo procedūrą, jei lygintuve yra daug
nešvarumų.
Po kalkių šalinimo procedūros
- Įjunkite lygintuvą į elektros lizdą ir leiskite padui išdžiūti.
- Kai tik gintarinė lemputė užges, išjunkite lygintuvą iš elektros lizdo.
- Šalindami vandens dėmes, susidariusias ant pado, švelniai perbraukite
karštu lygintuvu per nereikalingą medžiagos atraižą.
- Prieš padėdami lygintuvą į jo vietą, palikite atvėsti.
Po lyginimo
1 Ištraukite laidą iš elektros lizdo ir palikite lygintuvą atvėsti.
2 Skepetėlę sudrėkinkite nebraižančia (skysta) valymo priemone
ir ja nuvalykite nuosėdas nuo pado.
Saugokite padą : venkite jį sutrenkti metaliniais daiktais.
3 Viršutinę lygintuvo dalį nuvalykite drėgna skepetėle.
C
4 Reguliariai skalaukite vandens rezervuarą vandeniu. Po valymo
rezervuarą ištuštinkite.
Saugojimas
1 Išjunkite laidą iš elektros lizdo,palikite lygintuvą atvėsti ir
nustatykite garų reguliatorių ties 0 padėtimi.
2 Ištuštinkite vandens rezervuarą.
C
3 Palikite lygintuvą atvėsti.Apvyniokite laidą apie laido saugojimo
skyrelį ir pritvirtinkite jį spaustuku.
4 Lygintuvą visada saugokite, pastatytą ant kulno saugioje ir
sausoje vietoje.
LIETUVIŠKAI 97
Page 98

Garantija ir aptarnavimas
Jei jums reikia informacijos, jei turite problemą, prašome aplankyti
Philips tinklalapį, kurio adresas www.philips.com arba kreiptis į vietinį
Philips platintoją.
LIETUVIŠKAI98
Page 99

Sprendimas
Patikrinkite laidą, kyštuką ir rozetę.
Nustatykite temperatūros reguliatorių
ties norima temperatūra.
Užpildykite vandens rezervuarą (žr.
"Vandens rezervuaro užpildymas").
Nustatykite garų padėtį q arba w(žr.
"Lyginimas su garais").
Nustatykite temperatūros reguliatorių
ties garų padėtimi (2 iki MAX),
Pastatykite lygintuvą ant kulno ir, prieš
pradėdami lyginti, palaukite, kol užges
gintarinė lemputė.
Pastatykite lygintuvą horizontaliai, šiek
tiek palaukite ir tik tada vėl naudokitės
(vertikalaus) garų srauto funkcija.
Nustatykite temperatūros reguliatorių
ties garų padėtimi (2 iki MAX),
Pastatykite lygintuvą ant kulno ir, prieš
pradėdami lyginti, palaukite, kol užges
gintarinė lemputė.
Naudokite kalkių šalinimo funkciją kelis
kartus (žiūrėkite skyrelį "Kalkių
šalinimas").
Šiek tiek pajudinkite lygintuvą ir jis vėl
ims kaisti: raudona lemputė nustos
mirkčioti.
Nustatykite temperatūros reguliatorių
ties garų padėtimi (2 iki MAX),
Pastatykite lygintuvą ant kulno ir, prieš
pradėdami lyginti, palaukite, kol užges
gintarinė lemputė.
Galimos priežastys
Sujungimo problema.
Nustatykite temperatūrą ties MIN
atžyma.
Trūksta vandens rezervuare.
Garų reguliavimą nustatykite ties O
pozicija.
Lygintuvas pakankamai neįšyla arba
neįsijungia lašėjimo blokavimo funkcija
( GC2030, 2025,2020 tipams)
(Vertikalaus) garų srauto funkcija buvo
naudota pernelyg dažnai per labai
trumpą laiką.
Lygintuvas pakankamai neįšyla.
Kieto vandens apnašos lygintuvo pado
viduje.
Ėmė veikti automatinio išsijungimo
funkcija. Žiūrėkite skyrelyje
"Automatinis išsijungimas").
Lygintuvas nepakankamai įšyla.
Problema
Lygintuvas įjungtas, tačiau padas šaltas
Nėra garų
Nėra garų srauto ( tik GC2030, 2025,
2016, 2015,2011, 2010 tipams) arba
nėra vertikalaus garų srauto ( tik
GC2030, 2025,2016, 2015, 2010
tipams)
Lyginimo metu iš lygintuvo pado byra
nešvarumai.
Mirkčioja raudona lemputė (tik
GC2030 aparate).
Vanduo laša iš pado (tik GC2016, 2015,
2010, 2006,2005 tipams).
LIETUVIŠKAI 99
Problemų sprendimas
Šiame skyriuje apibendrinamos dažniausiai lyginant pasitaikančios problemos. Smulkiau jos aprašytos
atskiruose skirsniuose. Jei negalite išspręsti problemos,prašome kreiptis į artimiausią Philips
aptarnavimo centrą arba į vieną iš atstovų. Philips pagalbos telefonai nurodyti visame pasaulyje
galiojančios garantijos lankstinuke.Taip pat galite aplankyti mūsų tinklapį, kurio adresas
www.philipsonline.com.
Page 100

Pomembno
Za optimalno varnost, si pred uporabo aparata pazljivo preberite ta
navodila in oglejte ilustracije.
- Ko je likalnik priključen na električno omrežje, ga nikoli ne puščajte
brez nadzora.
- Slabotnim, nemočnim osebam ne pustite uporabe aparata brez
nadzora. Pazite na otroke, da se ne bodo igrali z aparatom.
- Likalna ploskev aparata lahko postane izredno vroča in lahko ob
dotiku povzroči opekline. Pazite, da se omrežni kabel ne bo dotikal
vroče likalne ploskve.
- Ko končate z likanjem, ko likalnik čistite, ko polnite ali spraznujete
vodni rezervoar in tudi, če likanje prekinete in odidete proč le za
kratek čas: nastavite parni regulator na položaj O, postavite likalnik
pokonci in izvlecite omrežni vtikač iz omrežne vtičnice.
- Če je poškodovan omrežni kabel tega aparata, ga sme zamenjati le
Philipsov pooblaščeni servisni center, saj so za to potrebna posebna
orodja in/ali rezervni deli.
- Nikoli ne uporabljajte aparata, če je kakorkoli poškodovan.
Pred prvo uporabo
1 Preverite če napetostna stopnja na tipski plošči aparata ustreza
napetosti v vašem električnem omrežju.
2 Iz likalne ploskve odlepite in odstranite vse morebitne nalepke,
zaščitne folije ali prevleke.
3 Segrejte likalnik na maksimalno temperaturo in nekaj minut
likajte z njim kos starega oblačila,da odstranite vse morebitne
ostanke iz likalne ploskve.
Pri prvi uporabi se lahko iz likalnika malo pokadi. Po kratkem času to
preneha.
Polnjenje rezervoarja za vodo
Likalnika nikoli ne potapljajte v vodo.
1 Izvlecite vtikač napajalnega kabla iz omrežne vtičnice.
C
2 Parni regulator nastavite na položaj 0 (= brez pare).
3 Nagnite likalnik.
SLOVENŠČINA100
 Loading...