

Page 1
Mistral
GC2030,GC2025,GC2020,GC,2016, GC2015,
GC2011,GC2010,GC2006,GC2005
Page 2

Page 3

ENGLISH 4
ESPAÑOL 12
PORTUGUÊS 20
TÜRKÇE 28
GC2005,2006,2010,2015,2020,2025,2030
3
Page 4
Important
For optimal safety,read these instructions carefully and look at the
illustrations before you start using the appliance.
- Never leave the iron unattended when it is connected to the mains.
- Young children should not be allowed to use the appliance without
supervision. Keep an eye on children to make sure that they do not
play with the appliance.
- The soleplate of the iron can become extremely hot and may cause
burns if touched. Do not allow the cord to come into contact with
the soleplate when it is hot.
- When you have finished ironing, when you clean the appliance, when
you fill or empty the water tank and also when you leave the iron
even for a short while: set the steam control to position O,put the
iron on its heel and remove the mains plug from the wall socket.
- If the mains cord of this appliance is damaged,it must always be
replaced by Philips or a service centre authorised by Philips,as
special tools and/or parts are required.
- Never use the appliance if it is damaged in any way.
Before first use
1 Check if the voltage indicated on the type plate corresponds to
the mains voltage in your home before you connect the
appliance.
2 Remove any sticker,protective foil or storage cover from the
soleplate.
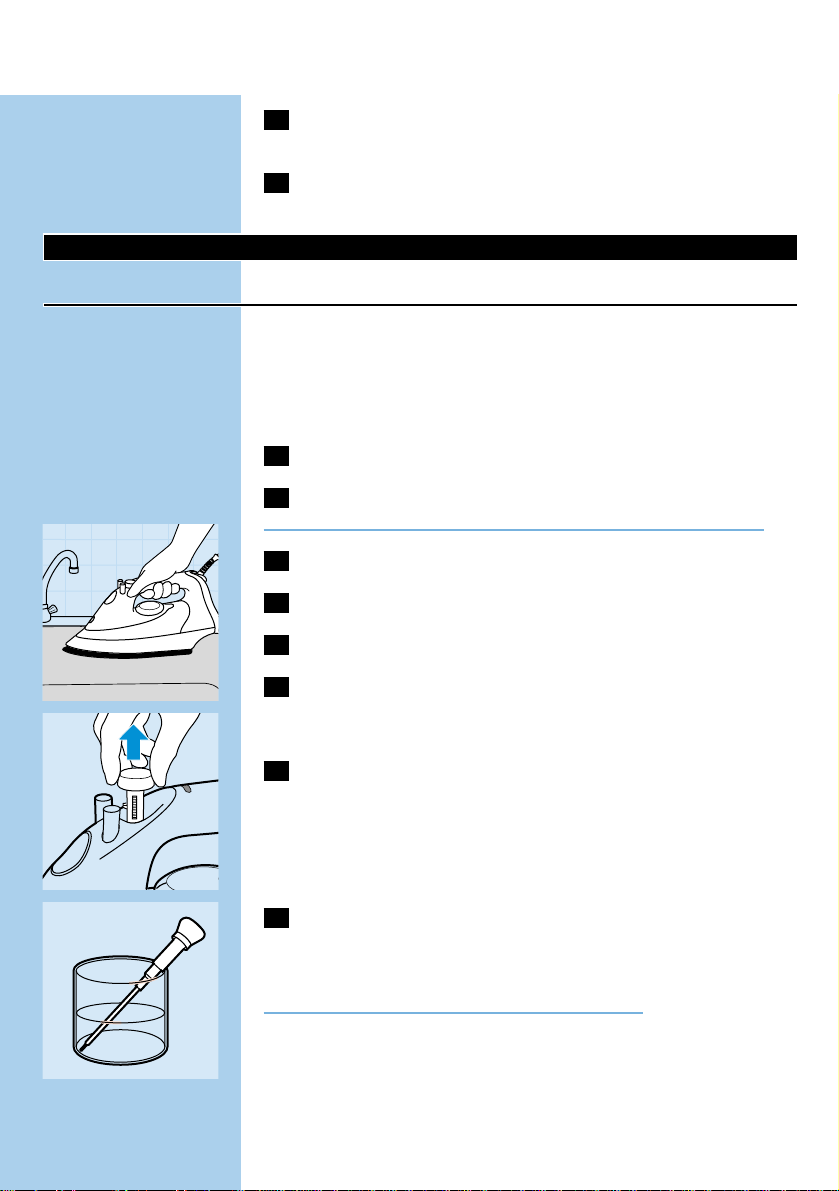
3 Heat up the iron to maximum temperature and pass the iron
over a piece of damp cloth for several minutes to remove any
residues from the soleplate.
The iron may give off some smoke when you use it for the first time.
This will cease after a short while.
Filling the water tank
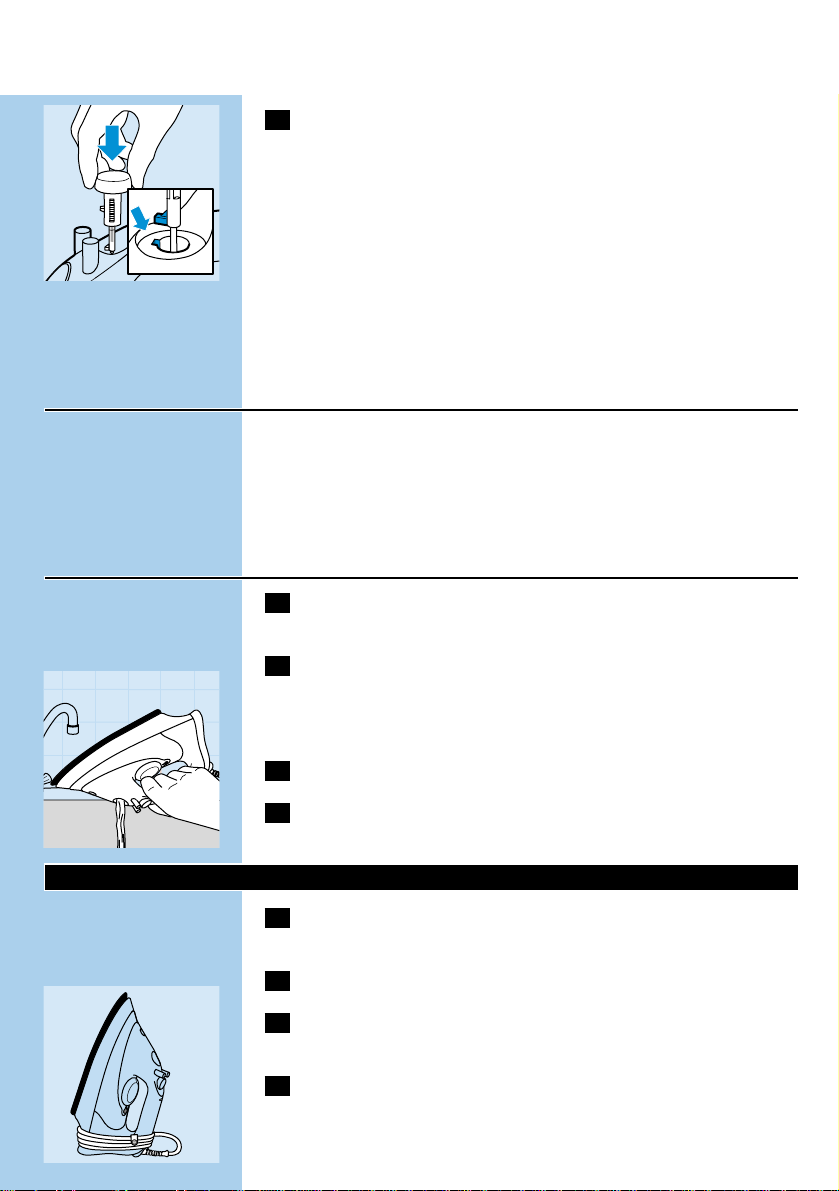
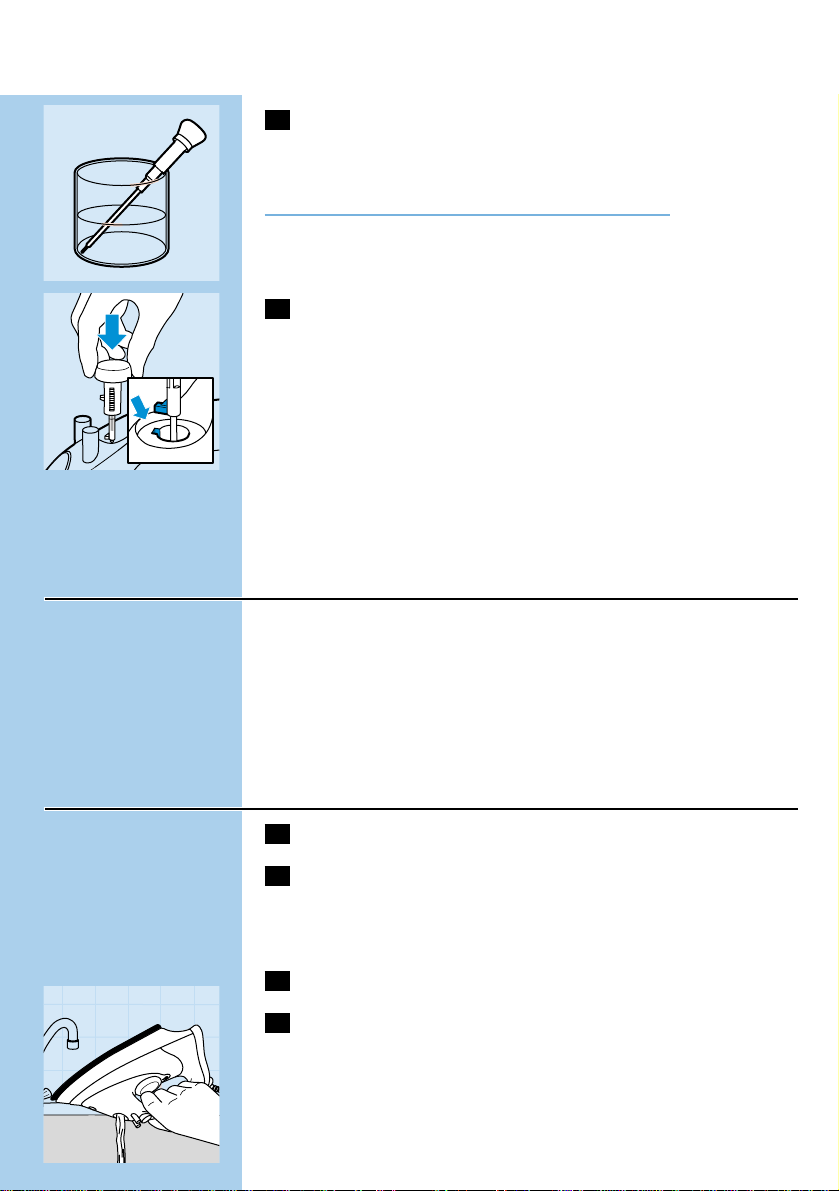
Never immerse the iron in water.
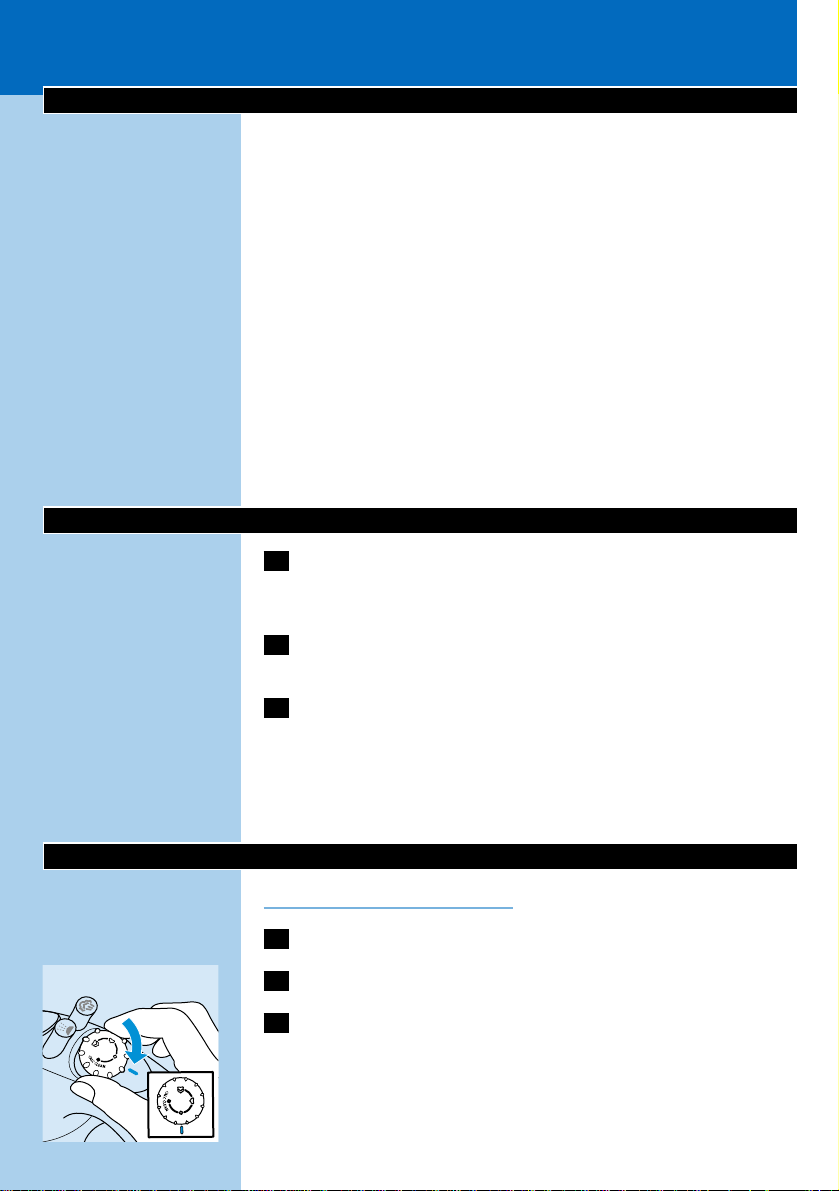
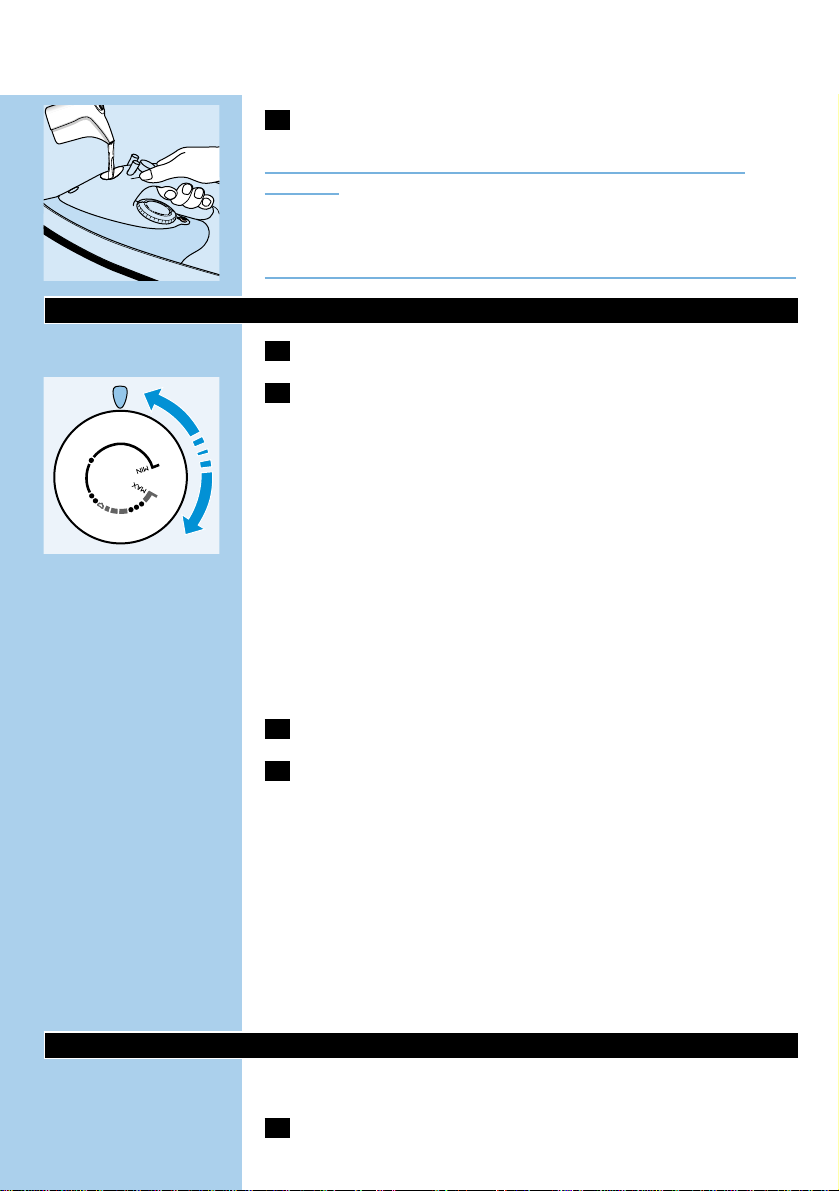
1 Remove the mains plug from the wall socket.
C
2 Set the steam control to position O (= no steam).
3 Tilt the iron.
ENGLISH4
Page 5
C
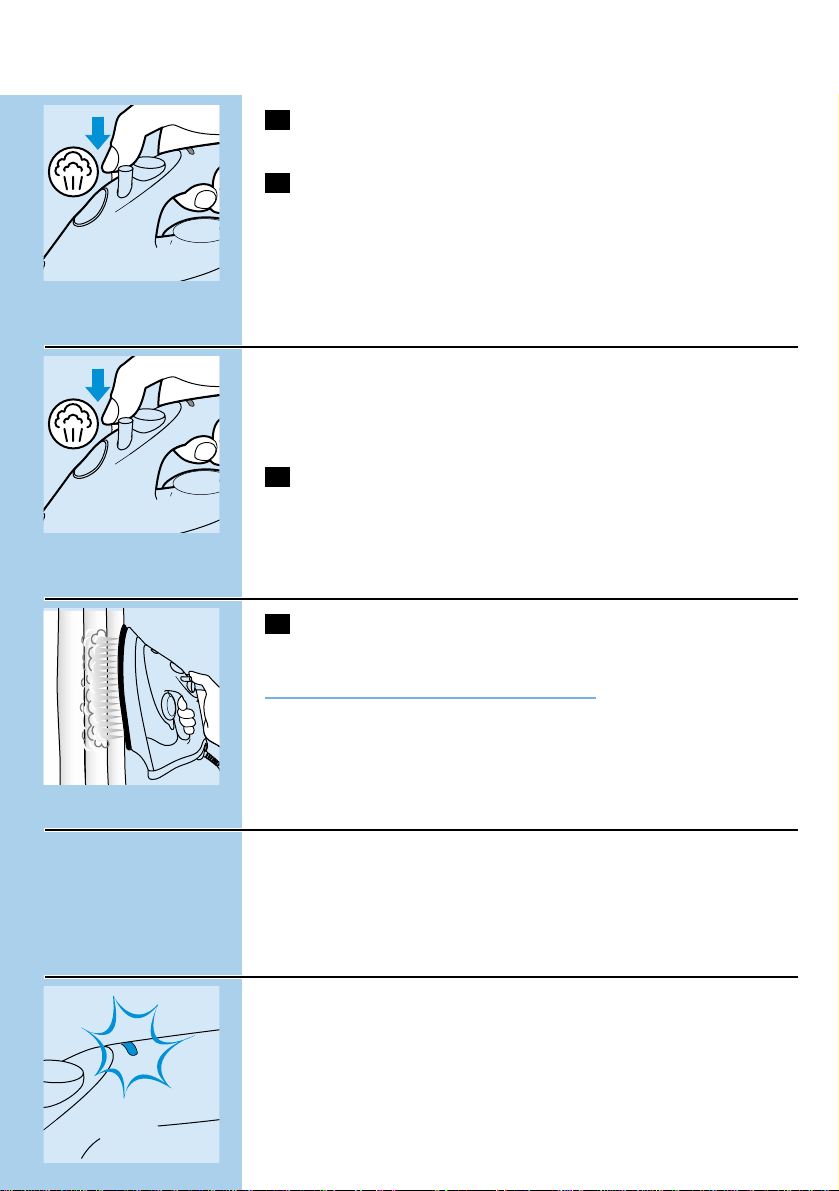
4 Pour tap water into the water tank by means of the filling jug
and fill the tank to maximum level.
Do not fill the water tank beyond the MAX indication.
If the tap water in your area is very hard, we advise you to use distilled
water.
Do not use vinegar, starch or chemically descaled water.
Setting the temperature
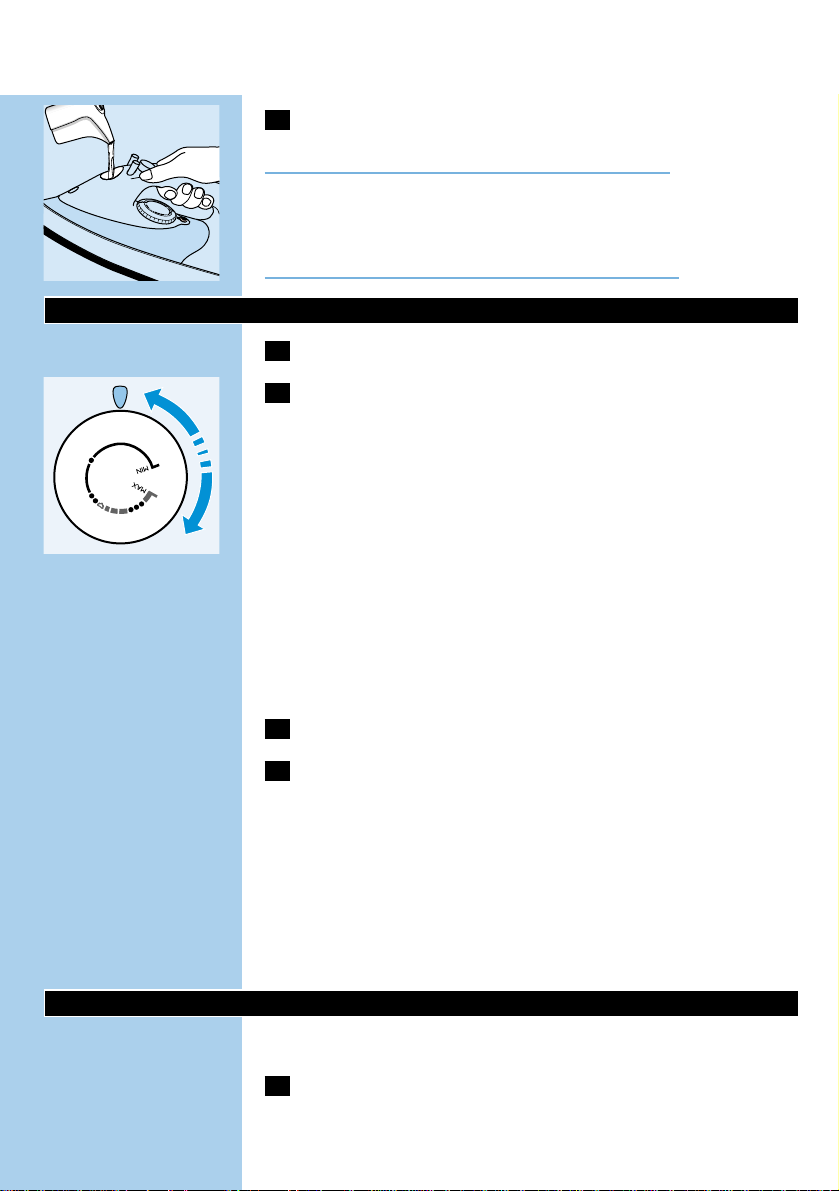
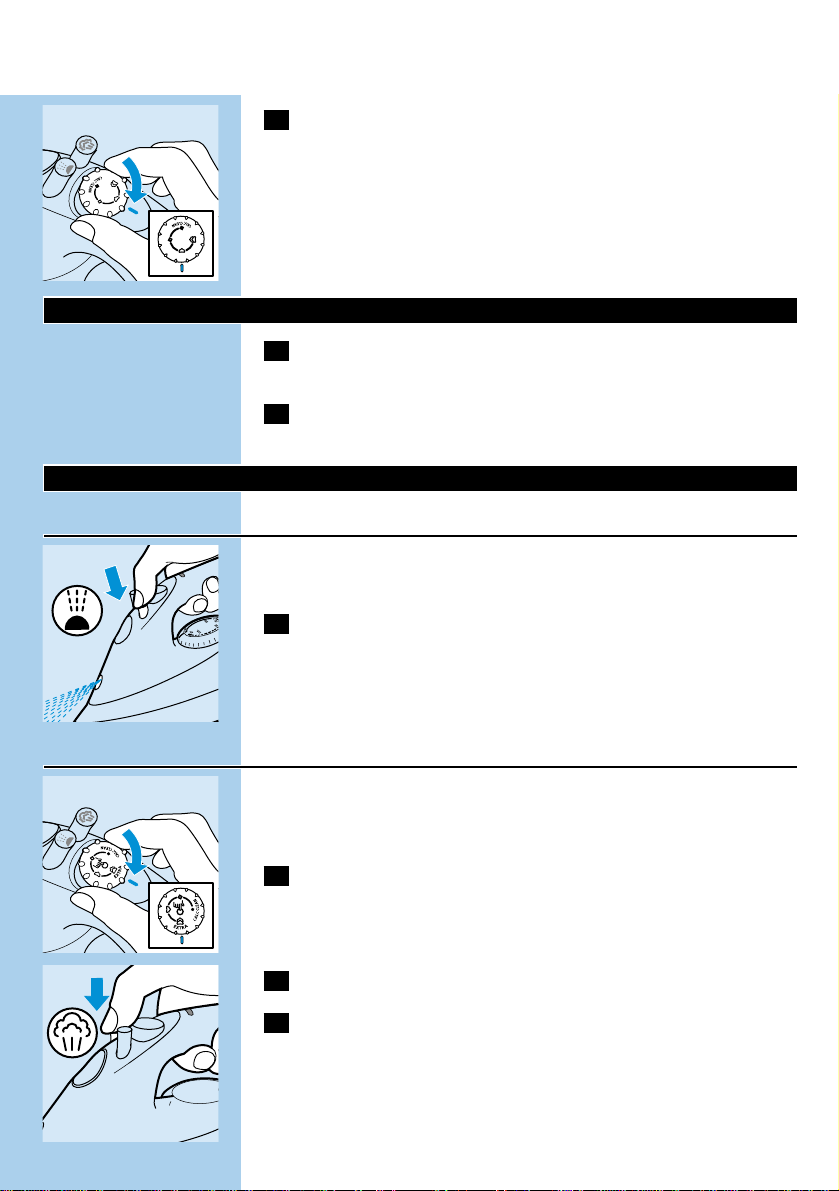
1 Put the iron on its heel.
C
2 Set the temperature dial to the required ironing temperature
by turning it to the position of the temperature indicator.
- Check the garment label for the required ironing temperature.
- 1 Synthetic fabrics (e.g. acrylic, viscose,polyamide,polyester)
- 1 Silk
- 2 Wool
- 3 Cotton, linen
- If you do not know what kind of fabric(s) a garment is made of,
determine the right ironing temperature by ironing a part that will
be invisible when you wear the garment.
- Silk,woollen and synthetic materials:iron the reverse side of the
fabric to prevent shiny patches.To prevent stains, avoid using the
spray function.
- Start ironing the articles that require the lowest ironing temperature,
such as those made of synthetic fibres.
3 Put the mains plug in an earthed wall socket.
4 When the amber temperature pilot light has gone out,wait a
while before you start ironing.
B
The amber pilot light will come on from time to time during ironing.
For auto-shut-off versions (only type GC2030):
If the auto-shut-off function has been activated (red pilot light blinks),
move the iron slightly to deactivate it (red pilot light stops blinking).
Steam ironing
Make sure that there is enough water in the water tank.
1 Set the temperature dial to the recommended position.
See 'Setting the temperature'.
ENGLISH 5
N
Y
L
O
N
N
Y
L
O
N
S
S
I
O
L
K
I
E
L
A
W
I
N
O
E
O
L
N
N
I
E
L
N
I
L
N
O
T
O
N
C
O
T
T
O
C
Page 6

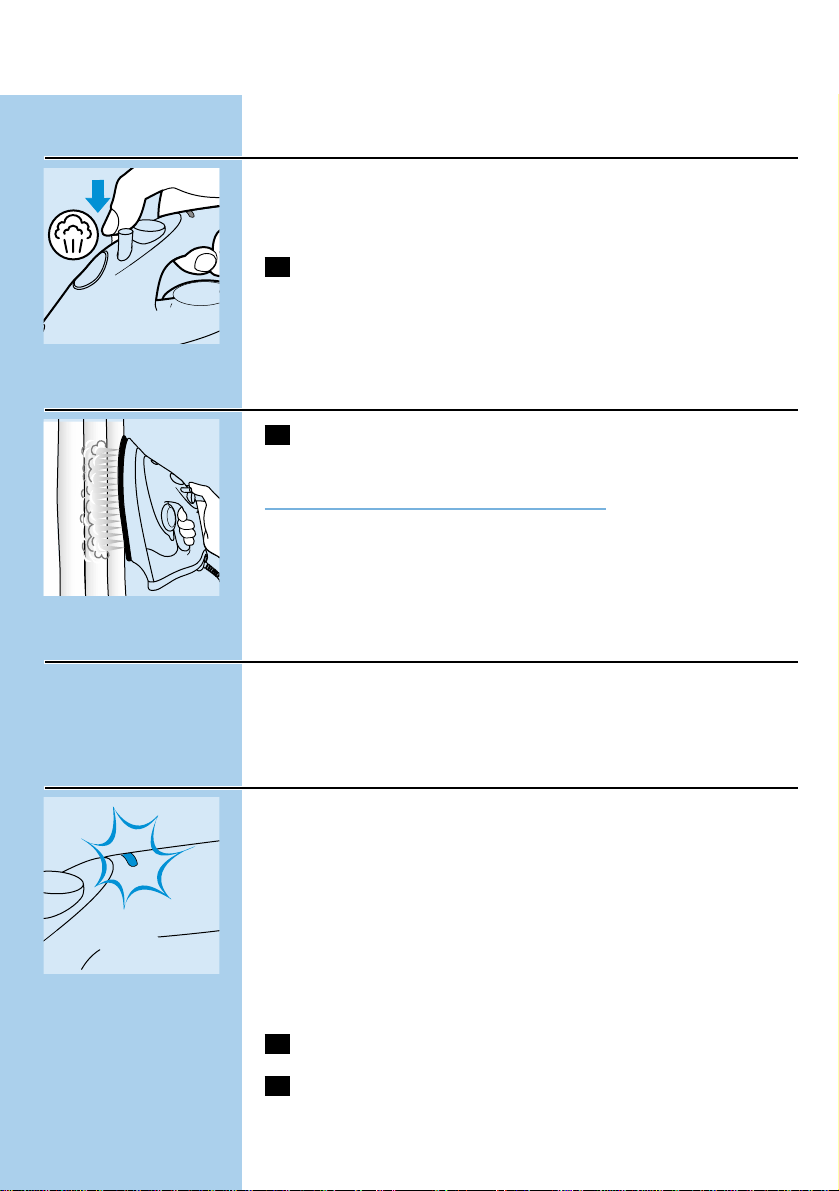
C
2 Set the steam control to the appropriate steam position.
- q for moderate steam (temperature settings 2 to 3)
- w for maximum steam (temperature settings 3 to MAX)
B
Steaming will start as soon as the set temperature has been reached.
◗ Types GC2005,2006,2010, 2011,2015,2016:Water may leak from
the soleplate if the set temperature is too low (MIN to 2).
Ironing without steam
1 Set the steam control to position O ( = no steam).
2 Set the temperature dial to the recommended position.
See 'Setting the temperature'.
Other features
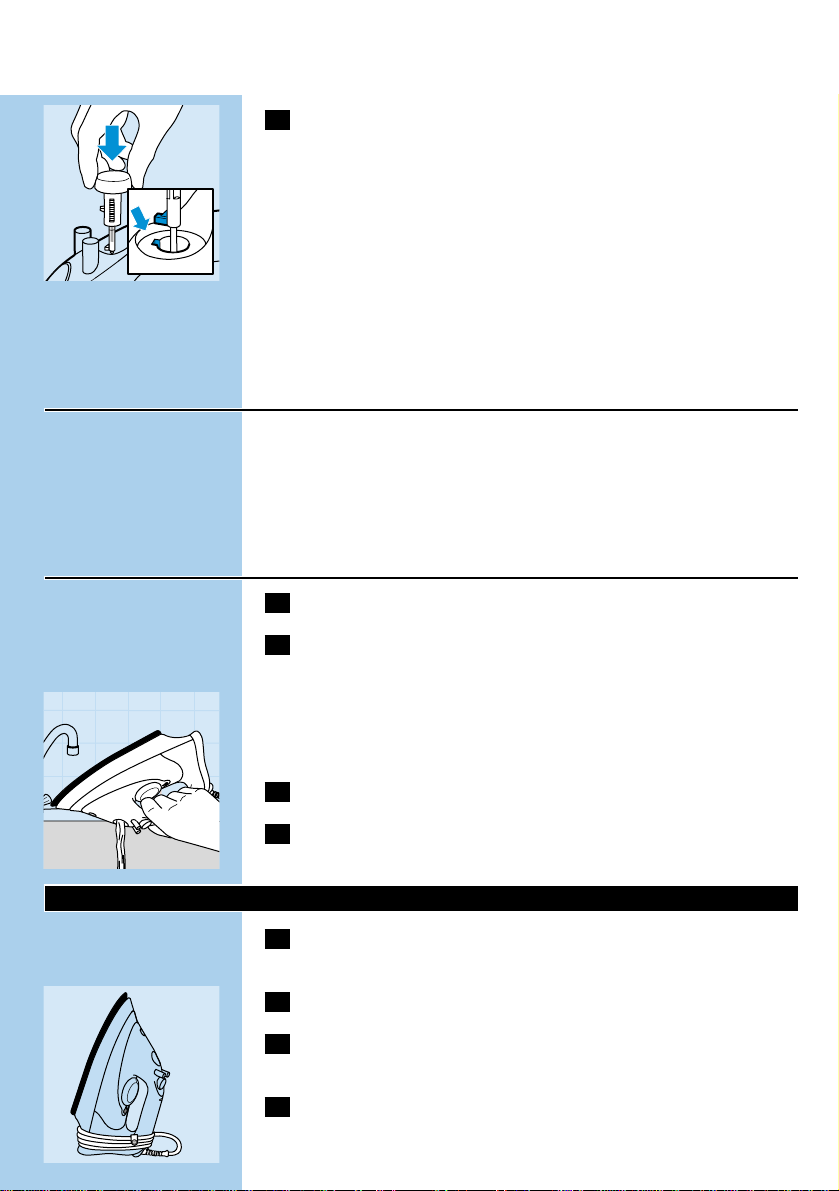
Spraying
To remove stubborn creases at any temperature
Make sure that there is enough water in the water tank.
C
1 Press the spray button a couple of times to moisten the
laundry.
Extra Steam (types GC2020,2006,2005 only)
This function provides extra stream to remove stubborn creases.
The Extra Steam function only works at temperature settings between
3 and MAX.
C
1 Set the steam control to highest position q.
C
2 Press and hold the Extra Steam button down for max.5
seconds.
3 Wait for at least 1 minute before you use the Extra Steam
function again to prevent water from dripping out of the
soleplate.
ENGLISH6
Page 7
Shot of Steam (types GC2030,2025,2016,2015,2011,2010
only)
A powerful shot of steam helps to remove stubborn creases.
The Shot-of-Steam function only works at temperature settings
between 2 and MAX.
C
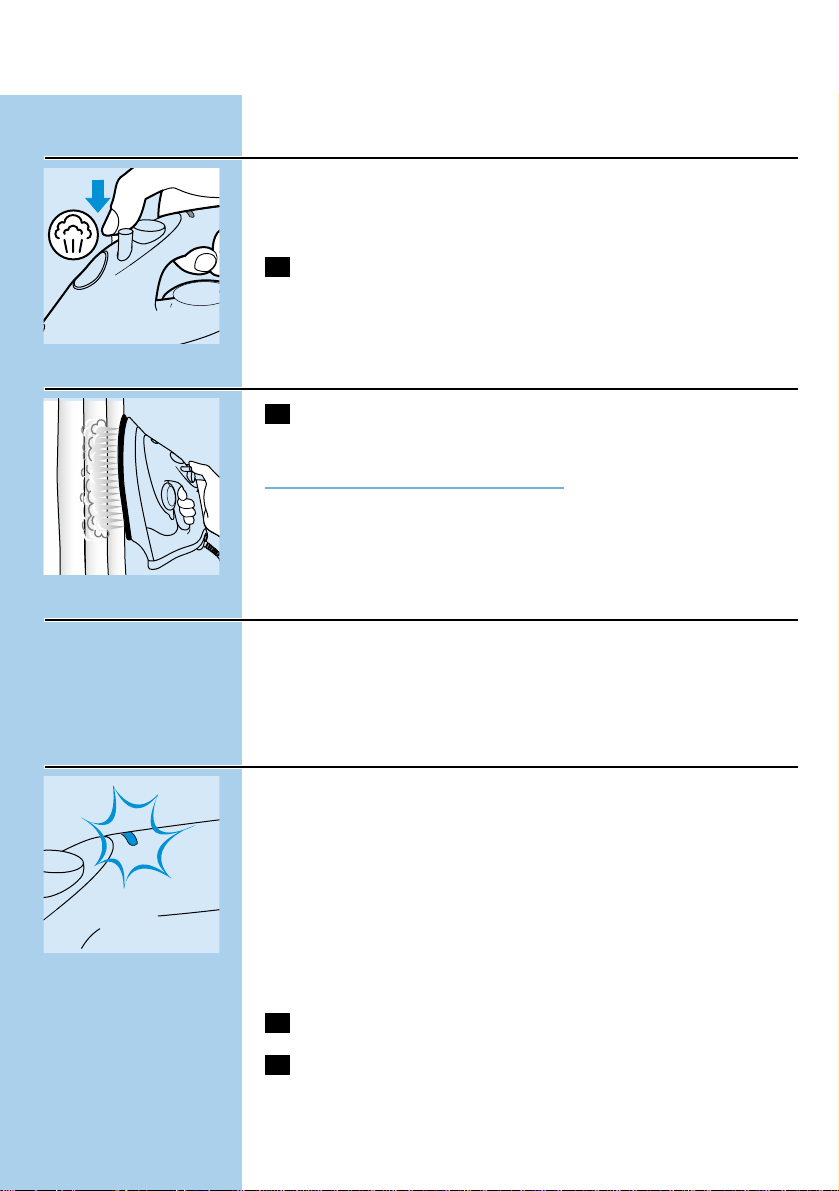
1 Press and release the Shot-of-Steam button.
Vertical Shot of Steam (types GC2030,2025,2016,2015 only)
C
1 The Shot of Steam function can also be used when you hold
the iron in vertical position.
Never direct the steam towards people.
Drip Stop (types GC2030,2025,2020 only)
This iron is equipped with a drip stop function: the iron automatically
stops steaming when the temperature is too low to prevent water
from dripping out of the soleplate.When this happens you will hear a
click.
Automatic shut-off (type GC2030 only)
C
◗ An electronic safety device will automatically switch the heating
element off if the iron has not been moved for a while.
◗ To indicate that the heating element has been switched off,the red
auto-off pilot light will start blinking.
To heat up the iron again:
1 Pick up the iron or move it slightly.
2 The red auto-off pilot light will go out.The amber temperature
pilot light will come on,depending on the soleplate
temperature.
ENGLISH 7
Page 8
3 If the amber pilot light comes on after the iron has been
moved,wait for it to go out before you start ironing.
4 If the amber light does not come on after the iron has been
moved,the iron is ready for use.
Cleaning and maintenance
Calc-Clean
The Calc-Clean function removes scale and impurities.
Use the Calc-Clean function once every two weeks. If the water in
your area is very hard (i.e. when flakes come out of the soleplate
during ironing), the Calc-Clean function should be used more
frequently.
1 Set the steam control to position O.
2 Fill the water tank to the maximum level.
Do not pour vinegar or other descaling agents into the water tank..
3 Set the temperature dial to MAX.
4 Put the plug in the wall socket.
5 Unplug the iron when the amber pilot light has gone out.
C
6 Hold the iron over the sink and set the steam control to
position v (Calc-Clean).The steam control knob will spring up
slightly.
C
7 Pull the steam control up slightly and gently shake the iron.
B
Steam and boiling water will come out of the soleplate.Impurities and
scale (if any) will be flushed out.
C
8 Pull the steam control knob further up to remove the steam
control needle.Use vinegar to remove scale, if any, from the
needle.
Do not bend or damage the steam control needle.
ENGLISH8
Page 9
C
9 Put the steam control needle back by inserting the point of the
needle exactly in the centre of the hole and by fitting the small
projection on the side of the needle into the slot.Set the
steam control knob to position O.
Repeat the Calc-Clean process if the iron still contains a lot
of impurities.
After the Calc-Clean process
- Plug in the iron to let the soleplate dry up.
- Unplug the iron when the amber pilot light has gone out.
- Move the iron gently over a piece of used cloth to remove any water
stains that may have formed on the soleplate.
- Let the iron cool down before you store it.
After ironing
1 Remove the mains plug from the wall socket and let the iron
cool down.
2 Wipe scale and any other deposits off the soleplate with a
damp cloth and a non-abrasive (liquid) cleaner.
Keep the soleplate smooth:avoid hard contact with metal objects.
3 Clean the upper part of the appliance with a damp cloth.
C
4 Regularly rinse the water tank with water.Empty the water
tank after cleaning.
Storage
1 Remove the mains plug from the wall socket and set the steam
control to position O.
2 Empty the water tank.
C
3 Let the iron cool down.Wind the mains cord round the cord
storage facility and fix it with the cord clip.
4 Always store the iron standing on its heel in a safe and dry
place.
ENGLISH 9
Page 10

Information & service
If you need information or if you have a problem, please visit the Philips
Web site at www.philips.com or contact the Philips Customer Care
Centre in your country (you will find its phone number in the
worldwide guarantee leaflet). If there is no Customer Care Centre in
your country,turn to your local Philips dealer or contact the Service
Department of Philips Domestic Appliances and Personal Care BV.
ENGLISH10
Page 11

Solution
Check the mains cord,the plug and
the wall socket.
Set the temperature dial to the
required temperature.
Fill the water tank (see Filling the
water tank).
Set to steam position q or w (see
Steam ironing).
Set the temperature dial to a
temperature in the steam area
(&@4,050 to MAX).Put the iron on
its heel and wait until the amber pilot
light has gone out before you start
ironing.
Put the iron in horizontal position and
wait for a while before using the
(Vertical) Shot of Steam function
again.
Set the temperature dial to a
temperature in the steam area
(&@4,050 to MAX).Put the iron on
its heel and wait until the amber pilot
light has gone out before you start
ironing.
Use the Calc-Clean function a few
times (see 'Calc-Clean').
Shake the iron lightly to deactivate the
auto shut-off function:the pilot light
will stop blinking.
Set the temperature dial to a
temperature in the steam area
(&@4,050 to MAX).Put the iron on
its heel and wait until the amber pilot
light has gone out before you start
ironing.
Possible cause(s)
Connection problem.
Temperature dial set at MIN.
Not enough water in the water tank.
The steam control has been set to
position O.
The soleplate is not hot enough
and/or the Drip Stop function (types
GC2030,2025,2020) has been
activated.
The (Vertical) Shot of Steam function
has been used too often within a very
short period.
The soleplate is not hot enough.
Hard water forms flakes inside the
soleplate.
The auto shut-off function has been
activated.See "Automatic shut-off"
section.
The temperature has been set too
low.
Problem
The iron is plugged in but the soleplate
is cold.
No steam
No Shot of Steam (type GC2010,
2011,2015,2016, 2025,2030 only) or
no Vertical Shot of Steam (Types
GC2030,2025,2016,2015 only)
Flakes and impurities come out of the
soleplate during ironing.
Red pilot light is blinking (type GC2030
only).
Water drips out of the soleplate (types
GC2016,2015,2011, 2010,2006,2005
only).
ENGLISH 11
Troubleshooting
This chapter summarises the most common problems you could
encounter with your iron.Please read the different sections for more
details.If you are unable to solve the problem, please contact the Philips
Customer Care Centre in your country.See the worldwide guarantee
leaflet for telephone numbers of the or visit our website at
www.philipsonline.com.
Page 12

Importante
Para una seguridad óptima, antes de empezar a usar el aparato lean
cuidadosamente estas instrucciones y miren las ilustraciones.
- Cuando esté enchufado a lared,no dejen nunca este aparato sin
vigilacia.
- Este aparato no está destinado a ser usado por chiquillos sin
vigilancia.Los niños deben ser vigilados para asegurarse de que no
juegan con este aparato.
- La suela de la Plancha puede calentarse extremadamente y puede
causar quemaduras si se toca. No permitan que el cable de red
toque la suela cuando esta esté caliente.
- Cuando hayan acabado de planchar,cuando limpien el aparato,
cuando llenen o vacien el depósito del agua y, también, cuando dejen
la Plancha aunque sea durante un momento,lleven el control del
vapor a la posición "O",pongan la Plancha sobre su talonera y
desenchúfenla de la red.
- Si el cable de red de este aparato se deteriora, debe siempre ser
sustituido por Philips o por un Servicio de Asistencia Técnica de
Philips ya que se precisan herramientas y/o piezas especiales.
- No usen nunca el aparato si tiene cualquier tipo de deterioro.
Antes del primer uso
1 Comprueben si la gama de voltajes de la placa de
características se corresponde con la de la red eléctrica de su
hogar.
2 Quiten de la suela cualquier etiqueta,lámina protectora o
cubierta para guardar.
3 Calienten la Plancha a la temperatura máxima y pásenla sobre
una pieza de ropa humedecida durante varios minutos para
eliminar cualquier residuo de la suela.
La Plancha puede producir un poco de humo al usarla por vez
primera. Ello cesará al cabo de un momento.
Cómo llenar el depósito del agua
No sumerjan nunca la Plancha en agua.
1 Desenchufen el aparato de la red.
C
2 Coloquen el control del vapor en la posición O (Sin vapor).
3 Inclinen la Plancha
ESPAÑOL12
Page 13

C
4 Utilizando la jarrita para llenar,viertan agua del grifo en el
depósito del agua y llénenlo hasta el nivel máximo.
No llenen el depósito por encima de la indicación "MAX".
Si el agua del grifo es muy dura en su zona,le aconsejamos usar agua
destillada.
No usen vinagre, almidón o agua químicamente descalcificada.
Cómo ajustar la temperatura
1 Pongan la Plancha sobre su talonera.
C
2 Girándolo a la posición del indicador de la temperatura,ajusten
el dial de la temperatura a la necesaria temperatura de
planchado.
- Para la necesaria temperatura de planchado,comprueben la etiqueta
de la prenda.
- 1 Tejidos sintéticos (Por ejemplo, acrílicos,viscosa,poliamidas,
poliesters)
- 1 Seda
- 2 Lana
- 3 Algodón, Lino
- Si no saben de que tipo de tejido(s) está fabricada la prenda,
determinen la correcta temperatura de planchado planchando un
trozo que no se vea cuando vistan la prenda.
- Seda,materiales de lana y sintéticos : Planchen por el reverso del
tejido para evitar puntos brillantes. Para evitar manchas, no usen la
función pulverizadora (Spray).
- Empiecen planchando los artículos que requieran la más baja
temperatura de planchado, tales como los fabricados con fibras
sintéticas.
3 Enchufen el aparato a la red en un enchufe con toma de tierra.
4 Cuando la lámpara piloto ambar de la temperatura se haya
apagado,esperen un momento antes de empezar a planchar.
B
La lámpara piloto ambar se encenderá,de vez en cuando,durante el
planchado.
Para las versiones con desconexión automática (Solo modelo
GC 2030) :
Si se ha activado la función de desconexión automática (La lámpara
piloto roja parpadea), muevan ligeramente la Plancha para desactivarla
(La lámpara piloto roja deja de parpadear).
ESPAÑOL 13
N
Y
L
O
N
N
Y
L
O
N
S
S
I
O
L
K
I
E
L
A
W
I
N
O
E
O
L
N
N
I
E
L
N
I
L
N
O
T
O
N
C
O
T
T
O
C
Page 14

Cómo planchar con vapor
Asegúrense de que haya suficiente agua en el depósito del agua.
1 Ajusten el dial de la temperatura a la temperatura
recomendada.
Consulten la sección "Cómo ajustar la temperatura".
C
2 Ajusten el control del vapor a la apropiada posición de vapor.
- q para vapor moderado (Posiciones de temperatura de 2 a
3).
- w para vapor máximo (Posiciones de temperatura de 3 a MAX).
B
El vaporizado empezará tan pronto como se haya alcanzado la
temperatura seleccionada.
◗ Modelos GC 2005,2006,2010,2011, 2015,2016 :El agua puede
salir por la suela si la temperatura es demasiado baja (De MIN a
2).
Cómo planchar sin vapor
1 Ajusten el control del vapor a la posición "O" (= Sin vapor)
2 Ajusten el dial de la temperatura a la posición recomendada.
Consulten la sección "Cómo ajustar la temperatura".
Otras funciones
Pulverizador
Para eliminar arrugas rebeldes a cualquier temperatura
Asegúrense de que haya suficiente agua en el depósito del agua.
C
1 Para humedecer la ropa,presionen un par de veces el botón
del pulverizador.
Vapor Extra (Solo en modelos GC 2020, 2006,2005)
Esta función proporciona vapor extra para eliminar las arrugas
rebeldes.
La función Vapor Extra solo funciona a posiciones de temperatura
entre 3 y MAX.
C
1 Ajusten el control del vapor a la posición MAX q.
ESPAÑOL14
Page 15
C
2 Presionen y mantengan apretado el botón del Vapor Extra
durante un máximo de 5 segundos.
3 Para evitar que haya pér didas de agua por la suela esperen,
como mínimo,1 minuto antes de volver a usar la función Vapor
Extra.
Chorro de Vapor (Solo en modelos GC 2030,2025,2016,
2015,2011,2010)
Un poderoso chorro de vapor que les ayudará a eliminar las arrugas
rebeldes
La función Chorro de Vapor solo funciona a posiciones de temperatura
entre 2 y MAX.
C
1 Presionen y suelten el botón del Chorro de Vapor.
Chorro de Vapor Vertical (Solo en modelos GC 2030,2025,
2016,2015)
C
1 La función Chorro de Vapor también puede utilizarse cuando
sostengan la Plancha en posición vertical.
No dirijan nunca el vapor hacia las personas.
Antigoteo (Solo en modelos GC 2030,2025,2020)
Esta Plancha está equipada con una función de antigoteo.Para evitar
pédidas de agua por la suela,la Plancha deja automáticamente de
vaporizar cuando la temperatura es demasiado baja.Cuando esto
suceda,oiran un "click".
Desconexión automática (Solo en modelo GC2030)
C
◗ Un dispositivo electrónico de seguridad desconectará
automáticamente el elemento calefactor si la Plancha no ha sido
movida durante algún tiempo.
◗ Para indicar que el elemento calefactor ha sido desconectado,la
lámpara piloto roja de la desconexión automática empezará a
parpadear.
ESPAÑOL 15
Page 16

Para volver a calentar la Plancha :
1 Cojan la Plancha o muévanla ligeramente.
2 La lámpara piloto roja se apagará.Dependiendo de la
temperatura de la suela,la lámpara piloto ambar de la
temperatura se encenderá.
3 Si la lámpara piloto ambar se enciende después de haber
movido la Plancha,esperen a que se apague antes de empezar a
planchar.
4 Si la lámpara piloto ambar no se enciende después de mover la
Plancha,esta está lista para el uso.
Limpieza y mantenimiento
Función Calc-Cleaning (Limpieza de la Cal)
La función Calc-Cleaning (Limpieza de la Cal) elimina las incrustaciones
y las impurezas.
Usen la función Calc-Cleaning (Limpieza de la Cal) una vez cada dos
semanas.Si el agua de su zona es muy dura (Por ejemplo, cuando
durante el planchado salen escamas por la suela), la función CalcCleaning (Limpieza de la Cal) debs ser usada más a menudo.
1 Ajusten el control del vapor a la posición O.
2 Llenen el depósito del agua hasta el nivel máximo.
No pongan vinagre u otros agentes desincrustantes en el depósito del
agua.
3 Ajusten el dial de la temperatura a la posición MAX.
4 Enchufen el aparato a la red.
5 Desenchufen la Plancha tan pronto como se haya apagado la
lámpara piloto ambar.
C
6 Sostengan la Plancha sobre el fregadero y lleven el control del
vapor a la posición V (Calc-Cleaning (Limpieza de la Cal). El
botón del control del vapor saltará ligeramente.
C
7 Hagan subir ligeramente el control del vapor y sacudan
ligeramente la Plancha.
B
Vapor agua hirviendo saldrán por la suela. Las impurezas e
incrustaciones (Si las hay) serán eliminadas.
ESPAÑOL16
Page 17
C
8 Estiren más del botón del control del vapor para sacar la aguja
de control del vapor. Usen vinagre para eliminar las
incrustaciones (Si las hay) de la aguja.
No tuerzan o deterioren la aguja de control del vapor.
C
9 Vuelvan a poner la aguja de control del vapor,insertándola
exactamente en el centro del agujero y fijando el pequeño
saliente del lado de la aguja en su ranura.Lleven el botón de
control del vapor a la posición "O".
Repitan el proceso Limpieza de la Cal (Calc-Cleaning) si la
Plancha contiene muchas impurezas.
Después del proceso Limpieza de la Cal (Calc-Cleaning)
- Enchufen el aparato a la red y dejen que la suela se caliente.
- Desenchufen la Plancha tan pronto como se haya apagado la
lámpara piloto ambar.
- Muevan suavemente la Plancha sobre una pieza de ropa usada para
eliminar cualquier mancha de agua que se haya podido formar en la
suela.
- Dejen que la Plancha se enfríe antes de guardarla.
Después del planchado
1 Desenchufen el aparato de la red y dejen que se enfríe.
2 Limpien las incrustaciones y otros depósitos de la suela con un
paño húmedo y un líquido limpiador no abrasivo.
Mantengan la suela lisa :Eviten contactos fuertes con objetos metálicos.
3 Limpien la parte superior del aparato con un paño húmedo.
C
4 Periódicamente,enjuaguen el depósito del agua con agua.
Vacíen el depósito del agua después de limpiarlo.
ESPAÑOL 17
Page 18

Cómo guardar la Plancha
1 Desenchufen la Plancha de la red y lleven el control del vapor a
la posición "O".
2 Vacíen el depósito del agua.
C
3 Dejen que la Plancha se enfríe.Enrrollen el cable de red
alrededor del siltio para guardarlo y fíjenlo con la brida del
cable.
4 Guarden siempre la Plancha sobre su talonera y en un lugar
seco y seguro.
Información y Servicio
Si necesitan información o si tienen algún problema,visiten la página
Web de Philips en www.philips.com o contacten con el Servicio Philips
de Atención al Cliente de su país (Hallarán el número de teléfono en el
folleto de la Garantía Mundial). Si en su país no hay Servicio Philips de
Atención al Cliente, diríjanse a su distribuidor local Philips o contacten
con el Service Department of Philips Domestic Appliances and
Personal Care BV.
ESPAÑOL18
Page 19

Solución
Comprueben el cable de red, la clavija
y el enchufe
Ajusten el control de la temperatura a
la temperatura requerida.
Llenen el depósito del agua
(Consulten "Cómo llenar el depósito
del agua")
Ajusten a la posición de vapor q o a
la w (Vean "Cómo planchar con
vapor")
Lleven el control de la temperatura a
una temperatura del área de vapor
(De &@4,050 a MAX).Pongan la
Plancha sobre su talonera y,antes de
empezar a planchar, esperen hasta que
la lámpara piloto ambar se haya
apagado.
Pongan la Plancha en posición
horizontal y esperen un poco antes de
volver a usar la función Chorro de
Vapor (Vertical).
Lleven el control de la temperatura a
una temperatura del área de vapor
(De &@4,050 a MAX).Pongan la
Plancha sobre su talonera y,antes de
empezar a planchar, esperen hasta que
la lámpara piloto ambar se haya
apagado.
Usen la función Limpieza de la Cal
(Calc-Clean) unas pocas veces (Vean
"Limpieza de la Cal (Calc-Clean)").
Agiten ligeramente la Plancha para
desactivar la función Desconexión
Automática.La lámpara piloto dejará
de parpadear.
Lleven el control de la temperatura a
una temperatura del área de vapor
(De &@4,050 a MAX).Pongan la
Plancha sobre su talonera y,antes de
empezar a planchar, esperen hasta que
la lámpara piloto ambar se haya
apagado.
Causa(s) posible(s)
Problema de conexión
Control de la temperatura ajustado al
MIN.
No hay suficiente agua en el depósito
del agua
El control de vapor ha sido ajustado a
la posición O.
La suela no está suficientemente
caliente o la función Antigoteo (Drip
Stop) (Modelos GC 2030,2025,
2020) ha sido activada.
El Chorro de Vapor (Vertical) ha sido
usado demasiado a menudo en un
muy corto espacio de tiempo.
La suela no está suficientemente
caliente.
El agua dura forma escamas en el
interior de la suela.
La función Desconexión Automática
se ha activado.Vean la sección
"Desconexión automática".
La temperatura está ajustada
demasiado baja.
Problema
La Plancha está enchufada pero la suela
está fría
No produce vapor
No produce Chorro de Vapor Solo en
modelos GC 2030,2025,2016, 2015,
2011,2010) o Chorro de Vapor Vertical
(Solo en modelos GC 2030,2025,
2016,2015)
Escamas e impurezas salen de la suela
durante el planchado.
La lámpara piloto roja está
parpadeando (Solo en modelo
GC 2030)
Hay pérdidas de agua por la suela (Solo
modelos GC20165,2015,2011, 2010,
2006,2005)
ESPAÑOL 19
Guía de problemas
Este capítulo reune los más comunes problemas con los que pueden
encontrase con su Plancha. Para más detalles,lean las diferentes secciones.
Si no pueden resolver el problema,contacten con el más cercano Servicio
de Asistencia Técnica de Philips.Vean el folleto de la Garantía Mundial para
hallar el número de teléfono del Servicio Philips de Atención al Cliente o
visiten nuestra página Web en www.philipsonline.com.
Page 20

Importante
Para sua segurança, antes de começar a usar o aparelho leia
atentamente as instruções e consulte as ilustrações fornecidas.
- Nunca deixe o ferro ligado à corrente sem vigilância.
- Este aparelho não deve ser utilizado por crianças sem a supervisão
de um adulto.Também as crianças devem ser mantidas à distância
para não brincarem com o aparelho.
- A base do ferro pode ficar extremamente quente e provocar
queimaduras. Não deixe que o cabo de alimentação entre em
contacto com a base quente do ferro.
- Quando terminar de passar,quando proceder à limpeza do ferro,
quando encher ou esvaziar o reservatório da água e também
quando sair de perto do ferro por algum tempo:regule o controlo
do vapor para a posição O,coloque o ferro em posição de descanso
e retire a ficha da tomada de corrente.
- Se o cabo de alimentação estiver estragado,só deverá ser
substituído pela Philips ou por um concessionário Philips autorizado,
porque é necessário usar ferramentas e/ou peças especiais.
- Nunca deve servir-se do ferro se ele tiver alguma deficiência.
Antes de usar
1 Verifique se a voltagem indicada na placa de tipo do ferro
corresponde à da corrente eléctrica local.
2 Retire todos os autocolantes,protecções ou coberturas da
base do ferro.
3 Aqueça o ferro na temperatura máxima e passe-o sobre um
pedaço de pano húmido durante alguns minutos para retirar
todos e quaisquer resíduos da base.
O ferro poderá libertar algum fumo quando da primeira utilização. É
normal e pára passado algum tempo.
Enchimento do reservatório
Nunca mergulhe o ferro dentro de água.
1 Retire a ficha da tomada de corrente.
C
2 Rode o controlo do vapor para a posição 0 (= sem vapor).
3 Incline o ferro.
PORTUGUÊS20
Page 21

C
4 Deite água da torneira para dentro do reservatório servindo-
se da medida.Encha o reservatório até ao nível máximo.
Não ultrapasse a indicação MAX.
Se a água da torneira da sua área de residência for muito dura, é
aconselhável usar água destilada.
Não use vinagre, lixívia ou água descalcificada quimicamente.
Selecção da temperatura
1 Coloque o ferro em posição de descanso.
C
2 Rode o selector da temperatura para a temperatura
pretendida,rodando-o para a posição indicada.
- Verifique a etiqueta da peça para saber qual a temperatura indicada:
- 1 Tecidos sintéticos (p.ex.acrílico,viscose,poliamide, poliester)
- 1 Seda
- 2 Lã
- 3 Algodão, linho
- Se não conhecer o(s) tipo(s) de tecido(s),calcule a temperatura
certa passando o ferro sobre uma parte da peça de roupa que não
fique à vista.
- Seda,lã e tecidos sintéticos:passe pelo lado do avesso para evitar a
formação de marcas de lustro.Para evitar manchas,evite usar o
borrifador.
- Comece por passar os artigos que requeiram uma temperatura mais
baixa,como é o caso dos tecidos sintéticos.
3 Ligue a ficha numa tomada com terra.
4 Depois da luz âmbar da temperatura se apagar,aguarde uns
instantes antes de começar o trabalho.
B
A luz âmbar acende-se de vez em quando durante o trabalho.
Nos modelos com desligar automático (apenas no GC2030):
Se a função de desligar automático tiver sido activada (luz encarnada a
piscar),movimente o ferro ligeiramente para a desactivar (a luz
encarnada deixa de piscar).
Passar com vapor
Verifique se existe água suficiente no reservatório.
1 Regule a temperatura para a posição recomendada.
Consulte o capítulo 'Selecção da temperatura'.
PORTUGUÊS 21
N
Y
L
O
N
N
Y
L
O
N
S
S
I
O
L
K
I
E
L
A
W
I
N
O
E
O
L
N
N
I
E
L
N
I
L
N
O
T
O
N
C
O
T
T
O
C
Page 22

C
2 Coloque o controlo do vapor na posição adequada.
- q para vapor moderado (temperaturas entre 2 e 3)
- w para vapor máximo (temperaturas entre 3 e MAX)
B
O vapor começa a sair logo que a água atinge a temperatura
seleccionada.
◗ Modelos GC2005,2006,2010,2011, 2015,2016:Pode pingar água
da base do ferro se a temperatura for muito baixa (MIN a 2).
Passar sem vapor
1 Regule o controlo do vapor para a posição O (=sem vapor).
2 Regule o selector da temperatura para a posição recomendada.
Consulte o capítulo 'Regulação da temperatura'.
Outras características
Borrifador
Para remover rugas difíceis em qualquer temperatura.
Verifique se existe água suficiente no reservatório.
C
1 Prima o botão do borrifador um par de vezes para humedecer
a roupa.
Vapor Extra (apenas nos mod.GC2020,2006,2005)
Esta função fornece vapor extra para remover vincos mais difíceis.
A função de Vapor Extra só funciona com temperaturas entre 3 e
MAX.
C
1 Regule o controlo do vapor para a posição MAX q.
C
2 Prima e mantenha premido o botão de Vapor Extra durante um
máx.de 5 segundos.
3 Aguarde pelo menos 1 minuto antes de voltar a usar a função
de Vapor Extra para evitar que pingue água pela base do ferro.
PORTUGUÊS22
Page 23

Jacto de Vapor (apenas nos mod.GC2030, 2025, 2016, 2015,
2011,2010)
Um potente jacto de vapor que ajuda a remover vincos mais
renitentes.
A função de Jacto de Vapor só funciona com temperaturas entre 2 e
MAX.
C
1 Prima e solte o botão do Jacto de Vapor.
Jacto de Vapor Vertical (apenas nos mod.GC2030,2025,2016,
2015)
C
1 O Jacto de Vapor também pode ser usado quando se mantém
o ferro na posição vertical.
Nunca vire o jacto de vapor na direcção de ninguém.
Sistema Anti-Gotejamento (apenas nos mod.GC2030,2025,
2015)
Este ferro está equipado com um sistema anti-gotejamento:o ferro
deixa automaticamente de emitir vapor quando a temperatura é
demasiado baixa para evitar que a água pingue da base do ferro.
Quando isso acontece ouvir-se-á um 'clique'.
Desligar automático (apenas no mod.GC2030)
C
◗ Um dispositivo electrónico de segurança desligará
automaticamente a resistência se o ferro não for mexido durante
algum tempo.
◗ Para indicar que a resistência foi desligada,a luz encarnada
começará a piscar.
Para voltar a aquecer o ferro:
1 Pegue no ferro ou movimente-o ligeiramente.
2 A luz encarnada apagar-se-á.A luz âmbar da temperatura
acende-se,dependendo da temperatura da base do ferro.
PORTUGUÊS 23
Page 24

3 Se a luz âmbar se acender depois do ferro ter sido
movimentado,aguarde que ela se apague antes de recomeçar o
trabalho.
4 Se a luz âmbar não se acender depois de o ferro ser
movimentado,o ferro está pronto para ser usado.
Limpeza e manutenção
Limpeza do Calcário
A função 'Calc-Clean' remove o calcário e as impurezas.
Use a função 'Calc-Clean' todos os quinze dias.Se a água da sua área
de residência for muito dura (isto é,se sairem partículas da base do
ferro quando estiver a passar a roupa),a função 'Calc-Clean' deve ser
usada com maior frequência.
1 Rode o controlo do vapor para a posição O.
2 Encha o reservatório com água até ao nível máximo.
Não deite vinagre ou qualquer outro descalcificante para dentro do
reservatório da água.
3 Regule a temperatura para a posição MAX.
4 Ligue a ficha à corrente.
5 Desligue o ferro quando a luz âmbar se apagar.
C
6 Segure o ferro sobre o lava-loiça e regule o controlo do vapor
para a posição v (Calc-Clean).O botão do controlo do vapor
sai ligeiramente para fora.
C
7 Puxe levemente o controlo do vapor e agite ligeiramente o
ferro.
B
O vapor e a água a ferver saiem pela base do ferro.As impurezas e o
calcário (se os houver) também serão expelidos para fora.
C
8 Puxe o botão do controlo do vapor um pouco mais para fora
para poder retirar a agulha.Se for necessário,use vinagre para
remover o calcário da agulha.
Não dobre nem estrague a agulha do controlo do vapor.
PORTUGUÊS24
Page 25

C
9 Volte a colocar a agulha no seu lugar,introduzindo a ponta da
agulha exactamente no centro do orifício e encaixando a
pequena saliência lateral da agulha na ranhura.Regule o
controlo do vapor para a posição O.
Repita o procedimento de limpeza (Calc-Clean) se ainda
houver muitas impurezas no ferro.
Depois de proceder à limpeza do calcário (Calc-Clean)
- Ligue o ferro e deixe a base secar.
- Desligue o ferro quando a luz âmbar se apagar.
- Movimente o ferro levemente sobre um pedaço de pano usado para
lhe retirar todas as manchas de água que se tenham formado na
base.
- Deixe arrefecer o ferro antes de o arrumar.
Quando terminar
1 Retire a ficha da tomada de corrente e deixe o ferro a
arrefecer.
2 Limpe o calcário e quaisquer outros vestígios de impurezas da
base do ferro com um pano húmido e um produto de limpeza
não abrasivo (líquido).
Mantenha a base do ferro macia:evite o contacto com objectos
metálicos.
3 Limpe a parte de cima do ferro com um pano húmido.
C
4 Regularmente,enxague o reservatório com água limpa.Após a
limpeza,esvazie o reservatório.
Arrumação
1 Retire a ficha da tomada de corrente e regule o controlo do
vapor para a posição O .
2 Esvazie o reservatório da água.
C
3 Deixe o ferro arrefecer.Enrole o cabo de alimentação no
compartimento respectivo e fixe-o com a mola.
4 Arrume sempre o ferro na vertical e em local seguro e seco.
PORTUGUÊS 25
Page 26

Informações e assistência
Se necessitar de informações ou se tiver qualquer problema,por favor
visite a página Philips na Internet em www.philips.com ou contacte o
Centro de Informação ao Consumidor Philips do seu país (o número
de telefone encontra-se no folheto da garantia mundial). Se não existir
um Centro de Informação ao Consumidor no seu país, dirija-se a um
agente Philips local ou ao Departamento de Service da Philips
Domestic Appliances and Personal Care BV.
Resolução de problemas
Este capítulo resume alguns dos problemas mais comuns que poderá
encontrar no seu ferro. Por favor,leia atentamente os vários capítulos
para obter mais informações. Se não conseguir resolver o problema,
queira contactar o Centro de Assistência Philips mais próximo ou um
dos seus representantes.Consulte o folheto da garantia mundial para
saber os números de telefone das Linhas de Ajuda Philips ou visite o
nosso endereço na web em www.philipsonline.com.
PORTUGUÊS26
Page 27

Solução
Verifique o cabo de alimentação, a
ficha e a tomada de corrente.
Regule a temperatura para a posição
correcta.
Encha o reservatório (vidé
'Enchimento do reservatório').
Regule o controlo do vapor para a
posição q ou w (vidé 'Passar com
vapor').
Regule a temperatura para uma
temperatura com produção de vapor
(&@4,050 a MAX).Ponha o ferro em
posição de descanso e aguarde até
que a luz âmbar se apague antes de
começar.
Coloque o ferro na posição horizontal
e aguarde um pouco antes de usar
novamente o Jacto (Vertical) de Vapor.
Regule a temperatura para uma
temperatura com produção de vapor
(&@4,050 a MAX).Ponha o ferro em
posição de descanso e aguarde até
que a luz âmbar se apague antes de
começar.
Use a função 'Calc-Clean' várias vezes
(vidé 'Calc-Clean').
Agite ligeiramente o ferro para
desactivar a função de desligar
automático:a lâmpada deixará de
piscar.
Regule a temperatura para uma
temperatura com produção de vapor
(&@4,050 a MAX).Ponha o ferro em
posição de descanso e aguarde até
que a luz âmbar se apague antes de
começar.
Causa(s) provável(eis)
Problema na ligação.
Controlo da temperatura na posição
MIN.
O reservatório não tem água
suficiente.
O controlo do vapor está na posição
O.
A base do ferro não está
suficientemente quente e/ou o
sistema Anti-Gotejamento (apenas
nos mod.GC2030,2025, 2020) foi
activado.
O Jacto (Vertical) de Vapor foi usado
muitas vezes num curto período de
tempo.
A base do ferro não está
suficientemente quente.
A água dura forma depósitos no
interior da base do ferro.
A função de desligar automático foi
activada.Vidé 'Desligar automático'.
A temperatura seleccionada é muito
baixa.
Problema
O ferro está ligado mas a base continua
fria.
Não sai vapor
Não sai Jacto de Vapor (Apenas nos
mod.GC2030,2025, 2016,2015,2011,
2010) ou não sai Jacto de Vapor Vertical
(Apenas nos mod.GC2030,2025,
2016,2015).
Sai calcário e impurezas da base do
ferro durante o trabalho.
A lâmpada encarnada está a piscar
(apenas no mod.GC2030).
Saiem gotas de água da base do ferro
(apenas nos mod.GC2015,2010, 2006,
2005).
PORTUGUÊS 27
Resolução de problemas
Este capítulo resume alguns dos problemas mais comuns que poderá
encontrar no seu ferro. Por favor,leia atentamente os vários capítulos
para obter mais informações. Se não conseguir resolver o problema,
queira contactar o Centro de Assistência Philips mais próximo ou um
dos seus representantes.Consulte o folheto da garantia mundial para
saber os números de telefone das Linhas de Ajuda Philips ou visite o
nosso endereço na web em www.philipsonline.com.
Page 28

Önemli
Güvenliğiniz açısından, lütfen cihazınızı kullanmaya başlamadan önce
kullanma kılavuzunu dikkatlice okuyunuz.
- Ütüyü kesinlikle fişi elektrik prizine bağlı ve sıcak halde yalnız
bırakmayınız.
- Küçük yaştaki kişilerin, cihazı yalnız başlarına kullanmalarına kesinlikle
izin verilmemelidir.
- Ütünün tabanı sıcak olduğundan, yanmamanız için dikkat ediniz.
Elektrik kordonunu sıcak ütü tabanından uzak tutunuz.
- Ütülemeyi bitirdiğinizde, ütüyü temizlediğinizde, su tankını doldurup
boşaltığınızda veya kısa bir süre için ara verdiğinizde, buhar ayar
düğmesini 0 pozisyonuna getiriniz ütüyü dik olarak arka kısmının
üzerine oturtarak cihazın fişini prizden çekiniz.
- Eğer cihazın elektrik kordonu zarar görürse, değiştirme işlemi için
yalnız Philips yetkili servislerinde orjinal kordonu ile değiştirilmelidir.
- Cihaz herhangi bir şekilde hasarlı ise asla kullanmayınız.
Cihazı kullanmadan önce
1 Tip numarası etiketi üstünde yazılı olan voltajın evinizin şebeke
voltajı ile aynı olmasına dikkat ediniz.
2 Ütülemeye başlamadan önce, tabanın altına yapıştırılmış
herhangi bir etiket, vs.varsa bunları çıkartınız ve yumuşak bir
bezle ütünün altını siliniz.
3 Ütüyü en yüksek sıcaklıkta ısıtıp bir bez parçası üzerinde
gezdirerek tabanını temizleyiniz.
Cihazı ilk kullanışınızda bir miktar duman çıkması normaldir.Bu durum
kısa bir süre sonra geçecektir.
Su tankının doldurulması
Ütüyü kesinlikle suya batırmayınız.
1 Cihazın fişini prizden çekiniz.
C
2 Buhar ayar düğmesini 0 pozisyonuna getiriniz.(=buharsız
ütüleme)
3 Ütüyü eğik tutunuz.
TÜRKÇE28
Page 29
C
4 Su tankını doldurma deliğinden su kabı yardımı ile maksimum
seviyeye kadar doldurunuz.
Doldurduğunuz suyun maksimum seviyesini geçmemesi için özen
gösteriniz.
Kullandığınız suyun cinsi çok sert ise, ütü suyu kullanınız.
Kesinlikle sirke, çamaşır kolası gibi kimyasal birleşimli sıvılar kullanmayınız.
Sıcaklık ayarı
1 Ütünüzü arka kısmı üzerine oturtunuz.
C
2 Sıcaklık ayar düğmesini istenilen sıcaklığa getiriniz.
- Kumaşın etiketinin üzerinde belirtilen sıcaklık derecesini kontrol
ediniz.
- 1 Sentetik kumaşlar (Örn:Viscont, polyester, akrilik)
- 1 İpekli
- 2 Yünlü
- 3 Pamuklu ve Ketenli
- Eğer ütü yaptığınız kumaşın ne cins bir kumaş olduğundan emin
değilseniz, ütülemeye kumaşın ilk önce giydiğiniz zaman
görülemeyecek bölümünden başlayınız.
- İpekli, yünlü ve sentetik materyaller : Bu cins kumaşları ütülerken,
kumaşın parlamasını önlemek için ters kısmından ütüleyiniz. Bu tür
kumaşları ütülerken leke olabileceğinden spreyleme yapmayınız.
- Ütü yapmaya öncelikle sentetik az sıcaklık isteyen kumaşlarla
başlayınız.
3 Cihazın fişini topraklı prize takınız.
4 Ütünün portakal rengi pilot ışığı söndüğünde, ütülemeye
başlamadan önce bekleyiniz.
B
Ütüleme esnasında pilot ışık zaman zaman yanıp sönecektir.
Otomatik kapanma özelliği bulunan modellerde (sadece GC2030 için
geçerlidir.):
Eğer otomatik kapanma özelliği çalışıyorsa (kırmızı pilot ışık yanıp
sönüyorsa), ütüyü hafiçe hareket ettirerek tekrar çalıştırınız.(kırmızı pilot
ışık yanıp sönmeyecektir.)
Buharlı Ütüleme
Su tankında yeterli suyun olduğundan emin olunuz.
1 Sıcaklık ayarını istenilen pozisyona getiriniz.
Sıcaklık ayar bölümüne bakınız.
TÜRKÇE 29
N
Y
L
O
N
N
Y
L
O
N
S
S
I
O
L
K
I
E
L
A
W
I
N
O
E
O
L
N
N
I
E
L
N
I
L
N
O
T
O
N
C
O
T
T
O
C
Page 30
C
2 Buhar ayarını istenilen pozisyona getiriniz.
- q az buhar (sıcaklık ayarları 2 den 3 'e)
- w kuvvetli buhar (sıcaklık ayarları 3 den MAKSİMUM 'a kadar)
B
Ütü istenilen sıcaklığa erişince istenilen buharı verebilirsiniz.
◗ GC2005, 2006, 2010,2011, 2015,2016 model ütülerde: Eğer
sıcaklık çok düşmüşse (en az 2) tabandan su damlatabilir.
Buharsız Ütüleme
1 Buhar ayar düğmesini "0" pozisyonuna getiriniz.(=Buharsız
ütüleme)
2 Sıcaklık ayar düğmesini istenilen pozisyona getiriniz.
Sıcaklık ayar bölümüne bakınız.
Diğer Özellikler
Spreyleme
Her ısı derecesinde çok kırışmış kumaşları ütüleme
Su tankında yeterli suyun olduğundan emin olunuz.
C
1 Sprey düğmesine bir kaç kez basmanız ütüleyeceğiniz kumaşı
nemli hale getirecektir.
Ekstra buhar ( GC2020, 2006, 2005 modelleri için geçerlidir.)
Cihazın bu fonksiyonunu, inatçı kırışıklıkları açarken kullanabilirsiniz.
Ekstra buhar fonksiyonu sadece 3 ile MAKS. sıcaklık ayarlarında
kullanılabilinir.
C
1 Buhar kontrol ayarını MAX pozisyona q getiriniz.
C
2 Ekstra buhar düğmesine maksimum 5 saniye basarak bekletiniz.
3 Ekstra buhar fonksiyonunu tekrar kullanmak için en az 1 dakika
bekleyiniz.
TÜRKÇE30
Page 31
Şok Buhar (Sadece GC2030, 2025, 2016, 2015, 2011, 2010
modelleri içindir)
Şok buhar özelliği çok fazla kırışmış kumaşlar için idealdir.
Şok buhar özelliği sadece (2ve Maksimum) yüksek sıcaklık
derecesinde kullanılır.
C
1 Şok buhar düğmesine basınız ve serbest bırakınız.
Dikey buharlama ( Sadece model GC2030,2025,2016, 2015
için geçerlidir.)
C
1 Cihazın şok buhar fonksiyonu , ütüyü dik olarak kullandığınız
zaman da kullanılabilir.
Buharı direk olarak insanlara doğru tutmayınız.
"Drip Stop" Damlamayı Önleme Özelliği (Sadece GC2030,
2025, 2020 modeller içindir.)
Bu ütü "Drip Stop", yani su damlamasını önleyici sisteme sahiptir. Bu da
uygun ısı derecesi tekrar elde edilene kadar ütünün buhar vermeyi
kesmesine neden olur.
Otomatik Kapanma (model GC2030 içindir.)
C
◗ Ütünüzün elektronik güvenlik sistemi sayesinde, hareketsiz
bırakılan ütünüzün ısıtma işlevi otomatik olarak devreden çıkar.
◗ Ütünün devreden çıktığını gösteren "Auto-off" otomatik kapanma
kırmızı pilot ışık yanıp sönecektir.
Ütünün tekrar ısınması için;
1 Ütüyü yavaşça kaldırınız veya kıpırdatınız.
2 Otomatik kapanma kırmızı pilot ışığı sönüp, ütü tabanının
sıcaklık seviyesine göre turuncu sıcaklık pilot ışığı yanmaya
başlayacaktır.
TÜRKÇE 31
Page 32

3 Eğer ütü hareket ettikten sonra turuncu pilot ışık yanarsa,
ütülemeye başlamadan önce sönmesini bekleyiniz.
4 Eğer ütü hareket ettikten sonra turuncu pilot ışık yanmıyorsa,
ütü kullanıma hazırdır.
Temizlik ve Bakım
"Calc clean" Kireç temizleme
Kireç temizleme- Calc Clean özelliği sayesinde buhar ünitesinde oluşan
kum, kir gibi küçük zerrecikler temizlenir.
İki haftada bir "Calc clean"kireç temizleme uygulanmalıdır. Eğer
kullandığınız musluk suyu çok sertse ( ütü yaparken tabandan kireç
zerrecikleri geliyorsa) kireç temizleme özelliği daha sık kullanılmalıdır.
1 Buhar kontrol düğmesini 0 pozisyonuna getiriniz.
2 Su tankını maksimum seviyede doldurunuz.
Sirke veya diğer kireç çözücü kimyevi maddeler kullanmayınız.
3 Sıcaklık ayarını maksimum sıcaklığa getiriniz.
4 Cihazın fişini prize takınız.
5 Pilot ışık sönünce ütüyü prizden çekiniz.
C
6 Ütüyü yatay olarak lavabonun üzerine tutunuz. Buhar kontrol
ayarını v pozisyonuna getiriniz.("Calc clean" - Kireç temizleme)
Buhar kontrol düğmesi yukarı yaylanarak yavaşça çıkacaktır.
arada yavaşça ütüyü ileri geri sallayınız.
C
7 Buhar kontrol düğmesini yavaşça yukarı çekerek, ütüyü yavaşça
sallayınız.
B
Kaynar su ve buhar, kireç ve diğer tortularla birlikte tabandaki deliklerden
aşağı doğru akacaktır.(Eğer varsa)
C
8 Buhar kontrol düğmesini çubuğu yerinden çıkana kadar yukarı
doğru çekiniz. Eğer çubukta kireç birikmesi varsa sirke ile
temizleyiniz.
Buhar kontrol düğmesinin çubuğunu kesinlikle eğmeğiniz ve zarar
vermeyiniz.
TÜRKÇE32
Page 33
C
9 Buhar kontrol düğmesinin çubuğunu deliğin tam ortasından
sokarak
"Calc Clean" - Kireç temizleme işlemini, ütünün içerisinde
hala kireç ve tortular varsa tekrarlayınız.
"Calc Clean"- Kireç Temizleme işleminden sonra
- Ütüyü prize takarak tabanının kurumasını sağlayınız.
- Pilot ışık sönünce ütüyü prizden çekiniz.
- Ütünüzü yavaşça eski bir bez üzerinde gezdiriniz. Kalan su lekeleri
tabandan çıkacaktır.
- Ütüyü saklamadan önce soğumasını bekleyiniz.
Ütülemeden sonra
1 Fişi prizden çekiniz ve ütünün soğumasını bekleyiniz.
2 Ütünüzün altında biriken maddeleri (kireç,vs.) nemli yumuşak
bir bez veya çizmeyen (sıvı) bir temizleme maddesi kullanarak
temizleyiniz.
Ütü tabanının her zaman pürüzsüz olmasına ve metal nesnelerle sert
bir şekilde temas etmemesine dikkat ediniz.
3 Ütünün üst kısmını nemli, yumuşak bir bezle silebilirsiniz.
C
4 Zaman zaman su tankını temizlemek için, tankı su ile doldurup
sallayınız ve daha sonra suyu boşaltınız.
Saklama
1 Fişi prizden çekiniz. Ütünün soğumasını bekleyiniz.Buhar ayar
düğmesini "0" pozisyonuna getiriniz.
2 Su tankını boşaltınız.
C
3 Ütünün soğumasını bekleyiniz. Kordonunu kordon saklama
bölümüne sarıp kordonun klipsini kullanarak sabitleyiniz
4 Ütüyü arka kısmının üzerinde kuru bir zeminde saklayınız.
TÜRKÇE 33
Page 34

Bilgi ve Servis
Ek bilgilere ihtiyacınız veya bir probleminiz olduğunda Tüketici danışma
hattını arayabilirsiniz. Numaralarını garanti belgelerinde bulabilirsiniz.
Veya web Sitemizi ziyaret edebilirsiniz. www.philips.com.tr
Sorunlar ve Çözümler
Bu bölümde ütüyü kullanırken karşınıza çıkabilecek en muhtemel
sorunları özetleyecektir. Daha fazla ayrıntı için değişik bölümleri
okuyunuz. Eğer karşılaştığınız sorunları çözemeyecek durumdaysanız size
en yakın yetkili Philips servislerinden yardım isteyebilirsiniz. Philips
tüketici Danışma Hattının telefonlarını garanti belgelerinin içinden
bulabilirsiniz. 0800 261 33 02
Türkçe34
Page 35

Yapılması gereken
Cihazın fişini, elektrik kordonunu ve
prizi kontrol ediniz.
Sıcaklık ayarını istenilen seviyeye
getiriniz.
Su tankını doldurunuz.(Su tankını
doldurma bölümüne bakınız.)
Buhar ayarını 1 ile 6 arasında bir ayara
getiriniz. (Buharla ütülemeye bakınız)
Sıcaklık ayar düğmesini buhar
konumuna getiriniz.(2 yada Max)
Ütüyü dik olarak arka kısmı üzerine
oturtunuz.Ve ütülemeye başlamadan
önce turuncu pilot ışık sönene kadar
bekleyiniz.
Tekrar şok buharlam veya dikey
buharlama kullanmadan önce ütüyü
yatay pozisyonda biraz bekletiniz.
Sıcaklık ayar düğmesini buhar
konumuna getiriniz.(2 yada Max)
Ütüyü dik olarak arka kısmı üzerine
oturtunuz.Ve ütülemeye başlamadan
önce turuncu pilot ışık sönene kadar
bekleyiniz.
"Calc-Clean " kireç temizleme işlemini
birkaç kez uygulayınız.(kireç temizleme
bölümüne bakınız.)
Ütüyü hafifçe hareket etirerek
otomatik kapanma özelliğini devre dışı
bırakınız. Işık yanıp sönmeyecektir.
Sıcaklık ayar düğmesini buhar
konumuna getiriniz.(2 yada Max)
Ütüyü dik olarak arka kısmı üzerine
oturtunuz.Ve ütülemeye başlamadan
önce turuncu pilot ışık sönene kadar
bekleyiniz.
Nedenleri
Bağlantı sorunu
Sıcaklık ayarı min. ayarlıdır.
Su tankında yeterli su bulunmaması
Buhar kontrol düğmesi 0 pozisyonuna
getirilmiştir.
Ütünün tabanı yeterli derecede sıcak
değil ve/veya "damlama kesme
fonksiyonu" (GC2030, 2025, 2020
modelleri içindir) aktif durumdadır.
Kısa bir zaman süresi içerisinde Şok
buharlama veya Dikey buharlama sık
kullanılmıştır.
Ütünün tabanı yeterli derecede sıcak
değil.
Suyun sertliği taban içinde tortular
oluşturur.
Otomatik kapanma çalışmaktadır.
"Otomatik kapanma" özelliği
bölümüne bakınız.
Ütünün sıcaklık derecesi düşüktür.
Problem
Ütünün fişi prize bağlı olduğu halde,
tabanının ısınmaması.
Ütünün buhar vermemesi
Şok buharlama (Sadece model
GCGC2030, 2025,2016, 2015, 2011,
2010 içindir) ve Dikey buharlama
çalışmıyor (Sadece model GCGC2030,
2025, 2016,2015 içindir)
Ütünün tabanından tortular ve kireç
zerrecikleri çıkıyor.
Kırmızı pilot ışık yanıp söner(sadece
model GC2030 içindir.)
Ütünün tabanından su damlıyorsa
(Sadece GC2016, 2015,2011, 2010,
2006, 2005 modelleri içindir.)
Türkçe 35
Sorunlar ve Çözümler
Bu bölümde ütüyü kullanırken karşınıza çıkabilecek en muhtemel
sorunları özetleyecektir. Daha fazla ayrıntı için değişik bölümleri
okuyunuz. Eğer karşılaştığınız sorunları çözemeyecek durumdaysanız size
en yakın yetkili Philips servislerinden yardım isteyebilirsiniz. Philips tüketici
Danışma Hattının telefonlarını garanti belgelerinin içinden bulabilirsiniz.
0800 261 33 02
 Loading...