

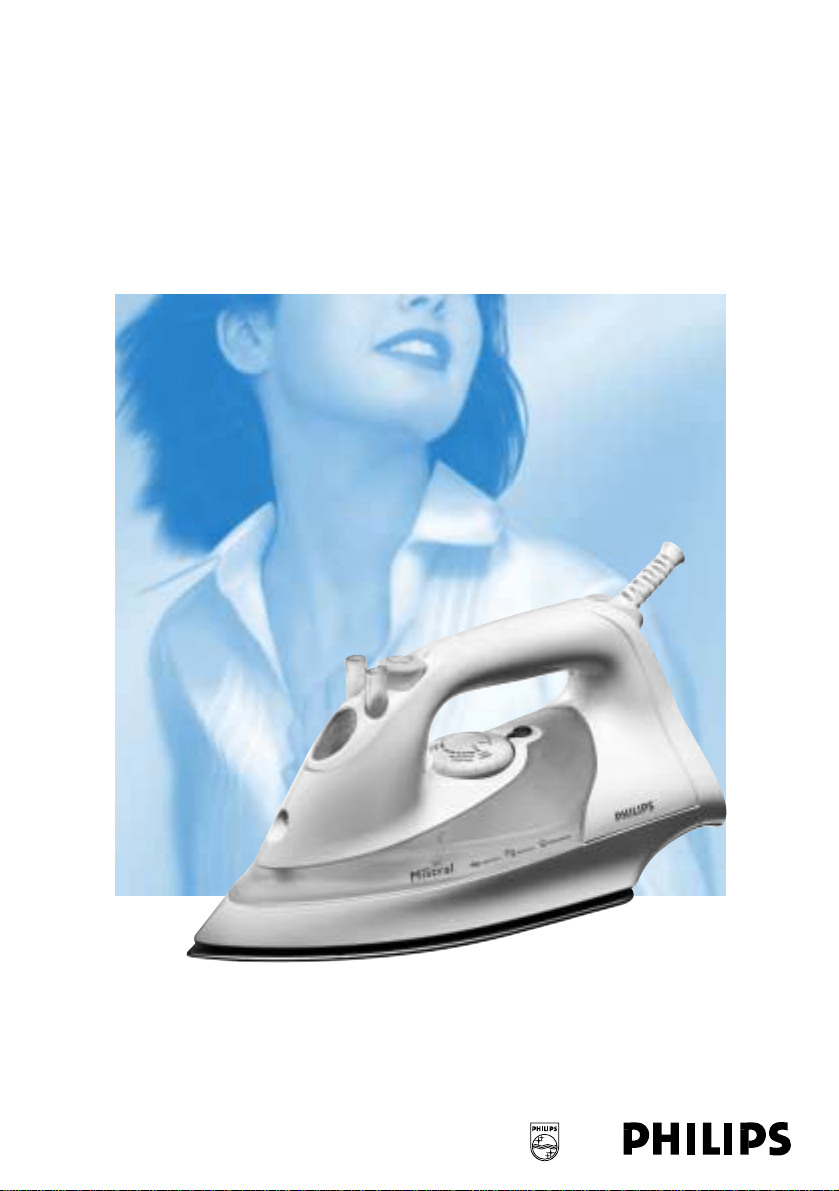
Mistral
GC2032,GC2030,GC2025,GC2020,GC,2016, GC2015,
GC2012,GC2011,GC2010,GC2006,GC2005

2

ENGLISH 4
DEUTSCH 11
FRANÇAIS 19
NEDERLANDS 27
ITALIANO 36
GC2032,2030,2025,2020,2016,2015,2012,2011,2010,2006,2005
3

Important
For optimal safety, read these instructions carefully and look at the
illustrations before you start using the appliance.
- Never leave the iron unattended when it is connected to the
electrical outlet.
- Young children should not be allowed to use the appliance without
supervision. Keep an eye on children to make sure that they do not
play with the appliance.
- The soleplate of the iron can become extremely hot and may cause
burns if touched. Do not allow the cord to come into contact with
the soleplate when it is hot.
- When you have finished ironing, when you clean the appliance, when
you fill or empty the water tank and also when you leave the iron
even for a short while: set the steam control to position O,put the
iron on its heel and remove the plug from the wall socket.
- If the cord of this appliance is damaged,it must always be replaced
by Philips or a service centre authorised by Philips,as special tools
and/or parts are required.
- Never use the appliance if it is damaged in any way.
- This appliance is intended for household use only.
- Save these instructions for future reference.
Before first use
1 Check if the voltage indicated on the type plate corresponds to
the voltage in your home before you connect the appliance.
2 Remove any sticker,protective foil or storage cover from the
soleplate.
3 Heat up the iron to maximum temperature and pass the iron
over a piece of damp cloth for several minutes to remove any
residue from the soleplate.
The iron may give off some smoke when you use it for the first time.
This will cease after a short while.
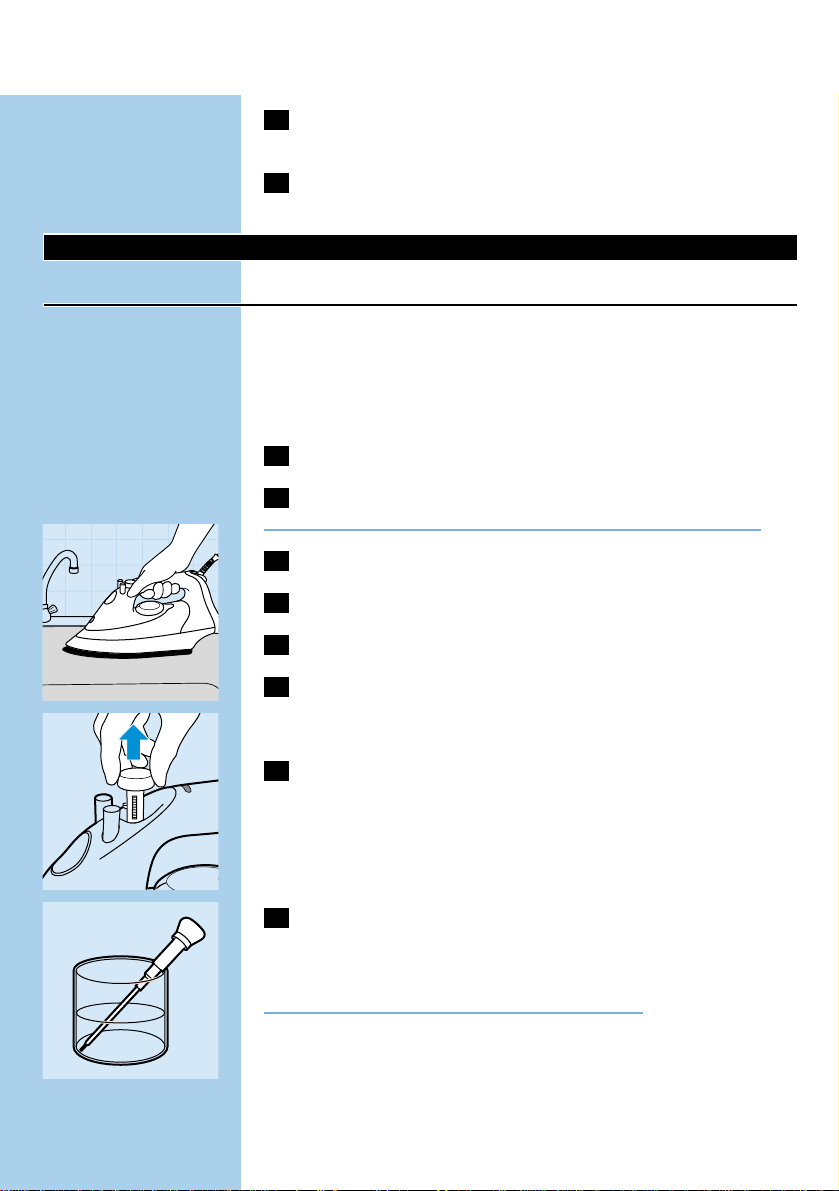
Filling the water tank
Never immerse the iron in water.
1 Remove the plug from the wall socket.
C
2 Set the steam control to position O (= no steam).
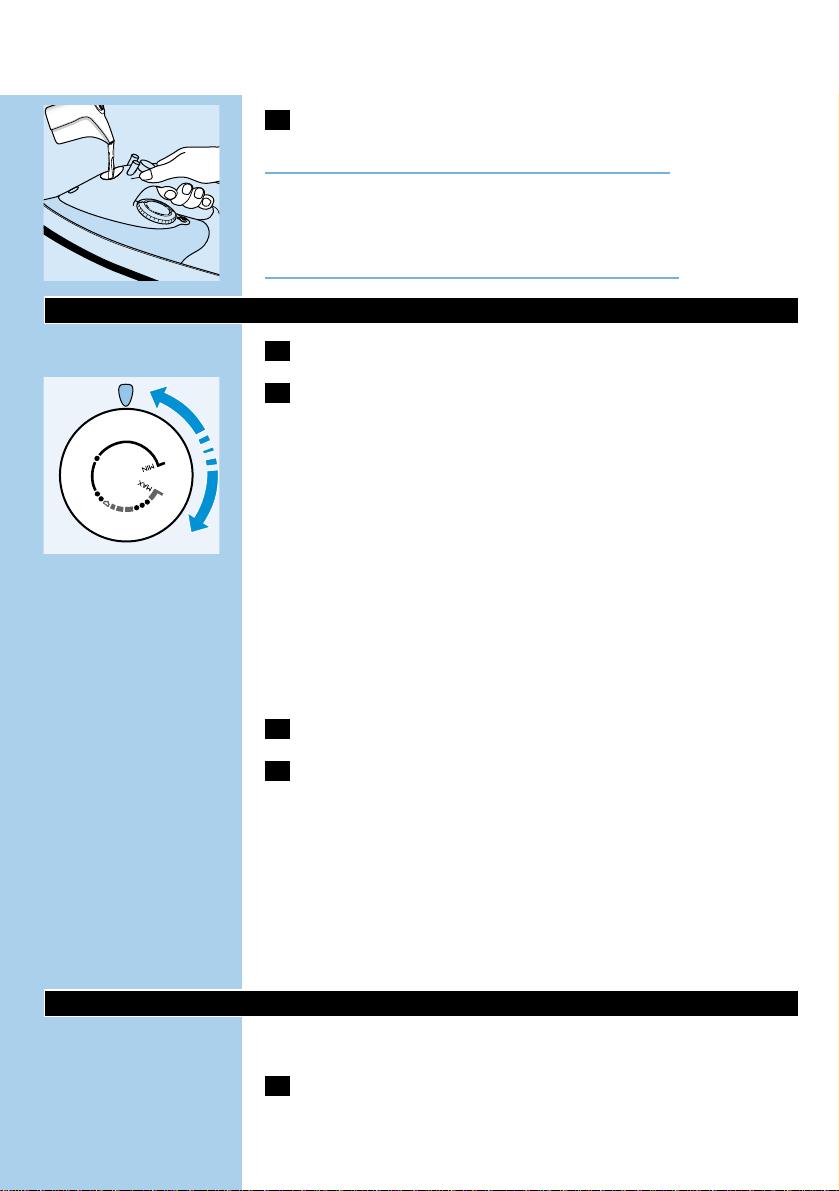
3 Tilt the iron.
ENGLISH4
C
4 Pour tap water into the water tank by means of the filling jug
and fill the tank to maximum level.
Do not fill the water tank beyond the MAX indication.
If the tap water in your area is very hard, we advise you to use distilled
water.
Do not use vinegar, starch or chemically descaled water.
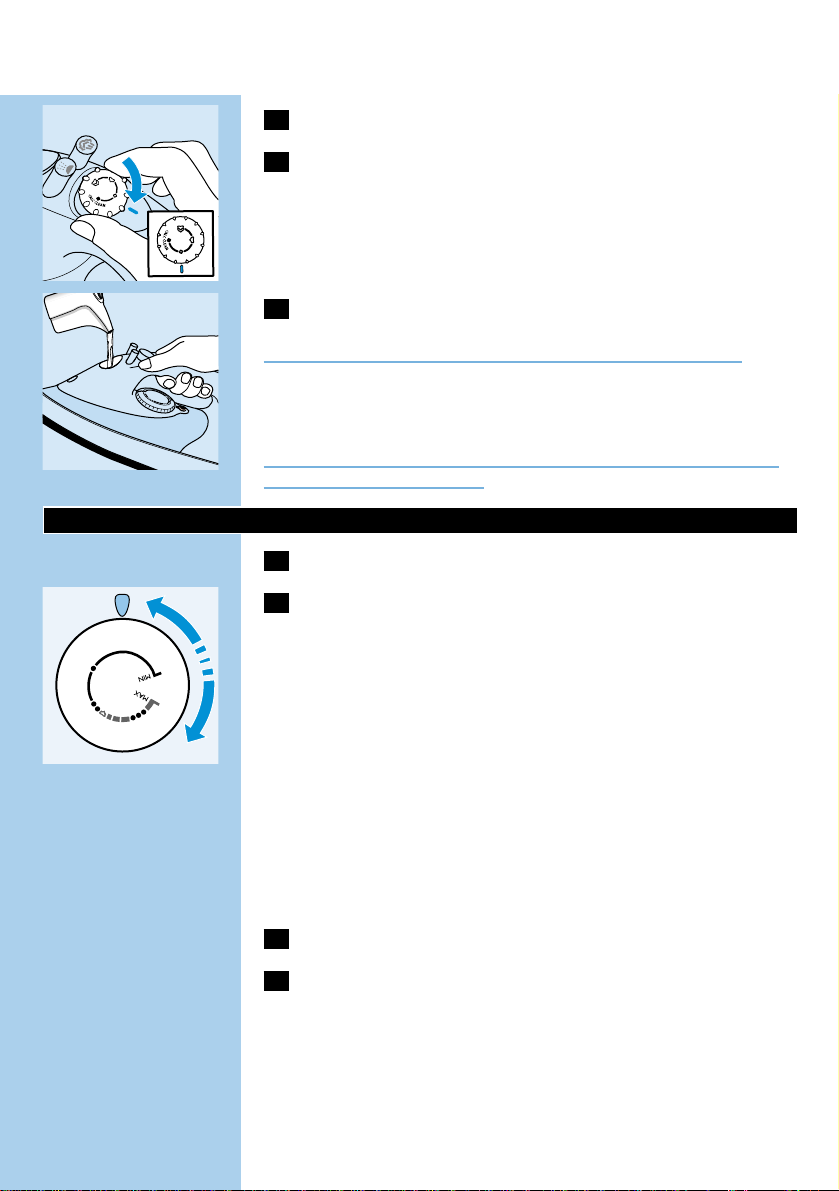
Setting the temperature
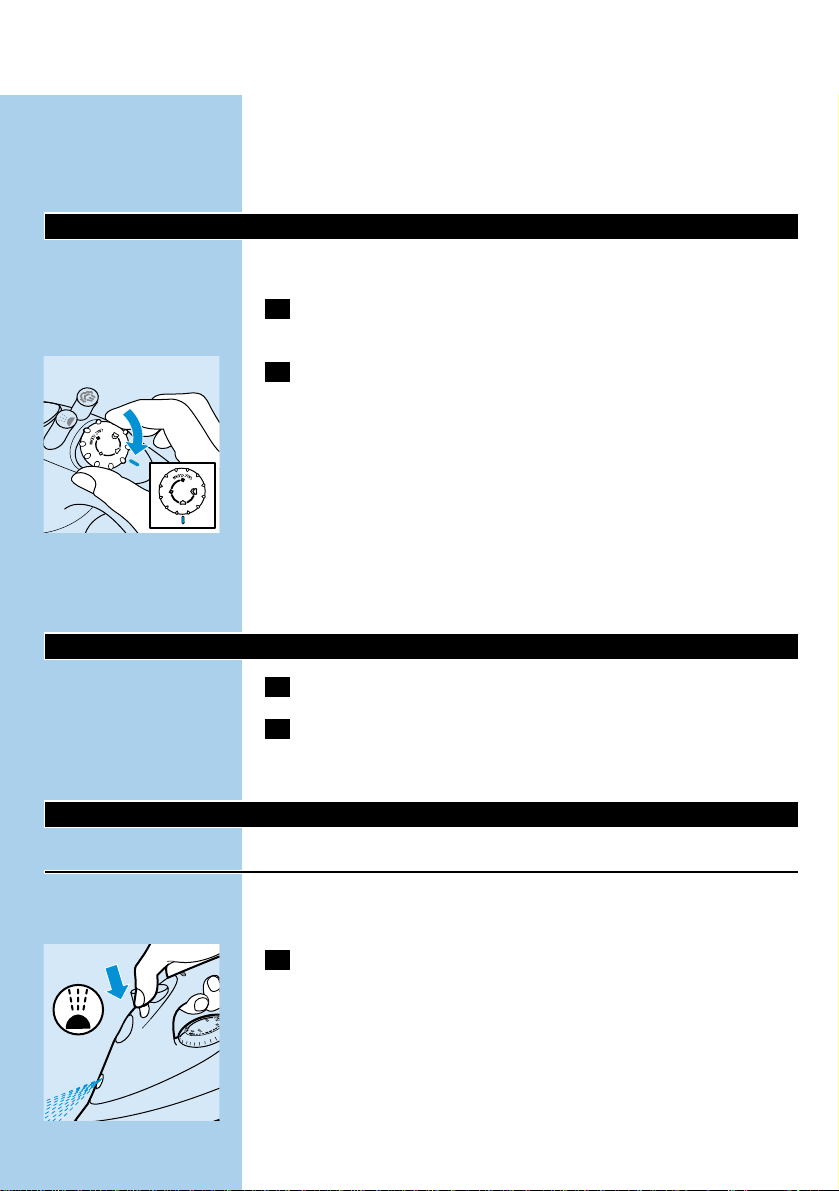
1 Put the iron on its heel.
C
2 Set the temperature dial to the required ironing temperature
by turning it to the position of the temperature indicator.
- Check the garment label for the required ironing temperature.
- 1 Synthetic fabrics (e.g. acrylic, viscose, polyamide, polyester)
- 1 Silk
- 2 Wool
- 3 Cotton, linen
- If you do not know what kind of fabric(s) a garment is made of,
determine the right ironing temperature by ironing a part that will
be invisible when you wear the garment.
- Silk,woollen and synthetic materials:iron the reverse side of the
fabric to prevent shiny patches.To prevent stains, avoid using the
spray function.
- Start ironing the articles that require the lowest ironing temperature,
such as those made of synthetic fibres.
3 Put the plug in a grounded wall socket.
4 When the amber temperature pilot light has gone out,wait a
while before you start ironing.
B
The amber pilot light will come on from time to time during ironing.
For auto-shut-off versions (types GC2032, 2030,2012 only):
If the auto-shut-off function has been activated (red pilot light blinks),
move the iron slightly to deactivate it (red pilot light stops blinking).
Steam ironing
Make sure that there is enough water in the water tank.
1 Set the temperature dial to the recommended position.
See 'Setting the temperature'.
ENGLISH 5
N
Y
L
O
N
N
Y
L
O
N
S
S
I
O
L
K
I
E
L
A
W
I
N
O
E
O
L
N
N
I
E
L
N
I
L
N
O
T
O
N
C
O
T
T
O
C
C
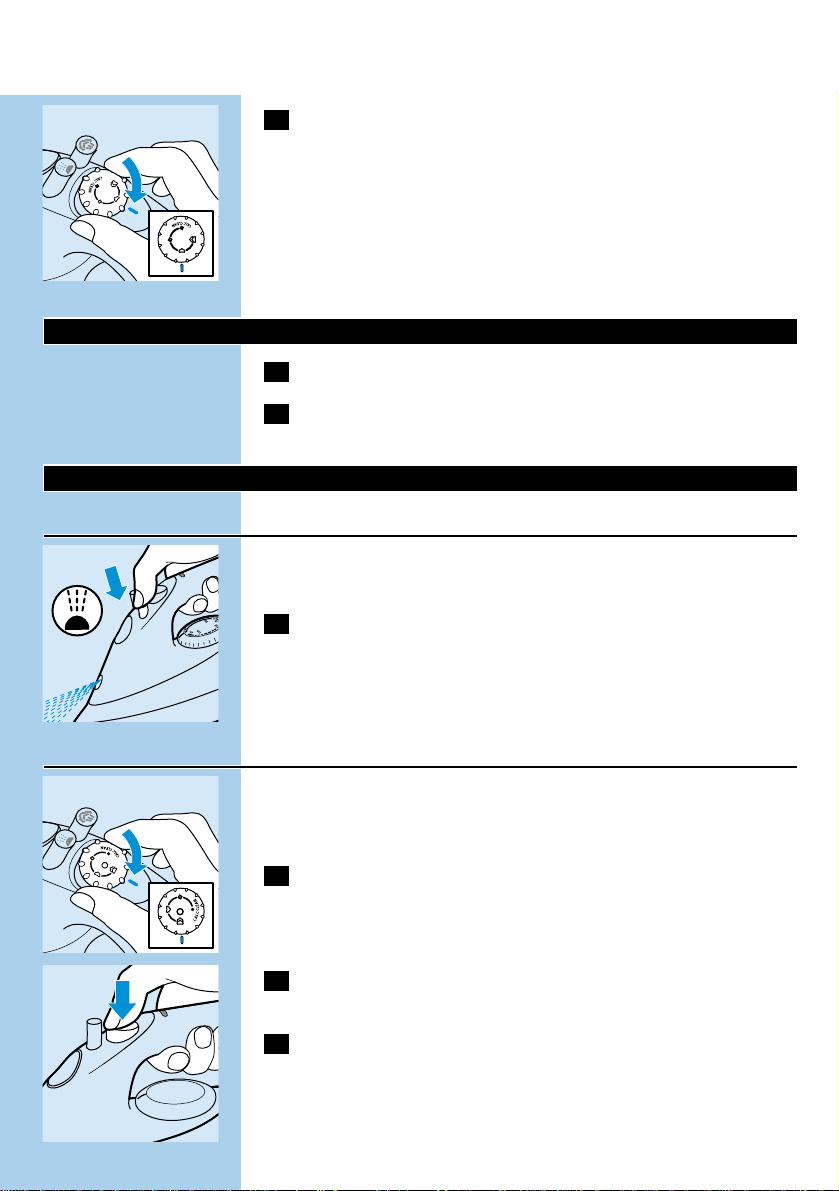
2 Set the steam control to the appropriate steam position.
- q for moderate steam (temperature settings 2 to 3)
- w for maximum steam (temperature settings 3 to MAX)
B
Steaming will start as soon as the set temperature has been reached.
◗ Types GC2016,2015,2012, 2011,2010,2006,2005 only:Water may
leak from the soleplate if the set temperature is too low (MIN to
2).
Ironing without steam
1 Set the steam control to position O ( = no steam).
2 Set the temperature dial to the recommended position.
See 'Setting the temperature'.
Other features
Spraying
To remove stubborn creases at any temperature
Make sure that there is enough water in the water tank.
C
1 Press the spray button a couple of times to moisten the
laundry.
Extra Steam (types GC2020,2006,2005 only)
This function provides extra steam to remove stubborn creases.
The Extra Steam function only works at temperature settings between
3 and MAX.
C
1 Set the steam control to highest position q.
C
2 Press and hold the Extra Steam button down for max.5
seconds.
3 Wait for at least 1 minute before you use the Extra Steam
function again to prevent water from dripping out of the
soleplate.
ENGLISH6
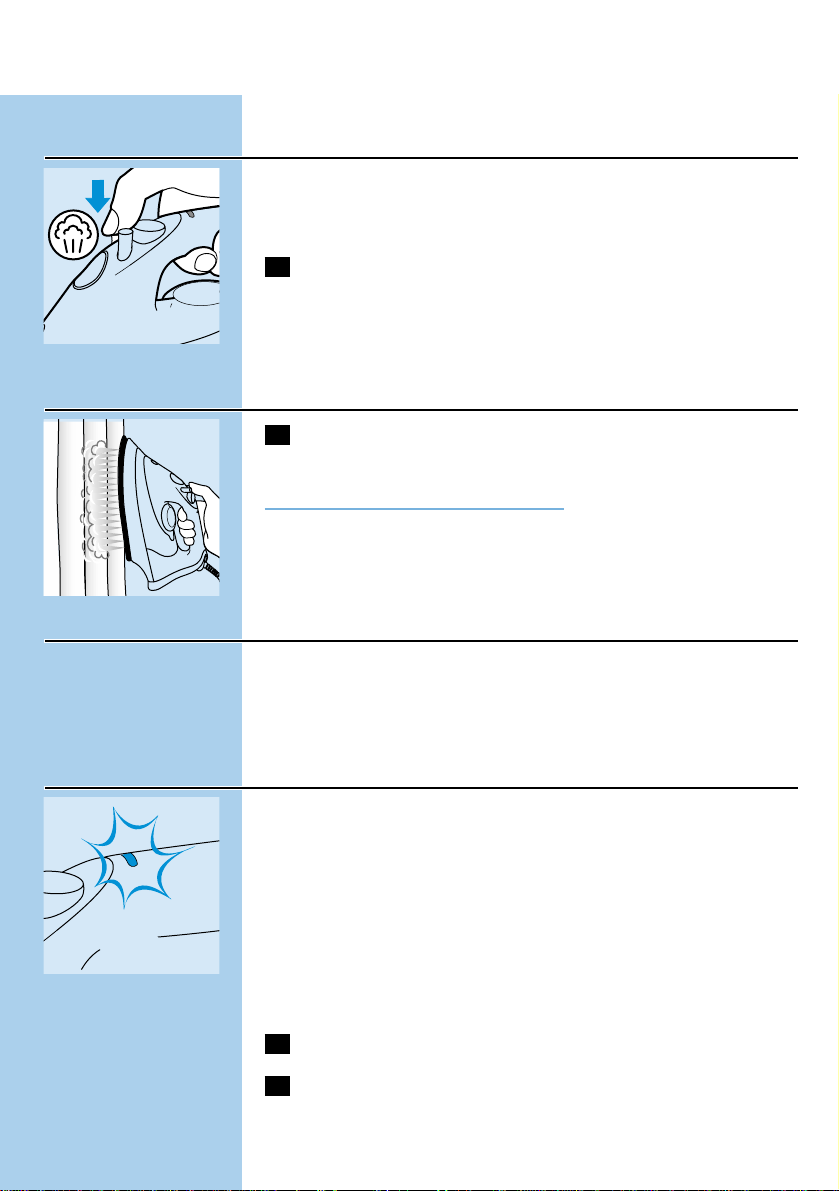
Shot of Steam (types GC2032,2030,2025,2016,2015, 2012,
2011,2010 only)
A powerful shot of steam helps to remove stubborn creases.
The Shot-of-Steam function only works at temperature settings
between 2 and MAX.
C
1 Press and release the Shot-of-Steam button.
Vertical Shot of Steam (types GC2032,2030,2025,2016,2015
only)
C
1 The Shot of Steam function can also be used when you hold
the iron in vertical position.
Never direct the steam towards people.
Drip Stop (types GC2032,2030,2025,2020 only)
This iron is equipped with a drip stop function: the iron automatically
stops steaming when the temperature is too low to prevent water
from dripping out of the soleplate.When this happens you will hear a
click.
Automatic shut-off (types GC2032,2030,2012 only)
C
◗ An electronic safety device will automatically switch the heating
element off if the iron has not been moved for a while.
◗ To indicate that the heating element has been switched off,the red
auto-off pilot light will start blinking.
To heat up the iron again:
1 Pick up the iron or move it slightly.
2 The red auto-off pilot light will go out.The amber temperature
pilot light will come on,depending on the soleplate
temperature.
ENGLISH 7
3 If the amber pilot light comes on after the iron has been
moved,wait for it to go out before you start ironing.
4 If the amber light does not come on after the iron has been
moved,the iron is ready for use.
Cleaning and maintenance
Calc-Clean
The Calc-Clean function removes scale and impurities.
Use the Calc-Clean function once every two weeks. If the water in
your area is very hard (i.e. when flakes come out of the soleplate
during ironing), the Calc-Clean function should be used more
frequently.
1 Set the steam control to position O.
2 Fill the water tank to the maximum level.
Do not pour vinegar or other descaling agents into the water tank.
3 Set the temperature dial to MAX.
4 Put the plug in the wall socket.
5 Unplug the iron when the amber pilot light has gone out.
C
6 Hold the iron over the sink and set the steam control to
position 1(Calc-Clean).The steam control knob will spring up
slightly.
C
7 Pull the steam control up slightly and gently shake the iron.
B
Steam and boiling water will come out of the soleplate.Impurities and
scale (if any) will be flushed out.
C
8 Pull the steam control knob further up to remove the steam
control needle.Use vinegar to remove scale, if any, from the
needle.
Do not bend or damage the steam control needle.
ENGLISH8
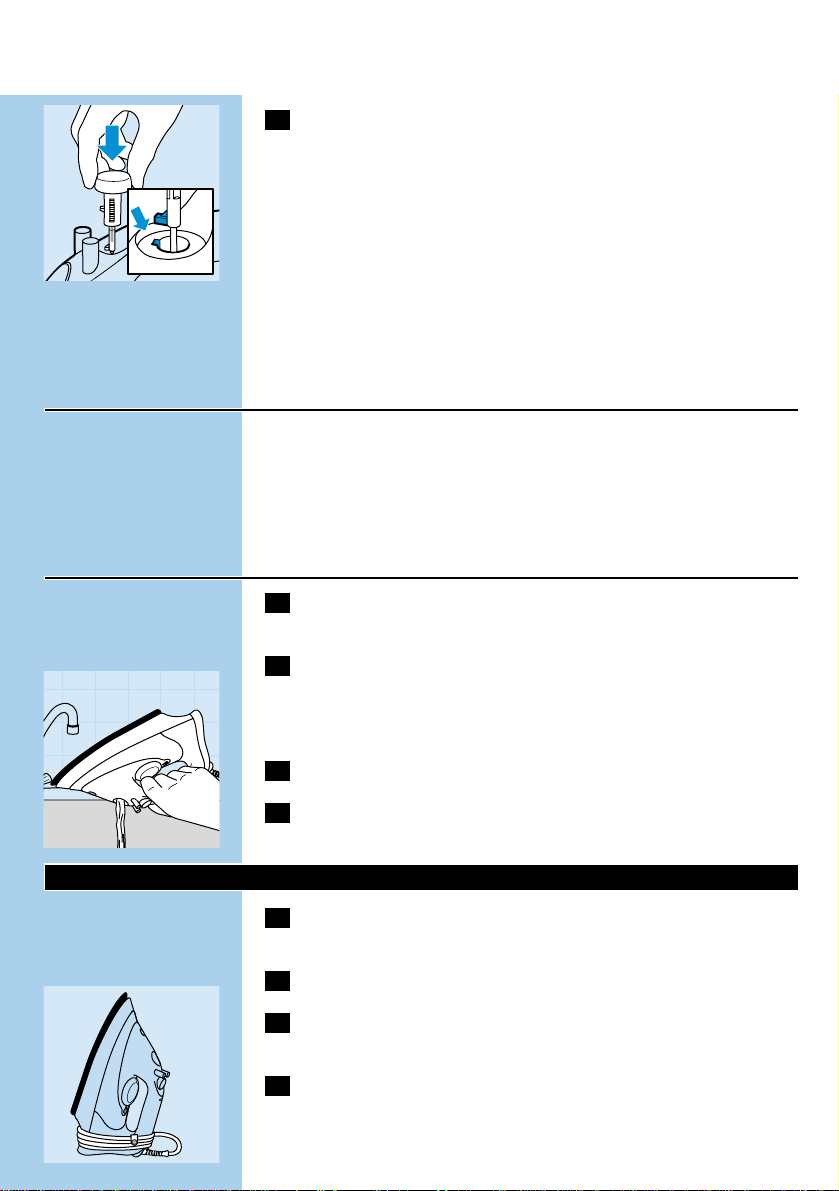
C
9 Put the steam control needle back by inserting the point of the
needle exactly in the centre of the hole and by fitting the small
projection on the side of the needle into the slot.Set the
steam control knob to position O.
Repeat the Calc-Clean process if the iron still contains a lot
of impurities.
After the Calc-Clean process
- Plug in the iron to let the soleplate dry up.
- Unplug the iron when the amber pilot light has gone out.
- Move the iron gently over a piece of used cloth to remove any water
stains that may have formed on the soleplate.
- Let the iron cool down before you store it.
After ironing
1 Remove the plug from the wall socket and let the iron cool
down.
2 Wipe scale and any other deposits off the soleplate with a
damp cloth and a non-abrasive (liquid) cleaner.
Keep the soleplate smooth:avoid hard contact with metal objects.
3 Clean the upper part of the appliance with a damp cloth.
C
4 Regularly rinse the water tank with water.Empty the water
tank after cleaning.
Storage
1 Remove the plug from the wall socket and set the steam
control to position O.
2 Empty the water tank.
C
3 Let the iron cool down.Wind the cord round the cord storage
facility and fix it with the cord clip.
4 Always store the iron standing on its heel in a safe and dry
place.
ENGLISH 9

Solution
Check the cord,the plug and the wall
socket.
Set the temperature dial to the
required temperature.
Fill the water tank (see Filling the
water tank).
Set to steam position q or w (see
Steam ironing).
Set the temperature dial to a
temperature in the steam area (2
to MAX).Put the iron on its heel and
wait until the amber pilot light has
gone out before you start ironing.
Put the iron in horizontal position and
wait for a while before using the
(Vertical) Shot of Steam function
again.
Set the temperature dial to a
temperature in the steam area (2
to MAX).Put the iron on its heel and
wait until the amber pilot light has
gone out before you start ironing.
Use the Calc-Clean function a few
times (see 'Calc-Clean').
Shake the iron lightly to deactivate
the auto shut-off function:the pilot
light will stop blinking.
Set the temperature dial to a
temperature in the steam area (2
to MAX).Put the iron on its heel and
wait until the amber pilot light has
gone out before you start ironing.
Possible cause(s)
Connection problem.
Temperature dial set at MIN.
Not enough water in the water tank.
The steam control has been set to
position O.
The soleplate is not hot enough
and/or the Drip Stop function (types
GC2032,2030,2025, 2020 only) has
been activated.
The (Vertical) Shot of Steam function
has been used too often within a
very short period.
The soleplate is not hot enough.
Hard water forms flakes inside the
soleplate.
The auto shut-off function has been
activated.See "Automatic shut-off"
section.
The temperature has been set too
low.
Problem
The iron is plugged in but the
soleplate is cold.
No steam
No Shot of Steam (types GC2032,
2030,2025,2016, 2015,2012,2011,
2010 only) or no Vertical Shot of
Steam (types GC2032,2030,2025,2
016,2015 only).
Flakes and impurities come out of
the soleplate during ironing.
Red pilot light is blinking (type
GC2032,2030 only).
Water drips out of the soleplate
(types GC2016,2015,2012, 2011,
2010,2006,2005 only).
Information & service
If you need information or if you have a problem, please visit the Philips
Web site at www.philips.com or contact the Philips Customer Care
Centre in your country (you will find its phone number in the
worldwide guarantee leaflet). If there is no Customer Care Centre in
your country,turn to your local Philips dealer or contact the Service
Department of Philips Domestic Appliances and Personal Care BV.
Troubleshooting
This chapter summarises the most common problems you could
encounter with your iron.Please read the different sections for more
details.If you are unable to solve the problem, please contact the
Philips Customer Care Centre in your country.
ENGLISH10
Wichtig
Lesen Sie zu Ihrer Sicherheit zuerst diese Gebrauchsanweisung durch,
bevor Sie das Gerät zum ersten Mal benutzen.
- Lassen Sie das eingeschaltete Gerät niemals unbeaufsichtigt.
- Achten Sie darauf, dass Kinder das Gerät nicht unbeaufsichtigt
benutzen oder mit diesem Gerät spielen.
- Achten Sie beim eingeschlteten Gerät darauf, dass Sie nicht die
Bügelsohle berühren;sie wird sehr heiß.Geben Sie auch darauf Acht,
dass das Netzkabel nicht mit der heißen Bügelsohle in Berührung
kommt.
- Wenn Sie das Bügeln beenden,aber auch wenn Sie das Gerät
reinigen,den Wasserbehälter füllen oder leeren,auch dann wenn Sie
den Raum nur kurzfristig verlassen, so stellen Sie stets den
Dampfregler auf Position O,stellen Sie das Bügeleisen auf seine
Rückseite und ziehen Sie den Netzstecker aus der Steckdose.
- Wenn das Netzkabel defekt oder beschädigt ist, muss es von Philips
oder von einer durch Philips autorisierten werkstatt ersetzt werden,
da für die Reparatur Spezialwerkzeug und/oder spezielle Teile
benötigt werden.
- Verwenden Sie das Gerät nicht, wenn es in irgendeiner Hinsicht
defekt oder beschädigt ist.
- Dieses Gerät ist nur für den Gebrauch im Haushalt bestimmt.
- Bewahren Sie diese Gebrauchsanweisung zur späteren Einsicht auf.
Vor dem ersten Gebrauch
1 Prüfen Sie,ob die örtliche Netzspannung mit der
Spannungsangabe auf dem Typenschild übereinstimmt.
2 Entfernen Sie vor dem ersten Gebrauch von der Bügelsohle
alle Aufkleber, die Schutzfolie bzw.die Abdeckung.
3 Lassen Sie die Bügelsohle auf die maximale Temperatur
aufheizen,und führen Sie das Bügeleisen einige Minuten über
ein feuchtes Tuch,damit sich alle Reste von der Bügelsohle
lösen.
Einige Teile des Bügeleisens sind leicht eingefettet und können beim
ersten Gebrauch etwas Rauch abgeben. Das geht nach kurzer Zeit
vorüber.
Den Wasserbehälter füllen
Tauchen Sie das Bügeleisen niemals in Wasser
1 Ziehen Sie vor dem Füllen den Netzstecker aus der Steckdose.
11DEUTSCH
DEUTSCH12
C
2 Stellen Sie den Dampfregler auf Position 0 (= kein Dampf).
3 Halten Sie das Gerät schräg.
C
4 Füllen Sie den Wasserbehälter mit Hilfe des Bechers bis zur
Markierung MAX mit Leitungswasser.
Füllen Sie niemals mehr Wasser ein als bis zur Markierung MAX.
Wenn das Leitungswasser in Ihrer Gegend sehr hart ist,empfehlen wir
Ihnen die Verwendung von destilliertem Wasser.
Verwenden Sie keinen Essig, keine Wäschestärke bzw.-steife und kein
chemisch enthärtetes Wasser.
Einstellen der Bügeltemperatur
1 Stellen Sie das Bügeleisen auf den Rücken.
C
2 Stellen Sie den Temperaturregler auf die erforderliche
Temperatur,indem Sie ihn auf die entsprechende Anzeige
drehen.
- Prüfen Sie die Bügelvorschrift auf dem Etikett des Wäschestücks.
- 1 Synthetics (z.B.Akryl,Viskose, Polyamid,Polyester)
- 1 Seide
- 2 Wolle
- 3 Baumwolle,Leinen
- Wenn Ihnen die Art des Materials nicht bekannt ist, so prüfen Sie die
Bügeltemperatur an einer Stelle, die bei normaler Verwendung der
Textilie nicht sichtbar ist.
- Bügeln Sie Seide,Wolle und Synthetics stets von links (auf der
Rückseite des Gewebes),damit keine glänzenden Stellen entstehen.
- Beginnen Sie stets mit den Textilien,die eine niedrige
Temperatureinstellung erfordern, also gfs. mit Synthetics.
3 Stecken Sie den Netzstecker in eine Schuko-Steckdose.
4 Warten Sie noch eine Weile,wenn die gelbe Kontroll-Lampe
erloschen ist,bevor Sie zu bügeln beginnen.
B
Die gelbe Kontrollampe schaltet sich von Zeit zu Zeit an und wieder
aus.
(Nur Typen GC2032,2030,2012:) Automatische ausschaltung
N
Y
L
O
N
N
Y
L
O
N
S
S
I
O
L
K
I
E
L
A
W
I
N
O
E
O
L
N
N
I
E
L
N
I
L
N
O
T
O
N
C
O
T
T
O
C
DEUTSCH 13
Wenn die automatische Ausschaltung das Gerät ausgeschaltet hat und
die rote Kontroll-Lampe leuchtet,so bewegen Sie das Bügeleisen ein
wenig hin und her, um es wieder einzuschalten.Die rote KontrollLampe erlischt dann.
Dampfbügeln
Achten Sie darauf, daß genügend Wasser im Wasserbehälter ist.
1 Stellen Sie den Temperaturregler auf die erforderliche Position.
Vgl.den Abschnitt "Die Temperatur einstellen".
C
2 Stellen Sie dann den Dampfregler auf die erforderliche Position.
- q für schwache Dampfabgabe (Temperatureinstellungen 2 bis
3)
- w für maximale Dampfabgabe (Temperatureinstellungen 3 bis
MAX)
B
Sobald die eingestellte Temperatur erreicht ist, können Sie mit dem
Dampfbügeln beginnen.
◗ (Nur T ypen GC2016, 2015,2012,2011,2010, 2006,2005:) W enn
die eingestellte Temperatur zu niedrig ist (MIN auf 2),kann
Wasser aus der Bügelsohle tropfen.
Trockenbügeln
1 Stellen Sie den Dampfregler auf Position 0 (= kein Dampf).
2 Stellen Sie den Temperaturregler auf die erforderliche
Temperatur.
Vgl.den Abschnitt "Die Temperatur einstellen".
Andere Anwendungen
Bügelgut einsprühen
Hartnäckige Falten bei beliebiger Temperatur ausbügeln
Achten Sie darauf, daß genügend Wasser im Wasserbehälter ist.
C
1 Drücken Sie einige Male die Sprühtaste,um die Wäsche
anzufeuchten.

DEUTSCH14
(Nur Typen GC 2005,2006 und 2020:) Turbo-Dampf
Mit dieser Funktion können Sie mehr Dampf erzeugen,um hartnäckige
Falten zu entfernen.
Die Funktion Turbo-Dampf wirkt nur bei Temperaturen zwischen 3
und MAX.
C
1 Stellen Sie den Dampfregler auf eine Position zwischen MAX
und q.
C
2 Drücken Sie die Turbo-Dampf-Taste und halten Sie sie
höchstens 5 Sekunden gedrückt.
3 Warten Sie mindestens eine Minute,bevor Sie die Funktion
Turbo-Dampf auslösen, damit kein Wasser aus der Bügelsohle
austritt.
(Nur T ypen GC2032, 2030, 2025,2016,2015,2012,2011,2010)
Dampfstoß
Ein kräftiger Dampfstoß beseitigt selbst hartnäckige Falten aus den
Textilien.
Die Dampfstoß-Funktion wirkt nur bei Temperaturen zwischen 2 und
MAX.
C
1 Drücken Sie die Dampfstoßtaste,und lassen Sie sie wieder los.
(Nur T ypen GC2032, 2030, 2025,2016,2015:) V ertikaler
Dampfstoß
C
1 Der Dampfstoß kann auch bei senkrecht gehaltenem
Bügeleisen angewandt werden.
Richten Sie den Dampstoß niemals auf Personen!
(Nur T ypen GC2032, 2030, 2025,2020:) T ropf-Stop
Dieses Bügeleisen ist mit der Funktion Tropf-Stop ausgerüstet.Das
Bügeleisen gibt keinen Dampf ab,wenn die Temperatur dafür zu niedrig
ist.So wird verhütet,dass Wasser aus der Bügelsohle austritt.

DEUTSCH 15
(Nur T ypen GC2032, 2030, 2012:) Automatische Ausschaltung
C
◗ Wenn das Bügeleisen einige Zeit nicht bewegt wurde,wird das
Heizelement durch eine elektronische Sicherheitseinrichtung
automatisch ausgeschaltet.
◗ Eine rote Kontroll-Lampe blinkt und zeigt an,dass das Gerät
automatisch ausgeschaltet wurde.
Die Bügelsohle wird wie folgt wieder beheizt:
1 Nehmen Sie das Bügeleisen zur Hand,und bewegen Sie es ein
wenig hin und her.Die gelbe Kontroll-Lampe leuchtet auf,weil
die Bügelsohle nachgeheizt werden muss.
2 Die rote Kontroll-Lampe erlischt.Die gelbe Kontroll-Lampe
leuchtet auf,sofern die Bügelsohle nachgeheizt werden muss.
3 Sollte jetzt die gelbe Kontroll-Lampe leuchten, so warten Sie
mit dem Bügeln,bis diese Kontroll-Lampe erloschen ist und
anzeigt,dass die erforderliche Temperatur wieder erreicht ist.
4 Sollte die gelbe Kontroll-Lampe nicht aufleuchten, nachdem Sie
das Bügeleisen bewegt haben,so ist es ausreichend aufgeheizt
und bereits fertig zum Gebrauch.
Reinigung und Wartung
Calc-Clean
Mit Hilfe der Funktion Calc-Clean können Sie Kalk und
Verunreinigungen aus dem Gerät entfernen.
Benutzen Sie Calc-Clean einmal alle 14 Tage.Ist das Wasser in Ihrer
Gegend besonders hart - wenn während des Bügelns Kalkpartikel aus
der Bügelsohle austreten sollten -,sollten Sie Calc-Clean häufiger
einsetzen.
1 Stellen Sie den Dampfregler auf Position O (= kein Dampf).
2 Füllen Sie den Wasserbehälter bis zur Markierung MAX.
Verwenden Sie keinen Essig oder andere Entkalker.
3 Stellen Sie den Temperaturregler auf Position MAX.
4 Stecken Sie den Netzstecker in die Steckdose.
5 Ziehen Sie den Netzstecker aus der Steckdose,sobald die
gelbe Kontrollampe erloschen ist.

DEUTSCH16
C
6 Halten Sie das Bügeleisen über ein Spülbecken.Stellen Sie den
Dampfregler auf Position 1(Calc-Clean).Die Kontrolltaste des
Dampfreglers springt etwas hervor.
C
7 Ziehen Sie den Dampfregler etwas heraus,und schütteln Sie
das Bügeleisen über dem Spülbecken leicht hin und her.
B
Dampf und kochendes Wasser treten aus der Bügelsohle aus.
Kalkpartikel und Verunreinigungen - sofern vorhanden - werden heraus
gespült.
C
8 Ziehen Sie den Dampfregler weiter hoch,und nehmen Sie die
Dampfkontrollnadel heraus.Entfernen Sie den Kalk, falls sich
etwas abgesetzt haben sollte,mit Haushaltsessig.
Geben Sie Acht,dass Sie sie Nadel nicht verbiegen.
C
9 Setzen Sie die Dampfkontrollnadel wieder ein.Führen Sie die
Spitze genau in die Mitte des Loches ein.Die kleine seitliche
Ausbuchtung an der Nadel muss in die Aussparung eingepasst
werden.Stellen Sie den Dampfregler auf Position 0.
Wiederholen Sie den Vorgang bei Bedarf.
Nach der Reingung mit Calc-Clean
- Stecken Sie den Netzstecker in die Steckdose,damit die Bügelsohle
trocknet.
- Ziehen Sie den Netzstecker aus der Steckdose, sobald die gelbe
Kontrollampe erloschen ist.
- Führen Sie die Bügelsohle einige Male über ein altes,aber sauberes
Tuch,um die Bügelsohle von evtl.verbliebenen Resten zu reinigen.
- Lassen Sie das Bügeleisen abkühlen,bevor Sie es zur Seite stellen.

DEUTSCH 17
Nach dem Bügeln
1 Ziehen Sie den Netzstecker aus der Steckdose,und lassen Sie
das Bügeleisen abkühlen.
2 Wischen Sie die Bügelsohle mit einem feuchten Tuch ab, auf das
Sie ein wenig Spülmittel aufgetragen haben.
Achten Sie darauf, daß die Bügelsohle unbeschädigt bleibt.Vermeiden
Sie, daß sie mit Metallgegenständen in Berührung kommt.
3 Der obere Teil des Bügeleisens lässt sich mit einem feuchten
Tuch abwischen, auf das Sie bei Bedarf ein wenig Spülmittel
auftragen können.
C
4 Füllen Sie den Wasserbehälter von Zeit zu Zeit mit klarem
Wasser. Gießen Sie das Wasser anschließend aus.
Aufbewahrung
1 Ziehen Sie den Netzstecker aus der Steckdose,und stellen Sie
den Dampfregler auf Position O.
2 Leeren Sie den Wasserbehälter.
C
3 Lassen Sie die Bügelsohle abkühlen.Wickeln Sie das Netzkabel
um die Kabelaufwicklung und fixieren Sie es mit der
Kabelklammer.
4 Bewahren Sie das Gerät stets auf seiner Rückseite stehend an
einem sicheren und trockenen Ort auf.
Information und Service
Wenden Sie sich mit Ihren Fragen,Wünschen und Problemen bitte an
das Philips Service Center in Ihrem Lande. Sollte sich in Ihrem Lande
kein solches Center befinden,so wenden Sie sich an das Service
Department von Philips Domestic Appliances and Personal Care BV.
Entnehmen Sie die Telefonnummern bitte der beigefügten
Garantieschrift. Besuchen Sie uns auch auf unserer Homepage
www.philips.com.

18
Abhilfe
Prüfen Sie das Netzkabel,den
Netzstecker und die Steckdose.
Stellen Sie den Temperaturregler auf
die erforderliche Temperatur.
Füllen Sie den Wasserbehälter.
Sellen Sie den Dampfregler auf
Position q or w.- Vgl. den Abschnitt
"Dampfbügeln".
Stellen Sie den Temperaturregler auf
eine Position im Dampfbereich (2
bis MAX).Stellen Sie das Bügeleisen
auf seine Rückseite, und warten Sie,
bis die gelbe Kontroll-Lampe erlischt,
bevor Sie weiter bügeln.
Stellen Sie das Bügeleisen waagerecht,
und warten Sie eine Weile,bevor Sie
den (vertikalen) Dampfstoß wieder
ausführen.
Stellen Sie den Temperaturregler auf
eine Position im Dampfbereich (2
bis MAX).Stellen Sie das Bügeleisen
auf seine Rückseite, und warten Sie,
bis die gelbe Kontroll-Lampe erlischt,
bevor Sie weiter bügeln.
Verwenden Sie einige Male die
Funktion Calc-Clean.- Vgl. den
Abschnitt "Calc-Clean".
Schütteln Sie das Gerät leicht hin und
her, um das Gerät wieder
einzuschalten.Die rote KontrollLampe erlischt.
Stellen Sie den Temperaturregler auf
eine position im Dampfbereich (2
bis MAX).Stellen Sie das Bügeleisen
auf seine Rückseite, und warten Sie,
bis die gelbe Kontroll-Lampe erlischt,
bevor Sie weiter bügeln.
Vermutliche Ursache(n)
Keine Stromzufuhr.
Der Temperaturregler steht auf MIN.
Es ist nicht genügend Wasser im Tank.
Der Dampfregler steht auf Position
O(= kein Dampf).
Die Bügelsohle ist nicht heiß genug
(Nur T ypen GC2032, 2030,2025,
2020:) und/oder die Funktion TropfStop ist nicht aktiviert.
Der (vertikale) Dampfstoß ist
innerhalb kurzer Zeit zu oft
angewandt worden.
Die Bügelsohle ist nicht heiß genug.
Durch hartes Wasser bilden sich in
der Bügelsohle Kalkpartikel.
Die automatische Ausschaltfunktion
hat das Gerät ausgeschaltet.- Vgl. den
Abschnitt "Die automatische
Ausschaltung".
Es ist eine zu niedrige Temperatur
eingestellt.
Problem
Der Netzstecker steckt in der
Steckdose, aber die Bügelsohle bleibt
kalt.
Kein Dampf
Kein Dampfstoß (Nur Typen GC2032,
2030,2025,2016, 2015,2012,2011,
2010) bzw.vertikaler Dampfstoß (Nur
Typen GC2032, 2030,2025, 2016,
2015)
Kalkpartikel und Verunreinigungen
treten beim Bügeln aus der Bügelsohle
aus.
(Nur Typen GC2032, 2030:) Die rote
Kontroll-Lampe blinkt
(Nur T ypen GC2016, 2015,2012,2011,
2010,2006,2005:) Aus der Bügelsohle
tropft Wasser .
DEUTSCH
Das Gerät arbeitet nicht wie gewünscht?
Der folgende Abschnitt führt eine Reihe von Problemen auf,die beim
Gebrauch des Geräts auftreten können. Lesen Sie bitte die
verschiedenen Abschnitte durch.Finden Sie dort keine Lösung für Ihr
Problem,so wenden Sie sich bitte an das nächstgelegene Philips Service
Center.

Important
Avant d'utiliser l'appareil,lisez soigneusement ces instructions et
regardez les images pour une sécurité optimale.
- Ne laissez jamais le fer à repasser sans surveillance pendant qu'il est
branché.
- Cet appareil n'est pas destiné à être utilisé par des enfants sans
surveillance.Faites bien attention à ce que les enfants ne puissent pas
jouer avec le fer.
- La semelle du fer à repasser peut devenir très chaude et donc peut
causer des brûlures si vous la touchez.Eviter le contact du cordon
d'alimentation avec la semelle lorsqu'elle est chaude.
- Lorsque vous avez fini de repasser,pendant que vous nettoyez,
remplissez ou videz le réservoir d'eau, et même si vous laissez le fer
pour un bref instant,réglez la commande de vapeur sur la position
O,placez le fer à repasser sur le talon et débranchez l'appareil.
- Si le cordon d'alimentation est endommagé,il ne doit être remplacé
que par un Centre Service Agréé Philips car des outils et/ou
composqnts spéciaux sont nécessaires.
- N'utilisez jamais le fer à repasser s'il est endommagé.
- Cet appareil est destiné à usage domestique uniquement.
- Veuillez garder ce mode d'emploi.
Avant la première utilisation
1 Vérifiez que la tension indiquée sous l'appareil correspond bien
à la tension de votre secteur.
2 Retirez tout auto-collant,film de protection ou toute autre
protection qui se trouve sur la semelle.
3 Faite chauffer le fer à la température maximum et repassez une
pièce de tissu humide pendant quelques minutes afin de retirer
tous les residus qui auraient pu se déposer sur la semelle.
Le fer peut fumer légèrement quand on le branche pour la première
fois.Cela cessera après un bref instant.
Remplissage du réservoir
Ne plongez jamais le fer dans l'eau.
1 Débranchez la fiche de la prise de courant.
C
2 Réglez la commande de vapeur sur la position 0 (pas de
vapeur).
3 Inclinez le fer.
19FRANÇAIS

FRANÇAIS20
C
4 Remplissez le reservoir avec de l'eau du robinet à l'aide du
récipient de remplissage.
Ne remplissez pas le réservoir au-delà de l'indication MAX.
Si l'eau du robinet dans votre region est très calcaire (sup.à 18°TH),il
est conseillé d'utiliser moitier eau du robinet,moitier eau
déminéralisée.
N'utilisez pas de vinaigre, amidon ou de l'eau traitée chimiquement.
Réglage de la température
1 Posez le fer à repasser sur son talon.
C
2 Réglez le bouton de thermostat sur la température conseillée.
- Vérifiez l'étiquette d'instructions de repassage pour vérifier la
température necessaire de repassage.
- 1 Fibres synthétiques (e.g. acrylique, viscose, polyamide,
polyester)
- 1 Soie
- 2 Laine
- 3 Coton, lin
- Si vous ne connaissez pas la composition des tissus,repassez en
commençant par la température la plus basse sur une partie interne
du vêtement et invisible de l'extérieur.
- La soie, la laine et autres fibres synthétiques:repassez sur l'envers
pour éviter les taches.N'utilisez pas la fonction spray.
- Commencez toujours le repassage des articles de fibres synthétiques
nécessitant la température la plus basse.
3 Branchez la fiche dans la prise de courant.
4 Attendez que le témoin lumineux orange s'éteigne avant de
commencer à repasser.
B
Le témoin lumineux s'allume et s'éteint de temps en temps pendant le
repassage.
Pour les versions à coupure automatique (types GC2032,2030,2012
uniquement):
Si la coupure automatique est activée (le témoin lumineux rouge
clignote),remuez le fer légèrement pour la désactiver (le témoin rouge
s'éteint).
N
Y
L
O
N
N
Y
L
O
N
S
S
I
O
L
K
I
E
L
A
W
I
N
O
E
O
L
N
N
I
E
L
N
I
L
N
O
T
O
N
C
O
T
T
O
C

Repassage à la vapeur
Assurez-vous qu'il y a suffisamment d'eau dans le réservoir.
1 Mettez le bouton de réglage de la température sur la position
conseillée.
Voir le chapitre "Réglage de la température".
C
2 Réglez la commande de vapeur sur la position appropriée.
- q vapeur modérée (réglage température 2 à 3)
- w vapeur maximum (réglage température 3 à MAX)
B
La vapeur commence à se dégager une fois que la température réglée a
été atteinte.
◗ Types GC2016,2015,2012, 2011,2010,2006,2005: Des gouttes
d'eau peuvent sortir par la semelle si la température a été réglée
sur une position trop basse (MIN à 2).
Repassage sans vapeur
1 Réglez la commande de vapeur sur la position 0 (pas de
vapeur).
2 Mettez le bouton de réglage de la température sur la position
conseillée.
Voir le chapitre "Réglage de la température".
Autres caractéristiques
Le spray
Pour enlever les faux plis difficiles à éliminer.
Assurez-vous qu'il y a suffisamment d'eau dans le réservoir.
C
1 Appuyez à plusieurs reprises sur le bouton du spray pour
humidifier l'article à repasser.
Extra Vapeur (types GC2020,2006,2005 uniquement)
Cette fonction fournit un jet de vapeur très puissant pour enlever les
faux plis difficiles à éliminer.
La fonction Extra Vapeur ne peut être utilisé qu'à des températures
comprises entre 3 et MAX.
C
1 Réglez la commande de vapeur sur la position MAX q.
FRANÇAIS 21

FRANÇAIS22
C
2 Appuyez et maintenez appuyé le bouton Extra Vapeur pendant
5 secondes.
3 Attendez au moins 1 minute avant d'utiliser à nouveau la
fonction Extra Vapeur, afin d'empêcher que la semelle ne
goutte.
Jet de Vapeur (types GC2032,2030, 2025, 2016,2015,2012,
2011,2010 uniquement)
Un jet de vapeur puissant est utile pour enlever les faux plis difficiles à
éliminer.
Le jet de vapeur ne peut être utilisé qu'à des températures comprises
entre 2 et MAX.
C
1 Appuyez et relâchez le bouton jet de vapeur.
Repassage vertical (types GC2032,2030,2025,2016,2015
uniquement)
C
1 Le jet de vapeur peut être aussi utilisé pour le repassage
vertical.
Ne dirigez jamais le jet de vapeur vers des personnes.
Anti-goutte (types GC2032,2030,2025,2020 uniquement)
Ce fer à repasser est doté d'un système anti-goutte :lorsque la
température de la semelle est trop basse, la production de vapeur est
interrompue afin d'empêcher que la semelle ne goutte de trop.Vous
entendrez un clic si cela ce produit.
Arrêt automatique (types GC2032,2030,2012 uniquement)
C
◗ Une sécurité électronique arrêtera automatiquement le fer s'il
reste inutilisé pendant un certain temps.
◗ Pour indiquer que le fer est arrêté,le témoin lumineux rouge
Arrêt-automatique se met à clignoter.

FRANÇAIS 23
Pour faire chauffer le fer à nouveau:
1 Prenez le fer en main et bougez-le légèrement.
2 Le témoin rouge s'éteint.Le témoin orange s'allume en
fonction de la température de la semelle.
3 Si le témoin orange s'allume juste après avoir repris le fer,
attendez que celui-ci s'éteigne avant de commencer à repasser.
4 Si le témoin reste éteint vous pouvez commencer le repassage.
Nettoyage et entretien
Auto-nettoyage
La fonction auto-nettoyage permet de retirer les particules de calcaire
et les impuretés.
Utilisez la fonction auto-nettoyage toutes les deux semaines.Si l'eau de
votre région est très calcaire (par ex:lorsque des particules de calcaire
sortent par la semelle) vous devez utiliser cette fonction plus souvent.
1 Réglez la commande de vapeur sur la position 0.
2 Remplissez le réservoir d'eau jusqu'au niveau maximum.
Ne versez pas de vinaigre ou d'autres agents détartrants dans le
réservoir d'eau.
3 Mettez le bouton de réglage de la température sur MAX.
4 Branchez l'appareil.
5 Quand le témoin lumineux orange s'éteint,débranchez
l'appareil.
C
6 Tenez le fer au dessus de l'évier et réglez la vapeur sur la
position 1(Auto-nettoyage).La commande de la vapeur surgit
légèrement.
C
7 Tirez doucement sur la commande de vapeur en haut et
remuez le fer à repasser.
B
De la vapeur et de l'eau bouillante sortent ainsi par les trous de la
semelle en entrainant avec elles les impuretés.

FRANÇAIS24
C
8 Retirez la commande de vapeur encore plus et enlever la tige
de commande.Utilisez du vinaigre pour enlever le calcaire qui
peut se trouver sur la tige.
Ne courbez ou n'endommagez pas la tige de commande.
C
9 Reinsérez la pointe de la tige exactement dans le centre de
l'orifice et fixez-la dans sa fente.Réglez la commande de vapeur
sur la position O.
Répétez cette opération aussi souvent que nécessaire.
Après l'auto-nettoyage
- Branchez l'appareil et laissez-le chauffer jusqu'à ce que la semelle soit
sèche.
- Quand le témoin lumineux orange s'éteint, débranchez l'appareil.
- Repassez un vieux morceau de tissu pour vous assurer que la
semelle est bien sèche.
- Avant de ranger l'appareil laissez-le refroidir.
Après le repassage
1 Débranchez l'appareil et laissez-le refroidir.
2 Les particules de calcaire et autres salissures peuvent être
retirées de la semelle avec un chiffon humide ou un détérgent
(liquide) non-abrassif.
Maintenez la semelle lisse :évitez le contact avec des objets
métalliques.
3 Nettoyez la partie supérieure du fer à repasser avec un chiffon
humide.
C
4 Rincez régulièrement le réservoir avec de l'eau.Videz le
réservoir après le nettoyage.

Rangement
1 Retirez la fiche de la prise de courant et positionnez le bouton
vapeur sur O.
2 Videz le réservoir.
C
3 Laissez le fer refroidir complètement.Enroulez le cordon
d'alimentation autour du support de rangement et fixez
l'extrémité à l'aide du clip.
4 Rangez toujours le fer sur son talon et placez-le sur une
surface stable et sèche.
Informations et service
Pour plus d'informations,visitez notre Philips Web site :
www.philips.com ou veuillez contacter le Service Consommateurs
Philips de votre pays (vous trouverez le numéro de téléphone dans le
dépliant sur la garantie internationale). S'il n'y a aucun Service
Consommateurs Philips dans votre pays,contactez votre distributeur
ou le Service Department of Philips Domestic Appliances and Personal
Care BV.
En cas de problèmes
Ce chapitre résume les problèmes les plus courants problèmes
susceptibles d'être rencontrés.Lisez les sections suivantes pour plus de
détails.Si vous ne pouvez pas résoudre le problème,contactez votre
revendeur ou un Centre Service Agréé Philips.
FRANÇAIS 25

FRANÇAIS26
Solution
Vérifiez que la prise de courant est
bien allimentée (à l'aide d'un autre
appareil par exemple).
Réglez le bouton de réglage de la
température sur la température
nécessaire.
Remplissez le réservoir d'eau.
Réglez la commande vapeur sur q ou
w (voir 'Le répassage à vapeur').
Mettez le bouton de réglage de
température sur la plage vapeur (2
au MAX).Pozes le fer sur son talon,
attendez que le témoin lumineux
orange s'éteigne avant de commencer
le repassage.
Placez le fer sur le talon et attendez
quelques instants avant de l'utiliser à
nouveau.
Mettez le bouton de réglage de
température sur la plage vapeur (2
au MAX).Pozes le fer sur son talon,
attendez que le témoin lumineux
orange s'éteigne avant de commencer
le repassage.
Utilisez l'Auto-nettoyage quelques fois
(voir 'Auto-nettoyage').
Remuez le fer doucement pour
désactiver la fonction arrêt
automatique:le témoin lumineux
s'éteint.
Mettez le bouton de réglage de
température sur la plage vapeur (2
au MAX).Pozes le fer sur son talon,
attendez que le témoin lumineux
orange s'éteigne avant de commencer
le repassage.
Cause(s) possible (s)
Problème de connexion.
Le bouton de réglage de la
température a été réglé sur la position
MIN.
Il n'y a pas assez d'eau dans le
réservoir.
La commande de vapeur a été réglée
sur la position 0.
La semelle n'est pas suffisament
chaude et/ou la fonction anti-goutte
est activée (types GC2032,2030,
2025,2020).
Le jet de vapeur a été utilisé trop
souvent et la semelle n'a pas eu le
temps de reprendre la température
initiale.
La semelle n'est pas suffisament
chaude.
L'eau est trop dure et entartre
l'intérieur de la semelle.
L'arrêt automatique est activé:Voir
paragraphe "Arrêt automatique".
La commande de vapeur a été réglée
sur une position inférieure.
Problème
Le fer à repasser est branché mais la
semelle est froide.
Pas de vapeur
Pas de jet de vapeur (Types GC2032,
2030,2025,2016, 2015,2012,2011,
2010 uniquement) ou pas de vapeur en
position vertikcale (Types GC2032,
2030,2025,2 016,2015 uniquement).
Des particules de calcaire et des
impuretés sortent par la semelle
pendant le repassage.
Le témoin lumineux rouge clignote
(types GC2032,2030 uniquement).
Des gouttes d'eau sortent par la
semelle (types GC2016,2015,2012,
2011,2010,2006, 2005 uniquement).

Waarschuwing
Voor optimale veiligheid: lees deze instructies aandachtig door en bekijk
de illustraties voordat u het strijkijzer gaat gebruiken
- Laat het apparaat nooit onbeheerd achter terwijl het op de
netspanning is aangesloten.
- Houd toezicht op jonge kinderen om te voorkomen dat ze met het
apparaat gaan spelen.
- De zoolplaat van het strijkijzer kan zeer heet worden en bij aanraking
brandwonden veroorzaken.Voorkom dat het snoer in aanraking
komt met de hete zoolplaat.
- Haal altijd de stekker uit het stopcontact,zet de stoomregelaar op O
en zet het strijkijzer op zijn achterkant als u klaar bent met strijken,
als u bij het strijkijzer wegloopt (ook al is het maar heel even),als u
het strijkijzer gaat schoonmaken en tijdens het vullen of legen van
het waterreservoir.
- Als het snoer van dit apparaat beschadigd is, mag het uitsluitend
worden vervangen door Philips of een door Philips aangewezen
servicecentrum, omdat hiervoor speciale gereedschappen en/of
onderdelen vereist zijn.
- Gebruik het apparaat nooit als het op de een of andere manier
beschadigd is.
- Dit apparaat is uitsluitend bedoeld voor huishoudelijk gebruik.
- Bewaar deze gebruiksaanwijzing om hem indien nodig te kunnen
raadplegen.
Voor het eerste gebruik
1 Controleer of de voltage-aanduiding op het typeplaatje van uw
apparaat overeenkomt met de netspanning in uw woning.
2 Verwijder de eventueel aanwezige sticker, beschermfolie of
afdekplaat van de zoolplaat en maak de zoolplaat schoon met
een zachte doek.
3 Warm het strijkijzer op tot de maximumtemperatuur en
beweeg het strijkijzer vervolgens gedurende een paar minuten
over een vochtige doek om eventuele verontreinigingen van de
zoolplaat te verwijderen.
Er kan wat rook uit het strijkijzer komen als u het voor de eerste keer
gebruikt. Dit houdt na enige tijd op.
Het waterreservoir vullen
Dompel het strijkijzer nooit in water.
1 Haal de stekker uit het stopcontact.
NEDERLANDS 27

NEDERLANDS28
C
2 Zet de stoomregelknop op stand 0 (=geen stoom).
3 Houd het strijkijzer gekanteld.
C
4 Giet water in het waterreservoir met behulp van het
vulkannetje en vul het reservoir tot aan het maximumniveau.
Vul het reservoir nooit verder dan het MAX-teken.
Als het kraanwater in uw woongebied erg hard is, raden wij u aan
gedistilleerd water te gebruiken.
Gebruik geen schoonmaakazijn, stijfsel of een chemische
waterontharder.
Temperatuur instellen
1 Zet het strijkijzer op zijn achterkant.
C
2 Stel de gewenste temperatuur in door de temperatuurregelaar
naar de juiste temperatuurstand te draaien.
- Raadpleeg het label in uw kledingstuk voor de gewenste
strijktemperatuur.
- 1 Synthetische stoffen (bijv.acryl, viscose, polyamide, polyester)
- 1 Zijde
- 2 Wol
- 3 Katoen, linnen
- Als u niet zeker weet van welk materiaal uw kledingstuk is gemaakt,
probeer de gekozen strijktemperatuur dan eerst uit op een plek die
niet zichtbaar is tijdens het dragen.
- Zijde, wol en synthetische materialen: strijk de binnenkant van de
stoffen om glimmende plekken te voorkomen.Gebruik de
sproeifunctie niet om vlekken te voorkomen.
- Strijk eerst de kledingstukken die op de laagste temperatuur
gestreken moeten worden,zoals kleding gemaakt van synthetische
stoffen.
3 Steek de stekker in een geaard stopcontact.
4 Als het temperatuurcontrolelampje uit is gegaan,wacht dan
even voordat u begint te strijken.
B
Het controlelampje gaat tijdens het strijken af en toe aan en uit.
N
Y
L
O
N
N
Y
L
O
N
S
S
I
O
L
K
I
E
L
A
W
I
N
O
E
O
L
N
N
I
E
L
N
I
L
N
O
T
O
N
C
O
T
T
O
C

NEDERLANDS 29
Voor stoomstrijkijzers met een automatische uitschakelfunctie (alleen
types GC2032,2030,2012):
Als de automatische uitschakelfunctie is geactiveerd (het rode lampje
knippert),beweeg het strijkijzer dan even om deze functie uit te
schakelen (het rode lampje houdt op met knipperen).
Stoom-strijken
Controleer of er genoeg water in het waterreservoir zit.
1 Zet de temperatuurregelaar in de aanbevolen stand.
Zie 'Temperatuur instellen'.
C
2 Zet de stoomregelaar in de juiste stand.
- q voor weinig stoom (temperatuurstand 2 tot 3)
- w voor maximum stoom (temperatuurstand 3 tot MAX)
B
Het apparaat begint te stomen zodra het de ingestelde temperatuur
heeft bereikt
◗ Bij types GC2016,2015,2012, 2011,2010,2006,2005 kan er water
uit de zoolplaat lekken als de ingestelde temperatuur te laag is
(MIN tot 2).
Strijken zonder stoom
1 Draai de stoomregelaar naar stand O (= geen stoom).
2 Zet de temperatuurregelaar in de aanbevolen stand.
Zie 'Temperatuur instellen'.
Overige functies
Sproeien
Voor het verwijderen van hardnekkige kreuken op elke temperatuur.
Controleer of er genoeg water in het waterreservoir zit.
C
1 Druk een paar keer op de sproeiknop om de stof vochtig te
maken.
Extra stoom (alleen bij types GC2020,2006 en 2005)
Deze functie levert extra stoom voor het verwijderen van hardnekkige
kreuken.

NEDERLANDS30
De extra-stoomfunctie werkt alleen als de temperatuur is ingesteld op
een stand tussen 3 en MAX.
C
1 Draai de stoomregelaar naar q.
C
2 Houd de extra-stoomknop maximaal 5 seconden ingedrukt.
3 Wacht tenminste 1 minuut voordat u de extra-stoomfunctie
opnieuw gebruikt,om te voorkomen dat er water uit de
zoolplaat druppelt.
Stoomstoot (alleen bij types GC2032,2030,2025,2016,2015,
2012,2011,2010)
Een krachtige stoomstoot helpt hardnekkig kreuken te verwijderen
De stoomstootfunctie werkt alleen als de temperatuur is ingesteld op
een stand tussen 2 en MAX.
C
1 Druk de stoomstootknop in.
Verticale stoomstoot (alleen bij types GC2032,2030,2025,
2016,2015)
C
1 De stoomstootfunctie kan ook gebruikt worden wanneer u het
strijkijzer verticaal houdt.
Richt de stoom nooit op mensen.
Druppelstop (alleen bij types GC2032,2030,2025,2020)
Dit strijkijzer is uitgerust met een druppelstopsysteem: het strijkijzer
stopt automatisch met stomen bij te lage temperaturen, zodat er geen
water uit de zoolplaat druppelt.Als dit systeem wordt ingeschakeld,
hoort u een klik.

NEDERLANDS 31
Automatische uitschakelfunctie (alleen bij types GC2032,
2030,2012)
C
◗ Een elektronisch beveiligingssysteem zorgt ervoor dat het
strijkijzer automatisch wordt uitgeschakeld als het een tijdje heeft
stilgestaan.
◗ Het rode waarschuwingslampje zal gaan knipperen om aan te
geven dat de automatische uitschakelfunctie het apparaat heeft
uitgeschakeld.
Om het strijkijzer weer te laten opwarmen:
1 Til het strijkijzer een stukje op of beweeg het even heen en
weer.
2 Het rode waarschuwingslampje gaat dan uit.Het oranje
temperatuurcontrolelampje kan,afhankelijk van de
temperatuur van de zoolplaat,gaan branden.
3 Als het oranje controlelampje gaat branden nadat u het
strijkijzer heen en weer bewogen heeft,wacht dan totdat het
uit is gegaan voordat u begint te strijken.
4 Als het oranje controlelampje niet gaat branden nadat u het
strijkijzer heen en weer bewogen heeft,dan is het strijkijzer
klaar voor gebruik.
Schoonmaken en onderhoud
Calc-Clean
Met deze ontkalkingsfunctie kunt u kalksteen en andere
verontreinigingen verwijderen.
Gebruik de ontkalkingsfunctie om de twee weken.Als het water in uw
regio erg hard is (d.w.z.wanneer er tijdens het strijken schilfertjes uit de
zoolplaat komen),moet u deze functie vaker gebruiken.
1 Zet de stoomregelaar op stand 0.
2 Vul het waterreservoir tot aan het maximumniveau.
Giet geen azijn of andere ontkalkingsmiddelen in het waterreservoir.
3 Draai de temperatuurregelaar naar MAX.
4 Steek de stekker in het stopcontact.
5 Haal,nadat het oranje controlelampje is uitgegaan,de stekker
uit het stopcontact.

NEDERLANDS32
C
6 Houd het strijkijzer boven de gootsteen en draai de
stoomknop naar stand 1 (Calc-Clean). De knop zal een stukje
omhoog springen.
C
7 Trek de stoomknop een beetje omhoog en schud het strijkijzer
zachtjes heen en weer.
B
Er komt stoom en kokend water uit de zoolplaat en tegelijkertijd worden
vuil en kalk (indien aanwezig) weggespoeld.
C
8 Trek de stoomregelaar verder omhoog om de naald uit het
apparaat te verwijderen.Gebruik schoonmaakazijn om
eventuele kalkaanslag van de naald te verwijderen.
Zorg ervoor dat de naald niet verbogen of beschadigd raakt.
C
9 Plaats de naald terug in het apparaat door de punt van de naald
precies in het midden van het gat te steken en het
uitsteekseltje aan de zijkant van de naald in de groef te laten
vallen.Zet de stoomregelaar op stand O.
Herhaal het ontkalkingsproces als het strijkijzer nog steeds
veel verontreinigingen bevat
Na het ontkalkingsproces
- Steek de stekker in het stopcontact om de zoolplaat te laten drogen.
- Haal,nadat het oranje controlelampje is uitgegaan,de stekker uit het
stopcontact.
- Beweeg het hete strijkijzer voorzichtig over een schone oude lap om
eventuele watervlekken van de zoolplaat te verwijderen.
- Laat het strijkijzer afkoelen voordat u het opbergt.

NEDERLANDS 33
Na het strijken
1 Haal de stekker uit het stopcontact en laat het strijkijzer
afkoelen.
2 Veeg schilfertjes en andere verontreinigingen van de zoolplaat
met een vochtige doek en een niet-schurend (vloeibaar)
schoonmaakmiddel.
Voorkom beschadiging van de zoolplaat:vermijd aanraking met harde
metalen voorwerpen.
3 Maak de bovenkant van het strijkijzer schoon met een vochtige
doek.
C
4 Spoel het waterreservoir regelmatig schoon met water.Leeg
het waterreservoir na het schoonmaken.
Opbergen
1 Haal de stekker uit het stopcontact en zet de stoomregelaar
op stand O.
2 Leeg het waterreservoir.
C
3 Laat het strijkijzer afkoelen.Wikkel het snoer om de
snoeropwindhaspel en maak het vast met de clip.
4 Berg het stijkijzer altijd op door het op zijn achterkant op een
veilige en droge plaats neer te zetten.
Informatie & service
Als u informatie nodig heeft of als u een probleem heeft,bezoek dan
onze Website (www.philips.com),of neem contact op met het Philips
Customer Care Centre in uw land (u vindt het telefoonnummer in het
'worldwide guarantee' vouwblad).Als er geen Customer Care Centre
in uw land is,ga dan naar uw Philips dealer of neem contact op met de
afdeling Service van Philips Domestic Appliances and Personal Care BV.
Hulp bij het oplossen van problemen
Dit hoofdstuk behandelt in het kort de problemen die u tegen kunt
komen tijdens het gebruik van uw strijkijzer.Lees de betreffende
hoofdstukken voor verdere details.Als u er niet in slaagt het probleem
op te lossen,neem dan contact op met het Philips Customer Care
Centre in uw land.

NEDERLANDS34
Oplossing
Controleer het snoer, de stekker en
het stopcontact.
Stel de temperatuur op de gewenste
temperatuur in.
Vul het waterreservoir (zie 'Het
waterreservoir vullen'),
Zet de stoomregelaar in de juiste
stand:q of w (zie 'Stoom-strijken').
Stel de temperatuurregelaar in op een
temperatuur in het stoomgebied
(tussen 2 en MAX). Plaats het
strijkijzer op zijn achterkant en wacht
tot het oranje waarschuwingslampje is
uitgegaan voordat u gaat strijken.
Zet het strijkijzer horizontaal en wacht
even voordat u de (verticale)
stoomstootfunctie opnieuw gaat
gebruiken.
Stel de temperatuurregelaar in op een
temperatuur in het stoomgebied
(tussen 2 en MAX). Plaats het
strijkijzer op zijn achterkant en wacht
tot het oranje waarschuwingslampje is
uitgegaan voordat u gaat strijken.
Gebruik de ontkalkingsfunctie een
paar keer (zie 'Calc-Clean').
Beweeg het strijkijzer even heen en
weer om de automatische
uitschakelfunctie uit te schakelen.Het
waarschuwingslampje houdt dan op
met knipperen.
Stel de temperatuurregelaar in op een
temperatuur in het stoomgebied
(tussen 2 en MAX). Plaats het
strijkijzer op zijn achterkant en wacht
tot het oranje waarschuwingslampje is
uitgegaan voordat u gaat strijken.
Mogelijke oorzaak/oorzaken
Aansluitproblemen.
Temperatuurregelaar staat op MIN.
Onvoldoende water in het
waterreservoir.
De stoomregelaar staat op stand O.
De zoolplaat is niet warm genoeg
en/of de druppelstopfunctie (in geval
van types GC2032,2030,2025, 2020)
is geactiveerd.
De (verticale) stoomstootfunctie is te
vaak achter elkaar gebruikt in korte
tijd.
De zoolplaat is niet warm genoeg.
Door hard water vormen zich
schilfterjes in de zoolplaat.
De automatische uitschakelfunctie is
geactiveerd.Zie ´Automatische
uitschakelfunctie´.
De temperatuur is te laag ingesteld.
Probleem
De stekker zit in het stopcontact,maar
de zoolplaat is koud.
Geen stoom
Geen stoomstoot (alleen bij types
GC2032,2030,2025, 2016,2015,2012,
2011,2010) of geen verticale
stoomstoot (alleen bij types GC2032,
2030,2025,2016, 2015).
Er komen schilfertjes en
verontreinigingen uit de zoolplaat
tijdens het strijken.
Het rode waarschuwingslampje
knippert (alleen bij types GC2032,
2030).
Er druppelt water uit de zoolplaat
(alleen bij types GC2016,2015,2012,
2011,2010,2006, 2005).

Importante
Per maggior sicurezza,leggete attentamente le istruzioni e osservate le
illustrazioni prima di usare l'apparecchio.
- Non lasciate mai il ferro incustodito mentre è collegato alla presa di
corrente.
- L'apparecchio non deve essere usato da bambini senza il controllo di
un adulto. Fate in modo che i bambini non possano giocare con
l'apparecchio.
- La piastra del ferro diventa bollente durante l'uso e può causare
gravi ustioni se toccata.Fate in modo che il cavo non tocchi la piastra
bollente.
- Quando avete finito di stirare,mentre pulite,riempite o svuotate il
ferro o quando dovete allontanarvi anche solo per un attimo,
mettete il regolatore di vapore in posizione O e il ferro in posizione
verticale, quindi togliete la spina dalla presa.
- Nel caso in cui il cavo fosse danneggiato,dovrà essere sostituito con
un cavo originale disponibile presso i centri Assistenza o i rivenditori
autorizzati Philips in quanto sono necessari pezzi e/o utensili speciali.
- Non usate l'apparecchio nel caso risultasse danneggiato.
- Questo apparecchio è destinato esclusivamente all'uso domestico.
- Conservate queste istruzioni per necessità future.
Prima dell'uso
1 Controllate che la tensione indicata sulla targhetta corrisponda
a quella della rete locale.
2 Togliete eventuali adesivi,pellicole protettive o foderine dalla
piastra.
3 Fate riscaldare il ferro alla temperatura massima e passatelo su
uno straccio umido per alcuni minuti per eliminare qualsiasi
residuo dalla piastra.
Il ferro potrebbe emettere un po' di fumo quando viene acceso per la
prima volta.Il fenomeno è del tutto normale e scomparirà nel giro di
poco tempo.
Come riempire il serbatoio
Non immergete mai il ferro nell'acqua.
1 Togliete la spina dalla presa di corrente.
C
2 Mettete il regolatore di vapore sulla posizione O (=Vapore
escluso).
3 Inclinate il ferro.
ITALIANO 35

ITALIANO36
C
4 Usate l'apposito misurino per riempire il ferro fino al livello
MAX,usando la normale acqua del rubinetto.
Non superate l'indicazione MAX.
Nel caso l'acqua della vostra zona fosse particolarmente dura, vi
consigliamo di usare acqua distillata.
Non usate aceto,amido o acqua decalcificata chimicamente.
Come impostare la temperatura
1 Mettete il ferro in posizione verticale.
C
2 Impostate la temperatura desiderata ruotando il termostato
nella posizione corretta.
- Controllate le istruzioni riportate sull'etichetta del capo da stirare
per individuare la temperatura consigliata.
- 1 Fibre sintetiche (es.acrilico,viscosa,poliammide,poliestere)
- 1 Seta
- 2 Lana
- 3 Cotone,lino
- Se non conoscete la composizione del tessuto,fate una prova su un
angolo del capo non visibile quando indossato,per stabilire la
temperatura giusta.
- Seta,lana e materiali sintetici:stirate il capo al rovescio per evitare
tracce di lucido.Per evitare di macchiare il tessuto, non usate la
funzione spray.
- Iniziate a stirare i capi che richiedono una temperatura più bassa,
come ad esempio quelli in fibra sintetica.
3 Inserite la spina in una presa dotata di messa a terra.
4 Non appena la spia arancione si spegnerà,aspettate qualche
minuto prima di iniziare a stirare.
B
La spia arancione sparirà di tanto in tanto durante la stiratura.
Per i modelli con spegnimento automatico (solo mod.GC2032,2030,
2012):
Se è stata attivata la funzione di spegnimento automatico (la spia rossa
lampeggia),muovete leggermente il ferro per disattivarla (la spia cessa
di lampeggiare).
Stiratura a vapore
Controllate che ci sia una quantità d'acqua sufficiente nel serbatoio.
1 Mettete il termostato nella posizione desiderata.
N
Y
L
O
N
N
Y
L
O
N
S
S
I
O
L
K
I
E
L
A
W
I
N
O
E
O
L
N
N
I
E
L
N
I
L
N
O
T
O
N
C
O
T
T
O
C

ITALIANO 37
Vedere la sezione "Come impostare la temperatura".
C
2 Mettete il regolatore di vapore nella posizione prescelta.
- q per un vapore moderato (temperatura fra 2 e 3)
- w per il massimo del vapore (temperatura fra 3 e MAX)
B
Il vapore inizierà a fuoriuscire non appena verrà raggiunta la
temperatura impostata.
◗ Modelli GC2016,2015,2012, 2011,2010,2006,2005: usando le
temperature più basse (da MIN a 2),l'acqua potrebbe fuoriuscire
dalla piastra.
Stiratura senza vapore.
1 Mettete il regolatore di vapore sulla posizione o (= Vapore
escluso)
2 Mettete il termostato nella posizione consigliata
Vedere la sezione "Come impostare la temperatura".
Altre caratteristiche
Spray
Per eliminare le pieghe più ostinate
Controllate che ci sia una quantità d'acqua sufficiente nel serbatoio.
C
1 Premete un paio di volte il pulsante spray per inumidire il
bucato.
Colpo di vapore (solo modelli GC2020,2006,2005)
Questa funzione fornisce un potente colpo di vapore per eliminare le
pieghe più ostinate.
Il Colpo di Vapore può essere utilizzato soltanto con temperature
comprese fra 3 e MAX.
C
1 Impostate il regolatore di vapore sulla posizione MAX q.

ITALIANO38
C
2 Tenete premuto il pulsante Colpo di Vapore per circa 5
secondi.
3 Aspettate almeno un minuto prima di usare nuovamente il
Colpo di Vapore per evitare che dalla piastra possa fuoriuscire
dell'acqua.
Getto di vapore (solo mod.GC2032,2030, 2025, 2016,2015,
2012,2011,2010)
Un potente getto di vapore per eliminare le pieghe più ostinate.
Il getto di vapore può essere utilizzato solo con temperature comprese
fra 2 e MAX.
C
1 Premete e rilasciate il pulsante Colpo di Vapore.
Getto di vapore verticale (solo mod.GC2032,2030, 2025,
2016,2015)
C
1 Il getto di vapore può essere usato anche tenendo il ferro in
posizione verticale.
Non puntate mai il getto di vapore verso persone.
Dispositivo antisgocciolamento (solo mod.GC2032,2030,
2025,2020)
Il ferro è provvisto di uno speciale dispositivo antisgocciolamento che
blocca automaticamente il vapore nel caso vengano utilizzate
temperature troppo basse, per evitare che l'acqua fuoriesca dalla
piastra. In questa caso,sentirete un click.

ITALIANO 39
Spegnimento automatico (solo mod.GC2032,2030,2012)
C
◗ Uno speciale dispositivo elettronico spegne automaticamente il
ferro nel caso venga lasciato immobile per un po'.
◗ La spia rossa "Autospegnimento" inizierà a lampeggiare per
indicare che il ferro si è spento.
Per riscaldare nuovamente il ferro:
1 Sollevate il ferro o muovetelo leggermente.
2 La spia rossa di autospegnimento si spegnerà e si accenderà la
spia arancione,in base alla temperatura della piastra.
3 Nel caso la spia arancione si accendesse dopo aver mosso il
ferro, aspettate che si spenga prima di iniziare a stirare.
4 Se dopo aver mosso il ferro la spia arancione non si accende,
significa che il ferro è pronto per l'uso.
Pulizia e manutenzione
Eliminazione calcare
Questa funzione serve ad eliminare il calcare e le altre impurità.
Usate la funzione "Eliminazione calcare " una volta ogni quindici giorni.
Nel caso di acqua particolarmente dura (durante la stiratura
fuoriescono pezzetti di calcare dalla piastra), la funzione "Eliminazione
calcare" dovrà essere attivata con maggior frequenza.
1 Mettete il regolatore di vapore in posizione O.
2 Riempite il serbatoio fino al livello MAX.
Non mettete aceto o altri prodotti disincrostanti nel serbatoio.
3 Mettete il termostato in posizione MAX
4 Inserite la spina nella presa di corrente.
5 Togliete la spina non appena la spia arancione si sarà spenta.
C
6 Tenendo il ferro sopra il lavandino ,mettete il termostato in
posizion 1(Eliminazione Calcare).La manopola del regolatore
di vapore si solleverà leggermente.

ITALIANO40
C
7 Sollevate leggermente il regolatore di vapore e scuotete
delicatamente il ferro.
B
Dalla piastra usciranno acqua bollente e vapore,che trascineranno con
sé le (eventuali) impurità e il calcare.
C
8 Sollevate ancora un po' il regolatore di vapore per togliere
l'astina.Usare l'aceto per eliminare l'eventuale calcare
depositatosi sull'astina-.
Non piegate o danneggiate l'astina.
C
9 Rimettete a posto l'astina inserendo la punta esattamente al
centro del foro e agganciando nella cavità la piccola sporgenza
posta sul lato dell'astina.Mettete la manopola del regolatore di
vapore in posizione O.
Ripetete l'operazione nel caso in cui il ferro contenga una
grande quantità di impurità.
Dopo l'operazione di eliminazione del calcare
- Inserite la spina nella presa per riscaldare il ferro.
- Togliete la spina non appena la spia arancione si sarà spenta.
- Passate il ferro sopra uno straccio per eliminare eventuali macchie
che si fossero formate sulla piastra.
- Lasciate raffreddare il ferro prima di riporlo.
Al termine della stiratura
1 Togliete la spina dalla presa e lasciate reffreddare il ferro.
2 Togliete i residui di calcare dalla piastra usando un panno
umido e un detergente (liquido) non abrasivo.
La piastra deve essere perfettamente liscia:evitate il contatto con
oggetti metallici.

ITALIANO 41
3 La parte superiore del ferro può essere pulita con un panno
umido.
C
4 Risciacquate regolarmente l'interno del serbatoio.Svuotate il
serbatoio dopo la pulizia.
Come riporre il ferro
1 Togliete la spina dalla presa e mettete il termostato in
posizione O.
2 Svuotate il serbatoio.
C
3 Lasciare raffreddare il ferro.Avvolgete il cavo attorno
all'apposito supporto e fissatelo con il gancio.
4 Riponete sempre il ferro in posizione verticale,in un posto
sicuro e asciutto.
Garanzia e assistenza
Se avete bisogno di assistenza o di ulteriori informazioni, vi preghiamo
di visitare il nostro sito web:www.Philips.com oppure di contattare il
Centro Assistenza Clienti Philips del vostro Paese (per conoscere il
numero di telefono,vedere l'opuscolo della garanzia).Qualora nel
vostro Paese non ci fosse un Centro Assistenza Clienti, rivolgetevi al
rivenditore autorizzato Philips oppure contattate il Service
Departmente of Philips Domestic Appliances and Personal Care BV.
Localizzazione guasti
In questo capitolo vengono riportati i problemi più ricorrenti legati
all'uso del ferro.Per ulteriori dettagli, vi preghiamo di leggere le diverse
sezioni.Nel caso non riusciste a risolvere un problema,vi preghiamo di
contattare il Centro Assistenza Philips più-vicino oppure un rivenditore
autorizzato.

ITALIANO42
Soluzione
Controllate il cavo,la spina e la presa
di corrente.
Impostate il termostato alla
temperatura adatta.
Riempite il serbatoio (Vedere "Come
riempire il serbatoio").
Mettete il regolatore di vapore in
posizione q oppure w (vedere
"Stiratura a vapore").
Impostate il termostato ad una
temperatura adatta per la stiratura a
vapore (da 2 a MAX). Mettete il
ferro in posizione verticale e aspettate
fino a quando si sarà spenta la spia
arancione prima di iniziare a stirare.
Mettete il ferro in posizione
orizzontale e aspettate qualche
minuto prima di usare nuovamente la
funzione Getto di Vapore (Verticale).
Impostate il termostato ad una
temperatura adatta per la stiratura a
vapore (da 2 a MAX). Mettete il
ferro in posizione verticale e aspettate
fino a quando si sarà spenta la spia
arancione prima di iniziare a stirare.
Attivate alcune volte il dispositivo
Eliminazione del Calcare (Vedere
"Eliminazione calcare")-.
Muovete leggermente il ferro per
disattivare la funzione Spegnimento
automatico:la spia cesserà di
lampeggiare.
Impostate il termostato ad una
temperatura adatta per la stiratura a
vapore (da 2 a MAX). Mettete il
ferro in posizione verticale e aspettate
fino a quando si sarà spenta la spia
arancione prima di iniziare a stirare.
Possibile causa
Problemi di collegamento.
Termostato su MIN.
Quantità d'acqua insufficiente nel
serbatoio
Il regolatore di vapore è in posizione
O.
Il ferro non è sufficientemente caldo
e/o è stato attivato il dispositivo
Antisgocciolamento (solo mod.
GC2032,2030,2025, 2020).
Il Getto di Vapore (Verticale) è stato
usato troppe volte in un periodo di
tempo limitato.
La piastra non è sufficientemente
calda.
L'acqua troppo dura ha formato del
calcare all'interno della piastra.
è stata attivata la funzione di
spegnimento automatico.Vedere
"Spegnimento automatico".
La temperatura impostata è troppo
bassa.
Problema
Il ferro è collegato alla presa di
corrente ma la piastra è fredda.
Mancanza di vapore
Non fuoriesce nessun Getto di Vapore
(solo mod.GC2032,2030, 2025,2016,
2015,2012,2011, 2010) o Getto di
Vapore Verticale (solo mod. GC2032,
2030,2025,2016, 2015).
Dalla piastra fuoriescono impurità e
residui di calcare durante la stiratura.
La spia rossa lampeggia (solo mod.
GC2032,2030).
Dalla piastra fuoriescono gocce d'acqua
(solo mod.GC2016,2015, 2012,2011,
2010,2006,2005).

43
 Loading...