

Page 1
www.philips.com
ENGLISH 2 - 3
7 - 5
10 - 8
Comfort LongLife
GC1680, GC1675,GC1665
1 2 3 4
5 6 7 8
9 10 11 12
13 14 15 16
17 18
á«Hô©dGá«Hô©dG
v<ñUãv<ñUã
Page 2
GC1680, GC1675,GC1665 4239 000 579912 ENGLISH
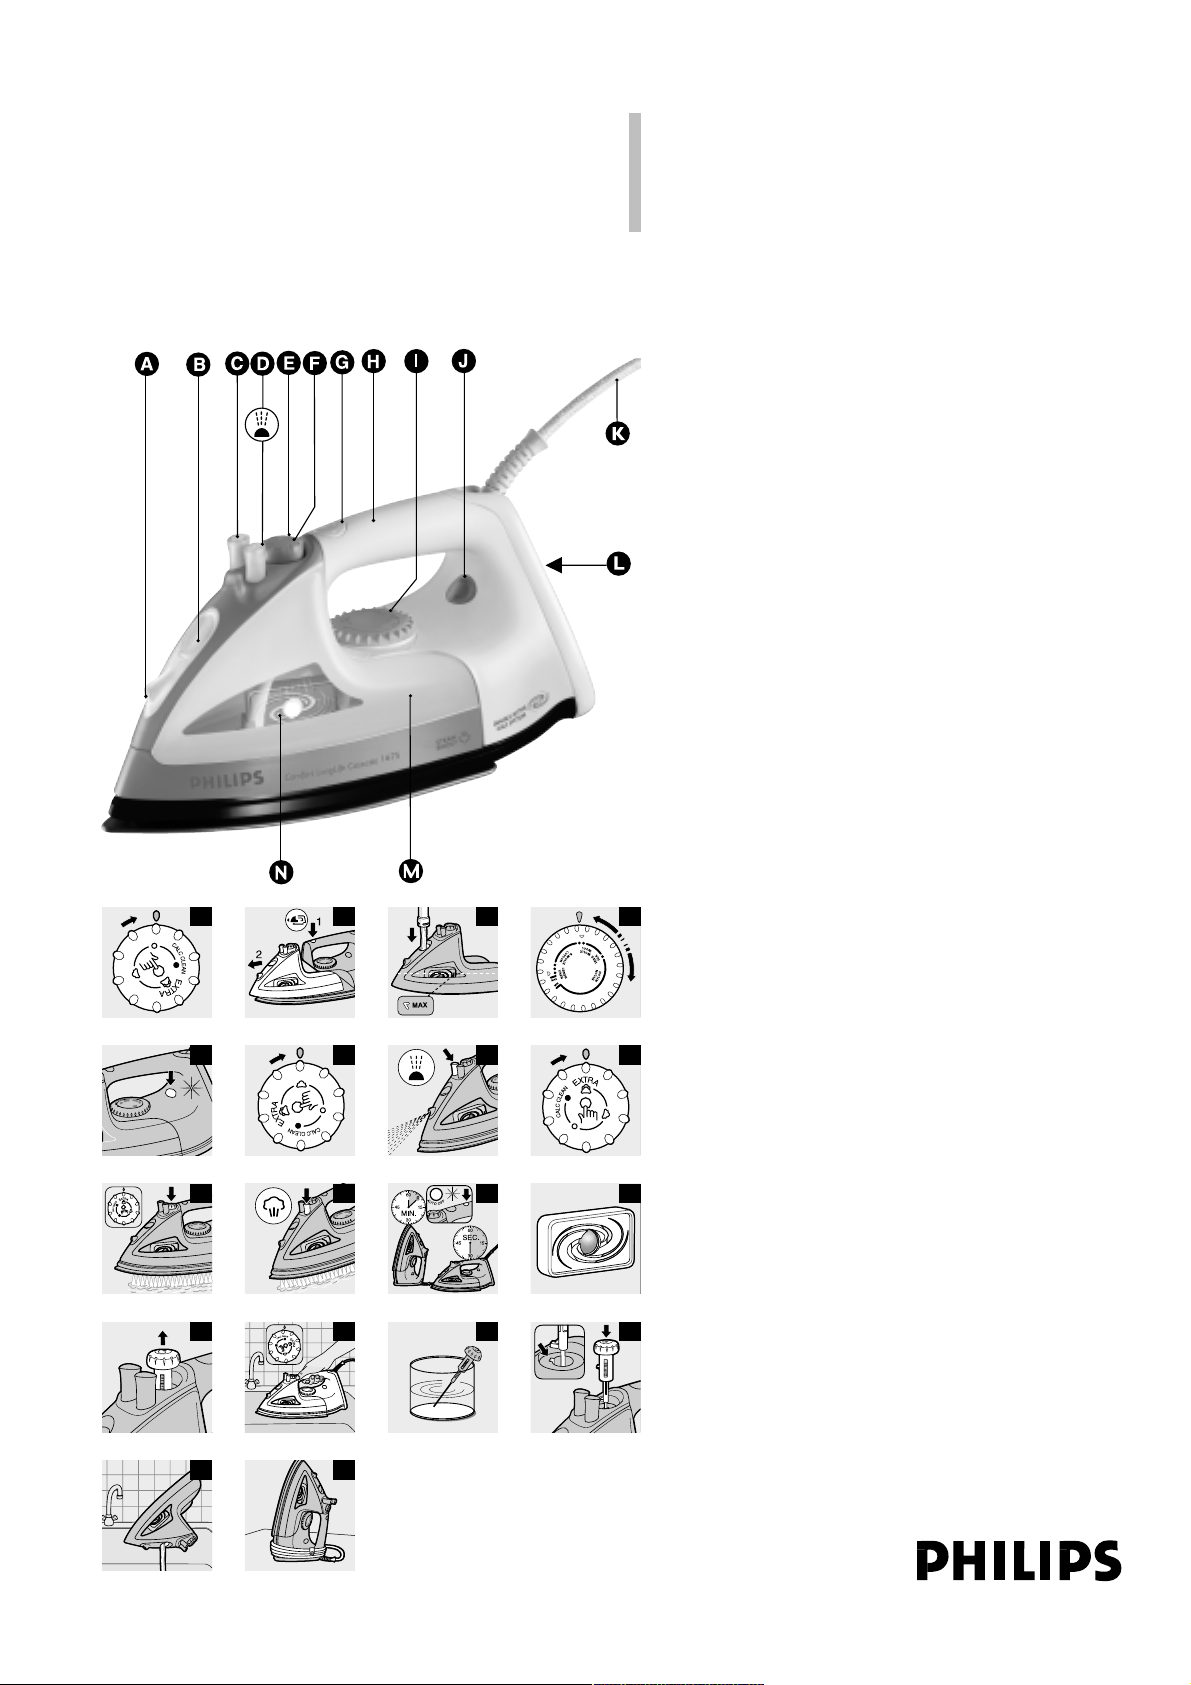
General description
.
A Spray nozzle
B Filling opening
C Shot-of-steam function (GC1675 only)
D Spray button T
E Steam control
- O = no steam
- q = moderate steam
- w = maximum steam
- x = Calc-Clean function
F Extra-steam function (GC1680 only)
G Release button for water tank
H Electronic safety shut-off function (GC1680 only)
I Temperature dial
J Temperature light
K Mains cord
L Type plate
M Water tank
N Anti-calc tablet
Important
.
Read these instructions for use carefully before using the appliance and save
them for future reference.
◗ Check if the voltage indicated on the type plate corresponds to the
local mains voltage before you connect the appliance.
◗ Do not use the appliance if the plug, the cord or the appliance itself is
damaged.
◗ If the mains cord is damaged, it must be replaced by Philips, a service
centre authorised by Philips or similarly qualified persons in order to
avoid a hazard.
◗ Never leave the iron unattended when it is connected to the mains.
◗ Never immerse the iron in water.
◗ Infirm persons should not be allowed to use the appliance without
supervision. Keep the appliance out of the reach of children.
◗ Do not put perfume, vinegar, starch, descaling agents, ironing aids or
other chemicals in the water tank.
◗ The soleplate of the iron can become extremely hot and may cause
burns if touched. Do not allow the cord to come into contact with
the soleplate when it is hot.
◗ When you have finished ironing, when you clean the appliance, when
you fill or empty the water tank and also when you leave the iron
even for a short while: set the steam control to position 0, put the
iron on its heel and remove the mains plug from the wall socket.
Before first use
.
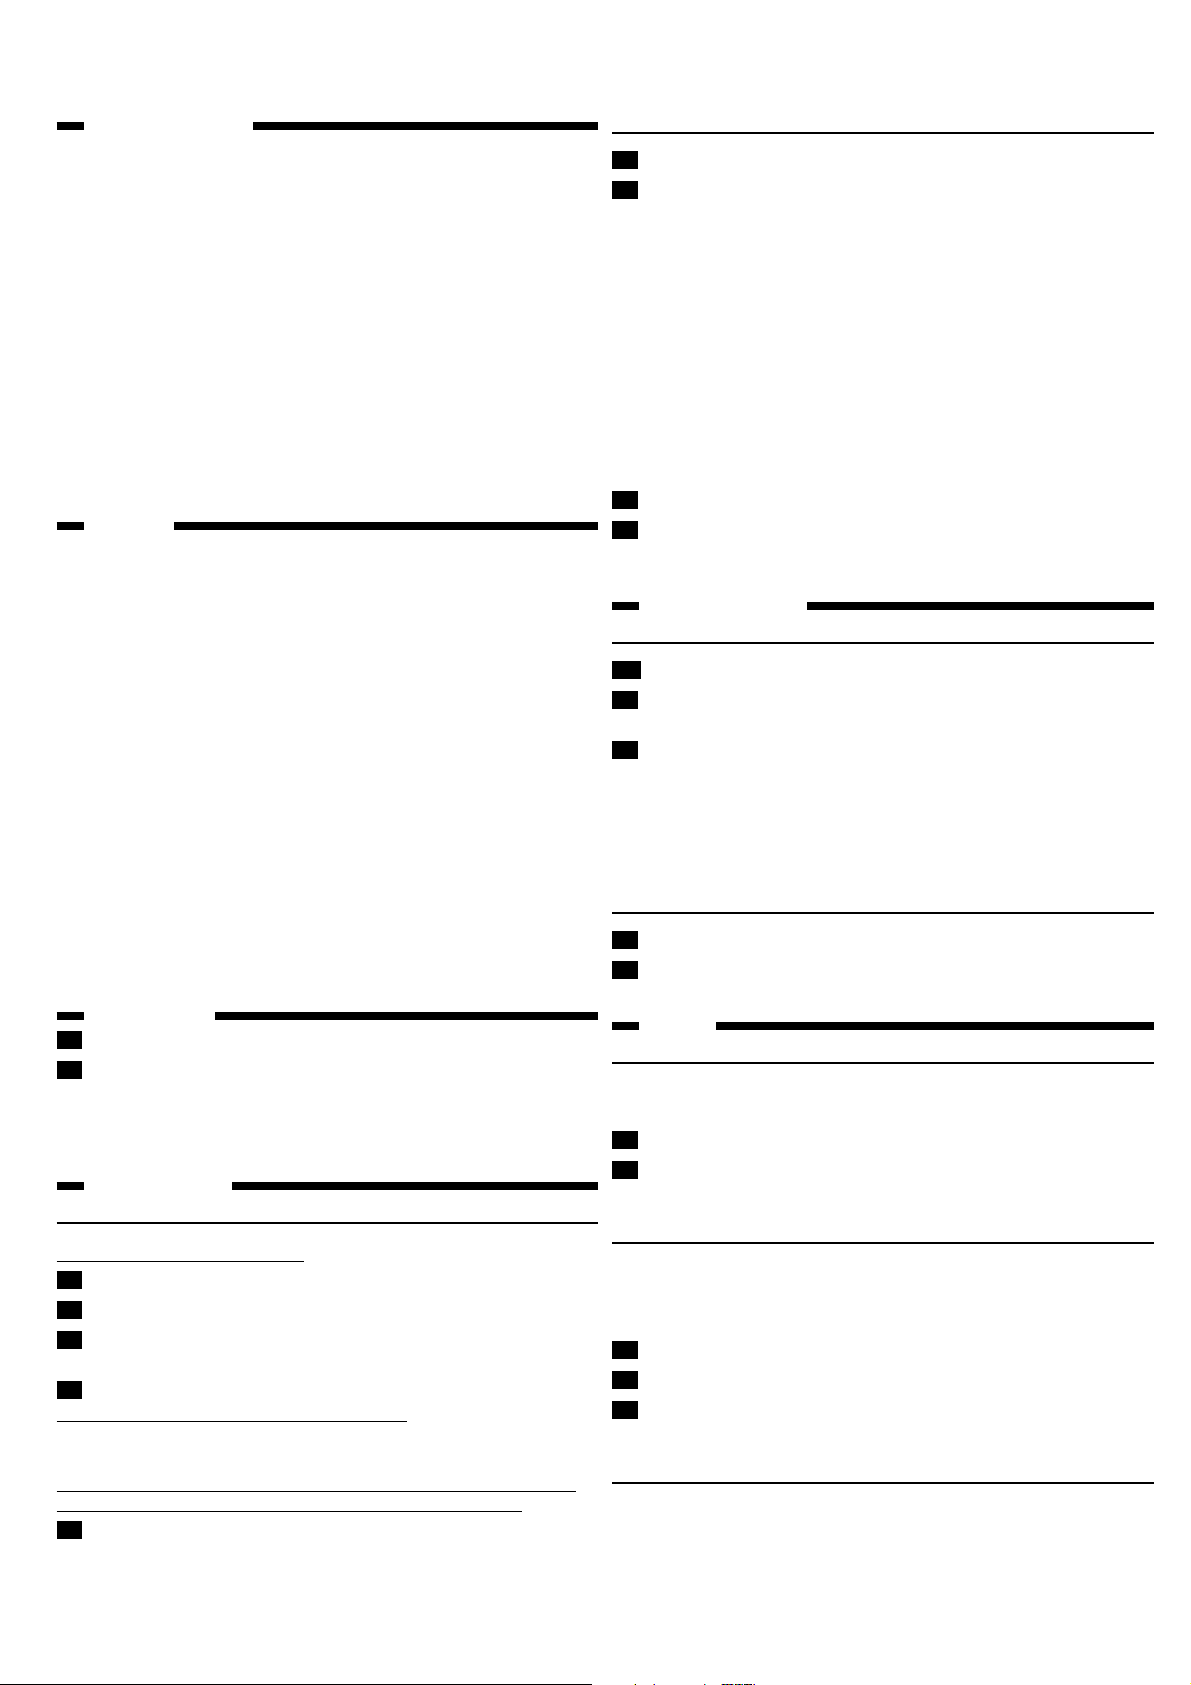
1 Remove any sticker or protective foil from the soleplate.
2 Let the iron heat up to maximum temperature and pass the iron over
a piece of damp cloth for several minutes to remove any residues
from the soleplate.
B
The iron may give off some smoke when you use it for the first time. This will
cease after a short while.
Preparing for use
.
Filling the water tank
Never immerse the iron in water.
1 Make sure the appliance is unplugged.
2 Set the steam control to position O (= no steam) (fig. 1).
3 Press and hold the release button and remove the detachable water
tank (fig. 2).
4 Fill the water tank with tap water up to the maximum level (fig. 3).
Do not fill the tank beyond the MAX indication.
◗ If the tap water in your area is very hard, we advise you to mix it with
an equal amount of distilled water or to use distilled water only.
Do not put perfume, vinegar, starch, descaling agents, ironing additives,
chemically descaled water or other chemicals in the water tank.
5 Push the water tank back into the iron ('click').
Setting the temperature
1 Put the iron on its heel.
2 Set the required ironing temperature by turning the temperature dial
to the appropriate position (fig. 4).
Check the laundry care label for the required ironing temperature:
- 1 Synthetic fabrics (e.g. acrylic, nylon, polyamide, polyester)
- 1 Silk
- 2 Wool
- 3 Cotton, linen
If you do not know what kind(s) of fabric(s) an article is made of, determine
the right ironing temperature by ironing a part that will not be visible when
you wear or use the article.
Silk, woollen and synthetic materials: iron the reverse side of the fabric to
prevent shiny patches. Avoid using the spray function to prevent stains.
Start ironing the articles that require the lowest ironing temperature, such as
those made of synthetic fibres.
3 Put the mains plug in an earthed wall socket.
4 When the temperature light has gone out, wait a while before you
start ironing (fig. 5).
The temperature light will go on from time to time during ironing.
Using the appliance
.
Steam ironing
1 Make sure that there is enough water in the water tank.
2 Select the recommended ironing temperature (see chapter 'Preparing
for use', section 'Setting the temperature').
3 After the temperature light has gone out, set the steam control to
the appropriate steam position. Make sure that the steam setting you
select is suitable for the ironing temperature selected: (fig. 6).
- q for moderate steam (temperature settings 2 to MAX)
- w for maximum steam (temperature settings 3 to MAX)
B
The iron will start steaming as soon as the set temperature has been reached.
Ironing without steam
1 Set the steam control to position O (= no steam).
2 Select the recommended ironing temperature (see chapter 'Preparing
for use', section 'Setting the temperature').
Features
.
Spray function
You can use the spray function to remove stubborn creases at any
temperature.
1 Make sure that there is enough water in the water tank.
2 Press the spray button several times to moisten the article to be
ironed (fig. 7).
Extra steam (GC1680 only)
This function provides extra steam to remove very stubborn creases.
◗ The extra-steam function only works at temperature settings
between 3 and MAX.
1 Set the steam control to position w (= maximum steam) (fig. 8).
2 Press and hold the steam control for a maximum of 5 seconds (fig. 9).
3 Release the steam control and wait at least 1 minute before using this
function again to prevent water from dripping out of the soleplate.
Shot of steam (GC1675 only)
A powerful shot of steam helps to remove stubborn creases.
The shot-of-steam function can only be used at temperature settings
between 3 and MAX.
Page 3
GC1680, GC1675,GC16653 ENGLISH 4239 000 57991
1 Press and release the shot-of-steam button (fig. 10).
Wait a while before using the button again to avoid spluttering.
Never direct the steam at people.
Electronic safety shut-off function (GC1680 only)
The electronic safety shut-off function automatically switches off the iron if it
has not been moved for a while.
◗ The auto-off light starts blinking to indicate that the iron has been
switched off by the safety shut-off function (fig. 11).
- In horizontal position, this will happen after 30 seconds.
- In vertical position, this will happen after 8 minutes.
◗ To let the iron heat up again:
- Pick up the iron or move it slightly.
- The auto-off light goes out and the temperature light goes on.
- When the temperature light has gone out and goes on again, the iron is
ready for use.
Cleaning and maintenance
.
After ironing
1 Remove the mains plug from the wall socket and let the iron cool down.
2 Wipe scale and any other deposits off the soleplate with a damp cloth
and a non-abrasive (liquid) cleaning agent.
To keep the soleplate smooth, you should avoid hard contact with metal
objects. Never use a scouring pad, vinegar or other chemicals to clean
the
soleplate.
3 Clean the upper part of the iron with a damp cloth.
4 Regularly rinse the water tank with water. Empty the water tank after
cleaning.
Double-Active Calc System
1 The anti-calc tablet prevents scale from clogging the steam vents
(fig. 12).
◗ The anti-calc tablet is constantly active and does not need replacement.
2 The Calc-Clean function removes the scale particles (fig. 13).
Calc-Clean function
Use the Calc-Clean function once every two weeks. If the water in your
area is very hard (i.e. when flakes come out of the soleplate during ironing),
you should use the Calc-Clean function more frequently.
1 Set the steam control to position O.
2 Set the temperature dial to MAX.
3 Fill the water tank to the maximum level.
Do not pour vinegar or other descaling agents into the water tank.
4 Put the plug in the wall socket.
5 Unplug the iron when the temperature light has gone out.
6 Hold the iron over the sink and set the steam control to the Calc-
Clean position x (fig. 14).
7 Pull the steam control slightly upwards and gently shake the iron until
all water in the tank has been used up.
Steam and boiling water will come out of the soleplate. Scale (if any) will be
flushed out.
8 After having used the Calc-Clean function, press the steam control
back to its original position and set it to position O.
Repeat the Calc-Clean process if the water coming out of the iron still
contains scale particles.
After the Calc-Clean process
1 Connect the iron to the mains to let the soleplate dry.
2 Unplug the iron when the light has gone out.
3 Move the iron gently over a piece of used cloth to remove any water
stains that may have formed on the soleplate.
4 Let the iron cool down before you store it.
Cleaning the steam control needle
1 Pull the steam control out of the appliance (fig. 13).
2 Use vinegar to remove scale, if any, from the needle (fig. 15).
Do not bend or damage the steam control needle.
3 Reinsert the steam control needle by placing the point of the needle
exactly in the centre of the hole and by fitting the small projection on
the side of the needle into the slot (fig. 16).
4 Set the steam control to position O.
Storage
.
1 Make sure the appliance is unplugged and set the steam control to
position O.
2 Empty the water tank (fig. 17).
3 Wind the mains cord round the cord storage facility.
4 Store the iron on its heel in a safe and dry place (fig. 18).
Guarantee & service
.
If you need information or if you have a problem, please visit the Philips
website at www.philips.com or contact the Philips Customer Care Centre
in your country (you will find its phone number in the worldwide guarantee
leaflet). If there is no Customer Care Centre in your country, turn to your
local Philips dealer or contact the Service Department of Philips Domestic
Appliances and Personal Care BV.
Page 4

GC1680, GC1675,GC16654 ENGLISH 4239 000 57991
Troubleshooting
This chapter summarises the most common problems you could
encounter with your iron. Please read the different sections for more
details. If you are unable to solve the problem, contact the Customer
Care Centre in your country.
Solution(s)
Check the mains cord, the
plug and the wall socket.
Set the temperature dial
to the required
temperature.
Move the iron slightly to
deactivate the safety shutoff function. The iron will
start heating up again.
Fill the water tank (see
chapter 'Preparing for
use').
Set the steam control to
position q or w (see
chapter 'Using the
appliance').
Set the temperature dial
to a temperature suitable
for steam ironing (2 to
MAX). Put the iron on its
heel and wait until the
temperature light has
gone out before you start
ironing.
Press and hold the steam
control for a maximum of
5 seconds.
Wait at least 1 minute
before using the extrasteam function again.
Set the temperature
control dial to a
temperature between
3 and MAX. Put the
iron on its heel and wait
until the temperature light
has gone out.
Fill the water tank (see
chapter 'Preparing for
use').
Set the temperature dial
to a temperature between
3 and MAX. Put the
iron on its heel and wait
until the temperature light
has gone out.
Wait at least 1 minute
before using the extrasteam function again (see
chapter 'Features').
Fill the water tank (see
chapter 'Preparing for
use').
Use the Calc-Clean
function one or more
times (see chapter
'Cleaning and
maintenance').
Set the temperature dial
to a temperature suitable
for steam ironing (2 to
MAX). Put the iron on its
heel and wait until the
temperature light has
gone out before you start
ironing.
Possible cause(s)
There is a connection
problem.
The temperature dial has
been set to MIN.
The safety shut-off
function has switched the
iron off.
There is not enough
water in the water tank.
The steam control has
been set to position O.
The iron is not hot
enough.
The steam control has not
been pressed long
enough.
The extra-steam function
has been used too often
in a short period.
The iron is not hot
enough.
There is not enough
water in the water tank.
The iron is not hot
enough.
The extra-steam function
has been used too often
in a short period.
There is not enough
water in the water tank.
You have been using hard
water, which has caused
scale flakes to develop
inside the soleplate.
The iron is not hot
enough.
Problem
The iron is plugged in but
the soleplate is cold.
The iron does not produce
any steam.
The extra-steam function
does not work (GC1680
only).
Water leaks from the
soleplate when the extrasteam function (GC1680
only) is being used.
The spray function does
not work.
Flakes and impurities come
out of the soleplate during
ironing.
Water leaks from the
soleplate during ironing.
Solution(s)
Empty the water tank and
set the steam control to
position O before storing
the iron (see chapter
'Storage'). Place the iron
on its heel.
Fill the water tank (see
chapter 'Preparing for
use').
Possible cause(s)
The iron has been put in
horizontal position while
there is still water in the
water tank.
There is not enough
water in the water tank.
Problem
Water leaks from the
soleplate while the iron is
cooling down or after it has
been stored.
The shot-of-steam function
does not work (GC1675
only).
Page 5

GC1680, GC1675,GC1665
54239 000 57991
v<ñUãv<ñUã
v!U| VOàv!U| VOà
`|dA" tö8 ñuD! «ñ b|œdÖ vî t3«uî ʬ U! uÉ« “« ÁœUH¶<« ÂU~MÙ të ‰uLFî †öJAî qBã s|«`|dA" tö8 ñuD! «ñ b|œdÖ vî t3«uî ʬ U! uÉ« “« ÁœUH¶<« ÂU~MÙ të ‰uLFî †öJAî qBã s|«
qJAî lãñ t! ñœUè dÖ« ÆbOzUîdã tFìUDî d¶AO! †UàöÉ« È«d! «ñ nK¶‹î ÈUNA‹! ÎUHDì ÆbMë vîqJAî lãñ t! ñœUè dÖ« ÆbOzUîdã tFìUDî d¶AO! †UàöÉ« È«d! «ñ nK¶‹î ÈUNA‹! ÎUHDì ÆbMë vî
Æb|dO~! ”U9 œu8 ñuAë ñœ ÊU|d¶Aî X|UL4 eëdî U! ¨bO¶fiOïÆb|dO~! ”U9 œu8 ñuAë ñœ ÊU|d¶Aî X|UL4 eëdî U! ¨bO¶fiOï
qJAîqJAî
tæH Uî« X<« ÁbÅ qË ‚d! t! uÉ«tæH Uî« X<« ÁbÅ qË ‚d! t! uÉ«
ÆX<« œd< uÉ«ÆX<« œd< uÉ«
ÆbMë v/ bOìu" ÈñU‹! uÉ«ÆbMë v/ bOìu" ÈñU‹! uÉ«
bMë v/ qLà tãU{« ñU‹! œdJKLàbMë v/ qLà tãU{« ñU‹! œdJKLà
‰bî jIã® ‰bî jIã®0861CGGC1680©©..
“« ÁœUH¶<« 54 ñœ uÉ« tæH “« »¬“« ÁœUH¶<« 54 ñœ uÉ« tæH “« »¬
bMë vî XAï tãU{« ñU‹! œdJKLàbMë vî XAï tãU{« ñU‹! œdJKLà
‰bî jIã® ‰bî jIã®0861CGGC1680©©..
ÆbMë v/ ñUë Èdá<« œdJKLàÆbMë v/ ñUë Èdá<« œdJKLà
Ë †U!u<ñ vAë uÉ« ÂU~MÙ ñœË †U!u<ñ vAë uÉ« ÂU~MÙ ñœ
vî ÃñU8 uÉ« tæH “« vBìU8Uïvî ÃñU8 uÉ« tæH “« vBìU8Uï
ÆbïuÅÆbïuÅ
uÉ« tæH “« »¬ vAë uÉ« 54 ñœuÉ« tæH “« »¬ vAë uÉ« 54 ñœ
ÆbMë vî XAïÆbMë vî XAï
“« bF! U| uÉ« ÊbÅ pM8 ÂU~MÙ »¬“« bF! U| uÉ« ÊbÅ pM8 ÂU~MÙ »¬
XAï ʬ tæH “« uÉ« Êœdë ÁdO8–XAï ʬ tæH “« uÉ« Êœdë ÁdO8–
ÆbMë vîÆbMë vî
bMë v/ qLà ñU‹! gÅUÄ œdJKLàbMë v/ qLà ñU‹! gÅUÄ œdJKLà
‰bî jIã® ‰bî jIã®5761CGGC1675©©..
vìUL¶4« ©ÈUÙ® XKàvìUL¶4« ©ÈUÙ® XKà
Æœñ«œ œu3Ë ‚d! t! ‰UB"« qJAîÆœñ«œ œu3Ë ‚d! t! ‰UB"« qJAî
ÈËñ †ñ«d4 t3ñœ tLëœ ÈËñ †ñ«d4 t3ñœ tLëœ
NIMMINñ«dèñ«dè
ÆX<« ÁbÅ Áœ«œÆX<« ÁbÅ Áœ«œ
«ñ uÉ« ‚d! lDè vM1« œdJKLà«ñ uÉ« ‚d! lDè vM1« œdJKLà
ÆX<« Áœdë ‘uîU8ÆX<« Áœdë ‘uîU8
Æœñ«bï œu3Ë »¬ Êe‹î ñœ vãUë »¬Æœñ«bï œu3Ë »¬ Êe‹î ñœ vãUë »¬
XOF{Ë ÈËñ ñU‹! ‰d¶Më XOF{Ë ÈËñ ñU‹! ‰d¶MëOOñ«dèñ«dè
ÆX<« ÁbÅ Áœ«œÆX<« ÁbÅ Áœ«œ
ÆXfiOï ⁄«œ vãUë ñ«bIî t! uÉ«ÆXfiOï ⁄«œ vãUë ñ«bIî t! uÉ«
Áœ«œ ñUAã vãUë ñ«bI0 ñU‹! ‰d¶MëÁœ«œ ñUAã vãUë ñ«bI0 ñU‹! ‰d¶Më
ÆX<« ÁbAïÆX<« ÁbAï
Á“«bï« “« gO! tãU{« ñU‹! œdJKLàÁ“«bï« “« gO! tãU{« ñU‹! œdJKLà
ÆX<« ÁbÅ ÁœUH¶<« ÁU"uë ÈUNïUî“ ñœÆX<« ÁbÅ ÁœUH¶<« ÁU"uë ÈUNïUî“ ñœ
ÆXfiOï ⁄«œ vãUë ñ«bIî t! uÉ«ÆXfiOï ⁄«œ vãUë ñ«bIî t! uÉ«
Æœñ«bï œu3Ë »¬ Êe‹î ñœ vãUë »¬Æœñ«bï œu3Ë »¬ Êe‹î ñœ vãUë »¬
ÆXfiOï ⁄«œ vãUë ñ«bIî t! uÉ«ÆXfiOï ⁄«œ vãUë ñ«bIî t! uÉ«
Á“«bï« “« gO! tãU{« ñU‹! œdJKLà Á“«bï« “« gO! tãU{« ñU‹! œdJKLà
ÆX<« ÁbÅ ÁœUH¶<« ÁU"uë ÈUNïUî“ ñœÆX<« ÁbÅ ÁœUH¶<« ÁU"uë ÈUNïUî“ ñœ
Æœñ«bï œu3Ë »¬ Êe‹î ñœ vãUë »¬Æœñ«bï œu3Ë »¬ Êe‹î ñœ vãUë »¬
ôU! ʬ v¶‹< t3ñœ të v!¬ “« ULÅôU! ʬ v¶‹< t3ñœ të v!¬ “« ULÅ
YàU! të b|« Áœdë ÁœUH¶<« X<«YàU! të b|« Áœdë ÁœUH¶<« X<«
tæH q8«œ ñœ »u<ñ Êbî¬ œu3u!tæH q8«œ ñœ »u<ñ Êbî¬ œu3u!
ÆX<« ÁbÅ uÉ«ÆX<« ÁbÅ uÉ«
ÆXfiOï ⁄«œ vãUë ñ«bIî t! uÉ«ÆXfiOï ⁄«œ vãUë ñ«bIî t! uÉ«
»¬ Êe‹î ñœ »¬ “uMÙ të vîU~MÙ»¬ Êe‹î ñœ »¬ “uMÙ të vîU~MÙ
ñ«dè vIã« XOF{Ë ñœ uÉ« ¨œñ«œ œu3Ëñ«dè vIã« XOF{Ë ñœ uÉ« ¨œñ«œ œu3Ë
ÆX<« ÁbÅ Áœ«œÆX<« ÁbÅ Áœ«œ
Æœñ«bï œu3Ë »¬ Êe‹î ñœ vãUë »¬Æœñ«bï œu3Ë »¬ Êe‹î ñœ vãUë »¬
©UÙ® q4 Á«ñ©UÙ® q4 Á«ñ
«ñ ‚d! e|dÄ Ë t8UÅ Ëœ ¨‚d! rO<«ñ ‚d! e|dÄ Ë t8UÅ Ëœ ¨‚d! rO<
ÆbOMë vMO!“U!ÆbOMë vMO!“U!
ÈËñ «ñ †ñ«d4 t3ñœ rOEM" t3ñœÈËñ «ñ †ñ«d4 t3ñœ rOEM" t3ñœ
ÆbOÙœ ñ«dè Á«u)œ †ñ«d4 t3ñœÆbOÙœ ñ«dè Á«u)œ †ñ«d4 t3ñœ
r¶fiO< U" bOÙœ Xëd4 vLë «ñ uÉ«r¶fiO< U" bOÙœ Xëd4 vLë «ñ uÉ«
uÉ« ÆbOMë ‰UFã dOä «ñ ‚d! lDè vM1«uÉ« ÆbOMë ‰UFã dOä «ñ ‚d! lDè vM1«
Æœdë bÙ«u8 ÊbÅ ⁄«œ t! ŸËdŠΫœbºîÆœdë bÙ«u8 ÊbÅ ⁄«œ t! ŸËdŠΫœbºî
ÁœU qBã t!® bOMë dÄ «ñ »¬ Êe‹îÁœU qBã t!® bOMë dÄ «ñ »¬ Êe‹î
tF3«dî ¢ ÁœUH¶<« È«d! ÁU~¶<œ ÊœdëtF3«dî ¢ ÁœUH¶<« È«d! ÁU~¶<œ Êœdë
Æ©bOMëÆ©bOMë
5! v¶OF{Ë ÈËñ «ñ ñU‹! t3ñœ 5! v¶OF{Ë ÈËñ «ñ ñU‹! t3ñœqq
Ë Ëww“« ÁœUH¶<«“ qBã t!® bOÙœ ñ«dè“« ÁœUH¶<«“ qBã t!® bOÙœ ñ«dè
Æ©bOMë tF3«dî fÙU~¶<œÆ©bOMë tF3«dî fÙU~¶<œ
ÈËñ «ñ †ñ«d4 t3ñœ rOEM" t3ñœÈËñ «ñ †ñ«d4 t3ñœ rOEM" t3ñœ
ñ«dè ñU‹! uÉ« V<UMî †ñ«d4 t3ñœñ«dè ñU‹! uÉ« V<UMî †ñ«d4 t3ñœ
® bOMë rOEM"® bOMë rOEM"22 U" U"XAMMAX«ñ uÉ« Æ©«ñ uÉ« Æ©
ÂU~MÙ U" Ë Áœ«œ ñ«dè tMÅUÄ ÈËñÂU~MÙ U" Ë Áœ«œ ñ«dè tMÅUÄ ÈËñ
q§è †ñ«d4 t3ñœ ⁄«dÇ ÊbÅ ‘uîU8q§è †ñ«d4 t3ñœ ⁄«dÇ ÊbÅ ‘uîU8
ÆbOMë d§ vAëuÉ« ŸËdÅ “«ÆbOMë d§ vAëuÉ« ŸËdÅ “«
tOïU# ˚ dßë«b4 È«d! «ñ ñU‹! ‰d¶MëtOïU# ˚ dßë«b4 È«d! «ñ ñU‹! ‰d¶Më
Æb|ñ«œ ÁU~ï Ë Áœ«œ ñUAãÆb|ñ«œ ÁU~ï Ë Áœ«œ ñUAã
ñU‹! œdJKLà “« œbºî ÁœUH¶<« “« q§èñU‹! œdJKLà “« œbºî ÁœUH¶<« “« q§è
ÆbOMë d§ tIOèœ ± qè«b4 ¨tãU{«ÆbOMë d§ tIOèœ ± qè«b4 ¨tãU{«
ÈËñ «ñ †ñ«d4 t3ñœ rOEM" t3ñœÈËñ «ñ †ñ«d4 t3ñœ rOEM" t3ñœ
5! v"ñ«d4 t3ñœ 5! v"ñ«d4 t3ñœ33 Ë ËXAMMAX
ÆbOMë rOEM"ÆbOMë rOEM"
U" Ë Áœ«œ ñ«dè tMÅUÄ ÈËñ «ñ uÉ«U" Ë Áœ«œ ñ«dè tMÅUÄ ÈËñ «ñ uÉ«
t3ñœ ⁄«dÇ ÊbÅ ‘uîU8 ÂU~MÙt3ñœ ⁄«dÇ ÊbÅ ‘uîU8 ÂU~MÙ
ÆbOMë d§ †ñ«d4ÆbOMë d§ †ñ«d4
ÁœU qBã t!® bOMë dÄ «ñ »¬ Êe‹îÁœU qBã t!® bOMë dÄ «ñ »¬ Êe‹î
tF3«dî ¢ÁœUH¶<« È«d! ÁU~¶<œ ÊœdëtF3«dî ¢ÁœUH¶<« È«d! ÁU~¶<œ Êœdë
Æ©bOMëÆ©bOMë
ÈËñ «ñ †ñ«d4 t3ñœ rOEM" t3ñœÈËñ «ñ †ñ«d4 t3ñœ rOEM" t3ñœ
5! v"ñ«d4 t3ñœ 5! v"ñ«d4 t3ñœ33 Ë ËXAMMAX
ÆbOMë rOEM"ÆbOMë rOEM"
U" Ë Áœ«œ ñ«dè tMÅUÄ ÈËñ «ñ uÉ«U" Ë Áœ«œ ñ«dè tMÅUÄ ÈËñ «ñ uÉ«
t3ñœ ⁄«dÇ ÊbÅ ‘uîU8 ÂU~MÙt3ñœ ⁄«dÇ ÊbÅ ‘uîU8 ÂU~MÙ
ÆbOMë d§ †ñ«d4ÆbOMë d§ †ñ«d4
ñU‹! œdJKLà “« œbºî ÁœUH¶<« “« q§èñU‹! œdJKLà “« œbºî ÁœUH¶<« “« q§è
t!® bOMë d§ tIOèœ ± qè«b4 ¨tãU{«t!® bOMë d§ tIOèœ ± qè«b4 ¨tãU{«
©bOMë tF3«dî ¢UN¶OuB8¢qBã©bOMë tF3«dî ¢UN¶OuB8¢qBã
ÁœU qBã t!® bOMë dÄ «ñ »¬ Êe‹îÁœU qBã t!® bOMë dÄ «ñ »¬ Êe‹î
tF3«dî ¢ÁœUH¶<« È«d! ÁU~¶<œ ÊœdëtF3«dî ¢ÁœUH¶<« È«d! ÁU~¶<œ Êœdë
Æ©bOMëÆ©bOMë
ñU! bMÇ U| p| Êœdë „UÄ œdJKLà “«ñU! bMÇ U| p| Êœdë „UÄ œdJKLà “«
Ë Êœdë eO9¢ qBã t!® bOMë ÁœUH¶<«Ë Êœdë eO9¢ qBã t!® bOMë ÁœUH¶<«
Æ©bOMë tF3«dî ¢Èñ«bN~ïÆ©bOMë tF3«dî ¢Èñ«bN~ï
ÈËñ «ñ †ñ«d4 t3ñœ rOEM" t3ñœÈËñ «ñ †ñ«d4 t3ñœ rOEM" t3ñœ
vAë uÉ« È«d! V<UMî †ñ«d4 t3ñœvAë uÉ« È«d! V<UMî †ñ«d4 t3ñœ
® bOÙœ ñ«dè ñU‹! U!® bOÙœ ñ«dè ñU‹! U!22 U" U"MAXXAM((
U" Ë Áœ«œ ñ«dè tMÅUÄ ÈËñ «ñ uÉ«U" Ë Áœ«œ ñ«dè tMÅUÄ ÈËñ «ñ uÉ«
t3ñœ ⁄«dÇ ÊbÅ ‘uîU8 ÂU~MÙt3ñœ ⁄«dÇ ÊbÅ ‘uîU8 ÂU~MÙ
d§ vAëuÉ« ŸËdÅ “« q§è †ñ«d4d§ vAëuÉ« ŸËdÅ “« q§è †ñ«d4
ÆbOMëÆbOMë
“« q§è Ë bOMë tOK‹" «ñ »¬ Êe‹î“« q§è Ë bOMë tOK‹" «ñ »¬ Êe‹î
ñœ «ñ ñU‹! ‰d¶Më uÉ« Êœdë ÁdO8–ñœ «ñ ñU‹! ‰d¶Më uÉ« Êœdë ÁdO8–
XOF{Ë XOF{ËOOg‹! t!® bOÙœ ñ«dèg‹! t!® bOÙœ ñ«dè
Æ©bOMë tF3«dî ¢Á dO8–¢Æ©bOMë tF3«dî ¢Á dO8–¢
ÆbOÙœ ñ«dè tMÅUÄ ÈËñ «ñ uÉ«ÆbOÙœ ñ«dè tMÅUÄ ÈËñ «ñ uÉ«
ÁœU qBã t!® bOMë dÄ «ñ »¬ Êe‹îÁœU qBã t!® bOMë dÄ «ñ »¬ Êe‹î
tF3«dî ¢ÁœUH¶<« È«d! ÁU~¶<œ ÊœdëtF3«dî ¢ÁœUH¶<« È«d! ÁU~¶<œ Êœdë
Æ©bOMëÆ©bOMë
Page 6

GC1680, GC1675,GC1665 64239 000 57991
v<ñUãv<ñUã
--ÆœuÅ vî sÅËñ †ñ«d4 t3ñœ ⁄«dÇ Ë œuÅ vî ‘uîU8 ñUëœu8 vÅuîU8 ⁄dÇÆœuÅ vî sÅËñ †ñ«d4 t3ñœ ⁄«dÇ Ë œuÅ vî ‘uîU8 ñUëœu8 vÅuîU8 ⁄dÇ
--ÆX<« ÁœUî¬ ÁœUH¶<« È«d! uÉ« ¨bÅ sÅËñ ÁñU!Ëœ Ë bÅ ‘uîU8 †ñ«d4 t3ñœ ⁄«dÇ të vîU~MÙÆX<« ÁœUî¬ ÁœUH¶<« È«d! uÉ« ¨bÅ sÅËñ ÁñU!Ëœ Ë bÅ ‘uîU8 †ñ«d4 t3ñœ ⁄«dÇ të vîU~MÙ
Èñ«bN~ï Ë Êœdë eO9Èñ«bN~ï Ë Êœdë eO9
vAë uÉ« “« bF!vAë uÉ« “« bF!
±±ÆœuÅ œd< uÉ« U" Èñ«c~! Ë bOMë ÃñU8 e|dÄ “« «ñ ‚d! t8UŘƜuÅ œd< uÉ« U" Èñ«c~! Ë bOMë ÃñU8 e|dÄ “« «ñ ‚d! t8UÅËœ
≤≤dOä ÁbMMë eO9 ÁœUî p| Ë ñ«b/ tÇñUÄ p| “« ÁœUH¶<« U! «ñ ÁbïUî Uº! œ«uî tïuÖ dÙ Ë †U!u<ñdOä ÁbMMë eO9 ÁœUî p| Ë ñ«b/ tÇñUÄ p| “« ÁœUH¶<« U! «ñ ÁbïUî Uº! œ«uî tïuÖ dÙ Ë †U!u<ñ
ÆbOMë „UÄ uÉ« tæH ÈËñ “« ©l|Uî® vA|U<ÆbOMë „UÄ uÉ« tæH ÈËñ “« ©l|Uî® vA|U<
rO< “« eÖdÙ ÆœuÅ ÈdOÖuK3 ÈeKã ¡UOÅ« U! tæH rJæî ”U9 “« ¨uÉ« tæH 7Å«œ ÁU~ï vKIO È«d!rO< “« eÖdÙ ÆœuÅ ÈdOÖuK3 ÈeKã ¡UOÅ« U! tæH rJæî ”U9 “« ¨uÉ« tæH 7Å«œ ÁU~ï vKIO È«d!
ÆbOMJï ÁœUH¶<« uÉ« tæH Êœdë eO9 È«d! d~|œ v|ULOÅ œ«uî U! tëd< ¨v|uÅ ·dÜÆbOMJï ÁœUH¶<« uÉ« tæH Êœdë eO9 È«d! d~|œ v|ULOÅ œ«uî U! tëd< ¨v|uÅ ·dÜ
≥≥ÆbOMë eO9 ñ«b/ tÇñUÄ t" p| U! «ñ uÉ« ÈôU! XLfièÆbOMë eO9 ñ«b/ tÇñUÄ t" p| U! «ñ uÉ« ÈôU! XLfiè
¥¥ÆbOMë tOK‹" «ñ »¬ Êe‹î Êœdë eO9 “« bF! ÆbOzuA! »¬ U! «ñ uÉ« »¬ Êe‹î rEMî ñuD!ÆbOMë tOK‹" «ñ »¬ Êe‹î Êœdë eO9 “« bF! ÆbOzuA! »¬ U! «ñ uÉ« »¬ Êe‹î rEMî ñuD!
q!Ëœ ‰UFã ÈdOÖ »u<ñ r¶fiO<q!Ëœ ‰UFã ÈdOÖ »u<ñ r¶fiO<
±±Æ©±≤ qJÅ® œuÅ vî »u<ñ j<u" ñU‹! cãUMî ÊbÅ œËbfiî “« lïUî »u<ñ b{ ’dèÆ©±≤ qJÅ® œuÅ vî »u<ñ j<u" ñU‹! cãUMî ÊbÅ œËbfiî “« lïUî »u<ñ b{ ’dè
ææÆœñ«bï i|uF" t! ÃUO¶4« Ë X<« ‰UFã ÎULz«œ »u<ñ b{ ’dèÆœñ«bï i|uF" t! ÃUO¶4« Ë X<« ‰UFã ÎULz«œ »u<ñ b{ ’dè
≤≤Æ©±≥ qJÅ® bMë vî „UÄ «ñ »u<ñ †«ñ– »u<ñ Êœdë „UÄ œdJKLàÆ©±≥ qJÅ® bMë vî „UÄ «ñ »u<ñ †«ñ– »u<ñ Êœdë „UÄ œdJKLà
êÖ Êœdë „UÄ œdJKLàêÖ Êœdë „UÄ œdJKLà
vMF|® bÅU! ôU! ULÅ tIDMî »¬ v¶‹< tâïUMÇ ÆbOMë ÁœUH¶<« ñU§J| t¶HÙ Ëœ dÙ v!«œ“ »u<ñ œdJKLà “«vMF|® bÅU! ôU! ULÅ tIDMî »¬ v¶‹< tâïUMÇ ÆbOMë ÁœUH¶<« ñU§J| t¶HÙ Ëœ dÙ v!«œ“ »u<ñ œdJKLà “«
d¶AO! b|U! v!«œ“ »u<ñ œdJKLà “« ¨©œuÅ vî ÃñU8 uÉ« tæH “« Êœdë uÉ« ÂU~MÙ ñœ »u<ñ të v¶èËd¶AO! b|U! v!«œ“ »u<ñ œdJKLà “« ¨©œuÅ vî ÃñU8 uÉ« tæH “« Êœdë uÉ« ÂU~MÙ ñœ »u<ñ të v¶èË
ÆœuÅ ÁœUH¶<«ÆœuÅ ÁœUH¶<«
±±XOF{Ë ÈËñ «ñ ñU‹! ‰d¶MëXOF{Ë ÈËñ «ñ ñU‹! ‰d¶MëOOÆbOÙœ ñ«dèÆbOÙœ ñ«dè
≤≤ÈËñ «ñ †ñ«d4 t3ñœ rOEM" t3ñœÈËñ «ñ †ñ«d4 t3ñœ rOEM" t3ñœXAMMAXÆbOÙœ ñ«dèÆbOÙœ ñ«dè
≥≥ÆbOMë dÄ Ê¬ dßë«b4 Ê«eOî U" «ñ »¬ Êe‹îÆbOMë dÄ Ê¬ dßë«b4 Ê«eOî U" «ñ »¬ Êe‹î
Æb|e|dï uÉ« »¬ Êe‹î ñœ «œ“ Âd3 œ«uîd|U< U| tëd<Æb|e|dï uÉ« »¬ Êe‹î ñœ «œ“ Âd3 œ«uîd|U< U| tëd<
¥¥ÆbOÙœ ñ«dè e|dÄ ñœ «ñ t8UÅ ËœÆbOÙœ ñ«dè e|dÄ ñœ «ñ t8UÅ Ëœ
µµÆbOAJ! ‚d! “« «ñ uÉ« t8UÅËœ X<« ÁbÅ ‘uîU8 †ñ«d4 t3ñœ ⁄«dÇ të vîU~MÙÆbOAJ! ‚d! “« «ñ uÉ« t8UÅËœ X<« ÁbÅ ‘uîU8 †ñ«d4 t3ñœ ⁄«dÇ të vîU~MÙ
∂∂bOÙœ ñ«dè v|«œ“ Âd3 XOF{Ë ÈËñ «ñ ñU‹! ‰d¶Më Ë b|ñ«bN~ï v|uÅ ·dÜ ÈôU! «ñ uÉ«bOÙœ ñ«dè v|«œ“ Âd3 XOF{Ë ÈËñ «ñ ñU‹! ‰d¶Më Ë b|ñ«bN~ï v|uÅ ·dÜ ÈôU! «ñ uÉ«xx Æ©±¥ qJÅ® Æ©±¥ qJÅ®
∑∑ÁœUH¶<« Êe‹î ÊËñœ »¬ vîU9 U" bOÙœ ÊUJ" «ñ uÉ« vîdï t! Ë bOAJ! ôU! t! Èñbè «ñ ñU‹! ‰d¶MëÁœUH¶<« Êe‹î ÊËñœ »¬ vîU9 U" bOÙœ ÊUJ" «ñ uÉ« vîdï t! Ë bOAJ! ôU! t! Èñbè «ñ ñU‹! ‰d¶Më
ÆœuÅÆœuÅ
Æbî¬ bÙ«u8 ÊËdO! ©7Å«œ œu3Ë †ñu ñœ® »u<ñ ÆbÅ bÙ«u8 ÃñU8 uÉ« tæH “« ‘u3 »¬ Ë ñU‹!Æbî¬ bÙ«u8 ÊËdO! ©7Å«œ œu3Ë †ñu ñœ® »u<ñ ÆbÅ bÙ«u8 ÃñU8 uÉ« tæH “« ‘u3 »¬ Ë ñU‹!
∏∏ñœ «ñ ʬ Ë bOï«œdÖd! vK§è XOF{Ë t! «ñ ñU‹! ‰d¶Më tLëœ ¨v|«œ“ Âd3 œdJKLà “« ÁœUH¶<« “« bF!ñœ «ñ ʬ Ë bOï«œdÖd! vK§è XOF{Ë t! «ñ ñU‹! ‰d¶Më tLëœ ¨v|«œ“ Âd3 œdJKLà “« ÁœUH¶<« “« bF!
XOF{ËXOF{ËOOÆbOÙœ ñ«dèÆbOÙœ ñ«dè
ÆbOMë ñ«dJ" «ñ v|«œ“ »u<ñ qLà ¨X<« »u<ñ †«ñ– È«ñ«œ “uMÙ uÉ« “« ÁbÅ ÃñU8 »¬ të v"ñu ñœÆbOMë ñ«dJ" «ñ v|«œ“ »u<ñ qLà ¨X<« »u<ñ †«ñ– È«ñ«œ “uMÙ uÉ« “« ÁbÅ ÃñU8 »¬ të v"ñu ñœ
†U!u<ñ Êœdë „UÄ qLà “« bF!†U!u<ñ Êœdë „UÄ qLà “« bF!
±±ÆœuÅ pA8 ÎöîUë uÉ« tæH U" b|ñ«c~! Ë bOMë qË ‚d! t! «ñ uÉ«ÆœuÅ pA8 ÎöîUë uÉ« tæH U" b|ñ«c~! Ë bOMë qË ‚d! t! «ñ uÉ«
≤≤ÆbOAJ! ‚d! “« «ñ uÉ« t8UÅËœ ¨bÅ ‘uîU8 ⁄«dÇ të vîU~MÙÆbOAJ! ‚d! “« «ñ uÉ« t8UÅËœ ¨bÅ ‘uîU8 ⁄«dÇ të vîU~MÙ
≥≥ÈËñ ÁbÅ qOJA" »¬ ÈUÙ tJì U" bOÙœ Xëd4 ÁbÅ ÁœUH¶<« tÇñUÄ tJ" p| ÈËñ vîdï t! «ñ ⁄«œ ÈuÉ«ÈËñ ÁbÅ qOJA" »¬ ÈUÙ tJì U" bOÙœ Xëd4 ÁbÅ ÁœUH¶<« tÇñUÄ tJ" p| ÈËñ vîdï t! «ñ ⁄«œ ÈuÉ«
ÆbïuÅ „UÄ uÉ« tæHÆbïuÅ „UÄ uÉ« tæH
¥¥ÆœuÅ pM8 uÉ« U" bOÙœ Á“U3« ¨Êœdë ÁdO8– “« q§èÆœuÅ pM8 uÉ« U" bOÙœ Á“U3« ¨Êœdë ÁdO8– “« q§è
ñU‹! ‰d¶Më Ê“u< Êœdë „UÄñU‹! ‰d¶Më Ê“u< Êœdë „UÄ
±±Æ©±≥ qJÅ® bOAJ! ÊËdO! ÁU~¶<œ ÈËñ “« «ñ ñU‹! ‰d¶MëÆ©±≥ qJÅ® bOAJ! ÊËdO! ÁU~¶<œ ÈËñ “« «ñ ñU‹! ‰d¶Më
≤≤Æ©±˚ qJÅ® bOMë ÁœUH¶<« Ê“u< ÈËñ »u<ñ Êœdë „UÄ È«d! tëd< “« “UOï †ñu ñœÆ©±˚ qJÅ® bOMë ÁœUH¶<« Ê“u< ÈËñ »u<ñ Êœdë „UÄ È«d! tëd< “« “UOï †ñu ñœ
ÆbOïU<dï VO<¬ ʬ t! U| bOMJï r8 «ñ ñU‹! ‰d¶Më Ê“u<ÆbOïU<dï VO<¬ ʬ t! U| bOMJï r8 «ñ ñU‹! ‰d¶Më Ê“u<
≥≥·UJÅ ñœ Ê“u< v~¶fi3d! Êœ«œ ñ«dè Ë Œ«ñu< eëdî ñœ ʬ „uï Êœ«œ ñ«dè U! «ñ ñU‹! ‰d¶Më Ê“u<·UJÅ ñœ Ê“u< v~¶fi3d! Êœ«œ ñ«dè Ë Œ«ñu< eëdî ñœ ʬ „uï Êœ«œ ñ«dè U! «ñ ñU‹! ‰d¶Më Ê“u<
Æ©±˚ qJÅ® bOÙœ ñ«dè œu8 ÈU3 ñœ ¨tÉu!dîÆ©±˚ qJÅ® bOÙœ ñ«dè œu8 ÈU3 ñœ ¨tÉu!dî
¥¥XOF{Ë ÈËñ «ñ ñU‹! ‰d¶MëXOF{Ë ÈËñ «ñ ñU‹! ‰d¶MëOOÆbOÙœ ñ«dèÆbOÙœ ñ«dè
Êœdë ÁdO8–Êœdë ÁdO8–
±±XOF{Ë ñœ ñU‹! ‰d¶Më tLëœ Ë X<« ÁbÅ ÃñU8 ‚d! “« ÁU~¶<œ të b|uÅ s£LDîXOF{Ë ñœ ñU‹! ‰d¶Më tLëœ Ë X<« ÁbÅ ÃñU8 ‚d! “« ÁU~¶<œ të b|uÅ s£LDîOOt¶ãdÖ ñ«dèt¶ãdÖ ñ«dè
ÆX<«ÆX<«
≤≤Æ©±∑qJÅ® bOMë tOK‹" «ñ »¬ Êe‹îÆ©±∑qJÅ® bOMë tOK‹" «ñ »¬ Êe‹î
≥≥ÆbOïU!U¶! rO< ÁdO8– XLfiè ñËœ «ñ ‚d! rO<ÆbOïU!U¶! rO< ÁdO8– XLfiè ñËœ «ñ ‚d! rO<
¥¥Æ©±∏ qJÅ® bOMë Èñ«bN~ï pA8 Ë s£LDî qæî ñœ «ñ ʬ Ë t¶Å«cÖ tMÅUÄ ÈËñ «ñ uÉ«Æ©±∏ qJÅ® bOMë Èñ«bN~ï pA8 Ë s£LDî qæî ñœ «ñ ʬ Ë t¶Å«cÖ tMÅUÄ ÈËñ «ñ uÉ«
f|Ëd< Ë XïUL{f|Ëd< Ë XïUL{
fáOKOã v¶ïd¶M|« X|U< t! b|« ÁbÅ t3«uî vKJAî U! U| b|ñ«œ “UOï †UàöÉ« t! tâïUMÇ fáOKOã v¶ïd¶M|« X|U< t! b|« ÁbÅ t3«uî vKJAî U! U| b|ñ«œ “UOï †UàöÉ« t! tâïUMÇmoc.spilihp.wwwwww.philips.com
s|« sHK" ÁñULÅ bOï«u" vî® b|dO~! ”U9 œu8 ñuAë ñœ fáOKOã Èd¶Aî †Uîb8 eëdî U! U| bOMë tF3«dîs|« sHK" ÁñULÅ bOï«u" vî® b|dO~! ”U9 œu8 ñuAë ñœ fáOKOã Èd¶Aî †Uîb8 eëdî U! U| bOMë tF3«dî
¨bÅU! v/ œu3uî ULÅ ñuAë ñœ Èd¶Aî †Uîb8 eëdî tâïUMÇ Æ©bOMë «bOÄ vïUN3 XïUL{ tÖd! ñœ «ñ eëdî¨bÅU! v/ œu3uî ULÅ ñuAë ñœ Èd¶Aî †Uîb8 eëdî tâïUMÇ Æ©bOMë «bOÄ vïUN3 XïUL{ tÖd! ñœ «ñ eëdî
X|UL4 Ë fáOKOã v~ïU8 “«uì †Uîb8 Áñ«œ« U! U| t¶ãdÖ ”U9 fáOKOã †ôuBæî vKæî ÁbMÅËdã U!X|UL4 Ë fáOKOã v~ïU8 “«uì †Uîb8 Áñ«œ« U! U| t¶ãdÖ ”U9 fáOKOã †ôuBæî vKæî ÁbMÅËdã U!
Æb|dO~! ”U9 ÈË v! vB‹ÅÆb|dO~! ”U9 ÈË v! vB‹Å
Page 7

GC1680, GC1675,GC1665 74239 000 57991
v<ñUãv<ñUã
vKë ÕdÅ vKë ÕdÅ
AAÈdá<« pïUÙœÈdá<« pïUÙœ
BBÊœdë dÄ tâ|ñœÊœdë dÄ tâ|ñœ
CC ‰bî jIã® ñU‹! gÅUÄ œdJKLà ‰bî jIã® ñU‹! gÅUÄ œdJKLà
5761CGGC1675©©
DD Èdá<« tLëœ Èdá<« tLëœTT
EEñU‹! ‰d¶MëñU‹! ‰d¶Më
--OO==ñU‹! ÊËb!ñU‹! ÊËb!
--qq==j<u¶î ñU‹!j<u¶î ñU‹!
--ww==ñU‹! dßë«b4ñU‹! dßë«b4
--xx==»u<ñ Êœdë „UÄ œdJKLà»u<ñ Êœdë „UÄ œdJKLà
FF ‰bî jIã® tãU{« ñU‹! œdJKLà ‰bî jIã® tãU{« ñU‹! œdJKLà
0861CGGC1680©©
GG»¬ Êe‹î È“U< œ«“¬ tL뜻¬ Êe‹î È“U< œ«“¬ tLëœ
HH ‰bî jIã® vM1« ‚d! lDè œdJKLà ‰bî jIã® vM1« ‚d! lDè œdJKLà
0861CGGC1680©©
II†ñ«d4 t3ñœ rOEM" t3ñœ†ñ«d4 t3ñœ rOEM" t3ñœ
JJ†ñ«d4 t3ñœ ⁄«ddžñ«d4 t3ñœ ⁄«dÇ
KK‚d! rO<‚d! rO<
LL‰bî „öĉbî „öÄ
MM»¬ Êe‹î»¬ Êe‹î
NN»u<ñ b{ ’dè»u<ñ b{ ’dè
rNîrNî
ÁbM|¬ tF3«dî È«d! vKæî ñœ «ñ UNï¬ Ë bOï«u‹! Xèœ U! ÁU~¶<œ “« ÁœUH¶<« “« q§è «ñ d|“ ÈUNKLFì«ñu¶<œÁbM|¬ tF3«dî È«d! vKæî ñœ «ñ UNï¬ Ë bOï«u‹! Xèœ U! ÁU~¶<œ “« ÁœUH¶<« “« q§è «ñ d|“ ÈUNKLFì«ñu¶<œ
ÆbOMë Èñ«bN~ïÆbOMë Èñ«bN~ï
ææv~MÙULÙ qæî ‚d! U! ÁU~¶<œ ÈËñ ÁbÅ h‹Aî ˛U¶ìË të bOMë Xèœ ‚d! t! ÁU~¶<œ ‰UB"« “« q§èv~MÙULÙ qæî ‚d! U! ÁU~¶<œ ÈËñ ÁbÅ h‹Aî ˛U¶ìË të bOMë Xèœ ‚d! t! ÁU~¶<œ ‰UB"« “« q§è
ÆbÅU! t¶Å«œÆbÅU! t¶Å«œ
ææÆbOMJï ÁœUH¶<« ÁU~¶<œ “« bÅU! Áb|œ VO<¬ ÁU~¶<œ t8UÅ Ëœ Ë rO< të v"ñu ñœÆbOMJï ÁœUH¶<« ÁU~¶<œ “« bÅU! Áb|œ VO<¬ ÁU~¶<œ t8UÅ Ëœ Ë rO< të v"ñu ñœ
ææÈœ«dã« U| fáOKOã XëdÅ j<u" ÁbÅ bO|U" f|Ëd< eëdî «ñ ʬ b|U! ¨X<« Áb|œ tîb ‚d! rO< dÖ«Èœ«dã« U| fáOKOã XëdÅ j<u" ÁbÅ bO|U" f|Ëd< eëdî «ñ ʬ b|U! ¨X<« Áb|œ tîb ‚d! rO< dÖ«
ÆbM|U/ i|uF" ¨dD8 œUº|« “« »UM¶3« È«d! Èd~|œ ÁbÅ bO|U"ÆbM|U/ i|uF" ¨dD8 œUº|« “« »UM¶3« È«d! Èd~|œ ÁbÅ bO|U"
ææÆbOMJï UÙñ X<« qË ‚d! t! të vîU~MÙ ñœ «ñ uÉ« eÖdÙÆbOMJï UÙñ X<« qË ‚d! t! të vîU~MÙ ñœ «ñ uÉ« eÖdÙ
ææÆb|d§ï Ëdã »¬ ñœ «ñ uÉ« ÁU~âOÙÆb|d§ï Ëdã »¬ ñœ «ñ uÉ« ÁU~âOÙ
ææñËœ ÊUëœuë ”d¶<œ “« «ñ ÁU~¶<œ ÆœuÅ Áœ«œ Vè«dî ÊËb! ÁU~¶<œ U! ñUë Á“U3« b|U§ï ‰uKFî œdã t!ñËœ ÊUëœuë ”d¶<œ “« «ñ ÁU~¶<œ ÆœuÅ Áœ«œ Vè«dî ÊËb! ÁU~¶<œ U! ñUë Á“U3« b|U§ï ‰uKFî œdã t!
Æb|ñ«œ ÁU~ïÆb|ñ«œ ÁU~ï
ææo|dÉ t! ÁbÅ v|«œ“ Âd3 »¬ U| ¨vAë uÉ« vïœËdã« œ«uî ¨«œ“ Âd3 œ«uî ¨t¶<UAï ¨tëd< ¨dDào|dÉ t! ÁbÅ v|«œ“ Âd3 »¬ U| ¨vAë uÉ« vïœËdã« œ«uî ¨«œ“ Âd3 œ«uî ¨t¶<UAï ¨tëd< ¨dDà
Æb|e|dï »¬ Êe‹î ÊËñœ «ñ v|UOLOÅ œ«uî d|U< U| v|UOLOÅÆb|e|dï »¬ Êe‹î ÊËñœ «ñ v|UOLOÅ œ«uî d|U< U| v|UOLOÅ
æætë bOÙbï “U3« ÆœuÅ v~¶8u< YàU! X<« sJ2 ”U9 †ñu ñœ Ë œuÅ vî ⁄«œ ñUOfi! uÉ« tæHtë bOÙbï “U3« ÆœuÅ v~¶8u< YàU! X<« sJ2 ”U9 †ñu ñœ Ë œuÅ vî ⁄«œ ñUOfi! uÉ« tæH
ÆbMë qU4 ”U9 X<« ⁄«œ të vîU~MÙ ñœ uÉ« tæH U! ‚d! rO<ÆbMë qU4 ”U9 X<« ⁄«œ të vîU~MÙ ñœ uÉ« tæH U! ‚d! rO<
ææË uÉ« »¬ Êe‹î të v¶èË ¨bOMë vî „UÄ «ñ ÁU~¶<œ të v¶èË ¨bO<ñ ÊU|UÄ t! vAëuÉ« të v¶èËË uÉ« »¬ Êe‹î të v¶èË ¨bOMë vî „UÄ «ñ ÁU~¶<œ të v¶èË ¨bO<ñ ÊU|UÄ t! vAëuÉ« të v¶èË
ñœ «ñ ñU‹! d¶Më ∫bOMë X|Uàñ «ñ d|“ œñ«uî ¨bOMë vî UÙñ vÙU"uë †bî È«d! «ñ uÉ« të v¶èË 5MâLÙñœ «ñ ñU‹! d¶Më ∫bOMë X|Uàñ «ñ d|“ œñ«uî ¨bOMë vî UÙñ vÙU"uë †bî È«d! «ñ uÉ« të v¶èË 5MâLÙ
ÆbOMë ÃñU8 ‚d! e|dÄ “« «ñ ÁU~¶<œ t8UÅËœ Ë Áœ«œ ñ«dè tMÅUÄ ÈËñ «ñ ñuÉ« ¨bOÙœ ñ«dè ∞ XOF{ËÆbOMë ÃñU8 ‚d! e|dÄ “« «ñ ÁU~¶<œ t8UÅËœ Ë Áœ«œ ñ«dè tMÅUÄ ÈËñ «ñ ñuÉ« ¨bOÙœ ñ«dè ∞ XOF{Ë
ÁœUH¶<« 5ìË« “« q§èÁœUH¶<« 5ìË« “« q§è
±±ÆbOMë «b3 uÉ« tæH “« «ñ v¶ÜUH4 gÅuÄ Ë VfiÇd! tïuÖ dÙÆbOMë «b3 uÉ« tæH “« «ñ v¶ÜUH4 gÅuÄ Ë VfiÇd! tïuÖ dÙ
≤≤tÇñUÄ tJ" p| ÈËñ ñU! bMÇ «ñ ʬ Ë œuÅ ⁄«œ ÁbÅ rOEM" †ñ«d4 t3ñœ dßë«b4 U" uÉ« U" b|ñ«c~!tÇñUÄ tJ" p| ÈËñ ñU! bMÇ «ñ ʬ Ë œuÅ ⁄«œ ÁbÅ rOEM" †ñ«d4 t3ñœ dßë«b4 U" uÉ« U" b|ñ«c~!
ÆœuÅ „UÄ uÉ« tæH “« ÁbïULOèU! œ«uî tïuÖ dÙ U" bOAJ! ñ«b/ ÆœuÅ „UÄ uÉ« tæH “« ÁbïULOèU! œ«uî tïuÖ dÙ U" bOAJ! ñ«b/
CCvîU~MÙvîU~MÙœñuî s|« ÆœuÅ bMK! ʬ “« œËœ vLë X<« sJ2 bOMë vî ÁœUH¶<« ñU! 5ìË« È«d! uÉ« “« tëœñuî s|« ÆœuÅ bMK! ʬ “« œËœ vLë X<« sJ2 bOMë vî ÁœUH¶<« ñU! 5ìË« È«d! uÉ« “« të
ÆbO<ñ bÙ«u8 ÊU|UÄ t! vÙU"uë †bî “« bF!ÆbO<ñ bÙ«u8 ÊU|UÄ t! vÙU"uë †bî “« bF!
ÁœUH¶<« È«d! ÁU~¶<œ 78U< ÁœUî¬ÁœUH¶<« È«d! ÁU~¶<œ 78U< ÁœUî¬
ÁU~¶<œ Êe‹î Êœdë dÄÁU~¶<œ Êe‹î Êœdë dÄ
Æb|d§ï Ëdã »¬ ñœ «ñ uÉ« ÁU~âOÙÆb|d§ï Ëdã »¬ ñœ «ñ uÉ« ÁU~âOÙ
±±ÆbÅU! v/ qË ‚d! t! ÁU~¶<œ të b|uÅ s£LDîÆbÅU! v/ qË ‚d! t! ÁU~¶<œ të b|uÅ s£LDî
≤≤XOF{Ë ÈËñ «ñ ñU‹! ‰d¶MëXOF{Ë ÈËñ «ñ ñU‹! ‰d¶MëOOÆ©± qJÅ® ©ñU‹! ÊËb! Ω® bOÙœ ñ«dèÆ©± qJÅ® ©ñU‹! ÊËb! Ω® bOÙœ ñ«dè
≥≥Æ©≤ qJÅ® bOMë «b3 «ñ »¬ Êe‹î Ë b|ñ«œ ÁU~ï Ë Áœ«œ ñUAã «ñ È“U< œ«“¬ tLëœÆ©≤ qJÅ® bOMë «b3 «ñ »¬ Êe‹î Ë b|ñ«œ ÁU~ï Ë Áœ«œ ñUAã «ñ È“U< œ«“¬ tLëœ
¥¥Æ©≥ qJÅ® bOMë dÄ dßë«b4 `D< U" dOÅ »¬ U! «ñ »¬ Êe‹îÆ©≥ qJÅ® bOMë dÄ dßë«b4 `D< U" dOÅ »¬ U! «ñ »¬ Êe‹î
ñ«bIî “« d¶AO! «ñ Êd‹îñ«bIî “« d¶AO! «ñ Êd‹î XAM MAXÆbOMJï dÄ ©dßë«b4®ÆbOMJï dÄ ©dßë«b4®
ææÁœUH¶<« dDIî »¬ “« të œuÅ vî tOu" ¨X<« ôU! ULÅ tIDMî ñœ vAë tìuì »¬ v¶‹< tâïUMÇÁœUH¶<« dDIî »¬ “« të œuÅ vî tOu" ¨X<« ôU! ULÅ tIDMî ñœ vAë tìuì »¬ v¶‹< tâïUMÇ
ÆbOMëÆbOMë
U| v|UOLOÅ o|dÉ t! ÁbÅ v|«œ“ Âd3 »¬ U| ¨vAë uÉ« vïœËdã« œ«uî ¨«œ“ Âd3 œ«uî ¨t¶<UAï ¨tëd< ¨dDàU| v|UOLOÅ o|dÉ t! ÁbÅ v|«œ“ Âd3 »¬ U| ¨vAë uÉ« vïœËdã« œ«uî ¨«œ“ Âd3 œ«uî ¨t¶<UAï ¨tëd< ¨dDà
Æb|e|dï »¬ Êe‹î ÊËñœ «ñ v|UOLOÅ œ«uî d|U<Æb|e|dï »¬ Êe‹î ÊËñœ «ñ v|UOLOÅ œ«uî d|U<
µµÆ©fJOKë È«b“® bOïe! U3 uÉ« ñœ «ñ »¬ Êe‹îÆ©fJOKë È«b“® bOïe! U3 uÉ« ñœ «ñ »¬ Êe‹î
†ñ«d4 t3ñœ Êœdë rOEM"†ñ«d4 t3ñœ Êœdë rOEM"
±±ÆbOÙœ ñ«dè tMÅUÄ ÈËñ «ñ uÉ«ÆbOÙœ ñ«dè tMÅUÄ ÈËñ «ñ uÉ«
≤≤bOMë rOEM" Á«u)œ XOF{Ë ñœ †ñ«d4 t3ñœ tLëœ ÊbïU8dÇ U! «ñ Êœdë uÉ« È«d! “ô †ñ«d4 t3ñœbOMë rOEM" Á«u)œ XOF{Ë ñœ †ñ«d4 t3ñœ tLëœ ÊbïU8dÇ U! «ñ Êœdë uÉ« È«d! “ô †ñ«d4 t3ñœ
Æ©¥ qJŮƩ¥ qJÅ®
∫bOMë vMO!“U! «ñ ”U§ì ÈuA¶fiÅ VfiÇd! ¨V<UMî †ñ«d4 t3ñœ È«d!∫bOMë vMO!“U! «ñ ”U§ì ÈuA¶fiÅ VfiÇd! ¨V<UMî †ñ«d4 t3ñœ È«d!
--11©Èd¶<« vKÄ Ë ÈbOî¬ vKÄ ¨vïuK|Uï ¨pOK|dë« bMïUî® vàuMBî ÈUÙ tÇñUÄ©Èd¶<« vKÄ Ë ÈbOî¬ vKÄ ¨vïuK|Uï ¨pOK|dë« bMïUî® vàuMBî ÈUÙ tÇñUÄ
--11rA|d!«rA|d!«
--22rAÄrAÄ
--33v‹ï ¨vïU¶ëv‹ï ¨vïU¶ë
“« v¶Lfiè Êœdë uÉ« U! «ñ †ñ«d4 t3ñœ ¨bï« ÁbÅ t¶8U< vfiM3 tÇ “« ©UÙ® tÇñUÄ të bOï«œ v/ tâïUMÇ“« v¶Lfiè Êœdë uÉ« U! «ñ †ñ«d4 t3ñœ ¨bï« ÁbÅ t¶8U< vfiM3 tÇ “« ©UÙ® tÇñUÄ të bOï«œ v/ tâïUMÇ
ÆbOMë 5OF" ¨œuÅ v/ Áb|œ ʬ “« ÁœUH¶<« U| ÊbOÅ uÄ ÂU~MÙ ñœ të tÇñUÄÆbOMë 5OF" ¨œuÅ v/ Áb|œ ʬ “« ÁœUH¶<« U| ÊbOÅ uÄ ÂU~MÙ ñœ të tÇñUÄ
“« ÆbOMë uÉ« «ñ ʬ XAÄ ¨tÇñUÄ Êœ“ ‚d! “« ÈdOÖuK3 È«d! ∫vàuMBî ·UOì« Ë vLAÄ ¨vLA|d!« ÈUÙ tÇñUÄ“« ÆbOMë uÉ« «ñ ʬ XAÄ ¨tÇñUÄ Êœ“ ‚d! “« ÈdOÖuK3 È«d! ∫vàuMBî ·UOì« Ë vLAÄ ¨vLA|d!« ÈUÙ tÇñUÄ
ÆbOMë Èñ«œu8 tJì Êbî¬ œu3u! “« ÈdOÖuK3 È«d! Èdá<« ÊbOÅUÄÆbOMë Èñ«œu8 tJì Êbî¬ œu3u! “« ÈdOÖuK3 È«d! Èdá<« ÊbOÅUÄ
“« të v|UÙ tÇñUÄ bMïUî ¨bOMë ŸËdÅ bïñ«œ “UOï †ñ«d4 t3ñœ s|d¶Lë t! v|UÙ tÇñUÄ “« «ñ Êœdë uÉ«“« të v|UÙ tÇñUÄ bMïUî ¨bOMë ŸËdÅ bïñ«œ “UOï †ñ«d4 t3ñœ s|d¶Lë t! v|UÙ tÇñUÄ “« «ñ Êœdë uÉ«
Æbï« ÁbÅ t¶8U< vàuMBî ·UOì«Æbï« ÁbÅ t¶8U< vàuMBî ·UOì«
≥≥ÆbOMë qË X<« 5î“ ‰UB"« È«ñ«œ të Èe|dÄ t! «ñ t8UÅ ËœÆbOMë qË X<« 5î“ ‰UB"« È«ñ«œ të Èe|dÄ t! «ñ t8UÅ Ëœ
¥¥Æ©˚ qJÅ® bOMë d§ Èñ«bIî vAë uÉ« ŸËdÅ “« q§è ¨b|œdÖ ‘uîU8 †ñ«d4 t3ñœ ⁄«dÇ të vîU~MÙÆ©˚ qJÅ® bOMë d§ Èñ«bIî vAë uÉ« ŸËdÅ “« q§è ¨b|œdÖ ‘uîU8 †ñ«d4 t3ñœ ⁄«dÇ të vîU~MÙ
ÆœuÅ vî ‘uîU8 Ë sÅËñ vAëuÉ« ‰uÉ ñœ vÙUÖ bMÇ “« dÙ †ñ«d4 t3ñœ ⁄«dÇÆœuÅ vî ‘uîU8 Ë sÅËñ vAëuÉ« ‰uÉ ñœ vÙUÖ bMÇ “« dÙ †ñ«d4 t3ñœ ⁄«dÇ
ÁU~¶<œ “« ÁœUH¶<«ÁU~¶<œ “« ÁœUH¶<«
ñU‹! U! vAë uÉ«ñU‹! U! vAë uÉ«
±±Æœñ«œ œu3Ë vãUë ñ«bIî t! »¬ ¨Êe‹î ñœ të b|uÅ s£LDîÆœñ«œ œu3Ë vãUë ñ«bIî t! »¬ ¨Êe‹î ñœ të b|uÅ s£LDî
≤≤¨fÙœUH¶<« È«d! ÁU~¶<œ Êœdë ÁœU t!® bOMë »U‹¶ï« «ñ ÁbÅ tOu" vAë uÉ« †ñ«d4 t3ñœ¨fÙœUH¶<« È«d! ÁU~¶<œ Êœdë ÁœU t!® bOMë »U‹¶ï« «ñ ÁbÅ tOu" vAë uÉ« †ñ«d4 t3ñœ
Æ©bOMë tF3«dî e"ñ«d4 t3ñœ rOEM"“ g‹!Æ©bOMë tF3«dî e"ñ«d4 t3ñœ rOEM"“ g‹!
≥≥ÆbOÙœ ñ«dè V<UMî ñU‹! XOF{Ë ÈËñ «ñ ñU‹! ‰d¶Më ¨†ñ«d4 t3ñœ ⁄«dÇ ÊbÅ ‘uîU8 “« bF!ÆbOÙœ ñ«dè V<UMî ñU‹! XOF{Ë ÈËñ «ñ ñU‹! ‰d¶Më ¨†ñ«d4 t3ñœ ⁄«dÇ ÊbÅ ‘uîU8 “« bF!
∫bÅU! vî V<UMî ÁbÅ »U‹¶ï« vAëuÉ« †ñ«d4 t3ñœ È«d! ÁbÅ »U‹¶ï«ñU‹! XìU4 të b|uÅ s£LDî∫bÅU! vî V<UMî ÁbÅ »U‹¶ï« vAëuÉ« †ñ«d4 t3ñœ È«d! ÁbÅ »U‹¶ï«ñU‹! XìU4 të b|uÅ s£LDî
Æ©∂ qJŮƩ∂ qJÅ®
--qq †ñ«d4 t3ñœ Ê«eOî® j<u¶î ñU‹! È«d! †ñ«d4 t3ñœ Ê«eOî® j<u¶î ñU‹! È«d!22 U" U"XAMMAX©©
--ww †ñ«d4 t3ñœ Ê«eOî® ñU‹! Ê«eOî dßë«b4 È«d! †ñ«d4 t3ñœ Ê«eOî® ñU‹! Ê«eOî dßë«b4 È«d!33 U" U"XAMMAX©©
CCÆbMë vî ñU‹! bOìu" t! ŸËdÅ ÁbÅ »U‹¶ï« †ñ«d4 t3ñœ t! ÊbO<ñ iæî t! uÉ«ÆbMë vî ñU‹! bOìu" t! ŸËdÅ ÁbÅ »U‹¶ï« †ñ«d4 t3ñœ t! ÊbO<ñ iæî t! uÉ«
ñU‹! ÊËb! vAëuÉ«ñU‹! ÊËb! vAëuÉ«
±±XOF{Ë ÈËñ «ñ ñU‹! ‰d¶MëXOF{Ë ÈËñ «ñ ñU‹! ‰d¶MëOOÆ©ñU‹! ÊËb! Ω®bOÙœ ñ«dèÆ©ñU‹! ÊËb! Ω®bOÙœ ñ«dè
≤≤¨fÙœUH¶<« È«d! ÁU~¶<œ Êœdë ÁœU t!® bOMë »U‹¶ï« «ñ ÁbÅ tOu" vAë uÉ« †ñ«d4 t3ñœ¨fÙœUH¶<« È«d! ÁU~¶<œ Êœdë ÁœU t!® bOMë »U‹¶ï« «ñ ÁbÅ tOu" vAë uÉ« †ñ«d4 t3ñœ
Æ©bOMë Ÿu3ñ e"ñ«d4 t3ñœ rOEM"“ g‹!Æ©bOMë Ÿu3ñ e"ñ«d4 t3ñœ rOEM"“ g‹!
UN¶OuB8UN¶OuB8
Èdá<« œdJKLàÈdá<« œdJKLà
ÆbOMë ÁœUH¶<« v"ñ«d4 t3ñœ dÙ ñœ X‹< ÈUNëËdÇ Êœd! 5! “« È«d! Èdá<« œdJKLà “« bOï«u" vîÆbOMë ÁœUH¶<« v"ñ«d4 t3ñœ dÙ ñœ X‹< ÈUNëËdÇ Êœd! 5! “« È«d! Èdá<« œdJKLà “« bOï«u" vî
±±Æœñ«œ œu3Ë vãUë ñ«bIî t! »¬ ¨Êe‹î ñœ të b|uÅ s£LDîÆœñ«œ œu3Ë vãUë ñ«bIî t! »¬ ¨Êe‹î ñœ të b|uÅ s£LDî
≤≤ÆœuÅ ñ«b/ dEï œñuî tÇñUÄ `D< U" bOÙœ ñUAã ñU! bMÇ «ñ Èdá<« tLëœÆœuÅ ñ«b/ dEï œñuî tÇñUÄ `D< U" bOÙœ ñUAã ñU! bMÇ «ñ Èdá<« tLëœ
‰bî jIã® tãU{« ñU‹!‰bî jIã® tãU{« ñU‹!0861CGGC1680©©
ÆbMë vî 5îU" X‹< ÈUNëËdÇ Êœd! 5! “« È«d! «ñ tãU{« ñU‹! œdJKLà s!«ÆbMë vî 5îU" X‹< ÈUNëËdÇ Êœd! 5! “« È«d! «ñ tãU{« ñU‹! œdJKLà s!«
ææ†ñ«d4 t3ñœ XOF{Ë ñœ jIã tãU{« ñU‹! œdJKLà†ñ«d4 t3ñœ XOF{Ë ñœ jIã tãU{« ñU‹! œdJKLà33ËËXAMMAXÆbMë vî ñUëÆbMë vî ñUë
±± XOF{Ë ñœ «ñ ñU‹! ‰d¶Më XOF{Ë ñœ «ñ ñU‹! ‰d¶MëwwÆ©∏ qJÅ® bOÙœ ñ«dè ©ñU‹! dßë«b4®Æ©∏ qJÅ® bOÙœ ñ«dè ©ñU‹! dßë«b4®
≤≤Æ©π qJÅ® b|ñ«œ ÁU~ï Ë Áœ«œ ñUAã tOïU# ˚ dßë«b4 È«d! «ñ ñU‹! ‰d¶MëÆ©π qJÅ® b|ñ«œ ÁU~ï Ë Áœ«œ ñUAã tOïU# ˚ dßë«b4 È«d! «ñ ñU‹! ‰d¶Më
≥≥ÁbOÅUÄ “« U" bMë d§ tIOèœ ± qè«b4 œdJKLà s|« “« œbºî ÁœUH¶<« È«d! Ë bOMë UÙñ «ñ ñU‹! ‰d¶MëÁbOÅUÄ “« U" bMë d§ tIOèœ ± qè«b4 œdJKLà s|« “« œbºî ÁœUH¶<« È«d! Ë bOMë UÙñ «ñ ñU‹! ‰d¶Më
ÆbOMë ÈdOÖuK3 uÉ« tæH “« ÃñU8 t! »¬ ÊbÅÆbOMë ÈdOÖuK3 uÉ« tæH “« ÃñU8 t! »¬ ÊbÅ
‰bî jIã® ñU‹! gÅUĉbî jIã® ñU‹! gÅUÄ5761GCCG1675©©
ÆbMë vî pLë ¯ñe! ÈUNëËdÇ Êœdë lãñ t! eëdL¶î ñU‹! gÅUÄ p|ÆbMë vî pLë ¯ñe! ÈUNëËdÇ Êœdë lãñ t! eëdL¶î ñU‹! gÅUÄ p|
†ñ«d4 t3ñœ XOF{Ë ñœ Ê«u" vî jIã «ñ ñU‹! gÅUÄ œdJKLà †ñ«d4 t3ñœ XOF{Ë ñœ Ê«u" vî jIã «ñ ñU‹! gÅUÄ œdJKLà33 Ë ËXAMMAXÆXãdÖ ñUJ!ÆXãdÖ ñUJ!
±±Æ©±∞ qJÅ® bOMë UÙñ Ë Áœ«œ ñUAã «ñ ñU‹! gÅUÄ tLëœÆ©±∞ qJÅ® bOMë UÙñ Ë Áœ«œ ñUAã «ñ ñU‹! gÅUÄ tLëœ
ÆbOMë ÈdOÖuK3 »¬ gÅUÄ “« U" bOMë d§ v"bî È«d! tLëœ “« œbºî ÁœUH¶<« “« q§èÆbOMë ÈdOÖuK3 »¬ gÅUÄ “« U" bOMë d§ v"bî È«d! tLëœ “« œbºî ÁœUH¶<« “« q§è
Æb|dO~ï œ«dã« ·dÉ t! «ñ ñU‹! eÖdÙÆb|dO~ï œ«dã« ·dÉ t! «ñ ñU‹! eÖdÙ
vJOïËd¶Jì« ‚d! lDè vM1« œdJKLàvJOïËd¶Jì« ‚d! lDè vM1« œdJKLà‰bî jI㮉bî jIã®0861CGGC1680©©
ÆbMë vî ‘uîU8 pO"Uîu"« ñuD! «ñ ʬ uÉ« “« ÊbAï ÁœUH¶<« †ñu ñœ ‚d! lDè vJOïËd¶Jì« œdJKLàÆbMë vî ‘uîU8 pO"Uîu"« ñuD! «ñ ʬ uÉ« “« ÊbAï ÁœUH¶<« †ñu ñœ ‚d! lDè vJOïËd¶Jì« œdJKLà
æælDè r¶fiO< j<u" uÉ« të X<« s|« tïUAï Ë bMë vî Êœ“ pLAÇ t! ŸËdÅ ñUëœu8 vÅuîU8 ⁄«dÇlDè r¶fiO< j<u" uÉ« të X<« s|« tïUAï Ë bMë vî Êœ“ pLAÇ t! ŸËdÅ ñUëœu8 vÅuîU8 ⁄«dÇ
Æ©±± qJÅ® X<« ÁbÅ ‘uîU8 ‚d!Æ©±± qJÅ® X<« ÁbÅ ‘uîU8 ‚d!
--Æb¶ã« vî ‚UH"« tOïU# ≥∞ “« bF! ÊbÅ lDè s|« ¨vIã« XOF{Ë ñœÆb¶ã« vî ‚UH"« tOïU# ≥∞ “« bF! ÊbÅ lDè s|« ¨vIã« XOF{Ë ñœ
--Æb¶ã« vî ‚UH"« tIOèœ ∏ “« bF! ÊbÅ lDè s|« ¨ÈœuLà XOF{Ë ñœÆb¶ã« vî ‚UH"« tIOèœ ∏ “« bF! ÊbÅ lDè s|« ¨ÈœuLà XOF{Ë ñœ
ææ∫uÉ« œbºî ÊbÅ ⁄«œ È«d!∫uÉ« œbºî ÊbÅ ⁄«œ È«d!
--ÆbOÙœ Xëd4 vLë «ñ ʬ U| bOMë bMK! «ñ uÉ«ÆbOÙœ Xëd4 vLë «ñ ʬ U| bOMë bMK! «ñ uÉ«
Page 8

GC1680, GC1675,GC1665 84239 000 57991
á«Hô©dGá«Hô©dG
πcÉ°ûŸG πM π«dOπcÉ°ûŸG πM π«dO
ójõŸ áØ∏àıG AGõLC’G IAGôb AÉLôdG .∂JGƒµe ™e IOÉY É¡æ«¡LGƒJ »àdG πcÉ°ûŸG ¢üî∏j π°üØdG Gòg ¿GójõŸ áØ∏àıG AGõLC’G IAGôb AÉLôdG .∂JGƒµe ™e IOÉY É¡æ«¡LGƒJ »àdG πcÉ°ûŸG ¢üî∏j π°üØdG Gòg ¿G
.∑ó∏H ‘ AÓª©dG áeóN õcôe ‘ ∫É°üJ’G AÉLôdG ,á∏µ°ûŸG πM øe »æµªàJ ⁄ GPG .π«°UÉØàdG øe.∑ó∏H ‘ AÓª©dG áeóN õcôe ‘ ∫É°üJ’G AÉLôdG ,á∏µ°ûŸG πM øe »æµªàJ ⁄ GPG .π«°UÉØàdG øe
á∏µ°ûŸGá∏µ°ûŸG
øµdh AÉHô¡µdG ‘ ádƒ°Uƒe IGƒµŸGøµdh AÉHô¡µdG ‘ ádƒ°Uƒe IGƒµŸG
.IOQÉH IóYÉ≤dG.IOQÉH IóYÉ≤dG
.QÉîH …CG IGƒµŸG Qó°üJ ’.QÉîH …CG IGƒµŸG Qó°üJ ’
πª©J ’ ‘É°V’G QÉîÑdG áØ«Xh ¿Gπª©J ’ ‘É°V’G QÉîÑdG áØ«Xh ¿G
RGôW §≤a) RGôW §≤a)GC1680GC1680((
óæY IóYÉ≤dG øe Üô°ùàj AÉŸG ¿GóæY IóYÉ≤dG øe Üô°ùàj AÉŸG ¿G
§≤a) ‘É°V’G QÉîÑdG áØ«Xh ΩGóîà°SG§≤a) ‘É°V’G QÉîÑdG áØ«Xh ΩGóîà°SG
RGôW RGôWGC1680GC1680.(.(
.AÉŸG ñÉîH áØ«Xh πª©J ’.AÉŸG ñÉîH áØ«Xh πª©J ’
IóYÉb øe áKƒ∏e OGƒeh äÉbÉbQ Qó°üJIóYÉb øe áKƒ∏e OGƒeh äÉbÉbQ Qó°üJ
.»µdG á«∏ªY ∫ÓN IGƒµŸG.»µdG á«∏ªY ∫ÓN IGƒµŸG
á«∏ªY AÉæKCG IóYÉ≤dG øe AÉŸG Üô°ùàjá«∏ªY AÉæKCG IóYÉ≤dG øe AÉŸG Üô°ùàj
.»µdG.»µdG
AÉæKCG IGƒµŸG IóYÉb øe AÉŸG Üô°ùàjAÉæKCG IGƒµŸG IóYÉb øe AÉŸG Üô°ùàj
.É¡æjõîJ ó©H hCG IGƒµŸG ójÈJ.É¡æjõîJ ó©H hCG IGƒµŸG ójÈJ
πª©J ’ ájQÉîÑdG á©aódG áØ«Xh ¿Gπª©J ’ ájQÉîÑdG á©aódG áØ«Xh ¿G
RGôW §≤a) RGôW §≤a)GC1675GC1675((
πªàÙG ÖÑ°ùdGπªàÙG ÖÑ°ùdG
.π«°UƒàdG ‘ á∏µ°ûe ∑Éæg.π«°UƒàdG ‘ á∏µ°ûe ∑Éæg
¤G IQGô◊G áLQO ìÉàØe §Ñ°V ”¤G IQGô◊G áLQO ìÉàØe §Ñ°V ”
™°Vh ™°VhMINMIN..
»FÉ≤∏àdG ∞bƒàdG áØ«XƒàØbhCG ó≤d»FÉ≤∏àdG ∞bƒàdG áØ«XƒàØbhCG ó≤d
.πª©dG øY IGƒµŸG áeÓ°ù∏d.πª©dG øY IGƒµŸG áeÓ°ù∏d
.AÉŸG ¿GõN ‘ ±Éc AÉe óLƒj ’.AÉŸG ¿GõN ‘ ±Éc AÉe óLƒj ’
≈∏Y QÉîÑdÉH ºµëàdG ìÉàØe §Ñ°V ”≈∏Y QÉîÑdÉH ºµëàdG ìÉàØe §Ñ°V ”
™°V ™°VOO..
.ájÉصdG ¬«a Éà áæNÉ°S â°ù«d IGƒµŸG.ájÉصdG ¬«a Éà áæNÉ°S â°ù«d IGƒµŸG
ºµëàdG ìÉàØe ≈∏Y §¨°†dG ºàj ⁄ºµëàdG ìÉàØe ≈∏Y §¨°†dG ºàj ⁄
.á«aÉc IóŸ QÉîÑdÉH.á«aÉc IóŸ QÉîÑdÉH
QÉîÑdG áØ«Xh ΩGóîà°SG ” ó≤dQÉîÑdG áØ«Xh ΩGóîà°SG ” ó≤d
âbh ¿ƒ°†Z ‘ äGôe IóY ‘É°V’Gâbh ¿ƒ°†Z ‘ äGôe IóY ‘É°V’G
.Ò°üb.Ò°üb
.ájÉصdG ¬«a Éà áæNÉ°S â°ù«d IGƒµŸG.ájÉصdG ¬«a Éà áæNÉ°S â°ù«d IGƒµŸG
.AÉŸG ¿GõN ‘ ±Éc AÉe óLƒj ’.AÉŸG ¿GõN ‘ ±Éc AÉe óLƒj ’
.ájÉصdG ¬«a Éà áæNÉ°S â°ù«d IGƒµŸG.ájÉصdG ¬«a Éà áæNÉ°S â°ù«d IGƒµŸG
QÉîÑdG áØ«Xh ΩGóîà°SG ” ó≤dQÉîÑdG áØ«Xh ΩGóîà°SG ” ó≤d
âbh ¿ƒ°†Z ‘ äGôe IóY ‘É°V’Gâbh ¿ƒ°†Z ‘ äGôe IóY ‘É°V’G
.Ò°üb.Ò°üb
.AÉŸG ¿GõN ‘ ±Éc AÉe óLƒj ’.AÉŸG ¿GõN ‘ ±Éc AÉe óLƒj ’
»àdGh á«°SÉb √É«e Úeóîà°ùJ ∂fG»àdGh á«°SÉb √É«e Úeóîà°ùJ ∂fG
πNGO á«°ù∏c äÉbÉbQ Qƒ¡¶H âÑÑ°ùJπNGO á«°ù∏c äÉbÉbQ Qƒ¡¶H âÑÑ°ùJ
.IGƒµŸG IóYÉb.IGƒµŸG IóYÉb
.ájÉصdG ¬«a Éà áæNÉ°S â°ù«d IGƒµŸG.ájÉصdG ¬«a Éà áæNÉ°S â°ù«d IGƒµŸG
»≤aCG ™°Vh ‘ IGƒµŸG ™°Vh ” ó≤d»≤aCG ™°Vh ‘ IGƒµŸG ™°Vh ” ó≤d
.AÉŸG ¿GõN ‘ AÉe OƒLh AÉæKCG.AÉŸG ¿GõN ‘ AÉe OƒLh AÉæKCG
.AÉŸG ¿GõN ‘ ±Éc AÉe óLƒj ’.AÉŸG ¿GõN ‘ ±Éc AÉe óLƒj ’
∫ƒ∏◊G/π◊G∫ƒ∏◊G/π◊G
¢ùÑ≤eh »FÉHô¡µdG ∂∏°ùdG »°üëaG¢ùÑ≤eh »FÉHô¡µdG ∂∏°ùdG »°üëaG
.§FÉ◊G ¢ùHÉbh AÉHô¡µdG.§FÉ◊G ¢ùHÉbh AÉHô¡µdG
≈∏Y IQGô◊G §Ñ°V ìÉàØe »£Ñ°VG≈∏Y IQGô◊G §Ñ°V ìÉàØe »£Ñ°VG
.áHƒ∏£ŸG IQGô◊G.áHƒ∏£ŸG IQGô◊G
áØ«Xh ±É≤j’ áØîH IGƒµŸG »côMáØ«Xh ±É≤j’ áØîH IGƒµŸG »côM
CGóÑJ ±ƒ°S .áeÓ°ù∏d »FÉ≤∏àdG ∞bƒàdGCGóÑJ ±ƒ°S .áeÓ°ù∏d »FÉ≤∏àdG ∞bƒàdG
.ójóL øe Úî°ùàdG á«∏ª©H IGƒµŸG.ójóL øe Úî°ùàdG á«∏ª©H IGƒµŸG
Iô≤a ¤G …ô¶fG) AÉŸG ¿GõN …CÓeGIô≤a ¤G …ô¶fG) AÉŸG ¿GõN …CÓeG
.(&eGóîà°SÓd Ò°†ëàdÉ".(&eGóîà°SÓd Ò°†ëàdÉ"
≈∏Y QÉîÑdÉH ºµëàdG ìÉàØe »£Ñ°VG≈∏Y QÉîÑdÉH ºµëàdG ìÉàØe »£Ñ°VG
™°Vh ™°Vhqq hCG hCGwwIô≤a ¤G …ô¶fG)Iô≤a ¤G …ô¶fG)
.(<RÉ¡÷G ΩGóîà°SÉ".(<RÉ¡÷G ΩGóîà°SÉ"
≈∏Y IQGô◊G §Ñ°V ìÉàØe »£Ñ°VG≈∏Y IQGô◊G §Ñ°V ìÉàØe »£Ñ°VG
…QÉîÑdG »µ∏d ºFÓe IQGôM áLQO…QÉîÑdG »µ∏d ºFÓe IQGôM áLQO
))22 ¤G ¤GMAXMAX≈∏Y IGƒµŸG »©°V .(≈∏Y IGƒµŸG »©°V .(
Aƒ°V A≈Ø£æj ¤G …ô¶àfGh É¡∏MÉcAƒ°V A≈Ø£æj ¤G …ô¶àfGh É¡∏MÉc
.»µdG á«∏ª©H AóÑdG πÑb IQGô◊G.»µdG á«∏ª©H AóÑdG πÑb IQGô◊G
¬«≤HCGh QÉîÑdÉH ºµëàdG ìÉàØe »£¨°VG¬«≤HCGh QÉîÑdÉH ºµëàdG ìÉàØe »£¨°VG
.ÊGƒK 5 ÉgÉ°übCG IóŸ ÉWƒ¨°†e.ÊGƒK 5 ÉgÉ°übCG IóŸ ÉWƒ¨°†e
πbC’G ≈∏Y IóMGh á≤«bO IóŸ …ô¶àfGπbC’G ≈∏Y IóMGh á≤«bO IóŸ …ô¶àfG
‘É°V’G QÉîÑdG áØ«Xh ∫ɪ©à°SG πÑb‘É°V’G QÉîÑdG áØ«Xh ∫ɪ©à°SG πÑb
.GOó›.GOó›
≈∏Y IQGô◊G §Ñ°V ìÉàØe »£Ñ°VG≈∏Y IQGô◊G §Ñ°V ìÉàØe »£Ñ°VG
ÚH Ée IQGôM áLQO ÚH Ée IQGôM áLQO33¤G¤G
MAXMAXÉ¡∏MÉc ≈∏Y IGƒµŸG »©°V .(É¡∏MÉc ≈∏Y IGƒµŸG »©°V .(
.IQGô◊G Aƒ°V A≈Ø£æj ¤G …ô¶àfGh.IQGô◊G Aƒ°V A≈Ø£æj ¤G …ô¶àfGh
Iô≤a ¤G …ô¶fG) AÉŸG ¿GõN …CÓeGIô≤a ¤G …ô¶fG) AÉŸG ¿GõN …CÓeG
.(&eGóîà°SÓd Ò°†ëàdÉ".(&eGóîà°SÓd Ò°†ëàdÉ"
≈∏Y IQGô◊G §Ñ°V ìÉàØe »£Ñ°VG≈∏Y IQGô◊G §Ñ°V ìÉàØe »£Ñ°VG
) ÚH Ée IQGôM áLQO) ÚH Ée IQGôM áLQO33¤G¤G
MAXMAXÉ¡∏MÉc ≈∏Y IGƒµŸG »©°V .(É¡∏MÉc ≈∏Y IGƒµŸG »©°V .(
.IQGô◊G Aƒ°V A≈Ø£æj ¤G …ô¶àfGh.IQGô◊G Aƒ°V A≈Ø£æj ¤G …ô¶àfGh
πbC’G ≈∏Y IóMGh á≤«bO IóŸ …ô¶àfGπbC’G ≈∏Y IóMGh á≤«bO IóŸ …ô¶àfG
‘É°V’G QÉîÑdG áØ«Xh ∫ɪ©à°SG πÑb‘É°V’G QÉîÑdG áØ«Xh ∫ɪ©à°SG πÑb
.(<ÉjGõŸÉ" Iô≤a ¤G …ô¶fG) GOó›.(<ÉjGõŸÉ" Iô≤a ¤G …ô¶fG) GOó›
Iô≤a ¤G …ô¶fG) AÉŸG ¿GõN …CÓeGIô≤a ¤G …ô¶fG) AÉŸG ¿GõN …CÓeG
.(&eGóîà°SÓd Ò°†ëàdÉ".(&eGóîà°SÓd Ò°†ëàdÉ"
hCG Iôe ¢ù∏µdG ∞«¶æJ áØ«Xh »∏ª©à°SGhCG Iôe ¢ù∏µdG ∞«¶æJ áØ«Xh »∏ª©à°SG
∞«¶æàdÉ" Iô≤a ¤G …ô¶fG) äGôe IóY∞«¶æàdÉ" Iô≤a ¤G …ô¶fG) äGôe IóY
.(<áfÉ«°üdGh.(<áfÉ«°üdGh
≈∏Y IQGô◊G §Ñ°V ìÉàØe »£Ñ°VG≈∏Y IQGô◊G §Ñ°V ìÉàØe »£Ñ°VG
…QÉîÑdG »µ∏d ºFÓe IQGôM áLQO…QÉîÑdG »µ∏d ºFÓe IQGôM áLQO
))22 ¤G ¤GMAXMAX≈∏Y IGƒµŸG »©°V .(≈∏Y IGƒµŸG »©°V .(
Aƒ°V A≈Ø£æj ¤G …ô¶àfGh É¡∏MÉcAƒ°V A≈Ø£æj ¤G …ô¶àfGh É¡∏MÉc
.»µdG á«∏ª©H AóÑdG πÑb IQGô◊G.»µdG á«∏ª©H AóÑdG πÑb IQGô◊G
ìÉàØe »£Ñ°VGh AÉŸG ¿GõN »ZôaCGìÉàØe »£Ñ°VGh AÉŸG ¿GõN »ZôaCG
™°Vh ≈∏Y QÉîÑdÉH ºµëàdG ™°Vh ≈∏Y QÉîÑdÉH ºµëàdGOOπÑb ,πÑb ,
Iô≤a ¤G …ô¶fG) IGƒµŸG øjõîJIô≤a ¤G …ô¶fG) IGƒµŸG øjõîJ
≈∏Y IGƒµŸG »©°V .(&æjõîàdÉ"≈∏Y IGƒµŸG »©°V .(&æjõîàdÉ"
.É¡∏MÉc.É¡∏MÉc
Iô≤a ¤G …ô¶fG) AÉŸG ¿GõN …CÓeGIô≤a ¤G …ô¶fG) AÉŸG ¿GõN …CÓeG
.(&eGóîà°SÓd Ò°†ëàdÉ".(&eGóîà°SÓd Ò°†ëàdÉ"
Page 9

GC1680, GC1675,GC1665 94239 000 57991
v<ñUãv<ñUã
áfÉ«°üdGh ∞«¶æàdGáfÉ«°üdGh ∞«¶æàdG
»µdG á«∏ªY ó©H»µdG á«∏ªY ó©H
11.OÈJ IGƒµŸG »YOh §FÉ◊G ¢ùHÉb øe AÉHô¡µdG ¢ùÑ≤e »YõfG.OÈJ IGƒµŸG »YOh §FÉ◊G ¢ùHÉb øe AÉHô¡µdG ¢ùÑ≤e »YõfG
22ÒZ ∞«¶æJ πFÉ°Sh á∏∏Ñe ¢Tɪb á©£b ᣰSGƒH IGƒµŸG IóYÉb ‘ á≤dÉY Ö°SGhQ ájCG hCG ¢ù∏µdG »ë°ùeGÒZ ∞«¶æJ πFÉ°Sh á∏∏Ñe ¢Tɪb á©£b ᣰSGƒH IGƒµŸG IóYÉb ‘ á≤dÉY Ö°SGhQ ájCG hCG ¢ù∏µdG »ë°ùeG
.§°TÉc.§°TÉc
hCG ∑ôa IGOCG GóHG »eóîà°ùJ ’á«fó©e OGƒŸ É¡à°ùeÓe ÖæŒ ∂«∏Y Öéj ,á°ùdÉe IGƒµŸG IóYÉb AÉ≤H’ hCG ∑ôa IGOCG GóHG »eóîà°ùJ ’á«fó©e OGƒŸ É¡à°ùeÓe ÖæŒ ∂«∏Y Öéj ,á°ùdÉe IGƒµŸG IóYÉb AÉ≤H’
.IóYÉ≤dG ∞«¶æàd iôNCG ájhɪ«c OGƒe hCG πÿG.IóYÉ≤dG ∞«¶æàd iôNCG ájhɪ«c OGƒe hCG πÿG
33.á∏∏Ñe ¢Tɪb á©£b ᣰSGƒH IGƒµŸG øe ≈∏YC’G Aõ÷G »Ø¶f.á∏∏Ñe ¢Tɪb á©£b ᣰSGƒH IGƒµŸG øe ≈∏YC’G Aõ÷G »Ø¶f
44.∞«¶æàdG á«∏ªY ó©H AÉŸG ¿GõN »ZôaCG .AÉŸÉH AÉŸG ¿GõN ΩɶàfÉH »Ø£°TG.∞«¶æàdG á«∏ªY ó©H AÉŸG ¿GõN »ZôaCG .AÉŸÉH AÉŸG ¿GõN ΩɶàfÉH »Ø£°TG
§°ûædG êhOõŸG ¢ù∏µdG ºcGôJ ™æe Ωɶf§°ûædG êhOõŸG ¢ù∏µdG ºcGôJ ™æe Ωɶf
11.(12 º°SQ) ájQÉîÑdG IGƒµŸG äÉgƒa OGó°ùfG ÖæŒ ¢ù∏µdG ºcGôJ ™æe áÑM ¿G.(12 º°SQ) ájQÉîÑdG IGƒµŸG äÉgƒa OGó°ùfG ÖæŒ ¢ù∏µdG ºcGôJ ™æe áÑM ¿G
ææ.É¡dGóÑà°S’ êÉà– ’h ᣰûf ÉehO ¢ù∏µdG ºcGôJ ™æe áÑM ¿G.É¡dGóÑà°S’ êÉà– ’h ᣰûf ÉehO ¢ù∏µdG ºcGôJ ™æe áÑM ¿G
22.(13 º°SQ) á≤dÉ©dG ¢ù∏µdG äÉÄjõL πjõJ ºcGΟG ¢ù∏µdG ∞«¶æJ áØ«Xh ¿G.(13 º°SQ) á≤dÉ©dG ¢ù∏µdG äÉÄjõL πjõJ ºcGΟG ¢ù∏µdG ∞«¶æJ áØ«Xh ¿G
¢ù∏µdG ∞«¶æJ áØ«Xh¢ù∏µdG ∞«¶æJ áØ«Xh
ÉeóæY …CG) GóL á«°SÉb ∂à≤£æe ‘ √É«ŸG âfÉc GPG .ÚYƒÑ°SCG πc Iôe ¢ù∏µdG ∞«¶æJ áØ«Xh »eóîà°SGÉeóæY …CG) GóL á«°SÉb ∂à≤£æe ‘ √É«ŸG âfÉc GPG .ÚYƒÑ°SCG πc Iôe ¢ù∏µdG ∞«¶æJ áØ«Xh »eóîà°SG
.ÌcCG äGôe OóY ¢ù∏µdG ∞«¶æJ áØ«Xh ∫ɪ©à°SG ∂«∏Y Öéj ,(»µdG á«∏ªY AÉæKCG Ió©≤dG øe Ö°SGhQ Qó°üJ.ÌcCG äGôe OóY ¢ù∏µdG ∞«¶æJ áØ«Xh ∫ɪ©à°SG ∂«∏Y Öéj ,(»µdG á«∏ªY AÉæKCG Ió©≤dG øe Ö°SGhQ Qó°üJ
11 ™°Vh ≈∏Y QÉîÑdÉH ºµëàdG ìÉàØe »£Ñ°VG ™°Vh ≈∏Y QÉîÑdÉH ºµëàdG ìÉàØe »£Ñ°VG .O .O
22 ™°Vh ¤G IQGô◊G ìÉàØe »£Ñ°VG ™°Vh ¤G IQGô◊G ìÉàØe »£Ñ°VG.MAX.MAX
33.iƒà°ùe ≈°übCG ¤G AÉŸG ¿GõN …CÓeG.iƒà°ùe ≈°übCG ¤G AÉŸG ¿GõN …CÓeG
.AÉŸG ¿GõN ‘ ¢ù∏µdG ∞«¶æJ OGƒe hCG πÿG »Ñµ°ùJ ’.AÉŸG ¿GõN ‘ ¢ù∏µdG ∞«¶æJ OGƒe hCG πÿG »Ñµ°ùJ ’
44.§FÉ◊G ¢ùHÉb ‘ ¢ùÑ≤ŸG »∏°UhCG.§FÉ◊G ¢ùHÉb ‘ ¢ùÑ≤ŸG »∏°UhCG
55.Aƒ°†dG A≈Ø£æj ÉeóæY AÉHô¡µdG øY IGƒµŸG »∏°üaG.Aƒ°†dG A≈Ø£æj ÉeóæY AÉHô¡µdG øY IGƒµŸG »∏°üaG
66 ¢ù∏µdG ∞«¶æJ ™°Vh ≈∏Y QÉîÑdÉH ºµëàdG ìÉàØe »£Ñ°VGh á∏°ù¨ŸG ¥ƒa IGƒµŸG »∏ªMG ¢ù∏µdG ∞«¶æJ ™°Vh ≈∏Y QÉîÑdÉH ºµëàdG ìÉàØe »£Ñ°VGh á∏°ù¨ŸG ¥ƒa IGƒµŸG »∏ªMGxx(14 º°SQ)(14 º°SQ)
77AÉŸG ᫪c ∫ɪ©à°SG ºàj ¿CG ¤G IGƒµŸG ∞£∏H »LQh ≈∏YC’G ¤G Ó«∏b QÉîÑdÉH ºµëàdG ìÉàØe »Ñë°SGAÉŸG ᫪c ∫ɪ©à°SG ºàj ¿CG ¤G IGƒµŸG ∞£∏H »LQh ≈∏YC’G ¤G Ó«∏b QÉîÑdÉH ºµëàdG ìÉàØe »Ñë°SG
.AÉŸG ¿GõN πNGO IOƒLƒŸG É¡∏ªcCÉH.AÉŸG ¿GõN πNGO IOƒLƒŸG É¡∏ªcCÉH
.(IGƒµŸG πNGO óLƒj ¿Éc GPG) ¢ù∏µdG êGôNG ºàj ±ƒ°S .IóYÉ≤dG øe »∏¨ŸG AÉŸGh QÉîÑdG Qó°üj ±ƒ°S.(IGƒµŸG πNGO óLƒj ¿Éc GPG) ¢ù∏µdG êGôNG ºàj ±ƒ°S .IóYÉ≤dG øe »∏¨ŸG AÉŸGh QÉîÑdG Qó°üj ±ƒ°S
88≥HÉ°ùdG ¬©°Vh ¤G ¬æjó«©àd QÉîÑdÉH ºµëàdG ìÉàØe »£¨°VG ,¢ù∏µdG ∞«¶æJ ∞«Xh ∫ɪ©à°SG ó©H≥HÉ°ùdG ¬©°Vh ¤G ¬æjó«©àd QÉîÑdÉH ºµëàdG ìÉàØe »£¨°VG ,¢ù∏µdG ∞«¶æJ ∞«Xh ∫ɪ©à°SG ó©H
™°Vh ≈∏Y ¬«£Ñ°VGh »∏°UC’G ™°Vh ≈∏Y ¬«£Ñ°VGh »∏°UC’GOO..
.á«°ù∏c äÉÄjõL ≈∏Y …ƒàëj ∫Gõj Ée IGƒµŸG øe QOÉ°üdG AÉŸG ¿Éc GPG ¢ù∏µdG ∞«¶æJ á«∏ªY …Qôc.á«°ù∏c äÉÄjõL ≈∏Y …ƒàëj ∫Gõj Ée IGƒµŸG øe QOÉ°üdG AÉŸG ¿Éc GPG ¢ù∏µdG ∞«¶æJ á«∏ªY …Qôc
ºcGΟG ¢ù∏µdG ∞«¶æJ á«∏ªY ó©HºcGΟG ¢ù∏µdG ∞«¶æJ á«∏ªY ó©H
11.IGƒµŸG IóYÉb ∞«Øéàd ô°TÉÑŸG »FÉHô¡µdG QÉ«àdG ¤G IGƒµŸG »∏°UhCG.IGƒµŸG IóYÉb ∞«Øéàd ô°TÉÑŸG »FÉHô¡µdG QÉ«àdG ¤G IGƒµŸG »∏°UhCG
22.Aƒ°†dG A≈Ø£æj ÉeóæY AÉHô¡µdG øY IGƒµŸG »∏°üaG.Aƒ°†dG A≈Ø£æj ÉeóæY AÉHô¡µdG øY IGƒµŸG »∏°üaG
33ób ¿ƒµJ ¿CG øµ‡ Aɪ∏d QÉKBG …CG ádGR’ áÁób ¢Tɪb á©£b ¥ƒa áØîH IGƒµŸG ∂jôëàH »eƒbób ¿ƒµJ ¿CG øµ‡ Aɪ∏d QÉKBG …CG ádGR’ áÁób ¢Tɪb á©£b ¥ƒa áØîH IGƒµŸG ∂jôëàH »eƒb
.IGƒµŸG IóYÉb ≈∏Y â∏µ°ûJ.IGƒµŸG IóYÉb ≈∏Y â∏µ°ûJ
44.É¡æjõîJ πÑb Ó«∏b OÈJ IGƒµŸG »YO.É¡æjõîJ πÑb Ó«∏b OÈJ IGƒµŸG »YO
QÉîÑdÉH ºµëàdG ìÉàØe IôHG ∞«¶æJQÉîÑdÉH ºµëàdG ìÉàØe IôHG ∞«¶æJ
11º°SQ) RÉ¡÷G êQÉN ¤G QÉîÑdÉH ºµëàdG ìÉàØe »Ñë°SGº°SQ) RÉ¡÷G êQÉN ¤G QÉîÑdÉH ºµëàdG ìÉàØe »Ñë°SG(13(13..
22º°SQ) IôH’G øe ,óLh GPG ,¢ù∏µdG ádGR’ πÿG ΩGóîà°SÉH »eƒbº°SQ) IôH’G øe ,óLh GPG ,¢ù∏µdG ádGR’ πÿG ΩGóîà°SÉH »eƒb(15(15..
.QÉîÑdÉH ºµëàdG ìÉàØe IôHG »Ø∏àJ hCG »æãH »eƒ≤J ’.QÉîÑdÉH ºµëàdG ìÉàØe IôHG »Ø∏àJ hCG »æãH »eƒ≤J ’
33øeh Ö≤ãdG §°Sh ‘ ÉeÉ“ IôH’G ±ôW ™°Vh ∫ÓN øe QÉîÑdÉH ºµëàdG ìÉàØe IôHG ∫ÉNOG …ó«YCGøeh Ö≤ãdG §°Sh ‘ ÉeÉ“ IôH’G ±ôW ™°Vh ∫ÓN øe QÉîÑdÉH ºµëàdG ìÉàØe IôHG ∫ÉNOG …ó«YCG
º°SQ) áëàØdG ‘ IôH’G ÖfÉL ≈∏Y RQÉÑdG ™∏°†dG Ö«côJ ∫ÓNº°SQ) áëàØdG ‘ IôH’G ÖfÉL ≈∏Y RQÉÑdG ™∏°†dG Ö«côJ ∫ÓN
(16(16..
44 ™°Vh ≈∏Y QÉîÑdÉH ºµëàdG ìÉàØe »£Ñ°V ™°Vh ≈∏Y QÉîÑdÉH ºµëàdG ìÉàØe »£Ñ°VOO..
øjõîàdGøjõîàdG
11 ™°Vh ¤G QÉîÑdÉH ºµëàdG ìÉàØe »£Ñ°VGh AÉHô¡µdG øY ’ƒ°üØe RÉ¡÷G ¿ƒµj ¿CÉH …ócCÉJ ™°Vh ¤G QÉîÑdÉH ºµëàdG ìÉàØe »£Ñ°VGh AÉHô¡µdG øY ’ƒ°üØe RÉ¡÷G ¿ƒµj ¿CÉH …ócCÉJOO..
22º°SQ) AÉŸG ¿GõN »ZôaCGº°SQ) AÉŸG ¿GõN »ZôaCG(17(17..
33.¬æjõîàd ¢ü°üıG ¿ÉµŸG ∫ƒM »FÉHô¡µdG ∂∏°ùdG »Ød.¬æjõîàd ¢ü°üıG ¿ÉµŸG ∫ƒM »FÉHô¡µdG ∂∏°ùdG »Ød
44º°SQ) ±ÉL h øeBG ¿Éµe ‘ É¡∏MÉc ≈∏Y IGƒµŸG ÊõNº°SQ) ±ÉL h øeBG ¿Éµe ‘ É¡∏MÉc ≈∏Y IGƒµŸG ÊõN(18(18..
áeóÿGh ¿Éª°†dGáeóÿGh ¿Éª°†dG
¢ùÑ«∏«a ácô°ûH ¢UÉÿG âfÎf’G ¿GƒæY IQÉjR AÉLôdG ,á∏µ°ûe ∂jód âfÉc hCG äÉeƒ∏©e ájC’ âéàMG GPG¢ùÑ«∏«a ácô°ûH ¢UÉÿG âfÎf’G ¿GƒæY IQÉjR AÉLôdG ,á∏µ°ûe ∂jód âfÉc hCG äÉeƒ∏©e ájC’ âéàMG GPG
www.philips.comwww.philips.com∞JÉ¡dG ºbQ øjóŒ ±ƒ°S) ∑ó∏H ‘ AÓª©dG áeóÿ ¢ùÑ«∏«a õcôà »∏°üJG hCG∞JÉ¡dG ºbQ øjóŒ ±ƒ°S) ∑ó∏H ‘ AÓª©dG áeóÿ ¢ùÑ«∏«a õcôà »∏°üJG hCG
π«ch á©LGôe AÉLôdG ,∑ó∏H ‘ AÓª©dG áeóÿ õcôe óLGƒàj ⁄ GPG .(»ŸÉ©dG ¿Éª°†dG Iô°ûf ‘ ¿hóeπ«ch á©LGôe AÉLôdG ,∑ó∏H ‘ AÓª©dG áeóÿ õcôe óLGƒàj ⁄ GPG .(»ŸÉ©dG ¿Éª°†dG Iô°ûf ‘ ¿hóe
.á«°üî°ûdG ájÉæ©dGh á«dõæŸG äGhOCÓd ¢ùÑ«∏«a ácô°ûd ™HÉàdG áeóÿG õcôà »∏°üJG hCG ¢ùÑ«∏«a.á«°üî°ûdG ájÉæ©dGh á«dõæŸG äGhOCÓd ¢ùÑ«∏«a ácô°ûd ™HÉàdG áeóÿG õcôà »∏°üJG hCG ¢ùÑ«∏«a
Page 10

GC1680, GC1675,GC1665 104239 000 57991
v<ñUãv<ñUã
ΩÉY ∞°UhΩÉY ∞°Uh
AA
AÉŸG ñÉîH áëàaAÉŸG ñÉîH áëàa
BBáÄÑ©àdG áëàaáÄÑ©àdG áëàa
CC RGôW §≤a) QÉîÑdG á©aO áØ«Xh RGôW §≤a) QÉîÑdG á©aO áØ«XhGC1675GC1675((
DD AÉŸG ñÉîH ìÉàØe AÉŸG ñÉîH ìÉàØeTT
EE
QÉîÑdÉH ºµëàdG ìÉàØeQÉîÑdÉH ºµëàdG ìÉàØe
--
OOQÉîH ¿hóH =QÉîH ¿hóH =
--
qq§°Sƒàe QÉîH =§°Sƒàe QÉîH =
--
ww≈°übCG óëH QÉîH =≈°übCG óëH QÉîH =
--
xxºcGΟG ¢ù∏µdG ∞«¶æJ áØ«Xh =ºcGΟG ¢ù∏µdG ∞«¶æJ áØ«Xh =
FF RGôW §≤a) ‘É°V’G QÉîÑdG áØ«Xh RGôW §≤a) ‘É°V’G QÉîÑdG áØ«XhGC1680GC1680((
GGAÉŸG ¿GõN ôjô– ìÉàØeAÉŸG ¿GõN ôjô– ìÉàØe
HH RGôW §≤a) áeÓ°ù∏d »FÉ≤∏àdG ∞bƒàdG áØ«Xh RGôW §≤a) áeÓ°ù∏d »FÉ≤∏àdG ∞bƒàdG áØ«XhGC1680GC1680((
IIIQGô◊G §Ñ°V ìÉàØeIQGô◊G §Ñ°V ìÉàØe
JJIQGô◊G Aƒ°VIQGô◊G Aƒ°V
KK»FÉHô¡µdG ∂∏°ùdG»FÉHô¡µdG ∂∏°ùdG
LLRGô£dG áë«Ø°URGô£dG áë«Ø°U
MMAÉŸG ¿GõNAÉŸG ¿GõN
NN¢ù∏µdG ∞«¶æJ ¢Uôb¢ù∏µdG ∞«¶æJ ¢Uôb
GóL º¡eGóL º¡e
.πÑ≤à°ùŸG ‘ ∂d ™Lôªc º¡H »¶ØàMGh RÉ¡÷G ΩGóîà°SG πÑb Gó«L ∫ɪ©à°SÓd äGOÉ°TQ’G √òg …CGôbG.πÑ≤à°ùŸG ‘ ∂d ™Lôªc º¡H »¶ØàMGh RÉ¡÷G ΩGóîà°SG πÑb Gó«L ∫ɪ©à°SÓd äGOÉ°TQ’G √òg …CGôbG
ææ‘ ô°TÉÑŸG »FÉHô¡µdG QÉ«àdG ≥HÉ£j RGô£dG áë«Ø°U ≈∏Y ¬«dG QÉ°ûŸG »FÉHô¡µdG QÉ«àdG ¿CÉH …ócCÉJ‘ ô°TÉÑŸG »FÉHô¡µdG QÉ«àdG ≥HÉ£j RGô£dG áë«Ø°U ≈∏Y ¬«dG QÉ°ûŸG »FÉHô¡µdG QÉ«àdG ¿CÉH …ócCÉJ
.RÉ¡÷G π«°UƒJ πÑb ∑ó∏H.RÉ¡÷G π«°UƒJ πÑb ∑ó∏H
ææ.¬°ùØf RÉ¡÷G hCG »FÉHô¡µdG ∂∏°ùdG hCG AÉHô¡µdG ¢ùÑ≤e ∞∏J GPG RÉ¡÷G »eóîà°ùJ ’.¬°ùØf RÉ¡÷G hCG »FÉHô¡µdG ∂∏°ùdG hCG AÉHô¡µdG ¢ùÑ≤e ∞∏J GPG RÉ¡÷G »eóîà°ùJ ’
ææøe ¢ùÑ«∏«a ácô°ûd ™HÉJ áeóN õcôe hCG ¢ùÑ«∏«a πÑb øe ¬dGóÑà°SG Öéj ,»FÉHô¡µdG ∂∏°ùdG ∞∏J GPGøe ¢ùÑ«∏«a ácô°ûd ™HÉJ áeóN õcôe hCG ¢ùÑ«∏«a πÑb øe ¬dGóÑà°SG Öéj ,»FÉHô¡µdG ∂∏°ùdG ∞∏J GPG
.áMOÉa QÉ£NCG çhóM Öæéàd AÉØcCGh Ú∏gDƒe ¢UÉî°TCG πÑb.áMOÉa QÉ£NCG çhóM Öæéàd AÉØcCGh Ú∏gDƒe ¢UÉî°TCG πÑb
ææ.É¡ÑfÉéH ∂aƒbh ¿hO ô°TÉÑŸG »FÉHô¡µdG QÉ«àdÉH á∏°üàe GóHG IGƒµŸG »cÎJ ’.É¡ÑfÉéH ∂aƒbh ¿hO ô°TÉÑŸG »FÉHô¡µdG QÉ«àdÉH á∏°üàe GóHG IGƒµŸG »cÎJ ’
ææ.GóHG AÉŸG πNGO IGƒµŸG …ôª¨J ’.GóHG AÉŸG πNGO IGƒµŸG …ôª¨J ’
ææRÉ¡÷G »≤HCG .º¡àÑbGôe ¿hóH RÉ¡÷G ∫ɪ©à°SÉH º¡d ìɪ°ùdG Öéj ’ Ú∏gDƒŸG ÒZ ¢UÉî°TC’G ¿GRÉ¡÷G »≤HCG .º¡àÑbGôe ¿hóH RÉ¡÷G ∫ɪ©à°SÉH º¡d ìɪ°ùdG Öéj ’ Ú∏gDƒŸG ÒZ ¢UÉî°TC’G ¿G
.∫ÉØWC’G ∫hÉæàe øY Gó«©H.∫ÉØWC’G ∫hÉæàe øY Gó«©H
ææ¿GõN πNGO iôNCG ájhɪ«c OGƒe ájCG hCG ¢ù∏µdG ∞«¶æJ OGƒe hCG AÉ°ûædG hCG πÿG hCG ô£©dG »©°†J ’¿GõN πNGO iôNCG ájhɪ«c OGƒe ájCG hCG ¢ù∏µdG ∞«¶æJ OGƒe hCG AÉ°ûædG hCG πÿG hCG ô£©dG »©°†J ’
.AÉŸG.AÉŸG
ææ»∏©Œ ’ .É¡à°ùeÓe ádÉM ‘ ¥hôM ÖÑ°ùJ ¿CG øµÁh GóL áæNÉ°S íÑ°üJ ¿CG IGƒµŸG IóYÉ≤d øµÁ»∏©Œ ’ .É¡à°ùeÓe ádÉM ‘ ¥hôM ÖÑ°ùJ ¿CG øµÁh GóL áæNÉ°S íÑ°üJ ¿CG IGƒµŸG IóYÉ≤d øµÁ
.áæNÉ°S ¿ƒµJ ÉeóæY IGƒµŸG IóYÉb ¢ùeÓj »FÉHô¡µdG ∂∏°ùdG.áæNÉ°S ¿ƒµJ ÉeóæY IGƒµŸG IóYÉb ¢ùeÓj »FÉHô¡µdG ∂∏°ùdG
ææIGƒµŸG ∑ôJ óæYh AÉŸG ¿GõN ÆGôaG hCG Aπe óæYh IGƒµŸG ∞«¶æJ óæYh »µdG á«∏ªY øe AÉ¡àf’G óæYIGƒµŸG ∑ôJ óæYh AÉŸG ¿GõN ÆGôaG hCG Aπe óæYh IGƒµŸG ∞«¶æJ óæYh »µdG á«∏ªY øe AÉ¡àf’G óæY
™°Vh ¤G QÉîÑdÉH ºµëàdG ìÉàØe §Ñ°†H »eƒb ,âbƒdG øe ágÈd ™°Vh ¤G QÉîÑdÉH ºµëàdG ìÉàØe §Ñ°†H »eƒb ,âbƒdG øe ágÈd
00É¡∏MÉc ≈∏Y IGƒµŸG »©°VhÉ¡∏MÉc ≈∏Y IGƒµŸG »©°Vh
.§FÉ◊G ¢ùHÉb øe »FÉHô¡µdG ¢ùÑ≤ŸG »YõfGh.§FÉ◊G ¢ùHÉb øe »FÉHô¡µdG ¢ùÑ≤ŸG »YõfGh
∫hC’G ΩGóîà°S’G πÑb∫hC’G ΩGóîà°S’G πÑb
11.IGƒµŸG IóYÉb øe á«eÉM á«fó©e ábÉbQ hCG á≤°U’ ábQh …CG ´õæH »eƒb.IGƒµŸG IóYÉb øe á«eÉM á«fó©e ábÉbQ hCG á≤°U’ ábQh …CG ´õæH »eƒb
22≥FÉbO Ió©d π∏ÑŸG ¢Tɪ≤dG øe á©£b ¥ƒa IGƒµŸG …Qôeh IQGôM áLQO ≈°übCG ¤G øî°ùJ IGƒµŸG »YO≥FÉbO Ió©d π∏ÑŸG ¢Tɪ≤dG øe á©£b ¥ƒa IGƒµŸG …Qôeh IQGôM áLQO ≈°übCG ¤G øî°ùJ IGƒµŸG »YO
.IóYÉ≤dG ‘ á≤dÉY ÉjÉ≤H ájCG ádGR’.IóYÉ≤dG ‘ á≤dÉY ÉjÉ≤H ájCG ádGR’
CC
.Ò°üb âbh ó©H ∞bƒà«°S ∂dP .Iôe ∫hC’ É¡eGóîà°SG óæY ¿ÉNódG ¢†©H IGƒµŸG Qó°üJ ¿CG øµÁ.Ò°üb âbh ó©H ∞bƒà«°S ∂dP .Iôe ∫hC’ É¡eGóîà°SG óæY ¿ÉNódG ¢†©H IGƒµŸG Qó°üJ ¿CG øµÁ
ΩGóîà°SÓd Ò°†ëàdGΩGóîà°SÓd Ò°†ëàdG
AÉŸG ¿GõN áÄÑ©JAÉŸG ¿GõN áÄÑ©J
.GóHG AÉŸG πNGO IGƒµŸG …ôª¨J ’.GóHG AÉŸG πNGO IGƒµŸG …ôª¨J ’
11.AÉHô¡µdÉH ∫ƒ°Uƒe ÒZ RÉ¡÷G ¿CÉH …ócCÉJ.AÉHô¡µdÉH ∫ƒ°Uƒe ÒZ RÉ¡÷G ¿CÉH …ócCÉJ
22 ™°Vh ¤G QÉîÑdG ìÉàØe »£Ñ°VG ™°Vh ¤G QÉîÑdG ìÉàØe »£Ñ°VGOO.(1 º°SQ) (QÉîH ¿hóH=).(1 º°SQ) (QÉîH ¿hóH=)
33.(3 º°SQ) ∫É°üØfÓd πHÉ≤dG AÉŸG ¿GõN »YõfGh ÉWƒ¨°†e ¬«≤HCGh ôjôëàdG ìÉàØe »£¨°VG.(3 º°SQ) ∫É°üØfÓd πHÉ≤dG AÉŸG ¿GõN »YõfGh ÉWƒ¨°†e ¬«≤HCGh ôjôëàdG ìÉàØe »£¨°VG
44.(3 º°SQ) iƒà°ùe ≈°übCG ¤G QƒÑæ°üdG AÉà AÉŸG ¿GõN …CÓeG.(3 º°SQ) iƒà°ùe ≈°übCG ¤G QƒÑæ°üdG AÉà AÉŸG ¿GõN …CÓeG
IQÉ°TG …ó©àJ ’ IQÉ°TG …ó©àJ ’MAXMAX.¿GõÿG áÄÑ©J óæY.¿GõÿG áÄÑ©J óæY
ææhCG ô£≤ŸG AÉŸG øe ájhÉ°ùàe ᫪µH É¡Lõà ∂ë°üæf ,GóL á«°SÉb ∑ó∏H ‘ QƒÑæ°üdG √É«e âfÉc GPGhCG ô£≤ŸG AÉŸG øe ájhÉ°ùàe ᫪µH É¡Lõà ∂ë°üæf ,GóL á«°SÉb ∑ó∏H ‘ QƒÑæ°üdG √É«e âfÉc GPG
.§≤a ô£≤ŸG AÉŸG ∫ɪ©à°SG.§≤a ô£≤ŸG AÉŸG ∫ɪ©à°SG
‘ iôNCG ájhɪ«c OGƒe hCG »µdG äÉaÉ°VG hCG ¢ù∏µ∏d á∏jõŸG πFGƒ°ùdG hCG É°ûædG hCG πÿG hCG Qƒ£©dG »©°†J ’ ‘ iôNCG ájhɪ«c OGƒe hCG »µdG äÉaÉ°VG hCG ¢ù∏µ∏d á∏jõŸG πFGƒ°ùdG hCG É°ûædG hCG πÿG hCG Qƒ£©dG »©°†J ’
.AÉŸG ¿GõN.AÉŸG ¿GõN
55.(∂«∏c 䃰U Ú©ª°ùà°S) IGƒµŸG πNGO ¬fɵe ¤G AÉŸG ¿GõN »©aOG.(∂«∏c 䃰U Ú©ª°ùà°S) IGƒµŸG πNGO ¬fɵe ¤G AÉŸG ¿GõN »©aOG
IQGô◊G §Ñ°VIQGô◊G §Ñ°V
11.É¡∏MÉc ≈∏Y IGƒµŸG »©°V.É¡∏MÉc ≈∏Y IGƒµŸG »©°V
22.ºFÓŸG ™°VƒdG ¤G IQGô◊G áLQO §Ñ°V ìÉàØe ∞d ∫ÓN øe áHƒ∏£ŸG »µdG IQGôM áLQO »£Ñ°VG.ºFÓŸG ™°VƒdG ¤G IQGô◊G áLQO §Ñ°V ìÉàØe ∞d ∫ÓN øe áHƒ∏£ŸG »µdG IQGôM áLQO »£Ñ°VG
áÑ°SÉæŸG »µdG IQGôM áLQO áaô©Ÿ ¢ùHÓŸG á©£b ≈∏Y π°ù¨dG äGOÉ°TQG øe …ócCÉJ áÑ°SÉæŸG »µdG IQGôM áLQO áaô©Ÿ ¢ùHÓŸG á©£b ≈∏Y π°ù¨dG äGOÉ°TQG øe …ócCÉJ
.(4 º°SQ).(4 º°SQ)
--11(ΰù«dƒH ,¿ƒ∏jÉf ,∂«∏jôcCG :∫Éãe) á«YÉ棰UG á°ûªbCG(ΰù«dƒH ,¿ƒ∏jÉf ,∂«∏jôcCG :∫Éãe) á«YÉ棰UG á°ûªbCG
--
1 1ôjôMôjôM
--
2 2±ƒ°U±ƒ°U
--
3 3ø£bø£b
øe »µ∏d áHƒ∏£ŸG IQGô◊G áLQO áaô©e ‹hÉM ,¢Tɪ≤dG É¡æe ™æ°U »àdG IOÉŸG Úaô©J ’ âæc GPGøe »µ∏d áHƒ∏£ŸG IQGô◊G áLQO áaô©e ‹hÉM ,¢Tɪ≤dG É¡æe ™æ°U »àdG IOÉŸG Úaô©J ’ âæc GPG
.É¡æjóJôJ ÉeóæY É¡æe ôgÉX ÒZ AõL »c ∫ÓN.É¡æjóJôJ ÉeóæY É¡æe ôgÉX ÒZ AõL »c ∫ÓN
çhóL Öæéàd ¢Tɪ≤dG øe »Ø∏ÿG Aõ÷G »µH »eƒb :á«YÉ棰U’G á°ûªbC’Gh ±ƒ°üdGh ôjô◊G á°ûªbC’çhóL Öæéàd ¢Tɪ≤dG øe »Ø∏ÿG Aõ÷G »µH »eƒb :á«YÉ棰U’G á°ûªbC’Gh ±ƒ°üdGh ôjô◊G á°ûªbC’
.™≤H çhóM Öæéàd AÉŸG ñÉîH áØ«Xh ∫ɪ©à°SG »ÑæŒ .áYÉŸ ™≤H.™≤H çhóM Öæéàd AÉŸG ñÉîH áØ«Xh ∫ɪ©à°SG »ÑæŒ .áYÉŸ ™≤H
.Óãe á«YÉ棰U’G á°ûªbC’Éc »c IQGôM áLQO ≈fOCG êÉà– »àdG á°ûªbC’G »µH …CGóHG.Óãe á«YÉ棰U’G á°ûªbC’Éc »c IQGôM áLQO ≈fOCG êÉà– »àdG á°ûªbC’G »µH …CGóHG
33.¢VQDƒe §FÉM ¢ùHÉb ‘ AÉHô¡µdG ¢ùÑ≤e »∏°UhCG.¢VQDƒe §FÉM ¢ùHÉb ‘ AÉHô¡µdG ¢ùÑ≤e »∏°UhCG
44.(5 º°SQ) »µdG á«∏ª©H AóÑdG πÑb âbƒdG ¢†©Ñd …ô¶àfG ,IQGô◊G Aƒ°V A≈Ø£æj ÉeóæY.(5 º°SQ) »µdG á«∏ª©H AóÑdG πÑb âbƒdG ¢†©Ñd …ô¶àfG ,IQGô◊G Aƒ°V A≈Ø£æj ÉeóæY
.»µdG á«∏ªY AÉæKCG ôNB’ âbh øe IQGô◊G Aƒ°V A»°†j ±ƒ°S.»µdG á«∏ªY AÉæKCG ôNB’ âbh øe IQGô◊G Aƒ°V A»°†j ±ƒ°S
RÉ¡÷G ΩGóîà°SGRÉ¡÷G ΩGóîà°SG
QÉîÑdG ≈∏Y »µdGQÉîÑdG ≈∏Y »µdG
11.AÉŸG ¿GõN πNGO ‘Éc AÉe OƒLh øe …ócCÉJ.AÉŸG ¿GõN πNGO ‘Éc AÉe OƒLh øe …ócCÉJ
22§Ñ°†" AõL &eGóîà°SÓd Ò°†ëàdÉ" Iô≤a ¤G …ô¶fG) É¡H í°üæj »àdG »µdG IGQôM áLQO …QÉàNG§Ñ°†" AõL &eGóîà°SÓd Ò°†ëàdÉ" Iô≤a ¤G …ô¶fG) É¡H í°üæj »àdG »µdG IGQôM áLQO …QÉàNG
.(<IQGô◊G áLQO.(<IQGô◊G áLQO
33¿CÉH …ócCÉJ .ºFÓŸG QÉîÑdG ™°Vh ¤G QÉîÑdÉH ºµëàdG ìÉàØe »£Ñ°VG IQGô◊G Aƒ°V A≈Ø£æj ¿CG ó©H¿CÉH …ócCÉJ .ºFÓŸG QÉîÑdG ™°Vh ¤G QÉîÑdÉH ºµëàdG ìÉàØe »£Ñ°VG IQGô◊G Aƒ°V A≈Ø£æj ¿CG ó©H
.(6 º°SQ) ÉgQÉ«àNÉH âªb »àdG IQGô◊G áLQód ºFÓe √QÉ«àNÉH âªb …òdG QÉîÑdG ™°Vh ¿ƒµj.(6 º°SQ) ÉgQÉ«àNÉH âªb »àdG IQGô◊G áLQód ºFÓe √QÉ«àNÉH âªb …òdG QÉîÑdG ™°Vh ¿ƒµj
--qq IQGô◊G ´É°VhCG) §°Sƒàe QÉîH : IQGô◊G ´É°VhCG) §°Sƒàe QÉîH :22 : :MAXMAX((
--ww IQGô◊G ´É°VhCG) ≈°übCG QÉîH : IQGô◊G ´É°VhCG) ≈°übCG QÉîH :33::MAXMAX((
CC
.áWƒÑ°†ŸG »µdG IQGôM áLQO ¤G π°üJ ÉŸÉM »µdG á«∏ª©H IGƒµŸG CGóÑJ ±ƒ°S.áWƒÑ°†ŸG »µdG IQGôM áLQO ¤G π°üJ ÉŸÉM »µdG á«∏ª©H IGƒµŸG CGóÑJ ±ƒ°S
QÉîH ¿hóH »µdG á«∏ªYQÉîH ¿hóH »µdG á«∏ªY
11 ™°Vh ¤G QÉîÑdG ìÉàØe »£Ñ°VG ™°Vh ¤G QÉîÑdG ìÉàØe »£Ñ°VGOO.(QÉîH ¿hóH=).(QÉîH ¿hóH=)
22§Ñ°†" AõL &eGóîà°SÓd Ò°†ëàdÉ" Iô≤a ¤G …ô¶fG) É¡H í°üæj »àdG »µdG IGQôM áLQO …QÉàNG§Ñ°†" AõL &eGóîà°SÓd Ò°†ëàdÉ" Iô≤a ¤G …ô¶fG) É¡H í°üæj »àdG »µdG IGQôM áLQO …QÉàNG
.(<IQGô◊G áLQO.(<IQGô◊G áLQO
ÉjGõŸGÉjGõŸG
AÉŸG ñÉîH áØ«XhAÉŸG ñÉîH áØ«Xh
.IQGôM áLQO ájCG ≈∏Y Ió«æY ó«YÉŒ ádGR’ AÉŸG ïH áØ«Xh ΩGóîà°SG ∂æµÁ.IQGôM áLQO ájCG ≈∏Y Ió«æY ó«YÉŒ ádGR’ AÉŸG ïH áØ«Xh ΩGóîà°SG ∂æµÁ
11.AÉŸG ¿GõN πNGO ‘Éc AÉe OƒLh øe …ócCÉJ.AÉŸG ¿GõN πNGO ‘Éc AÉe OƒLh øe …ócCÉJ
22.(7 º°SQ) É¡«c øjƒæJ »àdG ¢Tɪ≤dG á©£b Ö«WÎd äGôe IóY AÉŸG ïH ìÉàØe ≈∏Y »£¨°VG.(7 º°SQ) É¡«c øjƒæJ »àdG ¢Tɪ≤dG á©£b Ö«WÎd äGôe IóY AÉŸG ïH ìÉàØe ≈∏Y »£¨°VG
RGôW §≤a) »Ø°V’G QÉîÑdG RGôW §≤a) »Ø°V’G QÉîÑdGGC1680GC1680((
.GóL Ió«æ©dG ó«YÉéàdG ádGR’ ‘É°VG QÉîH ôaƒJ áØ«XƒdG √òg.GóL Ió«æ©dG ó«YÉéàdG ádGR’ ‘É°VG QÉîH ôaƒJ áØ«XƒdG √òg
ææ ÚH IQGô◊G äÉLQO ≈∏Y §≤a πª©J ‘É°V’G QÉîÑdG áØ«Xh ¿G ÚH IQGô◊G äÉLQO ≈∏Y §≤a πª©J ‘É°V’G QÉîÑdG áØ«Xh ¿G33hhMAXMAX..
11 ™°Vh ≈∏Y QÉîÑdÉH ºµëàdG ìÉàØe »£Ñ°VG ™°Vh ≈∏Y QÉîÑdÉH ºµëàdG ìÉàØe »£Ñ°VGww.(8 º°SQ) (≈°übCG QÉîH =).(8 º°SQ) (≈°übCG QÉîH =)
22.(9 º°SQ) ÊGƒK 5 ÉgÉ°übCG IóŸ ÉWƒ¨°†e ¬«≤HCGh QÉîÑdÉH ºµëàdG ìÉàØe »£¨°VG.(9 º°SQ) ÊGƒK 5 ÉgÉ°übCG IóŸ ÉWƒ¨°†e ¬«≤HCGh QÉîÑdÉH ºµëàdG ìÉàØe »£¨°VG
33GOó› áØ«XƒdG √òg ΩGóîà°SG πÑb πbC’G ≈∏Y IóMGh á≤«bO IóŸ …ô¶àfGh QÉîÑdÉH ºµëàdG ìÉàØe …QôMGOó› áØ«XƒdG √òg ΩGóîà°SG πÑb πbC’G ≈∏Y IóMGh á≤«bO IóŸ …ô¶àfGh QÉîÑdÉH ºµëàdG ìÉàØe …QôM
.IóYÉ≤dG øe AÉŸG Üô°ùJ Öæéàd.IóYÉ≤dG øe AÉŸG Üô°ùJ Öæéàd
RGôW §≤a) ájQÉîÑdG á©aódG RGôW §≤a) ájQÉîÑdG á©aódGGC1675GC1675((
.Ió«æ©dG ó«YÉéàdG ádGRG ≈∏Y óYÉ°ùJ ájƒ≤dG QÉîÑdG á©aO ¿G.Ió«æ©dG ó«YÉéàdG ádGRG ≈∏Y óYÉ°ùJ ájƒ≤dG QÉîÑdG á©aO ¿G
ÚH ìhGÎJ IQGôM äÉLQO ≈∏Y §≤a É¡dɪ©à°SG øµÁ ájQÉîÑdG á©aódG áØ«Xh ¿G ÚH ìhGÎJ IQGôM äÉLQO ≈∏Y §≤a É¡dɪ©à°SG øµÁ ájQÉîÑdG á©aódG áØ«Xh ¿GMAXMAXhh33..
11.(10 º°SQ) QÉîÑdG ™aO ìÉàØe …QôMh »£¨°VG.(10 º°SQ) QÉîÑdG ™aO ìÉàØe …QôMh »£¨°VG
.AÉŸG á≤Ñ≤H Öæéàd GOó› ìÉàØŸG ∫ɪ©à°SG πÑb âbƒdG øe ágÈd …ô¶àfG.AÉŸG á≤Ñ≤H Öæéàd GOó› ìÉàØŸG ∫ɪ©à°SG πÑb âbƒdG øe ágÈd …ô¶àfG
.¢UÉî°TC’G ¤G GóHG QÉîÑdG »¡LƒJ ’.¢UÉî°TC’G ¤G GóHG QÉîÑdG »¡LƒJ ’
RGôW §≤a) áeÓ°ù∏d »FÉ≤∏àdG ∞bƒàdG áØ«Xh RGôW §≤a) áeÓ°ù∏d »FÉ≤∏àdG ∞bƒàdG áØ«XhGC1680GC1680((
∑ôëàJ ⁄ GPG É«µ«JÉeƒJhCG πª©dG øY IGƒµŸG ∞bƒJ áeÓ°ù∏d á«fhεd’G »FÉ≤∏àdG ∞bƒàdG áØ«Xh ¿G∑ôëàJ ⁄ GPG É«µ«JÉeƒJhCG πª©dG øY IGƒµŸG ∞bƒJ áeÓ°ù∏d á«fhεd’G »FÉ≤∏àdG ∞bƒàdG áØ«Xh ¿G
.âbƒdG øe áæ«©e IÎØd IGƒµŸG.âbƒdG øe áæ«©e IÎØd IGƒµŸG
ææ∞bƒàdG áØ«Xh ᣰSGƒH É¡aÉ≤jG ” ób IGƒµŸG ¿CÉH GÒ°ûe ¢†«eƒdÉH »FÉ≤∏àdG ∞bƒàdG Aƒ°V CGóÑj∞bƒàdG áØ«Xh ᣰSGƒH É¡aÉ≤jG ” ób IGƒµŸG ¿CÉH GÒ°ûe ¢†«eƒdÉH »FÉ≤∏àdG ∞bƒàdG Aƒ°V CGóÑj
º°SQ) áeÓ°ù∏d »FÉ≤∏àdGº°SQ) áeÓ°ù∏d »FÉ≤∏àdG(11(11..
--.á«fÉK 30 ó©H çóëj ±ƒ°S ∂dP ,»≤aC’G ™°VƒdG ‘.á«fÉK 30 ó©H çóëj ±ƒ°S ∂dP ,»≤aC’G ™°VƒdG ‘
--.≥FÉbO 8 ó©H çóëj ±ƒ°S ∂dP ,…OƒeÉ©dG ™°VƒdG ‘.≥FÉbO 8 ó©H çóëj ±ƒ°S ∂dP ,…OƒeÉ©dG ™°VƒdG ‘
ææ:ójóL øe IGƒµŸG Úî°ùàd:ójóL øe IGƒµŸG Úî°ùàd
--.Ó«∏b É¡µjôëàH »eƒb hCG IGƒµŸG »∏ªMG.Ó«∏b É¡µjôëàH »eƒb hCG IGƒµŸG »∏ªMG
--.IQGô◊G Aƒ°V A»°†jh »FÉ≤∏àdG ∞bƒàdG Aƒ°V A≈Ø£æj.IQGô◊G Aƒ°V A»°†jh »FÉ≤∏àdG ∞bƒàdG Aƒ°V A≈Ø£æj
--.∫ɪ©à°SÓd IõgÉL IGƒµŸG ¿ƒµJ ,ójóL øe A»°†j ºK IQGô◊G Aƒ°V A≈Ø£æj ÉeóæY.∫ɪ©à°SÓd IõgÉL IGƒµŸG ¿ƒµJ ,ójóL øe A»°†j ºK IQGô◊G Aƒ°V A≈Ø£æj ÉeóæY
 Loading...