

2
5
7
8
9
0
3
5
6
7
8
3
8
GC1580, GC1575, GC1565
1
1
1
1
1
1
ENGLISH
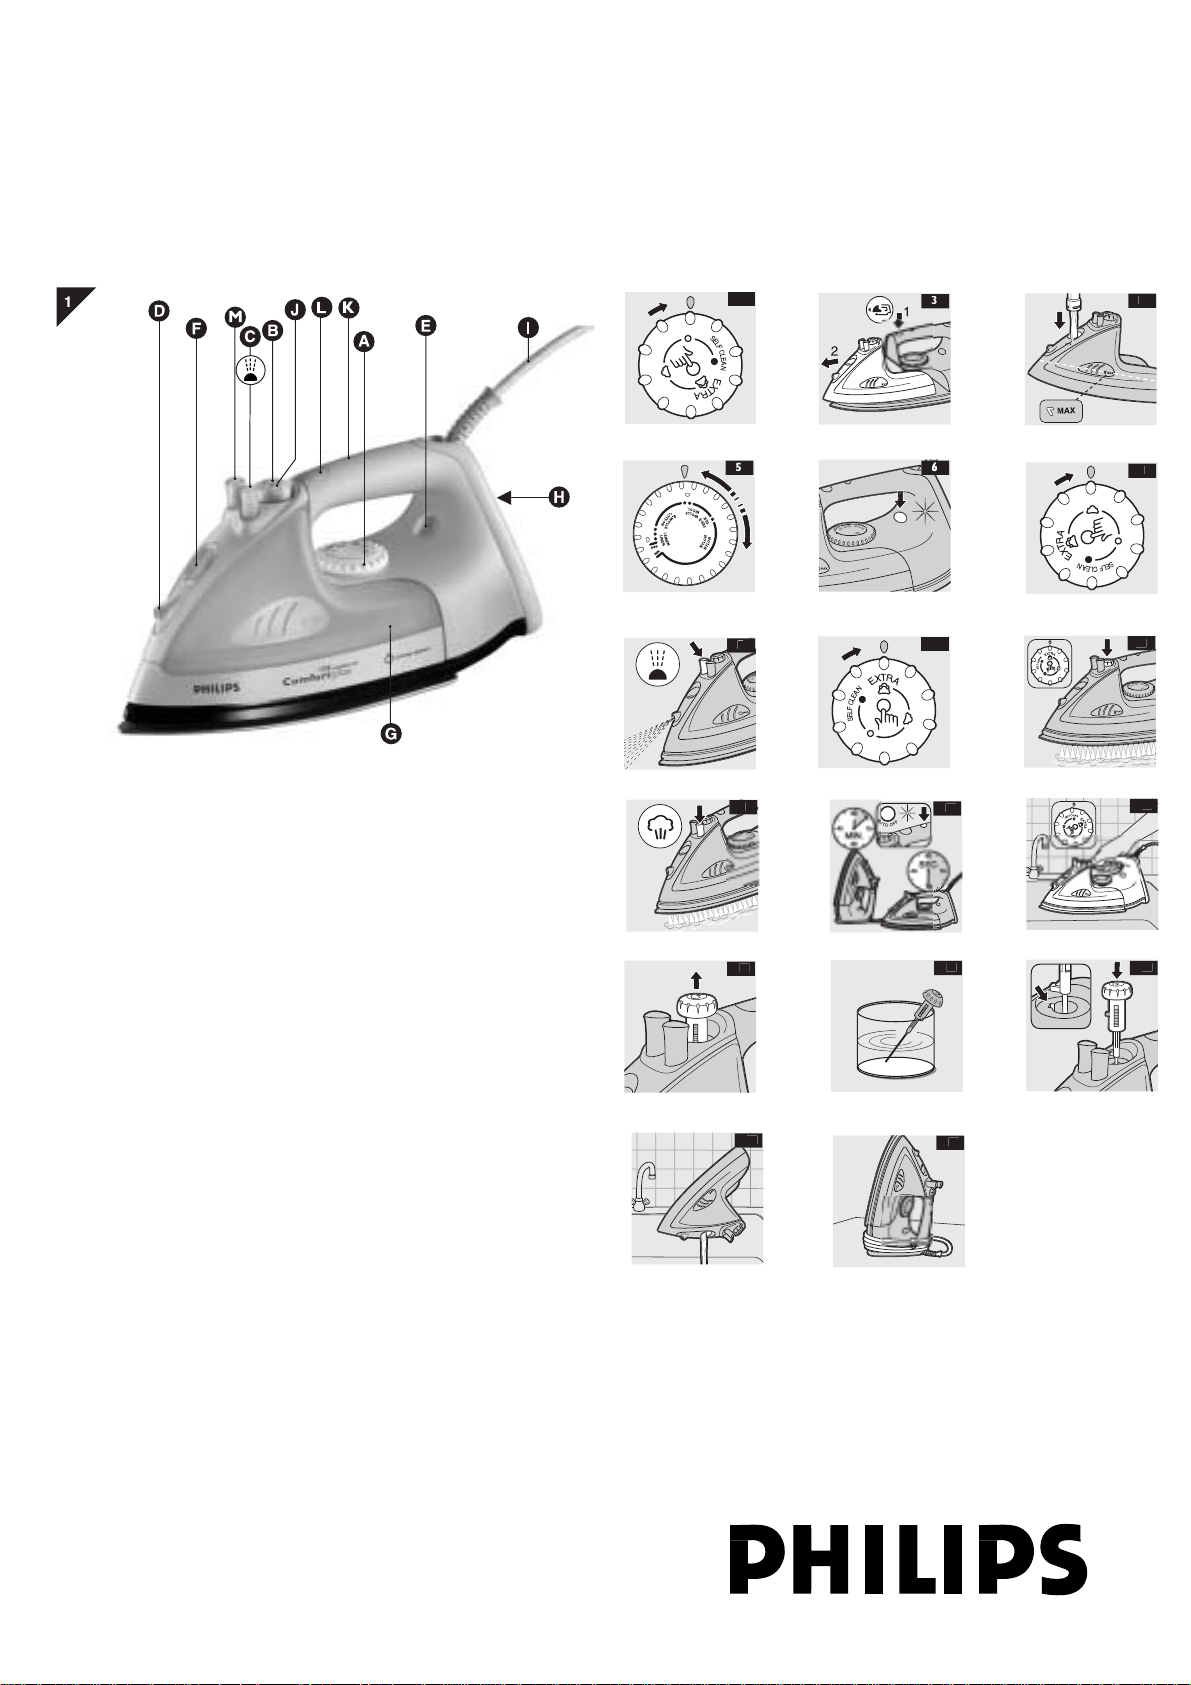
General description (fig. 1)IIIIIIIIIIIIIIIIIIIIIIIIIIIIIIIIIIIIIIIIIIIIIIIIIIIIIIIIIIIIIIIIIIIIIIIIIIIIIIIIIIIIIIIIIIIIIIIIIIIIIIIIIIIIIIIIIIIIIIIIIIIIIIIIIIIIIIIIIIIIII
A Temperature control dial
B Steam control dial
O = no steam
q = moderate steam
w = maximum steam
x = Calc-Clean function
C Spray button T
D Spray nozzle
E Temperature pilot light
F Water filling opening
G Water tank
H Type plate
I Cord
J Extra Steam function (press steam control dial) (type GC1580)
K Auto shut-off (type GC1580)
L Release button for water tank
M Shot of Steam function (type GC1575)
ImportantIIIIIIIIIIIIIIIIIIIIIIIIIIIIIIIIIIIIIIIIIIIIIIIIIIIIIIIIIIIIIIIIIIIIIIIIIIIIIIIIIIIIIIIIIIIIIIIIIIIIIIIIIIIIIIIIIIIIIIIIIIIIIIIIIIIIIIIIIIIIIIIIIIIIIIIIIIIIIIIIIIIIIIIIIIIIIIIIIIIIIIIIIIIIIIIIIIIIIIIIIIIIIIIIIII
For optimal safety, read these instructions carefully and look at the illustrations before
you start using the appliance.
Keep these instructions for future reference.
◗ Never leave the iron unattended when it is connected to the mains.
◗ This appliance is not intended for use by children.
◗ Keep an eye on children to make sure that they do not play with the appliance.
◗ The soleplate of the iron can become extremely hot and may cause burns if
touched.
◗ Never use the appliance if it is damaged in any way.
◗ When you have finished ironing, when you clean the appliance, when you fill or
empty the water tank and also when you leave the iron even for a short while:
set the steam control to position O, put the iron on its heel and remove the
mains plug from the wall socket.
◗ If the supply cord is damaged, it must be replaced by a special Philips or its
service agent or a similarly qualified person in order to avoid a hazard.
◗ Check if the voltage indicated on the type plate corresponds to the local mains
voltage before you connect the appliance.
Before first useIIIIIIIIIIIIIIIIIIIIIIIIIIIIIIIIIIIIIIIIIIIIIIIIIIIIIIIIIIIIIIIIIIIIIIIIIIIIIIIIIIIIIIIIIIIIIIIIIIIIIIIIIIIIIIIIIIIIIIIIIIIIIIIIIIIIIIIIIIIIIIIIIIIIIIIIIIIIIIIIIIIIIIIIIIIIIIIIIIIIIIIIIIIIIII
1 Remove sticker or protective foil from the soleplate if there is any.
2 Heat up the iron to the maximum temperature and pass the iron over a piece
of damp cloth for several minutes to remove any residues from the soleplate.
The iron may give off some smoke when you use it for the first time. This will cease
after a short while.
Filling the water tankIIIIIIIIIIIIIIIIIIIIIIIIIIIIIIIIIIIIIIIIIIIIIIIIIIIIIIIIIIIIIIIIIIIIIIIIIIIIIIIIIIIIIIIIIIIIIIIIIIIIIIIIIIIIIIIIIIIIIIIIIIIIIIIIIIIIIIIIIIIIIIIIIIIIIIIIIIIIIIIIIIIII
Never immerse the iron in water.
1 Remove the mains plug from the wall socket.
2 Set the steam control to position O (= no steam) (fig. 2).
3 Press and hold the release button and remove the detachable water tank
(fig. 3).
4 Fill the water tank with cold tap water up to the maximum level (fig. 4).
Do not fill the water tank beyond the MAX indication.
Only use water. Do not use vinegar, starch, ironing concentrates or chemically
descaled water.
If the tap water in your area is very hard, we advise you to mix it with an equal
amount of distilled water or to use distilled water only.
5 Push the water tank back into the iron until you hear a ‘click’.
Setting the temperatureIIIIIIIIIIIIIIIIIIIIIIIIIIIIIIIIIIIIIIIIIIIIIIIIIIIIIIIIIIIIIIIIIIIIIIIIIIIIIIIIIIIIIIIIIIIIIIIIIIIIIIIIIIIIIIIIIIIIIIIIIIIIIIIIIIIIIIIIIIIIIIIIIIIIIII
1 Put the iron on its heel.
2 Check the garment label for the required ironing temperature:
1 Synthetic fabrics (e.g. acrylic, viscose, polyamide, polyester)
1 Silk
2 Wool
3 Cotton, linen
If you do not know what kind of fabric(s) a garment is made of, determine the right
ironing temperature by ironing a part that will be invisible when you wear the
garment.
Silk, woollen and synthetic materials: iron the reverse side of the fabric to prevent
shiny patches. Avoid using the spray function to prevent stains.
Start ironing the articles that require the lowest ironing temperature, such as those
made of synthetic fibres.
3 Set the temperature control dial to the required ironing temperature by
turning it to the appropriate temperature indication (fig. 5).
4 Put the mains plug in an earthed wall socket.
5 When the temperature pilot light has gone out, wait a while before you start
ironing (fig. 6).
The pilot light will go on from time to time during ironing.
Steam ironingIIIIIIIIIIIIIIIIIIIIIIIIIIIIIIIIIIIIIIIIIIIIIIIIIIIIIIIIIIIIIIIIIIIIIIIIIIIIIIIIIIIIIIIIIIIIIIIIIIIIIIIIIIIIIIIIIIIIIIIIIIIIIIIIIIIIIIIIIIIIIIIIIIIIIIIIIIIIIIIIIIIIIIIIIIIIIIIIIIIIIIIIIIIIIIIII
1 Make sure that there is enough water in the water tank.
2 After the temperature pilot light has gone out, set the steam control to the
appropriate steam position (fig. 7).
q for moderate steam (temperature settings 2 to MAX)
w for maximum steam (temperature settings 3 to MAX)
The iron will start producing steam as soon as the set temperature has been
reached.
3 Set the temperature control dial to the recommended position.
See 'Setting the temperature'.
Ironing without steamIIIIIIIIIIIIIIIIIIIIIIIIIIIIIIIIIIIIIIIIIIIIIIIIIIIIIIIIIIIIIIIIIIIIIIIIIIIIIIIIIIIIIIIIIIIIIIIIIIIIIIIIIIIIIIIIIIIIIIIIIIIIIIIIIIIIIIIIIIIIIIIIIIIIIIIIIIIIIII
1 Set the steam control dial to position O (= no steam).
2 Set the temperature control dial to the recommended position.
See 'Setting the temperature'.
Other featuresIIIIIIIIIIIIIIIIIIIIIIIIIIIIIIIIIIIIIIIIIIIIIIIIIIIIIIIIIIIIIIIIIIIIIIIIIIIIIIIIIIIIIIIIIIIIIIIIIIIIIIIIIIIIIIIIIIIIIIIIIIIIIIIIIIIIIIIIIIIIIIIIIIIIIIIIIIIIIIIIIIIIIIIIIIIIIIIIIIIIIIIIIIIIII
Spray function
To remove stubborn creases at any temperature
◗ Make sure there is enough water in the water tank.
1 Press the spray button several times to moisten the article to be ironed
(fig. 8).
Extra Steam (type GC1580)
This function provides extra steam to remove very stubborn creases.
◗ The Extra Steam function only works at temperature settings between 3
and MAX.
1 Set the steam control dial to the maximum position w (fig. 9).
2 Press and hold the steam control dial for maximal 5 seconds (fig. 10).
3 Release the steam control dial and wait at least 1 minute before using this
function again to prevent water from dripping out of the soleplate.
Shot of steam (type GC1575)
A powerful shot of steam helps to remove stubborn creases.
Use the Shot-of-Steam function only at temperature settings between 3 and
MAX.
1 Press and release the Shot of steam button (fig. 11).
Wait for while before using the button again to avoid spluttering.
Never direct the steam towards people.
ASO - Auto shut off (type GC1580)
An electronic safety device will automatically switch off the iron if it has not been
removed for a while.
To indicate that the iron has been switched-off, the red auto-off pilot light will start
blinking (fig. 12).
- In a horizontal position, this will happen after 30 seconds.
- In a vertical position, this will happen after 8 minutes.
To heat up the iron again:
- Pick up the iron or move it slightly.
- The red auto-off pilot light will go out. The amber temperature pilot light will go
on.
- When the amber pilot light has gone out and goes on again, the iron is ready for
use.
Cleaning and maintenanceIIIIIIIIIIIIIIIIIIIIIIIIIIIIIIIIIIIIIIIIIIIIIIIIIIIIIIIIIIIIIIIIIIIIIIIIIIIIIIIIIIIIIIIIIIIIIIIIIIIIIIIIIIIIIIIIIIIIIIIIIIIIIIIIIIIIIIIIIIIII
Calc-Clean function
The Calc-Clean function removes scale and impurities.
4239.000.5257.3
2/9

Use the Calc-Clean function once every two weeks. If the water in your area is very
hard (i.e. when flakes come out of the soleplate during ironing), you should use the
Calc-Clean function more frequently.
1 Set the steam control dial to position O.
2 Set the temperature control dial to MAX.
3 Fill the water tank to the maximum level.
Do not pour vinegar or other descaling agents into the water tank.
4 Put the plug in the wall socket.
5 Unplug the iron when the temperature pilot light has gone out.
6 Hold the iron over the sink and set the steam control to the Calc-Clean
position • (fig. 13).
7 Pull the steam control dial slightly upwards and gently shake the iron until all
water in the tank has been used up.
Steam and boiling water will come out of the soleplate, flushing out impurities and
scale.
8 Press the steam control dial back to its original position and set it to position
O after having used the Calc-Clean function.
9 Repeat the Calc-Clean process if the iron still contains a lot of impurities.
10 To clean the steam control needle, pull the steam control out of the
appliance (fig. 14). Use vinegar to remove scale, if any, from the needle (fig.
15).
Do not bend or damage the steam control needle.
11 Reinsert the steam control needle by placing the point of the needle exactly
in the centre of the hole and by fitting the small projection on the side of the
needle into the slot (fig. 16).
12 Set the steam control to position O.
After the Calc-Clean process
1 Connect the iron to the mains to let the soleplate dry.
2 Unplug the iron when the pilot light has gone out.
3 Move the iron gently over a piece of used cloth to remove any water stains
that may have formed on the soleplate.
4 Let the iron cool down before you store it.
Cleaning after ironing
1 Make sure the plug has been removed from the wall socket and the iron has
cooled down.
2 Wipe scale and any other deposits off the soleplate with a damp cloth and a
non-abrasive (liquid) cleaner.
Keep the soleplate smooth: avoid contact with metal objects.
3 Clean the upper part of the appliance with a damp cloth.
4 Regularly rinse the water tank with water. Empty the water tank after
cleaning.
StorageIIIIIIIIIIIIIIIIIIIIIIIIIIIIIIIIIIIIIIIIIIIIIIIIIIIIIIIIIIIIIIIIIIIIIIIIIIIIIIIIIIIIIIIIIIIIIIIIIIIIIIIIIIIIIIIIIIIIIIIIIIIIIIIIIIIIIIIIIIIIIIIIIIIIIIIIIIIIIIIIIIIIIIIIIIIIIIIIIIIIIIIIIIIIIIIIIIIIIIIIIIIIIIIIIIIIIIIIIIII
1 Make sure the plug has been removed from the wall socket and the iron has
cooled down. Set the steam control to position O.
2 Empty the water tank (fig 17).
3 Wind the mains cord round the cord storage facility.
4 Store the iron standing on his heel in a safe and dry place (fig. 18).
Information & serviceIIIIIIIIIIIIIIIIIIIIIIIIIIIIIIIIIIIIIIIIIIIIIIIIIIIIIIIIIIIIIIIIIIIIIIIIIIIIIIIIIIIIIIIIIIIIIIIIIIIIIIIIIIIIIIIIIIIIIIIIIIIIIIIIIIIIIIIIIIIIIIIIIIIIIIIIIIIIIIIII
If you need information or if you have a problem, please visit the Philips Web site at
www.philips.com or contact the Philips Customer Care Centre in your country (you
will find its phone number in the worldwide guarantee leaflet). If there is no
Customer Care Centre in your country, turn to your local Philips dealer or contact
the Service Department of Philips Domestic Appliances and Personal Care BV.
TroubleshootingIIIIIIIIIIIIIIIIIIIIIIIIIIIIIIIIIIIIIIIIIIIIIIIIIIIIIIIIIIIIIIIIIIIIIIIIIIIIIIIIIIIIIIIIIIIIIIIIIIIIIIIIIIIIIIIIIIIIIIIIIIIIIIIIIIIIIIIIIIIIIIIIIIIIIIIIIIIIIIIIIIIIIIIIIIIIIIIIIIIIIII
This chapter summarises the most common problems you could encounter with
your iron. Please read the different sections for more details. If you are unable to
solve the problem, please contact the Philips Customer Care Centre in your country.
You can find its telephone number in the worldwide guarantee leaflet.
Solution(s)
Check if the plug is connected
to the wall socket properly.
Set the temperature control dial
to the required temperature.
Move the iron slightly and the
iron will start heating up again.
c
Fill the water tank (see 'Filling
the water tank').
Set the steam control dial to
position q or w (see 'Steam
ironing').
Set the temperature control dial
to a temperature suitable for
steam ironing (2 to MAX).
Put the iron on its heel and wait
until the pilot light has gone out
before you start ironing.
Press and hold the steam
control dial for maximal 5
seconds.
Wait at least 1 minute before
using the Extra Steam function
again.
Set the temperature control dial
to a temperature between 3
and MAX. Put the iron on its
heel and wait until the pilot light
has gone out.
Fill the water tank (see 'Filling
the water tank').
Set the temperature control dial
to a temperature between 3
and MAX. Put the iron on its
heel and wait until the pilot light
has gone out.
Wait at least 1 minute before
using the Extra Steam function
again (see 'Extra Steam').
Fill the water tank (see 'Filling
the water tank').
Use the Calc-Clean function a
few times (see 'Calc-Clean').
Set the temperature control dial
to a temperature suitable for
steam ironing (2 to MAX).
Put the iron on its heel and wait
until the pilot light has gone out
before you start ironing.
Empty the water tank and set
the steam control to position O
before storing the iron (see
'Storage'). Place the iron on its
heel.
Fill the water tank (see 'Filling
the water tank').
Possible cause(s)
There is a connection
problem.
The temperature
control dial has been
set to MIN.
The auto-off function is
activated.
There is not enough
water in the water tank.
The steam control dial
has been set to position
O.
The iron is not hot
enough.
The steam control dial
has not been pressed
long enough.
The Extra Steam
function has been used
too often in a short
period.
The iron is not hot
enough.
There is not enough
water in the water tank.
The iron is not hot
enough.
The Extra Steam
function has been used
too often in a short
period.
There is not enough
water in the water tank.
You have been using
hard water, which has
caused scale flakes to
develop inside the
soleplate.
The set temperature is
too low.
The iron has been put
in horizontal position
while there is still water
in the water tank.
There is not enough
water in the water tank.
Problem
The iron is plugged in
but the soleplate is
cold.
The iron does not
produce any steam.
The Extra Steam
function does not work
(type GC1580)
Water leaks from the
soleplate when I use
the Extra Steam
function (type GC1580)
The spray function does
not work
Flakes and impurities
come out of the
soleplate during ironing.
Water leaks from the
soleplate during ironing.
Water leaks from the
soleplate while the iron
is cooling down or after
it has been stored.
The Shot of steam
function does not work
(type GC1575).
4239.000.5257.3
3/9

M£ tÖ chung (hùnh 1)IIIIIIIIIIIIIIIIIIIIIIIIIIIIIIIIIIIIIIIIIIIIIIIIIIIIIIIIIIIIIIIIIIIIIIIIIIIIIIIIIIIIIIIIIIIIIIIIIIIIIIIIIIIIIIIIIIIIIIIIIIIIIIIIIIIIIIIIIIIIIIIIIIIIIIIIIIIIIIIIIIIIII
A N≤t Ûiòu chünh nhiõt Û´
B N≤t Ûiòu chünh h¨i n∑≠c
O = kh£ng s∫ d∂ng h¨i n∑≠c
q = h¨i n∑≠c vπa phÖi
w = h¨i n∑≠c tßi Ûa
x = ch∏c nÑng Calc-Clean
C N≤t phun T
D V¢i phun
E Ùín bÄo nhiõt Û´
F Náp ngÑn ch∏a n∑≠c
G NgÑn ch∏a n∑≠c
H H´p kh°a
I DÇy Ûiõn
J Ch∏c nÑng thìm h¨i n∑≠c (nhån n≤t Ûiòu khiôn h¨i n∑≠c) (kiôu mÄy GC1580)
K Ch∏c nÑng tát tº Û´ng (kiôu mÄy GC1580)
L Thaµ nu≥t ra nea tha≥o ngÑn ch∏a n∑≠c
M Ch∏c nÑng phun h¨i n∑≠c (kiôu mÄy GC1573 vÅ GC1575)
Quan tr¶ngIIIIIIIIIIIIIIIIIIIIIIIIIIIIIIIIIIIIIIIIIIIIIIIIIIIIIIIIIIIIIIIIIIIIIIIIIIIIIIIIIIIIIIIIIIIIIIIIIIIIIIIIIIIIIIIIIIIIIIIIIIIIIIIIIIIIIIIIIIIIIIIIIIIIIIIIIIIIIIIIIIIIIIIIIIIIIIIIIIIIIIIIIIIIIIIIIIIIIIIIIIII
Xin Û¶c kø nhªng h∑≠ng dèn s∫ d∂ng nÅy tr∑≠c khi d≥ng bÅn µi vÅ cåt giª Ûô tiõn
tham khÖo sau nÅy.
◗ Tr∑≠c khi cám Ûiõn, kiôm tra xem Ûiõn Äp ghi trìn bÅn µi c° t∑¨ng ∏ng v≠i
hiõu Ûiõn thó ngu®n hay kh£ng.
◗ Nóu thiôt b† Û∑±c cåp m´t phúch cám c° dÇy tióp Ûåt, n° phÖi Û∑±c cám vÅo
m´t © cám c° dÇy tióp Ûåt.
◗ Kh£ng s∫ d∂ng thiót b† nóu phúch cám, dÇy Ûiõn ngu®n hoãc chúnh thiót b† c°
dåu hiõu h∑ h•ng nhùn thåy Û∑±c, hoãc nóu thiót b† ÛÉ b† r¨i hoãc Ûang b† r¢
rü.
◗ Kiôm tra dÇy Ûiõn ngu®n th∑Æng xuyìn vò nhªng h∑ h•ng c° thô xÖy ra.
◗ Nóu dÇy Ûiõn ngu®n b† h∑ h•ng, viõc thay dÇy phÖi Û∑±c thºc hiõn bØi m´t
trung tÇm d†ch v∂ cµa Philips hay do Philips µy quyòn hay bØi nhªng ng∑Æi c°
trùnh Û´ chuyìn m£n t∑¨ng Û∑¨ng Ûô ph¢ng trÄnh nguy hiôm.
◗ PhÖi lu£n Ûô mát Ûón bÅn µi khi ÛÉ cám Ûiõn.
◗ Kh£ng bao giÆ nh≤ng bÅn µi vÅ giÄ Ûãt bÅn µi, nóu c°, vÅo trong n∑≠c.
◗ Ùô bÅn µi xa tçm tay trï em.
◗ Trï em phÖi Û∑±c giÄm sÄt Ûô ÛÖm bÖo ràng ch≤ng kh£ng ch¨i Û≥a v≠i thiót
b† nÅy.
◗ Thiót b† nÅy kh£ng dÅnh cho ng∑Æi s∫ d∂ng lÅ trï em hay ng∑Æi c° s∏c khoï
këm nóu kh£ng c° sº giÄm sÄt.
◗ Mãt bÅn µi råt n°ng vÅ c° thô gÇy b•ng nóu chÜm vÅo.
◗ Kh£ng Ûô dÇy Ûiõn ngu®n tióp x≤c v≠i mãt bÅn µi khi n° n°ng.
◗ Khi µi xong, khi lau ch≥i, khi Û© n∑≠c vÅo hoãc khi thÄo n∑≠c kh•i ngÑn ch∏a
vÅ c¥ng nh∑ khi bÜn kh£ng µi trong chßc lÄt : hÉy Ûiòu chünh m∏c h¨i n∑≠c
tÜi Ûiôm O, Ûãt Û∏ng bÅn µi vÅ r≤t © cám kh•i mÜch Ûiõn.
◗ Lu£n Ûãt vÅ s∫ d∂ng bÅn µi vÅ giÄ Ûãt bÅn µi, nóu c°, trìn m´t bò mãt nàm
ngang bàng phâng vÅ vªng chác.
◗ Kh£ng Û∑±c cho n∑≠c hoa, giåm, chåt h® vÖi, chåt téy r∫a, chåt ph∂ tr± µi
hay nhªng hoÄ chåt khÄc vÅo trong ngÑn ch∏a n∑≠c.
◗ BÅn µi nÅy chü dÅnh cho cÄc h´ gia Ûùnh.
Tr∑≠c khi s∫ d∂ng bÅn µiIIIIIIIIIIIIIIIIIIIIIIIIIIIIIIIIIIIIIIIIIIIIIIIIIIIIIIIIIIIIIIIIIIIIIIIIIIIIIIIIIIIIIIIIIIIIIIIIIIIIIIIIIIIIIIIIIIIIIIIIIIIIIIIIIIIIIIIIIIIIIIIIIII
1 HÉy g∞ nhÉn hoãc mióng bÖo võ kh•i mãt bÅn µi, nóu c°.
2 Chünh bÅn µi Ûón nhiõt Û´ tßi Ûa vÅ chÅ bÅn µi lìn m´t mióng vÖi ém vÅi ph≤t
Ûô lau hót b∂i bén trìn mãt bÅn µi.
Khi s∫ d∂ng lçn Ûçu tiìn, bÅn µi sî thÖi ra m´t út kh°i. Hiõn t∑±ng nÅy sî kót th≤c sau
m´t l≤c s∫ d∂ng.
ChÇm n∑≠c vÅo ngÑn ch∏aIIIIIIIIIIIIIIIIIIIIIIIIIIIIIIIIIIIIIIIIIIIIIIIIIIIIIIIIIIIIIIIIIIIIIIIIIIIIIIIIIIIIIIIIIIIIIIIIIIIIIIIIIIIIIIIIIIIIIIIIIIIIIIIIIIIIIIIIIIII
Kh£ng Û∑±c nh≤ng bÅn µi trong n∑≠c.
1 R≤t phúch cám bÅn µi ra kh•i © cám Ûiõn.
2 Vãn n≤t Ûiòu chünh h¨i n∑≠c vò v† trú O (= kh£ng s∫ d∂ng h¨i n∑≠c)
(hùnh 2).
3 Nhån vÅ giª n≤t mØ r®i thÄo ngÑn ch∏a n∑≠c bìn ngoÅi ra (hùnh 3).
4 Ù© n∑≠c lÜnh vÅo ngÑn ch∏a Ûón m∏c tßi Ûa (hùnh 4).
Kh£ng Û© n∑≠c vÅo ngÑn ch∏a quÄ m∏c MAX.
Chü s∫ d∂ng n∑≠c, kh£ng s∫ d∂ng giåm, h®, chåt d≥ng Ûô µi hoãc n∑≠c téy
bàng h°a chåt.
Nóu n∑≠c mÄy Ø khu vºc cµa bÜn c° nhiòu tÜp chåt, ch≤ng t£i khuyìn bÜn nìn h¢a
chung v≠i m´t l∑±ng n∑≠c cåt t∑¨ng Û∑¨ng hoãc chü s∫ d∂ng n∑≠c cåt.
5 NÅy ngÑn ch∏a n∑≠c vÅo bÅn µi cho nìn khi nghe tióng cÄch.
Ùiòu chünh nhiõt Û´IIIIIIIIIIIIIIIIIIIIIIIIIIIIIIIIIIIIIIIIIIIIIIIIIIIIIIIIIIIIIIIIIIIIIIIIIIIIIIIIIIIIIIIIIIIIIIIIIIIIIIIIIIIIIIIIIIIIIIIIIIIIIIIIIIIIIIIIIIIIIIIIIIIIIIIIIIIIIIIIIIIIIIIIII
1 Ùãt bÅn µi lìn Ûó l°t.
2 HÉy xem cÄc nhÉn trìn quçn Äo Ûô biót nhiõt Û´ µi cçn thiót cho tπng loÜi
quçn Äo:
1 VÖi s±i t©ng h±p (vú d∂: acrylic, s±i visco, polyamit, s±i nhÇn tÜo polyester)
1 T¨ l∂a
2 Len
3VÖi cotton, vÖi lanh
Nóu bÜn kh£ng biót quçn Äo Û∑±c lÅm bàng loÜi vÖi nÅo, hÉy µi th∫ m´t v≥ng sî b†
che khi mãc Ûô xÄc Û†nh nhiõt Û´ µi thúch h±p.
Ùßi v≠i vÖi t¨ l∂a, vÖi len vÅ vÖi t©ng h±p, hÉy µi mãt trÄi Ûô vÖi kh£ng b† b°ng. TrÄnh
s∫ d∂ng ch∏c nÑng phun Ûô ngÑn vÖi kh£ng b† ß vÅng.
HÉy µi tr∑≠c cÄc loÜi quçn Äo thúch h±p v≠i nhiõt Û´ µi thåp nhåt, vú d∂ nh∑ cÄc loÜi
quçn Äo lÅm tπ s±i t©ng h±p.
3 Vãn n≤t Ûiòu chünh nhiõt Û´ Ûón vÜch chü nhiõt Û´ thúch h±p Ûô chünh nhiõt
Û´ bÅn µi Ø m∏c cçn thiót (hùnh 5).
4 Cám Ûiõn vÅo © cám c° tióp Ûåt.
5 Khi Ûín bÄo nhiõt Û´ tát, hÉy Û±i m´t l≤c r®i µi (hùnh 6).
Trong khi µi, thünh thoÖng Ûín bÄo sî bêt sÄng.
Ëi c° s∫ d∂ng h¨i n∑≠cIIIIIIIIIIIIIIIIIIIIIIIIIIIIIIIIIIIIIIIIIIIIIIIIIIIIIIIIIIIIIIIIIIIIIIIIIIIIIIIIIIIIIIIIIIIIIIIIIIIIIIIIIIIIIIIIIIIIIIIIIIIIIIIIIIIIIIIIIIIIIIIIIIIIIIIIII
1 PhÖi bÖo ÛÖm c° Ûµ n∑≠c trong ngÑn ch∏a.
2 Vãn n≤t Ûiòu chünh nhiõt Û´ Ûón v† trú Û∑±c khuyìn d≥ng.
3 Khi Ûín bÄo nhiõt Û´ tát, vãn n≤t Ûiòu chünh h¨i n∑≠c Ûón v† trú thúch h±p
(hùnh 7).
q h¨i n∑≠c vπa phÖi (nhiõt Û´ trong khoÖng tπ 2 Ûón m∏c MAX)
w h¨i n∑≠c tßi Ûa (nhiõt Û´ trong khoÖng tπ 3 Ûón m∏c MAX)
BÅn µi sî bát Ûçu phun h¨i n∑≠c khi ÛÜt Ûón nhiõt Û´ Û∑±c chünh.
Xem phçn "Ùiòu chünh nhiõt Û´".
Ëi kh£ng s∫ d∂ng h¨i n∑≠cIIIIIIIIIIIIIIIIIIIIIIIIIIIIIIIIIIIIIIIIIIIIIIIIIIIIIIIIIIIIIIIIIIIIIIIIIIIIIIIIIIIIIIIIIIIIIIIIIIIIIIIIIIIIIIIIIIIIIIIIIIIIIIIIIIIIIIIIII
1 Vãn n≤t Ûiòu chünh h¨i n∑≠c Ûón v† trú O (= kh£ng s∫ d∂ng h¨i n∑≠c).
2 Vãn n≤t Ûiòu chünh nhiõt Û´ Ûón v† trú Û∑±c khuyìn d≥ng.
Xem phçn "Ùiòu chünh nhiõt Û´".
CÄc túnh nÑng khÄcIIIIIIIIIIIIIIIIIIIIIIIIIIIIIIIIIIIIIIIIIIIIIIIIIIIIIIIIIIIIIIIIIIIIIIIIIIIIIIIIIIIIIIIIIIIIIIIIIIIIIIIIIIIIIIIIIIIIIIIIIIIIIIIIIIIIIIIIIIIIIIIIIIIIIIIIIIIIIIIIIIIIIIIIIIIII
Ch∏c nÑng phun
Ùô lÅm phâng nhªng nóp nhÑn kh° µi Ø båt c∏ nhiõt Û´ nÅo
◗ PhÖi bÖo ÛÖm c° Ûµ n∑≠c trong ngÑn ch∏a.
1 Nhån n≤t phun nhiòu lçn Ûô lÅm ém v≥ng quçn Äo chuén b† µi (hùnh 8).
Thìm H¨i n∑≠c (kiôu mÄy GC1580)
Ch∏c nÑng nÅy cung cåp thìm h¨i n∑≠c Ûô lÅm phâng nhªng nóp nhÑn kh° µi nhåt.
◗ Ch∏c nÑng Thìm H¨i n∑≠c chü hoÜt Û´ng khi chünh nhiõt Û´ trong khoÖng tπ
3 Ûón MAX.
1 Vãn n≤t Ûiòu chünh h¨i n∑≠c Ûón v† trú tßi Ûa w (hùnh 9).
2 Nhån vÅ giª n≤t Ûiòu chünh h¨i n∑≠c tßi Ûa 5 giÇy (hùnh 10).
3 ThÖ n≤t Ûiòu chünh h¨i n∑≠c vÅ Û±i út nhåt m´t ph≤t tr∑≠c khi s∫ d∂ng lÜi
ch∏c nÑng nÅy Ûô n∑≠c kh£ng b† chÖy ra.
Ch∏c nÑng phun h¨i n∑≠c (kiôu mÄy GC1575 vÅ GC1573)
M´t d¢ng h¨i n∑≠c phun mÜnh sî gi≤p lÅm phâng nhªng nóp nhÑn kh° µi.
Chü d≥ng ch∏c nÑng Phun H¨i n∑≠c khi chünh nhiõt Û´ trong khoÖng tπ 3 Ûón
MAX.
1 Nhån vÅ thÖ n≤t Phun H¨i n∑≠c (hùnh 11).
Ù±i m´t l≤c r®i hÉy s∫ d∂ng lÜi ch∏c nÑng nÅy Ûô trÄnh phÄt ra tióng xío xío.
Kh£ng Û∑±c h∑≠ng h¨i n∑≠c vò phúa ng∑Æi khÄc.
ASO - Ch∏c nÑng tát tº Û´ng (kiôu mÄy GC1580)
M´t thiót b† Ûiõn t∫ an toÅn sî tº Û´ng tát bÅn µi nóu kh£ng s∫ d∂ng bÅn µi trong
m´t khoÖng thÆi gian.
TI”NG VI◊T
4239.000.5257.3
4/9

Ùô chü bÄo bÅn µi ÛÉ Û∑±c tát, Ûín bÄo ch∏c nÑng tát tº Û´ng mÅu Û• sî nhåp nhÄy
(hùnh 12).
- Â v† trú nàm ngang, quÄ trùnh lÅm n°ng lÜi sî xÖy ra sau 30 giÇy.
- Â v† trú dºng Û∏ng, quÄ trùnh lÅm n°ng lÜi sî xÖy ra sau 8 ph≤t.
Ùô lÅm bÅn µi n°ng lÜi:
- Cçm bÅn µi lìn hoãc Ûéy nhñ bÅn µi.
- Ùín bÄo ch∏c nÑng tát tº Û´ng sî tát. Ùín bÄo nhiõt Û´ mÅu h© phÄch sî bêt
sÄng.
- Khi Ûín bÄo mÅu h© phÄch vπa tát vÅ bêt sÄng lÜi, bÅn µi ÛÉ sän sÅng Ûô s∫
d∂ng.
Võ sinh vÅ bÖo trùIIIIIIIIIIIIIIIIIIIIIIIIIIIIIIIIIIIIIIIIIIIIIIIIIIIIIIIIIIIIIIIIIIIIIIIIIIIIIIIIIIIIIIIIIIIIIIIIIIIIIIIIIIIIIIIIIIIIIIIIIIIIIIIIIIIIIIIIIIIIIIIIIIIIIIIIIIIIIIIIIIIIIIIIIIIIIIIIIIII
Ch∏c nÑng Calc-Clean
Ch∏c nÑng Calc-Clean gi≤p loÜi b• chåt cãn vÅ gü.
HÉy s∫ d∂ng ch∏c nÑng Calc-Clean hai tuçn m´t lçn. Nóu n∑≠c mÄy Ø khu vºc cµa
bÜn c° nhiòu tÜp chåt (nghûa lÅ trong khi µi bÜn sî thåy cÄc vót bén thoÄt ra tπ mãt
bÅn µi), bÜn nìn d≥ng ch∏c nÑng Calc-Clean th∑Æng xuyìn h¨n.
1 Vãn n≤t Ûiòu chünh h¨i n∑≠c Ûón v† trú O.
2 Vãn n≤t Ûiòu chünh nhiõt Û´ Ûón m∏c MAX.
3 Ù© n∑≠c vÅo ngÑn ch∏a Ûón m∏c tßi Ûa.
Kh£ng Û© giåm hoãc cÄc chåt lÅm sÜch cãn khÄc vÅo ngÑn ch∏a n∑≠c.
4 Cám phúch cám vÅo © cám Ûiõn.
5 R≤t phúch cám bÅn µi ra khi Ûín bÄo nhiõt Û´ tát.
6 Giª bÅn µi phúa trìn b®n n∑≠c vÅ vãn n≤t Ûiòu chünh h¨i n∑≠c Ûón v† trú
Calc-Clean x (hùnh 13).
7 Nhñ nhÅng këo n≤t Ûiòu chünh h¨i n∑≠c lìn vÅ lác nhñ bÅn µi cho Ûón khi
n∑≠c trong ngÑn ch∏a thoÄt ra hót.
H¨i n∑≠c vÅ n∑≠c n°ng sî thoÄt ra kh•i mãt bÅn µi këo theo chåt cãn vÅ gü.
8 Nhån n≤t Ûiòu chünh h¨i n∑≠c vò v† trú ban Ûçu vÅ chünh sang v† trú O sau khi
ÛÉ s∫ d∂ng ch∏c nÑng Calc-Clean.
9 Lãp lÜi quÄ trùnh Calc-Clean nóu bÅn µi vèn c¢n ch∏a nhiòu chåt cãn.
10 Ùô lÅm sÜch cçn Ûiòu chünh h¨i n∑≠c, hÉy këo n≤t ra kh•i bÅn µi (hùnh 14).
S∫ d∂ng giåm Ûô lÅm sÜch chåt bén trìn cçn Ûiòu chünh, nóu c° (hùnh 15).
Kh£ng ußn cong hoãc lÅm h•ng cçn Ûiòu chünh h¨i n∑≠c.
11 Gán cçn Ûiòu chünh h¨i n∑≠c vÅo lÜi v† trú c¥ bàng cÄch Ûãt Ûçu nh• cµa cçn
Ûiòu chünh vÅo chúnh giªa l™ vÅ canh sao cho phçn nh£ ra bìn cÜnh kh≠p v≠i
khe nh• cµa l™ (hùnh 16).
12 Vãn n≤t Ûiòu chünh h¨i n∑≠c sang v† trú O.
Sau quÄ trùnh Calc-Clean
1 Cám Ûiõn cho bÅn µi Ûô lÅm kh£ mãt bÅn µi.
2 R≤t phúch cám bÅn µi khi Ûín bÄo nhiõt Û´ tát.
3 Ùéy nhñ bÅn µi trìn m´t mÖnh vÖi Ûô lÅm kh£ cÄc vót n∑≠c bÄm trìn mãt bÅn
µi.
4 Ùô bÅn µi ngu´i tr∑≠c khi Ûem cåt.
Võ sinh sau khi µi
1 BÖo ÛÖm phúch cám ÛÉ Û∑±c r≤t kh•i © cám vÅ bÅn µi ÛÉ ngu´i.
2 Lau sÜch cÄc chåt cãn vÅ gü kh•i mãt bÅn µi bàng mióng vÖi ém vÅ chåt r∫a
(dÜng l•ng) kh£ng Ñn m¢n.
Giª cho mãt bÅn µi tr¨n lÄng bàng cÄch trÄnh tióp x≤c v≠i cÄc vêt kim loÜi.
3 Lau ch≥i phçn trìn cµa bÅn µi bàng mióng vÖi ém.
4 Th∑Æng xuyìn r∫a ngÑn ch∏a n∑≠c. Nìn Û© hót n∑≠c trong ngÑn ch∏a sau
khi r∫a xong.
BÖo quÖnIIIIIIIIIIIIIIIIIIIIIIIIIIIIIIIIIIIIIIIIIIIIIIIIIIIIIIIIIIIIIIIIIIIIIIIIIIIIIIIIIIIIIIIIIIIIIIIIIIIIIIIIIIIIIIIIIIIIIIIIIIIIIIIIIIIIIIIIIIIIIIIIIIIIIIIIIIIIIIIIIIIIIIIIIIIIIIIIIIIIIIIIIIIIIIIIIIIIIIIIIIIIIIIIIIIII
1 ÙÖm bÖo phúch cám ÛÉ Û∑±c r≤t kh•i © cám vÅ bÅn µi ÛÉ ngu´i. Vãn n≤t Ûiòu
chünh h¨i n∑≠c sang v† trú O.
2 Ù© hót n∑≠c trong ngÑn ch∏a ra (hùnh 17).
3 Quån dÇy Ûiõn v¢ng quanh chÇn Ûó.
4 Ùô bÅn µi dºng Û∏ng trìn Ûó l°t Ø n¨i an toÅn vÅ kh£ rÄo (hùnh 18).
M£i tr∑Æng.
◗ Kh£ng v∏t b• thiót b† nÅy chung v≠i rÄc sinh hoÜt th£ng th∑Æng khi hót s∫
d∂ng thiót b†, nh∑ng giao n° cho m´t Ûiôm thu gom chúnh th∏c Ûô tÄi chó.
Bàng cÄch lÅm nh∑ vêy bÜn sî gi≤p gùn giª m£i tr∑Æng (hùnh 19).
Th£ng tin & d†ch v∂IIIIIIIIIIIIIIIIIIIIIIIIIIIIIIIIIIIIIIIIIIIIIIIIIIIIIIIIIIIIIIIIIIIIIIIIIIIIIIIIIIIIIIIIIIIIIIIIIIIIIIIIIIIIIIIIIIIIIIIIIIIIIIIIIIIIIIIIIIIIIIIIIIIIIIIIIIIIIIIIIIIIIIIIII
Nóu bÜn cçn thìm th£ng tin hay gãp sº cß, xin vui l¢ng truy cêp vÅo trang web cµa
Philips tÜi Û†a chü www.philips.com hoãc liìn hõ Trung tÇm ChÑm s°c KhÄch hÅng cµa
Philips tÜi qußc gia cµa bÜn (bÜn sî tùm thåy sß Ûiõn thoÜi cµa n¨i nÅy trìn tÆ bÖo
hÅnh kháp thó gi≠i). Nóu kh£ng c° Trung tÇm ChÑm s°c KhÄch hÅng nÅo tÜi qußc
gia cµa bÜn, xin liìn hõ v≠i ÛÜi lΩ Philip tÜi Û†a ph∑¨ng hoãc Ph¢ng D†ch v∂ cµa c£ng
ty Philip Domestic Appliances and Personal Care.
Khác ph∂c sº cßIIIIIIIIIIIIIIIIIIIIIIIIIIIIIIIIIIIIIIIIIIIIIIIIIIIIIIIIIIIIIIIIIIIIIIIIIIIIIIIIIIIIIIIIIIIIIIIIIIIIIIIIIIIIIIIIIIIIIIIIIIIIIIIIIIIIIIIIIIIIIIIIIIIIIIIIIIIIIIIIIIIIIIIIIIIIIIIIIIIIIIII
Ch∑¨ng nÅy t°m tát cÄc sº cß th£ng th∑Æng nhåt Ûßi v≠i bÅn µi mÅ bÜn c° thô gãp.
Vui l¢ng Û¶c kø cÄc phçn Ûô biót thìm chi tiót. Nóu bÜn kh£ng giÖi quyót Û∑±c cÄc
sº cß, vui l¢ng liìn lÜc v≠i Trung tÇm ChÑm s°c KhÄch hÅng cµa Philip tÜi qußc gia
bÜn. BÜn c° thô tùm thåy sß Ûiõn thoÜi cµa trung tÇm trong tÆ bÖo hÅnh qußc tó.
CÄch giÖi quyót
Kiôm tra xem phúch cám c° Û∑±c cám
Û≤ng vÅo © cám hay ch∑a.
Vãn n≤t Ûiòu chünh nhiõt Û´ sang nhiõt
Û´ cçn thiót.
Di chuyôn bÅn µi nhñ nhÅng Ûô bÅn
µi n°ng lÜi.
B¨m n∑≠c vÅo ngÑn ch∏a (xem phçn
"ChÇm n∑≠c vÅo ngÑn ch∏a").
Vãn n≤t Ûiòu chünh h¨i n∑≠c sang v† trú
q hoãc w (xem phçn "Ëi c° s∫ d∂ng
h¨i n∑≠c").
Vãn n≤t Ûiòu chünh nhiõt Û´ Ûón nhiõt
Û´ thúch h±p cho chó Û´ µi c° s∫
d∂ng h¨i n∑≠c (2 Ûón MAX). Ùãt
bÅn µi trìn Ûó l°t vÅ Û±i cho Ûón khi
Ûín bÄo nhiõt Û´ tát m≠i bát Ûçu µi.
Nhån vÅ giª n≤t Ûiòu chünh h¨i n∑≠c
tßi Ûa 5 giÇy.
HÉy Û±i út nhåt 1 ph≤t tr∑≠c khi s∫
d∂ng lÜi ch∏c nÑng Thìm H¨i n∑≠c.
Vãn n≤t Ûiòu chünh nhiõt Û´ sang nhiõt
Û´ tπ 3 Ûón MAX. Ùãt bÅn µi
trìn Ûó l°t vÅ Û±i cho Ûón khi Ûín
bÄo nhiõt Û´ tát.
B¨m n∑≠c vÅo ngÑn ch∏a (xem phçn
"ChÇm n∑≠c vÅo ngÑn ch∏a"').
Vãn n≤t Ûiòu chünh nhiõt Û´ sang nhiõt
Û´ tπ 3 Ûón MAX. Ùãt bÅn µi lìn
Ûó l°t vÅ Û±i cho Ûón khi Ûín bÄo
nhiõt Û´ tát.
HÉy Û±i út nhåt 1 ph≤t tr∑≠c khi s∫
d∂ng lÜi ch∏c nÑng Thìm H¨i n∑≠c
(xem phçn "Thìm H¨i n∑≠c").
B¨m n∑≠c vÅo ngÑn ch∏a (xem phçn
"ChÇm n∑≠c vÅo ngÑn ch∏a").
S∫ d∂ng ch∏c nÑng Calc-Clean vÅi lçn
(xem phçn "Calc-Clean).
Vãn n≤t Ûiòu chünh nhiõt Û´ sang nhiõt
Û´ thúch h±p cho chó Û´ µi c° s∫
d∂ng h¨i n∑≠c (2 Ûón MAX). Ùãt
bÅn µi trìn Ûó l°t vÅ Û±i cho Ûón khi
Ûín bÄo nhiõt Û´ tát m≠i bát Ûçu µi.
Ù© hót n∑≠c trong ngÑn ch∏a ra vÅ
vãn n≤t Ûiòu chünh h¨i n∑≠c sang v† trú
O tr∑≠c khi cåt bÅn µi (xem phçn
"BÖo quÖn"). Ùãt bÅn µi lìn Ûó l°t.
B¨m n∑≠c vÅo ngÑn ch∏a (xem phçn
"ChÇm n∑≠c vÅo ngÑn ch∏a").
Nguyìn nhÇn dº ÛoÄn
DÇy Ûiõn c° vån Ûò.
N≤t Ûiòu chünh nhiõt Û´
ÛÉ Û∑±c chünh vò m∏c
MIN.
Ch∏c nÑng tát tº Û´ng
Ûang Û∑±c kúch hoÜt.
Kh£ng c° Ûµ n∑≠c trong
ngÑn ch∏a.
N≤t Ûiòu chünh h¨i n∑≠c
ÛÉ Û∑±c chünh sang v† trú
O.
BÅn µi kh£ng Ûµ n°ng.
BÜn kh£ng nhån n≤t Ûiòu
chünh h¨i n∑≠c Ûµ lÇu.
S∫ d∂ng ch∏c nÑng Thìm
H¨i n∑≠c nhiòu lçn trong
khoÖng thÆi gian ngán.
BÅn µi kh£ng Ûµ n°ng.
Kh£ng c° Ûµ n∑≠c trong
ngÑn ch∏a.
BÅn µi kh£ng Ûµ n°ng.
S∫ d∂ng ch∏c nÑng Thìm
H¨i n∑≠c nhiòu lçn trong
khoÖng thÆi gian ngán.
Kh£ng c° Ûµ n∑≠c trong
ngÑn ch∏a.
BÜn ÛÉ s∫ d∂ng n∑≠c c°
nhiòu tÜp chåt, Û° lÅ
nguyìn nhÇn lÅm cho cÄc
chåt gü hùnh thÅnh trìn
mãt bÅn µi.
Chünh nhiõt Û´ quÄ thåp.
Ùô bÅn µi nàm ngang
trong khi n∑≠c vèn c¢n
trong ngÑn ch∏a.
Kh£ng c° Ûµ n∑≠c trong
ngÑn ch∏a.
Sº cß
BÅn µi ÛÉ Û∑±c cám Ûiõn
nh∑ng mãt bÅn µi kh£ng
n°ng.
BÅn µi kh£ng phun h¨i
n∑≠c.
Ch∏c nÑng Thìm H¨i
n∑≠c kh£ng hoÜt Û´ng
(kiôu mÄy GC1580)
N∑≠c rü ra tπ mãt bÅn µi
khi s∫ d∂ng ch∏c nÑng
Thìm H¨i n∑≠c (kiôu mÄy
GC1580)
Ch∏c nÑng phun kh£ng
hoÜt Û´ng
Trong khi µi, chåt gü vÅ
chåt cãn thoÄt ra tπ mãt
bÅn µi.
Trong khi µi, n∑≠c rü ra tπ
mãt bÅn µi.
N∑≠c rü ra tπ mãt bÅn µi
khi bÅn µi Ûang ngu´i
hoãc khi cåt giª.
Ch∏c nÑng phun h¨i n∑≠c
kh£ng hoÜt Û´ng (kiôu
mÄy GC1575, GC1573).
4239.000.5257.3
5/9

IIIIIIIIIIIIIIIIIIIIIIIIIIIIIIIIIIIIIIIIIIIIIIIIIIIIIIIIIIIIIIIIIIIIIIIIIIIIIIIIIIIIIIIIIIIIIIIIIIIIIIIIIIIIIIIIIIIIIIIIIIIIIIIIIIIIIIIIIIIIIIIIIIIIIIIIIIIIIIIIIIIIIII
A
B
O
q
w
x
C T
D
E
F
G
H
I
J
K
L
M
IIIIIIIIIIIIIIIIIIIIIIIIIIIIIIIIIIIIIIIIIIIIIIIIIIIIIIIIIIIIIIIIIIIIIIIIIIIIIIIIIIIIIIIIIIIIIIIIIIIIIIIIIIIIIIIIIIIIIIIIIIIIIIIIIIIIIIIIIIIIIIIIIIIIIIIIIIIIIIIIIIIIIIIIIIIIIIIIIIIIIIIIIIIIIIIIIIIIIIIIIIIIIII
◗
◗
◗
◗
◗
◗
◗
◗
◗
◗
◗
◗
◗
◗
◗
◗
IIIIIIIIIIIIIIIIIIIIIIIIIIIIIIIIIIIIIIIIIIIIIIIIIIIIIIIIIIIIIIIIIIIIIIIIIIIIIIIIIIIIIIIIIIIIIIIIIIIIIIIIIIIIIII
1
2
IIIIIIIIIIIIIIIIIIIIIIIIIIIIIIIIIIIIIIIIIIIIIIIIIIIIIIIIIIIIIIIIIIIIIIIIIIIIIIIIIIIIIIIIIIIIIIIIIIIIIIIIIIIIIIIIIIIIIIIIIIIIIIIIIIIIIIIIIIIIIIIIIIIIIIIIIIIIIIIIIIIIIIIIIIIIIIIIIIIIIII
1
2
3
4
5
IIIIIIIIIIIIIIIIIIIIIIIIIIIIIIIIIIIIIIIIIIIIIIIIIIIIIIIIIIIIIIIIIIIIIIIIIIIIIIIIIIIIIIIIIIIIIIIIIIIIIIIIIIIIIIIIIIIIIIIIIIIIIIIIIIIIIIIIIIIIIIIIIIIIIIIIIIIIIIIIIIIIIIIIIIIIIIIIIIIIIIIIIIIIIIIIIIIIIIIIIIIII
1
2
1
1
2
3
3
4
5
IIIIIIIIIIIIIIIIIIIIIIIIIIIIIIIIIIIIIIIIIIIIIIIIIIIIIIIIIIIIIIIIIIIIIIIIIIIIIIIIIIIIIIIIIIIIIIIIIIIIIIIIIIIIIIIIIIIIIIIIIIIIIIIIIIIIIIIIIIIIIIIIIIIIIIIIIIIIIIIIIIIIIIIIIIIIIIIIIIIIIIIIIIIIIIIIIIIIIIIIIIIII
1
2
3
q 2
w 3
IIIIIIIIIIIIIIIIIIIIIIIIIIIIIIIIIIIIIIIIIIIIIIIIIIIIIIIIIIIIIIIIIIIIIIIIIIIIIIIIIIIIIIIIIIIIIIIIIIIIIIIIIIIIIIIIIIIIIIIIIIIIIIIIIIIIIIIIIIIIIIIIIIIIIIIIIIIIIIIIIIIIIIIIIIIIIIIIIIIIIIIIIIIIIIIII
1
2
IIIIIIIIIIIIIIIIIIIIIIIIIIIIIIIIIIIIIIIIIIIIIIIIIIIIIIIIIIIIIIIIIIIIIIIIIIIIIIIIIIIIIIIIIIIIIIIIIIIIIIIIIIIIIIIIIIIIIIIIIIIIIIIIIIIIIIIIIIIIIIIIIIIIIIIIIIIIIIIIIIIIIIIIIIIIIIIIIIIIIIIIIIIIIIIIIIIIIIIIIIIII
◗
1
◗ 3
1 w
2
3
3
1
4239.000.5257.3
6/9

IIIIIIIIIIIIIIIIIIIIIIIIIIIIIIIIIIIIIIIIIIIIIIIIIIIIIIIIIIIIIIIIIIIIIIIIIIIIIIIIIIIIIIIIIIIIIIIIIIIIIIIIIIIIIIIIIIIIIIIIIIIIIIIIIIIIIIIIIIIIIIIIIIIIIIIIIIIIIIIIIIIIIIIIIIIIIIIIIIIIIIIIIIIIIIIII
1
2
3
4
5
6
1
7
8
9
10
11
12
1
2
3
4
1
2
3
4
IIIIIIIIIIIIIIIIIIIIIIIIIIIIIIIIIIIIIIIIIIIIIIIIIIIIIIIIIIIIIIIIIIIIIIIIIIIIIIIIIIIIIIIIIIIIIIIIIIIIIIIIIIIIIIIIIIIIIIIIIIIIIIIIIIIIIIIIIIIIIIIIIIIIIIIIIIIIIIIIIIIIIIIIIIIIIIIIIIIIIIIIIIIIIIIIIIIIIIIIIIIIIIIIIIIIIIIIIIIIIIIIIIIII
1
2
3
4
◗
IIIIIIIIIIIIIIIIIIIIIIIIIIIIIIIIIIIIIIIIIIIIIIIIIIIIIIIIIIIIIIIIIIIIIIIIIIIIIIIIIIIIIIIIIIIIIIIIIIIIIIIIIIIIIIIIIIIIIIIIIIIIIIIIIIIIIIIIIIIIIIIIIIIIIIIIIIIIIIIIIIIIIIIIIIIIIIIIIIIIIIIIIIIIIIIII
IIIIIIIIIIIIIIIIIIIIIIIIIIIIIIIIIIIIIIIIIIIIIIIIIIIIIIIIIIIIIIIIIIIIIIIIIIIIIIIIIIIIIIIIIIIIIIIIIIIIIIIIIIIIIIIIIIIIIIIIIIIIIIIIIIIIIIIIIIIIIIIIIIIIIIIIIIIIIIIIIIIIIIIIIIIIIIIIIIIIIIIIIIIIIIIIIIIIIIIIIIIII
q
w
2
3
3
2
O
O
2006/01/30
4239.000.5257.3
7/9

IIIIIIIIIIIIIIIIIIIIIIIIIIIIIIIIIIIIIIIIIIIIIIIIIIIIIIIIIIIIIIIIIIIIIIIIIIIIIIIIIIIIIIIIIIIIIIIIIIIIIIIIIIIIIIIIIIIIIIIIIIIIIIIIIIIIIIIIIIIIIIIIIIIIIIIIIIIIIIIIIIIIIIIIIIIIIIIIIIIIIIIIIII
A
B
O
q
w
x
C T
D
E
F
G
H
I
J
K
L
M
IIIIIIIIIIIIIIIIIIIIIIIIIIIIIIIIIIIIIIIIIIIIIIIIIIIIIIIIIIIIIIIIIIIIIIIIIIIIIIIIIIIIIIIIIIIIIIIIIIIIIIIIIIIIIIIIIIIIIIIIIIIIIIIIIIIIIIIIIIIIIIIIIIIIIIIIIIIIIIIIIIIIIIIIIIIIIIIIIIIIIIIIIIIIIIIIIIIIIIIIIIIIIIIIIIIIIIIIIII
◗
◗
◗
◗
◗
◗
◗
◗
◗
◗
◗
◗
◗
◗
◗
◗
IIIIIIIIIIIIIIIIIIIIIIIIIIIIIIIIIIIIIIIIIIIIIIIIIIIIIIIIIIIIIIIIIIIIIIIIIIIIIIIIIIIIIIIIIIIIIIIIIIIIIIIIIIIIIIIIIIIIIIIIIIIIIIIIIIIIIIIIIIIIIIIIIIIIIIIIIIIIIIIIIIIIIIIIIIIIIIIIIIIIIIIIIIIIIIIIIIIIIIIII
1
2
IIIIIIIIIIIIIIIIIIIIIIIIIIIIIIIIIIIIIIIIIIIIIIIIIIIIIIIIIIIIIIIIIIIIIIIIIIIIIIIIIIIIIIIIIIIIIIIIIIIIIIIIIIIIIIIIIIIIIIIIIIIIIIIIIIIIIIIIIIIIIIIIIIIIIIIIIIIIIIIIIIIIIIIIIIIIIIIIIIIIIIIIIIIIIIIIIIIIIIIII
1
2 O
3
4
4
IIIIIIIIIIIIIIIIIIIIIIIIIIIIIIIIIIIIIIIIIIIIIIIIIIIIIIIIIIIIIIIIIIIIIIIIIIIIIIIIIIIIIIIIIIIIIIIIIIIIIIIIIIIIIIIIIIIIIIIIIIIIIIIIIIIIIIIIIIIIIIIIIIIIIIIIIIIIIIIIIIIIIIIIIIIIIIIIIIIIIIIIIIIIIIIIIIIIIIIIIIIIIIIIIIIIIIIIIII
1
2
1
1
2
3
3
4
5
IIIIIIIIIIIIIIIIIIIIIIIIIIIIIIIIIIIIIIIIIIIIIIIIIIIIIIIIIIIIIIIIIIIIIIIIIIIIIIIIIIIIIIIIIIIIIIIIIIIIIIIIIIIIIIIIIIIIIIIIIIIIIIIIIIIIIIIIIIIIIIIIIIIIIIIIIIIIIIIIIIIIIIIIIIIIIIIIIIIIIIIIIIIIIIIIIIIIIIIIIIIIIIIIIIIIIIIII
1
2
3
q 2
w 3
IIIIIIIIIIIIIIIIIIIIIIIIIIIIIIIIIIIIIIIIIIIIIIIIIIIIIIIIIIIIIIIIIIIIIIIIIIIIIIIIIIIIIIIIIIIIIIIIIIIIIIIIIIIIIIIIIIIIIIIIIIIIIIIIIIIIIIIIIIIIIIIIIIIIIIIIIIIIIIIIIIIIIIIIIIIIIIIIIIIIIIIIIIIIIIIIIIIIIIIIIIIIIIII
1 O
2
IIIIIIIIIIIIIIIIIIIIIIIIIIIIIIIIIIIIIIIIIIIIIIIIIIIIIIIIIIIIIIIIIIIIIIIIIIIIIIIIIIIIIIIIIIIIIIIIIIIIIIIIIIIIIIIIIIIIIIIIIIIIIIIIIIIIIIIIIIIIIIIIIIIIIIIIIIIIIIIIIIIIIIIIIIIIIIIIIIIIIIIIIIIIIIIIIIIIIIIIIIIIIIIIIIIIIIIII
◗
1
◗ 3
1 w
2
3
3
1
IIIIIIIIIIIIIIIIIIIIIIIIIIIIIIIIIIIIIIIIIIIIIIIIIIIIIIIIIIIIIIIIIIIIIIIIIIIIIIIIIIIIIIIIIIIIIIIIIIIIIIIIIIIIIIIIIIIIIIIIIIIIIIIIIIIIIIIIIIIIIIIIIIIIIIIIIIIIIIIIIIIIIIIIIIIIIIIIIIIIIIIIIIIIIIIIIIIIIIIIIIIIIIII
1 O
4239.000.5257.3
8/9

2
3
4
5
6 x
7
8 O
9
10
11
12 O
1
2
3
4
1
2
3
4
IIIIIIIIIIIIIIIIIIIIIIIIIIIIIIIIIIIIIIIIIIIIIIIIIIIIIIIIIIIIIIIIIIIIIIIIIIIIIIIIIIIIIIIIIIIIIIIIIIIIIIIIIIIIIIIIIIIIIIIIIIIIIIIIIIIIIIIIIIIIIIIIIIIIIIIIIIIIIIIIIIIIIIIIIIIIIIIIIIIIIIIIIIIIIIIIIIIIIIIIIIIIIIIIIIIIIIIIIIIIIIIIIIIIIIIIIII
1 O
2
3
4
◗
IIIIIIIIIIIIIIIIIIIIIIIIIIIIIIIIIIIIIIIIIIIIIIIIIIIIIIIIIIIIIIIIIIIIIIIIIIIIIIIIIIIIIIIIIIIIIIIIIIIIIIIIIIIIIIIIIIIIIIIIIIIIIIIIIIIIIIIIIIIIIIIIIIIIIIIIIIIIIIIIIIIIIIIIIIIIIIIIIIIIIIIIIIIIIIIIIIIIIIIIIIIIIIII
IIIIIIIIIIIIIIIIIIIIIIIIIIIIIIIIIIIIIIIIIIIIIIIIIIIIIIIIIIIIIIIIIIIIIIIIIIIIIIIIIIIIIIIIIIIIIIIIIIIIIIIIIIIIIIIIIIIIIIIIIIIIIIIIIIIIIIIIIIIIIIIIIIIIIIIIIIIIIIIIIIIIIIIIIIIIIIIIIIIIIIIIIIIIIIIIIIIIIIIIIIIIIIIIIIIIIIIII
q w
2
3
3
2
O
O
4239.000.5257.3
9/9
 Loading...