

Page 1
Always there to help you
Question?
Contact
Philips
Register your product and get support at
www.philips.com/support
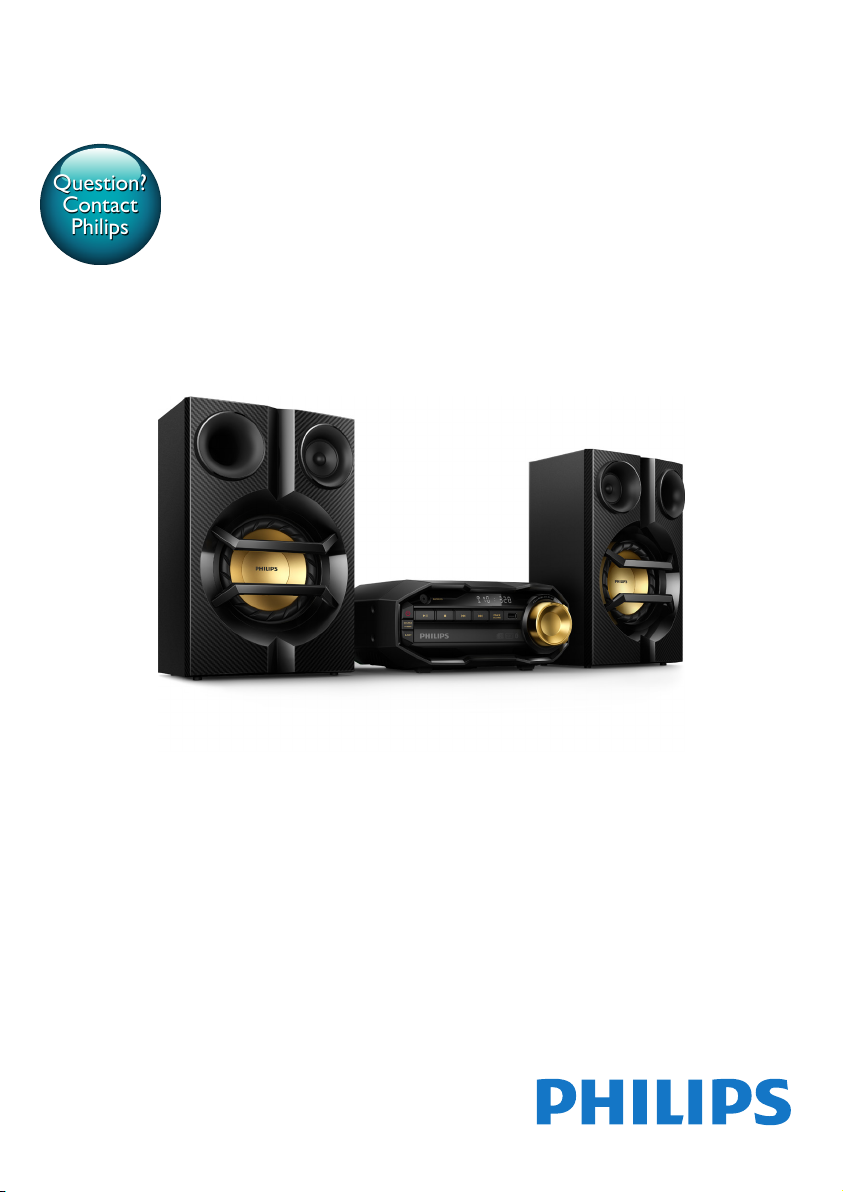
FX10
User manual
Page 2

Page 3

Contents
1 Important 2
Safety 2
Notice 3
8 Listen to radio 16
Tune to a radio station 16
Program radio stations automatically 16
Program radio stations manually 16
Select a preset radio station 16
Change AM tuning grid 16
2 Your Mini Hi-Fi System 5
Introduction 5
What's in the box 5
Overview of the main unit 6
Overview of the remote control 7
3 Get started 8
Connect antennas 8
Connect speakers 8
Connect power 9
Prepare the remote control 9
Set clock 9
Turn on 10
4 Play 11
Play from a Bluetooth-enabled device 11
Play a disc 12
Play from USB 12
5 Listen to an external device 13
Listen to an MP3 player 13
Listen to an external audio device
with RCA connectors 13
6 Play options 14
Repeat and shufe play 14
Display play information 14
9 Other features 17
Set the alarm timer 17
Set the sleep timer 17
10 Product information 18
Specications 18
USB playability information 19
Supported MP3 disc formats 19
Maintenance 19
11 Troubleshooting 20
7 Adjust volume level and sound
effect 15
Adjust volume level 15
Mute sound 15
Boost sound power 15
Select a preset sound effect 15
Enhance bass 15
1EN
Page 4
1 Important
Safety
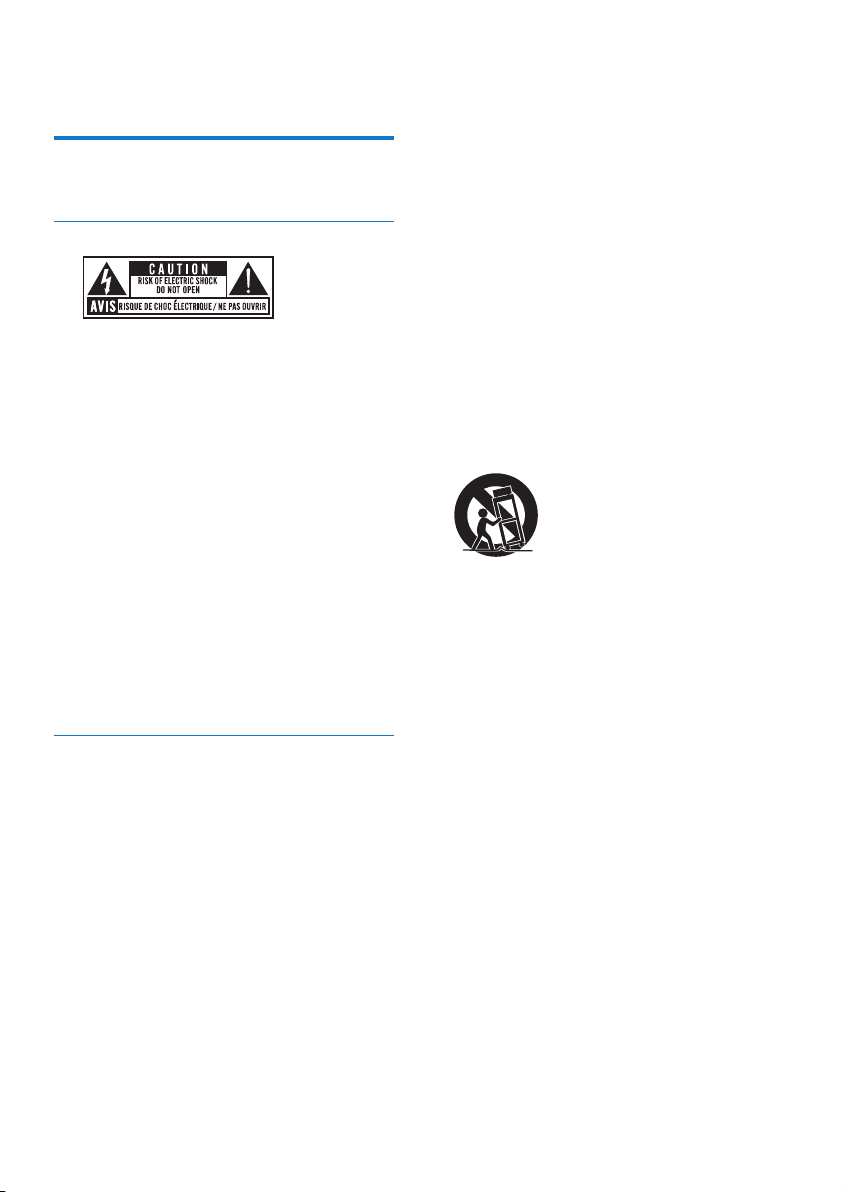
Know these safety symbols
This 'bolt of lightning' indicates uninsulated
material within your unit may cause an electrical
shock. For the safety of everyone in your
household, please do not remove product
covering.
The 'exclamation mark' calls attention to
features for which you should read the enclosed
literature closely to prevent operating and
maintenance problems.
WARNING: To reduce the risk of re or
electric shock, this apparatus should not be
exposed to rain or moisture and objects lled
with liquids, such as vases, should not be placed
on this apparatus.
CAUTION: To prevent electric shock, match
wide blade of plug to wide slot, and fully insert
the plug.
Important Safety Instructions
a Read these instructions.
b Keep these instructions.
c Heed all warnings.
d Follow all instructions.
e Do not use this apparatus near water.
f Clean only with dry cloth.
g Do not block any ventilation openings.
Install in accordance with the
manufacturer's instructions.
h Do not install near any heat sources such
as radiators, heat registers, stoves, or
other apparatus (including ampliers) that
produce heat.
i Protect the power cord from being
walked on or pinched, particularly at
plugs, convenience receptacles, and the
point where they exit from the apparatus.
j Only use attachments/accessories
specied by the manufacturer.
k Use only with the cart, stand, tripod,
bracket, or table specied by the
manufacturer or sold with the apparatus.
When a cart is used, use caution when
moving the cart/apparatus combination to
avoid injury from tip-over.
l Unplug this apparatus during lightning
storms or when unused for long periods
of time.
m Refer all servicing to qualied service
personnel. Servicing is required when
the apparatus has been damaged in any
way, such as power-supply cord or plug
is damaged, liquid has been spilled or
objects have fallen into the apparatus, the
apparatus has been exposed to rain or
moisture, does not operate normally, or
has been dropped.
n Battery usage CAUTION – To prevent
battery leakage which may result in bodily
injury, property damage, or damage to
the unit:
• Install all batteries correctly, + and - as
marked on the unit.
• Do not mix batteries (old and new or
carbon and alkaline, etc.).
• Remove batteries when the unit is not
used for a long time.
2 EN
Page 5
o Apparatus shall not be exposed to
dripping or splashing.
p Do not place any sources of danger on
the apparatus (e.g. liquid lled objects,
lighted candles).
q Where the MAINS plug or an appliance
coupler is used as the disconnect device,
the disconnect device shall remain readily
operable.
Risk of overheating! Never install this apparatus
in a conned space. Always leave a space of
at least four inches around this apparatus for
ventilation. Ensure curtains or other objects
never cover the ventilation slots on this
apparatus.
Warning
• Never remove the casing of this unit.
• Never lubricate any part of this unit.
• Place this unit on a at, hard and stable surface.
• Never place this unit on other electrical equipment.
• Only use this unit indoors. Keep this unit away from
water, moisture and liquid-lled objects.
• Keep this unit away from direct sunlight, naked ames
or heat.
Caution
• Never look into the laser beam inside the product.
Notice
Any changes or modications made to this
device that are not expressly approved by
Gibson Innovations may void the user’s
authority to operate the equipment.
Specications are subject to change without
notice. Gibson Innovations reserves the right
to change products at any time without being
obliged to adjust earlier supplies accordingly.
Your product is designed and manufactured
with high quality materials and components,
which can be recycled and reused.
Never dispose of your product with other
household waste. Please inform yourself about
the local rules on the separate collection of
electrical and electronic products and batteries.
The correct disposal of these products helps
prevent potentially negative consequences on
the environment and human health.
Your product contains batteries, which cannot
be disposed of with normal household waste.
Please inform yourself about the local rules on
separate collection of batteries. The correct
disposal of batteries helps prevent potentially
negative consequences on the environment and
human health.
Please visit www.recycle.philips.com for
additional information on a recycling center in
your area.
The making of unauthorized copies of copyprotected material, including computer
programs, les, broadcasts and sound
recordings, may be an infringement of
copyrights and constitute a criminal offence.
This equipment should not be used for such
purposes.
Environmental information
All unnecessary packaging has been omitted.
We have tried to make the packaging easy to
separate into three materials: cardboard (box),
polystyrene foam (buffer) and polyethylene
(bags, protective foam sheet.)
Your system consists of materials which can
be recycled and reused if disassembled by
a specialized company. Please observe the
local regulations regarding the disposal of
packaging materials, exhausted batteries and old
equipment.
The Bluetooth® word mark and logos are
registered trademarks owned by Bluetooth
3EN
Page 6
SIG, Inc. and any use of such marks by Gibson
Innovations Limited is under license. Other
trademarks and trade names are those of their
respective owners.
Other trademarks and trade names are those
of their respective owners.
This apparatus includes this label:
Note
• The type plate is located on the back of the unit.
4 EN
Page 7

2 Your Mini Hi-Fi
System
Congratulations on your purchase, and
welcome to Philips! To fully benet from the
support that Philips offers, register your product
at www.philips.com/welcome.
Introduction
With this Hi-Fi system, you can:
• enjoy audio from discs, USB storage
devices, Bluetooth enabled devices, or
other external devices
• listen to FM or AM radio stations
To enrich sound, this Hi-Fi system offers you
these sound effects:
• Max Sound for instant power boost
• Bass boost
• EQ (equalizer) settings
• The unit supports these media formats:
What's in the box
Check and identify the contents of your
package:
• Main unit
• 2 x loudspeakers
• Remote control (with battery)
• Printed materials
•
5EN
Page 8
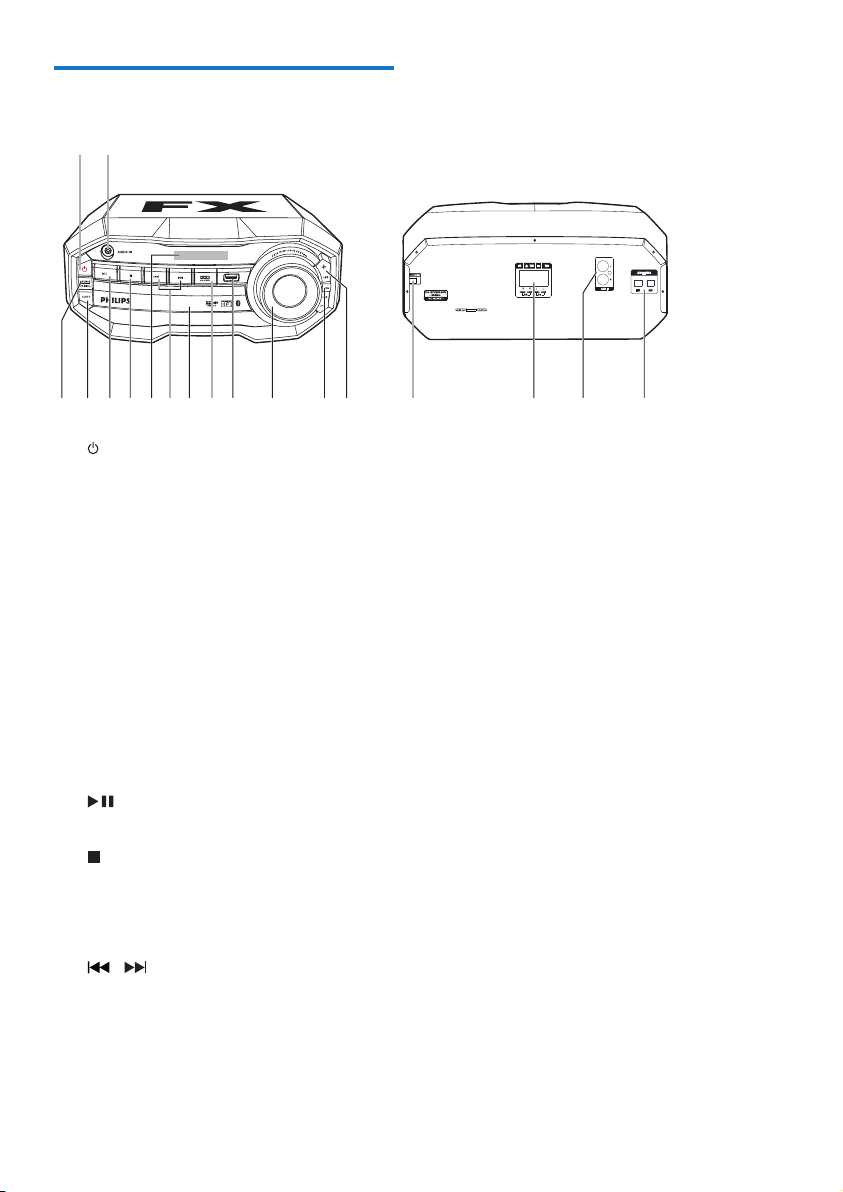
Overview of the main unit
cdef hijk mn opqr
gl
a
b
a
• Turn on the unit.
• Switch to standby mode.
b AUDIO IN
• Connect an external audio device
through a 3.5mm audio cable (not
supplied).
c SOURCE/PAIRING
• Select a sound source: DISC, BT, USB,
FM, AM, AUDIO IN, or AUX IN.
• In Bluetooth mode, press and hold for
three seconds to enter pairing mode.
d EJECT
• Open or close the disc compartment.
e
• Start, pause, or resume play.
f
• Stop play or erase a program.
g Display panel
• Show the current status.
h /
• Skip to the previous/next track.
• Tune to a radio station.
i Disc compartment door
j MAX SOUND
• Turn on or off instant power boost for
sound.
k USB socket
• Connect a USB mass storage device.
l Volume knob
• Adjust speaker volume.
m EQ
• Select a preset sound equalizer setting.
n PRE +/-
• Skip to the previous/next album/folder.
• Select a preset radio station.
o AC power connection
p Speaker connection sockets
• Connect the supplied loudspeakers.
q AUX IN (L/R)
• Connect an external audio device
through RCA (red/white) audio cables.
r ANTENNA (FM and AM)
• Connect the supplied FM and AM
antennas.
6 EN
Page 9
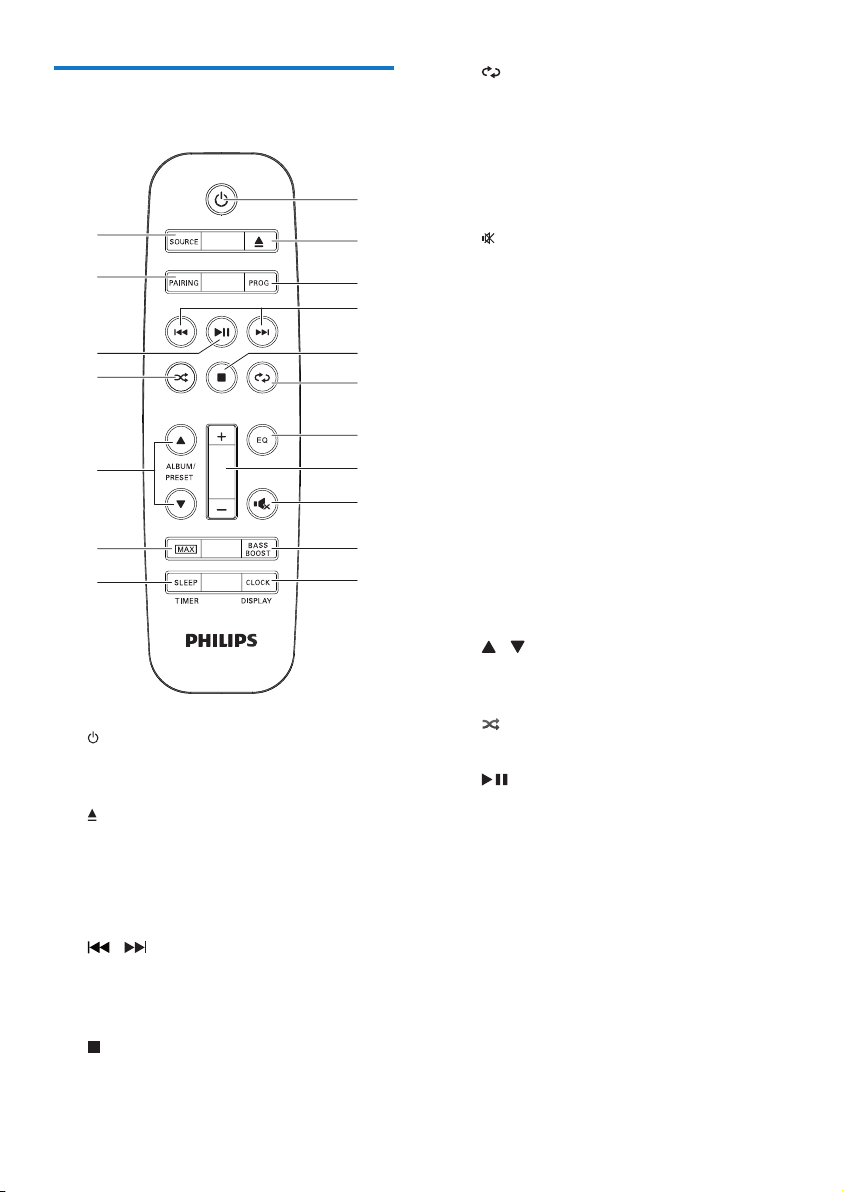
Overview of the remote control
r
q
p
o
n
m
l
a
• Turn on the unit.
• Switch to standby mode.
b
• Open or close the disc compartment.
c PROG
• Program tracks.
• Program radio stations.
d /
• Skip to the previous/next track.
• Search within a track/disc/USB.
• Tune to a radio station.
e
• Stop play or erase a program.
a
b
c
d
e
f
g
h
i
j
k
f
• Select repeat play.
g EQ
• Select a preset sound equalizer setting.
h +/-
• Adjust speaker volume.
i
• Mute or restore sound output.
j BASS BOOST
• Turn on or off dynamic bass
enhancement.
k CLOCK/DISPLAY
• Set the clock.
• View the set clock.
• Select display information.
l SLEEP/TIMER
• Set the sleep timer.
• Set the alarm timer.
• Turn on or off sleep/alarm timer.
m MAX
• Turn on or off instant power boost for
sound.
n / ALBUM/PRESET
• Skip to the previous/next album/folder.
• Select a preset radio station.
o
• Select random play.
p
• Start, pause, or resume play.
q PAIRING
• In Bluetooth mode, press and hold for
three seconds to enter pairing mode.
r SOURCE
• Select a sound source: DISC, USB, FM,
AM, AUDIO IN, AUX IN or BT.
7EN
Page 10
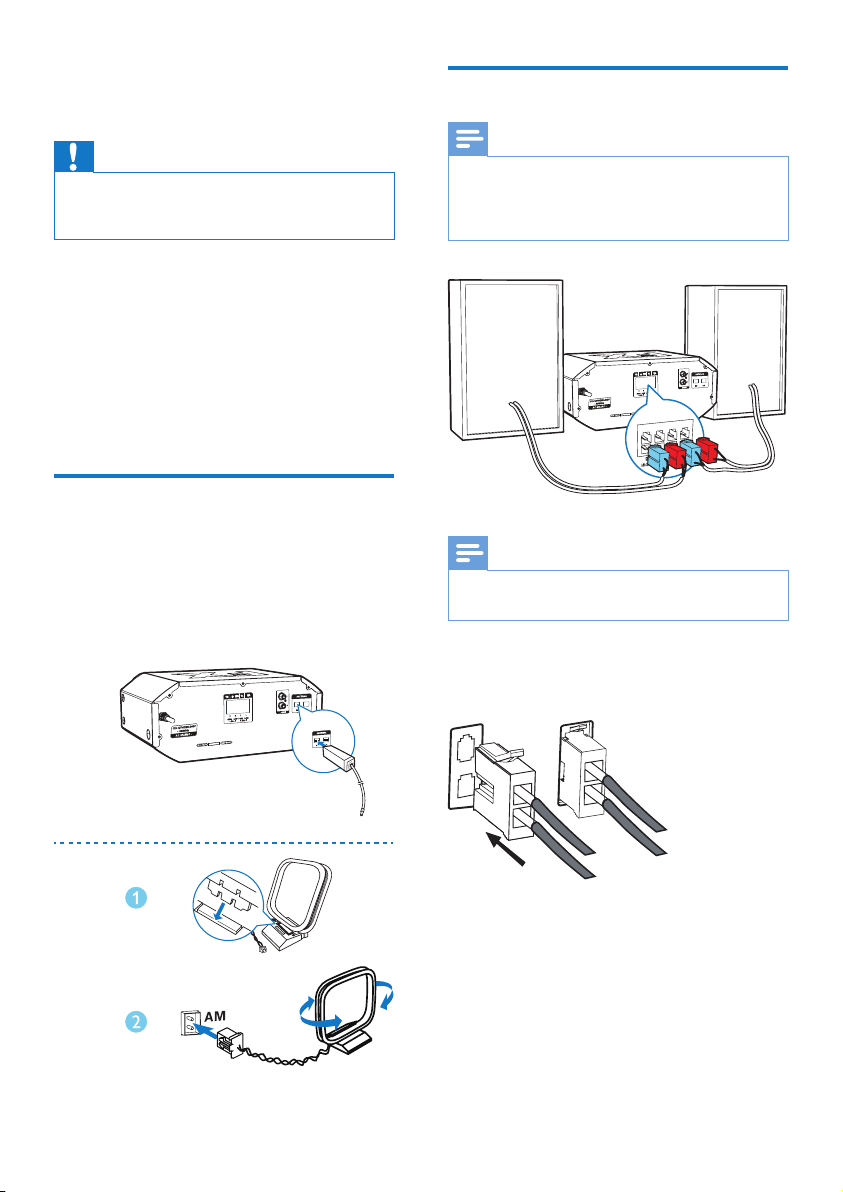
3 Get started
FM
Connect speakers
Caution
• Use of controls or adjustments or performance of
procedures other than herein may result in hazardous
laser exposure or other unsafe operation.
Always follow the instructions in this chapter in
sequence.
If you contact Philips, you will be asked for the
model and serial number of this apparatus. The
model number and serial number are on the
back of the apparatus. Write the numbers here:
Model No. __________________________
Serial No. ___________________________
Connect antennas
• For better radio reception, connect the
supplied FM and AM antennas to the
ANTENNA (FM, AM) sockets on the back
of the main unit respectively.
Note
• For optimal sound, use the supplied speakers only.
• Connect only speakers with impedance that is the
same or higher than the supplied speakers. Refer to the
Specications section of this manual.
Note
• Make sure that the colors of the speaker wires and
terminals are matched.
Insert the wire completely.
• Insert the right speaker wires to "R",
and left speaker wires to "L".
AM
8 EN
Page 11
Connect power
Caution
• Make sure that the power supply socket used can
support at least 10A current loading.
• Before connecting the AC power cord, make sure that
you have completed all the other connections.
Note
• If you are not going to use the remote control for a
long time, remove the battery.
• Batteries contain chemical substances, so they should
be disposed of properly.
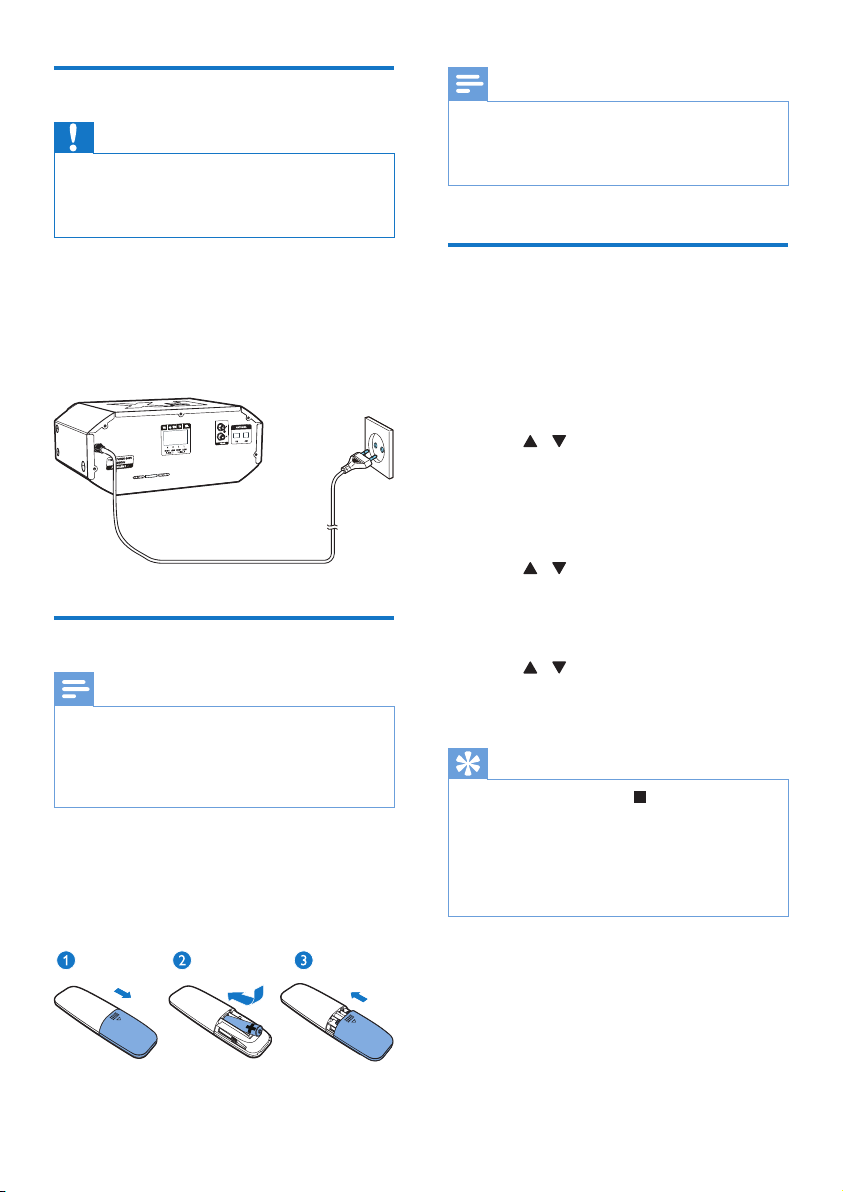
1 Adjust the voltage selector on the back of
the main unit to match your local power
supply.
2 Connect the AC power cable to the wall
socket.
Prepare the remote control
Note
• Risk of explosion! Keep batteries away from heat,
sunshine or re. Never discard batteries in re.
• Danger of explosion if the battery is incorrectly
replaced. Replace only with the same or equivalent
type.
1 Open the battery compartment.
2 Insert one AAA battery with correct
polarity (+/-) as indicated.
3 Close the battery compartment.
Set clock
1 In standby mode, hold CLOCK/DISPLAY
for more than two seconds to activate
clock setting.
» The 12 hour or 24 hour format is
displayed.
2 Press / repeatedly to select 12 hour
or 24 hour format.
3 Press CLOCK/DISPLAY to conrm.
» The hour digits are displayed and begin
to blink.
4 Press / repeatedly to set the hour,
then press CLOCK/DISPLAY to conrm.
» The minute digits are displayed and
begin to blink.
5 Press / repeatedly to set the minute,
then press CLOCK/DISPLAY to conrm
the set clock.
Tip
• During setting, you can press to exit clock setting
without saving the earlier operation.
• During setting, if no action is taken within 90 seconds,
the device exits clock setting automatically without
saving the earlier operation.
• During playback, you can press and hold CLOCK/
DISPLAY to view the set clock.
9EN
Page 12

Turn on
• Press .
» The unit switches to the last selected
source.
Switch to standby mode
• Press again to switch the unit to normal
standby mode.
» The clock (if set) is displayed on the
panel
10 EN
Page 13
4 Play
Play from a Bluetoothenabled device
Note
• The effective operation range between the unit and
your Bluetooth enabled device is approximately 10
meters (30 feet).
• Any obstacle between the unit and the Bluetooth
enabled device can reduce the operational range.
• Compatibility with all Bluetooth devices is not guaranteed.
• The unit can memorize up to 4 previously connected
Bluetooth devices.
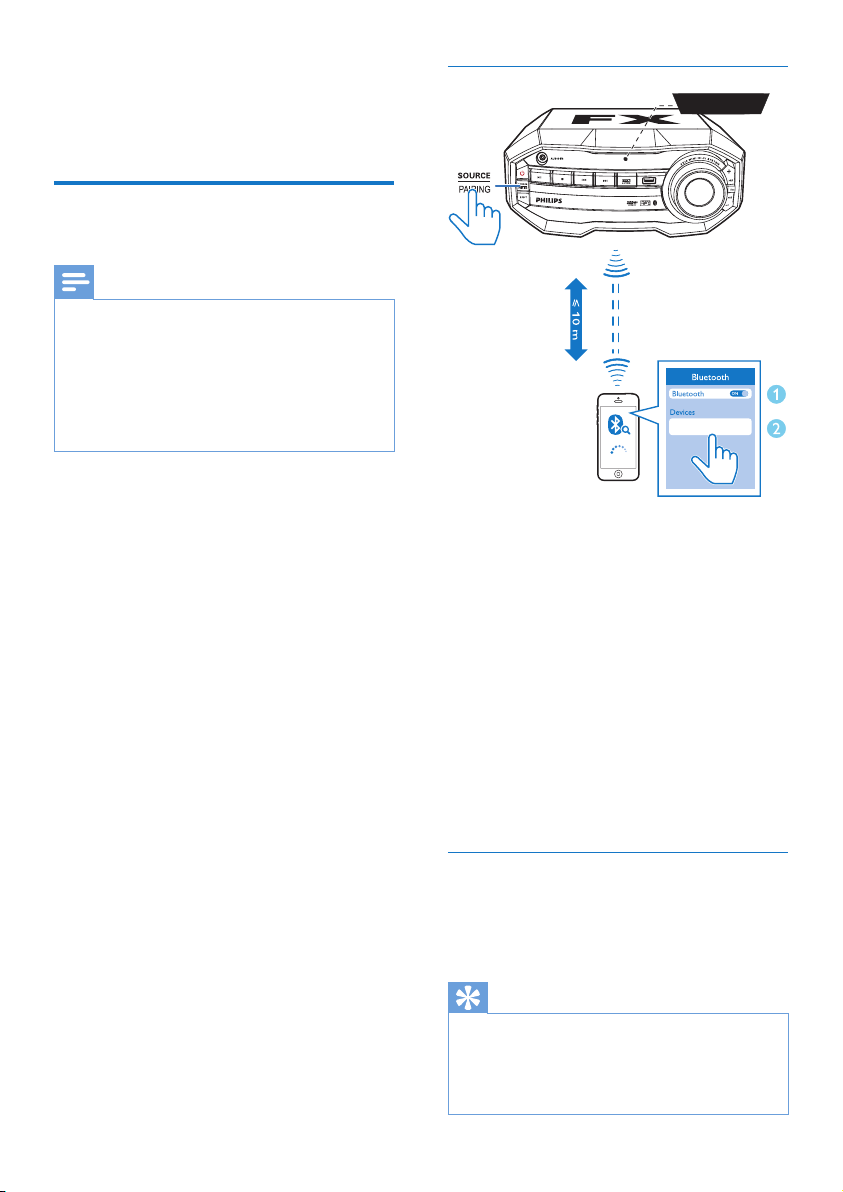
Pair and connect
BT
Philips FX10
To enjoy music through the unit wirelessly, you
need to pair your Bluetooth enabled device
with the unit.
• Before pairing and connection, you need
to:
a press SOURCErepeatedly to select
the Bluetooth source.
» [BT] (Bluetooth) ashes on the
screen.
b enable the Bluetooth feature on your
external device.
1 On the Bluetooth enabled device, search
for Bluetooth devices that can be paired
(see the user manual of the device).
2 Select 'Philips FX10' on your Bluetooth
enabled device and if necessary input
'0000' as the pairing password.
» After successful pairing and connection,
'BT CONNECTED' (BT connected)
scrolls on the screen once.
» If you fail to nd "Philips FX10'' for
pairing, press and hold PAIRING for
three seconds to enter pairing mode.
The Bluetooth indicator will ash blue
quickly.
Stream music through Bluetooth
• Play audio on the Bluetooth device
connected to the unit.
» Audio streams from your Bluetooth
enabled device to the unit.
Tip
• If the Bluetooth enabled device also supports AVRCP
(Audio Video Remote Control Prole), you can use
some basic operation buttons of the unit (such as the
play/pause, stop and previous/next buttons) to control
music play.
11EN
Page 14
To disconnect the Bluetooth-enabled device:
• Press and hold PAIRING for three seconds.
• Deactivate Bluetooth on your device; or
• Move the device beyond the
communication range.
To clear Bluetooth pairing history:
• Press and hold on the remote control
for 8 to 10 seconds.
Play a disc
Play from USB
USB
DISC
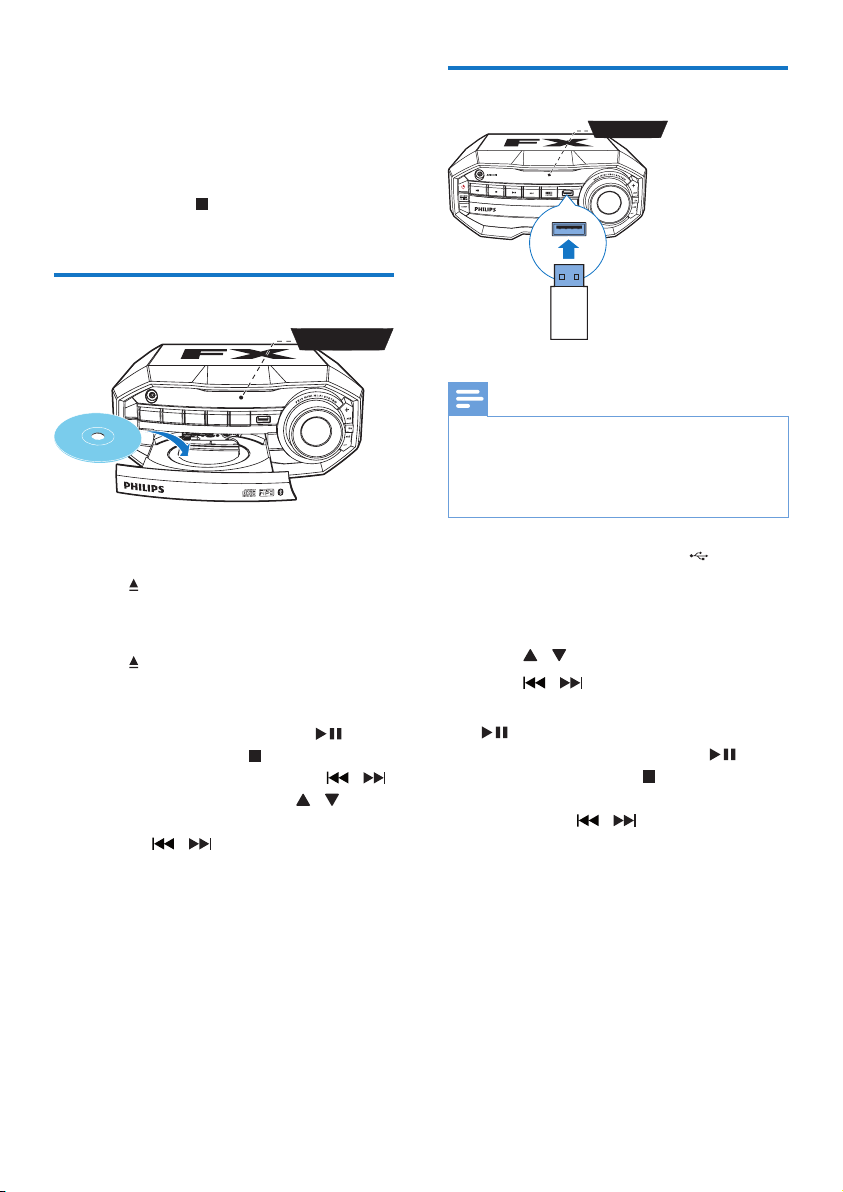
1 Press SOURCE repeatedly to select the
disc source.
2 Press to open the disc compar tment.
3 Load a disc onto the disc tray, with the
printed side facing up.
4 Press again to close the disc
compartment.
» Play starts automatically.
• To pause/resume play, press .
• To stop play, press .
• To select another track, press / .
• To select an album, press / .
• To search within a track, press and
hold / , then release to resume
normal play.
Note
• Make sure that the USB device contains playable audio
contents in supported formats. The NTFS le format is
not supported.
• A USB hub is not supported.
• Some card readers may not be supported.
1 Plug the USB device into the socket on
the main unit.
2 Press SOURCErepeatedly to select the
USB source.
3 Press / to select a folder.
4 Press / to select an audio le.
5 If play does not star t automatically, press
.
• To pause/resume play, press .
• To stop play, press .
• To search within an audio le, press
and hold / , then release to
resume normal play.
12 EN
Page 15
5 Listen to an
external device
You can listen to an external audio device
through the speakers of this unit.
Listen to an external audio
device with RCA connectors
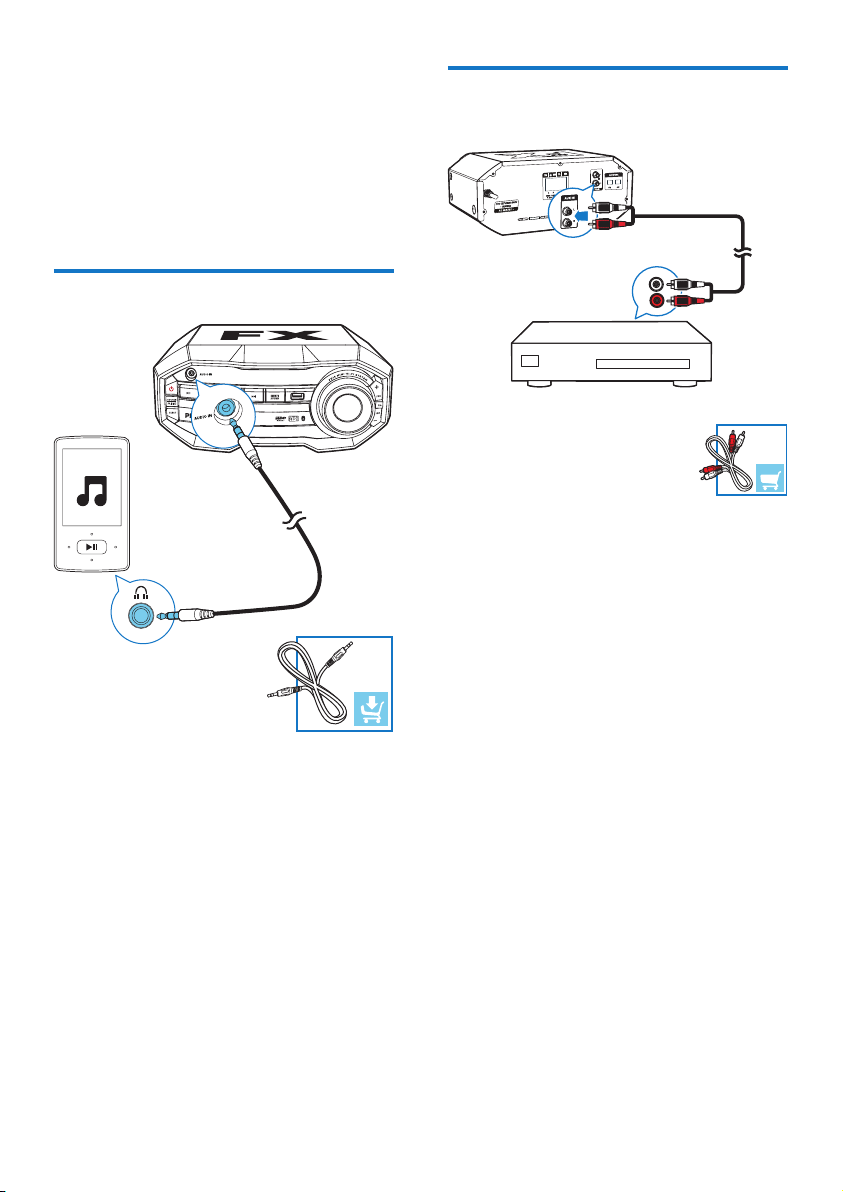
Listen to an MP3 player
1 Press SOURCE repeatedly to select the
AUDIO IN source.
2 Connect a 3.5mm audio cable (not
supplied) to:
• the 3.5mm audio input socket on the
front of the unit.
• the headphone socket on the MP3
player.
3 Star t play on the MP3 player (see the
player user manual).
L
R
1 Press SOURCE repeatedly to select the
AUX IN source.
2 Connect a pair of RCA audio cables (red/
white; not supplied) to:
• the AUX IN (L/R) socket on the back
of the unit.
• the RCA audio output sockets (red/
white) on the external device.
3 Star t play on the external device (see the
device user manual).
13EN
Page 16
6 Play options
Repeat and shufe play
• During disc play, press repeatedly to
select:
• REPEAT ONE: the current track is
played repeatedly.
• REPEAT ALL: all tracks are played
repeatedly.
• REPEAT OFF: normal play is resumed.
• During disc play, press to select shufe
(random) play.
Tip
• Shufe play cannot be selected when you play
programmed tracks.
You can program a maximum of 20 tracks.
1 In DISC/USB mode, press to stop
play, then press PROG to activate track
programming.
» [PROGRAM] (program) is displayed.
2 For MP3 tracks, press / to select an
album/folder.
3 Press / to select a track number,
then press PROGto conrm.
4 Repeat steps 2 to 3 to select and store all
tracks to program.
5 Press to play the programmed tracks.
• To erase the program, when play is
stopped, press .
Display play information
• During play, press CLOCK/DISPLAY
repeatedly to select different play
information.
14 EN
Page 17
7 Adjust volume
Select a preset sound effect
level and sound
effect
Note
• MAX sound and bass boost cannot be activated at the
same time.
Adjust volume level
Caution
• For your hearing health and being consideration of
other people, it is not recommended to listen at high
volume levels for a long time.
• During play, press +/- to increase/decrease
the volume level.
Mute sound
• During play, press to mute/unmute
sound.
The equalizer setting feature allows you to
enjoy special preset sound effects.
• During play, press EQ repeatedly to select:
• [POPJ (pop)
• [SAMBA] (samba)
• [ROCK] (rock)
• [TECHNO] (techno)
• [JAZZ] (jazz)
Enhance bass
You can manually select the level of dynamic
bass boost (DBB) that best suits your listening
environment.
• During play, press BASS BOOST
repeatedly to select:
• DBB 1
• DBB 2
• DBB 3
• DBB off
» If DBB is activated, DBB is displayed.
Boost sound power
The MAX sound feature gives an instant boost
to the sound power .
• Press MAX to turn on or off the instant
power boost.
15EN
Page 18
8 Listen to radio
2 Press PROG to activate program mode.
3 Press / to allocate a number to this
radio station, then press PROG to conrm.
4 Repeat the above steps to program other
stations.
Tune to a radio station
1 Press SOURCE repeatedly to select FM
or AM.
2 Press and hold / for more than two
seconds.
» [SEARCH] (search) is displayed.
» The radio tunes to a station with
strong reception automatically.
3 Repeat step 2 to tune to more stations.
• To tune to a weak station, press /
repeatedly until you nd optimal
reception.
Program radio stations
automatically
You can program a maximum of 20 FM and 10
AM preset radio stations.
• In tuner mode, press and hold PROG
for more than two seconds to activate
automatic programming.
» [AUTO] (auto) is displayed.
» All available stations are programmed
in the order of waveband reception
strength.
» The rst programmed radio station is
broadcast automatically.
Tip
• To overwrite a programmed station, store another
station in its place.
Select a preset radio station
• In tuner mode, press / to select a
preset number.
Tip
• Position the antennas as far as possible from TV, or
other radiation sources.
• For optimal reception, fully extend and adjust the
position of the antennas.
Change AM tuning grid
In some countries, the AM radio frequency step
between adjacent channels is 10 kHz (9 kHz in
some areas).
1 Select the tuner source.
2 Press and hold on the main unit for
more than ve seconds.
» All preset stations are erased and need
to be re-programmed.
Program radio stations
manually
You can program a maximum of 20 FM and 10
AM preset radio stations.
1 Tune to a radio station.
16 EN
Page 19

9 Other features
Set the alarm timer
Tip
• In BT, AUDIO IN or AUX IN mode, the alarm timer
cannot be set.
• If the disc or USB source is selected but no audio le
can be played, FM radio is activated automatically.
This unit can be used as an alarm clock. You can
select disc, radio or USB as alarm source.
1 Make sure that you have set the clock
correctly.
2 Press and hold SLEEP/TIMER for more
than two seconds.
» 'TIMER SET' is displayed. Then, a
prompt to select the sound source is
displayed.
3 Press SOURCE to select a source from
DISC, USB and FM, then press SLEEP/
TIMER to conrm.
» The hour digits are displayed and begin
to blink.
4 Press / repeatedly to set the hour,
then press SLEEP/TIMER to conrm.
» The minute digits are displayed and
begin to blink.
5 Press / repeatedly to set the minute,
then press SLEEP/TIMER to conrm.
» A prompt to select the volume level is
displayed.
6 Press +/- to select the desired volume
level, then press SLEEP/TIMER to conrm.
» The alarm timer is set and activated.
To deactivate or re-activate an alarm timer
• In standby mode, press SLEEP/TIMER
repeatedly.
» When the alarm timer is deactivated,
''TIMER OFF is displayed.
» When the alarm timer is re-activated,
'TIMER ON' is displayed.
Set the sleep timer
This unit can switch to standby automatically
after a set period of time.
• When the unit is turned on, press SLEEP/
TIMER repeatedly to select a set period of
time (in minutes).
To deactivate sleep timer
• Press SLEEP/TIMER repeatedly until [OFF]
(off) is displayed.
17EN
Page 20
10 Product
information
Note
• Product information is subject to change without prior
notice.
Specications
Amplier
Total output power 230W RMS (30%
THD)
Frequency response 60Hz -20KHz, ±3dB
Signal-to- noise ratio >70 dBA
Aux input 2000 +/- 100mV RMS
22kohm
Audio input 1000mV RMS 22kohm
Disc
Laser type Semiconductor
Disc diameter 12cm/8cm
Support disc CD-DA, CD-R,
CD-RW, MP3-CD
Audio DAC 24Bits / 44.1kHz
Total harmonic distortion <10% (1 kHz)
Audio SNR >70dBA
Tuner
FM tuning range FM: 87.5 - 108MHz
AM: 531 1602KHz(9KHz); 530
- 1700KHz(10KHz)
Tuning grid 100kHz (FM),
9KHz/10KHz (AM)
Number of Presets 20 FM; 10 AM
Sensitivity
- Mono, 26dB S/N Ratio
Search Selectivity < 35 dBf
Total Harmonic
Distortion
Signal to Noise Ratio > 50dB
< 22 dBf
< 2%
Speakers
Speaker Impedance 6ohm
Speaker Driver 5.25" woofer*2 + 2"
tweeter*2
Sensitivity 86dB/1m*1w
General information-Specs
AC power AC 110-127V/220-
240V~, 50/60Hz
Operation power
consumption
USB direct Version 2.0
Bluetooth
Bluetooth® version
Frequency band
Range
Dimensions
Main Unit (W x H
x D)
Speaker Box (W x H
x D)
Weight
Main Unit
Speaker Box
60 W
V2.1 + EDR
2.402-2.480 GHzISM
10m (free space)
280 x 118 x 230 mm
204 x 309 x 150 mm
2 kg
2.125 kg each
18 EN
Page 21
USB playability information
Maintenance
Compatible USB devices:
• USB ash memory (USB 2.0 or USB
1.1)
• USB ash players (USB 2.0 or USB 1.1)
• memory cards (requires an additional
card reader to work with this unit)
Supported formats:
• USB or memory le format FAT16,
FAT32 (sector size: 512 bytes)
• MP3 bit rate (data rate): 32-320 Kbps
and variable bit rate
• Directory nesting up to a maximum of
7 levels
• Number of albums/ folders: maximum
99
• Number of tracks/titles: maximum 999
• ID3 tag v2.0 or later
• File name in Unicode UTF8 (maximum
length: 128 bytes)
Unsupported formats:
• Empty albums: an empty album is an
album that does not contain MP3 les,
and is not be shown in the display.
• Unsupported le formats are skipped.
For example, Word documents (.doc)
or MP3 les with extension .dlf are
ignored and not played.
• AAC, WAV, PCM audio les
Clean the cabinet
• Use a soft cloth slightly moistened with
a mild detergent solution. Do not use a
solution containing alcohol, spirits, ammonia
or abrasives.
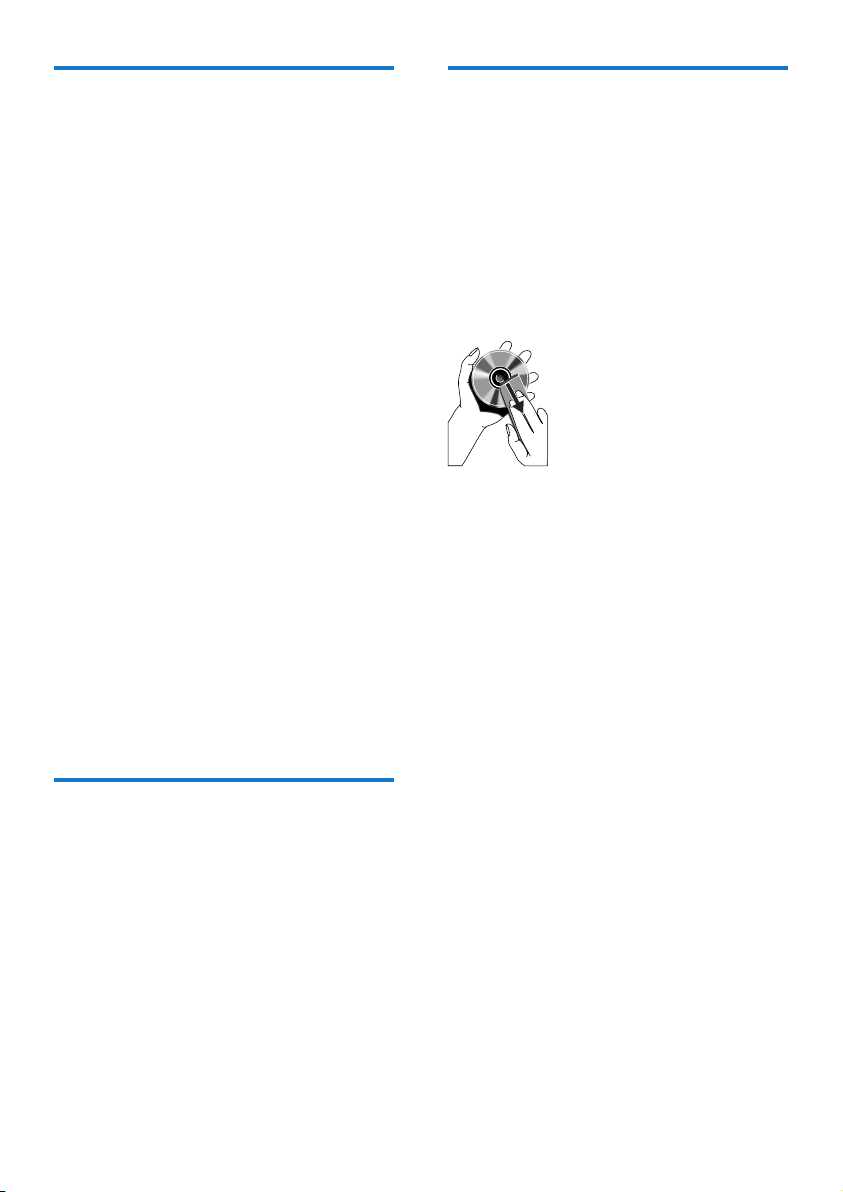
Clean discs
• When a disc becomes dirty, clean it with
a cleaning cloth. Wipe the disc from the
centre out.
• Do not use solvents such as benzene,
thinner, commercially available cleaners,
or antistatic spray intended for analogue
records.
Clean the disc lens
• After prolonged use, dirt or dust may
accumulate at the disc lens. To ensure good
play quality, clean the disc lens with Philips
CD lens cleaner or any commercially
available cleaner. Follow the instructions
supplied with cleaner.
Supported MP3 disc formats
• ISO9660, Joliet
• Maximum title number: 999 (depending on
le name length)
• Maximum album number: 99
• Supported sampling frequencies: 32 kHz,
44.1kHz, 48 kHz
• Supported Bit-rates: 32-320 (kbps),
variable bit rates
• ID3 tag v2.0 or later
• Directory nesting up to a maximum of 7
levels
19EN
Page 22

11 Troubleshooting
Warning
• Never remove the casing of this apparatus.
To keep the warranty valid, never try to repair
the system yourself.
If you encounter problems when using this
apparatus, check the following points before
requesting service. If the problem remains
unsolved, go to the Philips web site (www.
philips.com/welcome). When you contact
Philips, ensure that the apparatus is nearby
and the model number and serial number are
available.
No power
• Ensure that the AC power plug of the unit
is connected properly.
• Ensure that there is power at the AC
outlet.
• To save power, the unit switches to
standby automatically 15 minutes after
a play reaches the end and no control is
operated.
No sound or poor sound
• Adjust the volume.
• Check that the speakers are connected
correctly.
• Check if the stripped speaker wires are
clamped.
Left and right sound outputs reversed
• Check the speaker connections and
location.
No response from the unit
• Disconnect and reconnect the AC power
plug, then turn on the unit again.
Remote control does not work
• Before you press any function button, rst
select the correct source with the remote
control instead of the main unit.
• Reduce the distance between the remote
control and the unit.
• Inser t the batter y with their polarities (+/–
signs) aligned as indicated.
• Replace the batter y.
• Aim the remote control directly at the
sensor on the front of the main unit.
No disc detected
• Inser t a disc.
• Check if the disc is inser ted upside down.
• Wait until the moisture condensation at
the lens has cleared.
• Replace or clean the disc.
• Use a nalized CD or correct format disc.
Cannot display some les in USB device
• The number of folders or les in the USB
device has exceeded a certain limit. This
phenomenon is not a malfunction.
• The formats of these les are not
supported.
USB device not supported
• The USB device is incompatible with the
unit. Try another one.
Poor radio reception
• Increase the distance between the unit and
your TV or other radiation sources.
• If the signal is too weak, adjust the antenna
for better reception.
Clock/timer setting erased
• Power has been interrupted or the power
cord has been disconnected.
• Reset the clock/timer.
Timer does not work
• Set the clock correctly.
• Switch on the timer.
Music playback is unavailable on the system
even after successful Bluetooth connection.
• The device cannot be used with the unit
to play music.
The audio quality is poor after connection
with a Bluetooth-enabled device.
• The Bluetooth reception is poor. Move the
device closer to the unit or remove any
obstacle between the device and the unit.
Cannot connect with the unit.
• The device does not suppor t the proles
required for the unit.
• The Bluetooth function of the device is not
enabled. Refer to the user manual of the
device for how to enable the function.
• The unit is not in pairing mode.
20 EN
Page 23

• The unit is already connected with another
Bluetooth-enabled device. Disconnect that
device or all other connected devices and
then try again.
The paired mobile phone connects and
disconnects constantly.
• The Bluetooth reception is poor. Move the
mobile phone closer to the unit or remove
any obstacle between the mobile phone
and the unit.
• Some mobile phones may connect and
disconnect constantly when you make
or end calls. This does not indicate any
malfunction of the unit.
• For some mobile phones, the Bluetooth
connection may be deactivated
automatically as a power-saving feature.
This does not indicate any malfunction of
the unit.
21EN
Page 24

Specifications are subject to change without notice.
2016 © Gibson Innovations Limited. All rights reserved.
This product has been manufactured by, and is sold under the responsibility of Gibson
Innovations Ltd., and Gibson Innovations Ltd. is the warrantor in relation to this product.
Philips and the Philips Shield Emblem are registered trademarks of Koninklijke Philips N.V.
and are used under license from Koninklijke Philips N.V.
FX10_77_UM_V1.0
 Loading...