

Philips FREEVENTS User Manual
work + play
travail + loisirs
Windows XP Media Center Edition 2005


Windows XP Media Center Edition 2005
User Guide
PHILIPS and the PHILIPS Shield Emblem are registered trademarks of Koninklijke Philips Electronics N.V.
and used by Dixons under license from Koninklijke Philips Electronics N.V. Freevents is used as a trademark of
DSG Retail Ltd.
About your manual
UK
This user manual provides information and support for using your new
computer. You can find an electronic version in your native language o n
your Windows Desktop. Double-Click the ‘My Manual’ icon.
Telephone Support
Repair Line—0870 901 3000 (national rate)
Open 24 hours. Call this line if your computer develops a fault and needs
a repair.
Software Support— 0906 559 7897 (£1 per minute)
Open 24 hours. Call this line for help and advice with Windows, software
and peripherals.
Este manual de usuario contiene toda la informacíon y soporte nécesario
para utilizar su ordinador. Encontrará una versión electrónica en su
idioma nativo en el escritorio de Windows. Haga un doble click en el
icono “mi manual”.
Lineas de soporte de Hardware y Software
PC CITY
Ventas 902 100 302
Establecimiento de llamada: 8,33 céntimos de uro
3,84 céntimos por minuto
United Kingdom
ES
ESPAÑA
France
FR
Ce manuel offre l’information et l’aide nécessaire pour l’utilisation de
votre ordinateur. Vous trouverez une version électronique dans votre
langue maternelle dans votre DESKTOP de Windows. Doucle cliquez sur
l’icône “mon manuel”.
Assistance télephonique Hardware et Software
PC CITY 0825 31 4000
15 centimes d’ uro la minute
IT
Questo manuale d’uso da informazione e aiuto per l’utilizio de l su o nuovo
computer. Puo’ trovare unaversione elettronica nella sua lingua materna
sul desktop di Windows. Faccia un doppio click sull’icona di “mio
manuale”.
Supporto telefonico Hardware e Software
PC CITY 199 400 999
UNIEURO 199 400 990
5 centesimi d’ uro alla risposta
10 centesimi d’ uro al minuto
Italia
4

NO
Denne brukermanualen gir informasjon og support om hvord an du
bruker din nye datamaskin. Du kan finne en elektronisk versjon på ditt
språk, på skrivebordet i Windows. Dobelt klikk på 'Min Manual' ikonet.
Telefon support
* Når du ringer vennligst sørg for at du sitter foran datamaskinene og
har kviterningen tilgjengelig
Elkjøp kunder 815 32000
Lefsal kunder 815 85800
Norge
Sweden
SE
Denna manual innehåller information och support för din nya dator.
Om du dubbel-klickar på “Min Manual ikon” på skrivbordet så finner du
en elektronisk version av manualen på ditt modersmål.
Telefon support
För att kunna hjälpa dig på bästa möjliga sätt så bör du sitta framför
datorn med kvittot i beredskap när du ringer.
Elgigantens kunder 0771 115 115
PC City 0771 116 116
DK
Denne brugervejledning indeholder information og supp ort for b r ug af
din nye computer. Du kan finde en elektronisk udgave i dit eget sprog
på dit windows skrivebord. Dobbel klik på ikonet "My Manual"
Telefon support
Elgigantens kunder: 70 80 70 70
Danmark
Finalnd
FI
Tämä opas sisältää käyttöohjeet ja tukitietoja uutta t ietokonettasi
varten. Suomenkielinen sähköinen versio löytyy tietoko-neen työpöydältä. Tuplaklikkaa 'Minun käyttöopp aa ni' ('My Manual') kuvaketta.
Puhelintuki Gigantin asiakkaille: 020 321 321
5

Table of contents
Welcome 5
Philips-Freevents™ Help and Support Center 6
Chapter 1 - Your new Media Center PC
Essential Hardware explained 7
Your remote control 8
Ports explained 9
Using the TV-out function 11
Turning on surround sound support 12
Your Media Center’s hardware 13
Chapter 2 - Starting your Media Center for the first time
Turning on your Media Center 17
What you need to get started 18
Media Center Setup Wizard 19
Turning off your Media Center 25
Chapter 3 - Getting around Media Center
Starting Media Center 27
My TV
View live TV 29
TV Guide 30
Recording TV 34
Managing hard drive storage 39
My Pictures
How Media Center handles images 41
Organising your digital photos 42
Viewing your pictures 43
Save your pictures to CD / DVD 44
Editing & printing your pictures 45
My Music
Windows Media Player 10 47
Creating your music jukebox 48
Adding files to your jukebox 49
Creating your music library 50
Play your music 52
Playlists 53
Visualizations 54
Record music to a CD 55
My Videos
Organise your video files 58
Add video files to your library 59
Playing your video files 60
Supported video files 61
Saving your videos to CD/DVD 62
Play DVD
Playing a DVD disc 63
Stopping a DVD disc 64
FM Radio
Tuning into a station 66
More Programs
Messenger 68
Sync to Device 69
Media Center Settings 70
Remote Desktop 71
Parental Controls 76
Online Spotlight 77
6

Chapter 4 - Home networking
What you need to create a home network 78
Connecting your hardware 79
Network Setup Wizard 81
Wireless Network Setup Wizard 83
Connecting to a wireless network 86
Chapter 5 - Keeping your Media Center healthy
Task Manager 87
Disk Cleanup 88
Disk Defragmenter 88
System Restore 89
Chapter 6 - How do I…
Run a program? 90
Create a shortcut? 90
Remove unwanted software? 91
Find my files? 91
Retrieve a deleted file? 92
Empty the Recycle Bin? 92
Change the date and time? 92
Add new users? 93
Add a password? 94
Create a password reset disk? 94
Use a password reset disk? 94
Change my screen saver? 95
Change my Windows sounds? 95
Chapter 7 - Upgrading your Media Center
ESD safety notices 96
Removing the cover 97
Installing new memory 98
Graphics card replacement 99
Adding a new hard drive 100
Inserting a PCI expansion card 101
Replacing a CD /DVD drive 102
7

Welcome…
Thank you for purchasing your new Philips-Freevents™ Media Center PC. You are about to enter an exciting new world of digital entertainment.
Imagine being able to watch and record TV, listen to music, view your family photos, watch the latest DVD movies, listen to the radio and access
the Internet from the comfort of your arm chair. Your Philips-Freevents™ Media Center lets you do just that!
To compliment your new computer we have designed a range of wireless home entertainment and networking products to experience digital
entertainment in a truly connected home without the need for messy cables and wiring.
Using this guide
This user guide has been designed to explain all the important features of your Media Center PC. Learn about your Media Center and the various
ports you can connect new devices to. You can also learn about Windows XP Media Center and how to use many of its exciting new features.
Where to go for help
If you can’t find the answers you are looking for you can get help from a number of sources 24 hours a day.
Help and Support Center
Click Start > Help and Support to access detailed help and tutorials on your Philips-Freevents™ Media Center and Windows XP.
Internet
Visit our support website www.pcservicecall.co.uk to access the very latest help and support information and services.
Telephone
If you need to speak to us our support centre is open 24 hours, 365 days a year. Please have your receipt details and serial number to hand when
you call. 0870 901 3000.
8
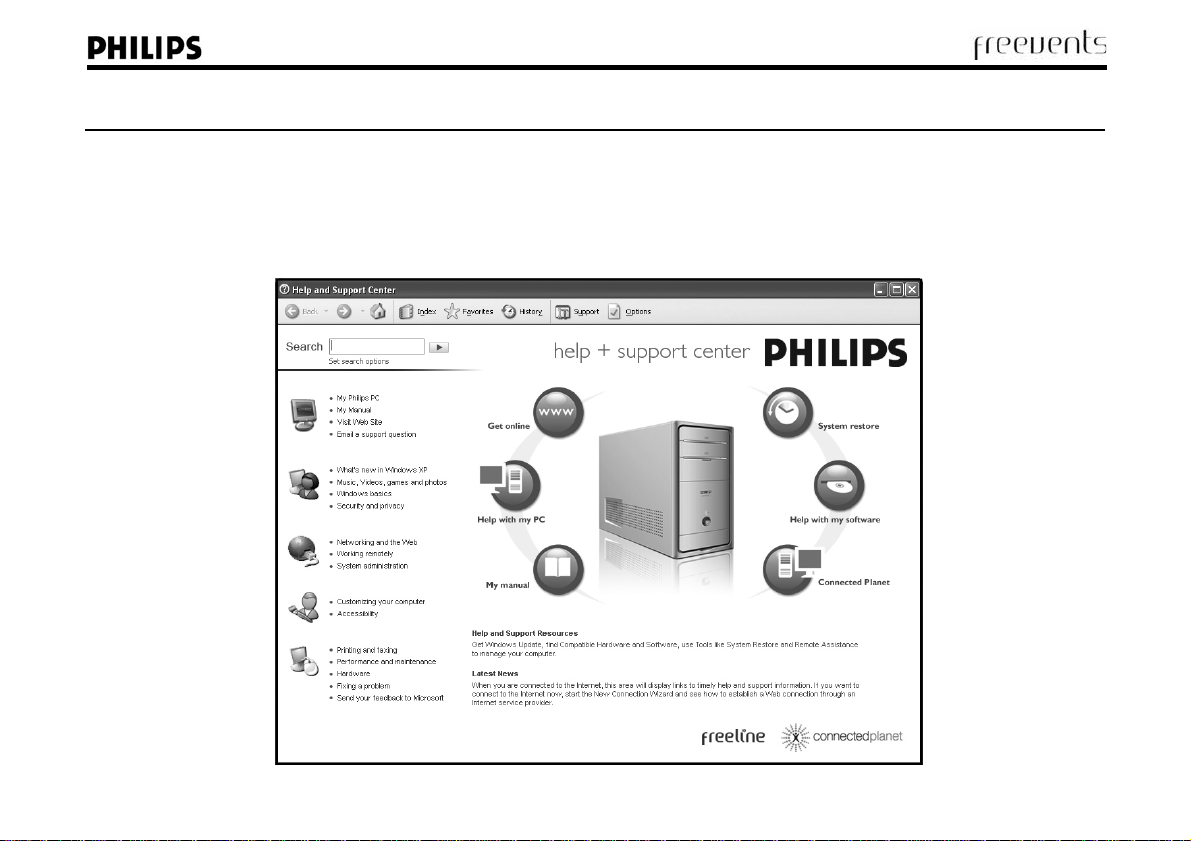
Philips-Freevents™ Help and Support Center
If you get stuck you can access the Help and Support Center at any time by clicking Start > Help and Support. Your Help and Support Center contains
information on Windows XP as well as specialised content, information, hin ts and tip s for P hilips- Freev ents™ customers.
If you have an Internet connection we will also keep you up-to-d ate b y downloading new content and information to your Help and Support Center.
Fig. 1
9
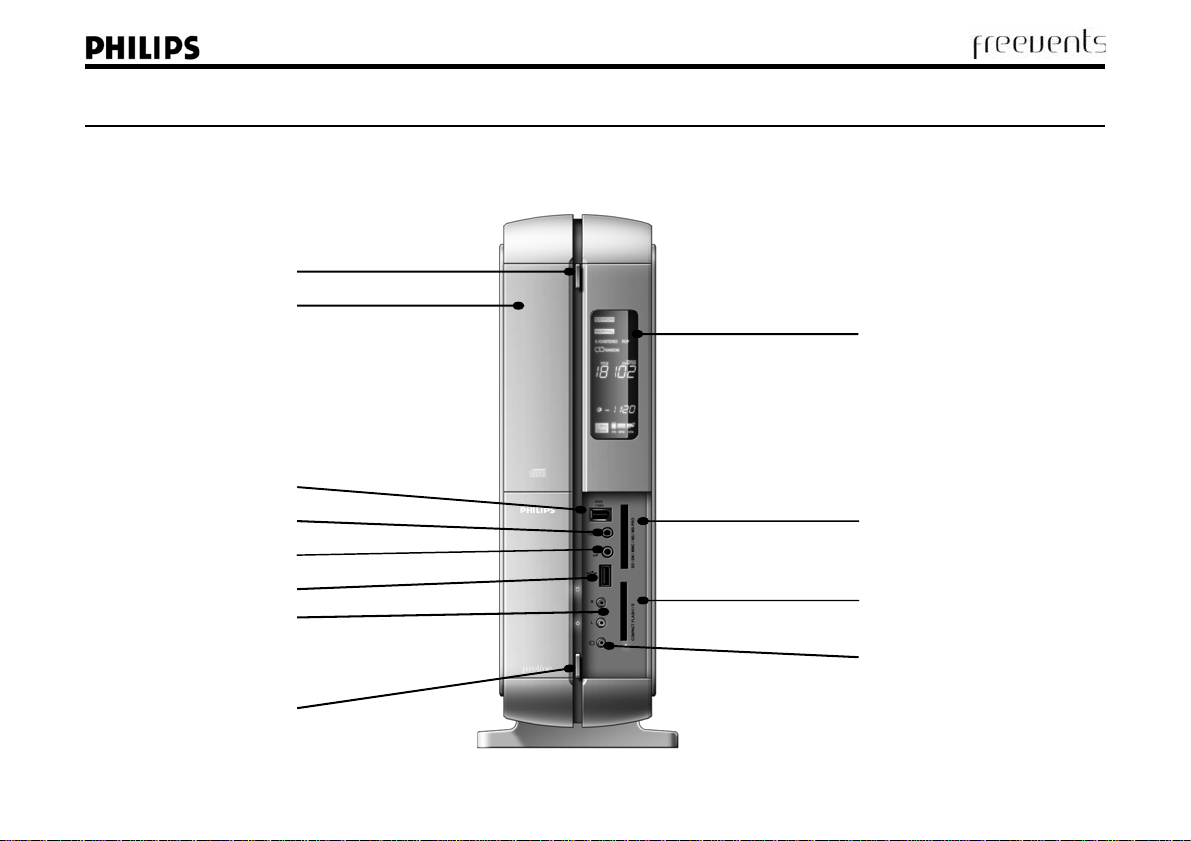
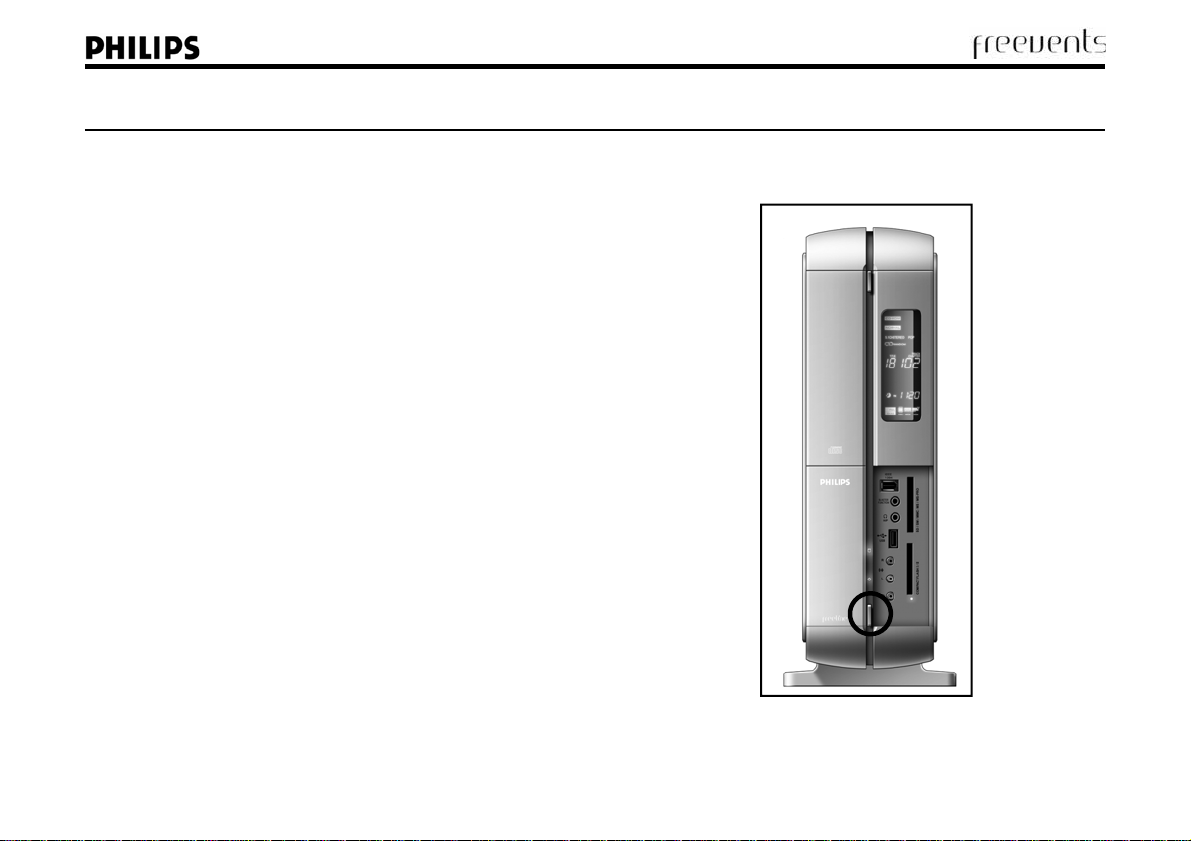
Chapter 1—Your new Media Center PC
Essential hardware explained
DVD eject
DVD drive
IEEE 1394 port
Remote Blaster Out
Headphone jack
USB 2.0 port
Phono inputs (audio)
LCD display
Memory card reader
Memory card reader
Composite video input
10
Power button
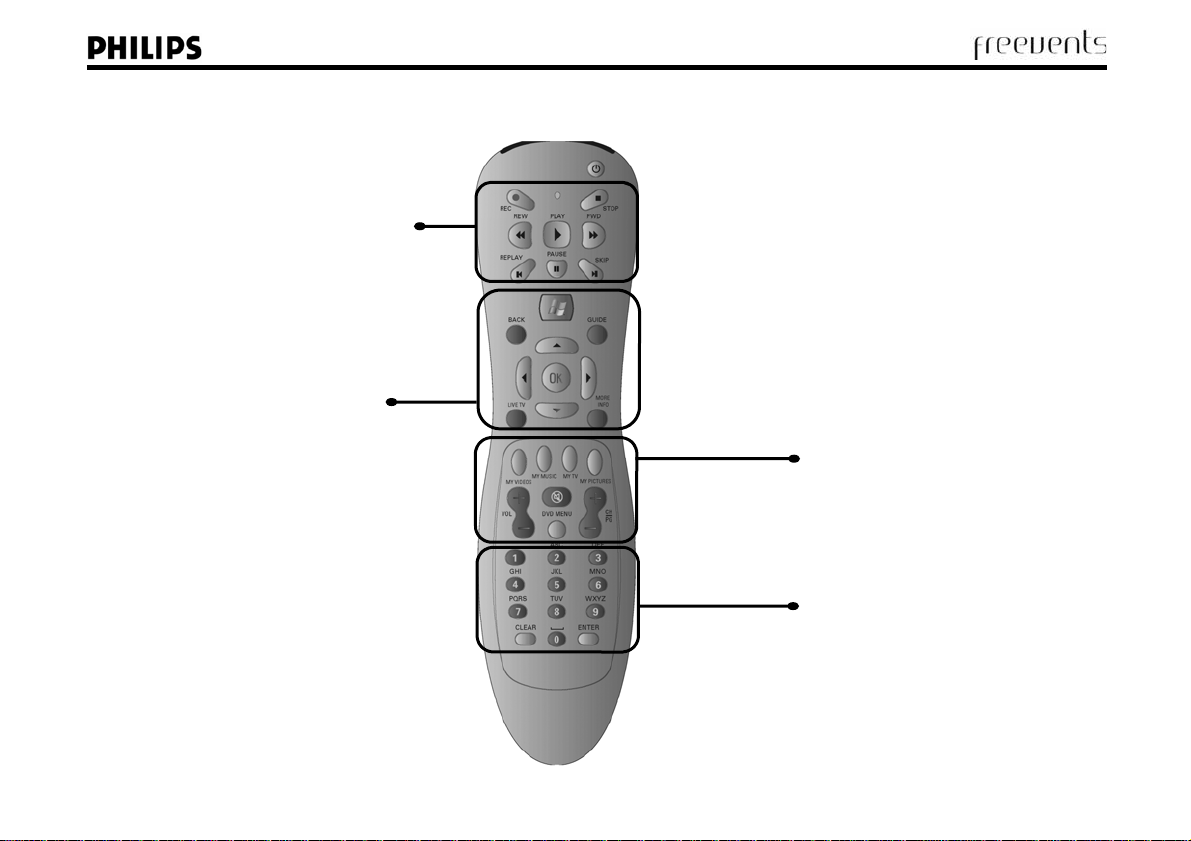
Your remote control...
Transport controls
These controls should be familiar to anyone who
has used a video recorder, DVD player or CD
player. The controls will perform the listed function
in whatever mode you are in, e.g., DVD mode, or
CD mode.
Direct Access, Audio and Video buttons
These controls allow you to change the
channel, volume and directly access common
functions within Media Center.
CH/PG allows you to move up and down
channels.
VOL allows you to increase or decrease the
volume.
Mute turns sound on or off.
DVD Menu opens the DVD disc’s menu.
My Videos takes you to your video section.
My Music takes you to your music section.
My TV opens the live TV functions.
My Pictures opens your digital pictures.
Navigation controls
Arrows move you around the screen.
OK confirms menu options similar to a mouse
click.
Back moves to the previous screen.
More Info shows details of the currently
selected media.
Guide opens the TV Guide.
Live TV opens full screen television.
Numeric keypad
Allows you to enter numbers and text on
screen.
11
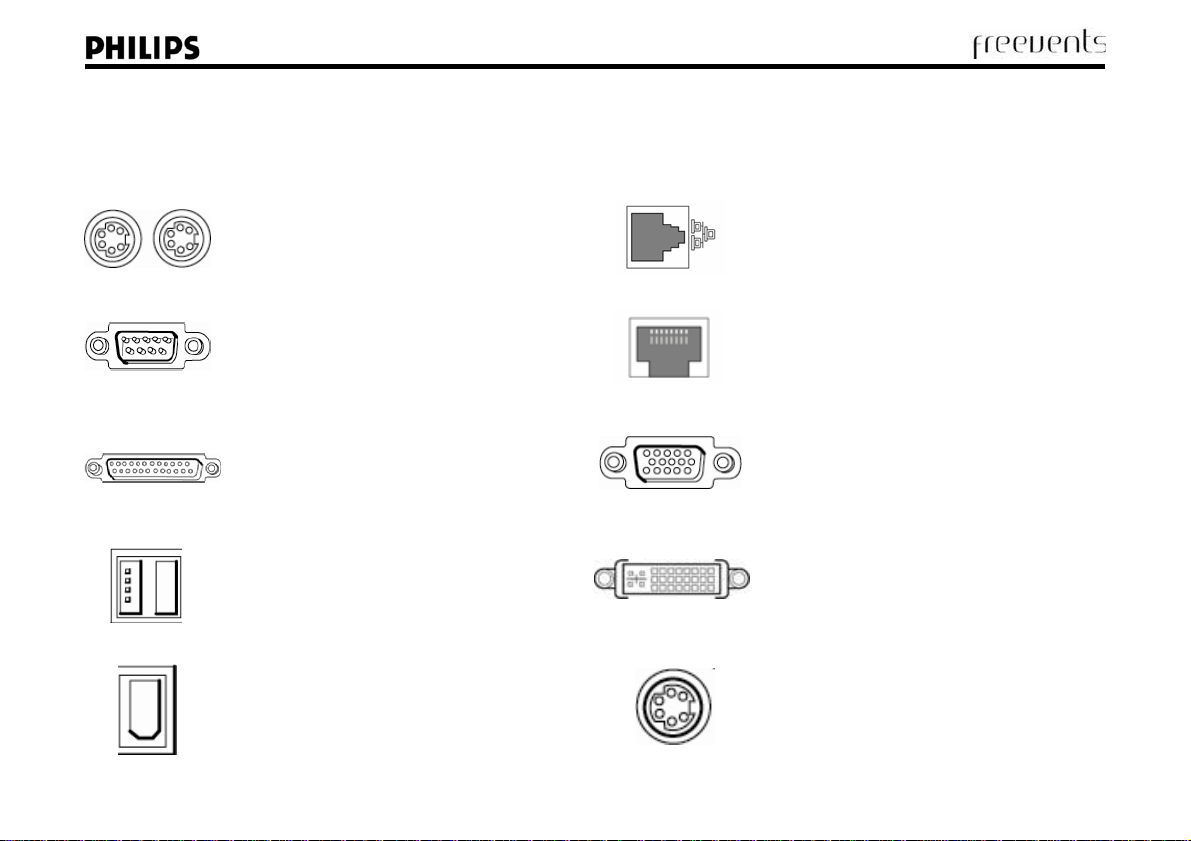
Ports explained...
Your Philips-Freevents™ Media Center has a number of sockets called ‘ports’ that allow you to connect a wide variety of devices. The following pages
will explain the function of each port. Some ports may not be present on certain models.
PS/ 2 ports
Connect your keyboard (purple) and mouse
(green) to these ports.
Serial port
A 9-pin serial port is used to connect older
devices such as external modems and mice.
Parallel (Printer) port
Use this port to connect older printers that are
unable to connect using a USB port.
USB 2.0 ports
Connect modern devices such as cameras, printers
and scanners to these ports. You can also connect
advanced keyboards and mice to these ports.
1394 FireWire ports
FireWire ports are used to connect digital video
cameras, hard drives and image editing equipment.
They are found in 2 sizes.
LAN (Network) port
Use this port to connect to a network of
computers at home or work.
Modem
Connect your phone line to this port to access the
Internet.
VGA
Connect your computer screen to this port.
DVI port
You can connect LCD screens with a digital
connection to this port.
S-video TV-out
You can connect your computer to your TV using
this port. It is ideal for watching DVD movies and
video files.
12
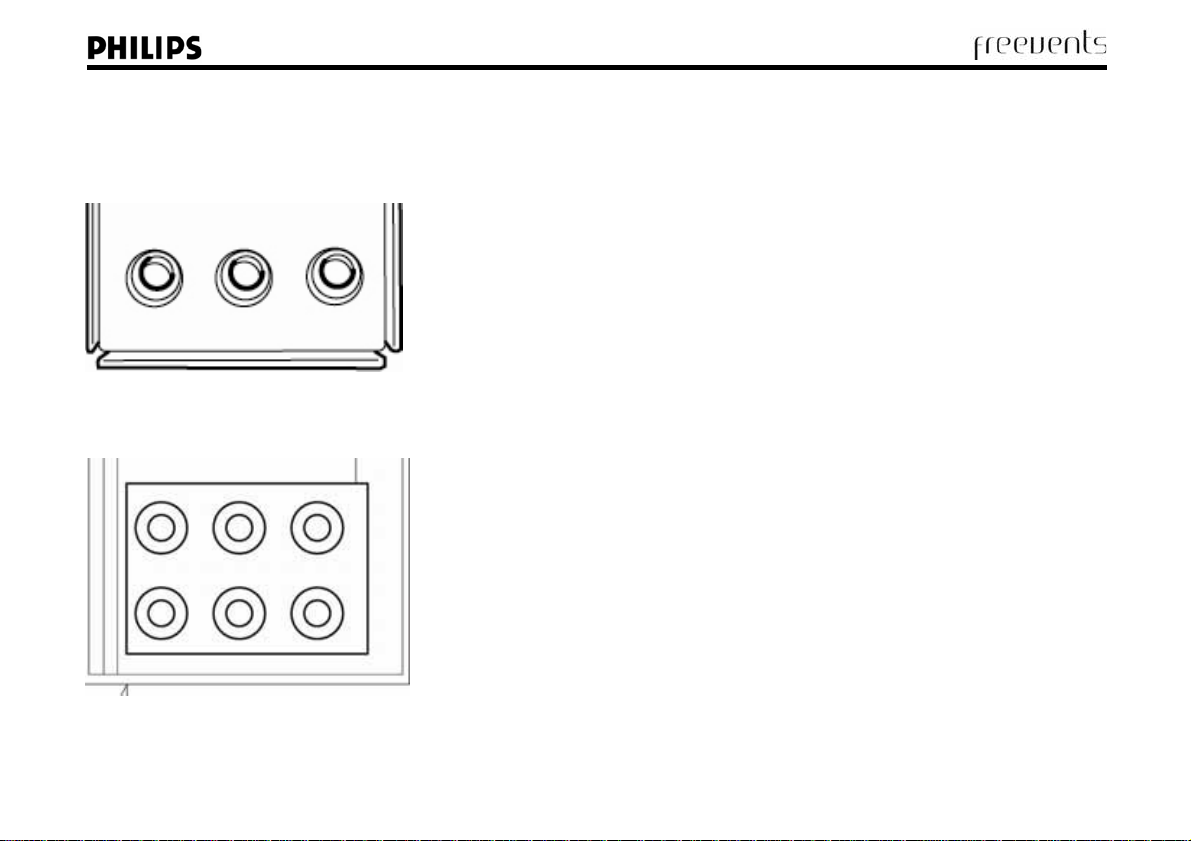
Audio ports
Your computer has a number of audio ports, some of which may have more than one function. The type of ports on your computer may vary
depending on which model you have. You can configure the aud io ports using the supplied software. See page 12 for more details.
Configuration 1
For models with 3 audio ports only.
• Line-in (Blue) - use this port to input sound for recording.
• Line-out (Green) - use this port to connect stereo speakers or he adphones.
• Mic (Pink) - use this port to con nect an external microphone.
Fig. 2
Configuration 2
For models with 6 audio ports. You can connect stereo, or 5.1 / 7.1 surround sound
speakers.
• Rear (Grey) - connect the rear speakers from your surround sound system.
• Side Speakers (Black) - connect side speakers where supplied.
• C/Sub (Orange) - connect your centre speaker or sub to this port.
• Front (Green) - connect stereo or front speakers to this port.
• Mic (Pink) - use this port to connect a microphone.
• Line-in (Blue) - use this port to connect external audio devices for recording.
Fig. 3
13
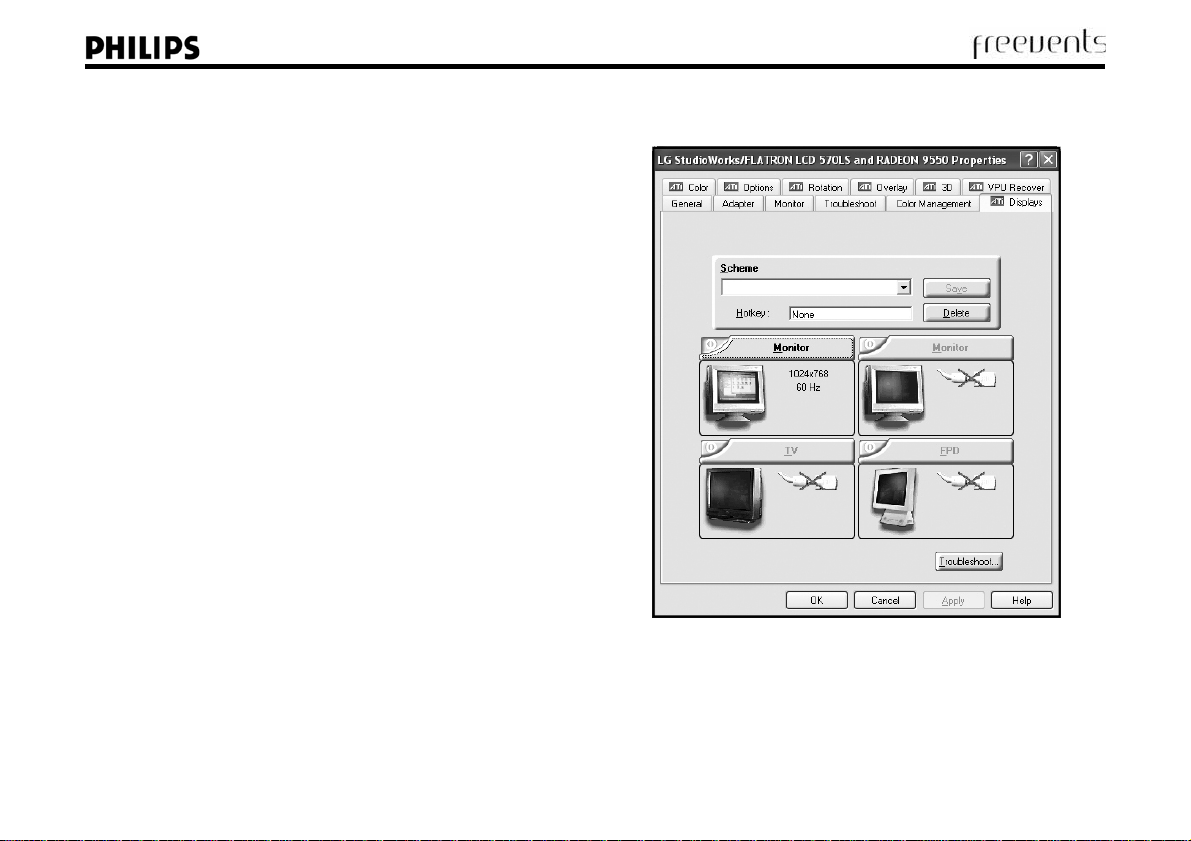
Using the TV-out function
The ATI graphics card supplied with your computer allows you to output to
most modern TV sets. This allows you watch DVDs and video files on a larger
screen. In order to use this feature you will need to purchase cable packs from
your local computer store.
1. Turn off your computer and TV set.
2. Connect the small adaptor cable supplied with your computer to the SVideo socket on the graphics card. You should now connect the cable you
purchased to the adaptor cable. Connect the other end to your TV.
3. Next, connect the audio cable (if supplied in the pack you purchased) to
the Line-out socket on your PC. Connect the other end to the red and
white Phono sockets on your TV set.
4. Turn on your TV and change to the appropriate AV channel. Now turn on
your PC.
5. Right-click the Windows Desktop and select Properties.
6. Now click the Settings tab and then the Advanced button.
7. You will see a screen similar to Fig. 4. If your TV is supported you will be
able to click the TV button.
8. The image will now appear on your TV screen.
Fig. 4
14
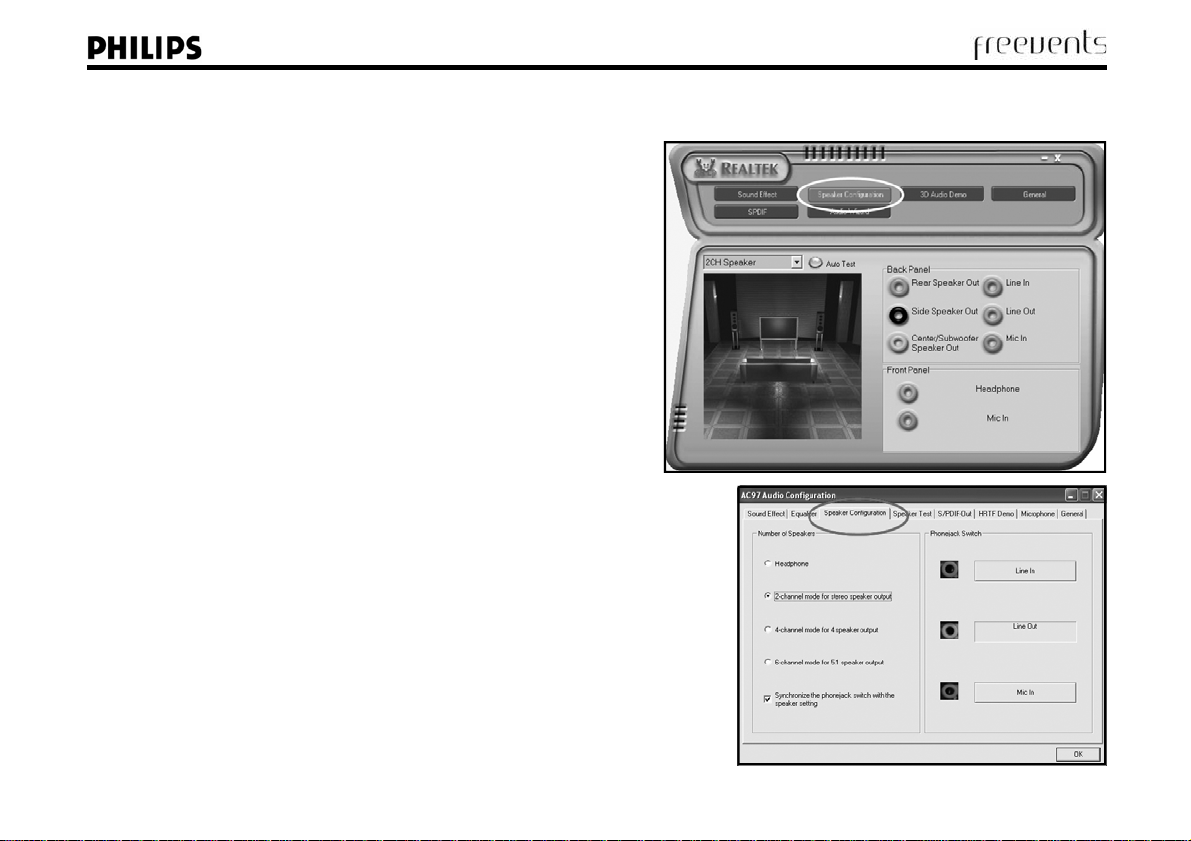
Turning on surround sound support
You Philips-Freevents™ computer allows you to use 5.1 surround
sound speakers. This allows you to experience DVD movies and
games to their full sound potential.
To configure your computer, please carry out the following steps:
1. Click Start > Control Panel.
2. Now click the “Switch to Classic View” option in the top left.
3. Look for an icon named Sound Manager or something similar
and double-click it.
4. A control panel will now be displayed and will look like Fig. 5 or
Fig. 6 depending on which sound chip is supplied with your
computer.
5. From here you can choose which speaker setup you want to
use, for example, Headphones, 2 Speakers, 4 Speakers, 5.1
Surround.
6. Make your selection. The diagram will explain where to connect
your speakers.
Most computer stores sell 5.1 Surround Sound speaker kits for
computers. If you enjoy games and DVD movies on your computer
these are an essential purchase.
Fig. 5
Fig. 6
15
Your Media Center’s hardware
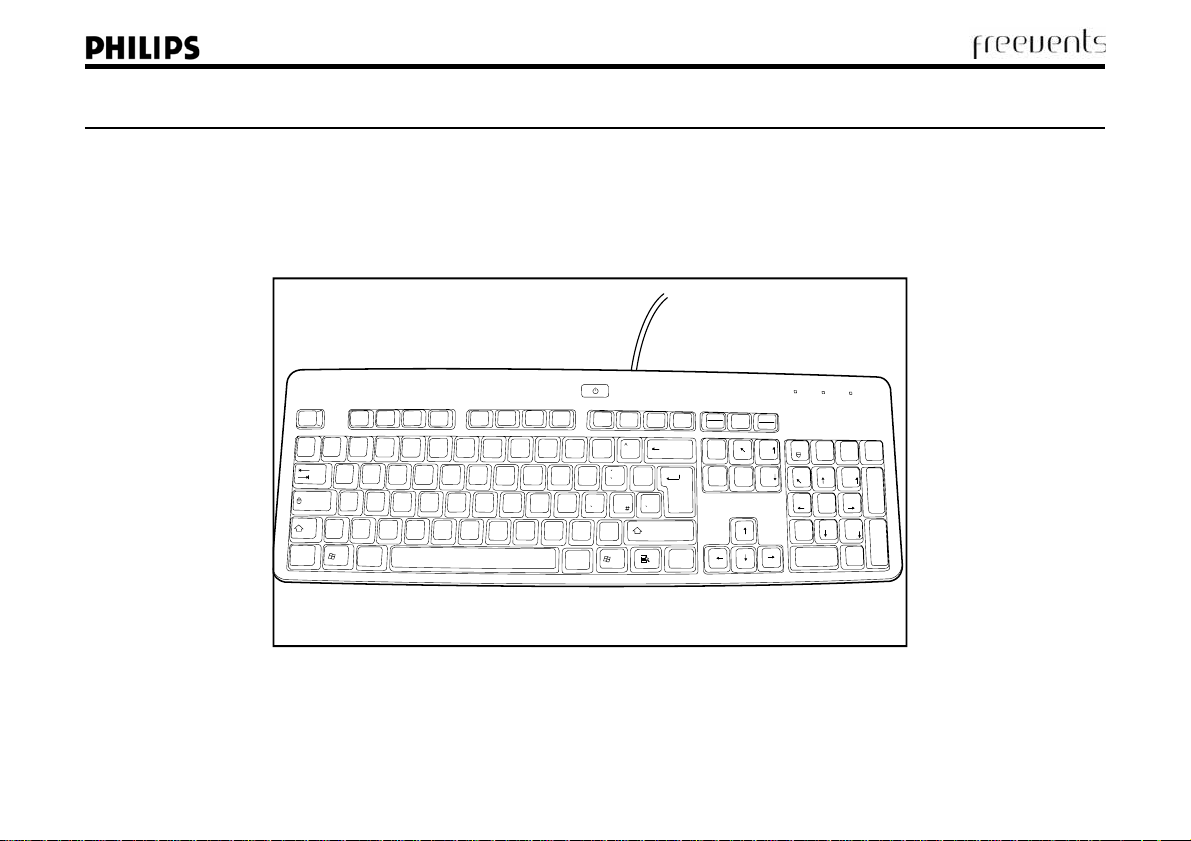
Keyboard
Along with the mouse your keyboard is one the main tools for interacting with your computer. The keyboard allows you to enter commands and text
when you use software to create documents, play games, chat with friends on the Internet and much more.
Prt Scr
Esc
|
\
Ctrl
F2
F4
F3
F1
"
!
£
1
Q
A
>
<
$
2
3
4
W
E
Û
S
D
Z
X
C
Alt
F5
F6 F7 F8
(
/
%
&
8
7
5
R
F
V
U
Y
T
G
B
I
H
K
J
N
N
F9 F10
F11
=
)
?
96
O
L
;
,
i
0
'
P
‚
o
@
:
Ð
.
-
Alt Gr
Invio
e
*
[
+
]
e
¤
o
u
a
Ctrl
Scroll
F12
Pause
Sys Rq
Lock
Break
Bloc
Num
/
Pag
Ins
789
Pag
FineCanc
456
123
Fine
0
Ins
Ð
*
+
Pag
Invio
Pag
Canc
16
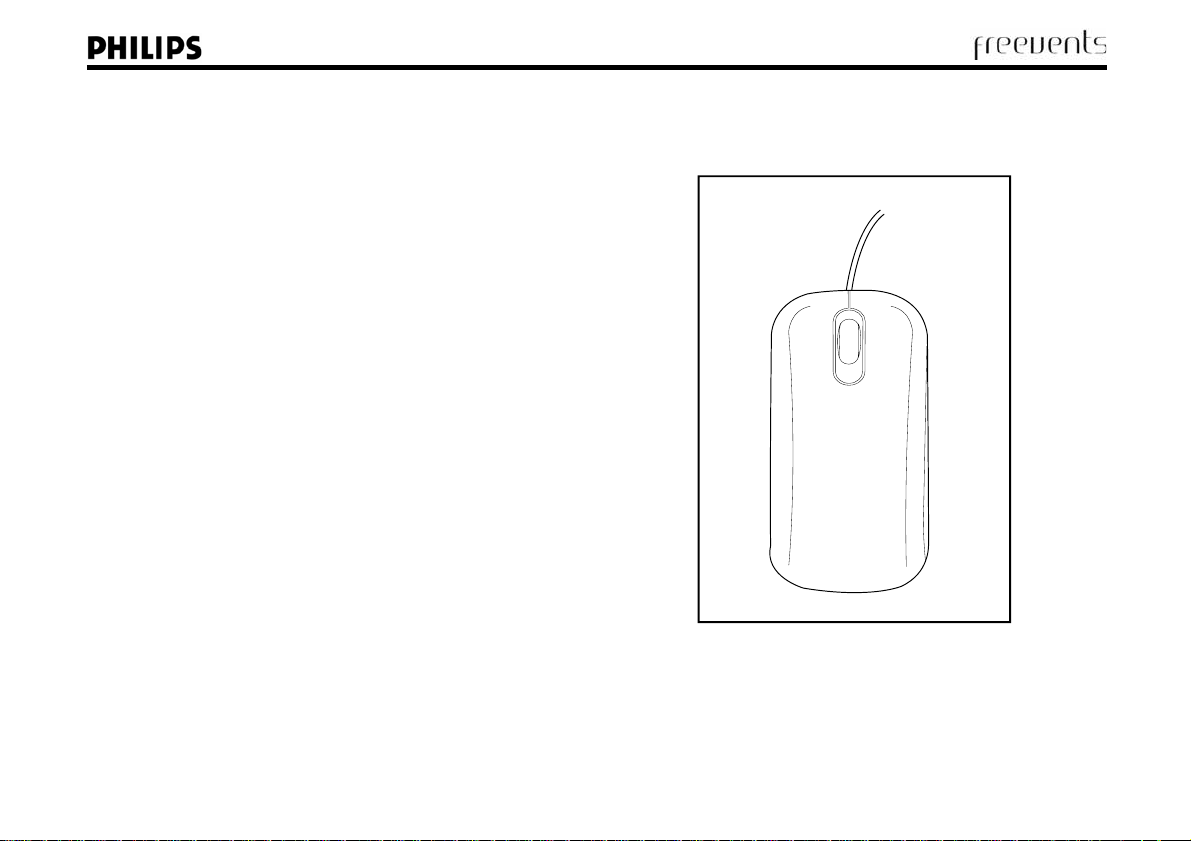
The Mouse
Use the mouse to control the arrow or cursor on your computer’s screen.
The mouse has 3 main controls that you can use, these are explained
below.
Mouse controls
Left button - this is the button you will use the most. Use a single-click to
select an item, or to insert the cursor at a required point in a text
document. You need to double-click an icon or file to open it.
Right-click - use this button to access ‘context menus’. These menus
contain common functions for the area you click on. For example, when
you right-click the Desktop you can access Display Properties, or create a
shortcut.
Scroll wheel - the scroll wheel changes function depe nd ing on which
program you are using. For example, in Internet Explorer you can use the
scroll wheel to move up and down a web page.
17

CD / DVD drives
Your Philips-Freevents™ computer is supplied with the latest in CD and DVD drive technology. Depending on the model you purchased you have
access to the following drives:
• CD ROM / CD R/RW - these drives allow you to use data and audio CDs with your computer. You can also record files and movies using
recordable or re-recordable CD discs.
• DVD - ROM / DVD R/RW - these drives have all t he func tions of a CD ROM / CD R/RW drive in addition to reading DVD discs. You can also
record files and movies to recordable and re-recordable DVD discs on compatible drives.
Recordable media
Recordable CD and DVD discs come in a variety of formats. You should check that your drive can support the discs you intend to use before you buy
them.
CD media
You can buy CD discs in the following formats:
• CDR - you can record data only once to these discs.
• CDRW - you can record and delete files up to 1000 times on these
discs.
18
DVD media
You can buy DVD discs in the following formats:
• DVD + R / DVD + RW - these discs use the +R format and come in
record once or re-recordable discs.
• DVD - R / DVD RW - these discs use the -R format and come in
record once or re-recordable discs.
• DVD RAM - prem ium standard ideally suited for data backup and TV
recording.
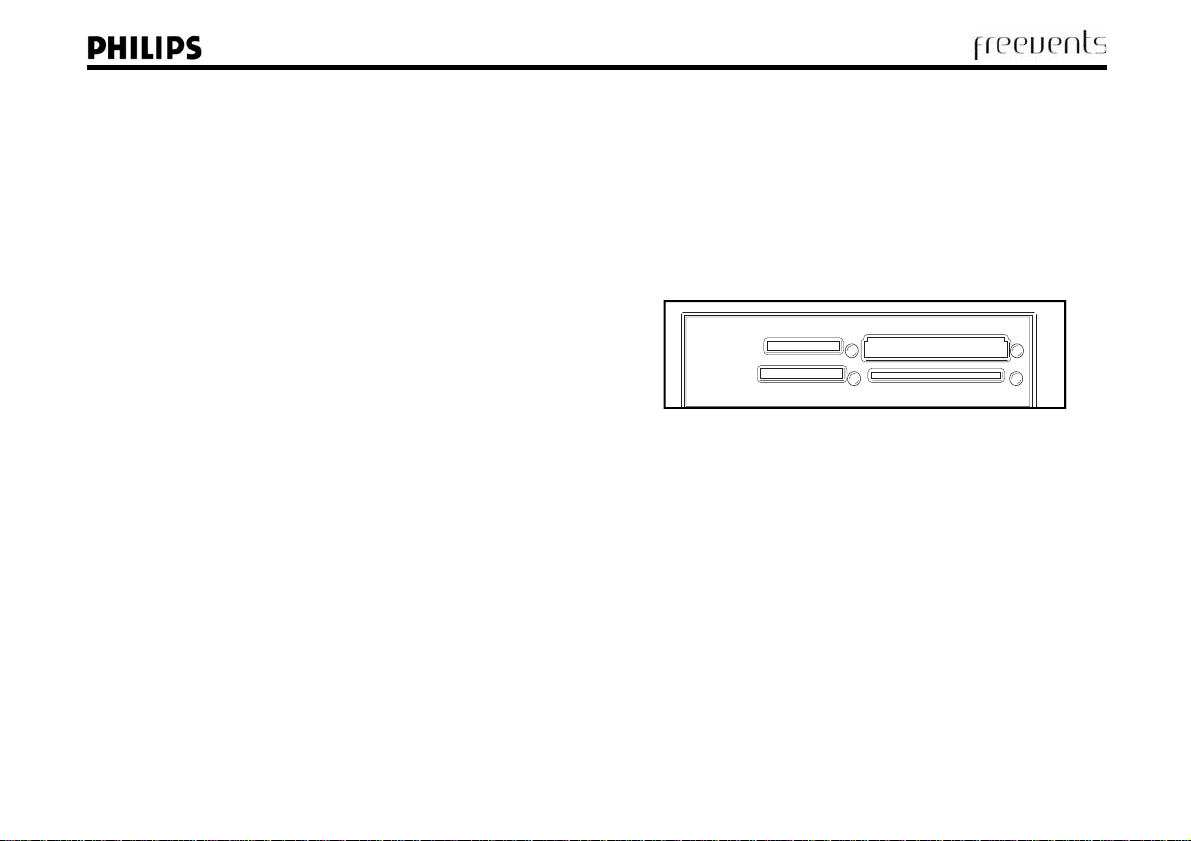
Memory card readers
Memory card readers are a relatively new addition to the home computer.
They are an ideal replacement for the humble floppy disk drive because the
cards are small, light and have a large storage capacity.
There are a number of different memory card formats but they all work in a
similar way. The use of memory cards has become popular in a number of
consumer devices including:
• Digital cameras
• PDAs
• Mobile phones
• Handheld games devices
Your Philips-Freevents™ computer is supplied with a built-in card reader that
supports the following cards:
• SD card (Secure Digital)
• MMC (Multimedia card)
• Compact Flash I
• Compact Flash II
• Smart Medi a
• Microdrive
• Memory Stick
• MagicGate Memory Stick
MS
SD/MMC
CF/MD
SM
19
Chapter 2 - Starting your Media Center for the first time
Turning on your Media Center
Once you have set up your computer and connected it to your TV you are
now ready to turn it on. To do this press the power button on the front of
the monitor and the cabinet (Fig. 7).
The computer will now load Microsoft® Windows® XP Med ia Center
Edition. Before you can start to use Windows® XP you will need to
complete the first time set up known as the ‘Out of box experience’.
During this process you will be asked to agree to the End User Licence
Agreement, create user accounts, and set up an Internet connection. When
you have completed the set up you are ready to set up Media Center to
work with your TV signal and Internet connection.
We strongly advise that you set up an Internet connection before you
begin the Media Center setup wizard. To gain the best possible
experience a broadband Internet connection is recommended.
20
Fig. 7

What you need to get started…
You can speed up the installation of your new Media Center by carrying out t he foll ow ing:
1. Connecting your Sky Digital box
To use Sky Digital with your Media Center you will need to know the UHF channel number your Sky Box uses. To do this carry out the following:
• Press the Services button, type 401, then press the Select button.
• You will see the Installer Menu. Go to the RF Outlets Menu. You will see the RF Channel number, make a note of this.
2. Setup your Internet connection
The Media Center setup wizard needs to use your Internet connection at various p oints, for example, downloading TV settings and the TV Guide. You
should set up your Internet account before your begin. If you do not have an Intern et account already we have included 2 Internet packages to get you
up and running.
AOL 9
AOL 9 allows you to connect to the Internet using a modem and telep hone l in e. For a monthly subscription you will receive email, special content and
Internet access without having to pay for the phone calls to the Internet.
Wanadoo Broadband
If you want to use Media Center to its fullest you will need a broadband Internet connection. Wanadoo Broadband software has been included with
your Media Center PC to get you started. In order to use broadband you will need a broadband modem and your telephone line will need to be
tested for availability. Wanadoo, or your chosen Internet Provider will carry out these checks for you.
3. Media Center Setup Wizard
When you are ready press the Start button on your remote control to start the Media Center Setup Wizard.
21
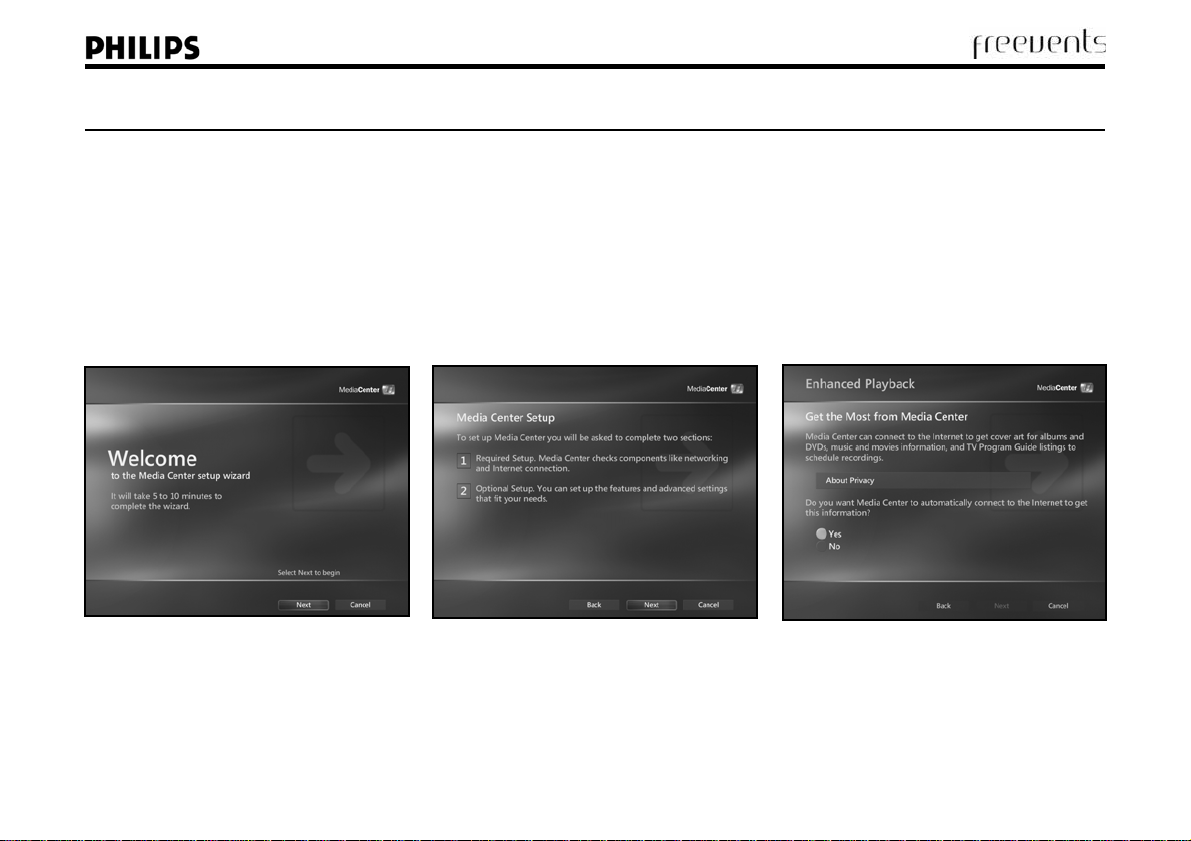
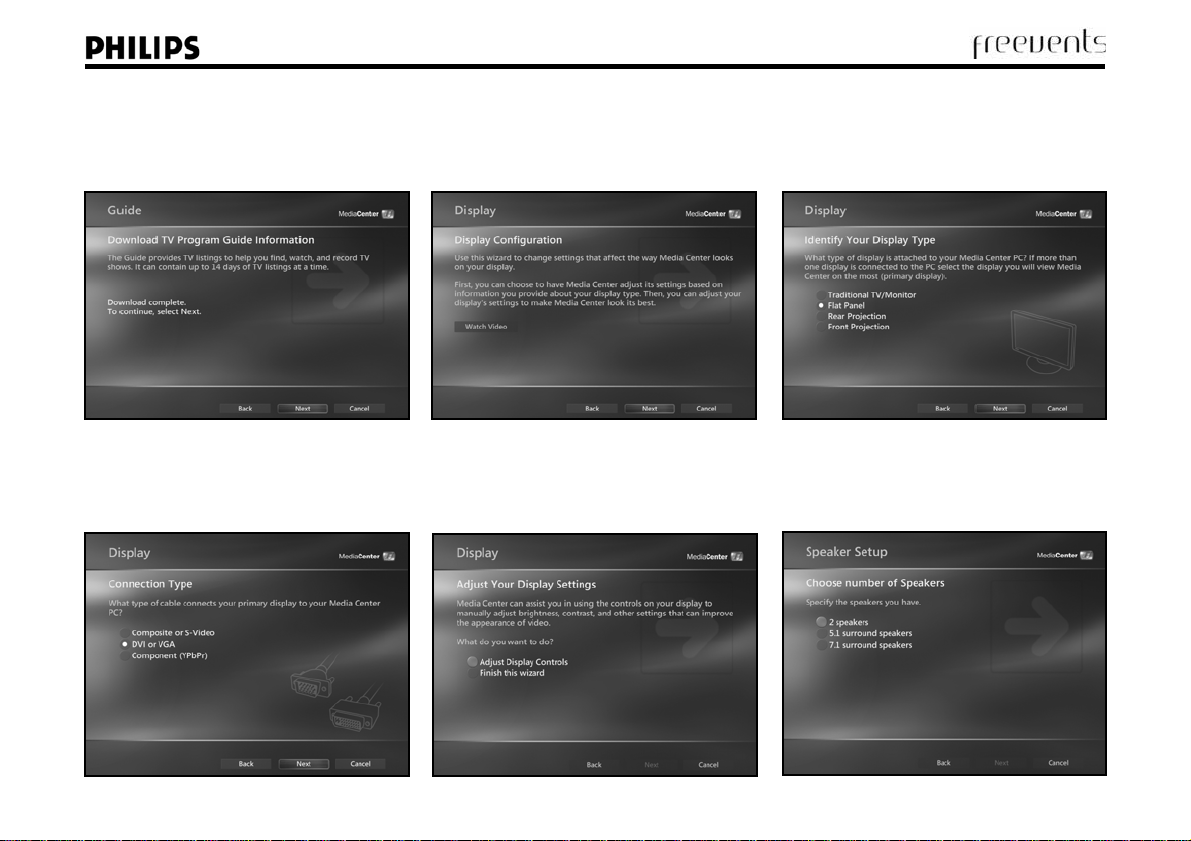
Media Center Setup Wizard
1. You will see the Welcome screen which
explains a little about the Wizard.
Click Next to continue.
2. There are 2 sections to complete during
the Setup Wizard:
• Required Setup
• Optional Setup
Click Next to continue.
3. Next, you will see the Media Center Privacy
Policy. You must agree to this in order to use
the TV Guide and album art / artist
information functions of Media Center.
Select Yes and then click Next to continue.
22

4. Next you are asked if you have an
“Always on” Internet connection. If you have
broadband select Yes then click Next.
5. Media Center will now test your Internet
connection. Click the Test button. If a
connection is successfully detected you will be
able to click Next to continue.
Optional setup
7. Now that you have completed the required
components of Media Center you can proceed to the
Optional Components. These include:
• Setup your TV
• Optimise your display
• Configure your speakers
Start by selecting the TV option and click Next.
6. You have now completed the required
setup components of Media Center.
Click Next to continue.
23
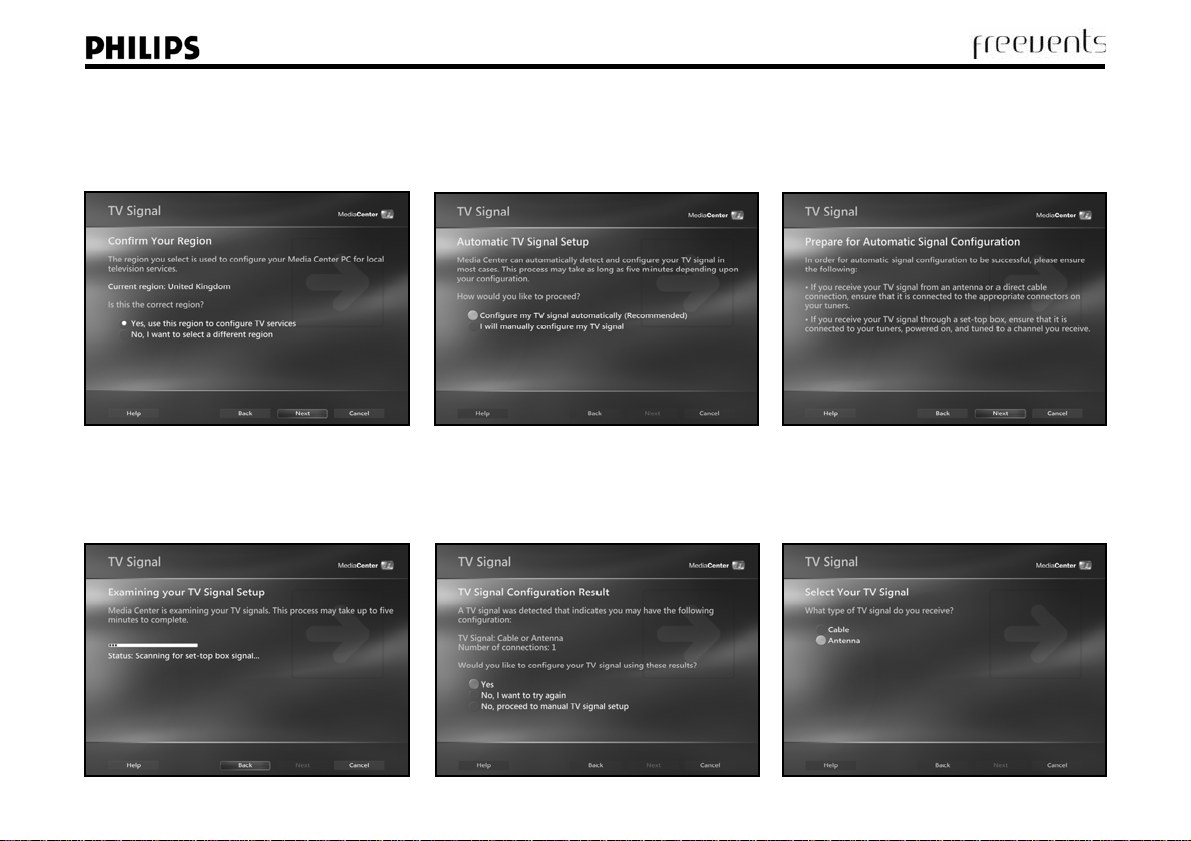
8. The first step is to confirm your region, for
example, United Kingdom. If this is correctly
identified click Yes. Now click Next to
continue.
9. Media Center can configure your TV signal
automatically. Click Configure my TV signal
automatically (recommended) and then click
Next.
10. You will see a message explaining what
to do next. Read this and click Next to
continue.
11. The Wizard will now scan for a TV
signal. You will see a green progress bar on
the screen.
24
12. A signal should be detected. Click Yes
then Next to continue. If a signal is not
detected choose the Manual setup option
and click Next.
13. Next you will be asked to select what
type of TV signal you are using. In the screen
below we chose Antenna for normal
terrestrial TV. Click Next to continue.
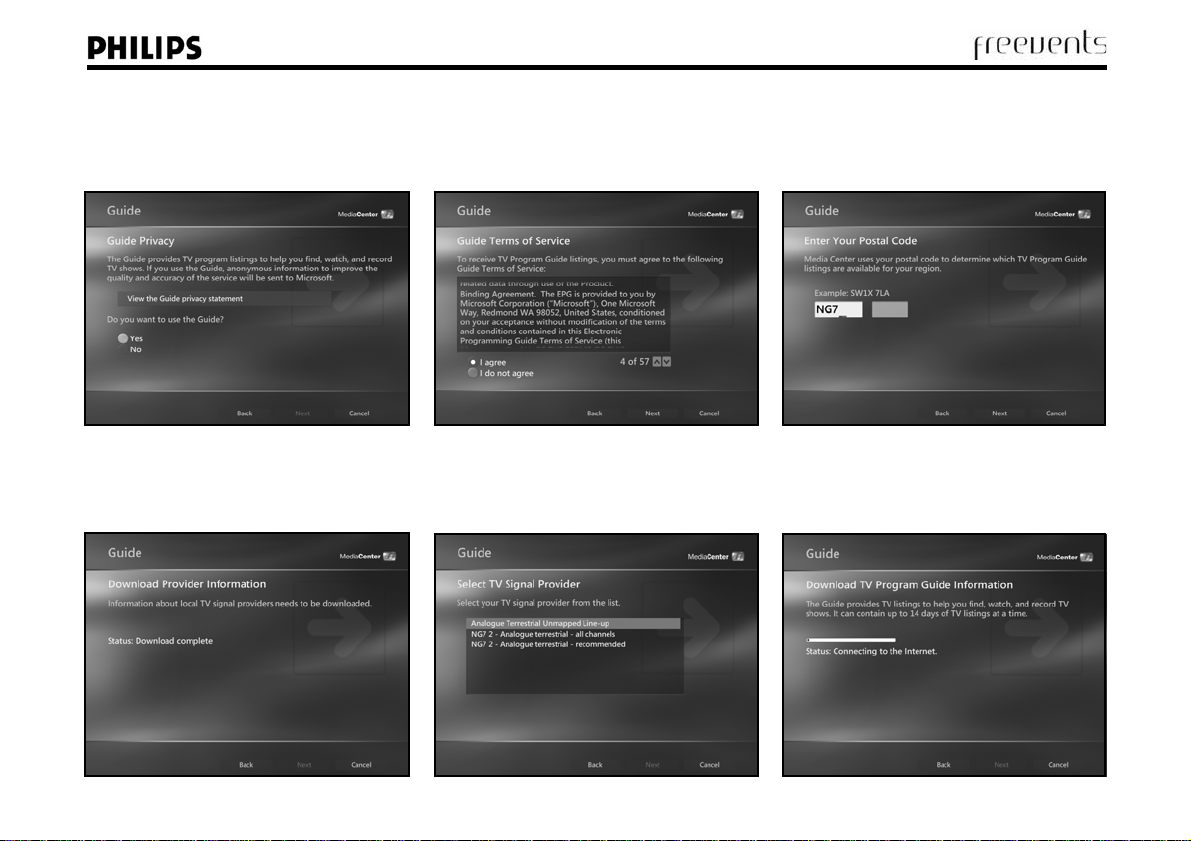
14. Media Center now needs to setup the
correct TV Guide. First you must agree to the
Privacy Statement by selecting Yes, then
Next.
15. Agree to the Guide Terms of Service
and click Next.
16. Enter your postcode so that Media
Center can download the correct Guide and
TV settings. Then click Next to continue.
17. Local TV settings are now downloaded
from the Internet. This may take a few
minutes. You will see a green progress bar.
Click Next when this is done.
18. A list of providers is displayed for your
area. Choose the appropriate entry then click
Next to continue.
19. Now the TV Guide is downloaded from
the Internet. This can take up to 5 minutes if
you use dial-up Internet.
25
20. When the Guide has been successfully
downloaded you will see a message on the
screen. Click Next to continue.
21. Next choose to Optimise your display
and click Next. You will see the Display
Configuration screen. Watch the short video
then click Next.
22. First, choose your display type from the
list and click Next.
23. Now choose the type of connection you
are using. Make your selection from the list and
click Next to continue. (Composite / S-Video
for TV. DVI / VGA for computer screen)
26
24. Now choose Adjust Display Controls
to configure contrast, brightness, colour,
aspect ratio and position. Click Next to
continue and make any adjustments.
25. Now choose the Speaker Setup option
and click Next. Choose what type of speakers
you are using and click Next.
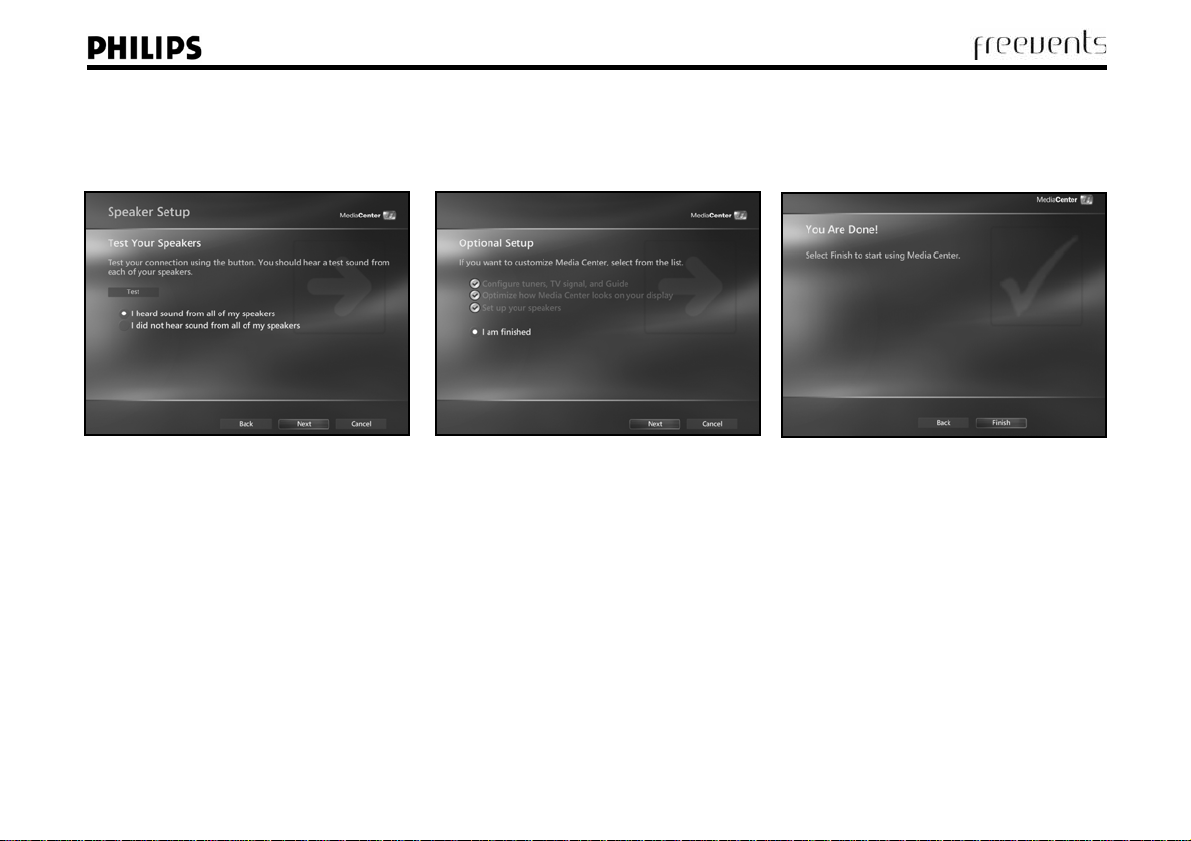
26. Click the Test button to check that
sound comes from each speaker. Choose “I
heard sound…” and click Next.
Congratulations! You have now successfully configured your new Philips-Freevents™ Media Center. The rest of this manual will help you to
explore the wide range of features that are available to you.
27. Now select ‘I am finished’ from the
menu and click Next.
28. Click Finish to complete the Wizard.
27
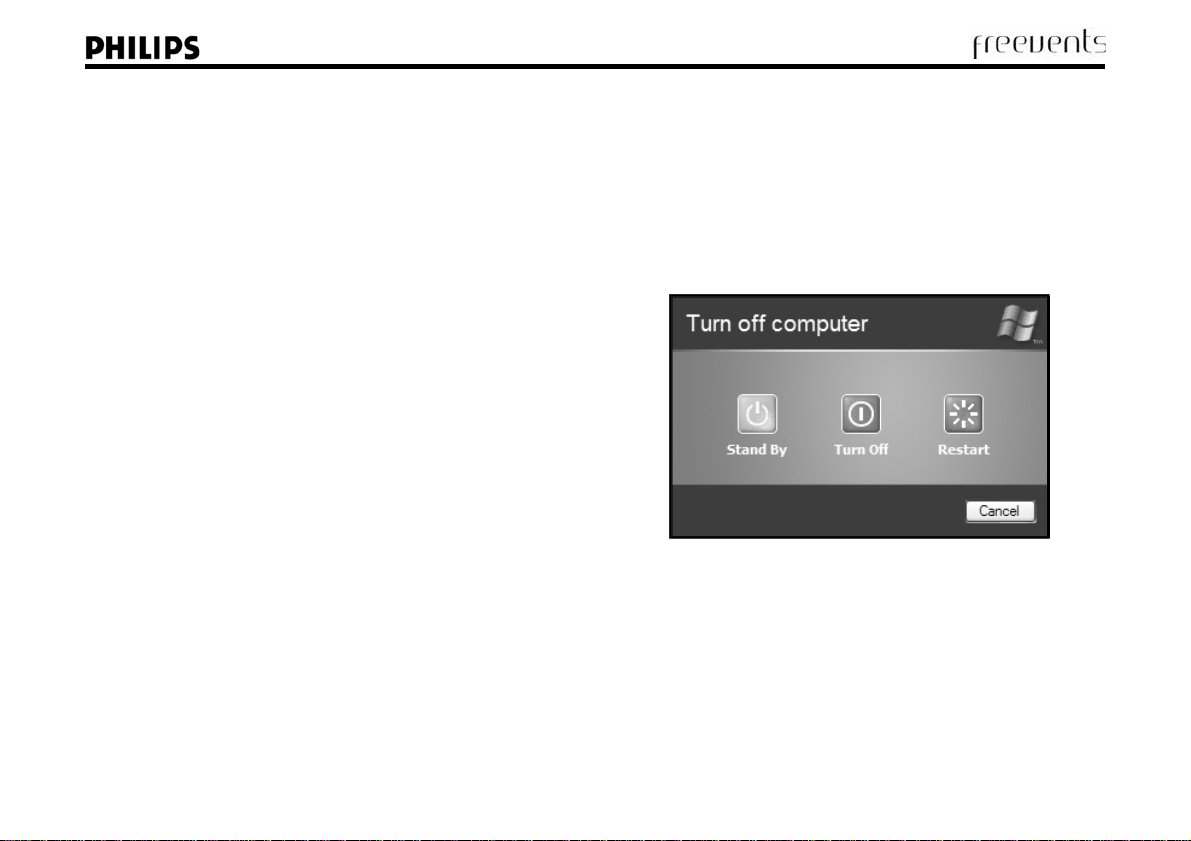
Turning off your Media Center
When you have finished with your computer you need to turn it off correctly. This will help keep your computer running smoothly. To turn off your
computer click Start then Turn off. Alternatively you can press the power button on your remote control and choose from the options. You will see
a series of options on the screen (Fig. 8).
Note: if you are using Media Center to record TV your should not turn of your computer.
• Shut down – this option will close Windows XP and turn off power to your
computer.
• Standby – your computer enters a power saving sleep mode. You can return
to work by moving the mouse, pressing a key on your keyboard, or pressing
the power button on the cabinet.
• Hibernate – if you choose this option Windows will take a snap shot of your
current work and save it to memory, then it will turn off. When you next
turn on your computer you will be returned to this saved condition.
• Restart – click this option to close Windows and restart your computer. This
is handy if you need to reset your computer when a crash occurs, or your
computer is running slowly.
Tip
To access the Hibernate option you need to hold the mouse pointer over the
Stand By button. Press and hold the Shift key on your keyboard and the
option will change to Hibernate.
Fig. 8
28

Chapter 3 - Getting around Media Center
Imagine the power to control all of your home entertainment from a single remote control
and without the need to buy a separate video recorder, DVD player and hi-fi system. With
your new Philips-Freevents™ Media Center PC you can do more than just imagine.
Your Philips-Freevents™ Media Center PC features the brand new Windows XP Media
Center Edition which allows you to view home mov ie s , watch TV, listen to radio, view your
digital photos with a single remote control. Just see what you can do.
• Watch and record your favourite television channels withou t the
need for a video recorder
• Pause and rewind live TV so that you have full control of your
viewing
• Organise your TV schedule with a powerful, free TV Guide
• Manage your digital photos and store them in a central location
• Spruce up your holiday photos with music and slide shows
Welcome to the future of digital entertainment in your home with the Philips-Freevents™ Media Center PC.
* Surround sound speakers are optional and can be purchased separately.
• Edit your home movies with Movie Maker 2 then watch them with
your family and friends
• Enjoy the latest DVD movies with cinema quality surround sound*
• Listen, pause and rewind live radio broadcasts
• Enjoy your digital music and audio CDs with track information, alb um
art and playlists
• View specialised web sites through your TV and enjoy games, news,
shopping and more
29
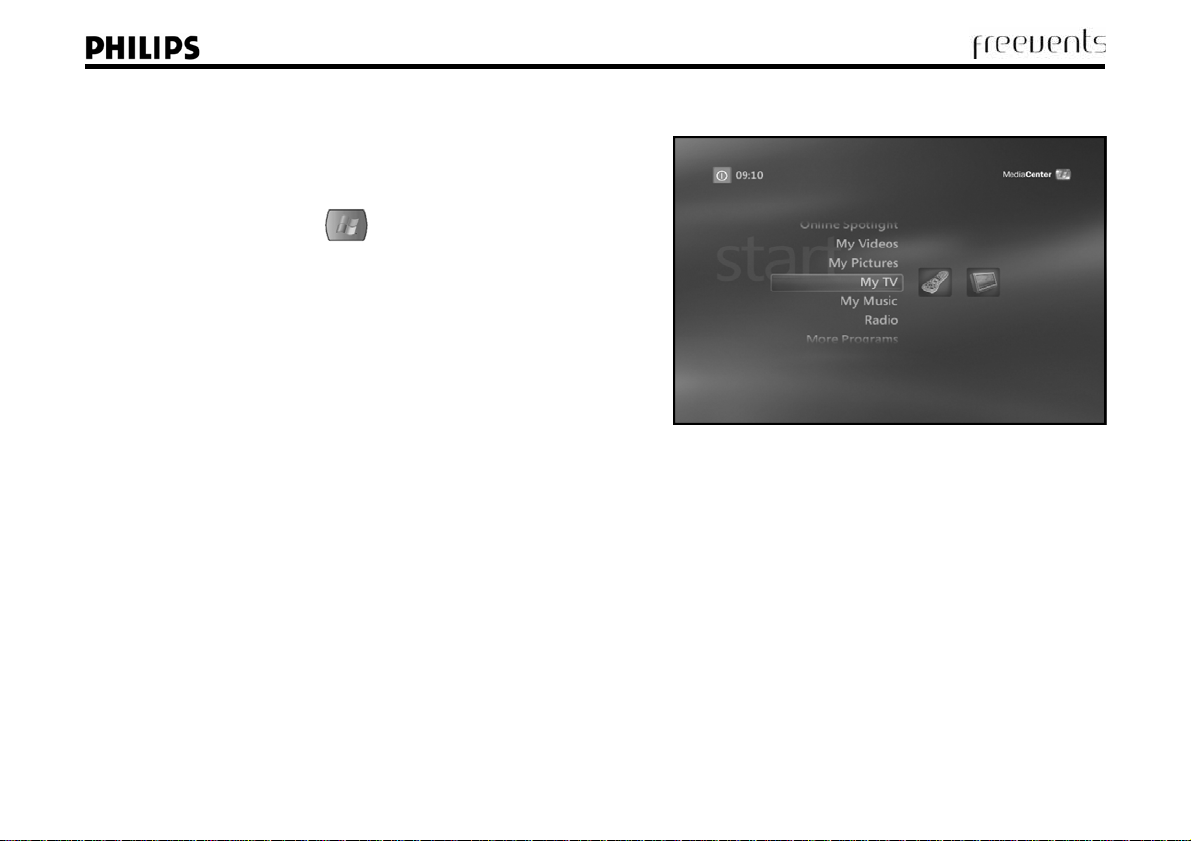
Starting Media Center
To start using Media Center you need to do one of the following:
• Press the green Start button
Or,
• Click Start > Media Center with your mouse from the Windows
Desktop.
Media Center will now load to the Start screen (Fig. 9). Use the remote
control or your mouse to move around the menus. Press the OK button on
your remote, or use the left mouse button to access menus and options on
the screen.
The Start screen is the launch pad from which you can access the different areas of Media Centre. You can return to the Start screen at any time by
pressing the Start button on your remote. The standard options include:
on your remote control
Fig. 9
• My TV - access TV functions and recordings
• My Music - access music functions
• My Pictures - access your digital photos
• My Videos - access your home movies and other video files
* Radio function may not be available on all models.
30
• Play DVD - watch DVD movies
• Radio - listen to your favourite radio stations*
• Online Spotlight - access websites created especially for Media Center
users
• Settings - change settings for Media Center to suit your requirements.
 Loading...