Philips FC9309 User Manual

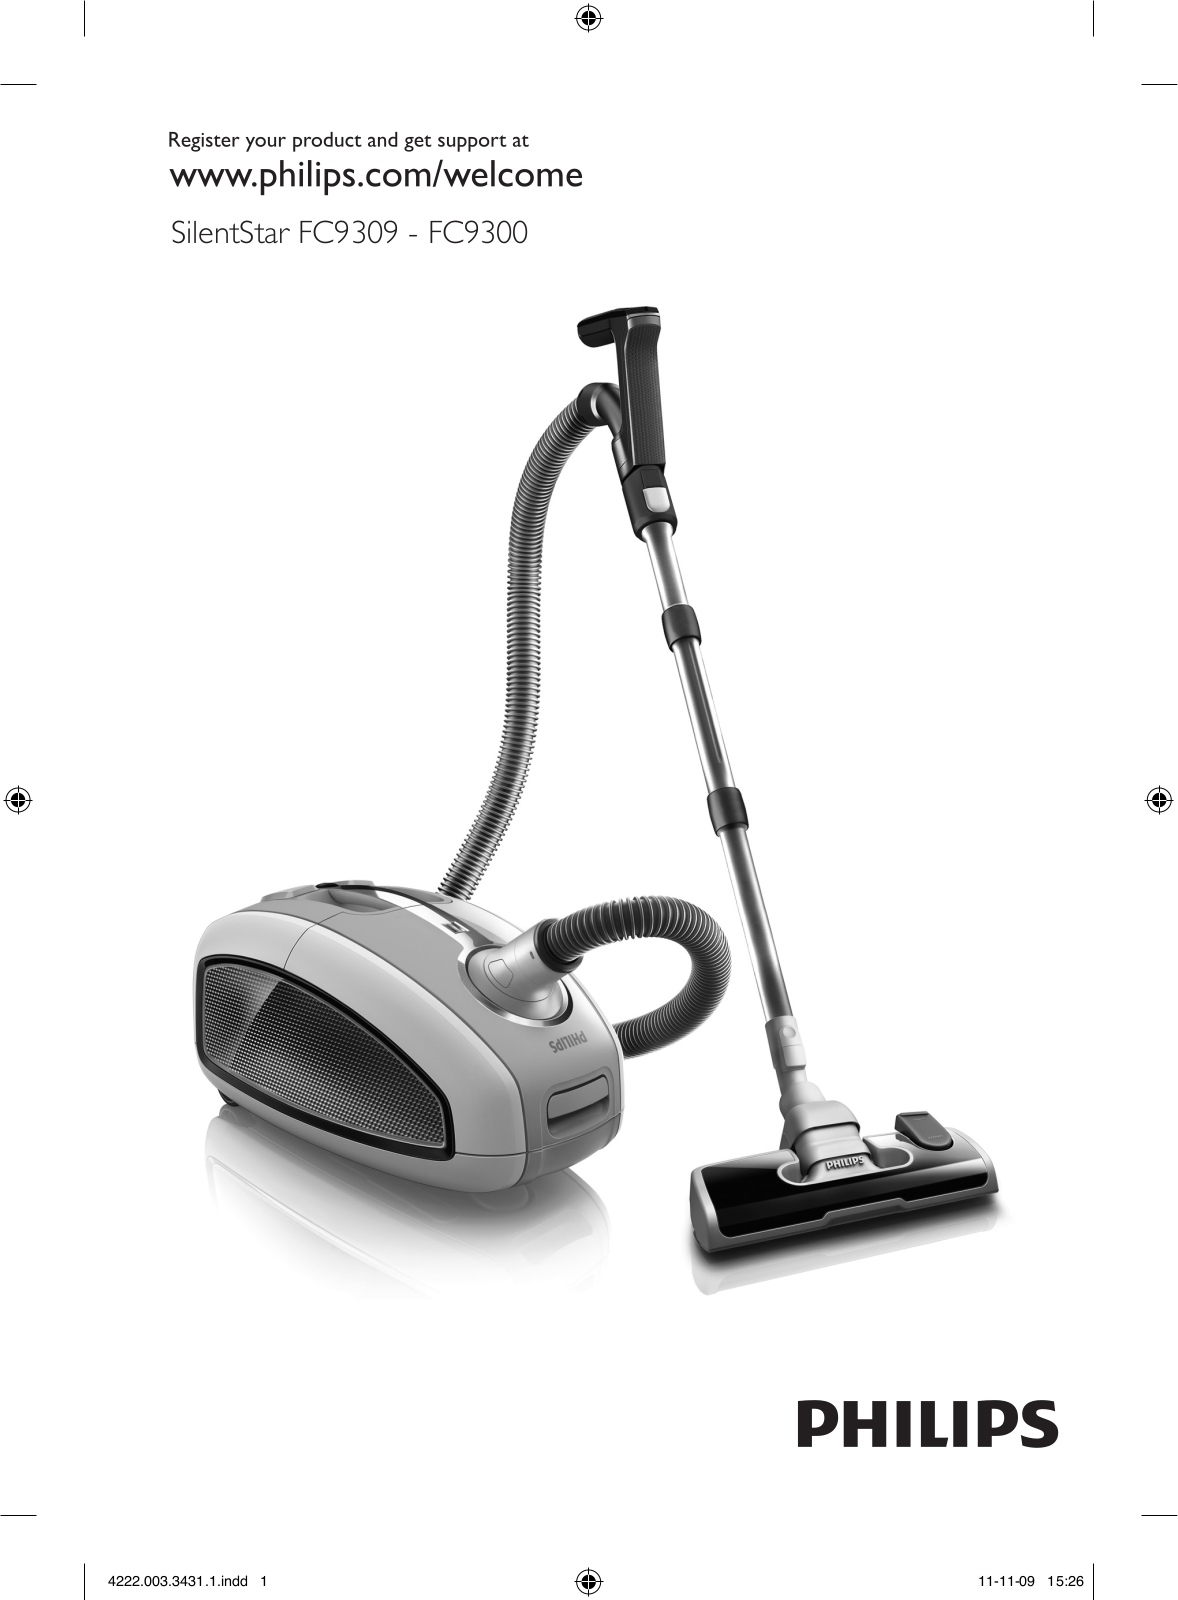
SilentStar FC9309 - FC9300

4222.003.3431.1.indd 1


11-11-09 15:26


2

4222.003.3431.1.indd 2


11-11-09 15:26


Philips FC9309 User Manual

3


7

1


9


2


1

3


8


10


12


4


11


5


6


22

23


13


19


24


14

20


21

26

25


27

28


15

18

29


17


16


30


36


31


37


32


38


33


39


34


40


35


4222.003.3431.1.indd

3


11-11-09

15:26

4

4222.003.3431.1.indd 4


11-11-09 15:26


English 6

Español 23 Indonesia 40

57

Bahasa Melayu 75

Português 93

111

TiếngViệt 127

144

160

SilentStar FC9309 - FC9300

4222.003.3431.1.indd 5


11-11-09 15:26


6 English

Introduction

Congratulations on your purchase and welcome to Philips!To fully benefit from the support that Philips offers, register your product at www.philips. com/welcome.

This vacuum cleaner’s extremely efficient motor produces less noise than other types and yields a high performance at a low power consumption.

General description (Fig. 1)

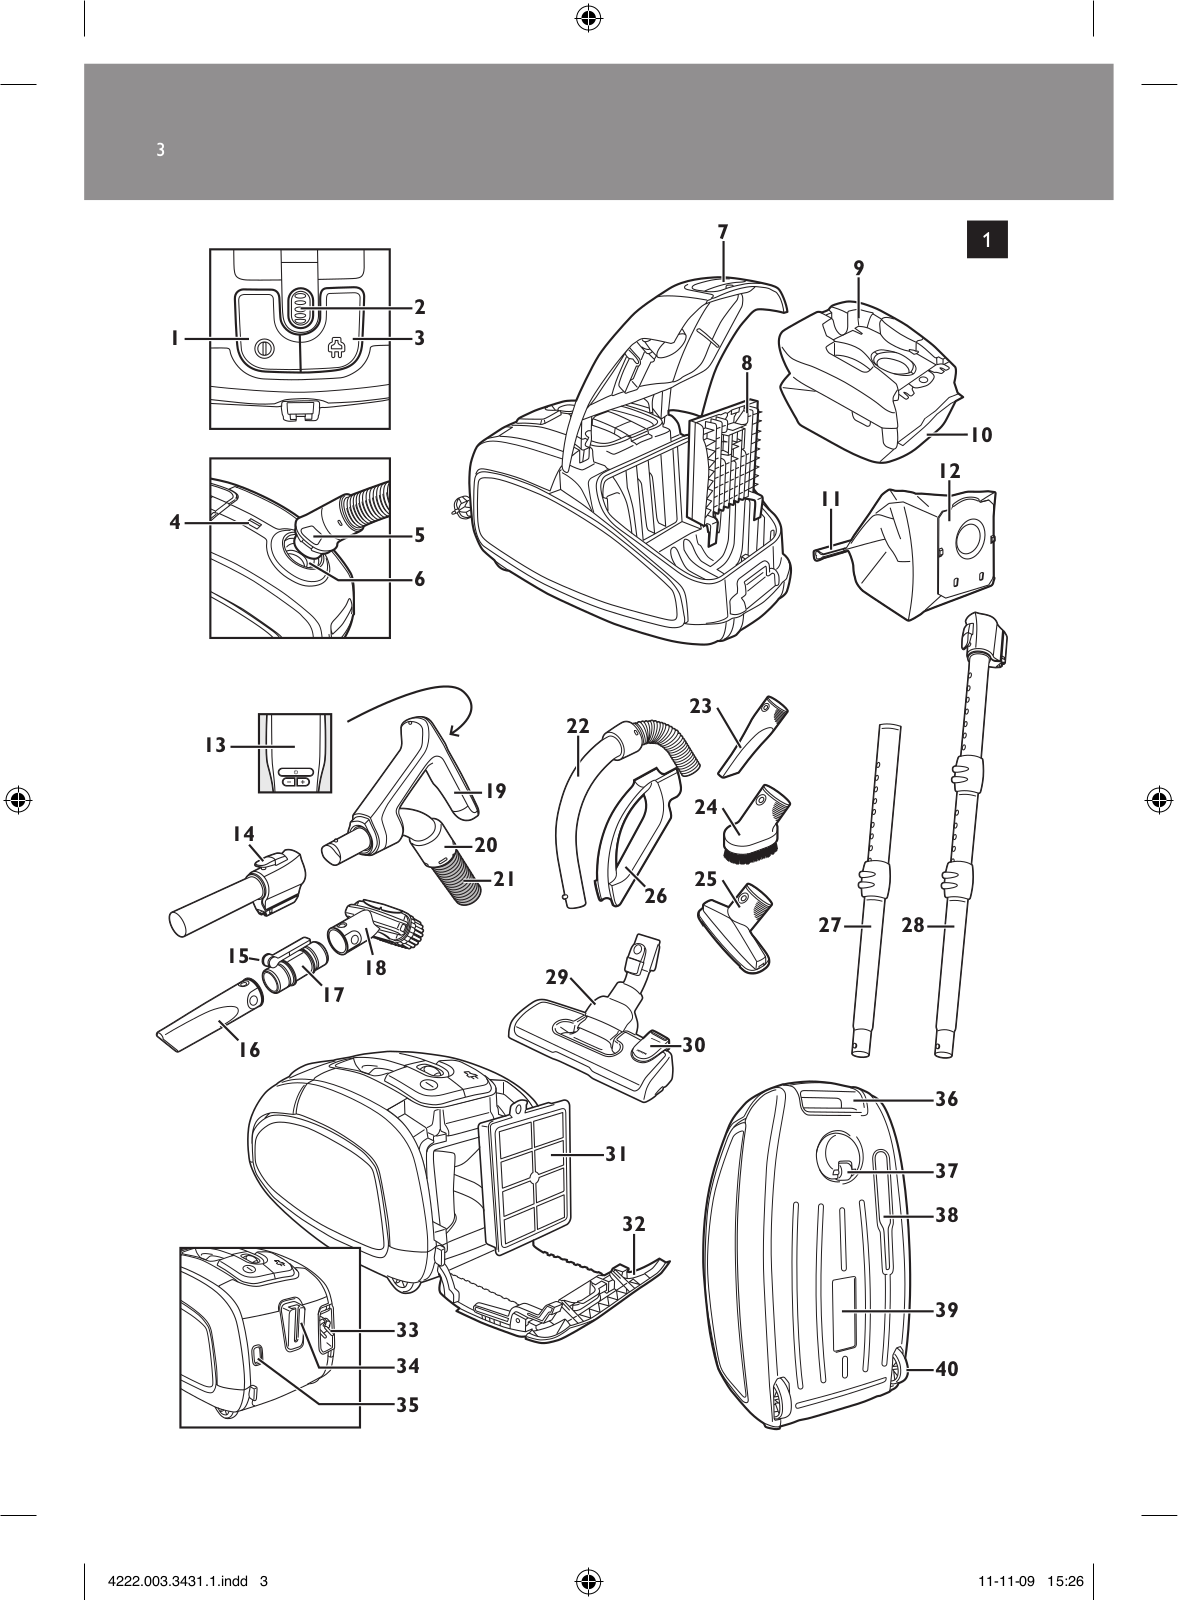
1On/off button

2Suction power selection wheel (specific types only) or infrared receiver (specific types only)

3Cord rewind button

4Dustbag-full indicator

5Hose release buttons

6Hose connection opening

7Cover release tab

8Motor protection filter holder

9Dustbag holder

10Dustbag

11Removable strip (specific types only)

12Reusable dustbag (specific types only)

13Infrared remote control (specific types only)

14Tube release button

15Accessory holder release levers (specific types only)

16Crevice tool (specific types only)

17Accessory holder (specific types only)

18Small nozzle with brush attachment (specific types only)

19Ergonomic ComfortControl handgrip (specific types only)

20Flexible hose connection

21Hose

22Standard handgrip (specific types only)

23Crevice tool (specific types only)

24Small brush (specific types only)

25Small nozzle (specific types only)

26Accessory holder (specific types only)

272-piece telescopic tube (specific types only)

283-piece telescopic tube (specific types only)

29SilentStar nozzle

30Rocker switch for carpet/hard floor settings

31HEPA 13 washable filter

32Filter cover

33Mains plug

34Parking slot

35Release button of filter cover

36Storage grip

37Swivel wheel

38Parking/storage ridge

39Type plate

40Rear wheels 

4222.003.3431.1.indd 6


11-11-09 15:26


English 7

Important

Read this user manual carefully before you use the appliance and save it for future reference.

Danger

-- Never suck up water or any other liquid. Never suck up flammable substances and do not suck up ashes until they are cold.

Warning

-- Check if the voltage indicated on the appliance corresponds to the local mains voltage before you connect the appliance.

-- Do not use the appliance if the plug, the mains cord or the appliance itself is damaged.

-- If the mains cord is damaged, you must have it replaced by Philips, a service centre authorised by Philips or similarly qualified persons in order to avoid a hazard.

-- This appliance is not intended for use by persons (including children) with reduced physical, sensory or mental capabilities, or lack of experience and knowledge, unless they have been given supervision or instruction concerning use of the appliance by a person responsible for their safety.

-- Children should be supervised to ensure that they do not play with the appliance.

-- Do not point the hose, the tube or any other accessory at the eyes or ears nor put it in your mouth when it is connected to the vacuum cleaner and the vacuum cleaner is switched on.

Caution

-- When you use the vacuum cleaner to vacuum ashes, fine sand, lime, cement dust and similar substances, the pores of the dustbag become clogged. As a result, the dustbag-full indicator will indicate that the dustbag is full. Replace the disposable dustbag or empty the reusable dustbag, even if it is not full yet (see chapter ‘Replacing/emptying the dustbag’).

-- Never use the appliance without the motor protection filter.This could damage the motor and shorten the life of the appliance.

-- Only use Philips s-bag ` synthetic dustbags or the reusable dustbag provided (some countries only).

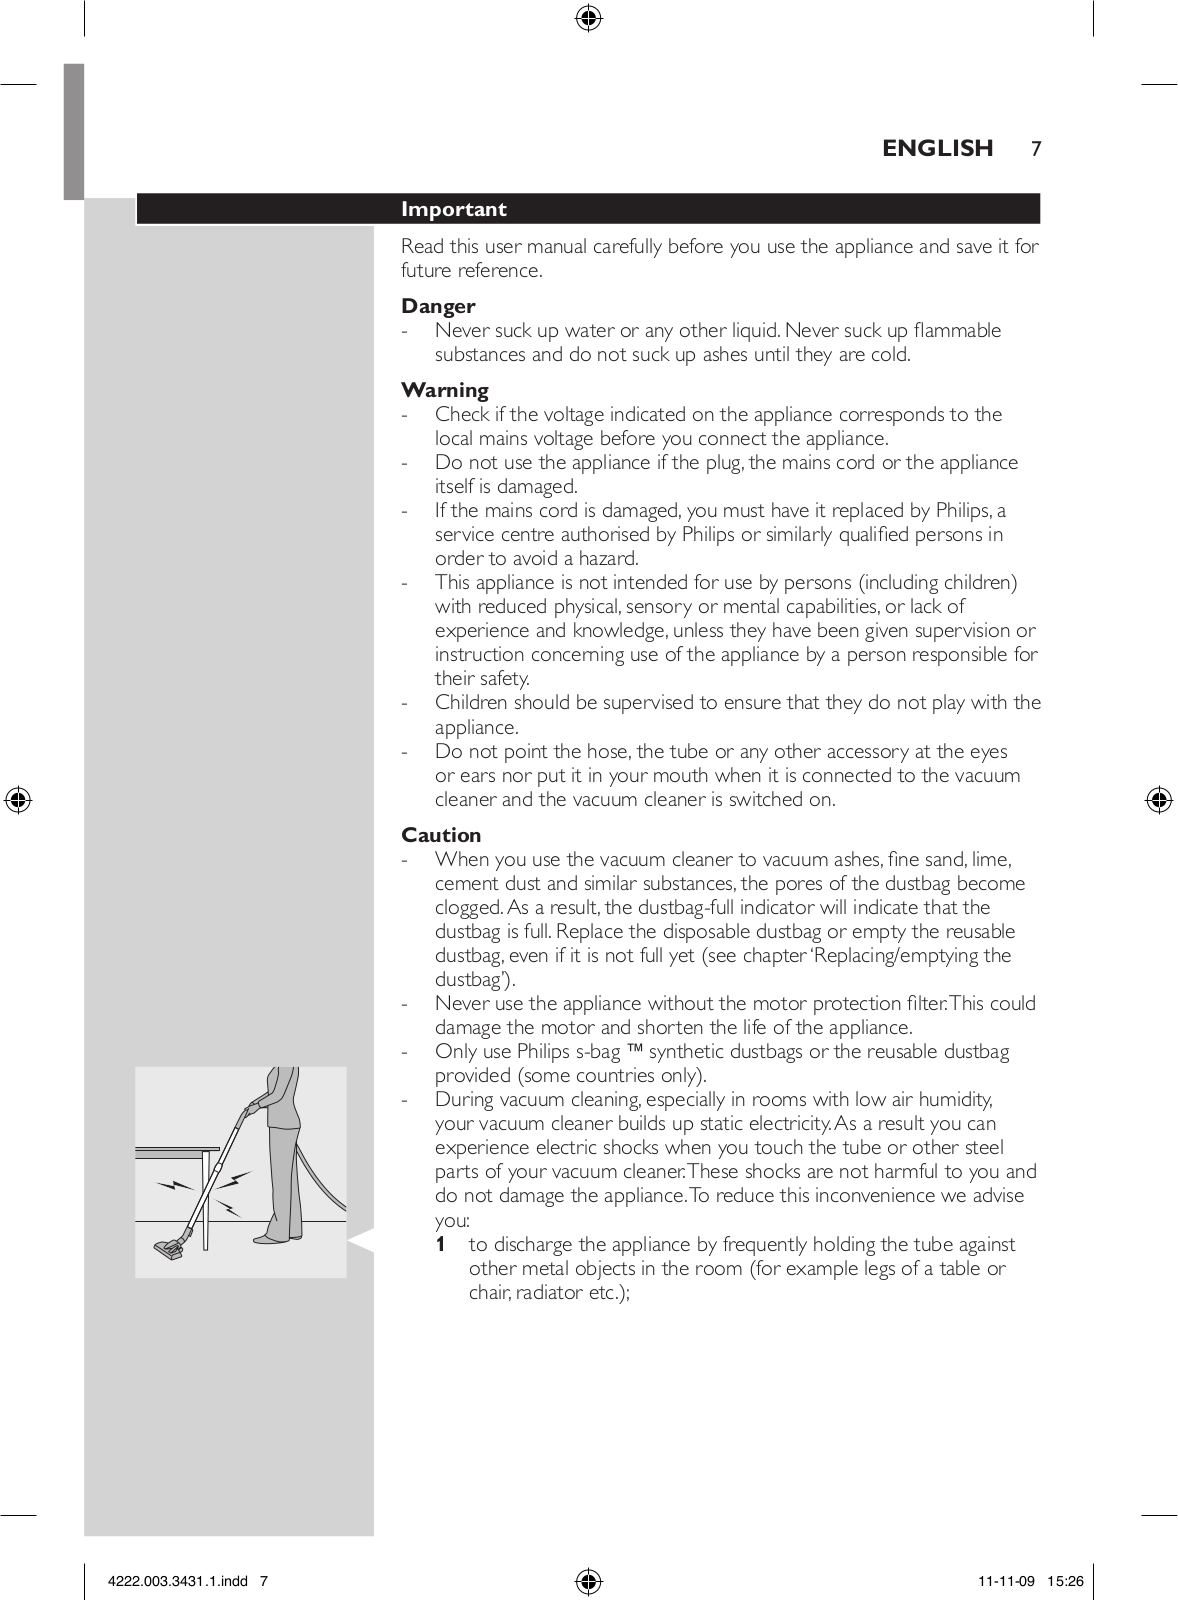
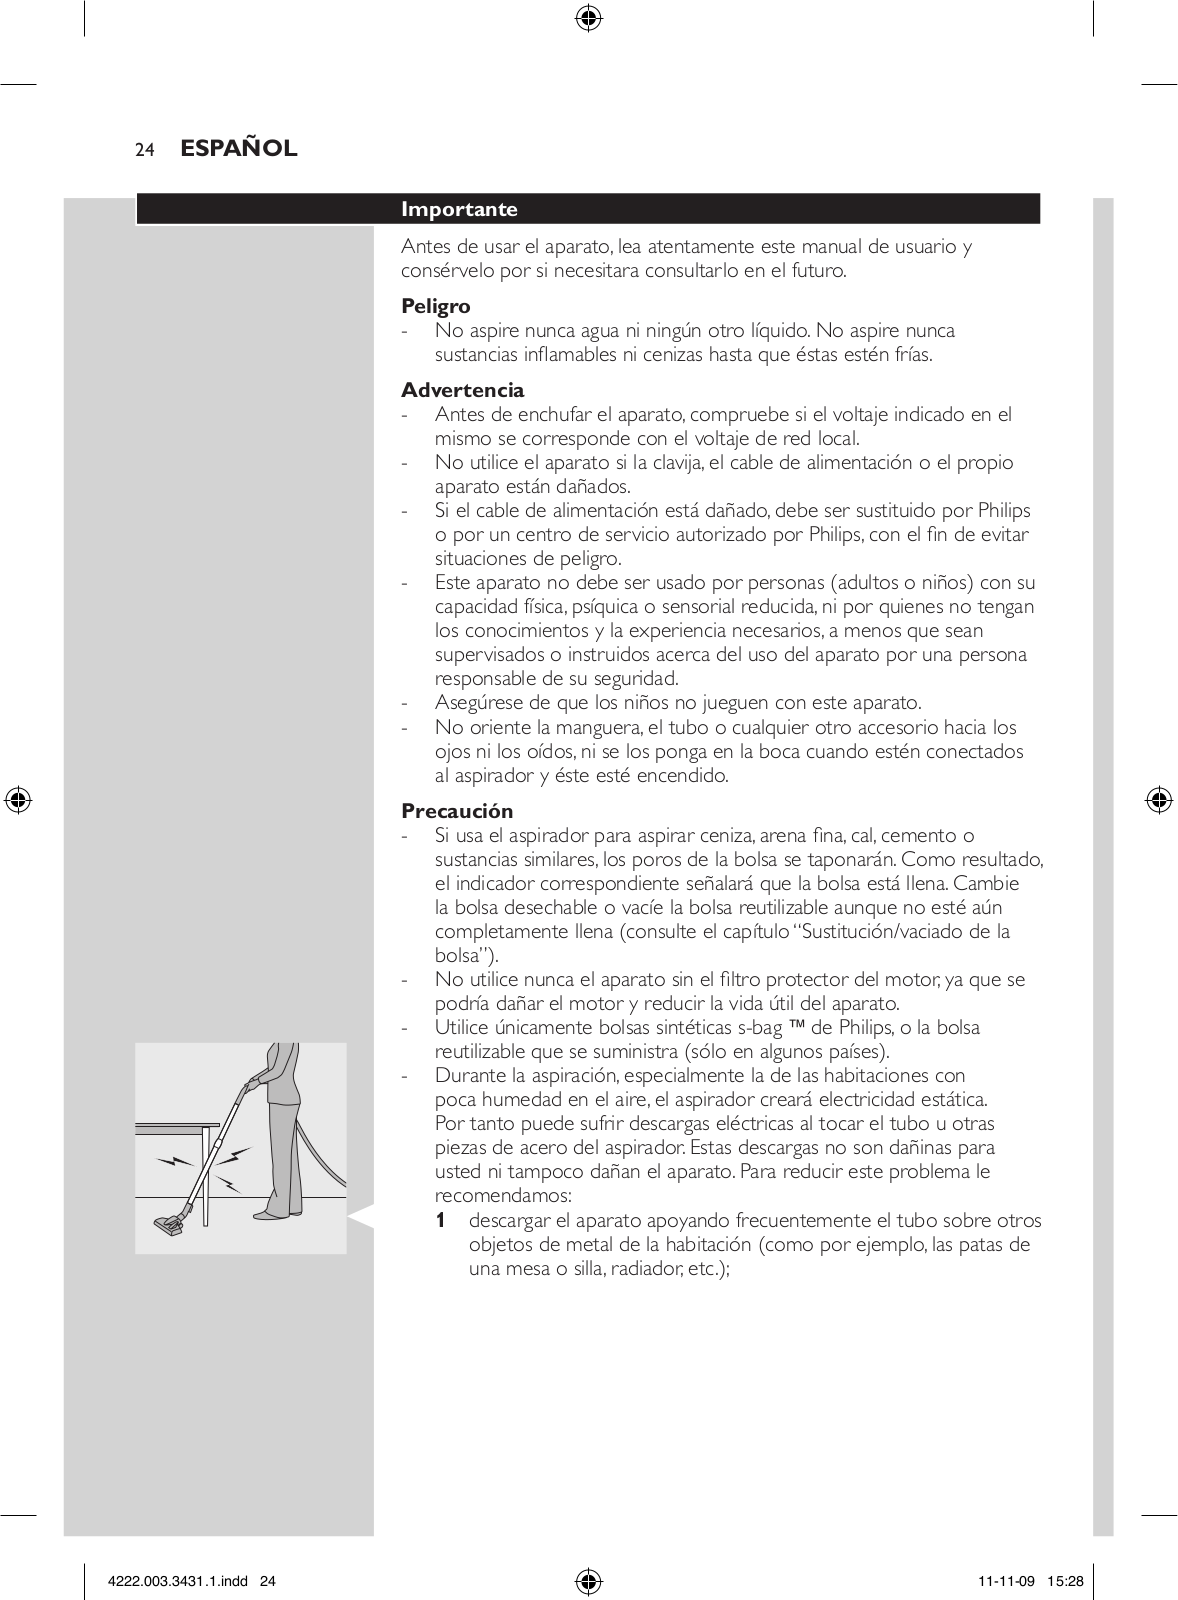
-- During vacuum cleaning, especially in rooms with low air humidity, your vacuum cleaner builds up static electricity. As a result you can experience electric shocks when you touch the tube or other steel parts of your vacuum cleaner.These shocks are not harmful to you and do not damage the appliance.To reduce this inconvenience we advise you:

1to discharge the appliance by frequently holding the tube against other metal objects in the room (for example legs of a table or chair, radiator etc.);

4222.003.3431.1.indd 7


11-11-09 15:26


8 English

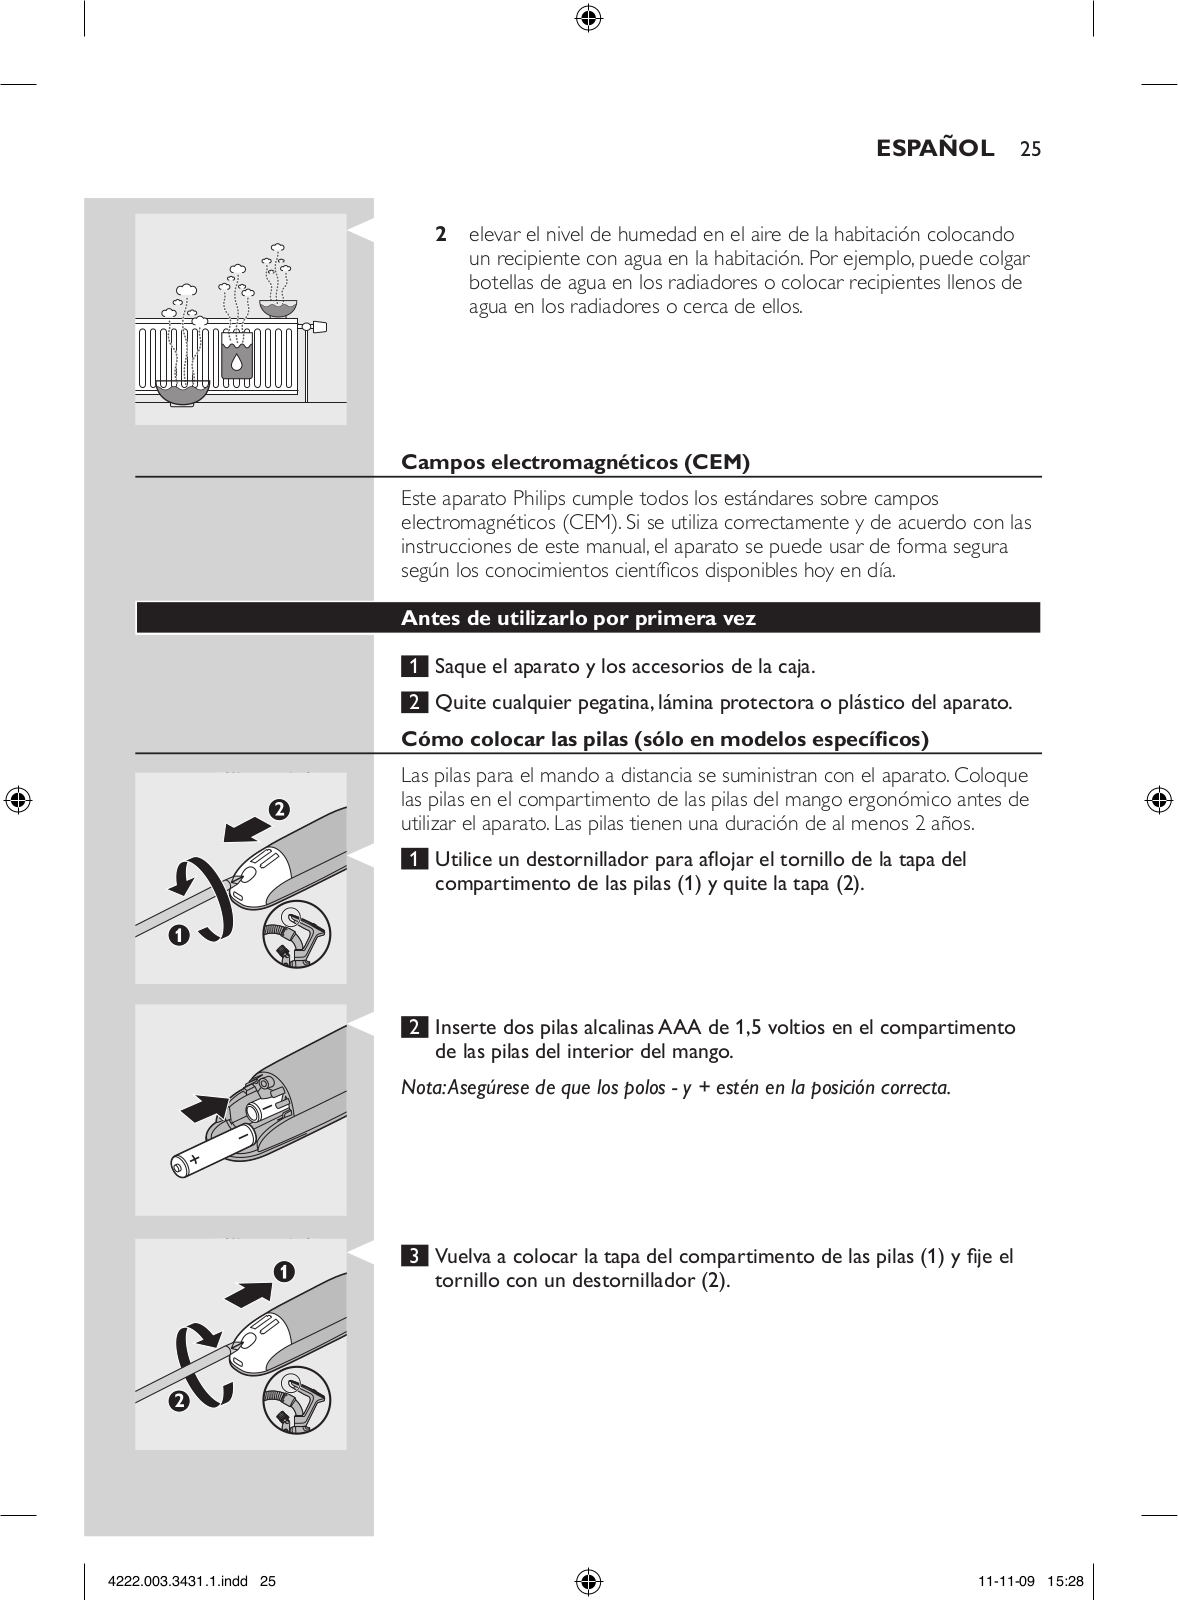
2 to raise the air humidity level in the room by placing water in the room. For example, you can hang containers filled with water from your radiators or place bowls filled with water on or near your radiators.

Electromagnetic fields (EMF)

This Philips appliance complies with all standards regarding electromagnetic fields (EMF). If handled properly and according to the instructions in this user manual, the appliance is safe to use based on scientific evidence available today.

Before first use

1Take the appliance and its accessories out of the box.

2Remove any sticker, protective foil or plastic from the appliance.

Inserting batteries (specific types only)

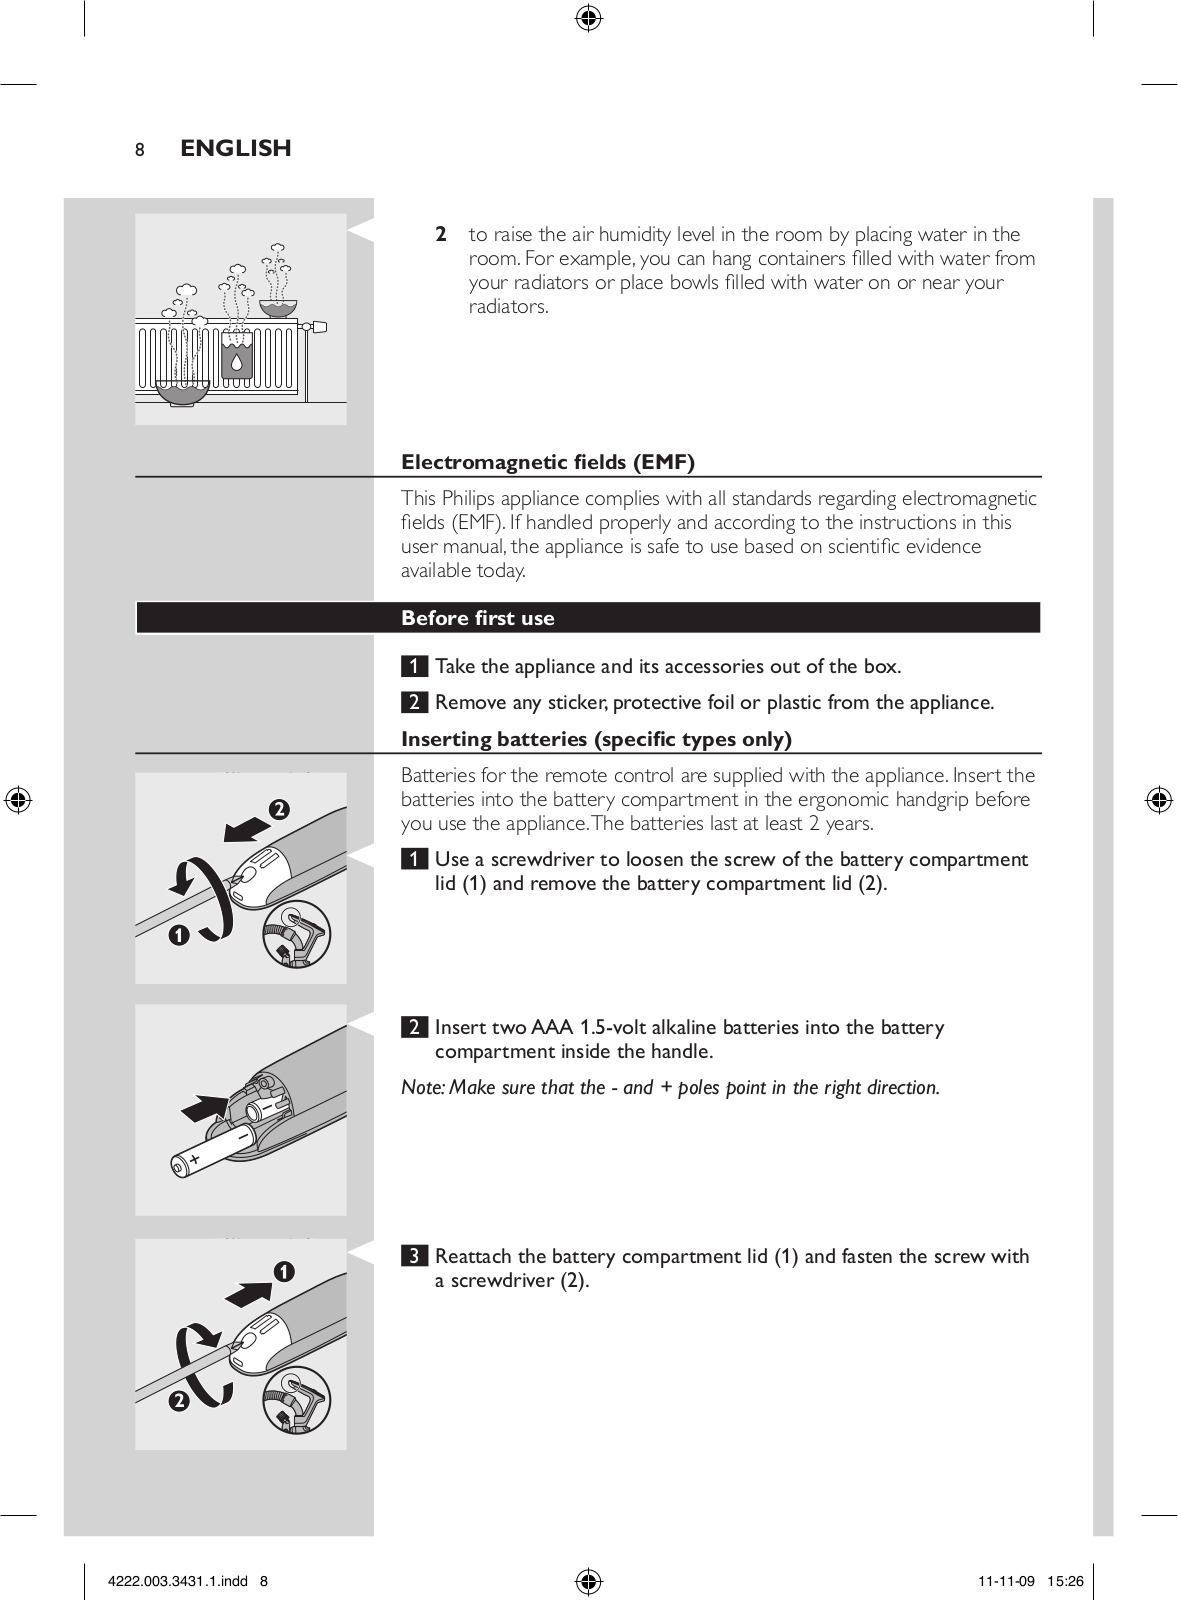
Batteries for the remote control are supplied with the appliance. Insert the batteries into the battery compartment in the ergonomic handgrip before you use the appliance.The batteries last at least 2 years.

1 Use a screwdriver to loosen the screw of the battery compartment lid (1) and remove the battery compartment lid (2).

2Insert two AAA 1.5-volt alkaline batteries into the battery compartment inside the handle.

Note: Make sure that the - and + poles point in the right direction.

3 Reattach the battery compartment lid (1) and fasten the screw with a screwdriver (2).

4222.003.3431.1.indd 8


11-11-09 15:26


English 9

Preparing for use

Ergonomic advice

ComfortControl handgrip (specific types only)

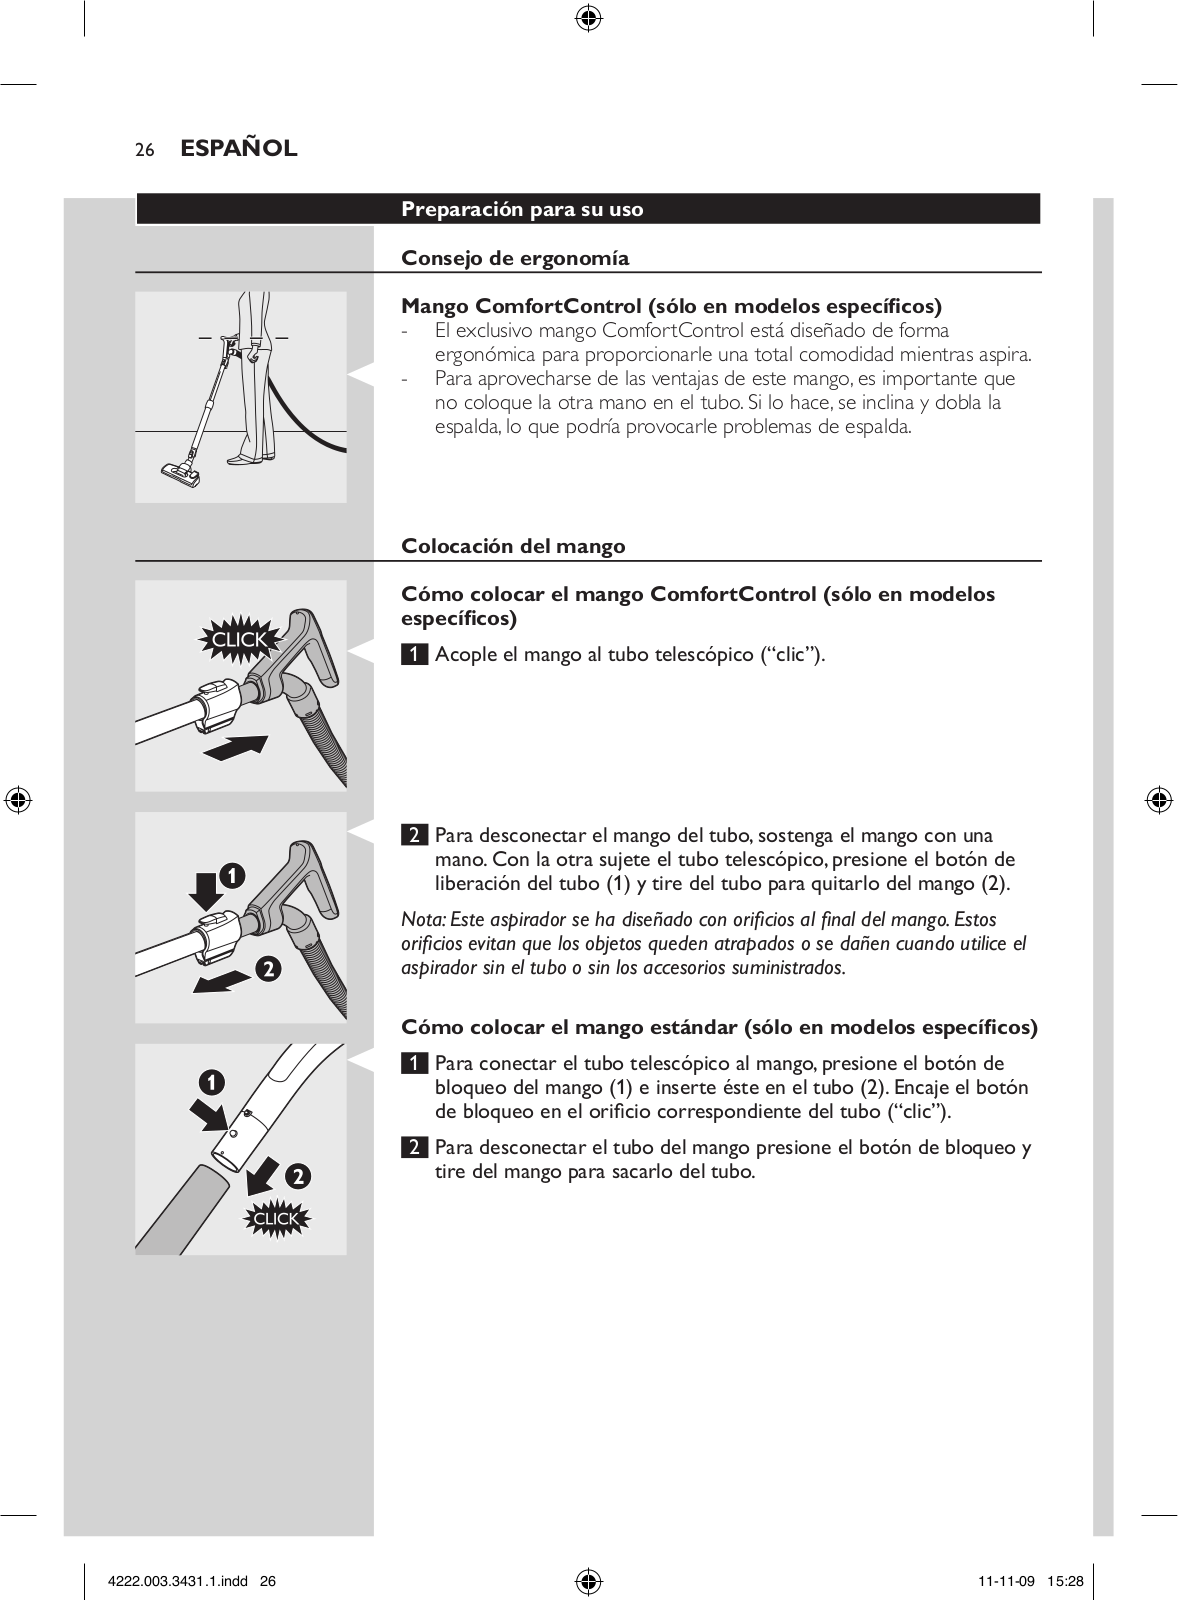
-- The unique ComfortControl handgrip is ergonomically designed to give you sufficient comfort during vacuum cleaning.

-- To gain optimal benefit from this handgrip, it is important that you do not position your second hand on the tube.When you do so, you twist and bend your back, which could result in back problems.

Attaching the handgrip

Attaching the Comfort Control handgrip (specific types only)

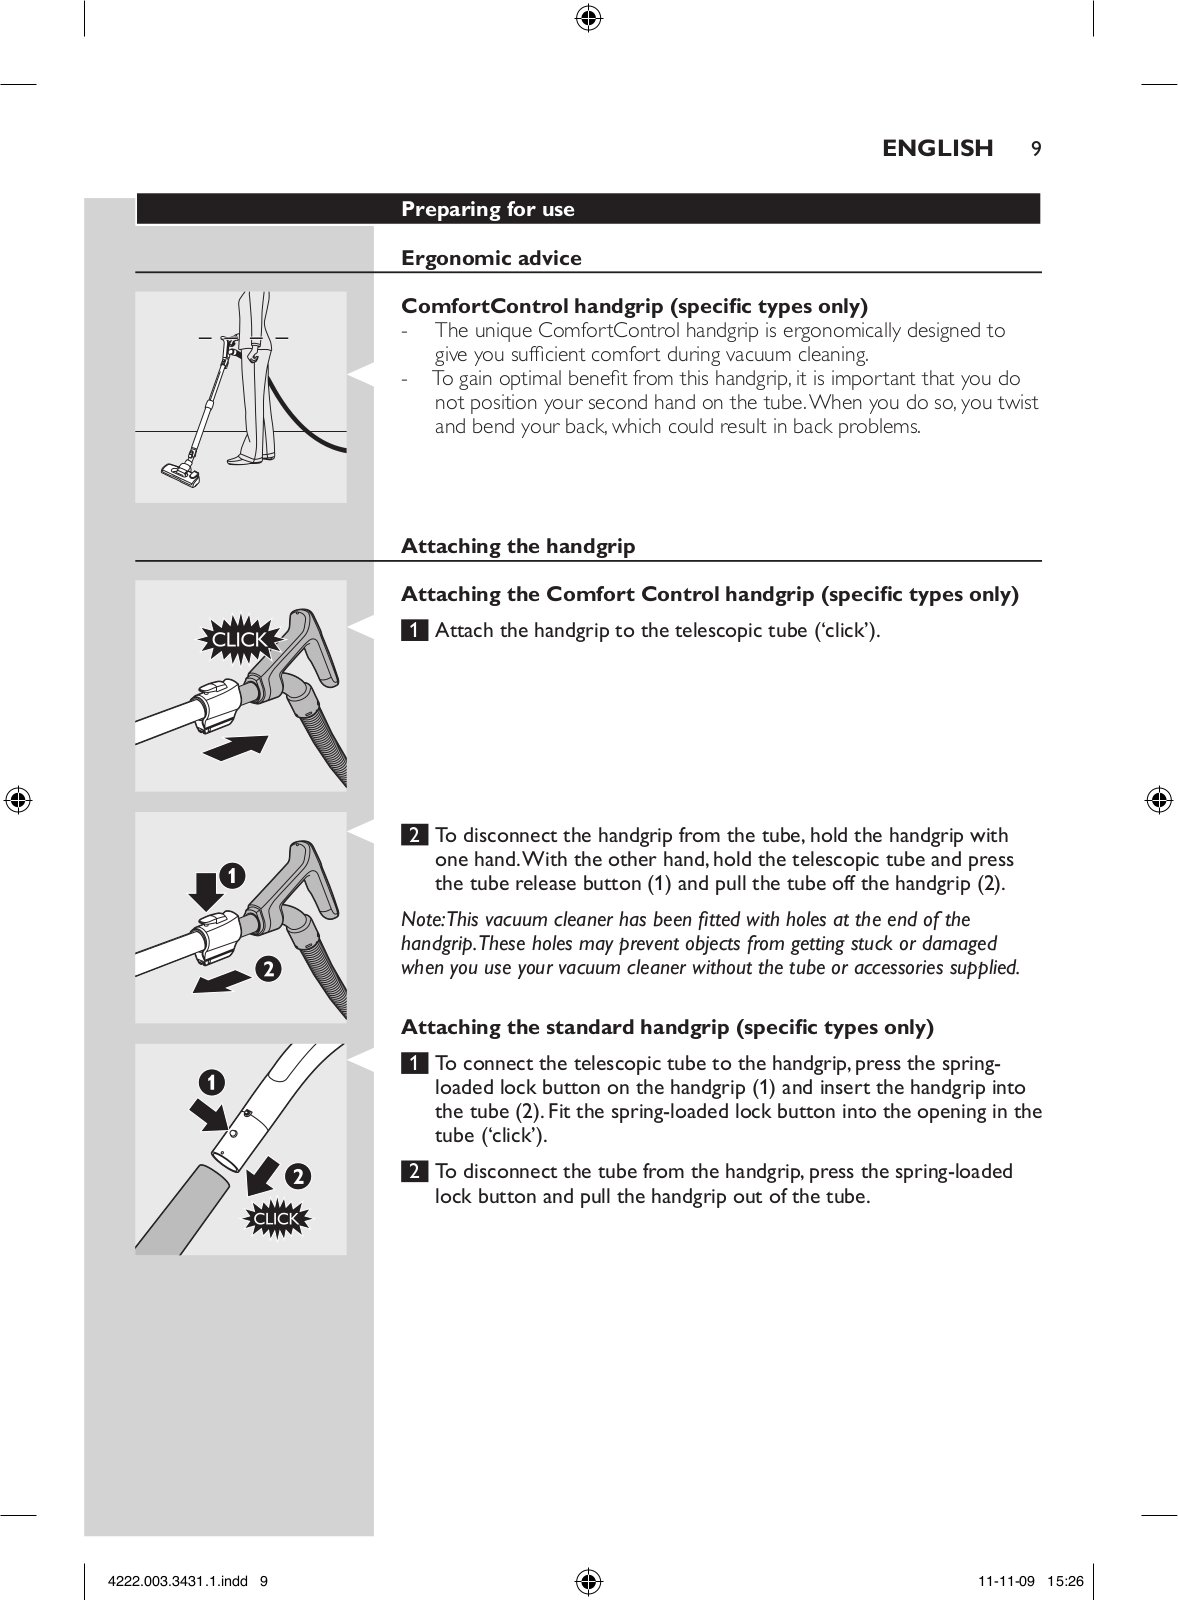
1 Attach the handgrip to the telescopic tube (‘click’).

2To disconnect the handgrip from the tube, hold the handgrip with one hand.With the other hand, hold the telescopic tube and press

the tube release button (1) and pull the tube off the handgrip (2).

Note:This vacuum cleaner has been fitted with holes at the end of the handgrip.These holes may prevent objects from getting stuck or damaged when you use your vacuum cleaner without the tube or accessories supplied.

Attaching the standard handgrip (specific types only)

1 To connect the telescopic tube to the handgrip, press the springloaded lock button on the handgrip (1) and insert the handgrip into the tube (2). Fit the spring-loaded lock button into the opening in the tube (‘click’).

2To disconnect the tube from the handgrip, press the spring-loaded lock button and pull the handgrip out of the tube.

4222.003.3431.1.indd 9


11-11-09 15:26


10 English

Attaching the nozzle and accessories

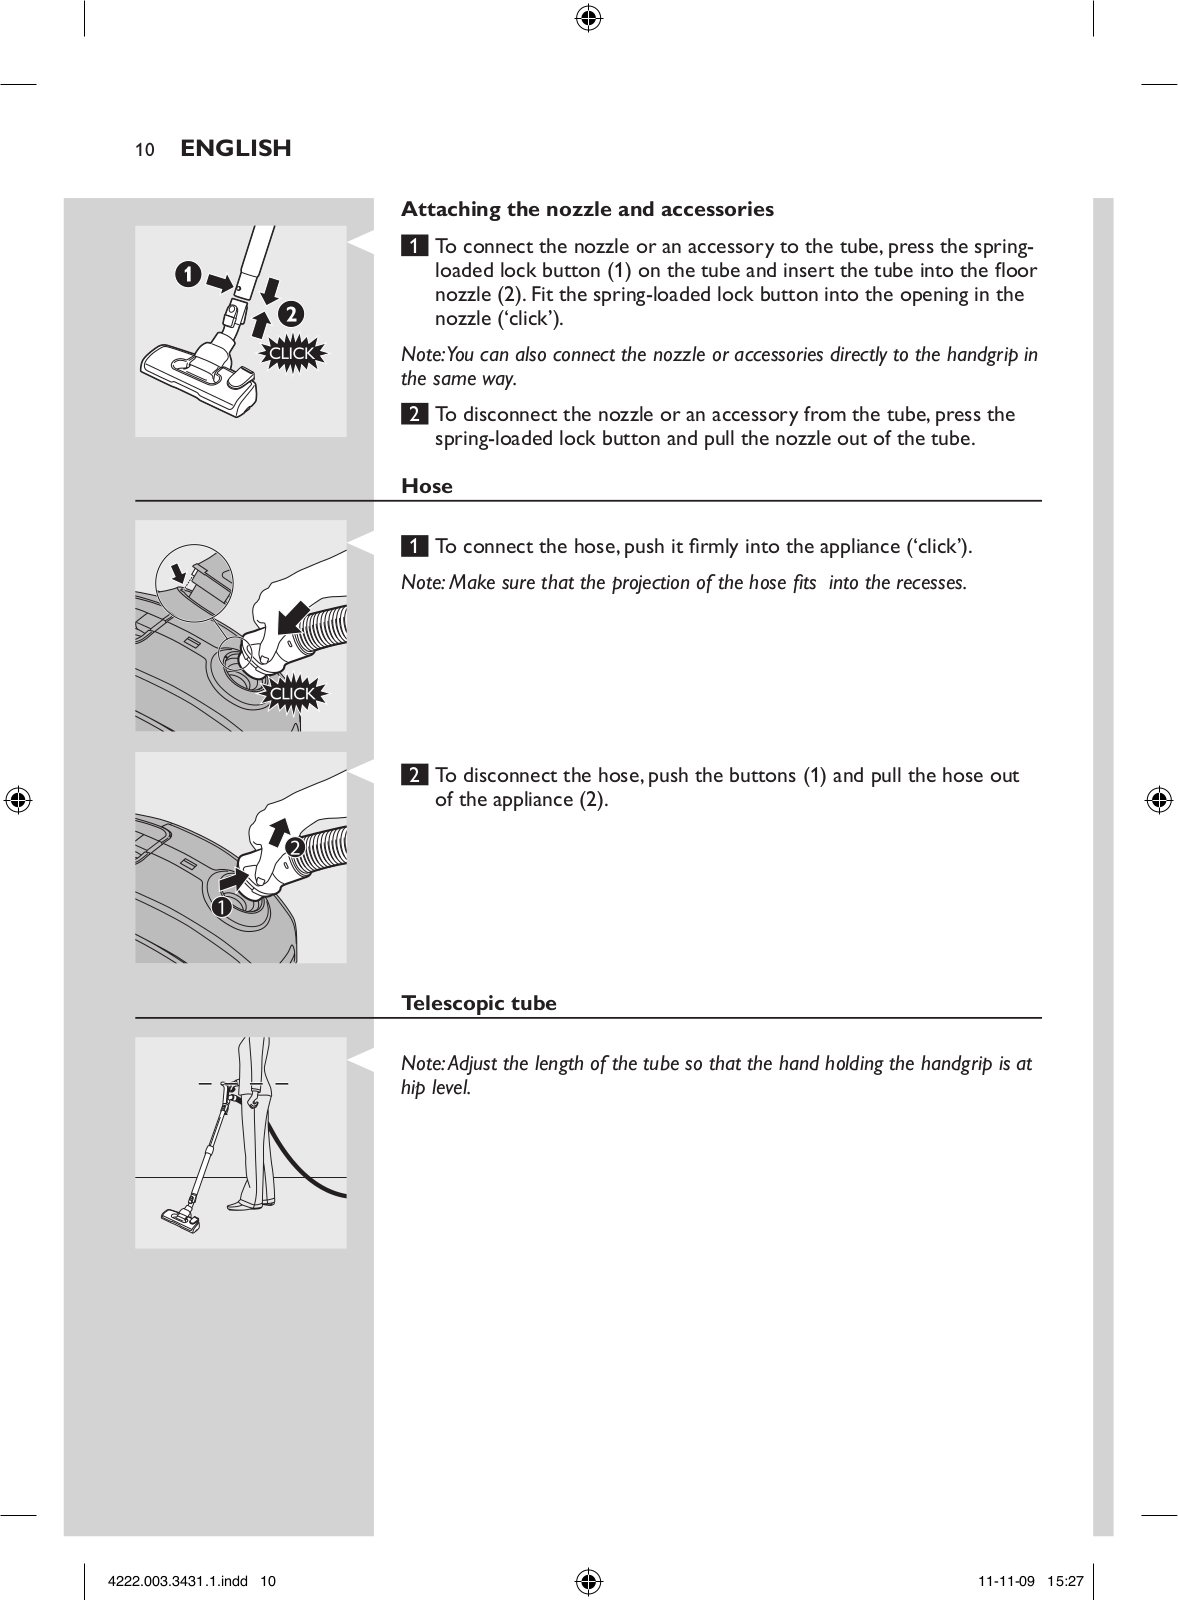
1To connect the nozzle or an accessory to the tube, press the springloaded lock button (1) on the tube and insert the tube into the floor nozzle (2). Fit the spring-loaded lock button into the opening in the

nozzle (‘click’).

Note:You can also connect the nozzle or accessories directly to the handgrip in the same way.

2 To disconnect the nozzle or an accessory from the tube, press the spring-loaded lock button and pull the nozzle out of the tube.

Hose

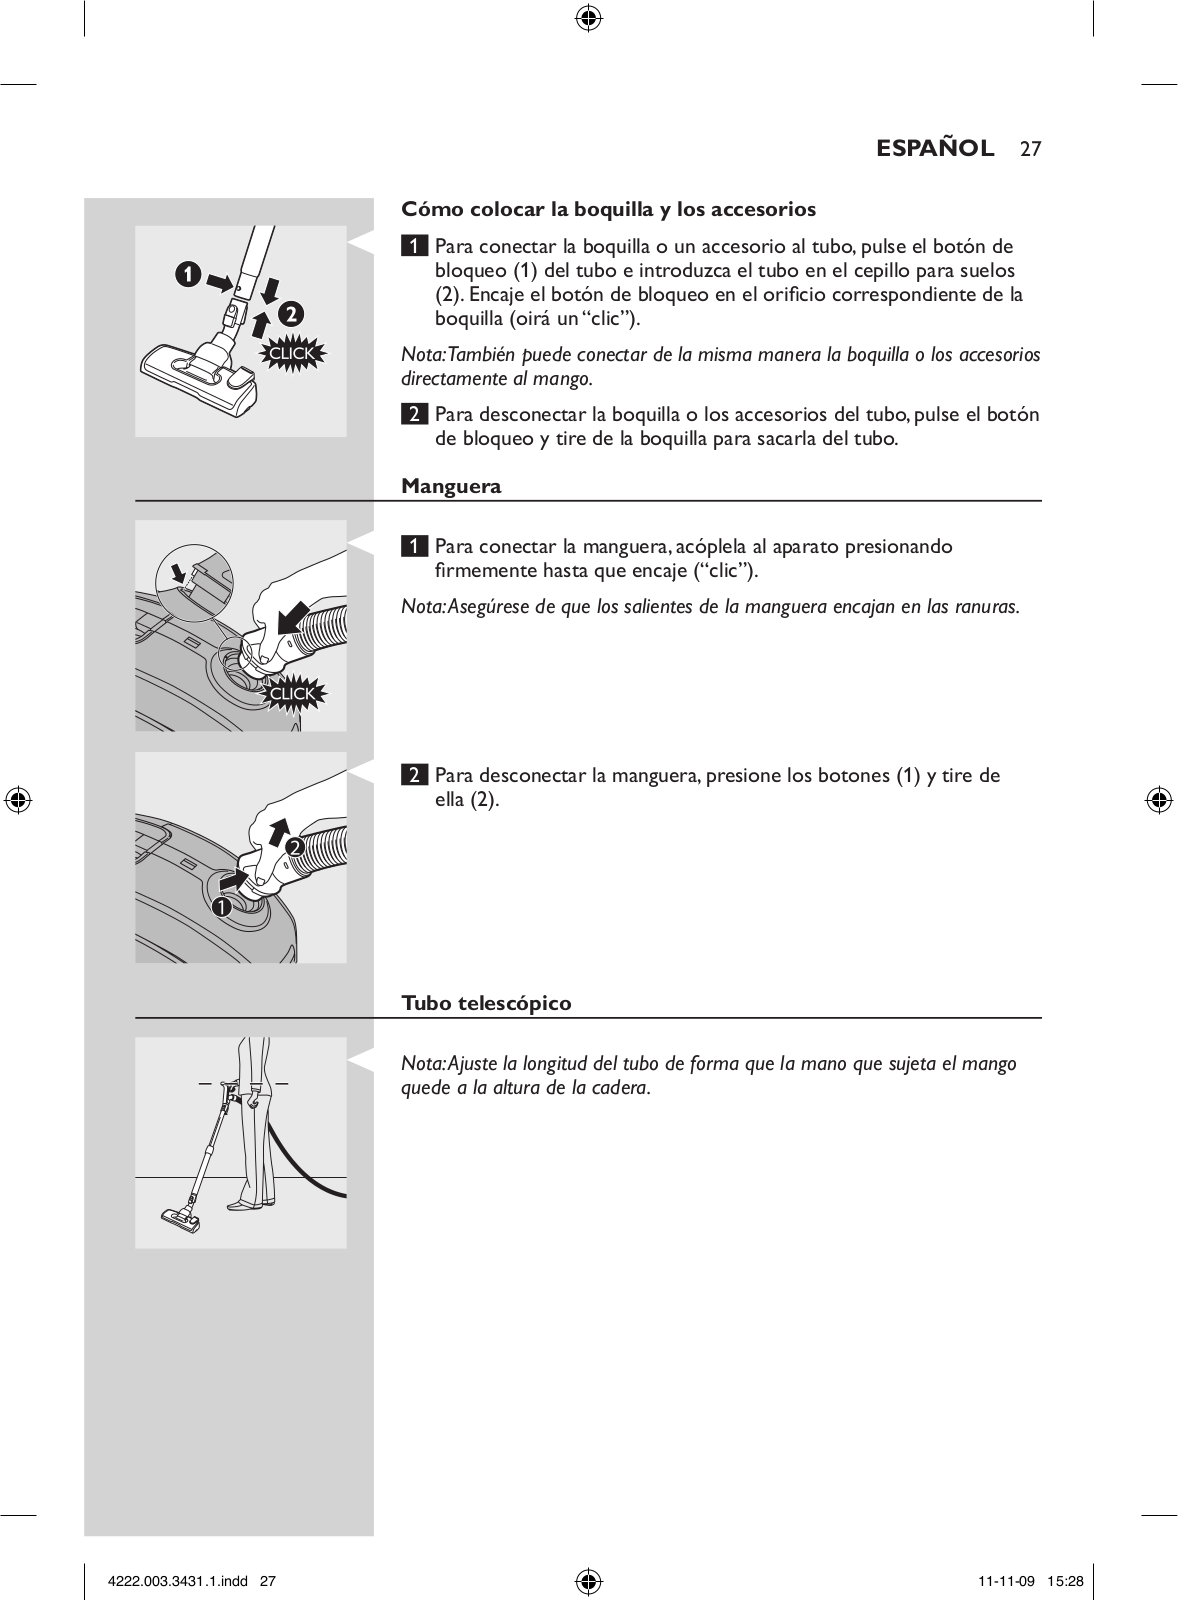
1 To connect the hose,push it firmly into the appliance (‘click’).

Note: Make sure that the projection of the hose fits  into the recesses.

2To disconnect the hose, push the buttons (1) and pull the hose out of the appliance (2).

Telescopic tube 

Note:Adjust the length of the tube so that the hand holding the handgrip is at hip level.

4222.003.3431.1.indd 10


11-11-09 15:27


English 11

3-piece telescopic tube (specific types only)

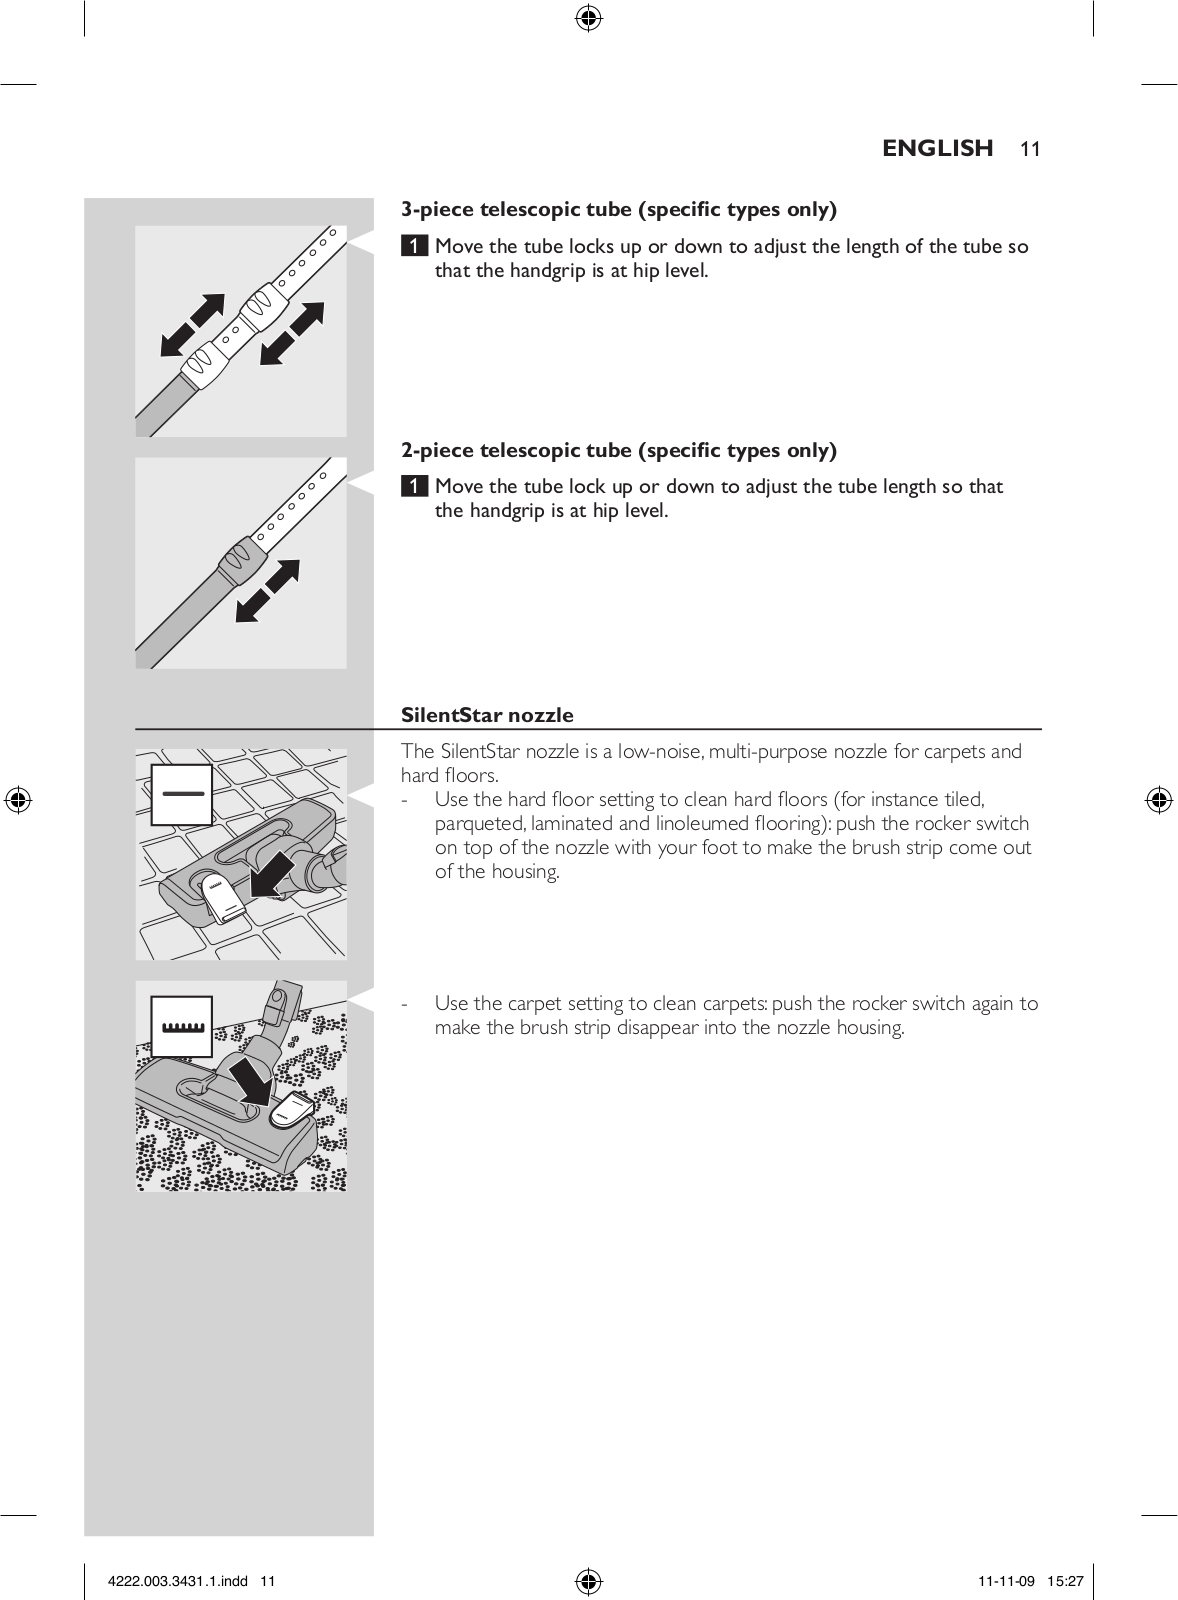
1Move the tube locks up or down to adjust the length of the tube so that the handgrip is at hip level.

2-piece telescopic tube (specific types only)

1Move the tube lock up or down to adjust the tube length so that the handgrip is at hip level.

SilentStar nozzle

The SilentStar nozzle is a low-noise, multi-purpose nozzle for carpets and hard floors.

-- Use the hard floor setting to clean hard floors (for instance tiled, parqueted, laminated and linoleumed flooring): push the rocker switch on top of the nozzle with your foot to make the brush strip come out of the housing.

-- Use the carpet setting to clean carpets: push the rocker switch again to make the brush strip disappear into the nozzle housing.

4222.003.3431.1.indd 11


11-11-09 15:27


12 English

Accessories

ComfortControl accessories (specific types only)

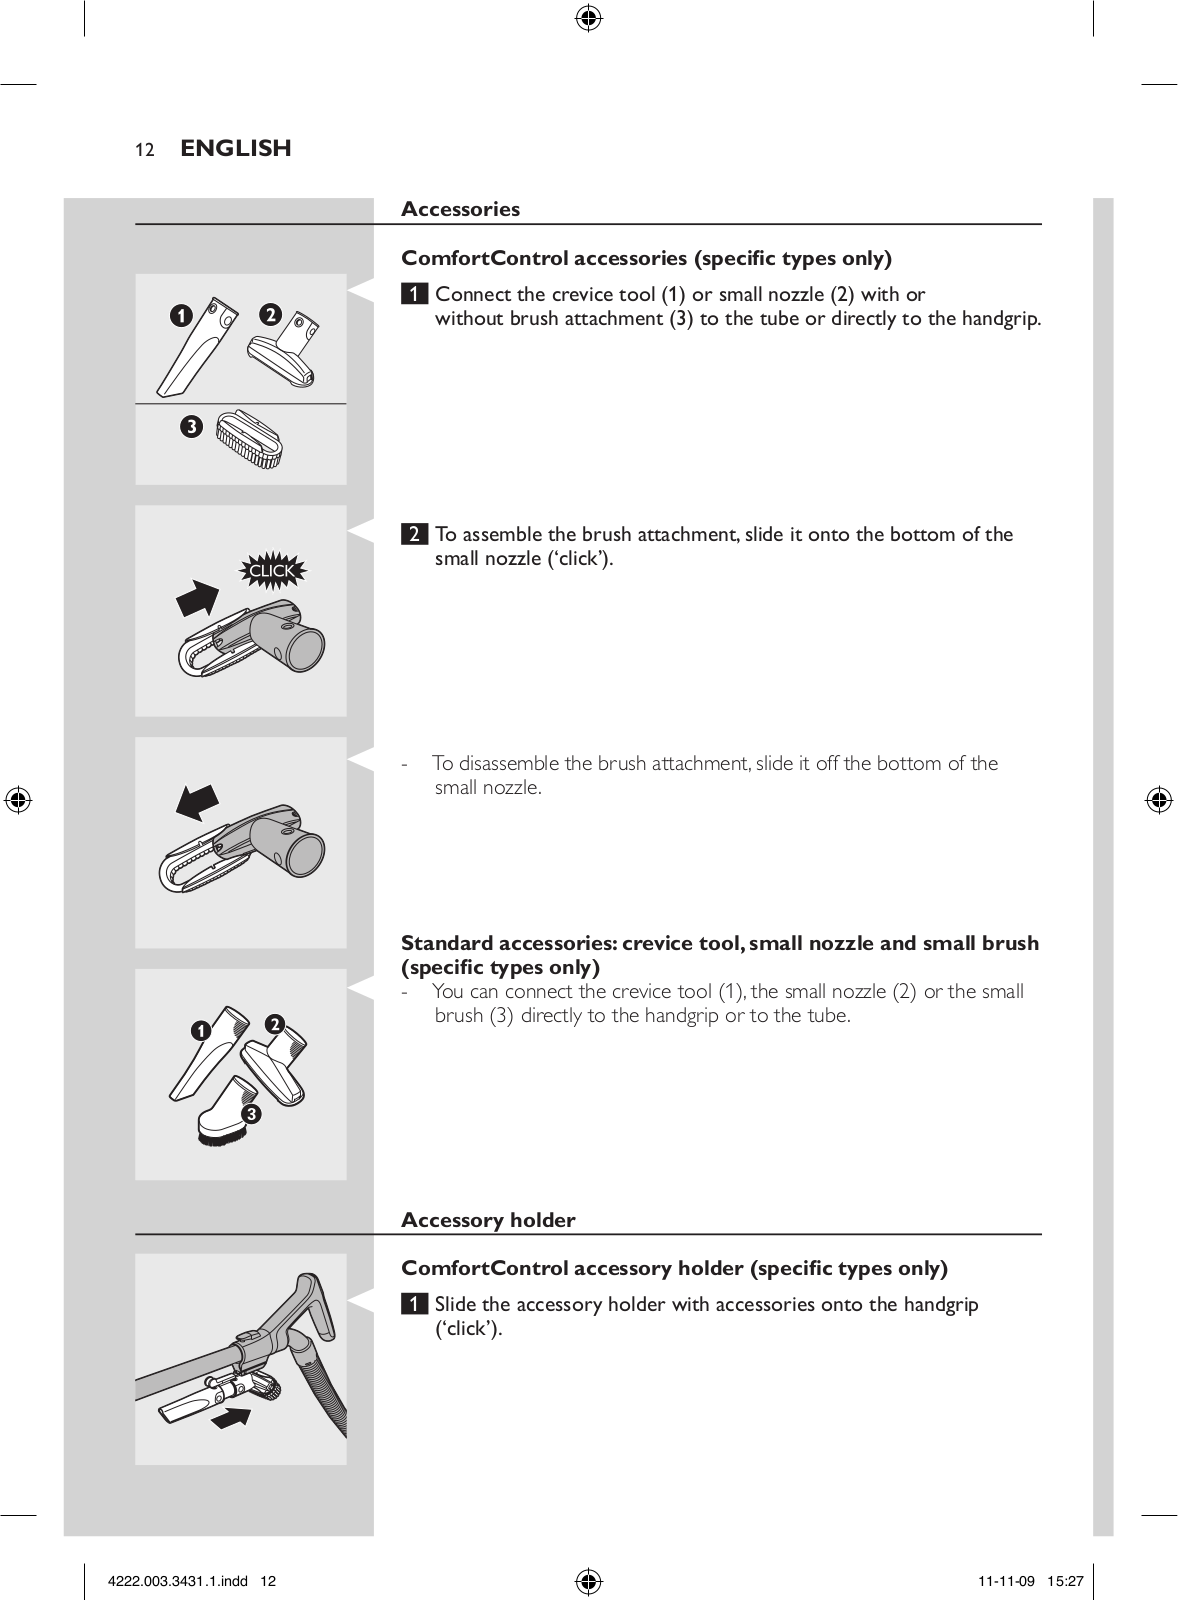
1 Connect the crevice tool (1) or small nozzle (2) with or without brush attachment (3) to the tube or directly to the handgrip.

2 To assemble the brush attachment, slide it onto the bottom of the small nozzle (‘click’).

-- To disassemble the brush attachment, slide it off the bottom of the small nozzle.

Standard accessories: crevice tool, small nozzle and small brush

(specific types only)

-- You can connect the crevice tool (1), the small nozzle (2) or the small brush (3) directly to the handgrip or to the tube.

Accessory holder

ComfortControl accessory holder (specific types only)

1Slide the accessory holder with accessories onto the handgrip (‘click’).

4222.003.3431.1.indd 12


11-11-09 15:27


English 13

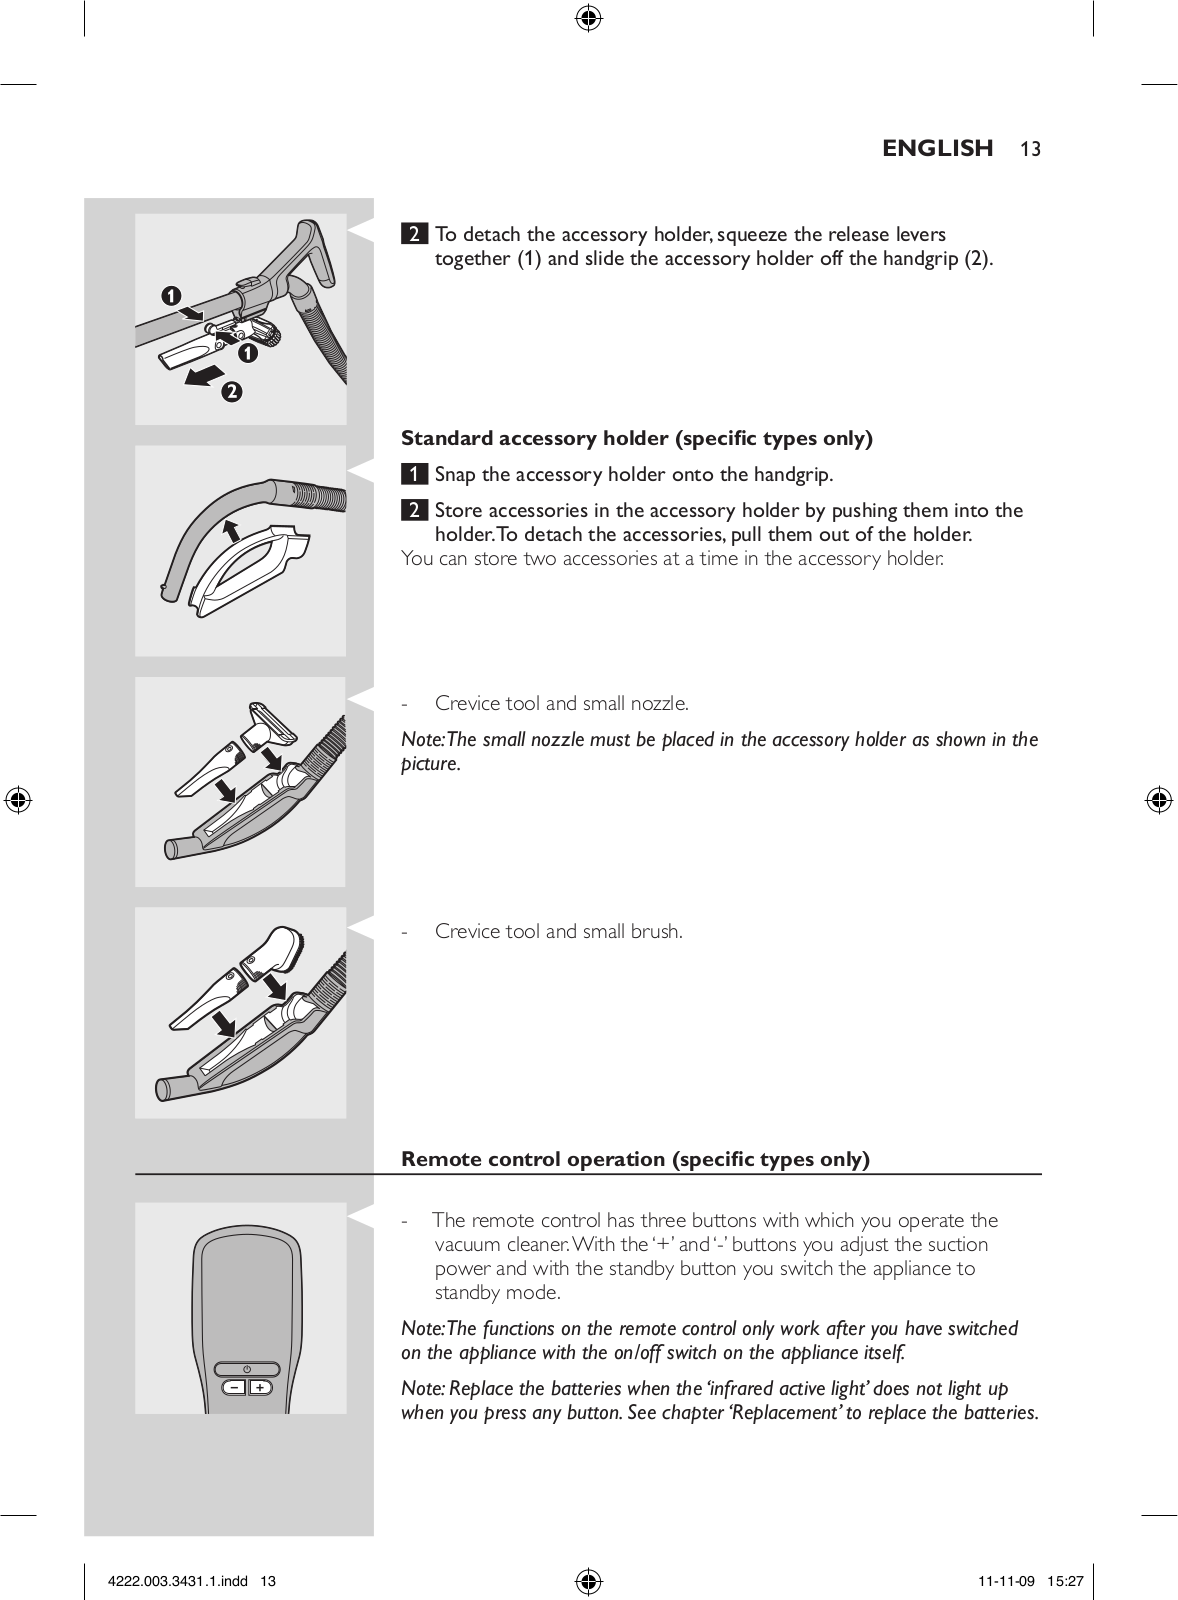
2To detach the accessory holder, squeeze the release levers together (1) and slide the accessory holder off the handgrip (2).

Standard accessory holder (specific types only)

1 Snap the accessory holder onto the handgrip.

2 Store accessories in the accessory holder by pushing them into the holder.To detach the accessories, pull them out of the holder.

You can store two accessories at a time in the accessory holder.

-- Crevice tool and small nozzle.

Note:The small nozzle must be placed in the accessory holder as shown in the picture.

-- Crevice tool and small brush.

Remote control operation (specific types only)

-- The remote control has three buttons with which you operate the vacuum cleaner.With the ‘+’ and ‘-’ buttons you adjust the suction power and with the standby button you switch the appliance to standby mode.

Note:The functions on the remote control only work after you have switched on the appliance with the on/off switch on the appliance itself. 

Note: Replace the batteries when the ‘infrared active light’ does not light up when you press any button. See chapter ‘Replacement’ to replace the batteries.

4222.003.3431.1.indd 13

11-11-09 15:27

14 English

Using the appliance

1Pull the cord out of the appliance and put the mains plug in the wall socket.

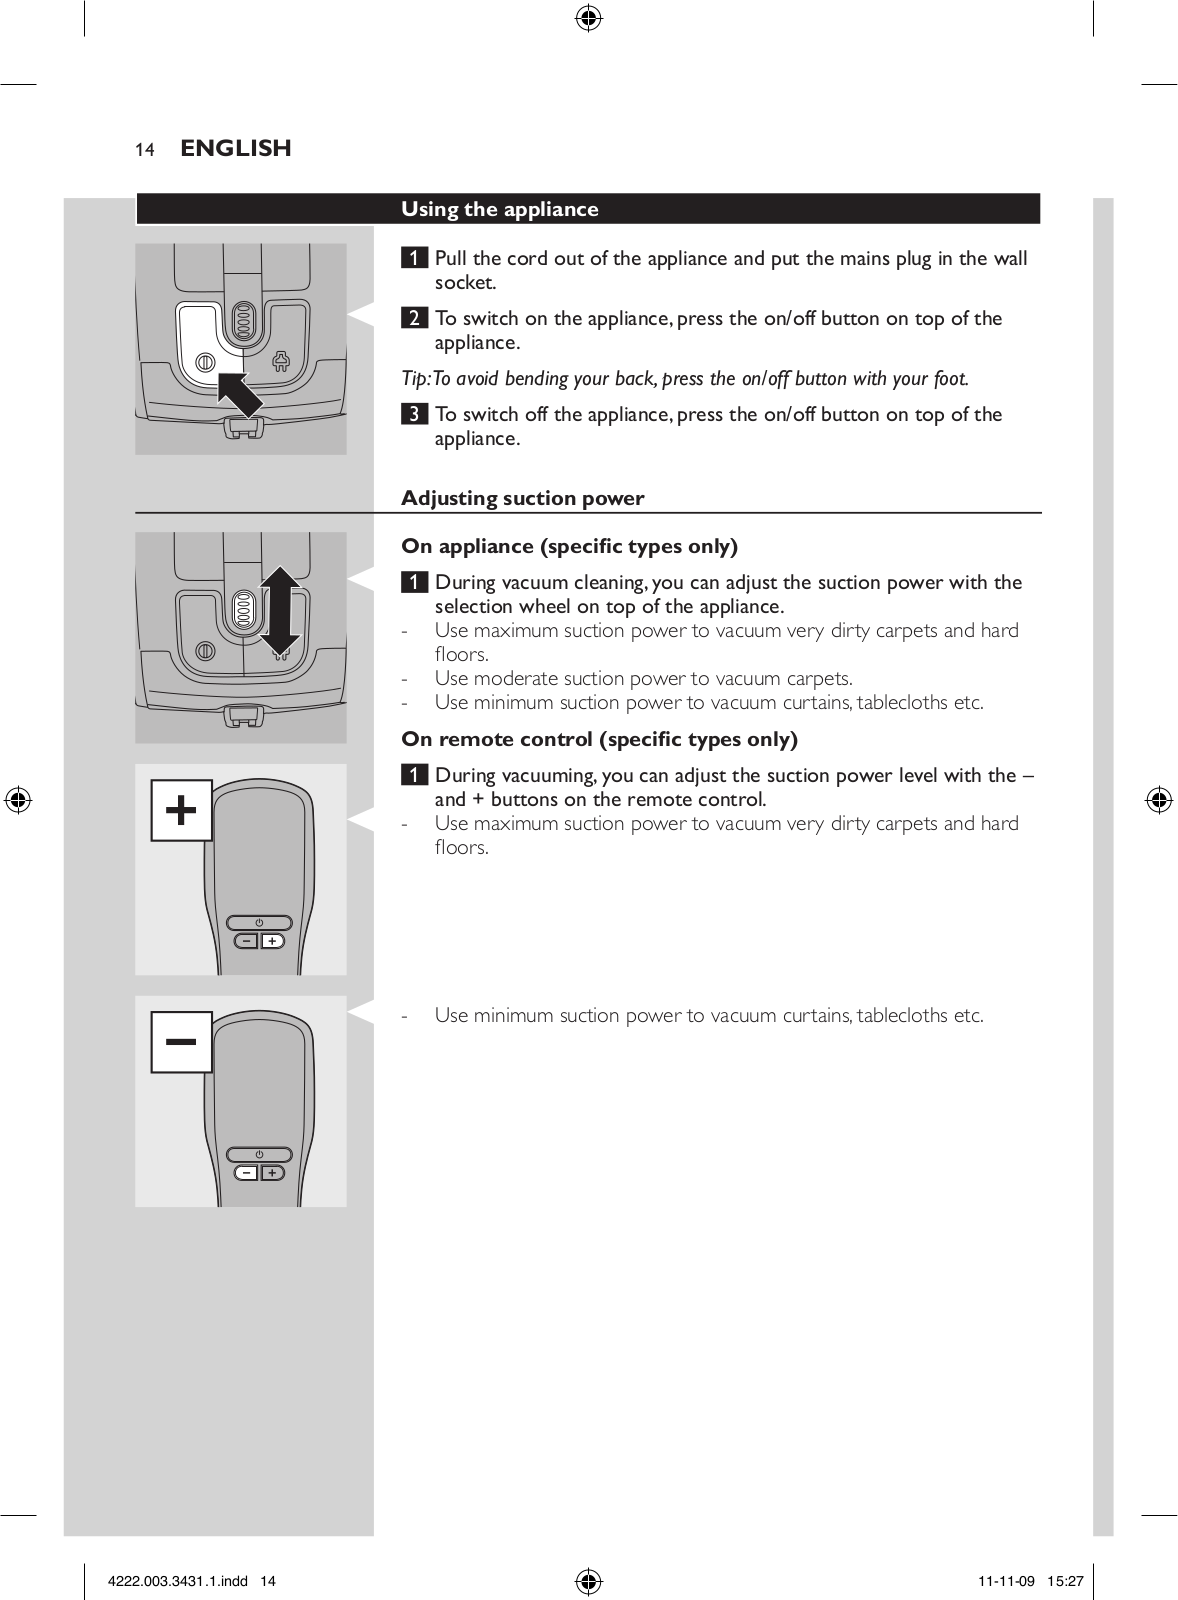
2To switch on the appliance, press the on/off button on top of the appliance.

Tip:To avoid bending your back, press the on/off button with your foot.

3 To switch off the appliance, press the on/off button on top of the appliance.

Adjusting suction power

On appliance (specific types only)

1 During vacuum cleaning, you can adjust the suction power with the selection wheel on top of the appliance.

-- Use maximum suction power to vacuum very dirty carpets and hard floors.

-- Use moderate suction power to vacuum carpets.

-- Use minimum suction power to vacuum curtains, tablecloths etc.

On remote control (specific types only)

1During vacuuming, you can adjust the suction power level with the – and + buttons on the remote control.

-- Use maximum suction power to vacuum very dirty carpets and hard floors.

-- Use minimum suction power to vacuum curtains, tablecloths etc.


4222.003.3431.1.indd 14


11-11-09 15:27


English 15

Pausing during use (specific types only)

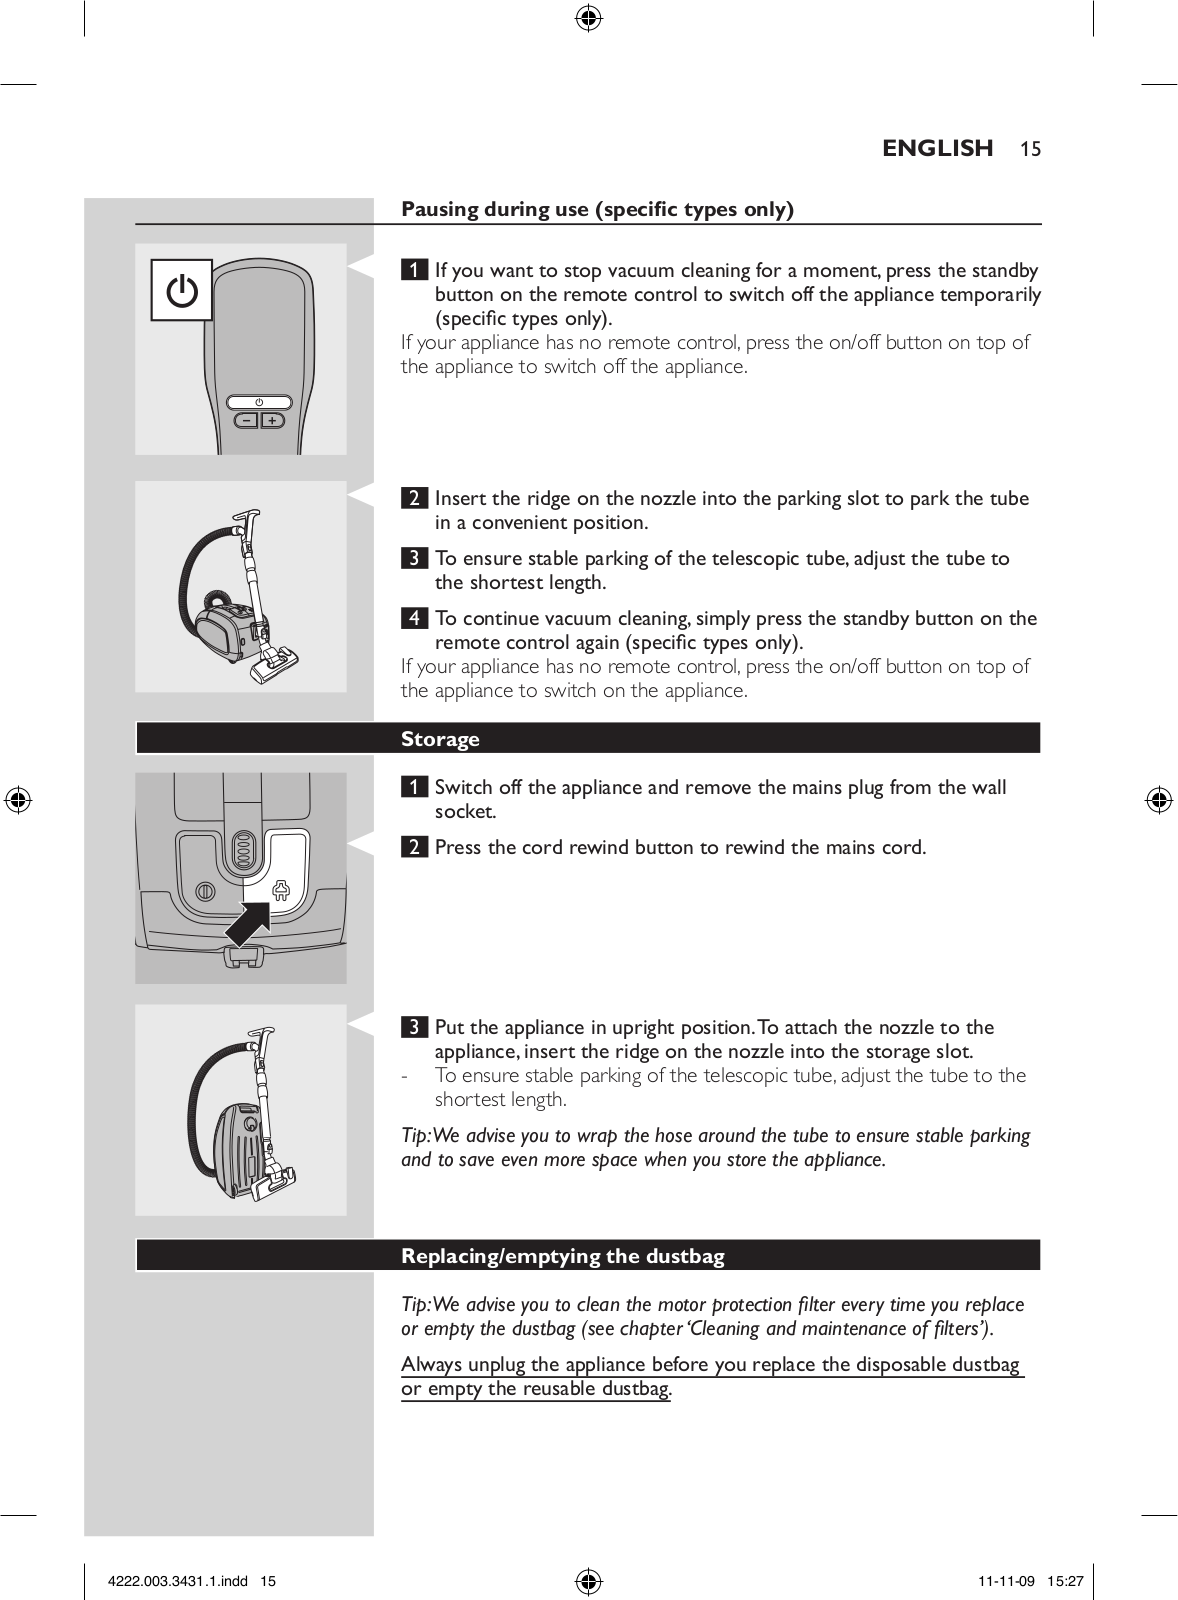
1If you want to stop vacuum cleaning for a moment, press the standby button on the remote control to switch off the appliance temporarily

(specific types only).

If your appliance has no remote control, press the on/off button on top of the appliance to switch off the appliance.

2Insert the ridge on the nozzle into the parking slot to park the tube in a convenient position.

3To ensure stable parking of the telescopic tube, adjust the tube to

the shortest length.

4To continue vacuum cleaning, simply press the standby button on the remote control again (specific types only).

If your appliance has no remote control, press the on/off button on top of the appliance to switch on the appliance.

Storage

1Switch off the appliance and remove the mains plug from the wall socket.

2 Press the cord rewind button to rewind the mains cord.

3 Put the appliance in upright position.To attach the nozzle to the appliance, insert the ridge on the nozzle into the storage slot.

-- To ensure stable parking of the telescopic tube, adjust the tube to the shortest length.

Tip:We advise you to wrap the hose around the tube to ensure stable parking and to save even more space when you store the appliance.

Replacing/emptying the dustbag

Tip:We advise you to clean the motor protection filter every time you replace or empty the dustbag (see chapter ‘Cleaning and maintenance of filters’).

Always unplug the appliance before you replace the disposable dustbag or empty the reusable dustbag.

4222.003.3431.1.indd 15


11-11-09 15:27


16 English

Before replacing/emtying the dustbag

In some cases, the dustbag full indicator can indicate that the dustbag is full, even though it is not.This may occur if the pores of the dustbag are clogged (e.g. when you have vacuumed ashes, fine sand, lime, cement dust and similar substances) or if something is blocking the nozzle, tube and/ or hose. If the pores of the dustbag are clogged, you have to replace the disposable dustbag or empty the reusable dustbag, even if it is not full yet. If the dustbag is not clogged but not full either, something is blocking the nozzle, tube and/or hose. In this case, do not replace the dustbag but remove the obstruction.

Replacing the disposable dustbag

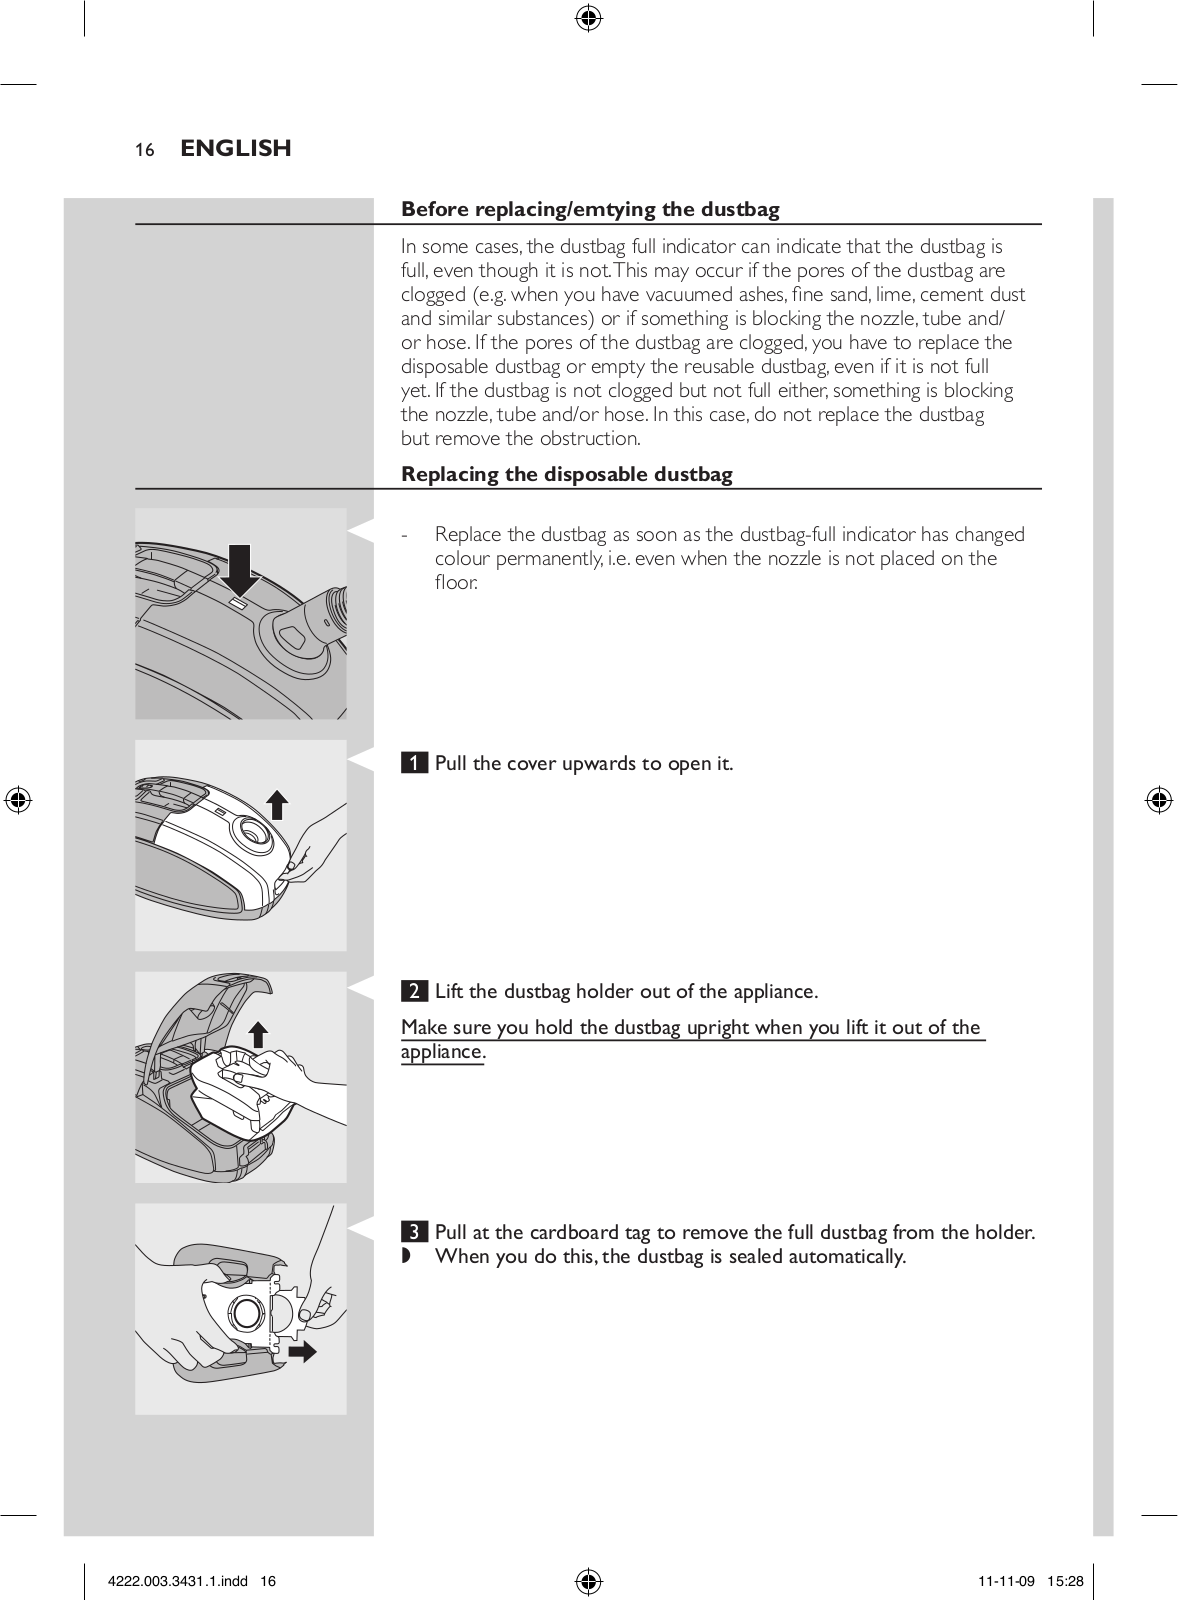
-- Replace the dustbag as soon as the dustbag-full indicator has changed colour permanently, i.e. even when the nozzle is not placed on the floor.

1Pull the cover upwards to open it.

2Lift the dustbag holder out of the appliance.

Make sure you hold the dustbag upright when you lift it out of the appliance.

3 Pull at the cardboard tag to remove the full dustbag from the holder. ,, When you do this, the dustbag is sealed automatically.

4222.003.3431.1.indd 16


11-11-09 15:28


English 17

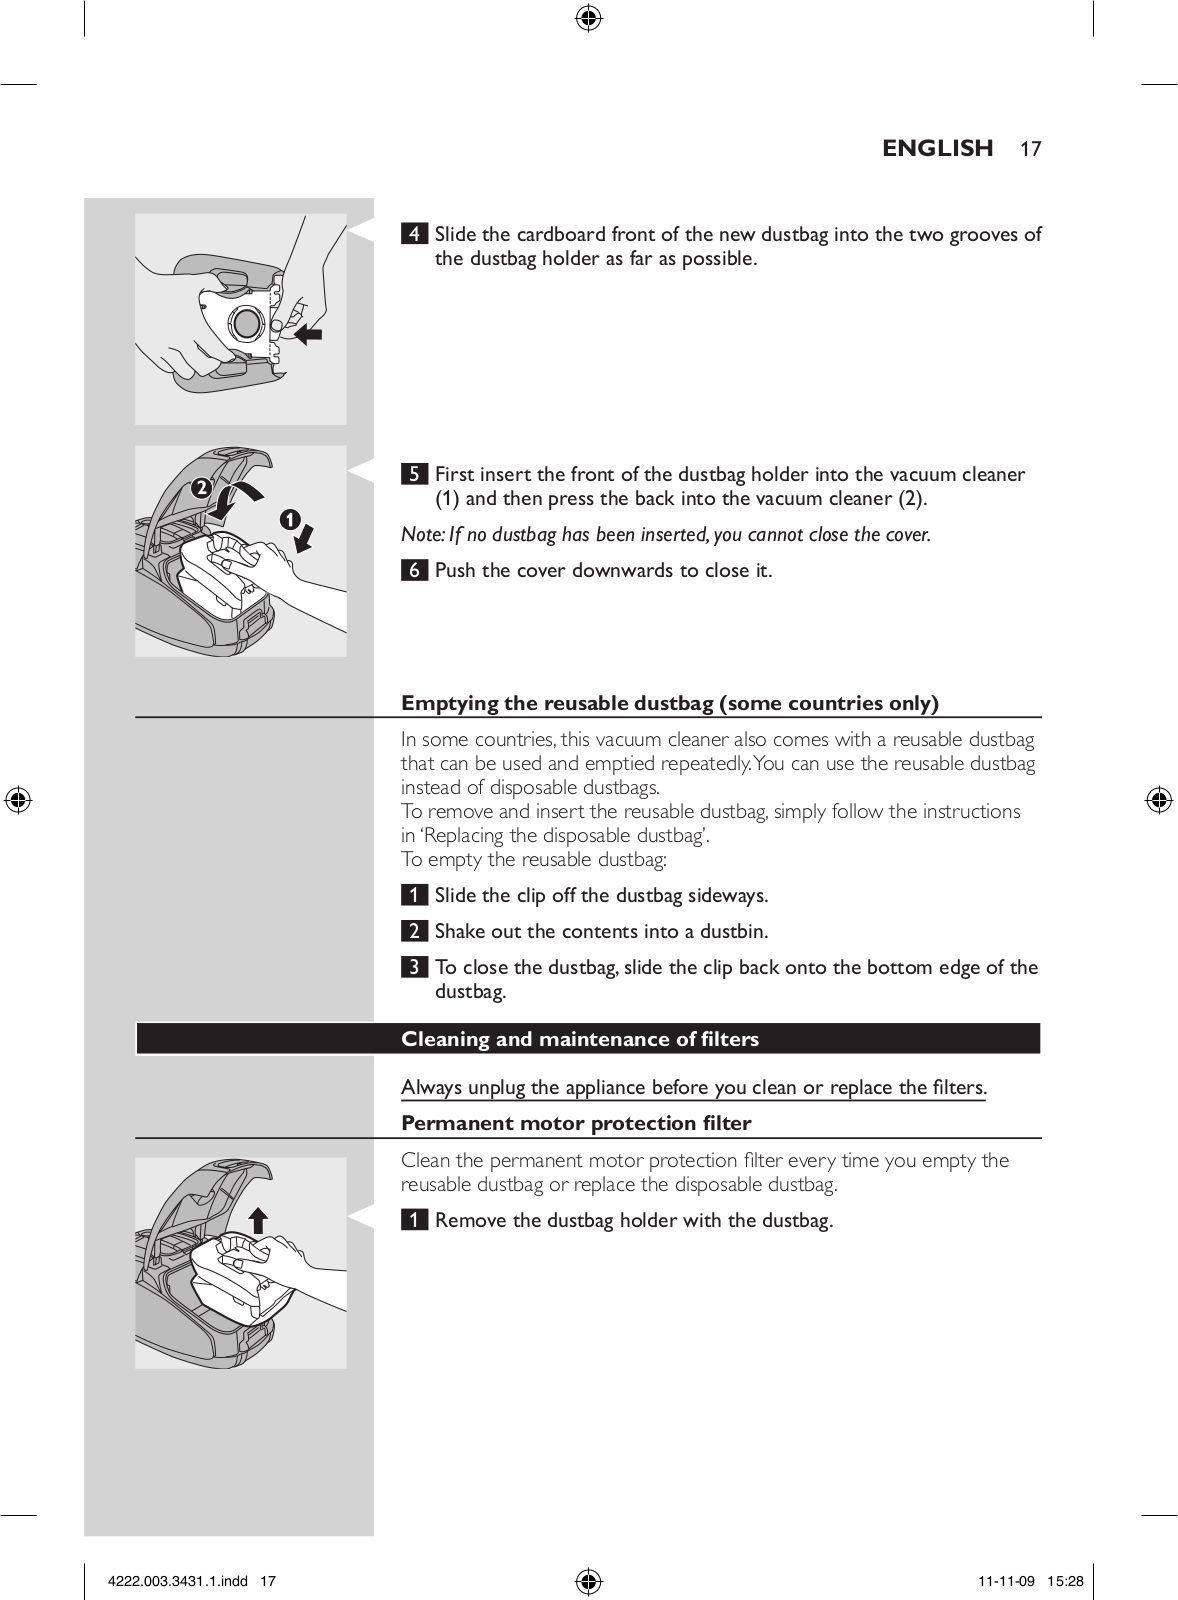
4Slide the cardboard front of the new dustbag into the two grooves of the dustbag holder as far as possible.

5First insert the front of the dustbag holder into the vacuum cleaner

(1) and then press the back into the vacuum cleaner (2).

Note: If no dustbag has been inserted, you cannot close the cover.

6 Push the cover downwards to close it.

Emptying the reusable dustbag (some countries only)

In some countries, this vacuum cleaner also comes with a reusable dustbag that can be used and emptied repeatedly. You can use the reusable dustbag instead of disposable dustbags.

To remove and insert the reusable dustbag, simply follow the instructions in ‘Replacing the disposable dustbag’.

To empty the reusable dustbag:

1Slide the clip off the dustbag sideways.

2Shake out the contents into a dustbin.

3To close the dustbag, slide the clip back onto the bottom edge of the dustbag.

Cleaning and maintenance of filters

Always unplug the appliance before you clean or replace the filters.

Permanent motor protection filter

Clean the permanent motor protection filter every time you empty the reusable dustbag or replace the disposable dustbag.

1 Remove the dustbag holder with the dustbag.

4222.003.3431.1.indd 17


11-11-09 15:28


18 English

2

3

4

5

6

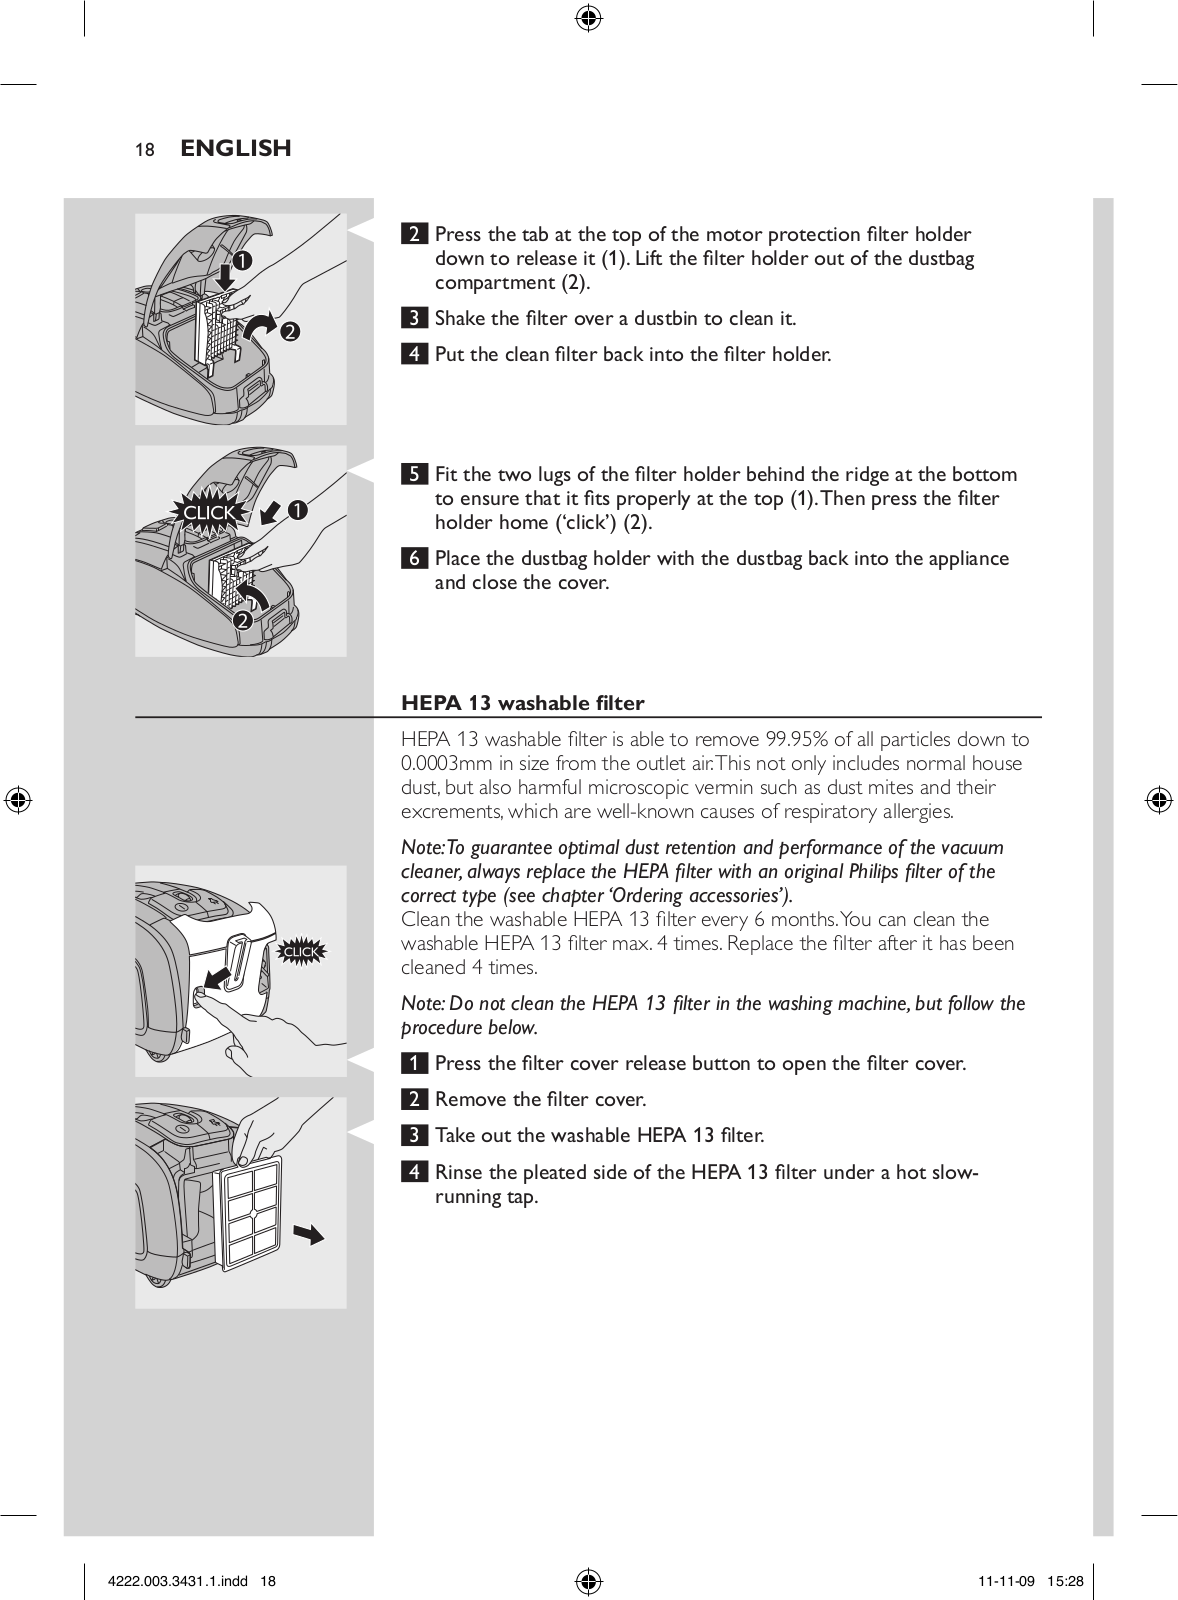
Press the tab at the top of the motor protection filter holder down to release it (1).Lift the filter holder out of the dustbag compartment (2).

Shake the filter over a dustbin to clean it. Put the clean filter back into the filter holder.

Fit the two lugs of the filter holder behind the ridge at the bottom to ensure that it fits properly at the top (1).Then press the filter holder home (‘click’) (2).

Place the dustbag holder with the dustbag back into the appliance and close the cover.

HEPA 13 washable filter

HEPA 13 washable filter is able to remove 99.95% of all particles down to

0.0003mm in size from the outlet air.This not only includes normal house dust, but also harmful microscopic vermin such as dust mites and their excrements, which are well-known causes of respiratory allergies.

Note:To guarantee optimal dust retention and performance of the vacuum cleaner, always replace the HEPA filter with an original Philips filter of the correct type (see chapter ‘Ordering accessories’).

Clean the washable HEPA 13 filter every 6 months.You can clean the washable HEPA 13 filter max. 4 times. Replace the filter after it has been cleaned 4 times.

Note: Do not clean the HEPA 13 filter in the washing machine, but follow the procedure below.

1 Press the filter cover release button to open the filter cover. 2 Remove the filter cover.

3 Take out the washable HEPA 13 filter.

4Rinse the pleated side of the HEPA 13 filter under a hot slowrunning tap.

4222.003.3431.1.indd 18


11-11-09 15:28


English 19

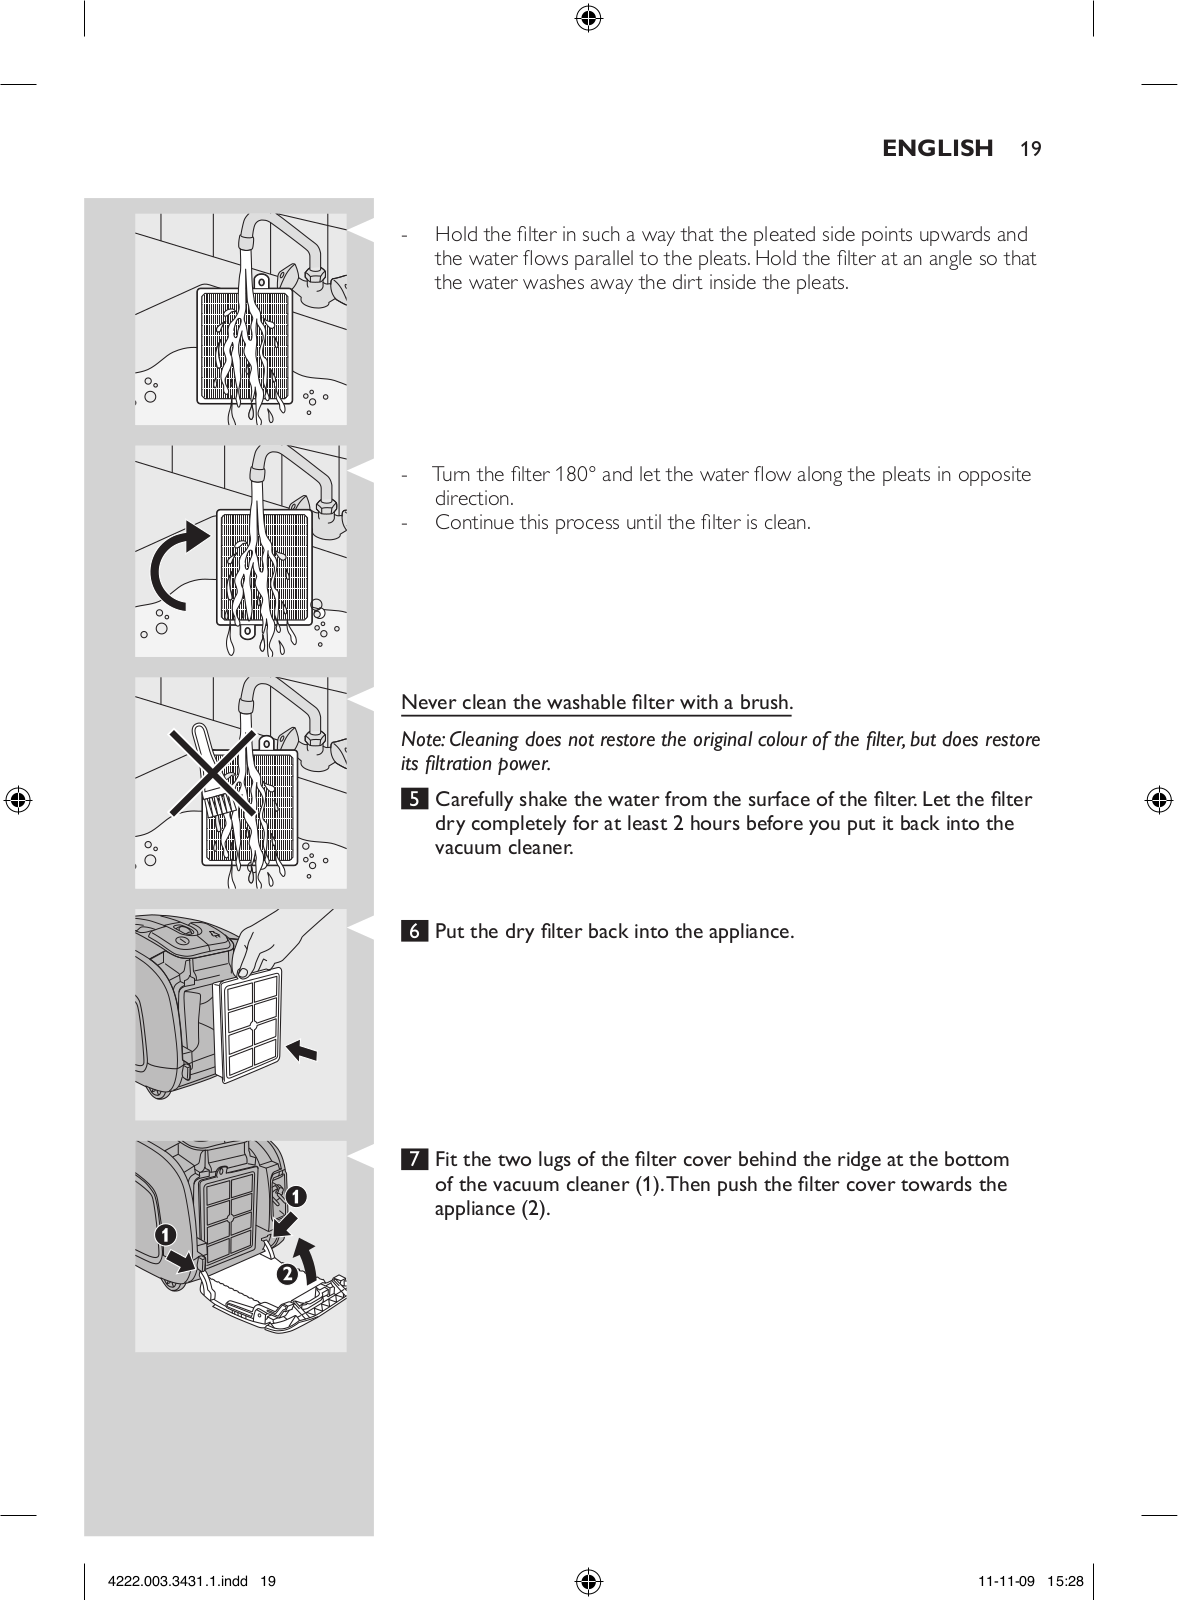
-- Hold the filter in such a way that the pleated side points upwards and the water flows parallel to the pleats. Hold the filter at an angle so that the water washes away the dirt inside the pleats.

-- Turn the filter 180° and let the water flow along the pleats in opposite direction.

-- Continue this process until the filter is clean.

Never clean the washable filter with a brush.

Note: Cleaning does not restore the original colour of the filter, but does restore its filtration power.

5 Carefully shake the water from the surface of the filter.Let the filter dry completely for at least 2 hours before you put it back into the vacuum cleaner.

6 Put the dry filter back into the appliance.

7 Fit the two lugs of the filter cover behind the ridge at the bottom of the vacuum cleaner (1).Then push the filter cover towards the appliance (2).

4222.003.3431.1.indd 19


11-11-09 15:28


20 English

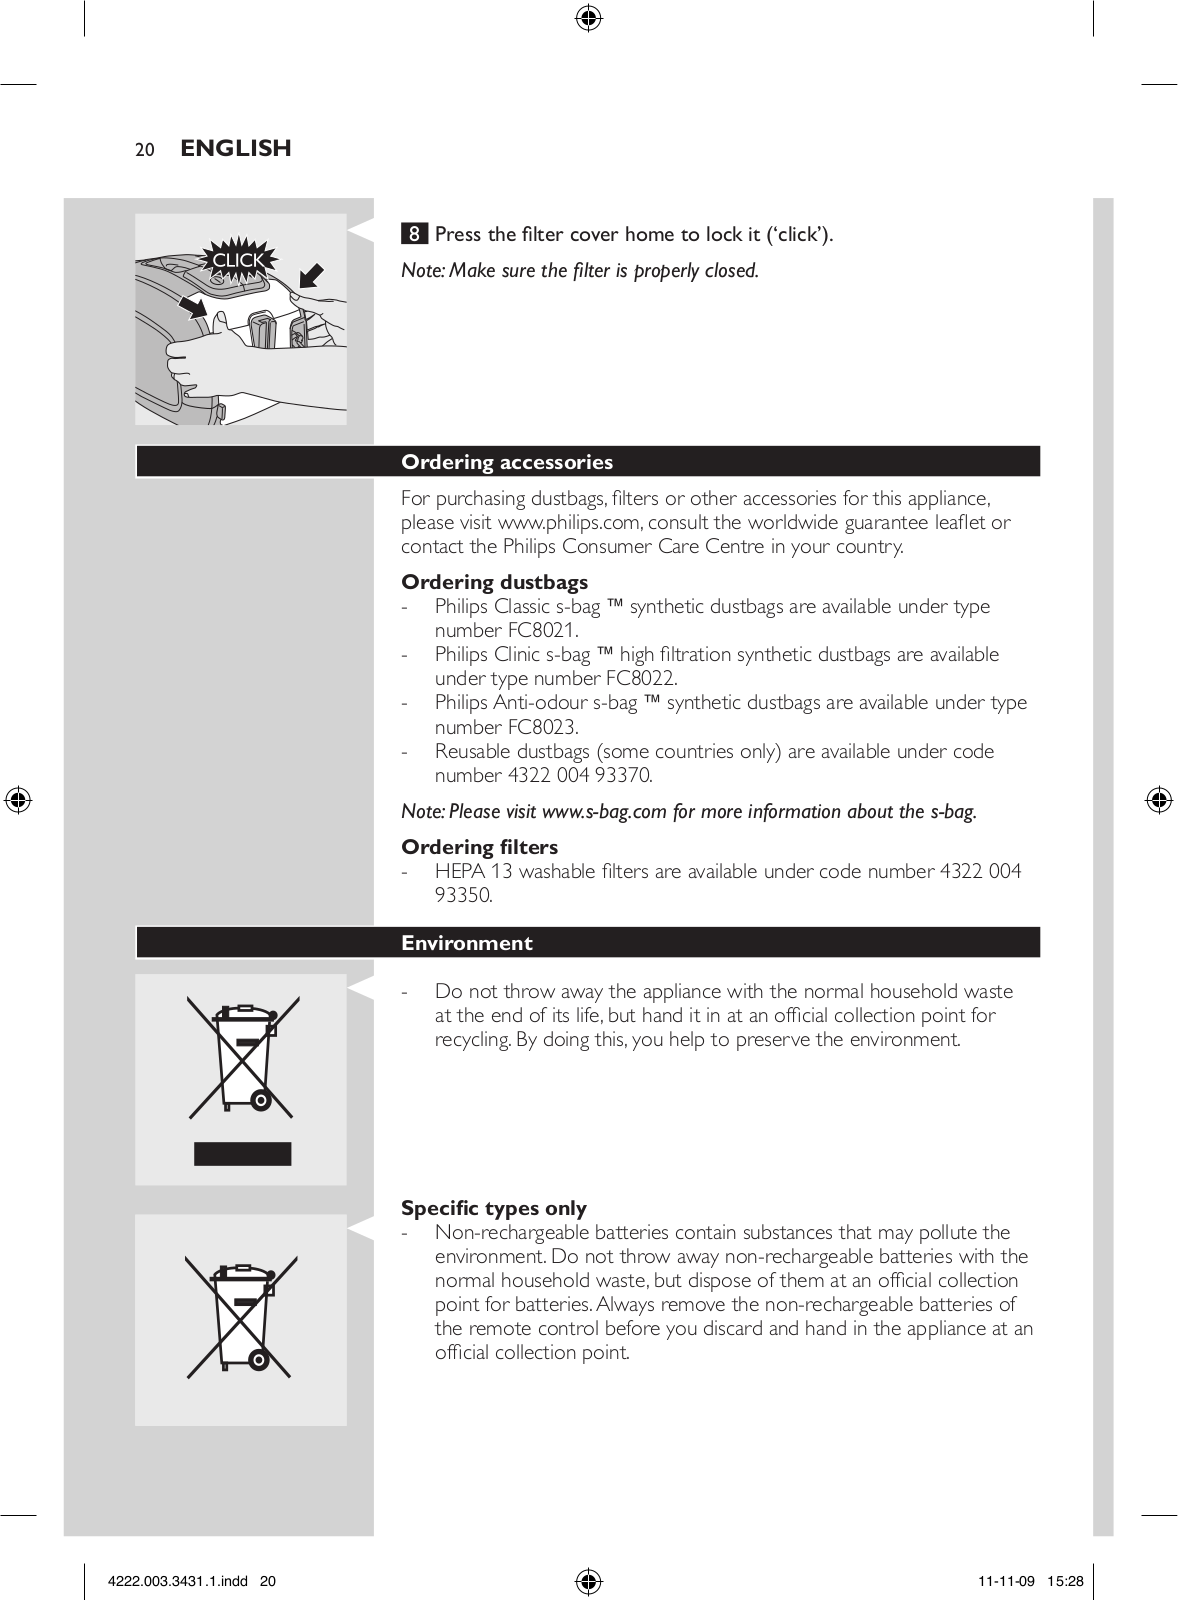
8 Press the filter cover home to lock it (‘click’).

Note: Make sure the filter is properly closed.

Ordering accessories

For purchasing dustbags, filters or other accessories for this appliance, please visit www.philips.com, consult the worldwide guarantee leaflet or contact the Philips Consumer Care Centre in your country.

Ordering dustbags

-- Philips Classic s-bag ` synthetic dustbags are available under type number FC8021.

-- Philips Clinic s-bag ` high filtration synthetic dustbags are available under type number FC8022.

-- Philips Anti-odour s-bag ` synthetic dustbags are available under type number FC8023.

-- Reusable dustbags (some countries only) are available under code number 4322 004 93370.

Note: Please visit www.s-bag.com for more information about the s-bag.

Ordering filters

-- HEPA 13 washable filters are available under code number 4322 004 93350.

Environment

-- Do not throw away the appliance with the normal household waste at the end of its life, but hand it in at an official collection point for recycling. By doing this, you help to preserve the environment.

Specific types only

-- Non-rechargeable batteries contain substances that may pollute the environment. Do not throw away non-rechargeable batteries with the normal household waste, but dispose of them at an official collection point for batteries. Always remove the non-rechargeable batteries of the remote control before you discard and hand in the appliance at an official collection point.

4222.003.3431.1.indd 20


11-11-09 15:28


English 21

Replacement

Batteries of remote control (specific types only)

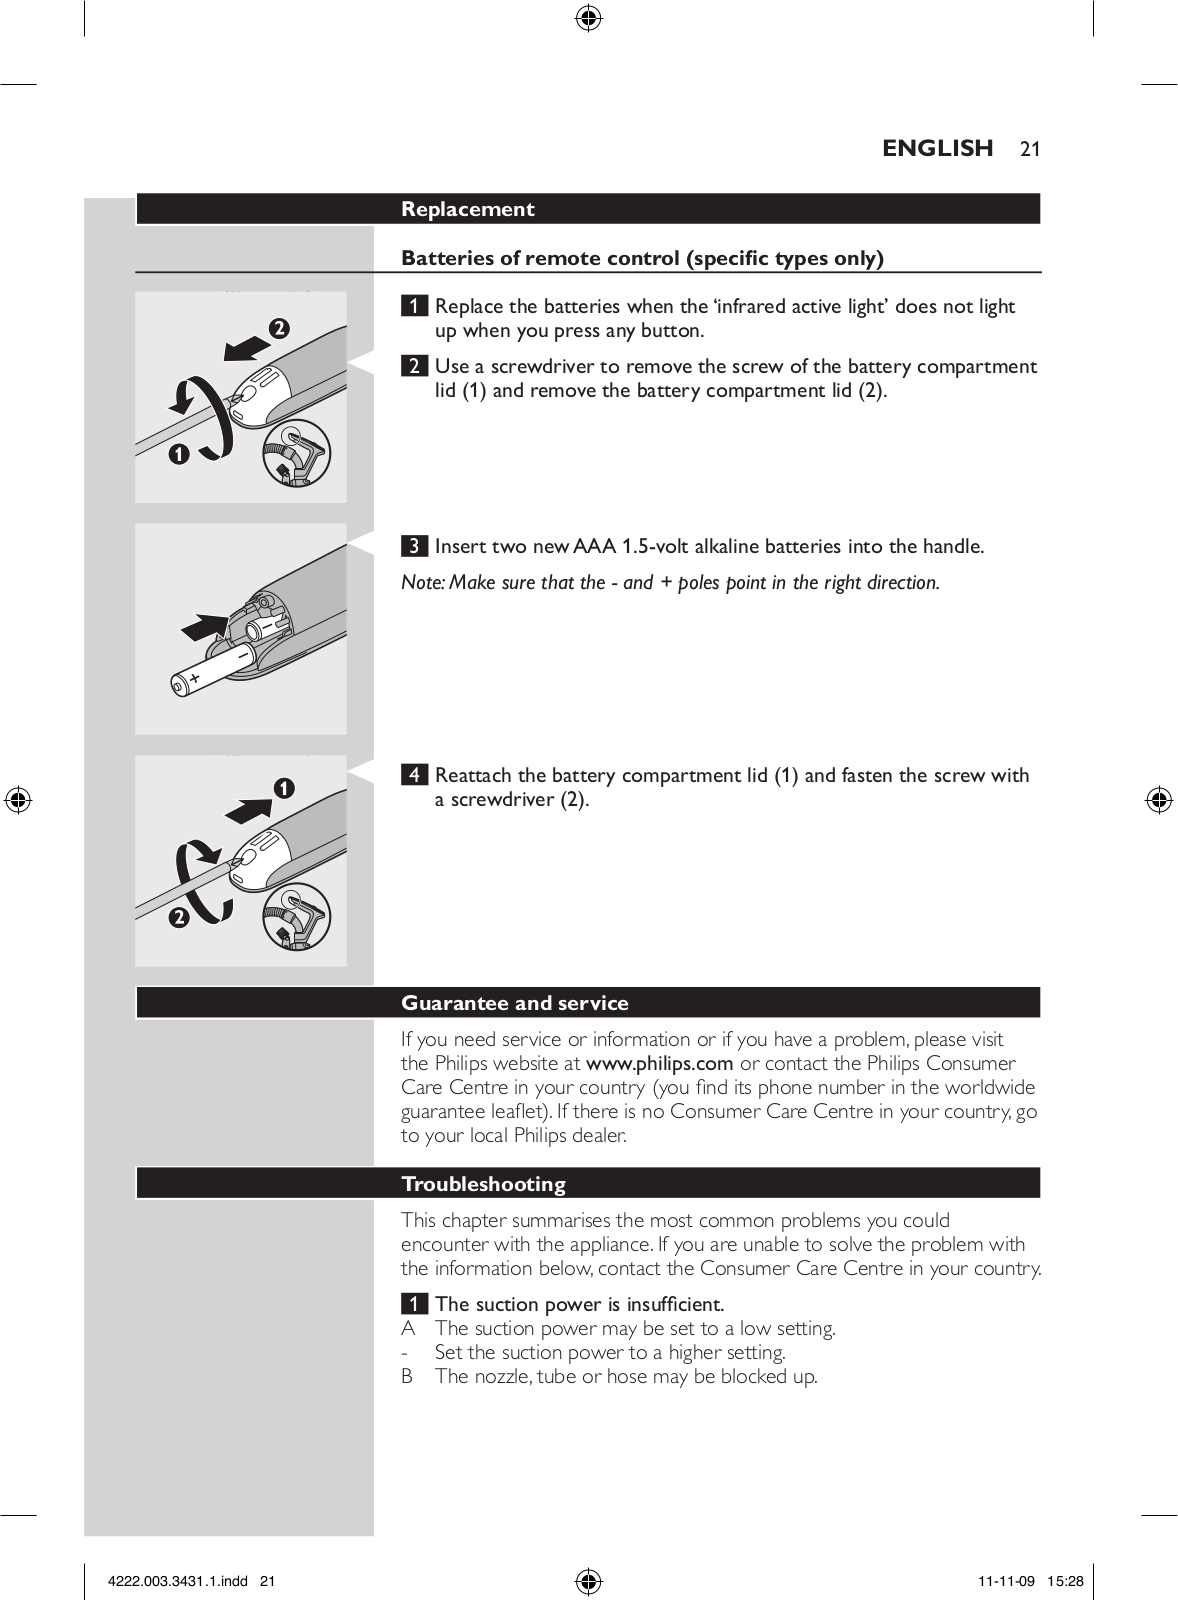
1 Replace the batteries when the ‘infrared active light’ does not light up when you press any button.

2 Use a screwdriver to remove the screw of the battery compartment lid (1) and remove the battery compartment lid (2).

3 Insert two new AAA 1.5-volt alkaline batteries into the handle.

Note: Make sure that the - and + poles point in the right direction.

4 Reattach the battery compartment lid (1) and fasten the screw with a screwdriver (2).

Guarantee and service

If you need service or information or if you have a problem, please visit the Philips website at www.philips.com or contact the Philips Consumer

Care Centre in your country (you find its phone number in the worldwide guarantee leaflet). If there is no Consumer Care Centre in your country, go to your local Philips dealer.

Troubleshooting

This chapter summarises the most common problems you could encounter with the appliance. If you are unable to solve the problem with the information below, contact the Consumer Care Centre in your country.

1 The suction power is insufficient.

AThe suction power may be set to a low setting. -- Set the suction power to a higher setting.

BThe nozzle, tube or hose may be blocked up.

4222.003.3431.1.indd 21


11-11-09 15:28


22 English

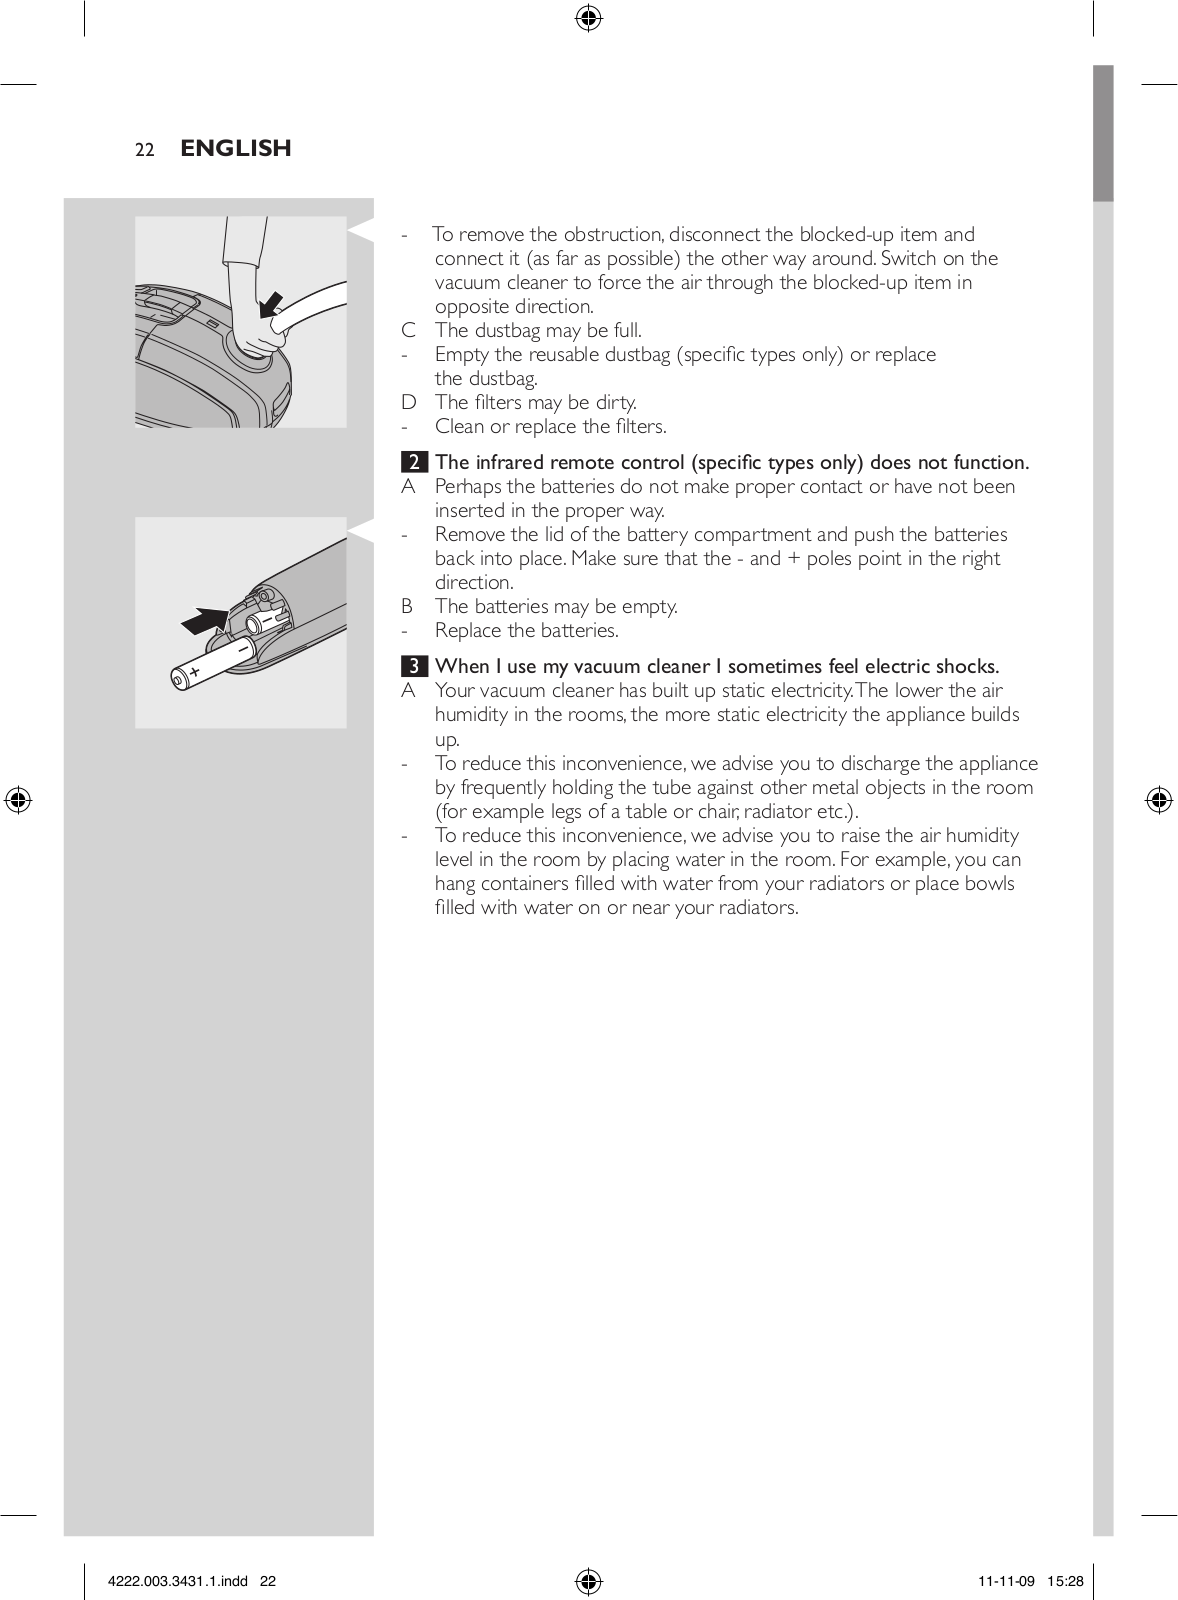
-- To remove the obstruction, disconnect the blocked-up item and connect it (as far as possible) the other way around. Switch on the vacuum cleaner to force the air through the blocked-up item in opposite direction.

C The dustbag may be full.

-- Empty the reusable dustbag (specific types only) or replace the dustbag.

D The filters may be dirty. -- Clean or replace the filters.

2 The infrared remote control (specific types only) does not function.

APerhaps the batteries do not make proper contact or have not been inserted in the proper way.

-- Remove the lid of the battery compartment and push the batteries back into place. Make sure that the - and + poles point in the right direction.

B The batteries may be empty. -- Replace the batteries.

3 When I use my vacuum cleaner I sometimes feel electric shocks.

AYour vacuum cleaner has built up static electricity.The lower the air humidity in the rooms, the more static electricity the appliance builds

up.

-- To reduce this inconvenience, we advise you to discharge the appliance by frequently holding the tube against other metal objects in the room

(for example legs of a table or chair, radiator etc.).

-- To reduce this inconvenience, we advise you to raise the air humidity level in the room by placing water in the room. For example, you can hang containers filled with water from your radiators or place bowls filled with water on or near your radiators.

4222.003.3431.1.indd 22


11-11-09 15:28


Español 23

Introducción

Enhorabuena por la compra de este producto y bienvenido a Philips. Para sacar el mayor partido de la asistencia que Philips le ofrece, registre su producto en www.philips.com/welcome.

El motor de este aspirador es extremadamente eficaz y produce menos ruido que otros tipos, además de ofrecer un alto rendimiento con un consumo de energía bajo.

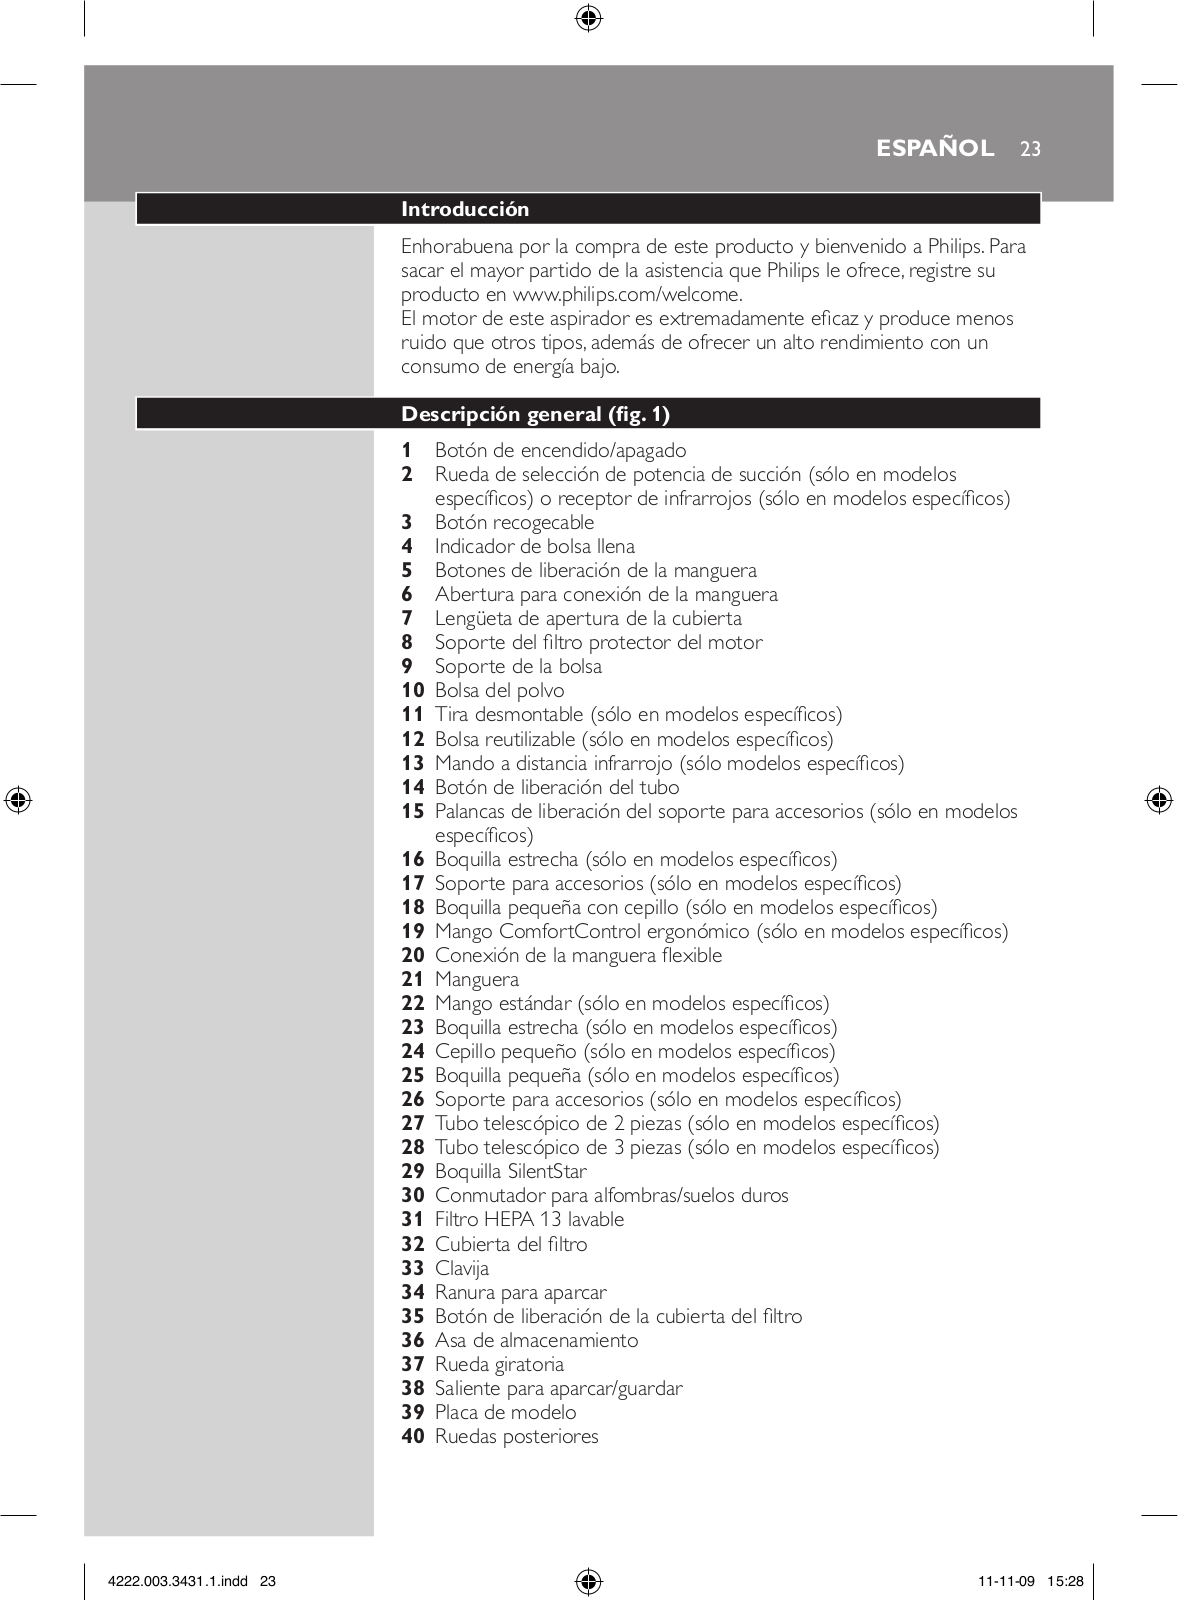
Descripción general (fig. 1)

1Botón de encendido/apagado

2Rueda de selección de potencia de succión (sólo en modelos específicos) o receptor de infrarrojos (sólo en modelos específicos)

3Botón recogecable

4Indicador de bolsa llena

5Botones de liberación de la manguera

6Abertura para conexión de la manguera

7Lengüeta de apertura de la cubierta

8Soporte del filtro protector del motor

9Soporte de la bolsa

10Bolsa del polvo

11Tira desmontable (sólo en modelos específicos)

12Bolsa reutilizable (sólo en modelos específicos)

13Mando a distancia infrarrojo (sólo modelos específicos)

14Botón de liberación del tubo

15Palancas de liberación del soporte para accesorios (sólo en modelos específicos)

16Boquilla estrecha (sólo en modelos específicos)

17Soporte para accesorios (sólo en modelos específicos)

18Boquilla pequeña con cepillo (sólo en modelos específicos)

19Mango ComfortControl ergonómico (sólo en modelos específicos)

20Conexión de la manguera flexible

21Manguera

22Mango estándar (sólo en modelos específicos)

23Boquilla estrecha (sólo en modelos específicos)

24Cepillo pequeño (sólo en modelos específicos)

25Boquilla pequeña (sólo en modelos específicos)

26Soporte para accesorios (sólo en modelos específicos)

27Tubo telescópico de 2 piezas (sólo en modelos específicos)

28Tubo telescópico de 3 piezas (sólo en modelos específicos)

29Boquilla SilentStar

30Conmutador para alfombras/suelos duros

31Filtro HEPA 13 lavable

32Cubierta del filtro

33Clavija

34Ranura para aparcar

35Botón de liberación de la cubierta del filtro

36Asa de almacenamiento

37Rueda giratoria

38Saliente para aparcar/guardar

39Placa de modelo

40Ruedas posteriores 

4222.003.3431.1.indd 23


11-11-09 15:28


24 Español

Importante

Antes de usar el aparato, lea atentamente este manual de usuario y consérvelo por si necesitara consultarlo en el futuro.

Peligro

-- No aspire nunca agua ni ningún otro líquido. No aspire nunca sustancias inflamables ni cenizas hasta que éstas estén frías.

Advertencia

-- Antes de enchufar el aparato, compruebe si el voltaje indicado en el mismo se corresponde con el voltaje de red local.

-- No utilice el aparato si la clavija, el cable de alimentación o el propio aparato están dañados.

-- Si el cable de alimentación está dañado, debe ser sustituido por Philips o por un centro de servicio autorizado por Philips, con el fin de evitar situaciones de peligro.

-- Este aparato no debe ser usado por personas (adultos o niños) con su capacidad física, psíquica o sensorial reducida, ni por quienes no tengan los conocimientos y la experiencia necesarios, a menos que sean supervisados o instruidos acerca del uso del aparato por una persona responsable de su seguridad.

-- Asegúrese de que los niños no jueguen con este aparato.

-- No oriente la manguera, el tubo o cualquier otro accesorio hacia los ojos ni los oídos, ni se los ponga en la boca cuando estén conectados al aspirador y éste esté encendido.

Precaución

-- Si usa el aspirador para aspirar ceniza, arena fina, cal, cemento o sustancias similares, los poros de la bolsa se taponarán. Como resultado, el indicador correspondiente señalará que la bolsa está llena. Cambie

la bolsa desechable o vacíe la bolsa reutilizable aunque no esté aún completamente llena (consulte el capítulo “Sustitución/vaciado de la bolsa”).

-- No utilice nunca el aparato sin el filtro protector del motor, ya que se podría dañar el motor y reducir la vida útil del aparato.

-- Utilice únicamente bolsas sintéticas s-bag ` de Philips, o la bolsa reutilizable que se suministra (sólo en algunos países).

-- Durante la aspiración, especialmente la de las habitaciones con poca humedad en el aire, el aspirador creará electricidad estática. Por tanto puede sufrir descargas eléctricas al tocar el tubo u otras piezas de acero del aspirador. Estas descargas no son dañinas para usted ni tampoco dañan el aparato. Para reducir este problema le recomendamos:

1descargar el aparato apoyando frecuentemente el tubo sobre otros objetos de metal de la habitación (como por ejemplo, las patas de una mesa o silla, radiador, etc.);

4222.003.3431.1.indd 24


11-11-09 15:28


Español 25

2 elevar el nivel de humedad en el aire de la habitación colocando un recipiente con agua en la habitación. Por ejemplo, puede colgar botellas de agua en los radiadores o colocar recipientes llenos de agua en los radiadores o cerca de ellos.

Campos electromagnéticos (CEM)

Este aparato Philips cumple todos los estándares sobre campos electromagnéticos (CEM). Si se utiliza correctamente y de acuerdo con las instrucciones de este manual, el aparato se puede usar de forma segura según los conocimientos científicos disponibles hoy en día.

Antes de utilizarlo por primera vez

1Saque el aparato y los accesorios de la caja.

2Quite cualquier pegatina, lámina protectora o plástico del aparato.

Cómo colocar las pilas (sólo en modelos específicos)

Las pilas para el mando a distancia se suministran con el aparato. Coloque las pilas en el compartimento de las pilas del mango ergonómico antes de utilizar el aparato. Las pilas tienen una duración de al menos 2 años.

1 Utilice un destornillador para aflojar el tornillo de la tapa del compartimento de las pilas (1) y quite la tapa (2).

2Inserte dos pilas alcalinas AAA de 1,5 voltios en el compartimento de las pilas del interior del mango.

Nota: Asegúrese de que los polos - y + estén en la posición correcta.

3 Vuelva a colocar la tapa del compartimento de las pilas (1) y fije el tornillo con un destornillador (2).

4222.003.3431.1.indd 25


11-11-09 15:28


26 Español

Preparación para su uso

Consejo de ergonomía

Mango ComfortControl (sólo en modelos específicos)

-- El exclusivo mango ComfortControl está diseñado de forma ergonómica para proporcionarle una total comodidad mientras aspira.

-- Para aprovecharse de las ventajas de este mango, es importante que no coloque la otra mano en el tubo. Si lo hace, se inclina y dobla la espalda, lo que podría provocarle problemas de espalda.

Colocación del mango

Cómo colocar el mango ComfortControl (sólo en modelos específicos)

1 Acople el mango al tubo telescópico (“clic”).

2Para desconectar el mango del tubo, sostenga el mango con una mano. Con la otra sujete el tubo telescópico, presione el botón de

liberación del tubo (1) y tire del tubo para quitarlo del mango (2).

Nota: Este aspirador se ha diseñado con orificios al final del mango. Estos orificios evitan que los objetos queden atrapados o se dañen cuando utilice el aspirador sin el tubo o sin los accesorios suministrados.

Cómo colocar el mango estándar (sólo en modelos específicos)

1 Para conectar el tubo telescópico al mango, presione el botón de bloqueo del mango (1) e inserte éste en el tubo (2). Encaje el botón de bloqueo en el orificio correspondiente del tubo (“clic”).

2 Para desconectar el tubo del mango presione el botón de bloqueo y tire del mango para sacarlo del tubo.

4222.003.3431.1.indd 26


11-11-09 15:28


Español 27

Cómo colocar la boquilla y los accesorios

1Para conectar la boquilla o un accesorio al tubo, pulse el botón de bloqueo (1) del tubo e introduzca el tubo en el cepillo para suelos

(2).Encaje el botón de bloqueo en el orificio correspondiente de la

boquilla (oirá un “clic”).

Nota:También puede conectar de la misma manera la boquilla o los accesorios directamente al mango.

2 Para desconectar la boquilla o los accesorios del tubo, pulse el botón de bloqueo y tire de la boquilla para sacarla del tubo.

Manguera

1 Para conectar la manguera, acóplela al aparato presionando firmemente hasta que encaje (“clic”).

Nota: Asegúrese de que los salientes de la manguera encajan en las ranuras.

2Para desconectar la manguera, presione los botones (1) y tire de ella (2).

Tubo telescópico 

Nota:Ajuste la longitud del tubo de forma que la mano que sujeta el mango quede a la altura de la cadera.

4222.003.3431.1.indd 27


11-11-09 15:28


28 Español

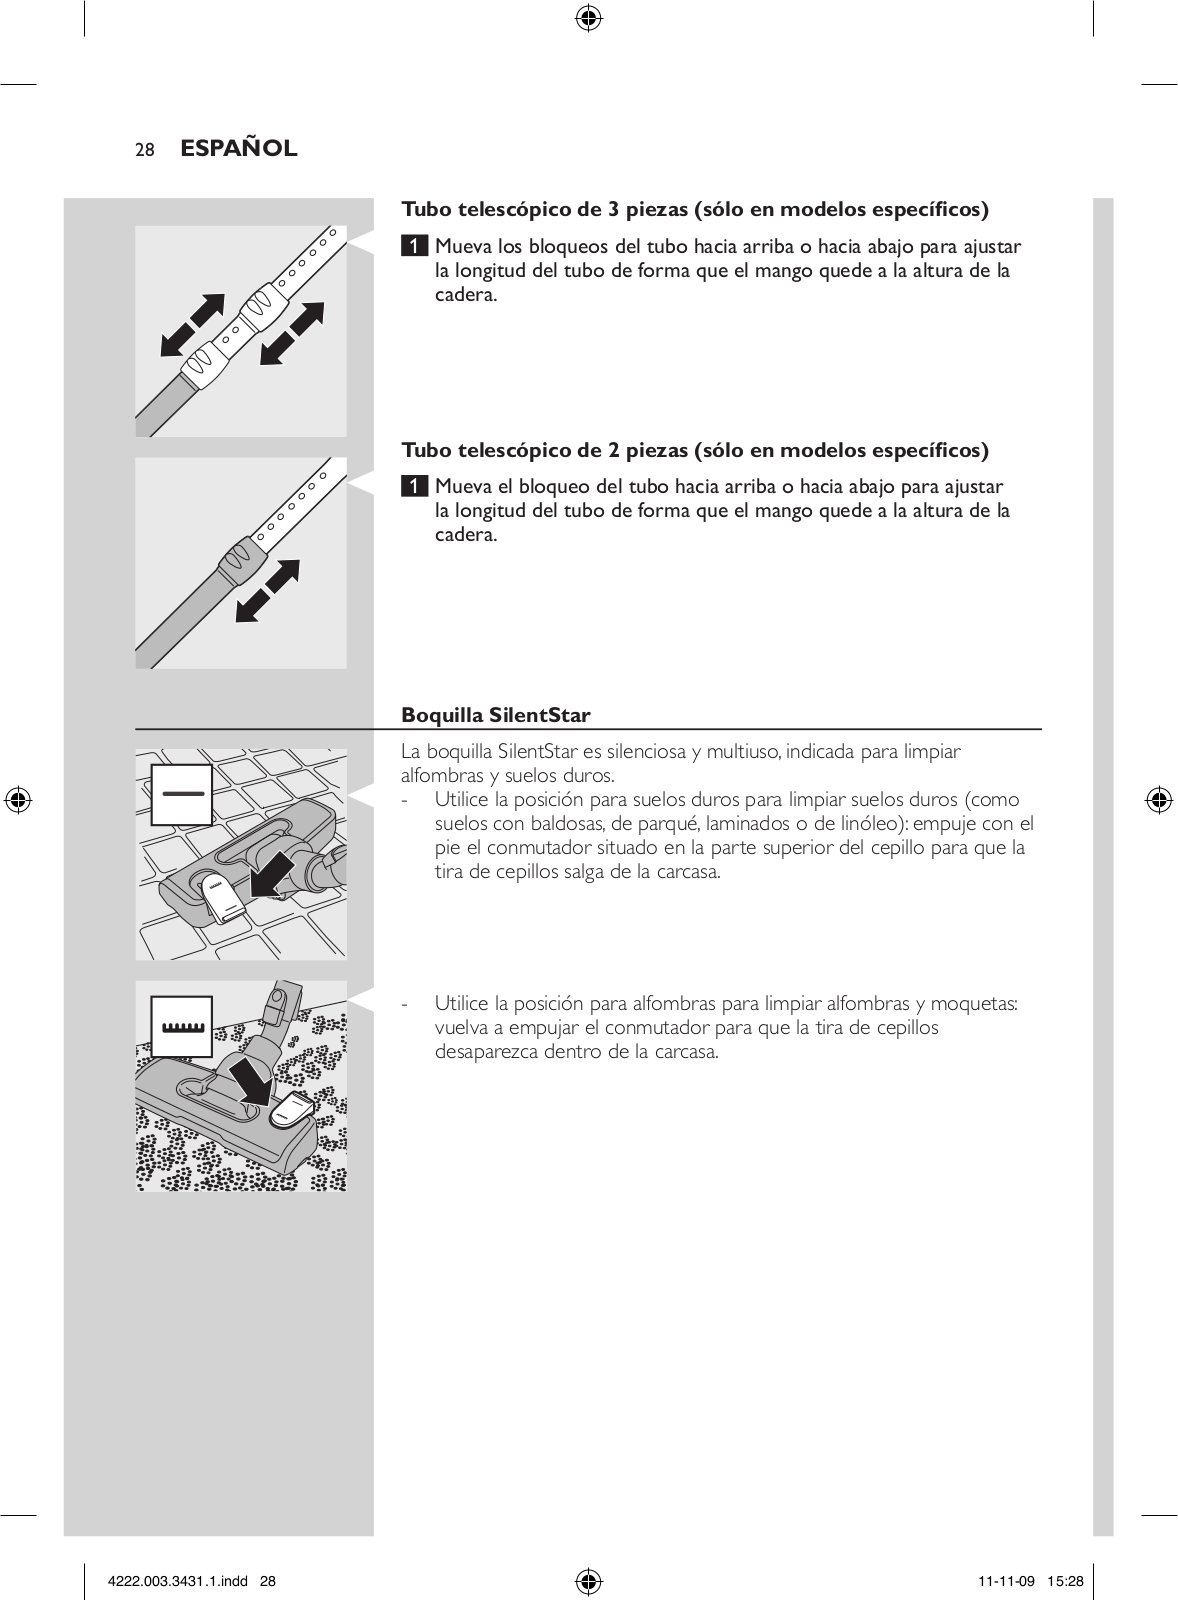
Tubo telescópico de 3 piezas (sólo en modelos específicos)

1Mueva los bloqueos del tubo hacia arriba o hacia abajo para ajustar la longitud del tubo de forma que el mango quede a la altura de la cadera.

Tubo telescópico de 2 piezas (sólo en modelos específicos)

1Mueva el bloqueo del tubo hacia arriba o hacia abajo para ajustar la longitud del tubo de forma que el mango quede a la altura de la cadera.

Boquilla SilentStar

La boquilla SilentStar es silenciosa y multiuso, indicada para limpiar alfombras y suelos duros.

-- Utilice la posición para suelos duros para limpiar suelos duros (como suelos con baldosas, de parqué, laminados o de linóleo): empuje con el pie el conmutador situado en la parte superior del cepillo para que la tira de cepillos salga de la carcasa.

-- Utilice la posición para alfombras para limpiar alfombras y moquetas: vuelva a empujar el conmutador para que la tira de cepillos desaparezca dentro de la carcasa.

4222.003.3431.1.indd 28


11-11-09 15:28


Español 29

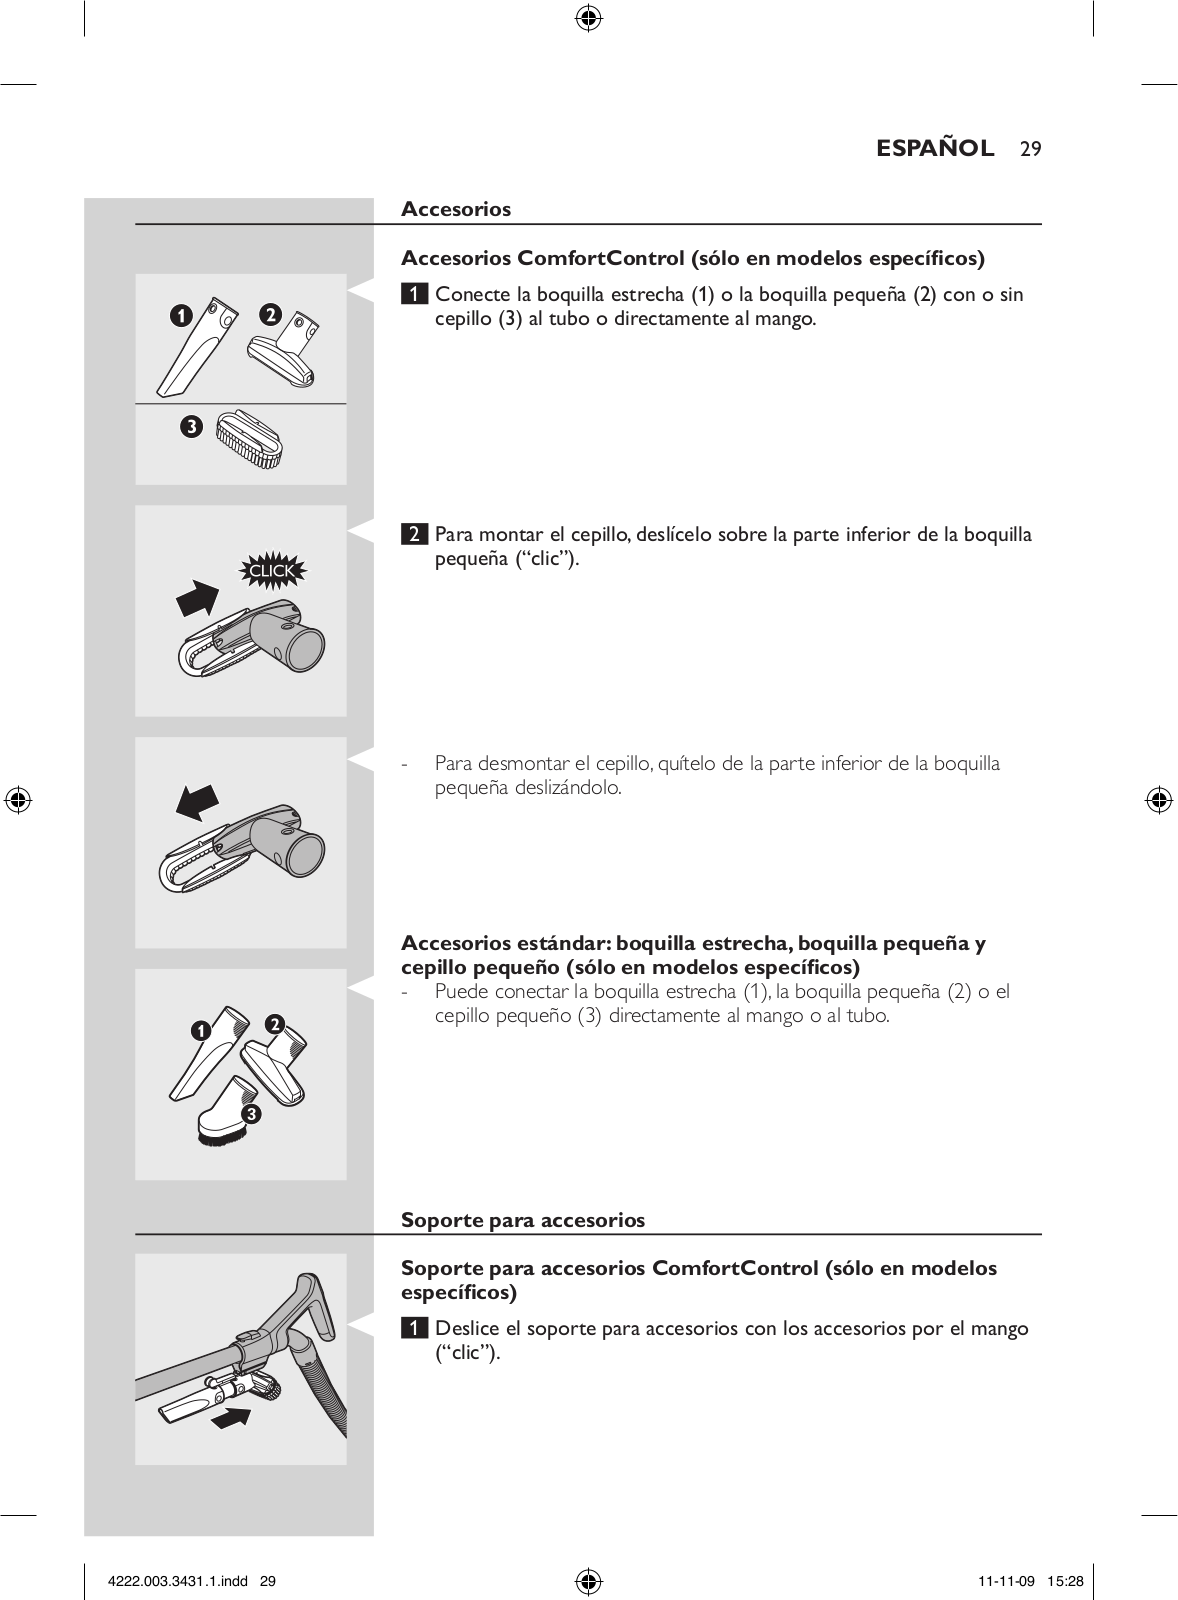
Accesorios

Accesorios ComfortControl (sólo en modelos específicos)

1 Conecte la boquilla estrecha (1) o la boquilla pequeña (2) con o sin cepillo (3) al tubo o directamente al mango.

2 Para montar el cepillo, deslícelo sobre la parte inferior de la boquilla pequeña (“clic”).

-- Para desmontar el cepillo, quítelo de la parte inferior de la boquilla pequeña deslizándolo.

Accesorios estándar:boquilla estrecha,boquilla pequeña y cepillo pequeño (sólo en modelos específicos)

-- Puede conectar la boquilla estrecha (1), la boquilla pequeña (2) o el cepillo pequeño (3) directamente al mango o al tubo.

Soporte para accesorios

Soporte para accesorios ComfortControl (sólo en modelos específicos)

1Deslice el soporte para accesorios con los accesorios por el mango (“clic”).

4222.003.3431.1.indd 29


11-11-09 15:28


30 Español

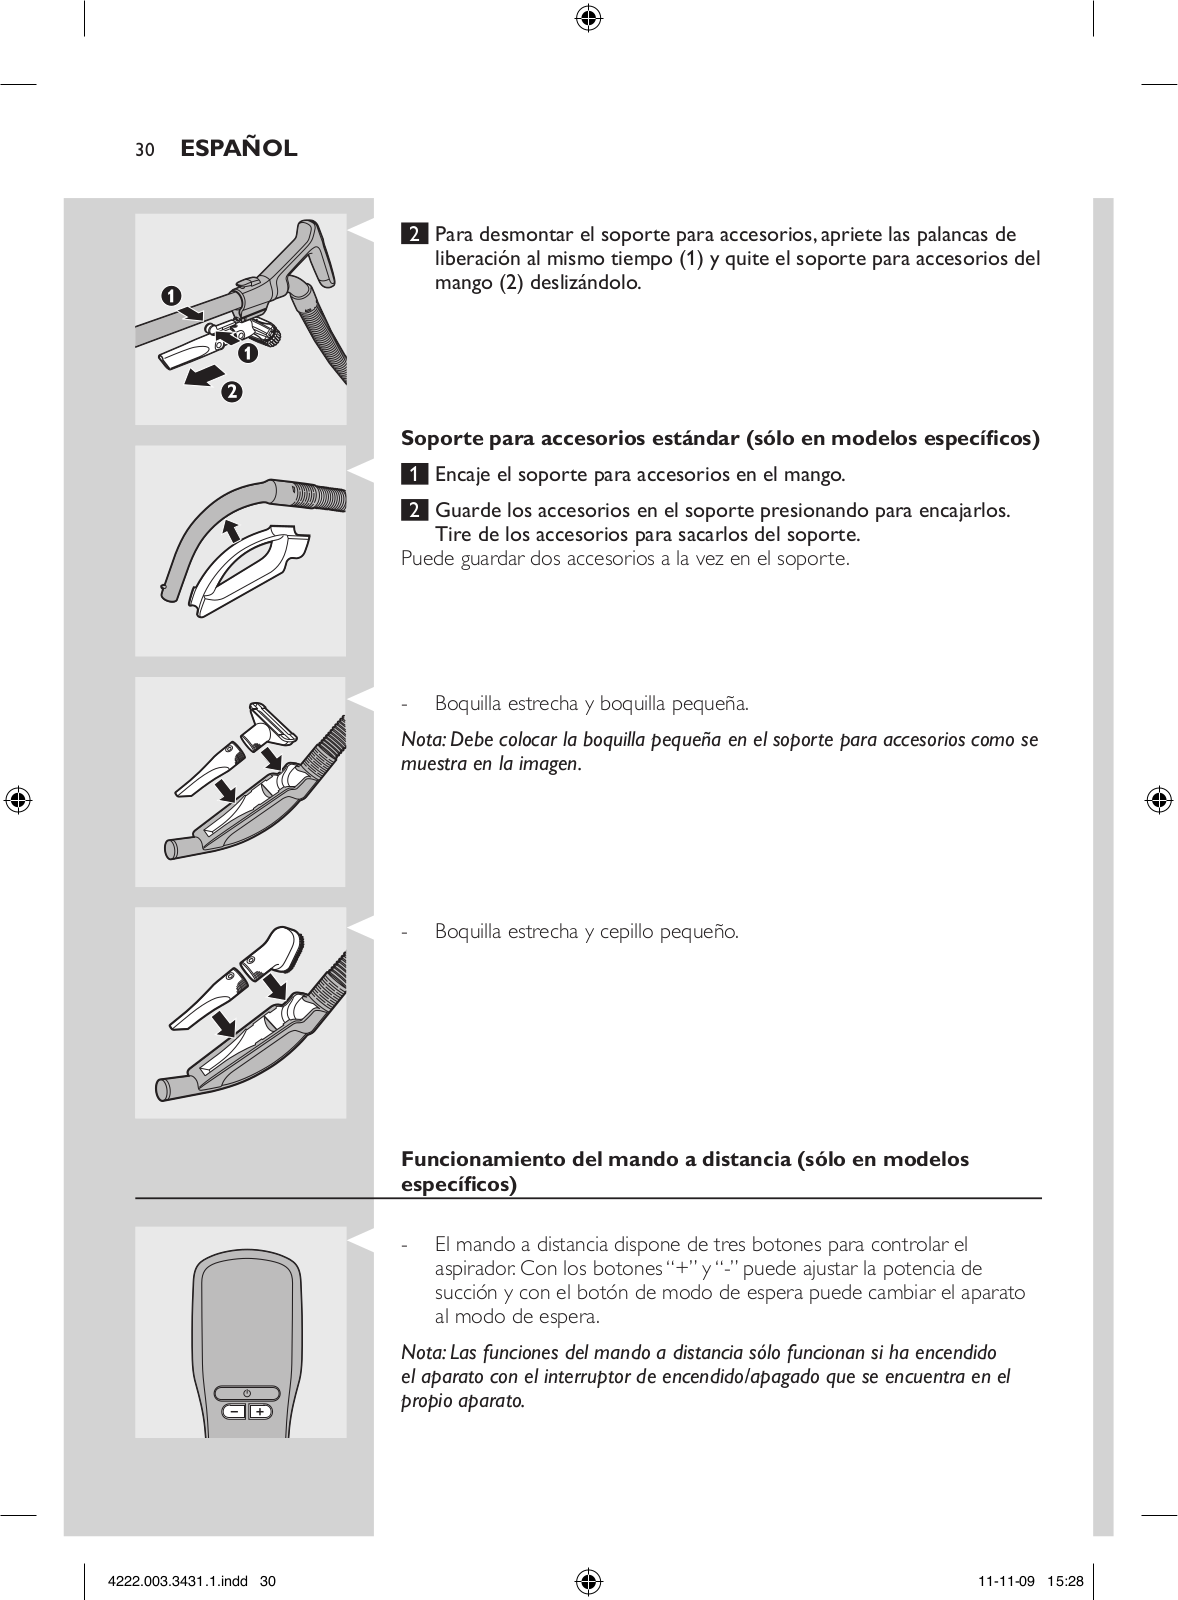
2Para desmontar el soporte para accesorios, apriete las palancas de liberación al mismo tiempo (1) y quite el soporte para accesorios del mango (2) deslizándolo.

Soporte para accesorios estándar (sólo en modelos específicos)

1 Encaje el soporte para accesorios en el mango.

2 Guarde los accesorios en el soporte presionando para encajarlos. Tire de los accesorios para sacarlos del soporte.

Puede guardar dos accesorios a la vez en el soporte.

-- Boquilla estrecha y boquilla pequeña.

Nota: Debe colocar la boquilla pequeña en el soporte para accesorios como se muestra en la imagen.

-- Boquilla estrecha y cepillo pequeño.

Funcionamiento del mando a distancia (sólo en modelos específicos)

-- El mando a distancia dispone de tres botones para controlar el aspirador. Con los botones “+” y “-” puede ajustar la potencia de succión y con el botón de modo de espera puede cambiar el aparato al modo de espera.

Nota: Las funciones del mando a distancia sólo funcionan si ha encendido el aparato con el interruptor de encendido/apagado que se encuentra en el propio aparato. 

4222.003.3431.1.indd 30

11-11-09 15:28

Loading...
+ 148 hidden pages