

Page 1
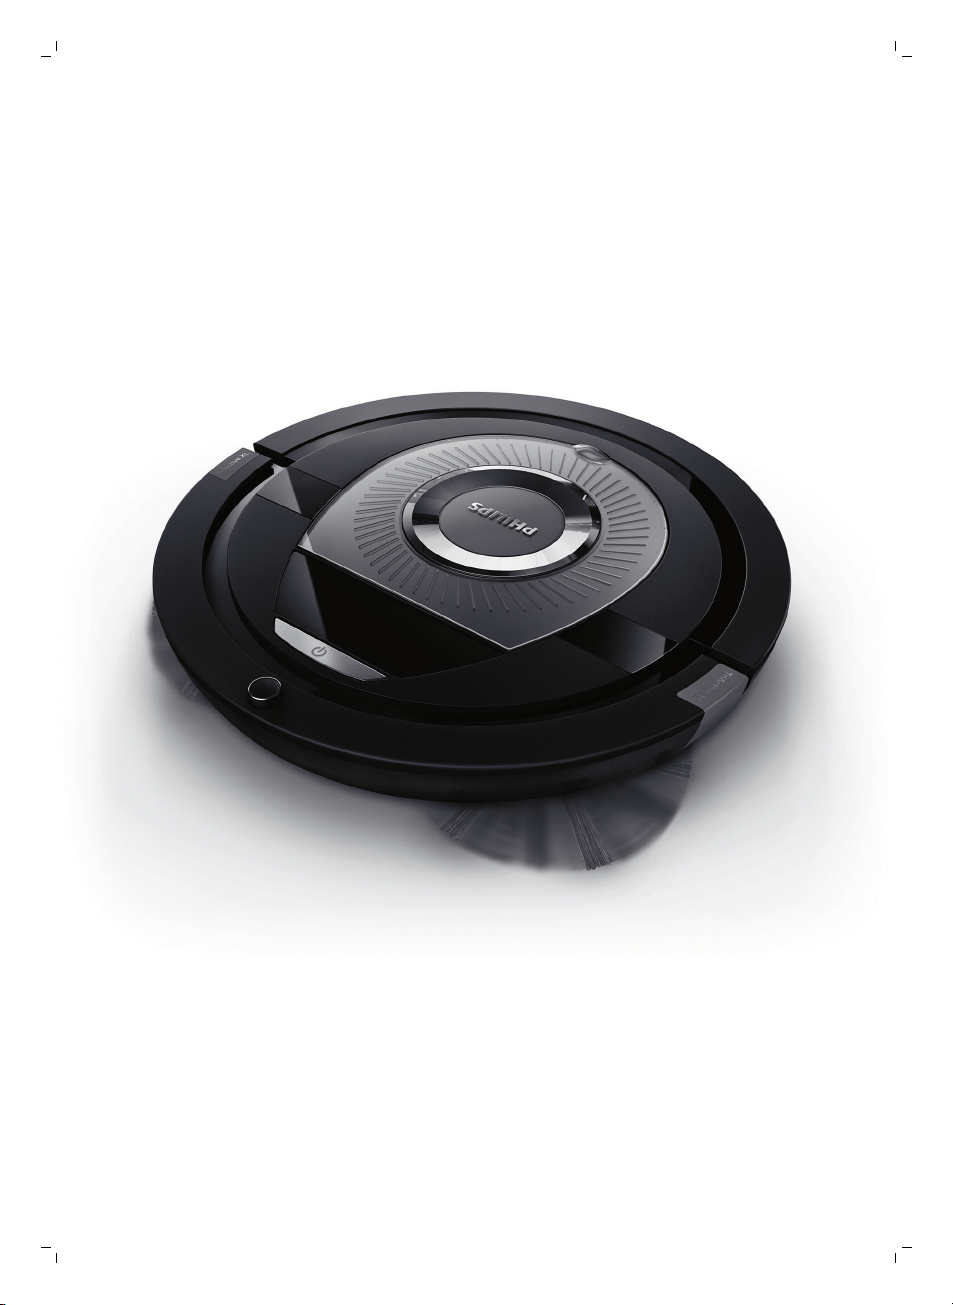
FC8972, FC8776, FC8774, FC8772
Page 2
Page 3
1
2
3
4
5
6
7
8
9 10 11
13
14
15
16
19
20
21
22
2324
18
12
17
1
Page 4

Page 5

English 6
Bahasa Melayu 16
ภาษาไทย
简体中文
繁體中文
한국의
27
36
44
52
Page 6

6
English
Introduction
Congratulations on your purchase and welcome to Philips! To fully benefit from the support that
Philips offers, register your product at www.philips.com/welcome.
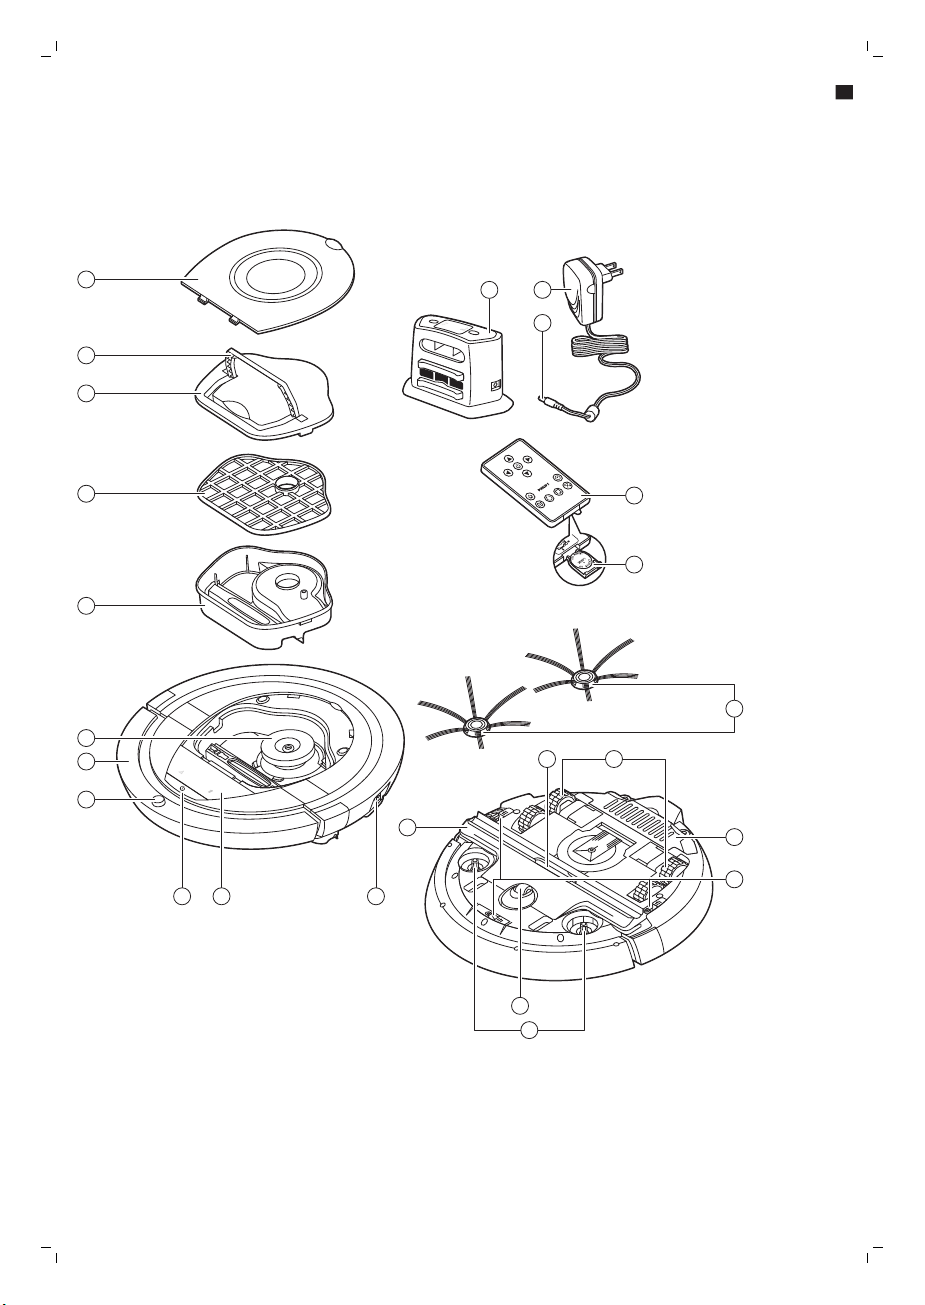
General description
1 Top cover
2 Handle of dust container lid
3 Dust container lid
4 Filter
5 Dust container
6 Fan
7 Bumper
8 Docking station sensor
9 Start/stop button (to start or stop the robot)
10 Display
11 Power switch (to switch the robot on or off)
12 TriActive XL nozzle
13 Front wheel
14 Side brush shafts
15 Drop-off sensors
16 Battery compartment
17 Wheels
18 Suction opening
19 Side brushes
20 Battery holder
21 Remote control
22 Small plug
23 Adapter
24 Docking station
Display and remote control
Display (Fig. 2):
1 Warning indicator
2 Dust container full indicator
Remote control (Fig. 3):
1 Navigation buttons and start/stop
2 Docking button
3 Cleaning time button
4 Cleaning mode buttons
How your robot works
What your robot cleans
This robot is equipped with features that make it a suitable cleaner to help you clean the floors in your
home.
The robot is especially suitable for cleaning hard floors, such as wooden, tiled or linoleum floors. It
may experience problems cleaning soft floors, such as carpet or rugs. If you use the robot on a carpet
English
Page 7

English
or rug, please stay close by the first time to see if the robot can deal with this type of floor. The robot
also needs supervision when you use it on very dark or shiny hard floors.
How your robot cleans
Cleaning system
The robot has a 2-stage cleaning system to clean your floors efficiently.
-
The two side brushes help the robot clean in corners and along walls. They also help to remove dirt
from the floor and move it towards the suction opening (Fig. 4).
-
The suction power of the robot picks up loose dirt and transports it through the suction opening
into the dust container (Fig. 5).
Cleaning patterns
In its auto cleaning mode, the robot uses an automatic sequence of cleaning patterns to clean each
area of the room optimally. The cleaning patterns it uses are:
1 Z-pattern or zigzag pattern (Fig. 6)
2 Random pattern (Fig. 7)
3 Wall-following pattern (Fig. 8)
4 Spot-cleaning pattern (Fig. 9)
In its auto cleaning mode, the robot uses these patterns in a fixed sequence:z-pattern, random
pattern, wall-following pattern, and spot-cleaning pattern.
When the robot has completed this sequence of patterns, it starts moving in Z-pattern again. The
robot continues to use this sequence of patterns to clean the room until the rechargeable battery runs
low, or until it is switched off manually.
Note: You can also select each mode individually by pressing the appropriate button on the remote
control. For more details, see chapter 'Using your robot', section 'Cleaning modes'.
7
How your robot avoids height differences
The robot has three drop-off sensors in its bottom. It uses these drop-off sensors to detect and avoid
height differences such as staircases.
Note: It is normal for the robot to move slightly over the edge of a height difference, as its front dropoff sensor is located behind the bumper.
Caution: In some cases, the drop-off sensors may not detect a staircase or other height difference
in time. Therefore monitor the robot carefully the first few times you use it, and when you operate
it near a staircase or another height difference. It is important that you clean the drop-off sensors
regularly to ensure the robot continues to detect height differences properly (see chapter '
Cleaning and maintenance' for instructions).
Before first use
Mounting the side brushes
1 Unpack the side brushes and place the robot upside down on a table or on the floor.
2 Push the side brushes onto the shafts on the bottom of the robot (Fig. 10).
Note: Make sure you attach the side brushes properly. Press them onto the shaft until you hear
them lock into position with a click.
Page 8

8
English
Removing the protection tag from the remote control
The remote control works on a CR2025 coin-shaped battery. This battery is protected with a
protection tag that has to be removed before use.
1 Pull the battery protection tag out of the battery compartment of the remote control (Fig. 11).
Now the remote control is ready for use.
Preparing for use
Installing the docking station
1 Insert the small plug of the adapter into the socket on the docking station (1) and insert the adapter
into the wall socket (2) (Fig. 12).
2 Place the docking station on a horizontal, level floor against a wall.
Note: Make sure that there are no obstacles or height differences 80 cm in front, 30 cm to the right
and 100 cm to the left of the docking station.
Charging
When charging for the first time and when the rechargeable battery of the robot is empty, the charging
time is four hours.
Your robot can be charged in two ways:
-
On the docking station, either manually or automatically during use;
-
By connecting the robot directly to the mains.
Note: When the rechargeable battery is fully charged, your robot can clean for up to 100 minutes.
Charging on the docking station
1 Set the power switch to 'on' position (Fig. 14).
2 Place the robot on the plugged-in docking station (Fig. 15).
3 The start/stop button starts flashing slowly (Fig. 16).
4 When the rechargeable battery is fully charged, the start/stop button lights up continuously (Fig.
17).
Charging automatically during use
1 When the robot has finished cleaning or when only 15% of the battery power remains, it
automatically searches for the docking station to recharge. When the robot searches for the
docking station, the start/stop button flashes quickly (Fig. 18).
2 When the rechargeable battery is fully charged, the start/stop button lights up continuously.
Note: The robot only searches for the docking station automatically when it started cleaning from the
docking station.
Charging directly from the mains
1 Press the power switch to switch on the robot.
2 Insert the small plug of the adapter into the socket on the robot (1). Insert the adapter into a wall
socket (2) (Fig. 19).
3 When the robot is connected to the mains correctly, the start/stop button starts flashing very
slowly. This indicates that the robot is charging.
4 When the rechargeable battery is fully charged, the start/stop button lights up continuously.
Page 9

English
Preparing the room for a cleaning run
Before you start the robot on its cleaning run, make sure that you remove all loose and fragile objects
from the floor (Fig. 20).
Also remove all cables, wires and cords from the floor.
Using your robot
Starting and stopping
1 Press the start/stop button.
-
You can press the start/stop button on the robot (Fig. 21).
-
You can also press the start/stop button on the remote control (Fig. 22).
2 The start/stop button is continuously on and the robot starts cleaning (Fig. 23).
3 The robot cleans in the auto-cleaning mode until its battery runs low. In the auto-cleaning mode, it
follows repeated sequences of Z-pattern, random, wall-following and spot-cleaning patterns (Fig.
24).
Note: To select an individual mode, press one of the mode buttons on the remote control. See
section 'Cleaning mode selection' for more details.
4 When the battery runs low, the start/stop button starts flashing and the robot searches for the
docking station to recharge (Fig. 18).
5 You can also press the start/stop button to interrupt or stop the cleaning run. If you press the
start/stop button again and there is still enough energy in the rechargeable battery, the robot
continues cleaning in the auto-cleaning mode.
6 To make the robot return to the docking station before the rechargeable battery runs low, press the
docking button on the remote control (Fig. 25).
The start/stop button starts flashing and the robot searches for the docking station (Fig. 26).
Note: If you did not start the robot from the docking station, it does not search for the docking
station automatically when the rechargeable battery runs low. If there is still enough energy in the
rechargeable battery, you can press the docking button on the remote control to make the robot
return to the docking station. If the rechargeable battery is completely empty, you have to place
the robot on the docking station manually.
9
Operating the docking station
The docking station has two controls that can be used to operate the robot.
Battery full and go button
If you press the battery full and go button on the docking station while the robot is charging, the robot
starts cleaning as soon as the rechargeable battery is full (Fig. 27).
24h button
If you press the 24h button on the docking station, the docking station starts to count down the 24
hours until the next cleaning run. When the countdown is finished, the robot starts cleaning until its
battery runs low and then returns to the docking station automatically to recharge (Fig. 28).
Cleaning mode selection
Next to the auto-cleaning mode, this robot has four individual cleaning modes that can each be
activated by pressing the appropriate button on the remote control.
Page 10
10
English
Z-pattern mode
In Z-pattern mode, the robot cleans by making Z-shaped loops through the room to clean large areas
(Fig. 29).
Random mode
In this mode, the robot cleans the room in a mixed pattern of straight and crisscross movements (Fig.
30).
Wall-following mode
In this mode, the robot follows the walls of the room to give the area alongside the walls an extra
clean (Fig. 31).
Spot-cleaning mode
In this mode, the robot moves randomly on a small area to clean this area thoroughly (Fig. 32).
Note: The manually selected modes are only active for a couple of minutes. After that, the robot
switches to auto-cleaning mode.
Manual driving
1 Use the arrow buttons above and below and to the left and right of the start/stop button on the
remote control to navigate the robot through the room. (Fig. 33)
Note: Be careful when you drive the robot manually close to height differences and staircases.
Note: The vacuuming function and the side brushes only work when the robot is driven forward.
The left, right or back buttons are only for maneuvering the robot.
Using the cleaning time button
Press the cleaning time button on the remote control to make the robot clean for 35 minutes. When
the cleaning time is finished, the robot returns to the docking station to recharge (Fig. 34).
Signals and their meaning
The robot has a display with two indicators: a warning indicator and the dust container full indicator.
The start/stop button gives light signals. The table below explains the meaning of the signals.
Signal
The start/stop button is on continuously. The robot is ready to clean.
The start/stop button flashes slowly. The robot is charging.
The start/stop button flashes quickly. The robot is is searching for the docking station.
The dust container full indicator lights up. The dust container is full.
The warning indicator lights up. The robot was lifted while it was cleaning.
Meaning
The rechargeable battery of the robot is low.
The bumper of the robot is stuck.
A wheel or side brush is stuck.
Page 11
English
Signal Meaning
The top cover is not present or is not closed
properly.
The robot cannot find the docking station.
Cleaning and maintenance
Emptying and cleaning the dust container
Empty and clean the dust container when the dust container full indicator lights up continuously.
1 Remove the cover (Fig. 35).
2 Pull up the handle of the dust container lid and lift the dust container out of the dust container
compartment (Fig. 36).
Note: When you remove or reinsert the dust container, take care not to damage the blades of the
motor fan.
3 Carefully lift the lid off the dust container (1) and take out the filter (2) (Fig. 37).
4 Shake the dust container over a dustbin to empty it. Clean the filter and the inside of the dust
container with a cloth or a toothbrush with soft bristles. Also clean the suction opening in the
bottom of the dust container (Fig. 38).
Caution: Do not clean the dust container and the filter with water or in the dishwasher.
5 Put the filter back into the dust container (1). Then place the lid on the dust container(2) (Fig. 39).
6 Put the dust container back into the dust container compartment and put the top cover back on
the robot (Fig. 40).
Caution: Always make sure the filter is present inside the dust container. If you use the robot
without the filter inside the dust container, the motor will be damaged.
11
Cleaning the robot
To maintain good cleaning performance, you have to clean the drop-off sensors, the wheels, the side
brushes and the suction opening from time to time.
1 Place the robot upside down on a flat surface.
2 Use a brush with soft bristles (e.g. a toothbrush) to remove dust or fluff from the drop-off sensors.
(Fig. 41)
Note: It is important that you clean the drop-off sensors regularly. If the drop-off sensors are dirty,
the robot may fail to detect height differences or staircases.
3 Use a brush with soft bristles (e.g. a toothbrush) to remove dust or fluff from the front wheel and
side wheels (Fig. 42).
4 To clean the side brushes, grab them by the bristles and pull them off their shafts (Fig. 43).
5 Remove fluff, hairs and threads from the shaft and from the side brush with a soft brush (e.g. a
toothbrush) or a cloth (Fig. 44).
6 Check the side brushes and the bottom of the robot for any sharp objects that could damage your
floor.
7 After you have removed the side brushes from their shafts, undo the snap connections of the
TriActive XL nozzle by inserting your fingers at the places marked with arrows and pull the TriActive
nozzle off the robot (Fig. 45).
Page 12

12
English
8 Clean the suction opening with a soft brush (e.g. a toothbrush) (Fig. 46).
9 Remove all visible dirt from the TriActive nozzle (Fig. 47).
10 Insert the snap hooks of the TriActive nozzle into the holes in the bottom of the robot (Fig. 48).
Push the TriActive nozzle back into position. Check if the nozzle can move a few millimeters up and
down freely.
Replacement
Ordering accessories
To buy accessories or spare parts, visit www.shop.philips.com/service or go to your Philips dealer.
You can also contact the Philips Consumer Care Centre in your country (see the international warranty
leaflet for contact details).
Replacing the filter
Replace the filter if it is very dirty or damaged. You can order a new filter under order number FC8012.
See 'Emptying and cleaning the dust container' in chapter 'Cleaning and maintenance' for instructions
on how to remove the filter from the dust container and how to place it in the dust container.
Replacing the side brushes
Replace the side brushes after some time to ensure proper cleaning results.
Note: Always replace the side brushes when you notice signs of wear or damage. We also recommend
that you replace both side brushes at the same time. You can order spare side brushes as a set under
order number FC8013.
1 To replace the side brushes, grab the old side brushes by the bristles and pull them off their shafts
(Fig. 43).
2 Push the new side brushes onto the shafts (Fig. 10).
Removing the rechargeable battery
Warning: Only remove the rechargeable battery when you discard the appliance. Make
sure the battery is completely empty when you remove it.
To remove the rechargeable battery, follow the instructions below. You can also take the robot to a
Philips service center to have the rechargeable battery removed. Contact the Philips Consumer Care
Center in your country for the address of a service center near you.
1 Start the robot from a place somewhere in the room and not from the docking station.
2 Let the robot run until the rechargeable battery is empty to make sure that the rechargeable
battery is completely discharged before you remove it and dispose of it.
3 Undo the screws of the battery compartment lid and remove the lid (Fig. 52).
4 Lift out the rechargeable battery and disconnect it (Fig. 50).
5 Take the robot and the rechargeable battery to a collection point for electrical and electronic
waste.
Page 13
English
Replacing the battery of the remote control
The remote control works on a CR2025 coin-shaped battery. Replace the battery when the robot no
longer responds when you press the buttons on the remote control.
1 Hold the remote control upside down. Push the release button on the battery holder and at the
same time slide the battery holder out of the remote control (Fig. 53).
2 Remove the empty battery from the battery holder and place a new battery in the battery holder.
Then slide the battery holder back into the remote control (Fig. 54).
Problem
The robot does not start
cleaning when I press the
start/stop button.
Possible cause Solution
The rechargeable battery is
empty.
Charge the rechargeable battery (see
chapter 'Preparing for use').
13
The robot does not
respond when I press
one of the buttons.
The warning indicator
flashes quickly.
The small plug is still inserted
in the socket on the robot.
The power switch is not set to
'on' (I) position.
You set the on/off switch to
'off'.
The robot could not find the
docking station and the
battery ran out.
One or both wheels are stuck. Set the power switch to 'off'. Remove
One or both side brushes are
stuck.
The top cover is not present or
is not closed properly.
The robot does not work on mains
power. It only works on its rechargeable
battery. Therefore, always disconnect
the adapter from the robot and the
mains before use.
Press the power switch to 'on'. Place the
robot on the plugged-in docking station
or plug in the small plug of the adapter.
After a few seconds, the robot beeps
and the display lights up.
Press the power switch to 'on'. Place the
robot on the plugged-in docking station
or plug in the small plug of the adapter.
After a few seconds, the robot beeps
and the display lights up.
Place the robot on the plugged-in
docking station or plug in the small plug
of the adapter. After a few seconds, the
robot beeps and the display lights up.
the fluff, hair, thread or wire that is
caught around the wheel suspension.
Clean the side brushes (see chapter
'Cleaning and maintenance').
When the top cover is not present or is
not closed properly, the robot does not
work. Place the top cover on the robot
properly.
The bumper is stuck. Press the start/stop button. Lift the
robot so that its bumper comes free.
Place the robot at some distance from
the obstacle and press the start/stop
button to make it resume cleaning.
Page 14
14
English
Problem Possible cause Solution
The robot was lifted while it
was cleaning.
Press the start/stop button. Place the
robot on the floor. Then press the
start/stop button to make the robot
resume cleaning.
The robot does not clean
properly.
The bristles of one or both side
brushes are crooked or bent.
The filter in the dust container
is dirty.
The suction opening in the
bottom of the dust container is
clogged.
The front wheel is jammed
with hair or other dirt.
The robot is cleaning a very
dark or shiny surface, which
triggers the drop-off sensors.
This causes the robot to move
in an unusual pattern.
Soak the brush or brushes in warm water
for a while. If this does not restore the
bristles to their proper shape, replace
the side brushes (see chapter
'Replacement').
Clean the filter in the dust container with
a cloth or a toothbrush with soft bristles.
You can also clean the filter and dust
container with a regular vacuum cleaner
at a low suction power setting.
If brushing or vacuuming does not help
to clean the filter, replace the filter with
a new one. We advise you to replace the
filter at least once a year.
Clean the suction opening (see chapter
'Cleaning and maintenance').
Clean the front wheel (see chapter
'Cleaning and maintenance').
Press the start/stop button and then
move the robot to a lighter colored
piece of the floor. If the problem
continues to occur on lighter colored
floors, please go to
www.philips.com/support or contact the
Consumer Care Center in your country.
The rechargeable battery
can no longer be charged
or runs empty very fast.
The battery of the
remote control runs
empty too fast.
The robot is cleaning a floor
that reflects sunlight quite
strongly. This triggers the dropoff sensors and causes the
robot to move in an unusual
pattern.
The rechargeable battery has
reached the end of its life.
Perhaps you did not insert the
correct type of battery.
Close the curtains to block sunlight from
entering the room. You can also start
cleaning when the sunlight is less bright.
Have the rechargeable battery replaced
by a Philips service center (see chapter
'Replacement').
For the remote control, you need a
CR2025 coin-shaped battery. If the
problem persists, go to
www.philips.com/support or contact the
Consumer Care Center in your country.
Page 15
Problem Possible cause Solution
The robot is moving in
circles.
The robot is in spot-cleaning
mode.
This is normal behavior. The spotcleaning mode can be activated when a
lot of dirt is detected on the floor for a
thorough clean. It is also part of the auto
cleaning mode. After approximately one
minute the robot resumes its normal
cleaning pattern. You can also stop the
spot-cleaning mode by selecting a
different cleaning mode on the remote
control.
English
15
The robot cannot find the
docking station.
There is not enough room for
the robot to navigate towards
the docking station.
The robot is still actively
searching.
The robot was not started from
the docking station.
Try to find another place for the docking
station. See 'Installing the docking
station' in chapter 'Preparing for use'.
Give the robot around 20 minutes to
return to the docking station.
If you want the robot to return to the
docking station after a cleaning run, start
it from the docking station.
Page 16

16
Bahasa Melayu
Pengenalan
Tahniah atas pembelian anda dan selamat menggunakan Philips! Untuk memanfaatkan sepenuhnya
sokongan yang ditawarkan oleh Philips, daftar produk anda di www.philips.com/welcome.
Perihalan umum
1 Penutup atas
2 Pemegang penutup bekas habuk
3 Tudung bekas habuk
4 Penuras
5 Bekas habuk
6 Kipas
7 Bampar
8 Sensor stesen dok
9 Butang mula/henti (untuk memulakan atau memberhentikan robot)
10 Paparan
11 Suis kuasa (untuk menghidupkan atau mematikan robot)
12 Muncung TriActive XL
13 Roda depan
14 Aci berus tepi
15 Sensor jatuh
16 Petak bateri
17 Roda
18 Bukaan sedutan
19 Berus tepi
20 Pemegang bateri
21 Unit kawalan jauh
22 Plag kecil
23 Penyesuai
24 Stesen dok
Paparan dan unit kawalan jauh
Paparan (Raj. 2):
1 Penunjuk amaran
2 Penunjuk bekas habuk penuh
Unit kawalan jauh (Raj. 3):
1 Butang navigasi dan mula/henti
2 Butang dok
3 Butang masa pembersihan
4 Butang mod pembersihan
Bagaimana robot anda berfungsi
Apa yang dibersihkan oleh robot anda
Robot ini dilengkapi dengan ciri-ciri yang membuatnya pembersih yang sesuai untuk membantu anda
membersihkan lantai di rumah anda.
Robot ini paling sesuai untuk membersihkan lantai keras, seperti lantai kayu, berjubin atau linoleum.
Robot mungkin mengalami masalah membersihkan lantai lembut, seperti karpet atau ambal. Jika
anda menggunakan robot di atas karpet atau ambal, harap berada dekat dengannya pada kali
Bahasa Melayu
Page 17

Bahasa Melayu
pertama untuk melihat sama ada robot itu boleh menangani lantai jenis ini. Robot juga memerlukan
penyeliaan apabila anda menggunakannya di atas lantai keras yang sangat gelap atau berkilat.
Bagaimana robot anda membersihkan kawasan
Sistem pembersihan
Robot mempunyai sistem pembersihan 2 tahap untuk membersihkan lantai anda dengan cekap.
-
Dua berus tepi membantu robot membersihkan sudut dan sepanjang dinding. Berus itu juga
membantu untuk mengeluarkan habuk daripada lantai dan menggerakkannya ke arah bukaan
sedutan (Raj. 4).
-
Kuasa sedutan robot mengutip habuk yang bertebaran dan mengangkutnya melalui bukaan
sedutan ke dalam bekas habuk (Raj. 5).
Corak pembersihan
Dalam mod auto-pembersihan, robot menggunakan urutan automatik corak pembersihan untuk
membersihkan setiap kawalan bilik secara optimum. Corak pembersihan yang digunakannya ialah:
1 Corak Z atau corak zigzag (Raj. 6)
2 Corak rambang (Raj. 7)
3 Corak mengikut dinding (Raj. 8)
4 Corak pembersihan rapi (Raj. 9)
Dalam mod auto-pembersihan, robot menggunakan corak-corak ini dalam urutan tetap: corak z,
corak rambang, corak mengikut dinding dan corak pembersihan rapi.
Apabila robot telah melengkapkan urutan corak ini, ia mula bergerak dalam corak Z semula. Robot
terus menggunakan urutan corak ini untuk membersihkan bilik sehingga bateri boleh cas semula
kurang kuasa atau sehingga ia dimatikan secara manual.
17
Catatan: Anda juga boleh memilih setiap mod secara individu dengan menekan butang yang sesuai
pada unit kawalan jauh. Untuk butiran lanjut, lihat bab 'Menggunakan robot anda', bahagian 'Mod
pembersihan'.
Bagaimana robot anda mengelak perbezaan ketinggian
Robot mempunyai tiga sensor jatuh di bawahnya. Robot menggunakan sensor jatuh ini untuk
mengesan dan mengelakkan perbezaan ketinggian seperti anak tangga.
Catatan: Memang lumrah untuk robot bergerak lebih sedikit dari hujung perbezaan ketinggian kerana
sensor jatuh depannya terletak di belakang bampar.
Awas: Dalam sesetengah kes, sensor jatuh mungkin tidak dapat mengesan tangga atau perbezaan
ketinggian lain tepat pada masanya. Oleh itu awasi robot dengan teliti pada beberapa kali
pertama anda menggunakannya dan apabila anda menggunakannya berhampiran anak tangga
atau perbezaan ketinggian lain. Penting untuk anda membersihkan sensor jatuhnya secara tetap
bagi memastikan robot terus dapat mengesan perbezaan ketinggian dengan betul (lihat bab
'Pembersihan dan penyelenggaraan' untuk arahan).
Sebelum penggunaan pertama
Memasang berus tepi
1 Buka berus tepi daripada bungkusannya dan terbalikkan robot di atas meja atau lantai.
2 Tolak berus tepi ke aci di bawah robot (Raj. 10).
Page 18

18
Bahasa Melayu
Catatan: Pastikan anda menyambungkan berus tepi dengan sempurna. Tekannya ke aci sehingga
anda mendengarnya terkancing ke kedudukannya dengan bunyi klik.
Keluarkan tag perlindungan daripada unit kawalan jauh
Unit kawalan jauh berfungsi menggunakan bateri CR2025 berbentuk syiling. Bateri ini dilindungi
dengan tag perlindungan yang perlu dikeluarkan sebelum guna.
1 Tarik keluar tag perlindungan bateri daripada petak bateri unit kawalan jauh (Raj. 11).
Kini unit kawalan jauh sudah bersedia untuk digunakan.
Membuat persediaan untuk guna
Memasang stesen dok
1 Masukkan palam kecil penyesuai ke dalam soket pada stesen dok (1) dan masukkan penyesuai ke
dalam soket dinding (2) (Raj. 12).
2 Letakkan stesen dok di atas lantai rata dan mendatar ke dinding.
Catatan: Pastikan tiada halangan atau perbezaan ketinggian 80 cm di depan, 30 cm ke kanan dan
100 cm ke kiri stesen dok.
Pengecasan
Apabila mengecas untuk kali pertama dan apabila bateri boleh cas semula robot sudah kosong, masa
pengecasan ialah empat jam.
Robot anda boleh dicas dengan dua cara:
-
Di stesen dok, secara manual atau automatik semasa guna;
-
Dengan menyambungkan robot secara langsung ke sesalur.
Catatan: Apabila bateri boleh cas semula telah dicas sepenuhnya, robot anda boleh membersihkan
kawasan selama 100 minit.
Pengecasan di stesen dok
1 Tetapkan suis kuasa kepada posisi 'on' (hidup) (Raj. 14).
2 Tempatkan robot pada stesen dok yang dipasangkan palamnya (Raj. 15).
3 Butang mula/henti mula berkelip dengan perlahan (Raj. 16).
4 Apabila bateri boleh cas semula telah dicas sepenuhnya, butang mula/henti menyala secara
berterusan (Raj. 17).
Mengecas secara automatik semasa guna
1 Apabila robot telah selesai membersihkan kawasan atau apabila hanya ada baki 15% kuasa bateri,
robot itu akan secara automatik mencari stesen dok untuk mengecas semula. Apabila robot
mencari stesen dok, butang mula/henti berkelip pantas (Raj. 18).
2 Apabila bateri boleh cas semula telah dicas sepenuhnya, butang mula/henti menyala secara
berterusan.
Catatan: Robot itu hanya mencari stesen dok secara automatik apabila ia memulakan pembersihan
daripada stesen dok.
Mengecas secara langsung daripada sesalur
1 Tekan suis kuasa untuk menghidupkan robot.
Page 19

Bahasa Melayu
2 Masukkan palam kecil penyesuai ke dalam soket pada robot (1). Masukkan penyesuai itu ke dalam
soket dinding (2) (Raj. 19).
3 Apabila robot disambung ke sesalur dengan betul, butang mula/henti mula berkelip dengan
sangat perlahan. Ini menunjukkan bahawa robot itu sedang mengecas.
4 Apabila bateri boleh cas semula telah dicas sepenuhnya, butang mula/henti menyala secara
berterusan.
19
Menyediakan bilik untuk aktiviti pembersihan
Sebelum anda memulakan robot bagi aktiviti pembersihan, pastikan anda mengetepikan semua objek
yang longgar dan mudah pecah daripada lantai (Raj. 20).
Ketepikan juga semua kabel, wayar dan kord daripada lantai.
Menggunakan robot anda
Bermula dan berhenti
1 Tekan butang mula/henti.
-
Anda boleh menekan butang mula/henti pada robot (Raj. 21).
-
Anda juga boleh menekan butang mula/henti pada unit kawalan jauh (Raj. 22).
2 Butang mula/henti terus menyala dan robot mula membersihkan kawasan (Raj. 23).
3 Robot membersihkan kawasan dalam mod auto-pembersihan sehingga baterinya kurang kuasa.
Dalam mod auto-pembersihan, robot mengikuti urutan berulang corak Z, secara rambang,
mengikuti dinding dan corak pembersihan rapi (Raj. 24).
Catatan: Untuk memilih mod individu, tekan salah satu daripada butang mod pada unit kawalan
jauh. Lihat bahagian 'Pemilihan mod pembersihan' untuk butiran lanjut.
4 Apabila kuasa bateri berkurangan, butang mula/henti mula berkelip dan robot mencari stesen dok
untuk mengecas semula (Raj. 18).
5 Anda juga boleh menekan butang mula/henti untuk mengganggu atau menghentikan aktiviti
pembersihan. Jika anda menekan butang mula/henti sekali lagi dan masih mempunyai tenaga
yang mencukupi dalam bateri boleh cas semula, robot akan terus membersihkan dalam mod autopembersihan.
6 Untuk membuat robot kembali ke stesen dok sebelum bateri boleh cas semula kurang kuasa, tekan
butang dok pada alat kawalan jauh (Raj. 25).
Butang mula/henti mula berkelip dan robot mencari stesen dok (Raj. 26).
Catatan: Jika anda tidak memulakan robot dari stesen dok, ia tidak akan mencari stesen dok secara
automatik apabila bateri boleh cas semula kurang kuasa. Jika tenaga masih mencukupi dalam
bateri boleh cas semula, anda boleh menekan butang dok pada unit kawalan jauh untuk membuat
robot kembali ke stesen dok. Jika bateri boleh cas semula sudah kosong sepenuhnya, anda perlu
meletakkan robot di stesen dok secara manual.
Mengendalikan stesen dok
Stesen dok mempunyai dua kawalan yang boleh digunakan untuk mengendalikan robot tersebut.
Butang bateri penuh dan mula
Jika anda menekan butang bateri penuh dan mula pada stesen dok semasa robot sedang mengecas,
robot mula membersihkan kawasan sejurus selepas bateri cas semua penuh (Raj. 27).
Page 20

20
Bahasa Melayu
Butang 24j
Jika anda menekan butang 24j pada stesen dok, stesen dok mula untuk menghitung undur 24 jam
sehingga aktiviti pembersihan yang berikutnya. Apabila hitung undur selesai, robot mula
membersihkan kawasan sehingga baterinya kurang kuasa dan kemudian kembali ke stesen dok
secara automatik untuk mengecas semula (Raj. 28).
Pemilihan mod pembersihan
Di sebelah mod auto-pembersihan, robot ini mempunyai empat mod pembersihan individu yang
setiap daripadanya boleh diaktifkan dengan menekan butang yang sesuai pada unit kawalan jauh.
Mod corak Z
Dalam mod corak Z, robot membersihkan dengan membuat gelung berbentuk Z dalam bilik untuk
membersihkan kawasan yang luas (Raj. 29).
Mod rambang
Dalam mod ini, robot membersihkan bilik dalam corak campuran pergerakan lurus dan silangmenyilang (Raj. 30).
Mod mengikut dinding
Dalam mod ini, robot mengikuti dinding bilik untuk memberi kawasan sepanjang dinding pembersihan
tambahan (Raj. 31).
Mod pembersihan rapi
Dalam mod ini, robot bergerak secara rambang di kawasan yang kecil untuk membersihkan kawasan
ini dengan rapi (Raj. 32).
Catatan: Mod yang dipilih secara manual hanya aktif untuk beberapa minit. Selepas itu, robot bertukar
kepada mod auto-pembersihan.
Pemanduan manual
1 Gunakan butang anak panah atas dan bawah serta kiri dan kanan butang mula/henti pada unit
kawalan jauh untuk mengemudi robot dalam bilik. (Raj. 33)
Catatan: Berhati-hati apabila anda memandu robot rapat dengan perbezaan ketinggian dan anak
tangga.
Catatan: Fungsi vakum dan berus tepi hanya berfungsi apabila robot dipandu ke hadapan. Butang
kiri, kanan atau belakang hanya untuk mengemudi robot tersebut.
Menggunakan butang masa pembersihan
Tekan butang masa pembersihan pada unit kawalan jauh untuk membuat robot membersihkan
selama 35 minit. Apabila masa pembersihan tamat, robot kembali ke stesen dok untuk mengecas
semula (Raj. 34).
Menggunakan suis kuasa
Menetapkan kuasa kepada posisi 'off' meletakkan robot dalam mod tidur lena. Dalam mod ini, robot
tidak memberi respons lagi.
-
Jika anda mahu mengecas robot, anda perlu menekan suis kuasa kepada 'on' (hidup).
Page 21
Bahasa Melayu
-
Jika robot memasuki mod tidur lena semasa guna, anda boleh mengaktifkannya semula dengan
menetapkan suis kuasa kepada 'on' (hidup) dan dengan mengecas robot tersebut. Selepas
beberapa saat, robot akan respons semula
-
Apabila anda tidak akan menggunakan robot selama sebulan atau lebih, tekan suis kuasa kepada
'off' (mati) dan cabutkan palam stesen dok atau penyesuai untuk melindungi bateri boleh cas
semula dan untuk menjimatkan tenaga.
21
Isyarat dan maknanya
Robot mempunyai paparan dengan dua penunjuk: penunjuk amaran dan penunjuk bekas habuk
penuh. Butang mula/henti mengeluarkan isyarat cahaya Jadual di bawah menerangkan makna isyarat
tersebut.
Isyarat
Butang mula/henti terus menyala. Robot bersedia untuk membersihkan.
Butang mula/henti berkelip dengan perlahan. Robot sedang mengecas.
Butang mula/henti berkelip dengan pantas. Robot sedang mencari stesen dok.
Penunjuk bekas habuk penuh menyala. Bekas habuk telah penuh.
Penunjuk amaran menyala. Robot diangkat semasa membersihkan kawasan.
Maksud
Bateri boleh cas semula robot rendah.
Bampar robot tersangkut.
Roda atau berus tepi tersangkut.
Tiada penutup atas atau tidak ditutup dengan
rapi.
Robot tidak dapat mencari stesen dok.
Respons tepuk tangan
Respons tepuk tangan didayakan apabila robot memasuki mod tidur dalam situasi-situasi yang
berikut:
-
apabila ia berhenti membersihkan kawasan kerana terdapat ralat
-
apabila anda telah memprogramkan masa pembersihan yang singkat
-
apabila robot itu tidak dapat mencari stesen doknya dalam masa 20 minit
Jika anda tidak melihat robot, anda boleh mencarinya dengan menepuk tangan anda sebanyak
sekali. Robot akan respons dengan mengeluarkan bunyi bip dan menyalakan semua ikon pada
paparannya.
Pembersihan dan penyelenggaraan
Mengosongkan dan membersihkan bekas habuk
Kosongkan dan bersihkan bekas habuk apabila penunjuk bekas habuk penuh menyala secara
berterusan.
1 Tanggalkan penutup (Raj. 35).
Page 22
22
Bahasa Melayu
2 Tarik pemegang penutup bekas habuk dan angkat keluar bekas habuk itu daripada petak bekas
habuk (Raj. 36).
Catatan: Apabila anda mengeluarkan atau memasukkan semula bekas habuk, berhati-hati supaya
tidak merosakkan bilah kipas motor.
3 Dengan berhati-hati, angkat penutup bekas habuk (1) dan keluarkan penuras (2) (Raj. 37).
4 Goncang bekas habuk di atas tong sampah untuk mengosongkannya. Bersihkan penuras dan
bahagian dalam bekas habuk dengan kain atau berus gigi yang mempunyai berus kejur yang
lembut. Bersihkan juga bukaan sedutan di bawah bekas habuk (Raj. 38).
Awas: Jangan bersihkan bekas habuk dan penuras dengan air atau dalam mesin basuh pinggan
mangkuk.
5 Letak semula penuras ke dalam bekas habuk (1). Kemudian letakkan penutup di atas bekas
habuk(2) (Raj. 39).
6 Letakkan bekas habuk semula ke dalam petak bekas habuk dan letakkan penutup atas semula ke
atas robot (Raj. 40).
Awas: Sentiasa pastikan ada penuras di dalam bekas habuk. Jika anda menggunakan robot
tanpa penuras di dalam bekas habuk, motor akan rosak.
Membersihkan robot
Untuk mengekalkan prestasi pembersihan yang baik, anda perlu membersihkan sensor jatuh, roda,
berus tepi dan bukaan sedutan dari semasa ke semasa.
1 Letakkan robot terbalik di atas permukaan yang rata.
2 Gunakan berus yang mempunyai bulu kejur yang lembut (cth. berus gigi) untuk membuang habuk
atau bulu halus daripada sensor jatuh. (Raj. 41)
Catatan: Penting untuk anda bersihkan sensor jatuh secara tetap. Jika sensor jatuh kotor, robot
mungkin tidak dapat mengesan perbezaan ketinggian atau anak tangga.
3 Gunakan berus yang mempunyai bulu kejur lembut (cth. berus gigi) untuk membuang habuk atau
bulu-bulu halus daripada roda depan dan roda tepi. (Raj. 42)
4 Untuk membersihkan berus tepi, genggam bulu kejurnya dan keluarkannya daripada acinya (Raj.
43).
5 Buangkan bulu-bulu halus, rambut dan benang daripada aci dan daripada berus tepi
menggunakan berus lembut (cth. berus gigi) atau kain (Raj. 44).
6 Periksa berus tepi dan bawah robot untuk sebarang objek tajam yang boleh merosakkan lantai
anda.
7 Selepas anda telah menanggalkan berus tepi daripada acinya, buka sambungan kilat muncung
TriActive XL dengan memasukkan jari anda di tempat yang ditandakan dengan anak panah dan
tarik muncung TriActive daripada robot (Raj. 45).
8 Bersihkan bukaan sedutan dengan berus lembut (cth. berus gigi) (Raj. 46).
9 Keluarkan semua habuk yang boleh dilihat daripada muncung TriActive (Raj. 47).
10 Masukkan cangkuk kilat muncung TriActive ke dalam lubang di bawah robot (Raj. 48). Tolak
muncung TriActive semula ke posisinya. Periksa sama ada muncung tersebut boleh bergerak
beberapa milimeter ke atas dan bawah dengan bebas.
Page 23

Bahasa Melayu
Penggantian
Memesan aksesori
Untuk membeli aksesori atau alat ganti, lawati www.shop.philips.com/service atau pergi ke penjual
Philips anda. Anda juga boleh menghubungi Pusat Penjagaan Pengguna Philips di negara anda (lihat
risalah jaminan seluruh dunia untuk maklumat perhubungan).
Menggantikan penuras
Gantikan penuras jika terlalu kotor atau rosak. Anda boleh memesan penuras baharu di bawah
nombor pesanan FC8012. Lihat 'Mengosongkan dan membersihkan bekas habuk' dalam bab
'Pembersihan dan penyelenggaraan' untuk arahan tentang cara mengeluarkan penuras daripada
bekas habuk dan cara meletakkannya dalam bekas habuk.
Menggantikan berus tepi
Gantikan berus tepi selepas sedikit masa untuk memastikan hasil pembersihan yang baik.
Catatan: Sentiasa gantikan berus tepi apabila anda melihat tanda-tanda kelusuhan atau kerosakan.
Kami juga mengesyorkan anda untuk menggantikan kedua-dua berus tepi pada masa yang sama.
Anda boleh memesan berus tepi simpanan sebagai satu set di bawah nombor pesanan FC8013.
1 Untuk menggantikan berus tepi, genggam bulu kejur berus tepi yang lama dan tariknya keluar
daripada acinya (Raj. 43).
2 Tolak berus tepi yang baharu ke dalam acinya (Raj. 10).
23
Menggantikan bateri boleh cas semula
Jurutera servis yang bertauliah sahaja boleh menggantikan bateri boleh cas semula. Bawa robot ke
pusat servis Philips yang sah untuk menggantikan bateri tersebut apabila anda tidak boleh mengecas
semula bateri atau apabila kuasa bateri itu habis dengan cepat. Anda boleh menemui butiran
hubungan Pusat Khidmat Pengguna Philips di negara anda dalam risalah jaminan seluruh dunia.
Menggantikan bateri unit kawalan jauh
Unit kawalan jauh berfungsi menggunakan bateri CR2025 berbentuk syiling. Ganti bateri apabila robot
tidak lagi memberikan respons apabila anda menekan butang pada unit kawalan jauh.
1 Pegang unit kawalan jauh secara terbalik. Tolak butang pelepas pada pemegang bateri dan pada
masa yang sama, luncurkan pemegang bateri keluar daripada unit kawalan jauh (Raj. 53).
2 Keluarkan bateri yang sudah kosong itu daripada pemegang bateri dan letakkan bateri baharu
dalam pemegang bateri. Kemudian lungcurkan pemegang bateri semula ke dalam unit kawalan
jauh (Raj. 54).
Mengeluarkan bateri boleh cas semula
Amaran: Hanya keluarkan bateri boleh cas semula apabila anda membuang perkakas
tersebut. Pastikan bateri kosong sepenuhnya apabila anda mengeluarkannya.
Untuk mengeluarkan bateri boleh cas semula, ikut arahan di bawah. Anda juga boleh membawa robot
ke pusat khidmat Philips untuk mengeluarkan bateri boleh cas semula. Hubungi Pusat Khidmat
Pelanggan Philips di negara anda untuk alamat pusat khidmat berdekatan dengan anda.
Page 24
24
Bahasa Melayu
1 Mulakan robot dari suatu tempat di dalam bilik dan bukan dari stesen dok.
2 Biarkan robot itu berjalan sehingga bateri boleh cas semula kosong untuk memastikan bateri boleh
cas semula dinyah cas sepenuhnya sebelum anda mengeluarkan dan membuangnya.
3 Buka skru dan penutup petak bateri dan tanggalkan penutupnya (Raj. 52).
4 Angkat keluar bateri boleh cas semula dan putuskan sambungannya (Raj. 50).
5 Bawa robot dan bateri boleh cas semula ke pusat kutipan bagi sisa elektrik dan elektronik.
Penyelesai Masalah
Bab ini meringkaskan masalah paling lazim yang anda mungkin hadapi dengan alat ini. Jika anda tidak
dapat menyelesaikan masalah dengan maklumat di bawah, lawati www.philips.com/support untuk
mendapatkan senarai soalan lazim atau hubungi Pusat Penjagaan Pengguna di negara anda.
Masalah
Robot tidak mula
membersihkan kawasan
apabila saya menekan
butang mula/henti.
Punca yang
berkemungkinan
Bateri boleh cas semula telah
habis.
Penyelesaian
Cas bateri boleh cas semula (lihat bab
'Membuat persediaan untuk guna').
Robot tidak memberikan
respons apabila saya
menekan salah satu
butangnya.
Penunjuk amaran
berkelip dengan pantas.
Palam kecil masih berada
dalam soket pada robot.
Suis kuasa tidak ditetapkan
kepada posisi 'on' (I)
Anda menetapkan suis on/off
(hidup/mati) kepada 'off'.
Robot tidak dapat mencari
stesen dok dan sudah
kehabisan bateri.
Salah satu atau kedua-dua
roda tersangkut.
Robot tidak berfungsi menggunakan
kuasa sesalur. Robot hanya berfungsi
menggunakan bateri boleh cas
semulanya. Oleh itu, sentiasa putuskan
sambungan penyesuai daripada robot
dan sesalur sebelum guna.
Tekan butang kuasa kepada 'on' (hidup).
Letakkan robot pada stesen dok yang
dipasangkan palamnya atau palam kecil
penyesuai yang dipasangkan palamnya.
Selepas beberapa saat, robot
mengeluarkan bunyi bip dan paparan
akan menyala.
Tekan butang kuasa kepada 'on' (hidup).
Letakkan robot pada stesen dok yang
dipasangkan palamnya atau palam kecil
penyesuai yang dipasangkan palamnya.
Selepas beberapa saat, robot
mengeluarkan bunyi bip dan paparan
akan menyala.
Letakkan robot pada stesen dok yang
dipasangkan palamnya atau palam kecil
penyesuai yang dipasangkan palamnya.
Selepas beberapa saat, robot
mengeluarkan bunyi bip dan paparan
akan menyala.
Tetapkan suis kuasa kepada 'off'.
Keluarkan bulu-bulu halus, rambut,
benang atau wayar yang tersangkut
sekitar ampaian roda.
Page 25
Bahasa Melayu
25
Masalah Punca yang
berkemungkinan
Salah satu atau kedua-dua
berus tepi tersangkut.
Tiada penutup atas atau tidak
ditutup dengan rapi.
Bampar tersangkut. Tekan butang mula/henti. Angkat robot
Robot diangkat semasa
membersihkan kawasan.
Robot tidak
membersihkan kawasan
dengan baik.
Bulu kejur pada salah satu
atau kedua-dua berus tepi
bengkok atau melengkung.
Penuras dalam bekas habuk
sudah kotor.
Penyelesaian
Bersihkan berus tepi (lihat bab
'Pembersihan dan penyelenggaraan').
Apabila penutup atas tiada atau tidak
ditutup dengan rapi, robot tidak akan
berfungsi. Letakkan penutup atas di atas
robot dengan betul.
untuk membebaskan bamparnya.
Letakkan robot jauh sedikit daripada
halangan dan tekan butang mula/henti
untuk membuatnya meneruskan
pembersihan.
Tekan butang mula/henti. Letakkan
robot di atas lantai. Kemudian tekan
butang mula/henti untuk membuat
robot meneruskan pembersihan.
Rendamkan berus atau berus-berus itu
dalam air untuk sementara waktu. Jika
ini tidak memulihkan bulu kejur itu
kepada bentuk yang sepatutnya,
gantikan berus tepi itu (lihat bab
'Penggantian').
Bersihkan penuras dalam bekas habuk
dengan kain atau berus gigi yang
mempunyai berus kejur yang lembut.
Anda juga boleh membersihkan penuras
dan bekas habuk dengan pembersih
vakum biasa pada tetapan kuasa
sedutan yang rendah.
Bukaan sedutan di bawah
bekas habuk tersumbat.
Roda depan tidak bergerak
kerana mempunyai rambut
atau kotoran lain.
Jika memberus atau memvakum tidak
membantu membersihkan penuras,
gantikan penuras dengan yang baharu.
Kami menasihatkan anda untuk
menggantikan penuras sekurangkurangnya sekali setahun.
Bersihkan bukaan sedutan (lihat bab
'Pembersihan dan penyelenggaraan').
Bersihkan roda depan (lihat bab
'Pembersihan dan penyelenggaraan').
Page 26
26
Bahasa Melayu
Masalah Punca yang
berkemungkinan
Robot membersihkan
permukaan yang sangat gelap
atau kilat, yang mencetuskan
sensor jatuh. Ini menyebabkan
robot untuk bergerak dalam
corak yang luar biasa.
Robot membersihkan lantai
yang memantulkan cara
matahari dengan agak kuat. Ini
mencetuskan sensor jatuh dan
menyebabkan robot untuk
bergerak dalam corak yang
luar biasa.
Bateri boleh cas semula
tidak boleh dicas lagi
atau sangat pantas
kehabisan kuasa.
Bateri unit kawalan jauh
terlalu panas kehabisan
kuasa.
Bateri boleh cas semula telah
mencapai akhir hayatnya.
Mungkin anda tidak
memasukkan jenis bateri yang
betul.
Penyelesaian
Tekan butang mula/henti dan kemudian
gerakkan robot ke bahagian lantai yang
berwarna terang. Jika masalah tersebut
terus berlaku pada lantai berwarna
terang, sila pergi ke
www.philips.com/support atau hubungi
Pusat Khidmat Pelanggan di negara
anda.
Tutupkan langsir untuk menghalang
cahaya matahari daripada memasuki
bilik itu. Anda juga boleh memulakan
pembersihan apabila cahaya matahari
kurang terang.
Dapatkan bateri boleh cas semula itu
digantikan oleh pusat khidmat Philips
(lihat bab 'Penggantian').
Untuk unit kawalan jauh, anda
memerlukan bateri CR2025 berbentuk
syiling. Jika masalah berlarutan, pergi ke
www.philips.com/support atau hubungi
Pusat Khidmat Pelanggan di negara
anda.
Robot bergerak dalam
bulatan.
Robot tidak dapat
mencari stesen dok.
Robot berada dalam mod
pembersihan rapi.
Terdapat ruang yang
mencukupi untuk robot
mengemudi ke atas stesen
dok.
Robot masih aktif mencari. Berikan robot lebih kurang 20 minit
Robot tidak bermula dari
stesen dok.
Ini kelakuan biasa. Mod pembersihan
sangat bersih boleh diaktifkan apabila
banyak kotoran dikesan di lantai bagi
pembersihan yang rapi. Ini juga adalah
sebahagian daripada mod autopembersihan. Selepas lebih kurang satu
minit, robot memulakan semula corak
pembersihan biasanya. Anda juga boleh
menghentikan mod pembersihan sangat
bersih dengan memilih mod
pembersihan yang berbeza pada unit
kawalan jauh.
Cuba cari tempat lain untuk stesen dok.
Lihat 'Memasang stesen dok' dalam bab
'Membuat persediaan untuk guna'.
untuk kembali ke stesen dok.
Jika anda mahu robot kembali ke stesen
dok selepas membersihkan, mulakannya
dari stesen dok.
Page 27

ภาษาไทย
ข้อมูลเบื้องต้น
ขอแสดงความยินดีกับผลิตภัณฑ์ใหม่และต้อนรับเข้าสู่โลกของฟิลิปส์! เพื่อให้คุณได้รับประโยชน์อย่างเต็มที่จากบริการที่ Philips มอบให้
โปรดลงทะเบียนผลิตภัณฑ์ของคุณที่ www.philips.com/welcome
คำอธิบายทั่วไป
1 ฝาปิดด้านบน
2 ด้ามจับฝาปิดภาชนะเก็บฝุ่น
3 ฝาปิดภาชนะเก็บฝุ่น
4 แผ่นกรอง
5 ภาชนะเก็บฝุ่น
6 พัดลม
7 กันชน
8 เซนเซอร์ที่แท่นวาง
9 ปุ่มเริ่ม/หยุด (เพื่อเริ่มหรือหยุดหุ่นยนต์)
10 หน้าจอแสดงผล
11 ปุ่มเปิด/ปิด (เพื่อเปิดหรือปิดหุ่นยนต์)
12 หัวดูด TriActive XL
13 ล้อหน้า
14 ด้ามแปรงด้านข้าง
15 เซนเซอร์ตรวจจับการร่วงหล่น
16 ช่องใส่แบตเตอรี่
17 ล้อ
18 ช่องดูดฝุ่น
19 แปรงด้านข้าง
20 ช่องใส่แบตเตอรี่
21 รีโมทคอนโทรล
22 ปลั๊กขนาดเล็ก
23 อะแดปเตอร์
24 แท่นวาง
27
หน้าจอแสดงผลและรีโมทคอนโทรล
หน้าจอแสดงผล (รูปที่ 2):
1 ไฟแสดงสถานะเตือน
2 ไฟแสดงสถานะภาชนะเก็บฝุ่นเต็ม
รีโมทคอนโทรล (รูปที่ 3):
1 ปุ่มเลื่อนและเปิด/ปิดและเริ่ม/หยุด
2 ปุ่มแท่นวาง
3 ปุ่มเวลาทำความสะอาด
4 ปุ่มโหมดทำความสะอาด
วิธีการทำงานของหุ่นยนต์
สิ่งที่หุ่นยนต์ทำความสะอาด
หุ่นยนต์นี้มีความสามารถที่เหมาะกับการทำความสะอาดพื้นในบ้านของคุณ
หุ่นยนต์นี้เหมาะอย่างยิ่งสำหรับใช้ทำความสะอาดพื้นแข็ง เช่น พื้นไม้ พื้นกระเบื้อง หรือพื้นเคลือบน้ำมัน
หากใช้ทำความสะอาดพื้นที่อ่อนนุ่ม เช่น พรม อาจมีปัญหาได้ หากคุณใช้หุ่นยนต์บนพรม ควรเฝ้าดูในครั้งแรกที่ใช้ว่า
หุ่นยนต์นั้นสามารถจัดการกับพื้นประเภทนี้ได้หรือไม่
หุ่นยนต์ยังต้องการการควบคุมดูแลอีกด้วยเมื่อคุณใช้หุ่นยนต์บนพื้นแข็งที่มีสีมืดหรือมีความมันเงามาก
ภาษาไทย
Page 28

28
ภาษาไทย
วิธีการทำความสะอาดของหุ่นยนต์
ระบบทำความสะอาด
หุ่นยนต์มีระบบทำความสะอาด 2 ขั้นตอน เพื่อให้ทำความสะอาดพื้นของคุณได้อย่างมีประสิทธิภาพ
-
แปรงแบบสองด้านสามารถช่วยหุ่นยนต์ทำความสะอาดตามมุมและผนังได้ นอกจากนี้
ยังช่วยขจัดสิ่งสกปรกจากพื้นและดูดเข้าไปยังช่องดูดฝุ่น (รูปที่ 4)อีกด้วย
-
ความแรงในการดูดของหุ่นยนต์จะดูดสิ่งสกปรกที่ไม่ฝังแน่น แล้วส่งไปยังช่องดูดฝุ่นเข้าสู่ภาชนะเก็บฝุ่น (รูปที่ 5)
รูปแบบการทำความสะอาด
ในโหมดทำความสะอาดอัตโนมัติ หุ่นยนต์จะใช้รูปแบบการทำความสะอาดที่เปลี่ยนลำดับไปโดยอัตโนมัติ
เพื่อให้ทำความสะอาดแต่ละพื้นที่ของห้องได้อย่างหมดจด รูปแบบการทำความสะอาดที่ใช้มีดังต่อไปนี้:
1 รูปแบบ (รูปที่ 6)ตัว Z หรือซิกแซก
2 รูปแบบ (รูปที่ 7)สุ่ม
3 รูปแบบ (รูปที่ 8)ตามแนวผนัง
4 รูปแบบ (รูปที่ 9)ทำความสะอาดเฉพาะจุด
ในโหมดทำความสะอาดอัตโนมัติ หุ่นยนต์จะใช้รูปแบบเหล่านี้ในลำดับที่ตายตัว ได้แก่ รูปแบบ Z, รูปแบบสุ่ม, รูปแบบตามแนวผนัง
และรูปแบบทำความสะอาดเฉพาะจุด
เมื่อหุ่นยนต์ดำเนินการตามลำดับรูปแบบนี้ครบแล้ว หุ่นยนต์จะเริ่มต้นเคลื่อนที่ตามรูปแบบ Z อีกครั้ง
หุ่นยนต์ยังคงใช้ลำดับรูปแบบนี้ในการทำความสะอาดห้องจนกระทั่งแบตเตอรี่ที่สามารถชาร์จไฟได้ลดต่ำ
หรือจนกระทั่งผู้ใช้ปิดเครื่องด้วยตนเอง
หมายเหตุ: คุณยังสามารถเลือกแต่ละโหมดได้โดยการกดปุ่มที่เหมาะสมบนรีโมทคอนโทรล หากต้องการรายละเอียดเพิ่มเติม โปรดดูบท
'การใช้หุ่นยนต์ของคุณ' ในส่วน 'โหมดทำความสะอาด'
วิธีที่หุ่นยนต์หลีกเลี่ยงพื้นที่ที่มีความสูงต่างระดับ
หุ่นยนต์มีเซนเซอร์ตรวจจับการร่วงหล่นสามตัวติดตั้งอยู่ที่ด้านล่าง
หุ่นยนต์จะใช้เซนเซอร์ตรวจจับการร่วงหล่นเหล่านี้ในการตรวจจับและหลีกเลี่ยงพื้นที่ที่มีความสูงต่างระดับ เช่น บันได
หมายเหตุ: เป็นเรื่องปกติสำหรับหุ่นยนต์ที่จะเคลื่อนที่เล็กน้อยเลยออกไปจากขอบซึ่งมีพื้นผิวที่มีความสูงต่างกัน
เนื่องจากเซนเซอร์ตรวจจับการร่วงหล่นนั้นอยู่ถัดจากกันชนเข้ามาเล็กน้อย
ข้อควรระวัง: ในบางกรณี เซนเซอร์ตรวจจับการร่วงหล่นอาจตรวจไม่พบบันไดหรือพื้นที่ที่มีความสูงต่างระดับได้ทันเวลา
ดังนั้น จึงควรตรวจสอบหุ่นยนต์อย่างรอบคอบในช่วงสองสามครั้งแรกที่คุณใช้งาน
และในเวลาที่หุ่นยนต์ทำงานในบริเวณใกล้กับบันไดหรือพื้นที่ที่มีความสูงต่างระดับ
ควรทำความสะอาดเซนเซอร์ตรวจจับการร่วงหล่นเป็นประจำเพื่อที่หุ่นยนต์จะยังคงตรวจจับพื้นที่ต่างระดับได้อย่างเหมาะส
มและต่อเนื่อง (ดูคำแนะนำในบท 'การทำความสะอาดและบำรุงรักษา')
ก่อนใช้งานครั้งแรก
การติดตั้งแปรงด้านข้าง
1 แกะกล่องแปรงด้านข้าง แล้ววางหุ่นยนต์บนโต๊ะหรือบนพื้นแบบหงายท้องขึ้น
2 กดแปรงด้านข้างลงไปบนแกนที่ด้านล่างของหุ่นยนต์ (รูปที่ 10)
หมายเหตุ: ตรวจสอบว่าคุณติดตั้งแปรงด้านข้างอย่างถูกต้องแล้ว กดแปรงลงไปบนแกนจนกระทั่งเข้าที่และมีเสียงดังคลิก
การนำแถบป้องกันออกจากรีโมทคอนโทรล
รีโมทคอนโทรลนี้ใช้งานแบตเตอรี่รูปเหรียญ CR2025 แบตเตอรี่นี้ได้รับการปกป้องด้วยแถบป้องกันที่ต้องนำออกก่อนใช้งาน
1 ดึงแถบป้องกันแบตเตอรี่ออกจากช่องใส่แบตเตอรี่ของรีโมทคอนโทรล (รูปที่ 11)
รีโมทคอนโทรลพร้อมใช้งานแล้วในขณะนี้
Page 29

ภาษาไทย
การเตรียมตัวก่อนใช้งาน
การติดตั้งแท่นวาง
1 เสียบปลั๊กขนาดเล็กของอะแดปเตอร์เข้ากับช่องเสียบบนแท่นวาง (1) และเสียบอะแดปเตอร์เข้ากับเต้ารับบนผนัง (2) (รูปที่ 12)
2 วางแท่นวางในแนวนอนบนพื้นระนาบให้พิงกับผนัง
หมายเหตุ: ตรวจดูให้แน่ใจว่าไม่มีสิ่งกีดขวางหรือมีพื้นต่างระดับที่มีความสูงต่างกัน 80 ซม. ที่ด้านหน้า, 30 ซม. ที่ด้านขวาและ 100
ซม. ที่ด้านซ้ายของแท่นวาง
การชาร์จ
ในการชาร์จครั้งแรก และเมื่อแบตเตอรี่แบบชาร์จใหม่ได้ของหุ่นยนต์หมด จะต้องใช้เวลาในการชาร์จ 4 ชั่วโมง
คุณสามารถชาร์จหุ่นยนต์ของคุณได้ 2 วิธีดังนี้:
-
ชาร์จด้วยตนเองหรือโดยอัตโนมัติบนแท่นวางระหว่างใช้งาน;
-
ด้วยการเชื่อมต่อหุ่นยนต์กับสายไฟหลักโดยตรง
หมายเหตุ: เมื่อชาร์จแบตเตอรี่แบบชาร์จใหม่ได้จนเต็ม หุ่นยนต์จะสามารถทำความสะอาดได้นานถึง 100 นาที
การชาร์จบนแท่นวาง
1 ตั้งสวิตช์เปิด/ปิดให้อยู่ในตำแหน่ง 'on' (รูปที่ 14)
2 วางหุ่นยนต์บนแท่นวางที่เสียบปลั๊กไฟอยู่
3 ปุ่มเริ่ม/หยุดเริ่มต้นกะพริบช้าๆ (รูปที่ 16)
4 เมื่อแบตเตอรี่แบบชาร์จใหม่ได้ชาร์จไฟเต็มแล้ว ปุ่มเริ่ม/หยุดจะติดสว่างอย่างต่อเนื่อง (รูปที่ 17)
การชาร์จโดยอัตโนมัติระหว่างการใช้งาน
1 เมื่อหุ่นยนต์ทำความสะอาดเสร็จแล้ว หรือเมื่อเหลือพลังงานในแบตเตอรี่เหลือเพียง 15%
หุ่นยนต์จะทำการค้นหาแท่นวางโดยอัตโนมัติเพื่อชาร์จไฟใหม่ เมื่อหุ่นยนต์ค้นหาแท่นวาง ปุ่มเริ่ม/หยุดจะกะพริบถี่ๆ (รูปที่ 18)
2 เมื่อแบตเตอรี่แบบชาร์จใหม่ได้ชาร์จไฟเต็มแล้ว ปุ่มเริ่ม/หยุดจะติดสว่างอย่างต่อเนื่อง
29
หมายเหตุ: หุ่นยนต์จะค้นหาแท่นวางโดยอัตโนมัติเฉพาะในกรณีที่หุ่นยนต์เริ่มการทำความสะอาดจากแท่นวางเท่านั้น
การชาร์จโดยตรงจากปลั๊กไฟ
1 กดปุ่มเปิด/ปิดเพื่อเปิดหุ่นยนต์
2 เสียบปลั๊กขนาดเล็กของอะแดปเตอร์เข้ากับช่องเสียบของหุ่นยนต์ (1) เสียบอะแดปเตอร์เข้ากับเต้ารับบนผนัง (2) (รูปที่ 19)
3 เมื่อหุ่นยนต์เชื่อมต่อกับสายไฟหลักอย่างถูกต้อง ปุ่มเริ่ม/หยุดจะเริ่มต้นกะพริบช้ามากๆ เพื่อแสดงว่าหุ่นยนต์กำลังชาร์จไฟ
4 เมื่อแบตเตอรี่แบบชาร์จใหม่ได้ชาร์จไฟเต็มแล้ว ปุ่มเริ่ม/หยุดจะติดสว่างอย่างต่อเนื่อง
การเตรียมห้องสำหรับทำความสะอาด
ก่อนที่คุณจะเริ่มใช้หุ่นยนต์ทำความสะอาด ตรวจสอบให้แน่ใจว่าคุณได้เก็บวัตถุที่แตกหักง่ายและไม่ยึดแน่นขึ้นจากพื้นแล้ว (รูปที่ 20)
และยังควรเก็บสายเคเบิล สายไฟ และสายต่างๆ ออกจากพื้น
การใช้หุ่นยนต์
การเริ่มและการหยุด
1 กดปุ่มเริ่ม/หยุด
-
คุณสามารถกดปุ่มเริ่ม/หยุดบนหุ่นยนต์ (รูปที่ 21)
-
คุณยังสามารถกดปุ่มเริ่ม/หยุดบนรีโมทคอนโทรล (รูปที่ 22)
Page 30

30
ภาษาไทย
2 ปุ่มเริ่ม/หยุดจะติดสว่างต่อเนื่องและหุ่นยนต์จะเริ่มต้นการทำความสะอาด (รูปที่ 23)
3 หุ่นยนต์จะทำความสะอาดในโหมดทำความสะอาดอัตโนมัติจนกระทั่งพลังงานแบตเตอรี่ลดต่ำ ในโหมดทำความสะอาดอัตโนมัติ
เครื่องจะทำความสะอาดในลำดับรูปแบบ Z, รูปแบบสุ่ม, รูปแบบตามแนวผนัง และรูปแบบทำความสะอาดเฉพาะจุด (รูปที่ 24)
หมายเหตุ: หากต้องการเลือกโหมดใดโหมดหนึ่ง ให้กดปุ่มโหมดที่ต้องการบนรีโมทคอนโทรล ดูส่วน 'การเลือกโหมดทำความสะอาด'
สำหรับรายละเอียดเพิ่มเติม
4 เมื่อพลังงานแบตเตอรี่เหลือน้อย ปุ่มเริ่ม/หยุดจะเริ่มกะพริบและหุ่นยนต์จะค้นหาแท่นวางเพื่อชาร์จแบตเตอรี่ใหม่ (รูปที่ 18)
5 คุณยังสามารถกดปุ่มเริ่ม/หยุดได้เพื่อหยุดหรือหยุดชั่วคราวการทำความสะอาด
หากคุณกดปุ่มเริ่ม/หยุดอีกครั้งหรือหากแบตเตอรี่ยังมีพลังงานเหลืออยู่บ้าง
หุ่นยนต์จะทำความสะอาดต่อไปในโหมดทำความสะอาดอัตโนมัติ
6 เพื่อทำให้หุ่นยนต์กลับสู่แท่นวางก่อนพลังงานแบตเตอรี่ที่ชาร์จใหม่ได้จะเหลือน้อย ให้กดปุ่มแท่นวางที่รีโมทคอนโทรล (รูปที่ 25)
ปุ่มเริ่ม/หยุดจะเริ่มกะพริบและหุ่นยนต์ค้นหาแท่นวาง (รูปที่ 26)
หมายเหตุ: หากคุณไม่ได้เริ่มต้นให้หุ่นยนต์ทำงานจากแท่นวาง
หุ่นยนต์จะไม่ค้นหาแท่นวางโดยอัตโนมัติเวลาที่แบตเตอรี่แบบชาร์จไฟได้เหลือน้อย
หากยังคงมีพลังงานเหลืออยู่เพียงพอในแบตเตอรี่แบบชาร์จใหม่ได้
คุณสามารถกดปุ่มแท่นวางบนรีโมทคอนโทรลเพื่อทำให้หุ่นยนต์กลับไปยังแท่นวาง หากแบตเตอรี่แบบชาร์จใหม่ได้หมดแล้ว
คุณจะต้องนำหุ่นยนต์ไปวางบนแท่นชาร์จด้วยตนเอง
การใช้งานแท่นวาง
แท่นวางมีปุ่มควบคุมสองปุ่มที่สามารถใช้เพื่อการใช้งานหุ่นยนต์ได้
ปุ่มแบตเตอรี่เต็มและเริ่มทำงาน
หากคุณกดปุ่มแบตเตอรี่เต็มและเริ่มทำงานบนแท่นวางในระหว่างที่หุ่นยนต์กำลังชาร์จแบตเตอรี่
หุ่นยนต์จะเริ่มทำความสะอาดทันทีที่ชาร์จแบตเตอรี่เต็ม (รูปที่ 27)
ปุ่ม 24h
หากคุณกดปุ่ม 24h บนแท่นวาง แท่นวางจะเริ่มนับถอยหลัง 24 ชั่วโมงจนกว่าการทำความสะอาดครั้งต่อไปจะเริ่มต้น
เมื่อเสร็จสิ้นการนับถอยหลังแล้ว หุ่นยนต์จะเริ่มทำความสะอาดจนกระทั่งพลังงานแบตเตอรี่ลดต่ำ
แล้วจึงกลับไปยังแท่นวางโดยอัตโนมัติเพื่อชาร์จแบตเตอรี่ใหม่ (รูปที่ 28)
การเลือกโหมดทำความสะอาด
นอกเหนือไปจากโหมดทำความสะอาดอัตโนมัติ
หุ่นยนต์นี้ยังมีโหมดทำความสะอาดสี่โหมดที่สามารถเลือกได้ด้วยการกดปุ่มบนรีโมทคอนโทรล
โหมดรูปแบบ Z
ในโหมดรูปแบบ Z หุ่นยนต์จะทำความสะอาดในรูปแบบตัวอักษร Z วนไปมาเพื่อทำความสะอาดพื้นที่ในห้องเป็นบริเวณกว้าง (รูปที่ 29)
โหมดสุ่ม
ในโหมดนี้หุ่นยนต์จะทำความสะอาดห้องในรูปแบบผสมผสานของเส้นตรงและแบบสลับไปมา (รูปที่ 30)
โหมดตามแนวผนัง
ในโหมดนี้ หุ่นยนต์จะเคลื่อนที่ไปตามแนวผนังห้อง เพื่อเน้นการทำความสะอาดพื้นที่ตามแนวผนัง (รูปที่ 31)
โหมดทำความสะอาดเฉพาะจุด
ในโหมดนี้ หุ่นยนต์จะเคลื่อนที่แบบสุ่มในพื้นที่เล็กๆ เพื่อทำความสะอาดบริเวณนี้อย่างทั่วถึง (รูปที่ 32)
หมายเหตุ: โหมดที่เลือกด้วยตนเองจะทำงานเพียงแค่สองนาที หลังจากนั้น หุ่นยนต์จะเปลี่ยนเป็นโหมดทำความสะอาดอัตโนมัติ
การขับเคลื่อนแบบกำหนดเอง
1 ใช้ปุ่มลูกศรที่ด้านบนและด้านล่างและทางซ้ายและขวาของปุ่มเริ่ม/หยุดบนรีโมทคอนโทรลเพื่อนำทางหุ่นยนต์ไปตามห้อง (รูปที่ 33)
Page 31
หมายเหตุ: ควรใช้ความระมัดระวังในขณะที่ควบคุมหุ่นยนต์ด้วยตนเองในบริเวณใกล้กับพื้นที่ที่มีความสูงต่างระดับและบันได
หมายเหตุ: ฟังก์ชันการดูดฝุ่นและแปรงด้านข้างจะทำงานเฉพาะเมื่อหุ่นยนต์ถูกขับเคลื่อนไปข้างหน้า ปุ่มซ้าย ขวา
และถอยหลังมีขึ้นเฉพาะสำหรับใช้ควบคุมหุ่นยนต์
การใช้ปุ่มเวลาการทำความสะอาด
กดปุ่มเวลาการทำความสะอาดบนรีโมทคอนโทรลเพื่อให้หุ่นยนต์ทำความสะอาดเป็นเวลา 35 นาที
เมื่อเสร็จสิ้นเวลาการทำความสะอาดแล้ว หุ่นยนต์จะกลับมายังแท่นวางเพื่อชาร์จแบตเตอรี่ใหม่ (รูปที่ 34)
สัญญาณและความหมาย
หุ่นยนต์มีจอแสดงผลพร้อมไฟแสดงสถานะสองดวง: ไฟแสดงสถานะเตือนและไฟแสดงสถานะภาชนะเก็บฝุ่นเต็ม
ปุ่มเริ่ม/หยุดจะแสดงสัญญาณไฟ ตารางด้านล่างอธิบายความหมายของสัญญาณ
สัญญาณ
ปุ่มเริ่ม/หยุดติดสว่างต่อเนื่อง หุ่นยนต์พร้อมทำความสะอาด
ปุ่มเริ่ม/หยุดกะพริบช้าๆ หุ่นยนต์กำลังชาร์จ
ปุ่มเริ่ม/หยุดกะพริบถี่ๆ หุ่นยนต์กำลังค้นหาแท่นวาง
ไฟแสดงสถานะภาชนะเก็บฝุ่นเต็มติดสว่าง ภาชนะเก็บฝุ่นเต็ม
ไฟแสดงสถานะเตือนติดสว่าง หุ่นยนต์ถูกยกขึ้นขณะทำความสะอาด
ความหมาย
แบตเตอรี่ที่ชาร์จใหม่ได้ของหุ่นยนต์เหลือพลังงานน้อย
กันชนของหุ่นยนต์ติด
ภาษาไทย
31
ล้อหรือแปรงด้านข้างติด
ไม่มีฝาครอบด้านบนหรือปิดอย่างไม่ถูกต้อง
หุ่นยนต์หาแท่นวางไม่พบ
การทำความสะอาดและบำรุงรักษา
การเทสิ่งสกปรกและการทำความสะอาดภาชนะเก็บฝุ่น
เทสิ่งสกปรกและทำความสะอาดภาชนะเก็บฝุ่นเมื่อไฟแสดงสถานะภาชนะเก็บฝุ่นเต็มติดสว่างต่อเนื่อง
1 ถอดฝาครอบ (รูปที่ 35)
2 ดึงด้ามจับของฝาภาชนะเก็บฝุ่นขึ้น และยกภาชนะเก็บฝุ่นออกจากช่องใส่ภาชนะเก็บฝุ่น (รูปที่ 36)
หมายเหตุ: เมื่อคุณถอดหรือใส่ภาชนะเก็บฝุ่น โปรดระมัดระวังไม่ให้เกิดความเสียหายกับใบพัดของพัดลมมอเตอร์
3 เปิดฝาภาชนะเก็บฝุ่น (1) ออกอย่างระมัดระวังและนำแผ่นกรองออก (2) (รูปที่ 37)
4 เขย่าภาชนะเก็บฝุ่นเพื่อให้ฝุ่นสิ่งสกปรกที่ติดอยู่หลุดออก
ทำความสะอาดแผ่นกรองและบริเวณภายในภาชนะเก็บฝุ่นด้วยผ้าหรือแปรงสีฟันที่มีขนนุ่ม นอกจากนี้
ยังควรทำความสะอาดช่องดูดฝุ่นที่บริเวณด้านล่างของภาชนะเก็บฝุ่นด้วย
ข้อควรระวัง: ห้ามทำความสะอาดภาชนะเก็บฝุ่นและแผ่นกรองด้วยน้ำหรือโดยใช้เครื่องล้างจาน
5 วางแผ่นกรองลับเข้าภาชนะเก็บฝุ่น (1) จากนั้น ปิดฝาลงบนภาชนะเก็บฝุ่น (2) (รูปที่ 39)
6 ใส่ภาชนะเก็บฝุ่นกลับเข้าไปในช่องใส่ภาชนะเก็บฝุ่นและปิดฝาปิดด้านบนตัวหุ่นยนต์ (รูปที่ 40)
Page 32

32
ภาษาไทย
ข้อควรระวัง: ตรวจสอบให้แน่ใจว่า มีแผ่นกรองอยู่ภายในภาชนะเก็บฝุ่น
หากคุณใช้หุ่นยนต์โดยที่ไม่มีแผ่นกรองอยู่ภายในภาชนะเก็บฝุ่น มอเตอร์จะชำรุดเสียหายได้
การทำความสะอาดหุ่นยนต์
เพื่อคงไว้ซึ่งประสิทธิภาพการทำความสะอาดที่ดี คุณต้องทำความสะอาดเซนเซอร์ตรวจจับการร่วงหล่น ล้อ แปรงด้านข้าง
รวมทั้งช่องดูดเป็นครั้งคราว
1 วางหุ่นยนต์หงายขึ้นบนพื้นผิวเรียบ
2 ใช้แปรงที่มีขนแปรงนุ่ม (เช่น แปรงสีฟัน) เพื่อขจัดสิ่งสกปรกหรือเศษขนออกจากเซนเซอร์ตรวจจับการร่วงหล่น (รูปที่ 41)
หมายเหตุ: คุณจำเป็นต้องทำความสะอาดเซนเซอร์เป็นประจำ หากเซนเซอร์ตรวจจับการร่วงหล่นสกปรก
หุ่นยนต์อาจตรวจไม่พบพื้นต่างระดับหรือบันได
3 ใช้แปรงที่มีขนแปรงนุ่ม (เช่นแปรงสีฟัน) เพื่อขจัดสิ่งสกปรกหรือเศษขนออกจากล้อหน้าและล้อด้านข้าง (รูปที่ 42)
4 ในการทำความสะอาดแปรงด้านข้าง ให้จับขนแปรงและดึงออกจากด้าม (รูปที่ 43)
5 ขจัดเศษขน เส้นผม และเส้นด้ายออกจากด้ามและแปรงด้านข้างด้วยแปรงขนอ่อนนุ่ม (เช่น แปรงสีฟัน) หรือผ้า (รูปที่ 44)แปรง (เช่น
แปรงสีฟัน) หรือผ้า (รูปที่ 44)
6 ตรวจสอบแปรงด้านข้างและด้านล่างของหุ่นยนต์ว่ามีวัตถุแหลมคมที่อาจทำให้เกิดความเสียหายต่อพื้นของคุณหรือไม่
7 หลังจากที่คุณถอดแปรงด้านข้างออกจากด้ามแล้ว ให้แงะส่วนที่ยึดแน่นของหัวดูด TriActive XL
โดยสอดนิ้วเข้าไปยังตำแหน่งที่ทำเครื่องหมายด้วยลูกศร และดึงหัวดูด TriActive ออกจากหุ่นยนต์ (รูปที่ 45)
8 ทำความสะอาดช่องดูดฝุ่นด้วยแปรงที่มีขนนุ่ม (เช่น แปรงสีฟัน) (รูปที่ 46)
9 ขจัดสิ่งสกปรกที่มองเห็นได้ทั้งหมดออกจากหัวดูด TriActive (รูปที่ 47)
10 เสียบตะขอเกี่ยวของหัวดูด TriActive ลงในช่องทางด้านล่างของหุ่นยนต์ (รูปที่ 48) ดันหัวดูด TriActive กลับเข้าที่
ตรวจดูว่าหัวดูดสามารถขยับขึ้นและลงได้อย่างอิสระสองสามมิลลิเมตร
การเปลี่ยนอะไหล่
การสั่งซื้ออุปกรณ์เสริม
หากต้องการซื้ออุปกรณ์เสริมหรืออะไหล่ โปรดไปที่ www.shop.philips.com/service หรือติดต่อตัวแทนจำหน่าย Philips
และคุณยังสามารถติดต่อศูนย์บริการลูกค้า Philips ในประเทศของคุณได้อีกด้วย
(ดูที่รายละเอียดการติดต่อจากเอกสารแผ่นพับเกี่ยวกับการรับประกันทั่วโลก)
การเปลี่ยนแผ่นกรอง
ควรเปลี่ยนแผ่นกรองหากสกปรกมากหรือชำรุด คุณสามารถสั่งซื้อแผ่นกรองใหม่ได้โดยใช้หมายเลขการสั่งซื้อ FC8012
สำหรับคำแนะนำเกี่ยวกับวิธีถอดแผ่นกรองออกจากภาชนะเก็บฝุ่นและวิธีใส่แผ่นกรองในภาชนะเก็บฝุ่น โปรดดูส่วน
'การเทสิ่งสกปรกและทำความสะอาดภาชนะเก็บฝุ่น' ในบท 'การทำความสะอาดและการบำรุงรักษา'
การเปลี่ยนแปรงด้านข้าง
เปลี่ยนแปรงด้านข้างหลังจากใช้ไประยะหนึ่งเพื่อให้ได้การทำความสะอาดอย่างเหมาะสม
หมายเหตุ: ควรเปลี่ยนแปรงด้านข้างอยู่เสมอเมื่อสังเกตเห็นร่องรอยของการสึกหรอหรือชำรุด
เรายังขอแนะนำให้คุณเปลี่ยนแปรงด้านข้างทั้งสองแปรงในคราวเดียวกันอีกด้วย
คุณสามารถสั่งซื้ออะไหล่แปรงด้านข้างได้แบบเป็นชุดโดยใช้หมายเลขการสั่งซื้อ FC8013
1 ในการเปลี่ยนแปรงด้านข้าง ให้จับที่ขนแปรงตัวเก่าแล้วดึงออกจากด้าม (รูปที่ 43)
2 ดันแปรงด้านข้างตัวใหม่ลงบนด้าม (รูปที่ 10)
Page 33
ภาษาไทย
33
การถอดแบตเตอรี่ที่สามารถชาร์จใหม่ได้
คำเตือน: เพียงถอดแบตเตอรี่ที่สามารถชาร์จไฟได้เมื่อทิ้งเครื่อง
ต้องแน่ใจว่าไม่มีประจุเหลืออยู่ในแบตเตอรี่ที่จะถอดออก
ทำตามขั้นตอนด้านล่างเพื่อถอดแบตเตอรี่ที่ชาร์จใหม่ได้ คุณยังสามารถนำหุ่นยนต์ไปที่ศูนย์บริการของ Philips
เพื่อทำการถอดแบตเตอรี่ที่ชาร์จใหม่ได้ ติดต่อศูนย์บริการลูกค้า Philips ในประเทศของคุณเพื่อขอรับที่อยู่ของศูนย์บริการที่อยู่ใกล้คุณ
1 เริ่มการทำงานของหุ่นยนต์จากตำแหน่งภายในห้อง ไม่ใช่จากแท่นวาง
2 ปล่อยให้หุ่นยนต์ทำงานจนกว่าแบตเตอรี่แบบชาร์จได้จะหมด เพื่อให้มั่นใจว่าได้ใช้พลังงานจนหมดจริงๆ ก่อนที่คุณจะถอดแบตเตอรี่ทิ้ง
3 ถอดสกรูของฝาปิดช่องแบตเตอรี่ออก และถอดฝาออก (รูปที่ 52)
4 ยกแบตเตอรี่ที่ชาร์จใหม่ได้ออกและปลดสาย (รูปที่ 50)
5 นำหุ่นยนต์และแบตเตอรี่ที่ชาร์จใหม่ได้ไปยังจุดเก็บรวบรวมขยะที่เป็นอุปกรณ์ไฟฟ้าและอิเล็กทรอนิกส์
การเปลี่ยนแบตเตอรี่ของรีโมทคอนโทรล
รีโมทคอนโทรลนี้ใช้งานแบตเตอรี่รูปเหรียญ CR2025
ควรเปลี่ยนแบตเตอรี่เมื่อหุ่นยนต์ไม่มีการตอบสนองเวลาที่คุณกดปุ่มบนรีโมทคอนโทรล
1 ให้คว่ำรีโมทคอนโทรลลง กดปุ่มปลดล็อคที่ช่องใส่แบตเตอรี่พร้อมกับเลื่อนช่องใส่แบตเตอรี่ออกจากรีโมทคอนโทรล (รูปที่ 53)
2 แกะแบตเตอรี่ที่หมดแล้วออกจากช่องใส่แบตเตอรี่และใส่แบตเตอรี่ใหม่ลงในช่องใส่แบตเตอรี่ จากนั้น
เลื่อนช่องใส่แบตเตอรี่กลับเข้าที่ในรีโมทคอนโทรล (รูปที่ 54)
ปัญหา
หุ่นยนต์ไม่ยอมเริ่มต้นทำความสะอาดเวลาที่ฉันกดปุ่มเริ่ม/หยุด
สาเหตุที่เป็นไปได้ การแก้ปัญหา
แบตเตอรี่แบบชาร์จใหม่ได้ไม่มีไฟ ชาร์จไฟแบตเตอรี่ที่ชาร์จไฟได้ (ดูบท
'การเตรียมเพื่อใช้งาน')
หุ่นยนต์ไม่ตอบสนองเมื่อกดปุ่มใดปุ่มหนึ่ง
ไฟแสดงสถานะเตือนกะพริบอย่างรวดเร็ว
เสียบปลั๊กไฟขนาดเล็กเข้ากับช่องเสียบบนหุ่นยนต์
สวิตช์เปิด/ปิดอยู่ในตำแหน่ง 'เปิด' (I) กดสวิตช์เปิด/ปิดเครื่องไปที่ 'on'
คุณตั้งสวิตช์เปิด/ปิดเครื่องไว้ที่ 'off' กดสวิตช์เปิด/ปิดเครื่องไปที่ 'on'
หุ่นยนต์หาแท่นวางไม่พบและแบตเตอรี่หมดพลังงาน
ล้ออย่างน้อยหนึ่งด้านติด ตั้งสวิตช์เปิด/ปิดเครื่องให้อยู่ที่ 'off' (ปิด) นำเศษขน
แปรงด้านข้างอย่างน้อยหนึ่งด้านติด ทำความสะอาดแปรงด้านข้าง (ดูได้จากบท
หุ่นยนต์ไม่ยอมทำงานเมื่อต่อเข้ากับกระแสไฟฟ้า
แต่จะทำงานเฉพาะเมื่อใช้พลังงานจากแบตเตอรี่แบบชาร์จใหม่เท่านั้น ดังนั้น
จึงควรถอดอะแดปเตอร์ออกจากหุ่นยนต์และกระแสไฟฟ้าอยู่เสมอก่อนใช้งาน
วางหุ่นยนต์บนแท่นวางที่เสียบปลั๊กไฟอยู่
หรือเสียบปลั๊กขนาดเล็กของอะแดปเตอร์
หลังผ่านไปไม่กี่วินาที
หุ่นยนต์จะส่งเสียงบี๊พและจอแสดงผลจะติดสว่าง
วางหุ่นยนต์บนแท่นวางที่เสียบปลั๊กไฟอยู่
หรือเสียบปลั๊กขนาดเล็กของอะแดปเตอร์
หลังผ่านไปไม่กี่วินาที
หุ่นยนต์จะส่งเสียงบี๊พและจอแสดงผลจะติดสว่าง
วางหุ่นยนต์บนแท่นวางที่เสียบปลั๊กไฟอยู่
หรือเสียบปลั๊กขนาดเล็กของอะแดปเตอร์
หลังผ่านไปไม่กี่วินาที
หุ่นยนต์จะส่งเสียงบี๊พและจอแสดงผลจะติดสว่าง
เส้นผม ด้าย หรือสายใดๆ
ที่ไปติดอยู่ที่ระบบกันสะเทือนของล้อออก
'การทำความสะอาดและการบำรุงรักษา')
Page 34
34
ภาษาไทย
ปัญหา สาเหตุที่เป็นไปได้ การแก้ปัญหา
ไม่มีฝาครอบด้านบนหรือปิดอย่างไม่ถูกต้-องเมื่อไม่มีฝาปิดด้านบน หรือไม่ได้ปิดฝาอย่างถูกต้อง
หุ่นยนต์จะไม่ทำงาน
ให้ปิดฝาด้านบนหุ่นยนต์อย่างถูกต้อง
กันชนติด กดปุ่มเริ่ม/หยุด ยกหุ่นยนต์ขึ้นเพื่อให้กันชนหายติดขัด
หุ่นยนต์ถูกยกขึ้นขณะทำความสะอาด กดปุ่มเริ่ม/หยุด วางหุ่นยนต์ลงบนพื้น จากนั้น
หุ่นยนต์ทำความสะอาดไม่ถูกต้อง ขนของแปรงอย่างน้อยหนึ่งข้างหักหรืองอ แช่แปรงไว้ในน้ำอุ่นสักครู่หนึ่ง
แผ่นกรองในภาชนะเก็บฝุ่นสกปรก ทำความสะอาดแผ่นกรองในภาชนะเก็บฝุ่นด้วยผ้าหรื-
ช่องดูดฝุ่นใต้เครื่องภาชนะเก็บฝุ่นอุดตัน ทำความสะอาดช่องดูดฝุ่น (ดูได้จากบท
ล้อหน้าติดกับเส้นผมหรือฝุ่นผงอื่นๆ ทำความสะอาดล้อหน้า (ดูได้จากบท
หุ่นยนต์ทำความสะอาดพื้นผิวสีมืดหรือพื้นผิวที่มันเงามาก
ทำให้เซนเซอร์ตรวจจับการร่วงหล่นทำงาน
เป็นเหตุให้หุ่นยนต์เคลื่อนที่ในรูปแบบที่ผิดปกติ
วางหุ่นยนต์ให้ห่างจากสิ่งกีดขวางและกดปุ่มเริ่ม/หยุดเพื่อทำความสะอาดต่อไป
กดปุ่มเริ่ม/หยุดเพื่อให้หุ่นยนต์ทำความสะอาดต่อไป
หากยังไม่สามารถทำให้ขนแปรงคืนสภาพ
ให้เปลี่ยนแปรงด้านข้าง (โปรดดูบท 'การเปลี่ยน')
อแปรงสีฟันที่มีขนนุ่ม
คุณยังสามารถทำความสะอาดแผ่นกรองและภาชนะเก็บฝุ่นด้วยเครื่องดูดฝุ่นทั่วไปที่ตั้งแรงดูดไว้ที่ระดับต่ำ
หากวิธีการปัดหรือดูดฝุ่นไม่อาจทำให้แผ่นกรองสะอาดได้ ให้เปลี่ยนแผ่นกรองใหม่
เราขอแนะนำให้คุณเปลี่ยนแผ่นกรองอย่างน้อยปีละครั้ง
'การทำความสะอาดและการบำรุงรักษา')
'การทำความสะอาดและการบำรุงรักษา')
กดปุ่มเริ่ม/หยุด
แล้วย้ายหุ่นยนต์ไปยังพื้นส่วนที่มีสีอ่อนกว่า
หากยังคงประสบปัญหาแม้บนพื้นที่มีสีอ่อนลง
โปรดไปที่ www.philips.com/support
หรือติดต่อศูนย์บริการลูกค้าในประเทศของคุณ
ไม่สามารถชาร์จแบตเตอรี่ที่ชาร์จใหม่ได้หรือแบตเตอรี่หมดอย่างรวดเร็ว
แบตเตอรี่ของรีโมทคอนโทรลหมดเร็วเกินไป
หุ่นยนต์ทำความสะอาดบนพื้นที่สะท้อนแสงแดดค่อนข้างแรง ดังนั้น
จึงทำให้เซนเซอร์ตรวจจับการร่วงหล่นทำงานและทำให้หุ่นยนต์เคลื่อนที่ในรูปแบบที่ผิดปกติ
แบตเตอรี่แบบชาร์จใหม่ได้หมดอายุการใช้งาน
คุณอาจใส่แบตเตอรี่ไม่ถูกประเภท สำหรับรีโมทคอนโทรลนี้
ปิดม่านเพื่อบดบังแสงแดดไม่ให้ส่องเข้ามาให้ห้อง
นอกจากนี้
คุณยังสามารถเริ่มต้นทำความสะอาดเวลาที่แสงแดดอ่อนลงกว่านั้นได้
ให้ศูนย์บริการ Philips เปลี่ยนแบตเตอรี่ให้ (ดูที่บท
'การเปลี่ยนอะไหล่')
จำเป็นต้องใช้แบตเตอรี่รูปเหรียญ CR2025
หากยังคงประสบปัญหา ไปที่
www.philips.com/support
หรือติดต่อศูนย์บริการลูกค้าในประเทศของคุณ
Page 35
ปัญหา สาเหตุที่เป็นไปได้ การแก้ปัญหา
หุ่นยนต์เคลื่อนที่ในลักษณะวนเป็นวงกลม
หุ่นยนต์อยู่ในโหมดทำความสะอาดเฉพาะจุด
ลักษณะเช่นนี้ถือเป็นเหตุการณ์ปกติ
โหมดทำความสะอาดเฉพาะจุดสามารถเปิดใช้งานเพื่อการทำความสะอาดอย่างหมดจดเมื่อตรวจพบสิ่งสกปรกจำนวนมาก
โหมดนี้ยังเป็นส่วนหนึ่งของโหมดทำความสะอาดอัตโนมัติอีกด้วย หลังจากผ่านไปประมาณหนึ่งนาที
หุ่นยนต์จะกลับสู่รูปแบบการทำความสะอาดปกติต่อไป
คุณยังสามารถหยุดโหมดทำความสะอาดเฉพาะจุดได้โดยเลือกโหมดทำความสะอาดโหมดอื่นบนรีโมทคอนโทรล
ภาษาไทย
35
หุ่นยนต์หาแท่นวางไม่พบ มีพื้นที่ไม่เพียงพอสำหรับให้หุ่นยนต์ขับเ-
คลื่อนมาหาแท่นวาง
หุ่นยนต์ยังคงค้นหาตำแหน่งอยู่ ให้เวลาหุ่นยนต์ประมาณ 20 นาที
หุ่นยนต์ไม่ได้เริ่มทำงานจากแท่นวาง หากต้องการให้หุ่นยนต์กลับสู่แท่นวางหลังจากการทำ-
ควรพยายามหาตำแหน่งอื่นสำหรับวางแท่นวาง ดู
'การติดตั้งแท่นวาง' ในบท 'การเตรียมตัวก่อนใช้งาน'
เพื่อที่จะกลับไปยังแท่นวาง
ความสะอาด
ให้เริ่มต้นการทำงานของหุ่นยนต์จากแท่นวาง
Page 36

36
简体中文
简介
感谢您的惠顾,欢迎光临飞利浦! 为了让您能充分享受飞利浦提供的支持,请在 www.philips.com/welcome
上注册您的产品。
基本说明
1 上盖
2 集尘桶盖手柄
3 集尘桶盖
4 过滤网
5 集尘桶
6 风扇
7 缓冲型
8 底座传感器
9 启动/停止按钮(启动或停止吸尘器)
10 显示屏
11 电源开关(打开或关闭吸尘器)
12 TriActive XL 吸嘴
13 前轮
14 侧毛刷轴
15 跌落传感器
16 电池仓
17 滚轮
18 吸口
19 侧毛刷
20 电池舱
21 遥控器
22 小插头
23 适配器
24 底座
显示屏和遥控器
显示屏 (图 2):
1 警告指示灯
2 集尘桶满盛指示灯
遥控器 (图 3):
1 导航按钮和启动/停止
2 插接按钮
3 清洁时间按钮
4 清洁模式按钮
吸尘器如何工作
吸尘器清洁哪些物体
本吸尘器具有许多功能,是一款适合帮助您在家中清洁地板的理想清洁工具。
此吸尘器尤其适合清洁硬地板,例如木制、瓷砖或油毡地板。 清洁软地板时可能会出现问题,例如地毯或地
垫。 如果您在地毯或地垫上使用吸尘器,请在第一次使用之前先留心观察吸尘器是否能够处理这种类型的地
板。 另外,当您在极暗或有光泽的坚硬地板上使用吸尘器时,需要对其加以监控。
简体中文
Page 37

简体中文
吸尘器如何清洁
清洁系统
吸尘器具有 2 重清洁系统来高效清洁地板。
-
两个侧毛刷有助于吸尘器在角落中以及沿着墙壁进行清洁。 它们还可帮助去除地板上的污垢,并将其移向
吸口 (图 4)。
-
吸尘器的吸力可吸入松动的污垢,然后通过吸口将污垢输送到集尘桶 (图 5)。
清洁方向图
在自动清洁模式下,吸尘器会按清洁方向图的自动顺序来使用,以最佳的方式清洁房间内的各个区域。 所使
用的清洁方向图包括:
1 Z 方向图或之字形方向图 (图 6)
2 随机方向图 (图 7)
3 沿墙方向图 (图 8)
4 局部清洁方向图 (图 9)
在自动清洁模式下,吸尘器以固定顺序使用这些方向图:Z 方向图、随机方向图、沿墙方向图和局部清洁方向
图。
如果吸尘器已按此顺序使用完方向图,则将重新以 Z 方向图开始移动。 吸尘器会继续按该顺序使用方向图来
清洁房间,直至充电电池的电量不足或直至将其手动关闭。
注意: 您还可以按遥控器上的相应按钮,单独选择各个模式。 有关详细信息,请参阅“使用吸尘器”一章中
的“清洁模式”部分。
吸尘器如何避开高度差
吸尘器底部配有三个跌落传感器。 吸尘器使用这些跌落传感器检测和避开楼梯等有高度差的地方。
37
注意: 吸尘器轻轻移动以越过高度差的边缘是正常现象,因为正面的跌落传感器位于缓冲装置后面。
警告: 在某些情况下,跌落传感器可能无法及时检测到楼梯或其他有高度差的地方。 因此,在最初几次使用
以及在楼梯或其他有高度差的地方附近使用时,应密切监控吸尘器的工作。 务必定期清洁跌落传感器,以确
保吸尘器能继续正确检测到高度差(有关说明,请参阅“清洁和保养”一章)。
首次使用之前
安装侧毛刷
1 打开侧毛刷包装,将吸尘器正面朝下置于桌子或地板上。
2 将侧毛刷推入吸尘器 (图 10)底部的轴上。
注意: 确保您已正确安装侧毛刷。 将侧毛刷按在轴上,直至听到咔哒一声锁定到位。
取下遥控器上的保护贴
遥控器由 CR2025 纽扣电池供电。 该电池采用保护贴保护,使用前须取下。
1 抽出遥控器 (图 11)电池仓中的电池保护贴。
遥控器就可以使用了。
Page 38

38
简体中文
使用准备
安装底座
1 将适配器的小插头插入底座上的插座 (1),将适配器插入电源插座 (2) (图 12)。
2 将底座放在靠墙的水平地板上。
注意: 确保底座正面 80 厘米、右侧 30 厘米、左侧 100 厘米没有障碍物或高度差。
充电
首次充电及吸尘器的充电电池电量耗尽时,需充电 4 小时。
吸尘器可使用两种方式充电:
-
使用期间在底座上手动或自动充电;
-
将吸尘器直接连接至电源。
注意: 充电电池充满电后,吸尘器可以清洁长达 100 分钟。
在底座上充电
1 将电源开关调至“开”位置 (图 14)。
2 将吸尘器置于接电的底座 (图 15)上。
3 启动/停止按钮开始缓慢闪烁 (图 16)。
4 当充电电池充满电时,启动/停止按钮将持续亮起 (图 17)。
使用期间自动充电
1 当吸尘器完成清洁或电池电量只剩 15% 时,会自动搜索底座进行充电。 当吸尘器搜索底座时,启动/停止
按钮将快速闪烁 (图 18)。
2 当充电电池充满电时,启动/停止按钮将持续亮起。
注意: 只有从底座开始清洁时,吸尘器才会自动搜索底座。
直接插电充电
1 按电源开关打开吸尘器。
2 将适配器的小插头插入吸尘器上的插座 (1)。 将适配器插入电源插座 (2) (图 19)。
3 当吸尘器正确连接至电源时,启动/停止按钮将开始非常缓慢地闪烁。 这表示吸尘器正在充电。
4 当充电电池充满电时,启动/停止按钮将持续亮起。
准备房间以进行清洁操作
在启动吸尘器进行清洁操作之前,确保清除地板上的 (图 20)所有散乱和易碎物体。
另外,移除地板上的所有电缆、电线和绳索。
使用吸尘器
开始和停止
1 按启动/停止按钮。
-
您可以按吸尘器上的 (图 21)启动/停止按钮。
-
您也可以按遥控器上的 (图 22)启动/停止按钮。
2 启动/停止按钮持续亮起,吸尘器开始清洁 (图 23)。
Page 39

简体中文
3 吸尘器以自动清洁模式进行清洁,直至电池电量不足。 在自动清洁模式下,吸尘器按照 Z 方向图、随机、
沿墙和局部清洁方向图 (图 24)的重复顺序进行清洁。
注意: 要选择单独模式,请按遥控器上的任一模式按钮。 有关详细信息,请参阅“清洁模式选择”。
4 如果电池电量不足,启动/停止按钮将开始闪烁,吸尘器会搜索底座进行充电 (图 18)。
5 您也可以按启动/停止按钮中断或停止清洁操作。 如果再次按启动/停止按钮且充电电池仍有足够的电量,
则吸尘器将继续以自动清洁模式进行清洁。
6 要使吸尘器在充电电池电量不足前返回底座,请按遥控器上的插接按钮 (图 25)。
启动/停止按钮开始闪烁,同时吸尘器会搜索底座 (图 26)。
注意: 如果您未从底座启动吸尘器,吸尘器则不会在充电电池电量不足时自动搜索底座。 如果充电电池仍
有足够的电量,您可以按遥控器上的插接按钮使吸尘器返回到底座。 如果充电电池的电量完全耗尽,则必
须将吸尘器手动放回底座。
操作底座
底座有两个可用于操作吸尘器控件。
电池电量充满并启动按钮
如果您在吸尘器充电时按底座上的电池电量充满并启动按钮,则吸尘器会在充电电池充满电 (图 27)后立即开
始清洁。
24 小时按钮
如果您按底座上的 24 小时按钮,则底座将开始 24 小时倒计时,直至下次清洁操作为止。 倒计时结束后,吸
尘器将开始清洁,直至电池电量不足,然后自动返回到底座进行充电 (图 28)。
39
清洁模式选择
清洁模式选择
除了自动清洁模式,此吸尘器还提供四种单独清洁模式,每种模式均可通过按遥控器上的相应按钮启动。
Z 方向图模式
在 Z 方向图模式下,吸尘器将在整个房间中进行 Z 形环状运动以清洁大片区域 (图 29)。
随机模式
在该模式下,吸尘器将使用直线运动和交叉运动 (图 30)的混合模式清洁房间。
沿墙模式
在该模式下,吸尘器将沿着房间的墙壁对墙边区域进行特别清洁 (图 31)。
局部清洁模式
在该模式下,吸尘器在小区域内随机移动以彻底 (图 32)清洁这个区域。
注意: 手动选定的模式仅处于启用状态数分钟。 之后,吸尘器会切换到自动清洁模式。
手动驱动
1 使用遥控器启动/停止按钮的上、下、左、右箭头按钮在房间 (图 33)内对吸尘器进行导航。
注意: 当您手动驱动吸尘器靠近有高度差的地方和楼梯时,请小心谨慎。
注意: 吸尘功能和侧毛刷只有在吸尘器向前驱动时才可用。 左右或后退按钮仅用于操纵吸尘器。
Page 40
40
简体中文
使用清洁时间按钮
按遥控器上的清洁时间按钮使吸尘器清洁 35 分钟。 清洁时间结束后,吸尘器会返回到底座进行充电 (图
34)。
信号及其含义
吸尘器配有带两个指示灯的显示屏: 警告指示灯和集尘桶已满指示灯。 启动/停止按钮发出指示灯信号。 下表
说明了这些信号的含义。
信号
启动/停止按钮持续亮起。 吸尘器已做好清洁准备。
启动/停止按钮缓慢闪烁。 吸尘器正在充电。
启动/停止按钮快速闪烁。 吸尘器正在搜索底座。
集尘桶已满指示灯亮起。 集尘桶已满。
警告指示灯亮起。 清洁时吸尘器被提起。
含义
吸尘器的充电电池电量不足。
吸尘器的缓冲装置被卡住。
滚轮或侧毛刷被卡住。
上盖不存在或未盖好。
吸尘器无法找到底座。
清洁和保养
倒空并清洁集尘桶
集尘桶已满指示灯持续亮起时,倒空并清洁集尘桶。
1 取下盖子 (图 35)。
2 向上拉集尘桶盖手柄,从集尘桶仓 (图 36)中提出集尘桶。
注意: 取下或重新插入集尘桶时,小心不要损坏马达风扇的刀片。
3 小心地提起集尘桶的盖子 (1) 并取出滤网 (2) (图 37)。
4 在垃圾箱上晃动集尘桶将其倒空。 用布或软毛牙刷清洁滤网和集尘桶内部。 另外清洁集尘桶 (图 38)底部
的吸口。
警告: 切勿用水或在洗碗机中清洁集尘桶和滤网。
5 将滤网放回集尘桶中 (1)。 然后将盖子放在集尘桶上 (2) (图 39)。
6 将集尘桶放回集尘桶仓,盖好吸尘器 (图 40)的上盖。
警告: 务必确保集尘桶内已放置好滤网。 如果您在集尘桶内未放置滤网的情况下使用吸尘器,马达会受
损。
清洁吸尘器
为保持良好的清洁效果,您必须经常清洁跌落传感器、滚轮、侧毛刷和吸口。
1 将吸尘器倒置在平面上。
Page 41

简体中文
2 使用带柔软刷毛的毛刷(例如牙刷)清除跌落传感器 (图 41)上的灰尘和绒毛。
注意: 务必定期清洁跌落传感器。 如果跌落传感器变脏,吸尘器可能无法检测到高度差或楼梯。
3 使用软毛刷(例如牙刷)清除前轮和侧轮 (图 42)上的灰尘和绒毛。
4 要清洁侧毛刷,请抓住刷毛并将其从轴 (图 43)上取下。
5 使用柔软的毛刷(例如牙刷)或布 (图 44)清除轴和侧毛刷中的绒毛、毛发和线头。刷子(如牙刷)或抹布
(图 44)。
6 检查吸尘器的侧毛刷和底部是否存在可能会损坏地板的尖锐物体。
7 当您从侧毛刷轴上取下侧毛刷后,将手指插入标有箭头的地方以解开 TriActive XL 吸嘴的扣合式连接,并
将 TriActive 吸嘴从吸尘器上拉出 (图 45)。
8 用软刷(例如牙刷 (图 46))清洁吸口。
9 去除 TriActive 吸嘴 (图 47)上所有肉眼可见的灰尘。
10 将 TriActive 吸嘴的安全钩插入吸尘器 (图 48)底部的孔中。 将 TriActive 吸嘴推回原位。 检查吸嘴是否可以
自由上下移动几毫米。
41
更换
订购配件
要购买附件或备件,请访问 www.shop.philips.com/service 或联系您的飞利浦经销商。 您还可以联系所在国
家/地区的飞利浦客户服务中心(请参阅全球保修卡了解详细联系信息)。
更换过滤器
如果滤网很脏或已损坏,请进行更换。 您可以通过订购号 FC8012 订购新滤网。 有关如何从集尘桶中取出滤
网以及如何将滤网放入集尘桶的说明,请参阅“清洁和保养”一章中的“倒空并清洁集尘桶”。
更换侧毛刷
一段时间后,请更换侧毛刷,以确保正常的清洁效果。
注意: 发现磨损或损坏迹象时务必更换侧毛刷。 另外,建议您同时更换两个侧毛刷。 您可以通过订购号
FC8013 订购一组备用侧毛刷。
1 如需更换侧毛刷,请抓住旧侧毛刷的刷毛将其从轴 (图 43)上拆下。
2 将新侧毛刷推到轴 (图 10)上。
拆下充电电池
警告: 仅在丢弃产品时取出充电电池。 在取出电池时请确保电池电量已耗尽。
按照以下步骤拆下充电电池。 您也可以将吸尘器送往飞利浦服务中心,由其拆下充电电池。 您可联系所在国
家/地区的飞利浦客户服务中心,获取您附近的服务中心地址。
1 启动吸尘器时,应将其置于房间内,不可从底座上启动吸尘器。
2 让吸尘器运转,直至充电电池电量完全耗尽,以确保在您取出并弃置充电电池前,其已完全放电。
3 拧下电池仓的螺丝,然后取下仓盖 (图 52)。
4 取出充电电池并断开连接 (图 50)。
5 将吸尘器和充电电池送往电子电器垃圾回收点。
Page 42
42
简体中文
更换遥控器的电池
遥控器由 CR2025 纽扣电池供电。 按遥控器上的按钮,吸尘器不再响应时,请更换电池。
1 将遥控器翻转过来。 推电池仓上的释放钮,同时将电池仓从遥控器 (图 53)中滑出。
2 从电池仓中取出电量耗尽的电池,装入新电池。 然后将电池仓滑回遥控器 (图 54)。
故障种类和处理方法
问题
可能的原因 解决方法
按启动/停止按钮时吸尘器
无法开始清洁。
随意按下一个按钮时,吸尘
器没有反应。
警告指示灯快速闪烁。 一个或多个滚轮被卡住。 将电源开关设为“关”。 清除滚轮悬架周
充电电池的电量已耗尽。 为充电电池充电(请参阅“使用准备”一
小插头仍插在吸尘器上的转换插
座中。
电源开关未设为“开”(I) 位置。 按下电源开关,将其设为“开”。 将吸尘
您已将电源开关设置为“关”。 按下电源开关,将其设为“开”。 将吸尘
吸尘器无法找到底座,而且电池
电量已经耗尽。
一个或两个侧毛刷被卡住。 清洁侧毛刷(请参阅“清洁和保养”一
上盖不存在或未盖好。 上盖不存在或未盖好时,吸尘器无法工作。
缓冲装置被卡住。 按启动/停止按钮。 提起吸尘器以释放其缓
章)。
吸尘器接通电源不工作。 它只能通过充电
电池工作。 因此,使用前请务必将适配器
从吸尘器和电源上断开。
器放在接电的底座上,或插入适配器的小插
头。 几秒钟后,吸尘器发出“哔”声,显
示器亮起。
器放在接电的底座上,或插入适配器的小插
头。 几秒钟后,吸尘器发出“哔”声,显
示器亮起。
将吸尘器放在接电的底座上,或插入适配器
的小插头。 几秒钟后,吸尘器发
出“哔”声,显示器亮起。
围吸附的绒毛、毛发、线头或线丝。
章)。
盖好吸尘器的上盖。
冲装置。 将吸尘器放置在远离障碍物的地
方,按启动/停止按钮使其继续清洁。
清洁时吸尘器被提起。 按启动/停止按钮。 将吸尘器置于地板上。
吸尘器无法正确清洁。 一个或两个侧毛刷的刷毛已变形
或弯曲。
集尘桶中的滤网变脏。 用布或软毛牙刷清洁集尘桶中的滤网。 您
然后按启动/停止按钮使吸尘器继续清洁。
将毛刷在温水中浸泡一会儿。 如果这样做
不能使刷毛复原,则更换侧毛刷(请参
阅“更换”一章)。
还可以在低吸力设置下使用普通真空吸尘器
清洁滤网和集尘桶。
Page 43
问题 可能的原因 解决方法
如果刷洗或吸尘无助于清洁滤网,请用新滤
网更换。 我们建议您至少每年更换一次滤
网。
集尘桶底部吸口被堵塞。 清洁吸口(请参阅“清洁和保养”一章)。
前轮被毛发或其他污垢卡住。 清洁前轮(见“清洁和保养”一章)。
简体中文
43
吸尘器在清洁颜色极深或有光泽
的地面时会触发跌落传感器。 这
将导致吸尘器沿异常的方向图移
动。
吸尘器正在清洁强烈反射太阳光
的地板。 这可能会触发跌落传感
器,导致吸尘器沿异常的方向图
移动。
充电电池无法充电或耗电极快。充电电池达到了其寿命的终点。 充电电池应由飞利浦服务中心更换(请参
遥控器的电池耗电太快。 可能是您没有插入正确类型的电池。遥控器必须使用 CR2025 纽扣电池。 如果
吸尘器在绕圈运动。 吸尘器处于局部清洁模式。 这属于正常现象。 彻底清洁过程中在地板
吸尘器无法找到底座。 没有足够的空间供吸尘器导航到
底座。
吸尘器仍在不断搜索。 给吸尘器约 20 分钟时间让其返回到底座。
吸尘器不是从底座启动的。 如果您希望吸尘器在清洁操作之后返回到底
按启动/关闭按钮,然后将吸尘器移至颜色
较浅的地板。 如果在颜色较浅的地板上问
题仍然存在,请访问
www.philips.com/support 或联系您所在国
家/地区的客户服务中心。
关闭窗帘,阻止太阳光射入房间。 您还可
以在阳光不那么明亮时开始清洁。
阅“更换”一章)。
问题仍然存在,请访问
www.philips.com/support 或联系您所在国
家/地区的客户服务中心。
上检测到大量灰尘时,可能激活局部清洁模
式。 这也是自动清洁模式的一部分。 大约
一分钟后,吸尘器恢复正常清洁模式。 您
还可以通过在遥控器上选择不同的清洁模式
来停止局部清洁模式。
请尝试将底座放置到其他地方。 请参
阅“使用准备”一章中的“安装底座”。
座,请从底座启动吸尘器。
Page 44

44
繁體中文
簡介
感謝您購買本產品。歡迎來到飛利浦的世界! 為充分享受飛利浦為您提供的好處,請至下列位址註冊產
品:www.philips.com/welcome。
一般描述
1 頂蓋
2 集塵盒蓋把手
3 集塵盒蓋
4 濾網
5 集塵盒
6 風扇
7 緩衝墊
8 機座感測器
9 開始/停止按鈕 (開啟或停止自動吸塵機器人)。
10 顯示幕
11 電源開關 (開啟或關閉自動吸塵機器人電源)
12 TriActive 特大全方位三效合一吸頭
13 前輪
14 側邊刷毛驅動軸
15 掉落感測器
16 電池盒
17 輪子
18 吸塵開口
19 側邊刷毛
20 電池固定座
21 遙控器
22 小插頭
23 電源轉換器
24 機座
顯示幕與遙控器
顯示幕 (圖 2):
1 警告指示燈
2 集塵盒滿指示燈
遙控器 (圖 3):
1 操控按鈕與開始/停止
2 返回機座按鈕
3 清潔時間按鈕
4 清潔模式按鈕
自動吸塵機器人運作方式
自動吸塵機器人清潔項目
自動吸塵機器人具備絕佳清潔功能,能協助您清理您的居家地板,
特別適合清理硬質地板,例如木質、磁磚、亞麻地板。 若用於清潔地毯或毛毯等軟質地板,可能會發生問
題。 若在地毯或毛毯上使用自動吸塵機器人,則初次使用時請待在附近,查看自動吸塵機器人是否適用於該
類型地板。 自動吸塵機人清理深色或亮面硬質地板時,也請在旁監看。
繁體中文
Page 45

繁體中文
自動吸塵機器人清潔方式
清潔系統
自動吸塵機器人採用 2 步驟清潔系統,有效清潔您的地板。
-
兩側刷毛可協助自動吸塵機器人清潔角落與牆緣, 亦可將灰塵掃離地板,並把灰塵移向吸塵開口 (圖 4)。
-
自動吸塵機器人透過吸力將灰塵由吸塵開口吸入集塵盒 (圖 5)中。
清潔模式
啟用自動清潔模式時,自動吸塵機器人會依循自動的清潔模式順序,徹底清潔房間內所有區域。 所採用的清
潔模式包括:
1 Z 字形模式或鋸齒形模式 (圖 6)
2 隨機模式 (圖 7)
3 沿牆模式 (圖 8)
4 定點清潔模式 (圖 9)
啟用自動清潔模式時,自動吸塵機器人會依循固定順序使用以下模式:Z 字形模式、隨機模式、沿牆模式及定
點清潔模式。
當自動吸塵機器人完成此模式順序之後,會重新由 Z 字形模式開始移動。 自動吸塵機器人繼續使用此模式順
序清潔房間,直到充電式電池電量不足或手動關閉為止。
注意: 您也可以按下遙控器上適當的按鈕,直接選擇個別模式。 如需詳細資訊,請參閱「使用自動吸塵機器
人」單元的「清潔模式」一節。
自動吸塵機器人如何避開高度落差
自動吸塵機器人底部有三個掉落感測器。 它使用這些掉落感測器偵測及避開高度落差,例如樓梯。
45
注意: 自動吸塵機器人移動時會稍微超過高度落差的邊緣,此屬正常現象,因為其前方的掉落感測器位於緩
衝墊後方。
警告: 有時,掉落感測器可能會偵測不到樓梯或其他高度落差。 因此,在前幾次使用以及在靠近樓梯或其他
有高度落差的地點使用時,請謹慎監視自動吸塵機器人。 請務必定期清潔掉落感測器,以確保自動吸塵機器
人可持續偵測高度落差 (相關說明請參閱「清潔與維護」單元)。
第一次使用前
安裝側邊刷毛
1 拆開側邊刷毛包裝,將自動吸塵機器人上下顛倒放置在桌面或地板上。
2 將側邊刷毛推入自動吸塵機器人 (圖 10)底部的驅動軸上。
注意: 請確定您正確安裝側邊刷毛。 將它們推到驅動軸上,直到聽到卡入定位的聲音為止。
取出遙控器的保護拉片
遙控器使用 CR2025 硬幣形電池。 此電池受到保護拉片的保護,使用前請移除保護拉片。
1 將電池保護拉片從遙控器 (圖 11)的電池槽內拉出。
您現在可以開始使用遙控器。
Page 46

46
繁體中文
使用前準備
安裝機座
1 將轉換器的小插頭插入機座上的插座 (1),然後將轉換器插入電源插座 (2) (圖 12)。
2 將機座靠牆擺放在平穩的水平地面上。
注意: 請確認機座前方 80 公分、右方 30 公分與左方 100 公分內沒有任何障礙物或高度落差。
充電
首次充電時及自動吸塵機器人的充電式電池電力耗盡後,充電時間為四小時。
自動吸塵機器人有兩種充電方式:
-
使用期間可手動或自動在機座上充電;
-
將自動吸塵機器人連接至電源加以充電。
注意: 充電式電池充飽電後,自動吸塵機器人可進行清潔達 100 分鐘。
在機座上充電
1 將電源開關設定至「開」(on) 的位置 (圖 14)。
2 將自動吸塵機器人放在已插電的機座 (圖 15)上。
3 開始/停止按鈕會開始緩慢閃爍 (圖 16)。
4 當電池充飽電力後,開始/停止按鈕會持續亮燈 (圖 17)。
使用期間自動充電
1 當自動吸塵機器人完成清潔或剩下 15% 電力時,將自動搜尋機座以進行充電。 在自動吸塵機器人搜尋機
座期間,開始/停止按鈕會快速閃爍。 (圖 18)
2 當電池充飽電力後,開始/停止按鈕會持續亮燈。
注意: 自動吸塵機器人只有在從機座開始清潔時,才會自動搜尋機座。
直接連接電源充電
1 按下電源開關,開啟自動吸塵機器人電源。
2 將電源轉換器的小插頭插入自動吸塵機器人上的插座 (1)。 將電源轉換器插到牆壁的插座 (2) (圖 19)。
3 當自動吸塵機器人正確連接至電源插座時,開始/停止按鈕會開始非常緩慢地閃爍。 這表示自動吸塵機器人
正在充電。
4 當電池充飽電力後,開始/停止按鈕會持續亮燈。
清潔房間前的準備工作
在啟動自動吸塵機器人進行清潔工作前,請確認您已將地板上所有鬆動和易碎的物品取走 (圖 20)。
也請移除地板上的所有纜線、電線及導線。
使用自動吸塵機器人
開始和停止
1 按壓開始/停止按鈕。
-
您可以按下自動吸塵機器人 (圖 21)的開始/停止按鈕。
-
您也可以按下遙控器上 (圖 22)的開關按鈕。
Page 47

繁體中文
2 開始/停止按鈕將持續亮起,自動吸塵機器人將開始清潔。 (圖 23)
3 自動吸塵機器人將以自動清潔模式進行清潔,直到電池電力不足為止。 在自動清潔模式下,則會依照 Z 字
形、隨機、沿牆及定點清潔模式 (圖 24)順序重複執行清潔。
注意: 若要選擇個別模式,請按下遙控器上的其中一顆模式按鈕。 如需詳細資訊,請參閱「清潔模式選
擇」一節。
4 當電池電力不足時,開始/停止按鈕會開始閃爍,自動吸塵機器人會尋找機座以進行充電 (圖 18)。
5 您也可以按下開始/停止按鈕以中斷或停止清潔作業。 如果您再次按下開始/停止按鈕,而且充電式電池仍
有足夠的電力,自動吸塵機器人將以自動清潔模式繼續清潔。
6 在充電式電池電力尚未不足前,若要讓自動吸塵機器人返回機座,請按下遙控器上的返回機座按鈕 (圖
25)。
開始/停止按鈕開始閃爍 (圖 26)時,自動吸塵機器人會搜尋機座。
注意: 如果您並非從機座啟動自動吸塵機器人,則充電式電池電力不足時,自動吸塵機器人不會自動尋找
機座。 如果充電式電池仍有足夠的電力,您可以按下遙控器上的返回機座按鈕,讓自動吸塵機器人返回機
座。 如果充電式電池電力已完全耗盡,您必須手動將自動吸塵機器人放回機座。
47
操作機座
機座配有兩個遙控器,可操作自動吸塵機器人。
電量已滿後開始清潔按鈕
若您按下機座上的電量已滿後開始清潔按鈕,自動吸塵機器人會在充電式電池充飽電 (圖 27)後立即開始清
潔。
24h 按鈕
若您按下機座的 24h 按鈕,機座會開始倒數至下一次清潔前的 24 小時。 倒數結束後,自動吸塵機器人會開始
清潔,直到電池電力不足,然後自動返回機座充電 (圖 28)。
清潔模式選擇
清潔模式選擇
此款自動吸塵機器人在自動清潔模式旁有四種個別清潔模式,只要按下遙控器上的適當按鈕即可啟動各個模
式。
Z 字形模式
使用 Z 字形模式時,自動吸塵機器人會在房內以 Z 字形環形路線清潔大面積 (圖 29)區域。
隨機模式
使用此模式時,自動吸塵機器人會以直線和交叉移動 (圖 30)的混合模式清潔房間。
沿牆模式
使用此模式時,自動吸塵機器人會沿著房間牆壁清潔,讓牆壁邊緣區域更加乾淨 (圖 31)。
定點清潔模式
使用此模式時,自動吸塵機器人會在小區域裡隨機移動,徹底 (圖 32)清潔。
注意: 手動選擇的模式運作時間只有幾分鐘。 之後,自動吸塵機器人就會切換至自動清潔模式。
手動操縱
1 利用位於遙控器開始/停止按鈕的上方、下方、左邊、右邊的箭頭按鈕,操縱自動吸塵機器人於房 (圖 33)內
清潔。
Page 48
48
繁體中文
注意: 在靠近高度落差與樓梯的位置,若以手動方式操作自動吸塵機器人,請特別小心。
注意: 吸塵功能與側邊刷毛只有在自動吸塵機器人向前移動時才有作用。 向左、向右或後退按鈕僅用於操
作自動吸塵機器人。
使用清潔時間按鈕
按下遙控器上的清潔時間按鈕,自動吸塵機器人會進行清潔 35 分鐘。 清潔時間結束後,自動吸塵機器人將返
回機座充電 (圖 34)。
指示燈號及其意義
自動吸塵機器人顯示幕上有兩種指示燈: 警告指示燈和集塵盒滿指示燈。 開始/停止按鈕會發出指示燈號。 指
示燈號所代表的意義如下表所示。
訊號
開始/停止按鈕持續亮起。 自動吸塵機器人準備清潔。
開始/停止按鈕緩慢閃爍。 自動控制機器人吸塵器正在充電。
開始/停止按鈕快速閃爍。 自動吸塵機器人正在搜尋機座。
集塵盒滿指示燈亮燈。 集塵盒已滿。
警告指示燈亮燈。 自動吸塵機器人在清潔時被拿起。
意義
自動吸塵機器人電力不足。
自動吸塵機器人的緩衝墊阻塞。
輪子或側邊刷毛堵塞。
未裝上頂蓋,或頂蓋未妥善合上。
自動吸塵機器人無法找到機座。
清潔與維護
清空和清潔集塵盒
集塵盒滿指示燈持續亮起時,應清空並清潔集塵盒。
1 取下蓋子 (圖 35)。
2 拉起集塵盒蓋把手,將集塵盒自集塵室 (圖 36)拉出。
注意: 當您取出或裝入集塵盒時,請小心勿損壞馬達風扇的葉片。
3 小心拿起集塵盒 (1) 的蓋子,再拿出濾網 (2) (圖 37)。
4 在垃圾桶上抖動集塵盒,以清空集塵盒。 用布或軟毛牙刷清潔集塵盒的濾網和內部。 也請清潔集塵盒 (圖
38)底部的吸塵開口。
警告: 請勿使用清水或洗碗機來清潔集塵盒及濾網。
5 將濾網放回集塵盒 (1)。 然後將蓋子放回集塵盒 (2) (圖 39)上。
6 將集塵盒裝回集塵室中,並將頂蓋裝回自動吸塵機器人 (圖 40)上。
警告: 請務必確認已在集塵盒內部放入濾網。 如果您在集塵盒內沒有濾網的情況下使用自動吸塵機器人,
將會導致馬達損壞。
Page 49

繁體中文
清潔自動吸塵機器人
為了維持良好的清潔效能,您必須不時清潔掉落感測器、輪子、側邊刷毛以及吸塵開口。
1 將自動吸塵機器人上下顛倒放置在平坦的表面上。
2 使用軟毛刷子 (例如:牙刷) 清理掉落感測器 (圖 41)的灰塵或毛絮。
注意: 請務必定期清潔掉落感測器。 如果掉落感測器髒污,自動吸塵機器人可能無法偵測高度落差或樓
梯。
3 使用軟毛刷子 (例如:牙刷) 清除前輪和側輪 (圖 42)的灰塵或毛絮。
4 若要清潔側邊刷毛,請抓住刷毛並將其從驅動軸 (圖 43)拉出。
5 使用軟毛刷子 (例如:牙刷) 或軟布 (圖 44)將毛絮、毛髮和絲線自驅動軸和側邊刷毛上移除。刷子 (例
如:牙刷) 或布 (圖 44)。
6 檢查側邊刷毛和自動吸塵機器人底部是否有任何可能損壞地板的尖銳物體。
7 將側邊刷毛從驅動軸取下後,將手指插入標有箭頭的地方,解開 TriActive 特大全方位三效合一吸頭的卡
榫,並將 TriActive 吸頭從自動吸塵機器人 (圖 45)拉出。
8 用軟毛刷子 (例如:牙刷) (圖 46) 清潔吸塵開口。
9 清除 TriActive 全方位三效合一吸頭 (圖 47)上明顯的灰塵。
10 將 TriActive 全方位三效合一吸頭上的彈簧鉤插入自動吸塵機器人 (圖 48)底部的孔中。 將 TriActive 全方位
三效合一吸頭推回原位。 檢查吸頭能否自由上下移動幾公釐。
更換
訂購配件
若要購買配件或備用零件,請造訪 www.shop.philips.com/service,或洽詢您的飛利浦經銷商。 您也可以聯絡
您所在國家/地區的飛利浦客戶服務中心 (詳細聯絡資料請參閱全球保證書)。
49
更換濾網
濾網非常髒或受損時,請予以更換。 您可利用訂購編號 FC8012 訂購的新濾網。 有關如何從集塵盒取下濾網
以及如何將濾網裝入集塵盒的說明,請參閱「清潔與維護」單元中的「清空和清潔集塵盒」。
更換側邊刷毛
使用一段期間後,請更換側邊刷毛,以確保適當的清潔效果。
注意: 當您發現側邊刷毛有磨損或損壞的跡象時,請務必予以更換。 此外,建議您同時更換兩側的側邊刷
毛。 您可利用訂購編號 FC8013 訂購一組備用側邊刷毛。
1 若要更換側邊刷毛,請抓住舊側邊刷毛的刷毛部分,將其從驅動軸 (圖 43)拉出。
2 將新的側邊刷毛推入驅動軸 (圖 10)。
取出充電式電池
警告: 請僅在棄置本產品前取出充電式電池。 取出電池前,請確認其電力已完全耗盡。
若要取出充電式電池,請遵照下列指示操作。 您也可以將自動吸塵機器人送到飛利浦服務中心,以取出充電
式電池。 請與您所在國家/地區的飛利浦客戶服務中心聯絡,找到離您最近的服務中心地址。
1 從房間任何一處啟動自動吸塵機器人,而非從機座啟動。
2 讓自動吸塵機器人持續轉動直到充電式電池電量耗盡,以確定充電式電池在您取下並棄置前已完全放電。
3 鬆開螺絲並取下電池室蓋板 (圖 52)。
Page 50
50
繁體中文
4 請取出並卸除 (圖 50)充電式電池。
5 請將自動吸塵機器人及充電式電池拿至電子電器廢棄物回收站。
更換遙控器電池
遙控器使用 CR2025 硬幣形電池。 若您按下遙控器上的按鈕而自動吸塵機器人沒有反應,請更換電池。
1 上下顛倒地拿著遙控器。 壓下電池固定座的釋放按鈕,同時將電池固定座滑出遙控器 (圖 53)。
2 從電池固定座中取出電力已用盡的電池,然後將新的電池放入電池固定座。 接著將電池固定座滑入遙控器
(圖 54)。
疑難排解
問題
可能原因 解決方法
按下開始/停止按鈕時,自
動吸塵機器人沒有啟動。
按下其中一個按鈕時,自動
吸塵機器人無回應。
警告指示燈會快速閃爍。 一或兩個輪子卡住。 將電源開關設為「關」(off)。 將卡在輪子懸
充電式電池沒電。 為充電式電池充電 (請參閱「使用前準備」
小插頭仍插在自動吸塵機器人上
的插座上。
電源開關並未設為「開」(on) (I)
位置。
您將電源開關設為「關」(off)
了。
自動吸塵機器人無法找到機座,
電池也沒電了。
單側 (或兩側) 側邊刷毛阻塞。 清潔側邊刷毛 (請參閱「清潔與維護」單
未裝上頂蓋,或頂蓋未妥善合上。若未安裝頂蓋或頂蓋未確實關閉,自動吸塵
單元)。
自動吸塵機器人無法利用主電源運作, 僅
能使用充電式電池的電力運作。 因此,使
用前請務必將電源轉換器從自動吸塵機器人
與電源插座上拔下。
按下電源開關,開啟電源。 將自動吸塵機
器人放在已插電的機座上或插入電源轉換器
的小插頭。 幾秒鐘後,自動吸塵機器人會
發出嗶聲,螢幕會亮起幾秒鐘。
按下電源開關,開啟電源。 將自動吸塵機
器人放在已插電的機座上或插入電源轉換器
的小插頭。 幾秒鐘後,自動吸塵機器人會
發出嗶聲,螢幕會亮起幾秒鐘。
將自動吸塵機器人放在已插電的機座上或插
入電源轉換器的小插頭。 幾秒鐘後,自動
吸塵機器人會發出嗶聲,螢幕會亮起幾秒
鐘。
空處的毛絮、毛髮、絲線或電線移除。
元)。
機器人將不會運作。 請將頂蓋正確放至自
動吸塵機器人上。
緩衝墊卡住。 按壓開始/停止按鈕。 將自動吸塵機器人拿
自動吸塵機器人在清潔時被拿起。按壓開始/停止按鈕。 將自動吸塵機器人放
起,以釋放其緩衝墊。 將自動吸塵機器人
放在離障礙物較遠處,然後按下開始/停止
按鈕讓其繼續清潔。
在地板上。 然後按下開始/停止按鈕讓自動
吸塵機器人繼續清潔。
Page 51
問題 可能原因 解決方法
繁體中文
51
自動吸塵機器人未妥善清潔。一個 (或兩個) 側邊刷毛變形或彎曲。將刷毛浸泡在溫水中一段時間。 如果刷毛
集塵盒內的濾網髒污。 用布或軟毛牙刷清潔集塵盒內的濾網。 您
集塵盒底部的吸塵開口阻塞。 清潔吸塵開口 (請參閱「清潔與維護」單
前輪卡有毛髮或其他灰塵。 清潔前輪 (請參閱「清潔與維護」單元)。
自動吸塵機器人正在清潔極為暗
色或閃亮的表面,因而觸發掉落
感測器, 導致自動吸塵機器人以
異常模式移動。
自動吸塵機器人正在清潔強烈反
射陽光的地板, 因而觸發掉落感
測器,導致自動吸塵機器人以異
常模式移動。
充電式電池無法充電或耗電
快速。
遙控器的電池耗電過快。 您可能未裝入正確的電池類型。 遙控器須使用 CR2025 硬幣形電池。 如果
充電式電池壽命結束。 請飛利浦服務中心協助更換充電式電池 (請
仍無法恢復為正常形狀,請更換側邊刷毛
(請參閱「更換」單元)。
亦可使用一般的吸塵器以低吸力設定清潔濾
網與集塵盒。
如果無法將濾網刷乾淨或吸乾淨,請更換新
的濾網。 建議您至少每年更換一次濾網。
元)。
按下開始/停止按鈕,然後將自動吸塵機器
人移至顏色較淺的地板上。 如果在顏色較
淺的地板上仍發生問題,請前往
www.philips.com/support 或聯絡您所在國
家/地區的客戶服務中心。
拉上窗簾阻隔陽光射入房間。 您亦可在陽
光較不強烈時開始進行清潔。
參閱「更換」單元)。
問題持續發生,請前往
www.philips.com/support 或聯絡您所在國
家/地區的客戶服務中心。
自動吸塵機器人以圓形移動。自動吸塵機器人以定點清潔模式
進行清潔。
自動吸塵機器人無法找到機座。沒有足夠的空間可讓自動吸塵機
器人返回機座。
自動吸塵機器人仍積極尋找中。 請等待約 20 分鐘,讓自動吸塵機器人返回
自動吸塵機器人並未從機座開始
進行清潔。
這是正常現象。 當偵測到地板上有大量髒
污時,將會啟動定點清潔模式以徹底清潔。
這也是自動清潔模式的一部分。 大約一分
鐘之後,自動吸塵機器人將恢復正常的清潔
模式。 您可以在遙控器上選擇不同的清潔
模式以停止自動清潔模式。
請嘗試尋找其他適合放置機座的位置。 請
參閱「使用前準備」單元中的「安裝機
座」。
機座。
如果您希望自動吸塵機器人在完成清潔之後
返回機座,則必須讓它從機座開始運作。
Page 52

52
한국의
소개
필립스 제품을 구입해 주셔서 감사합니다! 필립스가 드리는 지원 혜택을 최대한 누리시려면
www.philips.com/welcome에서 제품을 등록하십시오.
제품 정보
1 상단 덮개
2 먼지통 뚜껑 손잡이
3 먼지통 뚜껑
4 필터
5 먼지통
6 팬
7 범퍼
8 도킹 스테이션 센서
9 시작/중지 버튼(로봇 청소기 시작 또는 중지)
10 디스플레이
11 전원 스위치(로봇 청소기의 전원 켜기/끄기)
12 TriActive XL 노즐
13 앞바퀴
14 사이드 브러시 축
15 낙하 방지(drop-off) 센서
16 배터리함
17 바퀴
18 흡입구
19 측면 브러시
20 배터리함
21 리모콘
22 전원 플러그
23 어댑터
24 도킹 스테이션
디스플레이 및 리모콘
디스플레이 (그림 2):
1 경고 표시등
2 먼지통 가득참 표시등
리모콘 (그림 3):
1 탐색 버튼 및 시작/중지
2 도킹 버튼
3 청소 시간 버튼
4 청소 모드 버튼
로봇 청소기 작동 원리
로봇 청소기의 청소 기능
이 로봇 청소기는 집 바닥을 청소하는 데 적합한 기능을 갖추고 있습니다.
로봇 청소기는 특히 목재, 타일 또는 리놀륨 등의 재료로 된 청소하기 딱딱한 바닥에 적합합니다. 카펫 또는
러그 등의 청소하기 부드러운 바닥에는 어려움이 있을 수 있습니다. 카펫 또는 러그에서 로봇 청소기를
사용하려면 로봇 청소기가 그 바닥의 종류를 처리할 수 있는지 우선 가까이 지켜보십시오. 로봇 청소기는
너무 어둡거나 밝은 딱딱한 바닥에서 사용할 때 관리가 필요할 수도 있습니다.
한국의
Page 53

한국의
로봇 청소기 청소 원리
청소 시스템
로봇 청소기는 바닥을 효율적으로 청소하기 위한 2단계 청소 시스템을 갖추고 있습니다.
-
로봇 청소기는 두 개의 사이드 브러시로 벽을 따라 틈새까지 청소할 수 있습니다. 또한 이 브러시를
사용하여 바닥의 먼지를 쓸어서 흡입구 (그림 4)로 모아 놓습니다.
-
로봇 청소기의 흡입력으로 먼지를 빨아들여 흡입구를 통해 먼지통 (그림 5)으로 운반합니다.
청소 패턴
자동 청소 모드에서 로봇 청소기는 자동 청소 패턴 순서에 따라 공간의 각 부분을 최적화된 방식으로
청소합니다. 로봇 청소기의 청소 패턴은 다음과 같습니다.
1 Z 패턴 또는 지그재그 패턴 (그림 6)
2 임의 패턴 (그림 7)
3 벽면 패턴 (그림 8)
4 지점 집중 청소 패턴 (그림 9)
자동 청소 모드에서 로봇 청소기는 일정한 순서에 따라 Z 패턴, 임의 패턴, 벽면 패턴 및 지점 집중 청소
패턴으로 작동합니다.
로봇 청소기는 이와 같은 순서로 작동을 완료하고 나면 다시 Z 패턴으로 움직이기 시작합니다. 같은 순서로
계속 작동하면서 충전식 배터리의 잔량이 낮아지거나 전원이 수동으로 꺼질 때까지 청소합니다.
참고: 리모콘의 버튼을 눌러 각 모드를 개별적으로 선택할 수도 있습니다. 자세한 내용은 '로봇 청소기 사용'
장의 '청소 모드'를 참조하십시오.
로봇 청소기가 낙차를 피하는 방법
로봇 청소기의 하단에는 세 개의 낙하 방지(drop-off) 센서가 있습니다. 이 센서를 사용하여 계단과 같이
낙차가 있는 공간을 감지하고 피합니다.
53
참고: 로봇 청소기의 전면 낙하 방지(drop-off) 센서는 범퍼 뒤에 있으므로 낙차가 있는 부분의 가장자리를
약간 비켜 가는 것은 일반적인 현상입니다.
주의: 경우에 따라 낙하 방지(drop-off) 센서가 제때에 계단 또는 낙차가 있는 공간을 감지하지 못할 수도
있습니다. 따라서 로봇 청소기를 계단 근처 또는 낙차가 있는 곳에서 작동할 때 처음 몇 번은 주의 깊게
지켜보십시오. 로봇 청소기가 낙차를 올바르게 감지할 수 있도록 낙하 방지(drop-off) 센서를 반드시
정기적으로 청소하십시오(지침은 '청소 및 유지관리' 장 참조).
처음 사용 전
사이드 브러시 장착
1 사이드 브러시를 꺼내어 로봇 청소기를 테이블 또는 바닥에 거꾸로 뒤집어 놓습니다.
2 사이드 브러시를 로봇 청소기 (그림 10) 하단의 축에 끼웁니다.
참고: 사이드 브러시를 올바르게 장착했는지 확인합니다. 딸깍 소리가 날 때까지 축에 브러시를 밀어
넣습니다.
리모콘에서 보호 태그 제거
리모콘에는 동전 모양의 CR2025 배터리가 사용됩니다. 이 배터리는 보호 태그로 보호되며 사용하기 전에
이 태그를 제거해야 합니다.
1 배터리 보호 태그를 리모콘 (그림 11) 배터리 보관함에서 당겨 빼냅니다.
이제 리모콘을 사용할 수 있습니다.
Page 54

54
한국의
사용 준비
도킹 스테이션 설치
1 어댑터의 전원 플러그를 도킹 스테이션의 소켓에 꽂고(1) 어댑터를 벽면 콘센트에 꽂습니다(2) (그림
12).
2 도킹 스테이션은 평평한 바닥에 벽 쪽으로 둡니다.
참고: 도킹 스테이션의 앞쪽 80cm, 오른쪽 30cm 및 왼쪽 100cm 지점에 낙차 또는 장애물이 없는지
확인합니다.
충전
처음 충전하는 경우나 로봇 청소기의 충전식 배터리가 방전된 경우 충전 시간은 네 시간입니다.
로봇 청소기는 다음 두 가지 방식으로 충전할 수 있습니다.
-
사용 중 도킹 스테이션에서 수동 또는 자동으로 충전
-
로봇 청소기를 전원에 직접 연결하여 충전
참고: 충전식 배터리가 완전히 충전되면 로봇 청소기는 최대 100분 동안 청소할 수 있습니다.
도킹 스테이션에서 충전
1 전원 스위치를 '켜짐' 위치 (그림 14)로 설정합니다.
2 플러그가 전원에 연결된 도킹 스테이션 (그림 15)에 로봇 청소기를 놓습니다.
3 시작/중지 버튼이 천천히 깜박 (그림 16)이기 시작합니다.
4 충전식 배터리의 충전이 완료되면 시작/중지 버튼의 표시등이 켜집니다 (그림 17).
사용 중 자동 충전
1 로봇 청소기가 청소를 끝냈거나 배터리 전원이 15%만 남아 있는 경우 스스로 도킹 스테이션을 찾아
충전합니다. 로봇 청소기가 도킹 스테이션을 찾을 때 시작/중지 버튼이 빠르게 깜박입니다 (그림 18).
2 충전식 배터리의 충전이 완료되면 시작/중지 버튼의 표시등이 켜집니다.
참고: 로봇 청소기는 도킹 스테이션에서 청소를 시작한 경우에만 스스로 도킹 스테이션을 찾습니다.
전원에서 직접 충전
1 전원 스위치를 눌러 로봇 청소기를 켭니다.
2 어댑터의 전원 플러그를 로봇 청소기의 소켓에 꽂습니다(1). 어댑터를 벽면 콘센트 (그림 19)에
꽂습니다(2).
3 로봇 청소기가 전원에 올바르게 연결되면 시작/중지 버튼이 아주 천천히 깜박이기 시작합니다. 그러면
로봇 청소기가 충전되고 있는 것입니다.
4 충전식 배터리의 충전이 완료되면 시작/중지 버튼의 표시등이 켜집니다.
청소 작업을 위한 공간 정리
로봇 청소를 시작하기 전에 바닥에 늘어 놓은 물건이나 깨지기 쉬운 물체를 바닥에서 (그림 20) 치워야
합니다.
또한 모든 케이블, 전선 및 코드를 바닥에서 제거해야 합니다.
Page 55

한국의
로봇 청소기 사용
시작 및 중지
1 시작/중지 버튼을 누릅니다.
-
로봇 청소기에서 (그림 21) 시작/중지 버튼을 누를 수 있습니다.
-
또한 리모콘 (그림 22)의 시작/중지 버튼을 누를 수도 있습니다.
2 시작/중지 버튼이 켜진 상태로 유지되고 로봇 청소기가 청소를 시작 (그림 23)합니다.
3 배터리의 잔량이 낮아질 때까지 자동 청소 모드로 청소합니다. 자동 청소 모드에서 Z 패턴, 임의, 벽면 및
지점 집중 청소 패턴 (그림 24)을 반복하면서 청소합니다.
참고: 개별 모드를 선택하려면 리모콘의 모드 버튼 중 하나를 누릅니다. 자세한 내용은 '청소 모드 선택'
섹션을 참조하십시오.
4 배터리 잔량이 적으면 시작/중지 버튼이 깜박이기 시작하고 로봇 청소기가 충전을 위해 도킹
스테이션으로 (그림 18) 돌아갑니다.
5 시작/중지 버튼을 눌러 청소 작동을 일시 중단하거나 중지할 수도 있습니다. 시작/중지 버튼을 다시
눌렀을 때 충전식 배터리의 에너지가 아직 충분한 경우, 자동 청소 모드로 계속 청소합니다.
6 충전식 배터리 잔량이 없어지기 전 로봇 청소기가 도킹 스테이션으로 돌아가도록 하려면 리모콘에서
도킹 버튼 (그림 25)을 누릅니다.
시작/중지 버튼이 깜박이기 시작하고 로봇 청소기가 도킹 스테이션 (그림 26)을 찾습니다.
참고: 도킹 스테이션에서 로봇 청소기를 시작하지 않은 경우, 로봇 청소기는 충전식 배터리의 잔량이
부족해져도 스스로 도킹 스테이션을 찾을 수 없습니다. 충전식 배터리의 에너지가 아직 충분한 경우에도
리모콘의 도킹 버튼을 눌러 로봇 청소기가 도킹 스테이션으로 돌아가도록 할 수 있습니다. 충전식
배터리가 완전히 방전된 경우 로봇 청소기를 도킹 스테이션에 직접 가져다 놓아야 합니다.
55
도킹 스테이션 작동
도킹 스테이션에는 로봇 청소기 작동에 사용할 수 있는 컨트롤러 2개가 있습니다.
배터리 완전 충전 및 Go 버튼
로봇 청소기가 충전되는 동안 도킹 스테이션의 배터리 완전 충전 및 Go 버튼을 누르면 충전식 배터리가
완전히 충전 (그림 27)되자마자 청소가 시작됩니다.
24시간 버튼
도킹 스테이션의 24시간 버튼을 누르면 다음 청소 작업이 시작될 때까지 도킹 스테이션에서 24시간 카운트
다운을 시작합니다. 카운트 다운이 끝나면 로봇 청소기가 청소를 시작하고 배터리 잔량이 낮아지면 충전
(그림 28)을 위해 자동으로 도킹 스테이션으로 돌아갑니다.
청소 모드 선택
청소 모드 선택
자동 청소 모드 옆에 네 가지 청소 모드가 있으며, 리모콘의 해당 버튼을 눌러 각각 작동할 수 있습니다.
Z 패턴 모드
Z 패턴 모드의 경우, 실내에서 Z 모양을 그리며 넓은 구역 (그림 29)을 청소합니다.
임의 모드
이 모드에서는 직진이나 열십자 모양 (그림 30) 등의 혼합 패턴으로 청소합니다.
벽면 모드
이 모드에서는 로봇 청소기가 실내 벽을 따라 이동하며 구석 (그림 31)을 청소합니다.
Page 56
56
한국의
지점 집중 청소 모드
이 모드에서는 로봇 청소기가 작은 구역을 임의로 움직이며 완전하게 (그림 32) 청소합니다.
참고: 수동으로 선택한 모드는 몇 분 동안만 작동합니다. 수동으로 선택한 모드 작동이 끝나면 로봇
청소기는 자동 청소 모드로 전환합니다.
수동 작동
1 리모콘에 있는 시작/중지 버튼의 위, 아래 및 왼쪽, 오른쪽 화살표 버튼을 사용하여 실내 (그림 33)
전체를 탐색합니다.
참고: 로봇 청소기를 낙차가 있는 곳이나 계단 근처에서 작동할 경우 주의하십시오.
참고: 진공 기능과 사이드 브러시는 로봇 청소기가 앞으로 움직일 경우에만 작동합니다. 왼쪽, 오른쪽
또는 뒤쪽 버튼은 로봇 청소기를 조종할 경우에만 사용합니다.
청소 시간 버튼 사용
리모콘의 청소 시간 버튼을 눌러 35분 동안 청소합니다. 청소 시간이 끝나면 로봇 청소기가 충전 (그림
34)을 위해 도킹 스테이션으로 돌아갑니다.
신호와 그 의미
로봇 청소기 디스플레이에는 표시등 2개가 있습니다. 경고 표시등과 먼지통 가득참 표시등입니다.
시작/중지 버튼에는 표시등 신호가 들어옵니다. 아래 표에 신호의 의미가 나와 있습니다.
신호
시작/중지 버튼이 계속 켜져 있습니다. 로봇 청소기가 청소할 준비가 되었습니다.
의미
시작/중지 버튼이 천천히 깜박입니다. 로봇 청소기가 충전 중입니다.
시작/중지 버튼이 빠르게 깜박입니다. 로봇 청소기가 도킹 스테이션을 찾고 있습니다.
로봇 청소기의 충전식 배터리 잔량이 부족합니다.
먼지통 가득참 표시등이 켜집니다. 먼지통이 가득 찼습니다.
경고 표시등이 켜집니다. 청소 중에 로봇 청소기가 들어 올려졌습니다.
로봇 청소기의 범퍼가 끼었습니다.
바퀴 또는 사이드 브러시가 끼었습니다.
상단 덮개가 없거나 제대로 닫히지 않았습니다.
로봇 청소기가 도킹 스테이션을 찾지 못합니다.
청소 및 유지관리
먼지통 비우기 및 청소
먼지통 청소 표시등이 켜져 있으면 먼지통을 비우고 청소합니다.
1 덮개 (그림 35)를 분리합니다.
2 먼지통 뚜껑 손잡이를 위로 당기고 먼지통 보관함 (그림 36)에서 먼지통을 들어올립니다.
Page 57

한국의
참고: 먼지통을 분리하거나 다시 끼우는 경우 모터 팬의 날이 손상되지 않도록 주의하십시오.
3 먼지통에서 뚜껑을 조심스럽게 들어올린 다음(1) 필터 (그림 37)를 꺼냅니다(2).
4 휴지통 위에서 먼지통을 털어내 비웁니다. 부드러운 칫솔이나 천을 사용하여 필터와 먼지통 내부를
청소합니다. 먼지통 (그림 38) 하단의 흡입구도 청소합니다.
주의: 물 또는 식기 세척기로 먼지통과 필터를 세척하지 마십시오.
5 필터를 먼지통에 다시 넣습니다(1). 그런 다음 먼지통 (그림 39)의 뚜껑을 닫습니다(2).
6 먼지통을 먼지통 보관함에 넣고 로봇 청소기 (그림 40)의 상단 덮개를 다시 장착합니다.
주의: 먼지통 안에 필터가 있는지 항상 확인하십시오. 먼지통 안에 필터가 없는 상태로 로봇 청소기를
사용하는 경우 모터가 손상될 수 있습니다.
로봇 청소기 세척
우수한 청소 성능을 유지하려면 가끔씩 낙하 방지(drop-off) 센서, 바퀴, 사이드 브러시 및 흡입구를
청소해야 합니다.
1 로봇 청소기를 평평한 곳에 거꾸로 뒤집어 놓습니다.
2 부드러운 브러시(예: 칫솔)를 사용하여 낙하 방지(drop-off) 센서 (그림 41)에서 먼지 또는 잔털을
제거합니다.
참고: 낙하 방지(drop-off) 센서를 반드시 정기적으로 청소하십시오. 낙하 방지(drop-off) 센서가 더러운
경우 로봇 청소기가 낙차 또는 계단을 감지하지 못할 수 있습니다.
3 부드러운 브러시(예: 칫솔)를 사용하여 앞바퀴 및 옆바퀴 (그림 42)에서 먼지 또는 잔털을 제거합니다.
4 사이드 브러시를 청소하려면 브러시를 잡고 축 (그림 43)에서 빼냅니다.
5 부드러운 브러시(예: 칫솔) 또는 천 (그림 44)으로 사이드 브러시와 축에서 잔털, 머리카락 및 실을
제거합니다.브러시(예: 칫솔) 또는 천 (그림 44)
6 바닥을 손상시킬 수 있는 날카로운 물체가 있는지 사이드 브러시와 로봇 청소기 하단을 확인합니다.
7 축에서 사이드 브러시를 제거한 후 화살표로 표시된 곳에 손가락을 넣어 TriActive XL 노즐의 스냅형
연결부를 분리하고 로봇 청소기에서 TriActive 노즐 (그림 45)을 당겨 빼냅니다.
8 부드러운 브러시(예: 칫솔) (그림 46)로 흡입구를 청소합니다.
9 TriActive 노즐 (그림 47)에서 보이는 먼지를 모두 제거합니다.
10 TriActive 노즐 스냅 후크를 로봇 청소기 (그림 48) 하단 구멍에 끼웁니다. TriActive 노즐을 다시 제
자리에 밀어 넣습니다. 노즐이 위아래로 몇 밀리미터씩 원활하게 움직이는지 확인합니다.
57
교체
액세서리 주문
액세서리 또는 예비 부품을 구입하려면 www.shop.philips.com/service를 방문하거나 필립스 대리점에
문의하십시오. 또한 해당 국가의 필립스 고객 상담실에 문의하셔도 됩니다(연락처 정보는 국제 보증서
참조).
필터 교체
필터가 매우 더럽거나 손상된 경우 교체합니다. 주문 번호 FC8012로 새 필터를 주문할 수 있습니다.
먼지통에서 필터를 분리하는 방법 및 먼지통에 필터를 장착하는 방법에 대한 지침은 '청소 및 유지관리'
장의 '먼지통 비우기 및 청소'를 참조하십시오.
사이드 브러시 교체
적절한 청소 효과를 얻으려면 일정 시간이 지난 후 사이드 브러시를 교체합니다.
Page 58
58
한국의
참고: 마모 또는 손상의 흔적이 발견되면 항상 사이드 브러시를 교체합니다. 또한 두 사이드 브러시를 한
번에 교체하는 것이 좋습니다. 주문 번호 FC8013으로 여분의 사이드 브러시 세트를 주문할 수 있습니다.
1 사이드 브러시를 교체하려면 오래된 사이드 브러시를 잡고 축 (그림 43)에서 빼냅니다.
2 새로운 사이드 브러시를 축 (그림 10)에 끼웁니다.
충전식 배터리를 분리하는 방법
경고: 제품을 폐기할 때에만 충전식 배터리를 분리하십시오. 제거 시 배터리가 완전히
소모되었는지 확인하십시오.
충전식 배터리를 분리하려면 다음 단계를 따르십시오. 필립스 서비스 센터에서 로봇의 충전용 배터리를
분리할 수도 있습니다. 해당 국가의 주변 서비스 센터 주소를 참조하여 필립스 서비스 센터에 문의하십시오.
1 도킹 스테이션이 아닌 방 안의 아무 장소에서 로봇 청소기의 작동을 시작하십시오.
2 충전식 배터리를 버리기 전에 완전히 방전하려면 충전식 배터리가 방전될 때까지 로봇 청소기를
작동합니다.
3 나사를 풀고 배터리함 뚜껑 (그림 52)을 여십시오.
4 충전식 배터리를 꺼내어 분리 (그림 50)하십시오.
5 로봇 및 충전식 배터리를 전기 및 전자 제품용으로 분리 수거하십시오.
리모콘 배터리 교체
리모콘에는 동전 모양의 CR2025 배터리가 사용됩니다. 리모콘 버튼을 눌러도 로봇 청소기가 더 이상
응답하지 않으면 배터리를 교체합니다.
1 리모콘을 뒤집어 놓습니다. 배터리함의 분리 버튼을 누른 채로 배터리함을 밀어 리모콘 (그림 53)에서
분리합니다.
2 배터리함에서 빈 배터리를 제거하고 새 배터리를 넣습니다. 그런 다음 배터리함을 리모콘 (그림 54)에
밀어 넣습니다.
문제 해결
문제점
시작/중지 버튼을 눌러도
로봇 청소기가 청소를
시작하지 않습니다.
버튼 하나를 누르기 전에는
로봇이 반응하지 않습니다.
가능한 원인 해결책
충전식 배터리가
방전되었습니다.
전원 플러그가 여전히 로봇
청소기의 소켓에 삽입되어
있습니다.
전원 스위치가 '켜짐'(I) 위치에
설정되어 있지 않습니다.
전원 스위치를 '꺼짐'으로
설정합니다.
충전식 배터리를 충전합니다('사용 전
준비' 장 참조).
로봇 청소기는 주전원으로 작동되지 않고,
충전식 배터리로만 작동됩니다. 따라서
사용 전에는 항상 어댑터를 로봇 청소기와
주전원에서 분리합니다.
전원 스위치를 '켜짐'으로 설정합니다.
플러그가 전원에 연결된 도킹 스테이션에
로봇 청소기를 놓거나 어댑터의 작은
플러그를 연결합니다. 몇 초 후, 로봇의
신호음이 들리며 디스플레이가 켜집니다.
전원 스위치를 '켜짐'으로 설정합니다.
플러그가 전원에 연결된 도킹 스테이션에
로봇 청소기를 놓거나 어댑터의 작은
플러그를 연결합니다. 몇 초 후, 로봇의
신호음이 들리며 디스플레이가 켜집니다.
Page 59
문제점 가능한 원인 해결책
로봇이 도킹 스테이션을 찾지
못하여 배터리가 떨어졌습니다.
플러그가 전원에 연결된 도킹 스테이션에
로봇 청소기를 놓거나 어댑터의 작은
플러그를 연결합니다. 몇 초 후, 로봇의
신호음이 들리며 디스플레이가 켜집니다.
한국의
59
경고 표시등이 빠르게
깜박입니다.
청소가 제대로 되지
않습니다.
바퀴 하나 또는 둘 다
끼었습니다.
사이드 브러시 하나 또는 둘 다
끼웠습니다.
상단 덮개가 없거나 제대로
닫히지 않았습니다.
범퍼가 끼었습니다. 시작/중지 버튼을 누릅니다. 범퍼가 빠져
청소 중에 로봇 청소기가 들어
올려졌습니다.
사이드 브러시 하나 또는 둘 다의
모가 비뚤어지거나 구부러져
있습니다.
먼지통의 필터가 더럽습니다. 먼지통의 필터를 천 또는 부드러운 칫솔로
전원 스위치를 '꺼짐'으로 설정합니다.
바퀴 서스펜션에 걸려 있는 잔털,
머리카락, 실 또는 전선을 제거합니다.
사이드 브러시를 청소합니다('청소 및
유지관리' 장 참조).
상단 덮개가 없거나 제대로 닫히지 않은
경우 로봇 청소기가 작동하지 않습니다.
상단 덮개를 로봇 청소기에 올바르게
장착합니다.
나오도록 로봇 청소기를 들어올립니다.
장애물에서 약간 떨어진 곳에 청소기를
두고 시작/중지 버튼을 눌러 청소를 다시
시작합니다.
시작/중지 버튼을 누릅니다. 로봇 청소기를
바닥에 놓습니다. 그런 다음 시작/중지
버튼을 눌러 청소를 다시 시작합니다.
브러시를 잠시 동안 따뜻한 물에 담가
놓습니다. 모가 적절한 형태로 복원되지
않는 경우 사이드 브러시를
교체합니다('교체' 장 참조).
청소합니다. 진공 청소기의 흡입력을 낮게
설정하여 필터 및 먼지통을 청소할 수도
있습니다.
먼지통의 하단에 있는 흡입구가
막혀 있습니다.
앞바퀴에 머리카락이나 기타
먼지가 끼어 있습니다.
로봇 청소기가 매우 어둡거나
광이 나는 표면을 청소하면 낙하
방지(drop-off) 센서가
작동합니다. 이는 로봇 청소기가
비정상적인 패턴으로 움직이는
원인이 됩니다.
브러시나 진공 청소기로도 필터를 청소할
수 없는 경우 필터를 새것으로 교체합니다.
최소 일 년에 한 번은 필터를 교체하는
것이 좋습니다.
흡입구를 청소합니다('청소 및 유지관리'
장 참조).
앞바퀴를 청소합니다('청소 및 유지관리'
장 참조).
시작/중지 버튼을 누른 다음 로봇 청소기가
더 엷은 색상의 바닥으로 이동하도록
합니다. 엷은 색상의 바닥에서도 문제가
계속 발생하는 경우,
www.philips.com/support를 참조하거나
해당 국가의 필립스 서비스 센터로
문의하십시오.
Page 60
60
한국의
문제점 가능한 원인 해결책
로봇 청소기가 햇빛이 강하게
반사되는 바닥을 청소하고
있습니다. 이는 낙하 방지(dropoff) 센서를 작동시키며,
청소기가 비정상적인 패턴으로
움직이는 원인이 됩니다.
커튼을 닫아 방으로 들어오는 햇빛을
차단합니다. 또는 햇빛이 덜 비출 때
청소를 시작합니다.
충전식 배터리가 더 이상
충전되지 않거나 아주
빠르게 방전됩니다.
리모콘의 배터리가 너무
빨리 방전됩니다.
로봇 청소기가 원으로
움직입니다.
로봇 청소기가 도킹
스테이션을 찾지 못합니다.
충전식 배터리의 수명이
다했습니다.
올바른 유형의 배터리를
삽입하지 않았을 수 있습니다.
로봇 청소기가 지점 집중 청소
모드에 있습니다.
로봇 청소기가 도킹
스테이션으로 이동하기 위한
충분한 공간이 없습니다.
로봇 청소기가 도킹 스테이션을
아직 찾고 있습니다.
로봇 청소기가 도킹
스테이션에서 청소를 시작하지
않았습니다.
필립스 서비스 센터에서 충전식 배터리를
교체합니다('교체' 장 참조).
리모콘의 경우 동전 모양인 CR2025
배터리가 필요합니다. 문제가 계속될 경우
www.philips.com/support를 참조하거나
해당 국가의 필립스 서비스 센터로
문의하십시오.
이것은 정상적인 작동입니다. 바닥에 많은
먼지가 감지되어 보다 철저한 청소가
필요한 경우 지점 집중 청소 모드가 작동할
수 있습니다. 지점 집중 청소 모드는 자동
청소 모드에 포함되어 있습니다. 약 1분 후
로봇 청소기가 일반 청소 패턴을 다시
시작합니다. 리모콘에서 다른 청소 모드를
선택하여 지점 집중 청소 모드를 중지할
수도 있습니다.
도킹 스테이션을 다른 위치에 두십시오.
'사용 전 준비' 장의 '도킹 스테이션
설치'를 참조하십시오.
도킹 스테이션으로 돌아가기까지 약
20분간 기다리십시오.
청소 작동 후 로봇 청소기가 도킹
스테이션으로 돌아가도록 하려면 도킹
스테이션에서 청소를 시작합니다.
Page 61

Page 62
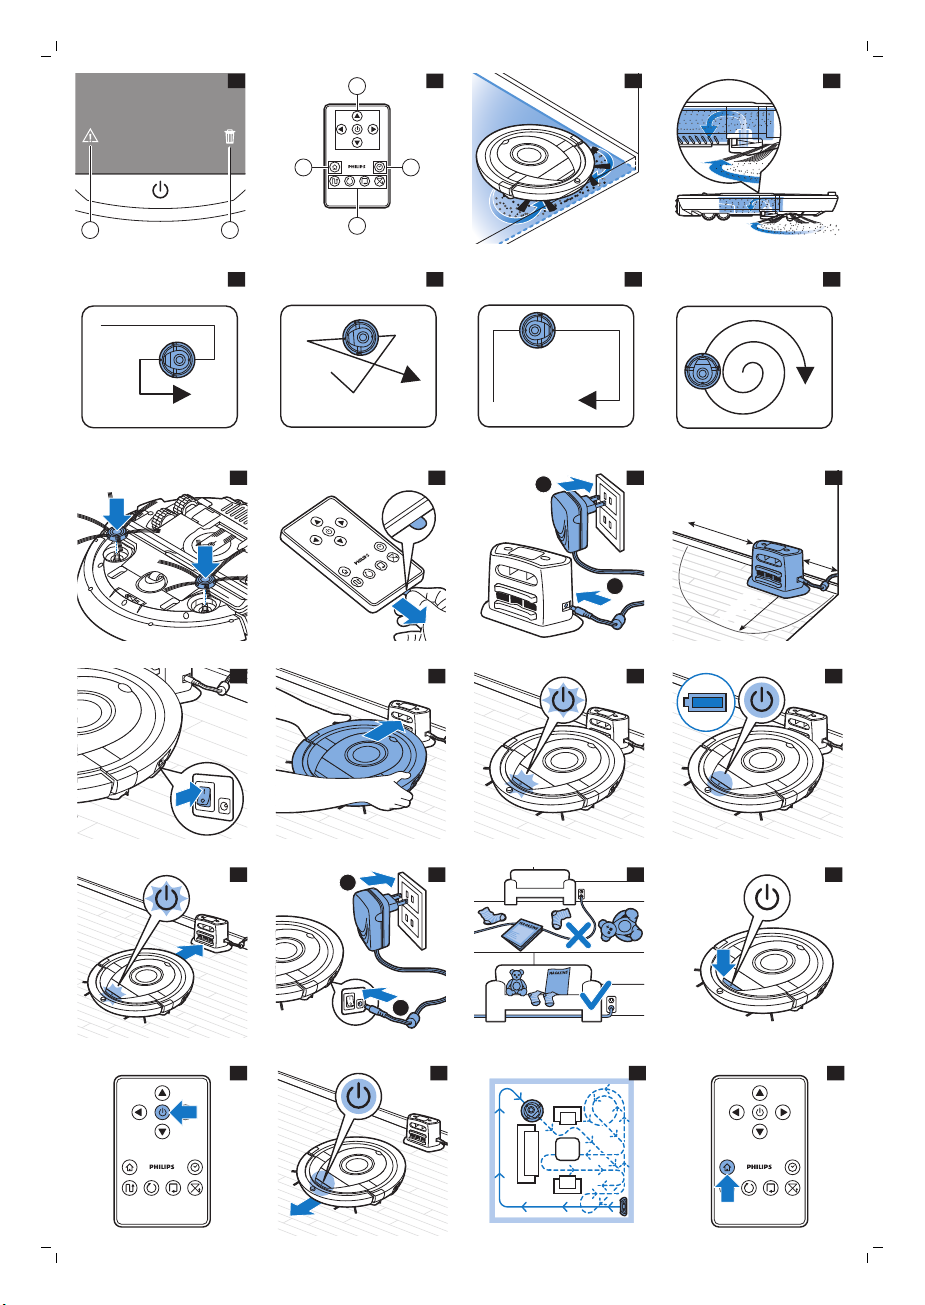
1 2
2
1
32
4
34567891011
1
2
12
100
厘米
80
厘米
30
厘米
100 cm
30 cm
80 cm
1314151617
18
1
2
192021
222324252627282930313233343536
Page 63
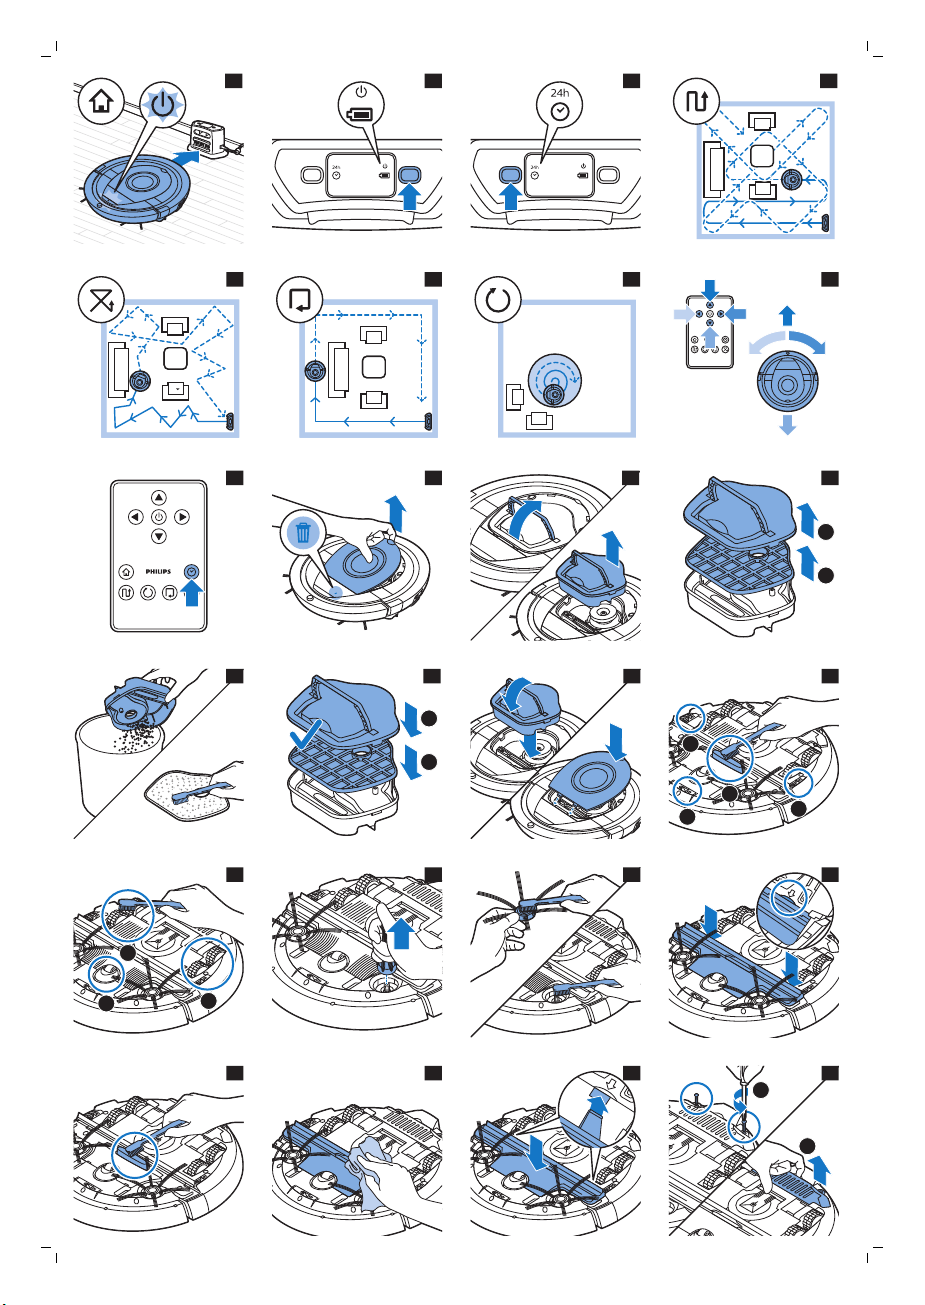
2
1
37
38
1
2
39
40
2
1
3
4
41
1
2
3
42434445464748
1
2
49
Page 64
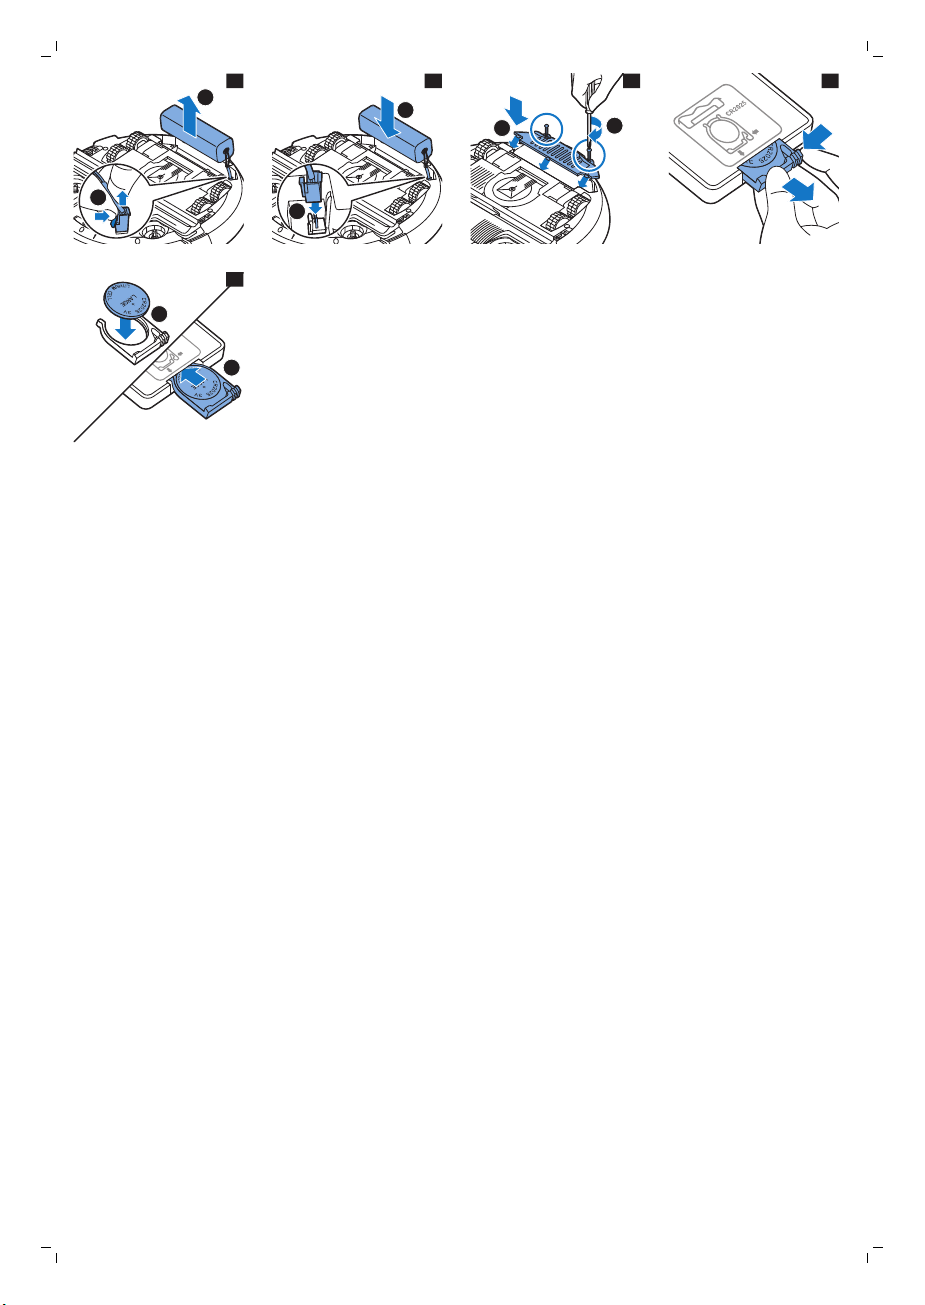
1
2
50
2
1
51
1
2
52
53
1
2
54
Page 65
Page 66
4222.003.4264.2
> 75% 循环再造纸
>75% recycled paper
>75% papier recyclé
 Loading...