

Page 1
Impact Plus
FC8388 / FC8386 / FC8384 / FC8382
Page 2

2
Page 3
3
21
11
10
6
2
5
10
14
2424
20
4
3
99
1
23
16 17
8
13
19
12
22
26
15
25
27
7
18
Page 4

4
Page 5

ENGLISH 6
13
FC8388, FC8386, FC8384, FC8382
5
Page 6

Important
◗ Only use Philips double-layer paper dustbags Sydney+ or S-bag`
or the cotton dustbag provided (types FC8388, FC8386, FC8384
only).
◗ Never suck up water or any other liquid. Never suck up ashes until
they are cold.
◗ When the vacuum cleaner is used to suck up fine dust, the pores
of the dustbag may become clogged, causing the passage of air
through the dustbag to become obstructed.As a result, the
'dustbag full' indicator will indicate that the dustbag needs to be
replaced, even though the dustbag is not full at all.
◗ Never use the appliance without the Motor Protection Filter.This
could damage the motor and shorten the life of the appliance.
◗ If the mains cord of this appliance is damaged, it may only be
replaced by Philips or a service centre authorised by Philips, as
repair requires special tools and/or parts.
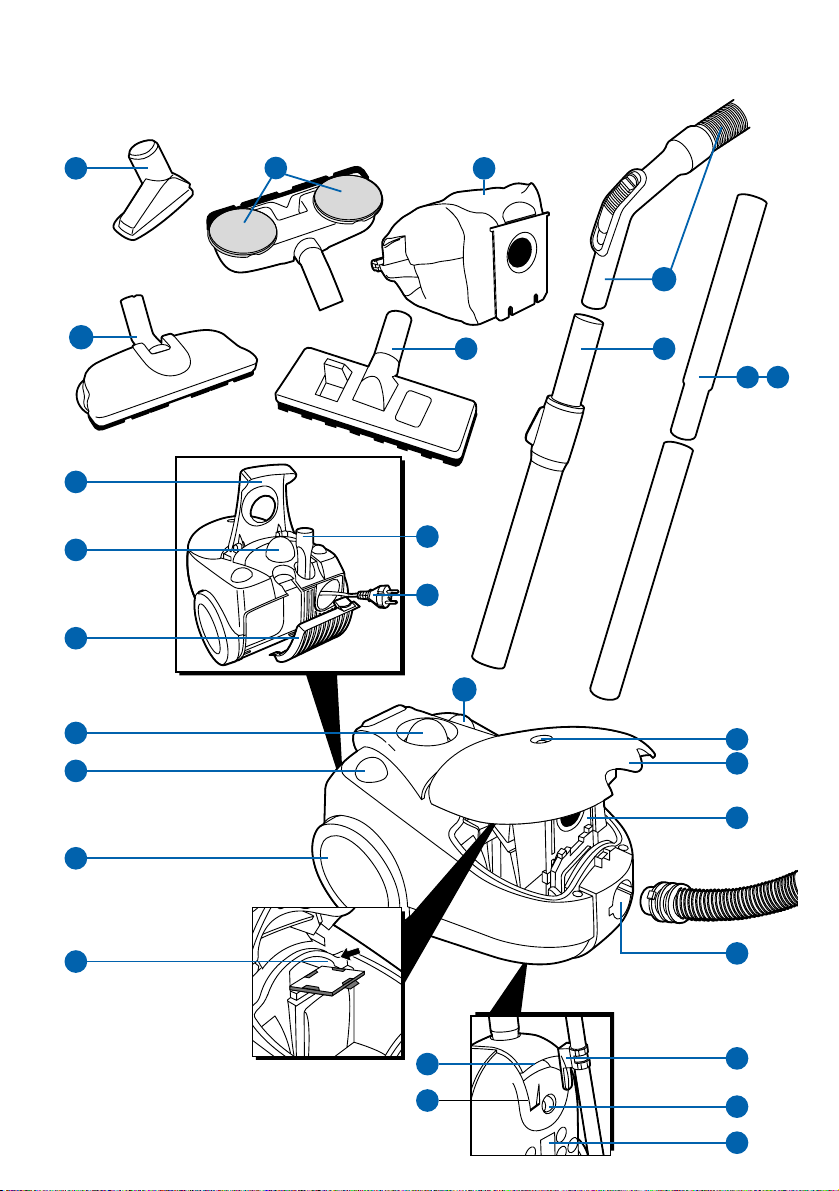
General description
1 On/Off button
2 Cordwinder button
3 Opening dustcover
4 Dustbag
5 Hinging handle
6 Opening filtercover
7 Tapturn opening
8 Front grip
9 Dustbag full indicator
10 Turnknob
11 Rearwheels
12 Front wheel
13 Storage position
14 Small nozzle (types FC8388, FC 8386 only)
15 Crevice tool
16 Plastic tubes (type FC8382 only)
17 Chrome tubes (types FC8386, FC8384 only)
18 Telescopic tube (type FC8388 only)
19 Parking ridge
20 Plug
21 Motor protection filter assy
22 Typeplate
23 Bend with hose assy
24 Twist & Clean nozzle (type FC8388 only)
25 Twist & Clean polishing pads (type FC8388 only)
26 Combi nozzle
27 Cotton dustbag (types FC8388, FC8386, FC8384 only)
ENGLISH6
Page 7
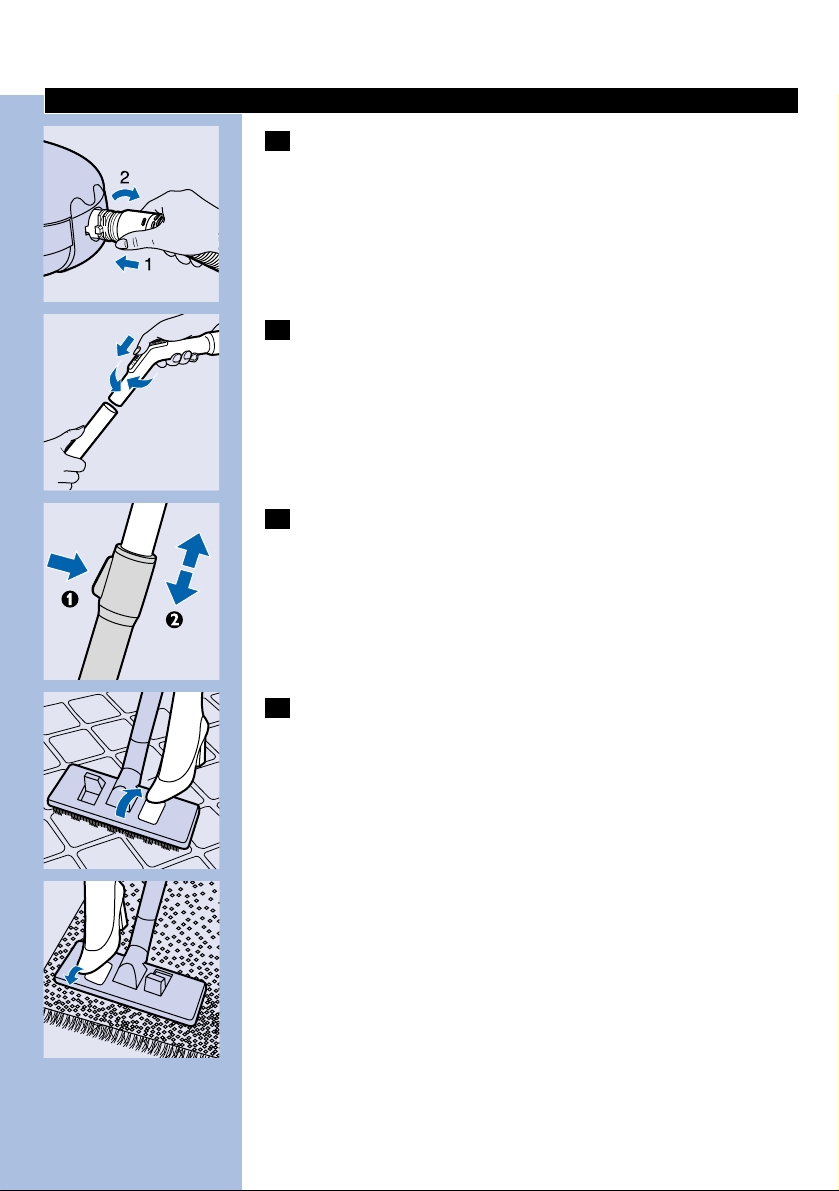
Connecting accessories
C
1 To connect the hose, push it into the appliance and turn it
clockwise.
To disconnect the hose, turn it anticlockwise and pull it out of the
appliance.
C
2 Connect the tubes to each other and to the handgrip by
inserting the narrow section into the wider section while
turning it a little.The tube with the clip is the lower tube.
You can connect the accessories in the same way.
Disconnect the accessories and tubes by pulling them and turning them
a little.
C
3 Telescopic tube (type FC8388 only):
Adjust the tube to the length you find most comfortable during
vacuum cleaning.
4 The combi nozzle can be used on either carpets (without
brush) or hard floors (with brush):
C
◗ Push the rocker switch on top of the combi nozzle with your foot
to make the brush strip for cleaning hard floors come out of the
nozzle housing.
C
◗ Push the rocker switch on the other side to make the brush strip
disappear into the housing.
ENGLISH 7
Page 8

C
5 The crevice nozzle can be found in the special storage
compartment.
Vacuum cleaning
C
1 Pull the cord out of the appliance and put the mains plug in the
wall socket.
Switch the appliance on by pushing the on/off button.
C
2 To carry the appliance, put the handle in upright position.
C
3 You can adjust the suction power by means of the slide on the
handgrip.
C
4 You can adjust the suction power by means of the electronic
suction power control .
ENGLISH8
Page 9

Storage
C
1 Switch the appliance off and remove the mains plug from the
wall socket.
Rewind the mains cord by pressing the cord rewind button.
C
2 Put the appliance in upright position and attach the lower tube
to the appliance by means of the clip.
The clip can be slide along the tube to adjust its height.
Replacing the dustbag
◗ Replace the dustbag as soon as the 'dustbag full' indicator has
changed colour permanently.
C
1 Switch the appliance off and open the cover.
C
2 Push the dustbag holder backwards.
C
3 Lift the dustbag out of the compartment by pulling the
cardboard lug upwards, which causes the dustbag to be sealed.
ENGLISH 9
Page 10

C
4 Slide the cardboard front of the new dustbag into the two
grooves of the dustbag holder. Press it down as far as possible.
C
5 Pull the dustbag holder forwards ('Click').You cannot close the
cover if no dustbag has been inserted.
Philips double layer dustbags Sydney+ are available under type number
HR6999.
Philips S-bag` paper dustbags are available under type number
FC8021.
◗ If provided, you can use the cotton dustbag instead of paper
dustbags.
The cotton dustbag can be used and emptied repeatedly.
For removing and inserting the cotton dustbag, simply follow the
instructions for replacing paper dustbags.
To empty the cotton dustbag:
1 Remove the clip by sliding it off the dustbag sideways.
2 Undo the metal hooks.
3 Shake out the contents.
4 Close the dustbag by fastening the metal hooks and sliding the
clip back onto the bottom edge of the dustbag.
Filter replacement
AFS Micro Filter
Replace the AFS Micro Filter when you insert the first of a new set of
dustbags or once a year if you are using a cotton dustbag.
The AFS Micro Filter will remove a large part of the smallest particles
from the exhaust air.
C
1 Open the grill and remove the filter
ENGLISH10
Page 11

C
2 Place the sides (1, 2) and the bottom edge (3) of the new filter
properly behind the ridges of the holder.
C
3 Put the holder back into the vacuum cleaner by first hooking
the bottom edge of the holder into the appliance (1) and then
pushing the holder towards the appliance (2) until it snaps
home.
Make sure the filter holder has been placed properly.
Motor Protection Filter
Replace the Motor Protection Filter when you insert the first of a new
set of dustbags.
If you are using the cotton dustbag, wash the Motor Protection Filter in
lukewarm water once a year.
Make sure the Motor Protection Filter is completely dry before you
put it back into the appliance.
C
1 Switch the appliance off and open the cover.Take out the filter
holder and remove the filter.
2 Insert a new filter into the holder with the white side facing
upwards and place the holder back.
Two AFS Micro Filters and one Motor Protection Filter are available
under type number FC8032.
Environment
To make recycling possible, the plastics used for this appliance have
been coded.
The cardboard packaging has been made of recycled material and is
fully recyclable.
Insufficient suction power
1 Check if the dustbag needs to be replaced.
2 Check if the filters need to be replaced.
3 Check if the slide on the handgrip is closed.
ENGLISH 11
Page 12

4 Check if the electronic suction power control is at its
maximum setting .
C
5 Check if the nozzle, tube or hose is blocked up.To remove the
obstruction, disconnect the blocked-up item and connect it (as
far as possible) the other way around.Switch the vacuum
cleaner on to force the air through the blocked-up item in
opposite direction.
Information & service
If you need information or if you have a problem, please visit the Philips
Web site at www.philips.com or contact the Philips Customer Care
Centre in your country (you will find its phone number in the
worldwide guarantee leaflet). If there is no Customer Care Centre in
your country, turn to your local Philips dealer or contact the Service
Department of Philips Domestic Appliances and Personal Care BV.
ENGLISH12
Page 13

◗
`
◗
◗
◗
◗
1
2
3
4
5
6
7
8
9
10
11
12
13
14
15
13
Page 14

16
17
18
19
20
21
22
23
24
25
26
27
C
1
C
2
C
3
4
C
◗
14
Page 15

15
C
◗
C
5
C
1
C
2
C
3
Page 16

C
4
C
1
C
2
◗
C
1
C
2
16
Page 17

17
C
3
C
4
C
5
`
◗
1
2
3
4
C
1
8
Page 18

18
C
2
C
3
C
1
2
1
2
3
4
Page 19

19
C
5
Page 20

20
2003/04
Page 21

21
Page 22

u
www.philips.com
4222 000 49603
 Loading...