

Page 1
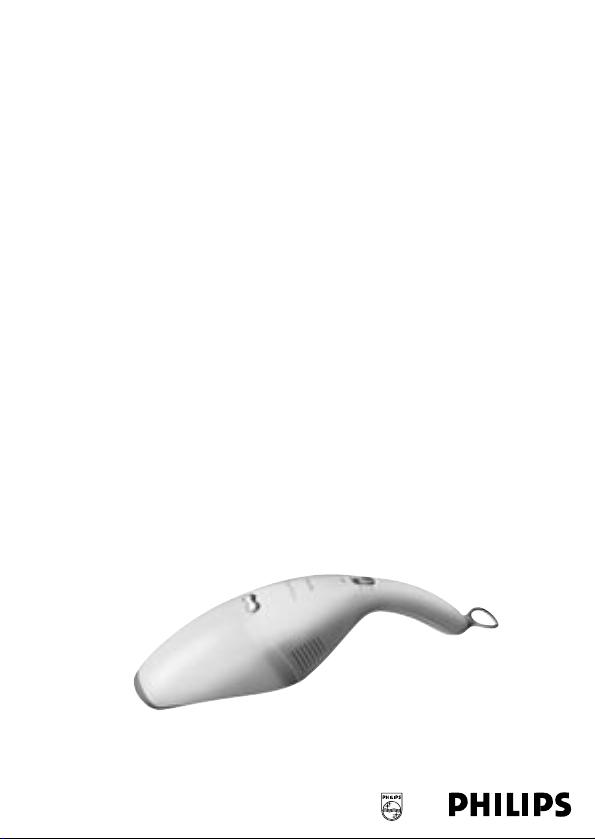
Daisy Deluxe Wet/Dry
FC6068, FC6067
Page 2

234
Page 3

Page 4

Page 5

ENGLISH 6
POLSKI 15
ROMÂNĂ 24
РУССКИЙ 33
ČESKY 43
MAGYAR 51
SLOVENSKY 59
УКРАЇНСЬКІЙ 68
HRVATSKI 77
EESTI 85
LATVISKI 93
LIETUVIŠKAI 101
SLOVENŠČINA 109
FC6068, FC6067
5
Page 6
Important
◗ Read these instructions for use carefully and
look at the illustrations before you start using
the appliance.
◗ Always switch the vacuum cleaner off after
use.
◗ Never suck up ashes until they are cold.
◗ Do not suck up flammable or corrosive
liquids.
◗ Do not let water enter the vacuum cleaner or
the wall holder. Never immerse the vacuum
cleaner or the wall holder in water.
◗ The charger plug feels warm.This is normal.
◗ Only charge the vacuum cleaner with the
charger supplied.
◗ Do not use the appliance if it is damaged.Take
it to an authorised Philips service centre for
repair.
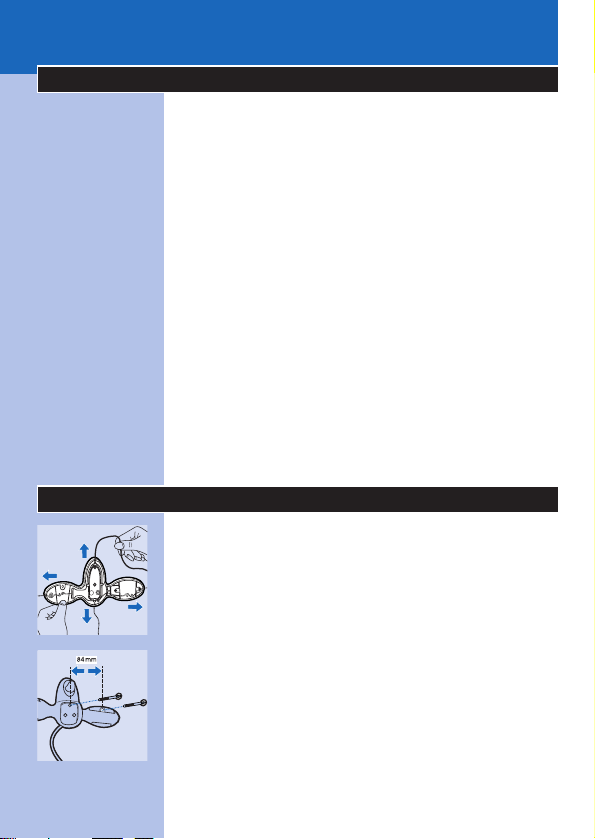
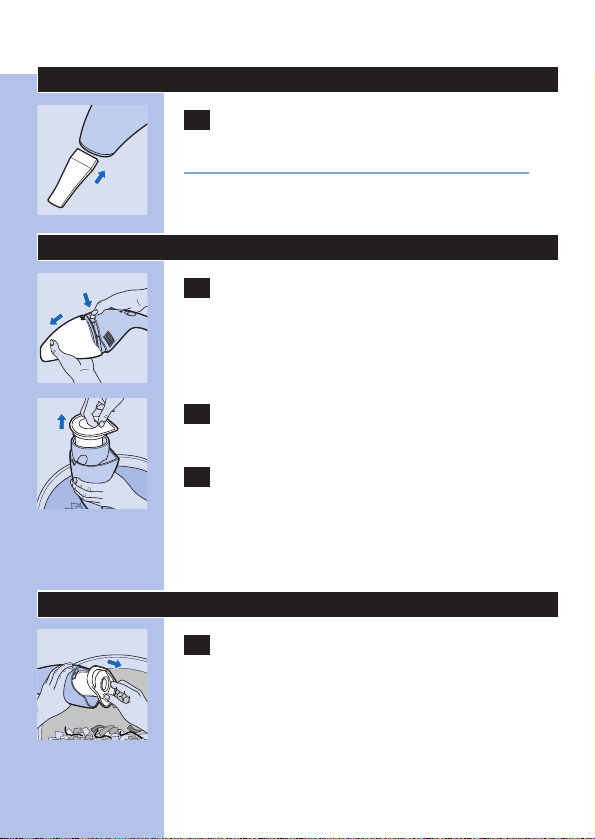
Preparing the appliance for use
C
◗ Wind and store excess mains cord in the wall
holder.
C
◗ Screw the wall holder to the wall.
◗ You can also place the vacuum cleaner and
the wall holder flat on a table during charging.
ENGLISH6
Page 7

C
◗ The crevice tool and the squeegee can be
attached to the wall holder by pushing them
into the appropriate fastening slots.
Charging the appliance
1 Make sure that the slide switch of the
vacuum cleaner is in off position (0) during
charging.The appliance will not charge if
the slide switch is in another position.
2 Insert the charger plug into the wall
socket.
C
3 Always put the vacuum cleaner back onto
the holder after use.
C
◗ The indicator light will come on to indicate
that the appliance is charging.
The indicator light will stay on as long as the
appliance is connected to the wall holder and the
plug is in the wall socket.
The indicator light does not give any information
about the charge level of the built-in batteries.
Charge the appliance for at least 16 hours before
you use it for the first time.
Recharge the appliance as soon as the motor
power decreases noticeably.
4 Leave the charger plug in the wall socket.
Always place the vacuum cleaner back
ENGLISH 7
Page 8
onto the holder (also when the built-in
batteries are fully charged).
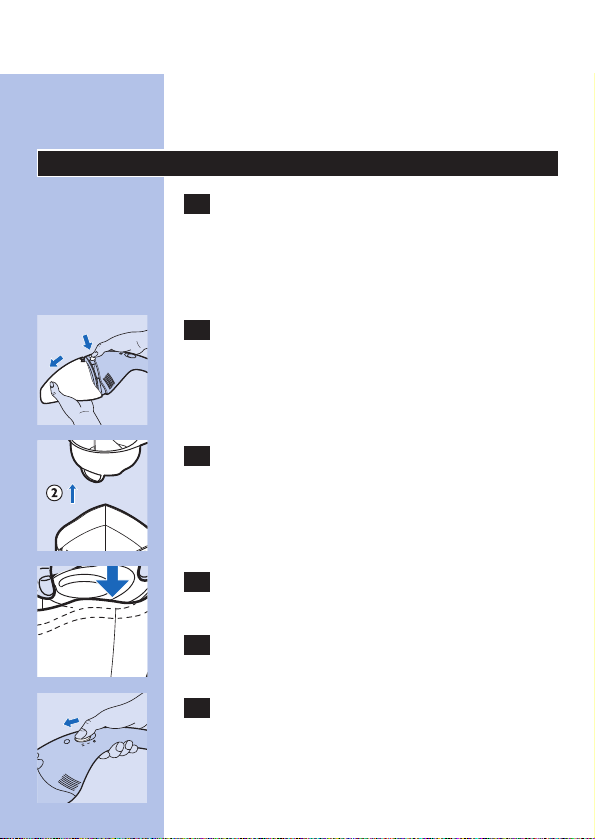
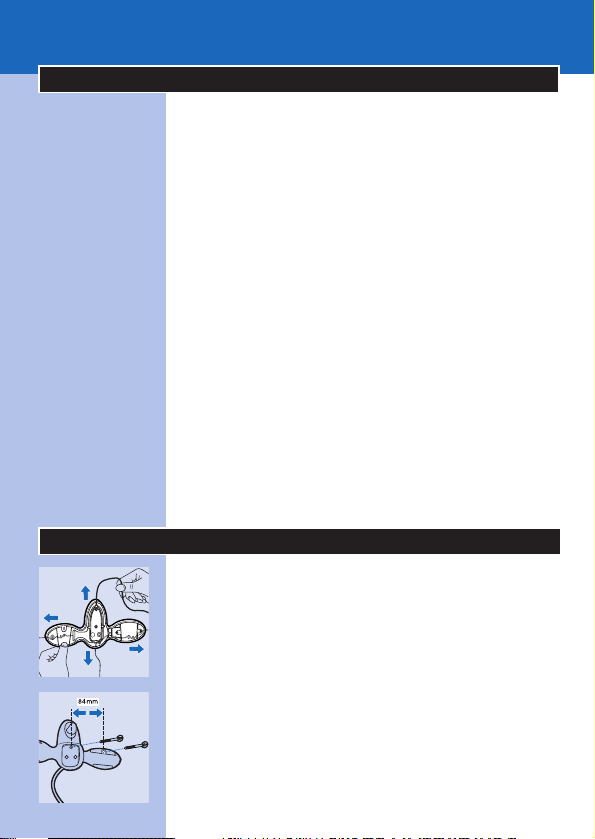
Vacuum cleaning
1 Make sure the deflector and the filter have
been inserted into the dust compartment
before you start using the appliance.
Deflector and filter
C
1 Press the break button and open the
vacuum cleaner.
C
2 Insert the deflector and the filter into the
dust compartment.
C
3 Push the filter firmly into the dust
compartment.
4 Close the vacuum cleaner again.
C
2 Set the slide switch to position I for
normal suction power. Set it to position II
for turbo suction power.
ENGLISH8
Page 9
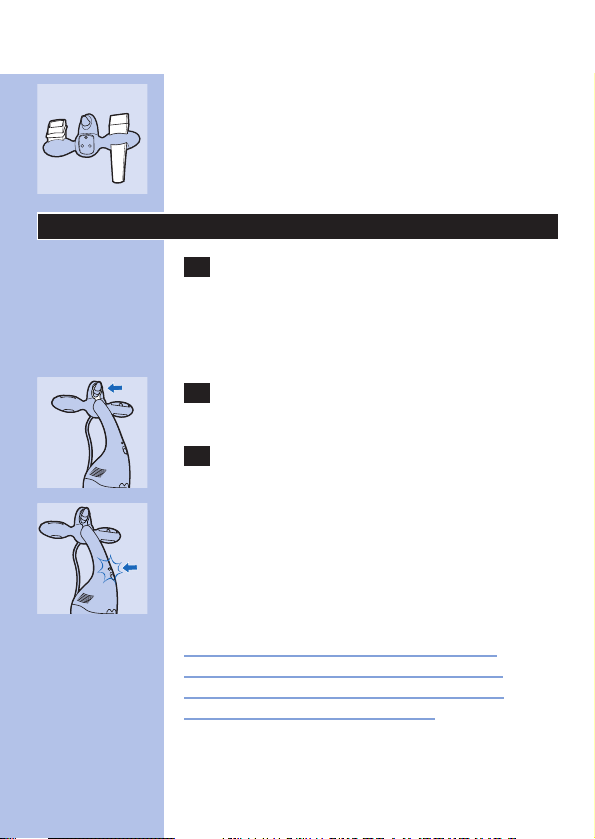
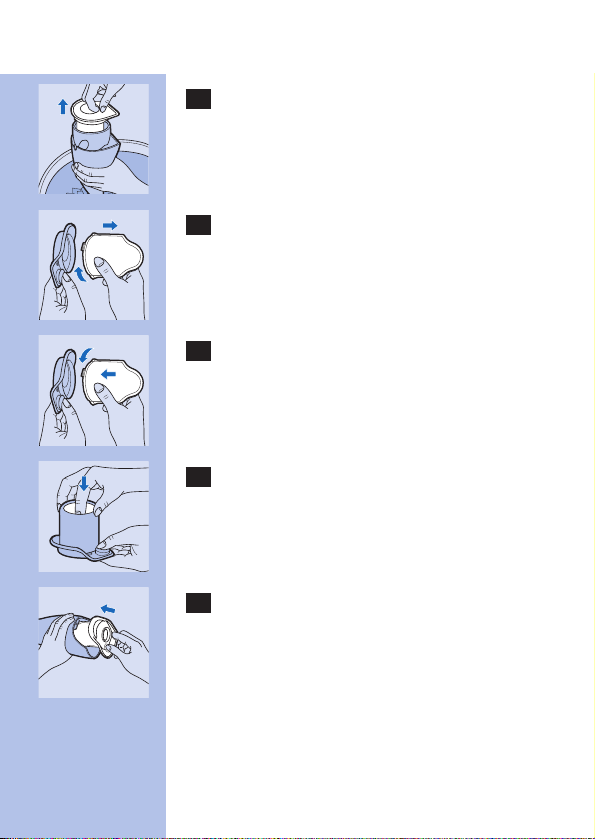
Sucking up liquids
C
1 Connect the squeegee to the dust
compartment.
C
2 Stop sucking up liquids when the liquid
level inside the dust compartment has
reached the maximum indication line.
C
3 When sucking up liquids, hold the
appliance with the dust compartment
pointing downwards at an angle. Make sure
the squeegee touches the surfact to be
cleaned. Do not tilt the appliance to one
side.
C
4 Do not hold the appliance with its dust
compartment pointing upwards, as this
would cause liquid to enter the appliance
and damage the parts inside.
5 Empty the dust compartment each time
you have used the appliance to suck up a
liquid.
ENGLISH 9
Page 10
Connecting accessories
C
1 Use the crevice tool to vacuum clean
hard-to-reach places.
Do not use the crevice tool to suck up liquids.
Emptying the dust compartment
C
1 Press the break button and open the
vacuum cleaner over a dustbin.
C
2 Remove the filter and the deflector from
the dust compartment.
3 Clean the filter and empty the dust
compartment.
◗ Clean the filter with a brush or with a normal
vacuum cleaner if it is very dirty.
Replacing the filter
C
1 Remove the deflector and the filter frame
from the dust compartment.
ENGLISH10
Page 11

C
2 Separate the filter from the deflector.
C
3 Gently turn the filter clockwise to detach
it from the frame.
C
4 Remove the old filter and replace it with a
new filter.
C
5 Push the tip of the filter inwards.
C
6 Put the filter and the deflector back into
the dust compartment.
ENGLISH 11
Page 12

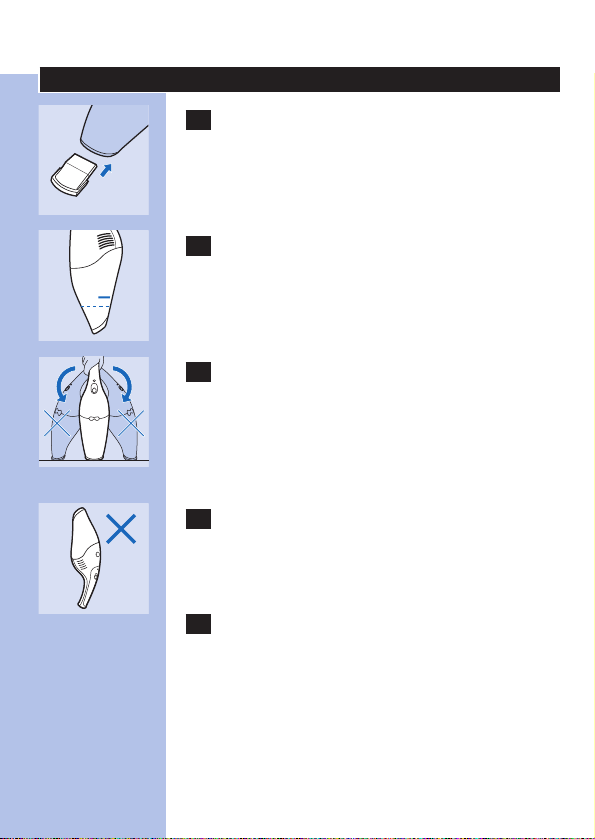
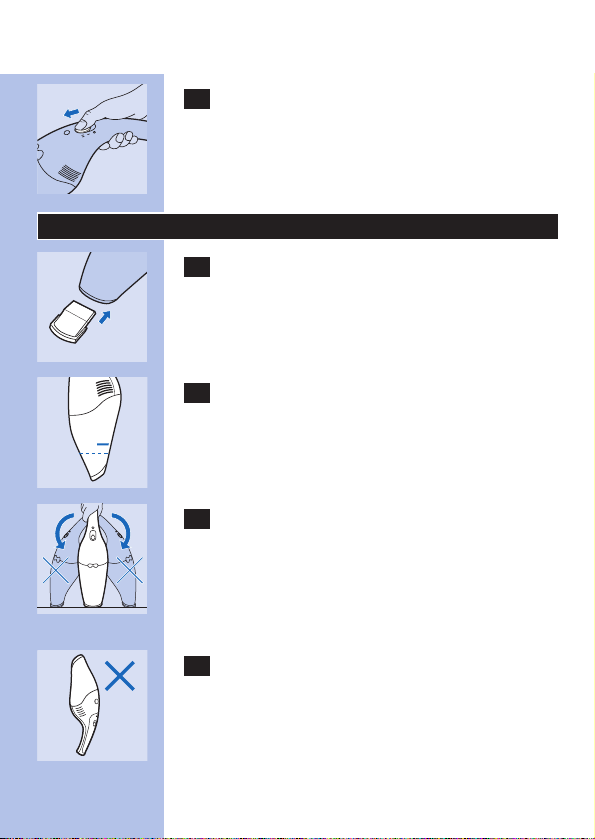
Cleaning the appliance
◗ You can clean the appliance with a damp
cloth. Remove the mains plug from the wall
socket before cleaning the wall holder.
Do not let water enter the vacuum cleaner or the
wall holder. Never immerse the vacuum cleaner
or the wall holder in water.
◗ If necessary,clean the dust compartment, the
deflector and the filter with cold or lukewarm
water.The dust compartment and the
deflector may also be cleaned in a dishwasher.
Never use the vacuum cleaner when the filter
and/or the dust compartment is/are still wet.
Ordering filters
Replace the filter if it can no longer be cleaned
properly (usually after having been cleaned 50
times).
New (replacement) filters are available under
type no. FC8036. Contact your Philips dealer.
If you have any difficulties obtaining filters or other
accessories for this appliance, please contact the
Philips Customer Care Centre in your country or
consult the worldwide guarantee leaflet.
ENGLISH12
Page 13

Environment
NiCd/NiMH batteries can be harmful to the
environment and may explode if exposed to high
temperatures or fire.
Remove the batteries when you discard the
appliance. Do not throw the batteries away with
the normal household waste, but hand them in at
an official collection point.You can also take the
batteries to a Philips service centre, which will
dispose of them in an environmentally safe way.
Only remove the batteries if they are completely
empty.
C
1 Let the appliance run until it stops, undo
the screws and open the vacuum cleaner.
C
2 Cut the connecting wires one by one and
remove the batteries.
◗ If you are not going to use the appliance for a
longer period of time, we advise you to
remove the charger plug from the wall socket
to save energy.
Information & service
If you need information or if you have a problem,
please visit the Philips Web site at
www.philips.com or contact the Philips Customer
Care Centre in your country (you will find its
phone number in the worldwide guarantee
ENGLISH 13
Page 14

leaflet). If there is no Customer Care Centre in
your country, turn to your local Philips dealer or
contact the Service Depar tment of Philips
Domestic Appliances and Personal Care BV.
ENGLISH14
Page 15
Ważne
◗ Przed pierwszym użyciem urządzenia
przeczytaj poniższą instrukcję i zapoznaj się z
ilustracjami.
◗ Zawsze wyłączaj odkurzacz po zakończeniu
używania urządzenia.
◗ Nie wciągaj odkurzaczem gorącego popiołu.
◗ Nie wciągaj odkurzaczem łatwopalnych ani
powodujących korozję płynów.
◗ Nie dopuść do tego,by woda dostała się do
odkurzacza lub do uchwytu ściennego.Nigdy
nie zanurzaj odkurzacza, ani uchwytu
ściennego w wodzie.
◗ Wtyczka ładowarki nagrzewa się. Jest to
normalne zjawisko.
◗ Ładuj urządzenie wyłącznie za pomocą
załączonej oryginalnej ładowarki.
◗ Nie używaj uszkodzonego urządzenia.Zanieś
go w celu naprawy do autoryzowanego
punktu serwisowego firmy Philips.
Przygotowanie urządzenia do użycia
C
◗ Zwiń nadmiar przewodu zasilającego i
schowaj go w uchwycie ściennym.
C
◗ Przykręć uchwyt ścienny do ściany.
◗ Podczas ładowania możesz także położyć
odkurzacz i uchwyt ścienny płasko na stole.
POLSKI 15
Page 16
C
◗ Możesz wcisnąć szczelinówkę i wycieraczkę
gumową w uchwyt ścienny, wpasowując je w
odpowiednie zaczepy.
Ładowanie urządzenia
1 Upewnij się, czy włącznik odkurzacza jest
ustawiony w pozycji wyłączonej (0)
podczas ładowania. Urządzenie nie
naładuje się, jeśli włącznik będzie w innej
pozycji.
2 Włóż wtyczkę ładowarki do gniazdka
ściennego.
C
3 Po użyciu zawsze umieszczaj odkurzacz z
powrotem w uchwycie ściennym.
C
◗ Podczas ładowania urządzenia będzie świecić
się lampka kontrolna.
Lampka kontrolna będzie się świecić tak długo, jak
urządzenie będzie połączone z uchwytem, a
wtyczka ładowarki będzie znajdować się w
gniazdku ściennym.
Lampka kontrolna nie informuje o stopniu
naładowania wbudowanych akumulatorów.
Przed pierwszym użyciem odkurzacza ładuj
urządzenie co najmniej 16 godzin.
Naładuj urządzenie, gdy tylko zauważysz, że moc
silnika zmniejszyła się wyraźnie.
POLSKI16
Page 17

4 Zostaw wtyczkę ładowarki w gniazdku
ściennym. Zawsze umieszczaj odkurzacz z
powrotem w uchwycie (nawet wówczas,
gdy wbudowane baterie są w pełni
naładowane).
Odkurzanie
1 Zanim uruchomisz odkurzacz, upewnij się,
czy deflektor i filtr zostały zamontowane w
komorze na kurz.
Deflektor i filtr
C
1 Wciśnij przycisk otwierający i otwórz
odkurzacz.
C
2 Włóż deflektor i filtr do komory.
C
3 Wciśnij dokładnie filtr do komory.
4 Zamknij odkurzacz.
POLSKI 17
Page 18
C
2 Przesuń regulator na poziom I, aby uzyskać
normalną moc ssania. Przesuń regulator na
poziom II, jeśli chcesz uzyskać wyższą moc.
Wciąganie płynów
C
1 Podłącz wycieraczkę gumową do komory
na kurz.
C
2 Przerwij wciąganie płynów,gdy tylko
poziom płynu wewnątrz komory osiągnie
maksymalny poziom.
C
3 Wciągając odkurzaczem płyny, trzymaj
urządzenie pod kątem, komorą na kurz
skierowaną ku dołowi.Upewnij się, czy
zbierak gumowy przylega do powierzchni,
którą zamierzasz wyczyścić. Nie przechylaj
urządzenia na boki.
C
4 Nie trzymaj urządzenia w ten sposób, by
komora na kurz była skierowana ku górze,
ponieważ mogłoby to spowodować
dostanie się płynu do środka urządzenia i
uszkodzenia wewnętrznych elementów.
POLSKI18
Page 19

5 Opróżniaj komorę po każdym użyciu
odkurzacza polegającym na wciąganiu
płynów.
Podłączanie akcesoriów
C
1 Miejsca trudno dostępne czyść
szczelinówką.
Nie wciągaj płynów szczelinówką.
Opróżnianie komory na kurz
C
1 Wciśnij przycisk i otwórz odkurzacz nad
koszem.
C
2 Wyjmij deflektor i filtr z komory.
3 Wyczyść filtr i opróżnij komorę na kurz.
◗ Jeśli filtr jest bardzo brudny, wyczyść filtr
szczotką lub zwykłym odkurzaczem.
Wymiana filtra.
C
1 Wyjmij deflektor i ramę filtra z komory na
kurz.
POLSKI 19
Page 20

C
2 Oddziel deflektor od filtra.
C
3 Aby odłączyć filtr od ramy, delikatnie
przekręć go w kierunku zgodnym z
ruchem wskazówek zegara.
C
4 Wyjmij stary filtr i załóż nowy.
C
5 Wciśnij końcówkę filtra do środka.
C
6 Włóż filtr i deflektor z powrotem do
komory na kurz.
POLSKI20
Page 21

Czyszczenie urządzenia
◗ Możesz przetrzeć odkurzacz wilgotną
szmatką. Przed przystąpieniem do czyszczenia
uchwytu ściennego wyjmij wtyczkę z gniazdka.
Nie dopuść do tego, by woda dostała się do
odkurzacza lub do uchwytu ściennego. Nigdy nie
zanurzaj odkurzacza, ani uchwytu ściennego w
wodzie.
◗ W razie potrzeby wymyj komorę na kurz,
deflektor i filtr zimną lub letnią wodą. Komorę
na kurz i deflektor możesz umyć także w
zmywarce.
Nigdy nie używaj odkurzacza, gdy filtr lub komora
na kurz są jeszcze wilgotne.
Zamawianie filtrów
Wymień filtr, jeśli nie da się już go dokładnie
wyczyścić (zazwyczaj po pięćdziesięciokrotnym
odkurzaniu).
Nowe (wymienne) filtry są dostępne pod
numerem FC8036. Pytaj o nie w sklepach AGD
lub punktach serwisowych autoryzowanych przez
firmę Philips.
POLSKI 21
Page 22

Jeśli masz trudności w zakupie filtrów lub innych
akcesoriów do urządzenia, skontaktuj się z
Działem Obsługi Klienta firmy Philips lub
najbliższym punktem serwisowym
autoryzowanym przez Philips AGD.
Ochrona środowiska
Akumulatory NiCd lub NiMH mogą by
szkodliwe dla środowiska naturalnego. Mogą te
wybuchnąć pod wpływem wysokiej temperatury
lub ognia.
Jeśli pozbywasz się odkurzacza, wyjmij z niego
akumulatory. Nie wyrzucaj akumulatorów wraz z
normalnymi odpadkami z gospodarstwa
domowego. Zanieś je do specjalnego punktu
zbiorczego. Możesz także zanieść akumulatory do
punktu obsługi klienta firmy Philips. Pracownicy
zajmą się wyrzuceniem zużytych akumulatorów
zgodnie z wymogami ochrony środowiska.
Wyrzucaj tylko w pełni wyczerpane akumulatory.
C
1 Odczekaj, aż urządzenie zatrzyma się,
wyczerpując do końca akumulatory;
odkręć śrubki i otwórz odkurzacz.
C
2 Przetnij kolejno przewody i wyjmij
akumulatory.
◗ Jeśli nie zamierzasz korzystać z urządzenia
przez dłuższy czas, wyjmij wtyczkę ładowarki z
POLSKI22
Page 23

gniazdka ściennego.W ten sposób
zaoszczędzisz energię elektryczną.
Informacja i serwis
Jeśli chcesz skorzystać z serwisu lub potrzebujesz
informacji bądź jeśli masz jakiś problem skontaktuj
się z Działem Obsługi Klienta (numer telefonu
znajdziesz w karcie gwarancyjnej) lub zwróć się
do najbliższego punktu serwisowego działu AGD
firmy Philips.
POLSKI 23
Page 24

Important
◗ Citiţi aceste instrucţiuni cu atenţie şi urmăriţi
ilustraţiile înainte de a începe să folosiţi
aparatul.
◗ Opriţi întotdeauna aparatul după utilizare.
◗ Nu aspiraţi niciodată scrum înainte ca aceasta
să se fi răcit.
◗ Nu aspiraţi lichide inflamabile sau corozive.
◗ Nu lăsaţi să intre apă în aparat sau în suportul
de perete. Nu introduceţi niciodată aparatul
sau suportul de perete în apă.
◗ Încărcătorul se încinge.Acest lucru este
normal.
◗ Încărcaţi aspiratorul doar cu încărcătorul
furnizat.
◗ Nu utilizaţi aparatul dacă este defect. Duceţi-l
la un centru service Philips autorizat pentru
reparaţii.
Pregătirea aparatului pentru utilizare
C
◗ Înfăşuraţi şi depozitaţi cablul rămas în suportul
de perete.
C
◗ Înşurubaţi suporul de perete în perete.
◗ În timpul încărcării puteţi aşeza aspiratorul şi
suportul de perete în poziţie orizontală pe o
masă.
ROMÂNĂ24
Page 25

C
◗ Duza cu fantă şi racleta pot fi ataşate la
suportul de perete fixându-le în nişele
speciale.
Încărcarea aparatului
1 În timpul încărcării, asiguraţi-vă că butonul
culisant al aspiratorului este pe poziţia
oprire (0). În caz contrar, aparatul nu se va
încărca.
2 Introduceţi încărcătorul în priză.
C
3 Puneţi întotdeauna aparatul în suport după
utilizare.
C
◗ Becul pilot se va aprinde pentru a indica faptul
că aparatul se încarcă.
Becul martor va rămâne aprins atâta timp cât
aparatul este conectat la suport şi cablul este în
priză.
Becul pilot nu indică nivelul de încărcare al
bateriilor încorporate.
Încărcaţi aparatul timp de cel puţin 16 ore înainte
de prima utilizare.
Reîncărcaţi aparatul imediat ce observaţi că
puterea motorului scade simţitor.
4 Lăsaţi încărcătorul în priza de perete.
Repoziţionaţi întotdeauna aspiratorul pe
suport (chiar şi atunci când acumulatorii
sunt încărcaţi).
ROMÂNĂ 25
Page 26

Aspirarea
1 Asiguraţi-vă că deflectorul şi filtrul au fost
introduse în compartimentul de praf
înainte de a începe folosirea aparatului.
Deflector şi filtru
C
1 Apăsaţi butonul oprire şi deschideţi
aspiratorul.
C
2 Introduceţi deflectorul şi filtrul în
compartimentul pentru sacul de praf.
C
3 Împingeţi bine filtrul în compartimentul
pentru praf.
4 Închideţi aspiratorul.
C
2 Reglaţi butonul culisant pe poziţia I pentru
o putere de aspirare normală.Reglaţi-l pe
poziţia II pentru puterea de aspirare turbo.
ROMÂNĂ26
Page 27

Aspirarea lichidelor
C
1 Conectaţi racleta la compartimentul de
praf.
C
2 Nu mai aspiraţi lichide când nivelul de
lichide din interiorul compartimentului de
praf a ajuns la gradaţia maximă.
C
3 Când folosiţi aspiratorul pentru aspirarea
lichidelor, ţineţi aparatul cu
compartimentul de praf orientat în jos.
Aveţi grijă ca racleta să poată ajunge la
suprafaţa ce urmează a fi curăţată. Nu
întoarceţi aparatul într-o parte.
C
4 Nu ţineţi aparatul cu compartimentul de
praf în sus întrucât ar putea pătrunde apă
în aparat, deteriorându-l.
5 Goliţi compartimentul sacului de praf de
fiecare dată când aţi utilizat aparatul
pentru a aspira lichide.
ROMÂNĂ 27
Page 28

Conectarea accesoriilor
C
1 Utilizaţi duza cu fantă pentru a aspira în
locurile greu accesibile.
Nu folosiţi duza cu fantă pentru a aspira lichide.
Golirea compartimentului de praf
C
1 Apăsaţi butonul oprire şi deschideţi
aspiratorul deasupra coşului de gunoi.
C
2 Scoateţi filtrul şi deflectorul din
compartimentul de praf.
3 Curăţaţi filtrul şi goliţi compartimentul de
praf.
◗ Curăţaţi filtrul cu o perie sau cu ajutorul unui
aspirator obişnuit dacă este foarte murdar.
Înlocuirea filtrului
C
1 Scoateţi deflectorul şi suportul filtrului din
compartimentul de praf.
ROMÂNĂ28
Page 29
C
2 Scoateţi filtrul din deflector.
C
3 Răsuciţi uşor filtrul în sensul acelor de
ceasornic pentru a-l desprinde din suport.
C
4 Scoateţi filtrul uzat şi înlocuiţi-l cu unul
nou.
C
5 Pliaţi capătul filtrului în interior.
C
6 Reintroduceţi filtrul şi deflectorul în
compartimentul de praf.
ROMÂNĂ 29
Page 30

Curăţarea aparatului
◗ Puteţi curăţa aparatul cu o cârpă umedă.
Scoateţi cablul din priză înainte de a curăţa
suportul de perete.
Nu lăsaţi să intre apă în aparat sau în suportul de
perete. Nu introduceţi niciodată aparatul sau
suportul de perete în apă.
◗ Dacă este necesar, curăţaţi compartimentul de
praf, deflectorul şi filtrul cu apă rece sau
călduţă. Compartimentul de praf şi deflectorul
pot fi spălate în maşina de spălat vase.
Nu folosiţi niciodată aspiratorul când filtrul şi/sau
compartimentul de praf este/sunt ud(e).
Comandarea filtrelor
Înlocuiţi filtrul dacă acesta nu mai poate fi spălat
corespunzător (de obicei, după aproximativ 50 de
spălări).
Filtre noi (de schimb) sunt disponibile cu numărul
de cod FC8036. Contactaţi furnizorul
dumneavoastră Philips.
Dacă aveţi probleme în obţinerea filtrelor sau a
altor accesorii pentru acest aparat, vă rugăm să
contactaţi Departamentul Consumatori Philips
din ţara dumneavoastră sau consultaţi foaia de
garanţie internaţională.
ROMÂNĂ30
Page 31

Protejarea mediului înconjurător
Bateriile NiCd/NiMH pot dăuna mediului
înconjurător şi pot exploda dacă sunt expuse
focului sau unor temperaturi înalte.
Scoateţi bateriile când aruncaţi aparatul. Nu
aruncaţi bateriile în gunoiul menajer, ci predaţi-le
unui centru de colectare. Puteţi duce bateriile la
un centru service Philips care le va depozita în
conformitate cu regulile privind protejarea
mediului înconjurător.
Scoateţi bateriile doar dacă sunt complet
descărcate.
C
1 Lăsaţi aparatul să funcţioneze până ce se
opreşte, desfaceţi şuruburile şi deschideţi
aspiratorul.
C
2 Tăiaţi firele de legătură unul câte unul şi
scoateţi bateriile.
◗ Dacă nu intenţionaţi să folosiţi aparatul pentru
o perioadă mai lungă de timp, vă sfătuim să
scoateţi încărcătorul din priză pentru a
economisi curent electric.
ROMÂNĂ 31
Page 32

Informaţii şi service
Dacă aveţi nevoie de informaţii sau service, sau în
cazul altor probleme, vă rugăm să vizitaţi site-ul
de web Philips www.philips.com sau contactaţi
Departamentul Clienţi din ţara dumneavoastră
(veţi găsi numărul în garanţia internaţională). Dacă
în ţara dumneavoastră nu există un astfel de
departament, contactaţi furnizorul dumneavoastră
Philips sau Departamentul Service pentru
Electrocasnice şi Produse de Ingrijire Personală.
ROMÂNĂ32
Page 33

Внимание
◗ Перед началом эксплуатации пылесоса
прочитайте настоящее руководство и
ознакомьтесь с иллюстрациями.
◗ Обязательно отключайте пылесос, когда вы
не пользуетесь им.
◗ Запрещается убирать пылесосом горячий
пепел до тех пор, пока пепел не остынет.
◗ Запрещается убирать пылесосом
легковоспламеняющиеся и едкие
жидкости.
◗ Не допускайте попадания воды в пылесос
или настенный держатель.Запрещается
погружать пылесос или настенный
держатель в воду.
◗ Вилка зарядного устройства может стать
теплой на ощупь. Это нормально.
◗ Заряжайте пылесос только с помощью
зарядного устройства,входящего в
комплект поставки.
◗ Запрещается пользоваться пылесосом,если
он неисправен. В этом случае его следует
доставить в уполномоченный сервисный
центр компании Филипс для ремонта.
Подготовка пылесоса к работе
C
◗ Вы можете хранить слишком длинный
шнур, обмотав его вокруг настенного
держателя.
РУССКИЙ 33
Page 34

C
◗ Укрепите настенный держатель на стене
винтами.
◗ Во время зарядки вы можете поставить
пылесос и настенный держатель на ровный
стол.
C
◗ Щелевую насадку и резиновый скребок
можно разместить на настенном
держателе,закрепив их в соответствующих
пазах.
Как заряжать аккумуляторную
батарею
1 Следите за тем, чтобы в процессе
зарядки аккумуляторной батареи
переключатель был установлен в
положение 0 (выключено).Если
выключатель находится в другом
положении,зарядка производиться не
будет.
2 Вставьте вилку зарядного устройства в
розетку электросети.
C
3 Закончив уборку, всегда устанавливайте
пылесос на настенный держатель.
C
◗ Загорится индикатор,показывая, что
прибор заряжается.
Индикатор будет гореть все время, пока
пылесос установлен на настенном держателе и
РУССКИЙ34
Page 35

вилка зарядного устройства вставлена в
розетку электросети.
Индикатор не выдает каких-либо показаний о
уровне заряда встроенной аккумуляторной
батареи.
Перед первым использованием
электроприбора необходимо заряжат
аккумуляторную батарею в течение не менее
16 часов.
Подзаряжайте прибор,когда мощность
электродвигателя заметно снижается.
4 Оставьте вилку зарядного устройства в
розетке электросети. Всегда храните
пылесос на настенном держателе (даже
когда встроенные аккумуляторные
батареи полностью заряжены).
Порядок работы
1 Перед началом работы убедитесь, что в
отсеке пылесборника установлены
дефлектор и фильтр.
Дефлектор и фильтр
C
1 Нажмите на кнопку-защелку и откройте
пылесос.
РУССКИЙ 35
Page 36

C
2 Установите дефлектор и фильтр в отсек
пылесборника.
C
3 Плотно вставьте фильтр в отсек
пылесборника.
4 Затем закройте пылесос.
C
2 Для работы с нормальной силой
всасывания установите переключатель в
положение «I».Установите
переключатель в положение «II» для
повышения силы всасывания.
Сбор жидкостей
C
1 Подсоедините резиновый скребок к
отсеку пылесборника.
C
2 Прекратите уборку, как только уровень
жидкости в отсеке пылесборника
достигнет отметки максимального
уровня.
РУССКИЙ36
Page 37

C
3 При сборе жидкостей удерживайте
пылесос в таком положении, чтобы
отсек пылесборника был ориентирован
вниз под углом. Убедитесь в том, что
резиновый скребок касается очищаемой
поверхности. Не наклоняйте
электроприбор в сторону.
C
4 Не устанавливайте пылесос в положение
пылесборником вверх, так как это
может привести к проникновению
жидкости в электроприбор и порче
внутренних деталей.
5 Каждый раз после уборки жидкости
опорожняйте отсек пылесборника.
Установка аксессуаров
C
1 Для уборки пылесосом
труднодоступных мест пользуйтесь
щелевой насадкой.
Не пользуйтесь щелевой насадкой для сбо
жидкостей.
Опорожнение отсека пылесборника
C
1 Нажмите на кнопку-защелку и откройте
пылесос над мусорным ведром.
РУССКИЙ 37
Page 38

C
2 Выньте из отсека пылесборника фильтр
и дефлектор.
3 Очистите фильтр и опорожните отсек
пылесборника.
◗ Если фильтр очень грязный, очистите его
щеткой или пылесосом для сухой уборки.
Замена фильтра
C
1 Выньте из отсека пылесборника
дефлектор и раму фильтра.
C
2 Отсоедините фильтр от дефлектора.
C
3 Чтобы снять фильтр с рамы, осторожно
поверните его по часовой стрелке.
C
4 Снимите старый фильтр и замените его
новым.
РУССКИЙ38
Page 39

C
5 Вставьте край фильтра внутрь.
C
6 Установите фильтр и дефлектор на
место в отсек пылесборника.
Очистка пылесоса
◗ Вы можете очищать пылесос с помощью
влажной ткани. Перед очисткой настенного
держателя выньте вилку шнура питания из
розетки электросети.
Не допускайте попадания воды в пылесос или
настенный держатель. Запрещается погружат
пылесос или настенный держатель в воду.
◗ При необходимости вы можете вымыть
отсек пылесборника, дефлектор и фильтр
холодной или теплой водой.Отсек
пылесборника и дефлектор можно также
мыть в посудомоечной машине.
Никогда не включайте пылесос, если фильт
и/или отсек пылесборника еще не высохли.
РУССКИЙ 39
Page 40

Заказ фильтров
Производите замену фильтра, если очистить
его как следует уже невозможно (обычно
после 50-кратной очистки).у
В продаже имеются новые (сменные) фильтры
для пылесоса: номер модели FC8036.
Обратитесь в вашу местную торговую
организацию компании «Филипс».
Если вы столкнулись с трудностями при
приобретении фильтров или других
аксессуаров, обращайтесь в Центр по связям с
потребителями в вашей стране или по номеру
телефона, который вы найдете в гарантийном
талоне.
Охрана окружающей среды
Никель-кадмиевые/никель-металл-гидридные
аккумуляторные батареи могут представлят
опасность для окружающей среды; кроме того
они могут взрываться при нагревании или
попадании в огонь.
Перед утилизацией пылесоса удалите
аккумуляторную батарею. Не выбрасывайте
аккумуляторную батарею с обычными
бытовыми отходами, а сдавайте в официальный
приемный пункт. Вы также можете сдать
пылесос в сервисный центр компании Филипс,
сотрудники которого позаботятся об
извлечении аккумуляторной батареи и ее
РУССКИЙ40
Page 41

утилизации без ущерба для окружающей
среды.
Перед удалением аккумуляторной батареи ее
необходимо полностью разрядить.
C
1 Включите пылесос и подождите,пока
двигатель не остановится,затем
отверните винты и откройте пылесос.
C
2 Последовательно обрежьте
соединительные провода, а затем
выньте аккумуляторную батарею.
◗ В случае если вы не собираетесь
пользоваться пылесосом в течение
продолжительного времени,рекомендуем
вам отключить прибор от электросети в
целях экономии электроэнергии.
Информация и обслуживание
По поводу обслуживания, получения
дополнительной информации, или в случае
возникновения каких-либо проблем,
обращайтесь на Web-сайт компании Филипс
по адресу www. philips.com или в центр
компании «Филипс» по обслуживанию
потребителей в вашей стране (вы найдете его
номер телефона на международном
гарантийном талоне).
РУССКИЙ 41
Page 42

Если подобный центр в вашей стране
отсутствует, обратитесь ввашу местную
торговую организацию компании «Филипс»
или сервисное отделение компании Philips
Domestic Appliances and Personal Care BV
РУССКИЙ42
Page 43

Důležité
◗ Než přístroj poprvé použijete, pročtěte
pečlivě celý návod a sledujte přitom příslušná
vyobrazení.
◗ Po použití vždy přístroj vypněte.
◗ Nikdy nevysávejte popel, pokud není zcela
chladný.
◗ Nikdy nevysávejte hořlavé nebo leptavé
kapaliny.
◗ Dbejte na to, aby se do přístroje nebo do jeho
nástěnného držáku nedostala voda. Přístroj ani
jeho nástěnný držák nesmíte nikdy ponořit do
vody.
◗ Zásuvka pro nabíjení může být teplá.To je
zcela normální jev.
◗ Akumulátory přístroje nabíjejte jen dodaným
nabíjecím zařízením.
◗ Pokud byste na přístroji zjistili jakékoli
poškození, nepoužívejte ho a vyhledejte
autorizovanou opravnu firmy Philips.
Příprava vysavače k použití
C
◗ Přebytečný síťový přívod naviňte a
uchovávejte v nástěnném držáku.
C
◗ Přišroubujte nástěnný držák na zeď.
◗ Během nabíjení můžete též vysavač spolu s
jeho držákem umístit naplocho na stůl.
ČESKY 43
Page 44

C
◗ Štěrbinovou hubici a hubici pro nasávání
tekutin můžete uchovávat též v nástěnném
držáku tak, že je zasunete do příslušných
výřezů.
Nabíjení akumulátorů přístroje
1 Přesvědčte se, že posuvný spínač je během
nabíjení ve vypnuté poloze 0. Pokud by
tomu tak nebylo,akumulátory přístroje by
se nenabíjely.
2 Zasuňte zástrčku do síťové zásuvky.
C
3 Vždy po použití vložte vysavač zpět do
jeho držáku.
C
◗ Kontrolka na vysavači se rozsvítí a indikuje
nabíjení akumulátorů.
Kontrolka nabíjení svítí po celou dobu, kdy je
vysavač zasunut do nástěnného držáku.
Kontrolka nedává žádnou informaci o úrovni
nabití akumulátorů.
Před prvním použitím nabíjejte akumulátory
přístroje alespoň po dobu 16 hodin.
Akumulátory nabíjejte vždy, když zjistíte, že má
motor zmenšený výkon.
4 Nabíjecí zástrčku ponechávejte v síťové
zásuvce.Vždy po použití vložte vysavač
zpět do držáku (i když jsou jeho
akumulátory nabité).
ČESKY44
Page 45

Vysávání
1 Před použitím přístroje se přesvědčte, že
jsou deflektor i filtr vloženy do
prachového prostoru.
Deflektor a filtr
C
1 Stiskněte odjišťovací tlačítko a otevřte
vysavač.
C
2 Do prachového prostoru vložte deflektor
a filtr.
C
3 Filtr zasuňte pevně do prachového
prostoru.
4 Vysavač opět zavřete.
C
2 Zvolte polohu I pro běžné vysávání.Zvolte
polohu II pro větší sací výkon vysavače.
ČESKY 45
Page 46

Vysávání tekutin
C
1 Na prachový prostor nasaďte hubicovou
stěrku.
C
2 Jakmile by hladina tekutiny v prachovém
prostoru dosáhla naznačeného maxima,
ukončete vysávání.
C
3 Když vysáváte tekutiny, držte vysavač tak,
aby prachový prostor směřoval v určitém
úhlu směrem dolů. Dbejte na to, aby se
nasávací hubice dotýkala plochy, která je
vysávána. Nenaklánějte přístroj do strany.
C
4 Nedržte přístroj s prachovým prostorem
směřujícím nahoru, což by mohlo zapříčinit
vniknutí tekutiny do přístroje a poškodit
ho.
5 Vždy po ukončeném vysávání tekutin
prachový prostor vyprázdněte.
Připojování příslušenství
C
1 Pro vysávání hůře přístupných míst
použijte štěrbinovou hubici.
Štěrbinovou hubici nikdy nepoužívejte pro
vysávání tekutin.
ČESKY46
Page 47

Vyprázdnění prachového prostoru
C
1 Stiskněte uvolňovací tlačítko a otevřte
vysavač nad odpadkovým košem.
C
2 Z prachového prostoru vyjměte fitr a
deflektor.
3 Vyčistěte filtr a vyprázdněte prachový
prostor.
◗ Filtr vyčistěte kartáčem nebo, pokud je více
znečistěn, použijte k vyčištění druhý vysavač.
Výměna filtru
C
1 Z prachového prostoru vysavače vyjměte
deflektor a rámeček filtru.
C
2 Oddělte filtr od deflektoru.
ČESKY 47
Page 48

C
3 Pomalým otáčením fitru ve směru pohybu
hodinových ruček jej oddělte od rámečku.
C
4 Starý filtr vyjměte a nahraďte jej novým
filtrem.
C
5 Konec filtru zatlačte směrem dovnitř.
C
6 Vložte filtr a deflektor zpět do prachového
prostoru.
Čištění přístroje
◗ Vysavač čistěte vlhkým hadříkem.Dříve, než
budete shodným způsobem čistit nástěnný
držák, odpojte ho od sítě.
Dbejte na to, aby se do přístroje nebo do jeho
nástěnného držáku nedostala voda. Přístroj ani
jeho nástěnný držák nesmíte nikdy ponořit do
vody.
ČESKY48
Page 49

◗ Pokud je to třeba, umyjte prachový prostor a
filtr studenou nebo vlažnou vodou. Prachový
prostor a deflektor mohou být též umývány v
myčce nádobí.
Nikdy vysavač nepoužívejte pokud jsou ještě
prachový prostor nebo filtr vlhké.
Obstarání filtrů
Filtr vyměňte, jestliže ho již není možné řádně
vyčistit (obvykle to bývá asi po 50 použití
vysavače).
Náhradní filtry lze zakoupit pod typovým
označením FC8036. Kontaktujte svého
obchodníka.
Pokud byste měli s obstaráváním filtrů nebo
jiného příslušenství jakékoli problémy, spojte de
laskavě s Informačním střediskem firmy Philips,
případně zavolejte na Infolinku firmy Philips.
Adresu a další údaje naleznete na letáku s
celosvětovou zárukou.
Ochrana životního prostředí
Akumulátory typu NiCd nebo typu NiMH mohou
při svém rozpadu poškodit životní prostředí
Nesmíte je též vystavit nadměrným teplotám
nebo ohni, kdy mohou způsobit škodu
vybuchnutím.
ČESKY 49
Page 50

Pokud přístroj likvidujete, nejprve z něho vyjměte
akumulátory.Akumulátory nazahazujte do
domovního odpadu, ale odevzdejte je do sběrny,
která je k tomu určena.Akumulátory můžete též
odevzdat v servisu firmy Philips, kde se již
postarají o jejich optimální likvidaci.
Akumulátory z přístroje vyjměte jen když jsou ve
zcela vybitém stavu.
C
1 Nechte proto přístroj v chodu až do doby,
kdy se jeho motor zastaví.
C
2 Odštípněte přívodní kablíky k
akumulátorům a akumulátory vyjměte.
◗ Pokud vysavač nebudete delší dobu používat,
doporučujeme vám vyjmout jej z nástěnného
držáku abyste ušetřili elektrickou energii.
Informace a servis
Pokud by se vám vyskytl jakýkoli problém, můžete
si otevřít internetovou stránku www.philips.com
nebo se můžete spojit s Infolinkou firmy Philips
(telefonní čísla a další možnosti spojení najdete na
letáku s celosvětovou zárukou).
ČESKY50
Page 51

Fontos
◗ A készülék első használata előtt figyelmesen
olvassa el a használati útmutatót és nézze meg
az ábrákat.
◗ Használat után mindig kapcsolja ki a porszívót.
◗ Soha ne szívjon fel forró hamut.
◗ Soha ne szívjon fel gyúlékony vagy maró
hatású folyadékot.
◗ Ne kerüljön víz a porszívóba vagy a fali
tartóba. Soha ne merítse vízbe a porszívót
vagy a fali tartót.
◗ A töltő csatlakozó dugó felmelegedhet.Ez
normális jelenség.
◗ A porszívót csak az együtt szállított töltővel
töltse.
◗ Ne használja a készüléket, ha sérült.Vigye el
javíttatás céljából a Philips szakszervizbe.
A készülék használata előtt
C
◗ A felesleges hálózati csatlakozó kábelt csévélje
a fali tartóra.
C
◗ Csavarozza a falitartót a falra.
◗ A porszívót és a fali tartót elhelyezheti töltés
közben lefektetve is, egy asztalon.
MAGYAR 51
Page 52

C
◗ A résszívót és a gumi felmosót úgy
csatlakoztathatja a fali tartóhoz, hogy a
megfelelő rögzítő résbe dugja.
A készülék töltése
1 Töltés közben győződjön meg róla, hogy a
porszívó csúszókapcsolója kikapcsolt (0)
helyzetben van-e.A készülék nem tölt, ha a
csúszókapcsoló más helyzetben van.
2 Csatlakoztassa a töltő csatlakozó dugóját a
fali konnektorba.
C
3 Használat után a porszívót mindig tegye
vissza a tartóra.
C
◗ A jelzőlámpa világítása jelzi, hogy a készülék
tölt.
A jelzőlámpa addig világít, amíg a készülék a fali
tartóban van és a hálózati csatlakozó dugó a fali
konnektorhoz csatlakozik.
A jelzőlámpa nem ad semmiféle információt a
beépített akkumulátor töltöttségi szintjéről.
Első használat előtt töltse a készüléket legalább 16
óra hosszat.
Amint a motor teljesítménye észrevehetően
csökken, töltse fel újra a készüléket.
4 Hagyja a töltő dugót a fali konnektorban.
Mindig tegye vissza a porszívót a tartóra
MAGYAR52
Page 53

(akkor is, ha az elemek teljesen fel vannak
töltve).
Porszívózás
1 Mielőtt elkezdené használni a készüléket,
ellenőrizze, hogy a terelőlapot és a szűrőt
bedugta a porkamrába.
Deflektor és szűrő
C
1 Nyomja meg a bontó gombot és nyissa ki a
porszívót.
C
2 Helyezze a deflektort és a szűrőt a
porzsáktartóba.
C
3 Erősen nyomja be a szűrőt a
porzsáktartóba.
4 Csukja össze ismét a porszívót.
C
2 Állítsa a csúszókapcsolót I-es pozícióba a
normál szívóerőhöz. Állítsa II-es pozícióba
a turbo szívóerőhöz.
MAGYAR 53
Page 54

Folyadékok felszívása
C
1 Csatlakoztassa a gumi felmosót a
porkamrára.
C
2 Nem lehet tovább felszívni folyadékot,ha a
porzsáktartó belsejében lévő folyadékszint
eléri a maximumot jelző vonalat.
C
3 Ha folyadékot szív, tartsa a készüléket úgy,
hogy a porkamra egy szögben lefele
mutasson.Vigyázzon, hogy a gumi felmosók
érintsék a tisztítandó felületet. Ne döntse a
készüléket egyik oldalára.
C
4 Ne tartsa a készüléket úgy, hogy a
porkamra felfelé mutasson, mert folyadék
juthat a készülékbe és tönkreteheti a belső
alkatrészeket.
5 Mindig ürítse ki a porzsáktartót, ha a
készüléket folyadék felszívására használja.
Csatlakozó tartozékok
C
1 A résszívót nehezen hozzáférhető helyek
porszívózására használja.
A résszívóval ne szívjon fel folyadékot.
MAGYAR54
Page 55

A porkamra ürítése
C
1 Nyomja meg az oldó gombot és nyissa ki a
porszívót a szemetes felett.
C
2 Vegye le a szűrőt és a deflektort a
porkamráról.
3 Tisztítsa ki a szűrőt és ürítse ki a
porkamrát.
◗ A szűrőt kefével,vagy ha nagyon piszkos,
normál porszívóval tisztítsa ki.
A szűrő cseréje
C
1 Vegye le a deflektort és a szűrőkeretet a
porkamráról.
C
2 Válassza le a szűrőt a deflektorról.
MAGYAR 55
Page 56

C
3 Forgassa óvatosan a szűrőt órajárás
irányába, hogy leválassza a keretről.
C
4 Távolítsa el a régi szűrőt és cserélje ki újra.
C
5 Nyomja a szűrő csúcsát befele.
C
6 Tegye vissza a terelőlapot és a szűrőt a
porkamrába.
A készülék tisztítása
◗ A készüléket nedves ruhával tisztíthatja.Húzza
ki a hálózati csatlakozó dugót a fali
konnektorból, mielőtt a fali tartót tisztítja.
Ne kerüljön víz a porszívóba vagy a fali tartóba
Soha ne merítse vízbe a porszívót vagy a fali
tartót.
MAGYAR56
Page 57

◗ Ha szükséges, tisztítsa a porkamrát,a
terelőlapot és a szűrőt hideg vagy langyos
vízzel.A porkamrát és a terelőlapot
mosogatógépben is tisztíthatja.
Soha ne használja a porszívót, ha a szűrő és/vagy a
porkamra nedves.
Szűrő rendelése
Ha a szűrőt már nem lehet jól kitisztítani, cserélje
ki (általában 50-szer lehet tisztítani).
Új (csere) szűrők FC8036 számmal rendelhetők
meg. Forduljon Philips kereskedőjéhez.
Ha nehézségei vannak a szűrők vagy más
tartozékok beszerzésével, forduljon az országában
lévő Philips vevőszolgálathoz vagy tanulmányozza
a garancialapot.
Környezetvédelem
A NiCd/NiMH akkumulátorok a környezetre
ártalmasak, magas hőmérséklet vagy tűz hatásának
kitéve felrobbanhatnak.
A készülék kiselejtezésekor vegye ki belőle az
akkumulátort. Az akkumulátort ne dobja a normál
háztartási szemétbe, vigye el a hivatalos
gyűjtőhelyre. Elviheti az akkumulátort a Philips
Szerviz Központba is, ahol gondoskodnak
környezetbarát elhelyezéséről.
MAGYAR 57
Page 58

Csak akkor vegye ki az akkumulátort, ha teljesen
lemerült.
C
1 Hagyja addig működni a készüléket, míg
megáll, csavarja ki a csavarokat és nyissa fel
a porszívó burkolatát.
C
2 Vágja el egyenként a csatlakozó
vezetékeket és vegye ki az akkumulátort.
◗ Ha a készüléket hosszú ideig nem használja,
azt tanácsoljuk, hogy energiatakarékossági
szempontból húzza ki a töltő csatlakozó dugót
a fali konnektorból.
Információ és szerviz
Javíttatás, tájékozódás vagy bármilyen probléma
esetén látogassa meg a www.philips.com Philips
Web-lapot,vagy lépjen érintkezésbe a helyi Philips
Vevőszolgálattal (a telefonszámot megtalálja a világ
minden részére kiterjedő garancialevélen). Ha
lakóhelyén nincs Vevőszolgálat, forduljon a helyi
Philips szaküzlethez vagy lépjen érintkezésbe a
Philips Háztartási kisgépek és Szépségápolási
termékek üzletága képviselőivel.
MAGYAR58
Page 59

Dôležité upozornenie
◗ Pred použitím prístroja si pozorne prečítajte
tento návod na použitie v spojitosti s
vyobrazeniami.
◗ Prístroj vždy po použití vypnite.
◗ Nikdy nevysávajte popol, pokiaľ nie je
vychladený.
◗ Nevysávajte horľavé alebo korozívne tekutiny.
◗ Do vysávača ani nástennej konzoly sa nesmie
dostať voda.Vysávač ani nástennú konzolu
nikdy neponorte do vody.
◗ Zástrčka nabíjača je horúca. Je to normálny
jav.
◗ Vysávač nabíjajte len s priloženým nabíjačom.
◗ Prístroj nepoužívajte, ak je poškodený. S jeho
opravou sa obráťte na autorizované servisné
centrum Philips.
Príprava prístroja na použitie
C
◗ Prevyšujúci kábel oviňte okolo nástennej
konzoly.
C
◗ Pripevnite konzolu ku stene skrutkami
◗ Vysávač aj s nástennou konzolou môžete
počas nabíjania položiť na stôl.
SLOVENSKY 59
Page 60

C
◗ Štrbinovú a špongiovú dýzu môžete pripevniť
na nástennú konzolu ich zatlačením do
príslušných drážok.
Nabíjanie prístroja
1 Dbajte, aby posuvný spínač vysávača nebol
počas nabíjania v pozícií vypnutý (0).
Prístroj sa nebude nabíjať, ak je posuvný
spínač v inej pozícii.
2 Zástrčku nabíjača vložte do zásuvky el
siete.
C
3 Po použití vysávač vždy vráťte späť na
konzolu.
C
◗ Kontrolné svetlo sa rozsvieti, čim udáva
nabíjanie prístroja.
Kontrolné svetlo zostane svietiť po celú dobu
pripojenia prístroja k nástennej konzole a
pripojenia zástrčky do el. siete.
Kontrolné svetlo neposkytuje žiadne informácie
týkajúce sa úrovne nabitia zabudovanej baterky.
Prístroj pred prvým použitím nabíjajte minimálne
16 hodín.
Prístroj dobite akonáhle sa viditeľne zníži výkon
motora.
SLOVENSKY60
Page 61

4 Zástrčku nabíjača ponechajte pripojenú na
sieť.Vysavač vždy postavte späť na konzolu
(aj v prípade, že batérie sú úplne nabité).
Vysávanie
1 Pred tým, ako začnete vysávač používať sa
uistite, že odchyľovač a filter sú na svojom
mieste v komore na zachytávanie prachu.
Odchyľovač a filter
C
1 Stlačte prerušovacie tlačidlo a otvorte
vysávač.
C
2 Odchyľovač a filter vložte do prachového
priestoru.
C
3 Filter pevne zatlačte do prachového
priestoru.
4 Vysávač znovu uzatvorte.
SLOVENSKY 61
Page 62

C
2 Posuvný spínač dajte do pozície I pre
normálny sací výkon.Pre dosiahnutie turbo
sacieho výkonu dajte spínač do pozície II.
Vysávanie tekutín
C
1 Špongiovú dýzu pripevnite k prachovému
priestoru.
C
2 Prestaňte vysávať tekutiny, akonáhle
hladina vody vo vnútri prachového
priestoru dosiahla maximálnu úroveň.
C
3 Pri vysávaní tekutín držte zariadenie tak,
aby komora na zachytávanie prachu
smerovala pod uhlom nadol. Uistite sa, že
stierka sa dotýka čisteného povrchu.
Nenakláňajte zariadenie do strán.
C
4 Nedržte prístroj s prachovým priestorom
smerujúcim hore, pretože by sa mohla
tekutina dostať do prístroja a poškodiť
vnútorné časti.
5 Prachový priestor vyčistite vždy po
vysávaní tekutín.
SLOVENSKY62
Page 63

Pripojenie nástavcov
C
1 Štrbinovú dýzu používajte na vysávanie
ťažko dostupných miest.
Štrbinovú dýzu nepoužívajte na vysávanie tekutín.
Vyprázdňovanie prachového vrecka.
C
1 Stlačte tlačidlo brzdy a otvorte vysávač
nad odpadkovým košom.
C
2 Filter a odchyľovač vyberte z prachového
priestoru.
3 Vyčistite filter a vyprázdnite prachový
priestor.
◗ Filter vyčistite kefou alebo bežným
vysávačom, ak je príliš znečistený.
Výmena filtra
C
1 Odchyľovač a rám filtra vyberte z
prachového priestoru.
SLOVENSKY 63
Page 64

C
2 Oddeľte rám filtra od odchyľovača.
C
3 Mierne pootočte filter v smere chodu
hodinových ručičiek, aby ste ho odpojili od
rámu.
C
4 Vyberte starý filter a vymeňte ho za nový
filter.
C
5 Okraj filtra zatlačte smerom dnu.
C
6 Filter a odchzľovač vráťte späť do komory
na zachytávanie prachu.
SLOVENSKY64
Page 65

Čistenie prístroja
◗ Prístroj môžete vyčistiť s vlhkou utierkou.
Pred čistením konzoly vytiahnite sieťovú
zástrčku zo zásuvky el. siete.
Do vysávača ani nástennej konzoly sa nesmie
dostať voda.Vysávač ani nástennú konzolu nikdy
neponorte do vody.
◗ V prípade potreby vyčistite komoru na
zachytávanie prachu, odchyľovač a filter
studenou alebo vlažnou vodou. Komoru a
odchyľovač môžete umývať aj v umývačke
riadu.
Nikdy nepoužívajte vysávač ak sú filter a/alebo
prachové vrecko stále mokré.
Objednávanie filtrov
Filter vymeňte, ak sa už nedá riadne vyčistiť
(zvyčajne po 50 čisteniach).
Nový (náhradný) filter si môžete objednať pod
typovým číslom FC8036. Obráťte sa na Vášho
predajcu.
Ak máte problém s obstaraním filtrov, alebo iného
príslušenstva k tomuto prístroju, prosíme Vás, aby
ste sa obrátili na oddelenie klientských služieb vo
Vašej krajine, alebo sa riadili celosvetovým
záručným listom.
SLOVENSKY 65
Page 66

Životné prostredie
NiCd/NiMH baterky môžu byť škodlivé pre
životné prostredie a pri vystavení vysokej teplote
alebo ohňu môžu explodovať.
Pri vyhadzovaní prístroja vytiahnite baterky.
Neodhadzujte ich do normálneho domového
odpadu, ale odneste ich do príslušnej zberne.
Baterky môžete odniesť aj do servisného centra
Philips, kde ich odstránia spôsobom ohľaduplným
k životnému prostrediu.
Baterky vytiahnite len ak sú úplne prázdne.
C
1 Prístroj nechajte ísť až kým nezastane,
odskrutkujte skrutky a otvorte vysávač.
C
2 Odpojte spájacie káble jeden po druhom a
vytiahnite baterky.
◗ Ak prístroj nebudete dlhšiu dobu používať,
doporučujeme Vám, vytiahnúť zástrčku
nabíjača zo zásuvky el. siete, aby ste šetrili el.
energiou.
SLOVENSKY66
Page 67

Informácie a servis
Ak potrebujete informáciu, alebo máte problém,
prosíme Vás, aby ste sa zoznámili s webovou
stránkou Philips - www.philips.com,alebo sa
obrátili na zákaznícke oddelenie vo Vašej krajine.
Ak sa vo Vašej krajine nenachádza oddelenie pre
zákazníkov, obráťte sa na miestneho predajcu
Philips, alebo sa skontaktujte s oddelením služieb
Philips - divízia domáce spotrebiče a osobná
starostlivosť.
SLOVENSKY 67
Page 68

Увага
◗ Перед початком використання приладу
уважно прочитайте цю інструкцію з
використання і подивіться малюнки.
◗ Після використання обов'язково вимкніть
пилосос.
◗ Ні у якому разі не збирайте попіл, якщо він
ще не захолонув.
◗ Не збирайте пилососом рідину, що легко
займається, або хімічно агресивну рідину.
◗ Не допускайте,щоб вода потрапила
всередину пилососу або у настінний
тримач. Ні у якому разі не занурюйте
пилосос або настінний тримач у воду.
◗ Вилка зарядного пристрою на дотик тепла.
Це нормально.
◗ Заряджайте пилосос тільки за допомогою
зарядного пристрою, що входить у
комплект поставки.
◗ Не використовуйте прилад,якщо його
пошкоджено. Радимо здати його до
уповноваженого сервісного центру фірми
"Філіпс" для ремонту.
Підготовка приладу до
використання.
C
◗ Намотуйте та складайте шнур на стінному
тримачі.
УКРАЇНСЬКІЙ68
Page 69

C
◗ Прикріпіть стінний тримач до стіни
гвинтами.
◗ Ви також можете розміщувати пилосос та
стінний тримач на столі під час зарядження.
C
◗ Щілинна насадка
Заряджання приладу.
1 Упевніться, що повзунковий вимикач
пилососа знаходиться у положенні
"Вимкнено" ("0") на протязі заряджання.
Прилад не буде заряджатися, якщо
повзунковий вимикач знаходиться у
іншому положенні.
2 Вставте вилку зарядного пристрою у
розетку.
C
3 Після використання завжди ставте
пилосос назад у тримач.
C
◗ Під час заряджання буде світитися
індикатор зарядки.
Доти, доки прилад буде під'єднаний до
настінного тримача і вилка буде вставлена в
розетку, працюватиме індикатор.
Індикатор не дає будь-якої інформації про
ступінь зарядження вбудованих батарей.
УКРАЇНСЬКІЙ 69
Page 70

Заряджайте приладщонайменше 16 годин
перед тим, як використовувати його вперше.
Перезаряджайте прилад, як тільки потужність
двигуна помітно знизиться.
4 Залишайте зарядний шнур у розетці.
Завжди встановлюйте пилосос назад у
тримач (навіть якщо акумулятори
повністю заряджені).
Використання пилососу
1 Перед тим, як використовувати прилад,
переконайтеся, що дефлектор та фільтр
вставлені у відсік для пакета для
збирання пилу.
Дефлектор та фільтр
C
1 Натисніть фіксуючу кнопку та відкрийте
пилосос.
C
2 Вставте дефлектор та фільтр до відсіку
для пакета для збирання пилу.
УКРАЇНСЬКІЙ70
Page 71

C
3 Міцно вставте фільтр до відсіку для
пакета для збирання пилу.
4 Закрийте пилосос знову.
C
2 Поставте повзунковий вимикач у
положення І для нормальної потужності
всмоктування. Поставте його у
положення ІІ для підвищеної потужності
всмоктування (режим "Турбо").
Всмоктування рідини
C
1 Приєднайте гумовий скребок до
відділення для пакета для збиранняпилу.
C
2 Припиніть всмоктування рідини, якщо
рівень рідини всередині відділення для
пакета для збирання пилу досяг лінії,що
вказує на максимум.
C
3 При всмоктуванні рідини тримайте
прилад з відсіком для пакета для пилу,
повернутим донизу під кутом.
Переконайтеся, що резиновий скребок
торкається поверхні, яку Ви чистите.Не
нахиляйте прилад на один бік.
УКРАЇНСЬКІЙ 71
Page 72

C
4 Не тримайте прилад з відсіком для
пакета для збирання пилу
5 Очищайте відсік для пакета для
збирання пилу кожного разу, коли ви
користувалися приладом для
всмоктування рідини.
Приєднання до пилососу
додаткового приладдя
C
1 Застосовуйте щілинну насадку для
чищення важкодоступних місць.
Не застосовуйте щілинну насадку дл
всмоктування рідини.
Спорожнення відсік дляпакета для
збирання пилу.
C
1 Натисніть на кнопку фіксатора і
відкрийте пилосос над відром для
сміття.
C
2 Зніміть фільтр та дефлектор з відсіка для
пакета для збирання пилу.
3 Почистіть фільтр та спорожніть відсік
для пакета для збирання пилу.
◗ Почистіть фільтр щіткою або звичайним
пилососом, якщо він дуже забруднений.
УКРАЇНСЬКІЙ72
Page 73

Заміна фільтра
C
1 Зніміть дефлектор та рамку фільтра з
відсіка для пакета для пилу.
C
2 Від'єднайте фільтр від дефлектора.
C
3 Обережно поверніть фільтр за
годинниковою стрілкою,щоб від'єднати
його від рамки.
C
4 Зніміть старий фільтр та замініть його на
новий.
C
5 Натисніть верхівку фільтру усередину.
УКРАЇНСЬКІЙ 73
Page 74

C
6 Встановіть фільтр та дефлектор назаду
відсік для пакета для збирання пилу.
Чистка пилососу
◗ Протирати пилосос можна вологою
тканиною. Перед тим, як протирати
настінний тримач, витягніть вилку з розетки.
Не допускайте,щоб вода потрапила всередину
пилососу або у настінний тримач. Ні у якому
разі не занурюйте пилосос або настінний
тримач у воду.
◗ Якщо необхідно, почистіть відсік для
пакета для збиранняпилу, дефлектор та
фільтр холодною або теплою водою.Відсік
для пакета для збирання пилу та дефлектор
також можна чистити миючим засобом.
Ніколи не вмикайте пилососа, якщо фільтр або
відсік для пакета для збирання пилу ще вологі.
Замовлення фільтрів
Замініть фільтр, якщо його вже не можна
почистити (зазвичай після 50 разів
використання).
УКРАЇНСЬКІЙ74
Page 75

Новий (запасний) фільтр можна замовити під
номером FC8036. Звертайтеся до Вашого
ділера Philips.
Якщо у Вас виникли проблеми з замовленням
фільтрів чи іншого приладдя для приладу, будьласка, звертайтеся до Центру обслуговування
клієнтів Philips у Вашій країні або подивіться
міжнародний гарантійний талон.
Навколишнє середовище
NiCd/NiMH батареї можуть завдати шкоду
навколишньому середовищу і можут
вибухнути, якщо на них буде діяти висок
температура або якщо їх кинути у полум'я.
Вийміть батареї, коли ви викидаєте прилад. Не
викидайте батареї разом зі звичайними
побутовими відходами, а здавайте їх у офіційно
призначений пункт збору.Ви можете також
здати батареї до сервісного центру фірми
"Філіпс", який зможе утилізувати їх способом,
безпечним для навколишнього середовища.
З приладу можна вилучати тільки цілком
розряджені батареї.
C
1 Дайте приладу попрацювати до
цілковитої зупинки.Зніміть гвинти і
відкрийте пилосос.
УКРАЇНСЬКІЙ 75
Page 76

C
2 Переріжте по черзі всі дроти, що
з'єднують батареї, і вилучіть батареї з
приладу.
◗ Якщо ви не збираєтесь користуватися
приладом на протязі довшого проміжку
часу, ми радимо вам вийняти штепсель
зарядного пристрою з настінної розетки
електромережі, щоб зберегти
електроенергію.
Інформація та сервіс
Якщо вам необхідна інформація, або якщо у вас
виникла проблема, будь ласка відвідайте
інформаційну (Web) сторінку фірми "Філіпс" за
адресою: www.philips.com, або зв'яжіться з
Центром фірми «Філіпс» з обслуговування
клієнтів у вашій країні (ви знайдете номер його
телефону у листівці світової гарантії). Якщо у
вашій країні немає Центру з обслуговування
клієнтів, зверніться до вашого місцевого дилера
фірми «Філіпс», або зв'яжіться з Відділом
сервісу підрозділу фірми "Філіпс" з побутової
техніки та приладів для особистого догляду, BV.
УКРАЇНСЬКІЙ76
Page 77

Važno
◗ Prije uporabe pažljivo pročitajte ove upute i
pogledajte slike.
◗ Uvijek isključite usisivač nakon uporabe.
◗ Nikad ne usisavajte pepeo dok se ne ohladi.
◗ Ne usisavajte zapaljive ili korozivne tekućine.
◗ Pazite da u usisivač ili zidni nosač ne dospije
voda. Nikada ih ne uranjajte u vodu.
◗ Utikač punjača je topao na dodir.To je
normalno.
◗ Punite usisivač samo isporučenim punjačem.
◗ Nemojte koristiti usisivač ako je oštećen.
Popravke povjerite ovlaštenom Philips servisu.
Priprema usisivača za uporabu
C
◗ Omotajte i spremite višak mrežnoga kabela u
zidni nosač.
C
◗ Vijcima pričvrstite zidni nosač na zid.
◗ Takoūer možete položiti usisivač i zidni nosač
na stol tijekom punjenja.
C
◗ Uski nastavak i nastavak za usisavanje tekućina
mogu se učvrstiti na zidni nosač tako da ih
stavite u odgovarajuće utore.
HRVATSKI 77
Page 78

Punjenje
1 Tijekom punjenja preklopka za uključenje
mora biti u položaju "isključeno" (0).
Usisivač se neće puniti ako je preklopka u
drugom položaju.
2 Utaknite utikač punjača u zidnu utičnicu.
C
3 Tijekom punjenja usisivač mora biti na
nosaču.
C
◗ Pali se indikator u znak da je punjenje u tijeku.
Indikator ostaje upaljen dok je usisivač na zidnom
nosaču i utikač utaknut u zidnu utičnicu.
Indikator ne pruža informaciju o razini
napunjenosti ugraūenih baterija.
Prije prve uporabe punite usisivač najmanje 16
sati.
Čim se snaga motora značajno smanji, napunite
usisivač.
4 Ostavite utikač punjača u zidnoj utičnici.
Uvijek držite usisivač na nosaču (i kada su
ugraūene baterije sasvim pune).
Usisavanje
1 Prije uporabe provjerite da li se usmjerivač
i filter nalaze u spremniku za prašinu.
HRVATSKI78
Page 79

Usmjerivač i filter
C
1 Pritisnite tipku za otpuštanje i otvorite
usisivač.
C
2 Uložite usmjerivač i filter u spremnik za
prašinu.
C
3 Čvrsto potisnite filter u spremnik za
prašinu.
4 Zatvorite usisivač.
C
2 Postavite preklopku u položaj I za
normalnu usisnu snagu. Za turbo usisnu
snagu postavite je u položaj II.
Usisavanje tekućina
C
1 Spojite nastavak za usisavanje tekućina na
spremnik za prašinu.
HRVATSKI 79
Page 80

C
2 Zaustavite usisavanje kad tekućina u
spremniku dosegne liniju maksimalne
razine.
C
3 Dok usisavate tekućinu,držite usisivač tako
da je spremnik za prašinu okrenut prema
dolje, pod nekim kutom. Pazite da nastavak
za usisavanje tekućine dodiruje površinu
koja se čisti. Nemojte naginjati usisivač na
jednu stranu.
C
4 Ne držite usisivač tako da spremnik za
prašinu bude okrenut prema gore jer na taj
način u unutrašnjost može dospjeti
tekućina i prouzročiti oštećenja.
5 Nakon svakoga usisavanja tekućina
ispraznite spremnik.
Nastavci
C
1 Za usisavanje teže dostupnih mjesta
koristite uski nastavak.
Ne koristite uski nastavak za usisavanje tekućina.
HRVATSKI80
Page 81

Pražnjenje spremnika za prašinu
C
1 Pritisnite tipku za otpuštanje i otvorite
usisivač iznad kante za otpatke.
C
2 Odvojite filter i usmjerivač od spremnika
za prašinu.
3 Očistite filer i ispraznite spremnik.
◗ Očistite filter četkicom ili normalnim
usisivačem ako je jako zaprljan.
Zamjena filtera
C
1 Skinite usmjerivač i okvir filtera sa
spremika za prašinu.
C
2 Odvojite filter od usmjerivača.
C
3 Nježno okrenite filter udesno za odvajanje
od okvira.
HRVATSKI 81
Page 82

C
4 Skinite stari filter i zamijenite ga novim.
C
5 Gurnite vrh filtera prema unutra.
C
6 Filter i usmjerivač vratite u spremnik za
prašinu.
Čišćenje
◗ Usisivač možete obrisati vlažnom krpom. Prije
čišćenja zidnog nosača izvucite utikač iz zidne
utičnice.
Pazite da u usisivač ili zidni nosač ne dospije voda
Nikada ih ne uranjajte u vodu.
◗ U slučaju potrebe, spremnik za prašinu,
usmjerivač i filter očistite hladnom ili mlakom
vodom. Spremnik za prašinu i usmjerivač se
mogu prati i u perilici posuūa
Nikada ne koristite usisivač ako su filter i/ili
spremnik za prašinu još mokri.
HRVATSKI82
Page 83

Narudžba filtera
Zamijenite filter ako se više ne može očistiti
(obično nakon 50 čišćenja).
Novi (zamjenski) filteri mogu se nabaviti pod
brojem FC8036. Obratite se Vašem Philips
prodavatelju.
Imate li poteškoća pri nabavi filtera ili drugog
pribora za ovaj usisivač, obratite se Philips
predstavništvu u Vašoj zemlji ili pogledajte
priloženo jamstvo.
Zaštita okoliša
NiCd/NiMH baterije mogu biti štetne za okoliš i
ako se izlože visokim temperaturama ili vatri
mogu eksplodirati.
Prije odbacivanja starog aparata izvadite baterije.
Nemojte ih bacati zajedno s kućnim otpadom, već
ih odnesite na za to namijenjeno odlagalište.
Takoūer ih možete odnijeti u Philips servis, gdje će
biti odbačene u skladu s pravilima o zaštiti okoliša.
Izvadite baterije samo ako su potpuno prazne.
C
1 Ostavite usisivač raditi dok se ne zaustavi,
odvrnite vijke i otvorite usisivač.
C
2 Prerežite žice za spajanje jednu po jednu i
izvadite baterije.
HRVATSKI 83
Page 84

◗ Ako usisivač nećete koristiti dulje vrijeme,
savjetujemo odspajanje punjača iz utičnice
zbog štednje energije.
Informacije i servis
Ako Vam je potrebna informacija ili imate
problem, posjetite Philips-ovu web stranicu
www.philips.com ili se obratite predstavništvu u
Vašoj zemlji (brojeve telefona pronaūite u
priloženom jamstvu). Ako takvo predstavništvo ne
postoji, obratite se Philips prodavatelju ili
ovlaštenom servisu.
HRVATSKI84
Page 85

Pange tähele
◗ Lugege juhend tähelepanelikult läbi ja vaadake
hoolega illustratsioone, enne kui seadet
kasutama hakkate.
◗ Lülitage tolmuimeja peale kasutamist alati
välja.
◗ Imege tolmuimejaga vaid jahtunud tuhka.
◗ Ärge imege tolmuimejaga kergesti süttivaid
või sööbivaid vedelikke.
◗ Vesi ei tohi sattuda tolmuimejasse ega
seinahoidikusse. Ärge kunagi pange
tolmuimejat ega seinahoidikut vette.
◗ Laadur soojeneb laadides. See on normaalne
nähtus.
◗ Laadige tolmuimejat vaid kaasasoleva
laaduriga.
◗ Ärge kasutage riketega seadet. Parandage
seadet Philipsi hooldustöökojas.
Seadme kasutuselevõtt
C
◗ Kerige kokku ja hoidke lisa toitejuhet
seinahoidikus.
C
◗ Kinnitage seinahoidik kruvidega seinale.
◗ Laadimise ajal võite tolmuimeja koos
seinahoidikuga panna horisontaalselt laua
peale.
EESTI 85
Page 86

C
◗ Praootsikut ja kaabitsat võite hoida
seinahoidikus lükates need vastavatesse
õnarustesse.
Seadme töökorda seadmine
1 Laadimise ajal kontrollige, kas tolmuimeja
lüliti on asendis (0). Seadet ei laeta,kui lüliti
on muus asendis.
2 Pange laadimispistik pistikupessa.
C
3 Peale kasutamist pange tolmuimeja alati
tagasi hoidukusse.
C
◗ Tolmuimeja laadimisest annab märku põlev
märgutuli.
Märgutuli põleb, kuni seade on seinahoidikus ning
pistik on pistikupesas.
Märgutuli ei anna infot tolmuimeja aku laetuse
kohta.
Enne esimest kasutamist laadige seadet vähemalt
16 tundi.
Laadige seadet uuesti, kui mootori jõudlus
väheneb.
4 Jätke laadimispistik seinapistikusse. Pärast
kasutamist pange tolmuimeja alati tagasi
hoidikusse (ka siis kui akud on täis laetud).
EESTI86
Page 87

Kasutamine
1 Enne seadme kasutamist veenduge, et
deflektor ja filter on tolmukambrisse
pandud.
Deflektor ja filter
C
1 Vajutage pidurnupule ja avage tolmuimeja.
C
2 Sisestage deflektor ja filter
tolmukambrisse.
C
3 Paigaldage filter kindlalt tolmukambrisse.
4 Sulgege tolmuimeja.
C
2 Tavaliseks imemisjõudluseks seadke lüliti
asendisse I.Turbo imemisjõudluseks seadke
lüliti asendisse II.
EESTI 87
Page 88

Vedelikkude imemine
C
1 Ühendage kaabits tolmukambrile.
C
2 Lõpetage vedeliku imemine, kui vedeliku
tase tolmukambris jõuab maksimaalse
märkeni.
C
3 Kui kasutate tolmuimejat vedelikkude
imemiseks, hoidke tolmuimejat
tolmukambriga allapoole. Kontrollige, et
kaabits on vastu puhastatavat pinda. Ärge
kallutage seadet ühele küljele.
C
4 Ärge hoidke seadme tolmukambrit
suunaga ülespoole, sest nii võib vedelik
sattuda seadmesse ja kahjustada siseosi.
5 Iga kord,kui olete seadet kasutanud
vedeliku imemiseks, tühjendage
tolmukamber.
Tarvikute ühendamine
C
1 Kasutage praootsikut raskesti
ligipääsetavate kohtade puhastamiseks.
Ärge kasutage praootsikut vedelikkude imemiseks.
EESTI88
Page 89

Tolmukambri tühjendamine
C
1 Vajutage tolmuimeja avamisnuppu ning
võtke tolmuimeja prügikasti kohal lahti.
C
2 Eemaldage filter ja deflektor
tolmukambrist.
3 Puhastage filter ja tühjendage
tolmukamber.
◗ Puhastage filtrit harja või tavalise
tolmuimejaga, kui filter on väga must.
Filtri vahetus
C
1 Eemaldage deflektor ja filtri raam
tolmukambrist.
C
2 Eraldage filter deflektorist.
EESTI 89
Page 90

C
3 Keerake filtrit õrnalt päripäeva, et seda
raamist eemaldada.
C
4 Eemaldage vana filter ja vahetage uue
vastu.
C
5 Vajutage filtri ots sissepoole.
C
6 Pange filter ja deflektor tagasi
tolmukambrisse.
Tolmuimeja puhastamine
◗ Tolmuimejat võite puhastada niiske lapiga.
Enne seinahoidiku puhastamist eemaldage
pistik pistikupesast.
Vesi ei tohi sattuda tolmuimejasse ega
seinahoidikusse. Ärge kunagi pange tolmuimejat
ega seinahoidikut vette.
EESTI90
Page 91

◗ Kui vaja,puhastage tolmukambrit, deflektorit
ja filtrit külma või leige veega.Tolmukambrit ja
deflektorit võib pesta ka nõudepesumasinas.
Ärge kunagi kasutage tolmuimejat, kui filter ja/või
tolmukamber on veel märjad.
Filtrite tellimine
Vahetage filter, kui seda ei ole võimalik enam
korralikult puhastada (tavaliselt peale 50
puhastamiskorda)
Uued (vahetus) filtrid sobivad mudelile FC8036.
Võtke ühendus Philipsi toodete müüjaga.
Juhul, kui Teil tekib probleeme filtrite või teiste
tarvikute hankimisel, pöörduge Philipsi
hoolduskeskusesse oma riigis või tutvuge infoga
garantiilehel.
Keskkonnakaitse
NiCd-/NiMH-akud võivad keskkonda kahjustada
ning kõrgel temperatuuril või tules plahvatada.
Kui Te mõnda aega ei kasuta seadet, eemaldage
akud. Ärge visake vanu akusid tavaliste
olmejäätmete hulka, vaid viige need selleks
ettenähtud kohta.Akusid võite ka viia Philips
hooldustöökotta, kus need hävitatakse keskkonda
kahjustamata.
EESTI 91
Page 92

Aku eemaldamisel seadmest peab ta olema täiesti
tühi (laenguta).
C
1 Laske seadmel töötada, kuni see seiskub,
keerake kruvid lahti ning avage tolmuimeja.
C
2 Lõigake juhtmed ükshaaval läbi ja
eemaldage aku.
◗ Kui te seadet ei kasuta pikema aja jooksul,
soovitame energia kokkuhoiu eesmärgil
eemaldada pistik seina pistikupesast.
Info&teenindus
Kui Te vajate informatsiooni või on Teil probleemid
tekkinud, külastage Philips Web lehekülge
www.philips.com või võtke ühendus teie maa
Philipsi hoolduskeskusega (lisainfot ja
telefoninumbrid leiate garantiitalongilt). Kui Teie
maal ei ole Philipsi hoolduskeskust, pöörduge
Philipsi toodete müüja poole või võtke ühendus
Philipsi koduhooldusseadmete ja isikliku hoolduse
BV teenindusosakonnaga.
EESTI92
Page 93

Svarīgi
◗ Pirms ierīces lietošanas uzmanīgi izlasiet šo
lietošanas pamācību un aplūkojiet zīmējumus.
◗ Pēc lietošanas vienmēr izslēdziet
putekļusūcēju.
◗ Neuzsūciet pelnus, kamēr tie nav atdzisuši.
◗ Neuzsūciet viegli uzliesmojošus vai kodīgus
šķidrumus.
◗ Raugieties, lai putekļusūcējā vai turētājā
neiekļūtu ūdens. Nekādā gadījumā nemērciet
putekļusūcēju vai turētāju ūdenī.
◗ Uzlādētāja kontaktdakša sasilst.Tas ir normāli.
◗ Putekļusūcēja uzlādēšanai izmantojiet tikai
komplektā esošo uzlādētāju.
◗ Nelietojiet bojātu putekļusūcēju. Ja
nepieciešams remonts, nogādājiet to Philips
pilnvarotā remontdarbnīcā.
Putekļusūcēja sagatavošana lietošanai
C
◗ Elektrovada lieko daļu satiniet un glabājiet
turētāja nodalījumā.
C
◗ Pieskrūvējiet turētāju pie sienas.
◗ Uzlādēšanas laikā putekļusūcēju un turētāju
varat novietot horizontāli uz galda.
LATVISKI 93
Page 94

C
◗ Šauro uzgali un mitru virsmu kopšanas uzgali
var iestiprināt turētājā, iespraužot tos
atbilstošajās stiprinājuma spraugās.
Putekļusūcēja uzlādēšana
1 Raugieties, lai uzlādēšanas laikā
putekļusūcēja slēdzis ir izslēgts (0).
Akumulatora uzlādēšana nenotiek, ja
slēdzis ir pārbīdīts citā pozīcijā.
2 Iespraudiet uzlādētāja kontaktdakšu
elektrotīkla kontaktligzdā.
C
3 Pēc lietošanas vienmēr novietojiet
putekļusūcēju atpakaļ turētājā.
C
◗ Iedegsies signāllampiņa, norādot,ka ierīce tiek
uzlādēta.
Signāllampiņa spīd visu laiku, kamēr ierīce ir
novietota turētājā un kontaktdakša iesprausta
sienas kontaktligzdā.
Signāllampiņa neinformē par iebūvētaj
akumulatorā atlikušo enerģijas daudzumu.
Pirms pirmās lietošanas uzlādējiet ierīci vismaz 16
stundas.
Atkārtota uzlādēšana nepieciešama, līdzko
pamanāt, ka samazinājusies motora jauda.
4 Elektrovada kontaktdakšu atstājiet
iespraustu sienas kontaktligzdā.Vienmēr
LATVISKI94
Page 95

novietojiet putekļusūcēju atpakaļ turētājā
(arī tad, ja akumulators ir pilnīgi uzlādēts).
Putekļsūcēja lietošana
1 Pirms ierīces lietošanas pārliecinieties, ka
aizsargs un filtrs ir ievietoti putekļu
nodalījumā.
Aizsargs un filtrs
C
1 Piespiediet slēdzi un atveriet
putekļusūcēju.
C
2 Ievietojiet aizsargu un filtru putekļu
nodalījumā.
C
3 Iestipriniet filtru putekļu nodalījumā.
4 Aizveriet putekļusūcēju.
C
2 Parastai uzkopšanai pārbīdiet slēdzi I
pozīcijā. Lai palielinātu uzsūkšanas jaudu,
pārbīdiet slēdzi II pozīcijā.
LATVISKI 95
Page 96

Šķidrumu uzsūkšana
C
1 Piestipriniet mitru virsmu kopšanas uzgali
putekļu nodalījumam.
C
2 Pārtrauciet šķidrumu uzsūkšanu, ja
šķidruma līmenis putekļu nodalījumā ir
sasniedzis maksimālā līmeņa atzīmi.
C
3 Uzsūcot šķidrumu, turiet ierīci ar putekļu
nodalījumu ieslīpi uz leju. Pārliecinieties,ka
mitrās uzkopšanas uzgalis skar tīrāmo
virsmu. Nonolieciet ierīci slīpi uz sāniem.
C
4 Nenovietojiet ierīci ar putekļu nodalījumu
uz augšu, jo šķidrums var ieplūst ierīcē un
to sabojāt.
5 Katru reizi pēc šķidruma uzsūkšanas
iztukšojiet putekļu nodalījumu.
Putekļsūcēja daļu savienošana
C
1 Izmantojiet šauro uzgali grūti pieejamu
vietu tīrīšanai.
Neizmantojiet šauro uzgali šķidrumu uzsūkšanai.
LATVISKI96
Page 97

Putekļu nodalījuma iztukšošana
C
1 Turot ierīci virs atkritumu tvertnes,
piespiediet podziņu un atveriet
putekļusūcēju.
C
2 Izņemiet filtru un aizsargu no putekļu
nodalījuma.
3 Iztīriet filtru un iztukšojiet putekļu
nodalījumu.
◗ Ja filtrs ir ļoti netīrs, iztīriet to ar birsti vai
parastu putekļusūcēju.
Filtra maiņa
C
1 Noņemiet aizsargu un filtra rāmīti no
putekļu nodalījuma.
C
2 Atdaliet filtru no aizsarga.
LATVISKI 97
Page 98

C
3 Viegli pagrieziet filtru pulksteņrādītāja
kustības virzienā, lai izņemtu to no rāmīša.
C
4 Noņemiet veco filtru un tā vietā ielieciet
jaunu.
C
5 Iebīdiet filtra galu uz iekšu.
C
6 Ievietojiet filtru un aizsargu putekļu
nodalījumā.
Ierīces tīrīšana
◗ Putekļusūcēja tīrīšanai varat izmantot mitru
drānu. Pirms turētāja tīrīšanas izvelciet
kontaktdakšu no elektrotīkla kontaktligzdas.
Raugieties, lai putekļusūcējā vai turētājā neiekļūtu
ūdens. Nekādā gadījumā nemērciet putekļusūcēju
vai turētāju ūdenī.
LATVISKI98
Page 99

◗ Ja nepieciešams, putekļu nodalījumu,aizsargu
un filtru mazgājiet vēsā vai remdenā ūdenī.
Putekļu nodalījumu un aizsargu var mazgāt
trauku mazgājamajā mašīnā.
Nekādā gadījumā neizmantojiet putekļusūcēju, ja
filtrs un/vai putekļu nodalījums ir mitrs.
Jaunu filtru iegāde
Nomainiet filtru, ja to vairs nevar pilnīgi iztīrīt
(parasti tas notiek pēc 50 tīrīšanas reizēm).
Jaunu filtru modeļa numurs ir FC8036, un tos var
iegādāties no Philips produkcijas izplatītājiem.
Ja sastopaties ar grūtībām filtru vai citu piederumu
iegādē, lūdzu, sazinieties ar Philips Pakalpojumu
centru jūsu valstī vai meklējiet informāciju pasaules
garantijas kartē.
Vides aizsardzība
NiCd/NiMH akumulators ir kaitīgs apkārtējai videi
Nokļūstot karstumā vai uguns tuvumā, tas var
eksplodēt.
Pirms ierīces izmešanas izņemiet akumulatoru.
Neizmetiet to kopā ar parastajiem saimniecības
atkritumiem, bet gan tam paredzētā vietā. Jūs varat
nogādāt akumulatoru arī Philips pilnvarotā
remontdarbnīcā, kur to likvidēs videi nekaitīgā
veidā.
LATVISKI 99
Page 100

Izņemiet akumulatoru tikai tad, kad tas ir pilnīgi
tukšs.
C
1 Darbiniet ierīci, līdz tā beidz darboties,
atskrūvējiet un atveriet tās korpusu.
C
2 Pārgrieziet savienojuma vadus vienu pēc
otra un izņemiet akumulatoru.
◗ Ja ilgāku laiku nelietosiet putekļusūcēju, mēs
iesakām izvilkt uzlādētāja kontaktspraudni no
sienas kontaktligzdas, lai ietaupītu
elektroenerģiju.
Informācija un apkalpošana
Ja jums nepieciešama palīdzība vai informācija,
lūdzu izmantojiet Philips mājas lapu internetā
www.philips.com vai sazinieties ar Philips
Pakalpojumu centru savā valstī (tā tālruņa numurs
atrodams pasaules garantijas kartē). Ja jūsu valstī
nav Philips Pakalpojumu centra, lūdziet palīdzību
Philips produkcijas izplatītājiem vai Philips
Mājturības un personīgās hiegiēnas ierīču nodaļas
pakalpojumu dienestam.
LATVISKI100
 Loading...