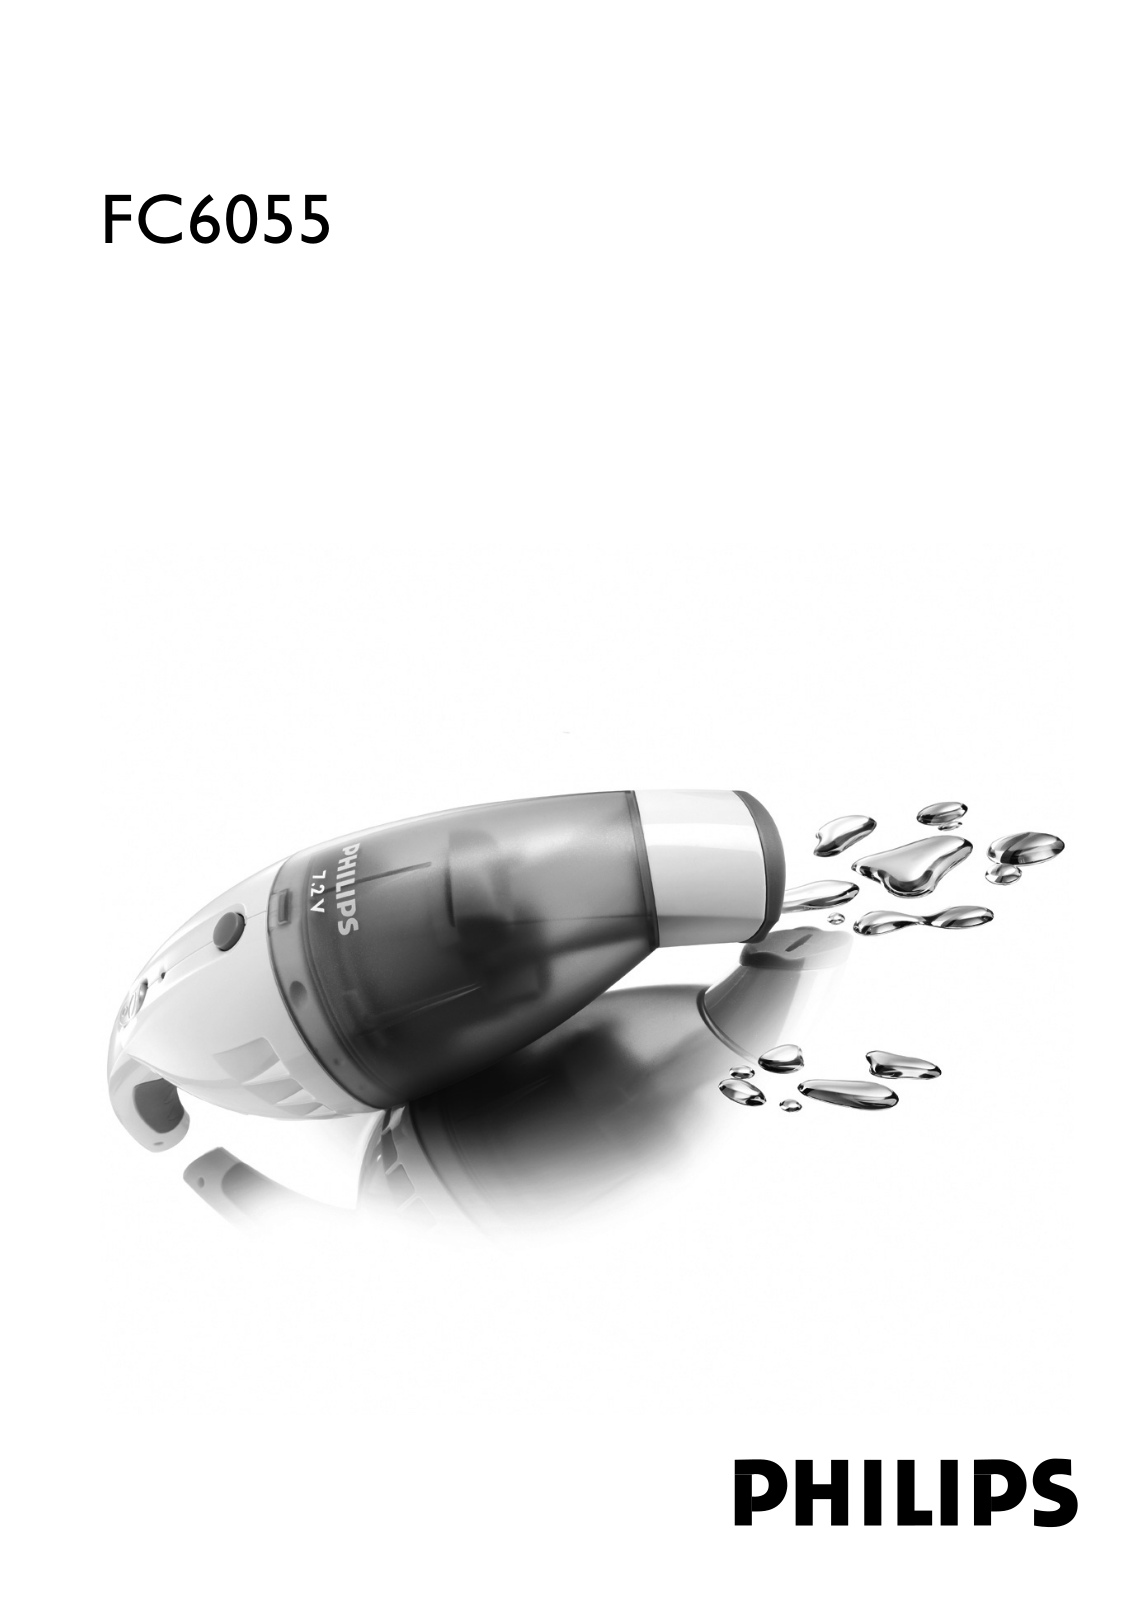
PHILIPS FC6055 Mini User Manual

0 (0)

FC6055

2

PHILIPS FC6055 Mini User Manual

3

1

4

ENGLISH 6

DEUTSCH 15

FRANCAIS 24

NEDERLANDS 33

ESPAÑOL 42

ITALIANO 51

PORTUGUÊS 60

NORSK 69

SVENSKA 77

SUOMI 85

DANSK 93

101

TÜRKÇE 112

FC6055

6 ENGLISH

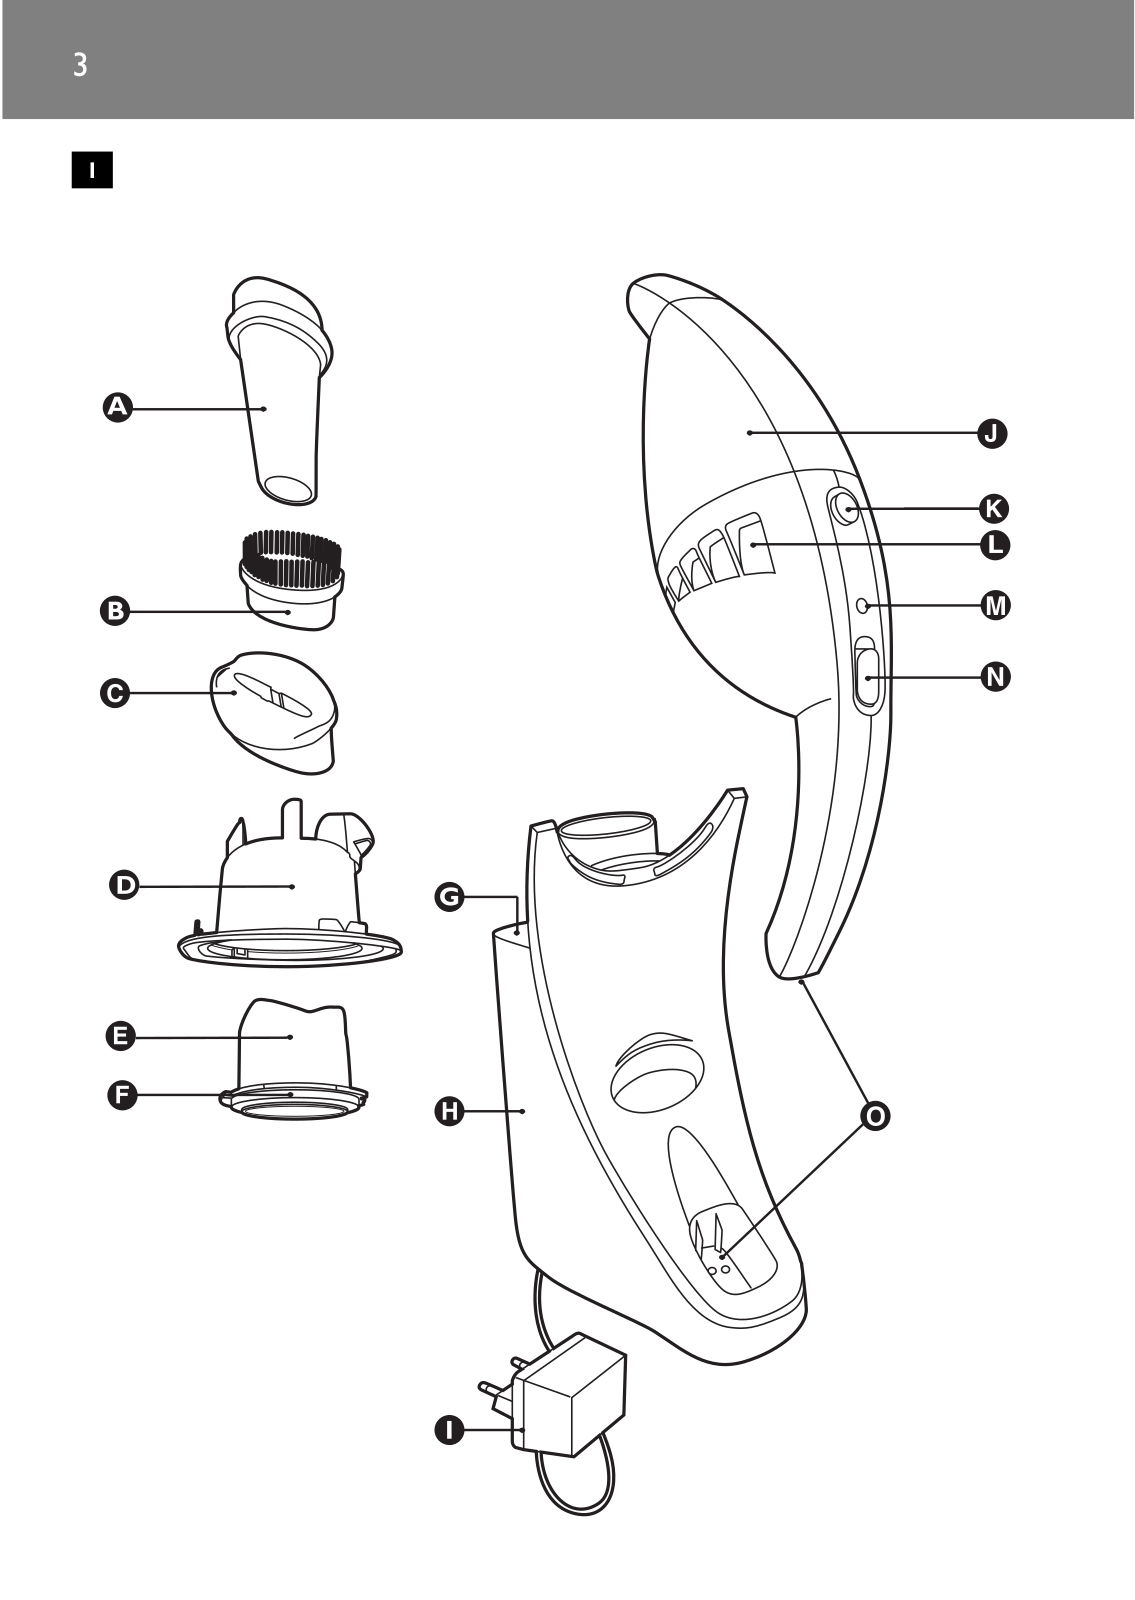
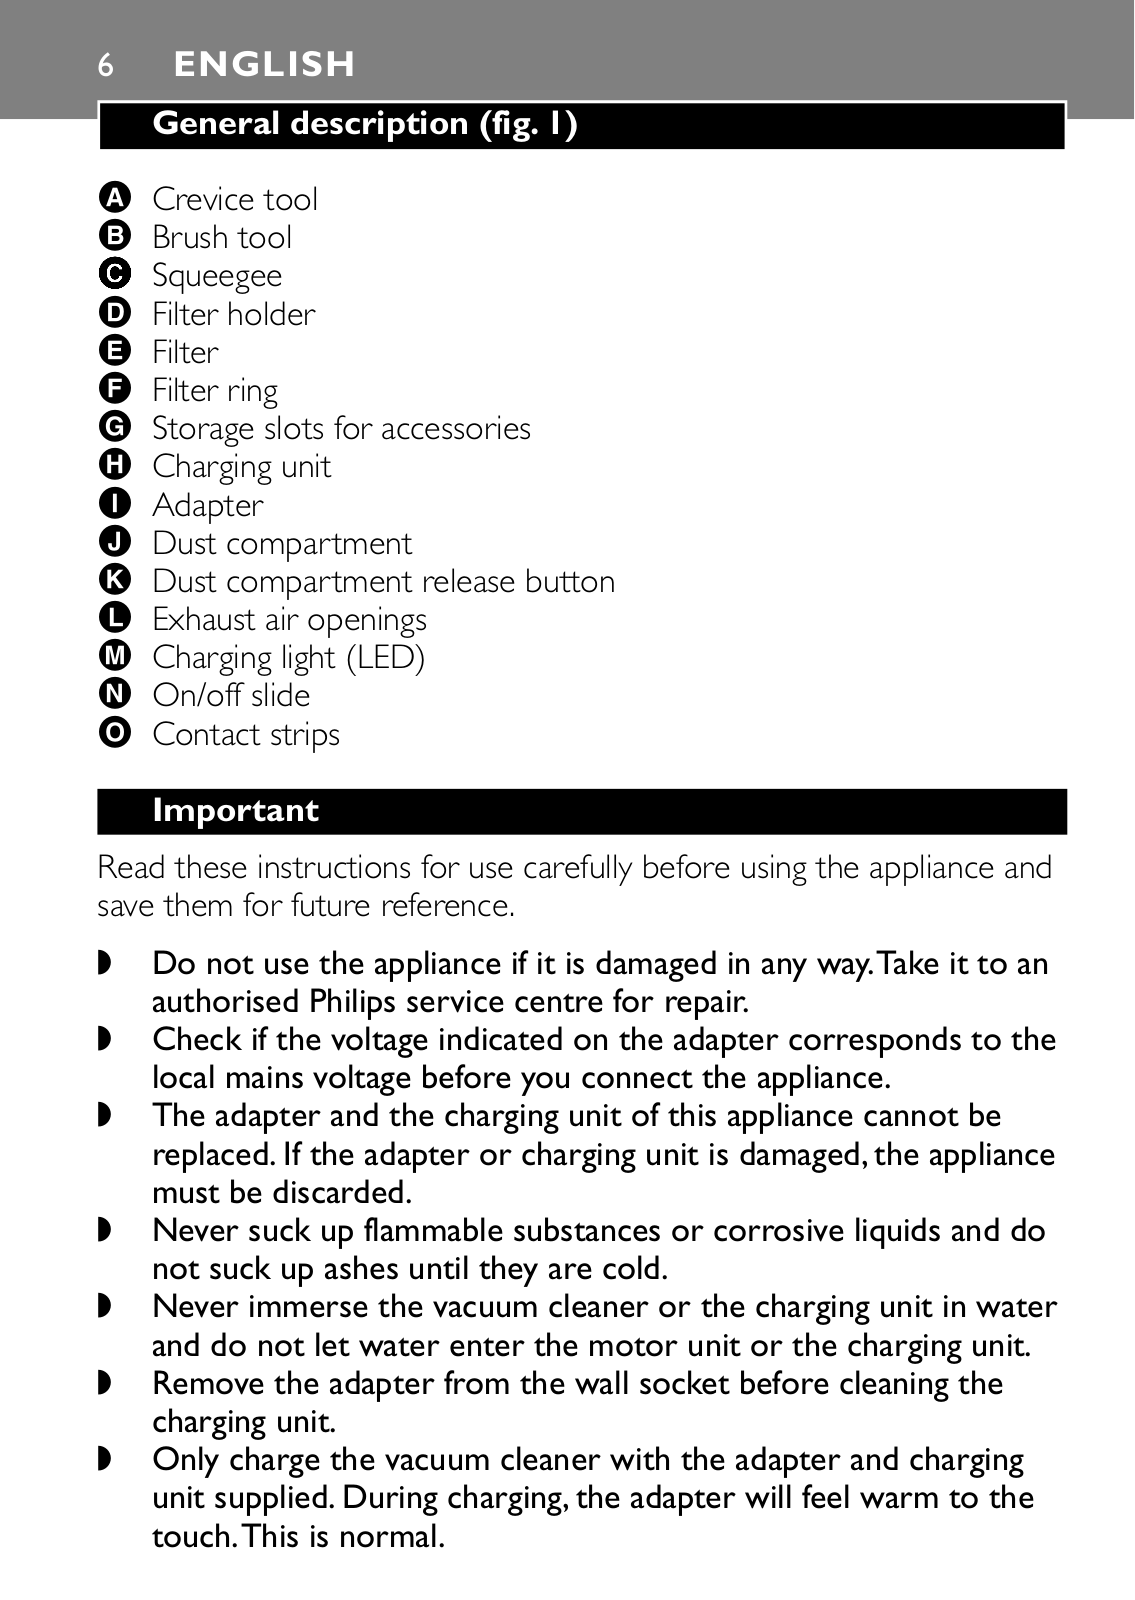
General description (fig. 1)

A Crevice tool

B Brush tool

C Squeegee

D Filter holder

E Filter

F Filter ring

G Storage slots for accessories

H Charging unit

I Adapter

J Dust compartment

K Dust compartment release button

L Exhaust air openings

M Charging light (LED)

N On/off slide

O Contact strips

Important

Read these instructions for use carefully before using the appliance and save them for future reference.

Do not use the appliance if it is damaged in any way.Take it to an authorised Philips service centre for repair.

Check if the voltage indicated on the adapter corresponds to the local mains voltage before you connect the appliance.

The adapter and the charging unit of this appliance cannot be replaced. If the adapter or charging unit is damaged, the appliance must be discarded.

Never suck up flammable substances or corrosive liquids and do not suck up ashes until they are cold.

Never immerse the vacuum cleaner or the charging unit in water and do not let water enter the motor unit or the charging unit.

Remove the adapter from the wall socket before cleaning the charging unit.

Only charge the vacuum cleaner with the adapter and charging unit supplied. During charging, the adapter will feel warm to the touch.This is normal.

ENGLISH 7

Do not hold the appliance with the dust compartment pointing upwards and do not tilt the appliance to one side when sucking up liquids.

Always switch the vacuum cleaner off after use.

Keep the appliance out of the reach of children.

The voltage on the contact strips in the charging unit is low (max. 12 volts) and therefore not dangerous.

Never block the exhaust air openings during vacuuming.

Switch the appliance off when recharging it.

When the appliance has been used to suck up liquids, empty and dry the dust compartment before storing the appliance in the charging unit.

To avoid the risk of electric shock, be careful when drilling holes in the wall to attach the charging unit, especially close to a wall socket.

Preparing for use Installing the charging unit

1You can attach the charging unit to the wall as indicated in the figure (fig. 2).

If you attach the charging unit to the wall, the space between the screw holes should be 70 mm.

2You can also place the charging unit on a horizontal surface (e.g. a table or desk) (fig. 3).

3Excess mains cord can be wound round the charging unit (fig. 4).

Charging the appliance

Charge the appliance for at least 16 hours before you use it for the first time.

1Insert the adapter into the wall socket.

2Place the vacuum cleaner on the charging unit (fig. 5).

8 ENGLISH

The charging light will go on to indicate that the appliance is charging (fig. 6).

BThe charging light will stay on as long as the appliance is connected to the charging unit and the adapter is in the wall socket.

BThe charging light does not give any information about the charge level of the built-in batteries.

Using the appliance

1Push the on/off slide forwards to switch the appliance on (fig. 7).

2Push the on/off slide backwards to switch the appliance off (fig. 8).

3Leave the adapter in the wall socket and always put the vacuum cleaner back onto the charging unit immediately after use, even if the batteries are still almost fully charged.

Brush, crevice tool and squeegee

This appliance comes with three accessories:

-a brush tool to clean delicate surfaces;

-a crevice tool to clean hard-to-reach places;

-a squeegee to suck up liquids.

1Take the accessory you want to use from the charging unit.

2Attach the accessory to the nozzle of the appliance (fig. 9).

When sucking up liquids, hold the appliance with the nozzle pointing downwards at an angle of 30c. Make sure the squeegee touches the surface to be cleaned. Do not tilt the appliance to one side.

Stop sucking up liquids when the liquid level inside the dust compartment has reached the maximum indication line.

Never hold the appliance with the on/off slide pointing downwards when the dust compartment is filled with liquid (fig. 10).

ENGLISH 9

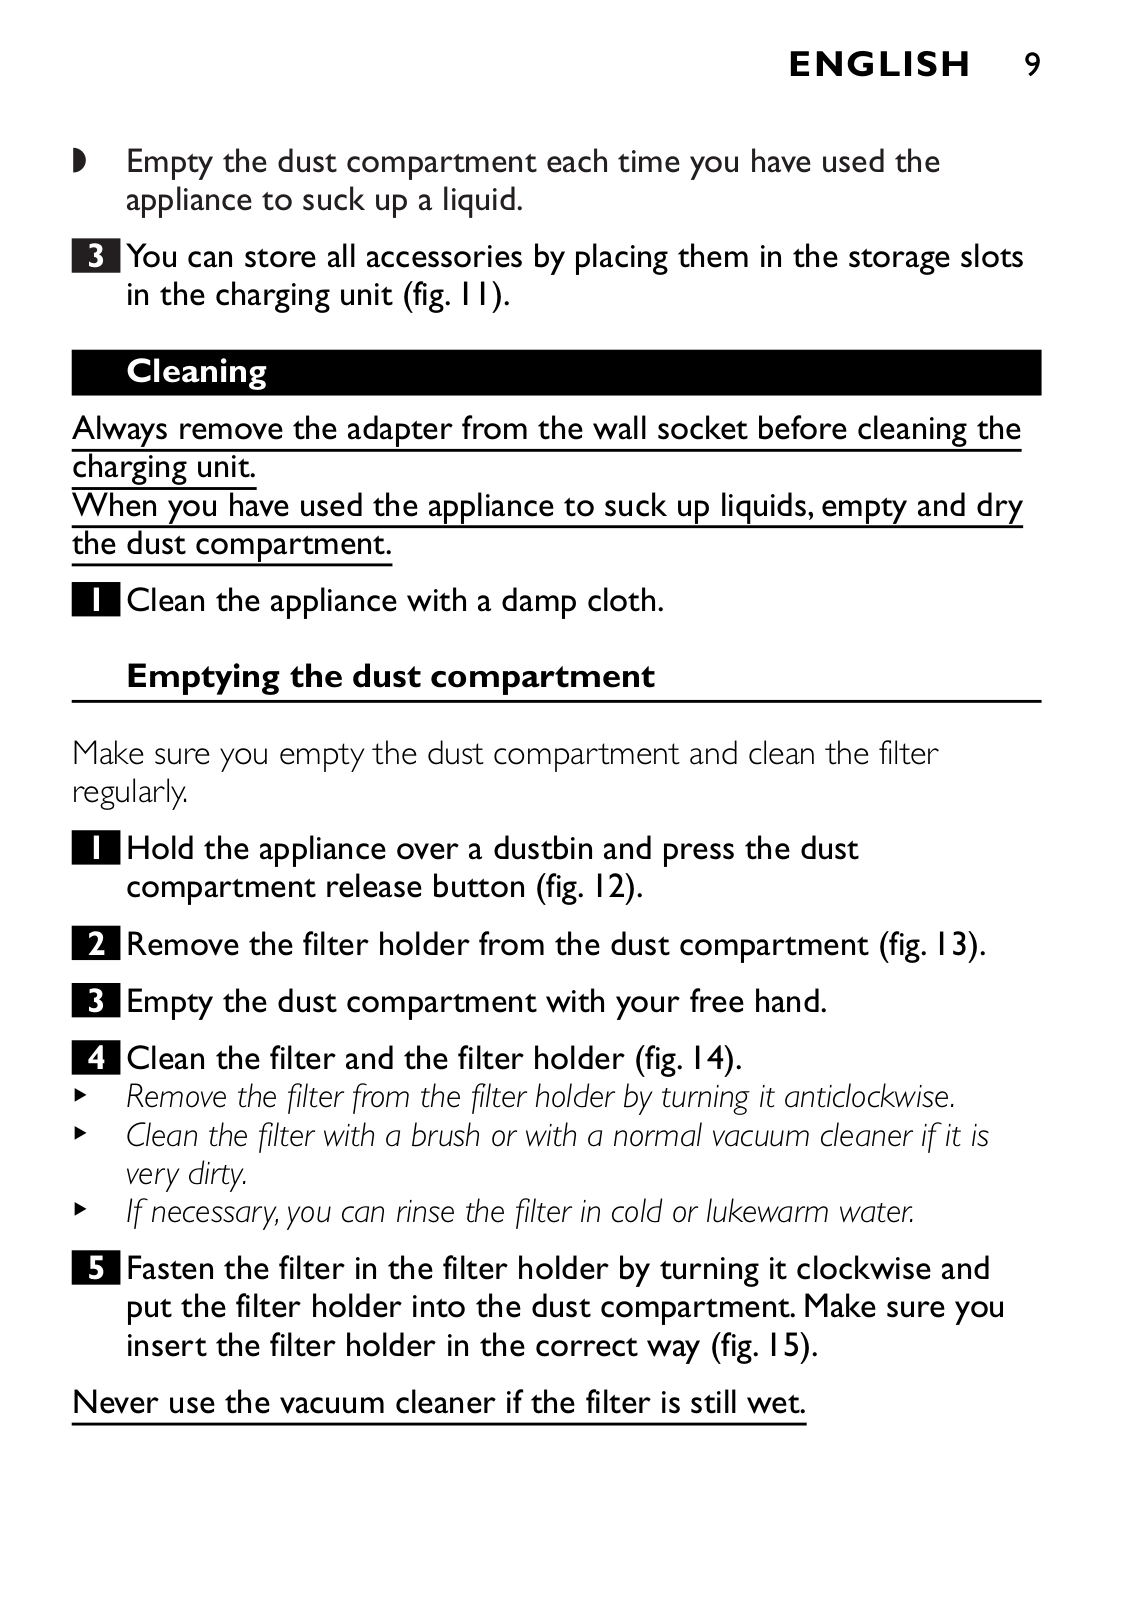
Empty the dust compartment each time you have used the appliance to suck up a liquid.

3You can store all accessories by placing them in the storage slots in the charging unit (fig. 11).

Cleaning

Always remove the adapter from the wall socket before cleaning the charging unit.

When you have used the appliance to suck up liquids, empty and dry the dust compartment.

1Clean the appliance with a damp cloth.

Emptying the dust compartment

Make sure you empty the dust compartment and clean the filter regularly.

1Hold the appliance over a dustbin and press the dust compartment release button (fig. 12).

2Remove the filter holder from the dust compartment (fig. 13).

3Empty the dust compartment with your free hand.

4Clean the filter and the filter holder (fig. 14).

B

Remove the filter from the filter holder by turning it anticlockwise.


BClean the filter with a brush or with a normal vacuum cleaner if it is very dirty.

B

If necessary, you can rinse the filter in cold or lukewarm water.


5Fasten the filter in the filter holder by turning it clockwise and put the filter holder into the dust compartment. Make sure you insert the filter holder in the correct way (fig. 15).

Never use the vacuum cleaner if the filter is still wet.

10 ENGLISH

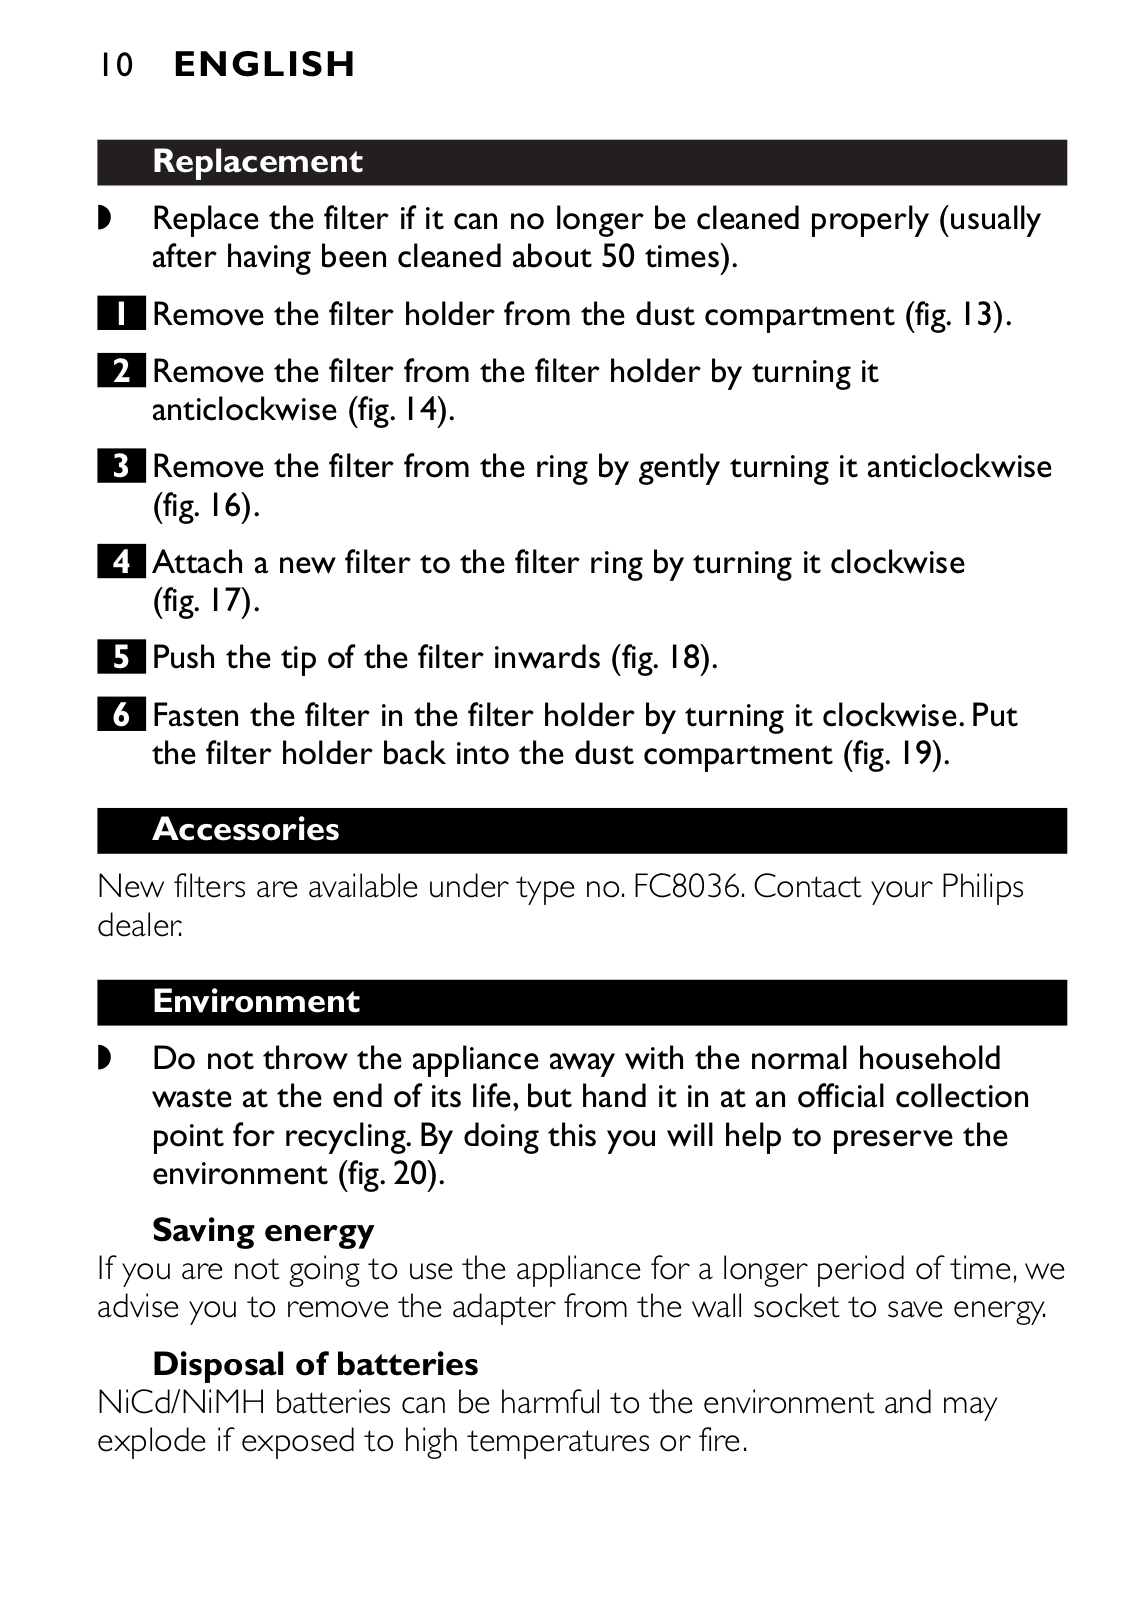
Replacement

Replace the filter if it can no longer be cleaned properly (usually after having been cleaned about 50 times).

1Remove the filter holder from the dust compartment (fig. 13).

2Remove the filter from the filter holder by turning it anticlockwise (fig. 14).

3Remove the filter from the ring by gently turning it anticlockwise (fig. 16).

4Attach a new filter to the filter ring by turning it clockwise (fig. 17).

5Push the tip of the filter inwards (fig. 18).

6Fasten the filter in the filter holder by turning it clockwise. Put the filter holder back into the dust compartment (fig. 19).

Accessories

New filters are available under type no. FC8036. Contact your Philips dealer.

Environment

Do not throw the appliance away with the normal household waste at the end of its life, but hand it in at an official collection point for recycling. By doing this you will help to preserve the environment (fig. 20).

Saving energy

If you are not going to use the appliance for a longer period of time, we advise you to remove the adapter from the wall socket to save energy.

Disposal of batteries

NiCd/NiMH batteries can be harmful to the environment and may explode if exposed to high temperatures or fire.

ENGLISH 11

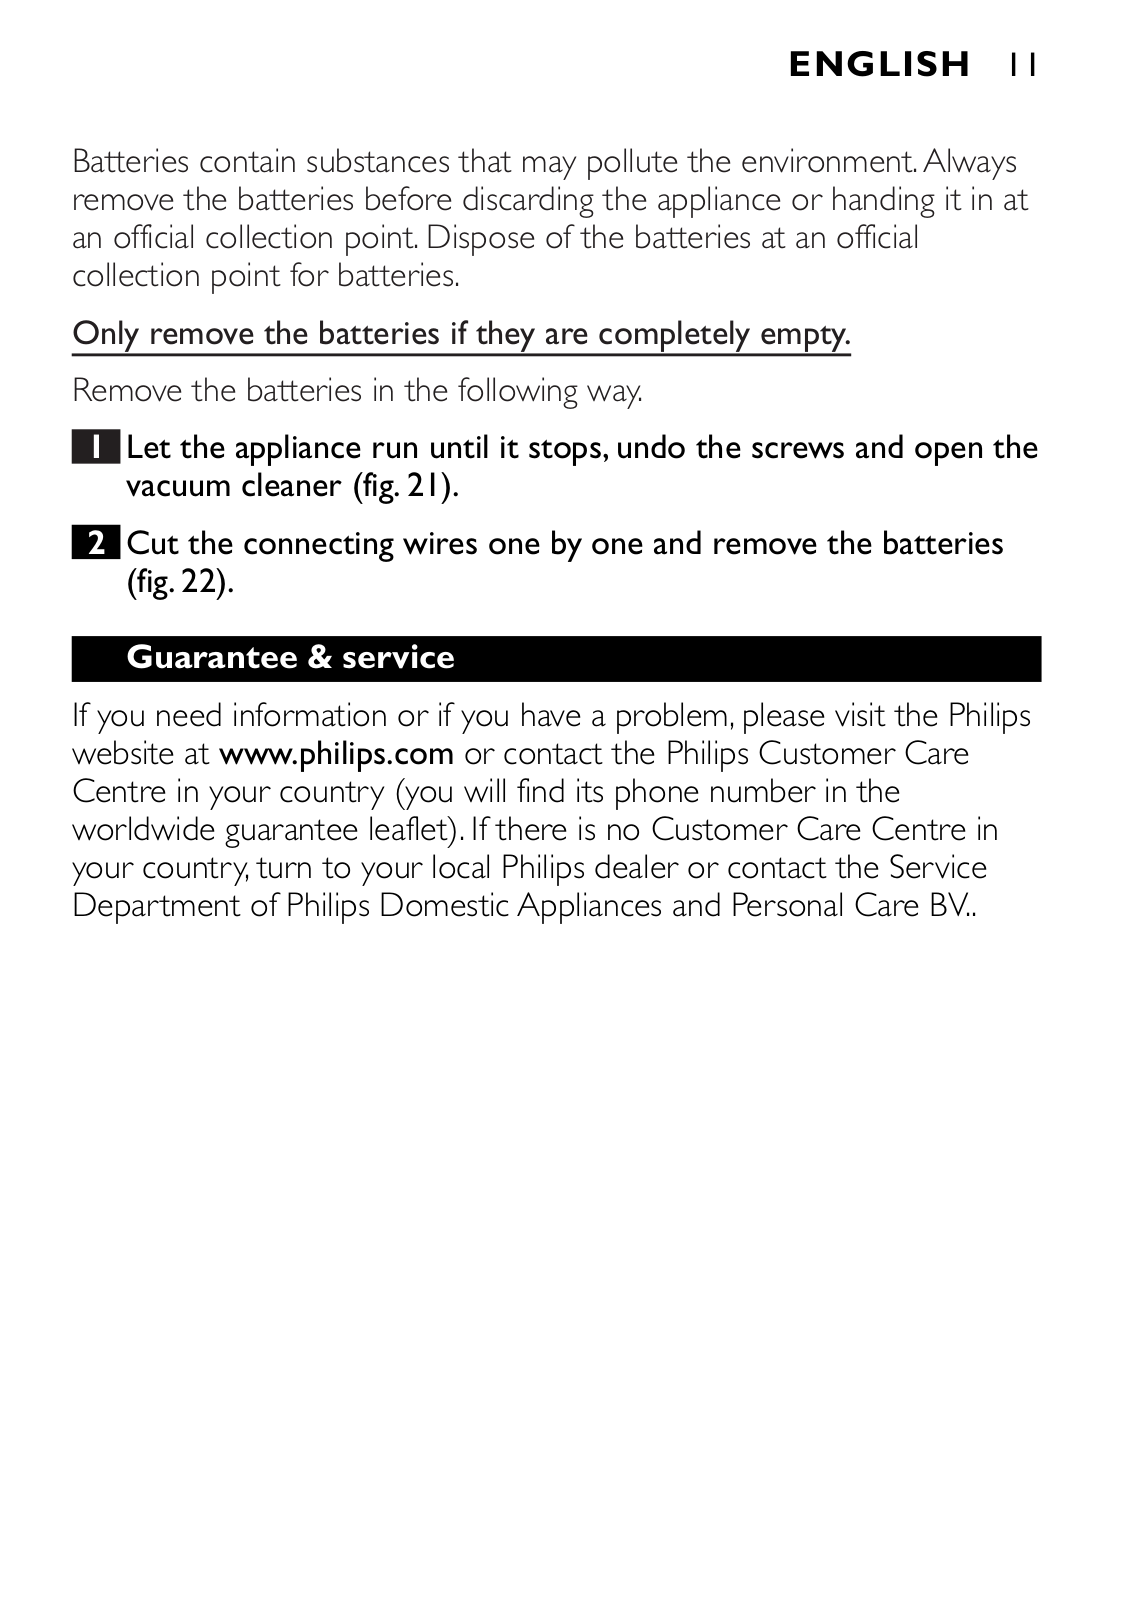
Batteries contain substances that may pollute the environment. Always remove the batteries before discarding the appliance or handing it in at an official collection point. Dispose of the batteries at an official collection point for batteries.

Only remove the batteries if they are completely empty.

Remove the batteries in the following way.

1Let the appliance run until it stops, undo the screws and open the vacuum cleaner (fig. 21).

2Cut the connecting wires one by one and remove the batteries (fig. 22).

Guarantee & service

If you need information or if you have a problem, please visit the Philips website at www.philips.com or contact the Philips Customer Care Centre in your country (you will find its phone number in the worldwide guarantee leaflet). If there is no Customer Care Centre in your country, turn to your local Philips dealer or contact the Service Department of Philips Domestic Appliances and Personal Care BV..

12 ENGLISH

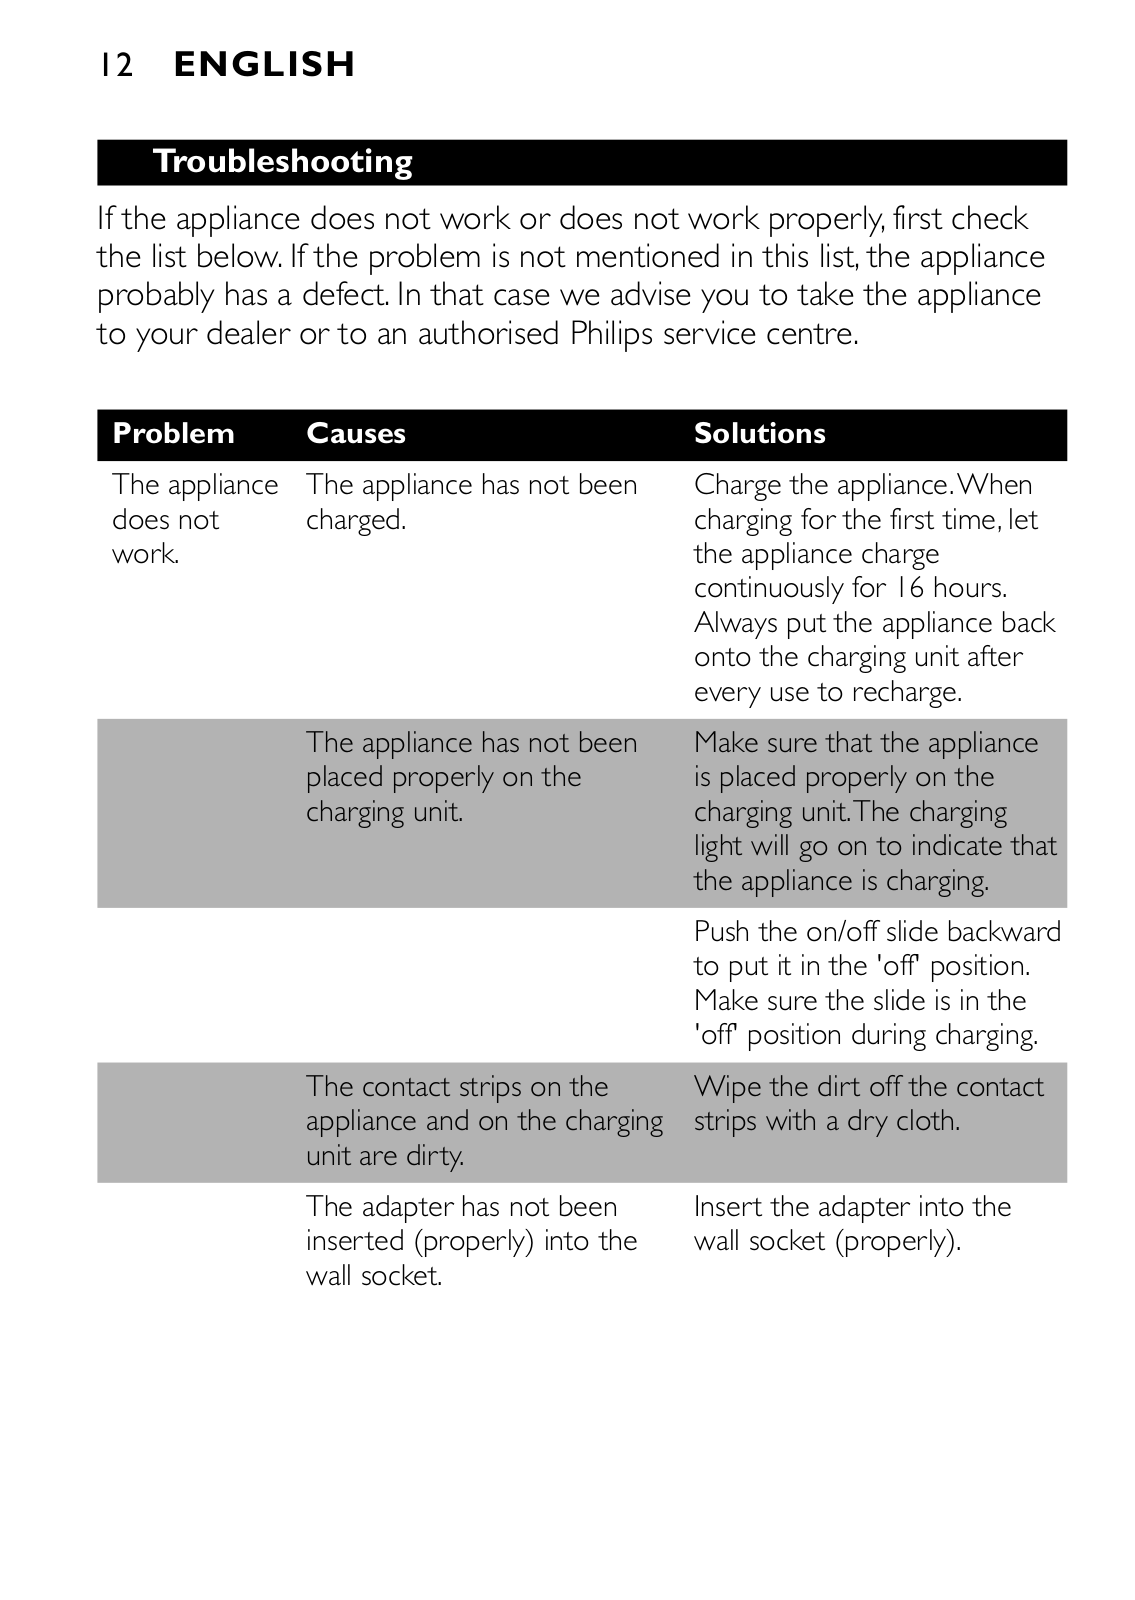
Troubleshooting

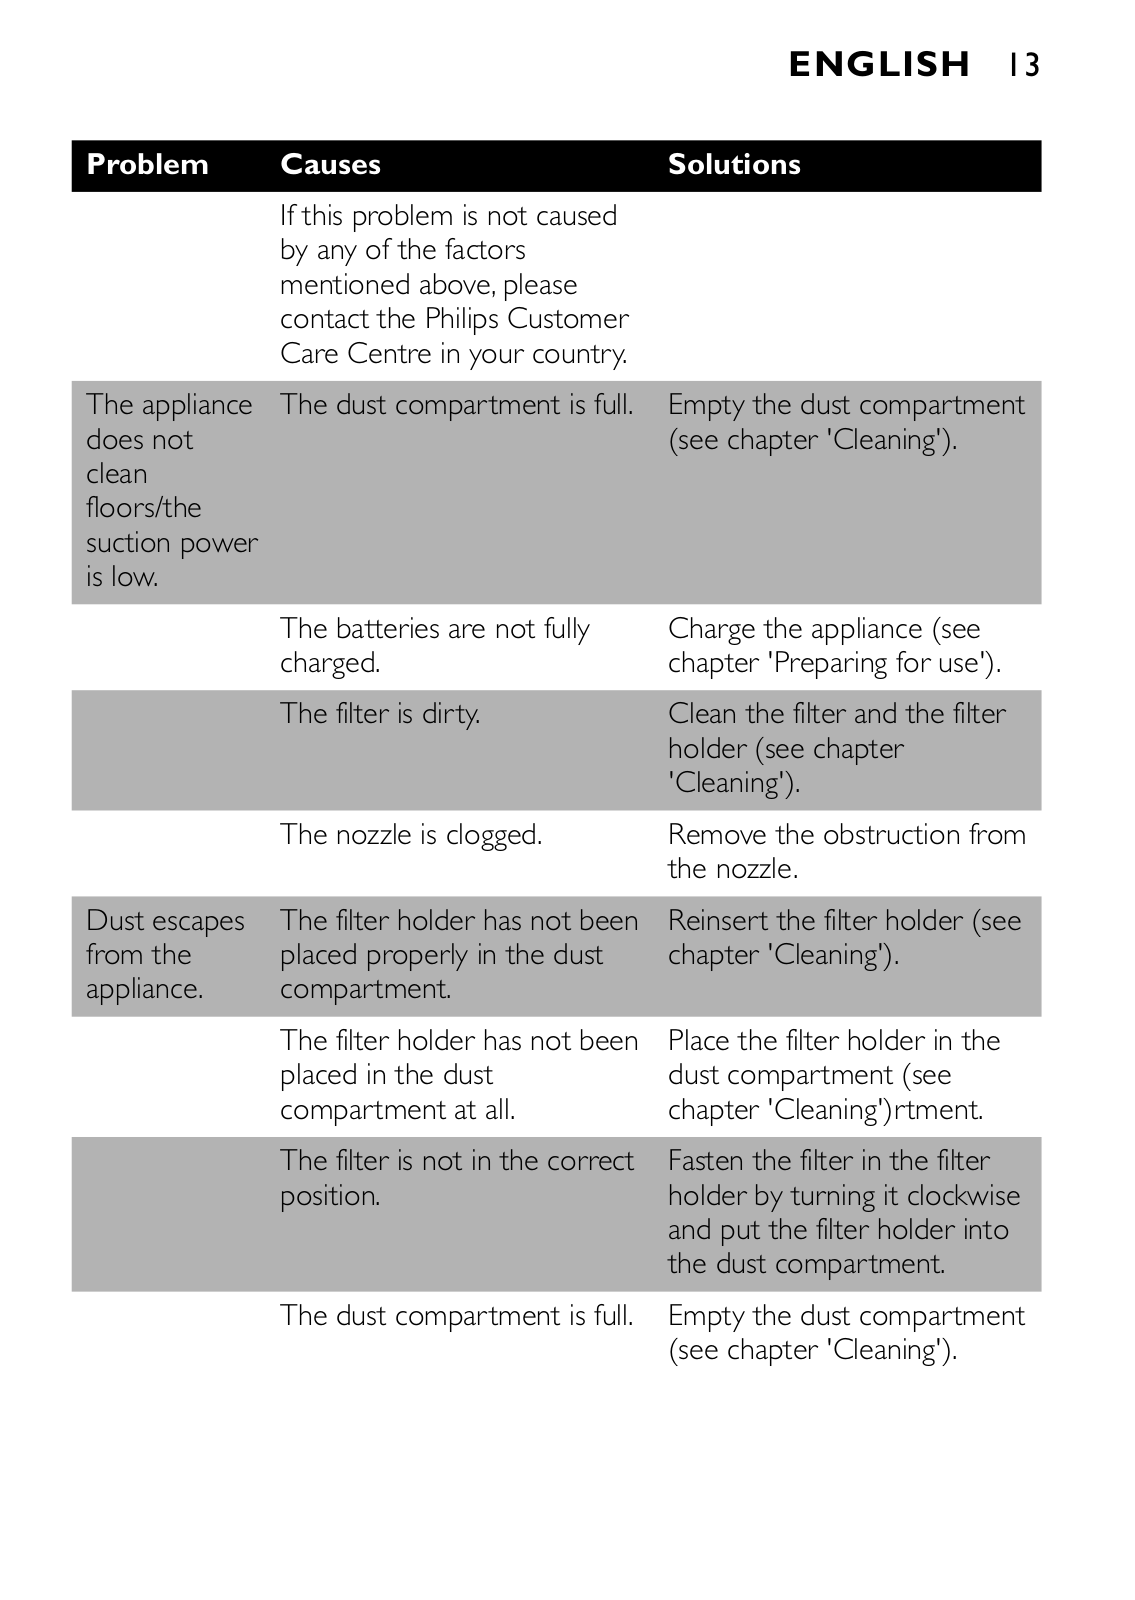
If the appliance does not work or does not work properly, first check the list below. If the problem is not mentioned in this list, the appliance probably has a defect. In that case we advise you to take the appliance to your dealer or to an authorised Philips service centre.

Problem

Causes

Solutions


The appliance

The appliance has not been

does not

charged.

work.


Charge the appliance.When charging for the first time, let the appliance charge continuously for 16 hours. Always put the appliance back onto the charging unit after every use to recharge.

The appliance has not been

Make sure that the appliance

placed properly on the

is placed properly on the

charging unit.

charging unit.The charging


light will go on to indicate that


the appliance is charging.


Push the on/off slide backward


to put it in the 'off' position.


Make sure the slide is in the


'off' position during charging.


The contact strips on the

Wipe the dirt off the contact

appliance and on the charging

strips with a dry cloth.

unit are dirty.


The adapter has not been inserted (properly) into the wall socket.

Insert the adapter into the wall socket (properly).


ENGLISH 13


Problem

Causes

Solutions


If this problem is not caused


by any of the factors


mentioned above, please


contact the Philips Customer


Care Centre in your country.


The appliance

The dust compartment is full.

Empty the dust compartment

does not


(see chapter 'Cleaning').

clean


floors/the


suction power


is low.


The batteries are not fully

Charge the appliance (see


charged.

chapter 'Preparing for use').


The filter is dirty.

Clean the filter and the filter


holder (see chapter


'Cleaning').


The nozzle is clogged.

Remove the obstruction from


the nozzle.


Dust escapes

The filter holder has not been

Reinsert the filter holder (see

from the

placed properly in the dust

chapter 'Cleaning').

appliance.

compartment.


The filter holder has not been placed in the dust compartment at all.

The filter is not in the correct position.

Place the filter holder in the dust compartment (see chapter 'Cleaning')rtment.

Fasten the filter in the filter holder by turning it clockwise and put the filter holder into the dust compartment.

The dust compartment is full. Empty the dust compartment (see chapter 'Cleaning').

14 ENGLISH

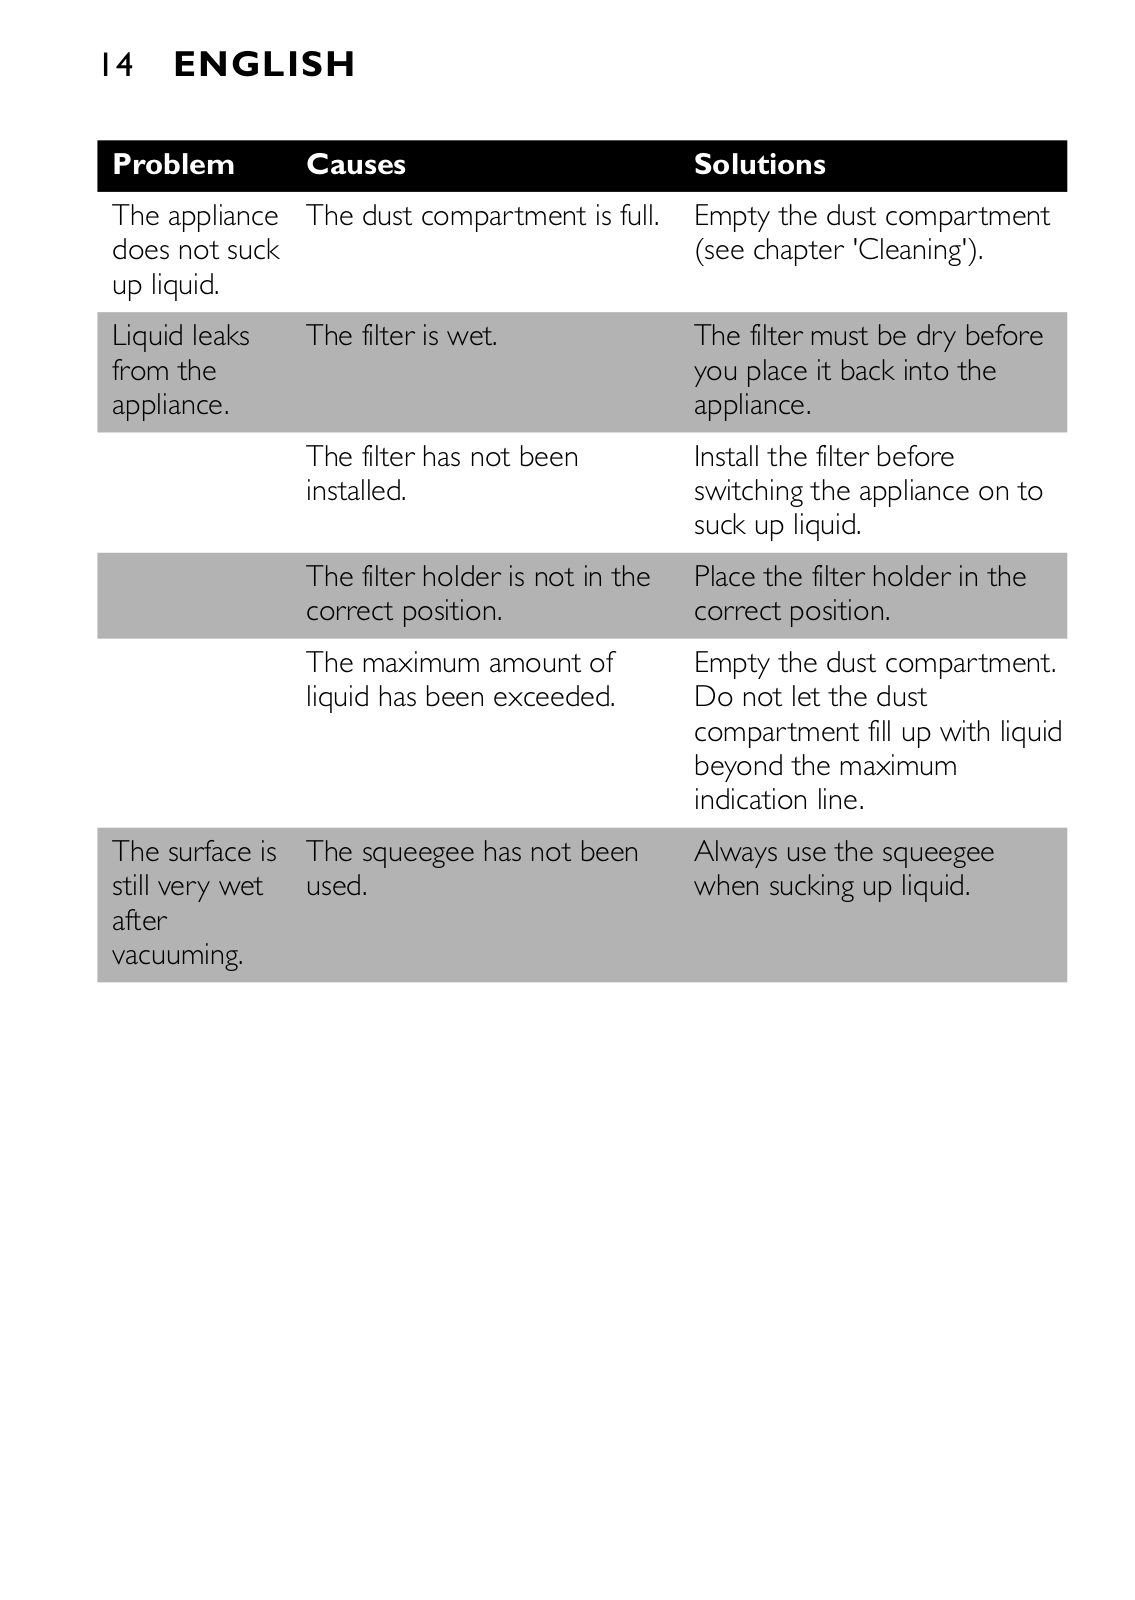
Problem

Causes

Solutions

The appliance

The dust compartment is full.

Empty the dust compartment

does not suck


(see chapter 'Cleaning').

up liquid.


Liquid leaks

The filter is wet.

The filter must be dry before

from the


you place it back into the

appliance.


appliance.


The filter has not been installed.

Install the filter before switching the appliance on to suck up liquid.


The filter holder is not in the

Place the filter holder in the


correct position.

correct position.


The maximum amount of

Empty the dust compartment.


liquid has been exceeded.

Do not let the dust


compartment fill up with liquid


beyond the maximum


indication line.


The surface is

The squeegee has not been

Always use the squeegee

still very wet

used.

when sucking up liquid.

after


vacuuming.


DEUTSCH 15

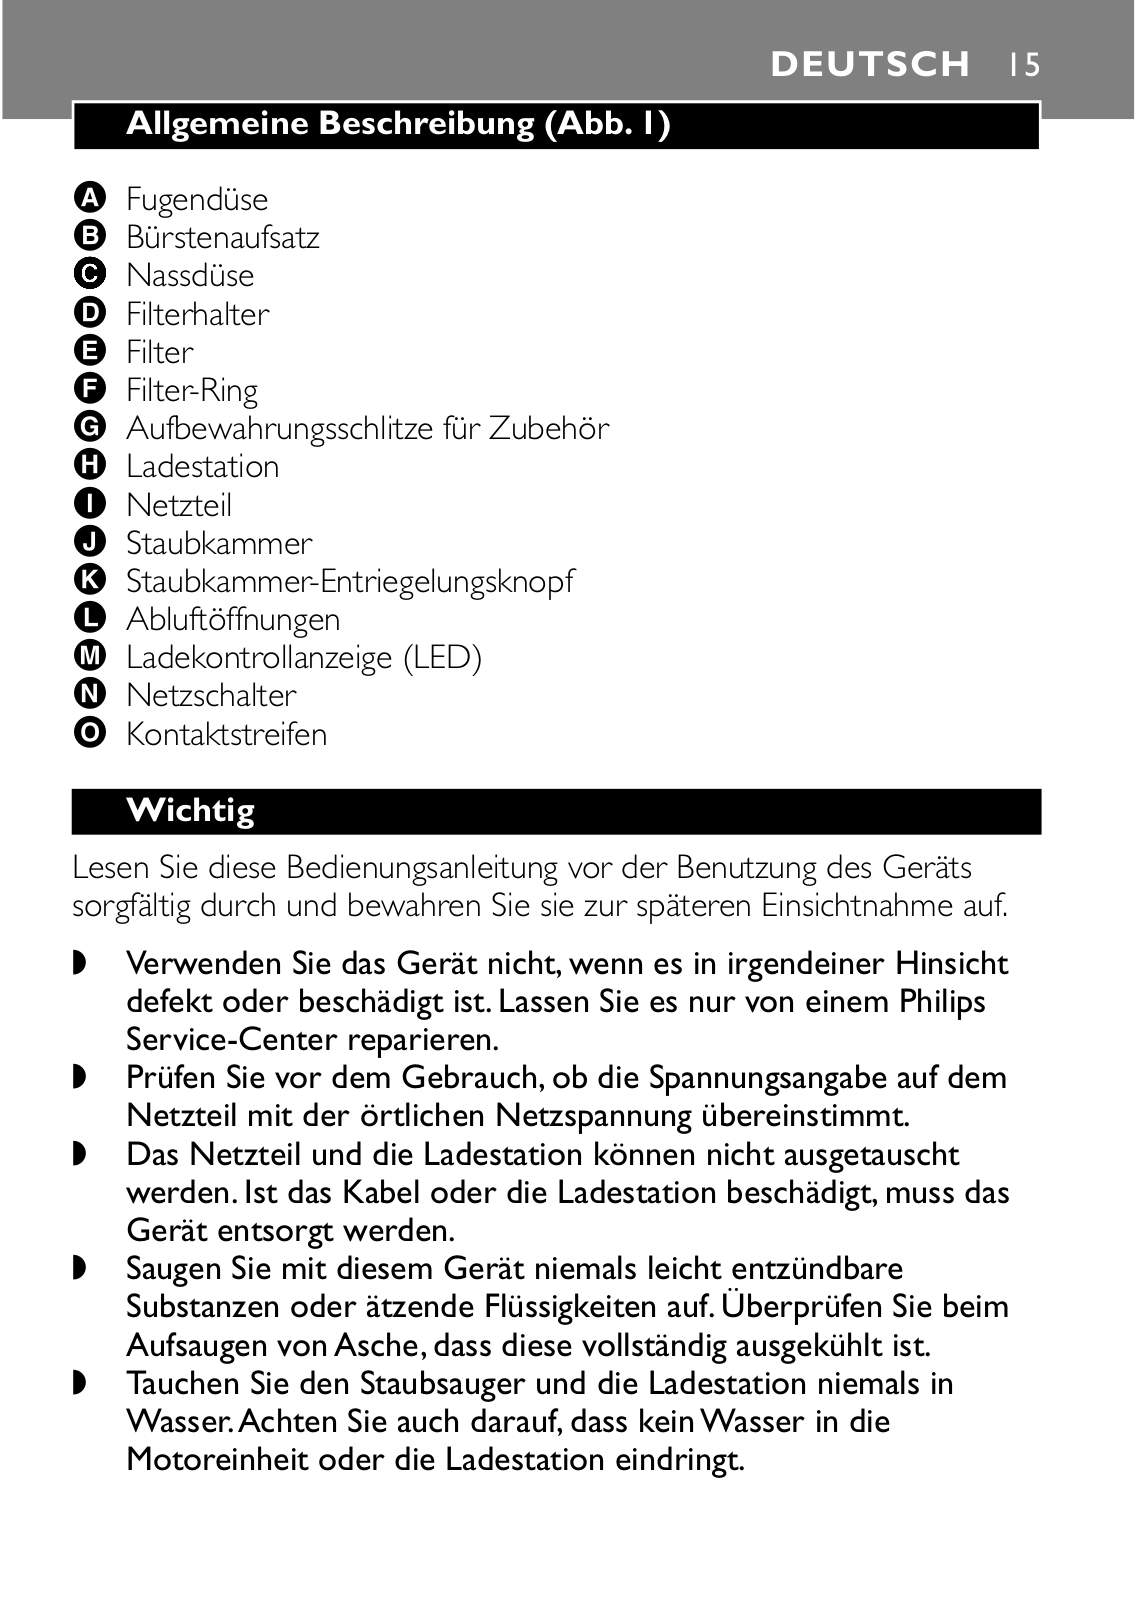
Allgemeine Beschreibung (Abb. 1)

A Fugendüse

B Bürstenaufsatz

C Nassdüse

D Filterhalter

E Filter

F Filter-Ring

G Aufbewahrungsschlitze für Zubehör

H Ladestation

I Netzteil

J Staubkammer

K Staubkammer-Entriegelungsknopf

L Abluftöffnungen

M Ladekontrollanzeige (LED)

N Netzschalter

O Kontaktstreifen

Wichtig

Lesen Sie diese Bedienungsanleitung vor der Benutzung des Geräts sorgfältig durch und bewahren Sie sie zur späteren Einsichtnahme auf.

Verwenden Sie das Gerät nicht, wenn es in irgendeiner Hinsicht defekt oder beschädigt ist. Lassen Sie es nur von einem Philips Service-Center reparieren.

Prüfen Sie vor dem Gebrauch, ob die Spannungsangabe auf dem Netzteil mit der örtlichen Netzspannung übereinstimmt.

Das Netzteil und die Ladestation können nicht ausgetauscht werden. Ist das Kabel oder die Ladestation beschädigt, muss das Gerät entsorgt werden.

Saugen Sie mit diesem Gerät niemals leicht entzündbare Substanzen oder ätzende Flüssigkeiten auf. Überprüfen Sie beim Aufsaugen von Asche, dass diese vollständig ausgekühlt ist.

Tauchen Sie den Staubsauger und die Ladestation niemals in Wasser.Achten Sie auch darauf, dass kein Wasser in die Motoreinheit oder die Ladestation eindringt.

16 DEUTSCH

Ziehen Sie das Netzteil aus der Steckdose, bevor Sie die Ladestation reinigen.

Laden Sie den Akkusauger nur mit dem mitgelieferten Netzteil und der mitgelieferten Ladestation auf.Während des Aufladens fühlt sich das Netzteil warm an. Das ist ganz normal.

Wenn Sie Flüssigkeiten aufsaugen, dann halten Sie das Gerät niemals so, dass die Staubkammer nach oben zeigt; kippen Sie es auch nicht auf die Seite.

Schalten Sie den Staubsauger nach jedem Gebrauch aus.

Halten Sie das Gerät außer Reichweite von Kindern.

Die Stromspannung an den Kontaktstreifen in der Ladestation ist

sehr gering (maximal 12 Volt) und daher ungefährlich.

Blockieren Sie während des Staubsaugens keinesfalls die Abluftöffnungen.

Schalten Sie das Gerät aus, wenn Sie es wieder aufladen.

Wenn Sie mit dem Akkusauger Flüssigkeiten aufgesaugt haben, sollten Sie die Staubkammer entleeren und trocknen, bevor Sie das Gerät zur Aufbewahrung in die Ladestation stellen.

Seien Sie besonders vorsichtig, wenn Sie zum Anbringen der Ladestation Löcher in die Wand bohren (insbesondere in der Nähe einer Steckdose), um das Risiko eines elektrischen Schlags zu vermeiden.

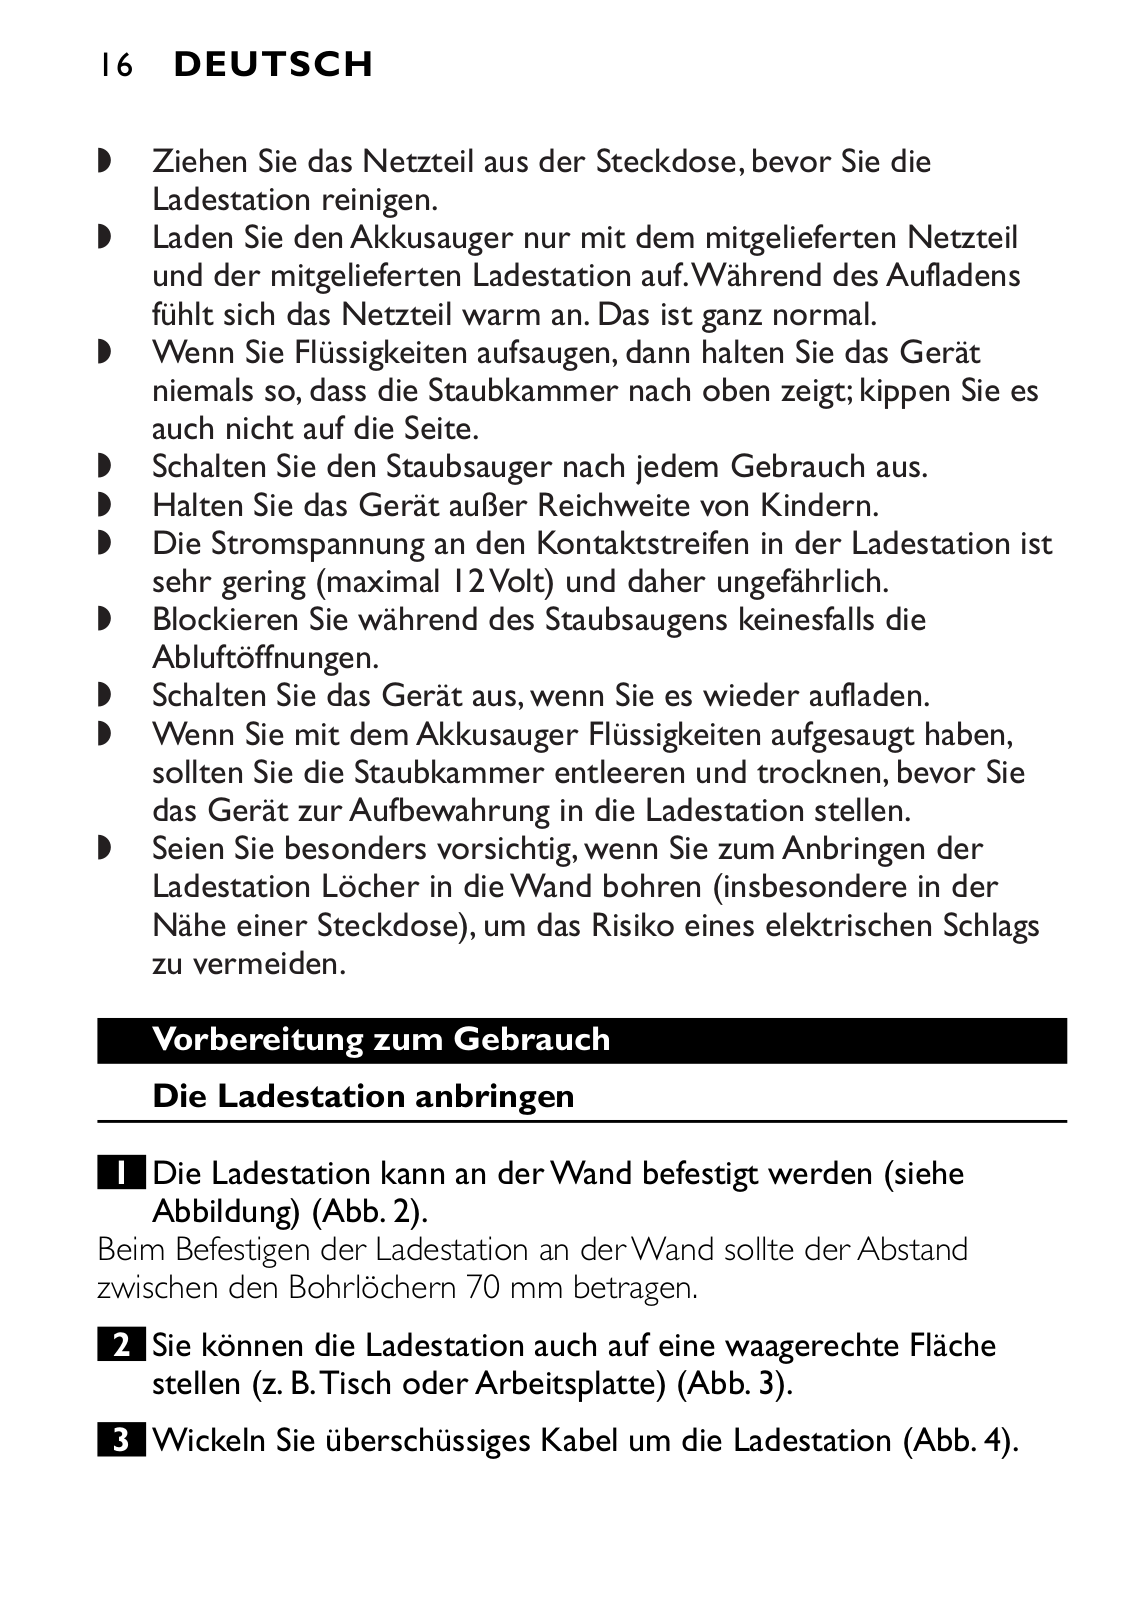
Vorbereitung zum Gebrauch Die Ladestation anbringen

1Die Ladestation kann an der Wand befestigt werden (siehe Abbildung) (Abb. 2).

Beim Befestigen der Ladestation an der Wand sollte der Abstand zwischen den Bohrlöchern 70 mm betragen.

2Sie können die Ladestation auch auf eine waagerechte Fläche stellen (z. B.Tisch oder Arbeitsplatte) (Abb. 3).

3Wickeln Sie überschüssiges Kabel um die Ladestation (Abb. 4).

DEUTSCH 17

Die Akkus aufladen

Laden Sie die Akkus vor dem ersten Gebrauch mindestens 16 Stunden lang auf.

1Stecken Sie das Netzteil in die Steckdose.

2Setzen Sie das Gerät auf die Ladestation (Abb. 5).

Die Ladekontrolllampe leuchtet auf und signalisiert, dass das

Gerät geladen wird (Abb. 6).

BDie Ladekontrolllampe brennt, solange das Gerät mit der Ladestation verbunden ist und das Netzteil in der Steckdose steckt.

BDie Ladekontrolllampe gibt keinerlei Hinweis über den Ladestand der integrierten Akkus.

Staubsaugen

1Schieben Sie den Ein-/Ausschalter nach vorn, um das Gerät einzuschalten (Abb. 7).

2Schieben Sie den Ein-/Ausschalter zurück, um das Gerät auszuschalten (Abb. 8).

3Lassen Sie das Netzteil in der Steckdose und setzen Sie das Gerät immer gleich nach Gebrauch auf die Ladestation, auch wenn die Akkus noch fast voll geladen sind.

Bürstenaufsatz, Fugendüse und Nassdüse

Das Gerät wird mit drei Aufsätzen geliefert:

-Bürstenaufsatz zum Reinigen empfindlicher Oberflächen;

-Fugendüse zum Reinigen schwer erreichbarer Stellen;

-Nassdüse zum Aufsaugen von Flüssigkeiten.

1Nehmen Sie das gewünschte Zubehör von der Ladestation.

2Setzen Sie den Aufsatz auf die Düse des Geräts (Abb. 9).

18 DEUTSCH

Halten Sie beim Aufsaugen von Flüssigkeiten die Düse in einem Winkel von 30c nach unten. Dabei muss die Nassdüse die zu reinigende Oberfläche berühren. Neigen Sie das Gerät nicht zur Seite.

Unterbrechen Sie den Saugvorgang, sobald der Flüssigkeitsspiegel die

Markierung "Maximum" in der Staubkammer erreicht hat.

Halten Sie das Gerät niemals mit dem Netzschalter nach unten, wenn die Staubkammer mit Flüssigkeit gefüllt ist (Abb. 10).

Leeren Sie die Staubkammer jedesmal, nachdem Sie Flüssigkeiten aufgesaugt haben.

3Alle Zubehörteile können in den Schlitzen der Ladestation aufbewahrt werden (Abb. 11).

Das Gerät reinigen

Ziehen Sie stets das Netzteil aus der Steckdose, bevor Sie die

Ladestation reinigen.

Entleeren und trocknen Sie die Staubkammer, wenn Sie mit dem Gerät Flüssigkeiten aufgesaugt haben.

1Reinigen Sie das Gerät mit einem feuchten Tuch.

Leeren der Staubkammer

Leeren Sie die Staubkammer und reinigen Sie den Filter regelmäßig.

1Halten Sie das Gerät über einen Mülleimer und drücken Sie den Entriegelungsknopf der Staubkammer (Abb. 12).

2Nehmen Sie den Filterhalter aus der Staubkammer (Abb. 13).

3Leeren Sie die Staubkammer mit der freien Hand.

4Reinigen Sie Filter und Filterhalter (Abb. 14).

BNehmen Sie den Filter mit einer Drehung gegen den Uhrzeigersinn vom Filterhalter.

BReinigen Sie den Filter, wenn er stark verschmutzt ist, mit einer Bürste oder mit einem anderen Staubsauger.

DEUTSCH 19

BBei Bedarf können Sie den Filter mit kaltem oder lauwarmem Wasser abspülen.

5Befestigen Sie den Filter mit einer Drehung im Uhrzeigersinn im Filterhalter, und setzen Sie den Filterhalter wieder in die Staubkammer.Achten Sie darauf, dass der Filterhalter richtig eingesetzt ist (Abb. 15).

Benutzen Sie den Staubsauger auf keinen Fall, solange der Filter noch feucht ist.

Ersatzteile

Wechseln Sie den Filter aus, wenn er sich nicht mehr vollständig reinigen lässt. (Das ist normalerweise nach ca. 50 Reinigungen notwendig.)

1Nehmen Sie den Filterhalter aus der Staubkammer (Abb. 13).

2Nehmen Sie den Filter mit einer Drehung gegen den Uhrzeigersinn vom Filterhalter (Abb. 14).

3Lösen Sie den Filter mit einer vorsichtigen Drehung gegen den Uhrzeigersinn vom Ring (Abb. 16).

4Befestigen Sie einen neuen Filter mit einer Drehung im Uhrzeigersinn am Ring (Abb. 17).

5Drücken Sie die Filterspitze nach innen (Abb. 18).

6Befestigen Sie den Filter mit einer Drehung im Uhrzeigersinn im Filterhalter, und setzen Sie den Filterhalter wieder in die Staubkammer ein (Abb. 19).

Zubehör

Ersatzfilter sind über Ihren Philips-Händler unter der Typennummer FC8036 erhältlich.

20 DEUTSCH

Umweltschutz

Geben Sie das Gerät am Ende der Lebensdauer nicht in den normalen Hausmüll. Bringen Sie es zum Recycling zu einer offiziellen Sammelstelle.Auf diese Weise helfen Sie die Umwelt zu schonen (Abb. 20).

Energie sparen

Wenn Sie beabsichtigen, das Gerät längere Zeit nicht zu benutzen, empfiehlt es sich, das Netzteil aus der Steckdose zu ziehen, um Strom zu sparen.

Die Akkus entsorgen

NiCd/NiMH Akkus können die Umwelt gefährden und sogar explodieren, wenn sie hohen Temperaturen oder Feuer ausgesetzt werden.

Akkus enthalten Substanzen, welche die Umwelt gefährden können. Entnehmen Sie die Akkus, bevor Sie das Gerät entsorgen oder an einer offiziellen Sammelstelle abgeben. Bringen sie die Akkus zu einer offiziellen Sammelstelle für Batterien.

Entnehmen Sie die Akkus nur in völlig entladenem Zustand.

Sie können die Akkus wie folgt auch selbst herausnehmen:

1Lassen Sie den Motor laufen, bis er stillsteht. Lösen Sie die Schrauben und öffnen Sie das Gerät (Abb. 21).

2Durchtrennen Sie jeden Verbindungsdraht einzeln, und nehmen Sie die Akkus heraus (Abb. 22).

Garantie und Kundendienst

Benötigen Sie weitere Informationen oder treten Probleme auf, wenden Sie sich bitte an Ihren Philips-Händler oder setzen Sie sich mit einem Philips Service-Center in Ihrem Land in Verbindung (Tel. Nr. 0180/5356767). Besuchen Sie auch die Philips Website (www.philips.com).

DEUTSCH 21

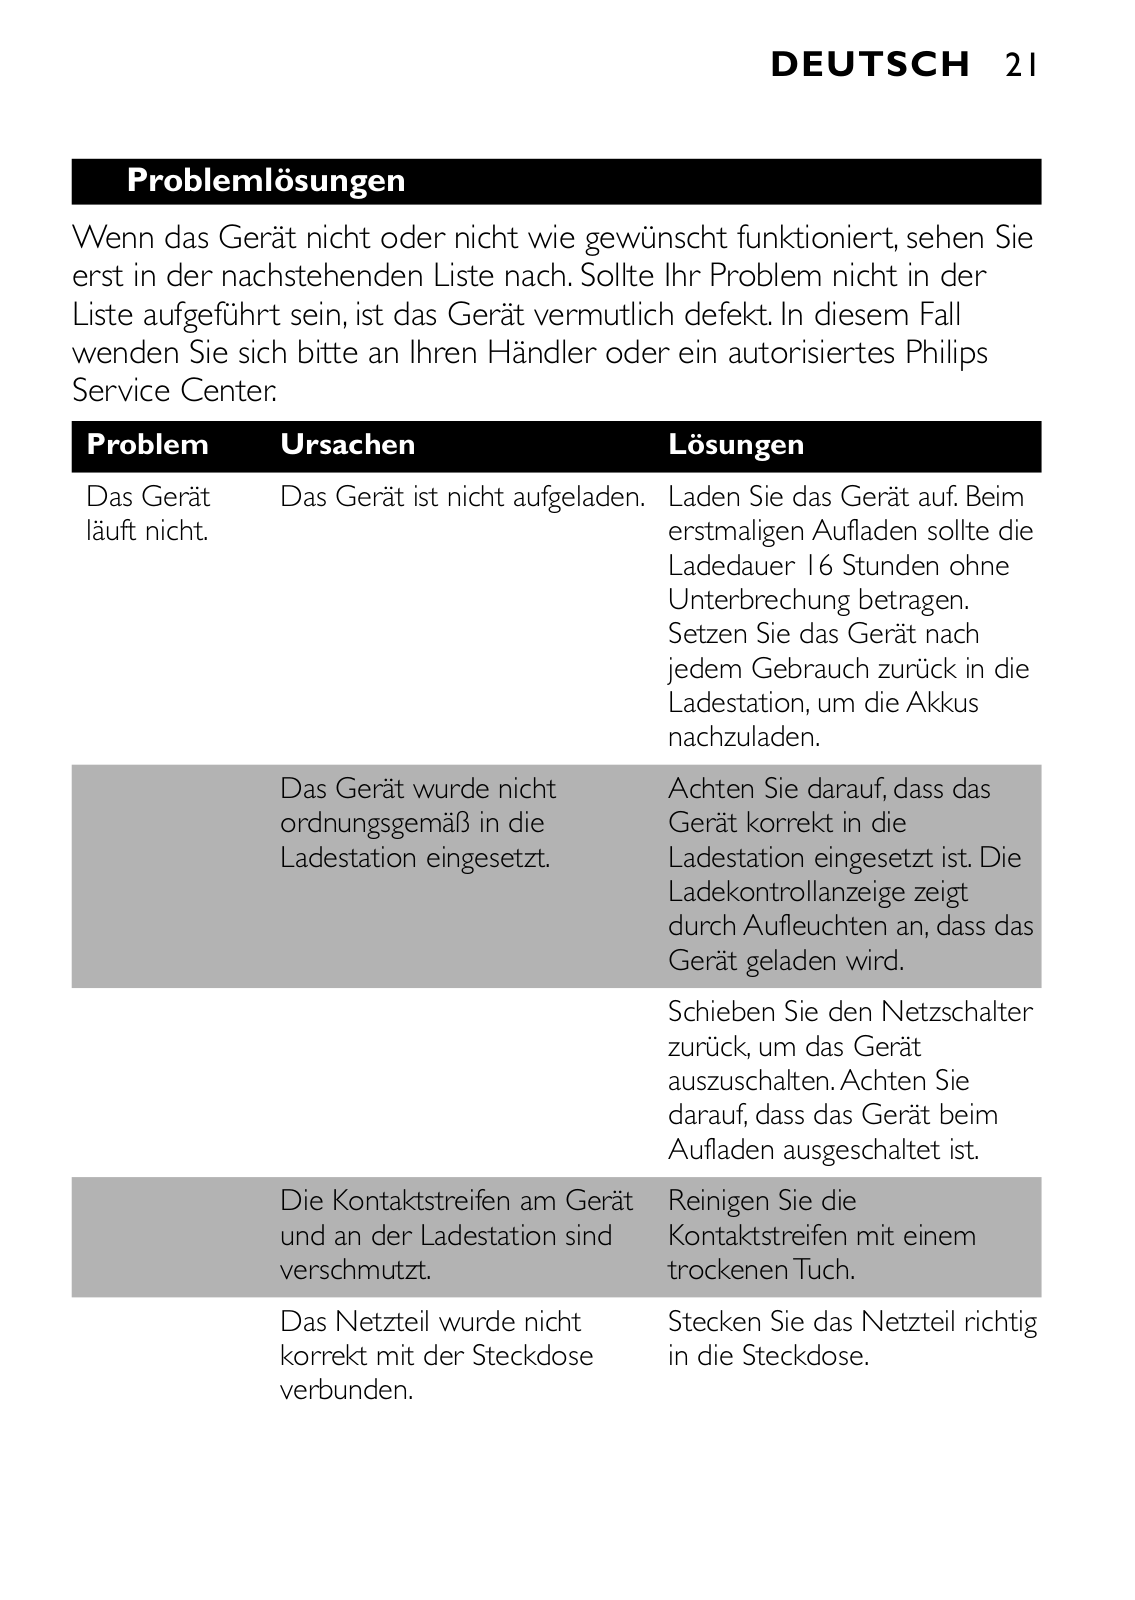
Problemlösungen

Wenn das Gerät nicht oder nicht wie gewünscht funktioniert, sehen Sie erst in der nachstehenden Liste nach. Sollte Ihr Problem nicht in der Liste aufgeführt sein, ist das Gerät vermutlich defekt. In diesem Fall wenden Sie sich bitte an Ihren Händler oder ein autorisiertes Philips Service Center.

Problem

Ursachen

Lösungen

Das Gerät

Das Gerät ist nicht aufgeladen.

Laden Sie das Gerät auf. Beim

läuft nicht.


erstmaligen Aufladen sollte die


Ladedauer 16 Stunden ohne


Unterbrechung betragen.


Setzen Sie das Gerät nach


jedem Gebrauch zurück in die


Ladestation, um die Akkus


nachzuladen.


Das Gerät wurde nicht

Achten Sie darauf, dass das


ordnungsgemäß in die

Gerät korrekt in die


Ladestation eingesetzt.

Ladestation eingesetzt ist. Die


Ladekontrollanzeige zeigt


durch Aufleuchten an, dass das


Gerät geladen wird.


Schieben Sie den Netzschalter


zurück, um das Gerät


auszuschalten. Achten Sie


darauf, dass das Gerät beim


Aufladen ausgeschaltet ist.


Die Kontaktstreifen am Gerät

Reinigen Sie die


und an der Ladestation sind

Kontaktstreifen mit einem


verschmutzt.

trockenen Tuch.


Das Netzteil wurde nicht korrekt mit der Steckdose verbunden.

Stecken Sie das Netzteil richtig in die Steckdose.

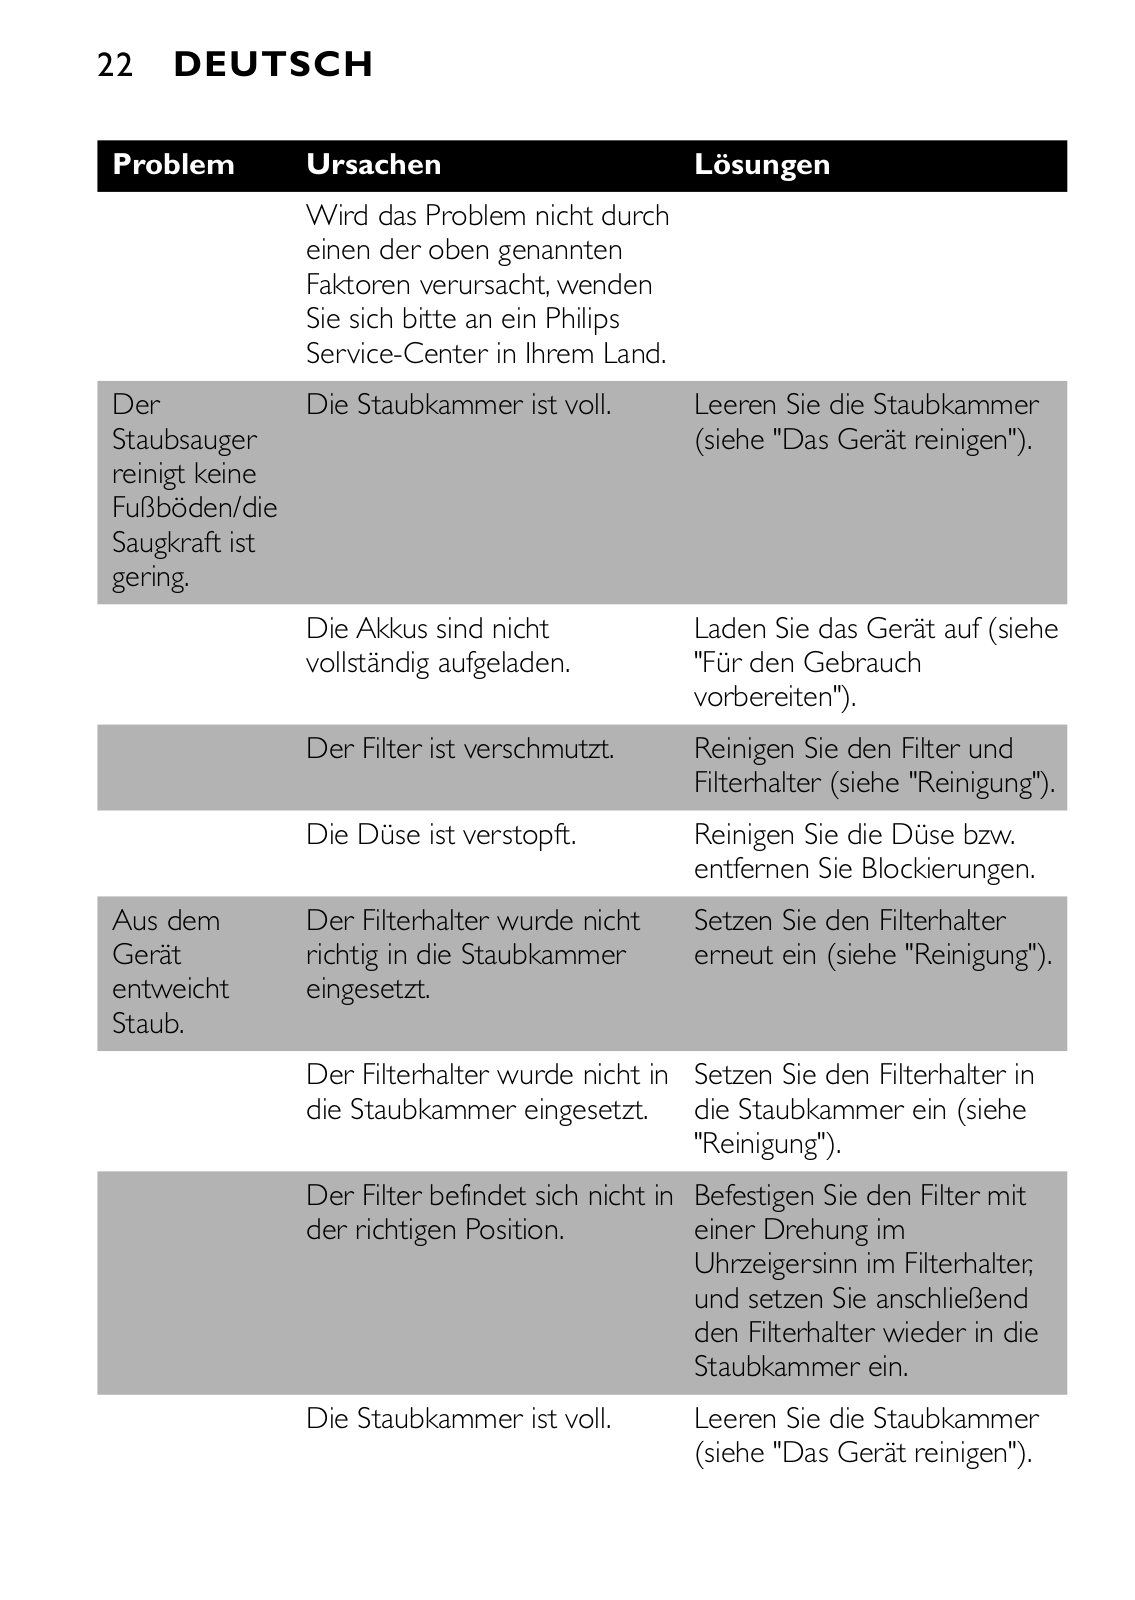
22 DEUTSCH

Problem

Ursachen

Lösungen


Wird das Problem nicht durch


einen der oben genannten


Faktoren verursacht, wenden


Sie sich bitte an ein Philips


Service-Center in Ihrem Land.


Der

Die Staubkammer ist voll.

Leeren Sie die Staubkammer

Staubsauger


(siehe "Das Gerät reinigen").

reinigt keine


Fußböden/die


Saugkraft ist


gering.


Die Akkus sind nicht

Laden Sie das Gerät auf (siehe


vollständig aufgeladen.

"Für den Gebrauch


vorbereiten").


Der Filter ist verschmutzt.

Reinigen Sie den Filter und


Filterhalter (siehe "Reinigung").


Die Düse ist verstopft.

Reinigen Sie die Düse bzw.


entfernen Sie Blockierungen.


Aus dem

Der Filterhalter wurde nicht

Setzen Sie den Filterhalter

Gerät

richtig in die Staubkammer

erneut ein (siehe "Reinigung").

entweicht

eingesetzt.


Staub.


Der Filterhalter wurde nicht in

Setzen Sie den Filterhalter in


die Staubkammer eingesetzt.

die Staubkammer ein (siehe


"Reinigung").


Der Filter befindet sich nicht in

Befestigen Sie den Filter mit


der richtigen Position.

einer Drehung im


Uhrzeigersinn im Filterhalter,


und setzen Sie anschließend


den Filterhalter wieder in die


Staubkammer ein.


Die Staubkammer ist voll.

Leeren Sie die Staubkammer


(siehe "Das Gerät reinigen").


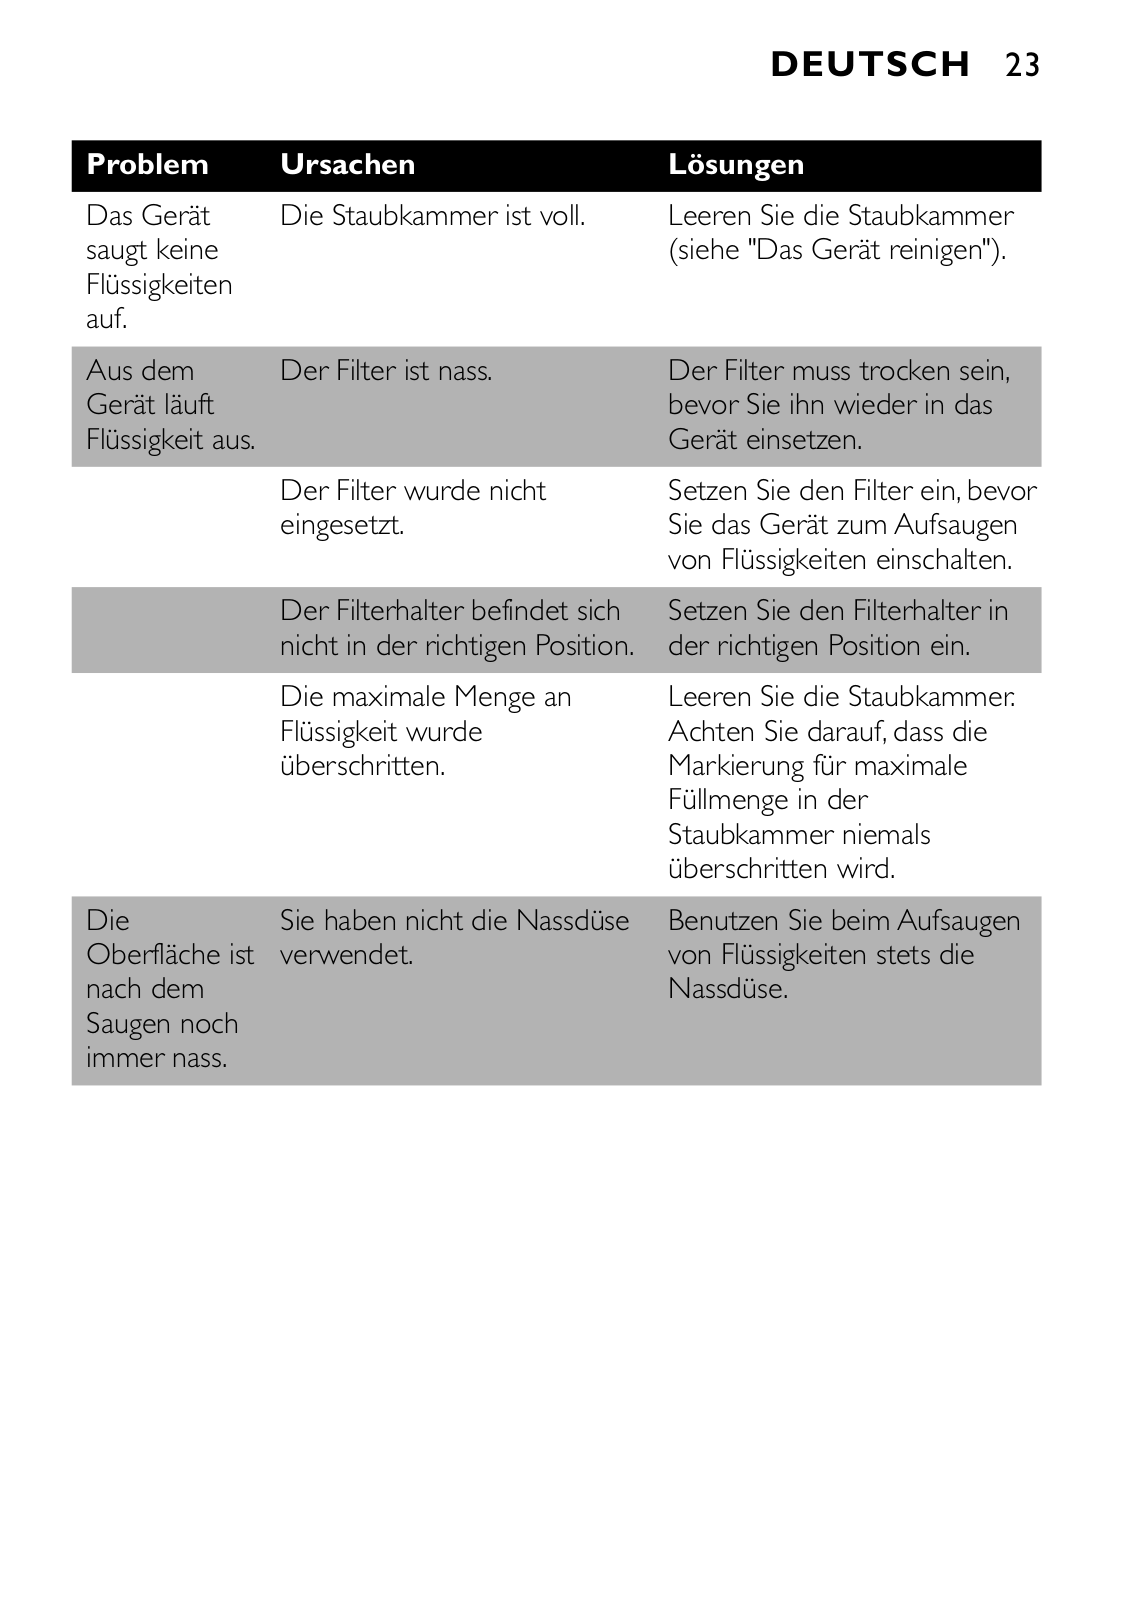
DEUTSCH 23


Problem

Ursachen

Lösungen

Das Gerät

Die Staubkammer ist voll.

Leeren Sie die Staubkammer

saugt keine


(siehe "Das Gerät reinigen").

Flüssigkeiten


auf.


Aus dem

Der Filter ist nass.

Der Filter muss trocken sein,

Gerät läuft


bevor Sie ihn wieder in das

Flüssigkeit aus.


Gerät einsetzen.


Der Filter wurde nicht

Setzen Sie den Filter ein, bevor


eingesetzt.

Sie das Gerät zum Aufsaugen


von Flüssigkeiten einschalten.


Der Filterhalter befindet sich

Setzen Sie den Filterhalter in


nicht in der richtigen Position.

der richtigen Position ein.


Die maximale Menge an

Leeren Sie die Staubkammer.


Flüssigkeit wurde

Achten Sie darauf, dass die


überschritten.

Markierung für maximale


Füllmenge in der


Staubkammer niemals


überschritten wird.


Die

Sie haben nicht die Nassdüse

Benutzen Sie beim Aufsaugen

Oberfläche ist

verwendet.

von Flüssigkeiten stets die

nach dem


Nassdüse.

Saugen noch


immer nass.


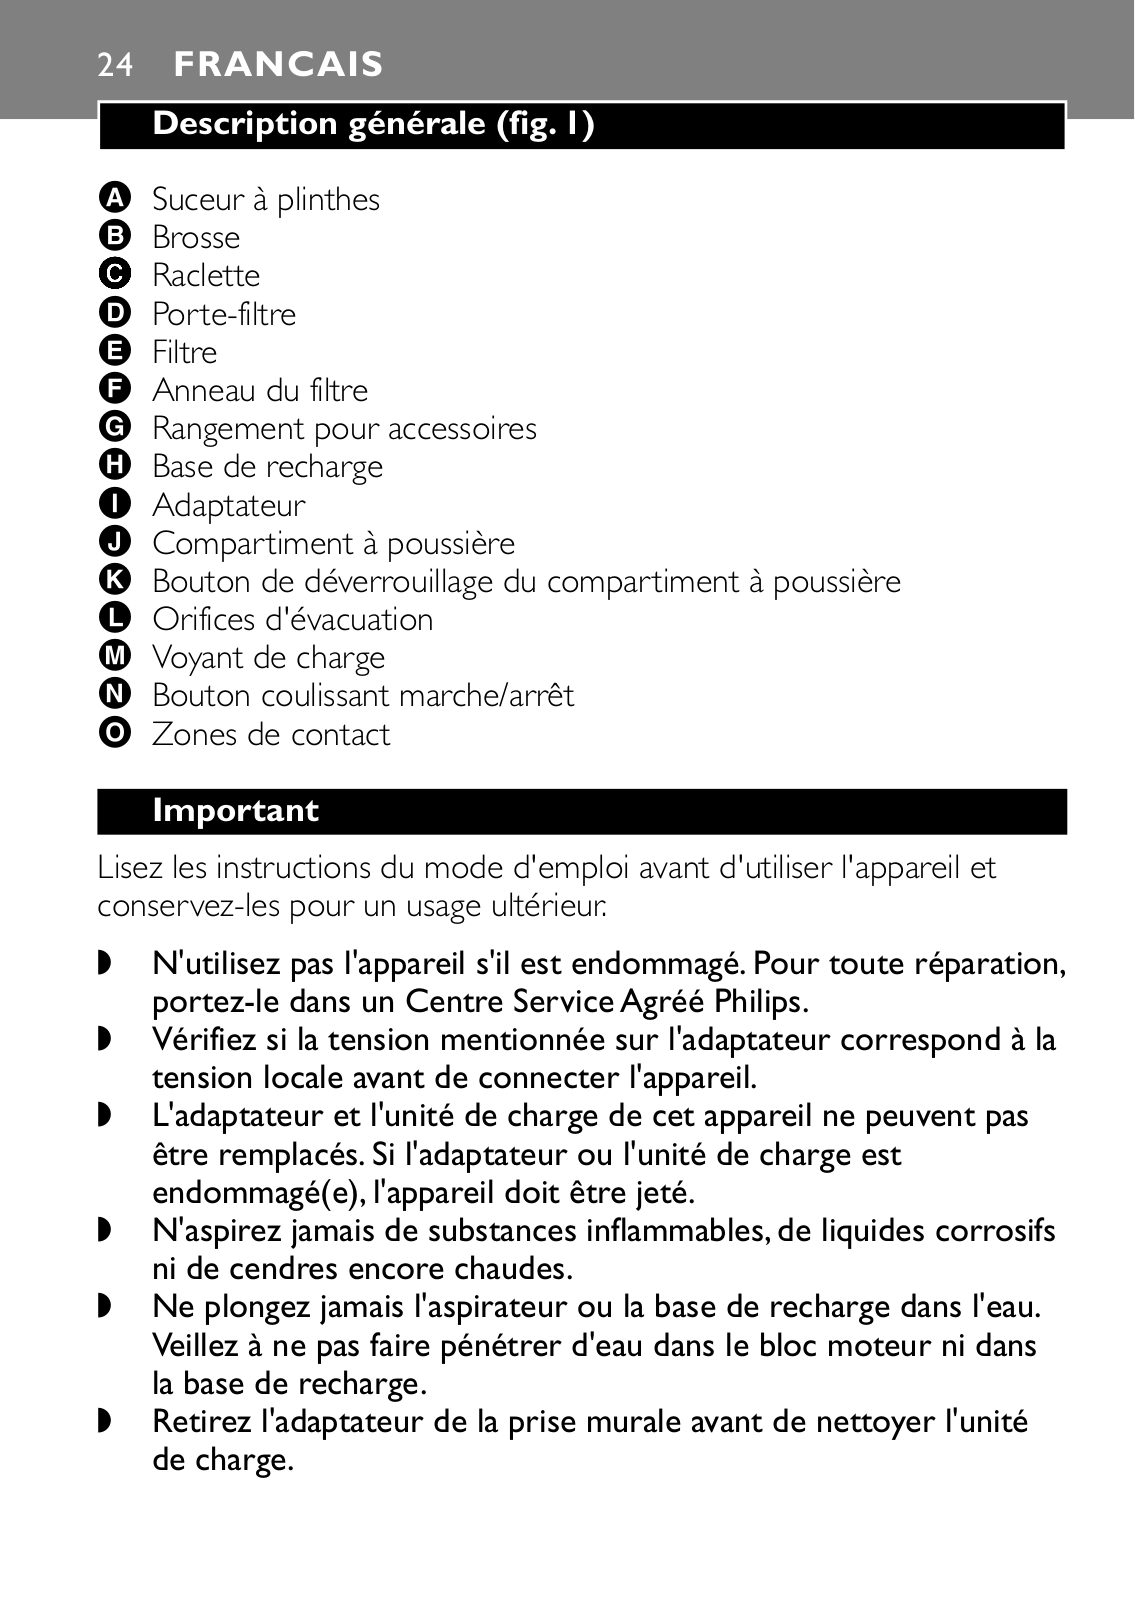
24 FRANCAIS

Description générale (fig. 1)

A Suceur à plinthes B Brosse

C Raclette D Porte-filtre E Filtre

F Anneau du filtre

G Rangement pour accessoires H Base de recharge

I Adaptateur

J Compartiment à poussière

K Bouton de déverrouillage du compartiment à poussière L Orifices d'évacuation

M Voyant de charge

N Bouton coulissant marche/arrêt O Zones de contact

Important

Lisez les instructions du mode d'emploi avant d'utiliser l'appareil et conservez-les pour un usage ultérieur.

N'utilisez pas l'appareil s'il est endommagé. Pour toute réparation, portez-le dans un Centre Service Agréé Philips.

Vérifiez si la tension mentionnée sur l'adaptateur correspond à la tension locale avant de connecter l'appareil.

L'adaptateur et l'unité de charge de cet appareil ne peuvent pas être remplacés. Si l'adaptateur ou l'unité de charge est endommagé(e), l'appareil doit être jeté.

N'aspirez jamais de substances inflammables, de liquides corrosifs ni de cendres encore chaudes.

Ne plongez jamais l'aspirateur ou la base de recharge dans l'eau. Veillez à ne pas faire pénétrer d'eau dans le bloc moteur ni dans la base de recharge.

Retirez l'adaptateur de la prise murale avant de nettoyer l'unité de charge.

FRANCAIS 25

Chargez l'aspirateur en utilisant l'adaptateur et l'unité de charge fournis. Pendant la charge, l'adaptateur chauffe. Cela est normal.

Ne tenez pas l'appareil avec le compartiment à poussière orienté vers le haut et n'inclinez pas l'appareil lorsque vous aspirez des liquides.

Arrêtez toujours l'appareil après utilisation.

Tenez l'appareil hors de portée des enfants.

La tension très basse des zones de contact de l'unité de charge n'est pas dangereuse (12 V au maximum).

Ne bloquez pas les sorties d'air pendant l'aspiration.

Arrêtez l'appareil lors de la recharge.

Après avoir aspiré des liquides, videz et séchez le compartiment à poussière avant de replacer l'appareil sur la base de recharge.

Pour éviter tout risque d'électrocution, soyez prudent lorsque vous percez les trous dans le mur pour fixer la base de recharge, surtout à proximité d'une prise de courant.

Préparation à l'emploi Installation de l'unité de charge

1Fixez la base de recharge au mur comme illustré sur la figure (fig. 2).

Si vous fixez l'unité de charge au mur, l'espace entre les vis de fixation doit être de 70 mm.

2Vous pouvez mettre l'unité de charge sur une surface horizontale (par ex. une table ou un bureau) (fig. 3).

3Ajustez la longueur du cordon d'alimentation en l'enroulant autour de l'unité de charge (fig. 4).

Charge de l'appareil

Chargez l'appareil pendant au moins 16 heures avant la première utilisation.

1 Insérez l'adaptateur dans la prise murale.

26 FRANCAIS

2Placez l'aspirateur sur l'unité de charge (fig. 5).

Lors de la charge le témoin lumineux s'allume (fig. 6).

BLe témoin de charge reste allumé aussi longtemps que l'appareil est connecté à l'unité de charge et l'adaptateur est branché.

BLe témoin de charge ne fournit aucune information sur le niveau de charge des accumulateurs.

Utilisation de l'appareil

1Faites glisser le bouton marche/arrêt vers l'avant pour mettre l'appareil en marche (fig. 7).

2Faites glisser le bouton marche/arrêt vers l'arrière pour arrêter l'appareil (fig. 8).

3Laissez l'adaptateur dans la prise murale et remettez toujours l'aspirateur sur l'unité de charge après utilisation, même si les accumulateurs ne sont pas déchargés.

Brosse, suceur et raclette

Cet appareil est livré avec trois accessoires :

-une brosse pour nettoyer les surfaces délicates;

-un suceur pour nettoyer les endroits difficiles à atteindre ;

-une raclette pour aspirer les liquides.

1Prenez l'accessoire dont vous avez besoin de l'unité de charge.

2Fixez l'accessoire sur l'appareil (fig. 9).

Lorsque vous utilisez l'appareil pour aspirer des liquides, tenez-le avec la raclette orientée vers le bas selon un angle de 30c. Assurez-vous qu'elle est en contact avec la surface à nettoyer. N'inclinez pas l'appareil.

Arrêtez d'aspirer des liquides dès que le niveau de liquide à l'intérieur du compartiment à poussière a atteint la limite maximale.

Ne tenez jamais l'appareil avec le bouton marche/arrêt dirigé vers le bas lorsque le compartiment à poussière est rempli de liquide (fig. 10).

FRANCAIS 27

Videz le compartiment à poussière après chaque aspiration de liquides.

3Vous pouvez ranger tous les accessoires dans le compartiment de la base de recharge prévu à cet effet (fig. 11).

Nettoyage

Retirez toujours l'adaptateur de la prise murale avant de nettoyer l'unité de charge.

Si vous avez aspiré des liquides, videz et séchez le compartiment à poussière.

1Nettoyez l'appareil avec un chiffon humide.

Pour vider le compartiment à poussières

Videz le compartiment à poussière et nettoyez le filtre régulièrement.

1Tenez l'appareil au-dessus d'une poubelle et appuyez sur la touche de libération du compartiment à poussières (fig. 12).

2Retirez le porte-filtre du compartiment à poussière (fig. 13).

3Videz le compartiment à poussière avec votre main libre.

4Nettoyez le filtre et le porte-filtre (fig. 14).

BFaites tourner le filtre dans le sens inverse des aiguilles d'une montre pour le retirer du porte-filtre.

BNettoyez le filtre à l'aide d'une brosse ou avec un aspirateur normal s'il est très sale.

B

Si nécessaire, vous pouvez rincer le filtre à l'eau froide ou tiède.


5Faites tourner le filtre dans le sens des aiguilles d'une montre pour le fixer sur le porte-filtre, puis placez ce dernier dans le compartiment à poussière.Veillez à l'insérer correctement (fig. 15).

Évitez d'utiliser l'aspirateur si le filtre est encore humide.

28 FRANCAIS

Remplacement

Si vous ne parvenez plus à le nettoyer correctement, remplacez le filtre (en général, le remplacement s'avère nécessaire après 50 nettoyages).

1Retirez le porte-filtre du compartiment à poussière (fig. 13).

2Faites tourner le filtre dans le sens inverse des aiguilles d'une montre pour le retirer du porte-filtre (fig. 14).

3Faites tourner le filtre avec précaution dans le sens inverse des aiguilles d'une montre pour le retirer de l'anneau (fig. 16).

4Insérez un nouveau filtre dans l'anneau en le faisant tourner dans le sens des aiguilles d'une montre (fig. 17).

5Poussez le bout du filtre vers l'intérieur (fig. 18).

6Faites tourner le filtre dans le sens des aiguilles d'une montre pour le fixer sur le porte-filtre. Replacez ensuite le porte-filtre dans le compartiment à poussière (fig. 19).

Accessoires

Des filtres de rechange sont disponibles chez votre revendeur Type : FC8036.

Environnement

Ne jetez pas l'appareil en fin de vie avec les ordures ménagères, mais déposez-le à un endroit prévu à cet effet par les pouvoirs publics pour son recyclage.Vous aiderez, ainsi, à protéger l'environnement (fig. 20).

Economiser de l'énergie

Si vous n'allez pas utiliser l'appareil pendant longtemps, il est conseillé de retirer l'adaptateur de la prise murale pour économiser de l'énergie.

FRANCAIS 29

Elimination des accumulateurs

Les accumulateurs NiCd/NiMH peuvent nuire à l'environnement et peuvent même exploser s'ils sont exposés à des températures élevées ou aux flammes.

La batterie contient des substances susceptibles de nuire à l'environnement. Retirez toujours la batterie avant de mettre l'appareil au rebut ou de le déposer à un endroit assigné à cet effet. Mettez la batterie usagée au rebut à un endroit assigné à cet effet.

Ne retirez les accumulateurs que lorsque ceux-ci sont entièrement déchargés.

Retirez les accumulateurs de la manière suivante:

1Laissez l'appareil fonctionner jusqu'à l'arrêt complet, défaites les vis et ouvrez l'aspirateur (fig. 21).

2Coupez les fils de connexion l'un après l'autre à ras des accumulateurs et enlevez-les (fig. 22).

Garantie & service

Si vous souhaitez obtenir des informations supplémentaires ou si vous rencontrez un problème, visitez le site Web de Philips à l'adresse www.philips.com ou contactez le Service Consommateurs Philips de votre pays (vous trouverez le numéro de téléphone correspondant sur le dépliant de garantie internationale). S'il n'existe pas de Service Consommateurs Philips dans votre pays, renseignez-vous auprès de votre revendeur local ou contactez le Service Department of Philips Domestic Appliances and Personal Care BV.

30 FRANCAIS

Dépannage

Lorsque l'appareil ne fonctionne pas (correctement), consultez d'abord les sections suivantes. Si le problème n'est pas mentionné dans ce guide, l'appareil est probablement défectueux. Dans ce cas, il est recommandé de contacter votre revendeur ou un Centre Service Agréé Philips.

Problème

Cause

Solutions

L'appareil ne

L'appareil n'a pas été chargé.

Chargez l'appareil pendant au

fonctionne


moins 16 heures avant la

pas.


première utilisation.Veillez à


toujours replacer l'aspirateur


sur la base de recharge après


chaque emploi.


L'appareil n'a pas été

Assurez-vous que l'appareil


correctement positionné sur

est correctement positionné.


l'unité de charge.

Lors de la charge le témoin


lumineux s'allume.


Faites glisser le bouton


marche/arrêt vers l'arrière


pour arrêter l'appareil. Lors de


la charge, l'aspirateur doit être


arrêté.


Les zones de contact de

Essuyez les zones de contact


l'appareil et de l'unité de

avec un chiffon sec.


charge sont sales.


L'adaptateur n'a pas été

Branchez (correctement)


(correctement) inséré dans la

l'adaptateur.


prise murale.


Si vous ne pouvez résoudre le


problème à l'aide de ce guide,


veuillez contacter le Service


Consommateurs Philips de


votre pays.


Loading...
+ 94 hidden pages