PHILIPS FC6053-01 User Manual

0 (0)

4222 003 30584 19-12-2006 07:24 Pagina 1

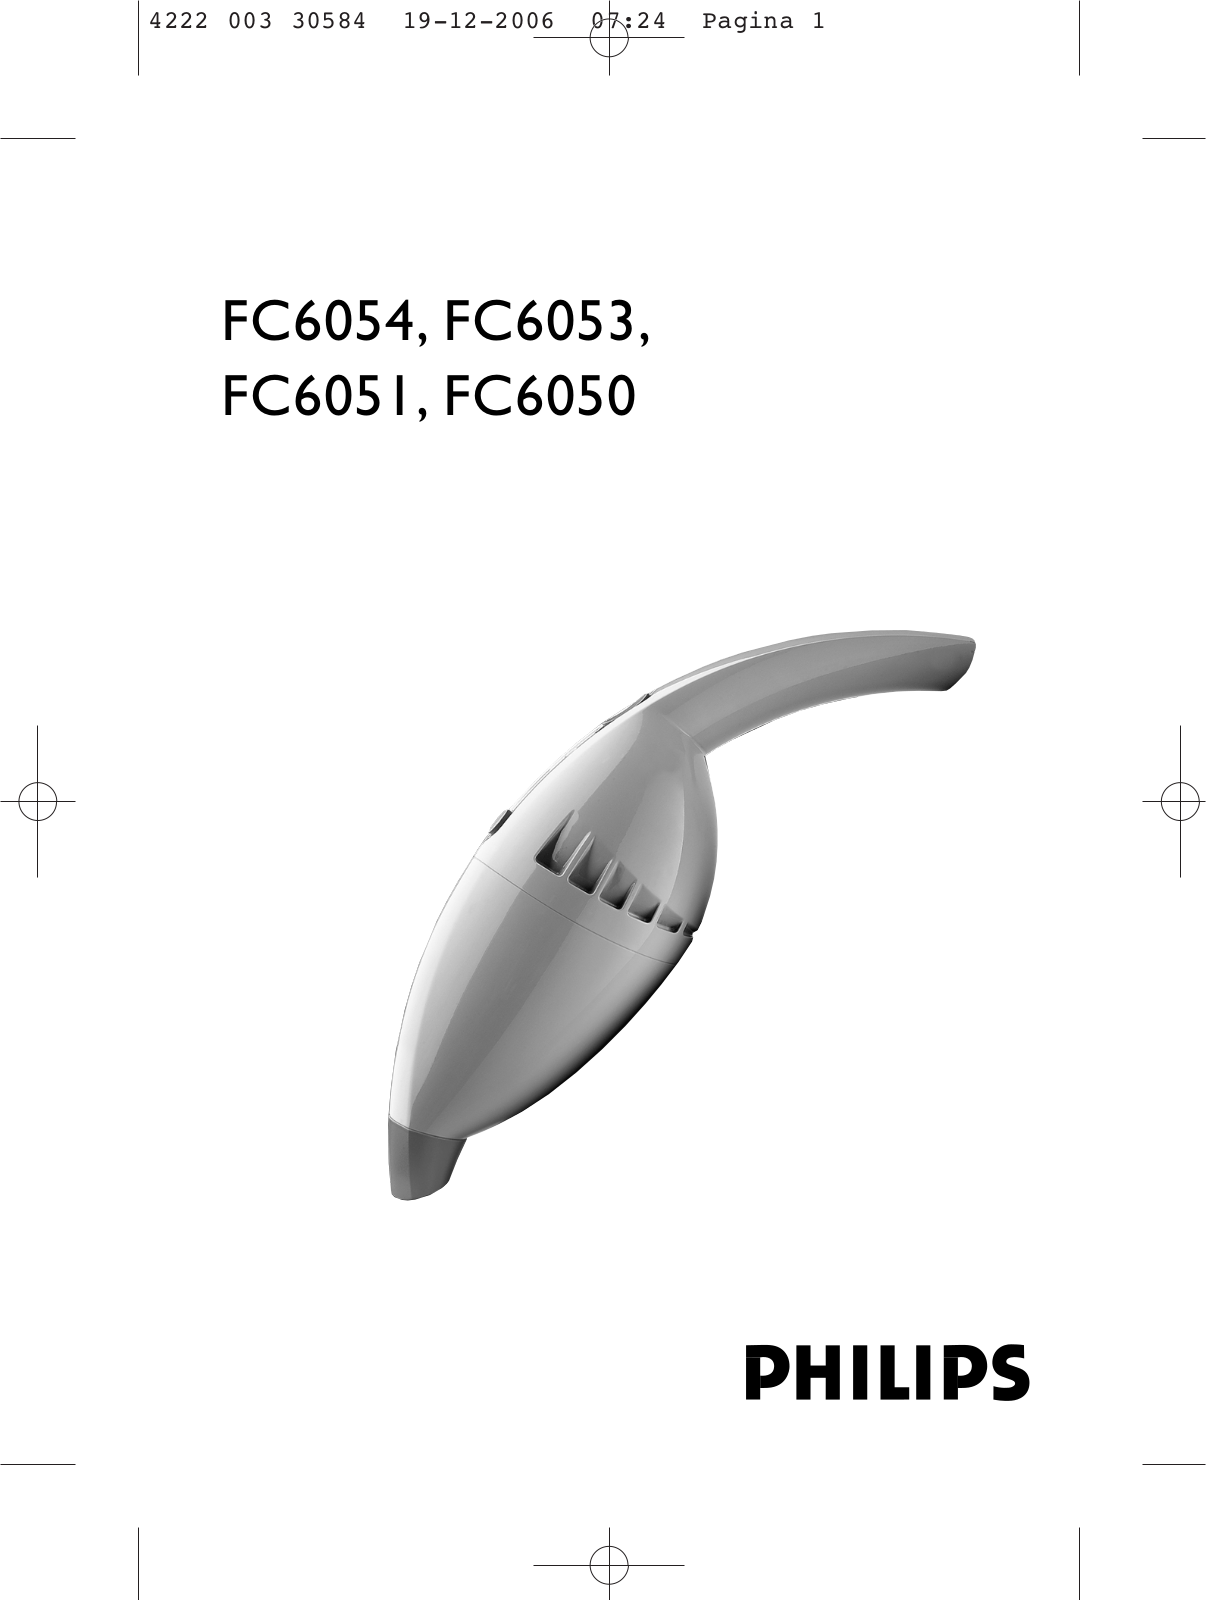
FC6054, FC6053, FC6051, FC6050

4222 003 30584 19-12-2006 07:24 Pagina 2

2

PHILIPS FC6053-01 User Manual

4222 003 30584 19-12-2006 07:24 Pagina 3

3

1

4222 003 30584 19-12-2006 07:24 Pagina 4

4

4222 003 30584 19-12-2006 07:24 Pagina 5

FC6054, FC6053, FC6051, FC6050

ENGLISH 6

DEUTSCH 11

FRANCAIS 17

NEDERLANDS 22

ESPAÑOL 28

ITALIANO 34

PORTUGUÊS 40

NORSK 46

SVENSKA 51

SUOMI 56

DANSK 61

66

TÜRKÇE 72

4222 003 30584 19-12-2006 07:24 Pagina 6

6 ENGLISH

General description (fig. 1)

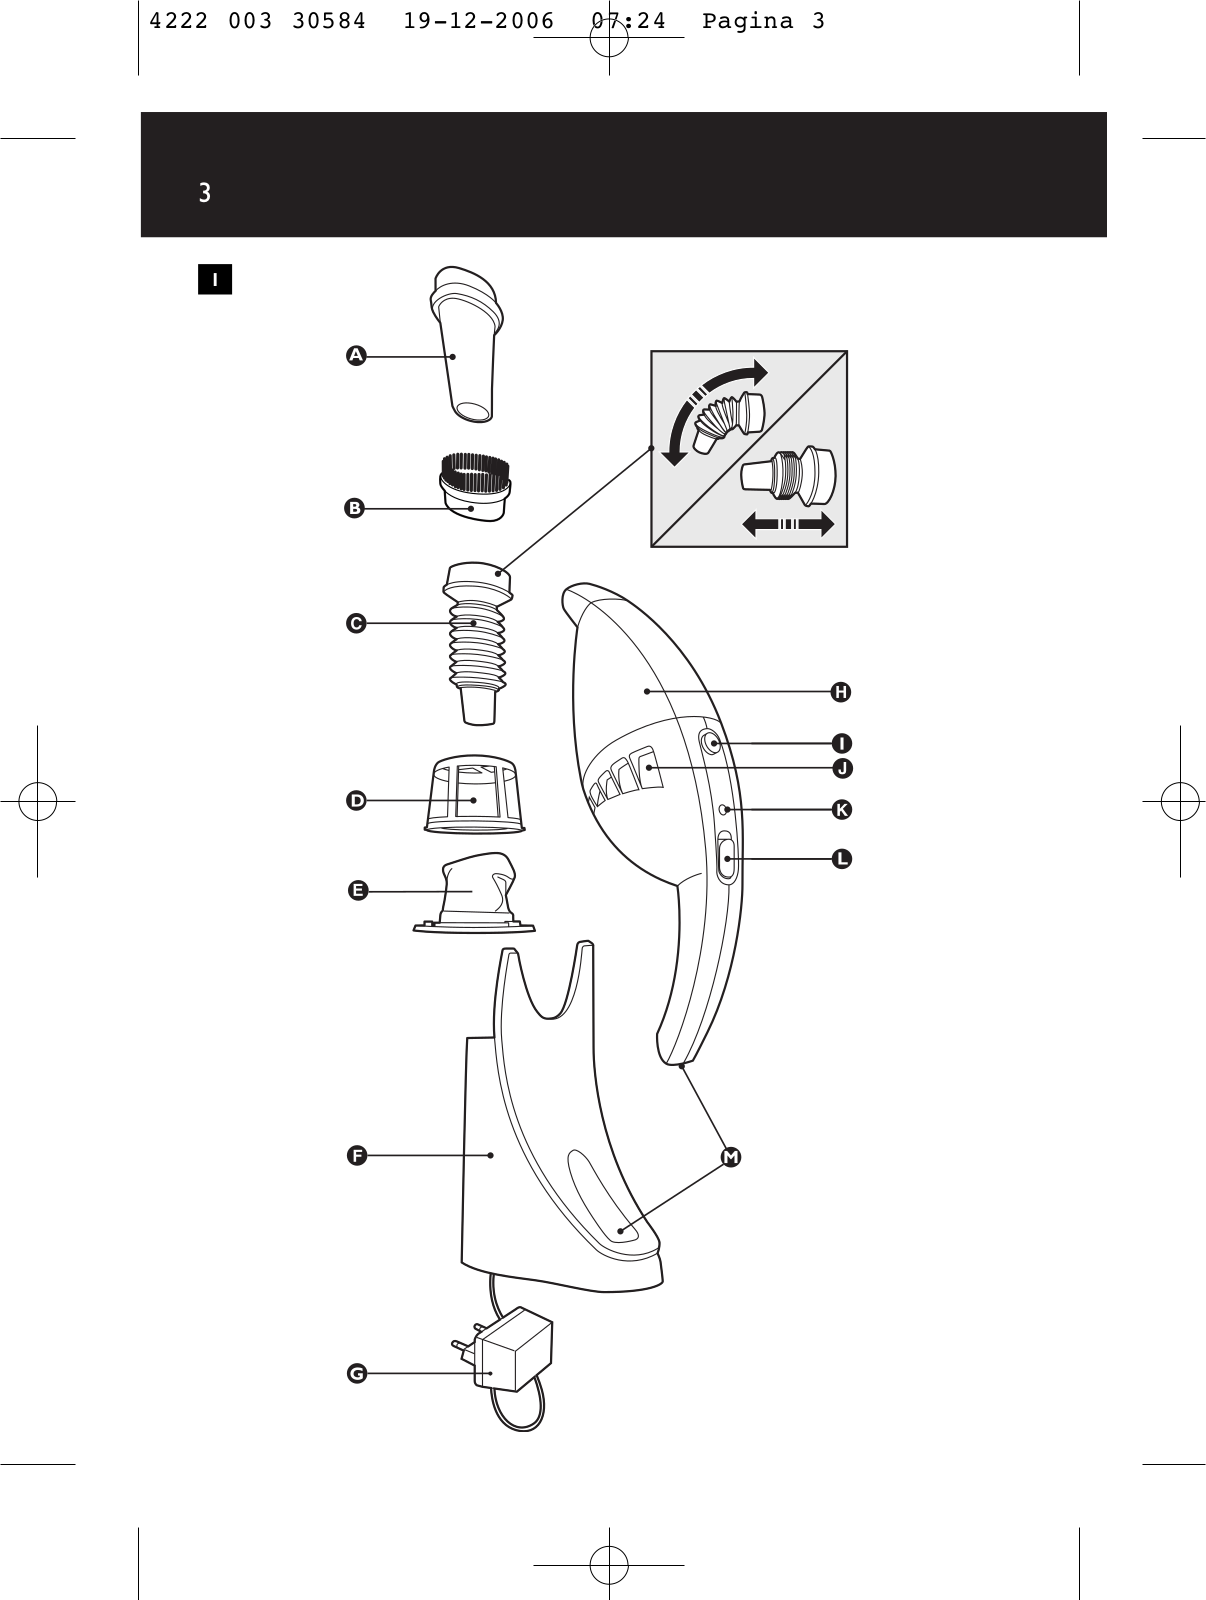
A Crevice tool

B Brush tool

C Bendable crevice tool (FC6053 only)

D Outer filter

E Inner filter

F Charging unit

GAdapter

H Dust compartment

I Dust compartment release button

J Exhaust air openings

K Charging light (LED)

L On/off slide

M Contact strips

Important

Read these instructions for use carefully before using the appliance and save them for future reference.

Check if the voltage indicated on the adapter corresponds to the local mains voltage before you connect the appliance.

Do not use the appliance if it is damaged in any way.Take it to an authorised Philips service centre for repair.

The adapter and the charging unit of this appliance cannot be replaced. If the adapter or charging unit is damaged, the appliance must be discarded.

Never suck up water or any other liquid. Never suck up flammable substances and do not suck up ashes until they are cold.

Never immerse the vacuum cleaner or the charging unit in water.

Remove the adapter from the wall socket before cleaning the charging unit.

Only charge the vacuum cleaner with the adapter and charging unit supplied. During charging, the adapter will feel warm to the touch.This is normal.

Always switch the vacuum cleaner off after use.

4222 003 30584 19-12-2006 07:24 Pagina 7

ENGLISH 7

Keep the appliance out of the reach of children.

The voltage on the contact strips in the charging unit is low (max. 12 volts) and therefore not dangerous.

Never block the exhaust air openings during vacuuming.Switch the appliance off when recharging it.

Always use the vacuum cleaner with filter unit.

Preparing for use

Installing the charging unit

1 Attach the charging unit to the wall as indicated in the figure (fig. 2).

If you attach the charging unit to the wall, the space between the screw holes should be 70 mm.

2You can also place the charging unit on a horizontal surface (e.g. a table or desk) (fig. 3).

3Excess mains cord can be wound round the charging unit (fig. 4).

Charging the appliance

Charge the appliance for at least 16 hours before you use it for the first time.

1Insert the adapter into the wall socket.

2Place the vacuum cleaner on the charging unit (fig. 5).

The charging light will go on to indicate that the appliance is

charging (fig. 6).

BThe charging light will stay on as long as the appliance is connected to the charging unit and the adapter is in the wall socket.

BThe charging light does not give any information about the charge level of the built-in batteries.

BTo optimise the lifetime of the rechargeable batteries, periodically discharge them completely by letting the appliance run until it stops and then recharge them fully again.

4222 003 30584 19-12-2006 07:24 Pagina 8

8 ENGLISH

Using the appliance

1Push the on/off slide forwards to switch the appliance on (fig. 7).

2Push the on/off slide backwards to switch the appliance off (fig. 8).

Accessories

The appliance comes with the following accessories: 1 a brush tool to clean delicate surfaces;

2 a crevice tool to clean corners or narrow gaps;

3a bendable crevice tool, contractible and extendable to clean hard- to-reach places (FC6053 only).

1Take the accessory you want to use from the charging unit.

2Attach the accessory to the nozzle of the appliance (fig. 9).

Cleaning

Always remove the adapter from the wall socket before cleaning the charging unit.

1Clean the appliance with a damp cloth.

Emptying the dust compartment

Make sure you empty the dust compartment and clean the filters regularly.

1Hold the appliance over a dustbin and press the dust compartment release button (fig. 10).

2Remove the filter unit from the dust compartment (fig. 11).

3Empty the dust compartment with your free hand.

4Clean the outer filter and the inner filter.

BTo clean the inner filter, you can remove the outer filter from the filter holder by turning it anticlockwise.

4222 003 30584 19-12-2006 07:24 Pagina 9

ENGLISH 9

BYou can clean the outer filter and the inner filter with a brush or with a normal vacuum cleaner if they are very dirty.

BIf necessary, you can clean the outer filter and the inner filter in cold or lukewarm water.

5Place the outer filter back onto the filter holder and put the filter holder back into the dust compartment. Make sure you insert the filter holder in the correct way (fig. 12).

Never use the vacuum cleaner if the filter unit is still wet.

Storage

1You can store the brush tool and the crevice tool by placing them on the charging unit (fig. 13).

Replacement

Replace the inner filter if it can no longer be cleaned properly (usually after having been cleaned about 50 times).

1Remove the filter unit from the dust compartment (fig. 11).

2Remove the outer filter from the holder by turning it anticlockwise (fig. 14).

3Remove the inner filter from the holder by gently turning it anticlockwise (fig. 15).

4Attach a new inner filter to the holder (fig. 16).

5Push the tip of the inner filter inwards (fig. 17).

6Reattach the outer filter to the holder (fig. 18).

Accessories

New inner filters are available under type no. FC8035. Contact your Philips dealer.

4222 003 30584 19-12-2006 07:24 Pagina 10

10 ENGLISH

Environment

Do not throw the appliance away with the normal household waste at the end of its life, but hand it in at an official collection point for recycling. By doing this you will help to preserve the environment (fig. 19).

Saving energy

If you are not going to use the appliance for a longer period of time, we advise you to remove the adapter from the wall socket to save energy.

Disposal of batteries

NiCd/NiMH batteries can be harmful to the environment and may explode if exposed to high temperatures or fire.

Batteries contain substances that may pollute the environment. Always remove the batteries before discarding the appliance or handing it in at an official collection point. Dispose of the batteries at an official collection point for batteries.

Only remove the batteries if they are completely empty.

Remove the batteries in the following way.

1Let the appliance run until it stops, undo the screws and open the vacuum cleaner (fig. 20).

2Cut the connecting wires one by one and remove the batteries (fig. 21).

Guarantee & service

If you need information or if you have a problem, please visit the Philips website at www.philips.com or contact the Philips Customer Care Centre in your country (you will find its phone number in the worldwide guarantee leaflet). If there is no Customer Care Centre in your country, turn to your local Philips dealer or contact the Service Department of Philips Domestic Appliances and Personal Care BV.

4222 003 30584 19-12-2006 07:24 Pagina 11

DEUTSCH 11

Allgemeine Beschreibung (Abb. 1)

A Fugendüse

B Bürstenaufsatz

C Biegsame Fugendüse (nur FC6053)

D Filterhalter

E Staubbeutel

F Ladestation

G Netzteil

H Staubkammer

I Staubkammer-Entriegelung

JAbluftöffnungen

K Ladekontrolllampe (LED)

L Ein-/Ausschalter

M Kontaktstreifen

Wichtig

Lesen Sie diese Bedienungsanleitung vor der Benutzung des Geräts sorgfältig durch und bewahren Sie sie zur späteren Einsichtnahme auf.

Prüfen Sie vor dem Gebrauch, ob die Spannungsangabe auf dem Netzteil mit der örtlichen Netzspannung übereinstimmt.

Verwenden Sie das Gerät nicht, wenn es in irgendeiner Hinsicht defekt oder beschädigt ist. Lassen Sie es nur von einem Philips Service-Center reparieren.

Das Netzteil und die Ladestation können nicht ausgetauscht werden. Ist das Kabel oder die Ladestation beschädigt, muss das Gerät entsorgt werden.

Saugen Sie mit diesem Gerät niemals Wasser, andere Flüssigkeiten oder leicht entzündbare Substanzen auf. Saugen Sie Asche erst auf, wenn sie völlig ausgekühlt ist.

Tauchen Sie den Akkusauger und das Netzteil niemals in Wasser.

Ziehen Sie das Netzteil aus der Steckdose, bevor Sie die Ladestation reinigen.

Laden Sie den Akkusauger nur mit dem mitgelieferten Netzteil und der mitgelieferten Ladestation auf.Während des Aufladens fühlt sich das Netzteil warm an. Das ist ganz normal.

4222 003 30584 19-12-2006 07:24 Pagina 12

12 DEUTSCH

Schalten Sie den Staubsauger nach jedem Gebrauch aus.

Halten Sie das Gerät außer Reichweite von Kindern.

Die Stromspannung an den Kontaktstreifen in der Ladestation ist

sehr gering (maximal 12 Volt) und daher ungefährlich.

Blockieren Sie während des Staubsaugens keinesfalls die Abluftöffnungen.

Schalten Sie das Gerät aus, wenn Sie es wieder aufladen.

Verwenden Sie den Staubsauger ausschließlich mit Filtereinheit.

Vorbereitung zum Gebrauch

Die Ladestation anbringen

1 Befestigen Sie die Ladestation an der Wand (siehe Abbildung) (Abb. 2).

Beim Befestigen der Ladestation an der Wand sollte der Abstand zwischen den Bohrlöchern 70 mm betragen.

2Sie können die Ladestation auch auf eine waagerechte Fläche stellen (z. B.Tisch oder Arbeitsplatte) (Abb. 3).

3Wickeln Sie überschüssiges Kabel um die Ladestation (Abb. 4).

Die Akkus aufladen

Laden Sie die Akkus vor dem ersten Gebrauch mindestens 16 Stunden lang auf.

1Stecken Sie das Netzteil in die Steckdose.

2Setzen Sie das Gerät auf die Ladestation (Abb. 5).

Die Ladekontrolllampe leuchtet auf und signalisiert, dass das

Gerät geladen wird (Abb. 6).

BDie Ladekontrolllampe brennt, solange das Gerät mit der Ladestation verbunden ist und das Netzteil in der Steckdose steckt.

BDie Ladekontrolllampe gibt keinerlei Hinweis über den Ladestand der integrierten Akkus.

4222 003 30584 19-12-2006 07:24 Pagina 13

DEUTSCH 13

BUm die Lebensdauer der Akkus zu optimieren, sollten Sie die Akkus von Zeit zu Zeit vollkommen entladen: Lassen Sie das Gerät laufen, bis es zum Stillstand kommt. Laden Sie die Akkus dann wieder voll auf.

Staubsaugen

1Schieben Sie den Ein-/Ausschalter nach vorn, um das Gerät einzuschalten (Abb. 7).

2Schieben Sie den Ein-/Ausschalter zurück, um das Gerät auszuschalten (Abb. 8).

Zubehör

Das Gerät wird mit folgendem Zubehör geliefert: 1 Eine Bürstendüse für empfindliche Oberflächen;

2 Eine Fugendüse für Ecken und schmale Zwischenräume;

3Eine biegsame Fugendüse - zusammenschiebbar und dehnbar zum Reinigen schwer erreichbarer Stellen (nur FC6053).

1Nehmen Sie das gewünschte Zubehör von der Ladestation.

2Setzen Sie den Aufsatz auf die Düse des Geräts (Abb. 9).

Das Gerät reinigen

Ziehen Sie stets das Netzteil aus der Steckdose, bevor Sie die Ladestation reinigen.

1Reinigen Sie das Gerät mit einem feuchten Tuch.

Leeren der Staubkammer

Leeren Sie die Staubkammer und reinigen Sie Filterhalter und Staubbeutel regelmäßig.

1Halten Sie das Gerät über einen Mülleimer und drücken Sie den Entriegelungsknopf der Staubkammer (Abb. 10).

2Nehmen Sie die Filtereinheit aus der Staubkammer (Abb. 11).

4222 003 30584 19-12-2006 07:24 Pagina 14

14 DEUTSCH

3Leeren Sie die Staubkammer mit der freien Hand.

4Reinigen Sie Filterhalter und Staubbeutel.

BZum Reinigen des Staubbeutels können Sie den Filterhalter vom Staubbeutelhalter lösen, indem Sie ihn gegen den Uhrzeigersinn drehen.

BBei starker Verschmutzung können Sie Filterhalter und Staubbeutel mit einer Bürste oder einem normalen Staubsauger reinigen.

BSofern erforderlich, können Sie Filterhalter und Staubbeutel auch mit kaltem oder lauwarmem Wasser reinigen.

5Setzen Sie den Filterhalter mit dem Staubbeutelhalter wieder in die Staubkammer.Achten Sie darauf, dass der Filterhalter richtig platziert ist (Abb. 12).

Benutzen Sie den Akkusauger nicht, solange die Filtereinheit noch feucht ist.

Aufbewahrung

1Sie können die Bürstendüse und die Fugendüse auf der Ladestation aufbewahren (Abb. 13).

Ersatzteile

Wechseln Sie den Staubbeutel, wenn er sich nicht mehr ordentlich reinigen lässt. Das ist normalerweise nach ca. 50 Anwendungen der Fall.

1Nehmen Sie die Filtereinheit aus der Staubkammer (Abb. 11).

2Nehmen Sie den Filterhalter mit einer Drehung im Uhrzeigersinn vom Staubbeutelhalter (Abb. 14).

3Nehmen Sie den Staubbeutel vom Staubbeutelhalter, indem Sie ihn sanft gegen den Uhrzeigersinn drehen (Abb. 15).

4Befestigen Sie einen neuen Staubbeutel am Staubbeutelhalter (Abb. 16).

5Drücken Sie die Spitze des Staubbeutels nach innen (Abb. 17).

4222 003 30584 19-12-2006 07:24 Pagina 15

DEUTSCH 15

6Setzen Sie Filterhalter und Staubbeutelhalter wieder zusammen (Abb. 18).

Zubehör

Ersatz-Staubbeutel erhalten Sie über Ihren Philips-Händler unter der Typennummer FC8035.

Umweltschutz

Geben Sie das Gerät am Ende der Lebensdauer nicht in den normalen Hausmüll. Bringen Sie es zum Recycling zu einer offiziellen Sammelstelle.Auf diese Weise helfen Sie die Umwelt zu schonen (Abb. 19).

Energie sparen

Wenn Sie beabsichtigen, das Gerät längere Zeit nicht zu benutzen, empfiehlt es sich, das Netzteil aus der Steckdose zu ziehen, um Strom zu sparen.

Die Akkus entsorgen

NiCd/NiMH Akkus können die Umwelt gefährden und sogar explodieren, wenn sie hohen Temperaturen oder Feuer ausgesetzt werden.

Akkus enthalten Substanzen, welche die Umwelt gefährden können. Entnehmen Sie die Akkus, bevor Sie das Gerät entsorgen oder an einer offiziellen Sammelstelle abgeben. Bringen sie die Akkus zu einer offiziellen Sammelstelle für Batterien.

Entnehmen Sie die Akkus nur in völlig entladenem Zustand.

Sie können die Akkus wie folgt auch selbst herausnehmen:

1Lassen Sie den Motor laufen, bis er stillsteht. Lösen Sie die Schrauben und öffnen Sie das Gerät (Abb. 20).

2Durchtrennen Sie jeden Verbindungsdraht einzeln, und nehmen Sie die Akkus heraus (Abb. 21).

4222 003 30584 19-12-2006 07:24 Pagina 16

16 DEUTSCH

Garantie und Kundendienst

Benötigen Sie weitere Informationen oder treten Probleme auf, wenden Sie sich bitte an Ihren Philips-Händler oder setzen Sie sich mit einem Philips Service-Center in Ihrem Land in Verbindung (Tel. Nr. 0180/5456767). Besuchen Sie auch die Philips Website www.philips.com.

4222 003 30584 19-12-2006 07:24 Pagina 17

FRANCAIS 17

Description générale (fig. 1)

A Suceur à plinthes

B Brosse

C Suceur flexible (FC6053 uniquement)

D Filtre extérieur

E Filtre intérieur

F Base de recharge

GAdaptateur

H Compartiment à poussière

ITouche d'ouverture du compartiment à poussière

J Orifices d'évacuation

KVoyant de charge

L Bouton coulissant marche/arrêt

M Zones de contact

Important

Lisez les instructions du mode d'emploi avant d'utiliser l'appareil et conservez-les pour un usage ultérieur.

Vérifiez si la tension mentionnée sur l'adaptateur correspond à la tension locale avant de connecter l'appareil.

N'utilisez pas l'appareil s'il est endommagé. Pour toute réparation, portez-le dans un Centre Service Agréé Philips.

L'adaptateur et l'unité de charge de cet appareil ne peuvent pas être remplacés. Si l'adaptateur ou l'unité de charge est endommagé(e), l'appareil doit être jeté.

N'aspirez jamais de l'eau ou tout autre liquide. N'aspirez jamais des substances inflammables, ni de cendres si elles ne sont pas complètement froides.

N'immergez jamais l'aspirateur ou l'unité de charge dans l'eau.

Retirez l'adaptateur de la prise murale avant de nettoyer l'unité de charge.

Chargez l'aspirateur en utilisant l'adaptateur et l'unité de charge fournis. Pendant la charge, l'adaptateur chauffe. Cela est normal.

Arrêtez toujours l'appareil après utilisation.

Tenez l'appareil hors de portée des enfants.

4222 003 30584 19-12-2006 07:24 Pagina 18

18 FRANCAIS

La tension très basse des zones de contact de l'unité de charge n'est pas dangereuse (12 V au maximum).

Ne bloquez pas les sorties d'air pendant l'aspiration.Arrêtez l'appareil lors de la recharge.

N'utilisez jamais l'aspirateur sans l'ensemble filtre.

Préparation à l'emploi

Installation de l'unité de charge

1 Fixez l'unité de charge sur le mur voir figure (fig. 2).

Si vous fixez l'unité de charge au mur, l'espace entre les vis de fixation doit être de 70 mm.

2Vous pouvez mettre l'unité de charge sur une surface horizontale (par ex. une table ou un bureau) (fig. 3).

3Ajustez la longueur du cordon d'alimentation en l'enroulant autour de l'unité de charge (fig. 4).

Charge de l'appareil

Chargez l'appareil pendant au moins 16 heures avant la première utilisation.

1Insérez l'adaptateur dans la prise murale.

2Placez l'aspirateur sur l'unité de charge (fig. 5).

Lors de la charge le témoin lumineux s'allume (fig. 6).

BLe témoin de charge reste allumé aussi longtemps que l'appareil est connecté à l'unité de charge et l'adaptateur est branché.

BLe témoin de charge ne fournit aucune information sur le niveau de charge des accumulateurs.

BPour optimiser la durée de vie de la batterie, pensez à la décharger et à la recharger complètement de temps en temps. Pour décharger la batterie, laissez l'appareil fonctionner jusqu'à l'arrêt du moteur.

4222 003 30584 19-12-2006 07:24 Pagina 19

FRANCAIS 19

Utilisation de l'appareil

1Faites glisser le bouton marche/arrêt vers l'avant pour mettre l'appareil en marche (fig. 7).

2Faites glisser le bouton marche/arrêt vers l'arrière pour arrêter l'appareil (fig. 8).

Accessoires

L'appareil est livré avec les accessoires suivants :

1 une brosse pour nettoyer les surfaces délicates ;

2 un suceur pour nettoyer les coins et les zones étroites ;

3un suceur flexible, extensible et rétractable pour nettoyer les zones difficiles à atteindre (FC6053 uniquement).

1Prenez l'accessoire dont vous avez besoin de l'unité de charge.

2Fixez l'accessoire sur l'appareil (fig. 9).

Nettoyage

Retirez toujours l'adaptateur de la prise murale avant de nettoyer l'unité de charge.

1Nettoyez l'appareil avec un chiffon humide.

Pour vider le compartiment à poussières

Videz le compartiment à poussières et nettoyez les filtres régulièrement.

1Tenez l'appareil au-dessus d'une poubelle et appuyez sur la touche de libération du compartiment à poussières (fig. 10).

2Retirez l'unité filtre du compartiment à poussières (fig. 11).

3Videz le compartiment à poussière avec votre main libre.

4Nettoyez les filtres intérieur et extérieur.

4222 003 30584 19-12-2006 07:24 Pagina 20

20 FRANCAIS

BPour nettoyer le filtre intérieur, retirez le filtre extérieur du porte-filtre en tournant dans le sens inverse des aiguilles d'une montre.

BVous pouvez nettoyer le filtre extérieur et celui intérieur avec une brosse ou un aspirateur traditionnel s'ils sont très sales.

BSi nécessaire, vous pouvez nettoyer le filtre extérieur et celui intérieur à l'eau chaude ou tiède.

5Mettez le filtre extérieur sur le porte-filtre et insérez le portefiltre correctement dans le compartiment à poussières (fig. 12).

N'utilisez pas l'aspirateur si l'unité filtre est encore humide.

Rangement

1Rangez la brosse et le suceur dans la base de recharge (fig. 13).

Remplacement

Remplacez l'unité filtre après environ 50 nettoyages.

1Retirez l'unité filtre du compartiment à poussières (fig. 11).

2Retirez le filtre extérieur du porte-filtre en tournant dans le sens inverse des aiguilles d'une montre (fig. 14).

3Retirez le filtre intérieur du porte-filtre en tournant légèrement dans le sens inverse des aiguilles d'une montre (fig. 15).

4Insérez un nouveau filtre dans le porte-filtre (fig. 16).

5Poussez le bout du filtre vers l'intérieur (fig. 17).

6Remontez le filtre extérieur sur le porte-filtre (fig. 18).

Accessoires

De nouveaux filtres intérieurs sont disponibles sous le code FC8035. Contactez votre distributeur Philips.

4222 003 30584 19-12-2006 07:24 Pagina 21

FRANCAIS 21

Environnement

Ne jetez pas l'appareil en fin de vie avec les ordures ménagères, mais déposez-le à un endroit prévu à cet effet par les pouvoirs publics pour son recyclage.Vous aiderez, ainsi, à protéger l'environnement (fig. 19).

Economiser de l'énergie

Si vous n'allez pas utiliser l'appareil pendant longtemps, il est conseillé de retirer l'adaptateur de la prise murale pour économiser de l'énergie.

Elimination des accumulateurs

Les accumulateurs NiCd/NiMH peuvent nuire à l'environnement et peuvent même exploser s'ils sont exposés à des températures élevées ou aux flammes.

La batterie contient des substances susceptibles de nuire à l'environnement. Retirez toujours la batterie avant de mettre l'appareil au rebut ou de le déposer à un endroit assigné à cet effet. Mettez la batterie usagée au rebut à un endroit assigné à cet effet.

Ne retirez les accumulateurs que lorsque ceux-ci sont entièrement déchargés.

Retirez les accumulateurs de la manière suivante:

1Laissez l'appareil fonctionner jusqu'à l'arrêt complet, défaites les vis et ouvrez l'aspirateur (fig. 20).

2Coupez les fils de connexion l'un après l'autre à ras des accumulateurs et enlevez-les (fig. 21).

Garantie & service

Pour plus d'informations, visitez notre Philips Web site: www.philips.com ou veuillez contacter le Service Consommateurs Philips de votre pays (vous trouverez le numéro de téléphone dans le dépliant sur la garantie internationale). S'il n'y a aucun Service Consommateurs Philips dans votre pays, contactez votre distributeur ou le Service Department of Philips Domestic Appliances and Personal Care BV.

4222 003 30584 19-12-2006 07:24 Pagina 22

22 NEDERLANDS

Algemene beschrijving (fig. 1)

A Spleetzuigmond

B Borstelzuigmond

C Buigbare spleetzuigmond (alleen FC6053)

D Buitenfilter

E Binnenfilter

F Oplader

GAdapter

H Stofvak

I Stofvakontgrendelknop

J Luchtuitlaatopeningen

K Oplaadlampje (LED)

LAan/uitknop

M Contactstrippen

Belangrijk

Lees deze gebruiksaanwijzing zorgvuldig door voordat u het apparaat gaat gebruiken. Bewaar de gebruiksaanwijzing om hem indien nodig te kunnen raadplegen.

Controleer of het voltage aangegeven op de adapter overeenkomt met de plaatselijke netspanning voordat u het apparaat aansluit.

Gebruik dit apparaat niet als het beschadigd is. Ga er dan mee naar een door Philips geautoriseerd servicecentrum om het te laten repareren.

De adapter en de oplader van dit apparaat kunnen niet vervangen worden. Indien de adapter of de oplader beschadigd is, moet het apparaat afgedankt worden.

Zuig nooit water of een andere vloeistof op met de stofzuiger. Zuig nooit brandbare substanties op en zuig nooit as op voordat deze volledig is afgekoeld.

Dompel de stofzuiger of de oplader nooit in water.

Verwijder de adapter uit het stopcontact voordat u de oplader gaat schoonmaken.

Laad de stofzuiger uitsluitend op met behulp van de bijgeleverde adapter en oplader.

4222 003 30584 19-12-2006 07:24 Pagina 23

NEDERLANDS 23

Tijdens het opladen zal de adapter warm aanvoelen. Dit is normaal.

Schakel het apparaat altijd uit na gebruik.

Houd het apparaat buiten het bereik van kinderen.

De spanning die op de contactstrippen in de oplader staat is laag (max. 12 volt) en is daarom niet gevaarlijk.

Blokkeer nooit de uitlaatopeningen tijdens het stofzuigen.Schakel het apparaat uit wanneer u het gaat opladen.

Gebruik de stofzuiger altijd met de filterunit.

Klaarmaken voor gebruik

Installeren van de oplader

1 Bevestig de oplader op de in de figuur aangegeven wijze aan de muur (fig. 2).

Als u de oplader aan de muur bevestigt, moet de afstand tussen de schroefgaten 70 mm zijn.

2U kunt de oplader ook op een horizontaal oppervlak (bijv. een tafel of bureau) plaatsen (fig. 3).

3Het niet benodigde deel van het snoer kan rond de oplader worden gewikkeld (fig. 4).

Opladen van het apparaat

Laad het apparaat tenminste 16 uur op voordat u het voor de eerste keer gebruikt.

1Steek de adapter in het stopcontact.

2Plaats de stofzuiger in de oplader (fig. 5).

Het oplaadlampje gaat aan om aan te geven dat het apparaat aan

het opladen is (fig. 6).

BHet oplaadlampje blijft branden zolang het apparaat in de oplader staat en de adapter in het stopcontact zit.

BHet oplaadlampje geeft geen informatie over het ladingsniveau van de ingebouwde accu's.

4222 003 30584 19-12-2006 07:24 Pagina 24

24 NEDERLANDS

BOm de levensduur van de accu's te verlengen, moet u ze periodiek volledig ontladen door het apparaat te laten lopen tot het stopt. Laad daarna de accu's weer volledig op.

Gebruik

1Druk de aan/uitknop naar voren om het apparaat in te schakelen (fig. 7).

2Druk de aan/uitknop naar achteren om het apparaat uit te schakelen (fig. 8).

Accessoires

Het apparaat wordt geleverd met de volgende accessoires:

1 een borstelzuigmond om kwetsbare oppervlakken te reinigen; 2 een spleetzuigmond om hoeken en smalle spleten te reinigen;

3een buigbare spleetzuigmond die ingeduwd en uitgetrokken kan worden om moeilijk bereikbare plekken te reinigen (alleen FC6053).

1Neem het accessoire dat u wilt gebruiken uit de oplader.

2Bevestig het accessoire aan de zuigmond van het apparaat (fig. 9).

Schoonmaken

Neem altijd de adapter uit het stopcontact voordat u de oplader gaat schoonmaken.

1Reinig het apparaat met een vochtige doek.

Legen van het stofvak

Gooi het stofzak regelmatig leeg en maak de filters regelmatig schoon.

1Houd het apparaat boven een afvalbak en druk op de stofvakontgrendelingsknop (fig. 10).

2Verwijder de filterunit uit het stofvak (fig. 11).

Loading...
+ 56 hidden pages