

Page 1
FC6048
/01
Vacuum Cleaner
1
ENGLISH 3 - 5
6 - 8
Page 2
2 4222 003 31091FC6048
/01
2 3 4 5
6 7 8 9
10 11 12 13
14 15 16
17
18
1
2
Page 3

3 ENGLISH 4222 003 31091FC6048
/01
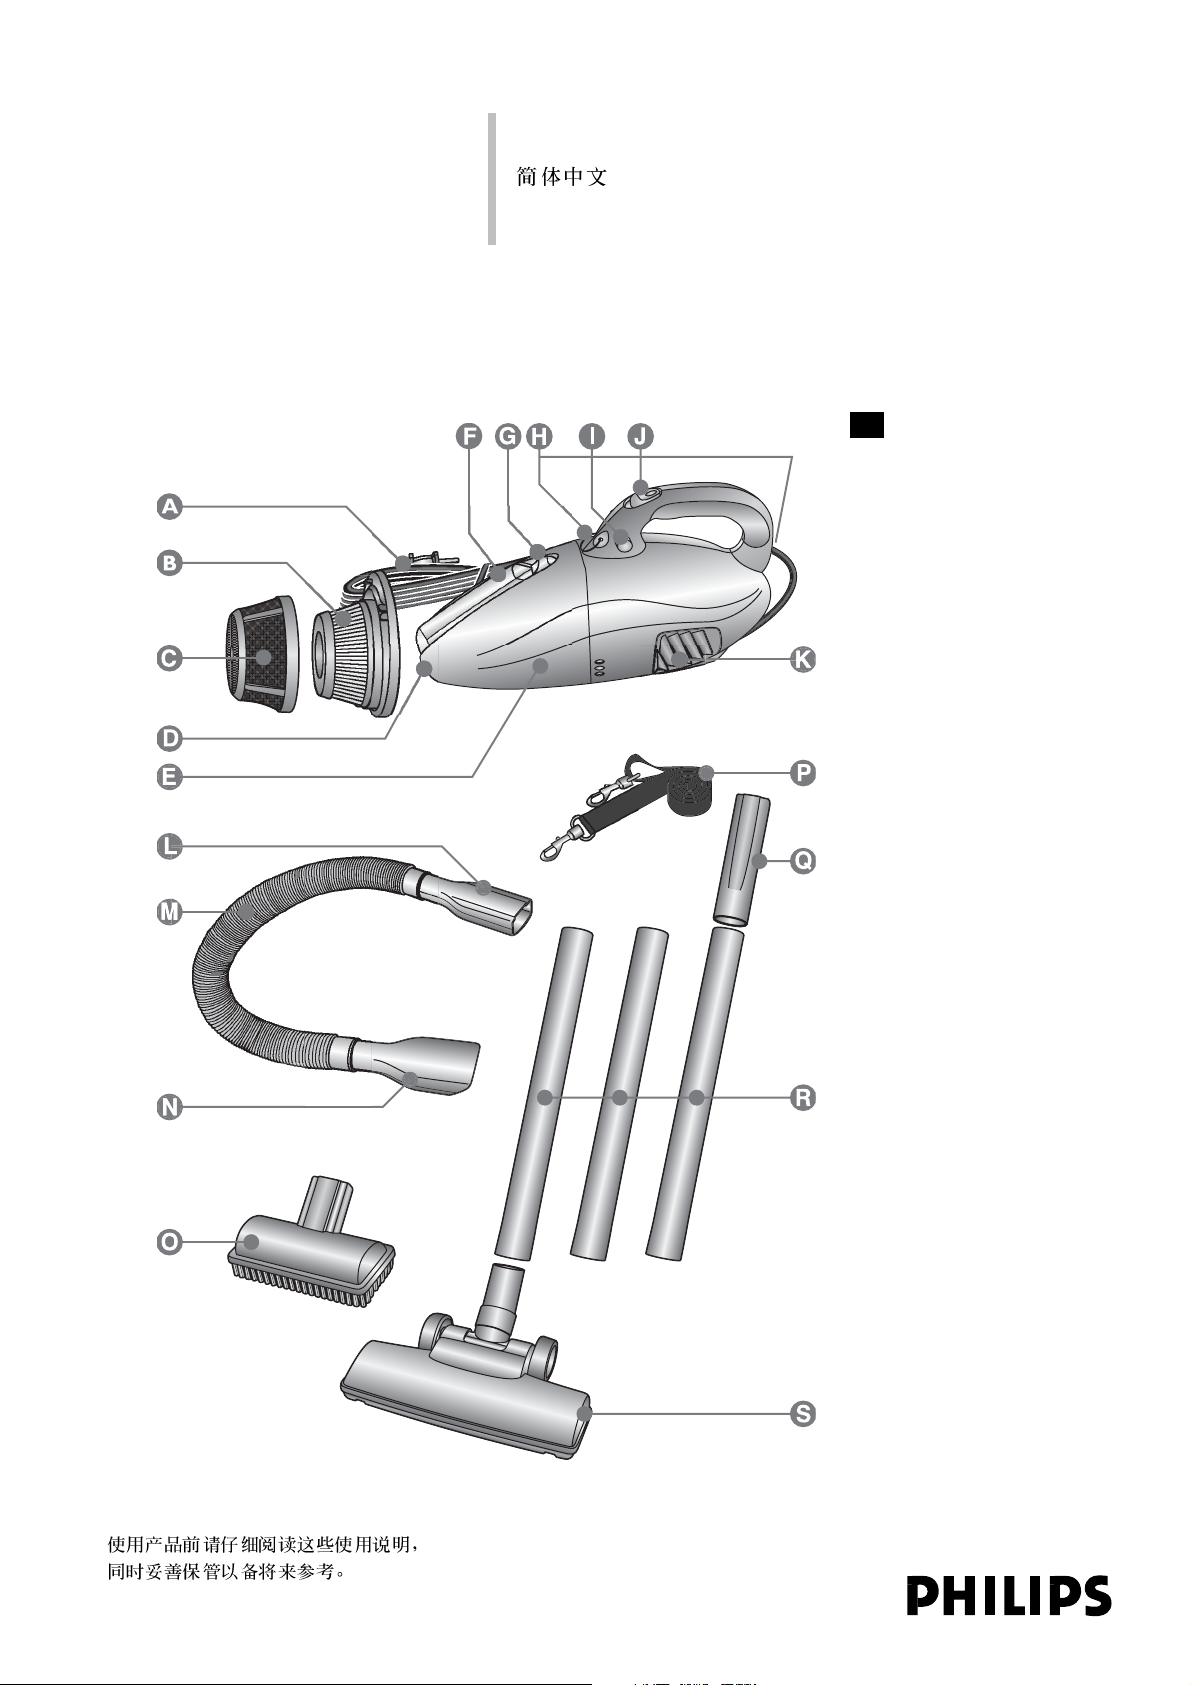
General description (fig.1)
.
A Mains cord K Exhaust air openings
B Filter holder L Appliance end of hose
C Filter M Hose
D Appliance nozzle N Attachment end of hose
E Dust compartment O Brush tool
F Integrated crevice tool P Shoulder strap + clasp
G Crevice tool release button Q Connector
H Shoulder strap holes R Tube parts
I Dust compartment release button S Nozzle
J On/off slide
i
Important
.
Read these instructions for use carefully before using the appliance and save them for future reference.
◗ Check if the voltage indicated on the appliance corresponds to the local mains voltage before you
connect the appliance.
◗ Do not use the appliance if the plug, the cord or the appliance itself is damaged. Take it to an
authorised Philips service centre for repair.
◗ If the mains cord is damaged, it must be replaced by Philips, a service centre authorised by Philips or
similarly qualified persons in order to avoid a hazard.
◗ Keep the appliance out of the reach of children.
◗ Never suck up water or any other liquid. Never suck up flammable substances and do not suck up
ashes until they are cold.
◗ Never immerse the vacuum cleaner in water.
◗ Never block the exhaust air openings during vacuuming.
◗ Do not use the vacuum cleaner without dust compartment and/or filter.
◗ Do not point the hose at the eyes or ears nor put it in your mouth when the vacuum cleaner is
switched on and the hose is connected to the vacuum cleaner.
◗ Always switch the vacuum cleaner off after use.
◗ Always switch the appliance off before connecting or disconnecting accessories.
◗ Remove the plug from the wall socket before cleaning the appliance.
Preparing for use
.
You can attach the shoulder strap to the appliance for extra convenience. Connect the clasp to the front and
back of the appliance. See figure 1 for the location of the shoulder strap holes.
1 Insert the plug into the wall socket.
Using the appliance
.
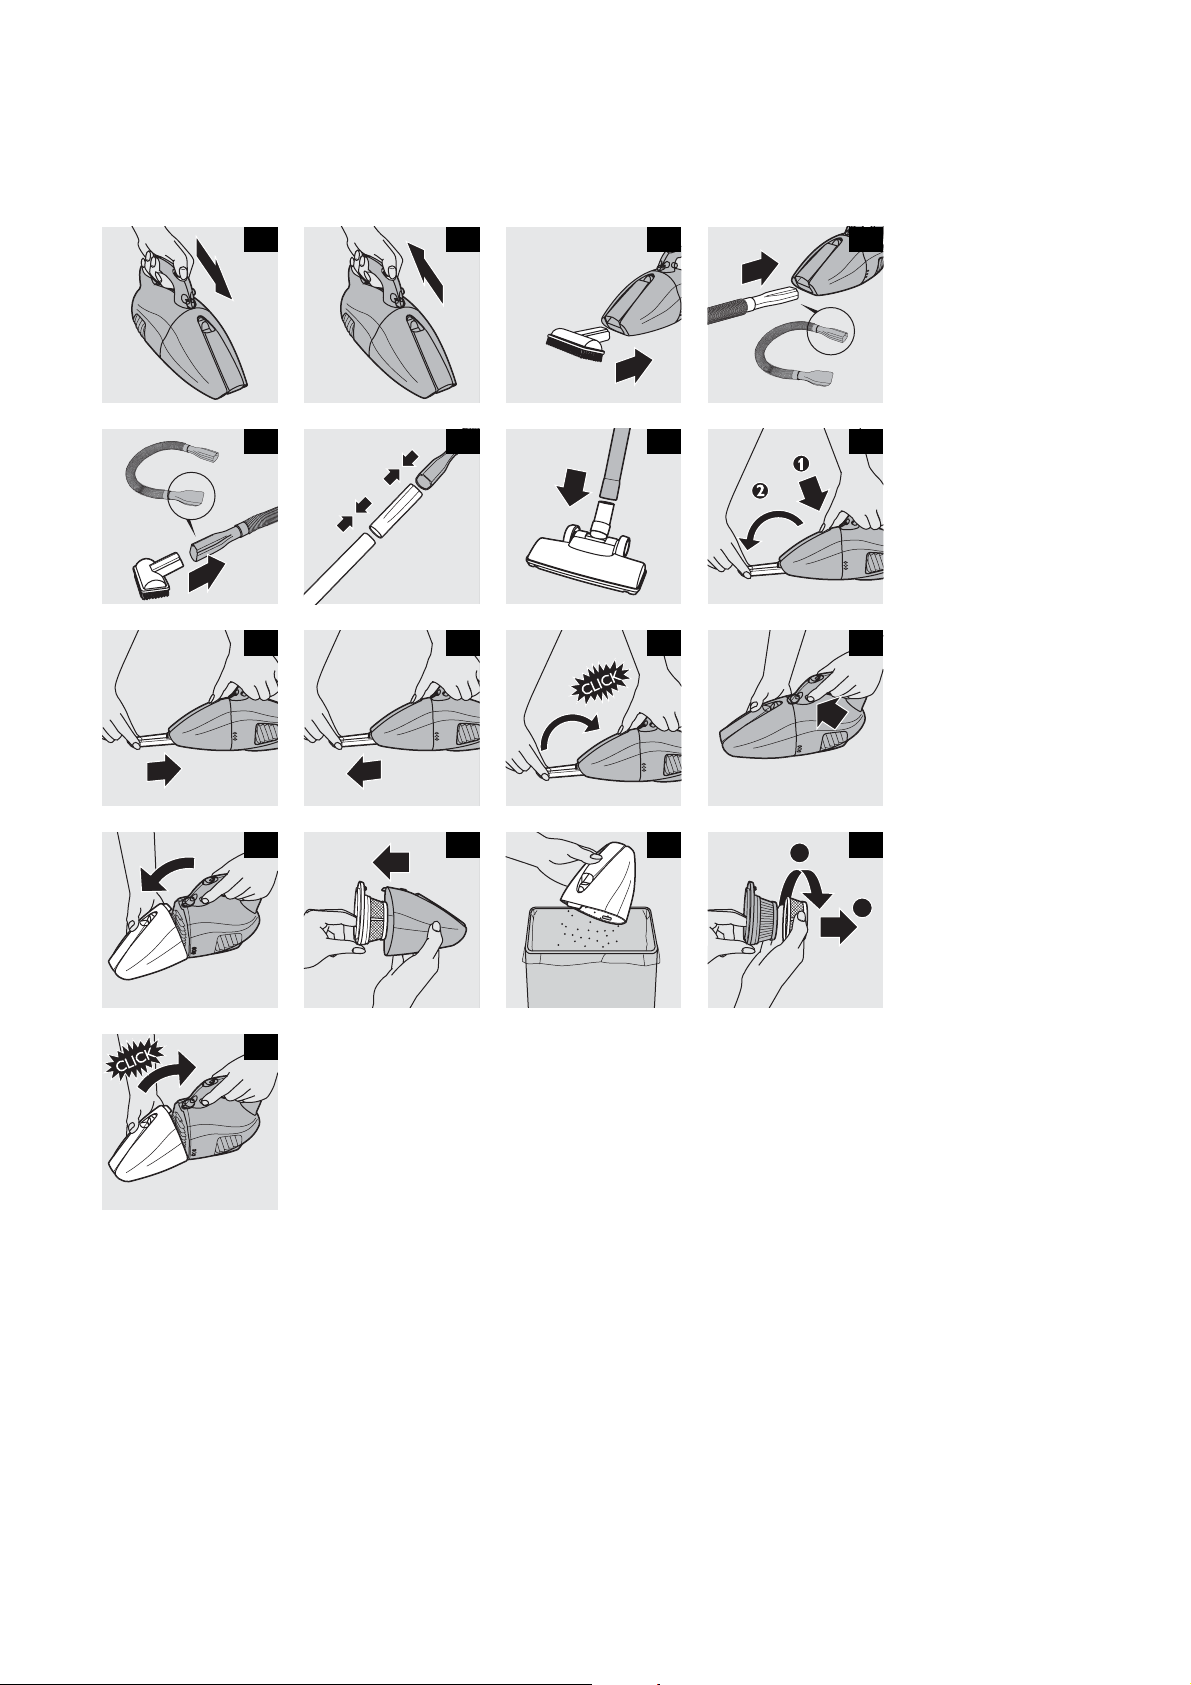
1 Push the on/off slide forwards to switch the appliance on (fig. 2).
2 Push the on/off slide backwards to switch the appliance off (fig. 3).
Always switch the appliance off before connecting or disconnecting accessories.
Brush tool
The brush tool can be used to clean delicate surfaces.
◗ Attach the brush tool to the appliance nozzle (fig. 4).
Hose
You can use the hose for extended reach with the brush tool.
Page 4

4 ENGLISH 4222 003 31091FC6048
/01
1 Insert the appliance end of the hose into the appliance nozzle (fig. 5).
2 Insert the brush tool into the attachment end of the hose (fig. 6).
Tube and nozzle
The nozzle can be used on either carpets or hard floors.
1 Connect the tube parts to each other by inserting the narrow section into the wider section while
turning it a little.
2 Connect the tube to the hose by means of the connector (fig. 7).
3 Attach the nozzle to the other end of the tube (fig. 8).
Integrated crevice tool
With the crevice tool you can quickly and conveniently clean hard-to-reach places.
1 Push the release slide towards the handle to release the crevice tool and fold it out with your free
hand (fig. 9).
2 Push the crevice tool into the appliance nozzle as far as possible to secure it (fig. 10).
To store the crevice tool on the body of the appliance:
3 Pull the crevice tool out of the appliance nozzle (fig. 11).
4 Fold the crevice tool back onto the body of the appliance and snap it home ('click') (fig. 12).
Cleaning
.
Always unplug the appliance before cleaning it.
1 Clean the appliance with a damp cloth.
Emptying the dust compartment.
Make sure you empty the dust compartment and clean the filter regularly.
Always unplug the appliance before emptying the dust compartment and cleaning the filter.
1 Press the dust compartment release button (fig. 13).
2 Remove the dust compartment from the appliance (fig. 14).
3 Pull the filter holder out of the dust compartment (fig. 15).
4 Empty the contents of the dust compartment into a dustbin (fig. 16).
5 Remove the filter from the holder by turning it anticlockwise (fig. 17).
6 Clean the filter.
Use a brush or a normal vacuum cleaner if the filter is very dirty.
7 Put the filter back in the holder and turn it clockwise.
8 Place the filter holder back into the dust compartment.
9 Reattach the dust compartment by aligning the slot on the dust compartment with the projecting part
of the appliance. First attach the bottom of the dust compartment and then push the top of the dust
compartment towards the appliance until it locks into place ('click') (fig. 18).
Page 5

5 ENGLISH 4222 003 31091FC6048
/01
Environment
.
To make recycling possible, the plastic parts used for this appliance have been coded. The cardboard packaging
has been made of recycled material and is fully recyclable.
Guarantee & service
.
If you need information or if you have a problem, please visit the Philips website at www.philips.com or
contact the Philips Customer Care Centre in your country (you will find its phone number in the worldwide
guarantee leaflet). If there is no Customer Care Centre in your country, turn to your local Philips dealer or
contact the Service Depar tment of Philips Domestic Appliances and Personal Care BV.
Solution
Make sure that you have inserted the plug properly into the wall socket.
Take the appliance to your dealer or a service centre authorised by Philips for
examination.
Make sure that you have attached the dust compartment properly to the appliance.
Empty the dust compartment (see chapter 'Cleaning').
Check if the filter is clogged. If so, remove the filter holder and clean the filter (see
chapter 'Cleaning').
Check if the dust compartment is full. If so, empty it.
Make sure you have attached the dust compartment properly to the appliance (see
chapter 'Cleaning').
Make sure the filter holder has been inserted properly into the dust compartment
(see chapter 'Cleaning').
Check whether one of the accessories is clogged. If so, remove the obstruction.
Check if the dust compartment is full. If so, empty it.
Check if the filter is clogged. If so, use a brush or a standard vacuum cleaner to clean
the filter.
Problem
The vacuum cleaner does not
work.
The vacuum cleaner does not
vacuum properly.
Dust escapes from the vacuum
cleaner.
The vacuum cleaner does not work
properly when one or more
accessories (hose, tube, brush tool
or crevice tool) are attached.
Troubleshooting
Page 6

6 4222 003 31091FC6048
/01
A K
B L
C M
D N
E O
F P
G Q
H R
I S
J
◗
◗
◗
◗
◗
◗
◗
◗
◗
◗
◗
◗
1
1
2
◗
Page 7

7 4222 003 31091FC6048
/01
1
2
1
2
3
1
2
3
4
1
1
2
3
4
5
6
7
8
9
Page 8

8 4222 003 31091FC6048
/01
2004/10/01
 Loading...