

Page 1

GENERAL INFORMATION SAFETY INFORMATION
Thank you …
Thank you for buying the new Philips Active Subwoofer.
We have designed and tested the subwoofer to provide
you with the latest technology and high quality sound.
Follow these instructions to adjust and operate all the
functions of your new subwoofer. Please read and perform
the instructions in the order shown.
General Information
This product complies with the radio interference
requirements of the EU (European Union).
• The typeplate (which contains the serial number) is
located at the rear of the subwoofer.
1 All unnecessary packaging material has been omitted.
We have tried to make the packaging easy to separate
into three mono-materials:
– cardboard (box)
– expandable polystyrene (buffer)
– polythene (bags, protective foam sheet).
2 Your subwoofer consists of materials which can be
recycled and reused if disassembled by a specialized
company. Please follow local regulations on recycling
your old subwoofer.
Accessories (Supplied)
– AC power cord
– Speaker wires (1 pair)
– Subwoofer-In cinch cable
Safety Information
• Before switching on the subwoofer, check that the
operating voltage indicated on the typeplate (or the
voltage indication beside the voltage selector) of your
system is identical with the voltage of your local power
supply. If not, please consult your dealer. The type plate
is located at the rear of the subwoofer.
• When the subwoofer is switched on, do not move it
around.
• When switching on or off an amplifier or other
equipment, lower the volume of the amplifier to
minimum to avoid damaging the subwoofer.
• Be careful when setting the volume control of your
audio amplifier to avoid an excessive output power.
• Place the system in a location with adequate
ventilation to prevent internal heat build-up in your
system.
• Do not expose the system to excessive moisture, rain,
sand or heat sources.
• Clean the cabinet with a soft cloth lightly moistened
with water. Do not use any type of abrasive pad,
scouring powder or solvent such as alcohol or benzene.
• Under no circumstances should you repair the unit
yourself, as this will invalidate the warranty.
• To disconnect the system from the power supply
completely, withdraw the AC power cord from
the wall socket.
English
5
Page 2
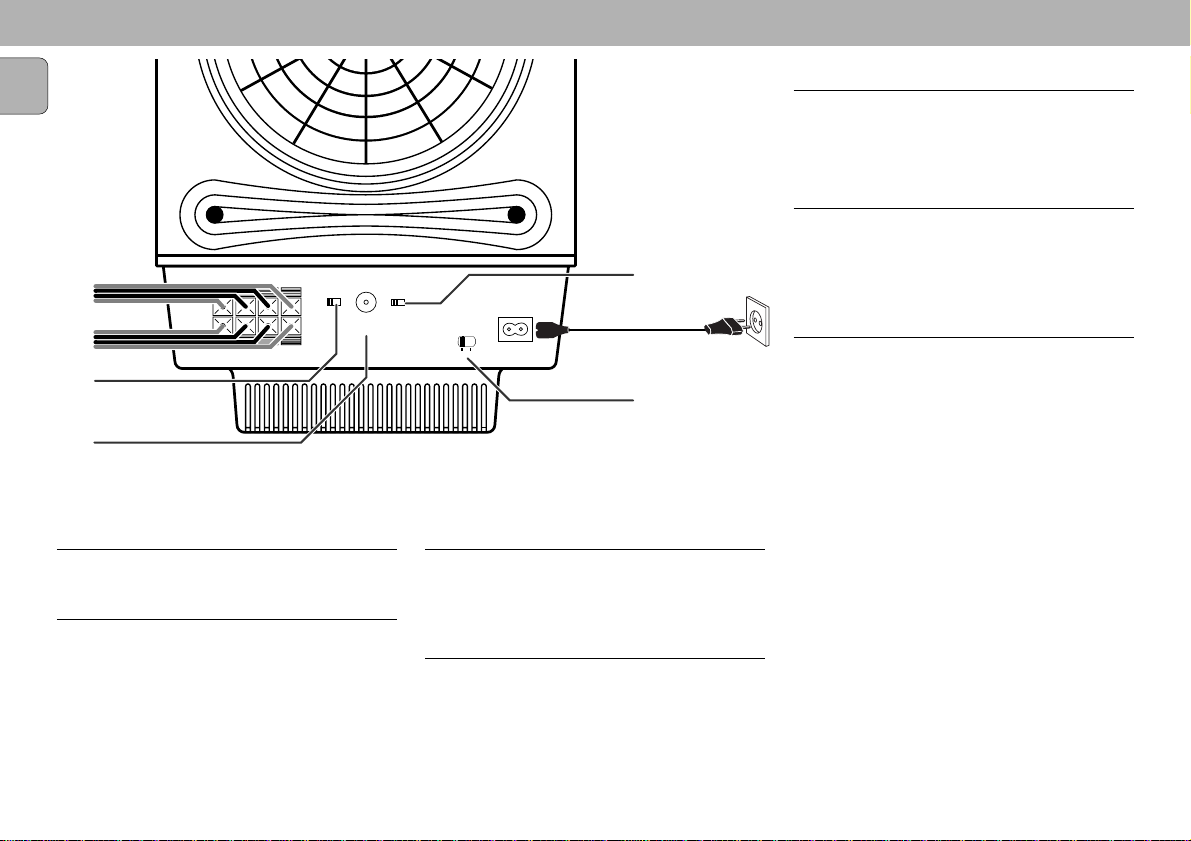
REAR CONNECTION
English
A
B
C
D
SPEAKER
IN
OUT
L + L – R – R +
L + L – R – R +
INPUT
SELECTOR
SPEAKER LINE
INPUT
SUBWOOFER LINE
PHASE
SELECTOR
E Phase Selector
This is to determine the best bass reproduction effect in
certain listening environment.
F Adjusting the Operating Voltage
(not available for version /30)
Before connecting the AC power cord to a wall outlet,
make sure that the voltage selector at the rear of the
E
VOLTAGE
SELECTOR
AC MAINS ~
110V/127V220V/240V
180 º0 º
G
F
system is set to the local power line voltage. If not, reset
the selector before connecting to the wall outlet.
G AC Power Supply
After all other connections have been made, connect the
AC power socket to the set and the AC power plug to the
wall outlet.
A Speaker In
For connection to an amplifier speaker terminal.
B Speaker Out
This output is used when the amplifier has only a single
set of speaker terminal. It is for connection to the front
speakers.
6
C Input Selector
You can select the subwoofer input either by the Speaker
IN terminals or the INPUT SUBWOOFER LINE cinch
connection. Adjust the input selector accordingly.
D Input Subwoofer Line
This is a cinch connection, if your amplifier has a
subwoofer out jack, connect it to the Input Subwoofer Line
at the rear of this system.
Page 3
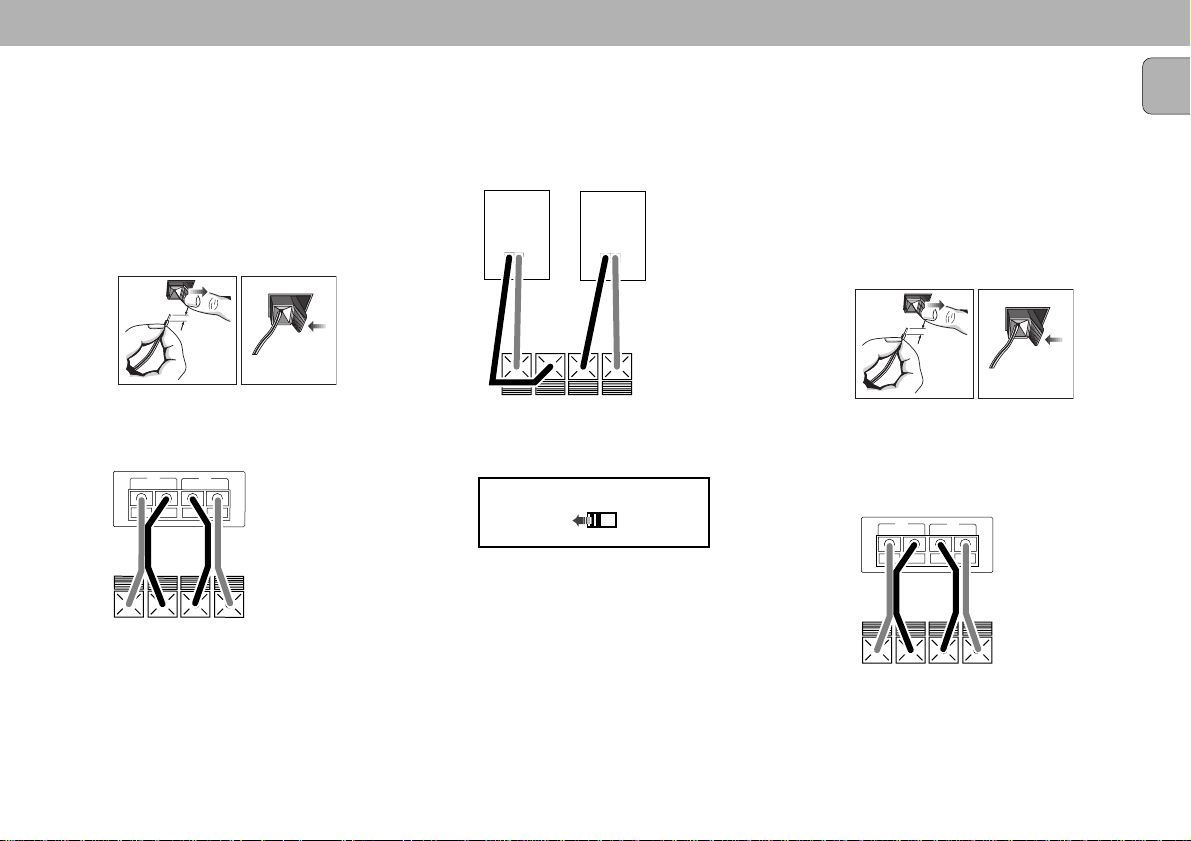
CONNECTING TO AN AMPLIFIER WITH A SINGLE
FRONT SPEAKERS
R
L
++––
AMPLIFIER
SUBWOOFER
SPEAKER IN
L + L – R – R +
SET OF SPEAKER TERMINALS
Connect the subwoofer to the amplifier, and then connect
the front speakers to the subwoofer.
• Connect the right socket R, with the red wire to + and
the black wire to -.
• Connect the left socket L, with the red wire to + and
the black wire to -.
• Clip the stripped portion of the speaker wire as shown.
reversed, the sound will be distorted and will lack bass.
2 Connect the SPEAKER OUT terminals of the Subwoofer
to the Front Left and Right speakers. If the speaker
wires are reversed, the sound will be distorted and will
lack bass.
FRONT LEFT
+–
FRONT RIGHT
+–
SPEAKERS' CONNECTION
CONNECTING TO AN AMPLIFIER WITH TWO SETS
OF SPEAKER TERMINALS (A + B)
Connect the subwoofer to the amplifier speaker terminal
B, and then connect the front speakers to the amplifier
speaker terminal A.
• Connect the right socket R, with the red wire to + and
the black wire to -.
• Connect the left socket L, with the red wire to + and
the black wire to -.
• Clip the stripped portion of the speaker wire as shown.
English
12 mm
UNLOCK LOCK
1 Connect the SPEAKER IN terminals of the Subwoofer to
the amplifier speakers' output. If the speaker wires are
SUBWOOFER
L + L – R – R +
SPEAKER OUT
3 Set Source Selector switch to SPEAKER IN position.
INPUT
SELECTOR
SPEAKER LINE
12 mm
UNLOCK LOCK
1 Connect the SPEAKER IN terminals of the Subwoofer to
the amplifier speaker terminal B. If the speaker wires
are reversed, the sound will be distorted and will lack
bass.
SPEAKER B
L
++––
L + L – R – R +
R
SPEAKER IN
AMPLIFIER
SUBWOOFER
7
Page 4

SPEAKERS' CONNECTION
INPUT
SELECTOR
SPEAKER LINE
English
2 Connect the Front Left and Right speakers to the
amplifier speaker terminal A. If the speaker wires are
reversed, the sound will be distorted and will lack bass.
SPEAKER A
L
++––
R
AMPLIFIER
CONNECTING TO AN AMPLIFIER WITH
SUBWOOFER CINCH OUT CONNECTOR
Connect the Input Subwoofer Line to the amplifier
Subwoofer Out.
1 Used the supplied cinch cable, connect the INPUT
SUBWOOFER LINE of the subwoofer to the amplifier
SUBWOOFER OUT.
AMPLIFIER SUBWOOFER
SUBWOOFER OUT
SUBWOOFER LINE
INPUT
+–
FRONT LEFT
+–
FRONT RIGHT
3 Set Source Selector switch to SPEAKER IN position.
Note:
1. When using the double (A+B) sets of speakers, make
sure that you select the “A+B” position with your
amplifier.
2. When you are using speaker terminal (A) only (front
speaker only) or when the power of the amplifier is
turned off, turn down the volume or turn off the power
of the subwoofer otherwise, hum noise may be heard.
8
2 Set Source Selector switch to LINE INPUT position.
INPUT
SELECTOR
LINE
SPEAKER
Page 5

SETTING UP THE SUBWOOFER CONTROLS
Setting up the Subwoofer
front
left
subwoofer
STANDBY ON
E
V
L
E
R
L
E
C
F
O
O
N
O
T
W
R
B
O
U
L
S
MIN MAX
CUT OFF FREQUENCY
FB301
HIGH POWER SUBWOOFER
60Hz 150Hz
center
DVD
VCR
LD
amplifier
W
tv
rear
left
• Install the subwoofer wherever you like because with the bass sound range reproduced
from the subwoofer (below 150Hz), human hearing cannot detect the direction and
position in which the sound is being produced.
• Also, since the feeling of stereo is lost with bass frequencies, a single subwoofer is
enough for reproducing the bass of stereo channels. However, you may install more
than one subwoofer if your system has more than one subwoofer out jack.
• To obtain a better bass reproduction, we recommend that you install the subwoofer on
a solid floor where resonance is unlikely to occur.
• Always place the subwoofer vertically, keeping a few centimeters from away the wall.
front
right
rear
right
Front View
1 ..............B : to switch the unit on or to standby mode.
2 ..............when LED is green, it indicates that the subwoofer is switched on and in
active (operation) mode.
3 ..............CUT OFF FREQUENCY : enables you to manually cut out frequency
responses between 60 Hz and 150 Hz.
4 ..............SUBWOOFER CONTROL LEVEL : to adjust the volume.
1
STANDBY ON
E
V
L
E
R
L
E
C
F
O
O
N
O
T
W
R
B
O
U
L
S
2
4
MIN MAX
3
FB301
HIGH POWER SUBWOOFER
CUT OFF FREQUENCY
60Hz 150Hz
English
• Do not place an object on the subwoofer or sit on it.
• If the subwoofer is placed in the center of a room, the bass could be extremely
weakened. This is due to the influence of the standing wave of the room. If this
happened, move the subwoofer away from the center of a room or eliminate the cause
of the standing wave, by installing a bookshelf on the wall, etc.
9
Page 6
CONTROLS
English
Important:
Before you begin operating the subwoofer, complete the
preparation procedures.
Switch on your audio amplifier and select the
program source.
Switching the subwoofer ON
1 Press STANDBY B.
™ The LED indicator lights up in green.
Switching the subwoofer to standby
mode
• Press STANDBY again .
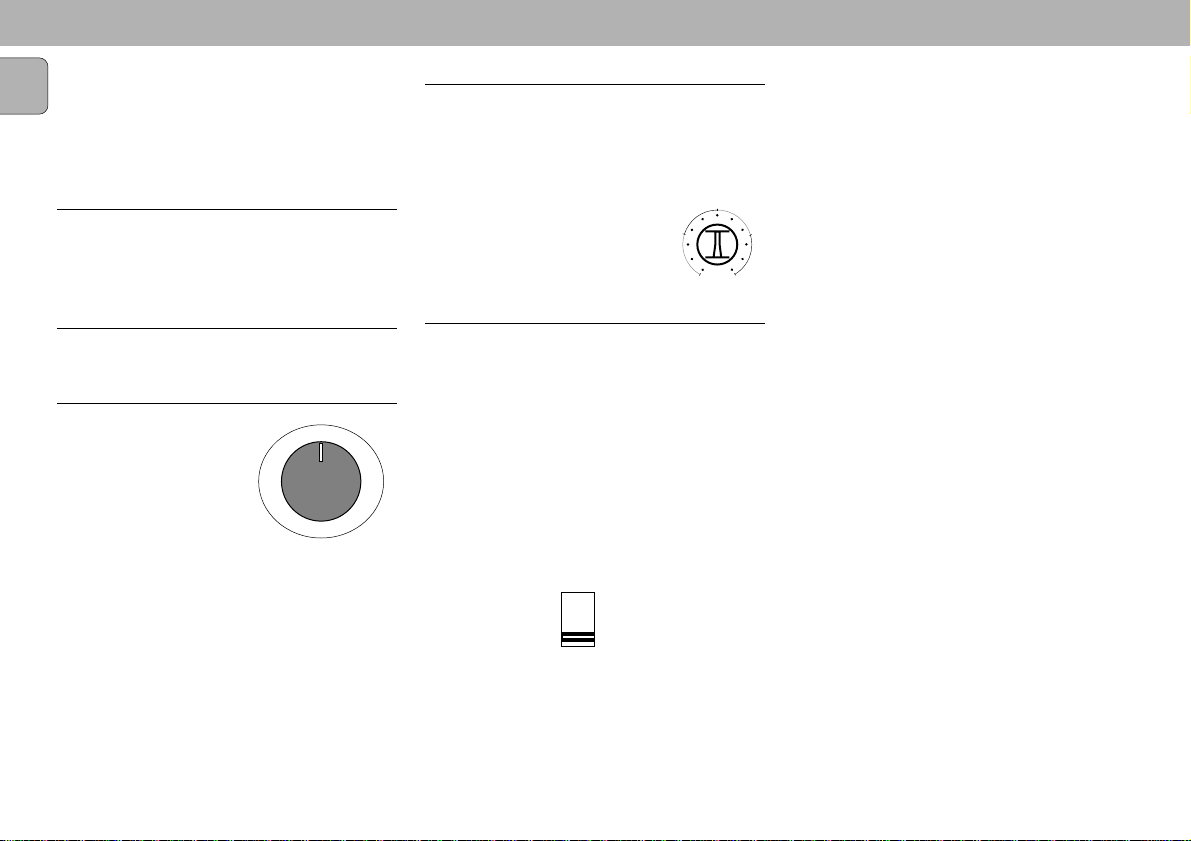
Volume Adjustment
O
You can adjust the subwoofer
to suit the sound level of your
front speakers. Reinforcing the
bass sound gives you a greater
sense of atmosphere.
1 Adjust the VOLUME on the
amplifier until the sound
from front speakers is not
distorted. If it is distorted, the sound from the
subwoofer will also be distorted.
2 Play your favourite songs. Male vocal tunes containing
bass sounds are most suitable for adjustment.
W
B
U
S
MIN MAX
Cut Off Frequency Adjustment
Turn the CUT OFF FREQUENCY control, to determine
which bass frequency is the best match with the type of
music playback from your audio system. e.g. classic or jazz
music.
Refer to the following when adjusting.
Typical very small sized speakers
Typical small sized speakers
.........2
Typical medium sized speakers
Typical large sized speakers
..........4
... 1
......3
CUT OFF FREQUENCY
4
60Hz 150Hz
Phase Polarity Adjustment
Use PHASE SELECTOR located at the rear of the
subwoofer to select the phase polarity. Selecting the
polarity at either 0˚ or 180˚ may determine better bass
E
V
L
E
R
L
E
C
F
O
O
N
T
R
O
L
reproduction effect in certain listening environments
(depending on the type of front speakers, the position of
the subwoofer and the adjustment of the cut-off
Repeat the adjustment for Volume, Cut Off Frequency,
Phase Polarity and Channel Selector to suit your
preference. Once you have adjusted the subwoofer to the
settings you desire, use the VOLUME control on the
amplifier to adjust the volume of the subwoofer and the
other speakers. You do not need to adjust the subwoofer
settings again even when you change the volume level of
the amplifier.
23
Note
1
Never set the amplifier’s tone control (BASS, TREBLE,
DBB, DSC) or the equalizer output to a high level or input
soundwaves of 20Hz to 50Hz recorded on a commercially available test disk or electronic musical instrument, pop
noise of analog disc turnable, sound with abnormally
enhanced bass, etc.) in a high level to this unit. These
actions may cause damage to the speakers.
When a special disc containing abnormally enhanced bass
is played, noise may be output in addition to the original
sound. In such a case, reduce the sound level.
frequency). It may also change the expense and tightness
of sound, and affect the feeling of sound field. Select the
setting that provides the sound you prefer when listening
in your normal listening position.
PHASE
SELECTOR
0
0
0
180
3 Adjust the SUBWOOFER LEVEL CONTROL to
determine the loudness of the bass sound from the
subwoofer.
10
Page 7

SPECIFICATIONS BEFORE CALLING FOR SERVICE
Specifications
System
Type ...................................................Active Subwoofer
(non magnetically shielded design)
Speaker unit................Subwoofer: 8 inches, cone type
Output Power ................................ 100W (8 ohms, DIN)
THD ...................................................................... < 1%
Reproduction frequency range ..................35Hz - 150Hz
Cross-over cut-off frequency .................... 60Hz - 150Hz
Phase switch ................................................... 0˚ , 180˚
Input sensitivity (Subwoofer In)....................300 mVrms
Inputs
SUBWOOFER IN........................................ Input pin jack
SPEAKER IN ........................................... Input terminals
Output
SPEAKER OUT......................................Output terminals
General
Power requirements110 - 127V/220 - 240V AC, 60/50Hz
Power consumption .............. 70W (at 1/8 Rated Power)
Dimensions (w / h / d) ...... Approx. 265 x 470 x 470mm
Weight ............................................................. 11kg
Design and specifications are subject to change
without notice.
Warning! Under no circumstances should you try to repair the set yourself, as this will invalidate the
warranty.
• If a fault occurs, check the points listed below before taking the set for repair.
• Should any problems persist after you have made these checks, consult your nearest dealer or service center.
There’s no sound.
™ Check that this subwoofer and components are connected correctly and securely.
™ Rotate LEVEL clockwise to turn the volume up.
The sound has suddenly stopped.
™ The speaker cords may have short-circuited.
™ Connect the cords properly.
The sound is distorted.
™ If the input signal is imperfect or distorted.
™ If the input signal level is too high.
™ If you turn in the bass reinforcement, eg. DBB, DSC, Incredible Sound or graphic equalizer from your audio amplifier.
Turn off these reinforcement or adjust the volume of your audio amplifier or adjust the subwoofer level control and
frequency cut level.
In case color irregularity is observed on the nearby TV screen
With the magnetically shielded type of the speaker system, the speakers can be installed near a TV set. However, color
irregular may still be observed on the TV screen depending on the type of your TV set.. If color irregularity is observed:
™ Turn off the TV set once, then turn it on after 15 to 30 minutes.
If color irregularity is observed again....
™ Place the speakers further apart from the TV set.
When howling occurs
™ Relocate the speaker or turn down the volume of the amplifier.
English
Before switching off the subwoofer, reduce the bass level control or switch off the amplifier.
11
 Loading...