

Page 1

Need help? Call us!
Philips representatives are ready to help you with
any questions about your new product. We can guide you
through Connections, First-time Setup, or any of the Features.
We want you to start enjoying your new product right away!
CALL us BEFORE YOU CONSIDER
RETURNiNG THE PRODUCT/
1-800-531-0039
or
Visit us on the web at www.phUips.com
PHILIPS
Page 2

Return your Warranty Registration card today to
ensure you receive all the benefits you’re entitled to.
Once your Philips purchase is registered,
youYe eligible to receive all the privileges
of owning a Philips product.
^Warranty i Verification
Registering your product
within 10 days confirms
your right to maximum
protection under the
terms and conditions of
your Philips warranty.
Know these
RIS K O F E LECTR IC SHO CK
A A
CAUTION: TO RE OUCE THE RISK OF ELE CT RIC SH OC K, 0 0 N OT
REMOVE COV ER (OR BACK ). N 0 U SE R-S ERVICEAB LE PA RTS
INS IOE . REFE R S ERVICING TO QU ALIFIE O S ERVIC E PERSON NE L.
DO NO T O PEN
^ Owner I Confirnmation
Your completed Warranty
Registration Card serves
as verification of owner
ship in the event of prod
uct theft or loss.
symbols
So complete and return the Warranty
Registration Card enclosed with your
purchase at once, and take advantage
of these important benefits.
, Model I
Registration
Retu rn I ng your Warranty
Registration Card right
away guarantees you’ll
receive all the information
and special offers which
you qualify for as the
owner of your model.
For Customer Use
Enter below the Serial No. which is locat
ed on the rear or bottom of the cabinet.
Retain this information for future reference.
Model No.
Serial No.
________________________
_________________________
This “bolt of lightning” indi
cates uninsulated material
A
an electrical shock. For the safety of
everyone in your household, please do
not remove product covering.
A
enclosed literature closely to prevent
operating and maintenance problems.
within your unit may cause
The “exclamation point” calls
attention to features for
which you should read the
WARNING: to prevent
FIRE OR SHOCK HAZARD, DO
NOT EXPOSE THIS EQUIPMENT TO
RAIN OR MOISTURE.
CAUTION: To prevent electric
shock, match wide blade of plug to
wide slot, and fully insert.
Page 3

PHILIPS
Visit our World Wide Web Site at http://www.philips.com
PHILIPS
Congratulations on your purchase,
and welcome to the **family!**
Dear Philips product owner:
Thank you for your confidence in Philips.You’ve selected one of the best-built,
best-backed products available today. And we’ll do everything in our power to
keep you happy with your purchase for many years to come.
As a member of the Philips “family,” you’re entitled to protection by one
of the most comprehensive warranties and outstanding service networks
in the industry.
What’s more, your purchase guarantees you’ll receive ail the information
and special offers for which you qualify, plus easy access to accessories
from our convenient home shopping network.
And most importantly you can count on our uncompromising commitment
to your total satisfaction.
All of this is our way of saying welcome - and thanks for investing in a
Philips product.
Sincerely,
Lawrence J. Blanford
President and Chief Executive Officer
P.S. Remember, to get the most from your Philips product, you
must return your Warranty Registration Card within 10 days.
So please mail it to us right now!
Page 4
IMPORTANT SAFETY INSTRUCTIONS
1 • Read these instructions.
2. Keep these instructions.
3. Heed all warnings.
4. Follow all instructions.
5. Do not use this apparatus near
water.
6. Clean only with dry cloth.
7. Do not block any ventilation
openings. Install in accordance with
the manufacturer's instructions.
8. Do not install near any heat sources
such as radiators, heat registers, stoves, or
other apparatus (including amplifiers) that
produce heat.
9. Do not defeat the
safety purpose of the
polarized or
grounding-type plug.
A polarized plug has two blades with one
wider than the other A grounding type plug
has two blades and a third grounding prong.
The wide blade or the third prong are
provided for your safety. If the provided plug
does not fit into your outlet, consult an
electrician for replacement of the obsolete
outlet.
10. Protect the power cord from being
walked on or pinched, particularly at plugs,
convenience receptacles, and the point
where they exit from the apparatus.
ll.Only use attachments/accessories
specified by the manufacturer
AC Pblarized
Plug
17. Use only with the cart, stand, tripod, bracket, or table specified
by the manufacturer or sold with
the apparatus. When a cart is
used, use caution when moving
the cart/apparatus combination
to avoid injury from tip-over
13. Unplug this apparatus during lightning
storms or when unused for long periods of
time.
14. Refer all servicing to qualified service
personnel. Servicing is required when the
apparatus has been damaged in any way,
such as power-supply cord or plug is
damaged, liquid has been spilled or objects
have fallen into the apparatus, the apparatus
has been exposed to rain or moisture, does
not operate normally, or has been dropped.
15. Battery usage CAUTION -To
prevent battery leakage which may result in
bodily injury, property damage, or damage
to the unit:
• Install all batteries correctly, + and - as
marked on the unit.
• Do not mix batteries (old and new or
carbon and alkaline, etc.).
• Remove batteries when the unit is not used
for a long time.
16. Apparatus shall not be exposed to
dripping or splashing.
17. Do not place any sources of danger
on the apparatus (e.g. liquid filled
objects, lighted candles).
Class II equipment symbol D
This symbol indicates that the unit has
a double insulation system
18. This product may contain lead and mercury.
Disposal of these material may be regulated
due to environment considerations.
For disposal or recycling information,
please contact your local authorities
or the Electronic Industries Alliance :
www.eiae.org.
EL6475-E004:03/12
Page 5

Canada
English:
This digital apparatus does not exceed
the Class B limits for radio noise
emissions from digital apparatus as set
out in the Radio Interference
Regulations of the Canadian
Department of Communications.
Français:
Cet appareil numérique n'emet pas de
bruits radioélectriques dépassant les
limites applicables aux appareils
numériques de Class B prescrites dans
le Règlement sur le Brouillage
Radioélectrique édicté par le Ministère
des Communications du Canada.
This warning label is located on the
rear panel and inside this laser
CAUTION' invisible
VMUI lun- RADIATION
WHEN OPEN. DO NOT STARE INTO BEAM.
HA Mr CD-INVISIBLE LASER RADIATION WHEN OPEN.
UAW\jt If-avoid direct exposure to beam.
VAROI avattaessa ja suojalukitus ohitettaessa olet
Tftnv. alttiinanakymattomaalle lasersateilylle.ala
KATSO SATEESEEN.
VADIJlIjri OSYNUGLASERSTRÄLNINGNÄRDENNADELÄRÖPPNAD.
THnn I nu. OCH SPARREN AR URKOPPLAD. BETPAKTA EJ STTÄLEN.
DANGER - Invisible laser radiation when open.
AVOID DIRECT EXPOSURE TO BEAM.
The apparatus shall not be exposed to dripping
or splashing and that no objects filled with
liquids, such as vases, shall be placed on
apparatus.
roduct.
ATTENTION
Uutilisation des commandes ou
réglages ou le non-respect des
procédures ci-incluses peuvent se
traduire par une exposition
dangereuse à ilrradiation.
ATENCIÓN
El uso de mando o ajustes o la
ejecucción de métodos que no sean
ios aquí descritos puede ocasionar
peligro de exposición a radiación.
important Note:
Due to the numerous versions of new
CD-Audio copy protection or
enhanced CD-Audio protection
recently available on certain discs.
Philips is unable to guarantee that
this DVD Player is fully compatible
with such new discs. Should you have
difficulty playing any such CD-Audio
discs, kindly refer them to your CDAudio disc retailer.
Due to the inconsistency of disc formats
provided by various disc manufacturers,
your DVD system may require a
playability enhancement or upgrade. As
DVD technology advances, these
enhancements will become common and
will be easy to complete.
Go to www.p4c.philips.com for
V software upgrade.
WARNING
To reduce the risk of fire or electric shock,
do not expose this appliance to rain or
moisture.
Use of controls or adjustments or
performance of procedures other than
herein may result in hazardous radiation
exposure.
The set complies with the FCC-Rules, Part
15 and with 21 CFR 1040.10.
‘CONSUMERS SHOULD NOTE THAT NOT
ALL HIGH DEFINITION TELEVISION SETS
ARE FULLY COMPATIBLE WITH THIS
PRODUCT AND MAY CAUSE ARTIFACTS
TO BE DISPLAYED IN THE PICTURE. IN
CASE OF 525 OR 625 PROGRESSIVE SCAN
PICTURE PROBLEMS, IT IS RECOMMENDED
THAT THE USER SWITCH THE
CONNECTION TO THE ‘STANDARD
DEFINITION’OUTPUT IFTHEREARE
QUESTIONS REGARDING OURTV SET
COMPATIBILITY WITH THIS MODEL 525p
AND 625p DVD PLAYER, PLEASE CONTACT
OUR CUSTOMER SERVICE CENTER.’
Page 6

General Information
Environmental Information
All unnecessary packaging has been
omitted.The packaging has been made
easy to separate into three materials:
cardboard (box), polystyrene foam
(buffer) and polyethylene (bags, protective
foam sheet).
Your DVD player consists of materials
which can be recycled and reused If
disassembled by a specialized company.
Please observe the local regulations
regarding the disposal of packaging
materials, exhausted batteries and old
equipment.
DivX, DivX Certified, and
associated logos are
trademarks of
DivXNetworks, Inc and
are used under license.
This product incorporates copyright
protection technology that is protected by
method claims of certain (J.S. patents and
other intellectual property rights owned by
Macrovision Corporation and other rights
owners. Use of this copyright protection
technology must be authorized by
Macrovision Corporation, and is intended
for home and other limited viewing uses
only unless otherwise authorized by
Macrovision Corporation. Reverse
engineering or disassembly is prohibited.
Laser safety
This unit employs a laser. Due to possible
eye injury, only a qualified service person
should remove the cover or attempt to
service this device.
NOTE:
PICTURES SHOWN MAY BE
DIFFERENT BETWEEN
COUNTRIES.
CAUTION
(WARNING LOCATION: ON THE
BACKPLATE OF THE SET)
NEVER MAKE OR CHANGE
CONNECTIONS WITH THE
POWER SWITCHED ON.
Manufactured under license from Dolby
Laboratories. ‘"Dolby”, “Pro-Logic” and the
double-D symbol are trademarks of
Dolby Laboratories.
For Customer Use:
Read carefully the information located at
the rear of your DVD Player and enter
below the Serial No. Retain this
information for future reference.
Model No. DVD 640 / DVD 642
Serial No.
_______________
LASER
Type
Wave length
Output Power
Beam divergence
Semiconductor laser
GaAIAs
650 nm (DVD)
780 nm (VCD/CD)
7 mW (DVD)
10 mW (VCD/CD)
60 degree
Page 7

Contents
General Information
Supplied accessories
Care and safety information..............................8
........................................
Connections
Connecting TV.............................................9-11
Using Composite Video jack (CVBS)...........9
Using S-Video jack.......................................9
Using Component Video jacks (Pr PbY). 10
Using an accessory RF modulator
Connecting the power cord
Optional: Connecting to an Audio System . 12
Stereo has Dolby Pro Logic or Right / Left
Audio In jacks.............................................12
Optional: Connecting to a Digital Receiver ..12
Receiver has a PCM, Dolby Digital, or
MPEG2 decoder
............................
........................................
......
10-11
Functional Overview
Front and Rear Panels
Remote Control...............................................14
...................................
Getting Started
Step 1: Inserting batteries into the
Remote Control...............................................15
Using the Remote Control to operate the
Player.........................................................15
Step 2: Setting up the TV
Deactivate Progressive manually
Selecting the color system that corresponds
to your TV...................................................16
Step 3: Setting language preferences
Setting the OSD Language
Setting the Audio, Subtitle and Disc menu
languages...................................................17
..........................
.........
.............
........................
15-16
15-16
Disc Operations
Playable Discs.................................................18
Region Codes
Playing discs
Using the Disc Menu.......................................19
Basic playback controls
Pausing playback.......................................19
Selecting track/chapter
Mute............................................................20
Resuming playback from the last stopped
point............................................................20
Zoom
Repeat........................................................20
Repeat A-B.................................................20
Display.......................................................21
Slow Motion
Searching...................................................21
Program playback
.................................................
.................................................
............................
..............................
..........................................................
...............................................
.....................................
19-21
19
Special DVD features......................................22
8
11
12
13
17
17
18
19
20
21
21
Playing a Title.............................................22
Camera Angle
Changing the Audio Language
Subtitles......................................................22
Special VCD & SVCD Features
Playback Control (PBC).............................22
Preview
Playing MP3/DivX/MPEG-4/jPEG/Kodak
Picture CD
General Operation
Playback selection
Special MP3/JPEG features
Preview Function (jPEG)
Zoom picture (jPEG)
Playback with multi-angles (jPEG)
Scan Effect QPEG)
Playback speed control (MP3)...................24
............................................
......................................................
.......................................................
.....................................
.....................................
..................................
....................................
..................
.................
...........................
...........................
22-23
............
DVD Menu Options
Basic Operations.....................................
General Setup menu
Screen Saver
Smart Power
Disc Lock
Program
Audio Setup Menu
DOWNMIX
Digital Output.....................................
LPCM Output.....................................
Sound Mode
Reverb Mode
D.R.C. (Dynamic Range Control) ...
Video Setup Menu
TV Display..........................................
Closed Captions
Video Output......................................
Progressive........................................
Smart Picture.....................................
Preferences Menu..................................
Parental
Password...........................................
Default
...............................................
MP3/JPEG Navigator
Specifications
..............................
.....................................
......................................
...........................................
.............................................
..................................
.........................................
......................................
.....................................
..................................
................................
.............................................
........................
..............................
Troubleshooting.........................
Glossary...........................................
Limited Warranty............................38-39
.........
....25-26
........
........
........
........
....27-28
........
........
........
........
........
........
....29-31
.........
.........
.........
.........
.........
....31-33
...
31-32
.........
.........
.........
........
.. 35-36
.........
22
22
23
24
24
24
24
24
24
24
24
25
25
25
26
26
27
27
27
28
28
28
29
29
30
30
31
32
33
33
34
37
Page 8
General Information
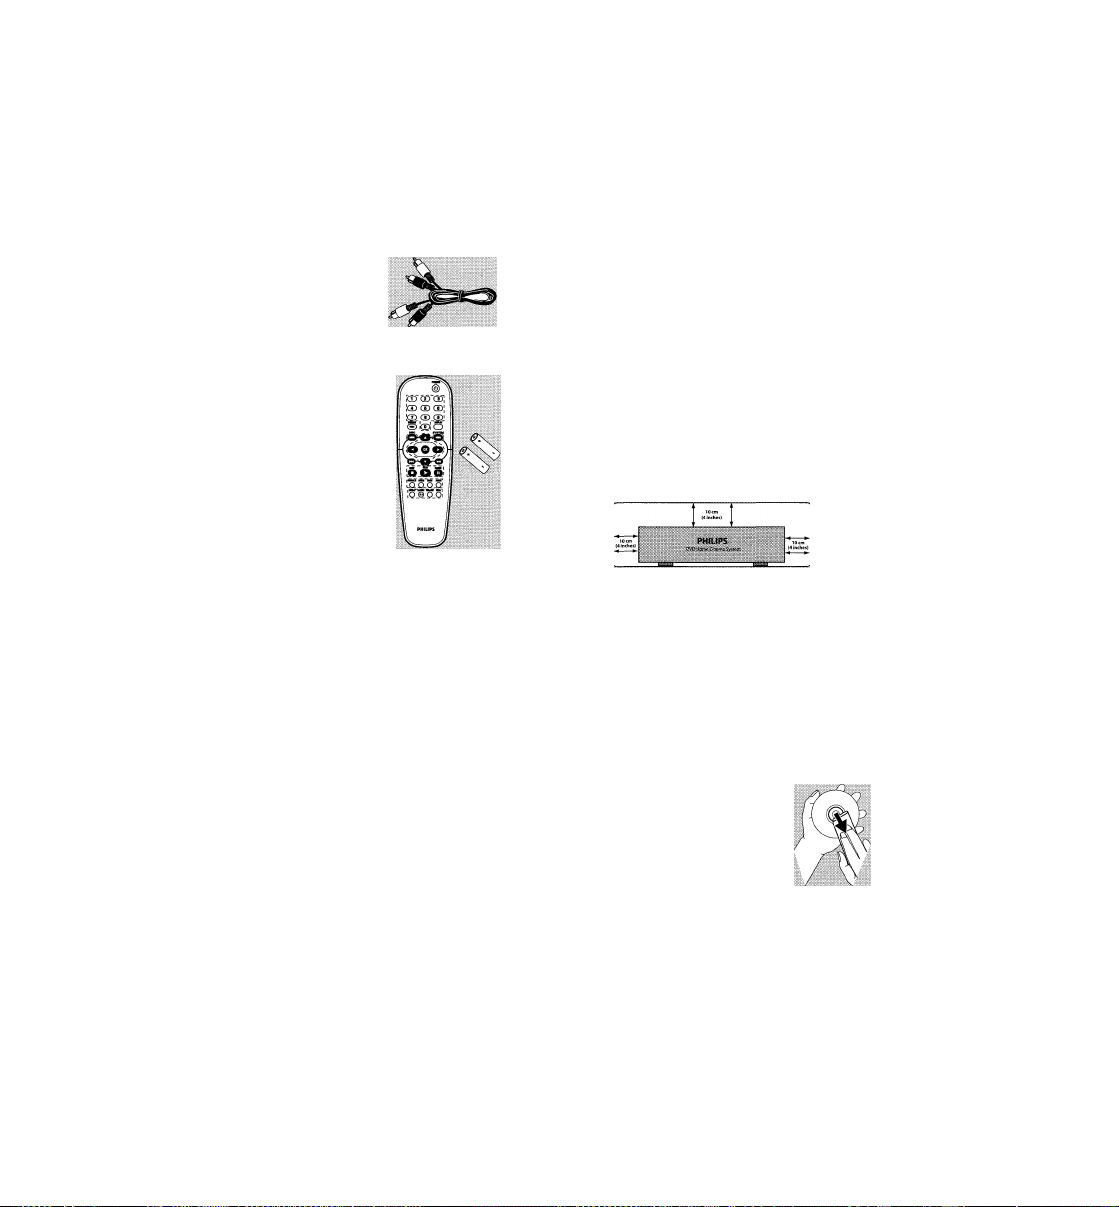
Supplied accessories
Video cable
(yellow)
Audio cable
(white, red)
Remote Control
and
two AA batteries
Care and safety information
Power consumption
- When the system is switched to
Standby mode, it is still consuming power.
To disconnect the system from the power
supply completely, remove the AC power
plug from the wall jack.
Avoid high temperatures, moisture, water and dust
- Do not expose the player, batteries or
discs to humidity, rain, sand or excessive
heat (caused by heating equipment or
direct sunlight).
Avoid condensation
- The lens may cloud over when the
player is suddenly moved from cold to
warm surroundings, making it impossible
to play a disc. Leave the player In the
warm environment until the moisture
evaporates.
Do not block the vents
- Do not operate the DVD Player in an
enclosed cabinet. Allow about 10 cm (4
inches) of free space around the player for
adequate ventilation.
Care of the cabinet
- Use a soft cloth slightly moistened with
a mild detergent solution. Do not use a
solution containing alcohol, spirits,
ammonia or abrasives.
Finding a suitable location
- Place the player on a flat, hard, and
stable surface.
Disc handling
- To clean a CD, wipe it in a
straight line from the center
toward the edge using a soft,
lint-free cloth. A cleaning
agent may damage the disc.
- Write only on the printed
side of a CD-R/CD-RW and only
soft felt-tipped pen.
- Handle the disc by its edge; do
touch the surface.
with a
not
Page 9

Connecting TV
Connections
IMPORTANT!
- You only need to make one video
connection from the following
options, depending on the
capabilities of your TV.
- Connect the DVD Player directly
to the TV.
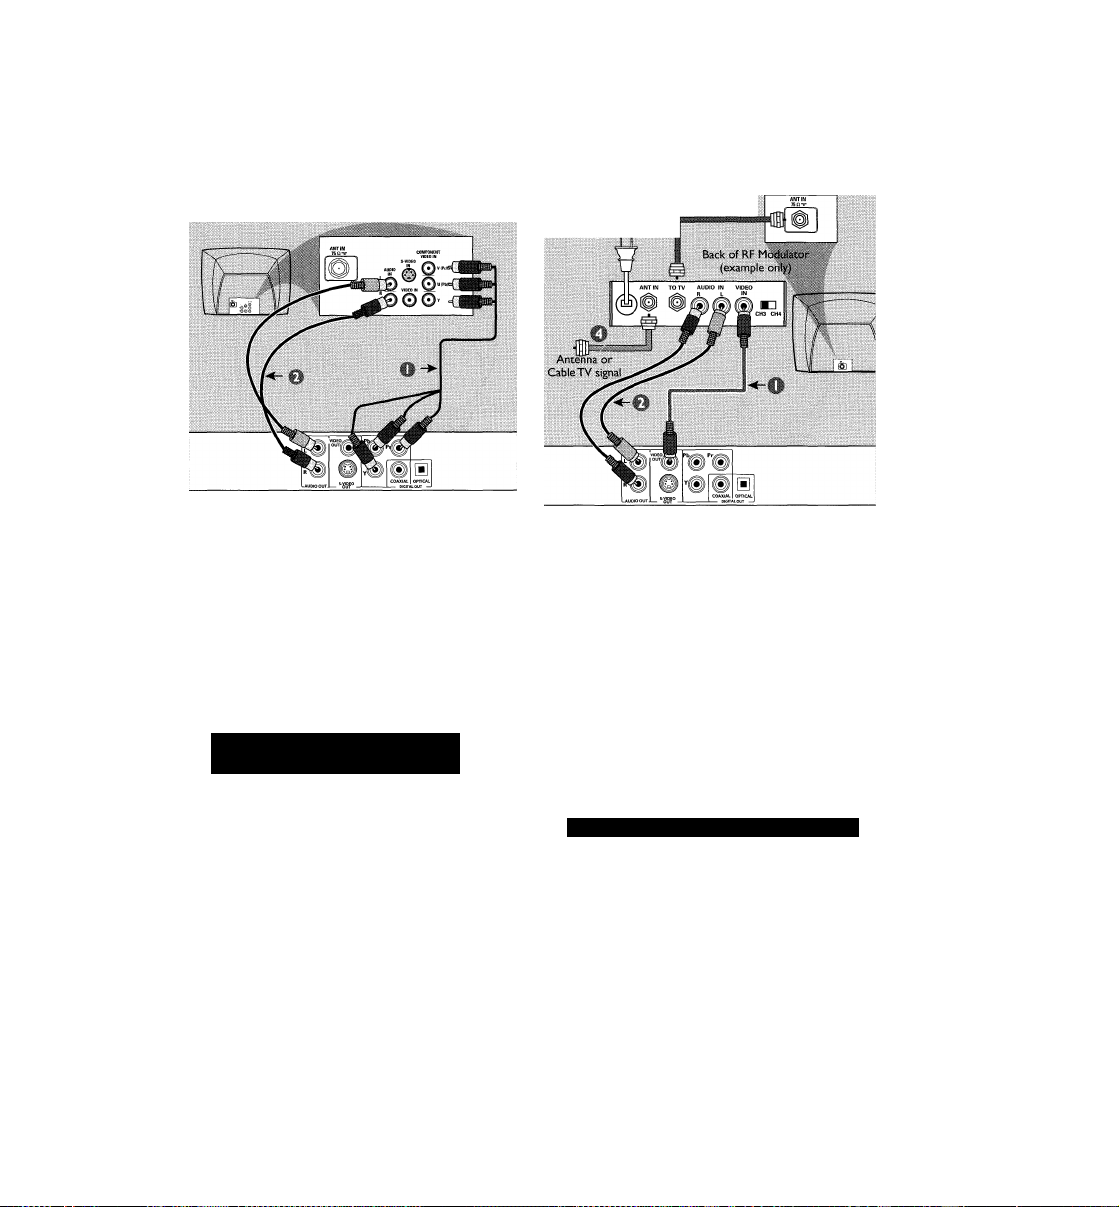
Using Composite Video jack (CVBS)
® Use the supplied composite video cable
(yellow) to connect the DVD Player’s
yellow VIDEO OUT (CVBS) jack to
the VIDEO IN jack (labeled as Video In,
Composite, CVBS, or Baseband) on the
TV
0
To hear the sound of this DVD Player
through your TV, use the audio cables
(white/red) to connect AUDIO OUT (L/
R) jacks of the DVD Player to the
corresponding AUDIO IN jacks on the TV
(cable supplied).
IMPORTANT!
- S-Video provides better picture
quality.This option must be available
on your TV.
Using S-Video jack
W Use the S-video cable to connect the
DVD Player’s S-VIDEO OUT jack to the
S-Video in jack (labeled asY/C or S-VHS)
on the TV (cable not supplied).
© To hear the sound of this DVD Player
through your TV, use the audio cables
(white/red) to connect AUDIO OUT
(UR) jacks of the DVD Player to the
corresponding AUDIO IN jacks on the TV
(cable supplied).
Page 10
Connections
RF coaxial cable to TV
m
IMPORTANT!
- Component Video provides
higher picture quality. This option
must be available on your TV.
- Progressive Scan video quality is
only possible when using
Component Video (Pr PbY).
Using Component Video jack
(Pr PbY)
® Use the component video cables
(red/blue/green) to connect the DVD
Player’s Pr PbY jacks to the
corresponding Component video in jacks
(labeled as Pr/Cr Pb/CbY orYUV) on
the TV (cable not supplied).
O To hear the sound of this DVD Player
through your TV, use the audio cables
(white/red) to connect AUDIO OUT
(L/R) jacks of the DVD Player to the
corresponding AUDIO IN jacks on the TV
(cable supplied).
lJ
IMPORTANT!
- If your TV only has a single
Antenna In jack (labeled as 75 ohm
or RF In), you will need an RF
modulator in order to view DVD
playback on the TV. The RF
modulator is not supplied with the
DVD Player. See your electronics
retailer or contact Philips for details
on RF modulator availability and
operations.
Using an accessory RF modulator
® Use the supplied composite video cable
(yellow) to connect the DVD Player’s
yellow VIDEO OUT (CVBS) jack to
the video in jack on the RF modulator.
O Use the supplied audio cable (white/red)
to connect the DVD Player’s AUDIO
OUT (L/R) jacks to the AUDIO jacks on
the TV
10
Page 11
© Use an RF coaxial cable (not supplied) to
connect ANTENNA OUT or TO TV jack
of the RF modulator to the ANTENNA
IN jack on the TV
® Connect the Antenna or Cable TV service
signal to the ANTENNA IN or RF IN jack
on the RF modulator. (It may have been
connected to your TV previously.
Disconnect it from the TV).
O Set the CH3/4 switch on the RF
modulator to 3 or 4. Set your TV to the
same channel.
1
Connections
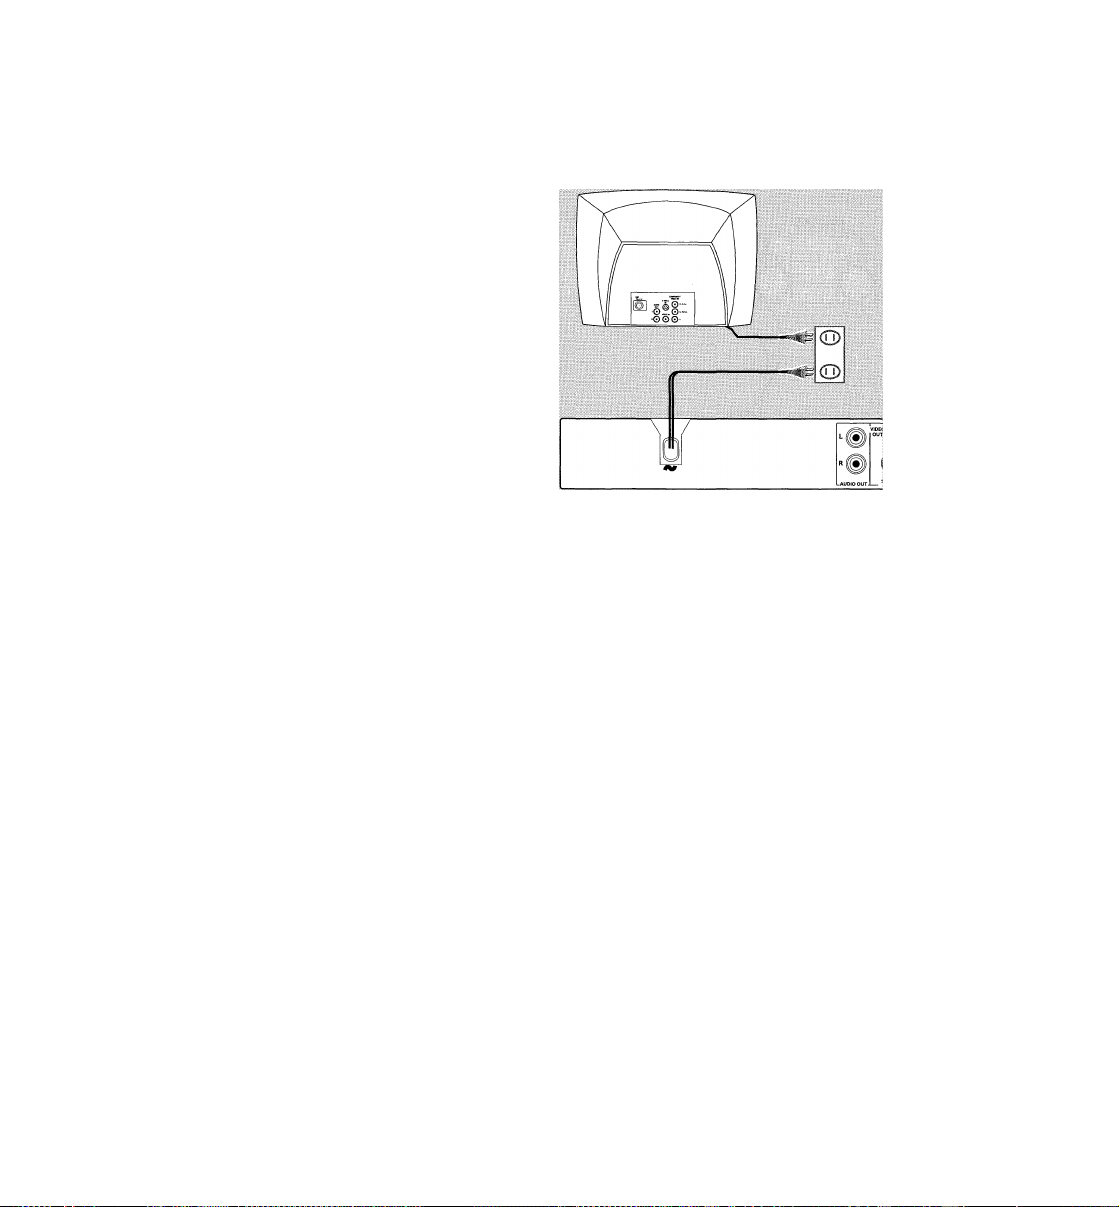
Connecting the power cord
After everything is connected
properly, plug the AC power cord
into the power outlet.
Never make or change any connections
with the power switched on.
When no disc is loaded, press
STANDBY ON on the DVD Player
to turn it on.
“i lu IlIEilI** may appear on the
display panel.
11
Page 12
Connections
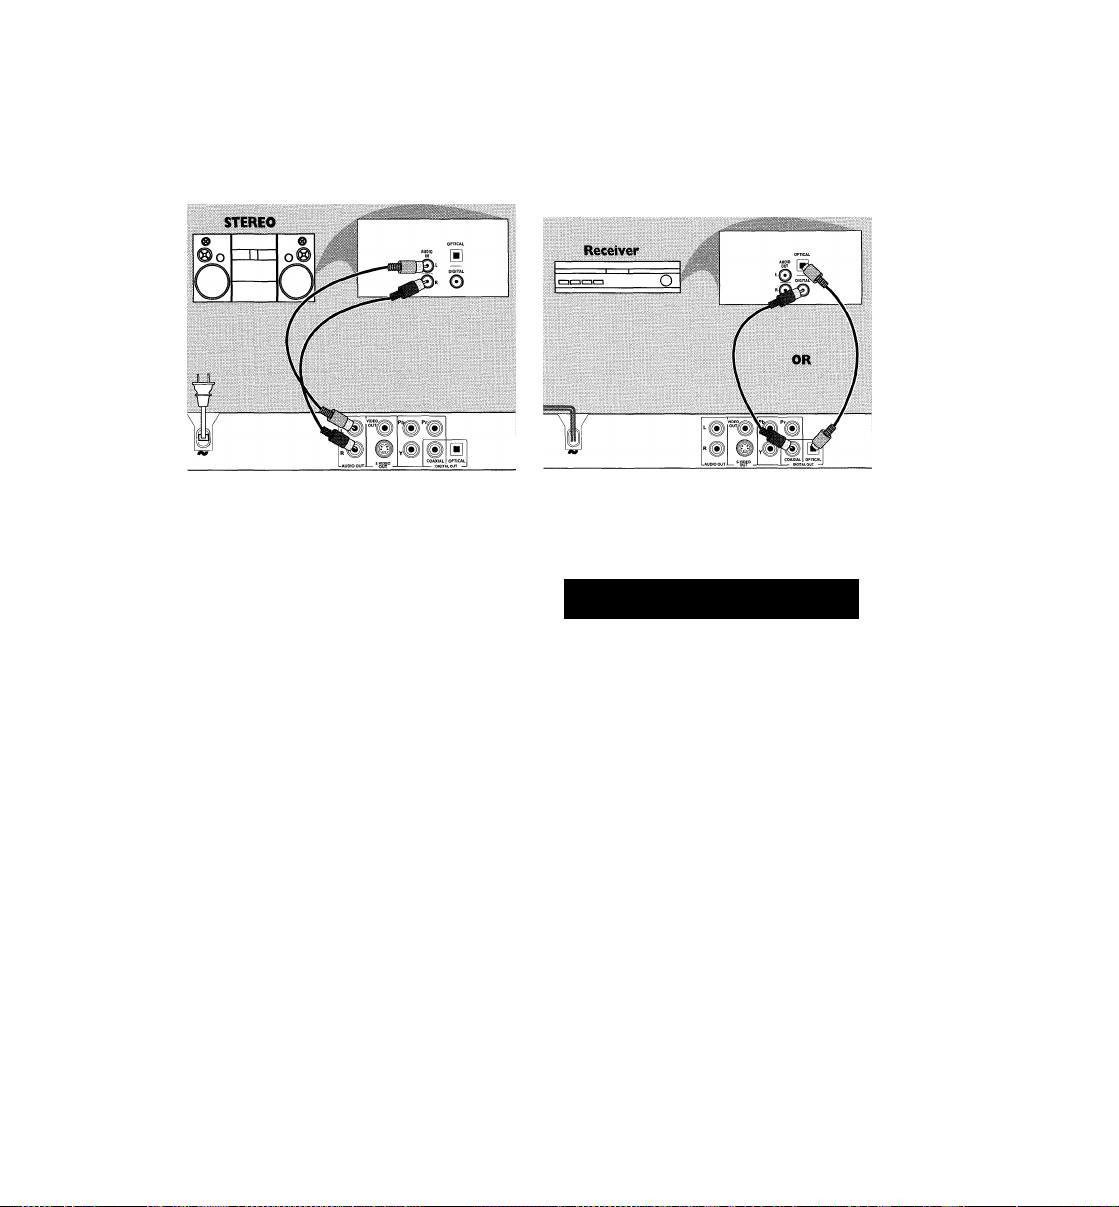
Optional: Connecting to an
Audio System
® Select one of the video connections to
yourTV (CVBSVIDEO IN,S-VIDEO IN,
or COMPONENTVIDEO IN) depending
on the options available on yourTV.
® Use the audio cables (white/red) to
connect AUDIO OUT (L/R) jacks of
the DVD Player to the corresponding
AUDIO IN jacks on the stereo (cable
supplied).
Optional: Connecting to a Digital Receiver
Receiver has a PCM, Dolby Digital,
or MPEG2 decoder
W Select one of the video connections to
yourTV (CVBSVIDEO IN,S-VIDEO IN,
or COMPONENTVIDEO IN) depending
on the options available on yourTV
© Connect either the COAXIAL or
OPTICAL jack of the DVD Player to the
corresponding Digital Audio In jack on
your Receiver (cable not supplied).
© Set the DVD Player’s Digital Output to
PCM-ONLY or ALL depending on the
capabilities of your Receiver (see page 27
^Vigital Output”).
Helpful Hint:
- If the audio format of Digital Output
does not match the capabilities of your
receiver, the receiver will produce a strong,
distorted sound or no sound at all.
12
Page 13
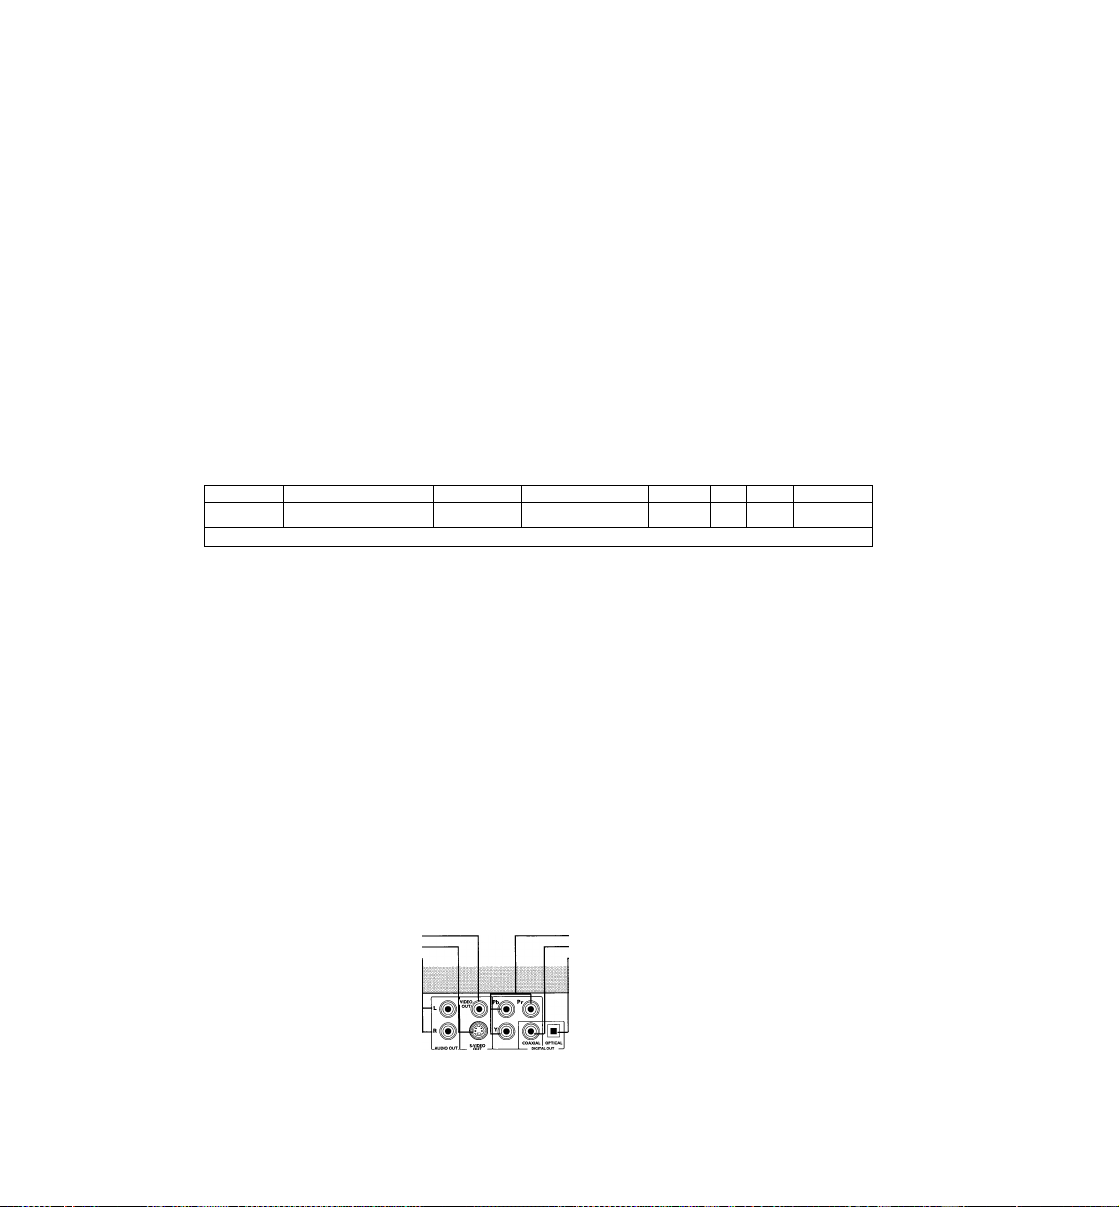
Front and Rear Panels
STANDBY-ON (!)
- To switch the DVD Player to Standby
mode or ON
Disc tray
H
OPEN/CLOSE A
- Open/Close the disc tray
Functional Overview
►II PLAY/PAUSE
-To start or interrupt playback
■ STOP
-To stop playback
IR Sensor
- Point the remote control towards this
sensor
Display
- Shows the current status of the DVD
Player
h
PHmpsE
Mains (AC Power Cord)
__
^Mai
Connect to a standard AC outlet
C
Audio Out (Left/Right)
- Connect to AUDIO inputs of an amplifier,
receiver or stereo
S-Video Out
- Connect to S-Video input of a TV
VIDEO OUT (CVBS)
- Connect to CVBS Video input of a TV
r
) ■:
OPTICAL (Digital audio out)
- Connect to the optical AUDIO input of a
COAXIAL (Digital audio out)
- Connect to the coaxial AUDIO input of a
- Connect to YPbPr input of a TV
digital audio equipment
digital audio equipment
h)
YPbPr
Caution: Do not touch the inner pins of the jacks on the rear panel.
Electrostatic discharge may cause permanent damage to the unit.
13
Page 14

Functional Overview
Remote Control
-To go back to previous menu /
RETURN/TITLE
show title menu
DISC MENU
- Enters the disc contents menu
- Switches on or off the playback
control mode (for VCD version
2.0 only)
◄ ►AT
- Selects an item in the menu/
fast forward/backward, slow forward/
backward
OK
-Acknowledge menu selection
-To search or select previous
chapter or track
STOP ( ■ )
-To stop playback
PLAY ( ► )
-To start playback
PAUSE (II)
-To pause playback temporarily /
frame-by-frame playback
REPEAT
- Selects various repeat modes
REPEAT (A-B)
- Repeats playback a specific section
on a disc
PREVIEW
-To preview the content of a track
or whole disc
MUTE
- Disables or enables sound output
POWER (!)
- To switch the DVD player to
standby mode or ON
0-9 numerical key pad
- Selects numbered items in a
DISPLAY
- Displays information on TV
screen during playback
SYSTEM MENU
- Access or exit DVD Player’s
system menu
- To search or select next chapter
or track
SUBTITLE
- To access subtitle language
system menu
ANGLE
- Selects a DVD camera angle
ZOOM
- Enlarge a picture on the TV
screen
AUDIO
- To access audio language system
menu
14
Helpful Hint:
Press *‘STOP** for about 2 seconds to
OPEN or CLOSE disc tray.
Page 15

Getting Started
Step 1: Inserting batteries into the Remote Control
P Open the battery compartment.
§ Insert two batteries type R06 or AA,
following the indications (H
the compartment.
!/? Replace the cover.
# Aim the Remote Control
directly at the remote
sensor (IR) on the front
panel of the DVD Player.
^ Do not put any objects
between the Remote
Control and the DVD
Player while operating the
DVD Player.
------
) inside
(D CD CD
CD (D ®
® ® ®
Step 2: Setting up the TV
IMPORTANT!
Make sure you have completed all
the necessary connections. (See
pages 9-11 “Connecting TV”).
II Turn on the TV and set it to the correct
Video-In channel. You should see the blue
Philips DVD background screen on the
TV.
Usually these channels are between the
lowest and highest channels and may be
called FRONT, A/V IN, or VIDEO. See your
TV manual for more details.
Or, you may go to channel 1 on your
TV, then press the Channel down button
repeatedly until you see the Video In
channel.
^ Or, the TV Remote Control may have a
button or switch that chooses different
video modes.
Or, set the TV to channel 3 or 4 if you
are using an RF modulator.
If you are using other external equipment
(audio system or receiver), turn it on and
select the appropriate input source for
the DVD Player. Refer to the equipment
owner’s manual for details.
ooH
oooo
CAUTION!
- Remove batteries if they are
exhausted or if the Remote Control
will not be used for a long time.
- Do not use old and new or
different types of batteries in
combination.
- Batteries contain chemical
substances, so they should be
disposed properly.
The progressive scan display presents 60
complete frames per second, rather than
30 frames per second of interlaced
scanning (normal TV system).With nearly
double the number of lines, progressive
scan offers higher picture resolution and
eliminates bothersome motion artifacts
jagged edges on moving objects.
To enjoy the quality offered by
progressive scan, a progressive scan TV is
required.To activate progressive scan,
refer to ‘Progressive’ on page 30.
15
Page 16

Getting Started
If the progressive function is activated but
your TV does not support progressive
scan or the cables are not connected
accordingly, the TV screen will be blank.
You can deactivate progressive scan as
below.
O Press STANDBY ON (!) on the front
panel to switch on the DVD player.
O Press OPEN/CLOSE ▲ on the front
panel to open the disc tray.
© Press STOP ■ on the front panel.
O Press PLAY/PAUSE Ml on the front
panel.
^ The blue Philips DVD background
appears on the TV screen.
Selecting the color system th corresponds to your TV
This DVD Player Is compatible with both
NTSC and PAL. In order for a DVD to
play on this Player, the color system of the
Disc, the TV and the DVD Player should
match.
PAL - Select this if the connected TV has
the PALcolor system. It will change the
video signal of an NTSC disc and output it
in PAL format.
NTSC - Select this if the connected TV
has the NTSC color system. It will change
the video signal of a PAL disc (VCD only)
and output it in NTSC format.
Multi - Select this if the connected TV Is
compatible with both NTSC and PAL
(multi-system). The output format will be
in accordance with the video signal of the
disc.
Helpful Hint:
- Before changing the current TV
Standard setting, determine the color
system of your TV
- If there is not a proper picture on
your TV, wait for 15 seconds for auto
recover.
® Press SYSTEM MENU.
© Press V A to select ‘Video Setup Page’.
© Enter its submenu by pressing OK.
® Use the ◄ ► A V keys on the Remote
Control to navigate in the menu.
Move to ‘TV Standard’ and press ►.
16
To exit from the menu
Press SYSTEM MENU.
Page 17

Getting Started
Step 3: Setting language preferences
You can select your preferred language
settings.This DVD Player will
automatically switch to the language for
you whenever you load a disc. If the
language selected is not available on the
disc, the disc’s default language will be
used instead. The OSD (on-screen
display) language for the system menu will
remain as you set it, regardless of various
disc languages.
Setting the OSD Language
# Press SYSTEM MENU.
O Press ▼ A to select ‘General Setup’ page.
© Enter its submenu by pressing OK.
O Use the ^ ► A T keys on the Remote
Control to navigate in the menu.
Move to ‘OSD Language’ and press ►.
© Select a language and press OK.
Setting the Audio, Subtitle and Disc menu languages
® Press STOP twice, then press SYSTEM
MENU.
© Press ▼ A to select ‘Preferences Page’.
© Enter its submenu by pressing OK.
® Press A T to highlight one of the
following in the Preferences Page.
- ‘Audio’ (disc’s soundtrack)
- ‘Subtitle’ (disc’s subtitles)
- ‘Disc Menu’ (disc’s menu)
© Enter its submenu by pressing ►.
© Select a language and press OK.
© Repeat steps ®~® for other language
settings.
To exit from the menu Press SYSTEM MENU.
To exit from the menu
Press SYSTEM MENU.
17
Page 18

Disc Operations
IMPORTANT!
- Depending on the DVD or VIDEO
CD, some operations may be
different or restricted.
- Do not push on the disc tray or
put any objects other than discs in
the disc tray. Doing so may cause
the disc player to malfunction.
Playable Discs
Your DVD Player will play:
- Digital Video Discs (DVDs)
- Video CDs (VCDs)
- Super Video CDs (SVCDs)
- Finalized Digital Video Discs
+ Recordable (DVD+R)
- Finalized Digital Video Discs
+ Rewritable (DVD+RW)
- Audio Compact Discs (CDs)
- MP3 files disc on CD-R(W):
-Maximum 30 characters display
-Supported sampling frequencies :
32 kHz, 44.1 kHz, 48 kHz (MPEG-1)
16 kHz, 22.05 kHz, 24 kHz (MPEG-2)
-Supported bitrates : 32-256 kbps
(MPEG-1), 8-160 kbps (MPEG-2)
variable bitrates
- Picture files on CD-R/CD-RW:
-JPEG pictures.
-KODAK pictures.
-Fuji color pictures.
- MPEG-4 files on CD-R/CD-RW:
- Simple profile
-Advanced simple profile (640-480)
- DivX® disc on CD-R/CD-RW:
-DivX 4.x and 5.x
-GMC (Global Motion Compensation)
and Q-Pel (Quarter Pixel) not
supported
This DVD Player can play DivX, MPEG-4,
MP3,JPEG,VCD & SVCD files on a
personally recorded CD-R/CD-RW disc
or commercial CD.
• Maximum files programmable is 24.
• MP3: Maximum supported bitrate is
320 kbps or 48 kHz.
• DivX4.x and 5.x comply with this
standard, except GMC (Global Motion
Compensation) and QP (Quarter Pixel)
features.
• MPEG-4:AII video codecs that comply
with specifications of ISO-MPEG4.
• JPEG: For baseline JPEG, maximum
resolution is 5120 x 3840 (beyond this
picture will be cropped). For progressive
JPEG, maximum resolution is 2048 x 1536
(beyond this, picture will not be
displayed).
Region Codes
DVDs must be labeled for ALL regions or
Region 1 in order to play on this Player.
You cannot play Discs that are labeled for
other regions.
Look for the symbols on your DVD’s.
VIDEO
_n COMPACT
DIGITAL AUDIO
;7iu HiRuu
Helpful Hint:
- If you are having trouble playing a
certain disc, remove the disc and try a
different one. Improperly formatted disc will
not play on this DVD Player.
18
Page 19

Disc Operations
IMPORTANT!
If the inhibit icon appears on the
TV screen when a button is
pressed, the function is not
available on the current disc or at
the current time.
Playing discs
® Connect the power cords of the DVD
Player and TV (and any optional stereo or
receiver) to a power outlet.
O Turn on the TV and set it to the correct
Video In channel. (See page 15 “Setting up
the TV”).
® Press STANDBY-ON (!) on the front of
the DVD Player.
You should see the blue Philips DVD
background screen on the TV.
0 Press OPEN-CLOSE ^ to open the disc
tray and load a disc. Press again to close
the disc tray.
"4 Make sure the label is facing up. For
double-sided discs, make sure the label of
the side you want to play is facing up.
© Playback may start automatically
(depending on the disc type).
If a disc menu appears on the TV, see
“Using the Disc Menu”.
If the disc is locked by parental control,
you must enter your four-digit password.
(See page 32).
® At any time, simply press STOP ■ to
stop playback.
Using the Disc Menu
Depending on the disc, a menu may
appear on the TV screen once you load
the disc.
To select a playback feature or item
• Use the ◄ ► A ▼ or numeric keypad
(0-9) on the Remote Control, then press
PLAY^ to start playback.
To access the menu
• Press DISC MENU on the Remote
Control.
Basic playback controls
Unless otherwise stated, all operations
described are based on Remote Control
use.
mm
O During playback, press PAUSE II.
Play will pause and sound will be mute.
0 During pause mode, press ◄ ► to select
the previous or next picture frame.
© To return to normal playback, press
PLAY ►.
Selecting a title (track) /chapter (DVDAfCD/CD)
• Press or use the numeric
keypad (0-9) to key in a title (track) /
chapter number.
19
Page 20

Disc Operations
Mute
(DVD/VCD/CD/MP3/DivX/JPEG)
Press MUTE repeatedly to disable and
enable the sound.
Resunning playback from the last stopped point (DVDA^CD/CD)
Resume playback of the last five discs,
even if the disc was remove from the
Player.
® Load one of the last five discs.
--&■ <<l nOTiTi'llT” ^
i_ui li-ij-i^lu appears.
© Press PLAY ► and the disc will play from
the last point.
To cancel resume mode
• While play Is stopped, press STOP ■
again.
Helpful Hint:
- Resume may not be available on some
discs.
Zoom (DVD/VCD
Zooming allows you to enlarge the video
image during playback.
® Press ZOOM during playback to select
the zoom factor.
O Press ◄ ► A ▼ to move through the
zoomed image.
© Press ZOOM repeatedly to increase and
decrease the zoom factor.
*4^ Playback will continue.
Repeat (DVD/VCD/CD/MP3)
You can play a chapter, track, title or
entire disc repeatedly.
Press REPEAT continuously to choose a
Repeat mode during playback.
^ DVD
‘chapter repeat on/title repeat on/
REPEAT OFF*.
VCD / CD
‘rep-one/rep-all/repeat off*.
ForVCDl.O, SVCD discs:
- Not available if Playback Control is on
(PBC On).
MP3
lf‘MP3/JPEG Nav’ is WITH MENU:
‘rep-one/folder repeat/rep-all/repeat
OFF*.
lf‘MP3/JPEG Nav’ is NO MENU:
‘rep-one/rep-all/repeat off*.
Helpful Hint:
- Repeat options are not available on
some discs.
Repeat A-B (DVD/VCD/CD)
You can play only a specific portion of a
Title/Track or Chapter repeatedly.
0 During playback, press REPEAT A-B at
your chosen starting point.
•*4^ ‘a TO B SET A* appears on the TV
screen.
© When the disc reaches your selected
ending point, press REPEAT A-B again.
«4 ‘a TO B SET B* appears on the TV
screen, and the repeat sequence begins.
® To resume regular playback, press
REPEAT A-B again.
“4 ‘a TO B CANCELLED* appears on the TV
screen.
20
Page 21

Disc Operatic
ForVCI
While pi
on the r
The p
1. INTf
The DVI >
few secc
disc con
► Press 1 <
J Press SI
2. DISC
Divide a
regular i
page to
J Press 2
The p
on theT
® To select
® Use the
track to
Display (DVD/VCD)
The Display function allows you to start
playback at any chosen time on the disc.
® During playback, press and hold DISPLAY
until the time edit box appears.
® Press DISPLAY once.
Use ^ ► to highlight one of the options
and use the numeric key pad (0-9) to
enter the number of title (track) /chapter.
O Press DISPLAY twice.
Use ► to highlight the time option and
use the numeric key pad (0-9) to enter
hours, minutes and seconds from left to
right in the time edit box.
O Press OK to confirm.
"4 Playback starts from the selected time
on the disc.
Highlight TIME’, then press A V to view
I
the status of the playing disc.
For DVD
‘title elapsed/ title remain/ chp
elapsed/ chp remain’ appears.
ForVCD
*4 ‘single elapsed/ single remain/ total
elapsed/ total remain’ appears.
Slow Motion (DVD/VCD/SVCD)
During playback, press A or T to select
slow reverse (SR) or slow forward (SF).
^ DVD
Press A or V repeatedly to select the
slow reverse or slow forward speed:
SFx2 SFx4 SFx8 PLAY
SRx2 SRx4 SRx8 -> PLAY
VCD / SVCD
Press A repeatedly to select the slow
forward speed:
SFx1 SFx2 ^ SFx3 PLAY
Helpful Hint:
- Slow Reverse is not available in VCDI
SVCDs.
Searching
(DVD/VCD/SVCD/CD/MP3)
Press 4 or ► repeatedly to select fast
reverse (FR) search or fast forward (F
search.
DVD / MP3
FRx2 ^ FRx4 ^ FRx6 ^ FRx8 ^ PL
FFx2 ^ FFx4 FFx6 ^ FFx8 -> PL/
VCD / SVCD / CD
FRx1 ^ FRx2 ^ FRx3 FRx4 -> PL
FFx1 FFx2 ^ FFx3 ^ FFx4 ^ PL/
1i
O Press SYSTEM MENU. Press T A ti
select ‘General Setup Page’.
0 Select‘Program’ and set it to ON, the
press OK (see page 26,‘Program’).
"4^ The‘Program’ menu appears.
© Use the ^ ► A T keys and numeric
keypad (0-9) on the Remote Control
select a title (track) /chapter.
& Press PLAY ► to start playback.
*4 For DVD, the maximum programm
titles or chapters is 16.
ForVCD/CD, the maximum
programmable tracks is 24.
To erase a selection in the Progrz
Use the ^ ► A V keys to select the
item(s),then press OK to delete.
To list the programmed item(s) While play is stopped, press SYSTEP MENU.
Select‘Program’ and set it to ON,thei
press ►.
J
Page 22

Disc C Disc Operations
Specis
Playin
# Press R
The '
screen.
® Use
(0-9) t<
© Press C
Came
• Press A
differen
perspe<
For
Press A
différer
the DV
Chang
ForVC
Press /
availabi
disc (LI
MONC
• Press S
différer
the DV
Playing MP3/DivX/MPEG-4/
JPEG/Kodak Picture CD
IMPORTANT!
You have to turn on your TV and set it to
the correct Video In channel. (See page
15 “Setting up the TV”).
General Operation
Load an MP3/DivX/MPEG-4/JPEG disc.
^ The DATA CD MENU appears on the
TV screen.
Use A T to select a folder. Press OK to
open the folder.
" Root
_________
I --I w
_J ® imENAMEl 1
J SBT1TUE.AME2 2 . j
j mji
Sg TITLE NAME4
J ^
'i- FILENAME;
® Press A ▼ or use the numeric keypad
(0-9) to highlight an option.
® Press OK to confirm.
Playback will start at the selected file
and continue to the end of the folder.
During MP3 playback, the selected track
name and current playing time will be
displayed under the ‘File Name’.
# If the ‘MP3/JPEG Nav’ is set to NO
MENU, the DATA CD MENU will not
appear on the TV screen (see page 33).
Helpful Hint:
- Kodak Picture CD, playback will start
automatically without a disc menu.
Press STOP ■ to display thumbnails of nine
pictures.
During playback, you can:
# Press to select another file in
the current folder,
# During playback, press A T ◄ ► to rotate
the picture on the TV screen.
# Press PAUSE II to pause playback.
Special MP3/JPEG features
This shows the content of the current
folder or the whole disc.
O Press PREVIEW during playback.
Thumbnails of 9 pictures appears or
the TV screen.
(example for 9 thumbnail pictures display)
® Press to display other pictur
on the previous/next page.
I Use ◄ ► A ▼ to highlight a picture. Pres
OK to start playback.
During playback, press ZOOM repeate
to choose ‘zoom on’ or zoom off’.^
Press to display the picture
with different zoom factors.
Use ◄ ► A ▼ to move through the
zoomed picture.
gles OPEG
During playback, press A T ◄ ► to rotat
the picture on the TV screen.
A: flip the picture vertically
▼: flip the picture horizontally
◄: rotate the picture counter-clockwise
►: rotate the picture clockwise
Press ANGLE repeatedly to choose
different scan effect.
^ Various scan effects appear in the to|
left corner of the TV screen.
Playbac
Press ◄ / ► repeatedly to play backward
forward at different speeds.
Press to change tracks.
M.
22
24
Page 23

DVD Menu Options
Basic Operations
# Press SYSTEM MENU when play is
stopped to enter the Setup Menu.
© Press OK to enter the next level
submenu or confirm your selection.
© Press ^ ► to enter the submenu or
return to the previous menu.
® Press AT to highlight the desired menu.
® Press SYSTEM MENU to quit the setup
menu.
The settings will be stored in the
player’s memory even if after the player is
switched off.
General Setup menu
The options in General Setup menu are:
‘OSD Language’,‘Screen Saver’,‘Smart
Power’,‘Disc Lock’ and‘Program’.
SET UP MENU • ‘ MAIN PAGE
AUE«0SE1W
vtUEC. St rUP
Screen Saver
® Press AT to highlight‘Screen Saver’.
® Enter its submenu by pressing ►.
® Press AT to choose a setting.
*4^ Off: Screen saver is disabled.
*4 On: When play is stopped or if no Disc
is in the Player, and if no actions are
performed within five minutes, the screen
saver will be activated.
® Press OK, then press ◄ to return to the
General Setup Page.
Smart Power
When play is stopped or if no Disc is in
the Player, the DVD Player will switch to
standby mode after fifteen minutes of
inactivity to save energy.
® Press SYSTEM MENU to enter the
setup menu.
© Press A T to select ‘General Setup’ page.
® Press OK to confirm.
NOTE:
Some of the features in the DVD
Menu Options are described in
“Getting Started”.
® Press AV to highlight‘Smart Power’.
© Enter its submenu by pressing ►.
® Press AV to choose a setting.
*4 Off: Smart Power is disabled.
^ On: When play is stopped or if no Disc
is in the Player, and if no actions are
performed for 15 minutes, the Player will
turn off.
O Press OK, then press ^ to return to the
General Setup Page.
25
Page 24

DVD Menu Options
Disc Lock (DVD/VCD/C
- GENERAL SETUP PAGE --
OSDLANGUAGE
SCREENSAVER
SMART POWER
[main PAGE ~1
i LOCK
Press AT to highlight ‘Disc Lock’.
S Enter its submenu by pressing ►.
iS Press AT to choose a setting.
Lock: Select this option and the player
will lock the current playing disc.
Unlock: Select this option and the
player will unlock the current playing disc.
You will need to enter the password to
confirm unlock selection. Use the
numerical keypad (0-9) on the remote.
The default password is 1234 (see
‘Password’ on page 32).
I Press OK, then press 4 to return to the
General Setup Page.
Helpful Hint:
- When a locked disc is in the Player, a
menu will appear.
-- GENERAL SETUP PAGE - -
OSD LANGUAGE
SCREEN SAVER
SMART POWER
& Press AT to highlight ‘Program’.
® Enter its submenu by pressing ►.
^ On: Select this option to activate
program function.
® Press OK to enter to ‘Program’ menu
(see‘Program Playback’ on page 21).
ForVCD / CD
For DVD
26
Page 25

DVD Menu Options
Audio Setup Menu
The options in the Audio Setup menu are:
‘Downmix’, ‘Digital Output’, ‘LPCM
Output’,‘Sound Mode’,‘Reverb Mode’ and
‘D.R.C. (Dynamic Range Control)’.
O Press SYSTEM MENU.
© Press A ▼ to select the ‘Audio Setup’ page.
® Press OK to confirm.
Downmix
® Press the AV keys to highlight‘Downmix’.
O Enter its submenu by pressing ►.
® Press AT to choose a setting.
^ LT/RT: Select this option if your DVD
Player is connected to a Stereo with a
Dolby Pro Logic decoder.
^ Stereo: Select this option if the TV or
Stereo has right and left Audio In jacks
but does not have Dolby Pro Logic.
® Press OK, then press A to return to the
Audio Setup Page.
O Press AT to highlight‘Digital Output’.
O Enter its submenu by pressing ►.
© Press AT to choose a setting.
^ All: If you connected the DVD Player’s
Digital (Coaxial or Optical) jack to a
multi-channel decoder/receiver.
PCM Only: Only if your receiver is
not capable of decoding multi-channel
audio.
© Press OK, then press 4 to return to the
Audio Setup Page.
Helpful Hint:
- If DIGITAL OUTPUT is set to A//’, all
audio settings except MUTE are invalid.
LPCM Output
If you connect the DVD Player to a PCM
compatible receiver using Player’s Digital
(Coaxial or Optical) jack, you may need to
adjust‘LPCM Output’.
Discs are recorded at a certain sampling
rate, measured in kHz.The higher the
sampling rate, the better the sound quality.
-‘AUDIO SETUP PAGE--
tJQWNtol?^
Digital Outp
Set Digital output according to the
optional audio equipment you connected.
“AUDIO SETUP PAGE“
UKJMOUTRrr ■
lAit 1
............................
i
0 Press AT to highlight ‘LPCM Output’.
O Enter its submenu by pressing ►.
® Press AT to choose a setting.
”»48K: Play a disc recorded at the
sampling rate of 48 kHz.
96K: Play a disc recorded at the
sampling rate of 96 kHz.
© Press OK, then press M to return to the
Audio Setup Page.
Helpful Hint:
- The average setting for most Discs is
48K.
27
Page 26

DVD Menu Options
Sound Mode
The digital sound effect allows you to
select from various pre-set modes that
control the frequency bands of optimized
certain musical styles. It enhances the
excitement and enjoyment of your
favorite music.
-AUDIO SETUP PAGE--
OOWI^X
OIGim<XJIFUf
LPCf^GlflHJT PCM»
F®VÌERB540DE
0.RC
INONE
m À M >
m m
OASS«:
© Press AT to highlight‘Sound Mode’.
O Enter its submenu by pressing ►.
© Press AT to choose a setting.
^ None, Rock, Pop, Ballad, Dance,
Classic
® Press OK, then press A to return to the
Audio Setup Page.
Reverb Mode
Reverb mode provides a virtual surround
sound effect even when the DVD Player is
connected to a Stereo or TV that has only
left/right stereo sound capability.
-AUDIO SETUP PAGE-
D«R.C. (Dynamic Range Control)
High volume outputs are softened,
enabling you to watch your favorite action
movie without disturbing others at night.
O Press AT to highlight‘D.R.C’.
© Enter its submenu by pressing ►.
® Press AT to choose a setting.
^ OffiThe dynamic range of the audio is
not compressed.You will hear the highs
and lows of the sounds.
On:The dynamic range of the audio is
compressed.The loud and soft sound will
be leveled evenly, reducing sudden bursts
of loud sounds.
& Press OK, then press A to return to the
Audio Setup Page.
{MG iTA tOUIFUT
ì^:s ^itoym rr
SrU DfO
m p m m
CNtmC H
® Press AT to highlight‘Reverb Mode’.
0 Enter its submenu by pressing ►.
© Press AT to choose a setting.
^ Off, Studio, Movie, Stadium,
Church, Club
® Press OK, then press M to return to the
Audio Setup Page.
28
Page 27

DVD Menu Options
Video Setup Menu
The options in the Video Setup menu are:
TV Standard’,TV Display’,‘Closed
Captions’, ‘Video Output’, ‘Progressive’
and ‘Smart Picture’.
® Press SYSTEM MENU.
© Press A T to select ‘Video Setup’ page.
® Press OK to confirm.
TV Display
Set the aspect ratio of the DVD Player
according to the TV you have connected
and the Discs you are playing.
.-VIDEO SETUP PAGE--
I '<xc^e>c»ptioNS
SMART PtCTUf^
® Press AY to highlight‘TV Display’.
© Enter its submenu by pressing ►.
® Press AV to choose a setting.
16:9
4:3
Letter Box
16:9
^ If you have a wide screen TV.
4:3 Letter Box
If you have a standard TV In this case, a
wide picture with black bands on the
upper and lower portions of the TV
screen will be displayed.
4:3 Pan Scan
^ If you have a regular TV and want both
sides of the picture to be trimmed or
formatted to fit your TV screen.
O Press OK, then press A to return to the
Video Setup Page.
Closed Captions
Closed captions are data that is hidden in
the video signal on specific discs, invisible
without a special decoder.The difference
between subtitles and closed captions is
that subtitles are intended for hearing
persons, and closed captions are for the
hearing impaired. For example, closed
captions show sound effects (e.g., “phone
ringing’’ and “footsteps’’), while subtitles
don’t.
Before you select this function, please
ensure that the disc contains closed
captions information and your TV also has
this function.
- - VIDEO SETUP PAGE - -
WD^PLAV
V«» OUTPUT
SMARTf^t^ '
i ON -
4:3
Pan Scan
O Press AV to highlight‘Closed Captions’.
© Enter its submenu by pressing ►.
© Press AV to choose a setting.
^ On: Enable Closed Captions.
^ Off: Disable Closed Captions.
O Press OK, then press ◄ to return to the
Video Setup Page.
29
Page 28

DVD Menu Options
Video Output
Choose the type of video output that
matches the connection of the DVD
Player to your TV
- - VIDEO SETUP PAGE -
I TV STANDARD
' CLOSED CAPTIONS
I PROGRESSIVE
, SMART PICTURE
® Press AV to highlight‘Video Output’.
© Enter its submenu by pressing ►.
© Press AT to choose a setting.
^ S-Video: If you have connected the SVideo Out jack to a TV.
^ YPbPr: If you have connected the
YPbPr Out jacks to a TV.
O Press OK, then press A to return to the
Video Setup Page.
Progressive
To select this item you must set ‘Video
Output’ to YPbPr (see left) and ensure
your TV has progressive scan.
® Press AT to highlight‘Progressive’.
© Enter its submenu by pressing ►.
© Press AT to choose a setting.
On: Enable Progressive Scan video.
^ Off: Disable Progressive Scan video.
© Press OK, then press A to return to the
Video Setup Page.
Helpful Hint:
- If a blank/distorted TV screen appears,
wait for 15 seconds for auto recover.
- To deactivate the progressive function,
refer to the hint menu displayed on the TV
screen or see pages 15 and 16.
30
Page 29

DVD Menu Options
Smart Picture
In this menu, you can choose an ideal
predefined picture setting.
--VIDEO SETUP PAGE-
0 Press AT to highlight‘Smart Picture’.
o Enter its submenu by pressing ►.
O Press AT to choose a setting.
*4^ Standard: select the standard picture
setting.
^ Bright: make the TV picture brighter.
^ Soft: make the TV picture softer.
^ Personal: set the ‘Brightness’,
‘Contrast’,‘Hue’ and ‘Saturation’ as you
prefer (see‘Brightness’ below).
O Press OK, then press A to return to the
Video Setup Page.
Brightness
You can personalize your picture by
adjusting brightness,contrast, hue and
saturation.
® Press ◄ ► to highlight‘Brightness’.
O Press T to open the level bar.
® Press 4 ► to decrease or increase the
brightness level.
• Repeat steps © - ® for adjusting the
contrast, hue and saturation.
O Press OK to exit.
Preferences Menu
The options in the Preferences menu are:
‘Audio’,‘Subtitle’,‘Disc Menu’,‘Parental’,
‘Password’,‘Default’ and‘MP3/JPEG Nav’.
© Press STOP twice.
© Press SYSTEM MENU to enter the
setup menu.
© Press A T to select the‘Preferences’ page.
O Press OK to confirm.
Parental
Some DVDs may have a parental level
assigned to the complete disc or to
certain scenes on the disc. This feature
lets you set a playback limitation level.
The rating levels are from 1 to 8 and are
country dependent. You can prohibit the
playing of certain discs that are not
suitable for your children or have certain
discs played with alternative scenes.
VCD, SVCD, CD have no level Indication,
so parental control has no effect on those
kinds of discs.This also applies to most
illegal DVDs.
- - PREFERENCE SETUP PAGE - -
. Z 'P Q :
m
r'm n
\
______________
:
31
Page 30

DVD Menu Options
I Press AT to highlight ‘Parental’.
I Enter its submenu by pressing ►.
J
Use AT to highlight a rating level for the
disc inserted.
^ DVDs that are rated above the level
you selected will not play unless you enter
your four-digit password and choose a
higher level rating.
^ To disable Parental controls and have
all Discs play, choose ‘No Parental’.
® Press OK, then press A to return to the
Preferences Setup Page.
Helpful Hint:
- Some DVDs are not encoded with a
rating though the movie rating may be
printed on the Disc cover. The rating level
feature does not prohibit play of such Discs.
Rating explanations
1KIDSAFE-2G
- General Audience; recommended as acceptable
for viewers of all ages.
3 PG
- Parental Guidance suggested.
4PG13
- Material Is unsuitable for children under age 13.
5 PGR - 6 R
- Parental Guidance - Restricted; recommended
that parents restrict children under 17 from
viewing or allow to view only when supervised by
a parent or adult guardian.
7NC-17
- No children under age 17; not recommended
viewing for children under age 17.
8 ADULT
- Mature material; should be viewed only by
adults due to graphic sexual material, violence or
language.
NO PARENTAL
- All discs will play.
This feature is used for Parental Control.
Enter your four digit password to play a
prohibit Disc or if prompt for a password.
The default password Is 1234.
- - PREFERENCE SETUP PAGE - -
I CHANGE
MP3/JPEG NAV
® Press AT to highlight ‘Password’.
® Enter its submenu by pressing ►.
® Press OK to open the password ‘Change’
page.
- - PASSWORD CHANGE PAGE - -
OLD PASSWORD 1
NEW PASSWORD !
CONFIRM PASSWORD 1
PRESS OK TO CONFIRM
_J
® Enter your current password as the OLD
PASSWORD. Use the numerical keypad
(0-9) on the remote.
® Enter a new four-digit code.
O Enter the new four-digit code a second
time to confirm.
The new four-digit code will take effect.
O Press OK, then press A to return to the
Preference Setup Page.
Helpful Hints:
- If the new password has been set, the
Parental and Disc Lock code will also be
changed to new password.The default
password won*t take effect.
- To reset the password to the default
setting (1234), press STOP four times.
32
Page 31

DVD Menu Options
Default
Setting the ‘Default’ function will reset all
options to the factory defaults.Your
personal settings will be erased.
® Press AT to highlight‘Default’.
© Highlight RESET by pressing ►.
© Press OK, then press ^ to return to the
Preference Setup Page.
Caution!
- When this function is activated, all
settings will reset to factory
defaults.
MP3/jPEG Navigator
This feature allows you to select alternate
settings when you playback picture CDs
OPEG/DivX) and MP3 CDs.
0 Press AT to highlight‘MP3/JPEG Nav’.
0 Enter its submenu by pressing ►.
© Press AT to choose a setting.
^ No Menu; playback all files in
sequence automatically without a menu.
^ With Menu; playback files in the
selected folder within a menu.
O Press OK, then press A to return to the
Preference Setup Page.
Helpful Hints:
- MP3/JPEG Nav can be set to WITH
MENU only if the disc was recorded with
menu.
- It may not be available on some discs,
even though it is set to WITH MENU'.
33
Page 32

Specifications
TV STANDARD (PAL/SOHz) (NTSC/60Hz)
Number of lines 625 525
Playback Multistandard (PAL/NTSC)
VIDEO PERFORMANCE
CVBS IVpp —75
YPbPr 0.7Vpp —75
VIDEO FORMAT
Digital Compression MPEG 2 for DVD,SVCD
DVD
Horiz. resolution 720 pixels 720 pixels
Vertical resolution 576 lines 480 lines
VCD 50Hz
Horiz. resolution 352 pixels 352 pixels
Vertical resolution
AUDIO FORMAT
Digital Mpeg/ AC-3/ compressed Digital
Analog Sound Stereo
Dolby Surround compatible downmix from Dolby Digital
multi-channel sound
MPEG 1 for VCD
MPEG-4
50Hz 60Hz
60Hz
288 lines 240 lines
PCM 16, 20, 24 bits
fs, 44.1,48, 96 kHz
MP3(ISO 9660) 96,112,128, 256
kbps & variable
bit rate fs, 32, 44.1,
48 kHz
AUDIO PERFORMANCE
DA Converter
DVD
SVCD
CD/VCD
Signal-Noise (1 kHz)
Dynamic range(lkHz)
Crosstalk (1kHz)
Distortion + noise (1 kHz)
MPEG MP3 MPEG Audio L3
CONNECTIONS
YPbPr Output
Video Output
Audio Output(L+R)
Digital Output
CABINET
Dimensions (w x h x d)
Weight
POWER CONSUMPTION
Power consumption in Standby mode < 0.8 W
24 bit
fs96kHz
fs 48 kHz
fs 48 kHz
fs 44.1 kHz
fs 44.1kHz
Cinch 3x (red, green, blue)
Cinch (yellow)
Cinch (white/red)
1 coaxial, 1 optical
IEC60958 for CDDA / LPCM
IEC61937for MPEG 1/2,
Dolby Digital
17.13 X 1.69 X 12.20 inch
435 X 43 X 235 mm
Approximately 4.18 pound
Approximately 2.0 kg
4Hz-44kHz
4Hz-22kHz
4Hz- 22kHz
4Hz- 20kHz
4Hz- 20kHz
95 dB
85 dB
>90dB
>80dB
34
Specifications subject to change without prior notice
Page 33

Troubleshooting
WARNING
Under no circumstances should you try to repair the system yourself, as this will
invalidate the warranty. Do not open the system as there is a risk of electric shock.
If a fault occurs, first check the points listed below before taking the system for repair. If
you are unable to remedy a problem by following these hints, please call 1-800-531-0039
for help.
Problem
No power
No picture
Distorted picture
Completely distorted picture or
black/white picture with DVD
No sound or distorted sound
No audio at digital output
Disc can’t play
Picture freezes momentarily
during playback
No return to start-up screen when
disc is removed
Solution
Check if the AC power cord is properly connected.
Press the STANDBY ON (!) on the front of the
DVD Player to turn on the power
Refer to your TV’s manual for correct Video In
channel selection. Change the TV channel until you
see the DVD screen.
Check if the TV is switched on.
Sometimes a small amount of picture distortion may
appear, depending on the disc being played.This is
not a malfunction.
Connect DVD Player directly to the TV
Make sure the disc is compatible with the DVD
Ensure that the DVD PlayersTV Standard is set to
match that of the Disc and yourTV
Adjust the volume.
Check the audio cables and make sure both are
connected secured to the TV or Stereo Audio In jacks.
Check the digital connections.
Check if your receiver can decode MPEG-2 or DTS.
Hake sure digital output is set to PCM Only.
Check if the audio format of the selected audio
language matches your receiver capabilities.
A DVD+R/CD-R must be finalized.
Ensure the disc label is facing up.
Check if the disc is defective by trying another disc.
If you have recorded a Picture CD or MP3 CD
yourself, ensure that your disc contains at least 10
pictures or 5 MP3 tracks.
Check tite Disc's Region Code. It must be 1 or ALL
Check the disc for fingerprints/scratches and
dean with a soft doth wiping from center to edge.
Reset the unit by switching the player oft, then on
35
Page 34

Troubleshooting
Problem
The player does not respond to
the Remote Control
Buttons do not work
Player does not respond to some
operating commands during playback.
DVD Player cannot read
CDs/DVDs
Menu items cannot be selected
Unable to play DivX movies
DVD Player upgrades
Solution
Aim the Remote Control directly at the sensor
on the front of the player
Reduce the distance to the player.
Replace the batteries in the Remote Control.
Re-insert the batteries with their polarities (+/-
signs) as indicated.
To completely reset the player, unplug the AC
cord fr'om the AC outlet for 5-10 seconds.
Operations may not be permitted by the disc.
Refer to the instructions of the disc jacket
Use a commonly available cleaning CD/DVD to
dean the lens before sending the DVD Player for
Press STOP twice before selecting the System Menu.
Depending on the disc availability, some menu items
cannot be selected.
Check that the DivX file is encoded in 'Home
Theater’ mode with DivX 5.x encoder
If a DVD does not play properly, contact Philips at 1 -
800-531-0339 for assistance. Due to the
inconsistency of Disc formats provided by various
Disc manufacturers, your DVD Player may require a
playability enhancement As DVD technology has
advanced, these enhancements have become both
common and easy to complete.
If you are unable to remedy a problem by following these hints, contact Philips,
36
Page 35

Glossary
Analog: Sound that has not been turned into
numbers. Analog sound varies, while digital
sound has specific numerical values. These
jacks send audio through two channels, the left
and right.
Aspect ratio: The ratio of vertical and
horizontal sizes of a displayed image.The
horizontal vs. vertical ratio of conventional TVs.
is 4:3, and that of wide-screens is 16:9.
AUDIO OUT lacks: Red and white jacks on
the back of the DVD Player that send audio to
another system (TV, Stereo, etc.).
Bit Rate: The amount of data used to hold a
given length of music; measured in kilobits per
second, or kbps. Or, the speed at which you
record. Generally, the higher the bit rate, or the
higher the recording speed, the better the
sound quality. However, higher bit rates use
more space on a Disc.
Chapter: Sections of a movie or a music
piece on a DVD that are smaller than titles. A
title is composed of several chapters. Each
chapter is assigned a chapter number enabling
you to locate the chapter you want.
Component Video Out Jacks: Red, blue
and green jacks on the back of the DVD
System that send high-quality video to a TV
that has Component Video In jacks (R/G/B, Y/
Pb/Pr,YUV, etc.).
Digital: Sound that has been converted into
numerical values. Digital sound is available
when you use the DIGITAL AUDIO OUT
(COAXIAL or OPTICAL) jacks.These jacks
send audio through multiple channels, instead
of just two channels as analog does.
Disc menu: A screen display prepared for
allowing selection of images, sounds, subtitles,
multi-angles, etc recorded on a DVD.
Dolby Digital: A surround sound system
developed by Dolby Laboratories containing up
to six channels of digital audio (front left and
right, surround left and right, center and
subwoofer).
IPEG: A very common digital still picture
formatA still-picture data compression system
proposed by the Joint Photographic Expert
Group, which features small decrease in image
quality in spite of its high compression ratio.
MP3: A file format with a sound data
compression system.“MP3” is the abbreviation
of Motion Picture Experts Group 1 (or MPEG-
1) Audio Layer 3. By using the MP3 format. One
CD-R or CD-RW can contain about 10 times
more data then a regular CD.
Multichannel: DVDs are formatted to have
each sound track constitute one sound field.
Multichannel refers to a structure of sound
tracks having three or more channels.
Parental Control: Limits Disc play according
to the age of the users or the limitation level in
each country. The limitation varies from disc to
disc; when it is activated, playback will be
prohibited if the software’s level is higher than
the user-set level.
PCM (Pulse Code Modulation): A system
for converting analog sound to digital sound for
later processing, with no data compression
used in conversion.
Playback control (PBC): Refers to the
signal recorded on video CDs or SVCDs for
controlling playback. By using menu screens
recorded on aVideo CD or SVCD that
supports PBC, you can enjoy interactive
playback and searching.
Progressive Scan: It displays all the
horizontal lines of a picture at one time, as a
single frame. This system can convert the
interlaced video from DVD into progressive
format when the DVD Player is connected to a
Progressive Scan TV. It dramatically increases
the vertical resolution and provides the best
picture.
Region code: A system allowing discs to be
played only in the region designated.This unit
will only play discs that have compatible region
codes. You can find the region code of your
unit by looking on the product label. Some
discs are compatible with more than one
region (or ALL regions).
S-Video: Produces a clear picture by sending
separate signals for the luminance and the
color. You can use S-Video only if your TV has
an S-Video In jack.
Title: The longest section of a movie or music
feature on DVD. Each title is assigned a title
number, enabling you to locate the title you
want.
VIDEO OUT jack: Yellow jack on the back
of the DVD Player that sends the DVD picture
video to a TV.
37
Page 36

Limited Warranty
Digital Video Disc Player
90 days Free Product Exchange / 9 / days-One Year Reduced-Cost Exchange
WHO IS COVERED?
You must have proof of the date of purchase to exchange
your product. A sales receipt or other document showing
the date that you purchased the product is considered such
proof.
WHAT IS COVERED?
Warranty coverage begins the day you buy your product. For
90 days thereafter, you may exchange the defective product
for a free new or renewed product through Philips.
From 91 days to one year from the date of purchase, you will
pay a preset exchange fee to obtain a new or renewed
product. Follow the exchange procedures on the next page.
This exchange opportunity ends one year after the date of
purchase.The replacement product is covered only for the
warranty period of the original product. When the warranty
on the original product expires, the warranty on all replaced
products also expires.
When it is necessary for you to ship the product to Philips for
exchange, you will pay the shipping costs for shipment to Philips.
Philips will pay the shipping costs when returning a product to
you.
WHAT IS EXCLUDED?
Your warranty does not cover:
• shipping charges to return defective product.
• labor charges for installation or setup of the product,
adjustment of customer controls on the product, and
installation or repair of antenna systems outside of the
product.
• product repair and/or part replacement because of
improper installation, abuse, neglect, misuse, accident,
unauthorized repair or other cause not within the
control of Philips.
• a product that requires modification or adaptation to
enable it to operate in any country other than the
country for which it was designed, manufactured,
approved and/or authorized, or repair of products
damaged by these modifications.
• incidental or consequential damages resulting from the
product. (Some states do not allow the exclusion of
incidental or consequential damages, so the above
exclusion may not apply to you.This includes, but is not
limited to, prerecorded material, whether copyrighted or
not copyrighted.)
• a product used for commercial or institutional purposes
(including but not limited to rental purposes).
WHERE IS EXCHANGE AVAILABLE?
Warranty exchange is available in all countries where the
product is officially distributed by Philips. In countries where
Philips does not distribute the product, the local Philips
service organization will attempt to exchange the product,
although there may be a delay if the appropriate product is
not readily available.
MAKE SURE YOU KEER..
Please keep your sales receipt or other document showing
proof of date of purchase. Attach it to the owner’s manual
and keep both nearby. Also keep the original box and
packing material in case you need to return your product.
BEFORE EXCHANGING THE PRODUCT...
Please check your owner’s manual before exchanging the
product. Adjustments of the controls discussed there may
save you time and money.
LIMITATION OF LIABILITY AND REMEDY...
PHILIPS IS NOT LIABLE UNDER ANY CIRCUMSTANCES
FOR ANY DIRECT, INDIRECT, SPECIAL, INCIDENTAL, OR
CONSEQUENTIAL DAMAGES, HOWSOEVER INCURRED,
EVEN IF NOTIFIED OF THE POSSIBILITY OF SUCH
DAMAGES.
TO THE EXTENT PERMITTED BY LOCAL LAW,THE
REMEDIES PROVIDED IN THIS WARRANTY STATEMENT
ARE YOUR SOLE AND EXCLUSIVE REMEDY.
THIS LIMITED WARRANTY GIVES YOU SPECIFIC LEGAL
RIGHTS, AND YOU MAY ALSO HAVE OTHER RIGHTS
WHICH VARY FROM STATE/PROVINCETO
STATE/PROVINCE.
TO EXCHANGE YOUR PRODUCT IN THE U.S.A.,
PUERTO RICO, OR U.S. VIRGIN ISLANDS...
FOLLOW THE INSTRUCTIONS STATED PREVIOUSLY IN
THE “WHAT IS COVERED’’ SECTION, OR REFER TO THE
EXCHANGE INSTRUCTIONS ON THE NEXT PAGE.
IN THE U.S.A., PUERTO RICO, AND U.S.VIRGIN ISLANDS,
ALL IMPLIED WARRANTIES, INCLUDING THE IMPLIED
WARRANTIES OF NON-INFRINGEMENT,
MERCHANTABILITY AND FITNESS FORA PARTICULAR
PURPOSE,ARE SPECIFICALLY DISCLAIMED,ANDTOTHE
EXTENT INCONSISTENT WITH LAW OF THE
LOCALITY OF THE USER, LIMITED IN DURATION TO
THE DURATION OF THIS EXPRESS WARRANTY.
BECAUSE SOME STATES DO NOTALLOW LIMITATIONS
ON HOW LONG AN IMPLIED WARRANTY MAY LAST,
THIS LIMITATION MAY NOT APPLY TO YOU.
TO EXCHANGE A PRODUCT IN CANADA...
Please contact Philips at:
In Canada, this warranty is given in lieu of all other
warranties.There are no other warranties, express or
implied, including any implied warranties of merchantability
or fitness for a particular purpose.
REMEMBER...
Please record below the model and serial numbers found on
the product. Also, please fill out and mail your warranty
registration card promptly. It will be easier for us to notify
you if necessary.
MODEL #______________________________
SERIAL #
I -800-661-6162 (French Speaking)
I -800-531 -0039 (English or Spanish Speaking)
____________________________________
__
38
Philips,P.O.Box 520890,Miami,FL 33152 (402)536-4171
EL6478E004 / 3-02
Page 37

ADDENDUM PHILIPS
Peräkkäispyyhkäisyn katka¡senninen manuaaiisesti
Esilia ilmestyy t/hjà nàyttòruutu, jos perakkaispyyhkàisytoiminto on
aktivoitu, muttaTVrsi ei tue perakkàispyyhkaisytoimintoa tai YUVkaapelia ei ole liitetty kunnolla.Voit katkaista
perakkaispyyhlaisytoiminnon seuraavana kuvatulla tavalla:
O Faina etupaneelin painiketta STANDBY ON kytkemàan DVD-
soitin.
# Faina etupaneelin painiketta OPEN/CLOSE levypesan
aukaisemiseksi.
0 Faina numeronàppàinta 1.
*4 TV:n na/ttòruutuun ilmestyy sininen Fhilips DVD:n tausta.
Рага desactiva* manualmente Progressivo
Se a fungào de varrimento progressivo està activada, mas a TV nào
suporta o varrimento progressivo ou o caboYFbFr nào se encontra
devidamente ligado, aparecerá um ecrà em branco. Fode desactivar o
varrimento progressivo corno se segue:
0 Fri ma STANDBY ON no painel dianteiro para ligar o leitor de
DVD.
0 Frima OPEN/CLOSE no painel dianteiro para abrir a gaveta do
disco.
0 Frima o teclado numérico‘T.
Aparecerá no ecrà daTV o fundo azul do DVD Fhilips.
Deaktivere progressiv manuelt
Hvis den progressive funksjonen er aktivert menTV-en ikke stotter
progressiv funksjon ellerYUV-kabelen ikke er koblet som den skal, vil
skjermen vaere torn. Du kan deaktivere den progressive funksjonen
ved ä folge instruksjonene nedenfor:
O Trykk STANDBY ON pä frontpanelet for ä slä pä DVD-spilleren.
0 Trykk OPEN/CLOSE pä frontpanelet for ä äpne plateskuffen.
0 Trykk pä talltasten ‘1’.
•4 Den blä Fhilips DVD-bakgrunnen vises päTV-skjermen.
fia va аттсуеруоттои^ОЕте рт] аитората тг|У Прос^ eutikí) oópw
Eáv ц прос^ EUTiKi^ AeiToupyía evspyonoiriSei, oAXó ц тт^Хеораоп
§ ev UTTOomipi^Ei ттро<^ eutikií аарыат) fj eóv r\ aú\^ eorig ev yívEi
pe то KoAUg lo ПрПа, 0a ерфауюте! кеут) o0óvt]. Mnopeíie va
апЕУЕруопоп^аете тт^у npocg eutiktí XeiTOupyía wq e^ií^:
O naníoTE то STANDBY ON пои ßpioKerai сщу прооофг! yia va
0éaETE OE XEiToupyía iti аиакеип avanapaywyfjqg íokcov DVD.
O rknfjoTe то OPEN/CLOSE пои ßpioKerai отру прооофр yia va
aVOÍ^ETE TI] 0Г|КГ1 TOUg 1СЖОи.
о Патт^отЕ то i ’ ото api0pi]TiKÓ пХт^ктроХоую.
“4 То рпХе фоуто П01р1пт DVD £рфаУ1^£та1 отт^у o0óvti тт\^
Tr\któpaax\q
Аая a% кти8и% ЦИИ прогрессивной pi звертки вручную
Если функция прогрессивной [^зверткиаКтивизиро%ьъ,но
телевизор не поддержиЕьет эту функцию, или ^^бeльYFbFr не
подсоединен соответствующим образом,отобразится пустой
экрьн. Д^ктиви%ция прогрессивной развертки осуществляется
следующим образом:
О Нажмите STANDBY ON (Выход из режикь ожи/^ния)
передней г^нели включения проигрыш теля DVD.
О Откройте лоток для дио^,>^я^в кнопку OPEN/CLOSE
(Открыть/Эа крыть) на передней г^нели.
О Нажмите цифровую к/^вишу*Т.
•4 hb экрь не телевизора появится синий фон DVD Fhilips.
ilerl modunun manuef olarak devre di§i birakilmasi
¡Ieri i§levinin etkinle§tirilmesine ragmen TV’niz ileri i§levini
desteklemiyorsa veya YPbPr kablosu dogru bigimde
baglanmami§sa, ekranda goruntu olmaz. ileri i§levini
a§agidaki §ekilde devre di§i birakabilirsiniz:
O DVD oynaticiyi agmak igin on paneldeki STANDBY-ON
butonuna basin.
0 Disk yukleme tepsisini agmak igin on paneldeki OPEN/CLOSE
butonuna basin.
0 Rakamli tug takiminda ‘T tuguna basin.
•4 TV ekraninda mavi renkte Philips DVD arka plani gosterilir.
De:i|^ ktyv£i с|| r^czi^ wyblei^nK koleinolinlowego
jezeli tryb wybierania kolejnoliniowego jest wlqczony, ale odbiornikTV
nie obstuguje tej funkcji lub kabel YUV jest niewtasciwie pocHqczony,
pojawi si? pusty ekran.Tryb \A^bierania kolejnoliniowego mozna
wyt^czyc w nast^puj^cy sposob:
O Nacisnij przycisk STANDBY ON na panelu przednim, aby wt^czyc
odtwarzacz.
O Nacisnij przycisk OPEN/CLOSE na panelu przednim, aby wysun^c
szuflad? odtwarzaaa.
O Nacisnij przycisk numeryczny 1.
*4 Na ekranie odbiornikaTV pojawi si? niebieskie t+o odtwarzacza
DVD Philips,
шшишкадж
Se a fun?ào progressivo estiver ativada, mas sua TV nào suportar esta
fun?ào ou o caboYFbFr nào estiver ligado corretamente,aparecerá
urna tela em branco.Vocè pode desativar a fun?ào progressivo corno
està descrito abaixo:
O Aperte STANDBY ON no painel frontal para ligar o leitor de
DVD.
0 Aperte OPEN/CLOSE no painel frontal para abrir a gaveta do
disco.
0 Aperte a teda numérica “1
•4 O fundo azul do DVD Fhilips aparece na tela daTV.
manualmente
12NC: 02_8239 300 31121
Page 38

ADDENDUM
PHILIPS
To deactivate Progressive manually
If the progressive function is activated, but your TV does not support
progressive function orYPbPr cable is not connected accordingly,
there will be a blank screen.You can deactivated progressive function
as below:
0 Press STANDBY ON on the front panel to switch on the DVD
player.
O Press OPEN/CLOSE on thè front panel to open the disc tray.
O Preiss numerical key padi’.
The blue Philips DVD background appears on the TV screen.
Pour désactiver le balayage progressif manuellement
Si la fonction de balayage progressif est activée, mais que votre
téléviseur n’est pas compatible ou que le câble YUV n’est pas
connecté correctement, l’écran restera vide.Vous pouvez désactiver
la fonction de balayage progressif de la façon ci-dessous :
O Appuyez sur le bouton STANDBY ON situé sur la façade du
lecteur de DVD.
O Appuyez sur le bouton OPEN/CLOSE situé sur la façade pour
ouvrir le tiroir.
O Appuyez sur la touche ‘T.
L’écran d’arrière-plan bleu du lecteur de DVD Philips apparaît sur
le téléviseur.
Manuelles Deaktivieren von Progressive
Wenn die Progressive-Funktion aktiviert ist, Ihr Fernsehgerät die
Progressive-Funktion aber nicht unterstützt oder einYUV-Kabel
nicht entsprechend angeschlossen ist, wird ein leerer Bildschirm
angetroffen. Sie können die Progressive-Funktion wie nachstehend
deaktivieren:
O Drücken Sie STANDBY ON auf dem vorderen Bedienfeld, um den
DVD-Spieler einzuschalten.
O Drücken Sie OPEN/CLOSE auf dem vorderen Bedienfeld, um die
Disk-Lade zu öffnen.
O Zifferntaste‘1’ drücken.
"4 Der blaue Philips DVD-Hintergrund erscheint auf dem
Fernsehbildschirm.
Para desactivar la exploración progresiva manualmente
Si la función de exploración progresiva o su televisor no admite la
función de exploración progresiva o el cable YPbPr no está
conectado de la forma correspondiente, aparece una pantalla en
blanco. Puede desactivar la función progresiva de la forma siguiente:
O Pulse STANDBY ON en el panel delantero para activar el
reproductor de DVD.
O Pulse OPEN/CLOSE en el panel delantero para abrir la bandeja de
discos.
O Pulse el botón numérico i’.
La pantalla de fondo azul de DVD de Philips aparece en la pantalla
del televisor.
Per disattivare manualmente la modalità Progressive
Se la funzione progressiva è attivata, ma il televisore non è
compatibile oppure se il cavoYPbPr non è collegato correttamente,
compare una schermata vuota. Per disattivare la funzione progressiva
completare la seguente procedura:
O Premere STANDBY ON sul pannello frontale per accendere il
lettore DVD.
O Premere OPEN/CLOSE sul pannello frontale per aprire il vassoio
del disco.
O Premere il tasto numerico “1”.
Sullo schermo del televisore compare lo sfondo blu Philips DVD.
För att stanga av ’’progressive scan” manuellt
Om funktionen ’’progressive scan” är aktiverad men din TV inte
stödjer denna funktion ellerYPbPr-kabeln inte är ansluten korrekt,
visas bara en svart skärm. Du kan stänga av funktionen ’’progressive
scan” pä följande sätt:
O Tryck STANDBY ON pà DVD-spelarens framsida för att sätta pä
den.
O Tryck OPEN/CLOSE p
skivsiäden.
O Tryck pä siffertangenten ”1”.
“4 Den bläa Philips DVD-bakgrunden visas päTV-skärmen.
. DVD-spelarens framsida för att öppna
Om Progressive handmatig uit te schakelen
Als de progressive-functie ingeschakeld is maar uw tv ondersteunt de
progressive-functie niet of deYPbPr-kabel is niet overeenkomstig
aangesloten dan krijgt u een leeg scherm. U kunt de progressivefunctie als volgt uitschakelen:
O Druk op STANDBY ON op de voorkant om de dvd-speler in te
schakelen.
O Druk op OPEN/CLOSE op de voorkant om de disklade te openen.
0 Druk op cijfertoets ‘T.
*4 De blauwe Philips dvd-achtergrond verschijnt op het tv-scherm.
Sádan deaktiveres Fremad manuelt
Hvis fremadfunktionen aktiveres, men fjernsynet ikke understotter
denne funktion, ellerYUV-kablet ikke er tilsluttet korrekt, giver det
sort skaerm. Fremad-funktionen deaktiveres som feiger:
O Tryk pä STANDBY ON pä frontpanelet for at taende DVD-
afspilleren.
O Tryk pä OPEN/CLOSE pä frontpanelet for at äbne diskskuffen.
O Tryk päi’ pä det numeriske tastatur.
•4 Den blä Philips DVD baggrund kommer frem pä
fjernsynsskaermen.
12NC: 02_8239 300 31121
Page 39

ADDENDUM
PHILIPS
JPEG and MP3 simultaneous playback
O Select a MP3 track and press AUDIO.
‘Music Slide Show’ appears on the TV screen.
© Press A to return to Root menu and select a picture file, then press
OK.
-¥ The picture will be played back in sequence together with MP3
music.
m To quit simultaneous playback, press STOP.
"f The picture and MP3 music playback will stop.
Helpful Hints:
- If the disc menu doesn’t appear on the TV screen, switch ‘MP3/JPEG
Navigator’ to With Menu’ (see page 32).
Lecture simultanée de fichiers JPEG et MP3
O Sélectionnez une piste MP3, puis appuyez sur AUDIO.
O Appuyez sur A pour revenir au menu racine. Sélectionnez une image,
m Pour quitter le mode de lecture simultanée, appuyez sur STOP.
Le message « Music Slide Show » s’affiche à l’écran du téléviseur.
puis appuyez sur OK.
L’image est lue en boucle, parallèlement au fichier MP3.
La lecture de l’image et du fichier MP3 est interrompue.
Conseils utiles :
- Si le menu du disque ne s’affiche pas à l’écran du téléviseur, passez du
mode (( MP3/JPEG Navigator » au mode « With Menu » (voir page 64).
Gleichzeitige Wiedergabe von JPEG und MP3
O Wählen Sie einen MP3-Titel aus, und drücken Sie AUDIO.
Auf dem Fernsehbildschirm wird ‘Music Slide Show’ angezeigt.
O Drücken Sie A, um zum Hauptmenü zurückzukehren.Wählen Sie
anschließend eine Bilddatei aus, und drücken Sie dann OK.
Das Bild wird zusammen mit der MP3-Musik wiedergegeben.
© Um die gleichzeitige Wiedergabe zu beenden, drücken Sie STOP.
Die Wiedergabe von Bild und MP3-Musik wird angehalten.
Hilfreiche Tipps:
- Wenn das Menü nicht auf dem Fernsehbildschirm angezeigt wird,
wechseln Sie vom Modus ‘MP3/JPEG Navigator’in den Modus With Menu’
(siehe Seite 96).
Reproducción simultánea de JPEG y MP3
m Seleccione una pista de MP3 y pulse AUDIO.
‘Music Slide Show’ (Diapositiva de música) aparece en la pantalla
de TV.
O Pulse A para volver al menú raíz, seleccione un archivo de imagen y, a
continuación, pulse OK.
La imagen se reproducirá en una secuencia acompañada de música
en MP3.
© Para detener la reproducción simultánea, pulse STOP.
La reproducción simultánea de imagen y música MP3 se detendrá.
Consejos útiles:
- Si el menú del disco no aparece en la pantalla de TV, cambie de ‘MP3!
JPEG Navigator’(Navegador MP3/JPEG) a With Menu’(Con menú).
Consulte la página 128.
Riproduzione simultanea JPEG e MP3
O Selezionare un brano MP3 e premere AUDIO.
Il messaggio ‘Music Slide Show’ compare sullo schermo del
televisore.
O Premere A per tornare al menu principale e selezionare un file
immagine, quindi premere OK.
L’immagine verrà riprodotta in sequenza insieme al brano musicale
MP3.
Per uscire dalla riproduzione simultanea, premere STOP.
La riproduzione dell’immagine e del brano musicale MP3 verrà
interrotta.
Suggerimenti utili
- Se il menu del disco non viene visualizzato sullo schermo televisivo,
posizionare ‘MP3/JPEG Navigator’su With Menu’(vedere pagina 160).
Samtidig uppspelning av JPEG och MP3
О Valj ett MP3-spar och tryck pa AUDIO.
“Music Slide Show’’ (Musikbildspel) visas pa tv-skarmen.
0 Ga tillbaka till huvudmenyn genom att trycka pa A, valj en bildfil och
tryck pa OK.
Bildfilen spelas upp i sekvens med MP3-musiken.
О Avsiuta den samtidiga uppspelningen genom att trycka pa STOP.
-> Uppspelningen av bildfilen och MP3-musiken avsiutas.
Praktiskt tips:
- От skivmenyn inte visas pa TV-skdrmen andrar du instdilning for MP3/
JPEG Navigator till‘With Menu” (Med meny) (se sidan 192).
JPEG en MP3 gelijkti|dig afspelen
O Selecteer een MP3-nummer en druk op AUDIO.
->Op het tv-scherm verschijnt ‘Music Slide Show’.
O Druk op A om terug te keren naar het hoofdmenu, selecteer een
fotobestand en druk vervolgens op OK.
De foto’s worden op volgorde afgespeeld met MP3-muziek.
© Druk op STOP om het gelijktijdig afspelen van muziek en foto’s te
beeindigen.
Er worden geen foto’s meer afgespeeld met MP3-muziek.
Nuttige tips:
- Als het schijfmenu niet op het tv-scherm verschijnt, schakel dan over van
‘MP3/JPEG Navigator’naar With Menu’(zie pagina 128).
Samtidig afspilning af JPEG og MP3
O Vaelg et MP3-spor, og tryk pá AUDIO.
“*> Der vises “Music Slide Show” (Diasshow med musik) pá tvskaermen.
© Tryk pá A for at vende tilbage til rodmenuen, og vaelg et billede.Tryk
derefter pá OK.
Billedet afspilles i raekkefolge sammen med MP3-musik.
© Hvis du vil afslutte samtidig afspilning, skal du trykke pá STOP.
Afspilning af billede og MP3-musik stopper.
Nyttige tip:
- Hvis diskmenuen ikke vises pa tv-sksermen, skal du skifte ‘‘MP3/JPEG
Navigator” til‘‘With Menu” (Med menu) (se side 224).
12NC8239 300 31121
Page 40

ADDENDUM
PHILIPS
JPEG-kuvien ja MP3-levyjen samanaikaínen toisto
O Valitse MP3-raita ja valitse AUDIO.
TV-ruutuun tulee teksti Music Slide Show (Musiikin diaesitys).
# Palaa alkuvalikkoon painamalla X-painiketta, valitse sitten
kuvatiedosto ja lopuksi OK.
Kuva toistetaan nyt MP3-musiikin kanssa.
O Lopeta samanaikainen toisto valitsemalla STOP (LOPETUS).
Kuvan ja MP3-musiikin toisto lopetetaan.
Hyódyllisiá vihjeitá:
- Jos levyn valikko ei tule ndkyviin TV-ruutuun, vaihda With Menu (Valikot)
-asetus asetukseen MP3/JPEG Navigator (MPSIjPEG-navigaattori)
(lisátietoja on sivulla 32).
Reprodu^ao simultànea JPEG e MP3
O Seleccione urna faixa em MP3 e prima em AUDIO.
‘Music Slide Show’ (diapositivos de música) é apresentado no ecrá
do televisor.
0 Prima A para voltar ao menu Root (raiz) e seleccionar um ficheiro
de imagens e, em seguida, prima OK.
A imagem é reproduzida em sequéncia com a música em MP3.
0 Para parar a reprodu^áo em simultaneo, prima STOP.
-»A reprodu?áo simultànea da imagem e do MP3 é interrompida.
Sugestoes úteis:
-Seo menu do disco nao for apresentado no ecra do televisor, mude
para do ‘MP3/JPEG Navigator' (navegador MP3/JPEG) para o With Menu’
(el menu) (ver página 64).
jednoezesne odt^ r:^. nie plików JPEG i MP3
O Wybierz utwór MP3 i nacisnij przydsk AUDIO.
Na ekranie telewizora pojawi si? napis 'Music Slide Show' (Muzyka
+ slajdy).
O Nacisnij przyeisk A, aby powrócic do menu gtównego, po czym wybierz
z^dany plik grafiezny i nacisnij przyeisk OK.
Rozpocznie si? pokaz slajdów z jednoczesnym odtwarzaniem
kolejnych nagrañ MP3.
O Aby zakonezye jednoezesne odtwarzanie plików graficznych i
muzycznych, nacisnij przyeisk STOP.
Wyswietlanie zdj?c i odtwarzanie utworów MP3 zostanie zakohezone.
Wskazówki:
- Jesli na ekranie telewizora nie pojawia si^ menu piyty, wybierz dia pozycji
'MP3/JPEG Navigator’ (Naw. MP3/JPEG) ustawienie ‘With Menu' (Z
menu). Patrz strona 128.
TauToxpovn avairapa>) ул JPEG kqi MP3
0 ЕтЛе^те eva коцрап MP3 kqi яатт|отЕ AUDIO.
*4 Zttiv oGovq rriq TqXcopacrriq £p<j>avi^cTai to prjvupa 'Music Slide
Show' ("ПророЛт) napouaiacrriq perd pouaiKqq")
О Пап)ore A yia va етатрефстЕ ото "Root menu", етпЛе^те evq
apxeio EiKovcjv kqi arq auvexcia тгап)отЕ OK.
H EiKova 0a avanapax0£i pc тг| OEipd napdAXrjXa це тт]
pouaiKq MP3.
Ф Tia va§ юкофЕТЕ Tqv TauToxpovT) ауапараушуЛ> ттап)сп-Е STOP.
H avanapaywyfi TX]q EiKovaq kqi тг|д pouoiKqq MP3 0a
OTapaTqaEi.
Xpqaipeg aupPouJ^ q:
- Edv TO Pa<^iKo pevoii той 5ioKou 6ev £p<f>aViorei ат^ o06v^t^
Ту^едраОф, optoTE tov 'MP3/JPEG Navigator'т ^ етХоУff 'With
Menu' ("Me pevou") (deire aeAida 160).
Одновременное воспроизведение JPEG и MP3
О Выберите ф^йл MP3 и жмите AUDIO (Аудио).
НЬ телеэкране появится длись "Music Slide Show"
(Музьи^льное с/^йд-шоу).
0 жмите А для возврата в корневое меню и выберите <{^йл
изображения, % тем нажмите ОК.
Изображение будет отобрь>»^ться одновременно с
воспроизведением музыки MP3.
О Для выхо^ из режим одновременного воспроизведения
ььжимте STOP (Стоп).
"^Отображение изображения и воспроизведение музыки MP3
оста новится.
Полезные советы:
- Если на телеэкране не появляется меню диска, установите
"MP3/JPEG Navigator" (Обозреватель MP3/JPEG) в положение "With
Menu" (С меню) (см. стр. 192).
Reprodufào simultànea JPEG e MP3
O Selecione urna triiha MP3 e pressione AUDIO.
‘Music Slide Show’ aparecerá na tela da TV.
B Pressione A para retornar ao menu de raiz e, em seguida, selecione
um arquivo de imagem e pressione OK.
A imagem será reproduzida em seqüéncia juntamente com a
música MP3.
O Para sair da reprodugáo simultanea, pressione STOP (PARAR).
A reprodu?ào da imagem e da mùsica MP3 parará.
Dicas úteis:
- Se o menu do disco nao aparecer na tela da TV, alterne de ‘MP3/JPEG
Navigator’para "With Menu’(ver pàgina 96).
12NC: 8239 300 31121
Page 41

Limited Warranty (cont’d)
EXCHANGE INSTRUCTIONS
To exchange your product with Philips (per the warranty conditions stated previously), remember:
• If you exchange the product within 90 days of the original purchase, there is no cost to you*
• If you exchange the product more than 90 days after but less than one year after the day of original purchase, contact
Philips at 1-800-531-0039 to determine the preset cost for exchange.
• If you do not have your original sales receipt, or if you have any questions, call Philips at I -800-531 -0039.
To obtain a replacement product from Philips:
1. Contact Philips at 1-800-531-0039 to determine the cost for exchange.
2. Complete the Exchange Form below.
3. Pack the product and its accessories in the original box or a suitable alternative.You will receive replacement
accessories with your replacement product. For packing details, call Philips at 1-800-531-0039.
4. Put the completed Exchange Form, a copy of the original sales receipt, and the proper payment amount into an
envelope. DO NOT SEND CASH. Do not staple or clip these items together. Label the envelope “Return Documents
Enclosed.” Place this envelope in the box with the product.
5. Seal the box with packing tape and return the product via United Parcel Service (UPS), insured and freight prepaid, to:
A replacement will be sent to you via UPS within 48 business hours of Philips’ receipt of the product.
*When it is necessary for you to ship the product to Philips for exchange, you will pay the shipping costs for shipment to Philips.
Philips will pay the shipping costs when returning a product to you.
Your Address (street address to which replacement should be delivered, no RO. boxes allowed):
Name:
Street Address: Apt. #:
City: State/Province: Zip Code/Postal Code:
Phone (day): Phone (night):
Philips Exchange Program
Suite A
406 North Irish Street
Greeneville,TN 37745
ATTENTION: DVD EXCHANGE
EXCHANGE FORM
Exchange Fee:
Method of Payment: (Check one. Please, no cash or CODs.)
Check/Money order
American Express
Visa
Novus/Discover
Mastercard
Signature:_______________________________________
Detailed reason for return, use additional paper if necessary: _
Model Number
Remember, the return box should include the following:
• The product, • Accessories supplied with the product, and
• Completed Exchange Form and sales receipt, • Payment, if applicable.
+ Sales Tax: = Total:
Check/Money order No.
Account number
Serial Number
Expiration date
39
Page 42

PHILIPS CONSUMER ELECTRONICS COMPANY
A Division of Philips Electronics North America Corporation, Knoxville,Tennessee 37914-1810, USA
DVP 640 • DVP 642
The products and services described herein are
not necessarily available in all countries.
Due to continuous product improvements this
document is subject to change without notice.
8239 210 98531
IB8461E001
 Loading...