

Philips DVP5992 12 User Manual
Register your product and get support at
www.philips.com/welcome
DVP5992
EN User manual 3
DA Brugervejledning 21
DE Benutzerhandbuch 39
EL ƆƣƷƥƩƱƟƤƩƯ ƷƱƞƳƧƲ 59
ES Manual del usuario 79
FI Käyttöopas 97
FR Mode d’emploi 115
IT Manuale utente 133
NL Gebruiksaanwijzing 151
PL Instrukcja obsãugi 169
PT Manual do utilizador 187
SV Användarhandbok 205
TR Kullanım kılavuzu 221

LASER
CAUTION:
USE OF CONTROLS OR ADJUSTMENTS OR
PERFORMANCE OF PROCEDURES OTHER
THAN THOSE SPECIFIED HEREIN MAY RESULT
IN HAZARDOUS RADIATION EXPOSURE.
CAUTION:
VISIBLE AND INVISIBLE LASER R ADIATION
WHEN OPEN AND INTERLOCK DEFEATED.
DO NOT STARE INTO BEAM.
LOCATION:
INSIDE, NEAR THE DECK MECHANISM.
Italia
DICHIARAZIONE DI CONFORMITA’
Si dichiara che l’apparecchio DVP5992, Philips
risponde alle prescrizioni dell’ar t. 2 comma 1 del
D.M. 28 Agosto 1995 n.548.
Fatto a Eindhoven
Philips Consumer Lifestyles
Philips, Glaslaan 25616 JB Eindhoven,
The Netherlands
This product is in compliance with the EEE
directive.
EEE yönergesine uygundur.
Norge
Typeskilt fi nnes på apparatens underside.
Observer: Nettbryteren er sekundert innkoplet.
Den innebygde netdelen er derfor ikke
frakoplet nettet så lenge apparatet er tilsluttet
nettkontakten.
For å redusere faren for br ann eller elektrisk
støt, skal apparatet ik ke utsettes for regn eller
fuktighet.
DK
Advarsel: Usynlig laserstr åling ved åbning når
sikkerhedsaf br ydere er ude af funktion. Undgå
utsættelse for s tråling.
Bemærk: Netafbryderen er sekundært indkoblet
og ofbryder ikke strømmen fra nettet. Den
indbyg gede netdel er der for tilsluttet til lysnet tet
så længe nets tikket sidder i stikkontakten.
S
Klass 1 laseraparat
Varning! Om apparaten används på annat sätt
än i denna bruksanvisning specifi cerats, kan
användaren utsättas för osynlig laserstr ålning, som
överskrider gränsen för laserklass 1.
Obser vera! Stömbr ytaren är sekundär t kopplad
och bryter inte strömmen från nätet . Den
inbyggda nätdelen är där för ansluten till elnätet så
länge stickproppen sitter i väggut taget.
SF
Luokan 1 laserlaite
Varoitus! Laitteen k äyttäminen muulla kuin
tässä käy ttöohjeessa mainitulla tavalla saat taa
altistaa käy ttäjän turvallisuusluokan 1 ylittävälle
näkymättömälle lasersäteilylle.
Oikeus muutoksiin var ataan. L aite ei saa
olla alttiina tippu-ja roiskevedelle. Huom.
Toiminnanvalitsin on k ytket ty toisiopuolelle,
eikä se ky tke laitet ta irti sähköverkosta.
Sisäänrakennettu verkko-osa on
kytket tynä sähköverkkoon aina silloin, kun pistoke
on pistorasiassa.
2 EN
Producent zastrzega moůliwoőĂ wprowadzania
zmian technicznych.
Trademark notice
Contents
Manufactured under license from Dolby
Laboratories. Dolby and the double-D symbol are
trademar ks of Dolby Laboratories.
Windows Media and the Windows logo are
trademar ks, or registered trademarks of Microsof t
Corporation in the United States and/or other
countries.
ABOUT DIV X VIDEO: DivX® is a digital video
format created by DivX, Inc. This is an offi cial DivX
Cer tifi ed device that plays DivX video. Visit ww w.
divx.com for more information and sof tware tools
to conver t your fi les into DivX video.
ABOUT DIV X VIDEO-ON-DEMAND: This DivX
®
Certifi ed
play DivX Video- on- Demand (VOD) content.
To generate the registration code, locate the
DivX VOD sec tion in the device setup menu. Go
to vod.divx.com with this code to complete the
regis tration process and learn more about DivX
VOD.
DivX
regis tered trademark s of DivX, Inc. and are used
under license.
device must be regis tered in order to
®
, DivX Cer tifi ed® and associated logos are
1 Important 4
Safety and important notice 4
2 Your DVD player 5
Playable media 5
Product overview 5
3 Connect 6
Connect video cables 6
Connect audio cables 7
Route audio to other devices 7
Connect USB fl ash drive 7
Connect power 8
4 Get started 8
Prepare the remote control 8
Find the correct viewing channel 8
Select menu display language 8
Turn on progressive scan 8
Use Philips EasyLink 9
5 Play 9
Play a disc 9
Play video 9
Play music 11
Play photo 11
Play musical slideshow 12
Play from a USB fl ash drive 12
6 Advanced features 12
Media copy 12
Create MP3 fi les 13
English
The USB-IF Logos are tr ademarks of Universal
Serial Bus Implementers Forum, Inc.
HDMI, and HDMI logo and High-Defi nition
Multimedia Interface are trademar ks or registered
trademar ks of HDMI licensing LLC.
7 Adjust settings 13
General setup 13
Audio setup 14
Video setup 15
Preferences 16
8 Additional information 18
Update software 18
Care 18
Specifi cations 18
9 Troubleshooting 19
EN
3

1 Important
Safety and important notice
Warning
Risk of overheati ng! Ne ver ins tall the pr oduc t in a •
confi ned space. Alw ays leave a space of at lea st 4 inches
around the product for ventil atio n. Ensure curt ains or
other objec ts ne ver cove r the ve ntilation s lots o n the
product.
Never p lace th e prod uct , rem ote control or batteri es
•
near na ked fl ames or other heat sou rces , including d irec t
sunlight.
Avoid high temperature, moistur e, wa ter an d dust.
•
This unit must not be expos ed to dr ippi ng or splash ing.•
Never p lace any objec t or it ems that can damage t his •
unit (e. g., li quid fi lled objec ts, l ighted candles).
Never p lace th is product on othe r elec tr ical e quipment .
•
Keep away from t his pr oduc t dur ing lightning storms .•
Wher e the ma ins plug or an applia nce coup ler is u sed as •
the dis conne ct de vice, the dis connect de vice sh all re main
readily operable.
Visib le and i nvisi ble la ser r adiation when open. Avoid
•
expos ure to b eam.
This produc t complies with the radio inter ference
requirements of the European Community.
About Progressive Scan
Consumers should note that not all high defi nition
television sets are fully compatible with this product
and may cause ar tifacts to be displayed in the
picture. In case of 525 or 625 progressive scan
picture problems, it is recommended that the user
switch the connection to the ‘standard defi nition’
output. If there are questions regarding our TV set
compatibility with this model 525p and 625p DVD
player, please contact our customer service center.
Disposal of your old product and
batteries
When this crossed-out wheeled bin symbol is
attached to a product it means that the product
is covered by the European Directive 2002/96/
EC. Please inform yourself about the local separate
collection system for electrical and electronic
products.
Please act according to your local rules and do not
dispose of your old products with your nor mal
household waste.
Correct disposal of your old product helps to
prevent potential negative consequences for the
environment and human health.
Your produc t contains batteries covered by the
European Directive 20 06/66/EC , which cannot be
disposed with normal household waste.
Please inform yourself about the local rules on
separ ate collection of batteries because correct
disposal helps to prevent negative consequences for
the environmental and human health.
Copyright notice
This item incorporates copy protection technolog y
that is protec ted by U.S. patents and other
intellectual proper ty rights of Rovi Corporation.
Reverse engineering and disassembly are prohibited.
CLASS 1
LASER PRODUCT
Your produc t is designed and manufac tured with
high quality materials and components, which can
be recycled and reused.
4
EN
2 Your DVD player
Congratulations on your purchase, and welcome to
Philips! To fully benefi t from the support that Philips offers,
register your product at www.philips.com/welcome.
Playable media
This product can play:
DVD, DVD -Video, DVD+R /+RW, •
DVD- R /-RW, DVD+R/-R DL (Dual Layer)
Video CD/SVCD•
Audio CD, CD-R/CD-RW, MP3- CD, •
WMA-CD, WMV-CD
DivX (Ultra)-CD, Picture CD•
USB fl ash drive•
Region codes
You can play discs with the following region codes.
DVD region code Countries
Europe
Product overview
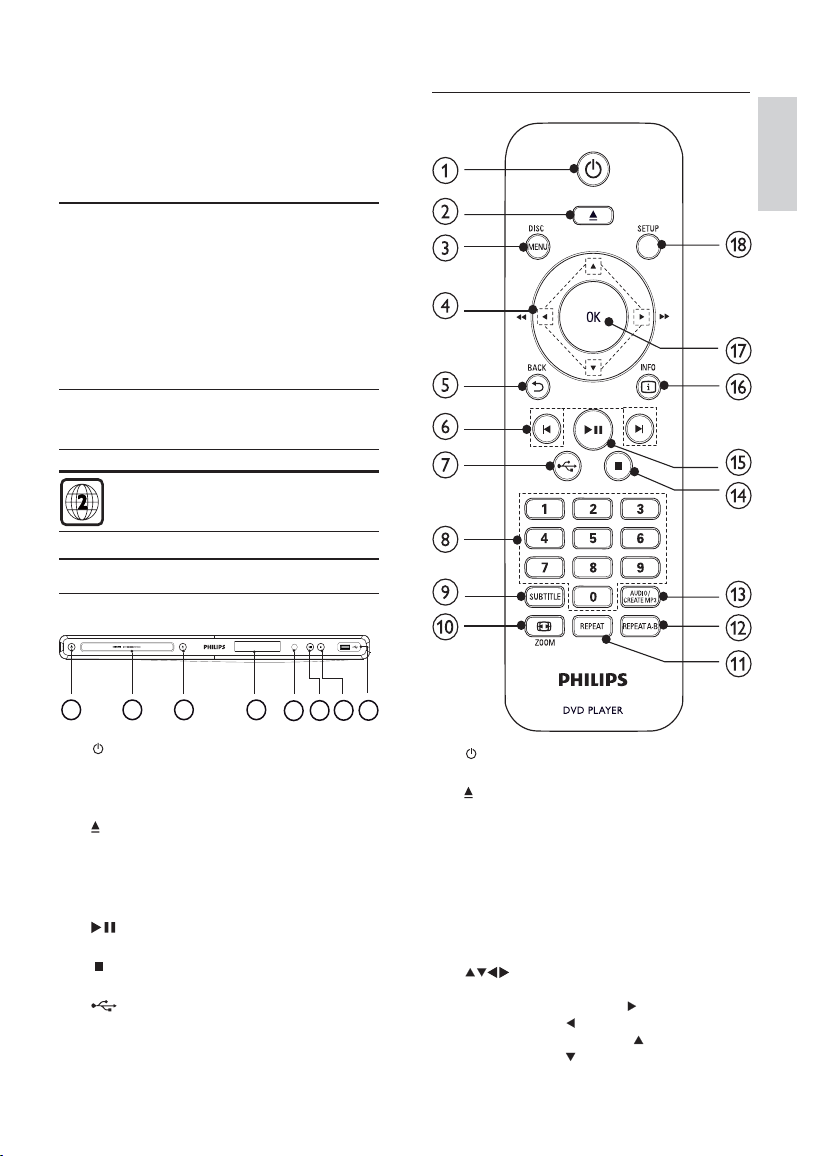
Main Unit
Remote control
English
3
a ( Standby-On )
b Disc compartment
c
d Display panel
e iR sensor
f
g
h
Turn on the DVD player or switch to •
standby mode.
( Open/Close )
Open or close the disc compar tment.•
Remote sensor.•
( Play/Pause )
Star t, pause or resume disc play. •
Stop play.•
( USB )jack
Connect a USB fl ash drive.•
41 2
5
8
7
6
a
b
c DISC MENU
d
Turn on the unit or switch to standby.•
Open or close the disc compar tment. •
Access or exit the disc menu. •
Switch to the disc mode.•
During the play of a photo slideshow, •
switch between the Fun Mode and
Simple Mode.
For VCD and SVCD, turn on or of f PBC •
(playback control).
Navigate the menus.•
Search fast-for ward ( •
backward (
Search slow-forward ( •
backward (
).
).
) or fast-
) or slow-
EN
5
e BACK
Retur n to the previous display menu.•
/
f
Skip to the previous or nex t title, chapter, •
or track.
g
Switch to the USB mode.•
h Numeric buttons
Select an item to play.•
i SUBTITLE
Select a subtitle language on a disc.•
Access the menu of copying/deleting USB •
audio fi les.
j
ZOOM
Fit the picture display to the TV screen.•
Zoom the picture in or out.•
k REPEAT
Select various repeat play modes.•
l REPEAT A-B
Repeat play for a specifi c section.•
m AUDIO/CREATE MP3
Select an audio language or channel on •
a disc.
Access the menu of creating MP3 fi les.•
n
Stop play.•
o
Star t, pause or resume disc play.•
p
INFO
For discs, access the play options or •
display the cur rent disc status.
For slideshows, display a thumbnail view •
of photo fi les.
q OK
Confi rm an entr y or selection.•
r SETUP
Access or exit the setup menu.•
3 Connect
All audio/video cables are sold separately.
Make the following connections to use this product.
Basic connections:
Video•
Audio•
Optional connections:
Route audio to other devices:•
Digital amplifi er/receiver•
Analog stereo system•
USB fl ash drive•
Note
Refer to t he ty pe pla te at the back or b otto m of the •
product for identifi cation and supply r atings.
Befor e you make or change any connec tion s, ens ure that
•
all the devices are disconnect ed fro m the power outlet .
Connect video cables
Connect this product to TV to view disc play. Select
the bes t video connection that TV can support.
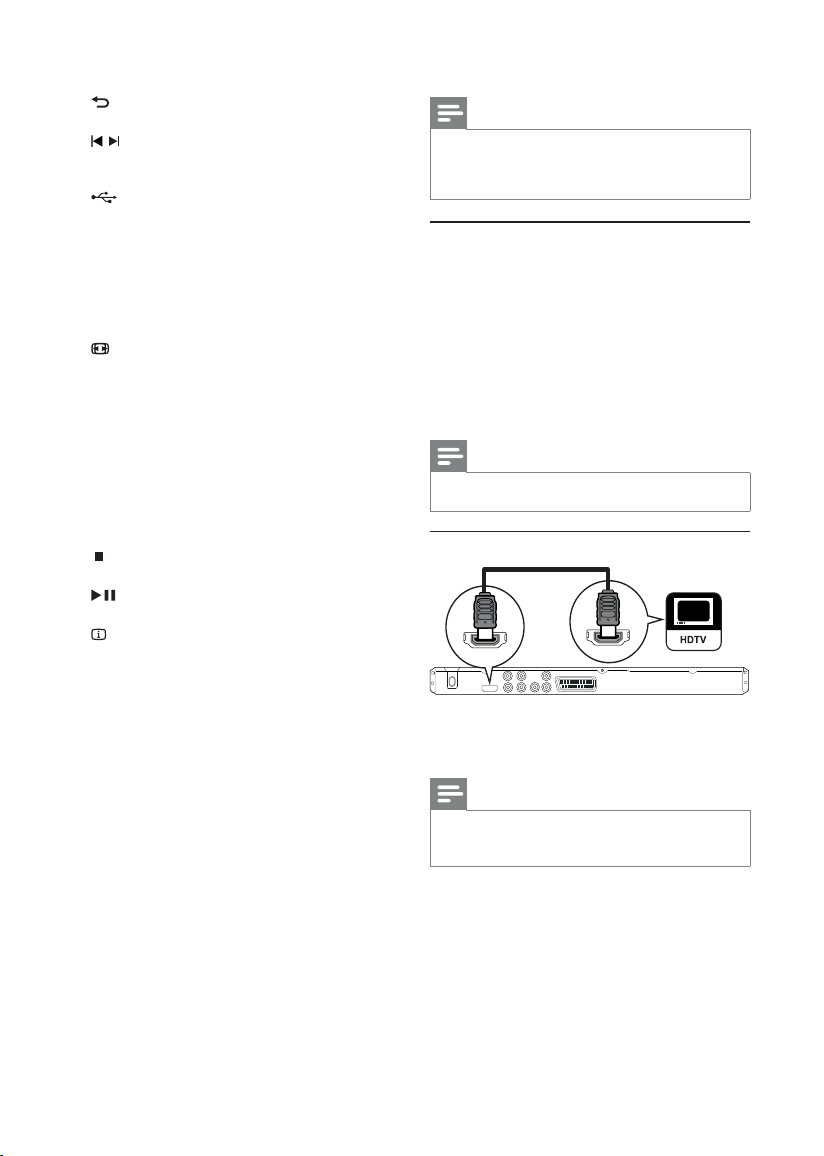
Option 1: Connect to the HDMI jack (for a HDMI ,
DVI or HDCP-compliant TV ).
Option 2: Connect to the component video jacks
(for a standard TV or Progressive Scan TV ).
Option 3: Connect to the scar t jack (for a standard
TV)).
Option 4: Connect to the video (CVBS) jack (for a
standard TV).
Note
You must con nec t this product directly to a T V.•
Option 1: Connect to the HDMI jack
HDMI OUT
1
Connect an HDMI cable to:
the • HDMI OUT jack on this product.
the HDMI input jack on the T V. •
Note
If the device suppor ts HDMI CE C, you can con trol •
compliant de vices w ith a single r emot e contr ol (see “G et
sta rted” > “ Use Philips EasyLink ”).
HDMI IN
6
EN
 Loading...