

Philips DVP3520 58 User Manual

Register your product and get support at
www.philips.com/welcome
DVP3520
EN User manual

SLOVAK REPUBLIC
.*+) &+'(62*+)'"(),"*$*)'-4%
(()*#%6!&*()0-&1%&!(,$!*(62*+)'"%
-)'/('),*+2%+'&0-'%%78'"2+#
&/(9&1%,'/06&2)'+'(62*+)'"/ ',
&'+-2)"+&!&*&2%"+" '#).+.#',#'$!
'()-,-5.*-:6+*(!$!/'-&1%,*)-!*,
/(9262*"%,+2#).+7'"!3+:&2
/(9&'*+&2 *(2&97 )'/2&/(92&-!!+$
&1 '$*)'-1 '/06&2
);+*(6(62%4%/0* %$*)'-1 '
(()*#,
0),#'#,.*+/"#1 '#'$!7-',(62*+)'"
%'&+'-$!-5.&"62--.+0 &:+*!+'-',
/0*+)9#,
MAGYARORSZÁG
Minőségtanúsítás
A garanciajegyen feltüntetett forgalombahozó
vállalat a 2/1984. (lll. 10.) BkM-lpM együttes
rendelet értelmében tanúsítja, hogy ezen készülék
megfelel a mûszaki adatokban megadott
értékeknek.
Figyelem! A meghibásodott készüleket -
beleértve a hálózati csatlakozót is - csak
szakember (szerviz) javíthatja. Ne tegye ki
készüléket esőnek vagy nedvesség hatásának!
Garancia
A forgalombahozó vállalat a termékre 12 hónap
garanciát vállal.
Prístroj sa nesmie používat’ v mokrom a
vlhkom prostredí! Chránte pred striekajúcou
a kvapkajúcou vodou!
Laser specification
Type: Semiconduc tor laser InGaAIP (DVD), •
AIGaAs (CD)
Wave leng th: 656 nm (DVD), 790 nm (CD)•
Output Power : 7.0 mW (DVD), 10.0 mW •
(VCD/CD)
Beam divergence: 60 degrees•
Specifikace laseru
Typ: Polovodičový laser InGaAIP (DVD), •
AIGaAs (CD)
Vlnová délka: 656 nm (DVD), 790 nm (CD)•
Výstupní výkon: 7,0 mW (DVD), 10,0 mW •
(VCD/CD)
Divergence paprsků: 60 stupňů•
This product is in compliance with the EEE
dir
ective.
EEE yönergesine uygundur.
Producent zastrzega możliwość wprowadzania
zmian technicznych.
2

Trademark notice
Contents
Dolby Laboratories. Dolby and the double-D
symbol are trademarks of Dolby Laboratories.
Windows logo are trademarks, or registered
trademarks of Microsoft Corporation in the United
States and/or other countries.
digital video format created by DivX, Inc. This is an
official DivX Certified device that plays DivX video.
Visit www.divx.com for more information and
software tools to conver t your files into DivX video.
ABOUT DIVX VIDEO-ON-DEMAND: This DivX
Certified® device must be regis tered in order to
play DivX Video-on-Demand (VOD) content. To
generate the registration code, locate the DivX
VOD section in the device setup menu. Go to vod.
divx.com with this code to complete the registration
process and learn more about DivX VOD.
®
and DivX Ultra® are registered trademar ks
DivX
of DivX, Inc., and are used under license.
Manufactured under license from
Windows Media and the
ABOUT DIVX VIDEO: DivX® is a
1 Important 4
Safety and important notice 4
2 Your DVD player 4
Playable media 4
Product o
3 Connect 6
Connect audio/video cables 6
Route audio to other devices 7
Connect USB flash drive 7
Connect power 7
4 Get started 8
Prepare the remote control 8
Find the TV input channel 8
Select menu display language 8
Turn on progressive scan 8
5 Play 9
Play a disc 9
Play video 9
Play music 10
Play photo 11
Play musical slideshow 12
Play from a USB flash drive 12
6 Advanced features 12
Create MP3 files 12
verview 5
English
Universal Serial Bus Implementers Forum, Inc.
The USB-IF Logos are trademarks of
7 Adjust settings 13
General setup 13
Audio setup 13
Video setup 14
Preferences 15
8 Additional information 16
Update software 16
Care 17
Specifications 17
9 Troubleshooting 17
Glossary 19
EN
3
1 Important
Safety and important notice
Warning
Risk of overheati ng! Never ins tall the produc t in a •
confined space. Alw ays leave a space of at least 4 inches
around the product for ve ntilation. Ensu re cur tains or
other objec ts never cove r the ventila tion slots on the
product.
•
Never p lace th e prod uct , remote cont rol or batteries
near naked flames or other heat sources, including direct
sunlight.
•
Avoid high temperature, moistur e, water and d ust .
This unit must not be expos ed to dr ipping or splashi ng. •
Never p lace any objec t or items that can da mage this •
unit (e.g., liquid filled objects, lighted candles).
•
Never p lace th is product on othe r elec trical equipm ent.
Keep away from this pr oduc t dur ing lightni ng sto rms . •
Wher e the mains plug or an appliance coupler is used as •
the disconnect device, the disconnect device shall remain
readily operable.
•
Visible and i nvisi ble la ser radiat ion wh en ope n. Avoid
exposure to b eam.
This produc t complies with the radio
interference requirements of the European
Community.
This product complies with the requirements of the
following directives and guidelines: 2004/108/EC
and 2006/95/EC.
About Progressive Scan
Consumers should note that not all high definition
television sets are fully compatible with this product
and may cause ar tifacts to be displayed in the
picture. In case of 525 or 625 progressive scan
picture problems, it is recommended that the user
switch the connection to the ‘standard definition’
output. If there are questions regarding our TV set
compatibility with this model 525p and 625p DVD
player, please contact our customer service center.
Disposal of your old product and
batteries
Your product is designed and manufactured
with high quality mater ials and components,
which can be recycled and reused.
When this crossed-out wheeled bin symbol
is attached to a product it means that
the product is covered by the European
Directive 2002/96/EC. Please inform
yourself about the local separ ate collection system
for electrical and electronic products.
Please act according to your local rules and do not
dispose of your old products with your normal
household waste.
Correct disposal of your old product helps to
prevent potential negative consequences for the
environment and human health.
Your produc t contains batteries covered by
the European Directive 2006/66/EC, which
cannot be disposed with normal household
waste.
Please inform yourself about the local rules on
separ ate collection of bat teries because correct
disposal helps to prevent negative consequences for
the environmental and human health.
Copyright notice
This product
incorporates
copyright
protection
technology that is protected by U.S. patents
and other intellectual property rights. Use of
this copyright protection technology must be
authorized by Macrovision, and is intended for
home and other limited viewing uses only unless
other wise authorized by Macrovision. Reverse
engineering or disassembly is prohibited.
CLASS 1
LASER PRODUCT
2 Your DVD player
Congratulations on your purchase, and welcome to
Philips! To fully benefit from the suppor t that Philips
offers, register your product at www.philips.com/
welcome.
Playable media
This product can play:
DVD, DVD-Video, DVD+R /+RW, DVD-R /-•
RW, DVD+R/-R DL (Dual Layer)
Video CD/SVCD•
Audio CD, CD-R/CD-RW•
MP3 media, WMA media, DivX (Ultra) media, •
JPEG files
USB flash drive•
Region codes
You can play discs with the following region codes.
4
EN

n
o
l
m
k
r
p
q
DVD region code Countries
Europe
Remote control
Product overview
Main unit
a b c d e f
a
b Disc compartment
c Display panel
d
e
f
Turn on the unit or switch to standby.•
Open or close the disc compar tment. •
Star t, pause or resume disc play.•
(USB) jack
Connect a USB flash drive.•
a
b
c
d
e
f
g
h
English
i
j
a
Turn on the unit or switch to standby.•
b
Open or close the disc compar tment. •
c DISC MENU
Access or exit the disc menu. •
Switch to the disc mode.•
EN
5

During photo slideshow, switch photo •
display between the fun mode (color)
and the simple mode (black and white).
For VCD and SVCD: turn on or off PBC •
(playback control).
d
e
f
g
h Numeric buttons
i SUBTITLE
j
k REPEAT
l REPEAT A-B
m AUDIO/CREATE MP3
n
o
p
q OK
r SETUP
Navigate the menus.•
Search fast-forward (•
( ).
Search slow-forward (• ) or slowbackward ( ).
BACK
Retur n to the previous display menu.•
/
Skip to the previous or nex t title, chapter, •
or track.
Switch to the USB mode.•
Select an item to play.•
Select a subtitle language on a disc.•
ZOOM
Fit the picture display to the TV screen.•
Zoom the picture in or out.•
Select various repeat play modes.•
Repeat play for a specific section.•
Select an audio language or channel on •
a disc.
Access the menu of creating MP3 files.•
Stop play.•
Star t, pause or resume disc play.•
INFO
For discs: access the play options or •
display the cur rent disc status.
For slideshows: display a thumbnail view •
of photo files.
Confirm an entry or selection.•
Access or exit the setup menu.•
) or fast-backward
3 Connect
All audio/video cables are sold separately.
Make the following connections to use this product.
Basic connections:
Video•
Audio•
Optional connections:
Route audio to other devices:•
Digital amplifier/receiver•
Analog stereo system•
USB flash drive•
Note
Refer to the ty pe plate at the back or bottom of the •
product for identification and supply ratings.
•
Befor e you make or change any connec tions, ensure th at
all the devices are disconnected from the power outlet.
Connect audio/video cables
Select the best video connection that TV can
support.
• Option 1: Connect to component video jacks
(for a standard TV or Progressive Scan TV ).
• Option 2: Connect to scart jack (for a
standard TV).
• Option 3: Connect to video (CVBS) jack (for a
standard TV).
Note
You must connec t this product dir ect ly to a T V. •
Option 1: Connect to component video
jacks
Y
Pb
Pr
AUDIO OUT
1 Connect the component video cables to:
2 Connect the audio cables to:
the • Y Pb Pr jacks on this product.
the COMPONENT VIDEO input jacks •
on the T V.
EN
6
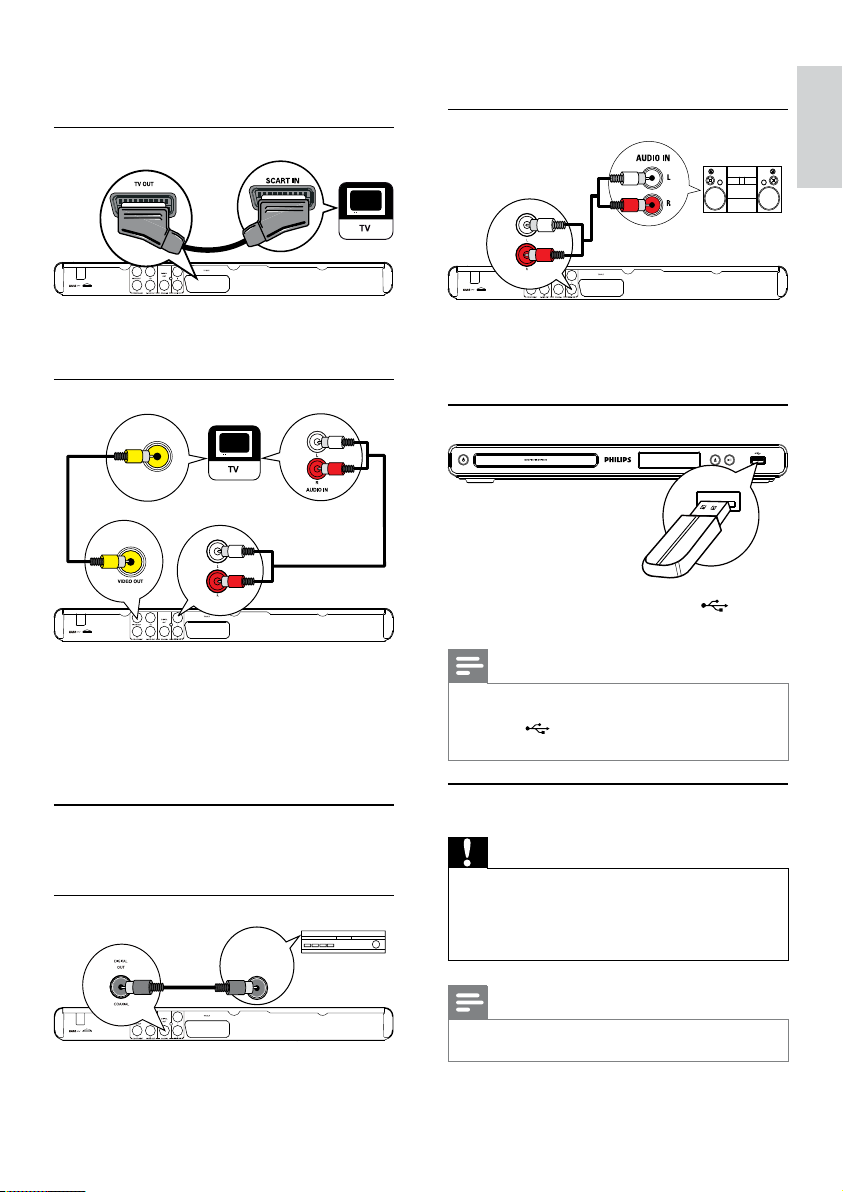
the • AUDIO OUT L/R jacks on this
product.
the audio input jacks on the TV.•
Option 2: Connect to scart jack
1 Connect a scar t cable to:
Option 3 : Connect to video (CVBS) jack
the • TV OUT jack on this product.
the scart input jack on the TV.•
AUDIO OUT
1 Connect a composite video cable to:
2 Connect the audio cables to:
Route audio to other devices
Route the audio from this product to other devices
to enhance audio play.
Connect to digital amplifier/receiver
1 Connect a coaxial cable (not supplied) to:
the • VIDEO OUT jack on this product.
the video input jack on the TV.•
the • AUDIO OUT L/R jacks on this
product.
the audio input jacks on the TV.•
DIGITAL AUDIO
INPUT
COAXIAL
the • COAXIAL jack on this product.
the COAXIAL/DIGITAL input jack on •
the device.
Connect analogue stereo system
AUDIO OUT
1 Connect the audio cables to:
Connect USB flash drive
1 Connect a USB flash drive to the jack on
Connect power
the • AUDIO OUT L/R jacks on this
product.
the audio input jacks on the device.•
this product.
Note
This product can only play/view MP3, W MA , DivX •
(Ultra) or JPEG files that are stored on a USB flash drive.
• but ton to access the content and pl ay
Press the
the files.
Caution
Risk of product da mage! Ensure that the power supp ly •
voltage cor responds to the vol tage printed on the back
of the un it.
•
Befor e connecting the AC power cor d, ensure you have
completed all other connections.
Note
The type pla te is located on the back of the product. •
English
EN
7
 Loading...