

Page 1
Register your product and get support at
www.philips.com/welcome
DVP3520
EN User manual
Page 2

Trademark notice
Contents
Dolby Labor atories. Dolby and the double-D
symbol are trademarks of Dolby Laboratories.
Windows logo are trademarks, or registered
trademarks of Microsoft Corporation in the United
States and/or other countries.
digital video format created by DivX, Inc. This is an
official DivX Certified device that plays DivX video.
Visit ww w.divx.com for more information and
software tools to convert your files into DivX video.
ABOUT DIVX VIDEO-ON-DEMAND: This DivX
Certified
play DivX Video-on-Demand (VOD) content.
To generate the registration code, locate the
DivX VOD sec tion in the device setup menu. Go
to vod.divx.com with this code to complete the
registration process and lear n more about DivX
VOD.
®
DivX
are registered trademarks of DivX, Inc. and
are used under license.
DivX Certified® to play DivX® video,
including premium content.
Manufactured under license from
Windows Media and the
ABOUT DIV X VIDEO: DivX® is a
®
device must be registered in order to
, DivX Certified® and associated logos
1 Important 4
Safety and important notice 4
2 Your DVD player 5
Playable media 5
Product overview 5
3 Connect 6
Connect audio/video cables 6
Option 1: Connect to component video jacks 6
Option 2:
Connect to video (CVBS) jack 7
Route audio to other devices 7
Connect power 7
4 Get started 8
Prepare the remote control 8
Find the TV input channel 8
Select menu display language 8
Turn on progressive scan 8
5 Play 9
Play a disc 9
Play video 9
Play music 11
Play photo 11
6 Adjust settings 12
General setup 12
Audio setup 13
Video setup 14
Preferences 15
English
7 Additional information 16
Update software 16
Care 16
Specifications 16
8 Troubleshooting 17
9 Glossary 18
EN
3
Page 3

1 Important
Safety and important notice
Warning
Risk of overheat ing! N ever i nst all the produc t in a •
confined space. Al ways leave a space of at leas t 4 inches
around the p roduct fo r vent ilat ion. Ensure cur tains or
other objects n ever cover the ventilation slots on t he
product.
•
Never p lace the produc t, remote contr ol or batte ries
near naked flames or other heat sources, including direct
sunlight.
•
Avoid high tem per ature, moist ure , water and dust .
This unit must not be exposed to dripping o r spla shing. •
Never p lace any object or i tems that can damage this •
unit (e.g., liquid filled objects, lighted candles).
•
Never p lace this produc t on other electrical equipm ent .
Keep away from this product during ligh tning storms . •
Wher e the mains plug or an appliance coupler is used as •
the disconnect d evice, the d isconnec t device shall remain
readily operable.
•
Visible and invis ible l aser radiation whe n open. Avoid
exposure to beam .
Your product contains batteries, which cannot be
disposed of with normal household waste.
Please infor m yourself about the local r ules on
separ ate collection of batteries. The correct
disposal of batteries helps prevent potentially
negative consequences on the environment and
human health.
Please visit www.recycle.philips.com for additional
information on a recycling center in your area.
Copyright notice
This item
incorporates
copy protection
technology that
is protected by U.S . patents and other intellectual
property rights of Rovi Corporation. Reverse engineering and disassembly are prohibited.
About Progressive Scan
Consumers should note that not all high definition
television sets are fully compatible with this product
and may cause ar tifac ts to be displayed in the
picture. In case of 525 or 625 progressive scan
picture problems, it is recommended that the user
switch the connec tion to the ‘standard definition’
output. If there are ques tions regarding our TV set
compatibility with this model 525p and 625p DVD
player, please contact our customer ser vice center.
Disposal of your old product and
batteries
Your product is designed and
manufactured with high quality materials
and components, which can be recycled
and reused.
Never dispose of your product with other
household waste. Please inform yourself about the
local r ules on the separate collection of electrical
and electronic products and batteries. The correc t
disposal of these produc ts helps prevent potentially
negative consequences on the environment and
human health.
CLASS 1
LASER PRODUCT
4
EN
Page 4
n
o
l
m
k
r
p
q
2 Your DVD player
Congratulations on your purchase, and welcome to
Philips! To fully benefit from the support that Philips
offers, register your product at www.philips.com/
welcome.
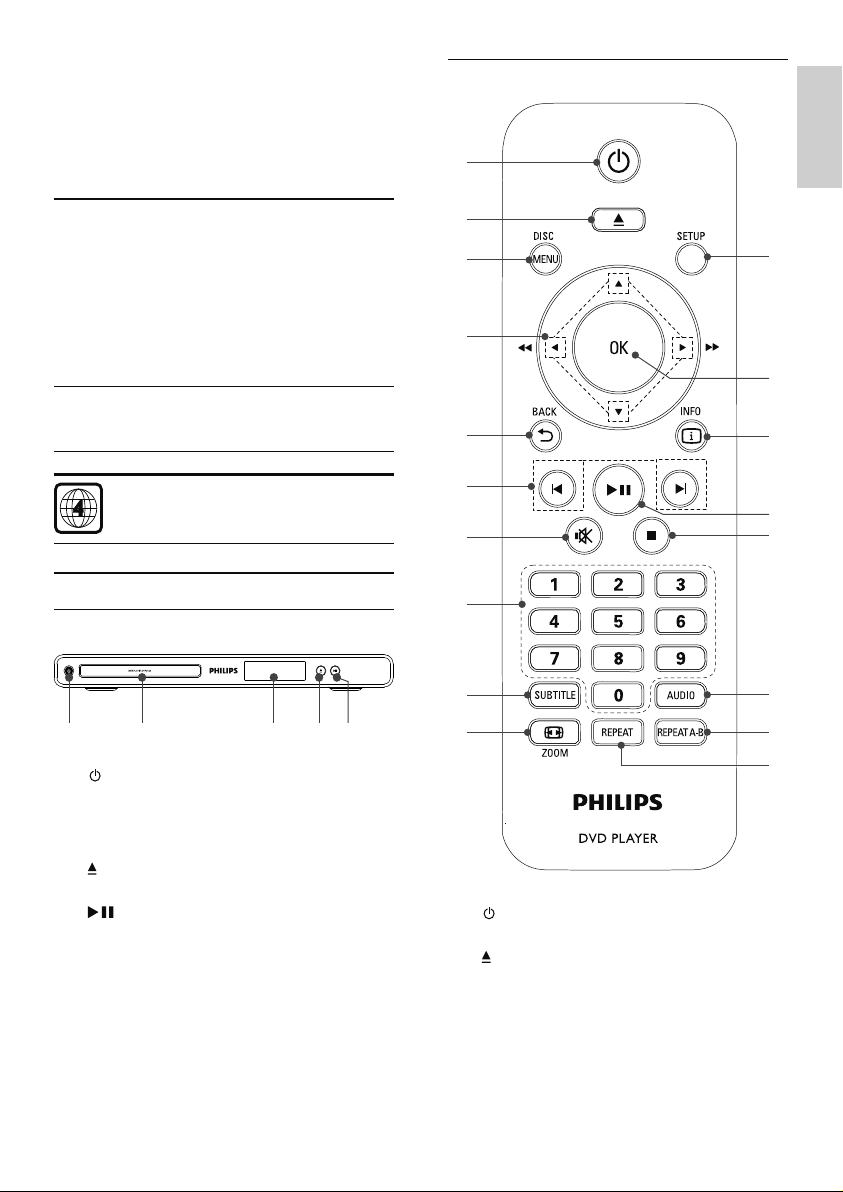
Remote control
English
a
Playable media
This product can play:
DVD, DVD-Video, DVD+R /+RW, DVD-R/-•
RW, DVD+R/-R DL (Dual Layer)
Video CD/SVCD•
Audio CD, CD- R/CD-RW•
MP3 media, WMA media, DivX media, JPEG •
files
Region codes
You can play discs with the following region codes.
DVD region code Countries
Latin America
Product overview
Main unit
a b c d e
a
b Disc compartment
c Display panel
d
e
Turn on the unit or switch to standby.•
Open or close the disc compar tment . •
Star t, pause or resume disc play.•
b
c
d
e
f
g
h
i
j
a
Turn on the unit or switch to standby.•
b
Open or close the disc compar tment . •
c DISC MENU
Access or exit the disc menu. •
During the play of a photo slideshow, •
switch bet ween the Fun Mode and
Simple Mode.
EN
5
Page 5
For VCD and SVCD: turn on or off PBC •
(playback control).
d
e
f
g
h Numeric buttons
i SUBTITLE
j
k REPEAT
l REPEAT A-B
m AUDIO
n
o
p
q OK
r SETUP
Navigate the menus.•
Search fast-forward (•
(
).
Search slow-forward (•
backward (
BACK
Retur n to the previous display menu.•
/
Skip to the previous or next title, chapter, •
or track.
Mute or restore the volume•
Select an item to play.•
Select a subtitle language on a disc.•
ZOOM
Fit the picture display to the T V screen.•
Zoom the picture in or out.•
Select various repeat play modes.•
Repeat play for a specific section.•
Select an audio language or channel on •
a disc.
Stop play.•
Start, pause or resume disc play.•
INFO
For discs: access the play options or •
display the current disc status.
For slideshows: display a thumbnail view •
of photo files.
Confirm an entry or selection.•
Access or exit the setup menu.•
3 Connect
Make the following connections to use this product.
) or fast-backward
) or slow-
).
Basic connections:
Video•
Audio•
Optional connections:
Route audio to other devices:•
Digital amplifier/receiver•
Analog stereo system•
Note
Refer to the type plate at the back or bot tom of the •
product for identifi cation and supply ratings.
•
Befor e you ma ke or change any conne ctions, ensure that
all the devices are disconnec ted from the power outlet.
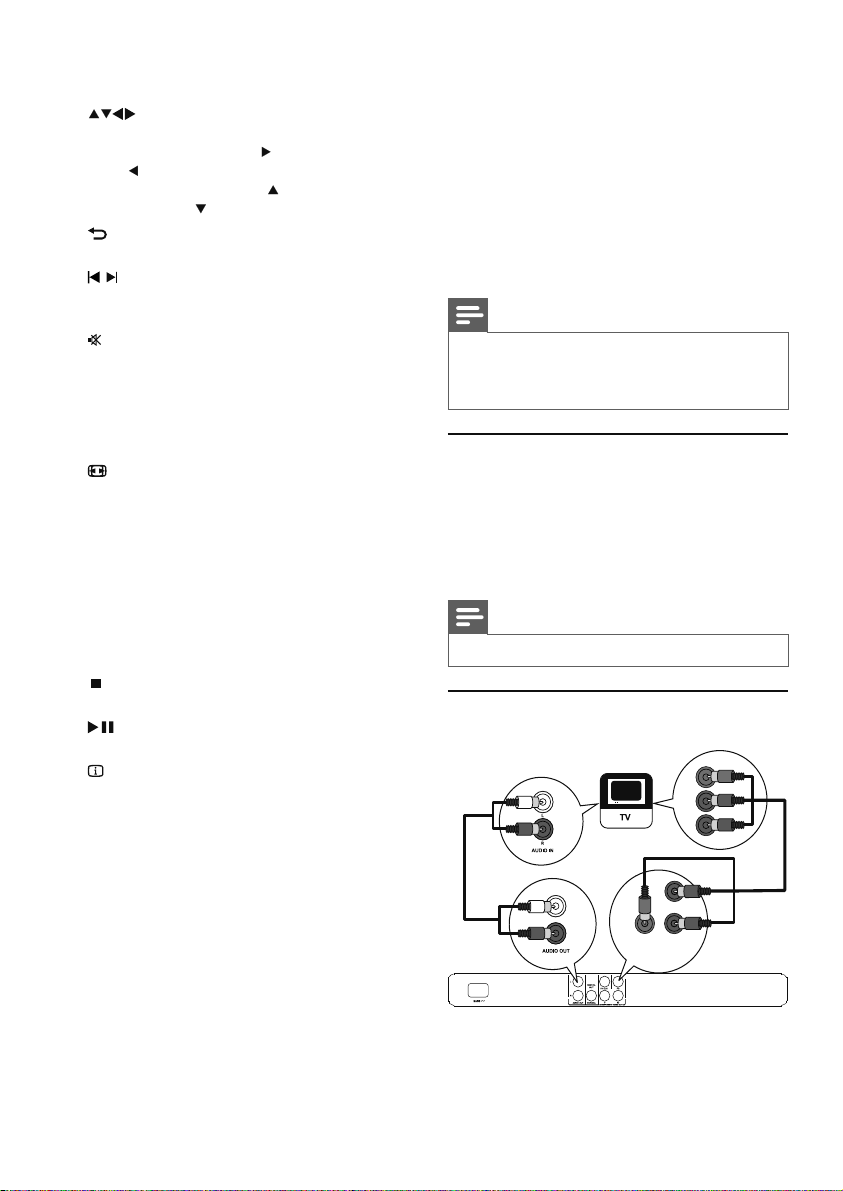
Connect audio/video cables
Connect this product to TV to view disc play. Select
the best video connection that TV can support.
• Option 1: Connect to component video jacks
(for a standard TV or Progressive Scan T V).
• Option 2: Connect to video (CVBS) jack (for a
standard TV).
Note
You must connec t this product d irectly to a TV. •
Option 1: Connect to component
video jacks
Y
Pb
Pr
Pb
Pr
Y
COMPONENT VIDEO OUT
EN
6
Page 6

1 Connect the component video cables (not
supplied) to:
the • Y Pb Pr jacks on this product.
the COMPONENT VIDEO input jacks •
on the T V.
2 Connect the audio cables to:
the • AUDIO OUT L/R jacks on this
product.
the audio input jacks on the TV.•
Option 2: Connect to video
(CVBS) jack
VIDEO IN
1 Connect a coaxial cable (not supplied) to:
the • COAXIAL jack on this product.
the COAXIAL/DIGITAL input jack on •
the device.
Connect analogue stereo system
1 Connect the audio cables to:
the • AUDIO OUT L/R jacks on this
product.
the audio input jack s on the device.•
English
TV OUT
1 Connect a composite video cable to:
2 Connect the audio cables to:
Route audio to other devices
Route the audio from this product to other devices
to enhance audio play.
Connect to digital amplifier/receiver
the • TV OUT jack on this product.
the video input jack on the TV.•
the • AUDIO OUT L/R jacks on this
product.
the audio input jacks on the TV.•
DIGITAL IN
DIGITAL
OUT
COAXIAL
Connect power
Caution
Risk of product d amage! Ensure t hat the power supply •
voltage cor responds to the volt age pr inted on the back
of the un it.
•
Befor e conn ect ing the AC power cord, ensure you have
completed all other connections.
Note
The type plate is located on the back of the produc t. •
1 Connect the AC power cable to:
this product.•
the wall socket.•
This product is ready to be set up for use. »
EN
7
Page 7
4 Get started
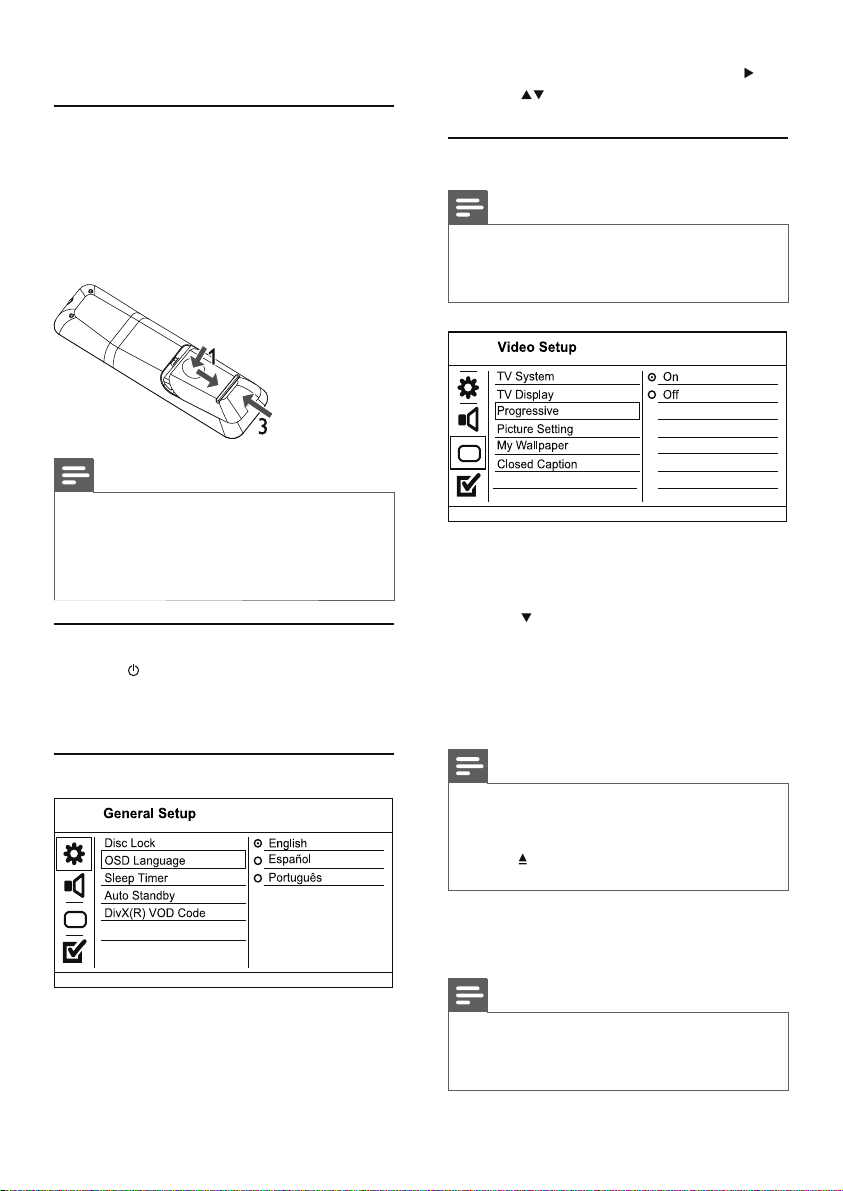
Prepare the remote control
1 Press and push the batter y compar tment to
slide it open (see “1” in the illus tration).
2 Insert two A AA bat teries with correct
polarity (+/-) as indicated.
3 Push and slide back the battery compar tment
(see “3” in the illustration).
Note
If you ar e not going to us e the remote contr ol for a long •
time , remove the batteries.
•
Do not use old and new or diffe rent types of batte ries
in combination.
•
Batteries contain chemical substances, so they should be
disposed of properly.
Find the TV input channel
1 Press to turn on this product.
2 Turn on the T V and switch to the video input
channel (refer to the TV user manual on how
to select the A/ V input channel).
2 Select [OSD Language], and then press .
3 Press to select a language, and then press
OK.
Turn on progressive scan
Note
To use the progre ssive scan feature, you mus t connect a •
progressive scan TV with the component video jacks (see
“Connect” > “Connect audio/video cables” > “Option 1:
Connect to the com pone nt video jacks” fo r det ails).
1 Turn on the T V to the correct viewing channel
for this product.
2 Press SETUP.
3 Press to select [Video Setup].
4 Select [Progressive] > [On], and then press
OK.
A warning message is displayed. »
5 To proceed, select [Ok] and then press OK.
The progressive setup is complete. »
Select menu display language
Deactivation
1 Press SETUP.
» [General Setup] menu is displayed.
8
EN
Note
If a blank/distor ted screen is displayed, wai t for 15 •
seconds for the auto recovery.
•
If no pic tur e is displayed, turn of f the progr essive scan
mode as follows:
to open the disc compar tment.
1) Press
Numeric but ton ‘1’.
2) Press the
6 Press SETUP to exit the menu.
7 You can now turn on the progressive scan
mode on the TV (see the T V user manual).
Note
During play, when the progressive s can mode is on for •
both this produc t and t he TV, disto rted picture may
display. In this case, turn off the progr essi ve sca n feature
on both this product and the T V.
Page 8

5 Play
Play a disc
Caution
Do not place any objec ts ot her than discs into the disc •
compartment.
•
Do not touch the disc optical lens inside the disc
compartment.
1 Press to open the disc compartment.
2 Insert a disc with its label facing up.
3 Press to close the disc compartment and
start disc play.
To view disc play, turn on the TV to the •
video input channel.
To stop disc play, press •
Note
Check the types of discs supported (see “Your DVD •
player” > “Playable media”).
•
If the password entr y men u is displayed, enter the
pass word b efor e you can play th e locked or restr ic ted
disc (see “Adjust settings” > “Pr efer ence s” > [Parental
Control]).
•
If you pause or stop a disc, the screen saver appears after
5 minutes of inact ivity. To deac tivate the scre en saver,
press DISC MENU.
•
After you pause or stop a disc and no button is pressed
with in 15 minu tes , this product automatically switches
to standby.
Play video
Note
Some operations may not work w ith some discs. See the •
infor mation acco mpanying the disc for details.
Control video play
1
Play a title.
2 Use the remote control to control the play.
Button Action
Start, pause or resume disc play.
Stop disc play.
,
Skip to a previous/nex t title or
chapter.
.
Button Action
,
,
AUDIO Select an audio language or channel
SUBTITLE Select a subtitle language available
REPEAT Select or turn off repeat mode.
ZOOM
ZOOM
INFO
Search fast-backward or fastforward. Press repeatedly to change
the search speed.
Search slow-forward or slowbackward. Press repeatedly to
change the search speed.
For VCD/SVCD, slow-backward
search is not available.
available on a disc.
on a disc.
Repeat options may vary from disc
type.
Fit the picture format to the TV
screen.
Press repeatedly until the image is
scaled to fit to the TV screen.
Toggle between screen aspect ratio
and dif ferent zoom factor.
To pan through the zoomed image,
press the Navigation buttons.
Access the play options and display
the cur rent disc status.
Access DVD menu
1
Press DISC MENU to access the disc root
menu.
2 Select a play option, then press OK.
In some menus, press the • Numeric
buttons to input your selection.
Access VCD menu
The PBC (playback control) feature is available for
VCD/SVCD, which can display the contents menu
for you to select a play option. The PBC is on by
default in the factory.
Note
• See “Adjust se ttings” > “Preferences” > [PBC]
on how to tur n PBC on or off.
1 Display the contents menu via one of the
following ways:
If PBC is on, load in a VCD/SVCD.•
During play with PBC on, press •
BACK.
English
EN
9
Page 9

2 Press the Numeric buttons to select a play
option, and then press OK to start play.
If PBC is turned off, it skips the menu •
display and star ts play from the firs t
track.
Preview disc contents
1
During play, press INFO.
The disc status menu is displayed. »
2 Select [Preview], and then press .
3 Select a preview option, and then press OK.
A thumbnails preview screen is displayed. »
To go to the next/previous preview •
screen, select [Prev] or [Next], and then
press OK.
To star t play, press • OK at the selected
thumbnail picture.
Skip play to a specific time
1
During play, press INFO.
The disc status menu is displayed. »
2 Select an option for the current elapsed
playing time, then press
• [TT Time] (title time)
• [Ch Time] (chapter time)
• [Disc Time] (disc time)
• [Track Time] (track time)
.
3 Press the Numeric buttons to enter the time
to skip to, then press OK.
Repeat play a specific section
1
During play, press .
2 Press to select [REPEAT AB].
3 Press OK to set the start point.
4 Press OK to set the end point.
Repeat play starts. »
To cancel repeat play, press » OK again.
Note
The marked section for repeat play is only possible •
within a track/title.
Play DivX® video
DivX video is a digital media for mat that retains high
quality despite a high rate of compression. You can
enjoy DivX video on this DivX cer tified produc t.
Play DivX video
You can play DivX files copied onto a CD-R/RW or
recordable DVD.
1 Insert a disc that contains DivX files.
A contents menu is displayed. »
2 Select a file to play and press OK / .
To stop play, press •
To pause or resume play, press • OK /
To change a subtitle language, press •
SUBTITLE.
.
.
Display play time
1
During play, press INFO.
The disc status menu is displayed. »
2 Select [Time Disp.], then press .
The display options vary from disc type. »
3 Select an option, then press OK.
View DVD play from different angles
1
During play, press INFO.
The disc status menu is displayed. »
2 Select [Angle], then press .
3 Press the Numeric buttons to change the
angle.
Play changes to the selected angle. »
Note
Applicable only to discs contain multi-angle scenes. •
10
EN
Note
You can only play Di vX videos ren ted or purchased •
through th e DivX regis tration code of this unit.
•
Subtitle files with the following filename ex tensions (.sr t,
.smi, .sub, .ssa, .ass) are supported but do not appear on
the file navigation menu.
•
The subtitle filenam e has to b e the same as the file name
of the video.
Note
You can only play Di vX video that is rented or pu rchased •
with t he DivX registr ation code of this produ ct (see
“Adjust Set ting s” > “General Setup” > [DivX(R) VOD
Code]).
Page 10

Play music
Control a track
1
Play a track.
2 Use the remote control to control the play.
Button Action
Start, pause or resume disc play.
Stop disc play.
,
Skip to a previous/next track.
Select an item to play.
,
REPEAT Select or turn off repeat mode.
Quick skip play
1
During play, press INFO repeatedly to
select an option.
Display Action
[Disc Go To] Skip play to a specific time
[Track Go To] Skip play to a specific time
[Select Track] Skip play to a specific tr ack
2 Press the numeric buttons to change the time/
number to skip to.
Play MP3/WMA music
MP3/WMA is a type of highly compressed audio file
(files with .mp3, .wma extensions).
1 Insert a disc that contains the MP3/WMA
music.
2 If play does not automatically start, select a
track to play.
Searches fast-backward or fastforward. Press repeatedly to
change the search speed.
Repeat options may vary from
disc type.
within the disc.
within a track.
number.
A contents menu is displayed. »
To select another track/folder, press •
then press OK.
Note
For disc recorded in multipl e sess ions , only the fir st •
session is played.
•
For a WMA file th at is pr otec ted by D igital R ight s
Management (DR M), i t cannot be pl ayed on t his pr oduct.
•
This product do es not support M P3PRO audi o format.
For any special char ac ter that is pr esent in th e MP3 track •
name (ID3) or alb um name, it might n ot be displayed
corr ectly on the screen because these charac ter s are not
supported.
•
Folders/files that exceed the supported limit of this
product cannot be displayed or played.
English
Play photo
Play photo as slideshow
You can play JPEG photos (files with .jpeg or .jpg
extensions).
1 Insert a disc that contains the JPEG photos.
2 Select a photo folder, then press OK to start
,
Slideshow begins (for Kodak disc), or a »
contents menu (for JPEG disc) is displayed.
slideshow.
To display photos in color (Fun Mode) or in •
black and white (Simple Mode), press
DISC MENU.
To preview the photos in thumbnail, press •
INFO.
To select a photo, press the • Navigation
buttons.
To enlarge the selected photo and star t •
slideshow, press OK.
To return to the menu, press •
Note
It may require longer ti me to display the disc content •
on the T V due to the large number of songs/photos
compiled onto one disc.
•
If the J PEG ph oto is not recorded with an ‘exif ’ type
file, t he ac tual t humbnail picture c annot be shown on
the screen. It is r eplaced by a ‘blue mount ain’ thumb nail
picture.
•
This product ca n only display digital came ra pictu res
according to t he JPEG- EXIF format, ty pically used by
almos t all digit al ca mer as. It cannot display Motion JPE G,
or pic tures in formats other than JPE G, or s ound clips
associated with pictures.
•
Folders/files that exceed the supported limit of this
product cannot be displayed or played.
BACK.
EN
11
Page 11

Control photo play
1
Play a photo slideshow.
2 Use the remote control to control the play.
Button Action
/
/
ZOOM
Play musical slideshow
Create a musical slideshow to play MP3/WMA
music files and JPEG photo files simultaneously.
Rotate a photo anti-clockwise/
clockwise.
Rotate a photo horizontally/
vertically.
Zoom in or out of a photo.
Play pauses in zoom mode.
Stop a play.
6 Adjust settings
Note
If the setup option is grayed ou t, it means the setti ng •
cannot be cha nged at the current state .
General setup
Deactivation
Note
To create a musical slideshow, you mus t store the MP3/ •
WMA an d JPEG files on the sa me disc.
1 Play MP3/WMA music.
2 Press BACK to return to the main menu.
3 Navigate to the photo folder/album and press
OK to start slideshow play.
Slideshow begins and continues till the end »
of the photo folder or album.
Audio continues to play until the end of »
the disc.
To stop slideshow play, press •
To stop music play, press •
.
again.
1 Press SETUP.
» [General Setup] menu is displayed.
2 Press .
3 Select an option, and then press OK.
4 Select a setting, and then press OK.
To return to the previous menu, press •
To exit the menu, press • SETUP.
[Disc Lock]
Set the play restr iction for a disc which is loaded in
the disc compartment (maximum 20 discs can be
locked).
• [Lock] - Restrict the access to the current
disc. At the nex t time when you want to play
this disc or unlock it, you need to enter the
password.
• [Unlock] - Play all discs.
[OSD Language]
Select a language for on-screen menu.
[Sleep Timer]
Switch automatically to standby at the preset time.
• [Off ] - Disable sleep mode.
• [15 Mins], [30 Mins], [45 Mins], [60 Mins] Select the countdown time for this product to
switch to standby.
[Auto Standby]
Turn on/off the auto standby mode.
• [On] - Switch to standby after 15 minutes
of inactivity (for example, in pause or stop
mode).
• [Off ] - Disable the auto standby mode.
.
12
EN
Page 12

[DivX(R) VOD Code]
Display the DivX
Note
Use this product’s DivX registr ation code w hen you rent •
or purchase video from ww w.divx.com/vod. The Di vX
videos ren ted or purchased thro ugh the DivX
(Vi deo On Demand) service ca n be played onl y on the
device to which it is r egis ter ed.
®
registration code.
®
VOD
Audio setup
Audio Setup
Analogue Output
Digital Audio
Volume
Sound Mode
CD Upsampling
Night Mode
1 Press SETUP.
» [General Setup] menu is displayed.
2 Press to select [Audio Setup], and then
press
.
3 Select an option, and then press OK.
4 Select a setting, and then press OK.
[Analogue Output]
Select an analogue setting based on the audio
device that is connected through the analogue
audio jack.
• [LT/RT] - For the surround sound output
• [Stereo] - For the stereo output.
[Digital Audio]
Select a digital setting based on the digital amplifier/
receiver that is connected through the digital jack
(coaxial/digital).
• [Digital Output] - Select a type of digital
To return to the previous menu, press •
To exit the menu, press • SETUP.
through two speakers.
output.
• [All] - Support multi-channel audio
formats.
• [Off ] - Disable digital output.
• [PCM Only] - Downmix to two-channel
audio format.
• [LPCM Output] - Select the LPCM (Linear
Pulse Code Modulation) output sampling rate.
• [48k HZ ] - For discs recorded at sampling
rate of 48 kHz.
• [96kHZ] - For discs recorded at sampling
rate of 96 kHz.
Note
• [LPCM Out put] se tting is on ly available if the [Digital
Output] is set to [PCM Only].
•
The higher t he sampling rate, the bet ter the sound
quality.
[Volume]
Set the default volume level when you play a disc.
1. Press OK.
2. Press
3. Press OK to confirm and exit.
[Sound Mode]
Select a preset sound ef fect to enhance the audio
output.
• [3D] - Select a virtual surround sound effect
• [Movie Mode] - Selec t a sound effect for
• [Music Mode] - Select a sound effect for
.
[CD Upsampling]
For bet ter sound quality in s tereo mode, conver t
the music CD to a higher sampling rate.
• [ON] - Conver t to twice the original sampling
• [Off ] - Conver t to the normal sampling rate.
[Night Mode]
Make loud sound level softer and soft sound level
louder so that you can watch the DVD movies at a
low volume, without dis tur bing others.
• [On] - Enjoy quiet viewing at night.
• [Off ] - Enjoy sur round sound with a full
to set the volume.
that is produced from the left and right audio
channels.
movies.
music.
rate.
dynamic range.
Note
Applicable only to Dolby Digi tal encod ed DVDs. •
English
EN
13
Page 13

Video setup
1 Press SETUP.
» [General Setup] menu is displayed.
2 Press to select [Video Setup], and then
press
.
3 Select an option, and then press OK.
4 Select a setting, and then press OK.
[TV System]
Change this setting if the video does not appear
correctly. By default, this setting matches the most
common setting for TVs in your country.
• [PAL] - For a PAL-system T V.
• [Multi] - For T V that is compatible with both
• [NTSC] - For an NTSC-system TV.
[TV Display]
Select a display format:
To return to the previous menu, press •
To exit the menu, press • SETUP.
PAL and NTSC.
Note
For mor e det ailed description , see “Get s tar ted” > •
“Turn on p rogress ive scan”.
[Picture Setting]
Select a predefined set of picture color settings or
customize the personal setting.
• [Standard] - Original color setting.
• [Bright] - Vibrant color setting.
• [Soft] - Warm color setting.
• [Personal] - Customize the color set ting. Set
the level of brightness, contras t, tint and color
saturation, then press OK.
[Wall paper Setting]
Select a picture as the wallpaper.
• [Default picture] - The default wallpaper
preset as the Philips logo.
• [Saved picture] - A captured video image or
.
JPEG photo.
• [Current picture] - Capture a video image or
JPEG photo and save it on the product.
1. Play a video or photo slideshow.
2. Select a video image or photo: press
pause, and then press SETUP.
3. Navigate to the option ([Video Setup] > [My
Wallpaper] > [Current picture]).
4. Press OK to confirm.
One video image or JPEG photo is saved as »
wallpaper.
A newly saved image or photo replaces the »
earlier one.
to
• [4:3 Pan Scan] - For a 4:3 screen T V: full-height
display with the trimmed sides.
• [4:3 Letter Box] - For a 4:3 screen TV: widescreen display with black bars on the top and
bottom of the screen.
• [16:9] - For a wide-screen TV: display ratio
16:9.
[Progressive]
If a progressive scan TV is connected to this
product, turn on the progressive scan mode.
• [On] - Turn on progressive scan.
• [Off ] - Turn of f progressive scan mode.
14
EN
[Closed Caption]
Turn off or on display captions.
• [On] - Show the sound effects in subtitles.
Applicable only to discs with Closed Caption
information included and the T V suppor ts this
feature.
• [Off ] - Disable closed caption.
Page 14

Preferences
Note
Stop disc play before you can access to • [Preferences].
Preferences
Audio
Subtitle
Disc Menu
Parental Control
PBC
Mp3/Jpeg Nav
Password
DivX Subtitle
1 Press SETUP.
» [General Setup] menu is displayed.
2 Press to select [Preferences], and then
press
.
3 Select an option, and then press OK.
4 Select a setting, and then press OK.
[Audio]
Select an audio language for disc play.
[Subtitle]
Select a subtitle language for disc play.
[Disc Menu]
Select a disc menu language.
[Parental Control]
Restrict access to discs that are unsuitable for
children. These types of discs must be recorded
with ratings.
1. Press OK.
2. Select a rating level, then press OK.
3. Press the numeric buttons to enter the
To return to the previous menu, press •
To exit the menu, press • SETUP.
Note
If the language you have set is not available on the disc, •
the disc uses its own default language.
•
For som e DVDs , the subti tle/audio language can only
change from t he disc menu.
•
To select the languages tha t are not lis ted in t he menu,
select [Other s]. The n check the Language Code lis t at
the back of this user manual and enter the res pec tive
language code.
password.
Note
Rated DVDs above the level you set in • [Parental
Control] require a password to be played .
•
The ratings are country-depend ent . To allow all discs to
play, select ‘ 8’.
•
Some discs have ratings printed on t hem but ar e not
recor ded with r atings. This function has no ef fec t on
such discs.
[PBC]
Turn on or off the content menu of VCDs/SVCDs
with PBC (playback control) feature.
• [On] - Display the index menu when you load
a disc for play.
• [Off ] - Skip the menu and start play from the
first track.
[Mp3/Jpeg Nav]
Select to display the folders or display all the files.
• [View Files] - Display all the files.
• [View Folders] - Display the folders of MP3/
WMA files.
[Password]
Set or change the password for locked discs and
play restricted DVDs.
.
English
1. Press the Numeric buttons to enter ‘136900’ or
the last set password at [Old Password] field.
2. Enter the new password at [New Password]
field.
3. Enter the new password again at [Confirm
PWD] field.
4. Press OK to exit the menu.
Note
If you forget t he password, enter ‘ 136900 ’ before you set •
a new password.
[DivX Subtitle]
Select a character set that supports the DivX
subtitle.
EN
15
Page 15

• [Standard] - English, Irish, Danish, Estonian,
Finnish, French, German, Italian, Por tuguese,
Luxembourgish, Nor wegian (Bokmål and
Nynorsk), Spanish, Swedish, Turkish
Note
Ensur e that the su btitle file has the exact sa me file name •
as the movie file. If for exa mple the file name of the
movie is ‘Mov ie. avi’, then you need to name t he tex t file
‘Movie.sub’ or ‘Movie.srt’.
8 Follow the on-screen instructions to complete
the upgrade.
Note
Disconnec t the power cord for a fe w seconds and •
connect again to turn on the pr oduct.
Care
[Version Info]
Display the sof tware version of this product.
Note
This information is re quired wh en you w ant to fi nd out •
if a newest sof tware version is available at the Ph ilips
websi te that you may d ownload and install on this
product.
[Default]
Reset all the settings of this produc t to factory
default, except for [Disc Lock], [Parental Control]
and [Password] settings.
7 Additional information
Update software
For software updates, check the current software
version of this product to compare with the latest
software (if available) at the Philips website.
Caution
Power supply must not be interrupted during soft war e •
upgrade.
1 Press SETUP.
2 Select [Preferences] > [Version Info], and
then press OK.
3 Write down the file name, and then press
SETUP to exit the menu.
4 Visit www.philips.com/suppor t to check for
the latest software version according to the
file name for this product.
5 Download the software file on your computer,
and then unzip the file.
6 Copy the unzipped in a CD-ROM, under the
root directory.
7 Load the CD-ROM in this product.
Caution
Never u se sol vent s such as benzene , thinner, cleaners •
available commercially, or an ti-sta tic sprays intended
for discs.
Clean discs
Wipe the disc with a micro fibre cleaning cloth from
the centre to the edge in a straight line movement.
Specifications
Note
Specification a nd des ign are subject to change withou t •
notice
Video
Signal system: PAL / NTSC•
Composite video output: 1 Vpp ~ 75 ohm•
Component video output: 0.7 Vpp ~ 75 ohm•
Audio
Analog stereo output•
Signal to noise ratio (1 kHz): > 90 dB •
(A-weighted)
Dynamic Range (1 kHz): > 80 dB (A-weighted)•
Cross talk (1 kHz): > 80 dB•
Distortion/noise: (1 kHz): > 70 dB•
MPEG MP3: MPEG Audio L3•
Digital output•
Coaxial•
Main unit
Dimensions (w x h x d): 360 x 39 x 209 (mm)•
Net Weight: approximately 1.4 kg•
Power
Power supply rating: 110 - 240V, 50/60HZ•
Power consumption: <10 W•
Power consumption in standby mode: <1 W•
Accessories supplied
Remote control and batteries•
Audio/Video cables•
16
EN
Page 16

Power plug adaptor•
User Manual•
Laser specification
Type: Semiconductor laser InGaAIP (DVD), •
AIGaAs (CD)
Wave leng th: 656 nm (DVD), 790 nm (CD)•
Output Power: 7.0 mW (DVD), 10.0 mW •
(VCD/CD)
Beam divergence: 60 degrees•
8 Troubleshooting
Warning
Risk of elec tric shock. N ever r emove the ca sing of the •
product.
To keep the warranty valid, never try to repair the
product yourself.
If you have problems using this product, check the
following points before you request service. If you
still have a problem, register your product and get
support at www.philips.com/welcome.
If you contact Philips, you will be asked for the model
and serial number of your product. The model
number and serial number are on the back of your
product. Write the numbers here:
Model No. __________________________
Serial No. ___________________________
Main unit
The buttons on this unit do not work.
Disconnect this product from the power •
outlet for a few minutes, then connect again.
No reaction to the remote control.
Connect this product to the power outlet.•
Point the remote control at the IR sensor •
located on the front panel of this product.
Insert the batteries correctly.•
Insert new bat ter ies in the remote control.•
Picture
No picture.
See the TVs user manual on how to select •
the correc t input on the TV. Change the TV
channel until you see the Philips screen.
If you have turned on the progressive scan •
setting or change the TV system setting,
switch back to default mode: 1) Press
open the disc compar tment. 2) Press the
Numeric button ‘1’ (for progressive scan) or
the Numeric button’3’ (for TV system).
to
Sound
No audio output from the loudspeakers of the
audio device (stereo system/amplifier/receiver).
Ensure that the audio cables are connected to •
the audio input of the audio device.
Turn on the audio device to its correct audio •
input source.
No audio output from the TV.
Ensure that the audio cables are connected to •
the audio input of the TV.
Assign the audio input of the TV to the •
corresponding video input. See the T V user
manual for details.
No sound during DivX video playback
The audio codec may not be supported by this •
product.
Play
The disc cannot be played.
The disc is badly scratched, deformed, or dirty. •
Replace or clean the disc.
Use the correct disc format or file for mat. •
DivX video files cannot be played.
Ensure that the DivX video file is complete. •
Ensure that the file name extension is correct. •
The aspect ratio of the screen is not aligned with
the TV display setting.
The aspect ratio is fixed on the disc.•
DivX subtitles are not displayed correctly.
Ensure that the subtitle file name is the same •
as the movie file name.
Select the correct character set. •
Press • SETUP.
Select • [Preferences] > [DivX Subtitle] in
the menu.
Select the character set that suppor ts the •
subtitle.
English
EN
17
Page 17

9 Glossary
A
Aspect ratio
Aspect ratio refers to the length to height ratio of
TV screens. The ratio of a standard T V is 4:3, while
the ratio of a high-definition or wide TV is 16:9.
The letter box allows you to enjoy a pic ture with a
wider perspec tive on a standard 4:3 screen.
D
DivX Video-On-Demand
This DivX Cer tified
in order to play DivX Video-on-Demand (VOD)
content. To gener ate the registration code, locate
the DivX VOD section in your device setup menu.
Go to vod.div x.com with this code to complete the
registration process and lear n more about DivX
video.
J
JPEG
A very common digital still picture format. A stillpicture data compression system proposed by the
Joint Photographic Expert Group, which features
small decrease in image quality in spite of its high
compression ratio. Files are recognized by their file
extension ‘.jpg’ or ‘.jpeg.’
®
device must be registered
P
PBC
Playback Control. A system where you navigate
through a Video CD/Super VCD with on-screen
menus that are recorded onto the disc. You can
enjoy interactive playback and search.
Progressive scan
The progressive scan displays twice the number of
frames per second than in an ordinary TV system. It
offer s higher picture resolution and quality.
M
MP3
A file format with a sound data compression
system. MP3 is the abbreviation of Motion Picture
Experts Group 1 (or MPEG-1) Audio Layer 3. With
the MP3 format, one CD-R or CD-RW can contain
about 10 times more data than a regular CD.
EN
18
Page 18

19
Page 19

1
20
Page 20

21
Page 21

© 2010 Koninklijke Philips Electronics N.V.
All rights reserved.
DVP3520_55_UM_V3.0_1020
 Loading...